Looks like no one’s replied in a while. To start the conversation again, simply
ask a new question.
After updating my imac to macOS Catalina it will not show my external hard drive. The drive is recognized on the disk utility but when I try to mount it I got the following message «Could not mount “TOSHIBA EXT”. (com.apple.DiskManagement.disenter error 49244.)». How can I fix this issue?
Posted on Oct 11, 2019 3:23 PM
6 replies
Question marked as
★
Helpful
Oct 16, 2019 5:51 AM in response to luisr1031
I solved the problem by install the trial 15 days tuxera license
Question marked as
★
Helpful
Nov 14, 2019 9:30 AM in response to luisr1031
Après la mise à jour de mon imac vers macOS Catalina, mon disque dur externe ne s’affiche pas. Le lecteur est reconnu sur l’utilitaire de disque, mais lorsque j’essaie de le monter, le message suivant «Impossible de monter» Backup». (Erreur 49244 de com.apple.DiskManagement.disenter). Comment puis-je résoudre ce problème?
Question marked as
★
Helpful
Oct 15, 2019 1:20 PM in response to luisr1031
My Macbook pro also got this problem when I insert my WD Mobile Hard disk.
There are so many important files
Question marked as
★
Helpful
Oct 18, 2019 6:44 PM in response to claus237
Hi,
In utilities, the hard drive was greyed out. I can’t mount my new hard drive. I just keep getting the error.
I’ll take it back to the store and see what they can do.
Question marked as
★
Helpful
Oct 16, 2019 6:20 AM in response to maminyana
I’ve reinstalled Tuxera, and the problem is been solved!
Question marked as
★
Helpful
Oct 16, 2019 9:23 AM in response to yeison208
And what will happen when your free trial expires?
35 replies
Oct 22, 2019 12:13 AM in response to rogerh@mac.com
tout fonctionne depuis la mise à jour de tuxera,
since the update of Tuxera it’s OK for me
Oct 25, 2019 3:19 AM in response to yeison208
Tuxera Works perfectly so far. Had bought the previous version in 2015. Bought a new license key just now.
Oct 25, 2019 7:13 AM in response to luisr1031
Same issue is happening on my MacBook Air Mid-2015. But it is not mounting anything, not even update nor any other download image (DMG file). External disks nor Time Machine either.
Does any one got any answer for that? Tuxera didn’t worked as well.
Workaround I am using is downloading in other machine, extract file do disk and copy using AirDrop, but is it not a solution.
Thanks.
Oct 30, 2019 2:27 PM in response to NickZaven
I am having major issues with spinning external hard drives after installing Catalina. I’ve had 2 hard drives die and a 3rd is now failing to mount.
Oct 30, 2019 3:10 PM in response to maminyana
You need special software to be able got access and use an NTFS volume. A system upgrade will remove that software so you’ll need to reinstall it.

Nov 2, 2019 10:20 AM in response to luisr1031
(com.apple.DiskManagement.disenter error 0.) In my case.
Is there a way to make my WD Mybook work again also on Catalina MBPro 2019? Strangest thing is that i have same model Mybook at office and it works fine with Catalina on Imac (27 late 2013) Both hdd’s are xFat and was working perfect before catalina update.
Nov 11, 2019 6:24 AM in response to luisr1031
Have similar error after updating macOS Catalonia. What should I do to rectify it. Have 4Tb of files in my external hard disk and it is not mounting.
Nov 13, 2019 6:40 PM in response to luisr1031
UPDATED YOUR TUXERA DISK MANAGER
I had the same error today. When I upgraded to the new macOS Catalina, Tuxera Disk Manager was outdated and needed to be manually updated (it doesn’t happen automatically like most other apps). Once I updated Tuxera, I was able to mount all my external hard drives.
Question marked as
★
Helpful
Nov 14, 2019 9:30 AM in response to luisr1031
Après la mise à jour de mon imac vers macOS Catalina, mon disque dur externe ne s’affiche pas. Le lecteur est reconnu sur l’utilitaire de disque, mais lorsque j’essaie de le monter, le message suivant «Impossible de monter» Backup». (Erreur 49244 de com.apple.DiskManagement.disenter). Comment puis-je résoudre ce problème?
Dec 10, 2019 11:03 PM in response to luisr1031
I have the exact same issue… except its with my Macbook’s internal SSD… yeah.
Happened sometime roughly after I upgraded my mac to MacOS Catalina. One day, I decide to restart my mac, and then next thing you know it can’t find it’s boot drive. Question mark icon on a blinking folder when I try to boot up.
I would really like to just be able to mount my internal SSD again so I can access my data normally, but for now I am stuck booting off of an external drive with MacOS Catalina installed, using 3rd party data recovery software to try and save some of my data before I will probably inevitably have to format the SSD and start over again.
Any known fixes to mount my internal APFS drive? Its not even recognized as a boot drive when in recovery mode… Thinking this is more serious than I’m making it out to be!
Dec 20, 2019 5:24 PM in response to luisr1031
I got same issue while i was copying boot image suddenly remove usb from mac. thereafter mac doesn’t recognise my usb even i format usb using windows machine. so I clearly read error message so then I realised partition table has issue. to fix that I used below resolution
- plug usb and open terminal with diskutil list ( in my case it was dev/disk2
- re-partition whole disk with «diskutil eraseDisk JHFS+ UntitledUFS diskN» (diskN is your disk number my case it was disk2)
mac Os Catalina and mac book pro 2018 version
Thanks
Damith
Jan 6, 2020 10:38 AM in response to luisr1031
After updating my imac to macOS Catalina it will not show my external hard drive. The drive is recognized on the disk utility but when I try to mount it I got the following message «Could not mount “TOSHIBA EXT”. (com.apple.DiskManagement.disenter error 49244.)». How can I fix this issue?
Jan 17, 2020 11:37 AM in response to maminyana
How did you reinstall this? Did you buy the Tuxera software?
Disk Management disenter error 49244
by
| Last Update:
|
0 Comments
What Is Error 49244?
Many users have reported Error 49244 to appear each time when they connect an external SSD drive to their Mac, running the latest version. The main problem with this error is that it holds the process of the connection and stops it completely from happening.
Read this post to learn more about what is this error and what it does on your Mac and what you can do to fix it for free.

On this page:
What Is Error 49244?Error 49244 DetailsError 49244 – What Are Its SymptomsIs Error 49244 Dangerous?Error 49244 – How to Fix It?Alternative Fixes
Error 49244 Details
| Name | Error 49244, also known as com.apple.DiskManagement.disenter error 49244 |
| Type | Runtime / Compatibility Error |
| Short Description | The error says that an external drive has incompatible partition, which cannot be read. |
| Symptoms | A pop-up stating the error and its number – “Disk Management disenter error 49244“. |
| Program | MacOS |
| Fix Tool |
Try this fix to repair your Mac from errors and optimise system performance:
Download SpyHunter |
Error 49244 – What Are Its Symptoms
Error 49244 is a typical compatibility runtime error and belongs to the same type of errors as the Error -1426, Error Code 1309 and Error Code 101.
Victims have posted on Apple’s Community Forums noticing this error with the following complaints:
error 49244
I tried to connect a SSD external hard drive, it is recognized by Mac OS Monterey but impossible to activate and thus format or partition. ???error message disenter error 49244
Another situation where Error 49244 appears is when you see the failed to mount pop-up, like shown in the screenshot below:

Other side effects of seeing the Disk Management disenter error 49244 on your Mac may also be:
- Internet speed starts slowing down.
- Your device may behave erratically.
- Some of your other apps or external drives connected may stop functioning.
This is a runtime error that most likely is related to the compatibility of your Mac with external drives. Seeing it does not necessarily mean that your Mac has a virus. However, it is recommended to do a checkup using a professional anti-malware software, due to the possibility of malware modifying your compatibility permissions and partitions.
Is Error 49244 Dangerous?
This error belongs to the category of runtime / compatibility errors, and as such, it doesn’t seem to be related to a more severe issue.
Error 49244 – How to Fix It?
Below we have quoted several different methods, which are possible fixes according to support. Be advised to backup all your files on your external drive from a safe device before applying those steps.
According to the experts on forums, the most upvoted solutions that are reportedly working to fix the com.apple.DiskManagement.disenter error 49244 are the following:
Error 49244 Fix #1:
- Open Disk Utility tool and click on Show All Devices.
- Select your external drive and then check if are able to erase and re-format the drive using GUID / APFS partition map.
- Erase or reformat the drive.
Error 49244 Fix #2
- Plug in your device.
- Open your Terminal after which navigate to dev/{your disk number or name}
- Type “diskutil eraseDisk JHFS+ UntitledUFS disk(Your disk number)” to repartition the whole disk.
Alternative Fixes
If these fixes do not work, you can try the general fixes that are designed to help you deal with most runtime errors for macOS, located below:
Step 1: Close any apps or programs that may be in conflict.
When you get errors, like this one, often conflicting apps may be the case. Below, you can find the solutions for closing conflicting apps for Windows and macOS:
Go to Activity Monitor, mark any processes you believe are suspicious and close them by clicking the “X” button on top left above them.
After you have done this fix, you should observe if this error will show up again if you start and stop a specific process.
Step 2: Update and Re-install Any Software You Believe is Problematic.
Go to Applications and drag the icon of your program to Bin to uninstall it. For macOS, you can go to your AppStore and click on the “Updates” tab to check if any applications are out of date.
Step 3: Install the latest updates of your OS.
Go to System Preferences – Software Update and check for a newer macOS version. You will see a button to install it and Upgrade if its available.
Step 4: Scan your Mac for errors and optimise it automatically.
If you have tried most of the fixes, but you keep getting error messages, then the best advice to go for is to make sure and check your computer for:
- Viruses.
- Tracking cookies and other pesky and harmful objects.
- Problematic files.
- Unwanted software.
- Adware.
- Browser Hijackers.
- Other errors that may be slowing it down.
You can do all of this by running an automatic scan of your computer using a professional anti-malware software. Such an advanced tool is created by cybersecurity and tech experts and is guaranteed to help detect and delete any malicious files and whatever may be causing errors and optimise your computer to make it fast again:
Spy Hunter scanner will only detect the problem. If you want the issue to be automatically removed, you need to purchase the full version of the anti-malware tool.Find Out More About SpyHunter Anti-Malware Tool / How to Uninstall SpyHunter
Mac Errors – Frequently Asked Questions
What are Mac Errors?
Mac errors are faulty problems of macOS. They are different types, affecting various programs running on your Mac.
Since macOS is frequently updated, it is easier to fix such errors, due to the way this operating system is constructed.
What Do Mac Error Codes Mean?
Error Codes on Mac are how your macOS explains the different types of problems that can occur on it. The number of the Mac Error code pops up on your screen, and it shows you the error with some explanatory text to help you fix it.
These error codes exist for both small and bigger problems, and in some cases, they can mean that there is a significant issue with your device.
Why Do I See Errors On My Mac?
The reasons may vary. These can be due to a badly written code, faulty software, external app modifying your app, incompatibility, problems with the resources required to run the app, and even a Mac malware infection.
What Types of Mac Errors Exist?
Just like with Windows devices, there are some general error types with Mac as well, including:
- Runtime Errors – when you execute a program and it fails due to badly written code, incompatibility with the program and web servers or other problems, like malware.
- Logic Errors – something in the logic makes the program fail to return results.
- Arithmetic Errors – a type of logic error, which involves miscalculation due to an erroneous configuration or code that does not fit the same logic as the system reads it.
- Resource Errors – when your device does not meet the resources required to run a program or if the program is coded faulty, so it requires more resources than necessary.
- Interface Errors – when there is a difference between what an app is meant to do and what it actually does.
- Compilation Errors – when the compiler of a software fails to turn complicated code into a simple language, understandable by your Mac.
Which are The Most Common Mac Errors?
According to different sources and online forums, the most commonly encountered errors on Mac carry the following codes:
- Error Code 36 – when Finder fails to read or write a file on your Mac.
- Error Code 41 – caused by malware, outdated software or corrupted files and directories.
- Error Code 50 – when you fail to copy and paste a file onto another drive, like USB or an external SSD or HDD.
- Error Code 2003F – it shows up when you try reinstalling your macOS in Recovery Mode. Possible causes include bad sectors in the hard disk, malware, etc.
What to Do If I See a Mac Error?
If you see an error on your Mac, your first job is to check the meaning of it. Then, you can see reputable forums, like Apple Discussions or SensorsTechForum in order to find different types of fixes for the problem.
How to Stop Getting Mac Errors?
You cannot. As long as there are people writing the code, there will always be the human error factor. However, there are several measures that you can take in order to significantly reduce the chance of getting a Mac Error:
- Check and update your Mac and your Apps (if possible) to the latest version on a daily basis.
- Install a relevant and reputable anti-malware for Mac.
- Install an optimizer for your Mac, which will keep all your apps updated, remove junk software, and improve your Mac’s health.
- Only install apps from trusted sources.

Ventsislav Krastev
Ventsislav is a cybersecurity expert at SensorsTechForum since 2015. He has been researching, covering, helping victims with the latest malware infections plus testing and reviewing software and the newest tech developments. Having graduated Marketing as well, Ventsislav also has passion for learning new shifts and innovations in cybersecurity that become game changers. After studying Value Chain Management, Network Administration and Computer Administration of System Applications, he found his true calling within the cybersecrurity industry and is a strong believer in the education of every user towards online safety and security.
More Posts — Website
Follow Me:
Many Mac users have reported an error occurs when connecting an external hard SSD to Mac, which is com.apple.DiskManagement.disenter error 49244.
The drive is recognized on the Disk Utility, but when I try to mount it, I get the following message «Could not mount TOSHIBA EXT. (com.apple.DiskManagement.disenter error 49244.)». How can I fix this issue? from Apple Community
What is error 49244 on macOS Sonoma and Ventura? It is one of the compatibility errors that prevents the connecting process of external drives to Mac. When you try to mount an external hard drive to your Mac, the error 49244 happens, and macOS prompts a window that says, «Could not mount xxx(external hard drive name) com.apple.DiskManagement.disenter error 49244», in which case you can’t access any file on the external hard drive.

Why error code 49244 happens on your Mac? The possible causes of the «DiskManagement.disenter error 49244» are as follows:
- The external drive is formatted as NTFS.
- Remove the external drive without ejecting or unmounting in Disk Utility.
- File system errors, corruption, or crashes on the external drive.
Strictly speaking, error code 49244 doesn’t seem to be a serious disk error, just a compatibility failure between your external drive and Mac. However, please note that data loss can also occur in this case. If your essential data is stored on the external drive without backup, try to recover it using the software first.
Recover Data Using Software When Error 49244 Occurs
To avoid data loss during the repair process, such as fixing error 49244 by formatting the external disk, you can first use EaseUS Data Recovery Wizard for Mac to recover important data stored on the unmounting external disk.
You can’t access the data on the unmounted external disk when the error 49244 occurs. Still, the EaseUS recovery tool can, so you can refer to the following 3 steps to recover your data from an external hard drive unmounted on Mac easily.
Step 1. Search for lost files
Correctly connect your external hard drive to your Mac. Launch EaseUS Data Recovery Wizard for Mac, and select the external hard drive. Then, click «Search for lost files» to find lost/deleted files on your external devices.
Note: Before data recovery, you’d better click «Disk Backup» from the left sidebar to create a backup of your external hard drive to avoid further data loss. After backing up the external hard drive, the software can recover data from your external hard drive’s backup, and you can remove the external hard drive and use it again.

Step 2. Filter and find lost files
After the scan, all file types will be presented in the left panel. Select the file type to find wanted files on your external devices.

Step 3. Preview and recover
Click the file and preview it. Then, select the files you want to recover and click the «Recover» button. You can save your data to local and cloud drives.

Share this article on social media to help others learn how to fix the com.apple.DiskManagement.disenter error 49244 on macOS.
How to Fix com.apple.DiskManagement.disenter error 49244
After recovering unmountable hard drive on Mac and protecting your essential files on the external drive, you can fix the error 49244 with 6 practical methods.
Fix 1. Restart Your Mac to Fix Error 49244
If the com.apple.DiskManagement.disenter error 49244 occurs on your MacBook Pro, you can restart MacBook Pro to fix the error. Click the Apple logo and select «Restart» to resart your computer.
Suppose your external hard disk error 49244 has caused your Mac to crash and a simple restart button is unresponsive, then you can refer to this article below to force restart your computer.

How to Hard Restart Mac or MacBook [2023 Update]
This article discusses 3 effective ways to hard restart MacBook: with keys, in Safe Mode or Apple Diagnostics Mode. Read more >>
Fix 2. Kill FSCK Process to Fix Unmounting Error
Termination of the FSCK process is generally applicable when the error code 49244 is caused by incorrectly ejecting an external disk, such as pulling out an external disk without ejecting it. Follow the steps below:
Step 1. Open Finder, or go to «Applications > Utilities» folder to open Terminal.
Step 2. Type sudo pkill -f fsck and press «Enter».
This method usually suitable for the external drives in exFAT format that is not mounted on Mac. The article below will discuss how to fix the exFAT drives not mounting issues on macOS.

macOS exFAT | How to Fix exFAT Not Mounting on macOS Ventura/Monterey/Big Sur
This article discuss how to fix the exFAT drives not mounting issues on macOS Ventura and other versions. Read more >>
Fix 3. Run First Aid in Disk Utility to Fix External Drive Error
You will find First Aid in the Disk Utility on your Mac. Its primary function is to assess the health of the internal and external hard drives and other identified issues. To fix Error 49244 on Mac, you can follow the steps below to repair the external drive using First Aid feature:
Step 1. Open «Disk Utility» and select the external drive in the left panel.
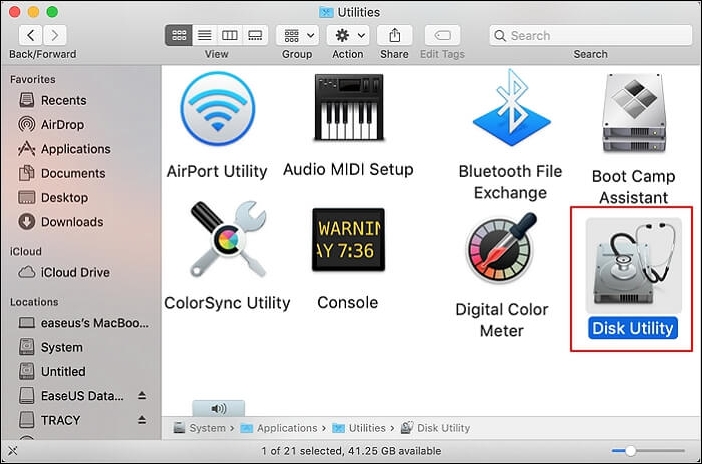
Step 2. Click «First Aid» in the top menu, and wait for the process finish.
If «First Aid found corruption that needs to be repaired error» occurs, don’t worry! Here are effective solutions in the following passage.

First Aid Found Corruption That Needs to Be Repaired, What Should I Do
This article discusses how to fix the First Aid found corruption that needs to be repaired error. Read more >>
Fix 4. Repair the External Drive Disk Using Mac Terminal
Mac Terminal is a tried and advanced tool for quickly locating folders and changing settings. Open Terminal and type diskutil eraseDisk JHFS+ UntitledUFS disk(Your disk number) to repartition the whole external drive. When the repartition process is finished, check if the external drive works without an error prompt.
Fix 5. Format Your External Drive to Fix Error 49244
Suppose the above-mentioned methods don’t work; you should consider formatting your external drive to fix the error 49244. Follow the steps below to format an external drive on Mac:
Step 1. Select the external drive in Disk Utility, and click «Erase» in the top menu.
Step 2. Choose the format and rename the external drive if you want. For example, choose the HFS+ as the external drive’s format.

Step 3. Click «Erase» again to confirm. Before erasing the whole external drive, you should ensure back up your essential data first.
If you are not sure which file system format is suitable for the external drive, this article can help you figure it out.

APFS vs Mac OS Extended [Beginner’s Guide]
This article discusses the differences between Apple File System and Mac OS Extended. Read more >>
Fix 6. Reinstall macOS to Fix Mac Error 49244
Reinstalling macOS can solve most of the glitches on your Mac, so you can try this method to fix the error 49244 on your Mac. Check out the following steps:
Step 1. Start Mac in Recovery Mode.
Step 2. Select «Reinstall macOS» in the list, and click «Continue».
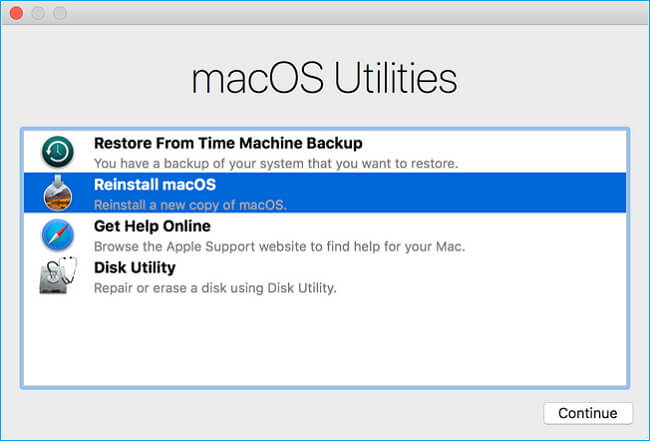
Step 3. Click «Agree» to confirm the reinstallation. Choose the Mac startup disk to install macOS.
Conclusion
The «com.apple.DiskManagement.disenter error 49244» on macOS is one of the compatibility errors that prevents the connecting process of external drives to Mac. You can fix it by restarting your Mac, killing the FSCK process, running Disk Utility’s First Aid feature, etc. However, if the problematic external drive stores essential data, you should use EaseUS Data Recovery Wizard for Mac to recover its lost data.
com.apple.DiskManagement.disenter error 49244 FAQs
Here are questions people frequently ask when they search for how to fix the «com.apple.DiskManagement.disenter error 49244» problem on Mac:
1. How do I mount a disk that won’t mount Mac?
To mount a disk on Mac, you should go to «Disk Utility» in the «Application > Utilities» folder, select the disk, and click «Mount» in the top menu.
2. What is disk management error 49244 on Mac?
It is one of the compatibility errors that prevents the connecting process of external drives to Mac, which happens when you try to mount an external hard drive on your Mac.
3. How to recover data from a hard disk that is not detecting Mac?
EaseUS Data Recovery Wizard for Mac is a powerful and trusted recovery tool that can recover lost data from a hard disk, which your Mac does not detect.

Did you get a com.apple.diskmanagement.disenter error when you tried to mount your external hard drive on Mac? This indicates a problem with either your external hard drive or macOS. Unfortunately, either case may lead to data loss – but don’t lose hope!
In this article, we’ll explore the possible reasons we encounter DiskManagement Distenter 49135 and how to fix it (without losing your data), as well as other common disk errors. Read on.
Need to recover data from the drive? Go to data recovery section ⤵
When you plug in your external hard drive, the system mounts it and makes its contents viewable in Finder. If it doesn’t show up there, you should still see it in Disk Utility (Finder > Applications > Utilities) where you can also attempt to mount it.
But there are cases when your external hard drive won’t mount, even using Disk Utility. In this scenario, you’ll probably encounter an error that says “Could not mount *name of the drive*”(com.apple.DiskManagement.disenter error 49513).
Several factors could lead to this problem. You may have an incompatible file system. Or, you may be using a Mac Superdrive while running macOS Catalina. Beyond those common reasons, error 49153 may occur simply due to malware, bugs, issues while resizing partitions and interference from local Time Machine backups.
Don’t worry – we’ll show you how to get rid of this pesky error in the next section.
How to Fix com.apple.diskmanagement.disenter error 49153?
There are several ways to address this specific error code, but most fixes can potentially harm your data. We suggest opening your external hard drive in read only mode and copying your files to a separate storage device or to the cloud.
To set your drive to read only mode, right-click your drive > Get Info and scroll down to Sharing and Permissions. Set your user’s privilege to Read only.
Method 1: Connect Your Drive to Another Mac
Disk Utility errors can be caused by either your drive or your Mac. To figure out which methods to try first, connect your drive to another Mac or even a PC. If your drive doesn’t work on other machines, then the problem likely lies with your drive.
If it works on another Mac, then your Mac might be experiencing glitches due to a faulty update or other issue. If it works on a PC, then it’s likely a formatting problem – we wrote more about that in the section of this article that covers other common DiskManagement Disenter errors.
Method 2: Restart your Mac
A temporary bug or glitch may have simply gotten macOS stuck while it attempted to recognize your drive. You may also have a lot of apps running in the background using up the resources macOS needs to properly recognize and mount your drive.
To get your system going, a simple restart might solve the problem. This will automatically close all running apps and reboot the operating system.
Method 3: Use First Aid in Disk Utility
First Aid is a useful tool that finds and repairs disk errors – specifically, it scans the drive and its partitions for issues related to its structure and formatting. These may prevent your drive from properly mounting.
Fortunately, First Aid is a feature of the Disk Utility app, which can recognize unmountable drives or partitions. To repair your drive using First Aid:
Step 1.Launch Disk Utility (Finder > Applications > Utilities).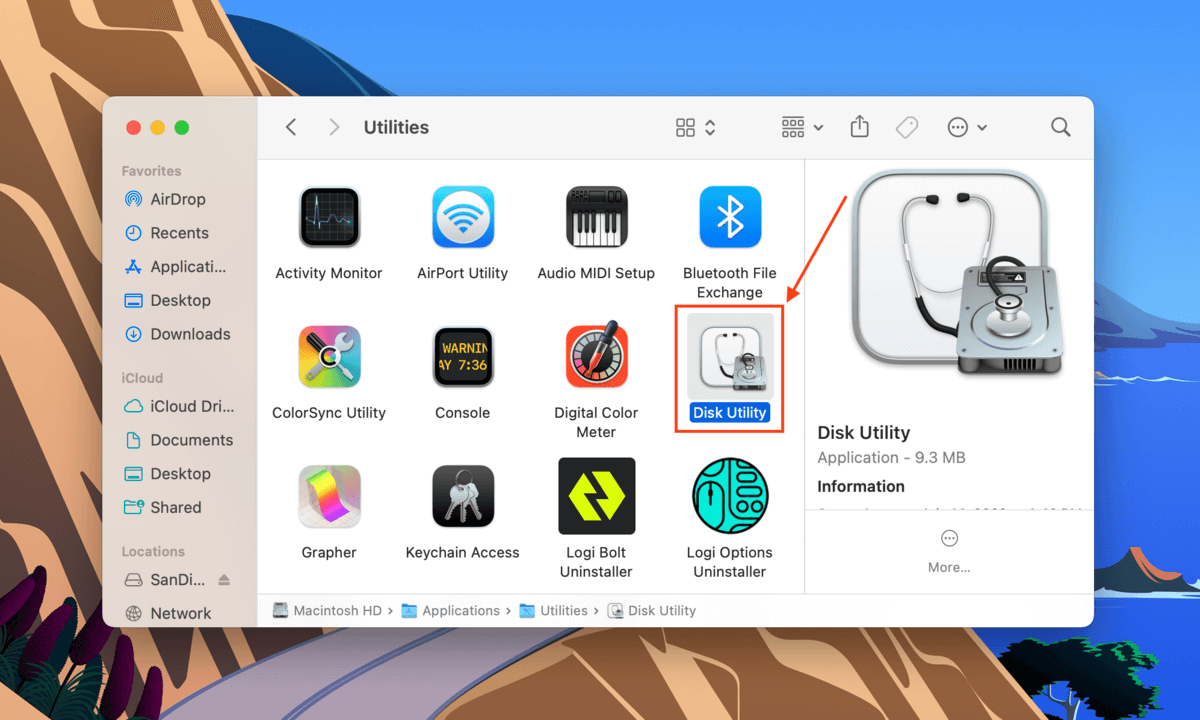
Step 2.Select your drive from the left sidebar, then click the First Aid button at the top of the window.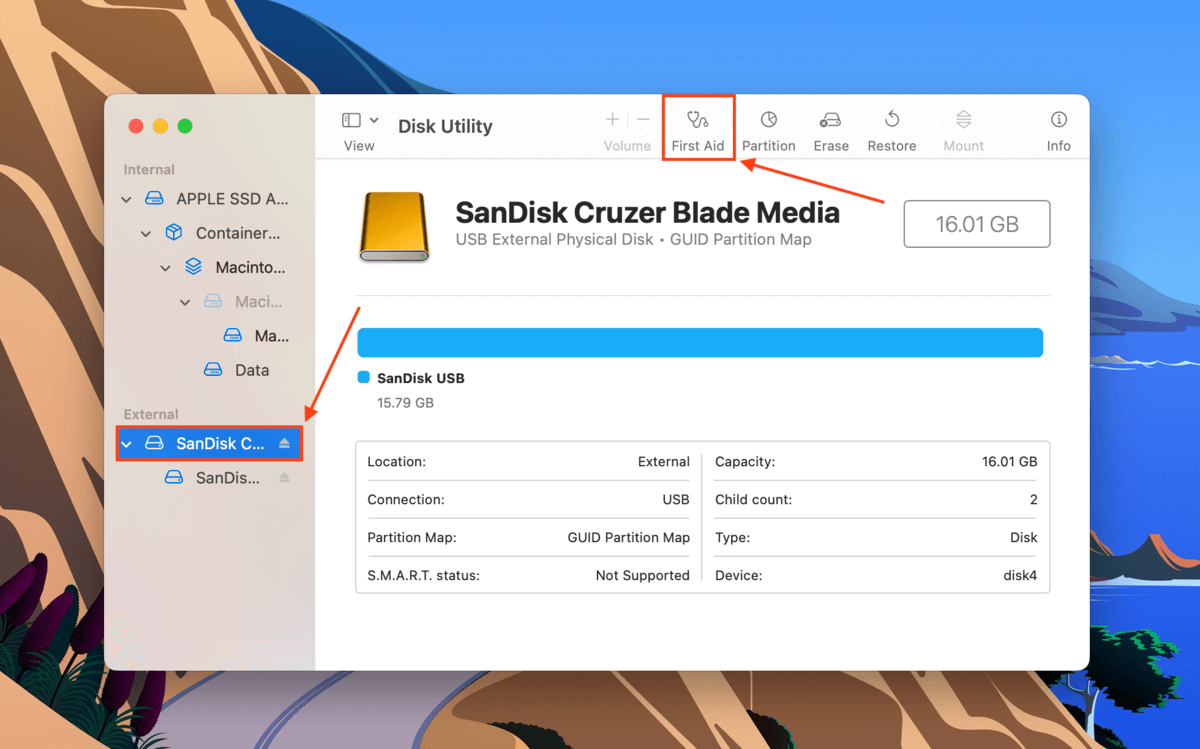
Step 3.In the dialogue box that appears, click Run.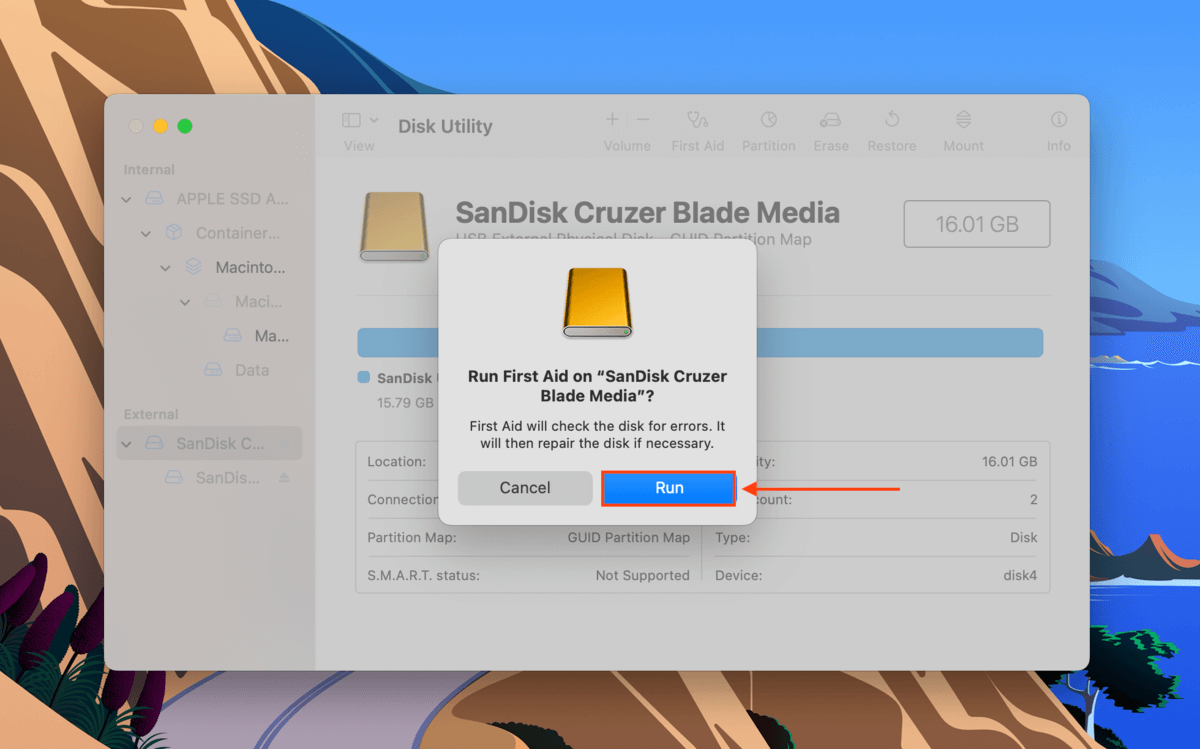
Step 4.Wait for the process to finish. Then, manually mount your hard drive in Disk Utility by selecting your drive or volume in the left sidebar and clicking the Mount button.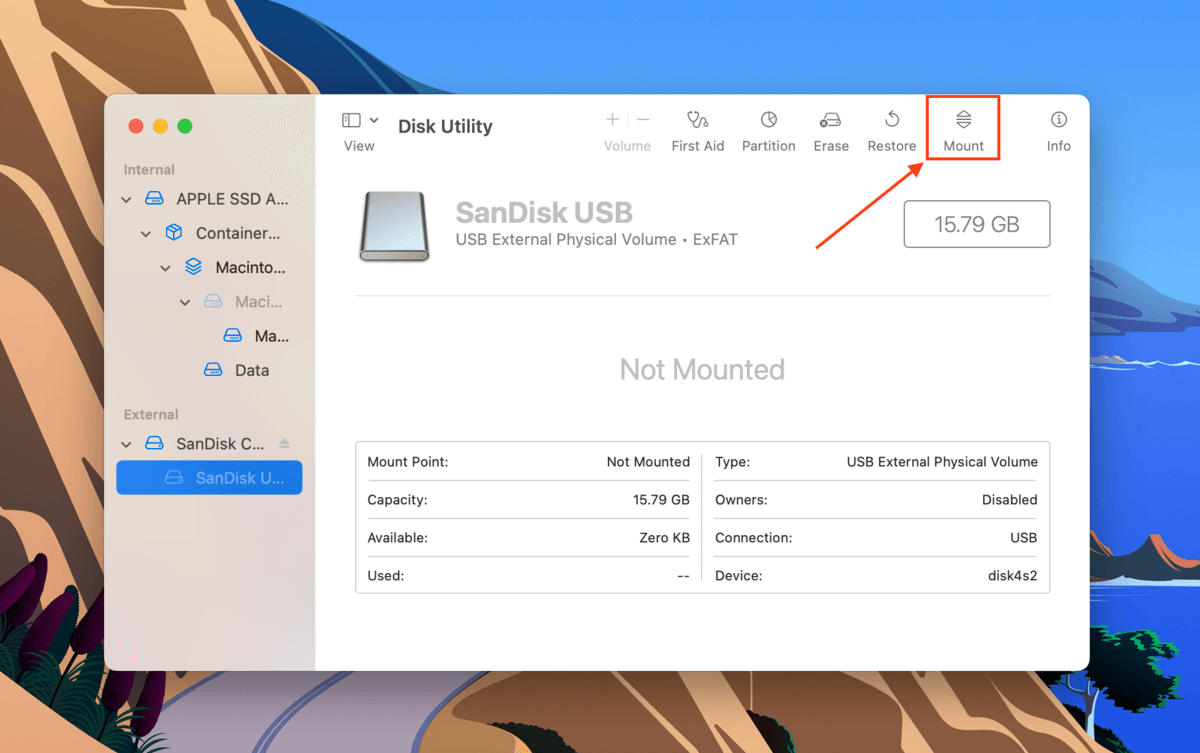
Method 4: Use the fsck Command in Single User Mode
Your external hard drive may not be mounting because of a file system issue. To resolve this problem, you can use Mac’s File System Check command or FSCK through Single User Mode. Here’s how:
Step 1.Enter Single User Mode. To do so, restart your Mac. As soon as it starts to reboot, press and hold the Power button and the CMD + S keys at the same time.
Step 2.You’ll know that you’ve successfully booted into Single User Mode when you see a window that looks like the Terminal app. Once the white text stops appearing, type the following command and hit Return.
/sbin/fsck -fy
Step 3.Once the process is complete, type reboot. This will command your Mac to restart itself.
If you remove your hard drive before ejecting it from Mac, fsck will automatically scan and repair it the next time you use it. This could potentially take a long time, which makes your drive unmountable. To deal with this, force quit the fsck command (Open the Activity Monitor > search fsck > click the x button).
Method 5: Disable Time Machine
Time Machine is a Mac built-in tool that regularly backs up your data, usually automatically. It works well, but on bad days, it can cause the operating system to get stuck while preparing your backup drive. Try disabling Time Machine to free your drive from this process and hopefully allow it to get mounted.
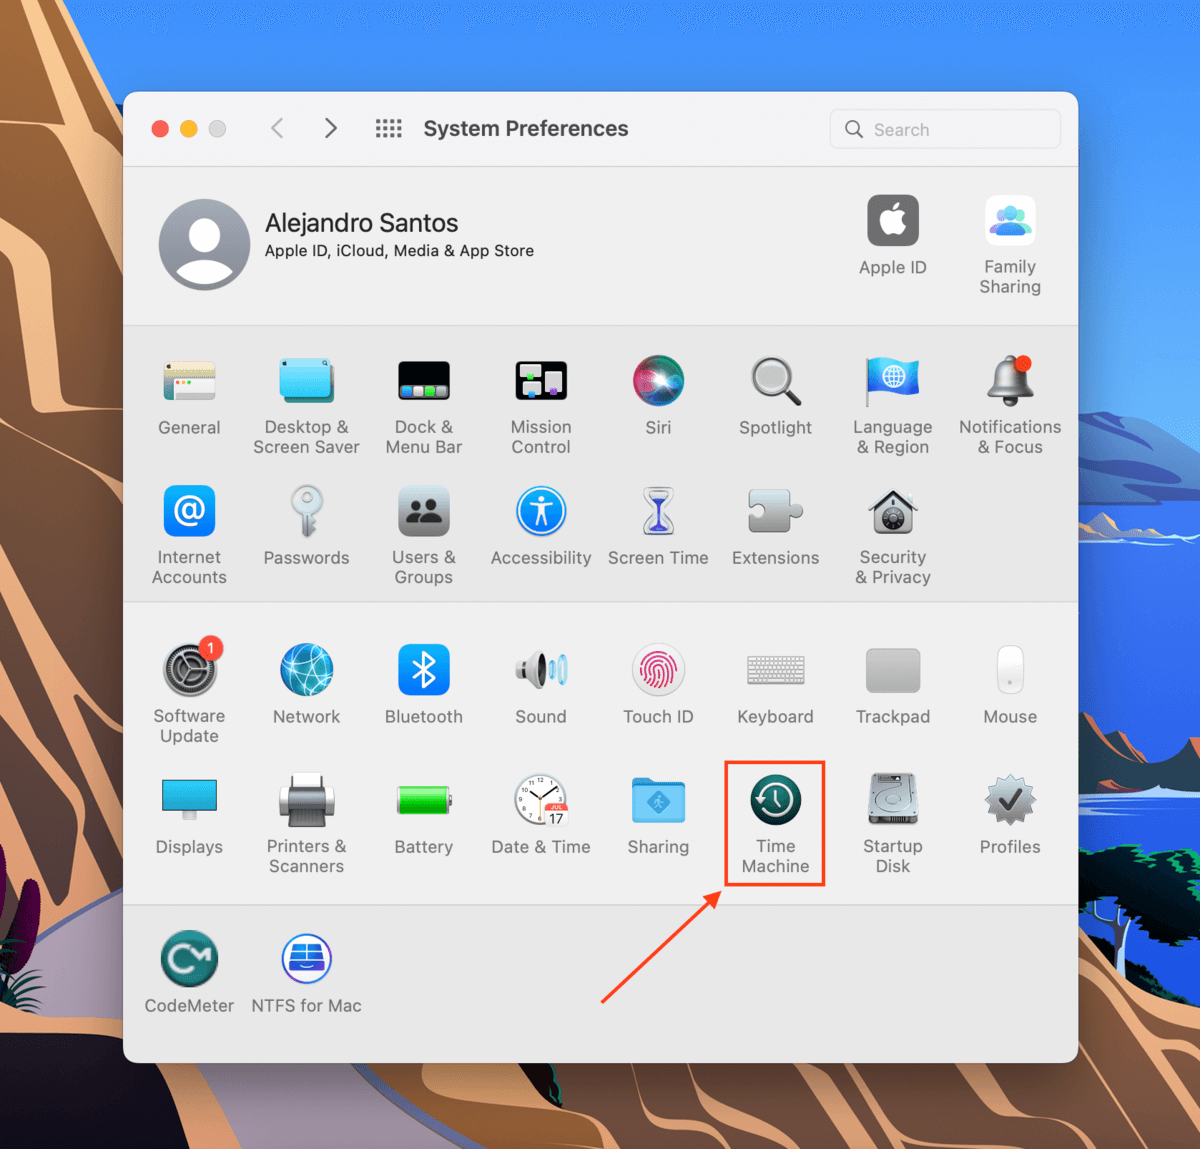
To disable Time Machine, open its settings window by launching System Preferences > Time Machine.
Then, untick the box beside the Back Up Automatically setting.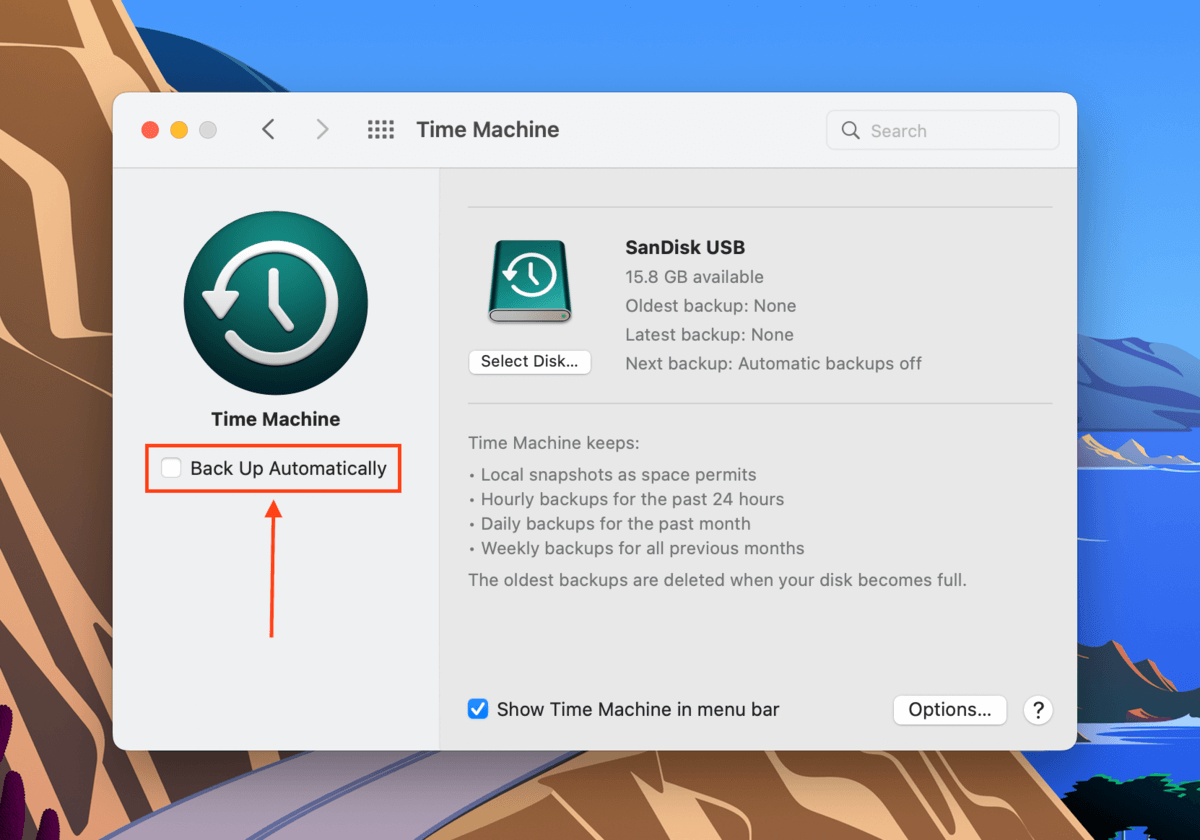
Method 6: Delete Time Machine snapshots using Terminal
Deleting Time Machine snapshots from your Mac may also resolve this disk utility error. Learn how to do it using the Terminal app by following the steps below:
Step 1.Launch Terminal (Finder > Applications > Utilities > Terminal).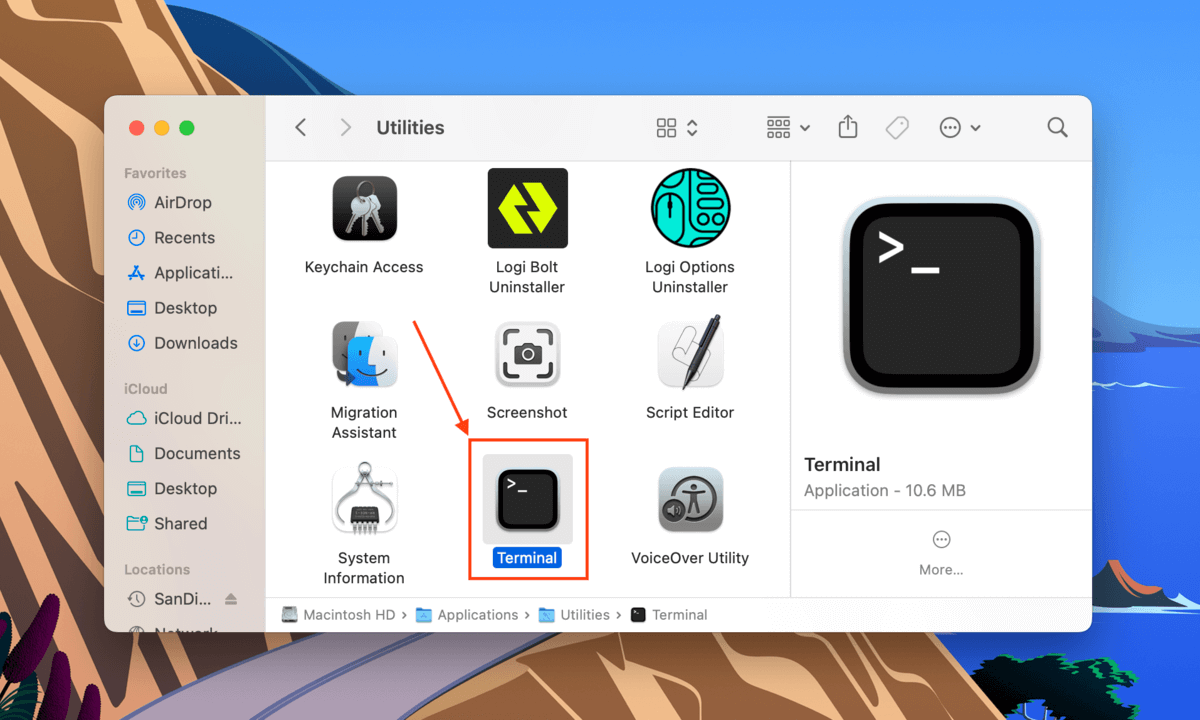
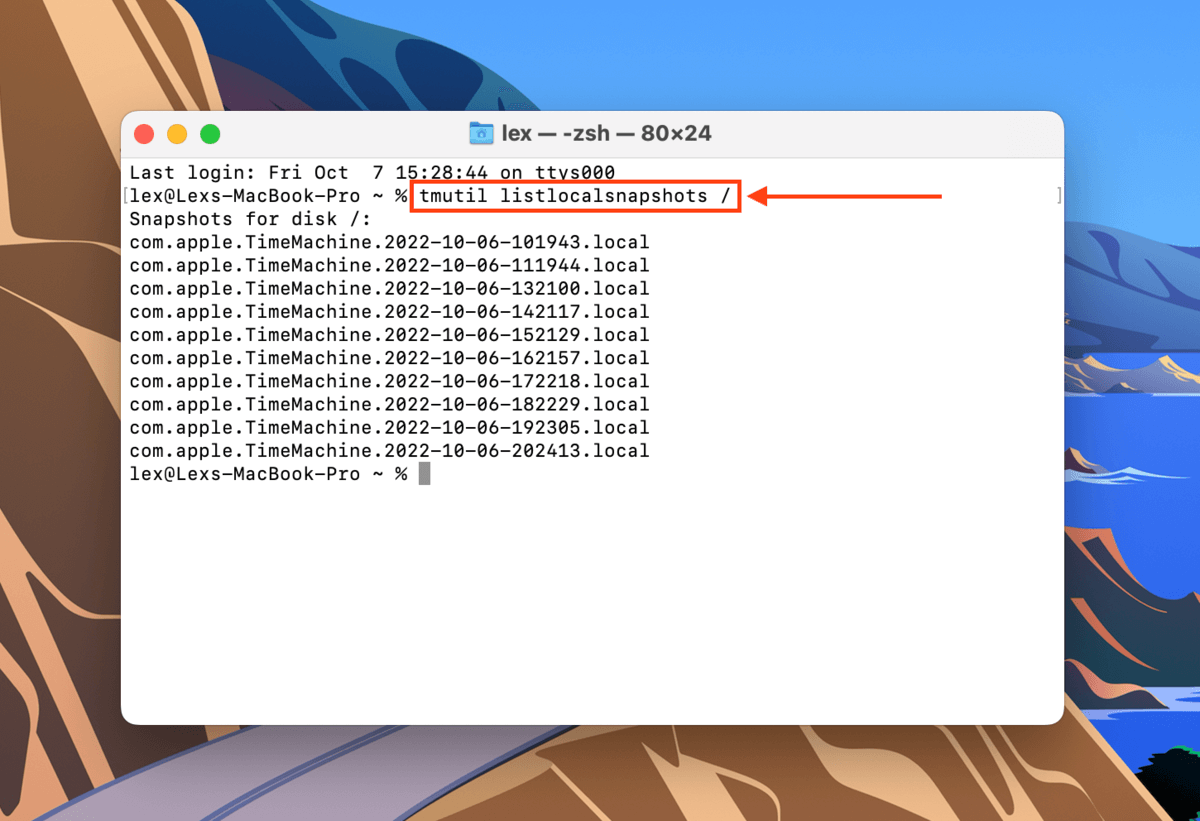
Step 2.The first command we’ll execute will list all locally stored Time Machine snapshots. Type the following command and hit Return:
Tmutil listlocalsnapshots /
Step 3.Type the following command and hit Return:
Tmutil thinlocalsnapshots /99999999999999
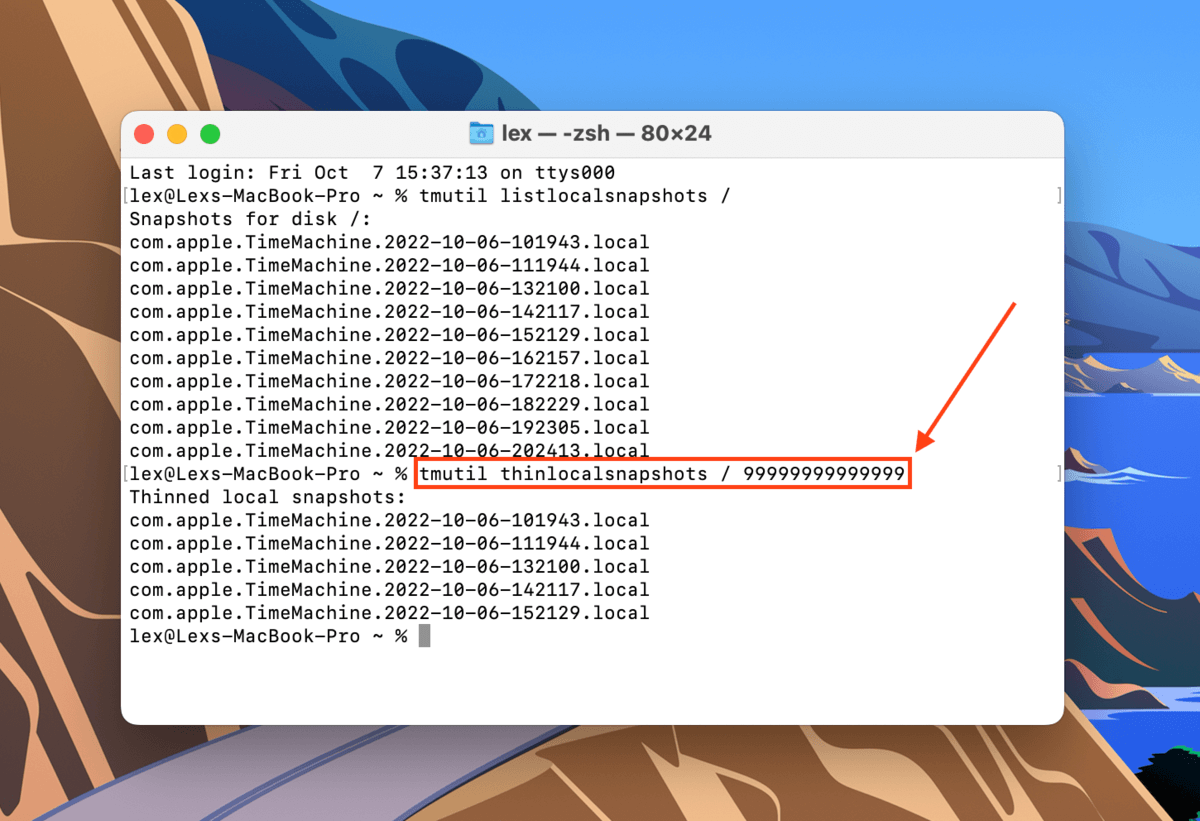
Step 4.Keep using the tmutil listlocalsnaphots and tmutil thinlocalsnapshots commands to make sure you delete all your snapshots.
Method 7: Format Your Drive
If all the above methods failed to get rid of the disk errors, your last resort is to format the drive. As we’ve already discussed earlier, formatting your drive will wipe the disk – including errors, viruses, corruption, and unfortunately, your data. We suggest copying your files to a secure location first.
To transfer your files safely, set your drive to read only mode first. To do this, read our pro tip in the introduction of this section.
Fortunately, formatting your drive on Mac is very easy thanks to the Disk Utility app. First, launch Disk Utility (Finder > Applications) and select your drive from the left sidebar. Then, click the Erase button on the top of the window.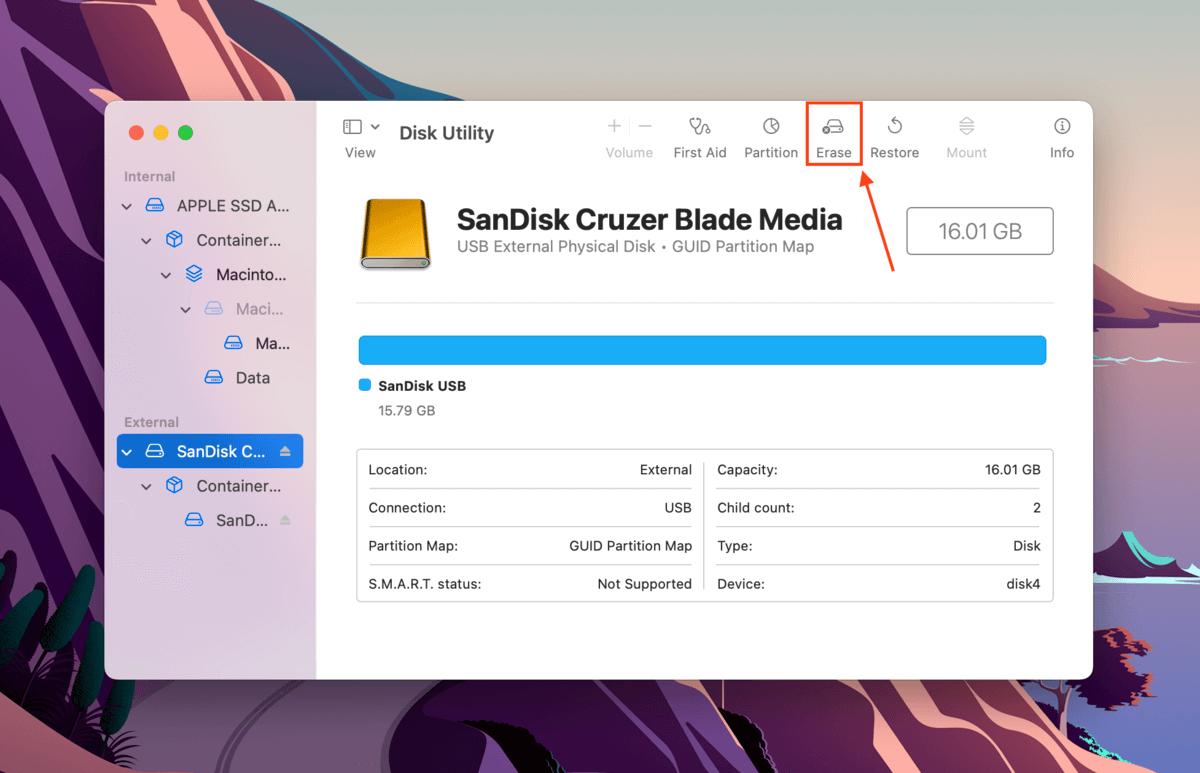
In the dialogue box that appears, name your drive and select a format. If you will only be using your drive with Mac computers, choose APFS. Otherwise, we suggest exFAT for maximum compatibility. Select GUID Partition Map for its scheme, then click Erase to proceed with the format.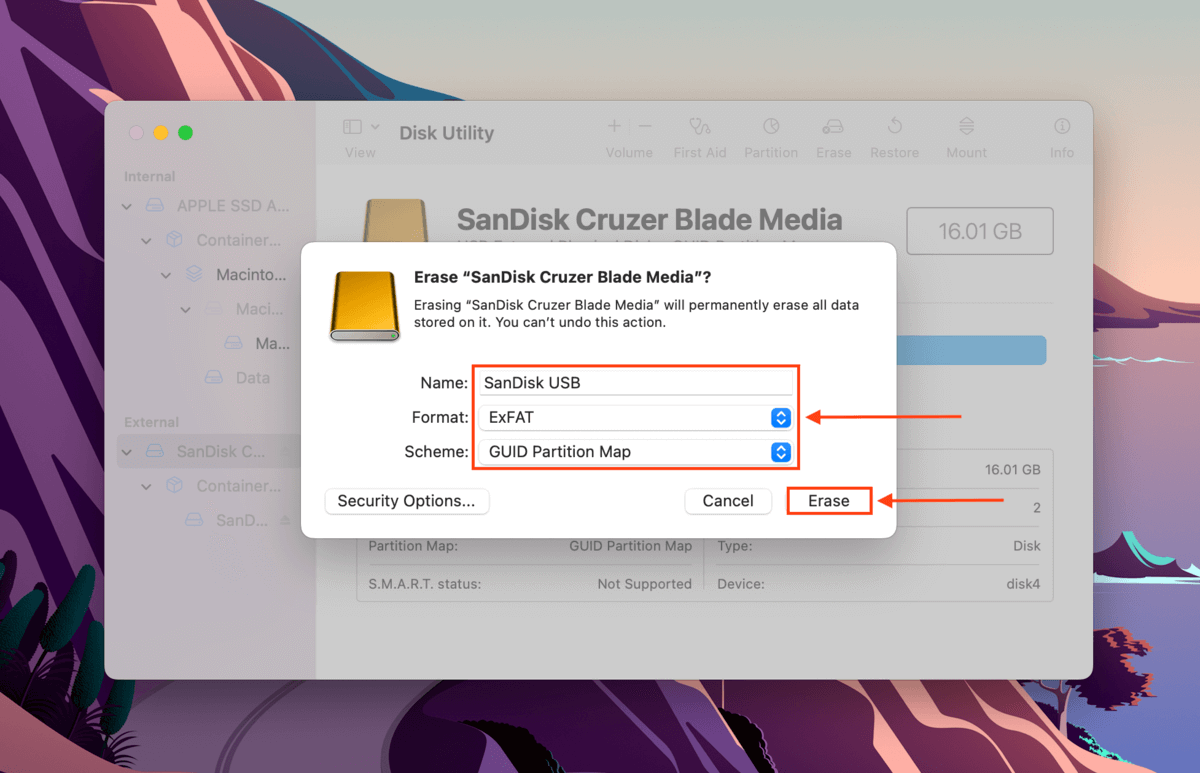
Other Types of DiskManagement Disenter Error
Aside from DiskManagement Disenter Error 49153, there are other DiskManagement Disenter errors that you may encounter that are represented by different codes. Below, we’ve listed the most common ones along with their solutions:
- DiskManagement Disenter Error 49223. An exFAT hard drive that’s been formatted using Windows can cause this error when connected to a Mac, as macOS doesn’t support all the storage block sizes available on Windows. This incompatibility makes MacOS unable to recognize and mount the drive.If you want to use this drive on both Mac and Windows, you need to format it using Mac (but first, back up your data!). If you intend to use it solely on Mac, we suggest formatting it to Apple-based APFS.
- DiskManagement Disenter Error 49221.This error is caused by a glitch in the security updates 2021-003 and 2022-003. After the update, you’ve probably tried to mount a NTFS hard drive in Disk Utility when you got this error. To fix this, reinstall macOS or use a third-party software to mount your NTFS drive.
- DiskManagement Disenter Error 49244. This error often appears when you try to mount your hard drive in Disk Utility while running macOS Catalina. You can use third-party software to mount your drive. If that doesn’t work, you need to format your drive to APFS (again, don’t forget to create a backup!).
- DiskManagement Disenter Error 49218. You might get this error when you remove a hard drive without proper ejection while using macOS Monterey. This error may also be caused by bugs from macOS Monterey itself.To fix it, (1) execute the sudo pkill -f command in the Terminal app, (2) execute the fsck /dev/disk_user_id/ command in single user mode, and finally (3) execute the mount -f /dev/disk_user_id/ command. Remember to replace “disk_user_id” with your disk’s identifier (diskutil list). To boot into single user mode, follow the first instruction in Method #4. If your drive still fails to work after this fix, you may need to format it.
- DiskManagement Disenter Error 49180. This error occurs when there’s a raw partition on the drive, which can happen if you connect an APFS drive to an old Mac or if something went wrong while you were shrinking your partition. You have two ways to address this error: (1) resize the external hard drive using Terminal or (2) format the hard drive altogether.
What to Do If You’d Lost Data After DiskManagement Disenter Error?
Disk Utility errors always have the potential to cause data loss and there’s no guarantee that your files will remain intact after fixing them. The safest and most efficient way to restore data caused by disk errors is to use data recovery software.
Data recovery software can restore files regardless of format – it will even work if you decided to format your drive due to the errors. For this article, we’ll be using a tool called Disk Drill. It’s easy to use and works with most disk formats, and it can restore data even from non-mounting drives. Here’s how to use it:
Disk Drill Basic for Mac does not offer free recovery. However, you can back up and preview your files for free. There are free data recovery solutions available on the internet, but they each have their own limitations – your mileage may vary.
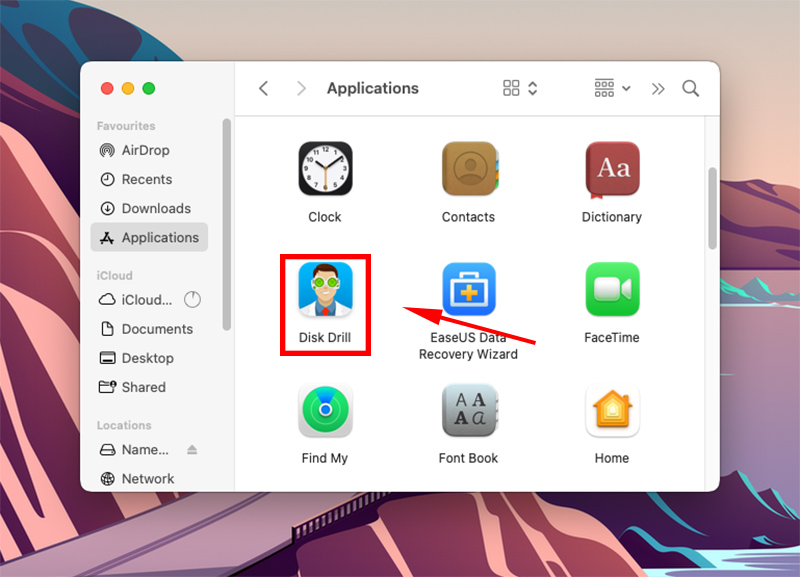
Step 1.Download and install Disk Drill for Mac.
Step 2.Launch Disk Drill (Finder > Applications > Disk Drill).
Step 3.Select your drive from the middle pane and click Search for lost data.
Step 4.Wait for the scan to finish, then click Review found items.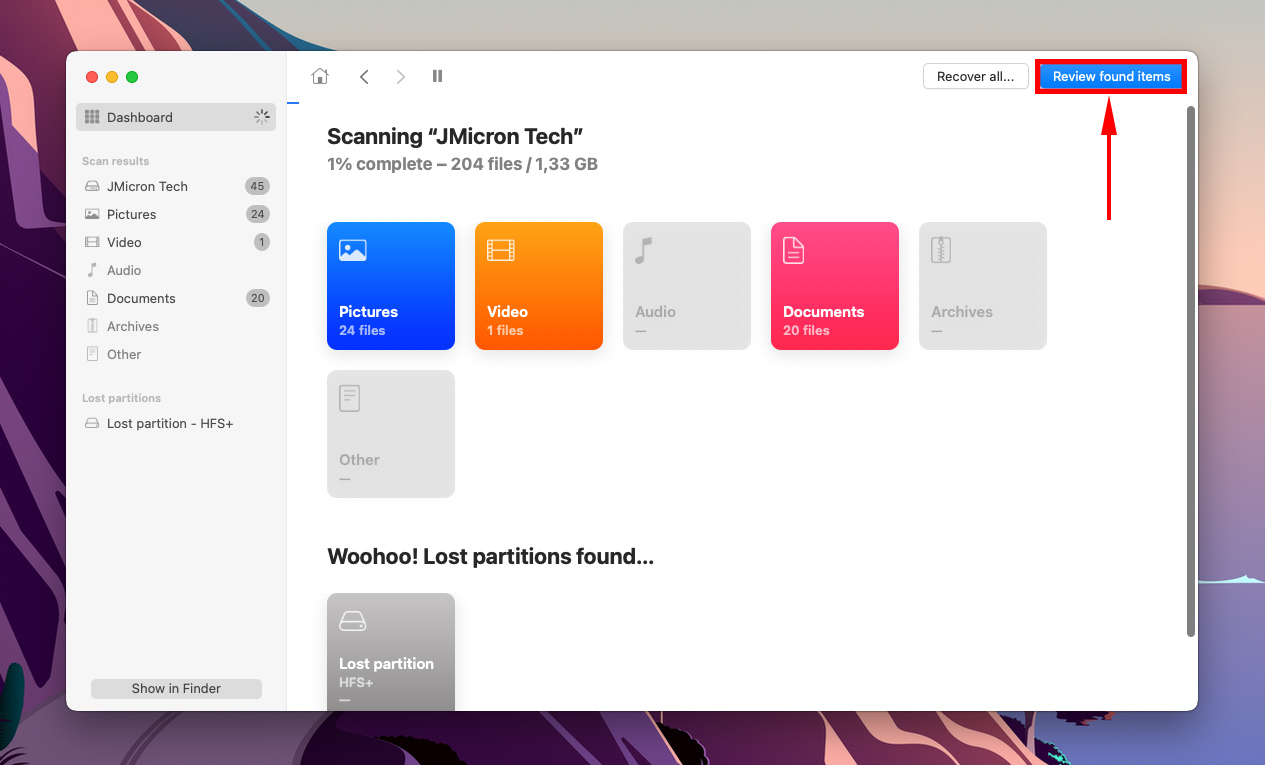
Step 5.Use the search bar to filter the results by name or by file extension, or use the left sidebar. You can also hover your mouse pointer beside any file to enable preview.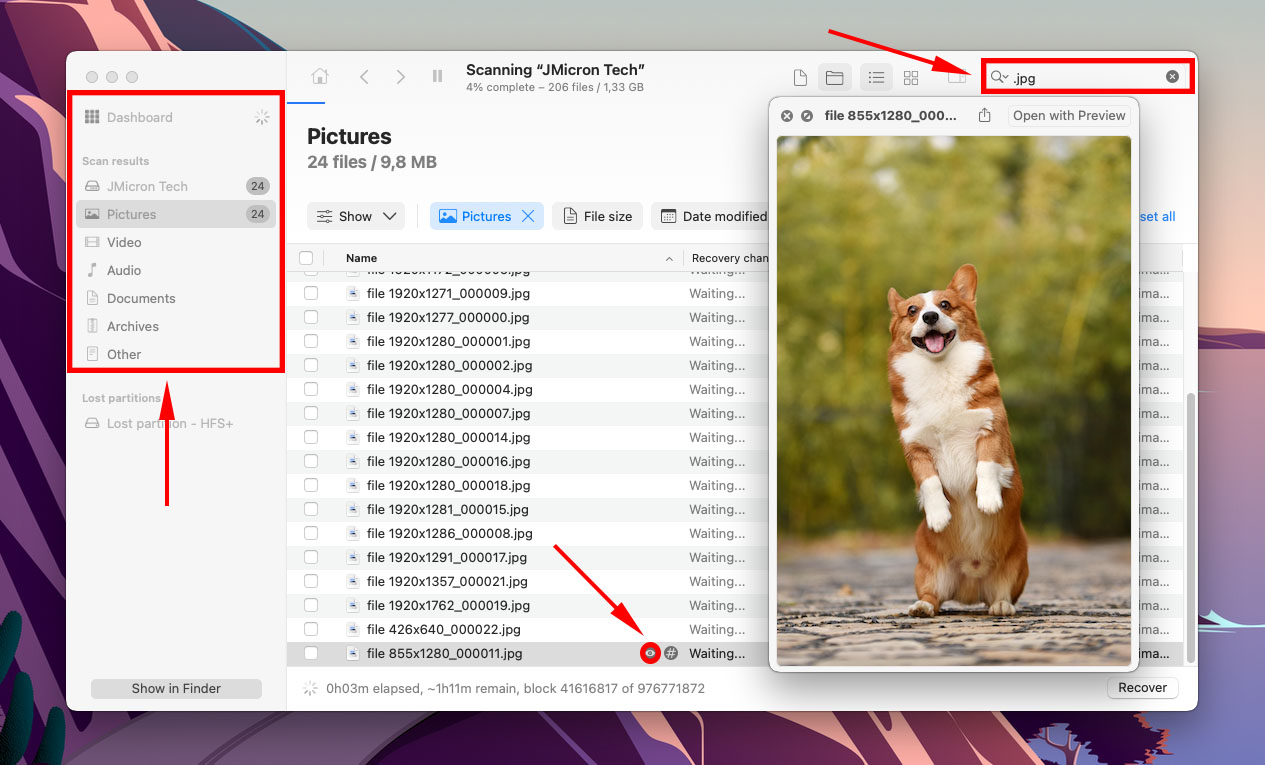
Step 6.Use the boxes in the left-most column to select the files you want to restore, then click Recover.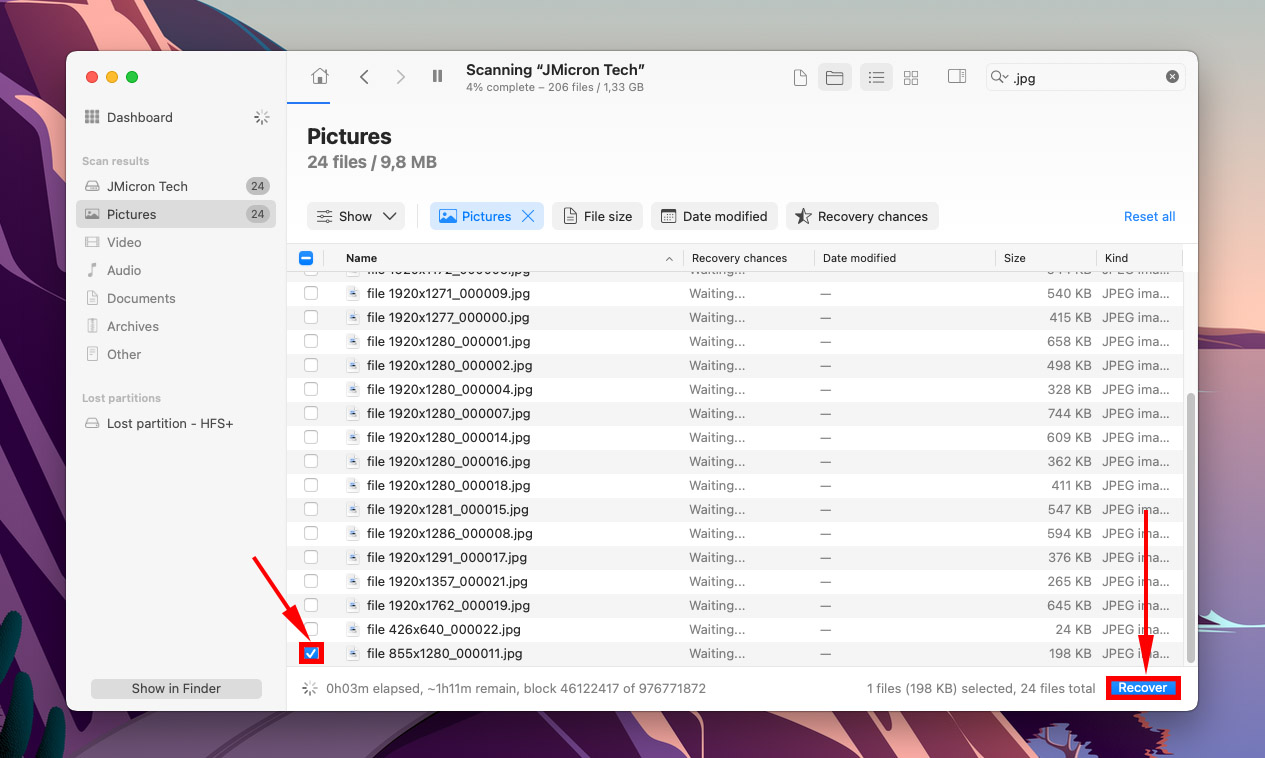
Step 7.Select a location on your non-malfunctioning drive to save the recovered files. Then, click Next.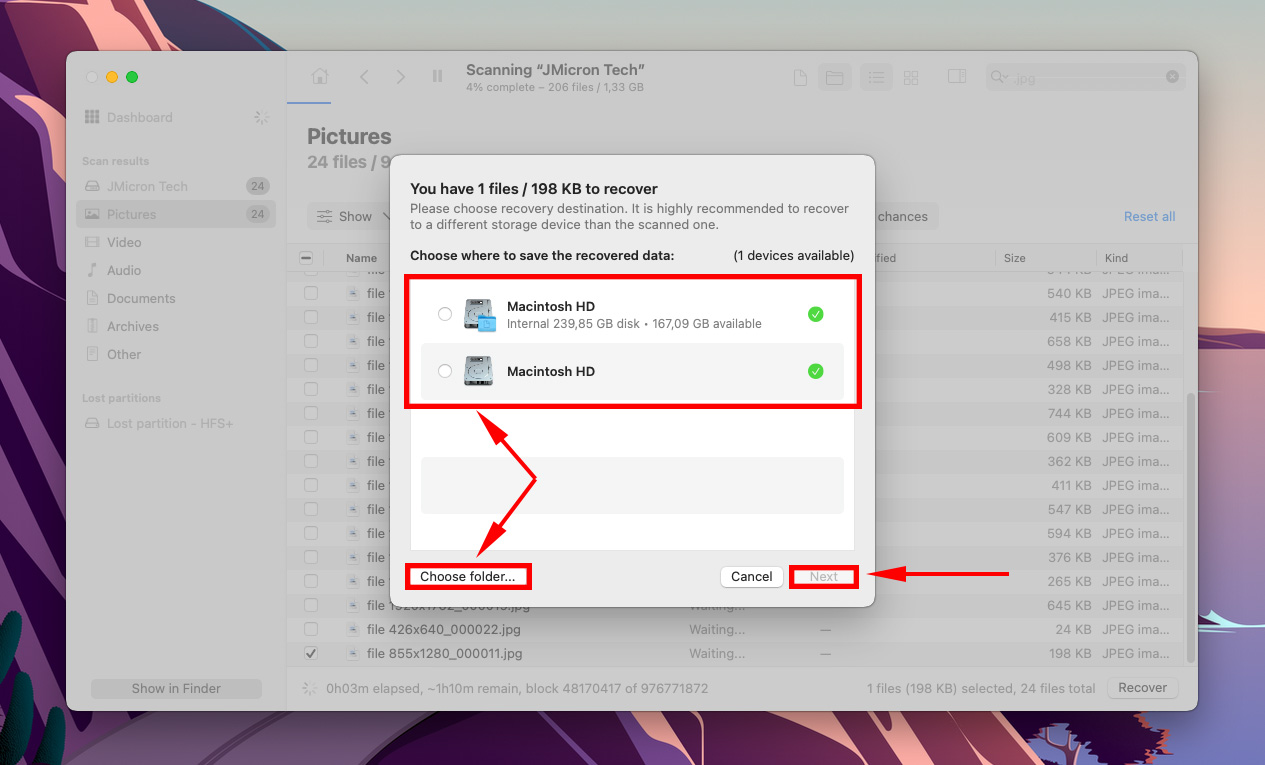
Conclusion
Bluntly, disk utility errors are inevitable. Buggy system updates, improper ejection, power surges, and other factors beyond the user’s control can cause one or multiple disk errors. Not only can these errors cause data loss by themselves, but the process of actually fixing them can also harm your files. The best you can do is to routinely back up your files to avoid the worst consequences of these errors.

-
#1
Help! one of my most important hard drives refuses to mount! (no, I wasn’t smart enough to make a back-up)
I try to mount it in disk utility and I keep getting this message :
Could not mount “5V”. (com.apple.DiskManagement.disenter error 49244.)
can anyone help? I have tried using a different USB connecting device, and also tried mounting in different computers.
as you can see, the drive appears in Disk Util, but it is grayed out, and that is the error message I get when I try to mount it.
failing all else, can anyone recommend a good hard drive recovery service in Manhattan?
thanks!
w
-

Screen Shot 2020-06-28 at 9.58.27 AM.jpg
80.5 KB · Views: 1,603

-
#2
if it is important I would suggest getting a proper data recovery specialist to look at it for you, as screwing around with random ideas from the internet (which is what you will get here) if you don’t know what you’re doing is likely to do more harm than good.
live and learn, take backups next time.
-
#3
thanks. have you ever worked with a data recovery specialist? Can you recommend one?
[automerge]1593354549[/automerge]
PS: get this error message when I try to run disk first aid (in disk util):
Running First Aid on “5V” (disk2s2)
Repairing file system.
Volume is already unmounted.
Performing fsck_hfs -fy -x /dev/rdisk2s2
Checking Journaled HFS Plus volume.
Invalid B-tree node size
The volume could not be verified completely.
File system check exit code is 8.
Restoring the original state found as unmounted.
File system verify or repair failed. : (-69845)
Operation failed…
Last edited:
-
#4
Here is a thread with some information on «File system check exit code is 8»
Not sure if any of this will help, but might be worth a read.

«File System Check Exit Code 8» — Disk wont repair
I’m not sure where this question should be posted. I’ve got a 3 tb Western Digital My Book Studio external drive that I use for backups. I bought it in July. I’ve got a 2 tb partition that I use for Time Machine and a 1 tb partition that holds old photos/music files. Last night, I started…

forums.macrumors.com
-
#5
thanks. have you ever worked with a data recovery specialist? Can you recommend one?
[automerge]1593354549[/automerge]
PS: get this error message when I try to run disk first aid (in disk util):Running First Aid on “5V” (disk2s2)
Repairing file system.
Volume is already unmounted.
Performing fsck_hfs -fy -x /dev/rdisk2s2
Checking Journaled HFS Plus volume.
Invalid B-tree node size
The volume could not be verified completely.
File system check exit code is 8.
Restoring the original state found as unmounted.
File system verify or repair failed. : (-69845)Operation failed…
If the drive is formatted in HFS+, a product like DiskWarrior can more then likely correct the issue. DiskWarrior has been a staple for me for years. It works great on HFS+ formatted drives. It is not free though.
ALSOFT — Makers of DiskWarrior.
DiskWarrior is a utility program designed from the ground up with a totally different approach to preventing and resolving directory damage.
www.alsoft.com
-
#6
update: yes, I tried DISKWARRIOR — and yes, it seems to have worked! so far, so good. Totally worth the $130 it cost.
thanks for all suggestions!
w
-
#7
update: yes, I tried DISKWARRIOR — and yes, it seems to have worked! so far, so good. Totally worth the $130 it cost.
thanks for all suggestions!
w
I have been using DiskWarrior since OS X 10.2. It has saved my system many many times. I am glad it worked.
-
#8
update: yes, I tried DISKWARRIOR — and yes, it seems to have worked! so far, so good. Totally worth the $130 it cost.
Now make your 3-2-3 backups!