Many users have been voicing their concern that they aren’t able to mount their external hard drives to their Mac. This issue comes independent of the OS and has been reported across Monterey, Big Sur, and even Ventura. When the user are trying the mount the disk using the Disk Utility, they’re getting the Mac Diskmanagement.Disenter Error with one of these error codes – 119930868, 49218, 119930872, 49223, 0, etc.
Follow us on Telegram
The inability to access data on the unmounted external hard drive has been causing a great deal of inconvenience to the users. If you’re in the same boat, then this guide will be of great help to you. In this guide, you will get to know how to fix Diskmanagement.Disenter Enter 119930868, 49218, 49223, 0, etc.
Mac users have reported encountering the com.apple.DiskManagement.disenter error -119930868 when attempting to mount their Macintosh HD (disk0s2) in Disk Utility after upgrading to macOS Big Sur. This error prevents access to the drive, causing significant issues for those who have installed macOS on that drive. This error is not new, but its recent occurrence suggests a connection to the Big Sur upgrade. The causes and solutions for this error are not specified in the given text.
Method 1: Kill the fsck process

- To start off, launch Terminal and Disc Utility
- After that, try to mount the disk and straightaway switch to Terminal
- Then, execute the following command in the terminal window –
sudo pkill –f fsck
- The disk will now mount in read-only mode
- You can now repair it by using First Aid in Disk Utility
- Wait patiently as repairing could take time
- Once it is done, it will fix the errors
Method 2: By using Terminal
- To start off, boot your Mac to Recovery Mode
- Press and hold the power button until the Loading Startup Options appear -> Select Options -> Continue
- After that, click Utilities and choose Terminal
- Type in the following command –
diskutil list
- It’ll bring a list of all disks
- Note down the disk’s volume identifier
- Lastly, execute the following command (replace diskX with the volume identifier that you noted above)
diskutil repairVolume/diskX
Method 3: Make changes to the Disk Allocation Size
Some older Macs will struggle to mount the drive if the allocation size is larger than 1024. For resolving this, you should head over to a Windows or Linux machine and reformat the drive in ExFAT. Then, choose “1024” as the allocation size. Now, you should try to mount it on your Mac and this time, you won’t be getting any error codes.
Conclusion
In short, the com.apple.DiskManagement.disenter error can be a frustrating problem for Mac users who have upgraded to MacOS Big Sur. Although the causes of the error are not specified, there are possible solutions that can be tried before resorting to wiping the drive and reinstalling MacOS. If all other options have been exhausted and there is no important data on the drive, or it has been successfully recovered, wiping and reinstalling MacOS in recovery mode may be the most effective solution. Remember to always back up your data before attempting any troubleshooting steps. Thank you for reading this guide, and please feel free to share your thoughts and experiences in the comment section down below the article.

Aviral Sharma is a talented and passionate writer who has been using words to express his thoughts ever since he learnt how to hold a pen. He is passionate about outer space, history, sports and most importantly technology. Aviral is a regular writer for rootmygalaxy.net and has been getting better by the day.
В этом руководстве мы покажем вам различные способы исправления ошибки Diskmanagement.disenter с кодами ошибок 119930868, 119930872, 49218, 49223, 0 и т. д. Многие пользователи выразили обеспокоенность тем, что не могут подключить внешние жесткие диски к своему Mac. . Эта проблема не зависит от ОС, о ней сообщалось в Big Sur, Monterey и даже Ventura.
Всякий раз, когда они пытаются смонтировать диск с помощью Дисковой утилиты, они приветствовал с ошибкой Diskmanagement.disenter вместе с одним из следующих кодов ошибок 119930868, 119930872, 49218, 49223, 0 и т. д. Невозможность доступа пользователей к данным на отключенном внешнем жестком диске доставляет им массу неудобств. Если вы тоже находитесь в одной лодке, то это руководство поможет вам. Следите за исправлениями.
Рекомендуется попробовать каждый из нижеперечисленных обходных путей, а затем посмотреть, какой из них приводит к успеху. Итак, имея это в виду, давайте начнем. Droidwin и его участники не будут нести ответственность в случае термоядерной войны, если ваш будильник не разбудит вас, или если что-то случится с вашим Mac и данными, выполнив следующие шаги.
ИСПРАВЛЕНИЕ 1. Завершение процесса fsck
Одна из наиболее распространенных причин этой ошибки может быть связана с тем, что «fsck» может держать ее в заложниках. Поэтому вам придется убить этот процесс и повторить попытку монтирования диска. Вот как это можно сделать:
- Для начала запустите Терминал и Дисковую утилиту.
- Затем попробуйте смонтировать диск и сразу переключитесь на Терминал.
- Теперь выполните следующую команду в окне терминала: sudo pkill -f fsck
- Диск смонтируется в режиме только для чтения. Теперь вы можете восстановить его с помощью программы «Первая помощь» в Дисковой утилите.
- Ремонт займет время. После этого это должно исправить ошибку Diskmanagement.disenter.
ИСПРАВЛЕНИЕ 2: использование терминала
- Для начала загрузите Mac в режим восстановления, как указано ниже: Apple Silicon: нажмите и удерживайте кнопку питания, пока не появится «Загрузка параметров запуска». Затем выберите Функции > Продолжить. Intel: перезагрузите Mac и одновременно нажмите и удерживайте сочетание клавиш Command+R.
- Затем нажмите «Утилиты» и выберите «Терминал». Теперь введите следующую команду: diskutil list
- Появится список всех дисков. Запишите идентификатор тома вашего диска [such as disk3s1].
- Наконец, выполните приведенную ниже команду [replace diskX with your volume identifier].diskutil repairVolume/diskX
- Проверьте, исправляет ли он ошибку Diskmanagement.disenter 119930868, 119930872, 49218, 49223, 0.
ИСПРАВЛЕНИЕ 3. Изменение размера выделяемого диска
Некоторые старые Mac не смогут смонтировать диск, если размер выделения больше 1024. Поэтому, чтобы решить эту проблему, перейдите на компьютер с Windows или Linux (или используйте виртуальную машину) и переформатируйте диск в ExFAT и выберите 1024 как размер выделения. Теперь попробуйте установить его на свой Mac, и на этот раз вы не получите никаких кодов ошибок.
Вот и все. Это были три метода, которые должны помочь вам исправить ошибку Diskmanagement.disenter с кодами ошибок 119930868, 119930872, 49218, 49223, 0 и т. д. Если у вас есть какие-либо вопросы относительно вышеупомянутых шагов, сообщите нам об этом в комментариях. Мы вернемся к вам с решением в ближайшее время.
О главном редакторе
Looks like no one’s replied in a while. To start the conversation again, simply
ask a new question.
Could not mount “Seagate”. (com.apple.DiskManagement.disenter error 49223.) message
Im new with MacBooks so thank you for any help. Im trying to mount my hard drive but I’m getting this message- Could not mount “Seagate”. (com.apple.DiskManagement.disenter error 49223.)
I ran the first aid in the disk utilities and it runs and says operation successful. But it still won’t mount.
MacBook Air 13″,
macOS 10.15
Posted on Oct 27, 2019 11:49 AM
Similar questions
-
Could not mount Seagate4 : ( com.apple.DiskManagement.disenter error 0. )
I too am getting the window: Could not mount
«Seagate 4 Drive»
( com.apple.DiskManagement.disenter error 0. )Anyone find out a solution ? Thanks !!
[Email Edited by Moderator]
319
3
-
can’t mount external hard disk or usb drive
This is the error message when I clicked ‘mount’ in the disk utility, hope someone could help.
Could not mount “Ted_16”. (com.apple.DiskManagement.disenter error -119930872.)On another macbook, the same disk works, so i am sure it’s not the disk itself that has the issue.
I have tried run first aid, still cannot mount. then, I erased it, still got the same error message.961
4
-
External hard drive won’t mount after power blip
After a momentary power interruption this morning, my external hard drive (on which I have a Time Machine backup) does not mount and does not appear in Finder. (It is a LaCie 2TB USB drive.) The device is recognized in System Information and Disk Utility, but an attempt to mount it in Disk Utility returns this error message:Could not mount “disk2s2”. (com.apple.DiskManagement.disenter error -119930868.)
I have tried First Aid in Disk Utility but it fails. Restarting the computer did not help either.
I have a Mac Mini (Late 2014) running MacOS Big Sur Ver. 11.6.2.
Any suggestions would be appreciated. Thank you!
1242
4
1 reply
Question marked as
★
Helpful
Dec 29, 2019 12:09 PM in response to Krakalaka
My 5 TB external harddrive is powered via external power supply and the Mac can’t use it, so I assume Mac and harddvie are just not working together for an unknown reason.
30 replies
Dec 21, 2019 11:45 AM in response to unnsteinngardars
unnsteinngardars wrote:
It is not a Catalina thing, I have a Seagate Backup Plus Hub drive that was formatted as exFAT on a windows computer and will not mount on a mac and gives me the exact same error as this thread. And it started to happen on my mac before Catalina and also was an issue on another mac with a mac os Sierra.
Windows can format the drive using different block sizes some of which macOS does not recognize. Backup any files on this drive and use the Mac’s Disk Utility to erase the drive as GUID partition and ExFAT. You need to erase the physical drive so you may need to click on «View» within Disk Utility and select «Show all devices» before the physical drive appears in the left pane of Disk Utility. This should allow the drive to be used on both Windows & Mac.
When you say Seagate Software, are you referring to the Paragon or something else?
I’ve never used the Seagate external drives or their proprietary software, so I am not sure what is included. Did you run a Seagate app which was included on or with the drive? If so uninstall it using the included uninstaller or by following Seagate’s instructions. I know Paragon software is sometimes included with the Seagate software to allow writing to NTFS volumes.
If you downloaded the Paragon software separately, then yes uninstall it according to the developer’s instructions since it is not needed on a Mac unless you need to write to an NTFS volume or access a Linux file system.
Dec 23, 2019 8:59 AM in response to HWTech
Yes I was referring to paragon software. Here’s what I know:
- I have a seagate drive I’ve used for a few years now. When I bought it, it would only mount as read-only on my Mac. I installed the Paragon software and it worked fine after that.
- I have backed up 100+ GB of data to that drive over those years
- I updated to Catalina. The seagate drive would no longer work, mounting as read-only. I updated the Paragon software and the drive worked fine. Just as before, I don’t have to do anything, as it mounts automatically when I plug it into my mac.
It continues to work fine now. I understand from other posts that this won’t work for everyone, but I can’t comment on those posts. I’m just passing on what I did. I don’t worry about disk formats or Mac vs. PC, I’m just a guy using a disk drive for backups.
-dave
Dec 23, 2019 1:42 PM in response to dchura7734
dchura7734 wrote:
1. Yes I was referring to paragon software. Here’s what I know:
I have a seagate drive I’ve used for a few years now. When I bought it, it would only mount as read-only on my Mac. I installed the Paragon software and it worked fine after that.
2. I have backed up 100+ GB of data to that drive over those years
3. I updated to Catalina. The seagate drive would no longer work, mounting as read-only. I updated the Paragon software and the drive worked fine. Just as before, I don’t have to do anything, as it mounts automatically when I plug it into my mac.
It continues to work fine now. I understand from other posts that this won’t work for everyone, but I can’t comment on those posts. I’m just passing on what I did. I don’t worry about disk formats or Mac vs. PC, I’m just a guy using a disk drive for backups.
-dave
Unless you are using an external drive for access with both Mac & Windows you should always use macOS Disk Utility to erase the drive as GUID partition and MacOS Extended (Journaled) so that only macOS is managing the drive using a native macOS file system. If a drive needs to be shared between Mac & Windows, then erasing the drive as ExFAT on a Mac using Disk Utility is an acceptable alternative since both macOS & Windows support read+write ExFAT file system (it must be erased on a Mac since Windows may format ExFAT with options currently incompatible with macOS).
Third party software is not needed to use an external drive on a Mac unless you want to use the built-in hardware encryption feature found on some external SSD drives. Third party software usually ends up causing issues at some point, but especially during system updates or upgrades. Plus access to the drive may become lost if the proprietary third party software is no longer supported.
Unfortunately this is a Windows only world when it comes to third party hardware so hardware manufacturers default everything to work with a Windows system which means many external drives are shipped using the Windows NTFS file system. It is always best to use the operating system’s built-in native file systems whenever possible to reduce the risk of problems and compatibility issues.
Just something to consider and I hope this information may help others.
Dec 26, 2019 9:39 AM in response to HWTech
Yep I agree its lousy advice. I guess some people should think before offering any advice and consider whether their advice is actually helpful.
Dec 28, 2019 12:26 PM in response to Krakalaka
I have read the whole thread and now concluded this is on Apple, not Seagate.
I bought the Seagate drive before Catalina. After installing the Paragon driver, from Seagate, everything worked. When I upgraded to Catalina, I needed to install a newer version (64-bit). Then it continued to work. A week ago, it stopped working on one of my computers. But it continued to work on the other. Before I triage, the other computer auto-upgraded itself to a newer Catalina. Now both computers stopped working for the drive.
I uninstalled Seagate’s paragon driver, the disk mounts but read-only. I reinstalled the previously working driver (same version) and the problem reproduced.
I guess Apple may claim the Paragon driver is now incompatible with one of the later Catalina patches and I will accept that. The point is still that Apple’s patch broke the driver, not the other way around.
I now have a 5TB drive that is basically useless.
Guess Seagate, Paragon, or Apple need to do something.
[Edited by Moderator]
Dec 28, 2019 8:13 PM in response to sin-yaw
sin-yaw wrote:
I have read the whole thread and now concluded this is on Apple, not Seagate.
I bought the Seagate drive before Catalina. After installing the Paragon driver, from Seagate, everything worked. When I upgraded to Catalina, I needed to install a newer version (64-bit). Then it continued to work. A week ago, it stopped working on one of my computers. But it continued to work on the other. Before I triage, the other computer auto-upgraded itself to a newer Catalina. Now both computers stopped working for the drive.
I uninstalled Seagate’s paragon driver, the disk mounts but read-only. I reinstalled the previously working driver (same version) and the problem reproduced.
I guess Apple may claim the Paragon driver is now incompatible with one of the later Catalina patches and I will accept that. The point is still that Apple’s patch broke the driver, not the other way around.
I now have a 5TB drive that is basically useless.
Guess Seagate, Paragon, or Apple need to do something.
[Edited by Moderator]
And so many other users in this thread have blasted me for recommending people not to use the proprietary software which ships with external drives! Seems I might know what I’m talking about!
You cannot expect Apple to make sure every piece of third party software works in macOS. It is up to the hardware manufacturers to update their third party software. It is the way it has ALWAYS been. It is the same for Windows & Linux systems as well. If you have an issue with a third party app provided by the drive manufacturer, then contact the manufacturer of your external drive for support and to complain about not having a timely software update to the app.
You do have options here. You can report the issue to Seagate and wait for an update to their app. Or you can transfer everything from the now read-only external drive to another drive or computer. Then erase the external drive using Disk Utility. Erase the drive as GUID partition and MacOS Extended (Journaled) if you will only be using it on Macs. Or if you will be using the drive with Windows as well, then erase it as GUID partition and exFAT using Disk Utility. If you erase it as exFAT on Windows, then macOS may not be able to read the drive. Once the external drive has been erased using Disk Utility, then you can transfer all the files back to the external drive.
Dec 28, 2019 8:36 PM in response to HWTech
stay friendly, be happy. we are not in the 1980’s anymore where any manufacturer made his own thing and almost nothing did fit well together. I personally refuse to use third party tools only to access well known, simple devices. to buy any harddrive in the next shop and use it without trouble should be no magic anymore today. not even when using an apple computer …
Dec 28, 2019 10:12 PM in response to HWTech
I have been an OS developers for decades and, in general, agree with you that the manufacturer must ultimately bear the responsibility to make things work.
In this case, however, it was working and got broken by a minor OS patch. Therefore, the patch failed the regression tests against the vendors.
Nearly all OS vendors maintain a large lab and developed a comprehensive regression test suite to prevent things like this from happening. Simply, what was working should continue so. Either Apple did not find such failure, didn’t warn Seagate on this failure, or expect a different relationship than what us customers expect. Probably Apple expects Seagate to test against all patches on its own and remedy any issue. From what I read from Seagate’s website, they appeared completely oblivious to this failure.
Apple must manage its ecosystem as a platform vendor. Your reply basically stated that Apple bears no responsibility. It’s either Seagate’s or customer’s problem. That attitude is really disappointing.
The industry is saying that «Apple is becoming Microsoft faster than Microsoft becoming Apple.» Remember that consumers have choices. Being arrogant will hurt you.
Dec 28, 2019 10:18 PM in response to HWTech
Just search this error message on the internet and count how many customers encountered the same problem. This is not isolated to Seagate. Catalina is not reliable. Fix it.
Dec 29, 2019 4:49 AM in response to HWTech
Thank you for all of your replies to my question. Here is a bit more updated information on my situation.
I have 2 external hard drives that are formatted the same. They both work when connected to my windows computer. The Samsung 1tb hd works when I connect to my Mac and it is powered by a wall plug. The seagate 6tb hd shows up but won’t mount, I can verify it using paragon software and is powered by the usb cable. I’ve tried using paragon software(old version/updated version), it still didn’t work.
I have both hard drives full so I can’t just reformat the seagate. Is there any chance that it could be because the hard drive isn’t getting enough power from the Mac book? Or does the seagate hd and Mac just not play nice together?
Question marked as
★
Helpful
Dec 29, 2019 12:09 PM in response to Krakalaka
My 5 TB external harddrive is powered via external power supply and the Mac can’t use it, so I assume Mac and harddvie are just not working together for an unknown reason.
Dec 29, 2019 4:19 PM in response to Krakalaka
Krakalaka wrote:
I have 2 external hard drives that are formatted the same. They both work when connected to my windows computer. The Samsung 1tb hd works when I connect to my Mac and it is powered by a wall plug. The seagate 6tb hd shows up but won’t mount, I can verify it using paragon software and is powered by the usb cable. I’ve tried using paragon software(old version/updated version), it still didn’t work.
That is one of the dangers of using a non-native macOS file system and relying on third party software to manage the drive. You may need to contact Seagate for support.
What file system is used on your 6TB drive? macOS should be able to mount an NTFS file system in read-only mode. If the drive is formatted as exFAT, then the exFAT format may be using block sizes which macOS cannot understand. To use an exFAT drive with both Mac & Windows you need to format the drive on the Mac using Disk Utility.
I have both hard drives full so I can’t just reformat the seagate. Is there any chance that it could be because the hard drive isn’t getting enough power from the Mac book? Or does the seagate hd and Mac just not play nice together?
Try using a powered USB3 hub with UASP support to connect the hard drive. This may help provide any extra power plus it will act as a buffer between the devices. Does the 6TB drive come with its own power supply or special double USB cable/dongle? Years ago I did encounter a drive enclosure which would not work on a Mac, so there is always a possibility of hardware incompatibility, but by using third party software the situation becomes more complicated. I think a 6TB drive will need extra power to work either with a double USB connector or its own power adapter.
Have you disconnected all other external devices from your Mac when trying to access the 6TB drive? Is your laptop using its power adapter?
Have you tried booting into Safe Mode to see if the 6TB drive can be mounted as read-only if it is formatted as NTFS?
Has this 6TB drive ever worked on this Mac? Do you see the drive (or the drive’s controller) show up under the USB section of the Apple System Profiler? You can access this by Option-clicking on the Apple menu and selecting the first option (System Information?).
Maybe your drive is physically failing. You may be able to check the health of the external hard drive on Windows by using GSmartControl (portable app available requiring no installation). GSmartControl also has a method to run a drive’s internal self diagnostics. There is no guarantee this information can be accessed since some external drive’s USB controllers block the necessary communication. Maybe your Seagate software on Windows can access this information or even test the physical drive. Feel free to post the GSmartControl report for the drive here using the «Additional Text» icon which looks like a piece of paper.
If the external drives are not backup drives, then I hope you have backup copies of all the data stored on your external drives.
Dec 29, 2019 4:26 PM in response to HWTech
I think we have already clarified that this issue is not related to third party tools and also appears when you are not using them. I haven’t expected there to be that much guys defending Apple at all cost by lacking any helpful information why in nearly 2020 a harddrive bought in the next store should not be able to be used without any hassle with any modern operating system.
Dec 29, 2019 5:33 PM in response to Imobisac
Imobisac wrote:
I think we have already clarified that this issue is not related to third party tools and also appears when you are not using them. I haven’t expected there to be that much guys defending Apple at all cost by lacking any helpful information why in nearly 2020 a harddrive bought in the next store should not be able to be used without any hassle with any modern operating system.
I am far from an Apple fan. I’ve been strongly opposed to the direction Apple has been going for years now and yes Apple does make some pretty stupid decisions. I personally do not purchase Apple’s computers, but am forced to use them for work. Apple is really a closed system where you do it Apple’s way or you will experience difficulties. Same thing if you do something which Apple did expect.
If you search these forums you will see so many threads where updating or removing third party drive management software solved so many of the users’ external hard drive problems.
Yes there can be hardware incompatibilities, but it is hard to identify the hardware issues when some people are unable to erase the drive to test without the third party software being involved. Some of the users posting here with problems may need to contact a local Apple hardware expert to physically examine their computer & drives to see what the source of their individual problem is. You also never get the complete story or system setup from people posting here so we are always working with incomplete information and many unknowns so there could be other factors involved such as security or AV software, etc. Like I said in my last post a 5TB+ drive may require extra power.
Many hardware vendors only pay lip service to macOS compatibility because unfortunately we live in a Windows centric world which is why most of these drives come pre-formatted for Windows with NTFS. Like Linux users Mac users need to research products and carefully choose & configure those products. Mac users do need to understand the hardware more than their Windows counterparts because a Mac user usually needs to do more to make hardware work properly. Mac users do have an option of purchasing guaranteed & tested products from an Apple friendly vendor such as OWC. If Mac users purchase off the shelf items at a regular store, then the Mac user will need to deal with possible incompatibilities. You know nothing of compatibility issues until you try to find Linux compatible hardware or Linux compatible firmware updaters. While Mac users are second class citizens in the tech world, Linux users are treated like the plague by hardware manufacturers. I agree it would be so nice if everyone would agree to standards and then properly implement those standards, but everyone including Apple takes shortcuts.
Dec 29, 2019 5:39 PM in response to HWTech
I was lucky and able to store my backup somewehre else so I connected my 5 TB harddrive with the Mac and made it ExFAT GUID. The harddrive itself is brand new and working okay on both Windows and Mac this way. Nethertheless I remember «strange» things like going into the next shop and find «special» hardware like harddrives with a MacOS compatible sign attached to. For those who are not too familar with re-formatting/partitioning that thing themself. ^^
Could not mount “Seagate”. (com.apple.DiskManagement.disenter error 49223.) message
I have created a Bootcamp partition but when I try to mount it using Disk Utility I get the following error «Could not mount “BOOTCAMP”. (com.apple.DiskManagement.disenter error 49223.)
I am using Parallels and it fails to start the VM and I believe that this is the reason
Currently, I use build 19A501i
Any help, would be greatly appreciated
Replies
Today I installed build 19A512f
By default the Bootcamp partition is not mounted
When I try to run Parallels desktop 14.1.3 it just crashes
With Disk Utility I mount the Bootcamp volume and it mounts Ok
I run again Parallels desktop 14.1.3 and it crashes again and bootcamp is now unmounted
By removing and reinstalling Parallels the issue was solved
Try checking /Library/Filesystems for any leftover files from other NTFS applications. I solved mine by deleting .fs file from iboysoft after I uninstalled the NTFS software.

Did you get a com.apple.diskmanagement.disenter error when you tried to mount your external hard drive on Mac? This indicates a problem with either your external hard drive or macOS. Unfortunately, either case may lead to data loss – but don’t lose hope!
In this article, we’ll explore the possible reasons we encounter DiskManagement Distenter 49135 and how to fix it (without losing your data), as well as other common disk errors. Read on.
Need to recover data from the drive? Go to data recovery section ⤵
When you plug in your external hard drive, the system mounts it and makes its contents viewable in Finder. If it doesn’t show up there, you should still see it in Disk Utility (Finder > Applications > Utilities) where you can also attempt to mount it.
But there are cases when your external hard drive won’t mount, even using Disk Utility. In this scenario, you’ll probably encounter an error that says “Could not mount *name of the drive*”(com.apple.DiskManagement.disenter error 49513).
Several factors could lead to this problem. You may have an incompatible file system. Or, you may be using a Mac Superdrive while running macOS Catalina. Beyond those common reasons, error 49153 may occur simply due to malware, bugs, issues while resizing partitions and interference from local Time Machine backups.
Don’t worry – we’ll show you how to get rid of this pesky error in the next section.
How to Fix com.apple.diskmanagement.disenter error 49153?
There are several ways to address this specific error code, but most fixes can potentially harm your data. We suggest opening your external hard drive in read only mode and copying your files to a separate storage device or to the cloud.
To set your drive to read only mode, right-click your drive > Get Info and scroll down to Sharing and Permissions. Set your user’s privilege to Read only.
Method 1: Connect Your Drive to Another Mac
Disk Utility errors can be caused by either your drive or your Mac. To figure out which methods to try first, connect your drive to another Mac or even a PC. If your drive doesn’t work on other machines, then the problem likely lies with your drive.
If it works on another Mac, then your Mac might be experiencing glitches due to a faulty update or other issue. If it works on a PC, then it’s likely a formatting problem – we wrote more about that in the section of this article that covers other common DiskManagement Disenter errors.
Method 2: Restart your Mac
A temporary bug or glitch may have simply gotten macOS stuck while it attempted to recognize your drive. You may also have a lot of apps running in the background using up the resources macOS needs to properly recognize and mount your drive.
To get your system going, a simple restart might solve the problem. This will automatically close all running apps and reboot the operating system.
Method 3: Use First Aid in Disk Utility
First Aid is a useful tool that finds and repairs disk errors – specifically, it scans the drive and its partitions for issues related to its structure and formatting. These may prevent your drive from properly mounting.
Fortunately, First Aid is a feature of the Disk Utility app, which can recognize unmountable drives or partitions. To repair your drive using First Aid:
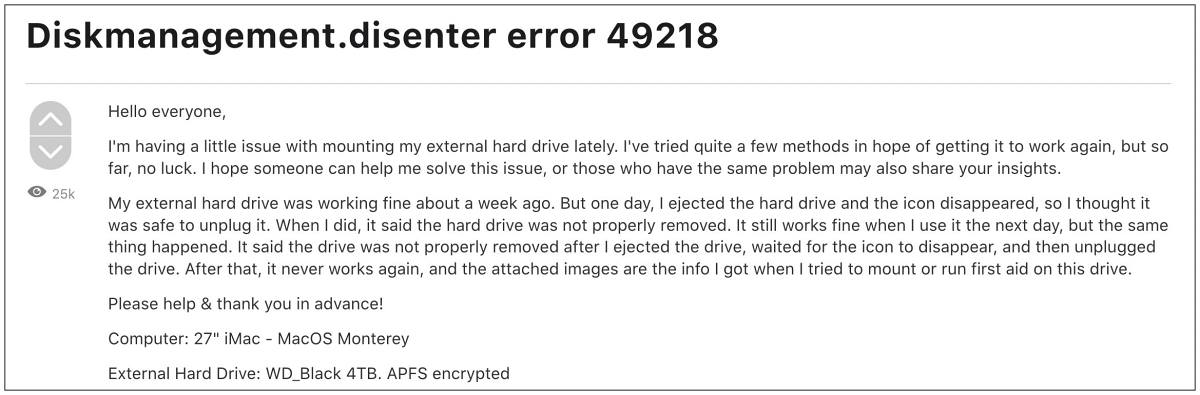
Step 1.Launch Disk Utility (Finder > Applications > Utilities).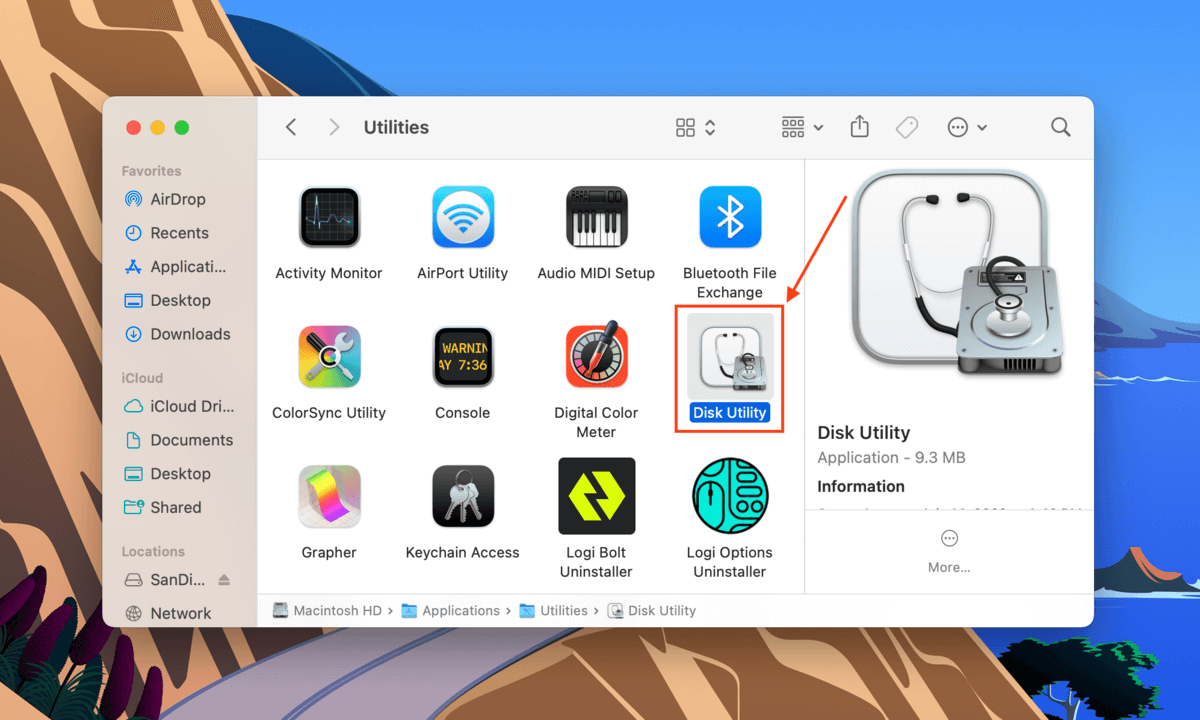
Step 2.Select your drive from the left sidebar, then click the First Aid button at the top of the window.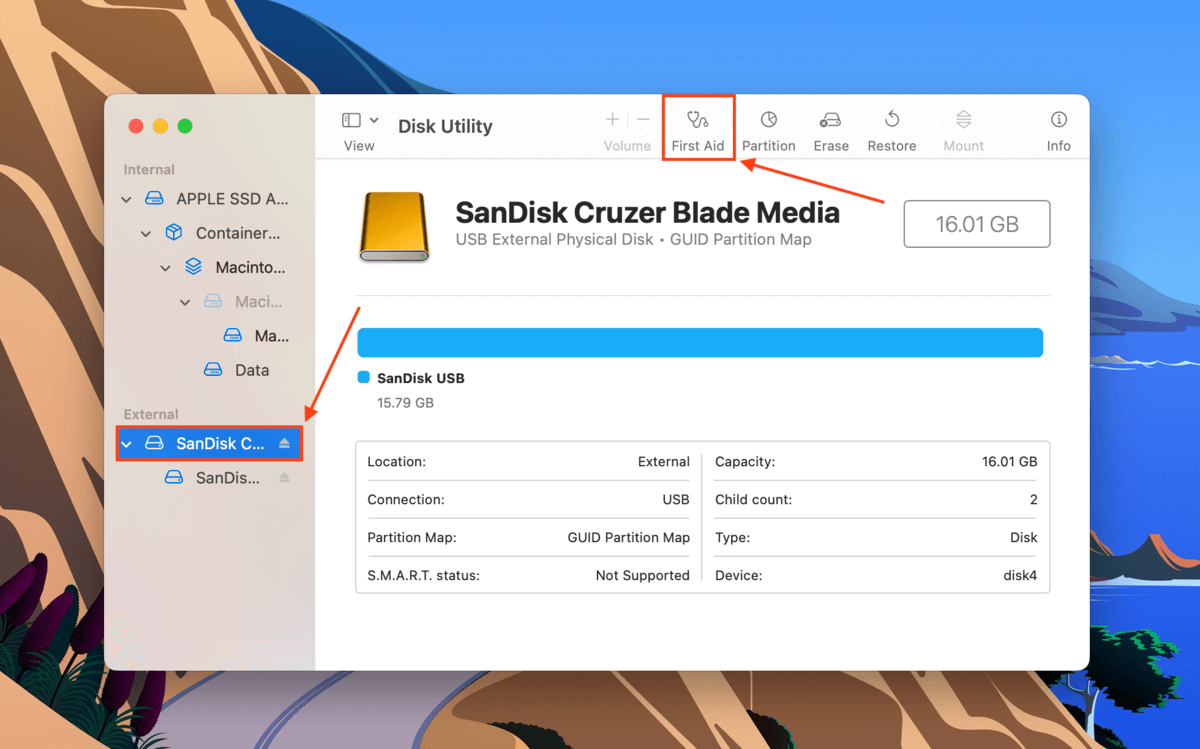
Step 3.In the dialogue box that appears, click Run.
Step 4.Wait for the process to finish. Then, manually mount your hard drive in Disk Utility by selecting your drive or volume in the left sidebar and clicking the Mount button.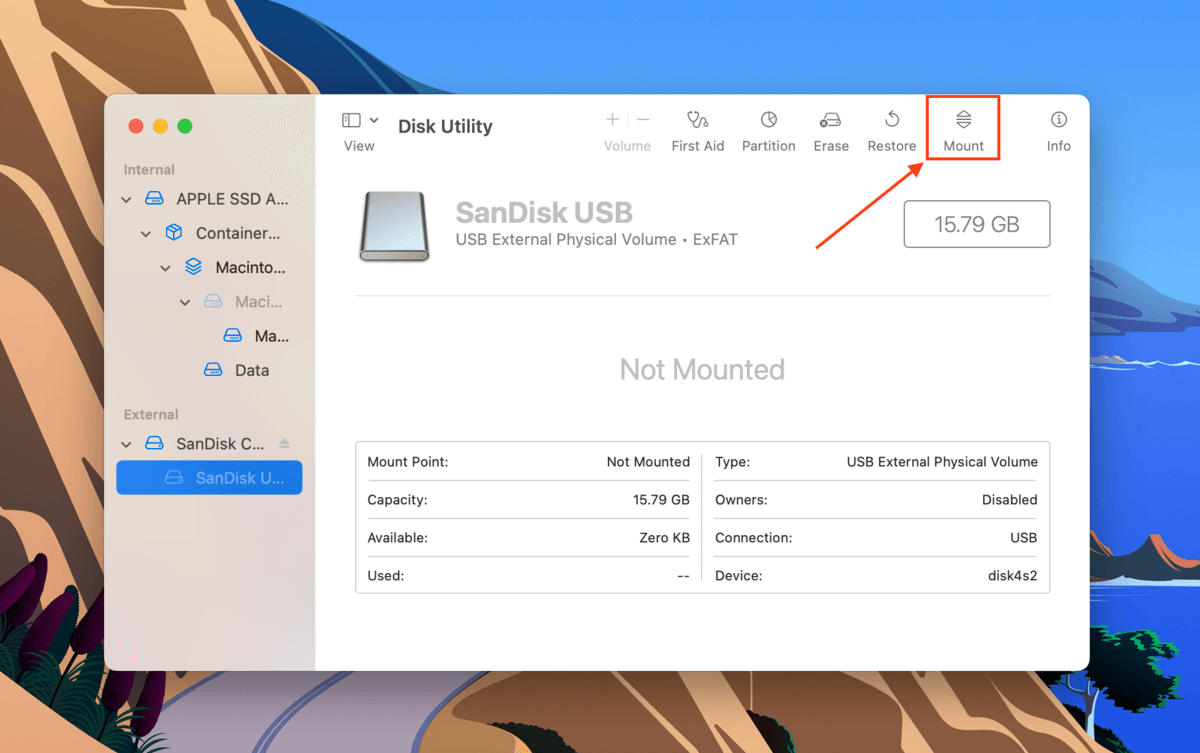
Method 4: Use the fsck Command in Single User Mode
Your external hard drive may not be mounting because of a file system issue. To resolve this problem, you can use Mac’s File System Check command or FSCK through Single User Mode. Here’s how:
Step 1.Enter Single User Mode. To do so, restart your Mac. As soon as it starts to reboot, press and hold the Power button and the CMD + S keys at the same time.
Step 2.You’ll know that you’ve successfully booted into Single User Mode when you see a window that looks like the Terminal app. Once the white text stops appearing, type the following command and hit Return.
/sbin/fsck -fy
Step 3.Once the process is complete, type reboot. This will command your Mac to restart itself.
If you remove your hard drive before ejecting it from Mac, fsck will automatically scan and repair it the next time you use it. This could potentially take a long time, which makes your drive unmountable. To deal with this, force quit the fsck command (Open the Activity Monitor > search fsck > click the x button).
Method 5: Disable Time Machine
Time Machine is a Mac built-in tool that regularly backs up your data, usually automatically. It works well, but on bad days, it can cause the operating system to get stuck while preparing your backup drive. Try disabling Time Machine to free your drive from this process and hopefully allow it to get mounted.
To disable Time Machine, open its settings window by launching System Preferences > Time Machine.
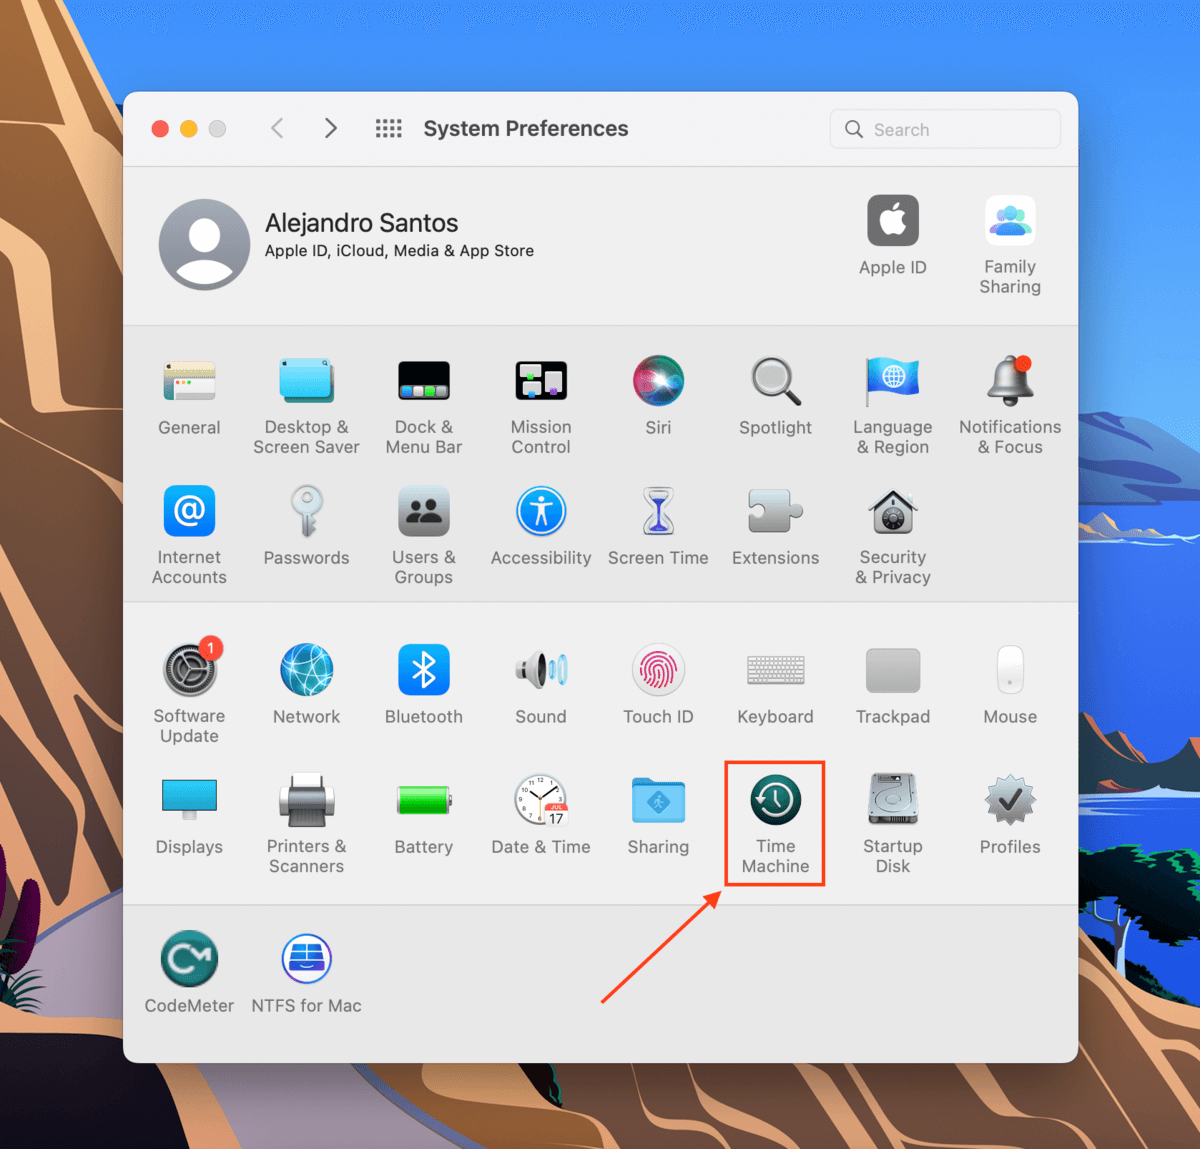
Then, untick the box beside the Back Up Automatically setting.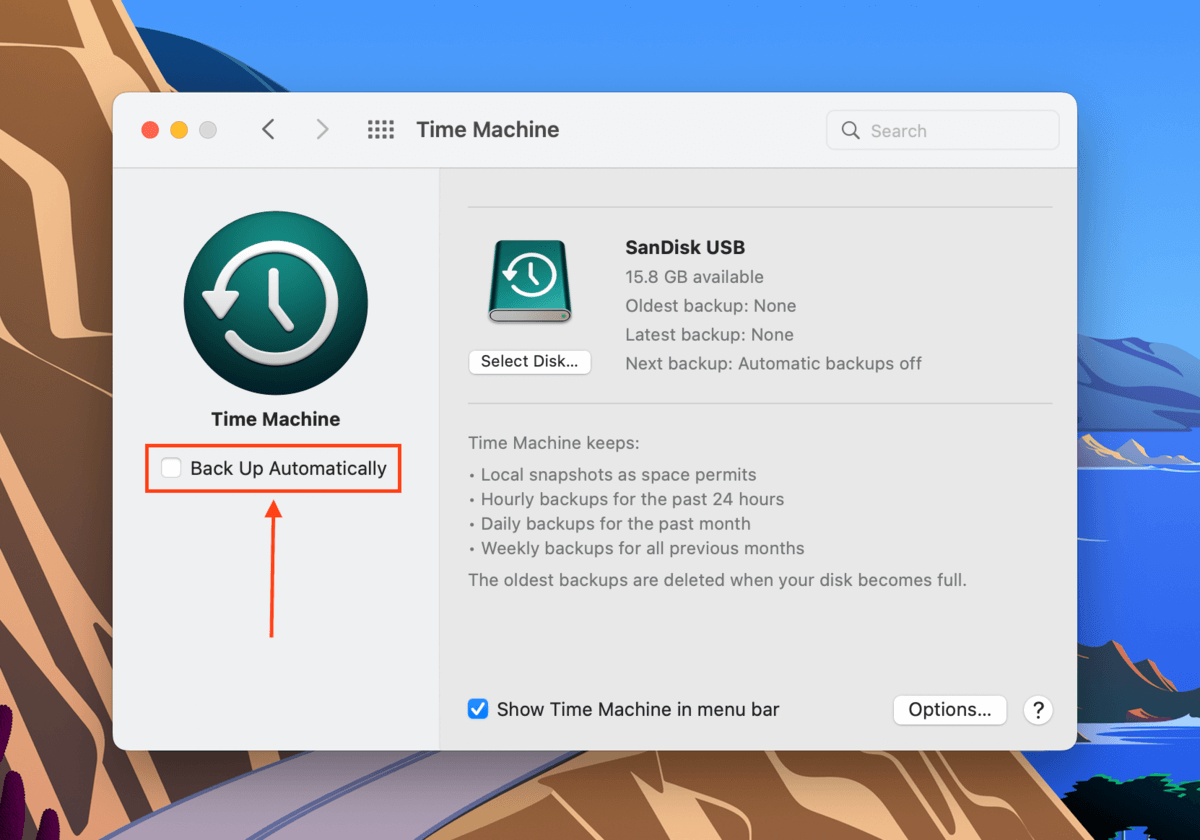
Method 6: Delete Time Machine snapshots using Terminal
Deleting Time Machine snapshots from your Mac may also resolve this disk utility error. Learn how to do it using the Terminal app by following the steps below:
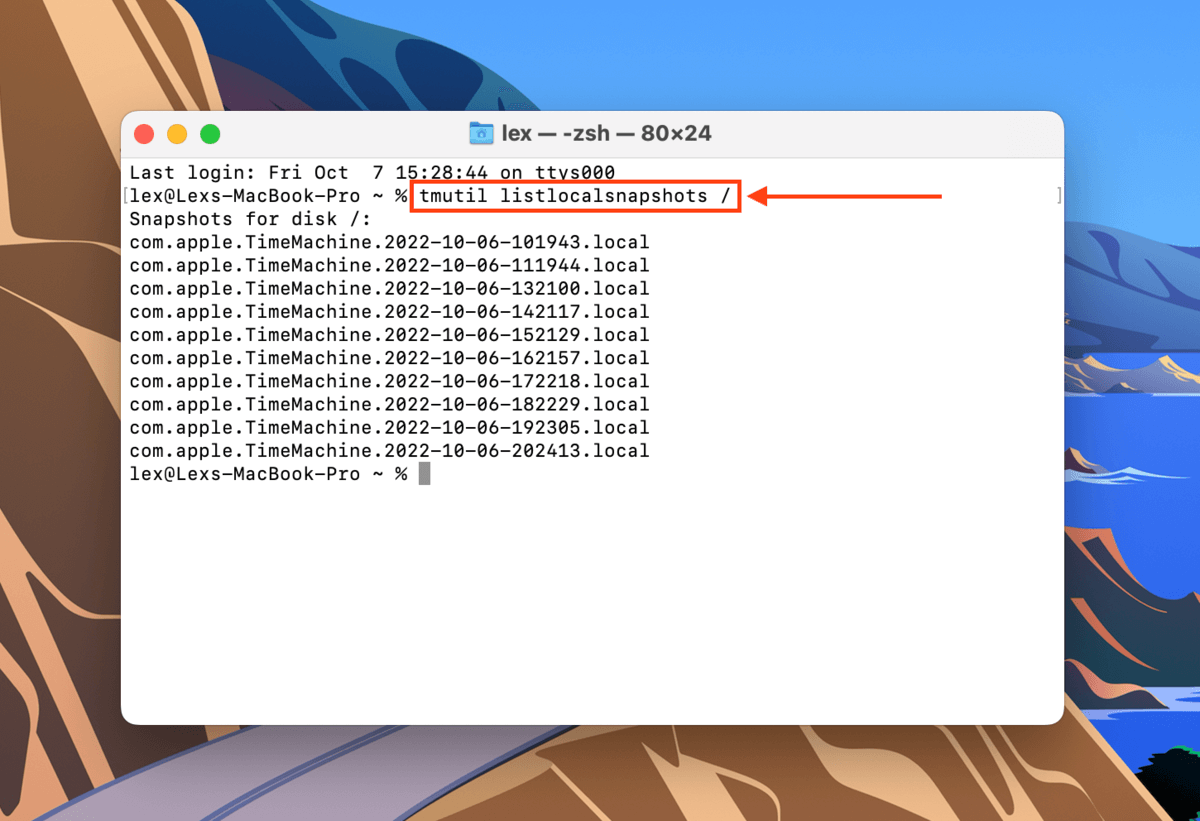
Step 1.Launch Terminal (Finder > Applications > Utilities > Terminal).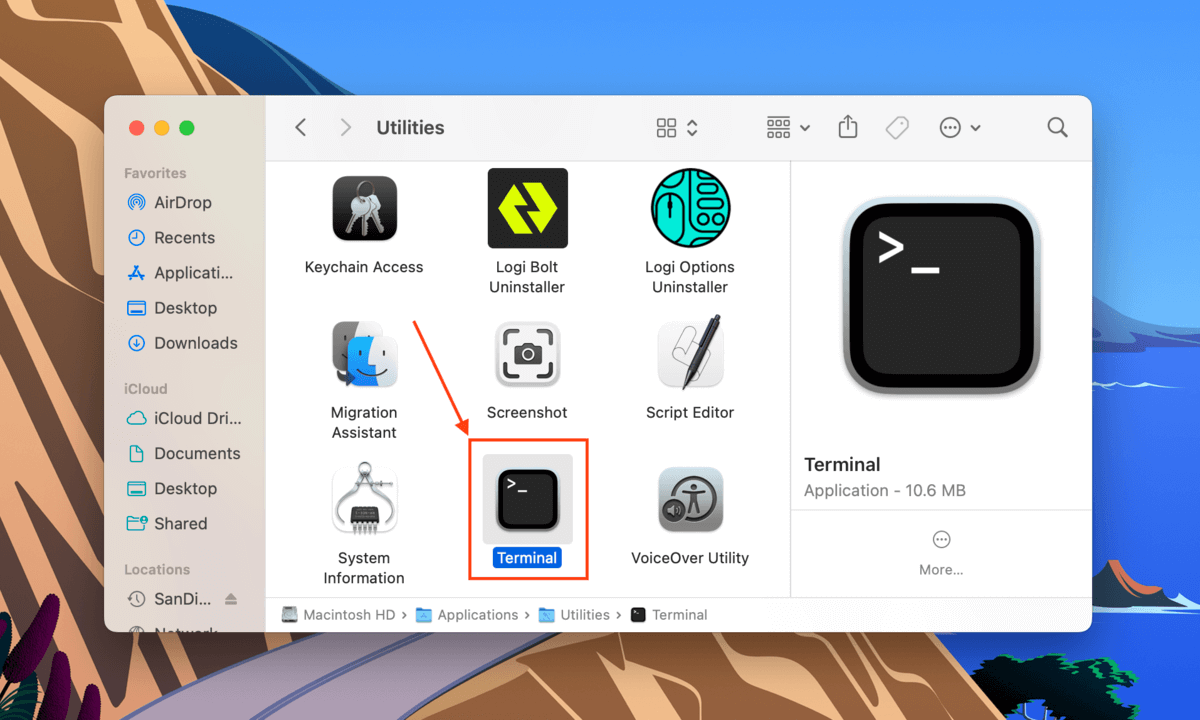
Step 2.The first command we’ll execute will list all locally stored Time Machine snapshots. Type the following command and hit Return:
Tmutil listlocalsnapshots /
Step 3.Type the following command and hit Return:
Tmutil thinlocalsnapshots /99999999999999
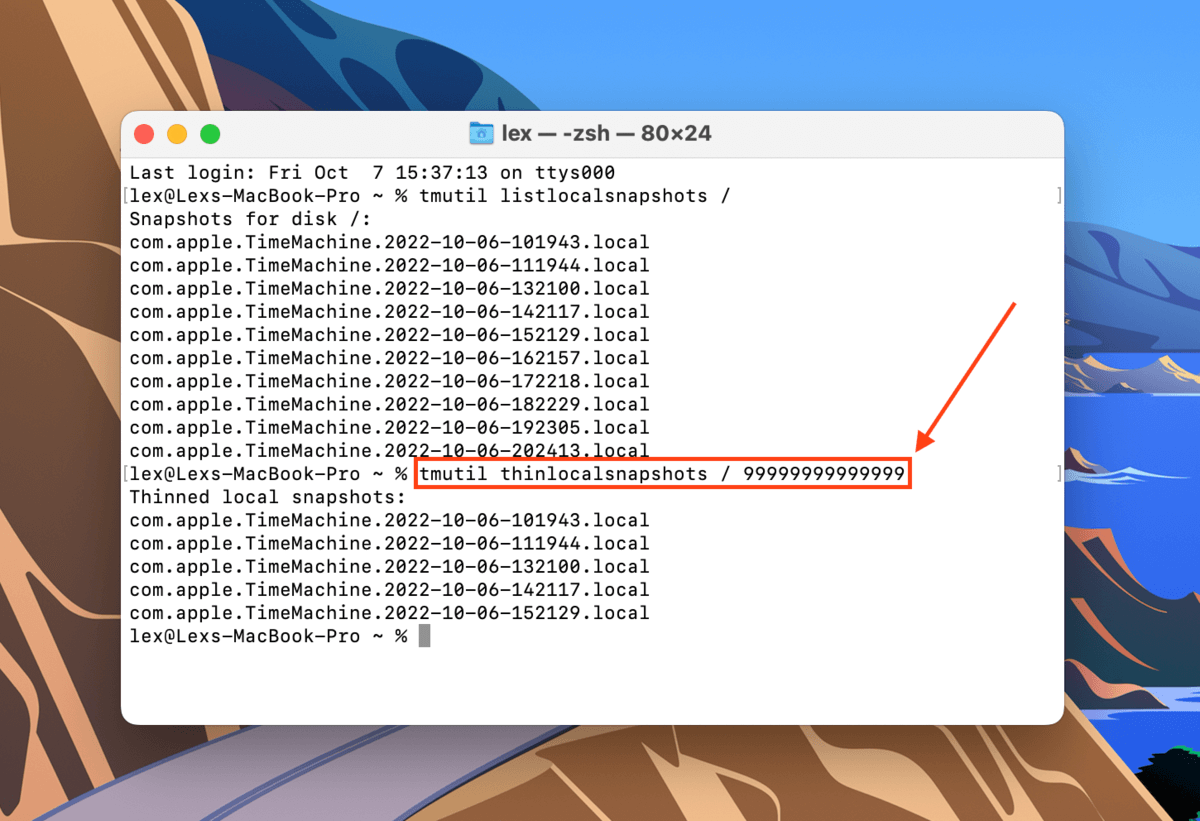
Step 4.Keep using the tmutil listlocalsnaphots and tmutil thinlocalsnapshots commands to make sure you delete all your snapshots.
Method 7: Format Your Drive
If all the above methods failed to get rid of the disk errors, your last resort is to format the drive. As we’ve already discussed earlier, formatting your drive will wipe the disk – including errors, viruses, corruption, and unfortunately, your data. We suggest copying your files to a secure location first.
To transfer your files safely, set your drive to read only mode first. To do this, read our pro tip in the introduction of this section.
Fortunately, formatting your drive on Mac is very easy thanks to the Disk Utility app. First, launch Disk Utility (Finder > Applications) and select your drive from the left sidebar. Then, click the Erase button on the top of the window.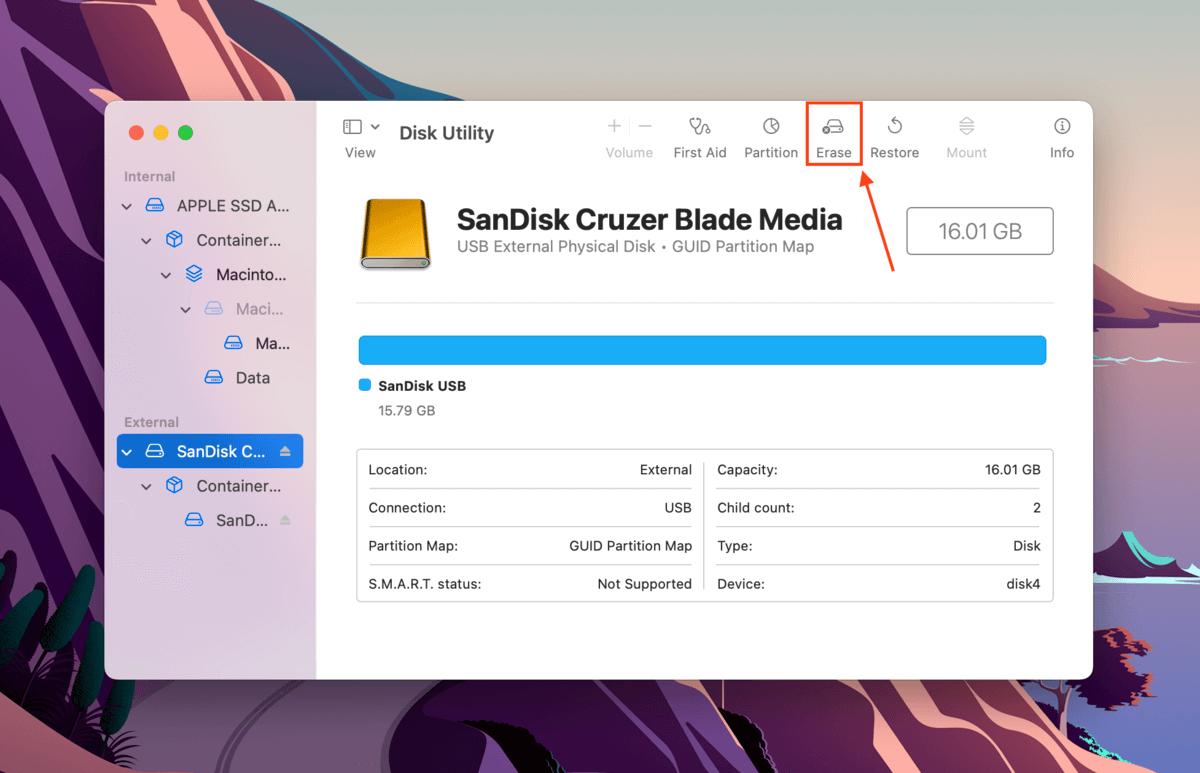
In the dialogue box that appears, name your drive and select a format. If you will only be using your drive with Mac computers, choose APFS. Otherwise, we suggest exFAT for maximum compatibility. Select GUID Partition Map for its scheme, then click Erase to proceed with the format.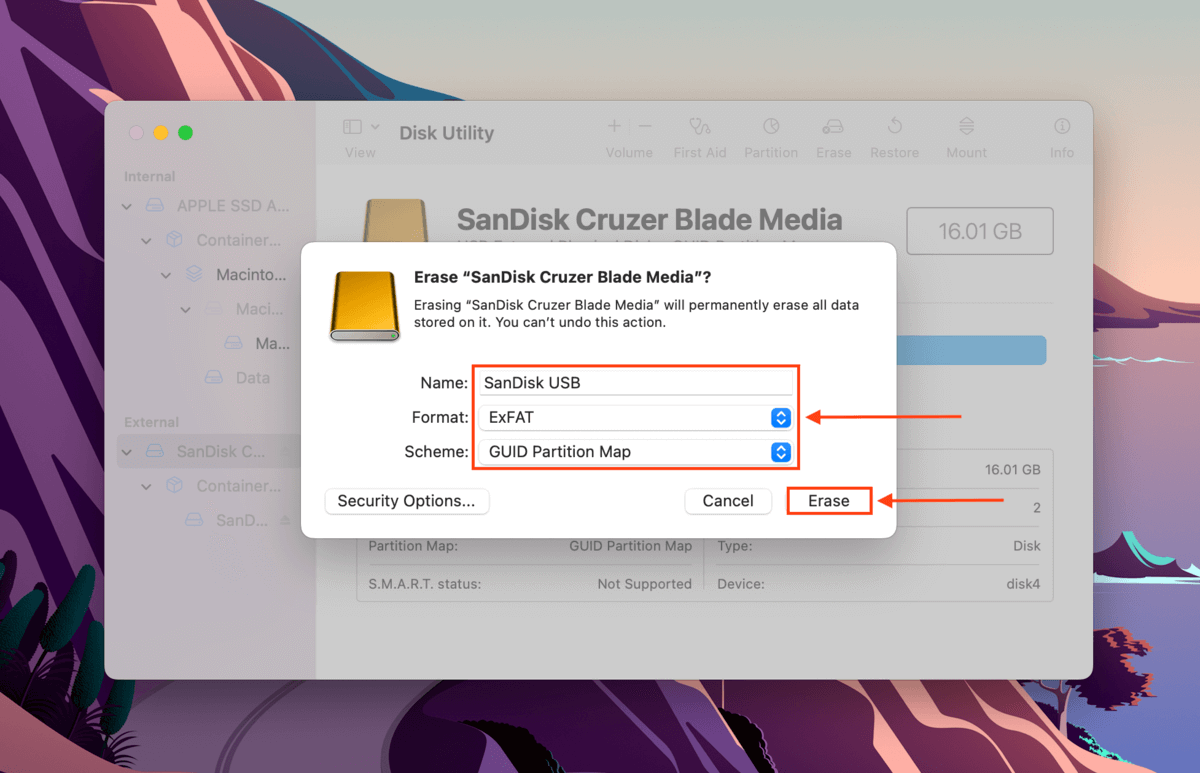
Other Types of DiskManagement Disenter Error
Aside from DiskManagement Disenter Error 49153, there are other DiskManagement Disenter errors that you may encounter that are represented by different codes. Below, we’ve listed the most common ones along with their solutions:
- DiskManagement Disenter Error 49223. An exFAT hard drive that’s been formatted using Windows can cause this error when connected to a Mac, as macOS doesn’t support all the storage block sizes available on Windows. This incompatibility makes MacOS unable to recognize and mount the drive.If you want to use this drive on both Mac and Windows, you need to format it using Mac (but first, back up your data!). If you intend to use it solely on Mac, we suggest formatting it to Apple-based APFS.
- DiskManagement Disenter Error 49221.This error is caused by a glitch in the security updates 2021-003 and 2022-003. After the update, you’ve probably tried to mount a NTFS hard drive in Disk Utility when you got this error. To fix this, reinstall macOS or use a third-party software to mount your NTFS drive.
- DiskManagement Disenter Error 49244. This error often appears when you try to mount your hard drive in Disk Utility while running macOS Catalina. You can use third-party software to mount your drive. If that doesn’t work, you need to format your drive to APFS (again, don’t forget to create a backup!).
- DiskManagement Disenter Error 49218. You might get this error when you remove a hard drive without proper ejection while using macOS Monterey. This error may also be caused by bugs from macOS Monterey itself.To fix it, (1) execute the sudo pkill -f command in the Terminal app, (2) execute the fsck /dev/disk_user_id/ command in single user mode, and finally (3) execute the mount -f /dev/disk_user_id/ command. Remember to replace “disk_user_id” with your disk’s identifier (diskutil list). To boot into single user mode, follow the first instruction in Method #4. If your drive still fails to work after this fix, you may need to format it.
- DiskManagement Disenter Error 49180. This error occurs when there’s a raw partition on the drive, which can happen if you connect an APFS drive to an old Mac or if something went wrong while you were shrinking your partition. You have two ways to address this error: (1) resize the external hard drive using Terminal or (2) format the hard drive altogether.
What to Do If You’d Lost Data After DiskManagement Disenter Error?
Disk Utility errors always have the potential to cause data loss and there’s no guarantee that your files will remain intact after fixing them. The safest and most efficient way to restore data caused by disk errors is to use data recovery software.
Data recovery software can restore files regardless of format – it will even work if you decided to format your drive due to the errors. For this article, we’ll be using a tool called Disk Drill. It’s easy to use and works with most disk formats, and it can restore data even from non-mounting drives. Here’s how to use it:
Disk Drill Basic for Mac does not offer free recovery. However, you can back up and preview your files for free. There are free data recovery solutions available on the internet, but they each have their own limitations – your mileage may vary.
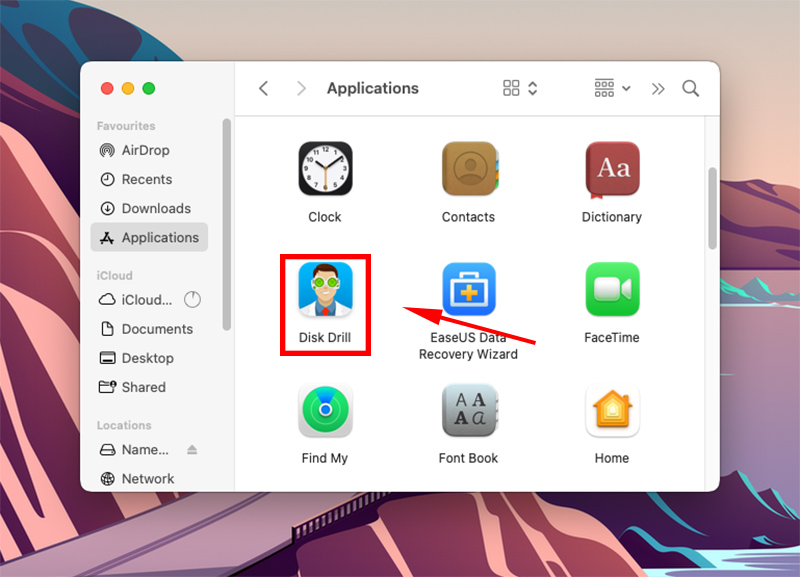
Step 1.Download and install Disk Drill for Mac.
Step 2.Launch Disk Drill (Finder > Applications > Disk Drill).
Step 3.Select your drive from the middle pane and click Search for lost data.
Step 4.Wait for the scan to finish, then click Review found items.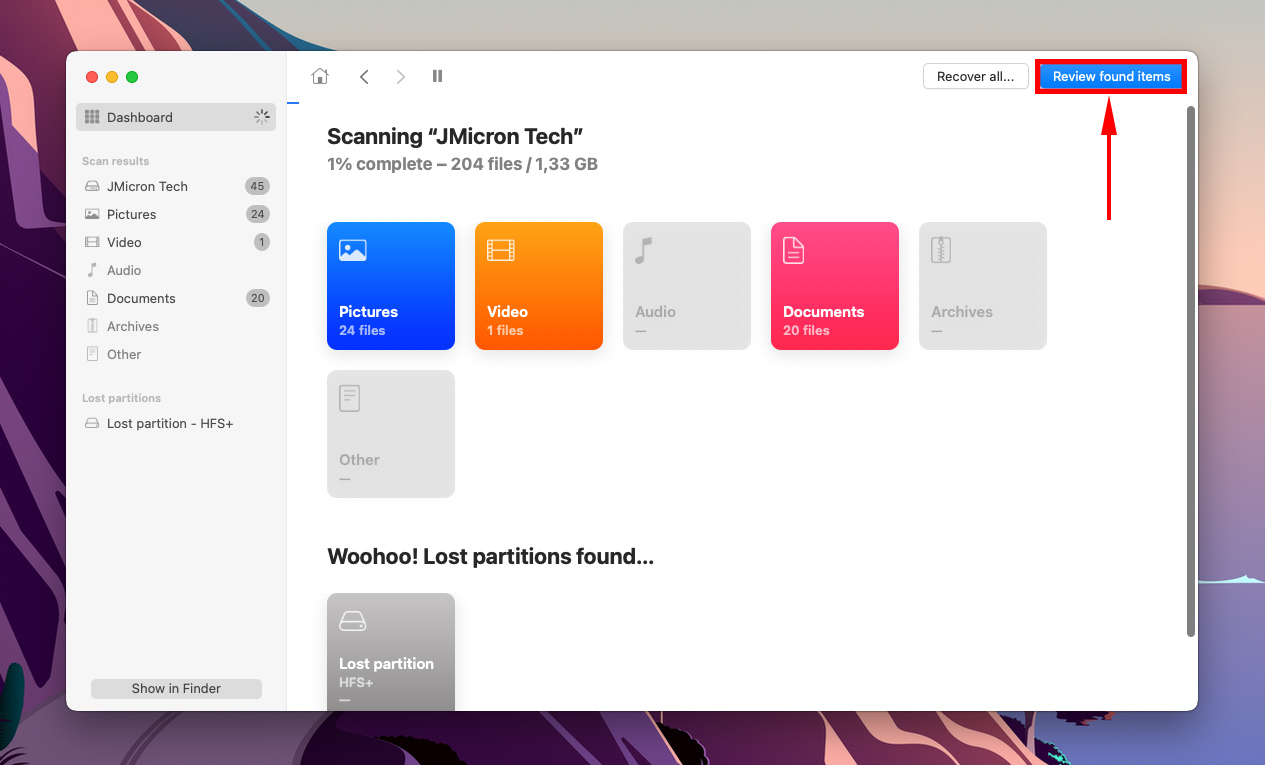
Step 5.Use the search bar to filter the results by name or by file extension, or use the left sidebar. You can also hover your mouse pointer beside any file to enable preview.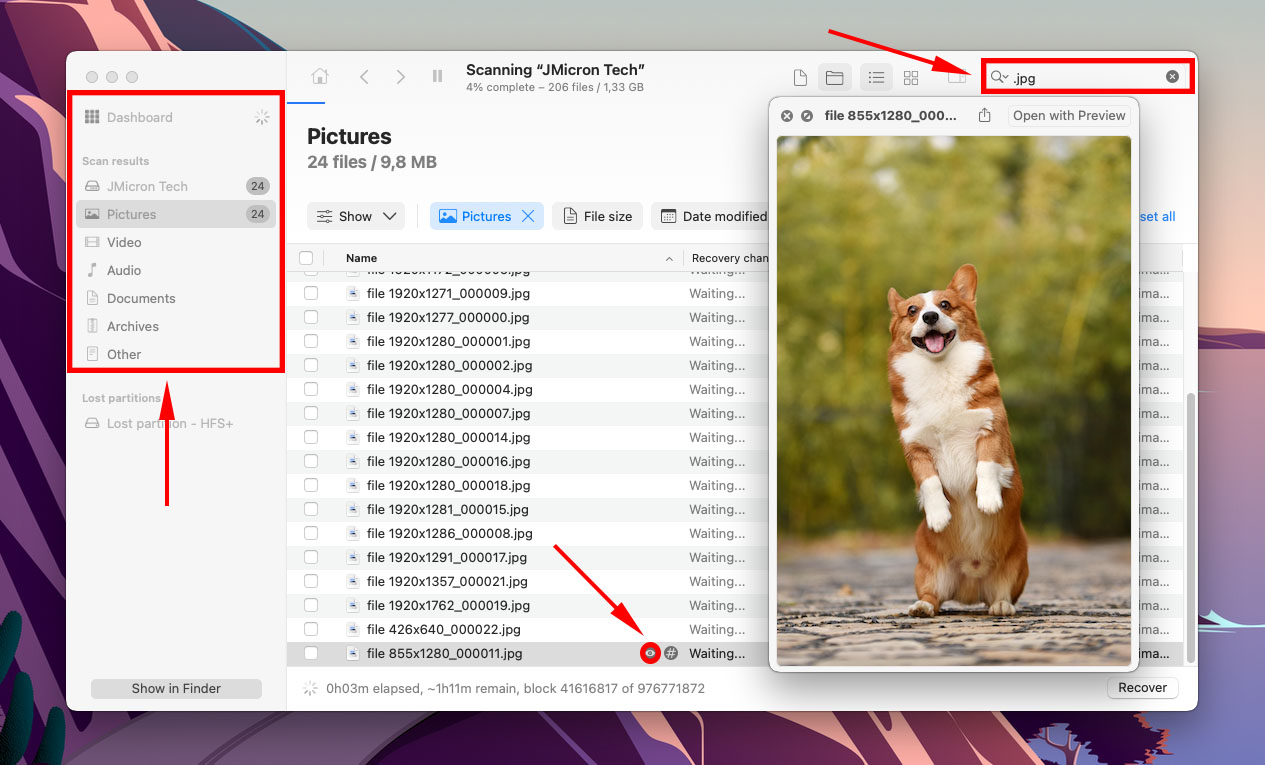
Step 6.Use the boxes in the left-most column to select the files you want to restore, then click Recover.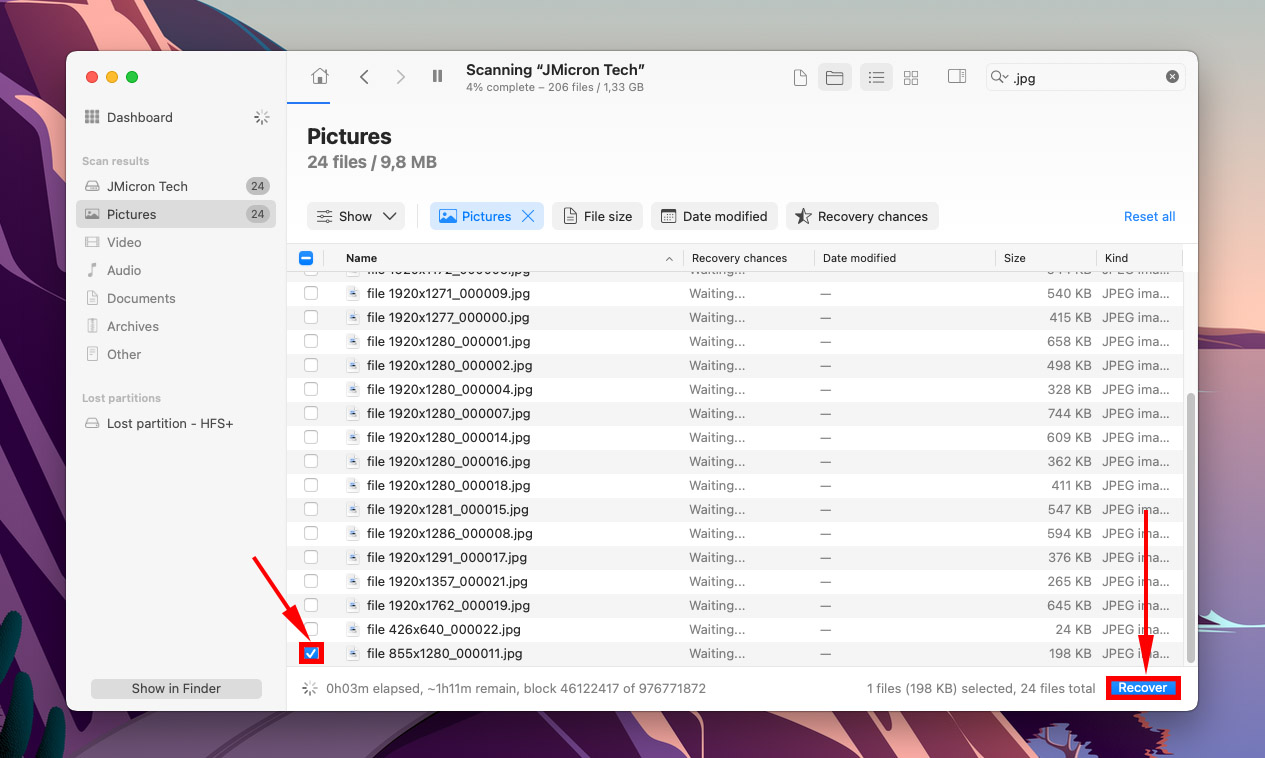
Step 7.Select a location on your non-malfunctioning drive to save the recovered files. Then, click Next.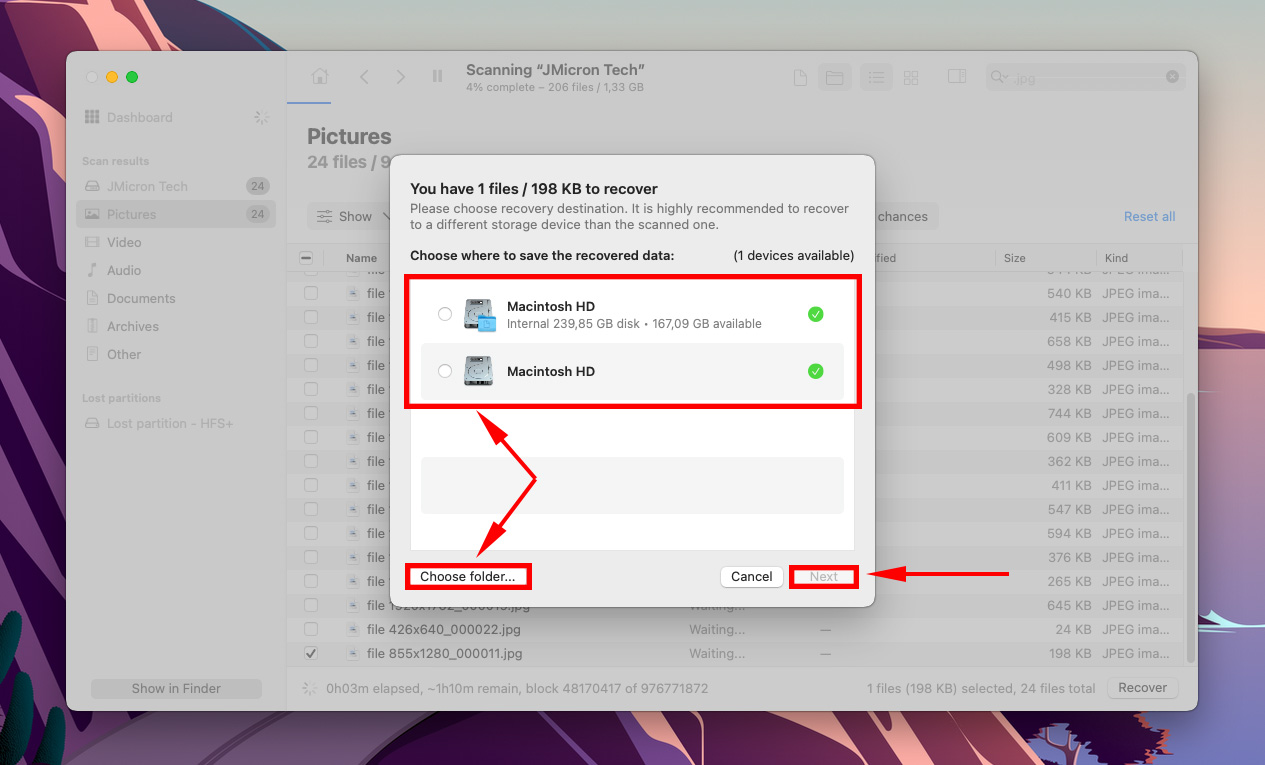
Conclusion
Bluntly, disk utility errors are inevitable. Buggy system updates, improper ejection, power surges, and other factors beyond the user’s control can cause one or multiple disk errors. Not only can these errors cause data loss by themselves, but the process of actually fixing them can also harm your files. The best you can do is to routinely back up your files to avoid the worst consequences of these errors.