Hello everyone,
I’m having a little issue with mounting my external hard drive lately. I’ve tried quite a few methods in hope of getting it to work again, but so far, no luck. I hope someone can help me solve this issue, or those who have the same problem may also share your insights.
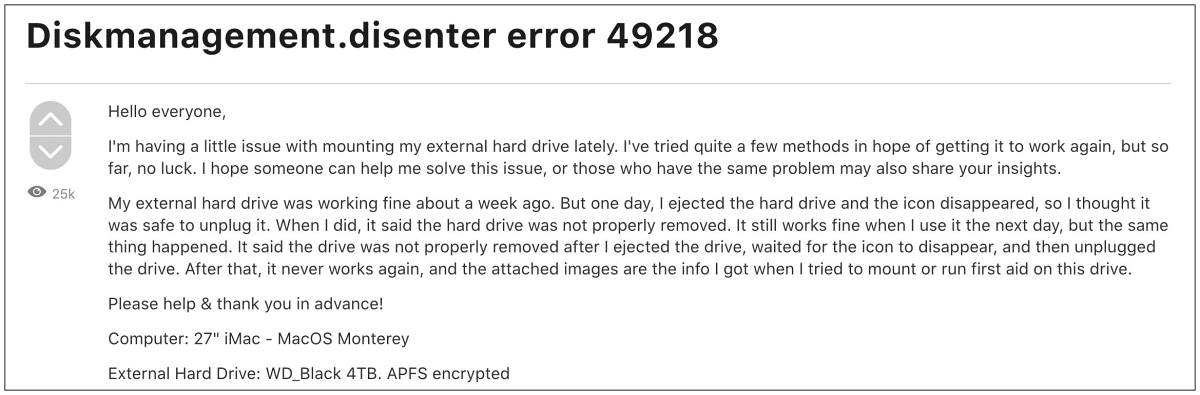
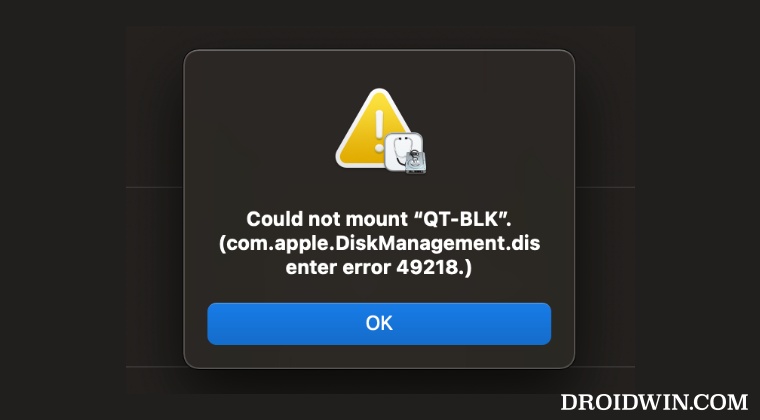
My external hard drive was working fine about a week ago. But one day, I ejected the hard drive and the icon disappeared, so I thought it was safe to unplug it. When I did, it said the hard drive was not properly removed. It still works fine when I use it the next day, but the same thing happened. It said the drive was not properly removed after I ejected the drive, waited for the icon to disappear, and then unplugged the drive. After that, it never works again, and the attached images are the info I got when I tried to mount or run first aid on this drive.
Please help & thank you in advance!
Computer: 27″ iMac — MacOS Monterey
External Hard Drive: WD_Black 4TB. APFS encrypted


Replies
Same issue with my drives…. I had an external drive for my pictures and I could not access it. I tried saving it through terminal with all the commands i could think of…. Nothing really helped. In the end i capitulated and bought „Disk Drill“ to access my files.
Then i loaded all the pics on a new external drive and about two weeks later the same error happened.
I am afraid, Monterey has a weird bug.
FIXED — NOW I’M GOING ***** 😁
FIXED … by doing WHAT?
Please post a solution to this problem if you could fix it.
I had this happen 4 TB WD My Passport on Big Sur 11.6.2, the 1 TB partition for my Time Machine didn’t come up and mounting gave the «disenter error 49218». Here’s what worked for me (at least for now):
https://developer.apple.com/forums/thread/680500?answerId=676624022#676624022
«Try to mount the disk, and switch to Terminal and write sudo pkill -f fsck«
Attempted to run First-Aid on that partition.
Restarted the computer.
Time machine came back after that. No clue which of the steps may have actually fixed it. Will find out the next time that this inevitably occurs.
This worked for me too:
https://developer.apple.com/forums/thread/680500?answerId=676624022#676624022%C2%A0%22Try to mount the disk, and switch to Terminal and write sudo pkill -f fsck»
Attempted to run First-Aid on that partition.
Restarted the computer.
I agree it’s a weird bug with Monterey. I ran into the same issue with my external Samsung 4TB SSD. After I upgra ded to Monterey my drive immediately started acting weird and then I received this message «Could not mount “4TB SSD”. (com.apple.DiskManagement.disenter error 49218.)» I’ve tried all kinds of software including Terminal to force mount and I’m still unable to mount this external drive. I have over a decades worth of family photos in iPhoto on this drive most likely all lost. Thanks MacOS Monterey!
I unplugged a 1TB SSD without ejecting it first, and when I connected it again sometime later, I couldn’t even see it in Finder.
I opened Disk Utility and run first aid on it and got an error (com.apple.DiskManagement.disenter error -119930878.) but after I closed it, it continued running and some minutes later, the drive was fixed and I was able to see it in Finder and use it again.
I’ll remember to eject the drive properly next time before unplugging it.
I unplugged an external HDD without ejecting it first, then had error 49218 when trying to mount it. Surprisingly First Aid didn’t show any errors, but still I couldn’t mount it. Restarting the MacBook helped, it just automounted. I’m on Big Sur.
Restarting the MacBook worked
Ok, I had this same issue and found a fix. However, it’s ONLY a fix if you do not care about what is on the external HDD. Open Disk Utility and hit Partition. Change it to APFS (Encrypted). I hit «Apply» and it warned me that all data would be deleted. I said ok. It wiped it and then it automatically mounted and all is well now.
Mine was previously on APFS (case sensitive) and I had all of the same issues you all have had and none of the suggested fixes did not work.
FIXED!
I’ve had trouble accessing my external LaCie time machine drive for a while now and nothing I had found online has helped. Couldn’t mount it, erase it or use first aid on it. Would get failed messages non stop.
The only solution that has helped I have, fortunately, found was by this guy on youtube, https://www.youtube.com/watch?v=Z9y1oRYlmh0. Formatting the container within the disk utility to a MAC OS Journaled had worked and I was able to access the partition anew and then restart the time machine.
I am no developer, but was reading these forums and thought of posting this in order to, maybe, help some of you.
I’m having the same problem with my MacBook Pro M1 max. I have a 2TB external drive I was using with Time machine backups that I can No longer mount. Even disk utility won’t allow the disk to be erased and reformatted. I would have thought that apple would have the solution by now seeing how so many have encountered this problem. can someone please help????

I’ve seen all the post on how to regain access to the disk, but how do I do that without erasing and loosing all my Time machine backups?
Same Problem here, it happened after the MacOS firmware update to 12.4… I use an external WD hard drive, APFS (encrypted). Already conacted the Apple and WD support, they couldn’t help me
I’m having the same issue…
В этом руководстве мы покажем вам различные способы исправления ошибки Diskmanagement.disenter с кодами ошибок 119930868, 119930872, 49218, 49223, 0 и т. д. Многие пользователи выразили обеспокоенность тем, что не могут подключить внешние жесткие диски к своему Mac. . Эта проблема не зависит от ОС, о ней сообщалось в Big Sur, Monterey и даже Ventura.

Всякий раз, когда они пытаются смонтировать диск с помощью Дисковой утилиты, они приветствовал с ошибкой Diskmanagement.disenter вместе с одним из следующих кодов ошибок 119930868, 119930872, 49218, 49223, 0 и т. д. Невозможность доступа пользователей к данным на отключенном внешнем жестком диске доставляет им массу неудобств. Если вы тоже находитесь в одной лодке, то это руководство поможет вам. Следите за исправлениями.
Рекомендуется попробовать каждый из нижеперечисленных обходных путей, а затем посмотреть, какой из них приводит к успеху. Итак, имея это в виду, давайте начнем. Droidwin и его участники не будут нести ответственность в случае термоядерной войны, если ваш будильник не разбудит вас, или если что-то случится с вашим Mac и данными, выполнив следующие шаги.
ИСПРАВЛЕНИЕ 1. Завершение процесса fsck
Одна из наиболее распространенных причин этой ошибки может быть связана с тем, что «fsck» может держать ее в заложниках. Поэтому вам придется убить этот процесс и повторить попытку монтирования диска. Вот как это можно сделать:
- Для начала запустите Терминал и Дисковую утилиту.
- Затем попробуйте смонтировать диск и сразу переключитесь на Терминал.
- Теперь выполните следующую команду в окне терминала: sudo pkill -f fsck
- Диск смонтируется в режиме только для чтения. Теперь вы можете восстановить его с помощью программы «Первая помощь» в Дисковой утилите.
- Ремонт займет время. После этого это должно исправить ошибку Diskmanagement.disenter.
ИСПРАВЛЕНИЕ 2: использование терминала
- Для начала загрузите Mac в режим восстановления, как указано ниже: Apple Silicon: нажмите и удерживайте кнопку питания, пока не появится «Загрузка параметров запуска». Затем выберите Функции > Продолжить. Intel: перезагрузите Mac и одновременно нажмите и удерживайте сочетание клавиш Command+R.
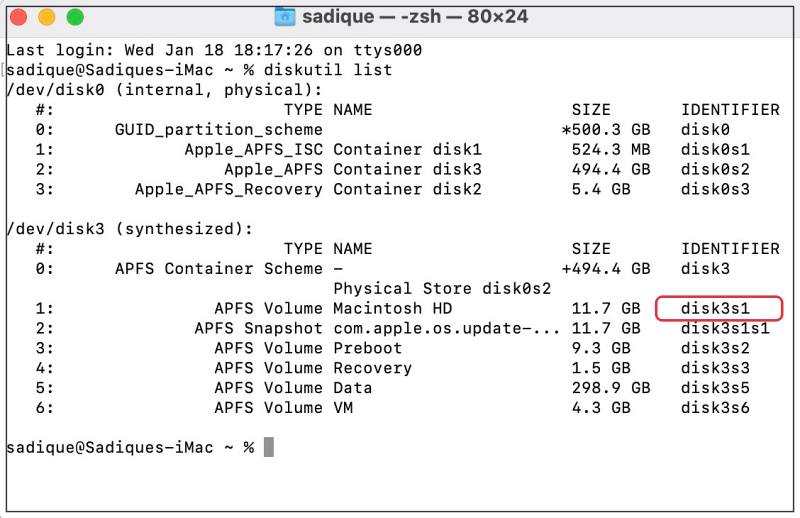
- Затем нажмите «Утилиты» и выберите «Терминал». Теперь введите следующую команду: diskutil list
- Появится список всех дисков. Запишите идентификатор тома вашего диска [such as disk3s1].
- Наконец, выполните приведенную ниже команду [replace diskX with your volume identifier].diskutil repairVolume/diskX
- Проверьте, исправляет ли он ошибку Diskmanagement.disenter 119930868, 119930872, 49218, 49223, 0.
ИСПРАВЛЕНИЕ 3. Изменение размера выделяемого диска
Некоторые старые Mac не смогут смонтировать диск, если размер выделения больше 1024. Поэтому, чтобы решить эту проблему, перейдите на компьютер с Windows или Linux (или используйте виртуальную машину) и переформатируйте диск в ExFAT и выберите 1024 как размер выделения. Теперь попробуйте установить его на свой Mac, и на этот раз вы не получите никаких кодов ошибок.
Вот и все. Это были три метода, которые должны помочь вам исправить ошибку Diskmanagement.disenter с кодами ошибок 119930868, 119930872, 49218, 49223, 0 и т. д. Если у вас есть какие-либо вопросы относительно вышеупомянутых шагов, сообщите нам об этом в комментариях. Мы вернемся к вам с решением в ближайшее время.
О главном редакторе
Many users have been voicing their concern that they aren’t able to mount their external hard drives to their Mac. This issue comes independent of the OS and has been reported across Monterey, Big Sur, and even Ventura. When the user are trying the mount the disk using the Disk Utility, they’re getting the Mac Diskmanagement.Disenter Error with one of these error codes – 119930868, 49218, 119930872, 49223, 0, etc.
Follow us on Telegram
The inability to access data on the unmounted external hard drive has been causing a great deal of inconvenience to the users. If you’re in the same boat, then this guide will be of great help to you. In this guide, you will get to know how to fix Diskmanagement.Disenter Enter 119930868, 49218, 49223, 0, etc.
Mac users have reported encountering the com.apple.DiskManagement.disenter error -119930868 when attempting to mount their Macintosh HD (disk0s2) in Disk Utility after upgrading to macOS Big Sur. This error prevents access to the drive, causing significant issues for those who have installed macOS on that drive. This error is not new, but its recent occurrence suggests a connection to the Big Sur upgrade. The causes and solutions for this error are not specified in the given text.
Method 1: Kill the fsck process

- To start off, launch Terminal and Disc Utility
- After that, try to mount the disk and straightaway switch to Terminal
- Then, execute the following command in the terminal window –
sudo pkill –f fsck
- The disk will now mount in read-only mode
- You can now repair it by using First Aid in Disk Utility
- Wait patiently as repairing could take time
- Once it is done, it will fix the errors
Method 2: By using Terminal
- To start off, boot your Mac to Recovery Mode
- Press and hold the power button until the Loading Startup Options appear -> Select Options -> Continue
- After that, click Utilities and choose Terminal
- Type in the following command –
diskutil list
- It’ll bring a list of all disks
- Note down the disk’s volume identifier
- Lastly, execute the following command (replace diskX with the volume identifier that you noted above)
diskutil repairVolume/diskX
Method 3: Make changes to the Disk Allocation Size
Some older Macs will struggle to mount the drive if the allocation size is larger than 1024. For resolving this, you should head over to a Windows or Linux machine and reformat the drive in ExFAT. Then, choose “1024” as the allocation size. Now, you should try to mount it on your Mac and this time, you won’t be getting any error codes.
Conclusion
In short, the com.apple.DiskManagement.disenter error can be a frustrating problem for Mac users who have upgraded to MacOS Big Sur. Although the causes of the error are not specified, there are possible solutions that can be tried before resorting to wiping the drive and reinstalling MacOS. If all other options have been exhausted and there is no important data on the drive, or it has been successfully recovered, wiping and reinstalling MacOS in recovery mode may be the most effective solution. Remember to always back up your data before attempting any troubleshooting steps. Thank you for reading this guide, and please feel free to share your thoughts and experiences in the comment section down below the article.

Aviral Sharma is a talented and passionate writer who has been using words to express his thoughts ever since he learnt how to hold a pen. He is passionate about outer space, history, sports and most importantly technology. Aviral is a regular writer for rootmygalaxy.net and has been getting better by the day.
I can’t open my WD external drive after I reboot my mac with Monterey 12.1!
I know that so many people had a similar problem so I followed all those solutions, but they are not working for me. I need to get the documents back so I can`t erase my drive. (ps. don’t want to use disk drill).
I found this https://matt.sh/apfs-object-map-free-recovery looks like something might help me but I’m not a coding guy so I’m not able to follow
I tried «mount» in disk utility and I got the (com.apple.DiskManagement.disenter error 49218.)

When I run first aid in disk utility, I got this:

I checked the fsck , run ps aux | grep fsck but only get this
laijaco 4059 0.0 0.0 34122828 800 s000 S+ 11:12PM 0:00.00 grep fsck
In this guide, we will show you various methods to fix Diskmanagement.disenter error with error codes 119930868, 119930872, 49218, 49223, 0, etc. Many users have voiced their concern that they are unable to mount their external hard drives to their Mac. This issue is independent of the OS and has been reported across Big Sur, Monterey, and even Ventura.
Whenever they are trying to mount the disk using the Disk Utility, they are greeted with the Diskmanagement.disenter error along with one of the following error codes 119930868, 119930872, 49218, 49223, 0, etc. The inability of the users to access data on the unmounted external hard drive is causing them a great deal of inconvenience. If you are also in the same boat, then this guide will help you out. Follow along for the fixes.
It is recommended that you try out each of the below-mentioned workarounds and then see which one spells out success. So with that in mind, let’s get started. Droidwin and its members wouldn’t be held responsible in case of a thermonuclear war, your alarm doesn’t wake you up, or if anything happens to your Mac and data by performing the below steps.
FIX 1: Kill the fsck Process
One of the most common reasons for this error could be due to the fact that “fsck” might be holding it hostage. So you will have to kill this process and retry mounting the disk. Here’s how it could be done:
- To begin with, launch both Terminal and Disk Utility.
- Then try to mount the disk and straightaway switch to Terminal.
- Now execute the below command in the terminal window:
sudo pkill -f fsck
- The disk will mount in read-only mode. You could now repair it via First Aid in Disk Utility.
- The repairing will take time. Once done, it should fix the Diskmanagement.disenter error.
FIX 2: Using Terminal
- To begin with, boot your mac to Recovery Mode as instructed below:
Apple Silicon: Press and hold the power button until “Loading startup options” appear. Then select Options > Continue.
Intel: Restart your Mac and while doing so press and hold the Command+R shortcut keys.
- Then click Utilities and select Terminal. Now type in the below command:
diskutil list

- It will bring up a list of all disks. Note down your disk’s volume identifier [such as disk3s1].
- Finally, execute the below command [replace diskX with your volume identifier].
diskutil repairVolume/diskX
- Check if it fixes Diskmanagement.disenter error 119930868, 119930872, 49218, 49223, 0.
FIX 3: Change the Disk Allocation Size
Some older Macs wouldn’t be able to mount the drive if the allocation size is larger than 1024. So to resolve this, go to a Windows or Linux machine (or use a Virtual machine) and reformat the drive in ExFAT and select 1024 as the allocation size. Now try mounting it on your Mac and this time you wouldn’t get any error codes.
That’s it. These were the three methods that should help you fix the Diskmanagement.disenter error with error codes 119930868, 119930872, 49218, 49223, 0, etc. If you have any queries concerning the aforementioned steps, do let us know in the comments. We will get back to you with a solution at the earliest.
- No Disk to Install macOS: How to Fix
- Western Digital Hard Disk Drive disconnecting randomly on Mac [Fixed]
- Cannot Format Drive using Disk Utility in Mac: How to Fix
- Disk Not Ejected Properly message after waking Mac from Sleep [Fixed]
About Chief Editor

Sadique Hassan
administrator
A technical geek by birth, he always has a keen interest in the Android platform right since the birth of the HTC Dream. The open-source environment always seems to intrigue him with the plethora of options available at his fingertips. “MBA by profession, blogger by choice!”