
Did you get a com.apple.diskmanagement.disenter error when you tried to mount your external hard drive on Mac? This indicates a problem with either your external hard drive or macOS. Unfortunately, either case may lead to data loss – but don’t lose hope!
In this article, we’ll explore the possible reasons we encounter DiskManagement Distenter 49135 and how to fix it (without losing your data), as well as other common disk errors. Read on.
Need to recover data from the drive? Go to data recovery section ⤵
When you plug in your external hard drive, the system mounts it and makes its contents viewable in Finder. If it doesn’t show up there, you should still see it in Disk Utility (Finder > Applications > Utilities) where you can also attempt to mount it.
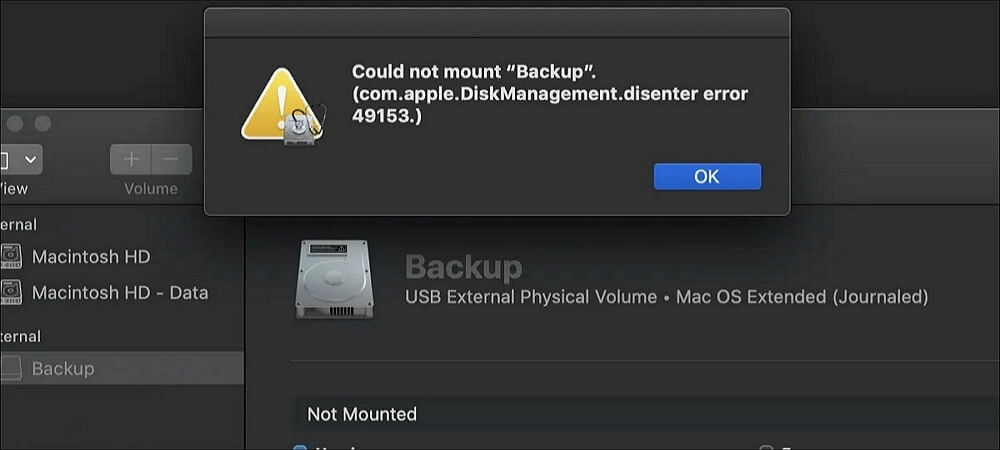
But there are cases when your external hard drive won’t mount, even using Disk Utility. In this scenario, you’ll probably encounter an error that says “Could not mount *name of the drive*”(com.apple.DiskManagement.disenter error 49513).
Several factors could lead to this problem. You may have an incompatible file system. Or, you may be using a Mac Superdrive while running macOS Catalina. Beyond those common reasons, error 49153 may occur simply due to malware, bugs, issues while resizing partitions and interference from local Time Machine backups.
Don’t worry – we’ll show you how to get rid of this pesky error in the next section.
How to Fix com.apple.diskmanagement.disenter error 49153?
There are several ways to address this specific error code, but most fixes can potentially harm your data. We suggest opening your external hard drive in read only mode and copying your files to a separate storage device or to the cloud.
To set your drive to read only mode, right-click your drive > Get Info and scroll down to Sharing and Permissions. Set your user’s privilege to Read only.
Method 1: Connect Your Drive to Another Mac
Disk Utility errors can be caused by either your drive or your Mac. To figure out which methods to try first, connect your drive to another Mac or even a PC. If your drive doesn’t work on other machines, then the problem likely lies with your drive.
If it works on another Mac, then your Mac might be experiencing glitches due to a faulty update or other issue. If it works on a PC, then it’s likely a formatting problem – we wrote more about that in the section of this article that covers other common DiskManagement Disenter errors.
Method 2: Restart your Mac
A temporary bug or glitch may have simply gotten macOS stuck while it attempted to recognize your drive. You may also have a lot of apps running in the background using up the resources macOS needs to properly recognize and mount your drive.
To get your system going, a simple restart might solve the problem. This will automatically close all running apps and reboot the operating system.
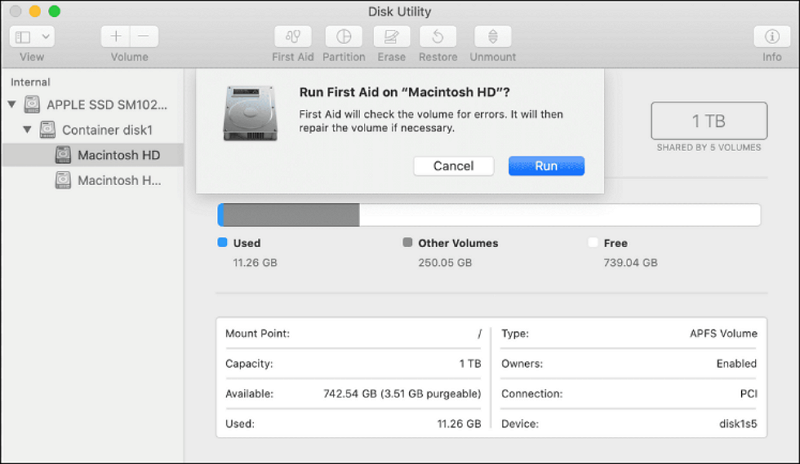
Method 3: Use First Aid in Disk Utility
First Aid is a useful tool that finds and repairs disk errors – specifically, it scans the drive and its partitions for issues related to its structure and formatting. These may prevent your drive from properly mounting.
Fortunately, First Aid is a feature of the Disk Utility app, which can recognize unmountable drives or partitions. To repair your drive using First Aid:
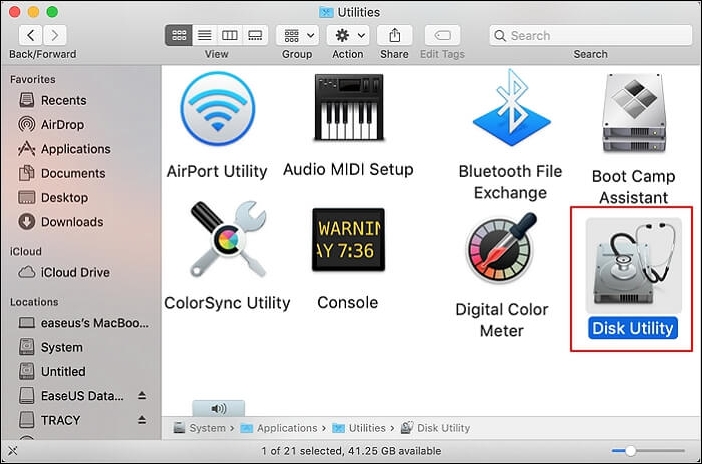
Step 1.Launch Disk Utility (Finder > Applications > Utilities).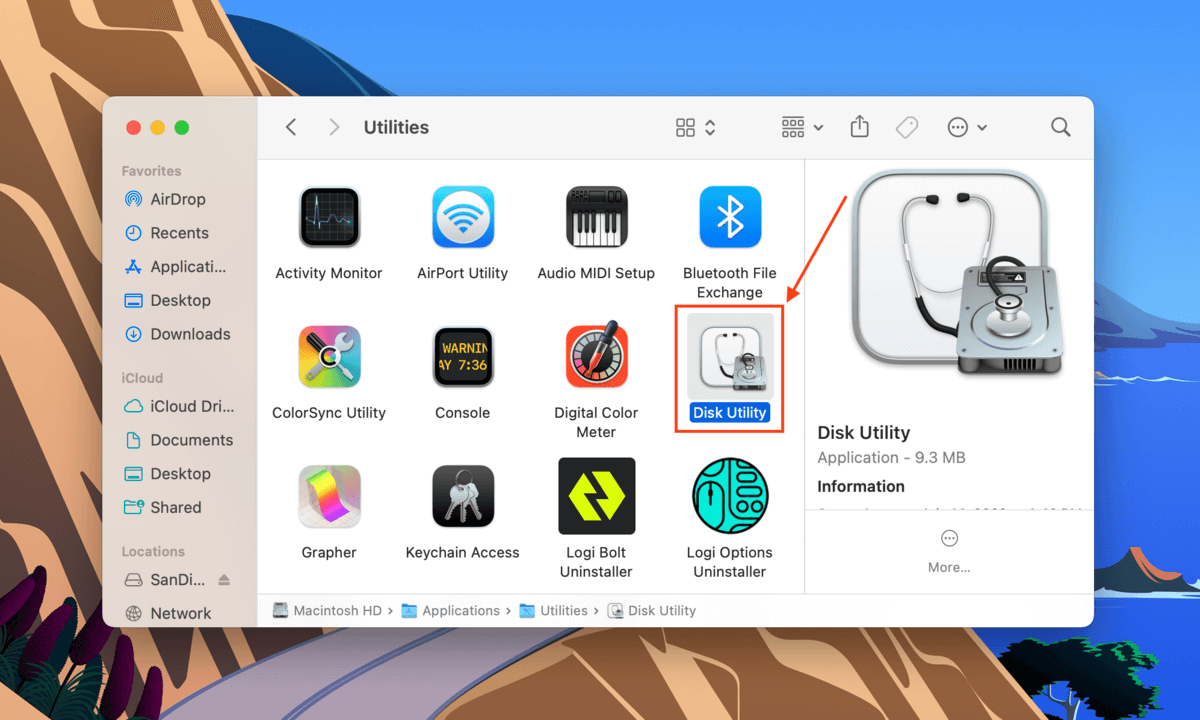
Step 2.Select your drive from the left sidebar, then click the First Aid button at the top of the window.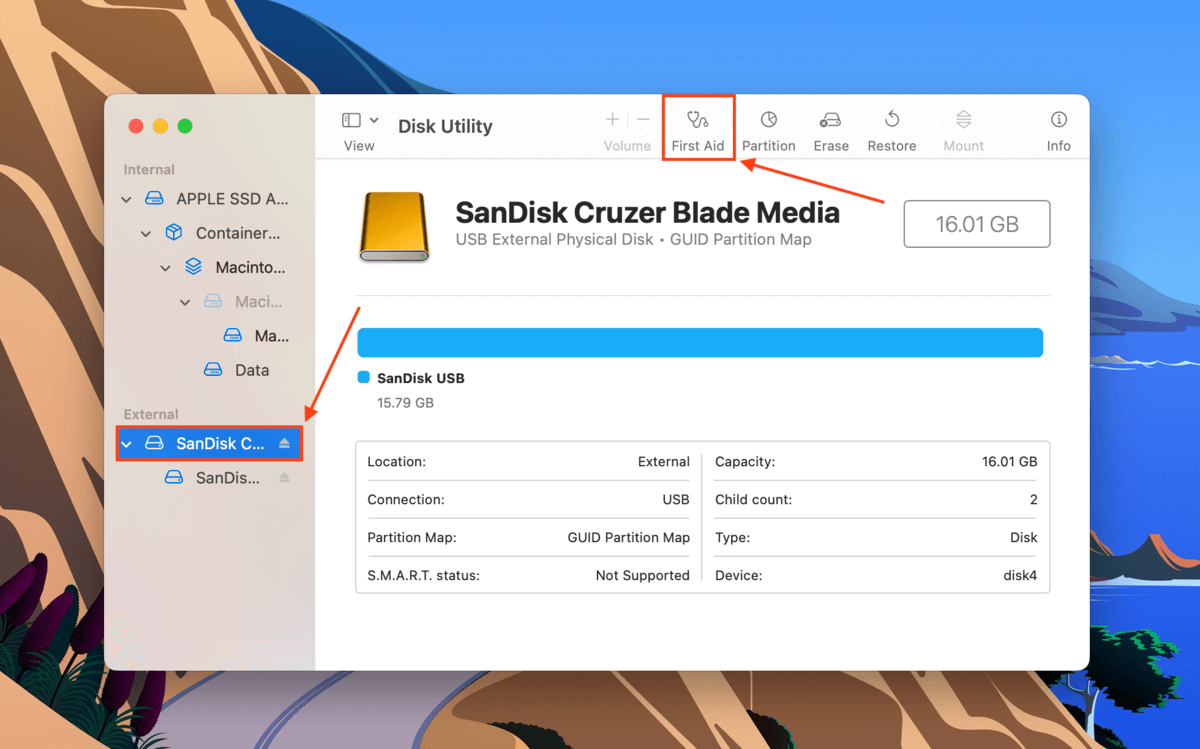
Step 3.In the dialogue box that appears, click Run.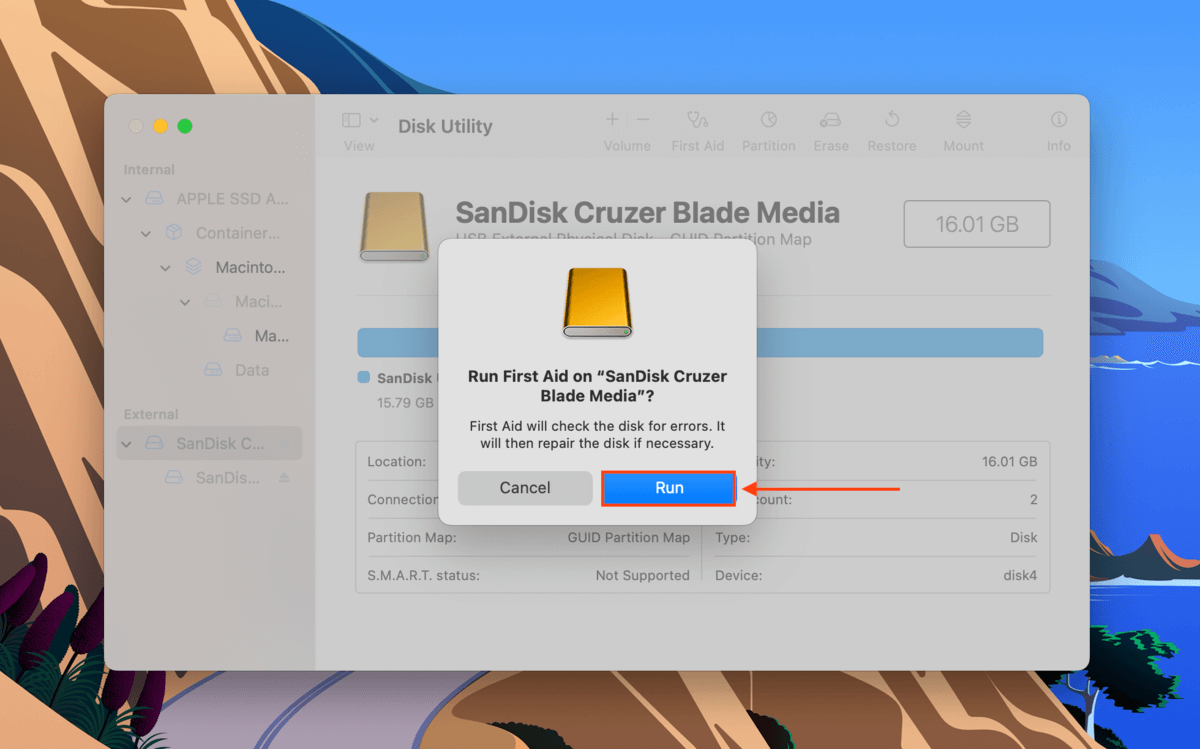
Step 4.Wait for the process to finish. Then, manually mount your hard drive in Disk Utility by selecting your drive or volume in the left sidebar and clicking the Mount button.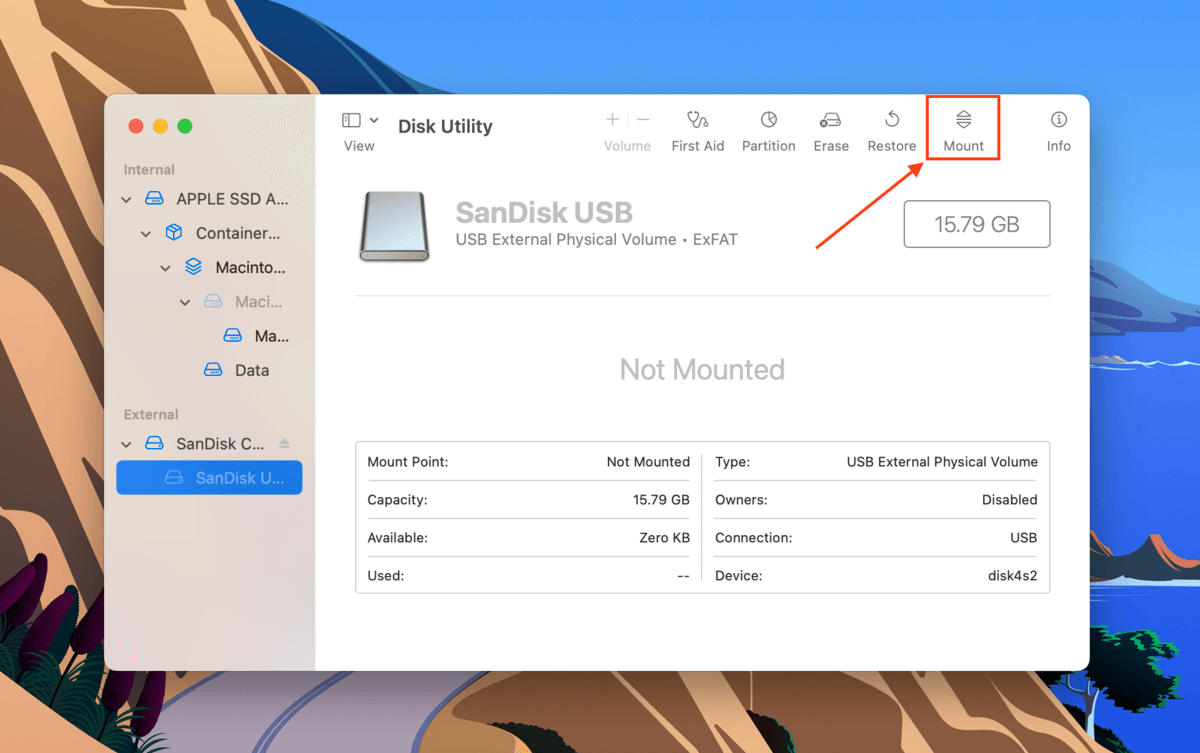
Method 4: Use the fsck Command in Single User Mode
Your external hard drive may not be mounting because of a file system issue. To resolve this problem, you can use Mac’s File System Check command or FSCK through Single User Mode. Here’s how:
Step 1.Enter Single User Mode. To do so, restart your Mac. As soon as it starts to reboot, press and hold the Power button and the CMD + S keys at the same time.
Step 2.You’ll know that you’ve successfully booted into Single User Mode when you see a window that looks like the Terminal app. Once the white text stops appearing, type the following command and hit Return.
/sbin/fsck -fy
Step 3.Once the process is complete, type reboot. This will command your Mac to restart itself.
If you remove your hard drive before ejecting it from Mac, fsck will automatically scan and repair it the next time you use it. This could potentially take a long time, which makes your drive unmountable. To deal with this, force quit the fsck command (Open the Activity Monitor > search fsck > click the x button).
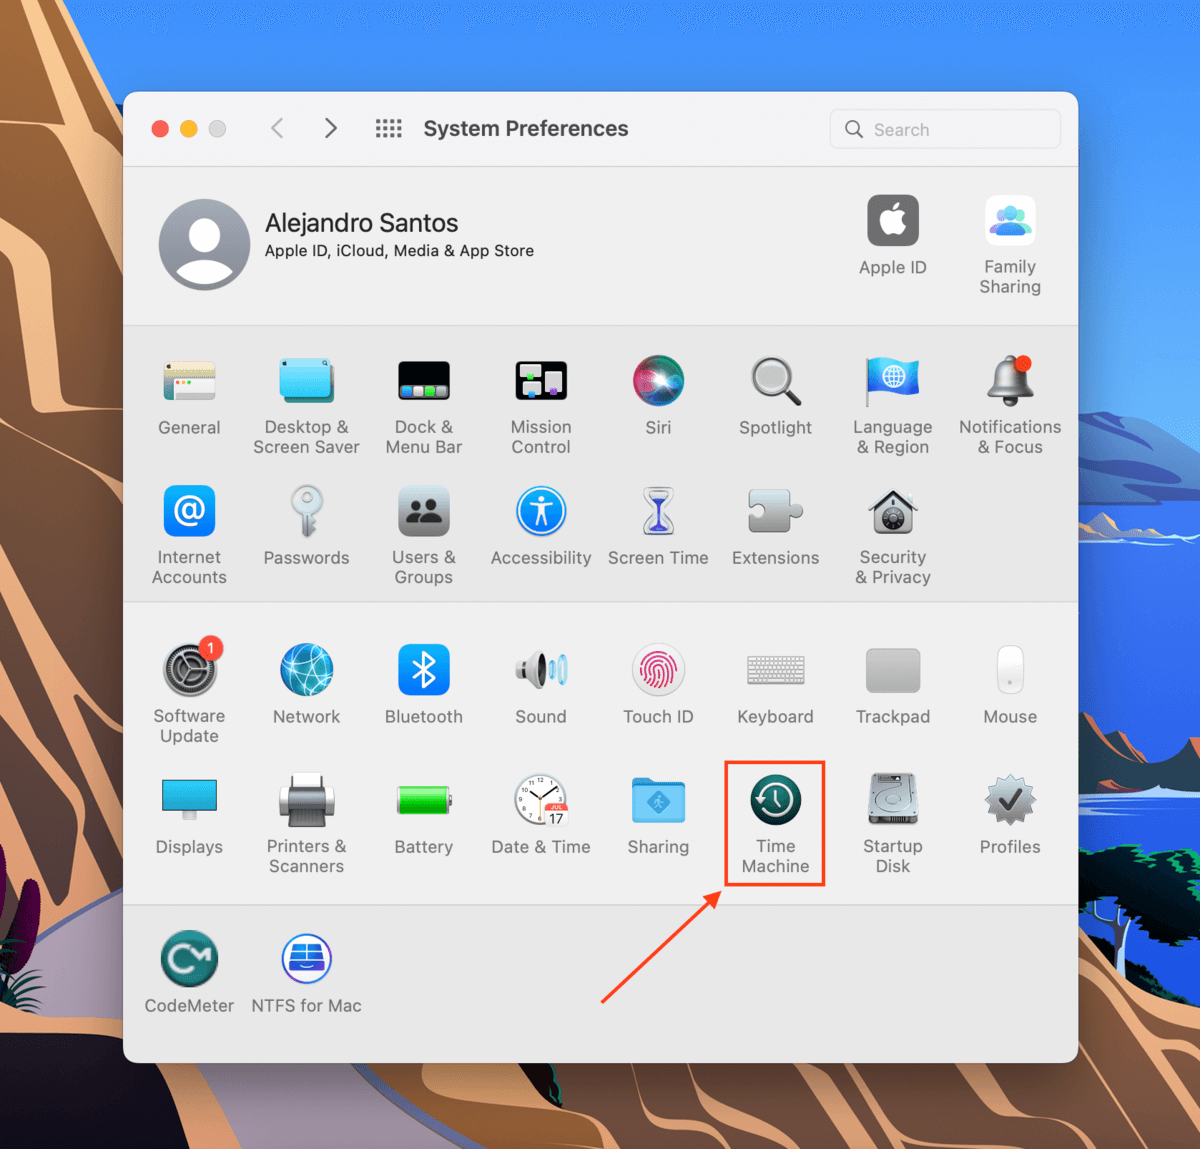
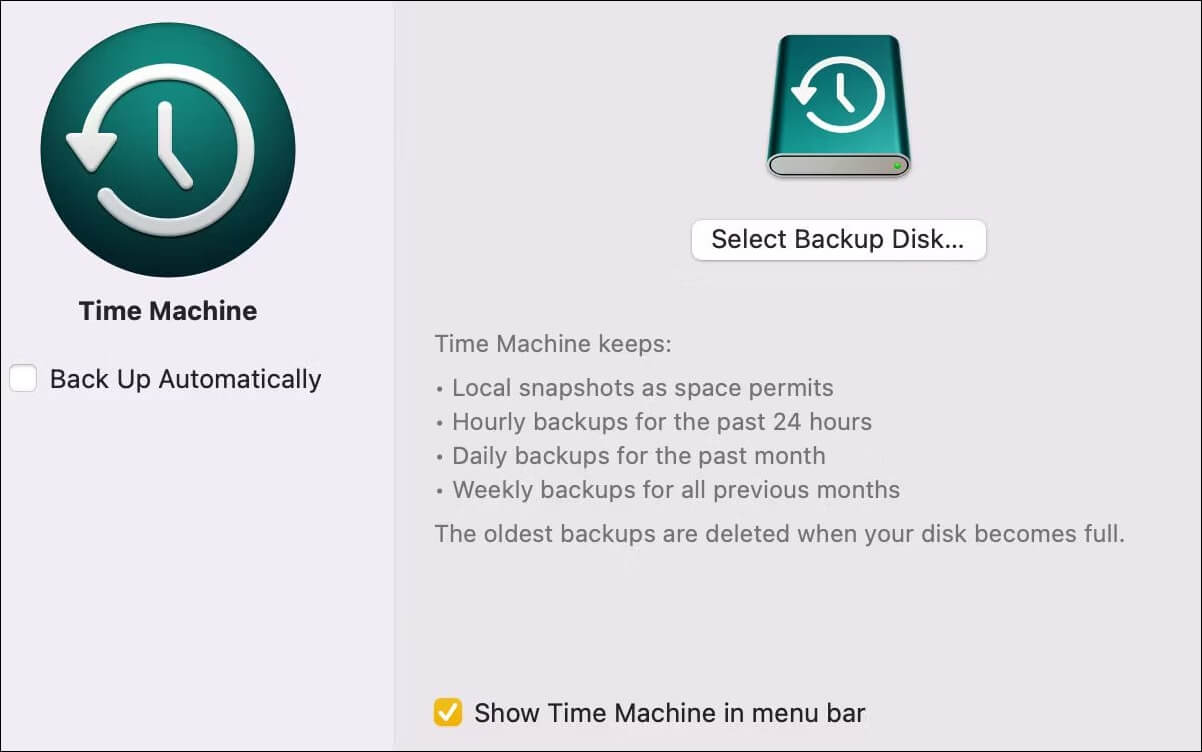
Method 5: Disable Time Machine
Time Machine is a Mac built-in tool that regularly backs up your data, usually automatically. It works well, but on bad days, it can cause the operating system to get stuck while preparing your backup drive. Try disabling Time Machine to free your drive from this process and hopefully allow it to get mounted.
To disable Time Machine, open its settings window by launching System Preferences > Time Machine.
Then, untick the box beside the Back Up Automatically setting.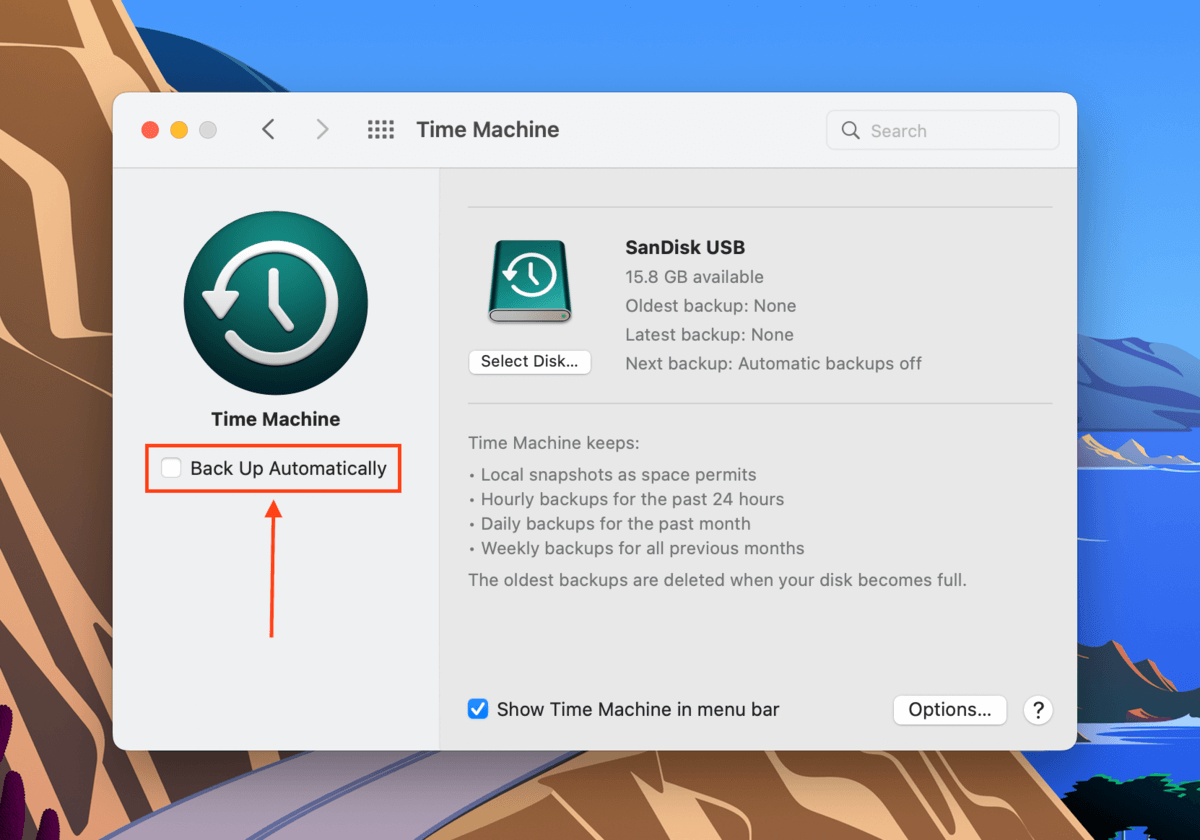
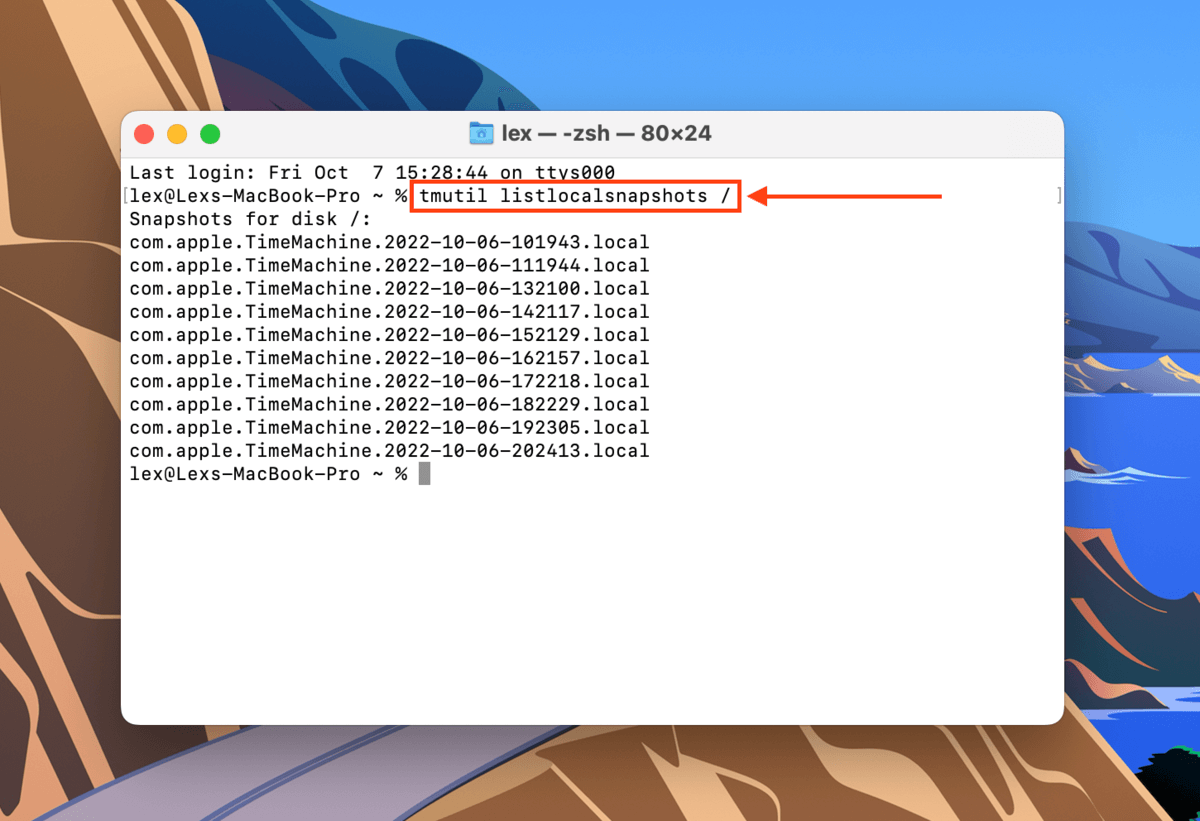
Method 6: Delete Time Machine snapshots using Terminal
Deleting Time Machine snapshots from your Mac may also resolve this disk utility error. Learn how to do it using the Terminal app by following the steps below:
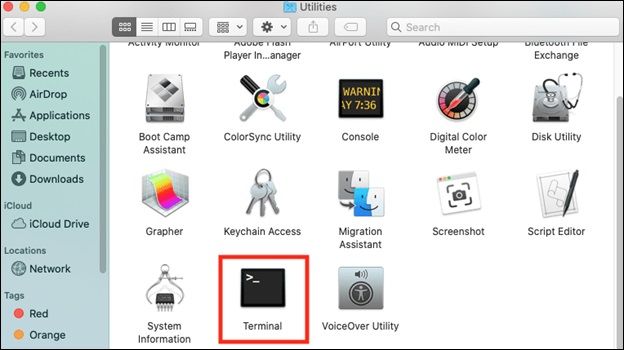
Step 1.Launch Terminal (Finder > Applications > Utilities > Terminal).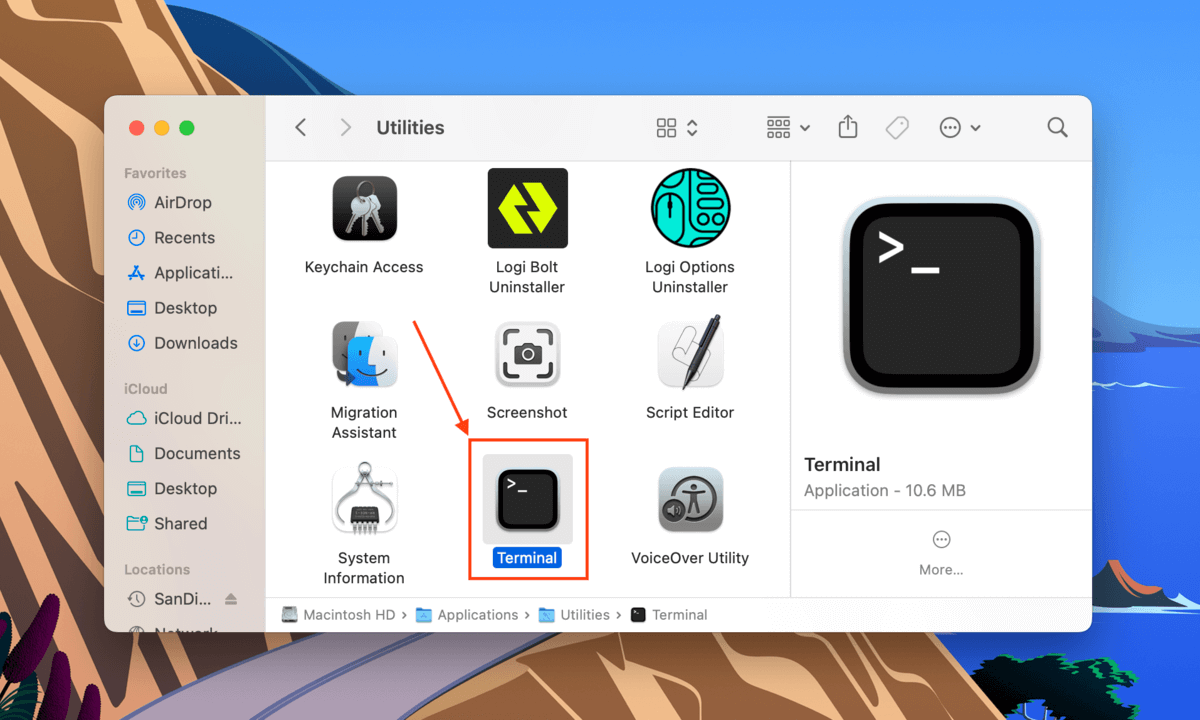
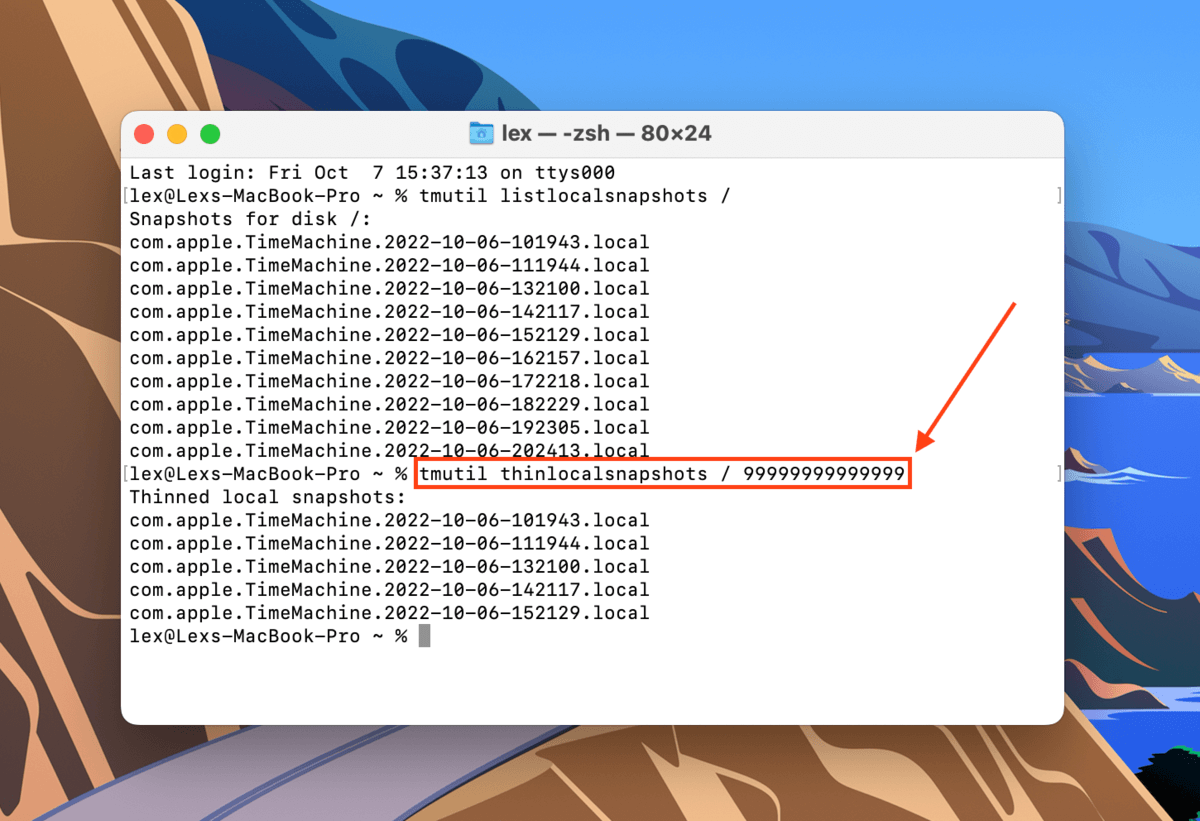
Step 2.The first command we’ll execute will list all locally stored Time Machine snapshots. Type the following command and hit Return:
Tmutil listlocalsnapshots /
Step 3.Type the following command and hit Return:
Tmutil thinlocalsnapshots /99999999999999
Step 4.Keep using the tmutil listlocalsnaphots and tmutil thinlocalsnapshots commands to make sure you delete all your snapshots.
Method 7: Format Your Drive
If all the above methods failed to get rid of the disk errors, your last resort is to format the drive. As we’ve already discussed earlier, formatting your drive will wipe the disk – including errors, viruses, corruption, and unfortunately, your data. We suggest copying your files to a secure location first.
To transfer your files safely, set your drive to read only mode first. To do this, read our pro tip in the introduction of this section.
Fortunately, formatting your drive on Mac is very easy thanks to the Disk Utility app. First, launch Disk Utility (Finder > Applications) and select your drive from the left sidebar. Then, click the Erase button on the top of the window.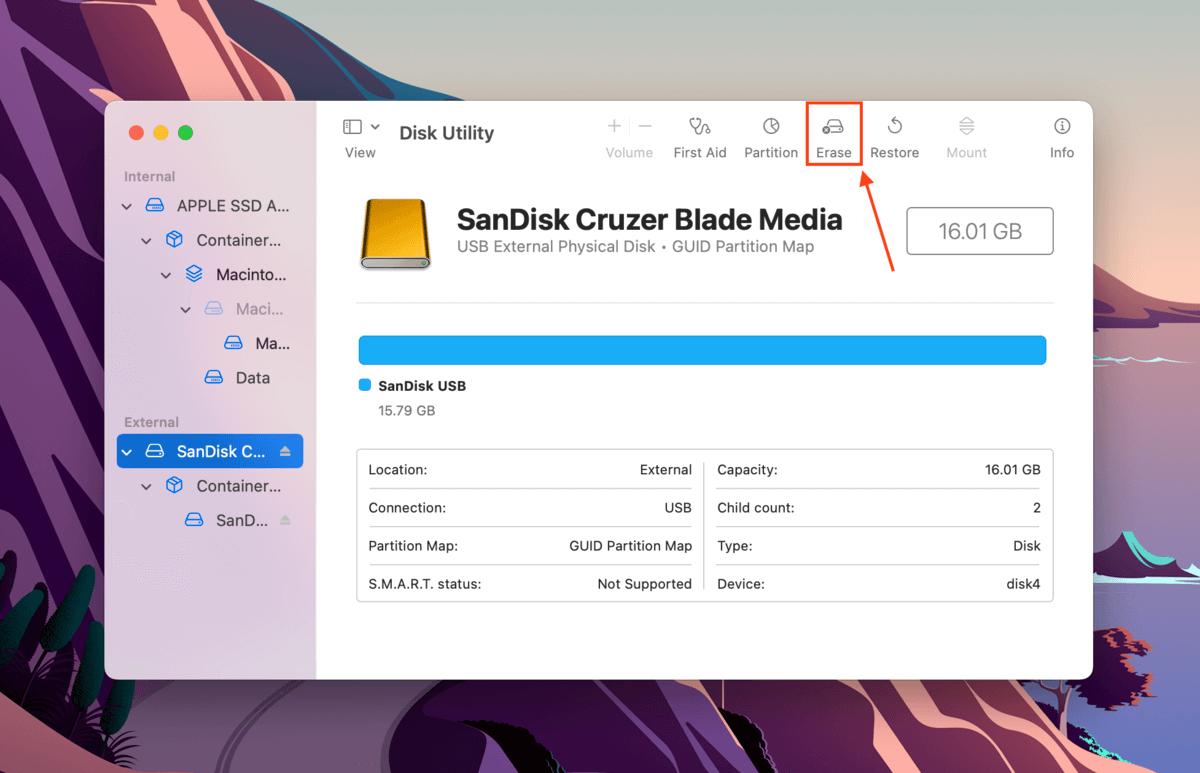
In the dialogue box that appears, name your drive and select a format. If you will only be using your drive with Mac computers, choose APFS. Otherwise, we suggest exFAT for maximum compatibility. Select GUID Partition Map for its scheme, then click Erase to proceed with the format.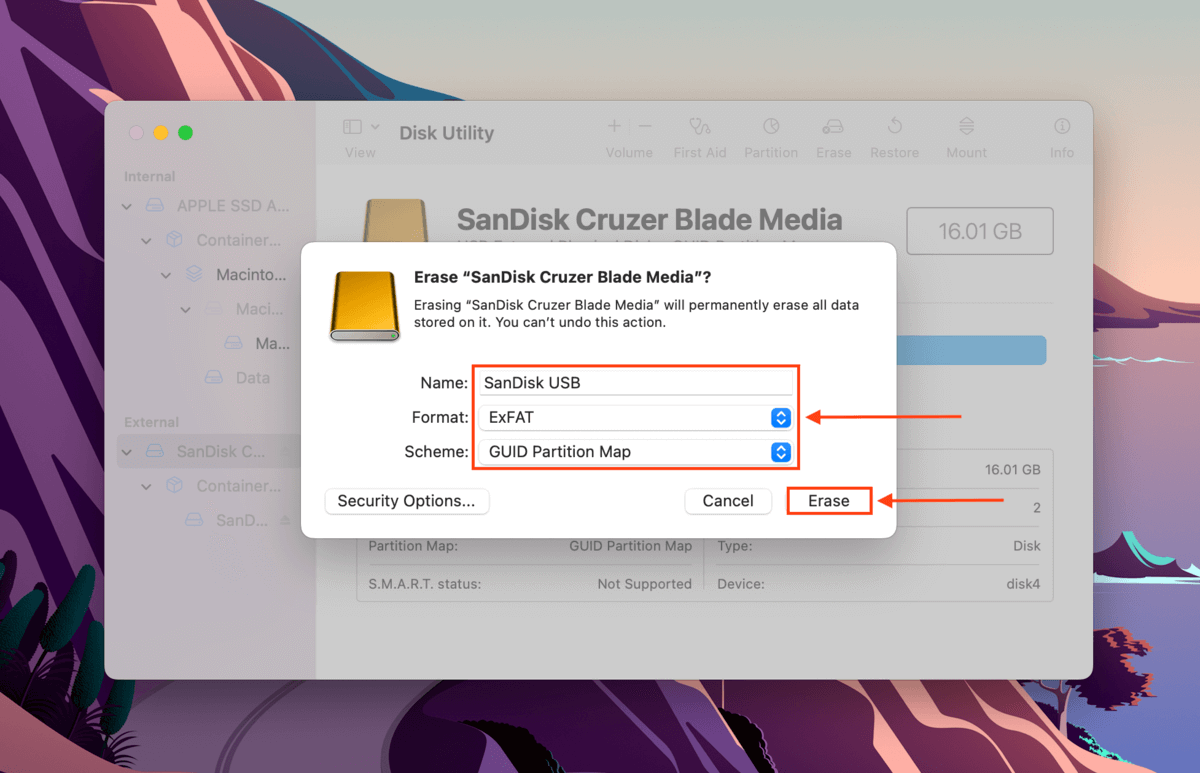
Other Types of DiskManagement Disenter Error
Aside from DiskManagement Disenter Error 49153, there are other DiskManagement Disenter errors that you may encounter that are represented by different codes. Below, we’ve listed the most common ones along with their solutions:
- DiskManagement Disenter Error 49223. An exFAT hard drive that’s been formatted using Windows can cause this error when connected to a Mac, as macOS doesn’t support all the storage block sizes available on Windows. This incompatibility makes MacOS unable to recognize and mount the drive.If you want to use this drive on both Mac and Windows, you need to format it using Mac (but first, back up your data!). If you intend to use it solely on Mac, we suggest formatting it to Apple-based APFS.
- DiskManagement Disenter Error 49221.This error is caused by a glitch in the security updates 2021-003 and 2022-003. After the update, you’ve probably tried to mount a NTFS hard drive in Disk Utility when you got this error. To fix this, reinstall macOS or use a third-party software to mount your NTFS drive.
- DiskManagement Disenter Error 49244. This error often appears when you try to mount your hard drive in Disk Utility while running macOS Catalina. You can use third-party software to mount your drive. If that doesn’t work, you need to format your drive to APFS (again, don’t forget to create a backup!).
- DiskManagement Disenter Error 49218. You might get this error when you remove a hard drive without proper ejection while using macOS Monterey. This error may also be caused by bugs from macOS Monterey itself.To fix it, (1) execute the sudo pkill -f command in the Terminal app, (2) execute the fsck /dev/disk_user_id/ command in single user mode, and finally (3) execute the mount -f /dev/disk_user_id/ command. Remember to replace “disk_user_id” with your disk’s identifier (diskutil list). To boot into single user mode, follow the first instruction in Method #4. If your drive still fails to work after this fix, you may need to format it.
- DiskManagement Disenter Error 49180. This error occurs when there’s a raw partition on the drive, which can happen if you connect an APFS drive to an old Mac or if something went wrong while you were shrinking your partition. You have two ways to address this error: (1) resize the external hard drive using Terminal or (2) format the hard drive altogether.
What to Do If You’d Lost Data After DiskManagement Disenter Error?
Disk Utility errors always have the potential to cause data loss and there’s no guarantee that your files will remain intact after fixing them. The safest and most efficient way to restore data caused by disk errors is to use data recovery software.
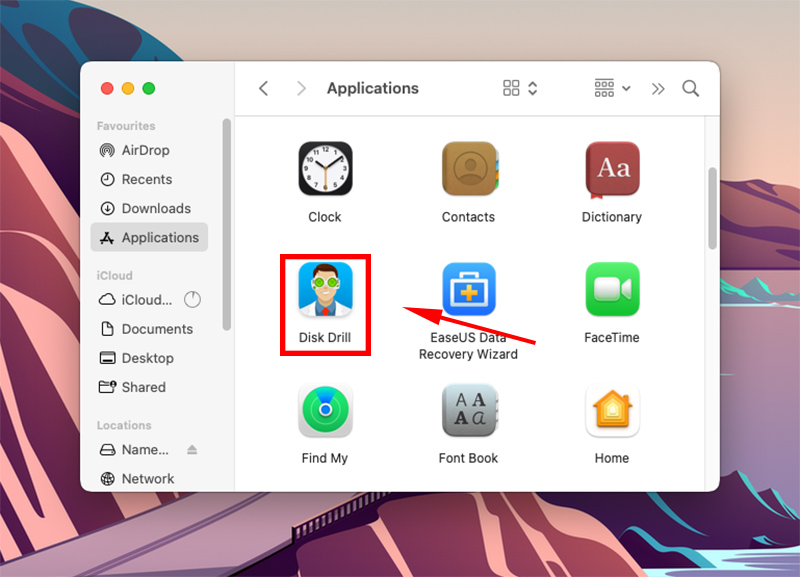
Data recovery software can restore files regardless of format – it will even work if you decided to format your drive due to the errors. For this article, we’ll be using a tool called Disk Drill. It’s easy to use and works with most disk formats, and it can restore data even from non-mounting drives. Here’s how to use it:
Disk Drill Basic for Mac does not offer free recovery. However, you can back up and preview your files for free. There are free data recovery solutions available on the internet, but they each have their own limitations – your mileage may vary.
Step 1.Download and install Disk Drill for Mac.
Step 2.Launch Disk Drill (Finder > Applications > Disk Drill).
Step 3.Select your drive from the middle pane and click Search for lost data.
Step 4.Wait for the scan to finish, then click Review found items.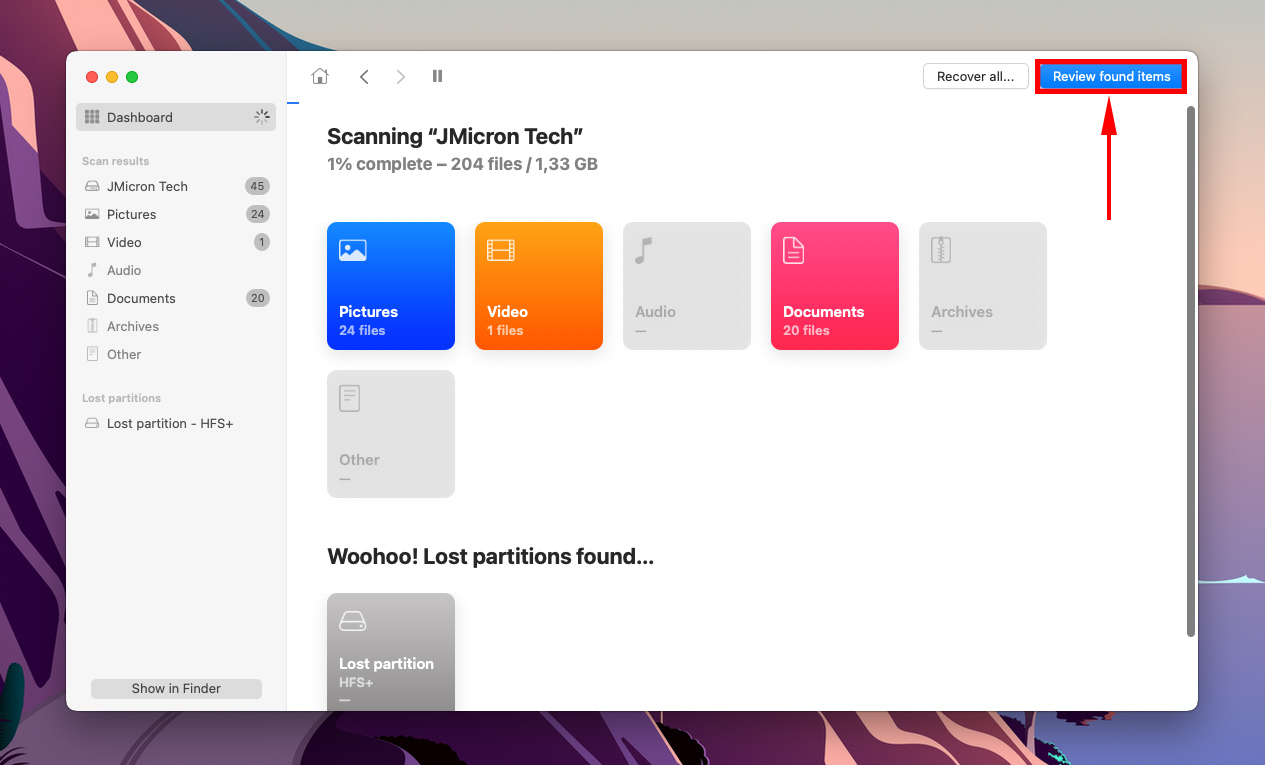
Step 5.Use the search bar to filter the results by name or by file extension, or use the left sidebar. You can also hover your mouse pointer beside any file to enable preview.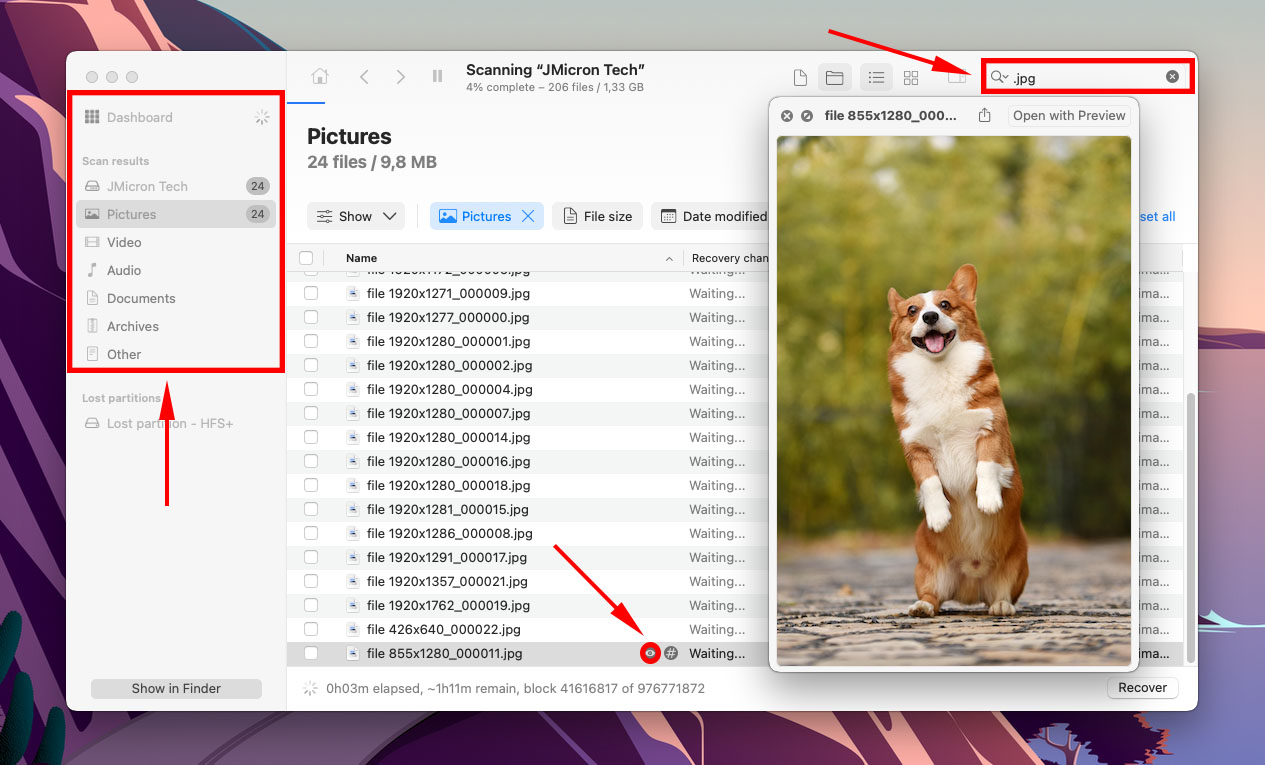
Step 6.Use the boxes in the left-most column to select the files you want to restore, then click Recover.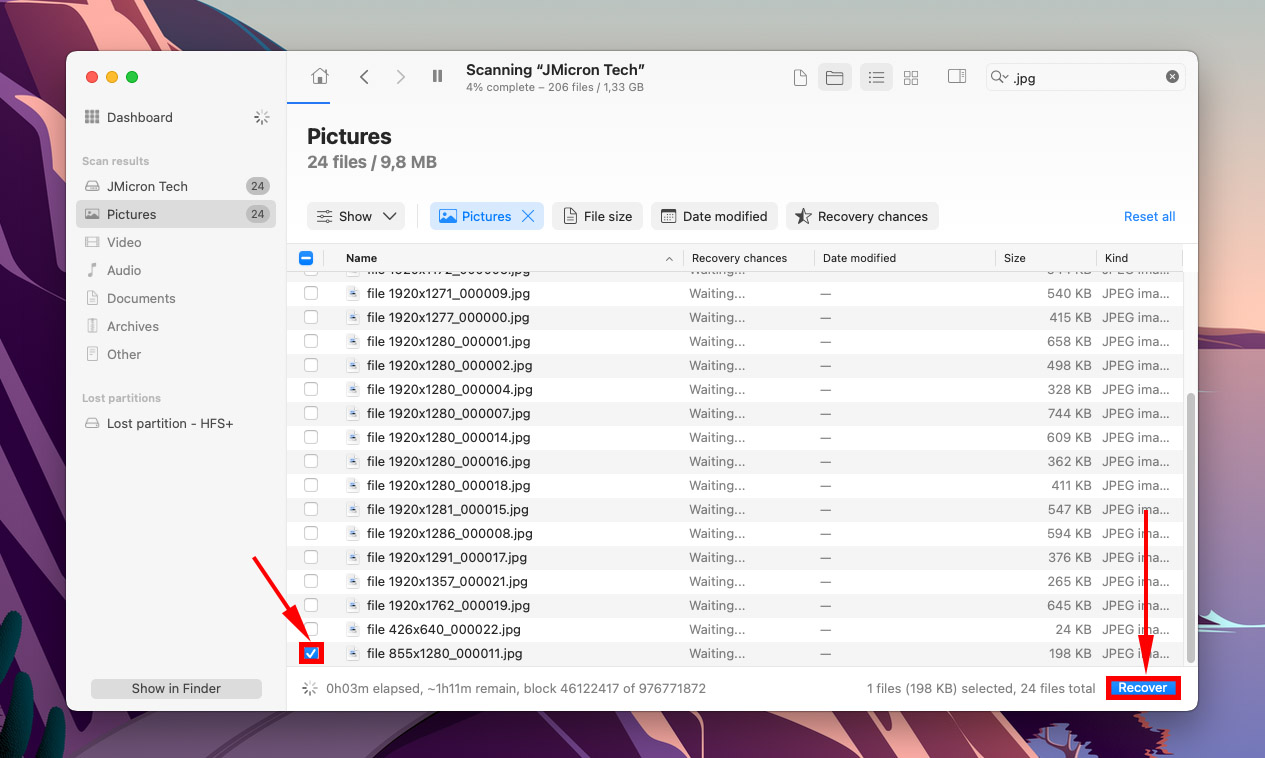
Step 7.Select a location on your non-malfunctioning drive to save the recovered files. Then, click Next.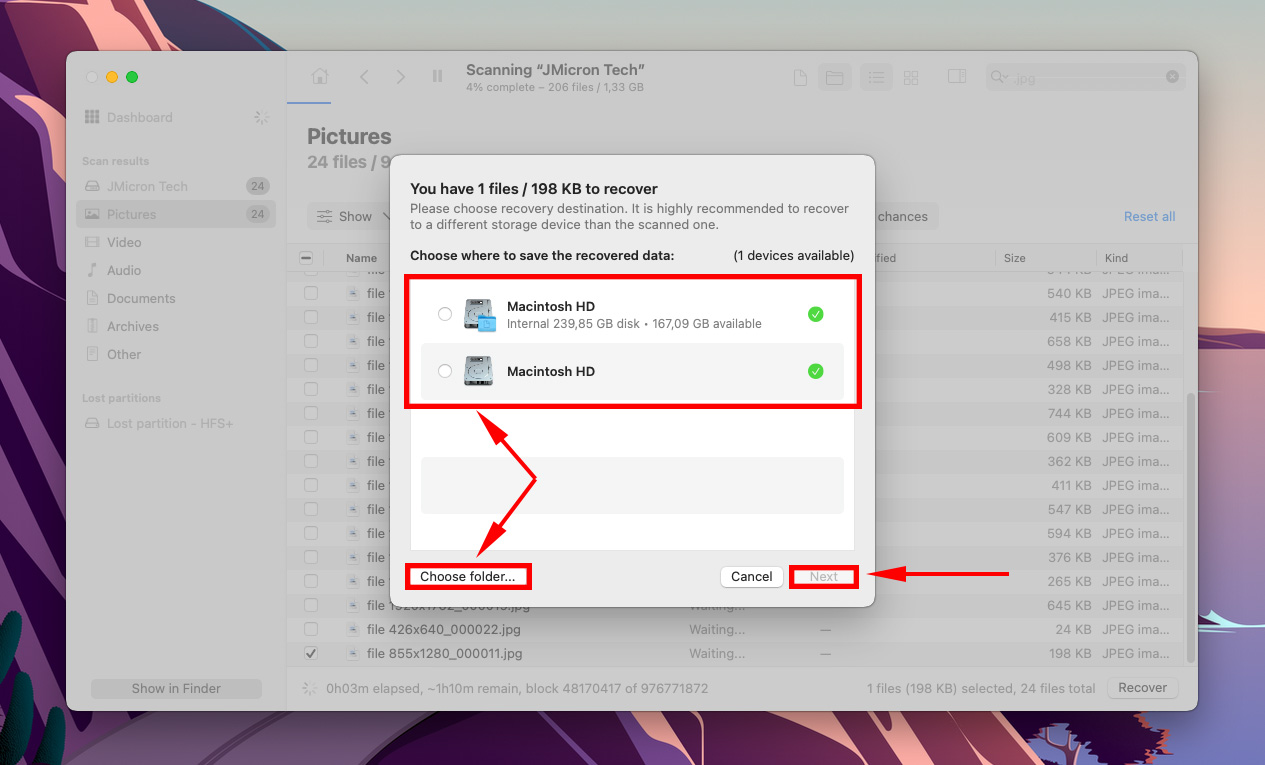
Conclusion
Bluntly, disk utility errors are inevitable. Buggy system updates, improper ejection, power surges, and other factors beyond the user’s control can cause one or multiple disk errors. Not only can these errors cause data loss by themselves, but the process of actually fixing them can also harm your files. The best you can do is to routinely back up your files to avoid the worst consequences of these errors.
Давным-давно Apple использовала файловую систему HFS +. Поскольку это уже известная файловая система, технологической компании потребовались десятилетия, чтобы обновить ее. Только в 2017 году Apple наконец выпустила обновленную версию HFS +, в которой были улучшены шифрование, распределение пространства и целостность файлов. Ее удачно назвали файловой системой Apple или APFS.
Хотя новая файловая система казалась идеальной, некоторые конечные пользователи столкнулись с неожиданными проблемами и несовместимостью. Одна из них — ошибка 49153 com.apple.DiskManagement.disenter.
Что такое ошибка com.apple.DiskManagement.disenter 49153?
Ошибка 49153 com.apple.DiskManagement.disenter — это ошибка, которая появляется после сбой сжимающегося раздела. Сообщается, что пользователи видели ошибку после сжатия раздела с помощью Дисковой утилиты.
Хотя существует множество возможных причин ошибки 49153 com.apple.DiskManagement.disenter, например вредоносные объекты и системный мусор, эксперты предполагают, что основными виновниками являются локально сохраненные снимки резервных копий Time Machine в системном разделе.
Как исправить ошибку com.apple.DiskManagement.disenter 49153
Перед тем, как попробовать любое из приведенных ниже решений, мы рекомендуем сначала создать резервную копию вашей системы. Это позволит вам быстро восстановить файлы в случае появления новых ошибок.
Теперь, если вы столкнетесь с ошибкой 49153 com.apple.DiskManagement.disenter, вот несколько решений, которые вы можете Попробуйте:
Решение №1: Отключите Time Machine
Как уже упоминалось, Time Machine является возможной причиной ошибки 49153 com.apple.DiskManagement.disenter. Таким образом, отключение может просто решить проблему.
Чтобы выключить Time Machine, выполните следующие действия:
Решение №2. Перезагрузите Mac в однопользовательском режиме и используйте FSCK.
На вашем Mac есть встроенный инструмент, который можно использовать для исправить любые проблемы с файловой системой. Это называется проверкой файловой системы или FSCK.
Чтобы использовать FSCK, выполните следующие действия:
Решение № 3. Используйте сторонний инструмент для восстановления Mac.
При условии, что первые два решения выше не помогли исправить ошибку 49153 com.apple.DiskManagement.disenter, вы можете попробовать использовать сторонний инструмент для восстановления Mac, например приложение для ремонта Mac.
MacRepair позволяет вашему Mac работать быстрее и эффективнее, очищая ценное системное пространство, избавляясь от разного рода системного мусора и оптимизируя оперативную память, чтобы освободить место для более важных процессов и приложений.
Помимо MacRepair, есть есть множество других онлайн-инструментов. Некоторые из них доступны бесплатно, другие — по определенной цене. Но независимо от вашего выбора имейте в виду, что вы получаете то, за что платите. Если вы инвестируете в дешевый или бесплатный инструмент, есть вероятность, что ему нельзя доверять, и никогда не безопасно доверять свои ценные данные ненадежному инструменту, верно?
Решение №4: начать сеанс терминала
Использование утилиты «Терминал» может исправить ошибку com.apple.DiskManagement.disenter 49153, с которой вы можете столкнуться.
Вот подробное руководство о том, что делать:
Решение №5: Обратитесь к специалистам.
Если вы имеете дело с критически важными данными и не можете позволить себе подвергать их риску, или вы просто не работаете с ними. уверенный в своих навыках поиска и устранения неисправностей, лучше всего обратиться за помощью к профессионалам. Посетите ближайший ремонтный центр Apple и обратитесь к сертифицированному специалисту для проверки вашего Mac.
Резюме
Вначале может быть сложно разобраться с ошибкой com.apple.DiskManagement.disenter 49153. Однако, если вы будете следовать решениям шаг за шагом, вы поймете, что процесс довольно прост.
Какое из приведенных выше решений позволило устранить ошибку 49153 com.apple.DiskManagement.disenter? Вы знаете другие способы исправить это? Не стесняйтесь обращаться к нам через раздел комментариев ниже!
YouTube видео: Как исправить ошибку 49153 com.apple.DiskManagement.disenter
09, 2023
Reading time: 3 Minutes
Apple developed the HFS+ file system, but it took decades for the company to update it. In 2017, Apple finally released an updated version called APFS with improvements to encryption, space allocation, and file integrity.
While the new file system seemed perfect, some end users have run into unexpected issues and incompatibilities. One of which is the com.apple.DiskManagement.disenter error 49153.
What is com.apple.DiskManagement.disenter Error 49153?
The com.apple.DiskManagement.disenter error 49153 is an error that surfaces after a shrinking partition failure. Users have reportedly seen the error after performing a partition shrink using Disk Utility.
Experts suggest that one of the primary causes of the com.apple.DiskManagement.disenter error 49153 are the locally stored snapshots of Time Machine backups on the system partition, even though other possible factors could include malware entities and system junk.
How to Fix com.apple.DiskManagement.disenter Error 49153
Before you try any of the solutions below, we suggest that you back up your system first. This will allow you to quickly recover your files in the event that more errors surface along the way.
Now, if you come across the com.apple.DiskManagement.disenter error 49153, here are some solutions you can try:
Solution #1: Turn Off Time Machine
As mentioned, Time Machine is a possible culprit for the com.apple.DiskManagement.disenter error 49153. So, turning it off might just resolve the problem.
To turn off Time Machine, here’s what you should do:
- Go to System Preferences.
- Select Time Machine.
- Untick the Backup Automatically option.
Solution #2: Restart Your Mac in Single User Mode and Use FSCK
Your Mac comes equipped with a built-in tool called the File System Check (FSCK), which can be used to diagnose and repair file system issues.
To use FSCK, follow these steps:
- Reboot your Mac into Single User Mode. You can do it by long-pressing the Power button and holding down the CMD + S keys while your Mac is booting.
- The moment the Command Prompt screen shows, input the /sbin/fsck -fy Hit Enter.
- Next, input reboot into the command line to restart your Mac.
- Check if your Mac reboots in a normal fashion. If it does not, try the next solution.
Solution #3: Use a Third-Party Mac Repair Tool
Provided that the first two solutions above did not work to fix the com.apple.DiskManagement.disenter error 49153, you may try to use a third-party Mac repair tool like Mac repair app.
macAries is designed to enhance your Mac’s performance by freeing up valuable system space, eliminating various forms of system junk, and optimizing RAM to allow for more crucial processes and apps.
Aside from macAries, there are plenty of other tools online. While some are available for free, others come at a certain price. Regardless of your choice, remember that quality often aligns with cost. While some affordable or free tools may be trustworthy, others may not. Always ensure that any tool you use is reliable, especially when handling your valuable data.
Solution #4: Start a Terminal Session
Using the Terminal utility can fix the com.apple.DiskManagement.disenter error 49153 you might be facing.
Here is a detailed guide on what to do:
- Launch Terminal.
- Into the command line, input tmutil listlocalsnapshots. This command will compile a list of all Time Machine snapshots for a certain partition.
- Next, input tmutil thinlocalsnapshots /99999999999999 to delete any recorded snapshots.
- Finally, check if the snapshots are completely gone by entering the tmutil listlocalsnaphots into the comand line again.
Solution #5: Contact Professionals.
If you are dealing with critical data and you cannot afford to put them at risk, or you simply aren’t confident with your troubleshooting skills, your best resort is to seek help from professionals. Visit the nearest Apple Repair Center and have your Mac checked by a certified technician.
Summary
It might be challenging to deal with the com.apple.DiskManagement.disenter error 49153 at the beginning. However, if you follow the solutions step-by-step, you’ll realize that the process is quite simple.
Which of the solutions above resolved the com.apple.DiskManagement.disenter error 49153? Do you know other ways to fix it? Feel free to reach us via the comments section below!
Give us some love and rate our post!
Looks like no one’s replied in a while. To start the conversation again, simply
ask a new question.
When I try to connect the Apple SuperDrive or an external DVD drive and try to read a CD-ROM, I can see the drive in Disk Utility but the drive won’t mount the disc. It gives the error, «Could not mount «name of disc». (com.apple.DiskManagement.disenter error 49153.)
I have content on this CD that I would like to preserve. It is a problem that the drives won’t mount so I can access the disc in Finder.
MacBook Pro 15″,
macOS 10.15
Posted on Nov 6, 2019 8:16 PM
com.apple.DiskManagement.disenter error 49153
Encountering the «com.apple.DiskManagement.disenter error 49153» while attempting to mount your external hard drive on your Mac can be quite disheartening.
This enigmatic error, often represented by the code 49135, indicates a problem with your cherished external drive or the macOS itself. At the same time, the specter of data loss looms; despair not! This article will explore why you might see the com.apple.diskmanagement.disenter error 49135 when using an external hard drive on your Mac.
We’ll also guide you through the steps to fix this issue and get your important data back, all without any complications.
| Workable Solutions | Step-by-step Troubleshooting |
|---|---|
| Fix 1. Restart Your Mac | Click the Apple menu at the top, and choose the Restart option to restart your Mac…Full steps |
| Fix 2. Run First Aid in Disk Utility | Initiate Disk Utility by navigating to Applications > Utilities, and identify your drive on the left…Full steps |
| Fix 3. Use Terminal in Single User Mode | Access Single User Mode, and press and hold the Power button and the Command + S…Full steps |
| Fix 4. Disable Time Machine | Stop the Time Machine process to enable your drive’s mounting and fix this error…Full steps |
| Other Effective Fixes | Delete Time Machine snapshots or format your drive to fix the error 49153…Full steps |
Just like the com.apple.DiskManagement.disenter error 49244 on Mac; the error 49153 can be fixed. Before fixing it, come along as we uncover the reasons behind this problem and help you solve it, making your digital life smoother again.
The error 49153 emerges due to complex interactions within the Disk Management framework. To resolve it effectively, one must delve into the potential reasons behind its occurrence.
⚠️Corrupted System Files and Directories
One plausible cause of error 49153 is the presence of corrupted or missing critical system files. Disk Management heavily relies on these files to function smoothly. When they are compromised, an error can emerge. Fixing corrupted files on Mac can solve error 49153.
❌Incompatible Software Installations
Conflicts arising from incompatible software installations can disrupt the harmony of Disk Management. If newly installed software clashes with existing components, error 49153 might manifest. Software incompatibility also leads to Sonoma installer failure.
💾Insufficient Disk Space
Insufficient disk space poses another potential trigger for this error. Disk Management requires ample space to execute its operations seamlessly. When space is lacking, or Mac deleted files not freeing space, error 49153 could appear.
😰Hardware Issues
Underlying hardware problems can also contribute to this error. Failing hard drives or malfunctioning disk sectors can disrupt the communication between the operating system and Disk Management, resulting in error 49153.
⛔Improper Permissions and Security Settings
Incorrect permissions or security settings can impede Disk Management’s functions, leading to error 49153. Proper permissions are vital for the smooth execution of disk-related tasks.
How to Fix com.apple.DiskManagement.disenter error 49153
After examining the potential causes behind the «com.apple.DiskManagement.disenter error 49153», let’s delve into actionable solutions. Users can regain optimal functionality in their Ventura and Sonoma systems by systematically addressing these remedies.
For a clearer understanding of the process and to assist you further, we have included a helpful video guide. Be sure to watch the video to ensure a smooth formatting process. Here are some of its parts to help you out with the problem:
- 00:00 — Introduction
- 02:03 — Drive sets to APFS format by default
- 02:49 — Two partitions of external HDD
Fix 1. Restart Your Mac to Fix Mac Error 49153
Rebooting a Mac or force restarting a Mac can effectively address various minor issues. If you still need to attempt this, consider initiating a reboot of your Mac. Click the Apple menu and select the «Restart» option.

Begin by safely ejecting the unmountable drive and disconnecting it from your Mac. Afterward, proceed to restart your Mac and then reconnect the problematic drive. This simple procedure is often a practical solution for resolving common glitches.
Fix 2. Run First Aid in Disk Utility
To resolve this issue, consider the option of repairing your drive using Disk Utility. Check the steps below:
Step 1. Initiate «Disk Utility» by navigating to «Finder > Applications > Utilities».
Step 2. Identify your drive in the left sidebar and tap the «First Aid» button at the window’s top section.
Step 3. Upon encountering the dialogue box, activate the «Run» option.
Step 4. Subsequently, take the step of manually mounting your hard drive within Disk Utility. It involves choosing your drive or volume from the left sidebar and selecting the «Mount» button.
No worry if you encounter this «couldn’t unmount disk 69888» error on your Mac! This article will solve the unmountable error 69888.

Couldn’t Unmount Disk 69888 on Mac | Top 6 Methods to Fix
This article will discuss 6 effective methods to fix the couldn’t unmount disk 69888 error on Mac. Read more >>
Fix 3. Use Terminal in Single User Mode
To use the Terminal in single-user mode, you must follow these steps:
Step 1. Access «Single User Mode» by restarting your Mac.

Step 2. After that, press and hold the Power button and the «Command + S» keys together.
Step 3. You are in Single User Mode when a window resembling the Terminal app appears. Wait for the continuous white text to halt, then input the subsequent command /sbin/fsck -fy and press «Return».
Step 4. Enter the command reboot after the process wraps up. Your Mac will receive the instruction to restart itself.
Fix 4. Disable Time Machine to Fix Error 49153
You can also stop the Time Machine process to enable your drive’s mounting and fix this error. To do this, you must access Time Machine’s settings by opening System Preferences and selecting Time Machine. From there, deselect the checkbox next to the «Back Up Automatically» option.
Share this article on social media to help others learn more about how to fix the «com.apple.DiskManagement.disenter error 49153» on Mac.
Fix 5. Delete Time Machine Snapshots
You might resolve this disk utility error by erasing Time Machine snapshots from your Mac. Follow these instructions to do so using the Terminal app:
Step 1. Open Terminal.
Step 2. Commence by displaying a list of locally stored Time Machine snapshots. Input the provided command and press the «Return» key:
tmutil listlocalsnapshots /
Step 3. Execute the next command by typing it and pressing «Return»:
tmutil thinlocalsnapshots /99999999999999
Step 4. Repeatedly use these commands to ensure the deletion of all your snapshots.
Fix 6. Format Drive to Fix Diskmanagement Disenter Error 49153
Before formatting an internal hard drive on a Mac, it’s crucial to recognize that this action will erase all of your existing data. Safeguarding your files by creating a backup is an essential initial step.
EaseUS Data Recovery Wizard for Mac comes to the rescue in such unfortunate scenarios, which can help you recover formatted hard drives on Mac.
This professional data recovery tool specializes in recovering permanently deleted files on Mac from various situations, whether due to errors, accidental deletions, emptied Trash Bins, or other causes. With a few simple steps, you can easily retrieve your valuable files and breathe easily.
🏆Key Features of EaseUS Data Recovery Wizard for Mac
- Recover deleted photos on Mac, and retrieve videos, music, documents, emails, etc.
- Support various Mac devices like HDD, SSD, and SD card recovery on Mac.
- Supports restore files without Time Machine backups or iCloud Drive.
Using the powerful EaseUS recovery tool to back up your essential data first:
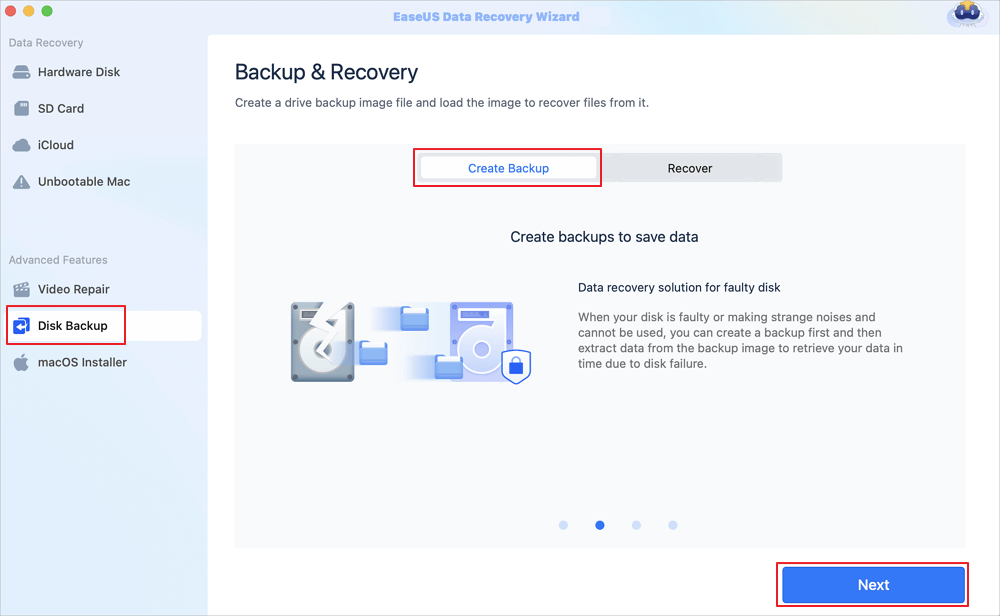
Step 1. Click «Disk Backup» > «Create Backup» > «Next» in EaseUS Data Recovery Wizard for Mac’s main interface. You can create a drive backup image file in case the data is overwritten.
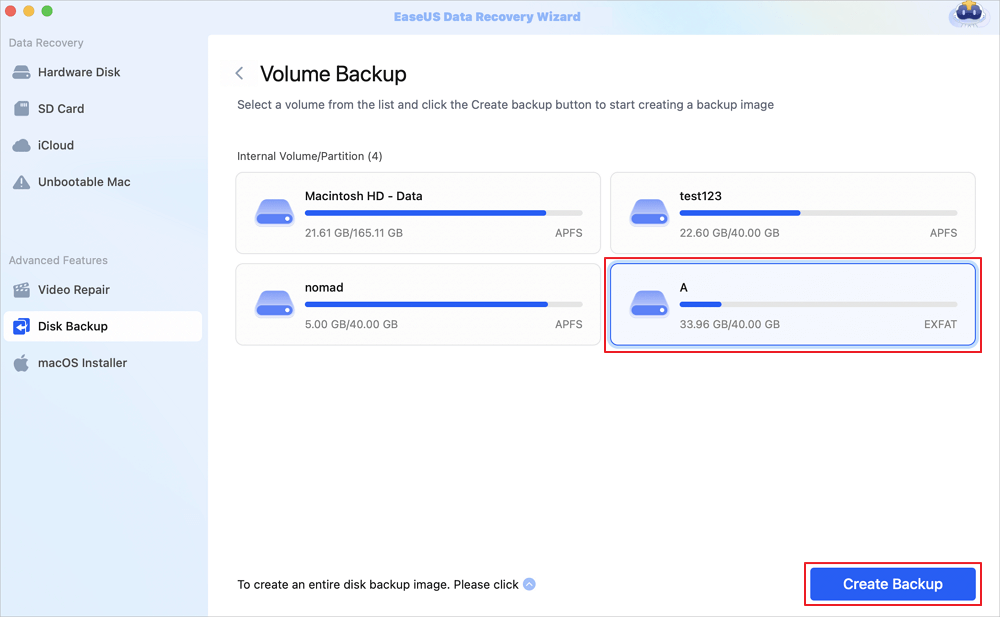
Step 2. Select an internal volume to back up, and click «Create Backup». If you want to create backups and recover data from an external hard drive, USB flash drive, or SD card, remember to connect the storage device to your Mac in advance.
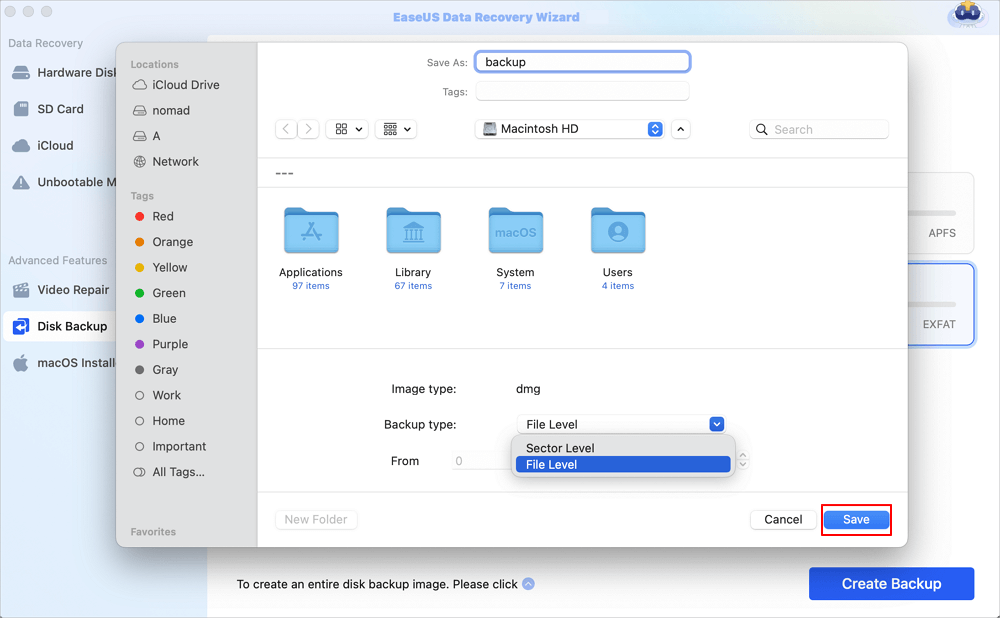
Step 3. Choose a place to save your backup files, and change the name of your backup file, then click «Save». It is not wise to save backups in the same storage device that you want to recover data from.
After backing up your essential data, check the steps below to format your hard drive on Mac:
Step 1. Launch the «Disk Utility» application. Locate your target drive in the left sidebar of the Disk Utility window.
Step 2. At the top of the window, locate and click the «Erase» button to initiate the formatting process.
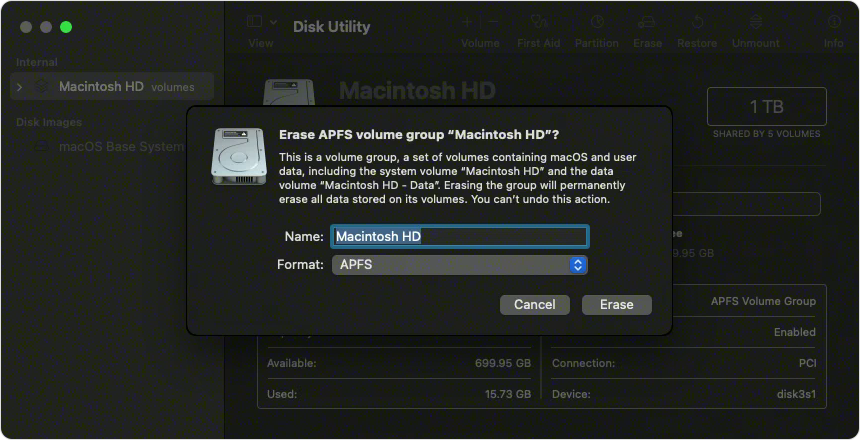
Step 3. A dialogue box will appear; within it, assign a name to your drive and opt for a specific format.
Step 4. Choose the «GUID Partition Map» scheme, which is ideal for compatibility with modern Mac systems.
Step 5. Once you’ve configured the settings, click the «Erase» button to proceed with the formatting procedure.
Conclusion
In summary, encountering data loss due to the «com.apple.DiskManagement.disenter error 49153» can be distressing. However, there’s a silver lining with EaseUS Data Recovery Wizard for Mac. This powerful tool is designed to address a wide range of data loss scenarios, whether it’s the error itself, accidental deletions, emptied Trash Bin, or more.
com.apple.DiskManagement.disenter error 49153 FAQs
Here are questions people frequently ask when the «com.apple.DiskManagement.disenter error 49153» occurs on Mac:
1. What is error 49153 on Mac?
Error 49153 on Mac, specifically the «com.apple.DiskManagement.disenter» error, typically occurs during disk formatting or partitioning. It signifies a failure in the Disk Utility’s operation, possibly due to conflicts or issues with the drive.
2. How can I compel my Mac to mount an unresponsive hard drive?
Ensure the drive is connected to your Mac. Access Disk Utility and choose your external HDD from the left sidebar. Initiate the mounting process by clicking the Mount button at the top of the window.
3. How to resolve the issue of a Mac not mounting a hard drive?
Check the connections and cables for any physical issues if a hard drive doesn’t mount on a Mac. Try connecting the drive to another USB or Thunderbolt port. If the issue persists, use Disk Utility to repair the drive and check its health. If unsuccessful, consider data recovery options and professional assistance.
4. How do I remount my internal hard drive Mac?
To do this, you must access Disk Utility. Locate the unmounted drive on the left panel, select it, and click the «Mount» button. If successful, the drive will reappear on your desktop and in Finder.