 The collect2: error: ld returned 1 exit status error message is easily fixed by removing an existing executable file inside your document. It is possible to remove the existing file that is running in the background by accessing the thread tools inside your system. The complete process is easy to do and only consists of a couple of steps.
If you want to become an expert at fixing this undefined reference in your program, keep reading this complete guide that contains all the details.
Contents
- Why Is the collect2: Error: Ld Returned 1 Exit Status Happening?
- How To Fix This Error Inside Your Program
- – Listing All the Possible Methods for Debugging This Error
- – A Common Error in the Gem Native Extension
- – Using the Debugging Library Syntax for the collect2 Error
- – Facing This Error in Dev C++
- FAQs
- – What Is collect2 Exe?
- – What Does Error 1d Returned 1 Exit Status Mean?
- – How To Combine Two Files in C++?
- Final Conclusion and Further Notes
Why Is the collect2: Error: Ld Returned 1 Exit Status Happening?
This specific collect2: error: ld returned 1 exit status error message appears due to previous errors in your document, especially when working with C++. It represents one of the most common errors web developers face but it is also one of the easiest ones to fix. In other words, this error is there to indicate that the linking step in the process of creating faced certain problems.
This is going to create an undefined reference because the exit status is more than the value of zero. You can run multiple steps to create a search thread that is going to eliminate the problem. We are going to list and explain the various methods you can use to fix this error in your document. Continue reading the following section of this article to learn more about the debugging process.
How To Fix This Error Inside Your Program
The easiest and most common method of fixing this error requires you to completely delete the existing executable file that is running in the background of your program. However, as is the case with most other bugs, this solution might not work for everyone and every single time. Lucky for you, programming languages allow users to fix an error in multiple ways, in case any of the previous ones does not work.
This is called a process of debugging, where you are trying to completely remove an error you have encountered in your program. No matter how serious the error may be, the debugging process always starts with an inspection of the problem. After that, locate where the error is coming from and apply all the necessary changes to the code.
Let us now learn something more about the ways of debugging this error.
– Listing All the Possible Methods for Debugging This Error
In this part of the guide, we are going to list the possible methods for debugging and also briefly explain their function. Let us take a deep dive at the following list that shows the most common ways of fixing this error:
- Deleting the existing executable file inside your program: The file may have failed because it is locked in a different location, such as an antivirus.
- It is possible to try and rename that specific executable file in your program. Then, you are supposed to restructure the contents, and you are done. Renaming the file helps the program to create an additional executable file.
- In case none of this works, you should try restarting your computer and redo the first step. This solution shows that debugging does not always have to be complicated.
In theory, this is all it takes to completely remove this error from your syntax. However, it is always best to learn from examples. That is why in the following section of this article, we are going to show you example codes to easily fix this error.
– A Common Error in the Gem Native Extension
Many web developers face certain problems once working with extensions for their browsers. One such bug appears when you are trying to install a gem inside the native extension on your browser.
The reason why we are explaining the native extension is that the collect2 error usually appears during the process of installing a gem. To better understand what this means, you should take a look at the complete syntax.
Take a closer look at the following code that is going to initiate the collect2 error:
Building a proper native extension. This might take a while…
ERROR: Error installing json:
ERROR: Failed to generate gem native extension.
/home/foobar/.rvm/ruby-2.4.7/bin/ruby -r ./siteconf134617815-3312439-1i9lahdrj.rb extconf.rb
creating Makefile
make “DESTDIR=” clean
make “DESTDIR=”
compiling generator.c
linking shared-object json/ext/generator.so
/usr/bin/ld: cannot find -lgmp
collect2: error: ld returned 1 exit status
make: *** [generator.so] Error 1
make failed, exit code 2
Gem files will remain installed in /home/foobar/.rvm/gems/ruby-2.4.7/gems/json-1.8.3 for inspection.
Results logged to /home/foobar/.rvm/gems/ruby-2.4.7/extensions/x86_64-linux/2.2.0/json-1.8.3/gem_make.out
As you can see, this is the complete code for the collect2 error inside your program. There is certainly something you can do to the syntax to debug this error and make the program functional again. Indeed, we are going to change some things in the library and this is going to completely remove the error. Take a look at the following section of this article to learn more.
– Using the Debugging Library Syntax for the collect2 Error
As previously explained, you are supposed to change certain things inside the library to fix this error. For this, you are going to need the gmp function to locate the correct files and return the incorrect status. Open the code with the cache search gmp function and include all the additional tools inside.
The following syntax shows how to properly use the gmp function to fix this error:
$ apt-cache search gmp
libgmp-dev – Multiprecision arithmetic library developers tools
libgmp10 – Multiprecision arithmetic library
libgmp10-doc – Multiprecision arithmetic library example code
libgmp3-dev – Multiprecision arithmetic library developers tools
libgmpxx4ldbl – Multiprecision arithmetic library (C++ bindings)
[…]
Be aware that the syntax may be subject to changes. As this example shows, the annoying collect2 error does not have to be complicated to locate and fix. However, pay attention to the exact location of the gmp function because this may sometimes be the difference between a correctly and incorrectly executed code. Let us now learn other things about this common error in your program.
– Facing This Error in Dev C++
As previously explained, the collect2 error may usually appear once working with Dev C++. It refers to a specific reference to a name where the linker cannot define the way it looks based on the object files. This also applies to all the libraries that make up your document.
Lucky for you, fixing the error is done in the same manner as previously taught. All you have to do is to follow the steps discussed in this article and the problem is going to disappear. To learn more about this error, continue reading the FAQ section of this article.
FAQs
Here are the answers to some of your questions regarding this error.
– What Is collect2 Exe?
Collect2 represents a utility that web developers use to arrange certain initialization functions during the start time. In other words, it is used to link the program and the adequate functions, while creating a table inside a temporary file. Then, it is going to create a second link with the program but include a different file.
– What Does Error 1d Returned 1 Exit Status Mean?
The returned 1 status refers to an error in your document that is created due to previous errors. It is used as an indicator to point out that certain linking steps during the building process have bugs. To fix the error, you are supposed to refer to all the previous functions and locate the part of the program that is operating incorrectly.
– How To Combine Two Files in C++?
You can start combining two files in C++ by creating two separate source files on your server. The process of combining two C++ files is important because you can combine two different programs and functions. Since the collect2 error usually appears during this process, it is important to understand how the files are merged together.
There are several steps you are supposed to closely follow, as shown in the following list:
- Create two separate C++ source files on your server.
- Both files should be saved inside the same location on the server.
- Open the Command Prompt tool and run the various commands from your files.
- The tool is going to merge the two separate source files together and comply their functions.
- Install the C++ Complier Program to run the newly-created file without any bugs.
This is all it takes to create a complex C++ file without facing any collect2 errors in your server. You can use this method for any two C++ files.
This section wraps everything important you were supposed to know about the collect2 error in your document. Let us now summarize the details.
Final Conclusion and Further Notes
This specific exit status error message is easily fixed by removing an existing executable file inside your document. Let us take a deep dive at the following list that contains all the important details from this article:
- The collect2 error is easily fixed by shutting down a program that is running in the background
- Web developers usually face this problem once working with Dev C++ and other files
- The Gem native extension usually displays this error alongside the complete syntax but it can be easily fixed
- It is important to know the meaning of collect2 to debug the error more efficiently
- It is possible to merge two C++ source files in five basic steps without caring about this error
 Web developers are constantly struggling with the collect2 error inside their syntax and are unable to debug it. Lucky for you, now you know all the details to remove this error from your document without affecting the rest of the syntax.
- Author
- Recent Posts

Your Go-To Resource for Learn & Build: CSS,JavaScript,HTML,PHP,C++ and MYSQL. Meet The Team
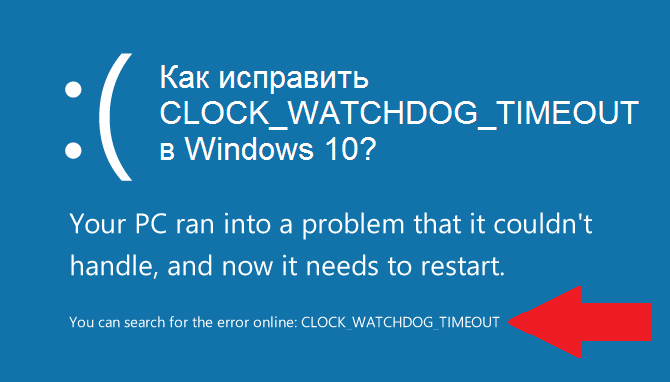
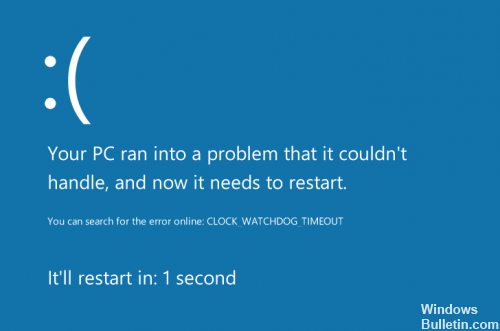
 Одна из самых сложных в определении причин и исправлении ошибок в Windows 10 — синий экран «На вашем ПК возникла проблема и его необходимо перезагрузить» и код ошибки CLOCK_WATCHDOG_TIMEOUT, который может появляться как в произвольные моменты, так и при выполнении определенных действий (запуск конкретной программы, подключение устройства и т.п.). Сама по себе ошибка говорит о том, что ожидаемое системой прерывание не было получено с одного из ядер процессора за ожидаемое время, что, как правило, мало говорит о том, что делать дальше.
В этой инструкции — о наиболее распространенных причинах ошибки и способах исправить синий экран CLOCK_WATCHDOG_TIMEOUT в Windows 10, если это возможно (в некоторых случаях проблема может быть аппаратной).
Синий экран смерти (BSoD) CLOCK_WATCHDOG_TIMEOUT и процессоры AMD Ryzen

Решил вынести информацию об ошибке применительно к владельцам компьютеров на Ryzen в отдельный раздел, поскольку для них, помимо причин, описанных далее есть и свои специфичные.
Итак, если у вас на борту установлен CPU Ryzen, и вы столкнулись с ошибкой CLOCK_WATCHDOG_TIMEOUT в Windows 10, рекомендую учесть следующие моменты.
- Не устанавливайте ранние сборки Windows 10 (версии 1511, 1607), поскольку в них возможны конфликты при работе на указанных процессорах, что приводит к ошибкам. В дальнейшем были устранены.
- Обновите БИОС вашей материнской платы с официального сайта её производителя.
По второму пункту: на ряде форумов сообщают, что, наоборот, ошибка проявляется после обновления БИОС, в данном случае срабатывает откат на предыдущую версию.
Проблемы с БИОС (UEFI) и разгон
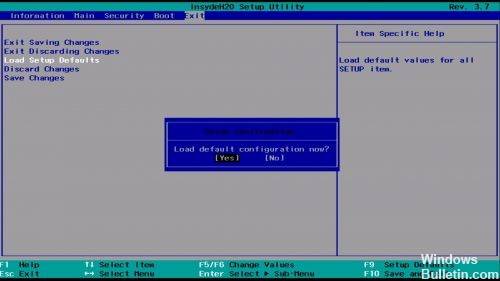
Если в последнее время вы меняли параметры БИОС или выполняли разгон процессора, это может служить причиной ошибки CLOCK_WATCHDOG_TIMEOUT. Попробуйте следующие шаги:
- Отключить разгон процессора (если выполнялся).
- Сбросить БИОС на настройки по умолчанию, можно — оптимизированные настройки (Load Optimized Defaults), подробнее — Как сбросить настройки БИОС.
- Если проблема появилась после сборки компьютера или замены материнской платы, проверьте, есть ли на официальном сайте производителя обновление БИОС для неё: возможно, проблема была решена в обновлении.
Проблемы с периферийным оборудованием и работой драйверов
Следующая по распространенности причина — неправильная работа оборудования или драйверов. Если вы недавно подключили новое оборудование или же только что переустановили (обновили версию) Windows 10, обратите внимание на следующие методы:
- Установите оригинальные драйверы устройств с официального сайта производителя вашего ноутбука или материнской платы (если это ПК), особенно драйверы чипсета, USB, управления электропитанием, сетевых адаптеров. Не используйте драйвер-паки (программы для автоматической установки драйверов), также не воспринимайте серьезно «Драйвер не нуждается в обновлении» в диспетчере устройств — это сообщение не говорит о том, что новых драйверов действительно нет (их нет лишь в центре обновлений Windows). Для ноутбука также следует установить вспомогательное системное ПО, также с официального сайта (именно системное, различные прикладные программы, которые также могут там присутствовать не обязательны).
- В случае, если в диспетчере устройств Windows есть устройства с ошибками, попробуйте отключить их (правый клик мышью — отключить), если это новые устройства, то можно отключить их и физически) и перезагрузить компьютер (именно перезагрузка, а не завершение работы с последующим включением, в Windows 10 это может быть важно), а затем понаблюдать — проявляется ли проблема снова.
Еще один момент, касающийся оборудования — в некоторых случаях (речь о ПК, не ноутбуках) проблема может проявляться при наличии двух видеокарт на компьютере (интегрированного чипа и дискретной видеокарты). В БИОС на ПК обычно присутствует пункт для отключения интегрированного видео (как правило, в разделе Integrated Peripherals), попробуйте выполнить отключение.
Программное обеспечение и вредоносные программы
Помимо прочего, BSoD CLOCK_WATCHDOG_TIMEOUT может быть вызвана недавно установленными программами, особенно теми из них, которые работают с Windows 10 на низком уровне или добавляют свои системные службы:
- Антивирусы.
- Программы, добавляющие виртуальные устройства (можно посмотреть в диспетчере устройств), например, Daemon Tools.
- Утилиты для работы с параметрами БИОС из системы, например, ASUS AI Suite, программы для разгона.
- В некоторых случаях — софт для работы с виртуальными машинами, например, VMWare или VirtualBox. Применительно к ним, иногда ошибка возникает в результате неправильной работы виртуальной сети или при использовании специфичных систем в виртуальных машинах.
Также к такому ПО можно отнести вирусы и другие вредоносные программы, рекомендую выполнить проверку компьютера на их наличие. См. Лучшие средства удаления вредоносных программ.
Ошибка CLOCK_WATCHDOG_TIMEOUT как следствие аппаратных проблем
И, наконец, причиной рассматриваемой ошибки могут быть аппаратные и сопутствующие проблемы. Некоторые из них достаточно просто исправляются, к ним можно отнести:
- Перегрев, пыль в системном блоке. Следует почистить компьютер от пыли (даже при отсутствии признаков перегрева это не будет лишним), при перегреве процессора, возможно, также поменять термопасту. См. как узнать температуру процессора.
- Неправильная работа блока питания, напряжения отличные от требуемых (можно отследить в БИОС некоторых материнских плат).
- Ошибки оперативной памяти. См. Как проверить оперативную память компьютера или ноутбука.
- Проблемы с работой жесткого диска, см. Как проверить жесткий диск на ошибки.
Более серьезные проблемы этого характера — неисправности материнской платы или процессора.
Дополнительная информация
Если ничто из описанного пока не помогло, возможно, могут оказаться полезными следующие пункты:
- Если проблема возникла недавно, а система не переустанавливалась, попробуйте использовать точки восстановления Windows 10.
- Выполните проверку целостности системных файлов Windows 10.
- Часто проблема бывает вызвана работой сетевых адаптеров или их драйверов. Иногда не удается точно определить, что дело в них (обновление драйверов не помогает и т.п.), но, при отключении компьютера от Интернета, выключении Wi-Fi адаптера или вынимании кабеля из сетевой карты проблема исчезает. Это не обязательно говорит о проблемах именно сетевой карты (также могут быть виноваты системные компоненты, неправильно работающие с сетью), но может помочь в диагностике проблемы.
- Если ошибка проявляется при запуске какой-то конкретной программы, возможно, проблема вызвана именно её некорректной работой (возможно, конкретно в этой программной среде и на этом оборудовании).
Надеюсь, один из способов поможет решить проблему и в вашем случае ошибка не вызвана аппаратными проблемами. Для ноутбуков или моноблоков с оригинальной ОС от производителя вы также можете попробовать выполнить сброс на заводские настройки.
Содержание
- 1 Способы решения ошибки CLOCK_WATCHDOG_TIMEOUT
- 2 Исправление обновления января 2020 года:
- 3 Разберёмся с причинами ошибки CLOCK_WATCHDOG_TIMEOUT
- 4 Как исправить ошибку CLOCK_WATCHDOG_TIMEOUT
- 5 Заключение
CLOCK_WATCHDOG_TIMEOUT — это синий экран смерти (или же БСоД). По сравнению с другими ошибками, которые появляются во время работы системы, синие экраны смерти куда более редки, но они из-за них пользователи обычно теряют какую-то часть своих данных на компьютере. Также от их попросту невозможно избавиться, кроме как выполнять аварийную перезагрузку компьютера.
CLOCK_WATCHDOG_TIMEOUT может быть вызван невероятно огромным списком причин: некорректно работающие драйвера, настройки BIOS, устаревшая версия BIOS, поврежденные записи Реестра Windows, повреждения диска, повреждение оперативной памяти и т.д. Это только самые распространенные среди пользователей причины.
Способ №1 Проверка системы на вирусы и проверка Firewall
Появление синего экрана смерти CLOCK_WATCHDOG_TIMEOUT BSOD может означать, что ваш компьютер был заражен вирусами, которые и привели его к нестабильности и появлению данной ошибки. В связи с этим, мы рекомендуем вам установить любой антивирус, которому вы доверяете и проверьте свою систему с помощью сканера. Если он что-то найдет, то ликвидируйте угрозу.
Если же ваш антивирус не нашел никаких следов вирусов, то проблема также может заключаться в Брандмауэре Windows. Попробуйте отключить его на время, чтобы проверить его причастие к проблеме в виде CLOCK_WATCHDOG_TIMEOUT. Для этого сделайте следующее:
- Нажмите Win+X и выберите пункт «Панель управления».
- Перейдите в «Брандмауэр Windows».
- Нажмите на ссылку «Включение и отключение Брандмауэра Windows» в левой панели окна.
- Затем поставьте галочки напротив «Отключить брандмауэр Windows(не рекомендуется)» рядом с параметрами частной и общественной сети.
- После выставления нужных настроек, нажмите «ОК» для подтверждения изменений.
- Теперь проверьте наличие CLOCK_WATCHDOG_TIMEOUT. Возможно именно брандмауэр являлся виновником проблемы.
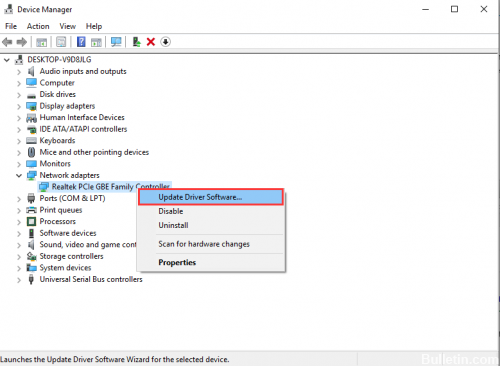
Способ №2 Обновление и проверка драйверов системы
Как мы уже упоминали в начале статьи, проблема в виде синего экрана смерти CLOCK_WATCHDOG_TIMEOUT может заключаться в устаревших драйверах для какого-то элемента в вашей системе. Если все дело в этом, то решается ваша «задачка» достаточно. Сделайте следующее:
- Нажмите правой кнопкой мыши на «Пуск» и выберите «Диспетчер устройств».
- Пройдитесь по своим устройствам в системе и посмотрите, нет ли напротив чего-то желтого значка, который сигнализирует об отсутствии установленных драйверов. Если вы нашли такое устройство, то возможно именно они вызывает проблему с нестабильностью системы. Нажмите на него правой кнопкой мыши и выберите «Обновить драйвера».
Заметка: к сожалению, автоматический поиск и установка драйверов, которые производятся силами вашей операционной системы, довольно часто не выполняют возложенную на них задачу. Поэтому лучшим решением будет найти официальный сайт производителя той или иной аппаратуры, скачать и установить нужные вам драйвера оттуда.
Также помимо устаревших драйвером, проблема также может заключаться и в драйверах, которые не могут корректно установится на внешне подключаемое устройство, например, с USB-интерфейсом. В этом случае вам нужно зайти в Диспетчер устройств и удалить сбоящее оборудование, а затем заново установить драйвера для него уже вручную. Но, так как Windows не отображает в Диспетчере устройств оборудование, которое не подключено к компьютеру, то вам нужно сделать его видимым. Для этого сделайте следующее:
- Нажмите правой кнопкой мыши на «Пуск» и выберите «Диспетчер устройств».
- Нажмите на «Вид» в Панели меню окна и выберите «Показать скрытые устройства».
- Найдите драйвера от отключенных в данный момент устройств и удалите их.
- Затем либо выберите «Действие→Обновить конфигурацию оборудования», либо установите драйвера вручную, скачав их с сайта производителя для устройства.
Способ №3 Обновление BIOS
Также не стоит исключать вероятность того, что синий экран смерти CLOCK_WATCHDOG_TIMEOUT был вызван устаревшей версией вашего BIOS. Если это так, то вам всего лишь нужно его обновить и проблема будет решена. Прежде всего, вам нужно посмотреть какая версия BIOS у вас в данный момент. Для этого сделайте следующее:
- Нажмите одновременно клавиши Win+R, впишите msinfo32 и нажмите Enter.
- Перед вами откроется окно «Сведения о системе». Найдите в списке информации версию вашего BIOS и запишите ее куда-нибудь, например в Блокнот.
- Затем перейдите на сайт производителя своей материнской платы, пройдите в раздел загрузок, найдите обновление для BIOS и скачайте его, если то будет новее вашего.
- Обновите ваш BIOS и перезагрузите вашу систему.
Проверьте наличие CLOCK_WATCHDOG_TIMEOUT. Если ничего из вышеуказанного не смогло исправить этот БСоД, то мы рекомендуем вам провести Восстановление системы с помощью Установочного носителя или же полную ее переустановку.
Нашли опечатку? Выделите текст и нажмите Ctrl + Enter
РЕКОМЕНДУЕМЫЕ: Нажмите здесь, чтобы исправить ошибки Windows и оптимизировать производительность системы. Ошибка CLOCK_WATCHDOG_TIMEOUT означает, что у вашего процессора проблемы с его ядрами и потоками. Потоки — это задачи, выполняемые ядрами, и некоторые ядра могут принимать несколько потоков одновременно. Проблема в том, что поток ожидает правильный ответ от другого потока — или ядро ожидает ответ от другого ядра — и эти ответы не приходят. Следовательно, вы получаете эту ошибку BSoD.
Проверка ошибок CLOCK_WATCHDOG_TIMEOUT имеет значение 0x00000101, указывающее, что ожидаемое прерывание тактовой частоты на вторичном процессоре в многопроцессорной системе не было получено в течение назначенного интервала.
Как восстановить BSOD «CLOCK WATCHDOG TIMEOUT» под Windows 10
Сброс настроек BIOS до значений по умолчанию.
1. Запустите конфигурацию CMOS и сбросьте значения BIOS на DEFAULT. * 3. Сохраните и выйдите из конфигурации BIOS. 2 Попробуйте использовать компьютер как обычно. Если проблема BSOD не устранена, перейдите к шагу 2.
Исправление обновления января 2020 года:
Мы рекомендуем вам попробовать этот новый инструмент. Он исправляет множество компьютерных ошибок, а также защищает от таких вещей, как потеря файлов, вредоносное ПО, сбои оборудования и оптимизирует ваш компьютер для максимальной производительности. Это исправило наш компьютер быстрее, чем делать это вручную:
- Шаг 1: Скачать PC Repair & Optimizer Tool (Windows 10, 8, 7, XP, Vista — Microsoft Gold Certified).
- Шаг 2: Нажмите «Начать сканирование”, Чтобы найти проблемы реестра Windows, которые могут вызывать проблемы с ПК.
- Шаг 3: Нажмите «Починить все», Чтобы исправить все проблемы.
 (дополнительное предложение для Advanced System Repair Pro -> Cайт | Лицензионное соглашение | Политика Kонфиденциальности | Удалить)
* Примечание. Если у вас настольный компьютер, попробуйте вручную сбросить настройки BIOS по умолчанию, обходя перемычку CLEAR CMOS на материнской плате или удаляя батарею CMOS, по крайней мере, с 60 до 90 секунд. (См. Руководство к материнской плате, чтобы найти перемычку CLEAR CMOS).
Обновите ваше устройство драйверы
Ошибки Blue Screen of Death часто бывают вызваны устаревшими или неисправными драйверами, и вы можете легко решить эту проблему, загрузив и установив последние версии драйверов. Обновление драйверов довольно просто, и вы можете сделать это, посетив веб-сайт производителя оборудования и загрузив последние версии драйверов для вашего устройства. Обратите внимание, что вам может потребоваться обновить все драйверы на вашем компьютере, чтобы исправить эту ошибку.
Удаление сторонних антивирусных программ

Эта ошибка иногда вызвана вмешательством стороннего антивирусного программного обеспечения. Чтобы выяснить, является ли это проблемой для вас, временно отключите антивирус и проверьте, сохраняется ли проблема (обратитесь к документации по антивирусам, чтобы узнать, как их отключить).
Если это решит проблему, обратитесь к производителю антивирусного программного обеспечения за советом или для установки другого антивирусного решения.
Хватит разгонять свой процессор
Разгон процессора обычно приводит к этим ошибкам. Прежде всего, вы должны знать, что CLOCK_WATCHDOG_TIMEOUT BSOD обычно вызывается проблемами с процессором, и вы должны рассмотреть возможность его проверки.
Разгон — это процесс, при котором вы меняете частоту и скорость вашего процессора на более высокое значение и выходите за пределы заводских настроек. Это может значительно увеличить скорость вашего ПК, но вы должны быть абсолютно осторожны, так как были случаи, когда целые ПК загорались после того, как пользователи их разогнали, или из-за халатности.
Возврат частоты и частоты процессора в исходное состояние зависит от программного обеспечения, которое вы использовали для разгона. Intel и AMD имеют свои собственные приложения, доступные для загрузки, которые позволяют пользователям разгонять свои процессоры, но есть десятки программ на выбор.
Хватит разгонять компьютер и проверьте, появляется ли BSOD снова.
Если ни одно из предложенных здесь решений не помогло, мы рекомендуем переустановить операционную систему Windows с поддержкой загрузочной установки Windows 10.
https://discussions.apple.com/thread/8190587РЕКОМЕНДУЕМЫЕ: Нажмите здесь, чтобы устранить ошибки Windows и оптимизировать производительность системы

CCNA, веб-разработчик, ПК для устранения неполадок
Я компьютерный энтузиаст и практикующий ИТ-специалист. У меня за плечами многолетний опыт работы в области компьютерного программирования, устранения неисправностей и ремонта оборудования. Я специализируюсь на веб-разработке и дизайне баз данных. У меня также есть сертификат CCNA для проектирования сетей и устранения неполадок.
Во время работы с ОС Windows пользователь может столкнуться с зависанием системы, а затем и появлением «синего экрана смерти» (BSoD), в тексте которого упомянута ошибка «CLOCK_WATCHDOG_TIMEOUT». Обычно данная ошибка имеет аппаратную природу, сигнализируя о проблемах с «железом» пользовательского ПК. В данном материале я расскажу, что за ошибка CLOCK_WATCHDOG_TIMEOUT, каковы её причины, и как исправить ошибку данную проблему на вашем компьютере.
Содержание
Разберёмся с причинами ошибки CLOCK_WATCHDOG_TIMEOUT
В переводе текст данной ошибки звучит что-то вроде «время ожидания контроля истекло» и обычно обозначает ситуацию, когда ожидаемое временное прерывание на вторичном процессоре в мультипроцессорной системе не было получено в течение выделенного временного интервала.
Проще говоря, какой-либо процессор (или ядро многоядерного процессора) не отвечает на запросы системы по различным причинам.
В большинстве случаев рассматриваемая ошибка имеет именно аппаратную природу. Что относится ко всей полноты вызывающих её причин, то я бы выделил следующие:
- Пользовательский разгон системы (оверклокинг);
- Нестабильная работа планок памяти ПК;
- Проблема в работе графической карты (в частности, конфликт между дискретной и встроенной графической картой компьютера);
- Проблемы с драйверами (некорректные, устаревшие, повреждённые драйвера);
- Реестр ОС Виндовс повреждён по различным причинам;
- Злокачественная деятельность вирусных программ;
- Проблемы в работе жёсткого диска (множество «битых» секторов);
- Нарушение целостности системных файлов;
- Недавняя установка на компьютер проблемного приложения (устройства), работающего не корректно.
Ошибка на Windows
Как исправить ошибку CLOCK_WATCHDOG_TIMEOUT
Для решения проблемы CLOCK_WATCHDOG_TIMEOUT советую выполнить следующее:
- Перейдите в БИОС и сбросьте его настройки по умолчанию;
- Откажитесь от разгона системы (оверклокинга), отмените все соответствующие настройки вашей системы;
- Отключите функции C1E и Intel Speedstep в БИОСе;
- Если у вас в системе две видеокарты (одна дискретная и одна встроенная), и вы пользуетесь дискретной, тогда отключите встроенную видеокарту в БИОСе вашего ПК;
- Обновите драйвера системных устройств до самых свежих версий. В частности, в этом поможет функционал специализированных программ уровня DriverPack Solution, Driver Genius и других аналогов;
Используйте DriverPack Solution для обновления драйверов - Используйте функционал системной утилиты SFC для проверки целостности системных файлов. Запустите командную строку от имени администратора, там введите:
sfc /scannow — и нажмите ввод. Дождитесь окончания проверки, перезагрузите систему и проверьте, будет ли появляться рассматриваемая ошибка.
- Проверьте системный реестр на ошибки с помощью соответствующих программ (CCleaner, RegCleaner и других аналогов);
- Выполните проверку системы на наличие вирусов (помогут антивирусные инструменты Dr.Web CureIt!, Malwarebytes Anti-Malware, Trojan Remover и другие аналоги);
- Удалите антивирус Avast с системы. В ряде случаев появление данной ошибки было обусловлено работой указанной антивирусной программы. Попробуйте удалить данную программу из системы, а затем понаблюдать над стабильностью работы вашего ПК;
Удалите Avast с системы - Удалите Daemon Tools lite. Та же ситуация;
- Если вы недавно установили какую-либо новую программу, попробуйте (хотя бы временно) деинсталлировать её с ПК, вполне возможно, что причиной ошибки CLOCK_WATCHDOG_TIMEOUT был именно данный программный продукт;
- Временно отключит ваш антивирус и брандмауэр, чтобы определить, не являются ли данные инструменты причиной рассматриваемой дисфункции;
- Откатите систему на временную точку, при которой рассматриваемой проблемы не наблюдалось. Нажмите кнопку «Пуск», в строке поиска введите rstrui и нажмите ввод. Поищите стабильную точку восстановления и откатите систему к данному состоянию;
Попробуйте восстановление системы - Проверьте корректность работы памяти компьютера с помощью программы Memtest86;
- Проверьте жёсткий диск на наличие плохих секторов (к примеру, с помощью функционала программы Victoria или команды CHKDSK);
- Попробуйте обновить ваш БИОС (рекомендуется для компетентных пользователей);
Заключение
Появление ошибки CLOCK_WATCHDOG_TIMEOUT может иметь множество причин, при этом большинство из них обычно имеют аппаратную природу. Рекомендую, прежде всего, отказаться от оверклокинга и сбросить настройки БИОС до базовых значений – часто эти советы оказывались наиболее эффективными. Если же данные способы не помогли, воспользуйтесь другими, перечисленными выше, советами, это позволит исправить ошибку CLOCK_WATCHDOG_TIMEOUT на вашем ПК.
Используемые источники:
- https://gamesqa.ru/kompyutery/clock_watchdog_timeout-windows-10-6557/
- http://windowsbulletin.com/ru/как-исправить-ошибку-bsod-clock_watchdog_timeout/
- https://rusadmin.biz/oshibki/oshibka-clock_watchdog_timeout-kak-ispravit/
I tried to search for that bug online, but all the posts are for C++.
This is the message:
test1.o: In function `ReadDictionary':
/home/johnny/Desktop/haggai/test1.c:13: undefined reference to `CreateDictionary'
collect2: error: ld returned 1 exit status
make: *** [test1] Error 1
It is super simple code, and I can’t understand what the problem is:
#include <stdio.h>
#include <stdlib.h>
#include <string.h>
#include "dict.h"
#include "hash.h"


pHash ReadDictionary() {
    /* This function reads a dictionary line by line from the standard input. */
    pHash dictionary;
    char entryLine[100] = "";
    char *word, *translation;

    dictionary = CreateDictionary();
    while (scanf("%s", entryLine) == 1) { // Not EOF
        word = strtok(entryLine, "=");
        translation = strtok(NULL, "=");
        AddTranslation(dictionary, word, translation);
    }
    return dictionary;
}

int main() {
    pHash dicti;
...
Now this is the header file dict.h:
#ifndef _DICT_H_
#define _DICT_H_

#include "hash.h"

pHash CreateDictionary();
...

#endif
And here is the dict.c file:
#include <stdio.h>
#include <stdlib.h>
#include <string.h>
#include "hash.h"
#include "dict.h"


pHash CreateDectionary()
{
    pHash newDict;
    newDict = HashCreate(650, HashWord, PrintEntry, CompareWords, GetEntryKey, DestroyEntry);
    return newDict;
}
And if you want to check file hash.h:
#ifndef _HASH_H_
#define _HASH_H_

// Type definitions //
typedef enum {FAIL = 0, SUCCESS} Result;
typedef enum {SAME = 0, DIFFERENT} CompResult;

typedef struct _Hash Hash, *pHash;

typedef void* pElement;
typedef void* pKey;

// Function types //
typedef int (*HashFunc) (pKey key, int size);
typedef Result (*PrintFunc) (pElement element);
typedef CompResult (*CompareFunc) (pKey key1, pKey key2);
typedef pKey (*GetKeyFunc) (pElement element);
typedef void (*DestroyFunc)(pElement element);
...

// Interface functions //

#endif
Maybe it will be easier if I give you the files here?
Anyway, I will be happy for tips on how to understand the problem.
 The collect2: error: ld returned 1 exit status error message is easily fixed by removing an existing executable file inside your document. It is possible to remove the existing file that is running in the background by accessing the thread tools inside your system. The complete process is easy to do and only consists of a couple of steps.
If you want to become an expert at fixing this undefined reference in your program, keep reading this complete guide that contains all the details.
Contents
- Why Is the collect2: Error: Ld Returned 1 Exit Status Happening?
- How To Fix This Error Inside Your Program
- – Listing All the Possible Methods for Debugging This Error
- – A Common Error in the Gem Native Extension
- – Using the Debugging Library Syntax for the collect2 Error
- – Facing This Error in Dev C++
- FAQs
- – What Is collect2 Exe?
- – What Does Error 1d Returned 1 Exit Status Mean?
- – How To Combine Two Files in C++?
- Final Conclusion and Further Notes
Why Is the collect2: Error: Ld Returned 1 Exit Status Happening?
This specific collect2: error: ld returned 1 exit status error message appears due to previous errors in your document, especially when working with C++. It represents one of the most common errors web developers face but it is also one of the easiest ones to fix. In other words, this error is there to indicate that the linking step in the process of creating faced certain problems.
This is going to create an undefined reference because the exit status is more than the value of zero. You can run multiple steps to create a search thread that is going to eliminate the problem. We are going to list and explain the various methods you can use to fix this error in your document. Continue reading the following section of this article to learn more about the debugging process.
How To Fix This Error Inside Your Program
The easiest and most common method of fixing this error requires you to completely delete the existing executable file that is running in the background of your program. However, as is the case with most other bugs, this solution might not work for everyone and every single time. Lucky for you, programming languages allow users to fix an error in multiple ways, in case any of the previous ones does not work.
This is called a process of debugging, where you are trying to completely remove an error you have encountered in your program. No matter how serious the error may be, the debugging process always starts with an inspection of the problem. After that, locate where the error is coming from and apply all the necessary changes to the code.
Let us now learn something more about the ways of debugging this error.
– Listing All the Possible Methods for Debugging This Error
In this part of the guide, we are going to list the possible methods for debugging and also briefly explain their function. Let us take a deep dive at the following list that shows the most common ways of fixing this error:
- Deleting the existing executable file inside your program: The file may have failed because it is locked in a different location, such as an antivirus.
- It is possible to try and rename that specific executable file in your program. Then, you are supposed to restructure the contents, and you are done. Renaming the file helps the program to create an additional executable file.
- In case none of this works, you should try restarting your computer and redo the first step. This solution shows that debugging does not always have to be complicated.
In theory, this is all it takes to completely remove this error from your syntax. However, it is always best to learn from examples. That is why in the following section of this article, we are going to show you example codes to easily fix this error.
– A Common Error in the Gem Native Extension
Many web developers face certain problems once working with extensions for their browsers. One such bug appears when you are trying to install a gem inside the native extension on your browser.
The reason why we are explaining the native extension is that the collect2 error usually appears during the process of installing a gem. To better understand what this means, you should take a look at the complete syntax.
Take a closer look at the following code that is going to initiate the collect2 error:
Building a proper native extension. This might take a while…
ERROR: Error installing json:
ERROR: Failed to generate gem native extension.
/home/foobar/.rvm/ruby-2.4.7/bin/ruby -r ./siteconf134617815-3312439-1i9lahdrj.rb extconf.rb
creating Makefile
make “DESTDIR=” clean
make “DESTDIR=”
compiling generator.c
linking shared-object json/ext/generator.so
/usr/bin/ld: cannot find -lgmp
collect2: error: ld returned 1 exit status
make: *** [generator.so] Error 1
make failed, exit code 2
Gem files will remain installed in /home/foobar/.rvm/gems/ruby-2.4.7/gems/json-1.8.3 for inspection.
Results logged to /home/foobar/.rvm/gems/ruby-2.4.7/extensions/x86_64-linux/2.2.0/json-1.8.3/gem_make.out
As you can see, this is the complete code for the collect2 error inside your program. There is certainly something you can do to the syntax to debug this error and make the program functional again. Indeed, we are going to change some things in the library and this is going to completely remove the error. Take a look at the following section of this article to learn more.
– Using the Debugging Library Syntax for the collect2 Error
As previously explained, you are supposed to change certain things inside the library to fix this error. For this, you are going to need the gmp function to locate the correct files and return the incorrect status. Open the code with the cache search gmp function and include all the additional tools inside.
The following syntax shows how to properly use the gmp function to fix this error:
$ apt-cache search gmp
libgmp-dev – Multiprecision arithmetic library developers tools
libgmp10 – Multiprecision arithmetic library
libgmp10-doc – Multiprecision arithmetic library example code
libgmp3-dev – Multiprecision arithmetic library developers tools
libgmpxx4ldbl – Multiprecision arithmetic library (C++ bindings)
[…]
Be aware that the syntax may be subject to changes. As this example shows, the annoying collect2 error does not have to be complicated to locate and fix. However, pay attention to the exact location of the gmp function because this may sometimes be the difference between a correctly and incorrectly executed code. Let us now learn other things about this common error in your program.
– Facing This Error in Dev C++
As previously explained, the collect2 error may usually appear once working with Dev C++. It refers to a specific reference to a name where the linker cannot define the way it looks based on the object files. This also applies to all the libraries that make up your document.
Lucky for you, fixing the error is done in the same manner as previously taught. All you have to do is to follow the steps discussed in this article and the problem is going to disappear. To learn more about this error, continue reading the FAQ section of this article.
FAQs
Here are the answers to some of your questions regarding this error.
– What Is collect2 Exe?
Collect2 represents a utility that web developers use to arrange certain initialization functions during the start time. In other words, it is used to link the program and the adequate functions, while creating a table inside a temporary file. Then, it is going to create a second link with the program but include a different file.
– What Does Error 1d Returned 1 Exit Status Mean?
The returned 1 status refers to an error in your document that is created due to previous errors. It is used as an indicator to point out that certain linking steps during the building process have bugs. To fix the error, you are supposed to refer to all the previous functions and locate the part of the program that is operating incorrectly.
– How To Combine Two Files in C++?
You can start combining two files in C++ by creating two separate source files on your server. The process of combining two C++ files is important because you can combine two different programs and functions. Since the collect2 error usually appears during this process, it is important to understand how the files are merged together.
There are several steps you are supposed to closely follow, as shown in the following list:
- Create two separate C++ source files on your server.
- Both files should be saved inside the same location on the server.
- Open the Command Prompt tool and run the various commands from your files.
- The tool is going to merge the two separate source files together and comply their functions.
- Install the C++ Complier Program to run the newly-created file without any bugs.
This is all it takes to create a complex C++ file without facing any collect2 errors in your server. You can use this method for any two C++ files.
This section wraps everything important you were supposed to know about the collect2 error in your document. Let us now summarize the details.
Final Conclusion and Further Notes
This specific exit status error message is easily fixed by removing an existing executable file inside your document. Let us take a deep dive at the following list that contains all the important details from this article:
- The collect2 error is easily fixed by shutting down a program that is running in the background
- Web developers usually face this problem once working with Dev C++ and other files
- The Gem native extension usually displays this error alongside the complete syntax but it can be easily fixed
- It is important to know the meaning of collect2 to debug the error more efficiently
- It is possible to merge two C++ source files in five basic steps without caring about this error
 Web developers are constantly struggling with the collect2 error inside their syntax and are unable to debug it. Lucky for you, now you know all the details to remove this error from your document without affecting the rest of the syntax.
- Author
- Recent Posts

Position Is Everything: Your Go-To Resource for Learn & Build: CSS,JavaScript,HTML,PHP,C++ and MYSQL.
I ran into the same problem and the following is my full log.
Building wheel torch-1.1.0a0+df05c7f
— Building version 1.1.0a0+df05c7f
[3/784] Building CXX object caffe2/CMakeFiles/caffe2.dir/ideep/operators/conv_op.cc.o
FAILED: caffe2/CMakeFiles/caffe2.dir/ideep/operators/conv_op.cc.o
/usr/bin/c++ -DCPUINFO_SUPPORTED_PLATFORM=1 -DHAVE_MALLOC_USABLE_SIZE=1 -DHAVE_MMAP=1 -DHAVE_SHM_OPEN=1 -DHAVE_SHM_UNLINK=1 -DNNP_CONVOLUTION_ONLY=0 -DNNP_INFERENCE_ONLY=0 -DONNX_NAMESPACE=onnx_torch -DTH_BLAS_MKL -DUSE_C11_ATOMICS=1 -D_FILE_OFFSET_BITS=64 -Dcaffe2_EXPORTS -I../aten/src -I. -I../ -I../third_party/protobuf/src -I../cmake/../third_party/benchmark/include -Icaffe2/contrib/aten -I../third_party/onnx -Ithird_party/onnx -I../third_party/foxi -Ithird_party/foxi -Icaffe2/aten/src/TH -I../aten/src/TH -Icaffe2/aten/src -Iaten/src -I../aten/../third_party/catch/single_include -I../aten/src/ATen/.. -Icaffe2/aten/src/ATen -I../caffe2/core/nomnigraph/include -I../third_party/miniz-2.0.8 -I../c10/.. -I../third_party/QNNPACK/include -I../third_party/pthreadpool/include -I../third_party/NNPACK/include -I../third_party/cpuinfo/include -I../third_party/fbgemm/include -I../third_party/fbgemm -I../third_party/FP16/include -isystem /home/yilingchen/miniconda3/envs/mrcnn-onnx/include -isystem ../third_party/ideep/include -isystem ../torch/include -isystem third_party/gloo -isystem ../cmake/../third_party/gloo -isystem ../cmake/../third_party/googletest/googlemock/include -isystem ../cmake/../third_party/googletest/googletest/include -isystem ../third_party/gemmlowp -isystem ../third_party/neon2sse -isystem ../third_party -isystem ../cmake/../third_party/eigen -isystem /home/yilingchen/miniconda3/envs/mrcnn-onnx/include/python3.7m -isystem /home/yilingchen/miniconda3/envs/mrcnn-onnx/lib/python3.7/site-packages/numpy/core/include -isystem /usr/lib/x86_64-linux-gnu/openmpi/include/openmpi -isystem /usr/lib/x86_64-linux-gnu/openmpi/include/openmpi/opal/mca/event/libevent2022/libevent -isystem /usr/lib/x86_64-linux-gnu/openmpi/include/openmpi/opal/mca/event/libevent2022/libevent/include -isystem /usr/lib/x86_64-linux-gnu/openmpi/include -isystem include -fvisibility-inlines-hidden -fopenmp -D_FORCE_INLINES -D_MWAITXINTRIN_H_INCLUDED -D__STRICT_ANSI__ -DUSE_FBGEMM -O2 -fPIC -Wno-narrowing -Wall -Wextra -Wno-missing-field-initializers -Wno-type-limits -Wno-array-bounds -Wno-unknown-pragmas -Wno-sign-compare -Wno-unused-parameter -Wno-unused-variable -Wno-unused-function -Wno-unused-result -Wno-strict-overflow -Wno-strict-aliasing -Wno-error=deprecated-declarations -Wno-stringop-overflow -Wno-error=pedantic -Wno-error=redundant-decls -Wno-error=old-style-cast -faligned-new -Wno-unused-but-set-variable -Wno-maybe-uninitialized -Wno-stringop-overflow -DHAVE_AVX_CPU_DEFINITION -DHAVE_AVX2_CPU_DEFINITION -O3 -fPIC -DCAFFE2_USE_GLOO -DHAVE_GCC_GET_CPUID -DUSE_AVX -DUSE_AVX2 -DTH_HAVE_THREAD -fvisibility=hidden -DCAFFE2_BUILD_MAIN_LIB -O2 -pthread -std=gnu++11 -MD -MT caffe2/CMakeFiles/caffe2.dir/ideep/operators/conv_op.cc.o -MF caffe2/CMakeFiles/caffe2.dir/ideep/operators/conv_op.cc.o.d -o caffe2/CMakeFiles/caffe2.dir/ideep/operators/conv_op.cc.o -c ../caffe2/ideep/operators/conv_op.cc
../caffe2/ideep/operators/conv_op.cc: In member function ‘virtual bool caffe2::IDEEPConvOp::RunOnDeviceWithOrderNCHW()’:
../caffe2/ideep/operators/conv_op.cc:75:27: error: no matching function for call to ‘ideep::convolution_forward::expected_weights_descriptor(ideep::param::dims, mkldnn::memory::data_type, std::vector&, ideep::param::dims, ideep::param::dims, std::vector&, int&, caffe2::IDEEPConvOp::ialgo&, caffe2::IDEEPConvOp::iprop&, mkldnn::memory::data_type, ideep::param::dims)’
X.get_dims());
^
In file included from ../third_party/ideep/include/ideep.hpp:44:0,
from ../caffe2/ideep/ideep_utils.h:6,
from ../caffe2/ideep/operators/conv_pool_base_op.h:6,
from ../caffe2/ideep/operators/conv_op.cc:1:
../third_party/ideep/include/ideep/computations.hpp:2173:29: note: candidate: static ideep::param::descriptor ideep::convolution_forward::expected_weights_descriptor(const dims&, ideep::param::data_type, const dims&, const dims&, const dims&, const dims&, int, ideep::algorithm, ideep::prop_kind, ideep::param::data_type)
static tensor::descriptor expected_weights_descriptor(
^~~~~~~~~~~~~~~~~~~~~~~~~~~
../third_party/ideep/include/ideep/computations.hpp:2173:29: note: candidate expects 10 arguments, 11 provided
../third_party/ideep/include/ideep/computations.hpp:593:22: note: candidate: ideep::param::descriptor ideep::primitive_group::expected_weights_descriptor() const
tensor::descriptor expected_weights_descriptor() const {
^~~~~~~~~~~~~~~~~~~~~~~~~~~
../third_party/ideep/include/ideep/computations.hpp:593:22: note: candidate expects 0 arguments, 11 provided
[36/784] Building CXX object caffe2/CMakeFiles/caffe2.dir/operators/cosh_op.cc.o
ninja: build stopped: subcommand failed.
Traceback (most recent call last):
File «setup.py», line 719, in
build_deps()
File «setup.py», line 285, in build_deps
build_dir=’build’)
File «/mnt/Data-1/Projects/faster-rcnn-onnx/pytorch/tools/build_pytorch_libs.py», line 278, in build_caffe2
check_call(ninja_cmd, cwd=build_dir, env=my_env)
File «/home/yilingchen/miniconda3/envs/onnxrt/lib/python3.7/subprocess.py», line 347, in check_call
raise CalledProcessError(retcode, cmd)
subprocess.CalledProcessError: Command ‘[‘ninja’, ‘install’]’ returned non-zero exit status 1.
0 / 0 / 0
Регистрация: 21.11.2019
Сообщений: 1
1
21.11.2019, 19:56. Показов 8595. Ответов 1

Здравствуйте, только начал изучать Qt. При попытке собрать проект выдает collect2.exe: error: ld returned 1 exit status в консоль. В коде я почти не разбираюсь, поэтому обращаюсь сюда. Прикрепляю проект. На данный момент весь код в shootcalc.cpp, остальные пустые и изменялись.
shoorcalc.cpp
| C++ (Qt) | ||
|
shootcalc.h
| C++ (Qt) | ||
|
P.S. Заранее хочу принести извинения за свой корявый код, который вам придется читать.
__________________
Помощь в написании контрольных, курсовых и дипломных работ, диссертаций здесь
0
Hi everyone,
I am trying to migrate my firmware to the ESP-IDF platform. I have multiple problem occuring. When i use a get started example Hello_World, i can build and upload to my esp32 board. Once i monitor i get :
Rebooting…
ets Jun 8 2016 00:22:57
rst:0xc (SW_CPU_RESET),boot:0x32 (SPI_FAST_FLASH_BOOT)
configsip: 0, SPIWP:0xee
clk_drv:0x00,q_drv:0x00,d_drv:0x00,cs0_drv:0x00,hd_drv:0x00,wp_drv:0x00
mode:DIO, clock div:2
load:0x3fff0030,len:4
load:0x3fff0034,len:6876
load:0x40078000,len:13072
load:0x40080400,len:3896
0x40080400: _init at ??:?
entry 0x40080688
I (29) boot: ESP-IDF v4.1-dirty 2nd stage bootloader
I (29) boot: compile time 10:36:22
I (29) boot: chip revision: 1
I (32) boot_comm: chip revision: 1, min. bootloader chip revision: 0
I (40) boot.esp32: SPI Speed : 40MHz
I (44) boot.esp32: SPI Mode : DIO
I (48) boot.esp32: SPI Flash Size : 16MB
I (53) boot: Enabling RNG early entropy source…
I (58) boot: Partition Table:
I (62) boot: ## Label Usage Type ST Offset Length
I (69) boot: 0 nvs WiFi data 01 02 00009000 00006000
I (77) boot: 1 phy_init RF data 01 01 0000f000 00001000
I (84) boot: 2 factory factory app 00 00 00010000 00100000
I (92) boot: End of partition table
I (96) boot_comm: chip revision: 1, min. application chip revision: 0
I (103) esp_image: segment 0: paddr=0x00010020 vaddr=0x3f400020 size=0x054a4 ( 21668) map
I (120) esp_image: segment 1: paddr=0x000154cc vaddr=0x3ffb0000 size=0x02150 ( 8528) load
I (124) esp_image: segment 2: paddr=0x00017624 vaddr=0x40080000 size=0x00404 ( 1028) load
0x40080000: _WindowOverflow4 at C:/repos/esp-idf/components/freertos/xtensa_vectors.S:1778
I (130) esp_image: segment 3: paddr=0x00017a30 vaddr=0x40080404 size=0x085e8 ( 34280) load
I (154) esp_image: segment 4: paddr=0x00020020 vaddr=0x400d0020 size=0x12dbc ( 77244) map
0x400d0020: _stext at ??:?
I (183) esp_image: segment 5: paddr=0x00032de4 vaddr=0x400889ec size=0x01100 ( 4352) load
0x400889ec: rtc_clk_wait_for_slow_cycle at C:/repos/esp-idf/components/soc/esp32/rtc_time.c:164
I (191) boot: Loaded app from partition at offset 0x10000
I (191) boot: Disabling RNG early entropy source…
I (193) cpu_start: Pro cpu up.
I (196) cpu_start: Application information:
I (201) cpu_start: Project name: hello-world
I (207) cpu_start: App version: v4.1-dirty
I (212) cpu_start: Compile time: Nov 3 2020 10:36:10
I (218) cpu_start: ELF file SHA256: c432a440140ad9cd…
I (224) cpu_start: ESP-IDF: v4.1-dirty
I (229) cpu_start: Starting app cpu, entry point is 0x4008102c
0x4008102c: call_start_cpu1 at C:/repos/esp-idf/components/esp32/cpu_start.c:271
I (221) cpu_start: App cpu up.
I (240) heap_init: Initializing. RAM available for dynamic allocation:
I (247) heap_init: At 3FFAE6E0 len 00001920 (6 KiB): DRAM
I (253) heap_init: At 3FFB2958 len 0002D6A8 (181 KiB): DRAM
I (259) heap_init: At 3FFE0440 len 00003AE0 (14 KiB): D/IRAM
I (265) heap_init: At 3FFE4350 len 0001BCB0 (111 KiB): D/IRAM
I (272) heap_init: At 40089AEC len 00016514 (89 KiB): IRAM
I (278) cpu_start: Pro cpu start user code
I (296) spi_flash: detected chip: generic
E (297) spi_flash: failed to get chip size
assertion «flash_ret == ESP_OK» failed: file «C:/repos/esp-idf/components/esp32/cpu_start.c», line 431, function: start_cpu0_default
abort() was called at PC 0x400d5497 on core 0
0x400d5497: __assert_func at /builds/idf/crosstool-NG/.build/HOST-x86_64-w64-mingw32/xtensa-esp32-elf/src/newlib/newlib/libc/stdlib/assert.c:62 (discriminator
ELF file SHA256: c432a440140ad9cd
Backtrace: 0x40083dc1:0x3ffe3b80 0x40084151:0x3ffe3ba0 0x400d5497:0x3ffe3bc0 0x40080fb2:0x3ffe3bf0 0x40081237:0x3ffe3c40 0x40079212:0x3ffe3c80 |<-CORRUPTED
0x40083dc1: invoke_abort at C:/repos/esp-idf/components/esp32/panic.c:157
0x40084151: abort at C:/repos/esp-idf/components/esp32/panic.c:174
0x400d5497: __assert_func at /builds/idf/crosstool-NG/.build/HOST-x86_64-w64-mingw32/xtensa-esp32-elf/src/newlib/newlib/libc/stdlib/assert.c:62 (discriminator
0x40080fb2: start_cpu0_default at C:/repos/esp-idf/components/esp32/cpu_start.c:431 (discriminator 1)
0x40081237: call_start_cpu0 at C:/repos/esp-idf/components/esp32/cpu_start.c:259
If i start my own project via VScode/platformIO, i cant build it :
Executing action: all (aliases: build)
Running ninja in directory c:reposesp-idffirmwarebuild
Executing «ninja all»…
[1/6] cmd.exe /C «cd /D C:reposesp-idfFirmwarebuildesp-…***********************************************************»
Partition table binary generated. Contents:
*******************************************************************************
# Espressif ESP32 Partition Table
# Name, Type, SubType, Offset, Size, Flags
nvs,data,nvs,0x9000,24K,
phy_init,data,phy,0xf000,4K,
factory,app,factory,0x10000,1M,
*******************************************************************************
[2/6] Performing build step for ‘bootloader’
ninja: no work to do.
[3/4] Linking CXX executable Firmware.elf
FAILED: Firmware.elf
cmd.exe /C «cd . && C:reposesp-idftoolstoolsxtensa-esp32-elfesp-2020r2-8.2.0xtensa-esp32-elfbinxtensa-esp32-elf-g++.exe -mlongcalls -Wno-frame-address @CMakeFilesFirmware.elf.rsp -o Firmware.elf && cd .»
c:/repos/esp-idf/tools/tools/xtensa-esp32-elf/esp-2020r2-8.2.0/xtensa-esp32-elf/bin/../lib/gcc/xtensa-esp32-elf/8.2.0/../../../../xtensa-esp32-elf/bin/ld.exe: esp-idf/esp32/libesp32.a(cpu_start.c.obj):(.literal.main_task+0x18): undefined reference to `app_main’
c:/repos/esp-idf/tools/tools/xtensa-esp32-elf/esp-2020r2-8.2.0/xtensa-esp32-elf/bin/../lib/gcc/xtensa-esp32-elf/8.2.0/../../../../xtensa-esp32-elf/bin/ld.exe: esp-idf/esp32/libesp32.a(cpu_start.c.obj): in function `main_task’:
C:/repos/esp-idf/components/esp32/cpu_start.c:551: undefined reference to `app_main’
collect2.exe: error: ld returned 1 exit status
ninja: build stopped: subcommand failed.
ninja failed with exit code 1
I’ve found nothing that works for me elsewhere
Содержание
- C компиляция: collect2: ошибка: ld возвращен 1 статус выхода
- ОТВЕТЫ
- Ответ 1
- Ответ 2
- Ответ 3
- Ответ 4
- Ответ 5
- Ответ 6
- Ответ 7
- Gcc collect2 exe error ld returned 1 exit status
- mironyuk
- Вложения
- Эдуард Анисимов
- mironyuk
- 03-05.7z
- Эдуард Анисимов
- mironyuk
- Эдуард Анисимов
- mironyuk
- Эдуард Анисимов
- mironyuk
- Эдуард Анисимов
- OpenSTM32 Community
- The STM32 Systems Resource
- SW4STM32 and SW4Linux fully supports the STM32MP1 asymmetric multicore Cortex/A7+M4 MPUs
- System Workbench for STM32
- collect2.exe: error: ld returned 1 exit status
Я попытался найти эту ошибку онлайн, но все сообщения для С++.
test1.o: В функции ReadDictionary’: /home/johnny/Desktop/haggai/test1.c:13: undefined reference to CreateDictionary ‘ collect2: error: ld возвращен 1 статус выхода make: *** [test1] Ошибка 1
супер простой код и не может понять, что проблема
теперь это заголовок dict.h
и если вы хотите проверить hash.h
Может быть, будет легче, если я дам вам файлы здесь?
В любом случае, я буду рад за советы о том, как понять проблему.
ОТВЕТЫ
Ответ 1
Ваша проблема — это опечатка в функции CreateD e ctionary(). Вы должны изменить ее на CreateD i ctionary(). collect2: error: ld return 1 статус выхода — та же проблема как на C, так и на С++, обычно это означает, что у вас есть неразрешенные символы. В вашем случае это опечатка, о которой я упоминал ранее.
Ответ 2
Ответ 3
У меня возникла эта проблема, и я попытался решить многие ее проблемы. Наконец, оказалось, что make clean и make снова решили. Причина в следующем: Я получил исходный код вместе с объектными файлами, скомпилированными ранее со старой версией gcc. Когда моя новая версия gcc хочет связать эти старые файлы объектов, она не может решить какую-либо функцию там. Случается со мной несколько раз, что дистрибуторы исходного кода не очищаются перед упаковкой, поэтому make clean сохранил день.
Ответ 4
иногда эта ошибка возникла, потому что не удалось скомпилировать ни в какой другой сборке. Лучший способ попробовать — сделать чистую и снова сделать весь код.
Ответ 5
При компиляции вашей программы вам необходимо включить dict.c, например:
gcc -o test1 test1.c dict.c
Кроме того, у вас есть опечатка в определении dict.c CreateDictionary , она говорит CreateDectionary ( e вместо i )
Ответ 6
обычно эта проблема возникала, когда мы вызывали функцию, которая не была определена в программном файле, поэтому, чтобы решить эту проблему, проверьте, вызывали ли вы такую функцию, которая не была определена в файле программы.
Ответ 7
Если вы используете Dev C++, то ваш .exe или означает, что ваша программа уже запущена, и вы пытаетесь запустить ее снова.
Источник
Gcc collect2 exe error ld returned 1 exit status
mironyuk
Marlin 2.0.8, COREXY, 3D TOUCH
все работало нормально. Не знаю, что сделал ,но ошибка при компиляции вылезает не зависимо от
-компа
-смены прошивки вплоть до чистой или родной заводской
-перезагрузки компа
-удаления полного VC и установки заново
В общем, мумукаюсь уже два дня, начинаю беситься.
Наверняка кто-то тоже сталкивался с такой проблемой, отзовитесь.
Прошивку прицепил.
Вложения

Эдуард Анисимов
mironyuk

03-05.7z
Эдуард Анисимов
mironyuk
я не программист, от слова Далеко, извините. Что я должен сделать с этим ромом? ну, и с предупреждениями?
Спасибо.
предупреждения и раньше были (это желтым, я понимаю), может не столько, как сейчас, но все работало. Вот начал автоуровень приделывать и кое что подкорректировал в прошиве, может и не туда ткнул где-то.
попробую вот так 
Эдуард Анисимов
mironyuk
если под железкой понимается комп, то я делал на другом компе и тоже самое происходит
достал старую прошивку, предупреждений нет, переполнения ром тоже нет, но появилось новое чего то там в файле .ld 
Эдуард Анисимов
А обновления PlatformIO перед этим не было?
Я столкнулся с тем, что писал на старом, на компе, где нет интернета. И всё работало.
Дома обновился и всё перестало работать.
А почему не пишете под CubeIDE?
А судя по логу, ему скрипт для F103VC не нравится.
mironyuk
я сносил два раза VC полностью и устанавливал, но вроде не писал мне VC что обновляет Платформио.
А почему не пишете под CubeIDE?\ я даже не знаю, что это, я далек от понимания языка С и пр. Просто обновил плату на 32 бит, за ней потянулся Марлин 2.0, ну и далее вопрос чем компилить, увидел VC и вперед.
А судя по логу, ему скрипт для F103VC не нравится. \ ну это «вдруг» сейчас ему не нравится, а всегда нравился, вроде.
ааааа, со старой прошивой сам баран — перенес ее в новую папку и обозвал кирилицей папку АРХИВ. блин, сам на эти грабли уже наступал. Так вот, когда АРХИВ переименовал в STORAGE, то все скомпилировалось!! Таакс, значит дело не в VC. Надо, наверное, сравнить построчно обе прошивы и найти разницу, в этой разнице и кроется ошибка или опять же русская буква закралась в команду.
Эдуард Анисимов
Вот про эту возможность я всегда забываю. Так как никогда ни пользователя, ни каталог для проекта не создаю кириллицей.
И в логах ошибки ничего не было. Поэтому и забыл.
А сравнивать построчно удобно TotalCommander. Файловый менеджер с кучей фич в максимальной комплектации.
Источник
The STM32 Systems Resource
SW4STM32 and SW4Linux fully supports the STM32MP1 asymmetric multicore Cortex/A7+M4 MPUs
 |
With System Workbench for Linux , Embedded Linux on the STM32MP1 family of MPUs from ST was never as simple to build and maintain, even for newcomers in the Linux world. And, if you install System Workbench for Linux in System Workbench for STM32 you can seamlessly develop and debug asymmetric applications running partly on Linux, partly on the Cortex-M4. You can get more information from the ac6-tools website and download (registration required) various documents highlighting:
|
System Workbench for STM32
collect2.exe: error: ld returned 1 exit status
I met this issue building SMARTMIC project for Bluecoin in Eclipse Oxygen with SW4STM32 plugin. I was able to build this project in the same configuration and environment, but after a few days this issue appeared. Installed Eclipse Photon and SW4STM32 plugin, issue disappeared, but after a few days reappeared again. There is the same issue with other of the shelf ST projects as well (eg STSW-SPIN3201). Could anyone help please?
Also, there is a warning:
- warning “Compiler generates FPU instructions for a device without an FPU (check __FPU_PRESENT)”
This wasn’t there before. It is strange, because the target MCU has FPU.
There is a build log.
make all
Building file: D:/workspace/STM32CubeFunctionPack_SMARTMIC1_V1.1.1/Middlewares/ST/STM32_AcousticDB_Library/Lib/Acoustic_DB100.c
Invoking: MCU GCC Compiler
D:workspaceSTM32CubeFunctionPack_SMARTMIC1_V1.1.1ProjectsMultiApplicationsFP-AUD-SMARTMIC1SW4STM32STM32F446ME-BlueCoinDebug
arm-none-eabi-gcc -mcpu=cortex-m4 -mthumb -mfloat-abi=hard -mfpu=fpv4-sp-d16 -DARM_MATH_CM4 -DUSE_HAL_DRIVER -DSTM32_BLUECOIN -DSTM32F446xx -DUSE_COMPOSITE_VCP_AUDIO
Источник
Let me show you CMakeError.log:
Compilation of the CXX compiler identification source «CMakeCXXCompilerId.cpp» did not produce an executable in «C:/Qt/CMakeFiles/3.18.4/CompilerIdCXX».
Compilation of the CXX compiler identification source «CMakeCXXCompilerId.cpp» did not produce an executable in «C:/Qt/CMakeFiles/3.18.4/CompilerIdCXX».
Compilation of the CXX compiler identification source «CMakeCXXCompilerId.cpp» did not produce an executable in «C:/Qt/CMakeFiles/3.18.4/CompilerIdCXX».
Compilation of the CXX compiler identification source «CMakeCXXCompilerId.cpp» did not produce an executable in «C:/Qt/CMakeFiles/3.18.4/CompilerIdCXX».
Compilation of the CXX compiler identification source «CMakeCXXCompilerId.cpp» did not produce an executable in «C:/Qt/CMakeFiles/3.18.4/CompilerIdCXX».
Compilation of the CXX compiler identification source «CMakeCXXCompilerId.cpp» did not produce an executable in «C:/Qt/CMakeFiles/3.18.4/CompilerIdCXX».
Compilation of the CXX compiler identification source «CMakeCXXCompilerId.cpp» did not produce an executable in «C:/Qt/CMakeFiles/3.18.4/CompilerIdCXX».
Compilation of the CXX compiler identification source «CMakeCXXCompilerId.cpp» did not produce an executable in «C:/Qt/CMakeFiles/3.18.4/CompilerIdCXX».
Compilation of the CXX compiler identification source «CMakeCXXCompilerId.cpp» did not produce an executable in «C:/Qt/CMakeFiles/3.18.4/CompilerIdCXX».
Compilation of the CXX compiler identification source «CMakeCXXCompilerId.cpp» did not produce an executable in «C:/Qt/CMakeFiles/3.18.4/CompilerIdCXX».
Checking whether the CXX compiler is IAR using «» did not match «IAR .+ Compiler»:
** Visual Studio 2019 Developer Command Prompt v16.8.4
** Copyright (c) 2020 Microsoft Corporation
[vcvarsall.bat] Environment initialized for: ‘x64’
Checking whether the CXX compiler is IAR using «» did not match «IAR .+ Compiler»:
** Visual Studio 2019 Developer Command Prompt v16.8.4
** Copyright (c) 2020 Microsoft Corporation
[vcvarsall.bat] Environment initialized for: ‘x64’
Checking whether the ASM compiler is GNU using «—version» did not match «(GNU assembler)|(GCC)|(Free Software Foundation)»:
Microsoft (R) C/C++ Optimizing Compiler Version 19.28.29336 for x64
Copyright (C) Microsoft Corporation. All rights reserved.
cl : Command line warning D9002 : ignoring unknown option ‘—version’
cl : Command line error D8003 : missing source filename
Checking whether the ASM compiler is Clang using «—version» did not match «(clang version)»:
Microsoft (R) C/C++ Optimizing Compiler Version 19.28.29336 for x64
Copyright (C) Microsoft Corporation. All rights reserved.
cl : Command line warning D9002 : ignoring unknown option ‘—version’
cl : Command line error D8003 : missing source filename
Checking whether the ASM compiler is AppleClang using «—version» did not match «(Apple LLVM version)»:
Microsoft (R) C/C++ Optimizing Compiler Version 19.28.29336 for x64
Copyright (C) Microsoft Corporation. All rights reserved.
cl : Command line warning D9002 : ignoring unknown option ‘—version’
cl : Command line error D8003 : missing source filename
Checking whether the ASM compiler is ARMClang using «—version» did not match «armclang»:
Microsoft (R) C/C++ Optimizing Compiler Version 19.28.29336 for x64
Copyright (C) Microsoft Corporation. All rights reserved.
cl : Command line warning D9002 : ignoring unknown option ‘—version’
cl : Command line error D8003 : missing source filename
Checking whether the ASM compiler is HP using «-V» did not match «HP C»:
Microsoft (R) C/C++ Optimizing Compiler Version 19.28.29336 for x64
Copyright (C) Microsoft Corporation. All rights reserved.
cl : Command line error D8004 : ‘/V’ requires an argument
Checking whether the ASM compiler is Intel using «—version» did not match «(ICC)»:
Microsoft (R) C/C++ Optimizing Compiler Version 19.28.29336 for x64
Copyright (C) Microsoft Corporation. All rights reserved.
cl : Command line warning D9002 : ignoring unknown option ‘—version’
cl : Command line error D8003 : missing source filename
Checking whether the ASM compiler is SunPro using «-V» did not match «Sun C»:
Microsoft (R) C/C++ Optimizing Compiler Version 19.28.29336 for x64
Copyright (C) Microsoft Corporation. All rights reserved.
cl : Command line error D8004 : ‘/V’ requires an argument
Checking whether the ASM compiler is XL using «-qversion» did not match «XL C»:
Microsoft (R) C/C++ Optimizing Compiler Version 19.28.29336 for x64
Copyright (C) Microsoft Corporation. All rights reserved.
cl : Command line warning D9002 : ignoring unknown option ‘-qversion’
cl : Command line error D8003 : missing source filename
Detecting CXX compiler ABI info failed to compile with the following output:
Change Dir: C:/Qt/CMakeFiles/CMakeTmp
Run Build Command(s):C:/ninja-win/ninja.exe cmTC_ea43b && [1/2] Building CXX object CMakeFilescmTC_ea43b.dirCMakeCXXCompilerABI.cpp.obj
FAILED: CMakeFiles/cmTC_ea43b.dir/CMakeCXXCompilerABI.cpp.obj
«C:PROGRA~2Microsoft Visual Studio2019COMMUN~1VCAUXILI~1Buildvcvars64.bat» -o CMakeFilescmTC_ea43b.dirCMakeCXXCompilerABI.cpp.obj -c «C:Program FilesCMakesharecmake-3.18ModulesCMakeCXXCompilerABI.cpp»
[ERROR:vcvarsall.bat] Invalid argument found : -o
[ERROR:vcvarsall.bat] Invalid argument found : CMakeFilescmTC_ea43b.dirCMakeCXXCompilerABI.cpp.obj
[ERROR:vcvarsall.bat] Invalid argument found : -c
La syntaxe de la commande n’est pas correcte.
ninja: build stopped: subcommand failed.
-
#1
Marlin 2.0.8, COREXY, 3D TOUCH
все работало нормально. Не знаю, что сделал ,но ошибка при компиляции вылезает не зависимо от
-компа
-смены прошивки вплоть до чистой или родной заводской
-перезагрузки компа
-удаления полного VC и установки заново
В общем, мумукаюсь уже два дня, начинаю беситься.
Наверняка кто-то тоже сталкивался с такой проблемой, отзовитесь.
Прошивку прицепил.
-
116.7 KB
Просмотры: 2

-
#3
да, думал, что конфига хватит, минуту…
03-05.7z
Посмотреть и скачать с Яндекс.Диска

disk.yandex.ru
может это поможет.
-
#4
Там пишет, что rom имеет переполнение на 660 байт.
Кроме того, 30 предупреждений, которые не решены.
-
#5
я не программист, от слова Далеко, извините. Что я должен сделать с этим ромом? ну, и с предупреждениями?
Спасибо.
предупреждения и раньше были (это желтым, я понимаю), может не столько, как сейчас, но все работало. Вот начал автоуровень приделывать и кое что подкорректировал в прошиве, может и не туда ткнул где-то…
попробую вот так
-
#6
ссылку на прошивку вы не видите до сих пор?
Нет.
Да и помочь вряд ли смогу.
Мне сама железка нужна, что бы понять.
-
#7
если под железкой понимается комп, то я делал на другом компе и тоже самое происходит
достал старую прошивку, предупреждений нет, переполнения ром тоже нет, но появилось новое чего то там в файле .ld
-
#8
А обновления PlatformIO перед этим не было?
Я столкнулся с тем, что писал на старом, на компе, где нет интернета. И всё работало.
Дома обновился и всё перестало работать.
А почему не пишете под CubeIDE?
А судя по логу, ему скрипт для F103VC не нравится.
-
#9
я сносил два раза VC полностью и устанавливал, но вроде не писал мне VC что обновляет Платформио.
А почему не пишете под CubeIDE?\ я даже не знаю, что это, я далек от понимания языка С и пр. Просто обновил плату на 32 бит, за ней потянулся Марлин 2.0, ну и далее вопрос чем компилить, увидел VC и вперед.
А судя по логу, ему скрипт для F103VC не нравится…\ ну это «вдруг» сейчас ему не нравится, а всегда нравился, вроде.
ааааа, со старой прошивой сам баран — перенес ее в новую папку и обозвал кирилицей папку АРХИВ… блин, сам на эти грабли уже наступал… Так вот, когда АРХИВ переименовал в STORAGE, то все скомпилировалось!! Таакс, значит дело не в VC. Надо, наверное, сравнить построчно обе прошивы и найти разницу, в этой разнице и кроется ошибка или опять же русская буква закралась в команду…
-
#10
Вот про эту возможность я всегда забываю. Так как никогда ни пользователя, ни каталог для проекта не создаю кириллицей.
И в логах ошибки ничего не было. Поэтому и забыл.
А сравнивать построчно удобно TotalCommander. Файловый менеджер с кучей фич в максимальной комплектации.
-
#11
Эдуард, БОЛЬШОЕ СПАСИБО!!