CTX226772
{{tooltipText}}
Article
|
|
{{likeCount}} found this helpful
|
Created:
{{articleFormattedCreatedDate}}
|
Modified:
{{articleFormattedModifiedDate}}
Symptoms or Error
This article is intended for Citrix administrators and technical teams only.
Non-admin users must contact their company’s Help Desk/IT support team and can refer to CTX297149 for more information.
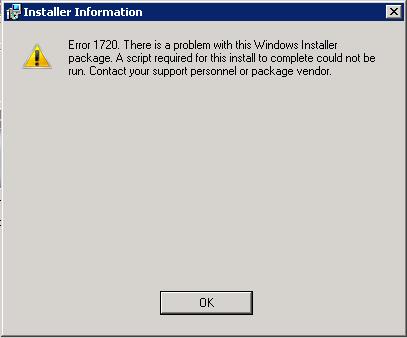
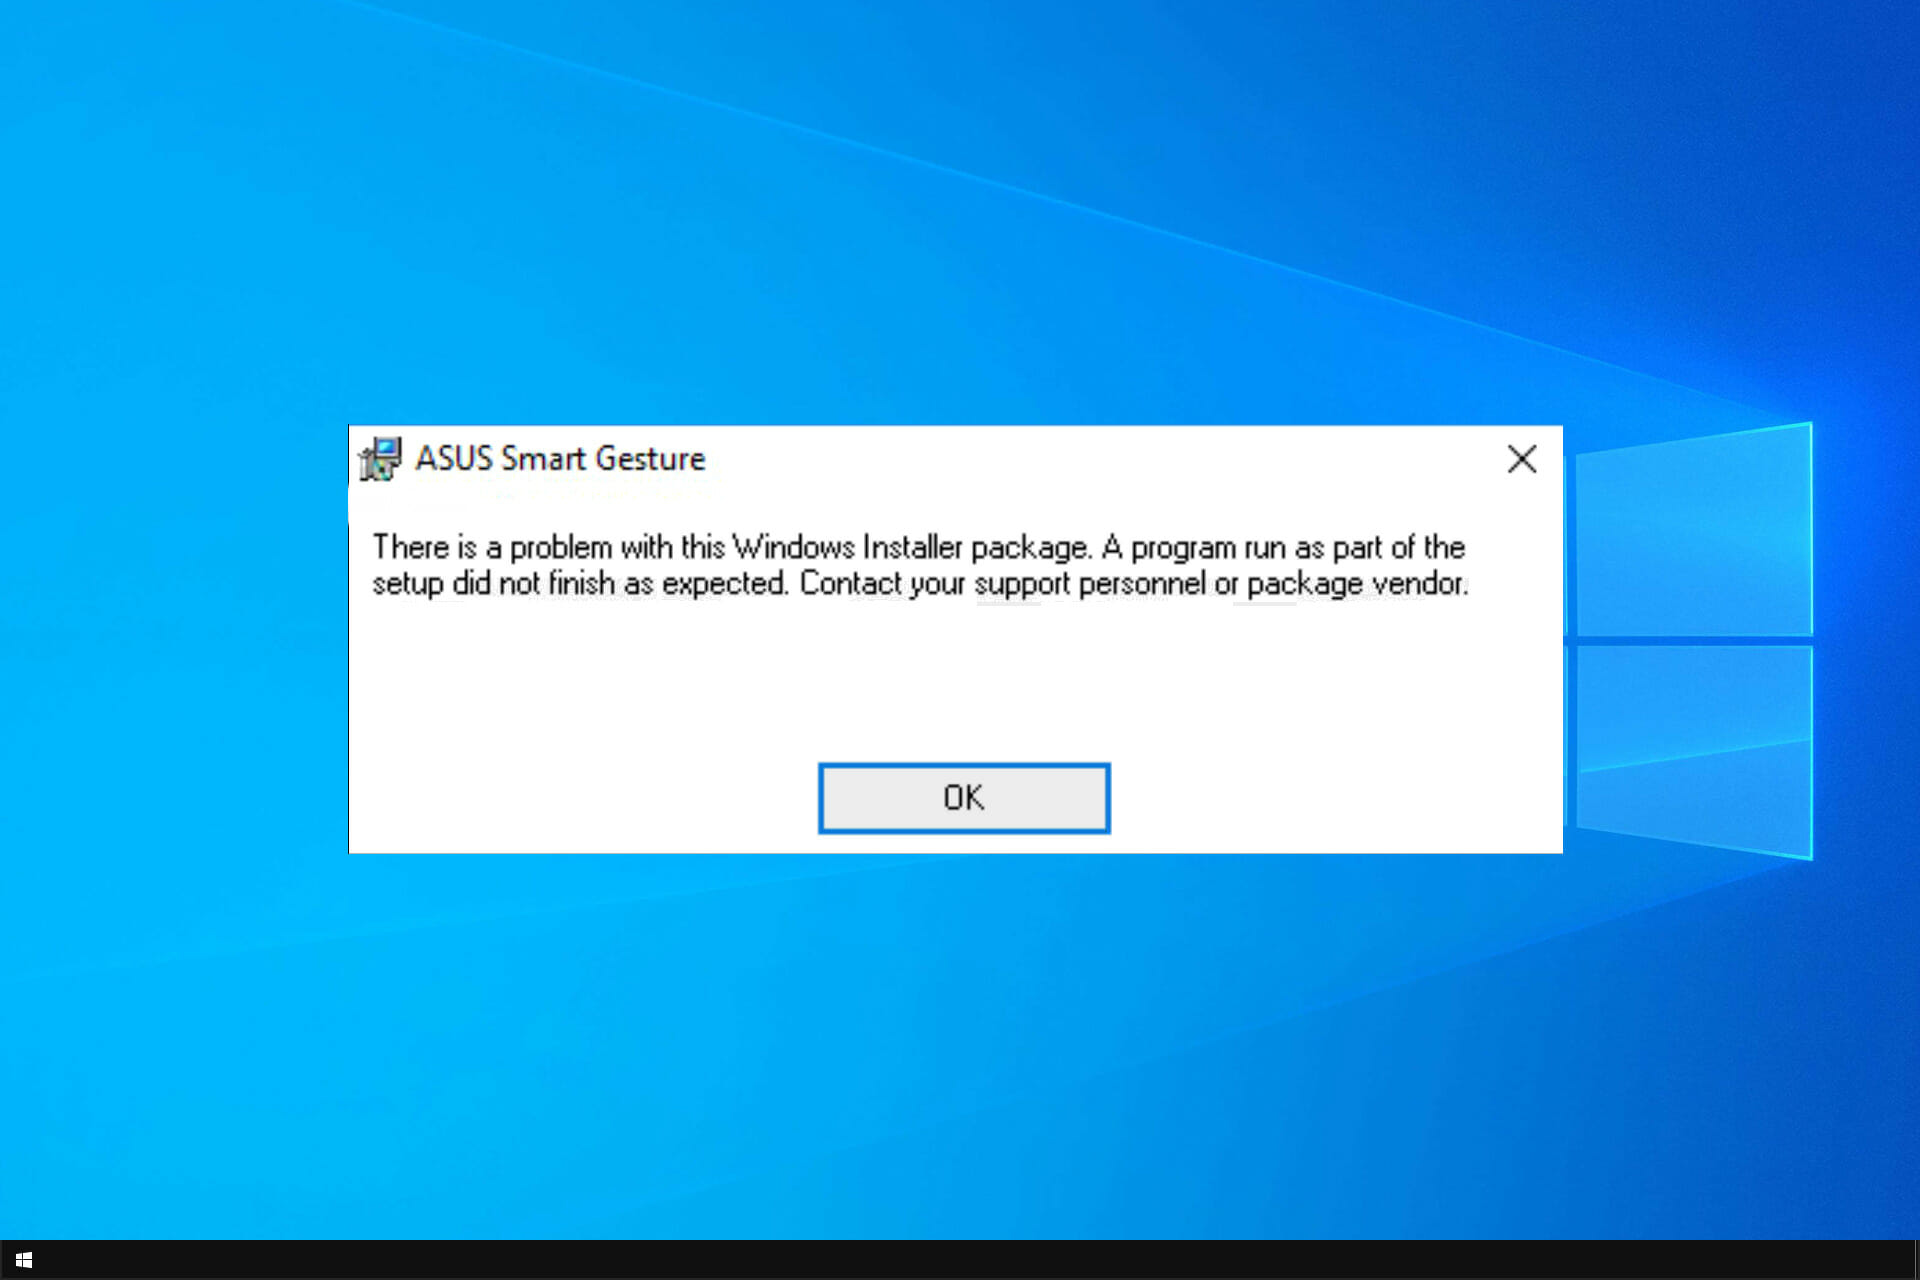
Installation of Receiver fails with the following error,
«There is a problem with this Windows Installer package. A program required for this install to complete could not be run. Contact your support personnel or package vendor»
Running Microsoft Fixit throws the following error,
«C:\Windows\System32\Rundll32.exe is missing»
\\No Trolley Express log is generated under C:\Users\username\AppData\Local\Temp
In Event Viewer we see the following error from MsiInstaller,
Event 11721, MsiInstaller
Product Online Plug-in — Error 1721. There is a problem with this Windows Installer package. A program required for this install to complete could not be run. Contact your support personnel or package vendor. Action: CtxCliLkdnInstallPerMachine.UID, location: C:\Program Files\ICA Client\, command: rundll32.exe»C:\Program Files\Citrix\ICA Client\icaconfs.dll», ApplyConfigurationA import —replace -f -all «C:\Program Files\Citrix\ICA Client\Configuration» —RunAsAdmin.
Solution
Complete the following steps:
- Clean up files/folders and registry entries as per CTX325140 — How to Remove Client Files Remaining on System after Uninstalling Receiver for Windows
- Run Microsoft Fixit using https://support.microsoft.com/en-us/help/17588/fix-problems-that-block-programs-from-being-installed-or-removed
- Copy «Rundll32.exe» from a working Windows machine of same OS version to non working machine at C:\Windows\System32.
- Install Receiver for Windows
Problem Cause
C:\Windows\System32\Rundll32.exe was missing on the client machine.
Когда вы пытаетесь установить Citrix Feature Pack 1 для сервера Xen App 5 на Windows Server 2008, вы можете получить следующую ошибку при использовании установщика Windows:
Ошибка 1720. Проблема с этим пакетом установщика Windows. Не удалось запустить сценарий, необходимый для завершения этой установки. Обратитесь в службу поддержки или к поставщику пакета.
С наших 50+ серверов приложений Xen мы получили эту ошибку на 11 серверах. Другие серверы не имели проблем с установщиком во время установки Citrix Feature Pack 3 для Xen App 5.
Чтобы решить эту проблему, пожалуйста, сделайте следующее.
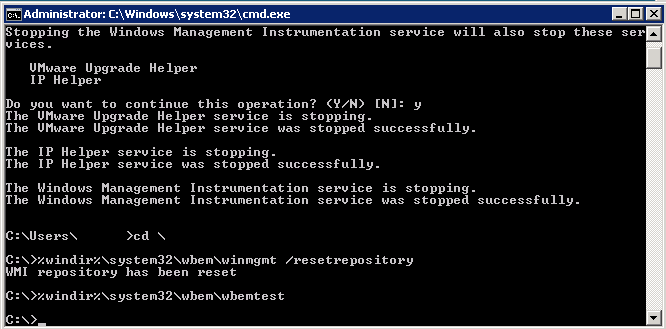
Хит НАЧАЛО | тип CMD | щелкните правой кнопкой мыши на CMD и выберите ‘Запустить от имени администратора’ (если вы используете UAC, в противном случае просто запустите CMD)
Введите следующее:
чистый стоп winmgmt
(если ваши серверы Citrix виртуализированы, вы можете получить приглашение, как показано на рисунке ниже)
Введите Y и нажмите ввод.
Теперь введите:
% windir% \ system32 \ wbem \ winmgmt / resetrepository
Нажмите ввод
Теперь введите:
% WINDIR% \ system32 \ WBEM \ WBEMTEST
На всплывающем экране нажмите «Подключиться», а также на следующем экране нажмите «Подключиться»
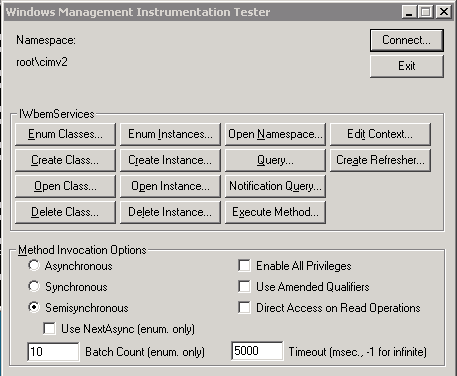
Если вы не получили никаких ошибок во время теста, вам следует перезагрузить сервер сейчас и попытаться установить Citrix Feature Pack 1 снова.
Если у вас все еще есть проблемы, пожалуйста, напишите ниже, и я постараюсь помочь.
Issue
Attempting to install an .msp file (in my case Citrix XenApp 6.5 RollUp7) it fails to install with the following error message.
Error Message

Troubleshooting Steps
- Run the msp with the verbose logging switch for example:
.\XA650W2K8R2X64R07.msp /L*v C:\Temp\RollUp7.log
2. Have a look in the C:\Temp\RollUp7.log file and you’re looking for the highlighted in red below “C:\Windows\Installer\d5c63.msi
Log File:
=== Verbose logging started: 30/05/2018 8:17:04 Build type: SHIP UNICODE 5.00.7601.00 Calling process: C:\windows\System32\msiexec.exe ===
MSI (c) (EC:F0) [08:17:04:901]: Font created. Charset: Req=0, Ret=0, Font: Req=MS Shell Dlg, Ret=MS Shell Dlg

MSI (c) (EC:F0) [08:17:04:901]: Font created. Charset: Req=0, Ret=0, Font: Req=MS Shell Dlg, Ret=MS Shell Dlg

MSI (c) (EC:10) [08:17:04:917]: Resetting cached policy values
MSI (c) (EC:10) [08:17:04:917]: Machine policy value 'Debug' is 0
MSI (c) (EC:10) [08:17:04:917]: ******* RunEngine:
 ******* Product: {1471A89F-8CAB-4C46-89AB-942432D1DD3D}
 ******* Action:
 ******* CommandLine: **********
MSI (c) (EC:10) [08:17:04:917]: Machine policy value 'DisableUserInstalls' is 0
MSI (c) (EC:10) [08:17:05:057]: Cloaking enabled.
MSI (c) (EC:10) [08:17:05:057]: Attempting to enable all disabled privileges before calling Install on Server
MSI (c) (EC:10) [08:17:05:151]: End dialog not enabled
MSI (c) (EC:10) [08:17:05:151]: Original package ==> C:\windows\Installer\d5c63.msi
MSI (c) (EC:10) [08:17:05:151]: Package we're running from ==> C:\windows\Installer\d5c63.msi
MSI (c) (EC:10) [08:17:05:166]: Note: 1: 2276 2: 3: 75
DEBUG: Error 2276: Database: . Codepage 75 not supported by the system.
1: 2276 2: 3: 75
This installation package could not be opened. Contact the application vendor to verify that this is a valid Windows Installer package.
C:\windows\Installer\d5c63.msi
MSI (c) (EC:10) [08:17:05:213]: Note: 1: 1708
MSI (c) (EC:10) [08:17:05:213]: Product: -- Installation failed.

MSI (c) (EC:10) [08:17:05:213]: Windows Installer installed the product. Product Name: . Product Version: . Product Language: . Manufacturer: . Installation success or error status: 1620.

MSI (c) (EC:10) [08:17:05:213]: MainEngineThread is returning 1620
=== Verbose logging stopped: 30/05/2018 8:17:05 ===
3. Browse to C:\Windows\Installer\ folder (hidden protected OS folder) and rename the .msi to .old mentioned in the log file.
4. Re-run the .msp install
5. This time it will prompt for the original msi files, in my case it was the mps.msi

6. Browse to the original msi file where it may be and now the .msp file will install normally.
by Aleksandar Ognjanovic
Aleksandar’s main passion is technology. With a solid writing background, he is determined to bring the bleeding edge to the common user. With a keen eye, he always… read more
Updated on
- To fix problem with this Windows Installer package, you have to use the administrative privileges.
- Your antivirus software can sometimes interfere and cause this message to appear.
- Restarting the required services is a quick and easy way to solve this issue.
From minor third-party tools to complex games and applications, one thing is certain: you need to install a program in order to use them.
There are quite a few Windows Installer errors in Windows 10, and the There is a problem with Windows Installer package error is one of the most resilient.
This isn’t the only message that you can encounter, and you can also get This installation package could not be opened error as well.
If you’re stuck with this error and you’re not sure how to deal with it, we recommend you keep reading this.
How can I fix Windows Installer package error in Windows 10/11?
1. Make sure you have administrative permissions
- Locate the setup file that you want to run.

- Right-click and choose Run as administrator from the menu.

- Now follow the instructions on the screen to complete the process.


As you already know, in order to install any application coming from a third-party source, you’ll need administrative permission. Luckily, you can make yourself an administrator easily on Windows.
Hence, you’ll need to authenticate using the Administrator account or have permission to make system-related changes on an alternate account.
Do keep in mind that There is a problem with this Windows Installer package can affect uninstall process as well.
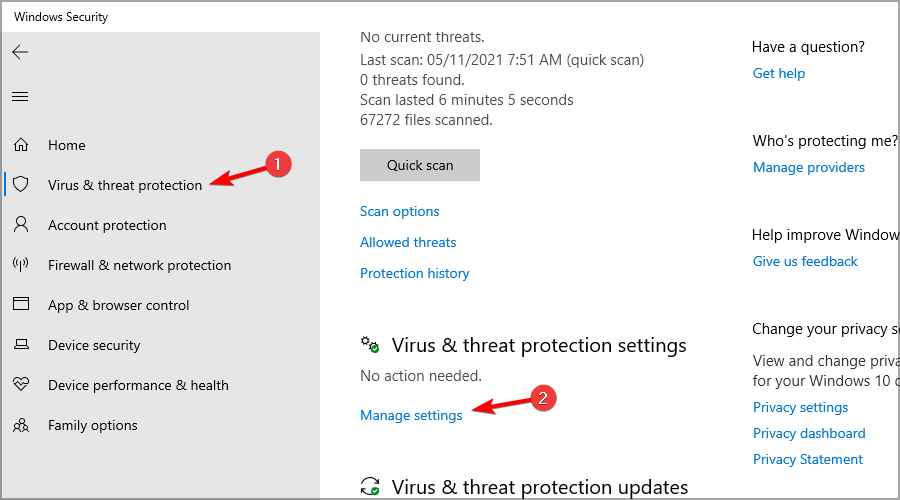
2. Disable the antivirus and download the file again
- Press Windows key + X and type defender. Select Windows Security from the list.

- Navigate to the Virus & threat protection and click on Manage settings.

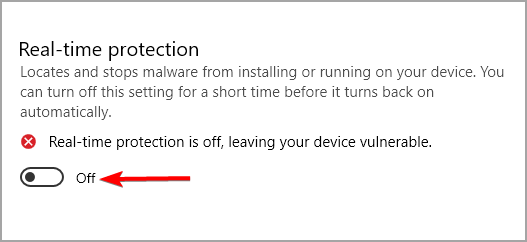
- Disable Real-time protection.

- Now try to install the application again.

You can also try downloading the installation file again and try to reinstall the software.
Users reported There is a problem with this windows installer package with iTunes, Chrome, Microsoft Edge, and Cisco AnyConnect, but it can also affect any other software.

NOTE
Disabling your antivirus protection will leave your system at risk, so use it only with the files you trust. Don’t forget to turn the protection back on once you’re done.
However, for further and stronger thread security, a specialized instrument like ESET Smart Security is highly advised.
3. Run Program Install and Uninstall Troubleshooter
- Visit the troubleshooter download page.
- Click on Download troubleshooter.

- Once the file is downloaded, run it.
- Follow the instructions on the screen to complete the process.


Once you run this software it will check and resolve installation-related errors. It’s also worth mentioning that this tool is provided by Microsoft, so you won’t need to take unnecessary risks with suspicious third-party solutions.
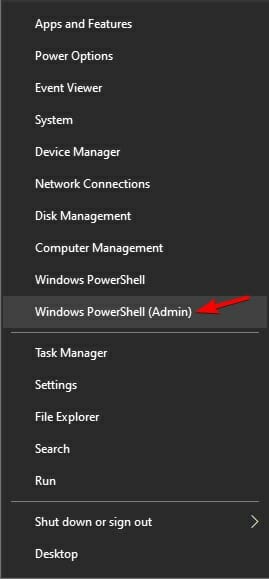
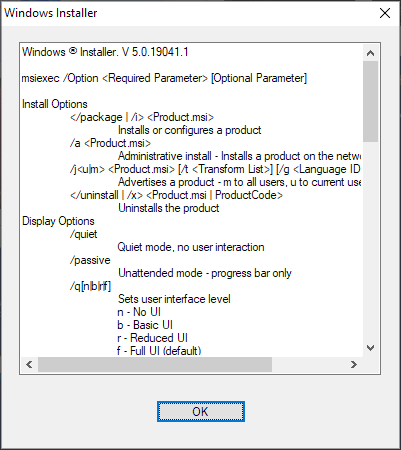
4. Check Windows Installer for errors
- Right-click the Start menu and and select PowerShell (Admin).

- Type the following command in the command line and press Enter: MSIExec

- If everything is good, you’ll see the pop-up window with Windows Installer details.

- If you see an error report, you should re-register Windows Installer.

In a system as complex as Windows is, you have various services that partake in everything you do. The MSI engine foundation is responsible for the installation, maintenance, and uninstallation of third-party programs.
You don’t need to be a tech enthusiast to get where this is going. If MSI engine (Windows Installer) is down, corrupted, or disabled by mistake, you’ll have a hard time installing anything.
- FIX: Another installation is already in progress error
- [Solved] The installer has insufficient privileges to access
- Security Settings Blocked Self-signed Application [Fix]
- Fix: Page Fault in Nonpaged Area on Windows 10
5. Re-register Windows Installer
- Right-click Start and choose PowerShell(Admin).
- In the command line, type the following commands and press Enter after each:
msiexec.exe /unregister
msiexec.exe /regserver
- Close PowerShell and look for changes. If the problem is still there, move to the Step 4.
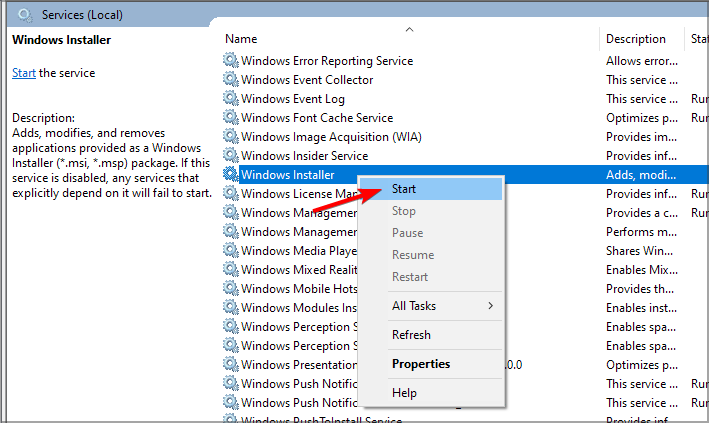
- Press Windows key + R, type services.msc and press Enter.
- Locate Windows Installer. It should be at the bottom of the list.
- Right-click on the service and select Stop.

- Now right-click it again and choose Start.

- Restart your computer.


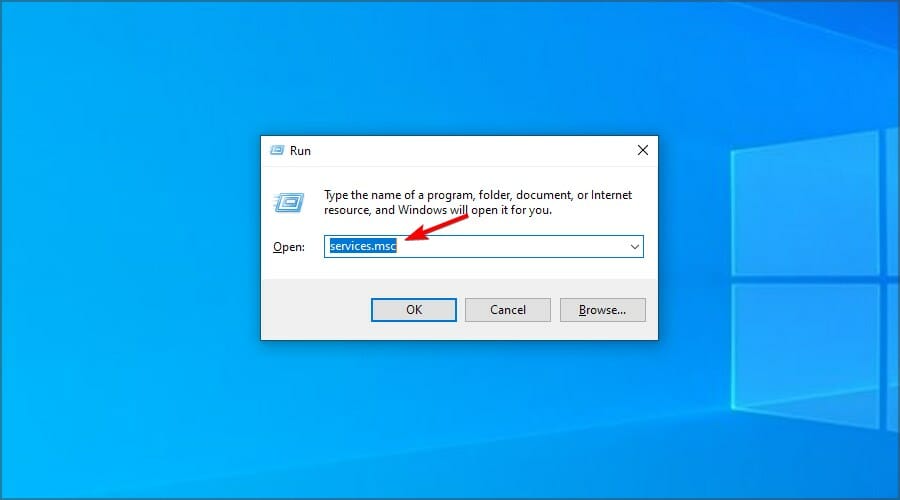

This is a simple solution, and it can help with There is a problem with this windows installer package error 1722 or any other error.
How can I fix Windows Installer package error on Windows 11?
This error affects all versions of Windows, and if you encounter the issue on Windows 11, you should know that all these solutions can be applied to it as well.
Windows 10 and 11 are pretty similar when it comes to core functionality, so most problems can be fixed by using the same solutions.
That should be enough to rid you of the There is a problem with this Windows Installer package installation error.
If you’re having more issues, we suggest reading our Windows Installer Service could not be accessed article for more useful solutions.
Should you know an alternative solution to this, feel free to tell us in the comments section below.
![]()
Many of my clients utilize Citrix XenDesktop or XenApp and thus Citrix StoreFront. Once it is initially configured and running, things are generally pretty smooth going. But when it comes time to perform in-place upgrades of Citrix StoreFront, sometimes things get a bit hairy and go off track, usually ending up with a dreaded 1603 MSI installer error. Then you are royally screwed because the StoreFront installation is half installed (or half uninstalled if you are an optimist) and you can’t repair, reinstall, or even uninstall using normal methods. Below are the notes I’ve developed for myself and my support team to manually uninstall StoreFront should the need arise – which it does, often.

These notes are based on single server stand alone installs of Citrix StoreFront versions 2.6.0.5031, 3.0.1.55 , and 3.6.0.33 (as in I’ve used these notes to manually uninstall those versions before). I have used these notes on XenApp 6.5 servers and on XenDesktop 7.x controllers without any issues. Your mileage may vary though.
As always – Use any tips, tricks, or scripts I post at your own risk.
**Warning** Reboot and take a VM snapshot of the StoreFront server before doing anything else. A reboot is a requirement before doing anything with StoreFront, it doesn’t matter if you are doing an install / upgrade, or are already screwed and need to manually uninstall – reboot before continuing!!! And if you do not reboot – YOU WILL GET ERRORS that will prevent the instructions below from working.
Immediately after you have rebooted, open an elevated Command Prompt and remove all thumbs.db files on the StoreFront server which can be locked opened by Windows Explorer and cause the uninstaller to fail:
c:
cd \
del /s thumbs.db

Next, verify that the HTML5 Client is actually installed on the machine, otherwise the uninstaller will likely fail later on.
msiexec /i "C:\Program Files\Citrix\Receiver StoreFront\Features\HTML5Client\template\HTML5Installer.msi"
If you get a repair / remove Windows Installer dialog box, then it is installed and you can just exit the installer, otherwise install using the default settings.
Open the StoreFront MMC, and if it allows you (which it likely won’t), delete all your stores.
Open Add/Remove Programs and uninstall the Citrix Receiver if it is installed.
Open an elevated Powershell console. Add the Delivery Services Framework snapin, remove all the Feature Instances, then confirm they are all removed.
**Note – only add the single snapin listed below, otherwise you potentially will end up with files locked open during the removal process, which can cause the removal to fail**
### Add the Citrix Delivery Services Framework Powershell Snapin
add-pssnapin Citrix.DeliveryServices.Framework.Commands

### Remove all DS FeatureInstances
Remove-DSFeatureInstance -all -confirm:$false

### Verify all FeatureInstances are deleted - you should see just {} listed
Get-DSFrameworkController

### If any FeatureInstances are still listed, remove manually them with the next line, otherwise skip to Uninstall-DSFeatureClass
remove-dsfeatureinstance -featureinstanceid feature_name

Stop the Storefront services if they are still running before continuing.
Close Powershell
**Note – it is very important you close the PowerShell console at this point and reopen a new one before continuing below and attempting to remove StoreFront’s Feature Classes, otherwise the removal of the Feature Classes will fail**
Open a new elevated Powershell console (see warning above). Add just the Delivery Services Framework snapin, remove all the Feature Classes, then confirm they are all removed.
###Add the Citrix Delivery Services Framework Powershell Snapin
add-pssnapin Citrix.DeliveryServices.Framework.Commands

###Remove all FeatureClasses
Uninstall-DSFeatureClass -all -confirm:$false

###Verify all Feature Classes have been removed - you should only see {} listed
Get-DSFrameworkController

If there are no DSFeatureClasses are still listed, skip to Citrix.DeliveryServices.UninstallUtil.exe below. Otherwise, some extra manual cleanup is going to be required. Using your favorite text editor (Notepad++ in my case), open the Framework.xml file (I usually just run the following from an elevated command prompt.
start notepad++ "C:\Program Files\Citrix\Receiver StoreFront\Framework\FrameworkData\Framework.xml"
Within Notepad++, search for the tag “<Type>” to get all the guid’s of any remaining Feature Classes.
Back in the elevated Powershell console, repeatedly run the Uninstall-DSFeatureClass for each <Type> guid you found in the Framework.xml:
Uninstall-DSFeatureClass -Type {guid}
Run the uninstall for each guid one at a time – if you get an error, don’t worry about it, skip it and continue on with the next one. Once you have gone through all of the guids, run:
Uninstall-DSFeatureClass -all -confirm:$false
Get-DSFrameworkController
Verify all DSFeatureClasses have now been removed. You may need to repeat the above three steps a few times to completely remove all the DSFeatureClasses due to dependencies within them.
**note – don’t forget to reload/refresh Framework.xml in your text edit of choice if you need to go back and do it again to the list of the remaining DS Feature Classes**
Once all DS Feature Classes have been removed, close PowerShell and open an elevated Command Prompt and run Citrix.DeliveryServices.Install.Uninstall.exe.
C:\ProgramData\Citrix\DeliveryServicesUninstall\UninstallUserInterface\Citrix.DeliveryServices.Install.Uninstall.exe

StoreFront should successfully uninstall for you now and disappear from Add/Remove programs. Reboot the machine from the elevated command prompt:
shutdown /f /r /t 0
After logging back in, open an elevated Command Prompt and cleanup any leftover folders by running:
rd /q /s "C:\ProgramData\Citrix\DeliveryServicesUninstall"
rd /q /s "C:\Program Files\Citrix\Receiver StoreFront"
Don’t worry if you get a “The system cannot find the file specified” error message – that just means the folder has already been removed or doesn’t exist anymore.
Finally, using Windows Explorer navigate to C:\Inetpub\wwwroot and verify the Citrix directory has been removed – if it has not been removed, manually check it’s contents for anything you need to keep and then delete C:\Inetpub\wwwroot\Citrix.
You should now be ready to install a fresh version of StoreFront.