Hard disks can fail unexpectedly and it is always best to keep recent backups of all important data. Please keep in mind that even if a current or oncoming failure is detected, there may not be enough time to backup the data. Below are several methods that can be used to identify bad blocks or disk errors in CentOS/RHEL.
Using smartctl
If there are several I/O errors in /var/log/messages or one simply suspects the hard disks may be failing, smartctl can be a helpful tool in checking them. S.M.A.R.T. stands for Self-Monitoring, Analysis and Reporting Technology. You have to enable the S.M.A.R.T. support in the BIOS before using it.
Next, install the needed packages to run /usr/sbin/smartctl. In Red Hat Enterprise Linux, it is provided by the smartmontools package.
1. Verify if your hard disk supports S.M.A.R.T. :
Replace /dev/xxx with the hard disk of interest when using the commands outlined in this post.
2. For SATA drives use:
# smartctl -i -d ata /dev/xxx
3. Enable S.M.A.R.T. support with:
# smartctl -s on /dev/xxx            ### For SCSI Disks
# smartctl -s on -d ata /dev/xxx     ### for SATA Disks
4. Running the following command as root can be a quick PASS/FAIL test but more thorough testing discussed below is generally more conclusive:
Running smartctl in the background
To start a background test run the following as root:
# smartctl -t long /dev/xxx
To access the results, use the following command:
To learn more about various options that can be used with smartctl view the man page of the command:
Using badblocks
You can also use the “badblocks” command in order to check for bad blocks on a disk device. The “badblocks” command can be very useful in isolating problems with syncing LVM partitions within Linux. LVM operations will fail due to bad blocks on a disk. Bad blocks on either the source or destination disk within a LVM mirror will cause a synchronization failure.
Badblocks can also be used in conjunction with the fsck and makefs to mark the blocks as bad. If the output of badblocks is going to be fed to the e2fsck or mke2fs programs, it is important that the block size is properly specified, since the block numbers which are generated are very dependent on the block size in use by the filesystem. For this reason, it is strongly recommended that users not run badblocks directly, but rather use the -c option of the e2fsck and mke2fs programs.
Warning: The mis-use of these commands can cause data loss. Additional information on the command “badblocks” is available using the “man badblocks” command.
1. Use the disk checking tool badblocks to scan the specified hard disk block by block. For example, to scan /dev/sdd issue the commands:
# mount | grep sdd                  # find all mounted partitions of sdd
# umount /dev/sdd1                  # unmount the partitions (may be more then one)
# badblocks -n -vv /dev/sdd
Where -n is use non-destructive read-write mode. By default only a non-destructive read-only test is done.
Note: Never use the -w option on a device containing an existing file system. This option erases data! If write-mode testing needs to be performed on an existing file system, use the -n option instead. It is slower, but it will preserve the data.
2. If the messages similar to the examples found below appear in /var/log/messages or to the console following the running of badblocks it is recommended to backup any data on the affected devices and replace the device:
Apr  4 13:50:40 test kernel: sdd: dma_intr: status=0x51 { DriveReady SeekComplete Error }
Apr  4 13:50:40 test kernel: sdd: dma_intr: error=0x40 { UncorrectableError }, LBAsect=74367249, sector=74367232
Apr  4 13:50:40 test kernel: ide: failed opcode was: unknown
Apr  4 13:50:40 test kernel: end_request: I/O error, dev sdd, sector 74367232
Apr  4 13:50:42 test kernel: sdd: dma_intr: status=0x51 { DriveReady SeekComplete Error }
Apr  4 13:50:42 test kernel: sdd: dma_intr: error=0x40 { UncorrectableError }, LBAsect=74367249, sector=74367240
Apr  4 13:50:42 test kernel: ide: failed opcode was: unknown
Apr  4 13:50:42 test kernel: end_request: I/O error, dev sdd, sector 74367240
Apr  4 13:50:44 test kernel: sdd: dma_intr: status=0x51 { DriveReady SeekComplete Error }
3. The command below will dump found bad blocks to the output file: badblocks.log.
# badblocks -v -o badblocks.log /dev/sdd
Одно из самых важных устройств компьютера — это жесткий диск, именно на нём хранится операционная система и вся ваша информация. Единица хранения информации на жестком диске — сектор или блок. Это одна ячейка в которую записывается определённое количество информации, обычно это 512 или 1024 байт.
Битые сектора, это повреждённые ячейки, которые больше не работают по каким либо причинам. Но файловая система всё ещё может пытаться записать в них данные. Прочитать данные из таких секторов очень сложно, поэтому вы можете их потерять. Новые диски SSD уже не подвержены этой проблеме, потому что там существует специальный контроллер, следящий за работоспособностью ячеек и перемещающий данные из нерабочих в рабочие. Однако традиционные жесткие диски используются всё ещё очень часто. В этой статье мы рассмотрим как проверить диск на битые секторы Linux.
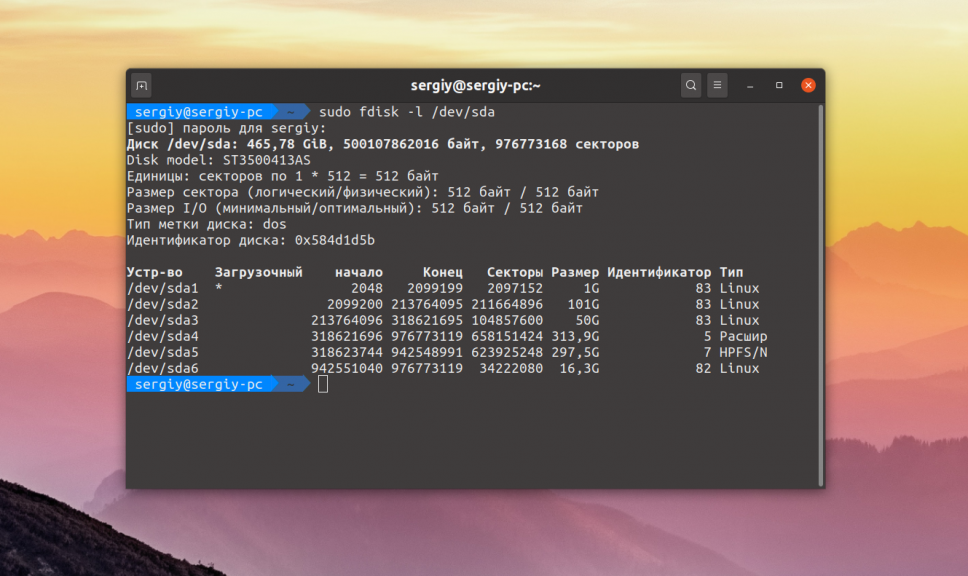
Для поиска битых секторов можно использовать утилиту badblocks. Если вам надо проверить корневой или домашний раздел диска, то лучше загрузится в LiveCD, чтобы файловая система не была смонтирована. Все остальные разделы можно сканировать в вашей установленной системе. Вам может понадобиться посмотреть какие разделы есть на диске. Для этого можно воспользоваться командой fdisk:
sudo fdisk -l /dev/sda1
Или если вы предпочитаете использовать графический интерфейс, это можно сделать с помощью утилиты Gparted. Просто выберите нужный диск в выпадающем списке:
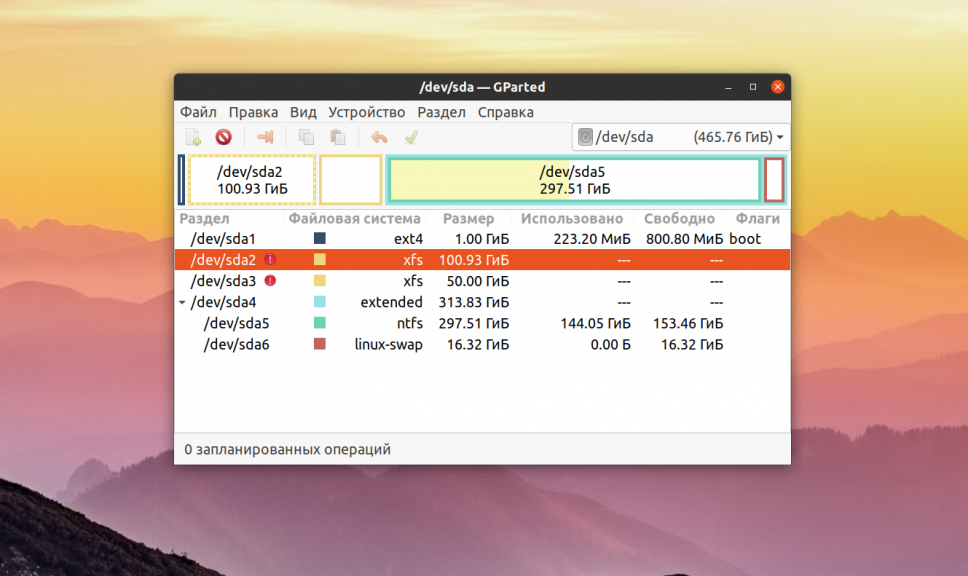
В этом примере я хочу проверить раздел /dev/sda2 с файловой системой XFS. Как я уже говорил, для этого используется команда badblocks. Синтаксис у неё довольно простой:
$ sudo badblocks опции /dev/имя_раздела_диска
Давайте рассмотрим опции программы, которые вам могут понадобится:
- -e — позволяет указать количество битых блоков, после достижения которого дальше продолжать тест не надо;
- -f — по умолчанию утилита пропускает тест с помощью чтения/записи если файловая система смонтирована чтобы её не повредить, эта опция позволяет всё таки выполнять эти тесты даже для смонтированных систем;
- -i — позволяет передать список ранее найденных битых секторов, чтобы не проверять их снова;
- -n — использовать безопасный тест чтения и записи, во время этого теста данные не стираются;
- -o — записать обнаруженные битые блоки в указанный файл;
- -p — количество проверок, по умолчанию только одна;
- -s — показывать прогресс сканирования раздела;
- -v — максимально подробный режим;
- -w — позволяет выполнить тест с помощью записи, на каждый блок записывается определённая последовательность байт, что стирает данные, которые хранились там раньше.
Таким образом, для обычной проверки используйте такую команду:
sudo badblocks -v /dev/sda2 -o ~/bad_sectors.txt
Это безопасно и её можно выполнять на файловой системе с данными, она ничего не повредит. В принципе, её даже можно выполнять на смонтированной файловой системе, хотя этого делать не рекомендуется. Если файловая система размонтирована, можно выполнить тест с записью с помощью опции -n:
sudo badblocks -vn /dev/sda2 -o ~/bad_sectors.txt
После завершения проверки, если были обнаружены битые блоки, надо сообщить о них файловой системе, чтобы она не пыталась писать туда данные. Для этого используйте утилиту fsck и опцию -l:
fsck -l ~/bad_sectors.txt /dev/sda1
Если на разделе используется файловая система семейства Ext, например Ext4, то для поиска битых блоков и автоматической регистрации их в файловой системе можно использовать команду e2fsck. Например:
sudo e2fsck -cfpv /dev/sda1
Параметр -с позволяет искать битые блоки и добавлять их в список, -f — проверяет файловую систему, -p — восстанавливает повреждённые данные, а -v выводит всё максимально подробно.
Выводы
В этой статье мы рассмотрели как выполняется проверка диска на битые секторы Linux, чтобы вовремя предусмотреть возможные сбои и не потерять данные. Но на битых секторах проблемы с диском не заканчиваются. Там есть множество параметров стабильности работы, которые можно отслеживать с помощью таблицы SMART. Читайте об этом в статье Проверка диска в Linux.
Обнаружили ошибку в тексте? Сообщите мне об этом. Выделите текст с ошибкой и нажмите Ctrl+Enter.
Об авторе
![]()
Основатель и администратор сайта losst.ru, увлекаюсь открытым программным обеспечением и операционной системой Linux. В качестве основной ОС сейчас использую Ubuntu. Кроме Linux, интересуюсь всем, что связано с информационными технологиями и современной наукой.
What’s the best way to check for HDD errors and early signs of failure on CentOS?
![]()
030
5,92113 gold badges68 silver badges110 bronze badges
asked Jun 11, 2010 at 14:55
![]()
1
I would recommend installing smartmon (http://sourceforge.net/apps/trac/smartmontools/wiki) to your machine this is some software which can check the health of your disks otherwise its going to be checking /var/log/messages or /var/log/syslog for any mentions of scsi errors
answered Jun 11, 2010 at 15:03
![]()
PaulPaul
5932 silver badges6 bronze badges
2
dmesg
The kernel will log any diagnostic messages about I/O devices, so you can check those messages out with the dmesg command.
answered Jun 11, 2010 at 15:12
![]()
BanjerBanjer
3,98412 gold badges41 silver badges47 bronze badges
2
SMART monitoring is a good way. As root, smartctl -a /dev/hda, where hda is the drive you want… could be hdb, sda, etc. Also recommend setting your email address in /etc/aliases as the person who should get root’s mail.
That’s a very vague answer though. If you have a server made by any of the big manufacturers (Dell, HP, etc), chances are there are better monitoring capabilities available.
answered Jun 11, 2010 at 15:39
![]()
churndchurnd
4,0775 gold badges34 silver badges42 bronze badges
You can run fsck on the device to check for errors.
answered Jun 11, 2010 at 15:04
![]()
cdatedcdated
1991 gold badge1 silver badge9 bronze badges
As Paul says, the SMART logs are a good place to check.
I’d also recommend running BadBlocks. If you’ve got a RAID card, you might have to use the monitoring on that.
answered Jun 11, 2010 at 15:26
![]()
DentrasiDentrasi
3,7621 gold badge24 silver badges19 bronze badges
You can try full check of partition /dev/sda1 (for example) as
fsck -f /dev/sda1
or, try full write-read non-descructive test of given partition
badblocks -vn /dev/sda1
answered Jul 30, 2013 at 15:58
![]()
LiiboLiibo
1091 bronze badge
3
You must log in to answer this question.
Not the answer you’re looking for? Browse other questions tagged
.
Not the answer you’re looking for? Browse other questions tagged
.

In this article, you will learn how to repair Linux disk errors by using fsck and xfs_repair commands.
Table of Contents:
- What is FSCK?
- List Linux Disk Partitions and Types
- Get Last Scanned Time of a Linux Disk
- Scan & Repair a Ext4 Type Disk Partition
- Enable Scanning of Ext4 Disk Partitions at Linux Startup
- What is XFS_REPAIR?
- Scan & Repair a XFS Type Disk Partition
- Enable Scanning of XFS Disk Partitions at Linux Startup
- Conclusion
What is FSCK?:
The system utility fsck (file system consistency check) is a tool for checking the consistency of a file system in Unix and Unix-like operating systems, such as Linux, macOS, and FreeBSD.
Generally, fsck is run either automatically at boot time, or manually by the system administrator. The command works directly on data structures stored on disk, which are internal and specific to the particular file system in use — so an fsck command tailored to the file system is generally required. The exact behaviors of various fsck implementations vary, but they typically follow a common order of internal operations and provide a common command-line interface to the user. (Source: Wikipedia)

List Linux Disk Partitions and Types:
First of all you need to identify the disk partitions in your Linux server, their respective file systems and the path where they are being mounted.
If you are not used to Linux commandline then we recommend that you should attend online training Linux Command Line: From novice to wizard![]()
By using a console or a ssh client, connect with your Linux server as root user.
You can execute the lsblk command with following switches at the Linux bash prompt to list the required information.
# lsblk -o NAME,FSTYPE,MOUNTPOINT
NAME        FSTYPE      MOUNTPOINT
sda
├─sda1      ext4        /boot
└─sda2      LVM2_member
  ├─cl-root xfs         /
  ├─cl-swap swap        [SWAP]
  └─cl-home xfs         /home
sr0
Get Last Scanned Time of a Linux Disk:
You can find the last scan time for Linux Ext4 type partitions with the help of following command.
# tune2fs -l /dev/sda1 | grep checked
Last checked:             Sun Sep 29 20:03:14 2019
Scan & Repair a Ext4 Type Disk Partition:
To scan a Linux disk partition, you can use fsck (File System Consistency Check) command. But you are required to unmount that partition before checking and repairing it.
# umount /dev/sda1
After successful unmount, execute fsck command at Linux bash prompt.
# fsck.ext4 /dev/sda1
e2fsck 1.45.6 (20-Mar-2020)
/dev/sda1: clean, 320/65536 files, 61787/262144 blocks
After checking and repairing your Linux disk, mount the partition again at its respective mountpoint.
For this purpose, execute following Linux command to mount all the disk partitions listed in /etc/fstab file.
# mount -a
Enable Scanning of Ext4 Disk Partitions at Linux Startup:
To enable disk checking at the time of Linux startup. You have to modify the Mount Count parameter for that disk partition.
# tune2fs -c 1 /dev/sda1
tune2fs 1.45.6 (20-Mar-2020)
Setting maximal mount count to 1
Reboot your Linux server now.
# reboot
Linux command fsck is now check your Ext4 disk partition on startup.
After reboot, get the Last Checked value for your disk partition, now it will show you the time of last Linux startup.
# tune2fs -l /dev/sda1 | grep checked
Last checked:             Sun Aug  1 22:50:46 2021
Set back the Mount Count parameter, or it will keep performing disk scans on each Linux boot.
# tune2fs -c -1 /dev/sda1
tune2fs 1.45.6 (20-Mar-2020)
Setting maximal mount count to -1
What is XFS_REPAIR?:
XFS is a high-performance 64-bit journaling file system created by Silicon Graphics, Inc (SGI) in 1993. It was the default file system in SGI’s IRIX operating system starting with its version 5.3. XFS was ported to the Linux kernel in 2001; as of June 2014, XFS is supported by most Linux distributions, some of which use it as the default file system.
The xfs_repair utility is highly scalable and is designed to repair even very large file systems with many inodes efficiently. Unlike other Linux file systems, xfs_repair does not run at boot time, even when an XFS file system was not cleanly unmounted. In the event of an unclean unmount, xfs_repair simply replays the log at mount time, ensuring a consistent file system.
Scan & Repair a XFS Type Disk Partition:
XFS type disk partitions have their own set of commands, that are a little bit different from Ext4.
You must unmount a XFS disk partition before checking it for consistency.
# umount /dev/mapper/cl-home
We have xfs_repair command for checking and repairing the disk errors.
In some Linux distros, you may also find xfs_check command. This command only perform scanning of XFS type disk partitions and do not perform any repair.
But xfs_check command is not available in all Linux distros.
Alternatively, you can use xfs_repair command with -n switch to get the same functionality as of xfs_check.
# xfs_repair -n /dev/mapper/cl-home
Phase 1 - find and verify superblock...
Phase 2 - using internal log
        - zero log...
        - scan filesystem freespace and inode maps...
        - found root inode chunk
Phase 3 - for each AG...
        - scan (but don't clear) agi unlinked lists...
        - process known inodes and perform inode discovery...
        - agno = 0
        - agno = 1
        - agno = 2
        - agno = 3
        - process newly discovered inodes...
Phase 4 - check for duplicate blocks...
        - setting up duplicate extent list...
        - check for inodes claiming duplicate blocks...
        - agno = 0
        - agno = 1
        - agno = 2
        - agno = 3
No modify flag set, skipping phase 5
Phase 6 - check inode connectivity...
        - traversing filesystem ...
        - traversal finished ...
        - moving disconnected inodes to lost+found ...
Phase 7 - verify link counts...
No modify flag set, skipping filesystem flush and exiting.
The above command only perform disk checking and do not try to repair any error.
Now, execute the xfs_repair command without -n switch and it will perform scanning and repairing of Linux disk partitions.
# xfs_repair /dev/mapper/cl-home
Phase 1 - find and verify superblock...
Phase 2 - using internal log
        - zero log...
        - scan filesystem freespace and inode maps...
        - found root inode chunk
Phase 3 - for each AG...
        - scan and clear agi unlinked lists...
        - process known inodes and perform inode discovery...
        - agno = 0
        - agno = 1
        - agno = 2
        - agno = 3
        - process newly discovered inodes...
Phase 4 - check for duplicate blocks...
        - setting up duplicate extent list...
        - check for inodes claiming duplicate blocks...
        - agno = 0
        - agno = 1
        - agno = 2
        - agno = 3
Phase 5 - rebuild AG headers and trees...
        - reset superblock...
Phase 6 - check inode connectivity...
        - resetting contents of realtime bitmap and summary inodes
        - traversing filesystem ...
        - traversal finished ...
        - moving disconnected inodes to lost+found ...
Phase 7 - verify and correct link counts...
done
Remount the XFS partition at its original mountpoint as listed in /etc/fstab file.
# mount -a
Enable Scanning of XFS Disk Partitions at Linux Startup:
In some scenarios you cannot unmount a disk partition, if the disk is in use by the Linux operating system. For this reason you may have to defer the disk checking until next system boot.
To enable xfs_repair command to run on Linux startup, add «fsck.mode=force fsck.repair=yes» at the end of GRUB menu kernel command.
You can refer to our previous post about Editing GRUB menu.
After Linux startup, check the system log to verify the execution of disk repair command.
# journalctl | grep systemd-fsck
To permanently enable disk checking at startup, you have to add «fsck.mode=force fsck.repair=yes» in GRUB configuration files.
Edit grub configuration file in vim text editor.
# vi /etc/default/grub
Locate GRUB_CMDLINE_LINUX parameter and append «fsck.mode=force fsck.repair=yes» at the end of line.
GRUB_CMDLINE_LINUX="resume=/dev/mapper/cl-swap rd.lvm.lv=cl/root rd.lvm.lv=cl/swap rhgb quiet fsck.mode=force fsck.repair=yes"
Regenerate GRUB menu configurations based on new parameters.
# grub2-mkconfig
Reboot your Linux operating system to verify the new settings.
# reboot
Conclusion:
You have successfully performed scanning and repairing of Linux Disk partitions of Ext4 and XFS types. If you feel any difficulty understanding this Linux tutorial, we suggest that you should read The Linux Command Line, 2nd Edition by William Shotts.
Повреждённый сектор (англ. bad sector, bad block, повреждённый блок, в любительской литературе — бэд-сектор) — сбойный (не читающийся) или ненадежный сектор жёсткого диска или флэш-накопителя; кластер, содержащий сбойные сектора, или кластер помеченный таковым в структурах файловой системы (операционной системой, дисковой утилитой или же вирусом, для собственного использования)
Для проверки диска на битые блоки в операционной системе предустановлена утилита badblocks
Смотрим разметку диска:
[root@localhost]# fdisk -l

Disk /dev/sda: 240.1 GB, 240057409536 bytes, 468862128 sectors
Units = sectors of 1 * 512 = 512 bytes
Sector size (logical/physical): 512 bytes / 512 bytes
I/O size (minimum/optimal): 512 bytes / 512 bytes
Disk label type: dos
Disk identifier: 0x00075d8d

   Device Boot      Start         End      Blocks   Id  System
/dev/sda1   *        2048     1173503      585728   83  Linux
/dev/sda2         1173504     9969663     4398080   8e  Linux LVM
/dev/sda3         9969664   468860927   229445632   fd  Linux raid autodetect

Disk /dev/sdb: 240.1 GB, 240057409536 bytes, 468862128 sectors
Units = sectors of 1 * 512 = 512 bytes
Sector size (logical/physical): 512 bytes / 512 bytes
I/O size (minimum/optimal): 512 bytes / 512 bytes
Disk label type: dos
Disk identifier: 0x000a3965

   Device Boot      Start         End      Blocks   Id  System
/dev/sdb1            2048     8798207     4398080   8e  Linux LVM
/dev/sdb2         8798208   467689471   229445632   fd  Linux raid autodetect

Disk /dev/md127: 234.8 GB, 234818109440 bytes, 458629120 sectors
Units = sectors of 1 * 512 = 512 bytes
Sector size (logical/physical): 512 bytes / 512 bytes
I/O size (minimum/optimal): 512 bytes / 512 bytes

Disk /dev/mapper/centos-swap: 9000 MB, 9000976384 bytes, 17580032 sectors
Units = sectors of 1 * 512 = 512 bytes
Sector size (logical/physical): 512 bytes / 512 bytes
I/O size (minimum/optimal): 512 bytes / 512 bytes
Проверяем диски:
[root@localhost]# badblocks -v /dev/sda3 -s
Checking blocks 0 to 229445631
Checking for bad blocks (read-only test): done
Pass completed, 0 bad blocks found. (0/0/0 errors)

[root@localhost]# badblocks -v /dev/sda2 -s
Checking blocks 0 to 4398079
Checking for bad blocks (read-only test): done
Pass completed, 0 bad blocks found. (0/0/0 errors)

[root@localhost]# badblocks -v /dev/sda1 -s
Checking blocks 0 to 585727
Checking for bad blocks (read-only test): done
Pass completed, 0 bad blocks found. (0/0/0 errors)
Параметр -s нужен для отображения прогресса проверки
Selectel — ведущий провайдер облачной инфраструктуры и услуг дата-центров
Компания занимает лидирующие позиции на рынке на рынке выделенных серверов и приватных облаков, и входит в топ-3 крупнейших операторов дата-центров в России.
Как видно из лога, битые блоки на диске не обнаружены

У блога появился новый хостинг от компании Selectel.
Нашли интересную или полезную информацию в блоге? Хотели бы видеть на нем еще больше полезных статей? Поддержи автора рублем.
Если вы размещаете материалы этого сайта в своем блоге, соц. сетях, и т.д., убедительная просьба публиковать обратную ссылку на оригинал.