17.11.2016
Ремонт принтеров и МФУ Canon
59
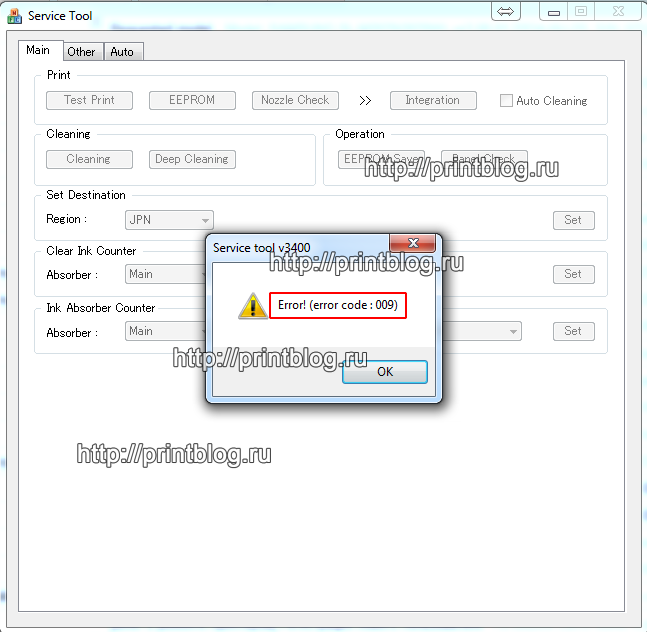
error code 009
– сообщает о том, что присутствует дополнительная ошибка, которая мешает работе Service tool. Прежде, чем работать с программой, необходимо устранить эту ошибку. Что бы понять, в чем причина, необходимо посчитать количество миганий индикатора “молния”, количество миганий сообщает код дополнительной ошибки, в других случаях она основная. Например, если индикатор “молния” мигает 16 раз, это означает, что ошибка у принтера E16, которая устраняется простым нажатием и удержанием кнопки СТОП более 10 сек.
error code 006
– чаще всего, причиной этой ошибки в программе Service tool, есть банальное – не правильно вошел в сервисный режим или не отменил “Мастер установки нового оборудования”. В некоторых случаях необходимо перезагрузить компьютер, подключить принтер в другой USB порт.
error code 005
– программа не видит ваш принтер, смените USB кабель или подключите в другой USB разъем компьютера, часто помогает перезагрузка компьютера.
error code 002
– эта ошибка говорит о том, что программа не поддерживает функцию для текущей модели принтера. Зачастую это ошибка появляется при попытке сбросить счетчик памперса, при этом другие сервисные функции программа вполне может выполнять.
И самое главное, в любом из этих случаев не забывайте программу извлекать из архива, т.к. работать нормально она не будет.
Осуществить ремонт или прошивку вашего принтера в г. Симферополь вы можете в сервисном центре по ул. Старозенитная, д.9 (вход со стороны забора). Обращайтесь пожалуйста в рабочее время с 9.00-18.00 по номеру +7 (978) 797-66-90
Не забывайте оценить запись и поделится ей с друзьями в социальных сетях, нажав специальные кнопки ниже.
Не забудь оставить комментарий и подписаться на наш канал Youtube
Рекомендуемые товары:
-
6 в наличии
Код: 10225
Микросхема MX29LV160AT для Canon imageRUNNER 1133а
599.00 руб.
Купить -
В наличии
Код: 00020
Adjustment program для Epson WF-7515, WF-7510, WF-7015, WF-7010, WF-7525, WF-7520
756.00 руб.
Купить -
В наличии
Код: 00034
Дамп микросхемы MX29LV160DT \ MX29LV160AT для Canon i-SENSYS MF5940dn
402.00 руб.
Купить -
0 в наличии
Код: 50021
Микросхема MX29LV160AT для Canon imageRUNNER 1133
599.00 руб.
Купить
Думаю, тем, кто читает эту статью, не нужно объяснять, для чего используются различные версии программы Service Tool. Самая распространенная версия на момент написания статьи — Service Tool v3400
Очень часто, при попытке сброса,»памперса», меня спрашивают, почему программа выдает ошибку.
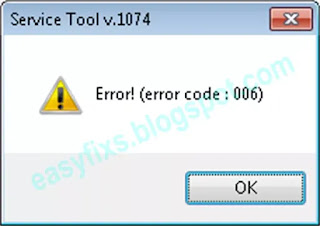
При чем основных ошибок две. Появляется окно с сообщением «Error! (error code 006)» или 009.
Error code 006, чаще всего, означает, что Вы не вошли в сервисный режим. Напомню, что при входе в сервисный режим устройство должно определяться как CanonDevice. Иногда такая ошибка появляется даже тогда, когда Вы правильно вошли в сервисный режим. Тогда может помочь перезагрузка компьютера или подсоединение принтера к другому USB порту.
Error code 009 означает, что у принтера существует какая-то дополнительная ошибка, кроме переполнения счетчика отработанных чернил. И перед сбросом «памперса» ее необходимо будет устранить. Узнать, какая ошибка можно по количеству миганий индикатора «молния». Подробнее об этом можете прочесть тут. Например, при отсутствующем или неисправном картридже Вы не сможете воспользоваться программой и она будет выдавать Вам Error code 009.
И не забывайте извлекать программу из архива. Запущенная в архиве корректно работать она не будет.
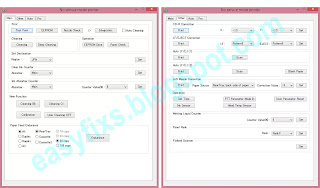
Canon Service Tool is a tool used to reset Canon printers after replacing parts such as: Logic Board Ass’y, Ink Absorber Kit, Print Head, etc. Canon Service Tool is a portable application so it does not require installation. In the Service Tool there are several functions such as; Test Print, Cleaning, Set Destination, Clear Ink Counter, Ink Absorber Counter, CD-R Correction, Auto LF/EJ, Left Margin Correction, Wetting Liquid Counter, Panel Rank, Flatbed Scanner, Data Save, etc.
In order for the Service Tool to be used to reset Canon printers, the printer must be in Service Mode. Service Mode is a condition where the Canon printer enters repair mode. After the printer enters Service Mode, open the Service Tool then select the desired function key.
When a button is clicked in the Service Tools dialog box, that function is executed. While the selected function is in operation, all buttons on the Service Tool are dimmed or inactive. When the operation is finished, the message «A function was finished» will appear and other functions can be selected later.
Canon Service Tool Error Code Mean (Error code: 002, 005, 006, 007, 009, etc)
If an unsupported function button is selected, an error message will be displayed, click OK to close the error message. Regarding the error messages that appear when using the Service Tool, there are several kinds of error messages that have different meanings. The following is the error message that appears when using a Canon Service Tool.
Error code: 002
Meaning: The service tool doesn’t support the requested operation.
Solution: Unfortunately not all functions in the Service Tool can be used. When the function key in the Service Tool is pressed, and an error code: 002 appears, it means that the Service Tool does not support the requested command. The conclusion is that not all buttons in the Service Tool can be used, so just ignore this error message and then select a function key that is supported by the Service Tool.
Error code: 005
Meaning:
- The Service Tool doesn’t detect the printer.
- The printer is not ready to accept commands from the Service Tool.
Solution:
- Unplug the printer USB cable that goes to the computer then reconnect it to the computer on a different USB port.
- After the Service Mode entry procedure is complete, the Power LED will flash. When the Power LED is still blinking and the button in the Service Tool is pressed (the Service Tool sends a command to the printer), an error code: 005 will appear. The solution is after the Service mode entry procedure is complete, wait for the Power LED to stop blinking, then run the Service Tool.
Error code: 006
Meaning: The printer is not in Service Mode, or the Service Tool does not support the printer.
Solution: Turn off the printer and then repeat the procedure to enter Service Mode correctly. If the procedure for entering Service Mode has been done correctly, but the error code: 006 still occurs, it means that the Service Tool doesn’t support your printer.
Error code: 007 and 009
Meaning: The printer cannot enter Service Mode due to another failure, or two different errors occurred. See the picture above.
Example: The printer has a double error. Error #1. Ink has run out, and Error #2. Waste ink absorber is full [5B00]. Both errors occur simultaneously.
Solution:
1. Turn on the printer, then press and hold the Resume/Cancel/Stop button for about 10-15 seconds, when you hear the sound of the print head starting to move, release the Resume/Cancel/Stop button.
2. After the cartridge reads normally, turn off the printer and repeat the procedure to enter Service Mode, then continue the reset process.
Error: Service Tool (Not Responding)
Meaning: the PC/Laptop can’t communicate with the printer.
Solution: disconnect the USB printer cable connected to the computer, close the service tool, then turn off the printer by pressing the power button or unplug the power cable. Repeat the Service Mode entry procedure, then open Service Tool. If this solution doesn’t work, check the printer’s USB port or change the printer’s USB cable.
Error: Service Tool Freezes
Meaning: The Service Tool does not detect a printer.
Solution:
1. Disconnect the printer USB cable that is connected to the computer. Plug it back into the computer in a different USB port. If it fails!
2. Turn off the printer, open Control Panel — Devices and Printers — Set as default printer that was repaired. Check the Printer Properties — the USB port of the printer. Make sure the USB port of the printer is checked. If all the settings have been done correctly, then repeat the procedure to enter Service Mode, then open the Service Tool. If it fails!
3. Replace the printer USB cable with a new one.
Error: The indicator light flashes orange when entering Service Mode
Meaning: there is damage to Service Mode (Service Mode is damaged).
Cause: the user uses more than one different Service Tool, when entering Service Mode.
Example: Printer user is Canon G3000. After the printer enters Service Mode, to reset the user using Service Tool v.3400, but it fails. Then the user uses Service Tool v.4718 to reset, but it fails. This is the beginning of trouble. When the printer enters Service Mode, the user uses two different Service Tools, namely ST.3400 and ST.4718. Using two different Service Tools in Service Mode will result in damage to Service Mode. When the printer enters Service Mode, the user uses ST.3400 but fails. If the user wants to try with ST.4718, turn off the printer first, then repeat the procedure to enter Service Mode, then reset it with ST.4718.
Solution: Replace the EEPROM IC with a new one, or reset the EEPROM IC manually.
Error: printer can’t enter Service Mode
Solution:
1. To enter the Service Mode, press the Resume/Cancel/Stop button 5 times. If the Resume/Cancel/Stop button is pressed 5 times but fails to enter Service Mode, repeat the procedure to enter Service Mode, then press the Resume/Cancel/Stop button 6 times (connected to the operation panel without a scanner).
2. To enter the Service Mode, press the Resume/Cancel/Stop button 2 times. If the Resume/Cancel/Stop button is pressed 2 times but fails to enter Service Mode, repeat the procedure to enter Service Mode, then press the Resume/Cancel/Stop button 3 times (connected to the operation panel without a scanner).
Conclusion:
— For printers where the Resume/Cancel/Stop button is pressed 5 times.
If the Resume/Cancel/Stop button is pressed 5 times and it fails to enter Service Mode, repeat the procedure then press the Resume/Cancel/Stop button 6 times.
— For printers where the Resume/Cancel/Stop button is pressed 2 times.
If the Resume/Cancel/Stop button is pressed 2 times and it fails to enter Service Mode, repeat the procedure then press the Resume/Cancel/Stop button 3 times.
Error: I can’t open the Service Tool on macOS X, Linux, etc. What should I do?
Cause
Service Tool is a portable software that only supports Windows Operating System. If your computer uses an operating system other than Windows, the Service Tool cannot be used.
Solution
1. If your home/office has a PC/Laptop that uses Windows OS, please install the printer driver, then do a reset with that computer.
2. If you don’t have a computer/laptop that uses Windows OS, please install Windows onto a USB Flash. Boot Windows from USB Flash, then install printer driver to USB Flash. After that, open the Service Tool and reset the printer. This method is applicable for Linux OS, MacOS, etc.
Error: I am using the Windows Operating System, but the Service Tool cannot be opened. What to do?
Cause
If Service Tool.exe is double-clicked but the program does not open automatically, right-click Service Tool — Properties, if under Attributes there is a message «Security: This file came from another computer and might be blocked to help protect this computer.»,
Solution
1. Check the «Unblock» — Apply — OK. If you are unsure about this solution, please follow the solution below.
2. Make sure your computer has the Winrar/Winzip/7zip application installed, etc.
Figure 1. Right click Service Tool (1), Add to archive (2), Set password (3), Enter password (4), OK (5)
Figure 2. Right-click the rar file (6), choose Cut (7) then paste it into a different folder.
Figure 3. Right click rar file (8), Extract rar file (9), Enter password (10), OK (11)
Figure 4. Right-click the folder (12), select Open (13) then open the Service Tool. Done.
Questions and Answers
Q: The printer printout is bad, is the print head clogged/damaged, should I replace the cartridge?
Q: Where can I get other Canon Service Tools?
A: For complete information regarding Canon Service Tool collection, please open Canon Service Tool Version
Q: I don’t know which Service Tool supports my printer, where can I get information about it?
A: For complete information regarding Canon printers and the Service Tools used, please open the Canon Service Tools and Supported Printers
If you are having trouble repairing a Canon printer yourself, it is highly recommended to ask the nearest Canon Service Center for help or the nearest printer repair professional.
17.11.2016
Ремонт принтеров и МФУ Canon
56

error code 009
– сообщает о том, что присутствует дополнительная ошибка, которая мешает работе Service tool. Прежде, чем работать с программой, необходимо устранить эту ошибку. Что бы понять, в чем причина, необходимо посчитать количество миганий индикатора “молния”, количество миганий сообщает код дополнительной ошибки, в других случаях она основная. Например, если индикатор “молния” мигает 16 раз, это означает, что ошибка у принтера E16, которая устраняется простым нажатием и удержанием кнопки СТОП более 10 сек.
error code 006
– чаще всего, причиной этой ошибки в программе Service tool, есть банальное – не правильно вошел в сервисный режим или не отменил “Мастер установки нового оборудования”. В некоторых случаях необходимо перезагрузить компьютер, подключить принтер в другой USB порт.
error code 005
– программа не видит ваш принтер, смените USB кабель или подключите в другой USB разъем компьютера, часто помогает перезагрузка компьютера.
error code 002
– эта ошибка говорит о том, что программа не поддерживает функцию для текущей модели принтера. Зачастую это ошибка появляется при попытке сбросить счетчик памперса, при этом другие сервисные функции программа вполне может выполнять.
И самое главное, в любом из этих случаев не забывайте программу извлекать из архива, т.к. работать нормально она не будет.
Осуществить ремонт или прошивку вашего принтера в г. Симферополь вы можете в сервисном центре по ул. Старозенитная, д.9 (вход со стороны забора). Обращайтесь пожалуйста в рабочее время с 9.00-18.00 по номеру +7 (978) 797-66-90
Не забывайте оценить запись и поделится ей с друзьями в социальных сетях, нажав специальные кнопки ниже.
Не забудь оставить комментарий и подписаться на наш канал Youtube
Рекомендуемые товары:
-
40 в наличии
Код: 00040
Прошитая EEPROM 93C66WP для Canon Pixma IP2700
299.00 руб.
Купить -
4 в наличии
Код: 50019
Микросхема MX29LV160AT для Canon i-SENSYS MF5940dn
599.00 руб.
Купить -
В наличии
Код: 00025
Дамп микросхемы MX29LV160DT для Canon i-SENSYS MF6140dn
459.00 руб.
Купить -
В наличии
Код: 00026
Canon iR 1133a дамп микросхемы MX29LV160DT MX29LV160AT
459.00 руб.
Купить
Комментарии для сайта Cackle
Думаю, тем, кто читает эту статью, не нужно объяснять, для чего используются различные версии программы Service Tool. Самая распространенная версия на момент написания статьи — Service Tool v3400
Очень часто, при попытке сброса,»памперса», меня спрашивают, почему программа выдает ошибку.
При чем основных ошибок две. Появляется окно с сообщением «Error! (error code 006)» или 009.
Error code 006, чаще всего, означает, что Вы не вошли в сервисный режим. Напомню, что при входе в сервисный режим устройство должно определяться как CanonDevice. Иногда такая ошибка появляется даже тогда, когда Вы правильно вошли в сервисный режим. Тогда может помочь перезагрузка компьютера или подсоединение принтера к другому USB порту.
Error code 009 означает, что у принтера существует какая-то дополнительная ошибка, кроме переполнения счетчика отработанных чернил. И перед сбросом «памперса» ее необходимо будет устранить. Узнать, какая ошибка можно по количеству миганий индикатора «молния». Подробнее об этом можете прочесть тут. Например, при отсутствующем или неисправном картридже Вы не сможете воспользоваться программой и она будет выдавать Вам Error code 009.
И не забывайте извлекать программу из архива. Запущенная в архиве корректно работать она не будет.
The service tool V3400 is used to reconfigure some of the settings of the Canon printers, but just after you have replaced some of the parts such as the print head. The tool is an application, but one that is also portable and therefore, does not require installation. The service tool has been designed to run many different functions and can be used to set destination, CD-R correction, Left margin correction, Panel rank, Ink Absorber Counter, and Test print among others.
To fully exploit the potential of this service tool, the printer must first be in service mode. This mode is better described as a condition where the Canon printers enter the repair mode. So, what happens is that once the printer enters the service mode, all you have to do is open the service tool and choose the relevant function key. The service tool V3400 is closely used with the service tool V3600 and they are both efficient when used to reset the waste pad ink counter on the Canon printers.
The service tool will, therefore, allow you to solve a variety of message errors such as the “Waste Ink Pad Full,” or “Waste Ink Tank Full,” you can also use the tool to clear the error code “5B00” or the error code “P07.” Notable is that this service tool will not just work on any kind of printer but some specific series from Canon such as the Canon Pixma iP2700, MP230, IX6500, IP3600, PRO900, MG2120, and MX397 among others.
Error Code 009-Cause
When your printer presents you with the error code 009, it usually means that it is not able to enter service mode, because of another failure. Or better yet, this could be an indication that two different errors occurred at the same time. And which means that you could also be presented with the error code 007 and the error code 009.
To understand the above codes better, here is a little explanation. When a printer has a double error it means that both errors occur simultaneously, the first error could be that the “Waste ink absorber is full” and the second error could be that the “ink has run out.” Now, this might seem like a complex problem, in fact almost irresolvable but there is a solution.
To fix the error code 009, you will first turn on your printer and then press and hold the Resume/Cancel/Stop button for about 10-15 seconds. And once the printer’s head begins to move you can release the button. The second step is that after the cartridge reads normally you will turn off the printer and repeat the procedure and which will enable you to enter service mode. From there you can proceed with the reset process.
How to use the Service tool
So the first thing to do is you must download the service tool Canon V3400, and then enter in maintenance mode with the printer. Power down your printer, and then connect it to the central unit using a USB cable. Hold on to the “Resume button and then press power. You will hold on to these buttons simultaneously up until the led power lights up.
You will then release the resume button but keep pressing the power button, and then press the resume button at least five times. Release the resume button and the led lights will flash. From here you will wait until the led lights stop where you will now be in maintenance mode.
The next step is to run the service tool V3400, but be sure to use the right USB PORT. And in the section “Ink Absorber Counter,” you will select main. And in the section counter value (%) you will choose the number that is closest to the counter number and click the option “SET.” You will then find the counter number in the section “EEPROM.”
As you perform the above process there is every likely hood that you will be presented with the error code 002, and which will mean that a function is not supported by the printer. You could also receive the error code 005 and which will mean that the printer is not compatible with this particular service tool. There are also occasions where the service tool V3400 could be inactive and in such a case you could power off your computer, then plug the power cable in another USB port and restart the procedure.
Alternatively, you could detach the USB cable from the printer, wait for a few seconds, and then power it back. And on windows, you will select “next” when presented with the text “NEW peripherals, you will then open the service tool and then rest.
Service tool not responding-How to Fix
On other occasions the service tool might fail to respond, and which will be an indication that your PC or laptop does not communicate with the printer. To solve this problem you could detach the USB printer cable that has been connected to the computer and then close the service tool. You will then turn off the printer by either unplugging the computer or by pressing the power button. You will then repeat the service mode entry procedure and then open the service tool.
If the above proves futile, you could find another USB cable. The service tool could also freeze and which will mean that it does not detect the printer. To remedy this situation you can detach the printer USB cable from the computer and plug it back into the PC using a different USB port.
Conclusion
The service tool V3400 is used to reset the ink counter in some of the Canon printers, the service tool is, however, prone to many errors and you will, therefore, be presented with error codes such as 002, 005, 006, 009, and 007. For the service tool to integrate with your printer, it must be in service mode but at times your printer might fail to enter the service mode because two different errors occurred simultaneously represented by the error code 007 and 009.
FAQ’s
What is the meaning of the error code 005?
It means that the service tool doesn’t detect the printer, or that the printer is not ready to receive commands from the service too.
What is the meaning of the error code 002?
It means that the service tool does not support the requested operation.
December 01, 2020
Canon Service Tool is a tool used to reset Canon printers after replacing parts such as: Logic Board Ass’y, Ink Absorber Kit, Print Head, etc. Canon Service Tool is a portable application so it does not require installation. In the Service Tool there are several functions such as; Test Print, Cleaning, Set Destination, Clear Ink Counter, Ink Absorber Counter, CD-R Correction, Auto LF/EJ, Left Margin Correction, Wetting Liquid Counter, Panel Rank, Flatbed Scanner, Data Save, etc.
In order for the Service Tool to be used to reset Canon printers, the printer must be in Service Mode. Service Mode is a condition where the Canon printer enters repair mode. After the printer enters Service Mode, open the Service Tool then select the desired function key.
When a button is clicked in the Service Tools dialog box, that function is executed. While the selected function is in operation, all buttons on the Service Tool are dimmed or inactive. When the operation is finished, the message «A function was finished» will appear and other functions can be selected later.
Canon Service Tool Error Code Mean (Error code: 002, 005, 006, 007, 009, etc)
If an unsupported function button is selected, an error message will be displayed, click OK to close the error message. Regarding the error messages that appear when using the Service Tool, there are several kinds of error messages that have different meanings. The following is the error message that appears when using a Canon Service Tool.
Error code: 002
Meaning: The service tool doesn’t support the requested operation.
Solution: Unfortunately not all functions in the Service Tool can be used. When the function key in the Service Tool is pressed, and an error code: 002 appears, it means that the Service Tool does not support the requested command. The conclusion is that not all buttons in the Service Tool can be used, so just ignore this error message and then select a function key that is supported by the Service Tool.
Error code: 005
Meaning:
- The Service Tool doesn’t detect the printer.
- The printer is not ready to accept commands from the Service Tool.
Solution:
- Unplug the printer USB cable that goes to the computer then reconnect it to the computer on a different USB port.
- After the Service Mode entry procedure is complete, the Power LED will flash. When the Power LED is still blinking and the button in the Service Tool is pressed (the Service Tool sends a command to the printer), an error code: 005 will appear. The solution is after the Service mode entry procedure is complete, wait for the Power LED to stop blinking, then run the Service Tool.
Error code: 006
Meaning: The printer is not in Service Mode, or the Service Tool does not support the printer.
Solution: Turn off the printer and then repeat the procedure to enter Service Mode correctly. If the procedure for entering Service Mode has been done correctly, but the error code: 006 still occurs, it means that the Service Tool doesn’t support your printer.
Error code: 007 and 009
Meaning: The printer cannot enter Service Mode due to another failure, or two different errors occurred. See the picture above.
Example: The printer has a double error. Error #1. Ink has run out, and Error #2. Waste ink absorber is full [5B00]. Both errors occur simultaneously.
Solution:
1. Turn on the printer, then press and hold the Resume/Cancel/Stop button for about 10-15 seconds, when you hear the sound of the print head starting to move, release the Resume/Cancel/Stop button.
2. After the cartridge reads normally, turn off the printer and repeat the procedure to enter Service Mode, then continue the reset process.
Error: Service Tool (Not Responding)
Meaning: the PC/Laptop can’t communicate with the printer.
Solution: disconnect the USB printer cable connected to the computer, close the service tool, then turn off the printer by pressing the power button or unplug the power cable. Repeat the Service Mode entry procedure, then open Service Tool. If this solution doesn’t work, check the printer’s USB port or change the printer’s USB cable.
Error: Service Tool Freezes
Meaning: The Service Tool does not detect a printer.
Solution:
1. Disconnect the printer USB cable that is connected to the computer. Plug it back into the computer in a different USB port. If it fails!
2. Turn off the printer, open Control Panel — Devices and Printers — Set as default printer that was repaired. Check the Printer Properties — the USB port of the printer. Make sure the USB port of the printer is checked. If all the settings have been done correctly, then repeat the procedure to enter Service Mode, then open the Service Tool. If it fails!
3. Replace the printer USB cable with a new one.
Error: The indicator light flashes orange when entering Service Mode
Meaning: there is damage to Service Mode (Service Mode is damaged).
Cause: the user uses more than one different Service Tool, when entering Service Mode.
Example: Printer user is Canon G3000. After the printer enters Service Mode, to reset the user using Service Tool v.3400, but it fails. Then the user uses Service Tool v.4718 to reset, but it fails. This is the beginning of trouble. When the printer enters Service Mode, the user uses two different Service Tools, namely ST.3400 and ST.4718. Using two different Service Tools in Service Mode will result in damage to Service Mode. When the printer enters Service Mode, the user uses ST.3400 but fails. If the user wants to try with ST.4718, turn off the printer first, then repeat the procedure to enter Service Mode, then reset it with ST.4718.
Solution: Replace the EEPROM IC with a new one, or reset the EEPROM IC manually.
Error: printer can’t enter Service Mode
Solution:
1. To enter the Service Mode, press the Resume/Cancel/Stop button 5 times. If the Resume/Cancel/Stop button is pressed 5 times but fails to enter Service Mode, repeat the procedure to enter Service Mode, then press the Resume/Cancel/Stop button 6 times (connected to the operation panel without a scanner).
2. To enter the Service Mode, press the Resume/Cancel/Stop button 2 times. If the Resume/Cancel/Stop button is pressed 2 times but fails to enter Service Mode, repeat the procedure to enter Service Mode, then press the Resume/Cancel/Stop button 3 times (connected to the operation panel without a scanner).
Conclusion:
— For printers where the Resume/Cancel/Stop button is pressed 5 times.
If the Resume/Cancel/Stop button is pressed 5 times and it fails to enter Service Mode, repeat the procedure then press the Resume/Cancel/Stop button 6 times.
— For printers where the Resume/Cancel/Stop button is pressed 2 times.
If the Resume/Cancel/Stop button is pressed 2 times and it fails to enter Service Mode, repeat the procedure then press the Resume/Cancel/Stop button 3 times.
Error: I can’t open the Service Tool on macOS X, Linux, etc. What should I do?
Cause
Service Tool is a portable software that only supports Windows Operating System. If your computer uses an operating system other than Windows, the Service Tool cannot be used.
Solution
1. If your home/office has a PC/Laptop that uses Windows OS, please install the printer driver, then do a reset with that computer.
2. If you don’t have a computer/laptop that uses Windows OS, please install Windows onto a USB Flash. Boot Windows from USB Flash, then install printer driver to USB Flash. After that, open the Service Tool and reset the printer. This method is applicable for Linux OS, MacOS, etc.
Error: I am using the Windows Operating System, but the Service Tool cannot be opened. What to do?
Cause
If Service Tool.exe is double-clicked but the program does not open automatically, right-click Service Tool — Properties, if under Attributes there is a message «Security: This file came from another computer and might be blocked to help protect this computer.»,
Solution
1. Check the «Unblock» — Apply — OK. If you are unsure about this solution, please follow the solution below.
2. Make sure your computer has the Winrar/Winzip/7zip application installed, etc.
Figure 1. Right click Service Tool (1), Add to archive (2), Set password (3), Enter password (4), OK (5)
Figure 2. Right-click the rar file (6), choose Cut (7) then paste it into a different folder.
Figure 3. Right click rar file (8), Extract rar file (9), Enter password (10), OK (11)
Figure 4. Right-click the folder (12), select Open (13) then open the Service Tool. Done.
Questions and Answers
Q: The printer printout is bad, is the print head clogged/damaged, should I replace the cartridge?
Q: Where can I get other Canon Service Tools?
A: For complete information regarding Canon Service Tool collection, please open Canon Service Tool Version
Q: I don’t know which Service Tool supports my printer, where can I get information about it?
A: For complete information regarding Canon printers and the Service Tools used, please open the Canon Service Tools and Supported Printers
If you are having trouble repairing a Canon printer yourself, it is highly recommended to ask the nearest Canon Service Center for help or the nearest printer repair professional.
Решено
CANON mg8240 — сброс памперса
Как войти в Сервисный режим
| Сообщение #1
Отправлено 12 марта 2017 — 20:56
Привет всем! Я перерыл весь форум, и руками и поиском и так и не нашел ответ на свой вопрос а звучит он так: Как на mg8240 зайти в сервисный режим, кнопки то на нем сенсорные да мало того они еще и не «светяться» — ну вы поняли о чем я.
Скачал тут утилиту Service tool v3400 — надеюсь она подойдет для моей модели принтера.
А цель моя это посмотреть цифры дабы не доводить прибор до ошибок.
Ну а так то он работает, все печатает.
Пробег 7500 страниц.
- Наверх of the page up there ^
-
0
| Сообщение #2
Отправлено 12 марта 2017 — 22:15
localhost
Когда они будут светится — прорисовать маркером нужные кнопки
Canon EOS 500D + 18-55 IS II + 50 mm STM + YoungNuo SpeedLite YN565 EX II, EPSON L800 + Hongsam
- Наверх of the page up there ^
-
0
| Сообщение #3
Отправлено 12 марта 2017 — 22:25
RIDDLE
Выполнил! Затем?
- Наверх of the page up there ^
-
0
| Сообщение #4
Отправлено 17 марта 2017 — 18:53
RIDDLE
Разведал такую инфу что кнопка питания она выполняет 2 функции.
- Наверх of the page up there ^
-
0
| Сообщение #5
Отправлено 17 марта 2017 — 19:36
Barranno
На выключенном зажмите то место где кнопка Resume, зажмите кнопку включения, отпустите Resume, три раза нажмите Resume, отпустите кнопку включения и Resume вместе, попробуйте так.
- Наверх of the page up there ^
-
0
| Сообщение #6
Отправлено 18 марта 2017 — 08:37
Barranno

Я ошибся, сначала попробуйте пять раз нажать, а если не войдёт то тогда можно попробовать и другое количество нажатий.
- Наверх of the page up there ^
-
0
| Сообщение #7
Отправлено 19 марта 2017 — 07:03
localhost
Правильно именно 5 раз! По крайней мере, на более младших моделях линейки оно так
Canon EOS 500D + 18-55 IS II + 50 mm STM + YoungNuo SpeedLite YN565 EX II, EPSON L800 + Hongsam
- Наверх of the page up there ^
-
0
| Сообщение #8
Отправлено 20 марта 2017 — 22:45
RIDDLE
я пробывал нажимать — не получается. ведь сенсорные кнопки активны в момент когда они подсвечиваются (по идее).
а если нажимать единственную кнопку питания то при первом нажатии принтер включаеться а при повторном — выключается.
- Наверх of the page up there ^
-
0
| Сообщение #9
Отправлено 21 марта 2017 — 12:24
localhost
Ну значит облом…
Canon EOS 500D + 18-55 IS II + 50 mm STM + YoungNuo SpeedLite YN565 EX II, EPSON L800 + Hongsam
- Наверх of the page up there ^
-
0
| Сообщение #10
Отправлено 21 марта 2017 — 16:22
Barranno

получается. ведь сенсорные кнопки активны в момент когда они подсвечиваются (по идее).
У меня 6340 с сенсорными кнопками нормально входил как я писал, с пятью нажатиями, правда у меня не сразу получилось, пробуйте пока не получится.
- Наверх of the page up there ^
-
0
| Сообщение #11
Отправлено 21 марта 2017 — 19:19
Barranno
Может надо посильнее зажимать Resume когда выключен. И сейчас ещё раз попробовал на своём 6340 три раза всё таки надо нажимать, если пять раз то просто включается. Так что в первый раз всё таки правильно написал .
- Наверх of the page up there ^
-
0
| Сообщение #12
Отправлено 28 марта 2017 — 20:38
RIDDLE
«Додрочил» все же. Зашел в сервис режим НО теперь столкнулся с ошибкой 009 (Service tool v3400). Не в курсе, что это ошибка означает?
- Наверх of the page up there ^
-
0
| Сообщение #13
Отправлено 28 марта 2017 — 21:10
localhost
Т.е. с сенсорных кнопок реал выйти в СР?
Canon EOS 500D + 18-55 IS II + 50 mm STM + YoungNuo SpeedLite YN565 EX II, EPSON L800 + Hongsam
- Наверх of the page up there ^
-
0
| Сообщение #14
Отправлено 28 марта 2017 — 21:10
RIDDLE
Service tool кодом ошибки 009 говорит вам, что аппарат находится в состоянии ошибки, и пока ошибка не будет устранена, прога работать с аппаратом не будет. Дело было в картридже.
Теперь надо понять как расшифровать отчет.
- Наверх of the page up there ^
-
0
| Сообщение #15
Отправлено 28 марта 2017 — 21:11
localhost
Фиг знает. Я на iP7240 с четырёх вроде входил. На MG5340 с 5…
Canon EOS 500D + 18-55 IS II + 50 mm STM + YoungNuo SpeedLite YN565 EX II, EPSON L800 + Hongsam
- Наверх of the page up there ^
-
0
| Сообщение #16
Отправлено 28 марта 2017 — 21:16
RIDDLE

Т.е. с сенсорных кнопок реал выйти в СР?
Да. Я делал вот как: Нажал на кнопку питания и держал ее, заметил что по середине синий индикатор мигает в тот момент когда я нажимаю на «» неподсвеченую поверхность где располагаеться знак «стоп»», ну а потом я тупо нажал на «то место» 6 раз и отпустил кнопку питания и о чудо он вошел в СР.

с четырёх вроде входил. На MG5340 с 5…
Я когда нажимал на кнопку «стоп» понял что разное кол-во нажатий это разные режимы ибо нажимал и 3 раза и 5 и 6. Дотыкал что все лампы вспыхнули и ничего не реагирует. Пришлось выдернуть шнур питания. Где то читал что таким вот образом можно его вобще в кому вогнать, посему каждый раз когда нажимал на кнопку питания дабы понять включиться он илил нет — замирало дыхание а на лице была тупая улыбка
- Наверх of the page up there ^
-
0
| Сообщение #17
Отправлено 28 марта 2017 — 21:16
localhost
Аллилуйя))
Ну а ошибки — обычное дело))
Лично у меня V3.400 нормально работает тока из под Win 8.1
А есди ошибка памперса вылезла, то я ваще хз как её устранить без прошивки. У кого-то получалось, конечно…
Canon EOS 500D + 18-55 IS II + 50 mm STM + YoungNuo SpeedLite YN565 EX II, EPSON L800 + Hongsam
- Наверх of the page up there ^
-
0
| Сообщение #18
Отправлено 28 марта 2017 — 21:18
RIDDLE
Как мне понять по отчетам: когда ему пора менять этот помперс?

А есди ошибка памперса вылезла
У меня — нет.
Я просто хочу за ранее посмотреть сколько еще до нее осталось.
- Наверх of the page up there ^
-
0
| Сообщение #19
Отправлено 28 марта 2017 — 21:20
localhost
К слову, истинный сервисный режим — это когда дисплей МФУ горит черным ровным светом и ничего не отображает. Ну и синяя лампочка по центру — как обычно.
Если D = 60-90, то точно пора.
Да и вообще, сброс счётчиков — это всегда хорошее дело)
Canon EOS 500D + 18-55 IS II + 50 mm STM + YoungNuo SpeedLite YN565 EX II, EPSON L800 + Hongsam
- Наверх of the page up there ^
-
0
| Сообщение #20
Отправлено 28 марта 2017 — 21:24
RIDDLE

— это когда дисплей МФУ горит черным ровным светом и ничего не отображает. Ну и синяя лампочка по центру — как обычно.
Именно так у меня и происходит.
D=071.0 — вот такой параметр
- Наверх of the page up there ^
-
0
- ← Предыдущая тема
- Сервисные программы, обнуление чипов, сброс памперса, коды ошибок, прошивки, EEPROM
- Следующая тема →
- Вы не можете создать новую тему
- Вы не можете ответить в тему
1 человек читают эту тему
0 пользователей, 1 гостей, 0 скрытых пользователей
Когда сработает блокировка струйного принтера или МФУ Canon, из-за переполненного счетчика абсорбера (памперса), на панели устройства начнут мигать индикаторы питания и поломки. Кроме того, если аппарат имеет встроенный сегментный дисплей, то на нем появится код ошибки E27 (на современных принтерах с сенсорным экраном всплывет сообщение, информирующее о заполнении абсорбера). К тому же при имеющемся подключении к компьютеру, на последнем, появится окно с маркировкой 5B00 и описанием действий по устранению ошибки.
К счастью, способов борьбы с этой проблемой существует достаточно много. Самый оптимальный вариант – это отдать устройство в сервисный центр, пусть им займутся специалисты. Если не хотите тратить деньги, можете «заморочиться» и самостоятельно обнулить счетчик абсорбера принтера Canon при помощи нехитрой комбинации кнопок, размещенных на панели принтера, а также программ Service Tool, General Tool или PrintHelp (подробнее читайте в разделе «Как сбросить абсорбер принтера Canon»).
Однако некоторые модели японской оргтехники весьма капризны, и не дают возможности избавиться от ошибки E27 быстрым, понятным и легким способом. Поэтому, в этой статье мы расскажем Вам, как обнулить счетчик «памперса» принтера Canon, если программа Service Tool выдает ошибку. К довершению всего, приведем примеры того, как прошить принтер Canon в домашних условиях.
Предупреждение: Если Вы никогда не работали с паяльником и программатором, лучше сразу откажитесь от идеи самостоятельно перепрошить принтер Canon. В этом случае обращение в сервисный центр будет самым рациональным решением, так как это поможет Вам сохранить технику, время и нервы.
Почему Service Tool выдает ошибку и не хочет сбрасывать счетчик абсорбера принтера Canon
Обнулить счетчик «памперса» принтера иногда может быть проблематично по самым разным причинам. Например, у старых аппаратов начинают западать кнопки или вовсе перестают работать, сбоит устаревшее ПО, выходят из строя различные узлы и механизмы, а также появляются другие проблемы (ознакомьтесь с подробным списком кодов ошибок принтеров Canon). Все это может помешать ввести устройство в режим сервисного обслуживания, без которого обнуление счетчика отработанного чернила становится невозможным для традиционных способов. Если что-то мешает осуществить сброс абсорбера, программа Service Tool выдаст соответствующую ошибку:
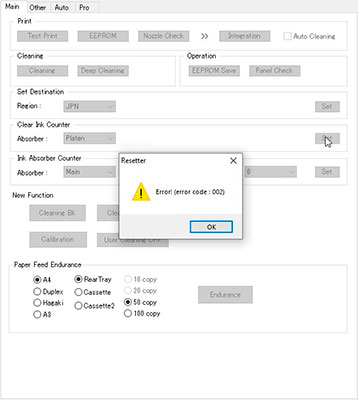
- Error code 002. В основном эта ошибка появляется из-за того, что используемая версия Service Tool не поддерживает данную модель принтера. Решается она заменой программы на подходящую вариацию. Сегодня можно купить Service Tool v5306, но это не значит, что она подойдет для всех МФУ Canon (например, для принтера PIXMA iP4600 лучше использовать Service Tool v2000).
- Error code 005. Самая распространенная ошибка. Появляется тогда, когда ПО не может распознать печатающее устройство. Причины могут быть самые разные: не ввели принтер в сервисный режим, сломалась плата управления, сбоит программное обеспечение и т.д. Можно попробовать исправить проблему перезагрузкой компьютера и принтера, а также переключением USB-порта или заменой USB-кабеля, который синхронизирует эти два изделия.
- Error code 006. Как правило, ошибка сигнализирует о том, что принтер не вошел в режим сервисного обслуживания. Попробуйте перезапустить принтер, перезагрузить ПК и снова осуществить процедуру обнуления абсорбера принтера. Параллельно не помешает сменить порт USB-подключения и кабель.
- Error code 009. Тоже довольно распространенная проблема. Вызвана она тем, что в принтере присутствует еще какой-то сбой, помимо переполненного счетчика «памперса» Canon. Чтобы определить ошибку, посчитайте количество миганий индикаторов устройства. Регулярнее всего сбой заключается в отсутствии или неработоспособности картриджа. Попробуйте обнулить счетчик уровня чернила струйного принтера Canon (не путайте со счетчиком абсорбера, это разные понятия). Пока не устраните проблему, Service Tool не сможет обнулить «памперс» принтера.
К тому же, во время сброса абсорбера принтера может выскочить сообщение с надписью «Service Tool не отвечает». Чаще всего такое сообщение появляется из-за несовместимости программы с печатающим устройством. К тому же, об этом мало кто знает, но по сути Service Tool довольно старое и примитивное приложение, функционал которого может не поддерживаться более современным ОС компьютера (актуальнее всего ST использовать на ПК с Win 7 или XP).
Обратите внимание: Если Вы пользуетесь General Tool, и в принтере имеются еще какие-то ошибки, то счетчик не будет сброшен. При этом программа может нормально функционировать. Иногда в левом нижнем меню можно заметить описание ошибки «Device it get false» – это означает, что приложение не может определить модель принтера. Вместо этого можно воспользоваться программой PrintHelp. Она редко выдает ошибки. Однако PrintHelp поддерживает малое количество принтеров Canon, так как предназначена для сброса абсорбера у оргтехники Epson.
Если сделали все возможное, но программа по-прежнему выдает ошибку и не хочет сбрасывать счетчик абсорбера, тогда поможет лишь перепрошивка платы управления принтера Canon.
Альтернативный способ сброса счетчика абсорбера. Прошивка платы управления принтера Canon
Когда Ваше МФУ Canon начнет «ругаться» из-за переполненного счетчика абсорбера, не спешите нести его в сервисный центр (кроме случаев, когда принтер еще на гарантии). Попробуйте обнулить счетчик одним из способов, указанных ранее. Однако бывают случаи, когда программным методом побороть ошибку никак не удается. Тогда можно поступить несколько иначе. Достать с принтера Canon плату управления и поменять или перепрошить ее.
В случае с заменой все ясно. Покупаете «донора», снимаете с него плату и устанавливаете на свой аппарат. Но с перепрошивкой все не так однозначно. Этот процесс достаточно требователен к аккуратности, так как малейшая ошибка может полностью вывести изделие из строя. В принципе, перепрошивка струйных принтеров Canon для всех моделей делается фактически одинаково. Тем не менее, на всякий случай, наведем сразу несколько примеров обнуления абсорбера, методом прошивки платы управления печатающего аппарата.
Прошивка МФУ Canon PIXMA MP280 и Canon PIXMA iP2700
Некоторые версии принтеров Canon PIXMA MP280 и iP2700 отказываются классическим способом входить в меню сервисного обслуживания (можно попробовать вместо пятикратного нажатия кнопки «Стоп/Сброс», нажать ее 1, 2, 3, 4, 6, 7, 8 или 9 раз, но это крайне редко помогает).
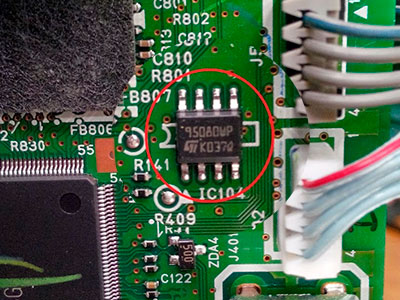
Перепрошивка принтеров Canon PIXMA MP280 и Canon PIXMA iP2700 осуществляется следующим образом:
- Снимите крышку корпуса со стороны бокового разъема USB.
- Извлеките плату управления.
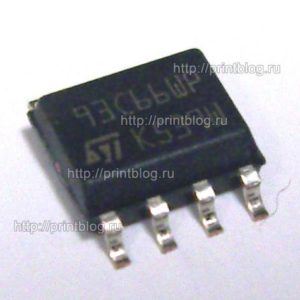
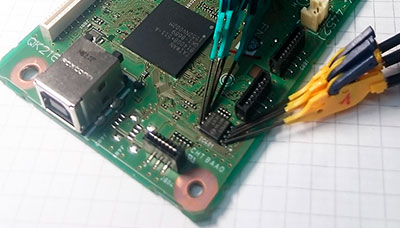
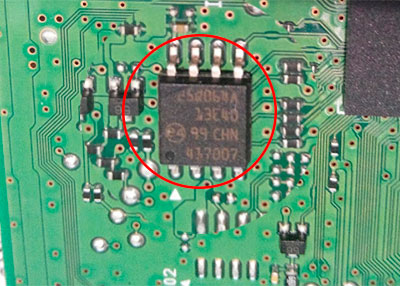
- Отпаяйте паяльником чип с маркировкой 95080WP (для iP2700 – 93C66WP).
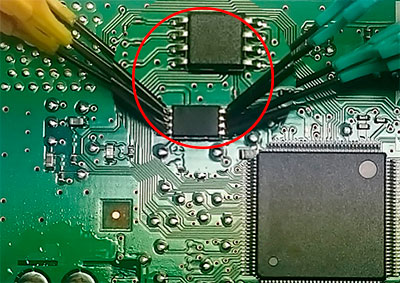
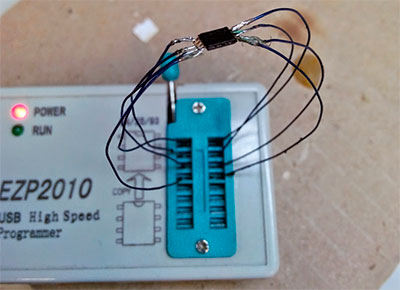
- При помощи программатора перепрошейте полученную микросхему копией содержимого ПО с нового принтера (однако, предварительно считайте и сделайте копию оригинальной прошивки принтера).
- Припаяйте чип обратно.
- Установите плату и закройте крышку корпуса.
Скачать прошивку для принтера Canon PIXMA MP280 (1 КБ)
Скачать прошивку для принтера Canon PIXMA iP2700 (1 КБ)
После этого принтер получит новое ПО и счетчик абсорбера (памперса) будет считаться сброшенным.
Прошивка МФУ Canon PIXMA MG2440/ 2540 и Canon PIXMA Ink Efficiency E404
Эти модели оргтехники самые капризные. Сбросить счетчик «памперса» на них очень непростая задача.
Можно попробовать подобрать программу Service Tool, так как некоторые вариации этих принтеров с n-ной попытки поддаются на сброс счетчика через приложение версии v2000, v3600 и новее. Однако обычно исправить это можно, только перепрошив плату управления принтера. Делается это следующим образом:
- Разберите принтер и извлеките плату управления.
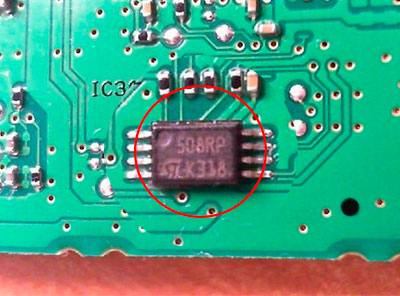
- Отпаяйте паяльником чип с маркировкой 508WP или 508RP.
- При помощи программатора прошейте полученную микросхему дампом ПО с нового принтера (не забудьте предварительно сделать копию оригинального ПО принтера).
- Припаяйте чип обратно.
- Соберите принтер.
Скачать прошивку для принтера Canon PIXMA MG2440 (1 КБ)
Скачать прошивку для принтера Canon PIXMA MG2540 (1 КБ)
Скачать прошивку для принтера Canon PIXMA Ink Efficiency E404 (1 КБ)
Теперь должно все заработать. Если никогда не занимались подобными работами, лучше доверьте это дело профессионалам. Еще можно купить уже перепрошитую микросхему и сразу ее впаять в плату устройства.
Прошивка МФУ Canon PIXMA MG3540
Уникальность прошивки этого устройства заключается в том, что в нем нет встроенной микросхемы EEPROM,
которая отвечает за сброс счетчика абсорбера принтера. Поэтому, чтобы обнулить абсорбер, если программно не получается, сделайте следующее:
- Снимите крышку корпуса и достаньте плату управления.
- На ней ни спереди, ни сзади Вы не найдете обычной EEPROM-ки. Поэтому, ищите чип с маркировкой 25Q64, который отвечает за основную прошивку аппарата.
- Прошейте чип дампом с нового принтера (выпаивать эту микросхему не обязательно, перепрошить ее можно прямо на плате управления).
- Соберите принтер.
Скачать прошивку для Canon PIXMA MG3540 (7 МБ)
Напоминаем, процесс перепрошивки платы принтера Canon довольно сложный. Поэтому, если у Вас нет соответствующего инструмента и навыков владения им, лучше обратитесь к специалисту или купите б/у МФУ и переставьте с него плату управления на свое устройство.
Обратите внимание: Так как счетчик памперса Canon Pixma MG3040 нельзя сбросить программным способом, то принтер придется перепрошивать. Микросхемы, которые следует прошить: 25Q16 и 25L64.
Прошивка МФУ с СНПЧ Canon PIXMA G1400/ 2400/ 3400
Принтеры с СНПЧ марки Canon вышли относительно недавно, но уже многие владельцы успели столкнуться с ошибкой 5В00. Несмотря на отсутствие стандартных картриджей, абсорбер принтера никуда от этого не исчез. Поэтому, спустя 12000-15000 отпечатков, работа МФУ блокируется, а на дисплее высвечивается код соответствующей ошибки.
Как и для других устройств, обнуление абсорбера (памперса) принтеров с СНПЧ Canon PIXMA серии G1400, G2400 и G3400 можно осуществить двумя способами. Первый, подразумевает собой подключение принтера к ПК, ввод его в режим сервисного обслуживания, и осуществление сброса при помощи программы Service tool v4718 и новее (можно попробовать через PrintHelp). Второй, более радикальный метод – сброс счетчика абсорбера, посредством прошивки платы управления принтера.
Чтобы перепрошить МФУ с СНПЧ Canon PIXMA G1400, G2400 и G3400, нужно выполнить следующее:
- Снять боковую панель корпуса принтера Canon PIXMA G1400, открутить винты и вытащить плату управления.
- Внимательно осмотреть плату, и найти на ней два чипа 24C16 и 25Q16 (для G2400 – 24C16 и 25Q32; для G3400 – 25Q16 и 25Q64).
- Выпаять их и перепрошить при помощи ПК и программатора.
- Припаять обратно и собрать принтер.
Скачать прошивку для Canon PIXMA G1400 (0,7 МБ)
Скачать прошивку для Canon PIXMA G2400 (1,4 МБ)
Скачать прошивку для Canon PIXMA G3400 (8 МБ)
Обратите внимание: Микросхемы не обязательно выпаивать с платы управления принтером, для подключения к программатору и прошивки можно использовать специальные клеммы.
Прошивки для различных моделей принтеров Canon
Здесь представлены прошивки для прочих печатающих аппаратов бренда Canon. Бесплатно и без регистрации их можно скачать с нашего сайта.
Скачать прошивку для Canon PIXMA iP2000 (1 КБ)
Скачать прошивку для Canon Bubble Jet S200 (1 КБ)
Скачать прошивку для Canon Bubble Jet S200x (1 КБ)
Скачать прошивку для Canon Bubble Jet S300 №1 (1 КБ)
Скачать прошивку для Canon Bubble Jet S300 №2 (1 КБ)
Скачать прошивку для Canon Bubble Jet S400 (1 КБ)
Скачать прошивку для Canon NP6317 (20 КБ)
Скачать прошивку для Canon NP7161 (69 КБ)
Внимание: Прошивки для принтеров Canon были собраны с различных открытых источников в интернет-сети. Мы их не тестировали. Пользоваться ими или нет – решать только Вам.
Ваше Имя:
Ваш вопрос:
Внимание: HTML не поддерживается! Используйте обычный текст.
Оценка:
Плохо
Хорошо
Введите код, указанный на картинке:

.webp)


