Пользователи Windows, использующие принтеры Canon, могли столкнуться с конечным кодом # 853 или кодом ошибки # 853 в очереди печати. Этот код ошибки появляется, когда пользователь пытается печатать обычным способом. Важно отметить, что эта ошибка обычно не возникает, когда выдается тестовое задание на печать.

Возможные причины этой ошибки:
- Postscript (.ps)-это формат файла, который содержит инструкции, а также необходимое содержимое для печати. Если драйвер принтера не поддерживает формат Postscript, можно увидеть эту ошибку. По умолчанию системы Windows 10 настроены на использование драйвера класса IPP от Microsoft. В большинстве случаев этот драйвер не поддерживает формат PS и обнаруженную ошибку.
- Драйвер принтера не обновлен.
- Прошивка принтера устарела.
Исправления, которые могут помочь вам решить эту ошибку, перечислены ниже.
Исправление 1. Установите драйвер UFR 2
Шаг 1. Откройте Страница поддержки Canon
Шаг 2. В разделе Драйверы и загрузка в раскрывающемся списке Операционная система выберите ОС.
Для 64-битной машины выберите Windows 10 (x64)
Для 32-разрядной машины выберите Windows 10
Шаг 3. Необходимые драйверы будут перечислены в разделе”Рекомендуемые драйверы”.
Шаг 4. Нажмите кнопку ВЫБРАТЬ

Шаг 5. Нажмите кнопку СКАЧАТЬ

Шаг 6. Дважды щелкните загруженный файл, чтобы запустить его. Завершите установку, следуя инструкциям на экране.
Шаг 7. Перезагрузите систему
Проверьте, помогает ли это, если ошибка все еще появляется, попробуйте следующее исправление.
Исправление 2. Убедитесь, что принтер использует драйвер UFR 2
По умолчанию Windows 10 настраивает драйвер класса Microsoft IPP в качестве драйвера принтера, даже если в вашей системе установлен драйвер UFR 2. Поэтому важно убедиться, что принтер использует драйвер UFR 2. Для этого выполните следующие действия:
Шаг 1. Откройте диалоговое окно”Выполнить”с помощью клавиш клавиатуры Windows и R
.
Шаг 2. Введите devmgmt.msc и нажмите Enter
.
Шаг 3. Откроется окно диспетчера устройств. Прокрутите вниз и дважды щелкните Очереди печати
.
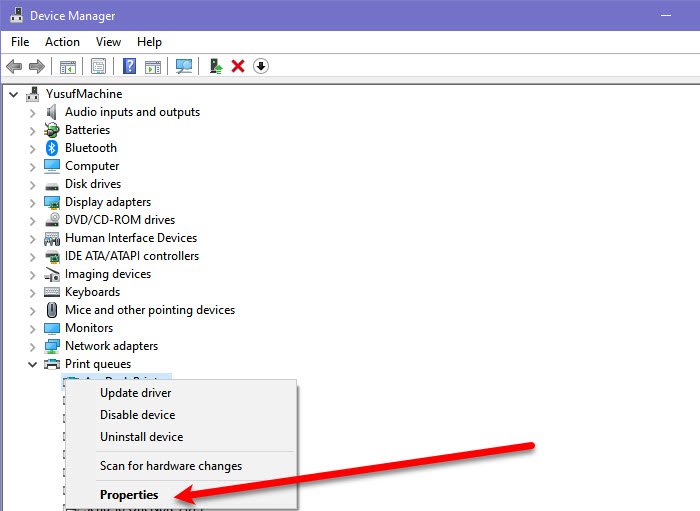
Шаг 4. В списке доступных принтеров щелкните правой кнопкой мыши на своем принтере Canon и выберите Свойства
.
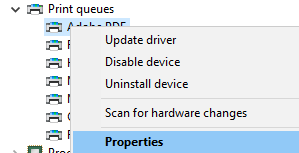
Шаг 5. В открывшемся окне”Свойства”перейдите на вкладку Драйвер
.
Шаг 6. В раскрывающемся меню выберите Canon Generic Plus UFR II
.
Шаг 7. Наконец, нажмите Применить , а затем-OK
.
Шаг 8. Перезагрузите систему.
Исправление 3. Запустите средство устранения неполадок принтера
Шаг 1. Откройте диалоговое окно”Выполнить”в своей системе, это можно сделать, удерживая кнопку Windows+r
Шаг 2. В появившемся окне введите команду ms-settings: Troubleshoot и нажмите OK

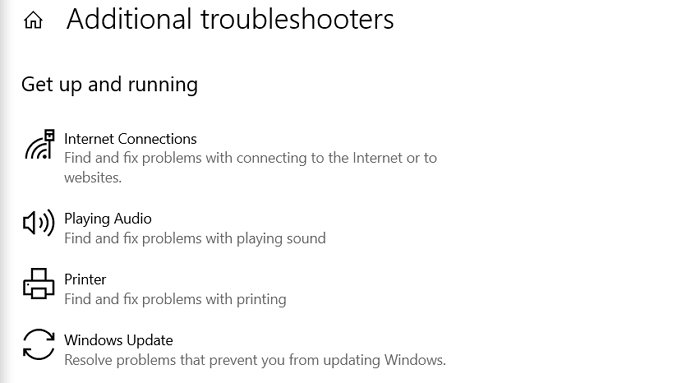
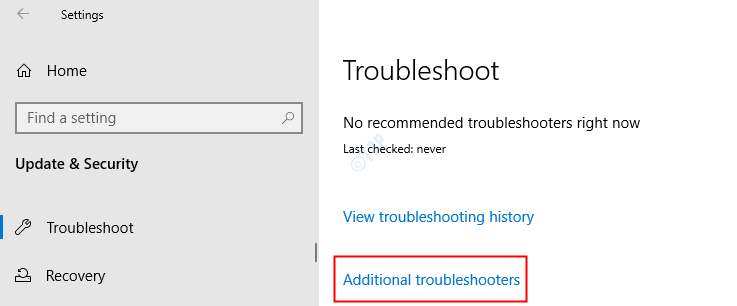
Шаг 3. В открывшемся окне”Настройки> Обновление и безопасность> Устранение неполадок”нажмите Дополнительные средства устранения неполадок
.
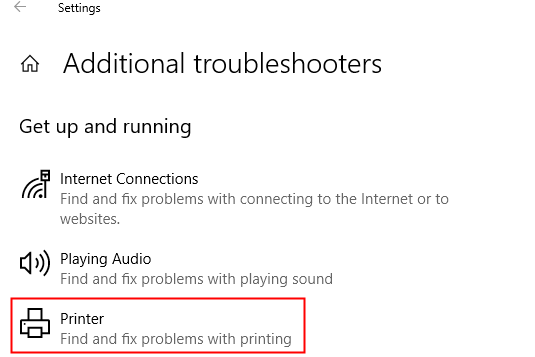
Шаг 4. В открывшемся окне”Дополнительные средства устранения неполадок”нажмите Принтеры
.
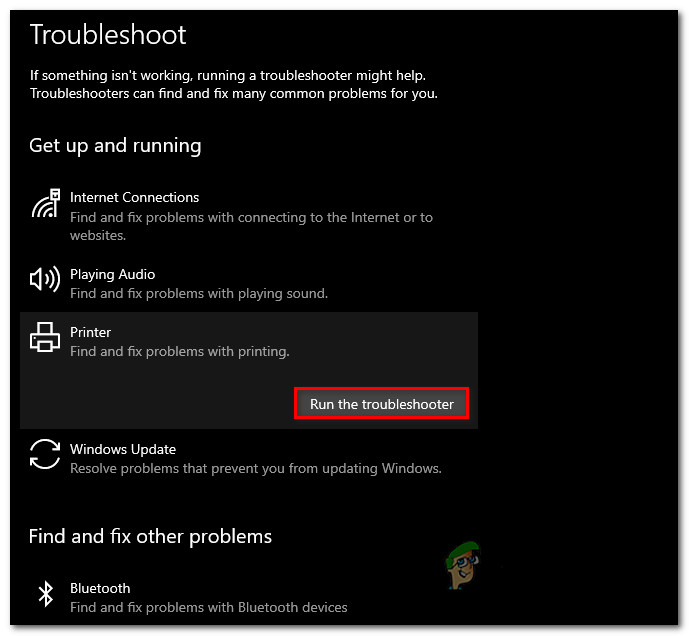
Шаг 5. Теперь нажмите кнопку Запустить средство устранения неполадок
.

Шаг 6. Теперь система начнет поиск проблем. Вы получите уведомление, как только проблема будет обнаружена. Следуйте инструкциям на экране, чтобы устранить проблему.
Исправление 4. Обновите драйвер принтера из диспетчера устройств
Шаг 1. Откройте диспетчер устройств. См. Шаги 1,2 из Исправления 1
Шаг 2. Прокрутите вниз и дважды щелкните Очереди печати
.
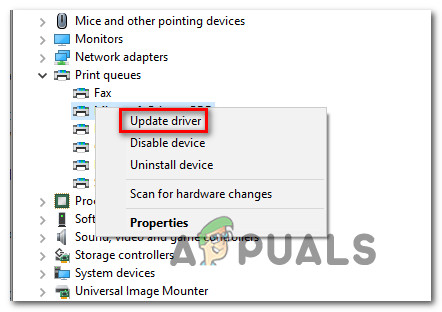
Шаг 3. Щелкните правой кнопкой мыши на принтере Canon и выберите Обновить драйвер
.

Шаг 4. В появившемся окне нажмите Автоматический поиск драйверов
.

Шаг 5. Вы получите уведомление, если будет найдена обновленная версия драйвера. Следуйте инструкциям на экране, чтобы обновить драйвер.
Шаг 6. Перезагрузите систему после завершения обновления.
Исправление 5. Обновите драйвер принтера вручную
Шаг 1. Откройте диспетчер устройств. См. шаги 1,2 из Исправления 1
Шаг 2. Прокрутите вниз и дважды щелкните Очереди печати
.
Шаг 3. Щелкните правой кнопкой мыши на принтере Canon и выберите Удалить драйвер
.

Шаг 4. Следуйте инструкциям на экране и полностью удалите принтер.
Чтобы переустановить драйвер, выполните следующие действия:
Шаг 5. Посетите Страница поддержки Canon
Шаг 6. Введите сведения о принтере
Шаг 7. Вам будет показан список необходимых драйверов.
Шаг 8. Следуйте инструкциям на экране и загрузите драйверы.
Шаг 9. Дважды щелкните загруженный файл, чтобы запустить его. Завершите установку, следуя инструкциям на экране.
Шаг 10. Перезагрузите систему
Исправление 6. Обновление прошивки принтера
Если вы попробовали все перечисленные выше исправления, но ошибка не исчезла, это может означать, что микропрограмму принтера необходимо обновить. Для этого внимательно следуйте приведенным ниже инструкциям.
Шаг 1. Убедитесь, что принтер подключен к сети
Шаг 2. На экране принтера откройте вкладку Меню
Шаг 3. Выберите Настройки управления системой
.
Шаг 4. Выберите Обновить прошивку
.
Шаг 5. Выберите Через Интернет
.
Шаг 6. Обновление микропрограммы займет некоторое время. Пожалуйста, подождите терпеливо.
Шаг 7. Перезагрузите принтер. На экране отображается сообщение Это последняя версия микропрограммы . Это означает, что микропрограмма была успешно обновлена.
Это все
Надеемся, эта статья была информативной. Спасибо за чтение.
Мы будем рады, если вы оставите комментарий и сообщите нам об исправлении, которое помогло вам устранить ошибку.
Download Windows Speedup Tool to fix errors and make PC run faster
Many Canon users are facing Error 853 while using the Canon Printer to print something. There are multiple reasons for the issue, but more often than not, an incorrect driver is responsible for the error. However, in this article, we are going to see all the possible solutions to fix Canon Printer Error 853 on Windows 10.
These are the things you need to do to fix Canon Printer Error 853 on Windows 10.
- Install UFR2 driver
- Alter Driver’s Properties
- Run Printer Troubleshooter
- Reinstall Driver
Let us talk about them in detail.
1] Install UFR2 driver
If the error appears when you try to initiate the printing job then the chances are you are facing a postscripting issue. To fix this issue, you need to install a UFR2 driver. You can download the driver from canon.com
Install this driver and see if it fixes the issue.
2] Alter Driver’s Properties
If installing a UFR2 driver doesn’t work then you have to select UFR II from the Device Manager and see if it fixes the error code. You can follow the given steps to do the same.
- Open Device Manager by Win + X > Device Manager.
- Expand Print queues, right-click on your printer’s driver, and select Properties.
- Now go to the Drivers tab and use the drop-down menu to select Canon Generic Plus UFR II.
- Finally, click Apply and restart your system to see if the issue is fixed.
3] Run Printer Troubleshooter
Windows has a built-in troubleshooter to fix any printer-related issue. So, you can entrust it, usually, to fix the Canon Printer error.
To do that, you can follow the given steps.
- Launch Settings by Win + I.
- Click Update & Security > Troubleshoot > Additional troubleshooter.
- Click Windows Update > Run the troubleshooter.
Now, follow the on-screen instructions to fix the Canon Printer error.
4] Reinstall Driver
If nothing works, you should try to uninstall the driver and then reinstall it from canon.com to see if it fixes the error.
Hopefully, this will fix the Canon driver error for you.
Read Next: B200: Printer error has occurred.
Yusuf is an Engineering graduate from Delhi. He has written over 1000 technical articles and has knowledge of programming languages including Java, and C++, and technologies such as Oracle 12C and MsSQL. Troubleshooting Windows is his favorite past-time.
Some Windows users using Canon printers are reporting that they end up seeing the error code #853 inside the Print Queue whenever they attempt to print something conventionally. Most affected users are reporting that printing out a test page doesn’t return the same error code.
After investigating this particular error code thoroughly, it turns out that several different underlying causes might be causing this error. Here’s a list of potential culprits that might be causing this problem:
- Postscript printing issue – In most cases, you can expect to see this error popping up if your Canon printer is attempting to execute a printing job through a driver that doesn’t support the Postscript printer’s language. In this case, you can get the issue resolved by installing the UFR2 driver to grant the printer’s the required dependencies.
- IPP Class Driver is used instead of the UFRII driver – As it turns out, you can also expect to see this error in those situations where your Windows 10 computer is configured by default to use the Microsoft IPP Class driver instead of the one that supports Postscript (UFR2 driver). If this scenario is applicable, you can resolve the issue by using Device Manager to modify the default behavior and make the UFR2 driver the default choice.
- Common printer inconsistency – According to some affected users, you can also expect to see this error code due to a common printer inconsistency if you’re seeing this error on Windows 10. In this case, you should run the Windows Printer Troubleshooter and apply the recommended fix to resolve the issue.
- Outdated printer version – Under certain circumstances, you can expect to see this error code due to an outdated printer driver that is affecting the connection between the host computer and the Canon printer that’s triggering this printing queue error. In this case, you should update your printer driver version manually or via Windows Update.
- Outdated printer firmware – If you’re seeing this error with Canon model MF733Cdw or similar models with smart functionality, chances are you’re dealing with an outdated firmware version. To resolve this issue, connect your printer to the internet and update the firmware version to the latest via the in-game menus of Canon.
Now that you are aware of every potential fix that might be responsible for this particular issue, here’s a list of verified methods that other affected users have successfully used to resolve the #853 error code:
Method 1: Installing the UFR2 driver (if applicable)
Since the 853 error code is an internal processing error at heart, you need to start this investigation by ensuring that the problem is not occurring due to a Postscript issue.
Most commonly, you can expect to see this error code when your Canon printer is attempting to execute a printing job because it attempts to use a Postscript driver even though the printer model does NOT support the Postscript printer language.
Note: This is a fairly common occurrence with printers that are using the Canon PS v4.x driver.
If this scenario applies to your particular situation, you should be able to fix the problem by installing and using the UFR2 driver instead.
If you’re looking for specific instructions on how to download & install the UFR2 driver on the computer that acts as the host for your printer, follow the instructions below:
- Open your default browser and navigate to the download page of the generic version of the UFR2 printer driver.
- Once you’re inside the correct page, click on the Download button to initiate the download.
Downloading the UFR driver Note: This driver version is compatible with every recent Windows version including Windows 7, Windows 8.1, and Windows 10.
- Once the download is complete, double-click on the executable that you’ve just downloaded and click Yes at the UAC (User Account Control) to grant admin access.
- Next, follow the on-screen instructions to complete the installation of the UFR2 driver before restarting your computer.
- After your computer boots back up, the new printer driver will automatically replace the old one you previously used.
- Repeat the action that was previously causing the #853 error code and see if the problem is now fixed.
In case the same problem is still occurring, move down to the next potential fix below.
Method 2: Forcing the correct driver (UFR II)
Even if you have previously installed the UFR II driver, that doesn’t guarantee that your computer is configured to use it in your particular situation.
In fact, Windows 10 is configured to use the Microsoft IPP Class driver by default, so chances are the UFRII driver is still not in use even if you followed the instructions above to install the correct driver.
Several affected users who found themselves in a similar situation have reported that they could fix the issue by modifying the driver priority via Device Manager, forcing the printer to use the Canon Generic Plus UFR II instead of the Microsoft IPP Class driver.
Follow the instructions below to ensure that your Canon printer is using the correct driver before printing a file again to check if the 853 error has been fixed:
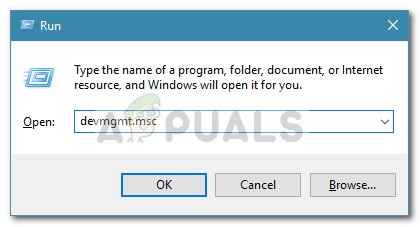
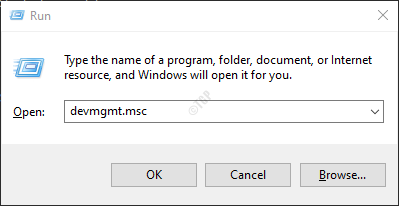
- Press Windows key + R to open up a Run dialog box. Next, type ‘devmgmt.msc’ inside the text box and press Enter to open up Device Manager. When you see the UAC (User Account Control), click Yes to grant admin access.
Opening Device Manager - Inside Device Manager, scroll down through the different device types and expand the drop-down menu associated with Print Queues.
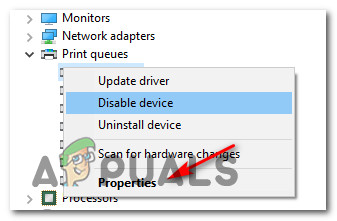
- Next, right-click on your printer from the list of available options inside and choose Properties from the context menu that just appeared.
Accessing the Properties menu - Once you’re inside the Properties screen of your printer, click on the Driver tab at the top, then use the drop-down menu inside to select Canon Generic Plus UFR II instead of Microsoft IPP Class Driver (or whatever the default choice currently is).
- After the modification is complete, click on Apply to save the changes, then restart your computer and see if the problem is finally fixed.
In case the same 853 error is still occurring even after you’ve ensured that you are indeed using the Canon Generic Plus UFR II driver, move down to the next potential fix below.
Method 3: Running the Windows Printer Troubleshooter
If the first two methods were not effective in your case, you should also consider the possibility that you might be dealing with a generic printer driver inconsistency.
If you’re using Windows 10, you have a built-in utility at your disposal that should be capable of resolving the issue automatically if the error is covered by one of the many automated repair strategies covered by the Printer Troubleshooter.
When you start the Printer Troubleshooter, the utility will analyze your current situation and determine if any of the predetermined repair strategies are applicable in this situation. If one is a match, you will be prompted to apply the fix. If everything goes well, this will end up resolving the issue with minimal hassle.
Follow the instructions below to run the Printer Troubleshooter:
- Press Windows key + R to open up a Run dialog box. Then, type” ms-settings:troubleshoot” and press Enter to open up the Troubleshoot tab of the Settings app.
Accessing the Activation troubleshooter - Once you’re inside the Troubleshooting tab, move to the Get up and running tab and click on Printer. Then, from the list of available options, and click on the Run the troubleshooter button.
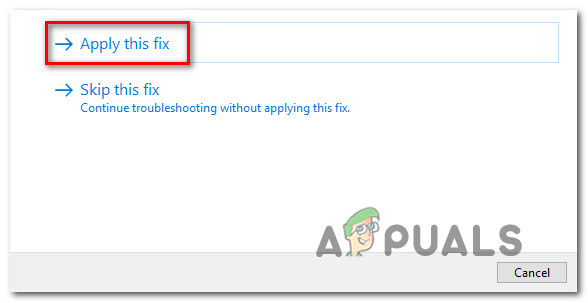
Running the printer troubleshooter - After the scanning period is complete, then click on Apply this fix if a repair strategy is recommended.
Applying the recommended fix - Once the operation is complete, close the troubleshooting window and see if you’re still encountering the same error message when trying to print something from your default printer.
If the same issue is still persisting, move down to the next method below.
Method 4: Updating your printer’s driver version
As it turns out, you can also expect to encounter the 853 error code due to some kind of outdated printer driver that is affecting the connection between the host computer and the Canon printer that is triggering the error.
In this case, you have two available options for mitigating the outdated driver issue:
- Updating your printer driver version via Windows Update
- Updating your printer driver version manually
We’ve covered both potential approaches with a series of sub guides that will walk you through every step. Follow the guide that is applicable to your preferred way of doing things under Windows.
A. Updating your printer driver via Windows Update
- Start by pressing Windows key + R to open up a Run dialog box. Then, type “devmgmt.msc” and press Enter to open up Device Manager. If prompted by the UAC (User Account Control), click Yes to grant administrative privileges.
Opening Device Manager - Once you’re inside Device Manager, scroll through the list of devices and expand the Printers (Print queues) drop-down menu.
- Right-click on the printer that you’re having issues with and choose Update driver.
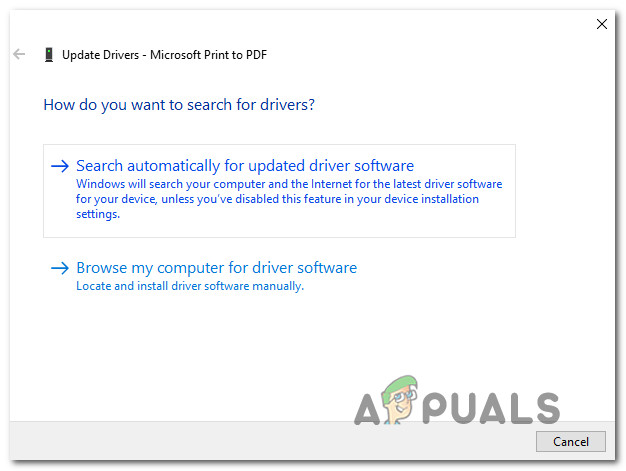
Updating your printer driver - Once you get to the next screen, click on Search automatically for updated driver software to let Windows Update scan and download the newer driver version for your printer.
Updating the driver version - If a new version of the printer version is available, follow the on-screen prompts to complete the installation of the newer driver version.
- At the end of this operation, restart your computer and see if the problem is now fixed.
B. Updating your printer driver manually
- Start by pressing Windows key + R to open up a Run dialog box. Then, type “devmgmt.msc” and press Enter to open up Device Manager. If you are prompted by the UAC (User Account Control), click Yes to grant admin access.
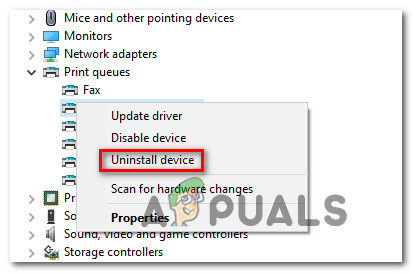
Opening Device Manager - Next, go ahead and expand the drop-down menu associated with Printers (or Print Queues). Next, right-click on the printer that you’re having issues with and choose Uninstall device – You’ll need to confirm once again before the driver is uninstalled.
Uninstalling the Printer Driver Note: Keep in mind that you need to avoid restarting your computer during this time. Doing this will trigger Windows Update to search and install a generic version of the driver at the next startup, which will likely end up producing the same error.
- After you manage to remove your printer’s driver open your browser and search online for your manufacturer’s website.
Note: The latest printer driver versions are often available in the support section. - After you finally locate and download the latest driver version, open it and follow the on-screen prompts to install it on your system. Almost all printer drivers are self-installing – meaning that they only require you to double-click them and accept the UAC prompt for them to install.
- Once the newer printer driver is installed, reboot your computer and see if the issue is resolved once the next startup is complete.
In case you’ve already ensured that you are using the latest printer drivers and you’re still seeing the 853 error while attempting to initiate a printing job, move down to the next method below.
Method 5: Updating the Canon printer’s firmware (if applicable)
If none of the methods above have proven to be effective in your case, you should also take into consideration that an outdated printer firmware can be responsible for the inability to take on printing jobs from the home/work network.
Several Canon users that were dealing with the same problem have reported that they finally managed to fix the issue by updating the firmware over the Internet after ensuring that the printer is connected to the internet.
Follow the instructions below to update your Canon firmware to the latest version:
Note: The instructions below were tested on a MF733Cdw Canon printer model. The steps should work on similar Canon models using the same OS with Wireless / Wired Capabilities.
- On your printer, access the Menu option using your printer’s screen.
- Inside the options available inside the Menu tab, access the System Management Settings.
- Make sure your printer is connected to the internet (via wireless or wired cable).
- Next, choose Update Firmware, then select Via Internet when asked to select your preferred approach of updating.
- Wait until the operation is complete, then restart your printer conventionally and return to the Update Firmware screen once again.
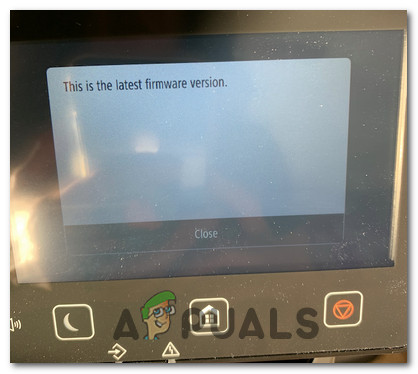
- If the same screen now returns the message ‘This is the latest firmware version‘, it means you have successfully updated your Canon printer versions to the latest version available.
Updating the latest firmware version on Canon printer
Kamil Anwar
Kamil is a certified MCITP, CCNA (W), CCNA (S) and a former British Computer Society Member with over 9 years of experience Configuring, Deploying and Managing Switches, Firewalls and Domain Controllers also an old-school still active on FreeNode.
Some Windows users using Canon printers are reporting that they end up seeing the error code #853 inside the Print Queue whenever they attempt to print something conventionally. Most affected users are reporting that printing out a test page doesn’t return the same error code.
After investigating this particular error code thoroughly, it turns out that several different underlying causes might be causing this error. Here’s a list of potential culprits that might be causing this problem:
- Postscript printing issue – In most cases, you can expect to see this error popping up if your Canon printer is attempting to execute a printing job through a driver that doesn’t support the Postscript printer’s language. In this case, you can get the issue resolved by installing the UFR2 driver to grant the printer’s the required dependencies.
- IPP Class Driver is used instead of the UFRII driver – As it turns out, you can also expect to see this error in those situations where your Windows 10 computer is configured by default to use the Microsoft IPP Class driver instead of the one that supports Postscript (UFR2 driver). If this scenario is applicable, you can resolve the issue by using Device Manager to modify the default behavior and make the UFR2 driver the default choice.
- Common printer inconsistency – According to some affected users, you can also expect to see this error code due to a common printer inconsistency if you’re seeing this error on Windows 10. In this case, you should run the Windows Printer Troubleshooter and apply the recommended fix to resolve the issue.
- Outdated printer version – Under certain circumstances, you can expect to see this error code due to an outdated printer driver that is affecting the connection between the host computer and the Canon printer that’s triggering this printing queue error. In this case, you should update your printer driver version manually or via Windows Update.
- Outdated printer firmware – If you’re seeing this error with Canon model MF733Cdw or similar models with smart functionality, chances are you’re dealing with an outdated firmware version. To resolve this issue, connect your printer to the internet and update the firmware version to the latest via the in-game menus of Canon.
Now that you are aware of every potential fix that might be responsible for this particular issue, here’s a list of verified methods that other affected users have successfully used to resolve the #853 error code:
Method 1: Installing the UFR2 driver (if applicable)
Since the 853 error code is an internal processing error at heart, you need to start this investigation by ensuring that the problem is not occurring due to a Postscript issue.
Most commonly, you can expect to see this error code when your Canon printer is attempting to execute a printing job because it attempts to use a Postscript driver even though the printer model does NOT support the Postscript printer language.
Note: This is a fairly common occurrence with printers that are using the Canon PS v4.x driver.
If this scenario applies to your particular situation, you should be able to fix the problem by installing and using the UFR2 driver instead.
If you’re looking for specific instructions on how to download & install the UFR2 driver on the computer that acts as the host for your printer, follow the instructions below:
- Open your default browser and navigate to the download page of the generic version of the UFR2 printer driver.
- Once you’re inside the correct page, click on the Download button to initiate the download.
Downloading the UFR driver Note: This driver version is compatible with every recent Windows version including Windows 7, Windows 8.1, and Windows 10.
- Once the download is complete, double-click on the executable that you’ve just downloaded and click Yes at the UAC (User Account Control) to grant admin access.
- Next, follow the on-screen instructions to complete the installation of the UFR2 driver before restarting your computer.
- After your computer boots back up, the new printer driver will automatically replace the old one you previously used.
- Repeat the action that was previously causing the #853 error code and see if the problem is now fixed.
In case the same problem is still occurring, move down to the next potential fix below.
Method 2: Forcing the correct driver (UFR II)
Even if you have previously installed the UFR II driver, that doesn’t guarantee that your computer is configured to use it in your particular situation.
In fact, Windows 10 is configured to use the Microsoft IPP Class driver by default, so chances are the UFRII driver is still not in use even if you followed the instructions above to install the correct driver.
Several affected users who found themselves in a similar situation have reported that they could fix the issue by modifying the driver priority via Device Manager, forcing the printer to use the Canon Generic Plus UFR II instead of the Microsoft IPP Class driver.
Follow the instructions below to ensure that your Canon printer is using the correct driver before printing a file again to check if the 853 error has been fixed:
- Press Windows key + R to open up a Run dialog box. Next, type ‘devmgmt.msc’ inside the text box and press Enter to open up Device Manager. When you see the UAC (User Account Control), click Yes to grant admin access.
Opening Device Manager - Inside Device Manager, scroll down through the different device types and expand the drop-down menu associated with Print Queues.
- Next, right-click on your printer from the list of available options inside and choose Properties from the context menu that just appeared.
Accessing the Properties menu - Once you’re inside the Properties screen of your printer, click on the Driver tab at the top, then use the drop-down menu inside to select Canon Generic Plus UFR II instead of Microsoft IPP Class Driver (or whatever the default choice currently is).
- After the modification is complete, click on Apply to save the changes, then restart your computer and see if the problem is finally fixed.
In case the same 853 error is still occurring even after you’ve ensured that you are indeed using the Canon Generic Plus UFR II driver, move down to the next potential fix below.
Method 3: Running the Windows Printer Troubleshooter
If the first two methods were not effective in your case, you should also consider the possibility that you might be dealing with a generic printer driver inconsistency.
If you’re using Windows 10, you have a built-in utility at your disposal that should be capable of resolving the issue automatically if the error is covered by one of the many automated repair strategies covered by the Printer Troubleshooter.
When you start the Printer Troubleshooter, the utility will analyze your current situation and determine if any of the predetermined repair strategies are applicable in this situation. If one is a match, you will be prompted to apply the fix. If everything goes well, this will end up resolving the issue with minimal hassle.
Follow the instructions below to run the Printer Troubleshooter:
- Press Windows key + R to open up a Run dialog box. Then, type” ms-settings:troubleshoot” and press Enter to open up the Troubleshoot tab of the Settings app.
Accessing the Activation troubleshooter - Once you’re inside the Troubleshooting tab, move to the Get up and running tab and click on Printer. Then, from the list of available options, and click on the Run the troubleshooter button.
Running the printer troubleshooter - After the scanning period is complete, then click on Apply this fix if a repair strategy is recommended.
Applying the recommended fix - Once the operation is complete, close the troubleshooting window and see if you’re still encountering the same error message when trying to print something from your default printer.
If the same issue is still persisting, move down to the next method below.
Method 4: Updating your printer’s driver version
As it turns out, you can also expect to encounter the 853 error code due to some kind of outdated printer driver that is affecting the connection between the host computer and the Canon printer that is triggering the error.
In this case, you have two available options for mitigating the outdated driver issue:
- Updating your printer driver version via Windows Update
- Updating your printer driver version manually
We’ve covered both potential approaches with a series of sub guides that will walk you through every step. Follow the guide that is applicable to your preferred way of doing things under Windows.
A. Updating your printer driver via Windows Update
- Start by pressing Windows key + R to open up a Run dialog box. Then, type “devmgmt.msc” and press Enter to open up Device Manager. If prompted by the UAC (User Account Control), click Yes to grant administrative privileges.
Opening Device Manager - Once you’re inside Device Manager, scroll through the list of devices and expand the Printers (Print queues) drop-down menu.
- Right-click on the printer that you’re having issues with and choose Update driver.
Updating your printer driver - Once you get to the next screen, click on Search automatically for updated driver software to let Windows Update scan and download the newer driver version for your printer.
Updating the driver version - If a new version of the printer version is available, follow the on-screen prompts to complete the installation of the newer driver version.
- At the end of this operation, restart your computer and see if the problem is now fixed.
B. Updating your printer driver manually
- Start by pressing Windows key + R to open up a Run dialog box. Then, type “devmgmt.msc” and press Enter to open up Device Manager. If you are prompted by the UAC (User Account Control), click Yes to grant admin access.
Opening Device Manager - Next, go ahead and expand the drop-down menu associated with Printers (or Print Queues). Next, right-click on the printer that you’re having issues with and choose Uninstall device – You’ll need to confirm once again before the driver is uninstalled.
Uninstalling the Printer Driver Note: Keep in mind that you need to avoid restarting your computer during this time. Doing this will trigger Windows Update to search and install a generic version of the driver at the next startup, which will likely end up producing the same error.
- After you manage to remove your printer’s driver open your browser and search online for your manufacturer’s website.
Note: The latest printer driver versions are often available in the support section. - After you finally locate and download the latest driver version, open it and follow the on-screen prompts to install it on your system. Almost all printer drivers are self-installing – meaning that they only require you to double-click them and accept the UAC prompt for them to install.
- Once the newer printer driver is installed, reboot your computer and see if the issue is resolved once the next startup is complete.
In case you’ve already ensured that you are using the latest printer drivers and you’re still seeing the 853 error while attempting to initiate a printing job, move down to the next method below.
Method 5: Updating the Canon printer’s firmware (if applicable)
If none of the methods above have proven to be effective in your case, you should also take into consideration that an outdated printer firmware can be responsible for the inability to take on printing jobs from the home/work network.
Several Canon users that were dealing with the same problem have reported that they finally managed to fix the issue by updating the firmware over the Internet after ensuring that the printer is connected to the internet.
Follow the instructions below to update your Canon firmware to the latest version:
Note: The instructions below were tested on a MF733Cdw Canon printer model. The steps should work on similar Canon models using the same OS with Wireless / Wired Capabilities.
- On your printer, access the Menu option using your printer’s screen.
- Inside the options available inside the Menu tab, access the System Management Settings.
- Make sure your printer is connected to the internet (via wireless or wired cable).
- Next, choose Update Firmware, then select Via Internet when asked to select your preferred approach of updating.
- Wait until the operation is complete, then restart your printer conventionally and return to the Update Firmware screen once again.
- If the same screen now returns the message ‘This is the latest firmware version‘, it means you have successfully updated your Canon printer versions to the latest version available.
Updating the latest firmware version on Canon printer
Содержание:
- Способ 1: Установка драйвера UFR2 (если применимо)
- Способ 2: Принудительная установка правильного драйвера (UFR II)
- Способ 3: Запуск средства устранения неполадок принтера Windows
- Способ 4: Обновление версии драйвера принтера’
- A. Обновление драйвера принтера через Windows Update
- B. Обновление драйвера принтера вручную
- Способ 5: Обновление микропрограммы принтера Canon (если применимо)
Некоторые пользователи Windows, использующие принтеры Canon, сообщают, что в итоге они видят код ошибки #853 в очереди печати при каждой попытке распечатать что-либо обычным способом. Большинство пострадавших пользователей сообщают, что распечатка тестовой страницы не возвращает тот же код ошибки.
После тщательного изучения этого конкретного кода ошибки выяснилось, что причиной ее возникновения могут быть несколько различных базовых причин. Вот список потенциальных виновников, которые могут вызывать эту проблему:
- проблема печати Postscript – В большинстве случаев вы можете ожидать появления этой ошибки, если ваш принтер Canon пытается выполнить задание печати через драйвер, который’ не поддерживает язык Postscript принтера’. В этом случае проблему можно устранить, установив драйвер UFR2, чтобы предоставить принтеру необходимые зависимости’.
- Драйвер класса IPP используется вместо драйвера UFRII – Как оказалось, эту ошибку можно также ожидать в тех ситуациях, когда ваш компьютер с Windows 10 настроен по умолчанию на использование драйвера Microsoft IPP Class вместо драйвера с поддержкой Postscript (драйвер UFR2). Если этот сценарий применим, вы можете решить проблему с помощью команды диспетчер устройств чтобы изменить поведение по умолчанию и сделать драйвер UFR2 выбором по умолчанию.
- Общее несоответствие принтера – По словам некоторых пострадавших пользователей, вы также можете ожидать увидеть этот код ошибки из-за общей несогласованности принтера, если вы’ видите эту ошибку на Windows 10. В этом случае необходимо запустить средство устранения неполадок принтера Windows и применить рекомендуемое исправление для решения проблемы.
- Устаревшая версия принтера – При определенных обстоятельствах вы можете ожидать появления этого кода ошибки из-за устаревшего драйвера принтера, который влияет на соединение между главным компьютером и принтером Canon, который’ вызывает эту ошибку очереди печати. В этом случае следует обновить версию драйвера принтера вручную или через Windows Update.
- Устаревшая прошивка принтера – Если вы’ наблюдаете эту ошибку на Canon MF733Cdw или аналогичных моделях с интеллектуальной функциональностью, есть вероятность, что вы имеете дело с устаревшей версией прошивки. Чтобы решить эту проблему, подключите принтер к Интернету и обновите версию прошивки до последней через внутриигровое меню Canon.
Теперь, когда вы знаете обо всех потенциальных неисправностях, которые могут быть причиной данной проблемы, вот список проверенных методов, которые другие пострадавшие пользователи успешно использовали для решения проблемы печати Postscript #853 код ошибки:
Способ 1: Установка драйвера UFR2 (если применимо)
Поскольку код ошибки 853 по своей сути является ошибкой внутренней обработки, вам необходимо начать расследование с того, чтобы убедиться, что проблема не возникает из-за проблемы Postscript.
Чаще всего вы можете увидеть этот код ошибки, когда ваш принтер Canon пытается выполнить задание печати, поскольку он пытается использовать драйвер Postscript, хотя модель принтера НЕ поддерживает язык печати Postscript.
Примечание: Это довольно частое явление для принтеров, использующих Canon PS v4.драйвер.
Если этот сценарий применим к вашей конкретной ситуации, вы сможете устранить проблему, установив и используя драйвер UFR2 вместо этого.
Если вы’ищете конкретные инструкции о том, как загрузить & Для установки драйвера UFR2 на компьютер, который является хостом для вашего принтера, следуйте приведенным ниже инструкциям:
- Откройте браузер по умолчанию и перейдите на страницу страницу загрузки общей версии драйвера принтера UFR2.
- Как только вы окажетесь на нужной странице, нажмите на кнопку Загрузка чтобы инициировать загрузку.
Загрузка драйвера UFR Примечание: Эта версия драйвера совместима со всеми последними версиями Windows, включая Windows 7, Windows 8.1, и Windows 10.
- После завершения загрузки дважды щелкните на исполняемом файле, который вы’ только что загрузили, и нажмите кнопку Да при UAC (Контроль учетных записей пользователей) для предоставления доступа администратора.
- Далее следуйте инструкциям на экране, чтобы завершить установку драйвера UFR2 перед перезагрузкой компьютера.
- После загрузки компьютера новый драйвер принтера автоматически заменит старый, который вы использовали ранее.
- Повторите действие, которое ранее вызывало кнопку #853 код ошибки и посмотрите, устранена ли проблема.
В случае, если та же проблема все еще возникает, перейдите к следующему потенциальному исправлению ниже.
Способ 2: Принудительная установка правильного драйвера (UFR II)
Даже если вы ранее установили драйвер UFR II, это не гарантирует, что ваш компьютер настроен для его использования в вашей конкретной ситуации.
Фактически, Windows 10 настроена на использование драйвера Microsoft IPP Class по умолчанию, поэтому есть вероятность, что драйвер UFRII все еще не используется, даже если вы следовали приведенным выше инструкциям по установке правильного драйвера.
Несколько пользователей, оказавшихся в аналогичной ситуации, сообщили, что смогли решить проблему, изменив приоритет драйвера через диспетчер устройств, заставив принтер использовать Canon Generic Plus UFR II вместо Microsoft IPP Class driver.
Следуйте приведенным ниже инструкциям, чтобы убедиться, что ваш принтер Canon использует правильный драйвер, прежде чем снова печатать файл, чтобы проверить, исправлена ли ошибка 853:
- Нажмите клавиша Windows + R чтобы открыть Запустить диалоговое окно. Далее введите ‘devmgmt.msc’ внутри текстового поля и нажмите Войти открыть Диспетчер устройств. Когда вы увидите окно UAC (Контроль учетных записей пользователей), нажмите Да предоставить администратору доступ.
Открытие диспетчера устройств - Внутри Диспетчер устройств, прокрутите вниз различные типы устройств и разверните раскрывающееся меню, связанное с Очереди печати.
- Далее щелкните правой кнопкой мыши на вашем принтере в списке доступных вариантов внутри и выберите Свойства из контекстного меню, которое только что появилось.
Доступ к меню Свойства - Как только вы войдете в Свойства экран вашего принтера, нажмите на Драйвер вкладку в верхней части, затем используйте выпадающее меню внутри, чтобы выбрать Canon Generic Plus UFR II вместо Драйвер класса Microsoft IPP (или любой другой выбор по умолчанию).
- После завершения модификации нажмите кнопку Примените сохранить изменения, затем перезагрузить компьютер и посмотреть, устранена ли проблема окончательно.
Если та же ошибка 853 продолжает возникать даже после того, как вы убедились, что действительно используете драйвер Canon Generic Plus UFR II, перейдите к следующему потенциальному исправлению, приведенному ниже.
Если первые два метода в вашем случае оказались неэффективными, вам также следует рассмотреть возможность того, что вы имеете дело с общей несогласованностью драйвера принтера.
Если вы используете Windows 10, в вашем распоряжении есть встроенная утилита, которая способна решить проблему автоматически, если на ошибку распространяется одна из многих стратегий автоматического устранения, предусмотренных в Printer Troubleshooter.
Когда вы запустите средство устранения неполадок принтера, утилита проанализирует текущую ситуацию и определит, применимы ли в данной ситуации какие-либо из заранее определенных стратегий ремонта. Если один из вариантов совпадает, вам будет предложено применить исправление. Если все пройдет успешно, это позволит решить проблему с минимальными затратами.
Следуйте приведенным ниже инструкциям, чтобы запустить программу Устранение неполадок принтера:
- Нажмите клавиша Windows + R открыть диалоговое окно Выполнить. Затем введите” ms-settings:troubleshoot” и нажмите Введите чтобы открыть Устранение неполадок на вкладке Настройки приложение.
Доступ к средству устранения неполадок активации - Как только вы войдете в Устранение неполадок вкладку, перейдите на Запустить вкладку и нажмите на Принтер. Затем, из списка доступных опций, нажмите на кнопку Запустите средство устранения неполадок кнопка.
Запуск программы устранения неполадок принтера - После завершения сканирования нажмите на кнопку Применить это исправление если рекомендуется стратегия ремонта.
Применение рекомендуемого исправления - После завершения операции закройте окно устранения неполадок и проверьте, не столкнулись ли вы с тем же сообщением об ошибке при попытке распечатать что-либо с принтера по умолчанию.
Если проблема не исчезла, перейдите к следующему способу.
Способ 4: Обновление версии драйвера принтера’
Как выяснилось, вы также можете столкнуться со следующей проблемой 853 код ошибки из-за какого-то устаревшего драйвера принтера, который влияет на соединение между главным компьютером и принтером Canon, вызывающим ошибку.
В этом случае у вас есть два варианта решения проблемы устаревших драйверов:
- Обновление версии драйвера принтера через Windows Update
- Обновление версии драйвера принтера вручную
Мы’ рассмотрели оба возможных подхода с помощью серии руководств, которые проведут вас через все шаги. Следуйте руководству, которое применимо к предпочитаемому вами способу действий в Windows.
A. Обновление драйвера принтера через Windows Update
- Начните с нажатия кнопки клавиша Windows + R чтобы открыть Запустить диалоговое окно. Затем наберите “devmgmt.msc” и нажмите Введите чтобы открыть Диспетчер устройств. Если появится запрос UAC (Контроль учетных записей пользователей), нажмите Да предоставить административные привилегии.
Открытие диспетчера устройств - Как только вы’окажетесь внутри Диспетчер устройств, прокрутите список устройств и разверните Принтеры (очереди печати) выпадающее меню.
- Щелкните правой кнопкой мыши на принтере, с которым у вас возникли проблемы, и выберите Обновить драйвер.
Обновление драйвера принтера - Как только вы попадете на следующий экран, нажмите кнопку Автоматический поиск обновленного программного обеспечения драйвера позволить Обновление Windows сканировать и загрузить более новую версию драйвера для вашего принтера.
Обновление версии драйвера - Если доступна новая версия принтера, следуйте подсказкам на экране, чтобы завершить установку новой версии драйвера.
- По окончании этой операции перезагрузите компьютер и проверьте, устранена ли проблема.
B. Обновление драйвера принтера вручную
- Начните с нажатия клавиши Клавиша Windows + R открыть Запустить диалоговое окно. Затем введите “devmgmt.msc” и нажмите Введите открыть Диспетчер устройств. Если вам будет предложено UAC (Контроль учетных записей пользователей), нажмите Да предоставление доступа администратора.
Открытие диспетчера устройств - Далее раскройте выпадающее меню, связанное с пунктом Принтеры (или Очереди печати). Затем щелкните правой кнопкой мыши на принтере, с которым у вас возникли проблемы, и выберите пункт Uninstall device – Вам’нужно будет подтвердить еще раз, прежде чем драйвер будет деинсталлирован.
Деинсталляция драйвера принтера Примечание: Помните, что в это время необходимо избегать перезагрузки компьютера. Это приведет к тому, что Обновление Windows для поиска и установки общей версии драйвера при следующем запуске, что, скорее всего, приведет к той же ошибке.
- После того, как вам удалось удалить драйвер принтера, откройте браузер и найдите в Интернете веб-сайт производителя вашего принтера’.
Примечание: Последние версии драйверов принтера часто доступны в разделе поддержки. - После того, как вы нашли и скачали последнюю версию драйвера, откройте его и следуйте подсказкам на экране, чтобы установить его в системе. Почти все драйверы принтеров являются самоустанавливающимися – это означает, что для их установки достаточно дважды щелкнуть по ним и принять приглашение UAC.
- После установки нового драйвера принтера перезагрузите компьютер и посмотрите, решится ли проблема после следующего запуска.
Если вы’ уже убедились, что используете последние версии драйверов принтера, но’ все еще видите ошибку 853 при попытке инициировать задание печати, перейдите к следующему способу ниже.
Способ 5: Обновление микропрограммы принтера Canon (если применимо)
Если ни один из вышеперечисленных способов не оказался эффективным в вашем случае, следует также принять во внимание, что устаревшая прошивка принтера может быть причиной неспособности принимать задания на печать из домашней/рабочей сети.
Несколько пользователей Canon, которые имели дело с той же проблемой, сообщили, что им, наконец, удалось решить проблему путем обновления прошивки через Интернет после того, как убедитесь, что принтер подключен к Интернету.
Следуйте приведенным ниже инструкциям, чтобы обновить прошивку принтера Canon до последней версии:
Примечание: Приведенные ниже инструкции были протестированы на MF733Cdw Модель принтера Canon. Эти шаги должны сработать на аналогичных моделях Canon, использующих ту же ОС с беспроводными/проводными возможностями.
- На вашем принтере зайдите в раздел Меню с помощью экрана вашего принтера’.
- Внутри доступных опций Меню вкладка, откройте Настройки управления системой.
- Убедитесь, что ваш принтер подключен к Интернету (через беспроводной или проводной кабель).
- Далее выберите Обновить микропрограмму, затем выберите Через Интернет когда вас попросят выбрать предпочтительный способ обновления.
- Дождитесь завершения операции, затем перезагрузите принтер обычным способом и снова вернитесь к экрану Обновление микропрограммы.
- Если на том же экране появляется сообщение ‘Это последняя версия прошивки‘, это означает, что вы успешно обновили версии принтера Canon до последней доступной версии.
Обновление последней версии микропрограммы на принтере Canon

