
Наш принтер CANON TM-300 прошёл небольшой пробег, эксплуатировался бережно, по долгу не простаивал без работы, а так же использовались только оригинальные чернила.
И вот беда пришла откуда её не ждали, в феврале 2023 года стала появляться ошибки EC21-2F50 и другие, которые ссылались на замену печатающей головки.
Но после ошибки EC21-2F51 – принтер встал колом, не помогли даже устройства обнуления пробега и прошивки печатающей головки, не перезагрузка принтера и даже не помогло отключение принтера из сети питания и простоя в течении 7-10 дней. Ошибка была сразу после включения и не давала печатать совсем.
Кому интересно почему возникает ошибка и из-за чего это может быть, я заметил что при печати на бумаге шириной 297 мм печатающая головка чаще выдавала ошибки, а вот на бумаге 914 мм при полной ширине печати – ошибки возникали меньше.
На всемирно известном китайском сайте была найдена головка за 9401,18 рублей, но на момент покупки головки в феврале 2023 года отзывов у данного товара не было, что ж, пришлось рискнуть и….
Получить посылку на 7 дней раньше установленного срока доставки!
На этом приятные моменты закончились.
После получения посылки через постомат я сразу стал снимать полное и детальное видео с распаковкой, что бы в случае чего вернуть деньги за бракованный товар.
И это было сделано не зря. После осмотра внешнего поверхностного вида посылки я её открыл, и тут всё оказалось достаточно плохо:
1. Печатающая головка не была упакована в пупырчатую плёнку.
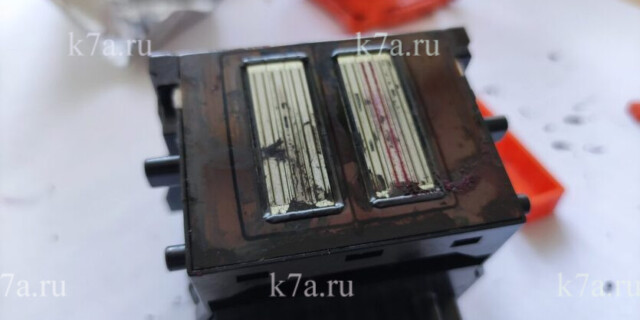
2. Печатающая головка оказалась б/у или восстановленной или же вообще просто израсходованной. Из неё вытекала краска, были повреждены защитные оранжевые заглушечки-крышечки.

Надежды на работоспособную головку улетучились моментально.
Осталось только установить печатающую головку в принтер и доконца убедиться в этом.
Так и сделали, перед заменой ПГ принтер CANON TM-300 долго поглощал чернила (сливал в памперс – он же контейнер отработанных чернил – он же: абсорбирующий картридж CANON MC-31). После этого подъехала каретка для замены печатающей головки и была установлена китайская головка, но после этого принтер выдал ошибку: Невозможно правильно определить печатающую головку. Откройте верхнюю крышку и установите подходящую печатающую головку.
Далее снова вытащили китайскую головку, проверили, осмотрели и снова попробовали поставить в принтер. Ошибка повторилась.
Был открыт спор по возврату денежной суммы в полном объёме а это 9400 рублей (на момент покупки). Спор прошёл и деньги вернули. Но к тому времени уже появились негативные отзывы, таких же покупателей которые попались на фишинг данного продавца. Но всё прошло успешно. Поэтому важно снимать полное видео распаковки товара любой дорогостоящей посылки с нуля, то есть внешний осмотр, демонстрация ваших контактных данных, трек-номер которые указаны на бирке или наклейке на посылке. Я записал вам детальное видео, вы сможете увидеть ниже.
А решение проблемы было достигнуто только путём покупки оригинальной печатающей головки через известные маркетплейсы, а так же вы сможете выбрать сами подходящий вам вариант покупки или заказа с гарантией установки сервисным инженером, а так же ещё при замене печатающей головки рекомендуют заменить сервисный картридж – он же CANON MC-31 – что бы ваш принтер проходил ещё не одну сотню квадратных метров.
Оригинальная головка CANON PF-06 встала в принтер без танцев с бубном и без лишних заморочек.
Вывод: Как бы вам не хотелось сэкономить и обойти хитрых “заботливых” менеджеров кэнона и другой техники, которые ВОЗМОЖНО специально устанавливают лимиты на пробеги или временное использование принтера, увы, можно влететь ещё и на недобросовестных продавцов и инженеров, которые могут вам помочь только временно устранить ошибку, но не излечить принтер совсем. И всё же нам помогла только замена печатающей головки на новую и оригинальную, да, дорого – а что поделать?
Всем удачных решений ваших ситуаций.
IPf 770 ошибка 2F51
2F51 и отказ печати теста дюз
| Сообщение #1
Отправлено 16 марта 2021 — 05:21
День добрый!
Небольшая вводная — есть Ipf 770, покупался новым для печати чертежей и иногда цветных плакатов, пробег за 4 с лишним года — 455 квадратов, но последние 2 года использовался как запасной с нечастой печатью пару чертежей и плакатов раз в 3 недели. Недавно начал ругаться на памперс, приобрели новый, заменили и продолжили дальше понемногу печатать.
Вчера напечатав пару чертежей, поставили новый рулон, бумага при выходе с печати начала сворачиваться в трубу и если первый чертеж придерживали, то второй уже нет. И после второго он выдал ошибку 03130031-2f51 и отказался печатать. В журнале ошибок затесалась еще 03800300-2832 перед ошибкой 2f51. Что пробовали делать — прочистка дюз способ А (при этом в конце проверки он выдавал ошибку), сброс через сервис меню памперса, сброс ошибок, сброс пг, при этом самое паршивое что плоттер не может запустить любую печать, даже проверки дюз, выдает ошибку 2F51. Покурив форум сложилось впечатление, что замена на новую ПГ очень вероятно не решит проблему, так как почти во всех темах связанных с этой ошибкой тест дюз из сервисного меню выполняется.
Просьба подсказать, может кто нибудь сталкивался с подобным…
- Наверх of the page up there ^
-
0
| Сообщение #2
Отправлено 31 марта 2021 — 20:01
Robinzon54
ошибка связана с утечкой чернил, зачастую вызвана хреновыми ПЗК или ушатаными картриджами — клапана текут. Решать вопрос с картриджами — и прошивать (сбрасывать) голову.
- Наверх of the page up there ^
-
0
| Сообщение #3
Отправлено 25 июля 2022 — 08:30
Po4
Столкнулся с такой же проблемой. Те же ошибки. 2 дня безуспешных попыток, менял голову (на старую), результат тот же. Плоттер постоял в выходные, в понедельник утром синий ПЗК был пуст под ноль, как-то раз уже было с ним такое, возможно в нем и дело. Голову не сбрасывал не прошивал, все заработало само собой. Может кому информация будет полезна.
- Наверх of the page up there ^
-
0
- ← Предыдущая тема
- Canon
- Следующая тема →
- Вы не можете создать новую тему
- Вы не можете ответить в тему
1 человек читают эту тему
0 пользователей, 1 гостей, 0 скрытых пользователей
 Thanks: 0
 Likes: 0
 Dislikes: 0
-
05-13-2022
#1

Technician
- Rep Power
- 20
EC21-2F51 error on Canon 4000 (imagePROGRAF PRO-4000)
Is there anything I can do first to avoid buying a new printhead?
So, I use a Canon 4000 at a maker space and I came in this morning to find it had an un-numbered error on the screen. It said there was an internal error and that I should shut it off and restart. However it didn’t respond to the power button or any buttons near the screen and the touchscreen itself didn’t respond to my touch. I unplugged the machine and waited about a minute to restart.
It went through some weird fast slapping noises and other strange sounds I’ve never heard, along with the regular wooshing…about two long cycles… claiming to be preparing the printhead, only to serve me in the end that same error from before. Only this time there was a history button which I could touch. There were «hardware» errors and «recoverable» errors. The hardware error was a list of four EC21-2F51 (4801) errors and the 5th error was EC21-2F53 (1478).
Basic high level Googling came up with Canon’s regular response that it might be a printhead issue and to call them to diagnose. The maker space captain called Canon and they said it’s most likely a printhead that needs replacing.
I own a bunch of large format printers already that have hit hardware errors I have yet to fix (Canon 8300, Epson 9890, 7900 and 4880). I managed to save the 9890 and extend its life 18 months a few years back so I’m aware that sometimes there are some deeper more «lower level» things we regular folks can do to resurrect our printers. I’m hoping maybe someone has some advice besides just getting the new printhead.
Thoughts?
-
06-24-2022
#2
Trusted Tech
50+ Posts
- Rep Power
- 17
Re: EC21-2F51 error on Canon 4000 (imagePROGRAF PRO-4000)
Hi there,
These errors are normally indicative of the print head, yes. However, updating your firmware may resolve this issue but you will have to get a technician in to do this otherwise you may not get any help should something go wrong.
Most likely it is your print head unfortunately
-
06-28-2022
#3
Re: EC21-2F51 error on Canon 4000 (imagePROGRAF PRO-4000)
Ink in the tubes going to the printhead?


Tags for this Thread
Bookmarks
Bookmarks
Posting Permissions

- You may not post new threads
- You may not post replies
- You may not post attachments
- You may not edit your posts
- BB code is On
- Smilies are On
- [IMG] code is On
- [VIDEO] code is On
- HTML code is Off
Forum Rules
Список кодов поддержки для ошибок
- Код поддержки:
Коды поддержки отображаются на ПК при возникновении ошибки.
Коды поддержки являются идентификационными номерами ошибок, которые появляются вместе с сообщениями об ошибках.
При возникновении ошибки проверьте код поддержки и следуйте инструкциям для решения проблемы.
Отображающийся код ошибки
-
От 1000 до 1ZZZ
1005
100A
1012
1021
1024
1041
1051
1052
1054
1055
1056
1057
1058
1061
1200
1201
1210
1213
1214
1300
1306
1317
1322
1323
1324
1401
1403
1408
1409
140A
140B
140C
140F
1468
1477
1478
1480
1481
1485
1492
1494
1495
1500
1551
1552
1570
1571
1660
168B
1720
1721
1722
1730
1731
1752
1753
1756
1757
-
От 2000 до 2ZZZ
2130
2131
2132
-
От 3000 до 3ZZZ
3000
3001
3200
3201
3250
3300
3301
3302
3303
3304
3306
3311
3312
3313
3314
3315
3316
3317
3331
3332
3333
3337
3340
3341
3414
3415
3416
3417
3418
3419
3420
3421
3422
3423
3424
3448
-
От 4000 до 4ZZZ
4111
4113
4114
4115
4116
4117
4801
4803
4905
4910
4911
4913
4920
4931
4932
4933
4934
4935
4937
4950
4951
4952
4953
4954
4955
4956
4957
-
От 5000 до 5ZZZ
5106
5200
5B16
5B20
5B21
5C00
-
От 6000 до 6ZZZ
6502
6700
6702
6820
6900
6901
6902
6910
6911
6920
6921
6930
6931
6932
6933
6940
6941
6942
6943
6944
6945
6946
-
От 7000 до 7ZZZ
7050
7051
7052
-
От 8000 до 8ZZZ
8200
-
От 9000 до 9ZZZ
9000
9110
-
От A000 до ZZZZ
B20A
B510
What If Print Head Replacement Doesn’t Work
In the event that a print head replacement does not clear the 2F51 error code, the next few steps can get pricey, and we recommend contacting Canon tech support to see if it’s cheaper and smarter to repair your printer or see if we are running any promotions that will make a brand new printer a better option.
In some cases, replacing the main controller is the next item on the list. For other models, the carriage relay PCB would be the right fix.
Lastly, other potential items to consider are the flat cables.
Final Notes
To recap, this error can be as simple as a reboot or can be as extensive as replacing 2 print heads, a carriage relay PCB, main controller, and a flat cable. There is much to consider when this error code comes into play, especially when thinking about the age of the printer. Older printers may not be compatible with computer operating systems now or in the future, meaning a few thousand dollar repair now may be meaningless in the very near future. In some cases, it may be better to replace the printer with a brand new model and get the accompanying warranty.
Related Error Codes
The 2F48, 2F49, and 2F50 error codes are all similar and apply to the print heads as well. The codes are active links here, so simply click whichever applies and you will be moved to that page.
2F51 isn’t my error code!
If 2F51 is not the error code displayed on your screen, please see our blog post that lists all the possible 03133310 error codes so you can learn more about your specific error.
Came across an error condition tonight and could use some help / advice.
Summary:
Canon Pro-2000 printer. Getting a few hardware errors: EC21-2F53 and EC21-2F51. Got this after installing Canon PGY and a B PFI-1700 carts in the printer. Pulled and cleaned (gently) the head surface (a good bit of ink on the substrate plate holding the heads) and reinstalled. Still not budging. Did order a new PF-10, but hoping that there may be a few things to do in the mean time.
Detail:
Got a used Pro-2000 from a guy that was moving onto other hobbies. About 2000-ish prints (per the printer status panel). He had been using 3rd party ink refilling the PFI-1100 carts and telling the printer to ignore the chip warning. Did several sample prints and all seemed to be fine at the time. Moved the printer to my house, set it up, several 8.5×11 prints later (using the USB printing the PDI chart) showed that the printer was functional.
Weighing all the carts showed that there was some ink in all carts EXCEPT the CO tank. It was dry.
Over the past weeks I�ve been ordering and installing PFI-1700 Canon official inks and finally got the last two in today. I agitated the tanks before putting them in the printer, and loaded a 24� RC Luster roll in ready to start a few more tests (and to help flush out the old ink). That�s when the fun started.
Upon starting the printer, I got the EC21-2F51 error. So I did as instructed � printer off, waited for about 3 minutes, printer back on � same error. After a couple of other restarts, I tried to print another sample image from the USB stick and now I get the EC21-2F53 error.
I pulled the print head, gently cleaned the print head surface (not touching the print nozzle areas), inspected the metal contacts, reseated the print head and the 2F53 error now constantly appears.
Googling around and looking at the forums on DP Review, Luminous-Landscapes, and the JToolman FB group, I did not find similar hits or issues.
What I am thinking is this:
1) Did Air get in the lines from me agitating the ink and putting it in the printer and then trying to get a test print out quickly? (BTW, when I did select to �change the head�, it did an ink purge, and this did not reset the issue)
2) Given that there was non-OEM ink in the immediate reservoirs, would there have been some reactions (gelling, interactions) that may have interfered with the printhead?
3) is there any other �resuscitation� processes that I can to do clean the head, or further purge the lines?
4) is there any other service menu that I can get into that may help diagnose or reset the issue?
Any and all advice is welcomed!
Thanks in advance
Mike
Как сбросить памперс Canon TM-200 видео инструкция
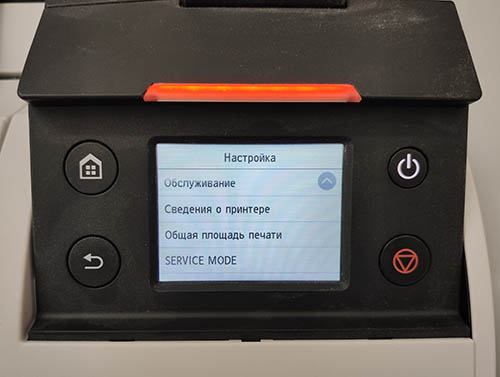
Как войти в сервес меню на Canon TM-200
Прописываем таблетку от жадности: продажа пластиковой коробочки (mc-31) за почти 6тр. это вверх жадности со стороны Canon.
Просто сбрасываем уровень через меню, через 2-3 сброса, промываем коробку от остатков чернил.
1. Зажимаем нижнюю левую четверть экрана.
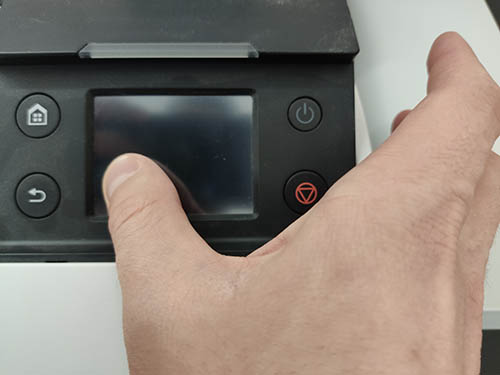
2. Не отпуская экран нажимаем и держим питание.
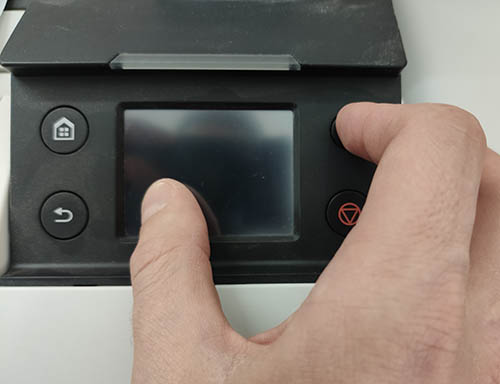
3. После появления надписи CANON, не отпуская кнопки питания, нажимаем по очереди внизу справа экрана — вверху слева экрана — вверху справа экрана и отпускаем кнопку питания.
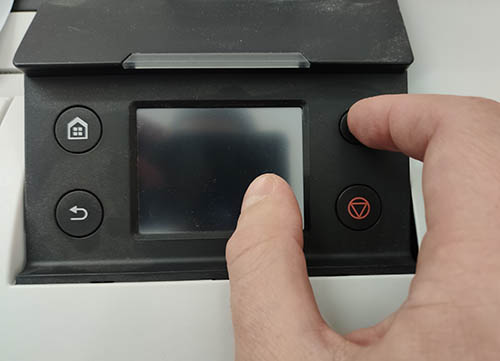
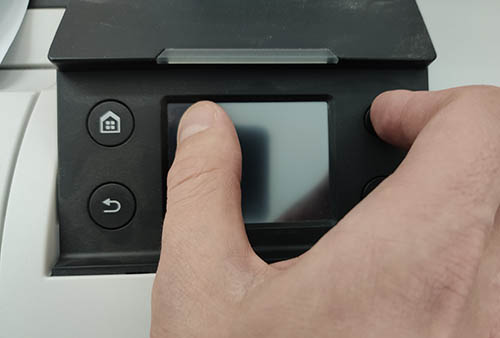
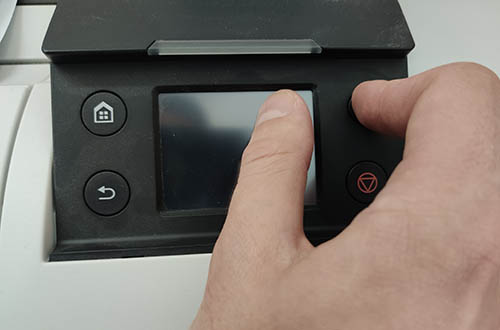
4. Индикатор загорается оранжевым цветом — вы попали в сервисное меню..
Как сбросить «памперс» Canon TM-200
Эта инструкция для пользователей, кому нужна не залповая работа начальных A1 моделей от кэнон, а в приоритете сохранение работоспособности печатающей головки на срок 2-3 года. Стоить иметь в виду, что сбрасывая «памперс» через меню, или отключая слежение чернил, вы запускается отложенный процесс блокировки ПГ.
После отключения слежения, или программного сброса памперса, система пристально следит за встроенным тестом ПГ, и, при определённом пороговом значении, блокирует вполне рабочую печатающую головку.
Если у вас эпизодическая печать малых объёмов, используйте одноразовые чипы для памперса и картриджей. Наш опыт показывает, что принтеры IPF серии, которые использовались эпизодически, отлично печатали при использовании одноразовых чипов более 3 лет. И сразу же заблокировали вполне рабочие ПГ при смене чипов на пустые и отключении уровня чернил.
Thank you for your quick reply.
I forgot to mention. My custommer used compatible cartridges because every time he started the printer and every print job, a lot of ink was consumed by the cleaning process he did every time. I hope the compatible ink is not the cause of the error.
Did your printer have print quality issues before?
Now the print head is so clogged because in service mode, print nozzle check was only in black and red.
I’m glad everything’s fine with your printer.
Good luck!
resetter для печатающих головок pf-03 и памперса
Рвем китай, создаем рессетер вместе
| Сообщение #101
Отправлено 08 февраля 2020 — 19:09
Всем привет, задаром отдали несколько динозавров ipf710 с PF-03, есть желание перешить голову, вопрос! Есть ли у кого прошивка головы PF-03?
- Наверх of the page up there ^
-
0
| Сообщение #102
Отправлено 15 марта 2020 — 20:43
Turbo_spb
Если кому интересно.
Прошиваю головы PF-03 и PF-04 — 800руб.
Диагностика ПГ (тест на КЗ по дюзам) — 500 руб.
Промывка щадящая для добавления в чернила (1л) — 1000 руб.
кому интересно пишите на WhatsApp 8951бб995O5
Санкт-Петербург
- Наверх of the page up there ^
-
0
| Сообщение #103
Отправлено 14 декабря 2020 — 16:58
csv979
ошибка 2f51 HV leak (ipf670)
первая голова проработала около 2 лет выдала ошибку 2f51, перепрошить получилось но не помогло, сразу выдовал ошибку не делая никакого теста дюз или очистку, поменял… через год таже ситуация… прочитал на какойта зарубежный форум про солвентых принтеров мимаки кажется что хв леак из за некачественных чернил бывает часто лечится хорошей промывкой. никакой специальной промывки под рукой небыло прочисли средством дезинфекций спиртом воняет сильно (ковид все же) и обычном шприцом примерно по 10-15 мл/цв. поставил принер начал качать обратно чернила в голову минут 10 чистил проверял дюзы и вуаля… тест дюз идеален… первая голова простояла год но после прочистки тоже заработала так что 2f51 может еще не приговор головке
- Наверх of the page up there ^
-
0
| Сообщение #104
Отправлено 22 декабря 2020 — 13:27
Robinzon54
2F51 не приговор ни разу, но!!! Надо снять и промыть а не гонять в плоттере очистку, иначе труп — забитые дюзы не выпускают краску, голова температурная т.е. внутри нагревы, и получаем высокую температуру внутри головы и следствие пробой и сгоревшая ПГ….
- Наверх of the page up there ^
-
0
| Сообщение #105
Отправлено 10 февраля 2021 — 04:44
Robinzon54
В теме не раз мелькали вопросы «после прошивки ПГ плоттер выдает что ПГ не найдена, хотя s/n в сервис меню он ее видит, пробоя нет», кто-то нашел причину данной проблемы и решение?
вчера столкнулся с тем же вопросом, прошивки пробовал разные. В чем может быть причина?
- Наверх of the page up there ^
-
0
| Сообщение #106
Отправлено 10 февраля 2021 — 14:24
Robinzon54
Причину нашел самостоятельно….над устранением еще кумекаю…
- Наверх of the page up there ^
-
0
| Сообщение #107
Отправлено 11 февраля 2021 — 12:54
christian
Подскажите, что с этим делать? Замена ПГ?
Прочистка не помогла.
- Наверх of the page up there ^
-
0
| Сообщение #108
Отправлено 12 февраля 2021 — 17:57
Robinzon54
Встроенная и не поможет, только снимать, нежно мыть, а потом прошивать, НО быть готовым к замене, так как может и это не помочь, а 770й еще по отзывам к шитым головам не очень хорошо относится.
Показания термистров какие? Сервисное меню — function — head chk — temp
- Наверх of the page up there ^
-
0
| Сообщение #109
Отправлено 15 февраля 2021 — 09:28
christian
25 25 25 T 25
25 25 25 t 26
- Наверх of the page up there ^
-
0
| Сообщение #110
Отправлено 19 февраля 2021 — 06:51
Robinzon54
Показания термистров в норме, подгарания по тестам тоже не видно, теоритически промывка со снятием должна помочь, но тут есть другой ньюанс, шанс что плоттер при снятии запишет голову как снятую и не примет её назад присутствует.
- Наверх of the page up there ^
-
0
| Сообщение #111
Отправлено 16 февраля 2022 — 21:24
romanipk
Всем доброго времени суток.
У кого есть дамп прошивки головки PF-06 &
У меня ошибка головки EC21-2F53? ,было пару раз EC21-2F51
- Наверх of the page up there ^
-
0
| Сообщение #112
Отправлено 06 марта 2022 — 18:17
Robinzon54
у меня есть все дампы, от 03, до 06. 51 ошибка часта связана с тем что забиты каппы (чернила плохо уходят и остаются на башке), желательно менять их хоть иногда.
- Наверх of the page up there ^
-
0
| Сообщение #113
Отправлено 11 марта 2022 — 11:59
Александр П
Уважаемые коллеги, кто может поделиться прошивкой головки PF-06 для плоттера Canon TX-2000. Голова встала по ошибке EC21-2F53
- Наверх of the page up there ^
-
0
| Сообщение #114
Отправлено 14 марта 2022 — 09:36
Александр П
Правильнее будет сказать, что у меня есть 04 голова рабочая, в нее хочется залить дамп 06 головы и попробовать ее в работе.
- Наверх of the page up there ^
-
0
| Сообщение #115
Отправлено 07 июня 2022 — 12:24
Stasweb
Доброго времени суток форумчане! Подскажите пожалуйста распиновку подключения головки к программатору ch341a, пробовал как в первом посте но PonyProg2000 не считывает. Если есть возможность скинуть фото распиновки (подключения) программатора на почту stas . pavlov @ mail . ru. Скиньте пожалуйста, очень надо. Заранее спасибо кто откликнулся
- Наверх of the page up there ^
-
0
| Сообщение #116
Отправлено 08 июня 2022 — 12:24
Stasweb
Разобрался, программатор читает головку. Попробовал дамп с топика https://forum.resett…ndpost&p=408989 головка не запускается. Если есть у кого рабочий дамп дайте пожалуйста.
- Наверх of the page up there ^
-
0
| Сообщение #117
Отправлено 12 декабря 2022 — 12:49
Dymich
Прошивал голову PF-06 разными прошивками, а все равно не меняется количество напечатанных количество точек. Где в прошивке эта информация, не понятно.
- Наверх of the page up there ^
-
0
| Сообщение #118
Отправлено 15 марта 2023 — 23:50
overhp
Парни. Поделитесь плз прошивкой новой головы pf06.. заблокировалась голова видимо по пробегу. Печать была идеальная. Принтер видел в своей жизни только оригинал.
Попробую прошить.
- Наверх of the page up there ^
-
0
| Сообщение #119
Отправлено 14 мая 2023 — 14:45
isw10183
Поделитесь плиз дампом PF-06
- Наверх of the page up there ^
-
0
- ← Предыдущая тема
- iPF500, iPF600, iPF605, iPF610, iPF700, iPF710, iPF755, iPF6100, iPF8100
- Следующая тема →
- Вы не можете создать новую тему
- Вы не можете ответить в тему
2 человек читают эту тему
0 пользователей, 2 гостей, 0 скрытых пользователей
Список кодов поддержки для ошибок
- Код поддержки:
Коды поддержки отображаются на ПК при возникновении ошибки.
Коды поддержки являются идентификационными номерами ошибок, которые появляются вместе с сообщениями об ошибках.
При возникновении ошибки проверьте код поддержки и следуйте инструкциям для решения проблемы.
Отображающийся код ошибки
-
От 1000 до 1ZZZ
1005
100A
1012
1021
1024
1041
1051
1052
1054
1055
1056
1057
1058
1061
1200
1201
1210
1213
1214
1300
1306
1317
1322
1323
1324
1401
1403
1408
1409
140A
140B
140C
140F
1468
1477
1478
1480
1481
1485
1492
1494
1495
1500
1551
1552
1570
1571
1660
168B
1720
1721
1722
1730
1731
1752
1753
1756
1757
-
От 2000 до 2ZZZ
2130
2131
2132
-
От 3000 до 3ZZZ
3000
3001
3200
3201
3250
3300
3301
3302
3303
3304
3306
3311
3312
3313
3314
3315
3316
3317
3331
3332
3333
3337
3340
3341
3414
3415
3416
3417
3418
3419
3420
3421
3422
3423
3424
3448
-
От 4000 до 4ZZZ
4111
4113
4114
4115
4116
4117
4801
4803
4905
4910
4911
4913
4920
4931
4932
4933
4934
4935
4937
4950
4951
4952
4953
4954
4955
4956
4957
-
От 5000 до 5ZZZ
5106
5200
5B16
5B20
5B21
5C00
-
От 6000 до 6ZZZ
6502
6700
6702
6820
6900
6901
6902
6910
6911
6920
6921
6930
6931
6932
6933
6940
6941
6942
6943
6944
6945
6946
-
От 7000 до 7ZZZ
7050
7051
7052
-
От 8000 до 8ZZZ
8200
-
От 9000 до 9ZZZ
9000
9110
-
От A000 до ZZZZ
B20A
B510
Came across an error condition tonight and could use some help / advice.
Summary:
Canon Pro-2000 printer. Getting a few hardware errors: EC21-2F53 and EC21-2F51. Got this after installing Canon PGY and a B PFI-1700 carts in the printer. Pulled and cleaned (gently) the head surface (a good bit of ink on the substrate plate holding the heads) and reinstalled. Still not budging. Did order a new PF-10, but hoping that there may be a few things to do in the mean time.
Detail:
Got a used Pro-2000 from a guy that was moving onto other hobbies. About 2000-ish prints (per the printer status panel). He had been using 3rd party ink refilling the PFI-1100 carts and telling the printer to ignore the chip warning. Did several sample prints and all seemed to be fine at the time. Moved the printer to my house, set it up, several 8.5×11 prints later (using the USB printing the PDI chart) showed that the printer was functional.
Weighing all the carts showed that there was some ink in all carts EXCEPT the CO tank. It was dry.
Over the past weeks I�ve been ordering and installing PFI-1700 Canon official inks and finally got the last two in today. I agitated the tanks before putting them in the printer, and loaded a 24� RC Luster roll in ready to start a few more tests (and to help flush out the old ink). That�s when the fun started.
Upon starting the printer, I got the EC21-2F51 error. So I did as instructed � printer off, waited for about 3 minutes, printer back on � same error. After a couple of other restarts, I tried to print another sample image from the USB stick and now I get the EC21-2F53 error.
I pulled the print head, gently cleaned the print head surface (not touching the print nozzle areas), inspected the metal contacts, reseated the print head and the 2F53 error now constantly appears.
Googling around and looking at the forums on DP Review, Luminous-Landscapes, and the JToolman FB group, I did not find similar hits or issues.
What I am thinking is this:
1) Did Air get in the lines from me agitating the ink and putting it in the printer and then trying to get a test print out quickly? (BTW, when I did select to �change the head�, it did an ink purge, and this did not reset the issue)
2) Given that there was non-OEM ink in the immediate reservoirs, would there have been some reactions (gelling, interactions) that may have interfered with the printhead?
3) is there any other �resuscitation� processes that I can to do clean the head, or further purge the lines?
4) is there any other service menu that I can get into that may help diagnose or reset the issue?
Any and all advice is welcomed!
Thanks in advance
Mike
Came across an error condition tonight and could use some help / advice.
Summary:
Canon Pro-2000 printer. Getting a few hardware errors: EC21-2F53 and EC21-2F51. Got this after installing Canon PGY and a B PFI-1700 carts in the printer. Pulled and cleaned (gently) the head surface (a good bit of ink on the substrate plate holding the heads) and reinstalled. Still not budging. Did order a new PF-10, but hoping that there may be a few things to do in the mean time.
Detail:
Got a used Pro-2000 from a guy that was moving onto other hobbies. About 2000-ish prints (per the printer status panel). He had been using 3rd party ink refilling the PFI-1100 carts and telling the printer to ignore the chip warning. Did several sample prints and all seemed to be fine at the time. Moved the printer to my house, set it up, several 8.5×11 prints later (using the USB printing the PDI chart) showed that the printer was functional.
Weighing all the carts showed that there was some ink in all carts EXCEPT the CO tank. It was dry.
Over the past weeks I’ve been ordering and installing PFI-1700 Canon official inks and finally got the last two in today. I agitated the tanks before putting them in the printer, and loaded a 24” RC Luster roll in ready to start a few more tests (and to help flush out the old ink). That’s when the fun started.
Upon starting the printer, I got the EC21-2F51 error. So I did as instructed — printer off, waited for about 3 minutes, printer back on — same error. After a couple of other restarts, I tried to print another sample image from the USB stick and now I get the EC21-2F53 error.
I pulled the print head, gently cleaned the print head surface (not touching the print nozzle areas), inspected the metal contacts, reseated the print head and the 2F53 error now constantly appears.
Googling around and looking at the forums on DP Review, Luminous-Landscapes, and the JToolman FB group, I did not find similar hits or issues.
What I am thinking is this:
1) Did Air get in the lines from me agitating the ink and putting it in the printer and then trying to get a test print out quickly? (BTW, when I did select to “change the head”, it did an ink purge, and this did not reset the issue)
2) Given that there was non-OEM ink in the immediate reservoirs, would there have been some reactions (gelling, interactions) that may have interfered with the printhead?
3) is there any other “resuscitation” processes that I can to do clean the head, or further purge the lines?
4) is there any other service menu that I can get into that may help diagnose or reset the issue?
Any and all advice is welcomed!
Thanks in advance
Mike
Список кодов поддержки для ошибок
- Код поддержки:
Коды поддержки отображаются на ПК при возникновении ошибки.
Коды поддержки являются идентификационными номерами ошибок, которые появляются вместе с сообщениями об ошибках.
При возникновении ошибки проверьте код поддержки и следуйте инструкциям для решения проблемы.
Отображающийся код ошибки
-
От 1000 до 1ZZZ
1005
100A
1012
1021
1024
1041
1051
1052
1054
1055
1056
1057
1058
1061
1200
1201
1210
1213
1214
1300
1306
1317
1322
1323
1324
1401
1403
1408
1409
140A
140B
140C
140F
1468
1477
1478
1480
1481
1485
1492
1494
1495
1500
1551
1552
1570
1571
1660
168B
1720
1721
1722
1730
1731
1752
1753
1756
1757
-
От 2000 до 2ZZZ
2130
2131
2132
-
От 3000 до 3ZZZ
3000
3001
3200
3201
3250
3300
3301
3302
3303
3304
3306
3311
3312
3313
3314
3315
3316
3317
3331
3332
3333
3337
3340
3341
3414
3415
3416
3417
3418
3419
3420
3421
3422
3423
3424
3448
-
От 4000 до 4ZZZ
4111
4113
4114
4115
4116
4117
4801
4803
4905
4910
4911
4913
4920
4931
4932
4933
4934
4935
4937
4950
4951
4952
4953
4954
4955
4956
4957
-
От 5000 до 5ZZZ
5106
5200
5B16
5B20
5B21
5C00
-
От 6000 до 6ZZZ
6502
6700
6702
6820
6900
6901
6902
6910
6911
6920
6921
6930
6931
6932
6933
6940
6941
6942
6943
6944
6945
6946
-
От 7000 до 7ZZZ
7050
7051
7052
-
От 8000 до 8ZZZ
8200
-
От 9000 до 9ZZZ
9000
9110
-
От A000 до ZZZZ
B20A
B510
Коды ошибок, актуальные для Canon imagePROGRAF iPF670, iPF605, iPF770, iPF750, iPF710, iPF650, iPF700, iPF785, iPF610, iPF765, iPF680, iPF760, iPF510, iPF780, iPF600, iPF500, iPF685, iPF720, iPF670e, iPF671, iPF671e (для картриджей PFI-102, PFI-104, PFI-107).
Check printing results
Call for service.
Call for service.
После проверки датчика деталей в сервисном меню, замените деталь, указанную в ошибке.
Проверьте загруженные данные перед повтором печати.
Проверьте количество бумаги.
Exchange for the compatible paper to HP-GL/2.
The memory is full.
Check if there is the non-image area of the print. Verify the transmitted data before reprinting.
The memory is full.
The memory is full.
The parameter is out of range.
Verify the transmitted data before reprinting.
This command is not supported.
Delete unwanted data
Delete unneeded jobs stored in Personal Boxes.
Now printing without saving data.
Delete unneeded jobs stored in Personal Boxs.
Prepare to replace the ink.
Renew the C ink tank
Prepare to replace the ink.
Renew the M ink tank.
Prepare to replace the ink.
Renew the Y ink tank.
Prepare to replace the ink.
Renew the MBK ink tank.
Prepare to replace the ink.
Renew the BK ink tank.
Replace the ink tank.
Renew the C ink tank.
Replace the ink tank.
Renew the M ink tank.
Replace the ink tank.
Renew the Y ink tank.
Replace the ink tank.
Renew the MBK ink tank.
Replace the ink tank.
Renew the BK ink tank.
Check ink tank.
Attach the C ink tank.
Check ink tank.
Attach the M ink tank.
Check ink tank.
Attach the Y ink tank.
Check ink tank.
Attach the MBK ink tank.
Check ink tank.
Attach the BK ink tank.
Check the media size check. Change the media size.
Delete unwanted data.
Press the stop button to cancel the print job. Delete print jobs from the queue.
Delete unneeded jobs stored on the hard disk.
Press Online to clear error.
Clean the printhead. Identify the nozzles in a nozzle check pattern. Replace the printhead.
Lift the release lever and reload the paper.
Check the leading end of paper. Reload the paper.
Lift the release lever and align leading edge with orange line.
Check the sheet length. Check to see if paper has not jammed.
Lift the release lever and reload the paper.
Check the right edge of paper. Check the paper type.
Lift the release lever and reload the paper.
Check the left edge of paper.
Check the paper type.
Press Online to clear the error and readjust printhead.
Check the paper on which a pattern is printed for smears. Check the environment for interferences from outside light.
Clean the printhead.
Press Online to clear the error and readjust printhead.
Check the paper on which a pattern is printed for smears. Check the environment for interferences from outside light.
Clean the printhead.
Lift the release lever and replace paper with A4/ LTR (vertical) or larger.
Replace with A4/Letter or any larger-sized paper.
Lift the release lever and replace paper with A3/ Ledger (vertical) or larger.
Replace with A3/11″x17″ or any larger-sized paper.
Lift the release lever and replace roll with 10 in. wide or larger roll.
Replace with roll media at least 10 inches in width.
Remove paper and press Load/Eject.
Remove the paper jam and reload the paper.
Lift the release lever and reload paper.
Reload the paper.
Check supported paper sizes.
Replace with larger-sized paper.
Check supported paper sizes.
Replace with smaller-sized paper.
Press Online to clear the error.
Replace with adjustable media.
Lift the release lever.
Correct the skew in the paper and reload it.
Reload paper.
Reload the paper
Press Load/Eject and reload the paper.
Reload the paper
Lift the release lever and reload the paper.
Reload the roll media.
Press Online to clear the error.
Check to see if paper has not jammed.
Press Load/Eject and load sheets.
Load cut sheets at the paper tray port.
Press OK, remove the sheets, and load a roll.
Replace with roll media.
Press Load/Eject and load a roll.
Load roll media.
Turn printer off and install roll feed unit.
Install the roll media unit.
Lift the release lever and replace the roll.
Renew the supply of roll media.
Press Load/Eject and reload the paper.
Check the type of paper that can be fed and reload the paper.
Press Load/Eject and remove the roll.
Load cut sheets at the paper tray port.
03130031-2E23
Turn off printer, wait, then turn on again.
Check the cutter unit.
03130031-2E14
Turn off printer, wait, then turn on again.
Replace the main controller PCB
03130031-2E16
Turn off printer, wait, then turn on again.
Check the mist fan.
03130031-2E17
Turn off printer, wait, then turn on again.
Check the suction fan.
03130031-2E20
Turn off printer, wait, then turn on again.
Check the purge unit.
03130031-2E22
Turn off printer, wait, then turn on again.
Check the purge unit.
03130031-2E23
Turn off printer, wait, then turn on again.
Check the purge unit.
03130031-2E25
Turn off printer, wait, then turn on again.
Check the carriage unit. Check the linear encoder for smears.
03130031-2E26
Turn off printer, wait, then turn on again.
Check the carriage unit and surrounding parts.
03130031-2E27
Turn off printer, wait, then turn on again.
Check the carriage unit and surrounding parts.
03130031-2E1F
Turn off printer, wait, then turn on again.
Check the purge unit.
03130031-2E2A
Turn off printer, wait, then turn on again.
Check the feed roller encoder and surrounding part. Check to see if paper has not jammed.
03130031-2E29
Turn off printer, wait, then turn on again.
Check the roll feed unit. Check roll media. Check to see if paper has not jammed in the printer.
03130031-2E2E
Turn off printer, wait, then turn on again.
Check the roll feed unit.
03130031-4027
Turn off printer, wait, then turn on again.
Check the carriage unit and surrounding parts.
03130031-2E13
Turn off printer, wait, then turn on again.
03130031-2F32
Turn off printer, wait, then turn on again.
Replace the multi sensor unit.
03130031-2F3A
Turn off printer, wait, then turn on again.
Check the ink supply unit.
03130031-2F3B
Turn off printer, wait, then turn on again.
Remove the ink tanks and then reload them. Check the main controller PCB.
03130031-2F70
Turn off printer, wait, then turn on again.
03130031-2F71
Turn off printer, wait, then turn on again.
03130031-2F72
Turn off printer, wait, then turn on again.
03130031-260E
Turn off printer, wait, then turn on again.
Check the carriage unit and surrounding parts. Replace the main controller PCB.
03130031-2618
Turn off printer, wait, then turn on again.
Check the power supply unit.
03130031-260F
Turn off printer, wait, then turn on again.
Turn off printer and check roll feed unit
Replace the roll feed unit.
Turn off printer, wait a while, then turn it on again.
Transmit valid ROM data.
Turn off printer, wait a while, then turn it on again.
Verify the validity of MID data before transferring it.
03130031-2F2B
Turn off printer, wait, then turn on again.
Open top cover and replace the printhead.
Replace printhead
Open top cover and replace the right printhead.
Replace printhead
Open top cover and replace the right printhead.
Replace printhead
03800500-2F40
Turn off printer, wait, then turn on again.
Проверьте блок очистки печатающей головки и окружающие детали.
Проверьте датчик управления головкой и окружающие детали.
Убедитесь, что печатающая головка установлена правильно.
Если визуально все чисто и корректно подключено, нужно пробовать:
Заменить датчик управления головкой.
Заменить главную плату контроллера.
Замените печатающую головку.
Замените каретку.
03800500-2F2F
Turn off printer, wait, then turn on again.
Замените датчик управления печатающей головкой.
Замените печатающую головку.
Identify the head management sensor unit
Replace the head management sensor unit
Replace the printhead
03800500-2F30
Turn off printer, wait, then turn on again.
Замените датчик управления печатающей головкой.
Замените печатающую головку.
Identify the head management sensor unit
Replace the head management sensor unit
Replace the printhead
Press OK and replace ink tank.
Renew the Bk ink tank
Press OK and replace ink tank.
Renew the Y ink tank
Press OK and replace ink tank.
Renew the M ink tank
Press OK and replace ink tank.
Renew the C ink tank
Press OK and replace ink tank.
Renew the MBk ink tank
Press OK and replace ink tank.
Renew the MBk ink tank
Press OK and replace ink tank.
Replace with a fully replenished Bk ink tank
Press OK and replace ink tank.
Replace with a fully replenished Y ink tank
Press OK and replace ink tank.
Replace with a fully replenished M ink tank
Press OK and replace ink tank.
Replace with a fully replenished C ink tank
Press OK and replace ink tank.
Replace with a fully replenished MBk ink tank
Press OK and replace ink tank.
Replace with a valid Bk ink tank
Press OK and replace ink tank.
Replace with a valid Y ink tank
Press OK and replace ink tank.
Replace with a valid M ink tank
Press OK and replace ink tank.
Replace with a valid C ink tank
Press OK and replace ink tank.
Replace with a valid MBk ink tank
Press OK and replace ink tank.
Replace with a valid MBk ink tank
Press OK and check ink tank.
Install a Bk ink tank
Press OK and check ink tank.
Install a Y ink tank
Press OK and check ink tank.
Install a M ink tank
Press OK and check ink tank.
Install a C ink tank
Press OK and check ink tank.
Install a MBk ink tank
Press OK and check ink tank.
Install a MBk ink tank
Turn off printer, wait a while, and turn it on again.
Close the top cover and turn on the printer again.
Turn off printer, wait a while, and turn it on again.
Close the ink tank cover and turn on the printer again.
Replace the maintenance cartridge.
Renew the maintenance cartridge.
Cartridge capacity.
Replace the maintenance cartridge.
Replace the maintenance cartridge.
Replace the maintenance cartridge.
Renew the maintenance cartridge.
Replace the maintenance cartridge.
Renew the maintenance cartridge.
Check roll position.
Online: Print Load/Eject:
Change Paper
Check to see if a borderless printing spacer is installed. Reload the paper.
Check paper size setting.
Online: Print
Load/Eject: Change Paper
Check the paper size. Change the paper size.
Online: Print
Stop: Stop Printing
Load/Eject: Change Paper
Renew the supply of roll media.
Lift the release lever and reload the paper.
Cut paper manually. Check the cutter.
Press Online to clear the error.
Check the multi sensor.
Check the head management sensor.
Online: Print
Stop: Stop Printing
Load/Eject: Change Paper
Exchange for the compatible paper to HP-GL/2 before reprinting.
Delete unwanted data on your computer to resume printing.
Press Stop to cancel printing.
Delete unneeded jobs stored in Personal Boxes.
Cannot save. Delete unwanted data on your computer to resume printing.
Press Stop to cancel printing.
Press OK to reformat
Press the [OK] button to start reformatting the hard disk. When formatting is finished, the printer automatically restarts.
Turn off printer, wait a while, and turn it on again.
Invalid files will be deleted.
Restart the printer. Only the corrupted files will be deleted, and the printer will restart.
Turn off printer, wait, then turn on again.
Check the head management sensor. Replace the head management sensor. Replace the printhead.
Turn off printer, wait, then turn on again.
Check the pinch roller and surrounding part. Replace the pinch roller pressure drive unit.
Install printhead.
Install the printhead.
Replace the printhead.
Check the maintenance cartridge.
Install the maintenance cartridge.
Lift the release lever and reload the paper.
Check the cutter unit and surrounding part. Replace the cutter.
Renew the supply of roll media.
Manually rewind roll all the way and press OK.
Check the pick-up unit and roll media. Check to see if paper has not jammed.
Load cut sheets at the paper tray port.
Check the media size. Change the media size.
Confirm usage cond. of the paper.
Reload the paper.
Reload the roll media.