Это сообщение об ошибке указывает на то, что загрузочный сектор поврежден или отсутствует.
Решение
Воспользуйтесь приведенными ниже способами, чтобы устранить ошибки запуска Windows.
 Примечание. Чтобы выполнить приведенные ниже действия, требуется установочный диск Windows 8.1, Windows 8, Windows 7 или Windows Vista. Если его нет, обратитесь к изготовителю компьютера или в службу поддержки Майкрософт с просьбой предоставить установочный диск. Если у вас нет установочного диска, но при этом на компьютере предустановлено средство восстановления при загрузке, воспользуйтесь способом 4.
Способ 1. Запуск средства восстановления при загрузке в среде восстановления Windows (WinRE)
Чтобы выполнить восстановление при загрузке в среде восстановления Windows (WinRE), сделайте следующее:
-
Вставьте установочный диск Windows в дисковод и запустите компьютер.
-
После появления сообщения Press any key to boot from CD or DVD (Нажмите любую клавишу для загрузки с компакт-диска или DVD-диска), выполните требуемое.
Если компьютер не обнаружит носитель автоматически-
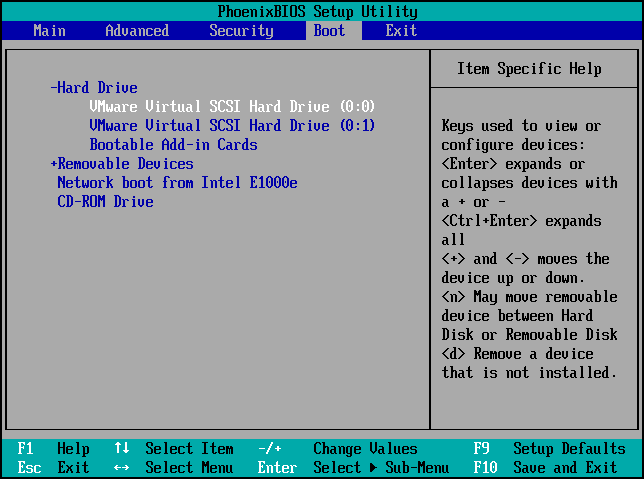
При перезагрузке найдите на экране инструкции, в которых объясняется, как прервать загрузку в обычном режиме и войти в программу настройки BIOS. Чтобы начать настройку BIOS, для большинства компьютеров можно нажать клавиши F2, F10, ESC или DEL.
-
В окне программы настройки BIOS Setup Utility найдите вкладку Boot Order (Порядок загрузки), Boot Options (Параметры загрузки) или Boot (Загрузка). Следуя инструкциям на экране, воспользуйтесь клавишами со стрелками, чтобы открыть вкладку Boot Order (Порядок загрузки), а затем нажмите клавишу ВВОД.
-
В списке загрузки найдите обозначение компакт-диска, DVD-диска или USB-устройства флэш-памяти (CD, DVD или USB flash drive соответственно). Возможно, носитель определен как Removable Device (Съемное устройство). Следуя инструкциям на экране, воспользуйтесь клавишами со стрелками, чтобы поднять обозначение диска в списке загрузки и сделать его первым. Нажмите клавишу ВВОД. Теперь последовательность загрузки с компакт-диска, DVD-диска или USB-устройства флэш-памяти изменена.
-
Нажмите клавишу F10, чтобы сохранить изменения и выйти из программы настройки BIOS Setup Utility. Выберите команду Yes (Да) в окне подтверждения. Компьютер будет перезагружен.
-
-
Выберите язык, время и денежные единицы, а также способ ввода и клавиатуру, затем нажмите кнопку Далее.
-
Выберите пункт Восстановить компьютер.
-
При появлении диалогового окна Параметры восстановления системы выберите диск с установочными файлами Windows и нажмите кнопку Далее.
-
В окне Параметры восстановления системы выберите пункт Восстановление системы.
-
Укажите операционную систему, которую требуется восстановить, и нажмите кнопку Далее.
-
В диалоговом окне Параметры восстановления системы выберите пункт Восстановление при загрузке.
Способ 2. Перестроение данных конфигурации загрузки в среде восстановления Windows (WinRE)
Для перестроения данных конфигурации загрузки в среде восстановления Windows (WinRE) выполните следующие действия
-
Вставьте установочный диск Windows в дисковод и запустите компьютер.
-
После появления сообщения Press any key to boot from CD or DVD (Нажмите любую клавишу для загрузки с компакт-диска или DVD-диска), выполните требуемое.
Если компьютер не обнаружит носитель автоматически-
При перезагрузке найдите на экране инструкции, в которых объясняется, как прервать загрузку в обычном режиме и войти в программу настройки BIOS. Чтобы начать настройку BIOS, для большинства компьютеров можно нажать клавиши F2, F10, ESC или DEL.
-
В окне программы настройки BIOS Setup Utility найдите вкладку Boot Order (Порядок загрузки), Boot Options (Параметры загрузки) или Boot (Загрузка). Следуя инструкциям на экране, воспользуйтесь клавишами со стрелками, чтобы открыть вкладку Boot Order (Порядок загрузки), а затем нажмите клавишу ВВОД.
-
В списке загрузки найдите обозначение компакт-диска, DVD-диска или USB-устройства флэш-памяти (CD, DVD или USB flash drive соответственно). Возможно, носитель определен как Removable Device (Съемное устройство). Следуя инструкциям на экране, воспользуйтесь клавишами со стрелками, чтобы поднять обозначение диска в списке загрузки и сделать его первым. Нажмите клавишу ВВОД. Теперь последовательность загрузки с компакт-диска, DVD-диска или USB-устройства флэш-памяти изменена.
-
Нажмите клавишу F10, чтобы сохранить изменения и выйти из программы настройки BIOS Setup Utility. Выберите команду Yes (Да) в окне подтверждения. Компьютер будет перезагружен. Пусть компьютер загрузится в обычном режиме. Проверка займет несколько минут. За это время удалится вредоносная программа, которой, возможно, заражен компьютер.
-
-
Выберите язык, время и денежную единицу, способ ввода данных (с клавиатуры или другой), а затем нажмите кнопку Далее.
-
Выберите пункт Восстановить компьютер.
-
Укажите операционную систему, которую требуется восстановить, и нажмите кнопку Далее.
-
В диалоговом окне Параметры восстановления системы выберите пункт Командная строка.
-
Введите Bootrec /RebuildBcd и нажмите клавишу ВВОД.
Подробнее о том, как использовать Bootrec.exe, см. в статье Как использовать средство Bootrec.exe в среде восстановления Windows для устранения неполадок при запуске Windows.
Способ 3. Запуск восстановления системы в среде восстановления Windows (WinRE)
 Важно! Для этого способа на компьютере должно быть включено восстановление системы.
Чтобы выполнить восстановление системы в среде восстановления Windows (WinRE), сделайте следующее:
-
Вставьте установочный диск Windows в дисковод и запустите компьютер.
-
После появления сообщения Press any key to boot from CD or DVD (Нажмите любую клавишу для загрузки с компакт-диска или DVD-диска), выполните требуемое.
Если компьютер не обнаружит носитель автоматически-
При перезагрузке найдите на экране инструкции, в которых объясняется, как прервать загрузку в обычном режиме и войти в программу настройки BIOS. Чтобы начать настройку BIOS, для большинства компьютеров можно нажать клавиши F2, F10, ESC или DEL.
-
В окне программы настройки BIOS Setup Utility найдите вкладку Boot Order (Порядок загрузки), Boot Options (Параметры загрузки) или Boot (Загрузка). Следуя инструкциям на экране, воспользуйтесь клавишами со стрелками, чтобы открыть вкладку Boot Order (Порядок загрузки), а затем нажмите клавишу ВВОД.
-
В списке загрузки найдите обозначение компакт-диска, DVD-диска или USB-устройства флэш-памяти (CD, DVD или USB flash drive соответственно). Возможно, носитель определен как Removable Device (Съемное устройство). Следуя инструкциям на экране, воспользуйтесь клавишами со стрелками, чтобы поднять обозначение диска в списке загрузки и сделать его первым. Нажмите клавишу ВВОД. Теперь последовательность загрузки с компакт-диска, DVD-диска или USB-устройства флэш-памяти изменена.
-
Нажмите клавишу F10, чтобы сохранить изменения и выйти из программы настройки BIOS Setup Utility. Выберите Да в окне подтверждения.
-
-
Выберите язык, время и валюту, а также способ ввода и клавиатуру, затем нажмите кнопку Далее.
-
Выберите пункт Восстановить компьютер.
-
При появлении диалогового окна Параметры восстановления системы выберите диск с установочными файлами Windows и нажмите кнопку Далее.
-
В диалоговом окне Параметры восстановления системы выберите пункт Восстановление системы.
-
Следуйте указаниям мастера восстановления системы и выберите подходящую точку восстановления.
-
Нажмите кнопку Готово, чтобы восстановить систему.
Дополнительные сведения о восстановлении системы см. в разделе Восстановление системы: часто задаваемые вопросы.
Способ 4. Использование средства восстановления при загрузке, если оно уже установлено на компьютере
Важно! Этот способ работает, только если на компьютере заранее установлено средство восстановления при загрузке.
Если у вас нет установочного диска Windows, но при этом на компьютере заранее установлено средство восстановления при загрузке, выполните следующие действия, чтобы восстановить загрузочные файлы.
-
Извлеките из компьютера все дискеты, компакт-диски и DVD-диски, а затем перезагрузите компьютер, нажав кнопку питания.
-
Если на компьютере установлена только одна операционная система, при перезагрузке компьютера нажмите и удерживайте клавишу F8. Клавишу F8 необходимо нажать до появления эмблемы Windows. В случае появления эмблемы Windows необходимо повторить перезагрузку после вывода приглашения войти в систему Windows.
-
Если на компьютере установлено несколько операционных систем, с помощью клавиш со стрелками выберите операционную систему, которую необходимо восстановить, а затем нажмите и удерживайте клавишу F8.
-
-
На экране Дополнительные варианты загрузки выберите с помощью клавиш со стрелками пункт Устранение неполадок компьютера и нажмите клавишу ВВОД. (Если пункт Восстановление системы отсутствует, то средства восстановления не установлены на компьютере или отключены администратором сети.)
-
Выберите раскладку клавиатуры и нажмите кнопку Далее.
-
Выберите имя пользователя, введите пароль и нажмите кнопку OK.
-
В меню Параметры восстановления системы выберите пункт Восстановление при загрузке. Средство восстановления при загрузке может предлагать вам выбор вариантов устранения проблемы и перезагружать компьютер в процессе восстановления.
Have you encountered the situation when a black screen pops up and says «BOOTMGR is Missing. Press Ctrl+Alt+Del to restart» while you are booting your Windows 10/8/7/XP computer? Don’t worry and take it easy! This post will walk you through 11 useful solutions to fix the issue of Boot Manager missing.
What Is BOOTMGR
BOOTMGR is short for Windows Boot Manager which refers to a small piece of software that is loaded from the volume boot code. Usually, the BOOTMGR file is read-only and is locating in the boot directory of the partition which is set as “active”.
On most PCs, the partition is labeled as system reserved without a drive letter. If there is no system reserved partition, BOOTMGR probably locates in your primary partition C. BOOTMGR can read boot configuration data and display the operating system selection menu.
However, sometimes BOOTMGR may be missing or lost due to reasons including incorrect bootable disk, damaged MBR, outdated BIOS, loose or damaged hard disk interface cables, etc.
BOOTMGR Error Messages
This issue usually appears shortly after the computer is turned on, immediately after the Power On Self Test (POST for short) is complete.
When the BOOTMGR error message occurs, the Windows has initially started to load. And you can see the message “BOOTMGR is missing. Press Ctrl+Alt+Del to restart“, as shown below:
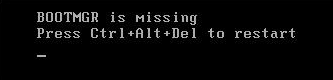
In addition, you may receive different messages like “BOOTMGR is missing. Press any key to restart” or “CDBOOT: Couldn’t find BOOTMGR“.
Tip: BOOTMGR issue only applies to Windows 7, Windows 8, Windows 10 and Windows Vista. In Windows XP, missing NTLDR issue is common. Thus, if you encounter NTLDR missing error, please refer to this post – 10 Solutions to Fix NTLDR Is Missing in Windows 10/8/7.
11 Solutions to Missing BOOTMGR
- Restart your PC
- Remove all removable media
- Change boot order in BIOS
- Repair Master Boot Record
- Mark partition active
- Test hard drive
- Run Windows Startup Repair
- Reseat all internal data nad power cables
- Update BIOS
- Clean Install
- Replace the hard drive
How to Fix BOOTMGR Is Missing Windows 7/8/10
When the issue “Windows couldn’t find BOOTMGR or missing BOOTMGR” occurs, you would try to search for solutions on the internet. Here we have summarized eleven solutions for you and hopefully, you can solve your problem on your Windows 7/8/10 computer.
Here is a related video for you:
Solution 1: Restart Your Desktop or Laptop
Once Windows prompts you “BOOTMGR is missing, please try to restart your PC by pressing Ctrl+Alt+Del keys or any key”, follow what the error message suggests first because maybe the BOOTMGR error is just a fluke.
However, sometimes a reboot can’t solve the BOOTMGR problem. Therefore, please try the following ways if rebooting did not work.
Solution 2: Remove All Removable Media
Since BOOTMGR error can be caused by booting your computer from a non-bootable hard drive, you should check if your PC is configured to boot from a USB flash drive, a floppy disk, or other non-bootable disks.
If this is the problem, please remove the device and make sure your BIOS doesn’t load from any of them. Otherwise, missing BOOTMGR issue will happen again.
Solution 3: Change Boot Order in BIOS
After unplugging a non-bootable disk, perhaps Boot Manager not found error will still appear. In this case, you need to consider checking the boot sequence in BIOS.
Step 1: Restart your computer.
Step 2: Then press a specific key to go to the main interface of BIOS.
Note: The key is different depending on different computers and different Windows operating systems. It can be F2,F8, F10,F12, Esc or Del, etc.
Step 3: Then under the Boot tab, modify the boot order to set the hard drive as the first boot device.
After restarting PC, if the error “Boot Manager is missing” still happens, try to look for the next way.
Solution 4: Repair Master Boot Record
It is most likely that the message “BOOTMGR is missing” happens due to damaged Master Boot Record (MBR). In this case, it is necessary to repair MBR. You might be wondering about how you can repair MBR to fix BOOTMGR is missing with USB drive effectively; especially when the operating system is unbootable.
Don’t worry, we will introduce you a piece of professional partition and disk management software – MiniTool Partition Wizard. This tool has multiple editions including Free, Pro, Pro Ultimate, Server and more which are designed for users with different needs.
Professional Edition and the advanced editions all have a feature called Bootable Media, which is available when there is no OS or OS fails to boot.
If you fail to boot your Windows 7/8/10 OS due to the error “BOOTMGR is missing”, you can try this function. Unfortunately, the Free Edition doesn’t support this feature.
Tip: Before you do, please purchase MiniTool Partition Wizard Professional Edition to build a bootable USB flash drive or CD/DVD disc, then connect this device to your PC and boot from this device by changing the boot order in BIOS. Then start to fix BOOTMGR missing issue with a USB drive or DVD/CD disc by rebuilding MBR.
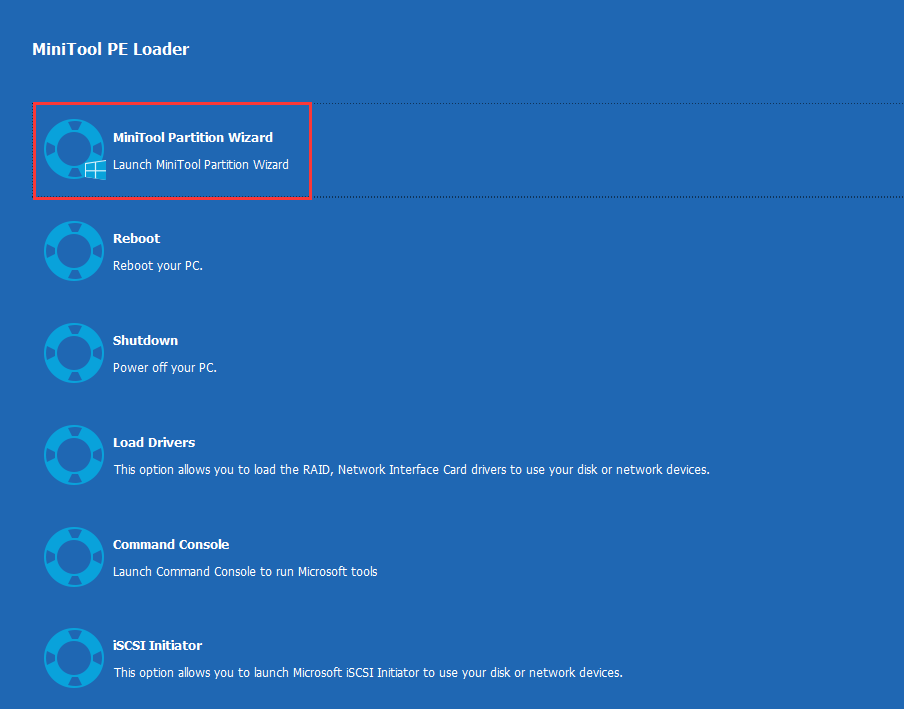
Step 1: A few seconds later, you will see the MiniTool PE Loader interface. Please launch MiniTool Partition Wizard.
Step 2: In the MiniTool Partition Wizard main interface, right-click the target disk and choose the Rebuild MBR feature.
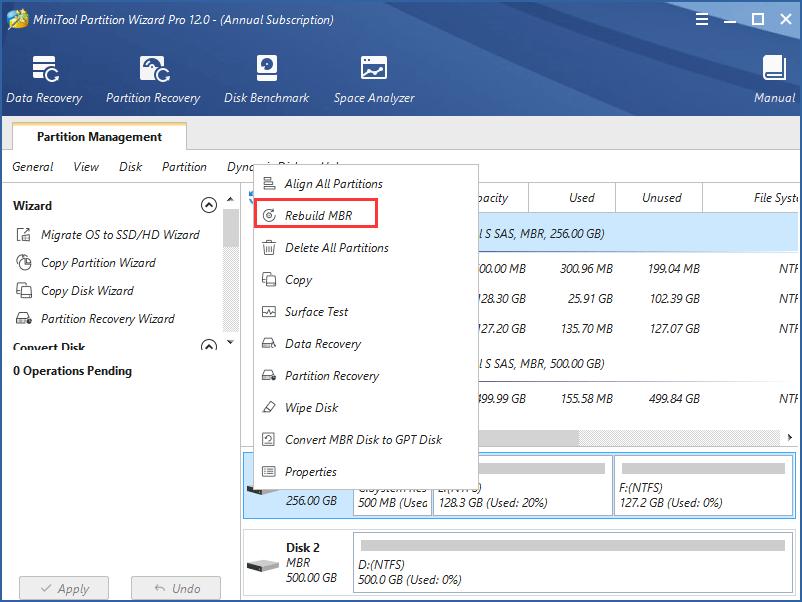
Step 3: Click Apply to perform MBR restoration. After finishing this operation, please exit the program and restart your computer again. The “BOOTMGR is missing press Ctrl+Alt+Del to restart” error might be solved by this way.
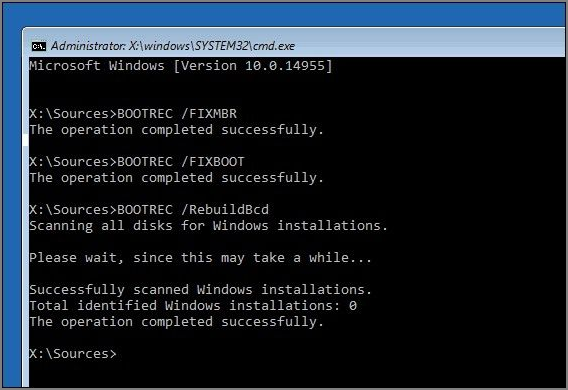
In addition to performing MBR recovery, some of you choose to use the bootrec tool. Firstly, you need to prepare a Windows installation disc and connect it to your PC. Next, try to repair the issue “BOOTMGR is missing” in Windows 7 with Command Prompt.
Please launch CMD according to the wizard. On Windows 7/8/10, type the following commands in turn:
bootrec /fixmbr
bootrec /fixboot
bootrec /rebuildbcd
Tip: For Windows 8/10, you need to type bootrec /scanos before rebuilding BCD.
To fix BOOTMGR using CMD seems to be a bit complicated. Therefore, here we suggest using MiniTool Partition Wizard since it is a more convenient solution.
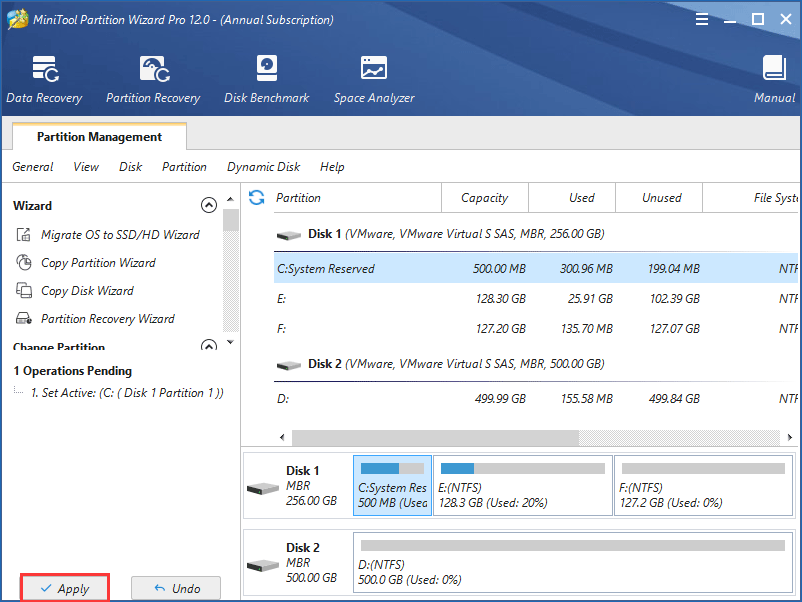
Solution 5: Mark Partition Active
If you have marked a wrong partition active, the computer will fail to start up and show the BOOTMGR error message because the active partition probably doesn’t contain boot files. In PC there is only one active partition and system partition or boot partition must be primary and active.
In this case, you must mark the partition within boot files active to ensure the computer runs properly. In order to solve the issue, please reset your system partition active.
How to mark the partition active to fix “BOOTMGR is missing” on Windows 7/8/10? You can use MiniTool Partition Wizard Professional Edition as well and the operation is also very simple. Remember to boot your computer from the bootable disc or USB drive to enter the main interface of MiniTool Partition Wizard first.
Step 1: Select the wrong active partition. You could see there are many partition functions in the left pane and please select Set Inactive.
Step 2: Select the target partition, click the Set Active function from Partition Management menu.
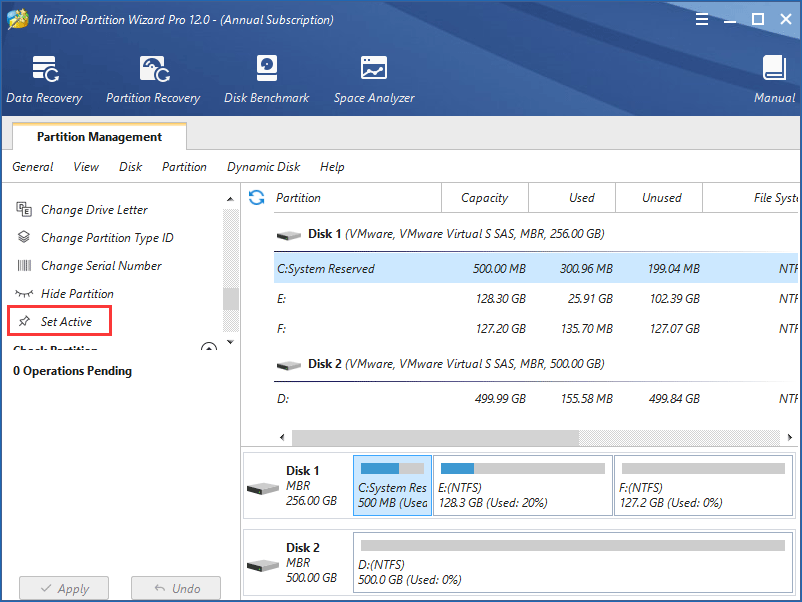
Step 3: At last, you will go back to the main interface of MiniTool Partition Wizard again and click the Apply button to make these changes effective.
Solution 6: Test Hard Drive
Another reason that may cause BOOTMGR files missing is that there are some bad sectors. What you need to do is to check the disk surface.
MiniTool Partition Wizard provides a feature to do this with its Surface Test on Windows 7/8/10. If bad sectors exist, this tool will mark them red. On the contrary, healthy sectors will be marked green.
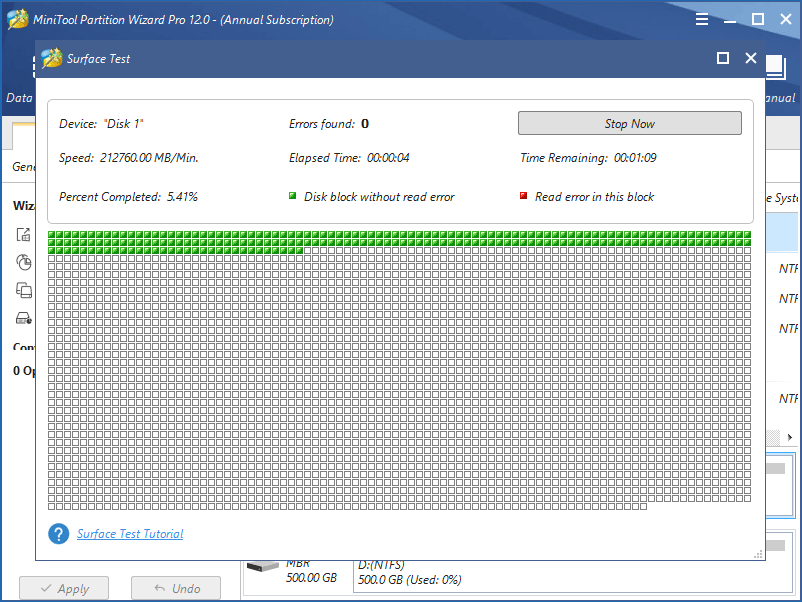
Related article: What to Do If I Find Bad Sectors on Hard Drive in Windows 10/8/7?
Once bad blocks are found, you can use the chkdsk tool to shield them. If there are many bad blocks, in order to avoid data loss, please back up the significant data on the target disk.
Fortunately, MiniTool Partition Wizard has those two functions: copy partition and copy disk. Here we strongly suggest cloning the entire disk data to an appropriate hard drive.
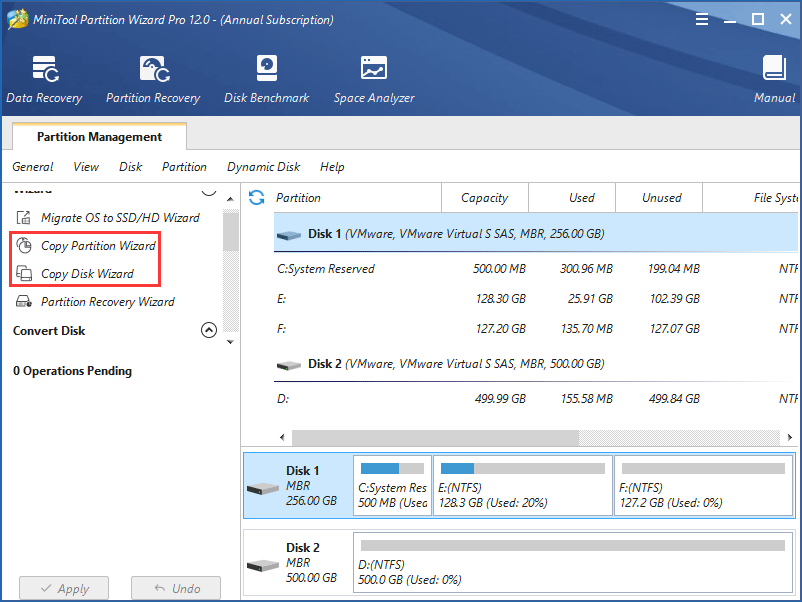
Tip:
1. The destination hard drive should be larger than the used disk space of the original disk.
2. Make sure there is no important data on the destination disk, otherwise, all data will be destroyed during the copy process.
Are you experiencing the same issue? Now try MiniTool Partition Wizard Professional Edition to create a bootable disc or USB drive to boot your computer and then fix the issue of missing BOOTMGR on Windows 7/8/10.
If there are no logical bad sectors detected on your hard drive, you can skip the backup operation and try the next solution.
Solution 7: Perform Windows Startup Repair
In addition, you can perform a Windows startup repair. This way can replace any missing or corrupted files, including BOOTMGR. You may be wondering that if there is no CD disc, can BOOTMGR is missing Windows 7 fix without CD be done? In other words, how to fix BOOTMGR is missing in Windows 7 without CD?
Create a bootable USB from ISO and then boot the PC from the USB drive to enter the Windows Recovery Environment. On Windows 7, choose Startup Repair under the System Recovery Options window to continue.
On Windows 8/10, go Troubleshoot → Advanced options → Automatic Repair(Windows  or Startup Repair(Windows 10).
Solution 8: Reseat All Internal Data and Power Cables
The above content mentioned the “BOOTMGR is missing press Ctrl+Alt+Delete to restart” error could be caused by loose, unplugged or malfunctioning power cables. Please try to replace the old cable with a new IDE one to check whether your cable works or not.
Solution 9: Update the Motherboard BIOS
If the BIOS on your motherboard is outdated, sometimes you will get a BOOTMGR error message. Thus, you should ensure the BIOS is upgraded to the latest version. If it is not, try to update it first since the BIOS must be available on your computer. If you don’t know how to update it, you could find the way from the article How to Update Your BIOS.
Solution 10: Perform a Clean Windows Installation
If all the solutions above did not work when trying to solve the Boot Manager missing issue, it is a good way to perform a Windows installation to repair this error. This way, it will completely remove Windows from your PC. However, all data will be deleted so you’d better back up important files before re-installing OS.
At first, follow solution 6 which shows you how to clone disk or partition using MiniTool Partition Wizard. Then you can start to install a new operating system. There is another professional backup software: MiniTool ShadowMaker that you can use it for Windows 10/8/7. It’s very easy to back up data without booting OS with the help of this software.
Solution 11: Replace the Hard Drive
If you still receive a BOOTMGR message, you should consider that the hard drive has a physical issue. The only solution for this situation is to replace the died or damaged hard disk with a new one and re-install Windows after that.
“When I ran Windows 10, I got a black screen showing “BOOTMGR is missing”. Luckily, these solutions are helpful to fix BOOTMGR. Hope you can get rid of it.”Click to Tweet
Bottom Line
Here you have come to the end of this post. After learning so much information about BOOTMGR, we think you now know what “BOOTMGR is missing” error is and understand several solutions to solve the BOOTMGR error. Now, it is time for you to solve this problem in order to fix your computer and make it runs normally.
If you have any suggestions to fix BOOTMGR on Windows 7/8/10, please don’t hesitate to tell us by leaving a comment below or sending an email to [email protected]. Thank you!
BOOTMGR Is Missing FAQ
How do I fix Bootmgr is missing?
Insert your Windows install CD. Restart your computer and boot from the CD. Click Repair your computer after selecting your language, time and keyboard method. Then choose Startup Repair under the System Recovery Options window to continue. After the Startup Repair is done, restart and check if the error “Bootmgr is missing” is fixed.
How do I fix Bootmgr is missing in Windows 10?
You can run Startup Repair to fix Bootmgr is missing in Windows 10. Create a bootable USB drive with Windows 10 Media Creation Tool. Boot from the USB drive. Click on Repair your computer after selecting language preferences. Go to Troubleshoot > Advanced options > Startup Repair. After the repair process completed, follow the prompts to restart Windows 10.
How do I fix Bootmgr is missing in Windows 7 without CD?
To fix BOOTMGR is missing in Windows 7 without CD, you can create a bootable USB from ISO and then boot the PC from the USB drive to enter the Windows Recovery Environment. Click the Repair your computer option after selecting your language, time and keyboard method. Then on Windows 7, choose Startup Repair under the System Recovery Options window to continue.
What is a Bootmgr?
BOOTMGR, the abbreviation of Windows Boot Manager, is a small piece of software that is loaded from the volume boot record. It executes winload.exe (Windows boot loader) to load important device drivers and core parts of Windows operating system. BOOTMGR helps your Windows 10, Windows 8, Windows 7, or Windows Vista operating system start. When BOOTMGR is missing, the operating system will not load, so you are unable to boot into Windows.
Windows manager software enables a computer to boot into an operating system. In certain scenarios, the boot manager cannot load the operating system and start the computer normally. An error may be prompted, or the system may be stuck on a black screen.
However, there are ways to troubleshoot Windows Boot Manager Boot Failed. But if you’re unaware, you’ve come to the right place. In this article, you’ll discover the finest ways to boot windows normally. Let’s get into the details!
Why Windows Boot Manager Boot Failed
Before moving forward, you need to understand the reason behind the occurrence of this supervening event. There are several reasons why the Windows Boot Manager may fail to boot:
- Corrupt Master Boot Record (MBR): The MBR is a critical data structure located on the hard drive’s first sector. It contains the boot code and a table that lists the partitions on the drive. If the MBR is corrupt, the boot manager may be unable to load the operating system.
- Damaged hard drive cable: If the cable that connects the hard drive to the motherboard is damaged, the boot manager may not be able to access the operating system files on the hard drive.
- Improper shutdown of the computer: If the computer is shut down improperly, it can cause the system files that the boot manager relies on to be corrupted or damaged.
- Hardware missing: If a hardware component is missing or not properly installed, it can cause the boot manager to fail.
A boot failure can generally occur due to any issue that prevents the boot manager from loading the operating system. These issues can be caused by hardware or software problems and may require different solutions.
📖Extend Reading: Default Boot Device Missing or Boot Failed
If you want to check if the problem is with your hard drive first, you can click on the link below to check the health status of your hard drive.
![]()
How to Check Hard Drive Health in Windows
It’s crucial that you maintain a close eye on hard drive health in Windows 11 and Windows 10 to prevent any unforeseen crashes and the subsequent data loss they would cause.
Now you know what windows boot manager boot failure is, you must be wondering how to fix it. Let’s jump onto that in the next section.
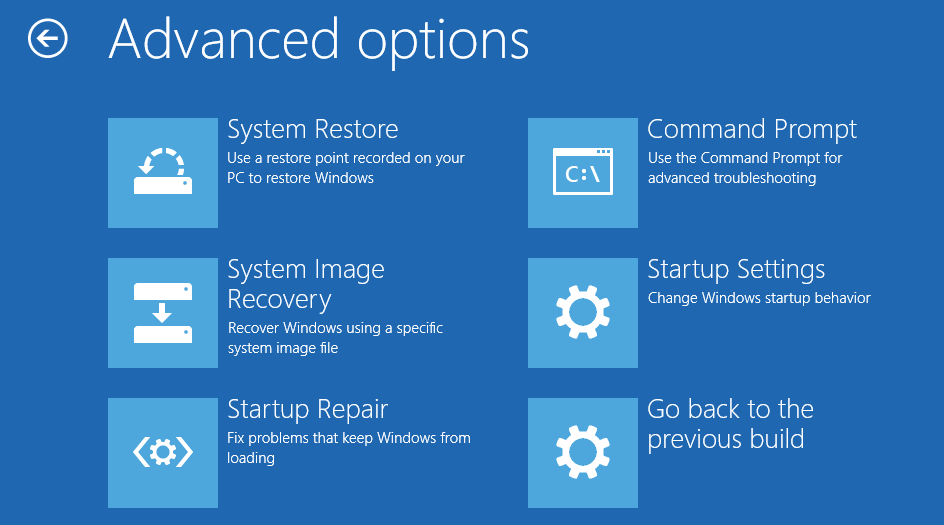
How to Fix Windows Boot Manager Boot Failed
Looking for possible ways to troubleshoot the windows boot manager boot failed? This is the section for you! In this section, you’ll get some of the finest ways to load your operating system properly:
- Fix 1. Rebuild MBR
- Fix 2. Repair the Boot Manager
- Fix 3. Edit Windows Boot Manager
- Fix 4. Update Your BIOS or UEFI
Let’s look at how each method works to fix the Windows boot manager boot failed error.
Fix 1. Rebuild MBR
If the MBR is damaged or corrupt, it can cause the Windows Boot Manager to fail to boot the computer. To fix this issue, you may need to rebuild the MBR. Rebuilding the MBR involves replacing the damaged or corrupt MBR with a new, functional one.
One tool that can be used to rebuild the MBR is EaseUS Partition Master. EaseUS Partition Master is a partition management software that provides a range of features for managing hard drive partitions. It includes a rebuild MBR function that can repair or rebuild the MBR on a hard drive. This can be a useful tool for fixing a Windows Boot Manager boot failure caused by a corrupt MBR.
With EaseUS Partition Master rebuild MBR function, you can eradicate the damaged MBR with a new function MBR causing normal booting of the operating system.
Step 1. Create a WinPE bootable disk
- Launch EaseUS Partition Master, and click «Bootable Media» on the toolbar. Select «Create bootable media».
- Click «Next» to finish the process.

Step 2. Boot EaseUS Partition Master Bootable USB
- Connect the bootable USB or CD/DVD to your PC.
- Press F2 or Del when you restart the computer to enter the BIOS screen. Set and boot your computer from «Removable Devices» or «CD-ROM Drive». And then EaseUS Partition Master will run automatically.
Step 3. Rebuild MBR
- Click «Toolkit» and choose «Rebuild MBR».

- Select the disk and the type of MBR. Then, click «Rebuild».

- After that, you can see «MBR has been successfully rebuilt on Disk X».

You can also use the Diskpart command in Windows to repair the corrupted MBR. But EaseUS Partition Master simplifies the process, and you can also fix MBR on internal and external hard disk easily.
Fix 2. Repair the Boot Manager
To repair the Boot Manager, you can use a tool called «Bootrec.exe,» which is included in the Windows Recovery Environment (RE). Here is a step-by-step guide on how you can use Bootrec.exe to repair the Boot Manager:
Step 1: Boot up your system with windows installation media.
Step 2: Select your language, time and currency format, and keyboard or input method, and then click Next.
Step 3: Use the arrow keys to select Repair Your Computer and click Troubleshoot.
Step 4: Click on Advanced Options, then click on the Command Prompt option.
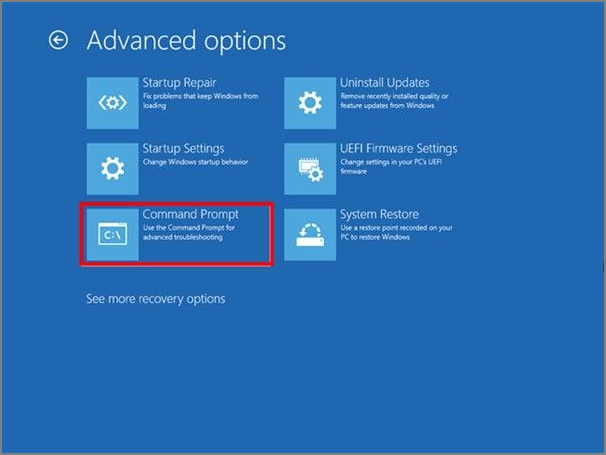
Step 5: Type bootrec.exe /fixmbr and press Enter. This will repair the Boot Manager.
Step 6: Type bootrec.exe /fixboot and press Enter. This will repair the boot sector.
Step 7: Type bootrec.exe /rebuildbcd and press Enter. This will rebuild the BCD.
Step 8: Remove the media and restart your computer. Entering the above commands successfully will assist you in normally booting your system.
Fix 3. Edit a Windows Boot Manager
Sometimes, the Windows Boot Manager can become corrupted or damaged, causing issues with booting into the operating system. By editing the Windows Boot Manager, you may be able to fix issues such as a corrupt boot configuration or an incorrect boot order. To edit the Windows Boot Manager, follow these steps:
Step 1: Run your system with the help of windows installation media.
Step 2: Select your language, keyboard or input method, and time format, and then click next
Step 3: Select «Repair Your Computer» and click troubleshoot using the arrow keys.
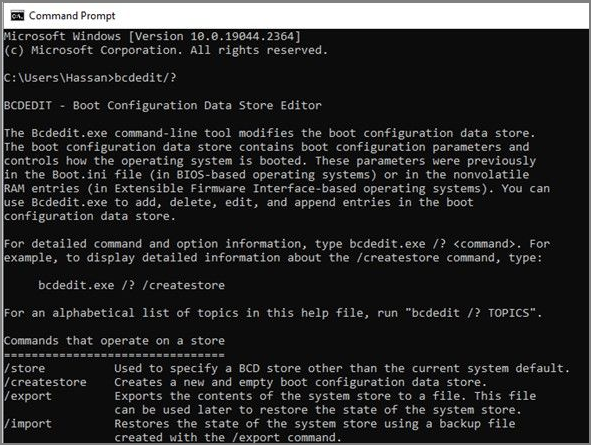
Step 4: Select «Advanced Options,» then select «Command Prompt.»
Step 5: Enter bcdedit/? to check commands for editing.
Step 6: Enter bcdedit/? default to set the default entry.
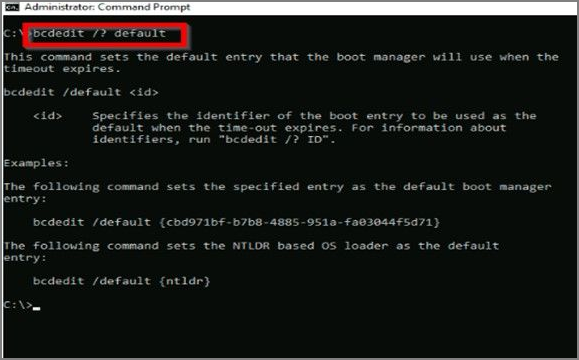
After entering the above commands, your system will no longer face the booting problem.
Fix 4. Update Your BIOS or UEFI
Updating your BIOS or UEFI (Unified Extensible Firmware Interface) can provide several benefits. It can fix bugs, improve your system’s overall performance, and enable support for new hardware or devices.
Here are the steps to update your BIOS or UEFI:
Step 1: Open the Microsoft store and search MSI center.
Step 2: Click on the Get button to download.
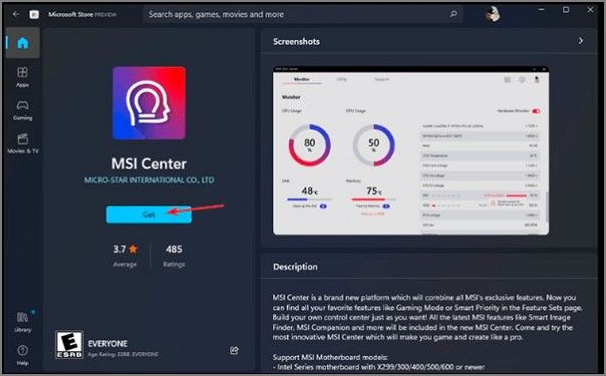
Step 3: Navigate to Support and select Advanced Options. Select BIOS update and wait until its complete
It’s important to note that updating your BIOS or UEFI can be risky, as it can potentially brick your system if something goes wrong.
You May Also Like:
Conclusion
To wrap up the discussion, we thoroughly explained various fixes for the normal booting of the operating system, and we hope this helped you to overcome the Windows Boot Manager Boot Failed. These fixes can troubleshoot and resolve issues preventing your system from booting properly.
To improve your system’s efficiency, we recommend using EaseUS Partition Master as a powerful tool for managing and optimizing your system’s disk space. It can solve all partition errors except for rebuilding MBR.
FAQs About «Windows Boot Manager Boot Failed» Error
After finding out how to troubleshoot the Boot error, you might have some questions, and you’ll get the answers here:
1. How do I fix Windows Boot Manager failed to start?
This article discussed four ways to fix Windows Boot Manager failed to start. You can use EaseUS Partition Master to rebuild MBR:
Step 1. Launch EaseUS Partition Master and click «Bootable Media» on the toolbar. Select «Create bootable media.»
Step 2. Connect the bootable USB to PC and press F2 to BIOS.
Step 3. Click «Toolkit» and choose «Rebuild MBR.»
2. What is Boot Manager failure?
When the boot manager cannot boot the operating system, it starts displaying an error message, or the system gets stuck on a black screen. This phenomenon is called Boot Manager failure.
3. How do I get past Windows Boot Manager?
There are several steps you can follow to repair Windows Boot Manager boot and get past it:
Step 1: Boot up with installation media and select language and formatting.
Step 2: Select repair your computer > Troubleshoot > Advanced options> Command prompt.
Step 3: Write bootrec.exe /fixboot, then click Enter.
Step 4: Type bootrec.exe /fixmbr, then click Enter. After that, input bootrec.exe /rebuildbcd, then again click Enter.
Далеко не все пользователи хорошо разбираются в вопросах настройки операционной системы, автором которой выступает известная корпорация Microsoft.
Потому для множества обычных юзеров столкнуться с чёрным экраном с какими-то непонятными строками при загрузке ОС на компьютере или ноутбуке равносильно пережитому стрессу. Они тут же начинают паниковать, не понимая, что произошло и как это исправить.

Часто появление ранее не виданных чёрных экранов воспринимается как поломка компьютера, требующая незамедлительного ремонта и покупки дорогостоящих компонентов на замену.
Но не стоит спешить с выводами. Некоторые непривычные для обычной загрузки Windows окна появляются по вполне безобидным причинам. Это можно отнести и к Windows Boot Manager.
Что это такое
Первым делом нужно понять, что это за Boot Manager на ноутбуке или компьютере и почему он появляется.
Тут речь идёт о специальном инструменте, который отображает окно с вариантами выбора операционной системы при загрузке компьютера.
Это унифицированный клиент в ОС Windows, который отвечает за загрузку операционной системы. Фактически именно он предлагает пользователю выбрать, какую именно модификацию или версию операционки следует загрузить. В общих чертах это позволяет понять, что же значит Boot Manager и какие функции он выполняет на компьютерах с операционной системой Windows.

При этом есть одна важная особенность. Раньше этот Бут Менеджер отвечал исключительно за то, чтобы предлагать пользователю на выбор загружать предпочтительную ОС. Актуально это было для тех случаев, когда на компьютере устанавливалось несколько операционных систем. Это довольно распространённое явление, когда на одном ПК или ноутбуке одновременно стоят ОС Windows 7, Windows 8, Windows 10 или же более ранние версии. Обусловлено такое решение тем, что ряд программ работают с одной ОС, но не запускаются на других поколениях операционок. Чтобы устранить этот недостаток, на комп ставится 2 операционные системы, а иногда и больше.
Но с течением времени функционал этого менеджера загрузки несколько изменился. В частности, его превратили в инструмент для загрузки ядра системы после того, как пройдёт начальная проверка компонентов железа через BIOS и UEFI. После чего управление передаётся уже на операционную систему.
При загрузке Windows в обычном режиме, что особенно актуально для 10 поколения этой ОС, на мониторе часто появляется экран для выбора. Причём пользователю предлагается назначить старт ОС либо перейти к инструментам для устранения неполадок, связанных с системой. Именно за это и отвечает Boot Manager.
Вопрос о том, что это такое и для чего используется, во многом решён. Но всё равно пользователи порой не знают, как устранить проблемы и ошибки, связанные с этим менеджером загрузок ОС.

Какие бывают загрузчики
Изначально для операционных систем серии Windows используется сразу несколько различных загрузчиков. Они отличаются между собой по функционалу, возможностям и выполняемым задачам.
Boot Manager считается стандартным загрузчиком, который реализован в виде исполнительных файлов и системных процессов. Работает исключительно при старте операционки, давая пользователю возможность выбрать конкретную версию и модификацию, если на компьютере установлено 2 и более ОС.
Это актуально и для случаев, когда на ПК или ноутбуке применяются виртуальные машины. То есть на старте пользователю даётся возможность выбрать, какую конкретно ОС ему требуется загрузить и запустить.
Если это операционные системы не из семейства Windows, тогда тут применяются уже другие загрузчики. В их числе BootX, Silo, Lilo и пр. Они применяются на ОС MacOS, Linux и других платформах.

Для Windows можно задействовать и другие загрузчики. Они устанавливаются с помощью настроек первичной системы, то есть BIOS. Это рациональное решение в тех ситуациях, когда на компьютере установлены разные операционные системы от различных производителей. То есть в рамках одного ПК или ноутбука могут быть использованы одновременно ОС Windows, Linux, Solaris и пр.
Распространённые ошибки
Столкнувшись с Boot Manager, у многих пользователей возникает закономерный вопрос о том, что делать дальше. На самом деле ошибка Boot Manager в Windows не всегда страшная и критичная. Многое зависит от конкретных обстоятельств её появления. Сразу же впадать в панику и искать номера сервисных центров по ремонту компьютерной техники не стоит.
Часто юзеры задаются вопросами о том, как самостоятельно отключить в системе Windows этот загрузчик Boot Manager. Это можно сделать, причём в БИОСе. Но торопиться пока не стоит.
Бут Менеджер, как служба-загрузчик, также может сталкиваться с ошибками и сбоями во время работы. Довольно часто пользователи наблюдают картину в виде чёрного экрана, на котором прописывается сообщение вроде «Bootmgr is missing».

Пока ничего страшного не произошло.
Если говорить о причинах сбоя настроек в Boot Manager для Windows, то их несколько. Сама настройка сбивается, либо её требуется настроить заново, если происходят ошибки с жёстким диском либо повреждается сам менеджер загрузки операционной системы. Также страдают загрузочные записи и секторы.
Тут важно ещё учитывать, что исправить ошибки обычно удаётся 2 способами:
- Простой. Не предполагает использования сторонних решений. Нужно лишь выполнить несколько действий.
- Сложный. Здесь уже в ход идут съёмные носители, через которые осуществляется запуск системы и вызываются необходимые командные строки.
Насколько тому или иному пользователю повезёт, зависит от конкретной ситуации.
Первостепенные действия
Для начала нужно понять, что необходимо делать в первую очередь, когда возник сбой в загрузчике Boot Manager на ОС Windows.

Столкнувшись с такой проблемой, для начала стоит выполнить несколько сравнительно простых действий:
- Наиболее простым решением, когда загрузка не произошла по причине кратковременного нарушения или случайного сбоя, является банальная перезагрузка. Сделать это можно сочетанием клавиш, либо же кнопкой Reset на системном блоке или ноутбуке.
- Если этот метод не сработал и при повторном запуске ситуация повторяется, стоит попробовать выполнить загрузку, используя последнюю удачную версию.
- Альтернативой предыдущему пункту является запуск через режим Safe Mode.
- Затем открывается командная консоль для проверки жёсткого диска на возможное наличие ошибок. Для этого требуется прописать команду chkdsk /x/f/r, либо её иные варианты, в зависимости от наименования диска.

Только тут важно понимать, что встроенный инструмент проверки, доступный в ОС Windows, высокой степенью эффективности не отличается. Потому порой приходится воспользоваться альтернативными решениями.
Анализ состояния системных компонентов
Прежде чем убрать или удалить загрузчик Boot Manager в Windows, стоит выполнить ещё несколько действий. Препятствием для загрузки могут выступать ошибки компонентов системы. В том, как их проверить, разобраться не сложно.
После выполнения описанных действий нет никаких гарантий, что загрузчик начнёт нормально работать. Потому на следующем этапе выполняется проверка всех системных компонентов.
Открывается командная строка, где и прописывается стандартная команда. Выглядит она так sfc / scannow. Делать это можно в режиме обычной загрузки ОС, либо при использовании оптических дисков и накопителей USB с операционкой.

Если есть возможность запустить систему, не используя съёмные носители, компьютер лучше запускать, используя имя администратора.
Ошибки диска
Намного хуже, когда появляются ошибки диска. Когда проверка предыдущим методом не даёт результата, пользователи начинают переживать, поскольку не знают, что им делать дальше.
При наличии программных ошибок на жёстком диске правильным решением будет воспользоваться утилитой типа Victoria и просканировать систему. Причём этот инструмент объективно является одним из лучших. Альтернативой выступает HDD Regenerator. Применяется в тех ситуациях, когда диск окончательно посыпался. Эта программа, как утверждают разработчики, способна восстановить жёсткий диск, используя метод перемагничивания.
Использование командной консоли
Всё описанное выше касается довольно сложных ситуаций. Но зачастую справиться с проблемой можно куда более простыми и действенными методами.
Одним из таких решений является восстановление загрузки с использованием определённых кодов через командную консоль. При этом загружаться система будет через съёмный носитель.

Здесь потребуется воспользоваться инструментом Bootrec.exe. Для него, используя пробел и символ /, прописываются следующие команды:
- FixMbr, справляется с ошибками загрузчика, устраняет проблемы записей и секторов;
- FixBoot, выполняет аналогичные функции;
- RebuildBcd, позволяет перезаписать всю доступную загрузочную область.
При нежелании сталкиваться с подобным порой единственным здравым решением становится отключение Boot Manager в Windows. Это можно сделать. Потому отдельно следует поговорить о том, как отключить этот загрузчик в BIOS и более к нему не возвращаться.
Отключение загрузчика
Желание отключить загрузчик Boot Manager объяснить довольно легко. Пользователям не хочется сталкиваться со сбоями и ошибками. При отключении менеджера старт системы будет происходить спокойно, без каких-либо сложностей.

Чтобы добиться желаемого результата, достаточно открыть командную консоль и здесь прописать несколько строк. А именно:
- сначала идёт команда c: expand bootmgr temp;
- следующей строкой attrib bootmgr -s -r -h;
- далее del bootmgr;
- следом строка ren temp bootmgr;
- и в завершение attrib bootmgr -a +s +r +h.
Действительно рабочий метод, который позволяет справиться с этим менеджером загрузок операционной системы и избавить пользователя от ошибок и возможных сбоев.
Нельзя исключать, что представленные методы борьбы с ошибками и сбоями могут не сработать. Тут уже высока вероятность нарушения работоспособности самого жёсткого диска, который придётся ремонтировать, либо менять на новый. Иногда случается и так, что возникают проблемы с доступом к планкам ОЗУ. Для проверки оперативной памяти можно воспользоваться специальными утилитами. При механических повреждениях придётся демонтировать планки ОЗУ, вытащив их из слотов, и провести диагностику.
Если речь не идёт о физических повреждениях, послуживших причиной ошибки загрузчика, можно просто отключить его в BIOS, как показано выше.
Ещё один вариант заключается в редактировании файла. Он носит название boot.ini. В нём потребуется просто удалить строки с теми ОС, которые предлагаются на выбор при загрузке, оставив лишь одну операционку. Вариант для тех, кто готов отказаться от дополнительных ОС и использовать только одну из них.
-
Home
-
News
- Windows Boot Manager Failed To Start In Windows 10
By Sarah |
Last Updated
The Windows boot manager is actually a piece of small software that helps you load your system. It is part of the volume boot record, which is responsible for the boot process. If any problems are found on the Windows boot manager, you won’t be able to access your system or disk data. In this case, you need to find solutions to fix the error.
Windows boot manager, also called BOOTMGR, is located in the root directory and responsible for starting a system & interacting with users. The BOOTMGR configuration data is located in the Boot Configuration Data (BCD) store, which is a database similar to registry; it is used in new Windows system to replace the boot.ini file used in some old Windows like Windows XP.
Stay Calm When Windows Boot Manager Failed
When you find the Windows boot manager failed, please don’t panic. You should try the methods that will be introduced in the next part to fix the Windows boot manager error. To prevent the possible data loss resulted from the boot failure, you should go to the home page to get reliable data recovery software and backup program.

Error: Inaccessible Boot Device, How To Fix It Yourself?
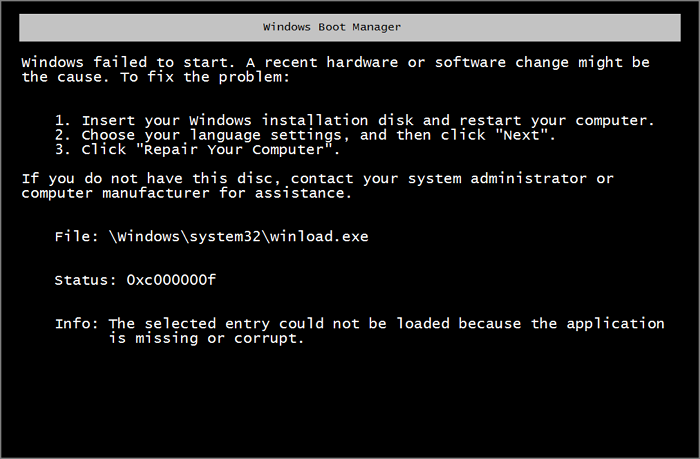
Windows Boot Manager Failed to Start
The error message Windows Boot Manager boot failed sometimes appear on your computer screen during startup process. The most possible cause of this error is a damaged or corrupted Master Boot Record. You can press F8 to boot into Windows Recovery Menu or perform a System Restore to fix the Boot Manager failure.
Definitely, you are not able to enter your system when Windows Boot Manager is failed. You’ll probably see the following errors on the screen:
- 0xc00000f
- 0xc00000e
- 0xc00000d
- 0xc00000e9
- …
What are the possible causes for a failed Windows boot manager?
- The file integrity is damaged.
- The HDD data cable is not working.
- The BCD file is missed or corrupted due to disk write errors, power outages or boot sector viruses. (How to recover files lost by virus attack?)
In fact, the root reason is a corrupted Master Boot Record (MBR). What’s more important is how to fix when you find Windows boot manager not working.
How to Fix Windows Boot Manager Boot Failed
This part will show you how to fix Windows boot manager in Windows 10.
Solution 1: Make Use of Bootrec.exe Tool
- Restart your system and press F8 to see the Windows Recovery Menu.
- Select Troubleshoot.
- Select Advanced options.
- Select Command Prompt. (How to recover files using CMD?)
- Type bootrec /RebuildBcd command and press Enter.
- Type bootrec /fixMbr and press Enter.
- Type bootrec /fixboot and press Enter.
- Type bootsect /nt60 SYS (or bootsect /nt60 ALL) and press Enter.
- Wait for the commands to complete.

You can also use the Rebuild MBR function in the bootable version of MiniTool Partition Wizard to try to fix the Windows boot manager error caused by damaged MBR.
Solution 2: Perform a System Restore
- Restart your computer and boot from the Windows installation disk.
- Choose to change language & other settings in Windows Setup or not; then, click Next.
- Click Repair your computer.
- Select Troubleshoot > Advanced options > System Restore.
- Choose the target operating system.
- Click Next in the System Restore wizard.
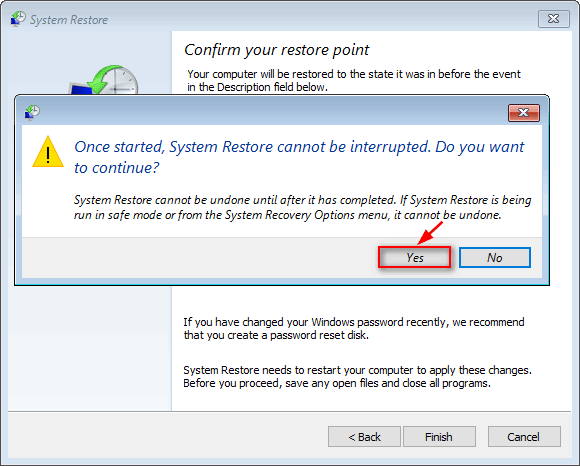
- Select the proper restore point and click Next.
- Confirm your selection and click Finish.
- Click Yes in the prompt window to confirm system restore.
- Wait for the restore to complete.
- Restart your PC.
In addition, you can also try to fix Windows boot manager failed to start by removing newly installed hardware & external devices and then reboot.
Verdict
The Windows boot manager file is very essential for the PC startup, so it is protected by the system (hidden and read-only). It is actually located in the root directory of the active partition. In most PCs, it has a System Reserved label. When it is damaged, you won’t be able to boot into the system. You must follow the solutions given above to try to troubleshoot Windows boot manager failed issue.
About The Author
Position: Columnist
Sarah has been working as an editor at MiniTool since she graduated from university. Sarah aims at helping users with their computer problems such as disk errors and data loss. She feels a sense of accomplishment to see that users get their issues fixed relying on her articles. Besides, she likes to make friends and listen to music after work.