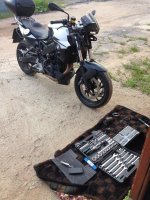
-
#1
на приборке загорелась LAMP, ближний не горит
иду в магаз, покупаю лампу, меняю — не горит, LAMP по-прежнему на приборке …
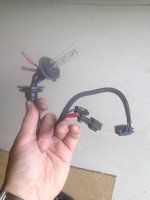
несу лампочку обратно в магаз, мол не работает … они цепляют фишку к ней, цепляют к акку — горит
ставлю обратно на мот — не горит
че делать, куда копать?
зы
старая лампа похожа была на перегоревшую, стекло потемневшее внутри
проверять правда не стал, тупо выкинул ))
Последнее редактирование:
-
#2
на приборке загорелась LAMP, ближний не горит
иду в магаз, покупаю лампу, меняю — не горит, LAMP по-прежнему на приборке …
несу лампочку обратно в магаз, мол не работает … они цепляют фишку к ней, цепляют к акку — горит
ставлю обратно на мот — не горитче делать, куда копать?
зы
старая лампа похожа была на перегоревшую, стекло потемневшее внутри
проверять правда не стал, тупо выкинул ))
где-то проводок отгнил скорее всего, проверь все контакты
-
#3
Был на ТО у дилера, приговорили фару к замене, мол там внутри какие-то усики отгнивают и надо менять фару. На фишку фары все приходит, проводка исправна. Косяк внутри самой фары.
Гарантия кончилась 3 недели назад.
Еду к АndreyX в гараж, снимаем фару.
Вооружившись подручными проводками начинаем искать причину неисправности. На лампу не приходит + внутри фары.
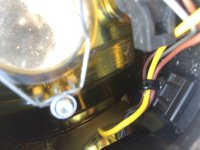
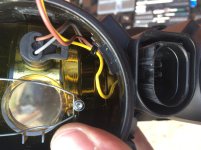
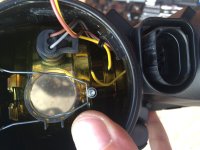
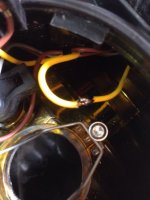
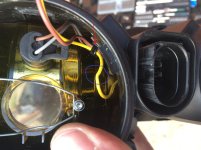
Косяк найден! Сдвинул чуток провод и обнаружил явный перелом под штатным хомутиком
Зачищаем, паяем
Вуаля
-
#4
Был на ТО у дилера, приговорили фару к замене, мол там внутри какие-то усики отгнивают и надо менять фару.
Какие же феерические мудаки(
-
#5
Похоже тоже самое. Можно подробнее , где перелом провода?
-
#6
Похоже тоже самое. Можно подробнее , где перелом провода?
Жёлтый провод. Он там один.
-
#7
А где именно перелом смотреть? Возле фары или необходимо разбирать облицовку? А я на ксенон грешил, уже все местами поменял и блоки розжига и лампочки)
-
#8
А где именно перелом смотреть? Возле фары или необходимо разбирать облицовку? А я на ксенон грешил, уже все местами поменял и блоки розжига и лампочки)
Фару сними. Там делов на 15 мин.
-
#9
Похоже тоже самое. Можно подробнее , где перелом провода?
снимаешь фару (две звездочки на 40 кажись)
снимаешь разъем, на фишке, которая осталась на моте 4 контакта (минус, плюс габарит, плюс ближний, плюс дальний)
если на нее все приходит
открой крышку фары, где лампа на ближний
все увидишь )
красная стрелка — хомут
синим обвел место, которое было под этим хомутом … просто сдвинь провод и посмотри
телефон в профиле если че, звони, словами объясню )))
Последнее редактирование:
-
#10
А где именно перелом смотреть? Возле фары или необходимо разбирать облицовку? А я на ксенон грешил, уже все местами поменял и блоки розжига и лампочки)
Сам перелом был по черным хомутом , который объединяет 4 провода . Сразу не видно , но если чуть вытащить …
-
#11
Разобрался сегодня с фарой. Оказалась проблема не в самой фаре, а в фишке , которая проходит в районе рулевой колонки, где ещё вин набит. До этого фара горела и гасла, если рулём начать крутить.
-
#12
Приветствую! Хорошая тема! Видимо распространенная проблема. Сейчас готовлю байк к сезону,… стоит разобранный. Под конец прошлого сезона была проблема: то ближний свет горит, то нет. Буду на днях разбирать. Обязательно обращу внимание на хомут и желтый провод. Дело определенно в контакте, буду искать. Начну с хомута. Видимо это слабое место!
-
#13
Приветствую! Сегодня разобрал фару. Пересмотрел все провода. Похоже у меня все хорошо. Собрал все обратно и… уаля! Фара снова то горит, то нет::scratch_one-s_head: Поспрашивал у соседей по гаражу и до меня дошла следующая информация: КСЕНОН УМИРАЕТ ПОСТЕПЕННО! А я всегда думал — лампочка либо горит, либо ей каюк!:sad:. Вообщем буду менять лампочку. Посмотрю, что будет.
Забыл сказать, байк покупал бу и по ходу первый хозяин заморочился на ксенон.
-
IMG_1.jpg
9.5 KB
· Просмотры: 549
Последнее редактирование:
-
- Регистрация:
- 25 апр 2014
- Сообщения:
- 99
- Пол:
- Мужской
- Регион:
- Мурманская обл.
Всем доброго времени суток! Загорелась ошибка осветительных приборов. Все лампы целы, все горит как надо. В чем может быть причина? Че делать? (F800R).
-
Проверь лампочку стопового фонаря(выними и посмотри на свет на спирали),100% это от нее…
-
Уже столько написано-что если перегорает одна из спиралей стопа или габарита,то комп берет оставшуюся уцелевшую спираль накала и подает на нее 6в(типа габарит)а когда жмешь на стоп то все 12В(типа стоп)…хитрые немцы,это чтоб в любом случае зад работал..
-
- Регистрация:
- 25 апр 2014
- Сообщения:
- 99
- Пол:
- Мужской
- Регион:
- Мурманская обл.
Горит лампочка. Обоими нитями.
-
- Регистрация:
- 25 апр 2014
- Сообщения:
- 99
- Пол:
- Мужской
- Регион:
- Мурманская обл.
Работами обе нити лампочки. Но и ошибка никуда не пропадает.
-
проверь все лампы,где то есть нерабочая,или плохой контакт лампочка-комп по сопротивлению ошибку Lamp определяет..нет такого все горит а LAMP не уходит…где то есть!!!Попробуй диагностику-она конкретное место ошибки должна выдать..
-
Например горят контакты на тэках головного света(в основном ближнего)у меня на днях тэка ближнего сгорела-LAMP сработала, а лампочка целая была,я как за тэку взялся так она плюсе в прах и рассыпалась,пока плоскогубцами поджал контакты…когда куплю новую перепаяю ..
-
- Регистрация:
- 25 апр 2014
- Сообщения:
- 99
- Пол:
- Мужской
- Регион:
- Мурманская обл.
Проверил все лампы. Оказалась глючила лампа стопа двухнитиевая. Хотя обе нити горят. Самое смешное,что эту лампу поменял неделю назад. Очень странно.
-
- Регистрация:
- 31 июл 2011
- Сообщения:
- 719
- Пол:
- Мужской
- Регион:
- Москва
ты уверен что горят обе нити, а не одна с разным накалом, как тебе говорили чуть выше?
-
- Регистрация:
- 25 апр 2014
- Сообщения:
- 99
- Пол:
- Мужской
- Регион:
- Мурманская обл.
-
Вчера после мойки первый раз загорелось уведомление. На первый взгляд все горело. Мне некогда было разбираться кто именно стал причиной, поэтому поехал в гараж. С утра решил проверить — что это все же было?
Все лампы горят, уведомления больше нет.
Поделиться этой страницей
В моем F800ST оптика мягко сказать неудачная, она просто никакая, ночью можно ехать только на дальнем, и это всех слепит.
Есть желание поставить LED лампу на ближний, но мастер сказал, что у BMW бортовой компьютер будет выбивать ошибку, так как там другое сопротивление, и ни ксенон, ни LED лучше не ставить в штатные места. Там через CAN-шину идёт проверка каждый раз, поэтому только фирменные LED лампы за космические деньги.
Однако находил в сети отзывы, что на BMW ставили LED и комп не ругался. Подскажите, кто ставил LED в штатную оптиву и не имел ошибок? Если такие есть, то название лампочки плз.
Zed_
- Макс
- 15 ноября 2021 в 14:10
-
?
Только зарегистрированные пользователи могут оставлять ответы и комментировать их.
Войдите, пожалуйста, или зарегистрируйтесь.
При перепечатке материалов, видео или картинок гиперссылка на «bikepost.ru» обязательна
- Manuals
- Brands
- BMW Manuals
- Motorcycle
- F 800 R —
- Rider’s manual
-
Contents
-
Table of Contents
-
Troubleshooting
-
Bookmarks
Quick Links
Rider’s Manual
F 800 R
BMW Motorrad
The Ultimate
Riding Machine
Related Manuals for BMW F 800 R
Summary of Contents for BMW F 800 R
-
Page 1
Rider’s Manual F 800 R BMW Motorrad The Ultimate Riding Machine… -
Page 2
Motorcycle data/dealership details Motorcycle data Dealership details Model Person to contact in Service department Vehicle identification number Ms/Mr Phone number Colour code Date of first registration Dealership address/phone number (com- Registration number pany stamp) -
Page 3
The right to modify designs, equipment and accessories is reserved. Errors and omissions excepted. © 2010 BMW Motorrad Not to be reproduced either wholly or in part without written permission from BMW Motorrad, After Sales. Printed in Germany. -
Page 4
89 AKI Usable fuel capacity approx. 16 l Reserve fuel approx. 2 l Tyre pressures Tyre pressure, front 2.5 bar, Tyre cold Tyre pressure, rear 2.9 bar, Tyre cold BMW recommends Order No.: 01 41 8 521 171 06.2010, 3rd edition… -
Page 5
We congratulate you on your choice of a motorcycle from We hope that you will enjoy rid- BMW and welcome you to the ing your BMW and that all your community of BMW riders. journeys will be pleasant and Familiarise yourself with your new safe. -
Page 6: Table Of Contents
Table of Contents You can also consult the index at Emergency off switch (kill 3 Status indicators ..21 the end of this Rider’s Manual if Multifunction display ..22 switch) .
-
Page 7
RDC ……68 Cleaning easily damaged BMW Motorrad service ..130 7 Accessories … . . 71 components . -
Page 9: General Instructions
General instructions General instructions Overview ……6 Abbreviations and symbols ..6 Equipment .
-
Page 10: Overview
BMW optional ex- overview of your motorcycle. All tras originally ordered. Indicates the end of an maintenance and repair work on item of information.
-
Page 11: Equipment
This Rider’s Manual are quoted to the Rider’s Manual describes option- standards and comply with the al extras (OE) offered by BMW tolerance requirements of the and selected optional accessor- Deutsches Institut für Normung ies (OA). This explains why the e.V.
-
Page 13: General Views
General views General views General view, left side ….11 General view, right side … . . 13 Underneath the seat .
-
Page 15: General View, Left Side
General view, left side Payload table (on left on steering-head bearing) Seat lock ( Engine-oil filler neck and oil dipstick (…
-
Page 17: General View, Right Side
General view, right side Fuel filler neck ( Adjuster, spring preload VIN, type plate (on steering-head bearing) Brake-fluid reservoir, front Coolant level indicator (be- hind side panel) ( Power socket ( Adjuster for damping char- acteristic ( Brake-fluid reservoir, rear…
-
Page 18: Underneath The Seat
Underneath the seat Tool for adjusting spring preload ( Standard toolkit ( Rider’s Manual Stowage with first-aid kit Location of the first-aid kit Table of tyre pressures Stowage with service toolkit Location of the service toolkit (…
-
Page 19: Underneath The Centre Trim Pan
Underneath the centre trim panel Battery ( 107) Stowage with tyre repair kit Location of the tyre repair…
-
Page 20: Handlebar Fitting, Left
Handlebar fitting, left High-beam headlight and headlight flasher ( Selecting reading in exten- ded area ( Hazard warning flashers Operation of the flashing turn indicators ( Horn…
-
Page 21: Handlebar Fitting, Right
Handlebar fitting, right with heated handlebar grips Grip heating control Starter button ( Emergency off switch (kill switch) (…
-
Page 22: Instrument Panel
Instrument panel Warning and telltale lights Speedometer Set the clock ( 39). with on-board com- puter Operation of the stopwatch Multifunction display Select the readings 40). Resetting tripmeter 41).
-
Page 23
Ambient-light brightness sensor (for adapting the brightness of the instru- ment lighting) with anti-theft alarm Anti-theft alarm telltale light (see the instructions for use for the anti-theft alarm) with on-board com- puter Redline warning ( Rev. counter The instrument-cluster lighting has automatic day and night switchover. -
Page 25: Status Indicators
Status indicators Status indicators Multifunction display ….22 Meaning of symbols ….23 Fuel capacity .
-
Page 26: Multifunction Display
Multifunction display Trip meter ( Warning for engine elec- tronics ( with on-board com- puter Stopwatch ( Time ( with tyre pressure monit- oring (RDC) Tyre pressures ( Warning for coolant tem- perature ( Service due ( Values area ( with on-board com- puter Symbols explaining the…
-
Page 27: Meaning Of Symbols
Meaning of symbols 11 – with on-board computer the others and the quantity of (optional extra) fuel it represents is significantly with on-board computer larger. Gear indicator; «N» indic- ates neutral Once you have refuelled, the distance travelled after gauge briefly shows the original with on-board com- fuel down to reserve in km level, before the reading is up-…
-
Page 28: Warning And Telltale Lights
Warning and telltale lights Oil-pressure warning light with BMW Motorrad ABS warning light ( Warning light for fuel down to reserve ( General warning light, in combination with warnings in the display ( High-beam headlight tell- tale light Telltale light for right turn…
-
Page 29: Service-Due Indicator
1 is shown briefly consult a specialist workshop, serviced at a date in advance after the Pre-Ride Check com- preferably an authorised BMW of the forecast due date. If the pletes. The month is shown as a Motorrad dealer.
-
Page 30: Ambient Temperature
‘General’ warning light temperature reading. If the effect flashes red. of the engine’s heat becomes ex- The detailed description of BMW The tyre-pressure readings are cessive, temporarily appears Motorrad RDC starts on page based on a reference tyre tem- on the display.
-
Page 31: Warnings
Warnings Warnings in multifunction display A reading in values area 2 that constitutes a warning is accompanied by warning triangle 3. These warnings can Warnings that do not have warn- alternate with the odometer ing lights of their own are indic- readings ( 40).
-
Page 32
Warnings, overview Warning light Status indicators Meaning Lights up yellow + » » appears Electronic immobiliser active ( on the display Lights up Fuel down to reserve ( Lights up red Flashes Coolant temperature too high ( Lights up yellow Appears on the dis- Engine in emergency-operation mode play… -
Page 33
Warning light Status indicators Meaning Flashes ABS self-diagnosis not completed Lights up ABS fault ( Lights up yellow + » » flashes Tyre pressure close to limit of permitted tolerance ( Flashes red Tyre pressure outside permitted toler- + » «… -
Page 34
Have the defective key re- engine, but leave the ignition placed, preferably by an au- Coolant temperature too switched on so that the radiat- thorised BMW Motorrad dealer. high or fan continues to operate. General warning light shows Fuel down to reserve If the coolant temperature is red. -
Page 35
Possible cause: preferably an authorised BMW mode. Motorrad dealer. The engine-oil level is too low. You can continue to ride, but Checking engine oil level Engine in emergency- bear in mind that the usual en- 81). -
Page 36
Ride carefully and think well Replacing the brake light and Seek the advice of a specialist ahead. rear light bulbs ( 102). workshop, preferably an author- Replacing turn indicator bulbs, ised BMW Motorrad dealer. front and rear ( 103). -
Page 37
» (critical pressure) flashes. completed The ABS control unit has detec- ted a fault. The ABS function is with BMW Motorrad ABS Possible cause: not available. Measured tyre pressure is close ABS warning light flashes. You can continue to ride. Bear… -
Page 38
If the motorcycle can be ridden Have the fault rectified by a authorised BMW Motorrad with the tyre in its present condi- specialist workshop, preferably dealer. tion: an authorised BMW Motorrad Signal transmission dealer. Incorrect tyre pressures im- disrupted pair the motorcycle’s hand- Possible cause: ling characteristics. -
Page 39
Possible cause: stances: specialist workshop, preferably The integral battery in the tyre- Have the fault rectified by a an authorised BMW Motorrad pressure sensor has lost a sig- specialist workshop, preferably dealer. nificant proportion of its original an authorised BMW Motorrad capacity. -
Page 41: Operation
Operation Operation Ignition switch and steering lock ..38 Damping ……49 Electronic immobiliser EWS .
-
Page 42: Ignition Switch And Steering Lock
Electrically powered accessor- with topcase ies remain operational for a lim- If you wish you can arrange to with BMW Motorrad ABS ited period of time. have the cases and the top- The battery can be recharged ABS self-diagnosis is case fitted with locks that can via the on-board socket.
-
Page 43: Electronic Immobiliser Ews
You can obtain replacement/extra unit has recognised the key as keys only through an authorised «authorised» for your motorcycle. BMW Motorrad dealer. The keys are part of an integrated security A spare key attached to system, so the dealer is under an…
-
Page 44: Reading
Reading with tyre pressure monitoring (RDC) Select the readings Tyre pressures Switch on the ignition. Warnings, if applicable with on-board computer Press and hold down button 1 until the hours number 2 flashes. Repeatedly press the button until the hours number is cor- Press button 2 to select the rect.
-
Page 45: Stopwatch
Resetting average values Stopwatch Average consumption in l/ 100 km with on-board computer Current consumption in l/ Switch on the ignition. 100 km Select average consumption or average speed. distance travelled after fuel down to reserve in km Resetting tripmeter Switch on the ignition.
-
Page 46
use button 2 to operate the on- Changing button board computer. functions The stopwatch continues to time in the background if you switch back temporarily to the odometer reading. Similarly, the stopwatch continues timing if you temporar- ily switch off the ignition. Operating stopwatch When the stopwatch is stopped, press button 2 to… -
Page 47: Lights
: Stopwatch operated by Low-beam headlight Pull switch 1 back to operate means of the INFO button on the headlight flasher. The low-beam headlight switches the handlebar fitting. on automatically when you start Parking light : Stopwatch operated by the engine. Switch off the ignition.
-
Page 48: Turn Indicators
Turn indicators Centre button 1 to cancel the flashing turn indicators. Operating flashing turn indicators Hazard warning Switch on the ignition. flashers The turn indicators are can- Operating hazard warning celled automatically after flashers you have ridden for approxim- Switch on the ignition. ately 10 seconds, or covered a distance of about 200 m.
-
Page 49: Emergency Off Switch
Emergency off switch gine speeds. If the charge level is low, grip heating is switched (kill switch) off to ensure the battery’s start- ing capability. Engine switched off Normal operating position (run) Emergency off switch (kill switch) Grip heating Repeatedly press button 1 until with heated handlebar grips Operating the kill switch the desired heating stage ap-…
-
Page 50: Clutch
Clutch the span between the clutch lever and the handlebar grip. Adjusting clutch lever The adjusting screw is easi- Attempting to adjust the er to turn if you push the clutch lever while riding the clutch lever forward. motorcycle can lead to accidents. Do not attempt to adjust the Brakes clutch lever unless the motor-…
-
Page 51: Mirrors
Mirrors Adjusting mirror arm Adjusting mirrors Turn adjusting screw 1 clockwise to increase the span Push protective cap 1 up over between the brake lever and the threaded fastener on the Turn the mirror to the correct the handlebar grip. mirror arm.
-
Page 52: Spring Preload
Push the protective cap over Adjust the damping characteristic the threaded fastener. to suit spring preload. If you want to increase spring Spring preload preload, use the tool from the Setting on-board toolkit to turn knob 2 clockwise. It is essential to set spring pre- If you want to reduce spring load of the rear suspension to preload, use the tool from the…
-
Page 53: Damping
Damping Tyres Setting Checking tyre pressure Damping must be adapted to suit Incorrect tyre pressures im- the surface on which the motor- pair the motorcycle’s hand- cycle is ridden and to suit spring ling characteristics and increase preload. the rate of tyre wear. An uneven surface requires Always check that the tyre pres- softer damping than a smooth…
-
Page 54: Headlight
Adjusting headlight beam Check tyre pressures against preferably an authorised BMW the data below. Motorrad dealer. throw Tyre pressure, front Headlight beam throw and spring preload Headlight beam throw is gener- 2.5 bar (Tyre cold) ally kept constant when spring Tyre pressure, rear preload is adjusted to suit load.
-
Page 55: Seat
Beam-throw basic setting Remove the seat and place it, upholstered side down, on a clean surface. Installing seat Turn the key to the left in seat lock 1 and hold it in this pos- Slacken screws 1 on left and ition while pressing down the right.
-
Page 57: Riding
Riding Riding Safety instructions ….54 Checklist ……56 Starting .
-
Page 58: Safety Instructions
Payload of tankbag Note the maximum permissible the year. Your authorised BMW payload and the speed limit Motorrad dealer will be glad to for riding with cases fitted, as advise you on the correct cloth-…
-
Page 59
Settings of the spring-strut and Catalytic converter Risk of overheating shock-absorber system If misfiring causes unburned fuel Cooling would be Imbalanced load to enter the catalytic converter, inadequate if the engine Loose clothing there is a danger of overheating were allowed to idle for a lengthy Insufficient tyre pressure and damage. -
Page 60: Checklist
Pre-ride check is performed. Brakes switch itself off if you start it with Brake-fluid levels, front and rear the gearbox in neutral and then with BMW Motorrad ABS Clutch engage a gear before retracting ABS self-diagnosis is Damping-characteristic setting the side stand.
-
Page 61
0 °C, disengage the clutch after If ambient temperatures are ted if you start the engine before switching on the ignition. very low, you might find it it completes. necessary to open the throttle The start attempt is auto- Phase 1 slightly when starting the en- matically interrupted if bat- The rev. -
Page 62: Running In
Test of the diagnosis-compat- specialist workshop, preferably not show: ible system components with an authorised BMW Motorrad the motorcycle at a standstill. Some malfunctions cannot dealer. ABS warning light flashes. be indicated if one of the warning lights fails to show.
-
Page 63: Speed
dicate that the engine is red- Do not omit the first inspection Tyres do not have their full lining. after 500 — 1200 km. grip when new and there is a risk of accidents at extreme The signal remains active un- Brake pads angles of heel.
-
Page 64: Brakes
The reckoned with in the following with BMW Motorrad ABS higher the wheel load, the more situations: braking force can be transmitted BMW Motorrad ABS prevents Riding in the rain or through without the wheel locking.
-
Page 65: Parking Your Motorcycle
Riding on salted or gritted tee that the motorcycle will rest Centre stand roads. firmly on the stand. with centre stand After work has been carried on Always check that the ground Switch off the engine. the brakes, due to traces of oil under the stand is level and or grease.
-
Page 66: Refuelling
Refuelling The volume of the tank can be utilised to the full only Fuel is highly flammable. A when the motorcycle is propped naked flame close to the on its side stand. fuel tank can cause a fire or ex- Open the protective cap.
-
Page 67: Securing Motorcycle For Transportation
motorcycle are adequately pro- Recommended fuel tected against scratching. Use grade adhesive tape or soft cloths, for example, for this purpose. Super unleaded 95 ROZ/RON 89 AKI Usable fuel capacity Risk of damaging compon- approx. 16 l ents. Take care not to trap Reserve fuel components such as brake lines or wires.
-
Page 68
At the rear, secure the straps to the rear footrests on both sides and tighten the straps. Tighten all the straps uniformly; the motorcycle’s suspension should be compressed as tightly as possible front and rear. -
Page 69: Engineering Details
Engineering details Brake system with BMW Motorrad ABS ……. . 66…
-
Page 70: Brake System With Bmw
Severe braking can cause ing force exceeds the maxim- face. At this instant the BMW the rear wheel to lift off the um transferrable limit, the wheels Motorrad ABS must assume an ground.
-
Page 71
The system is not op- of maintenance. Rear wheel rotating with the timised for special requirements In order to ensure that the BMW motorcycle held stationary by that apply under extreme com- Motorrad ABS is always main- applying the front brake (burn-… -
Page 72: Tyre Pressure Monitoring
15 minutes The tyre-pressure readings BMW Motorrad ABS is unable to after the motorcycle comes to a shown by the multifunction counteract their effects. stop. display are temperature- compensated; the reference tyre…
-
Page 73
Tyre pressure within permitted tyre pressure by the 0.2 bar dif- tolerance. ference between the value in the table and the RDC reading; when Tyre pressure close to limit of the air-line gauge shows 2.6 bar, permitted tolerance. the tyre is inflated to the correct Tyre pressure outside permit- pressure. -
Page 75: Accessories
Accessories Accessories General instructions ….72 Power sockets ….. . 72 Luggage .
-
Page 76: General Instructions
BMW Power sockets are shut down proved by BMW for this purpose. motorcycles without constituting automatically under the following Genuine BMW parts and ac- a safety hazard. Country-specific…
-
Page 77: Luggage
in order to prevent overloading of the on-board electrics. Cable routing The cables from the power sock- ets to the auxiliary devices must be routed in such a way that they: Do not impede the rider Do not restrict the steering Pull luggage strap 1 through Pass luggage strap 1 through angle or obstruct handling…
-
Page 78
Opening cases Pull the grey release lever (OPEN) up again and simultaneously pull case lid 3 out of the retainer. Closing cases Also press catches 3 of the lock straps into retainers 2 until Turn the lock barrel to the they engage. -
Page 79
Press the case lid against the case body. The case volume adapts to the contents. Removing cases Push lock straps 1 out and pull Pull the black release lever 1 them up. (RELEASE) up and simultan- eously pull the case out. This expands the case to max- imum volume. -
Page 80: Topcase
Secure attachment Pull the black release lever 1 Screws 1 inside the case allow (RELEASE) up and simultan- you to make this adjustment. If a case wobbles or is difficult eously push the case into the to fit, it has to be adapted to the topcase upper holder 2.
-
Page 81
Opening topcase Pull the release lever all the way up. The lid of the topcase opens. Close the topcase Push release lever 2 down until it engages. Turn the key to the OPEN pos- Turn the key in the topcase ition in the topcase lock. -
Page 82
Removing topcase Lift the topcase at the rear and remove it from the luggage carrier. Installing topcase Pull the handle up as far as it will go. Push handle 3 down until it engages. Turn the key to the RELEASE Turn the key in the topcase position in the topcase lock. -
Page 83: Maintenance
Maintenance Maintenance General instructions ….80 Toolkit ……80 Engine oil .
-
Page 84: General Instructions
Some of the work calls for spe- Adjusting headlight beam cial tools and a thorough know- throw ( 50). ledge of motorcycle technology. Tools service set If you are in doubt consult a spe- cialist workshop, preferably your with service toolkit authorised BMW Motorrad deal-…
-
Page 85: Engine Oil
BMW Motorrad has assembled In order to ensure that the en- a tools service set that is ideal gine oil level is read correctly,…
-
Page 86: Brake System
Remove the oil dipstick and by a specialist workshop, high. check the oil level. preferably an authorised BMW Always make sure that the oil Motorrad dealer. level is correct. Install the oil dipstick.
-
Page 87
Have the brakes checked by a Visually inspect the left and specialist workshop, preferably Brake-pad wear limit, right brake pads to ascertain an authorised BMW Motorrad front their thickness. Viewing direc- dealer. tion: between wheel and front min 1.0 mm (Friction pad… -
Page 88
Have the brake pads replaced by a specialist workshop, preferably an authorised BMW Visually inspect the brake pads Brake-pad wear limit, Motorrad dealer. to ascertain their thickness. rear… -
Page 89
Move the handlebars to the past the minimum permissible straight-ahead position. thickness. Have the brake pads replaced by a specialist workshop, preferably an authorised BMW Brake fluid level, front Motorrad dealer. (visual inspection) Check the brake-fluid DOT4 brake fluid level, front brakes… -
Page 90
If the brake fluid level drops be- low the permitted level: Have the defect rectified as quickly as possible by a spe- cialist workshop, preferably an authorised BMW Motorrad dealer. -
Page 91: Coolant
Coolant Checking coolant level Make sure the ground is level and firm and place the motor- cycle on its stand. Open cap 1 of the expansion Minimum quantity of tank. coolant Top up coolant to specified level. do not permit the fluid level Close the cap of the expansion to drop below the MIN mark tank.
-
Page 92: Rims And Tyres
Have the clutch checked by a Repeat the steps in this pro- specialist workshop, preferably Clutch play cedure until clutch play is set an authorised BMW Motorrad correctly. dealer. Tighten nut 3. 3 mm (Handlebars turned Check the clutch play…
-
Page 93: Chain
Check the tyre tread e.g. by the letters TI, TWI or by Clean the drive chain with a an arrow. suitable cleaning product, dry it depth and apply chain lubricant. If the tyre tread is worn to minim- Your motorcycle’s handling Wipe off excess lubricant.
-
Page 94
Tighten quick-release axle Chain deflection nut 1 to the specified tight- ening torque. 30…40 mm (Motorcycle with Rear quick-release axle no weight applied, supported in swinging arm on its side stand) 100 Nm If measured value is outside per- mitted tolerance: Checking chain wear Adjust the chain sag ( 90). -
Page 95: Wheels
Tyre recommendation with tyre pressure monitoring and are fundamental to all cal- (RDC) For each size of tyre BMW culations. Any change in these Motorrad tests certain makes, influencing variables, caused for and approves those that it example by a switch to wheels certifies as roadworthy.
-
Page 96
RDC sensor. Remove screws 2 of the brake bore. When changing the tyre, take calipers on left and right. care not to damage the RDC sensor. Be sure to draw the attention of the authorised BMW Motorrad dealer or specialist… -
Page 97
Raise front of motorcycle until the front wheel can turn freely. BMW Motorrad recommends the BMW Motorrad front-wheel stand for lifting the motorcycle. Force the brake pads 3 slightly Install the front-wheel stand apart by rocking brake caliper 4 97). -
Page 98
without centre stand Remove the auxiliary stand. Ease the brake calipers on to the brake discs. Slip spacing bushing 3 onto Raise the front wheel, insert the left-hand side of the wheel quick-release axle 2 and tight- hub. en to specified torque. The front wheel must be Quick-release axle in fork installed right way round to… -
Page 99
Remove the rear wheel Operate the brake several times until the brake pads are bedded. with BMW Motorrad ABS Remove axle nut 2. Slacken locknuts 3 on left and Remove screw 1 and remove right. the speed sensor from its bore. -
Page 100
Always have the security of the fasteners checked by a specialist workshop, preferably an author- ised BMW Motorrad dealer. Roll the rear wheel into the swinging arm, making sure that the brake disc passes between Roll the rear wheel as far for- the brake pads. -
Page 101: Front-Wheel Stand
Place the motorcycle on an aux- wheel. iliary stand before lifting the front wheel with the BMW Motorrad Make sure that the axle fits in- to the recess of the adjusting front-wheel stand. plate. Make sure the ground is level…
-
Page 102: Bulbs
Slacken adjusting screws 1. Make sure the motorcycle is standing firmly. Push the two adapters 2 apart until the front forks fit between Bulbs them. Adjust the adapter studs to suit the front suspension. General instructions Use locating pins 3 to set the A warning appears in the multi- front-wheel stand to the de- function display if a bulb is de-…
-
Page 103
in the section entitled «Technical Replace the defective bulb. data». Do not touch the glass of new bulbs with your fingers. Replacing low-beam and Use a clean, dry cloth to hold high-beam headlight bulb the bulbs when handling them. Make sure the ground is level Dirt deposits, in particular oil and and firm and place the motor- grease, interfere with heat radi-… -
Page 104
Install the bulb, making sure Install cover 1 or cover 2, as Remove cover 2. that alignment is correct at po- applicable. sition 6. Replacing parking-light Close and lock spring clips 4. bulb Make sure the ground is level and firm and place the motor- cycle on its stand. -
Page 105
Bulb for parking light W5W / 12 V / 5 W Remove the bulb from the bulb Insert parking-light bulb 3 into holder. the headlight housing. Replace the defective bulb. Do not touch the glass of new bulbs with your fingers. Push the bulb into the bulb Use a clean, dry cloth to hold socket. -
Page 106
Replacing the brake light and rear light bulbs Make sure the ground is level and firm and place the motor- cycle on its stand. Switch off the ignition. Remove bulb 2. Install bulb 2. Replace the defective bulb. Bulb for tail light/brake light P21/5W / 12 V / 5 W / 21 W Remove screws 1. -
Page 107
Replacing turn indicator Replace the defective bulb. bulbs, front and rear Do not touch the glass of new bulbs with your fingers. Make sure the ground is level Use a clean, dry cloth to hold and firm and place the motor- the bulbs when handling them. -
Page 108: Body Panels
Turn bulb 2 clockwise to install Install screw 1. Remove four screws 1 on it in the bulb housing. left and right and remove the Body panels centre trim panel. Removing centre trim panel Remove the seat ( 51). Working from the inboard side, insert the glass into the bulb housing and close the housing.
-
Page 109
Installing centre trim panel Install four screws 1 on left and Remove circlip 1. right. Install the seat ( 51). Slip the centre trim panel un- derneath the left and right side Remove the right side panels at position 2 and then panel seat it in guides 3 on left and Remove the centre trim panel… -
Page 110: Jump Starting
Install the right side panel A short-circuit can res- ult if the crocodile clips of the jump leads are accident- ally brought into contact with the motorcycle. Use only jump leads fitted with fully insulated crocodile clips at both ends. Jump-starting with a donor- Install circlip 1.
-
Page 111: Battery
The spring-strut screw can Install the centre trim panel be used as an alternative to 105). the battery’s negative terminal. Battery Run the engine of the donor Maintenance instructions vehicle during jump-starting. Start the engine of the vehicle Correct upkeep, recharging and with the discharged battery storage will prolong the life of in the usual way;…
-
Page 112
Use BMW chargers with the without having to disconnect the electrical system. part numbers 71 60 7 688 864 battery from the motorcycle’s… -
Page 113
Comply with the operating in- of disuse. See the instructions structions of the charger. for caring for your battery. Al- ways fully recharge the battery If you are unable to charge before restoring it to use the battery through the on- board socket, you may be using Removing battery a charger that is not compatible… -
Page 114
If you want to have the date set Slip the battery holder over the battery and install screw 3. consult a specialist workshop, preferably an authorised BMW Connection in the wrong Motorrad dealer. sequence increases the risk of short-circuits. -
Page 115: Care
Care Care Care products ….. 112 Washing motorcycle ….112 Cleaning easily damaged compon- ents .
-
Page 116: Care Products
Washing motorcycle until the brake discs and brake Glass of the instrument panel BMW Motorrad recommends pads have dried out. Black, unpainted parts that you use BMW insect re- mover to soften and wash off insects and stubborn dirt on…
-
Page 117: Paint Care
BMW rubber-care Chrome include spilt fuel, oil, grease, products. brake fluid and bird droppings. Use plenty of water and BMW Using silicone sprays for We recommend BMW vehicle shampoo to clean chrome, par- the care of rubber seals can…
-
Page 118: Protective Wax Coating
«puddles» on BMW Motorrad dealer. Com- the surface, instead of forming bine work for laying up/restoring beads. to use with a BMW service or inspection. Laying up motorcycle Restoring motorcycle Clean the motorcycle. to use Removing battery ( 109).
-
Page 119: Technical Data
Technical data Technical data troubleshooting chart ….116 Riding specifications ….127 Threaded fasteners ….117 Engine .
-
Page 120: Troubleshooting Chart
troubleshooting chart Engine does not start at all or is difficult to start. Possible cause Rectification Emergency off switch (kill switch) Kill switch in operating position (run). Side stand Retract the side stand ( 56). Gear engaged and clutch not disengaged. Select neutral or pull the clutch lever ( 56).
-
Page 121: Threaded Fasteners
Threaded fasteners Front wheel Value Valid Brake caliper on fork leg M10 x 1.25 x 35 — 10.9 30 Nm Clamp of quick-release axle M8 x 40 20 Nm Quick-release axle in fork leg M24 x 1.5 50 Nm Rear wheel Value Valid Locknut of the final-drive chain…
-
Page 122
Mirrors Value Valid Locknut (mirror) to clamp ad- apter M14 x 1 20 Nm… -
Page 123: Engine
Engine Engine design Two-cylinder four-stroke, DOHC with chain-and- sprocket drive, 4 valves operated by cam follow- ers, balancing conrod, liquid-cooled cylinders and heads, integral water pump, 6-speed gearbox and dry sump lubrication Displacement 798 cm Cylinder bore 82 mm Piston stroke 75.6 mm Compression ratio 12 : 1…
-
Page 124: Fuel
BMW recommends BP fuels Engine oil Engine oil, capacity 3 l, with filter change products recommended by BMW Motorrad and generally admissible viscosity classes Castrol GPS SAE 10W-40, API SG / JASO MA ~-20 °C SAE 10W-40, API SF / SG / SH ~-20 °C, Operation in winter…
-
Page 125: Clutch
Oil additives BMW Motorrad recommends not using oil addit- ives, because they can have a detrimental effect on clutch operation. Please do not hesitate to contact your authorised BMW Motorrad dealer if you have any questions relating the choice of a suitable engine oil for your motorcycle.
-
Page 126: Rear-Wheel Drive
Rear-wheel drive Type of final drive Chain drive Type of rear suspension Two-arm cast-aluminium swinging arm Number of teeth, rear-wheel drive (Pinion / 20 / 47 sprocket) Running gear Front wheel Type of front suspension Telescopic forks Spring travel, front 125 mm, At wheel Rear wheel Type of rear suspension…
-
Page 127: Brakes
Brake-pad material, rear sintered metal Wheels and tyres Recommended tyre sets You can obtain an up-to-date list of approved tyres from your authorised BMW Motorrad dealer or on the Internet at «www.bmw-motorrad.com». Front wheel front wheel type Cast aluminium, MT H2 front wheel rim size 3.50″…
-
Page 128: Electrics
Rear wheel rear-wheel type Cast aluminium, MT H2 rear wheel rim size 5.5″ x 17″ Tyre designation, rear 180 / 55 ZR 17 Tyre pressures Tyre pressure, front 2.5 bar, Tyre cold Tyre pressure, rear 2.9 bar, Tyre cold Electrics Electrical rating of on-board socket 5 A, One on-board socket Fuses…
-
Page 129
Spark plugs Spark plugs, manufacturer and designation NGK DCPR 8 E Electrode gap of spark plug 0.8…0.9 mm, When new Lighting Bulb for high-beam headlight H7 / 12 V / 55 W Bulbs for the low-beam headlight H7 / 12 V / 55 W Bulb for parking light W5W / 12 V / 5 W Bulb for tail light/brake light… -
Page 130: Frame
Frame Frame type Light alloy weldment with bolt-on tubular steel rear frame type plate location Steering head, right VIN location Steering head, right Dimensions Length of motorcycle 2082 mm Height of motorcycle 1240 mm, without rider at DIN unladen weight Width of motorcycle 812 mm, across mirrors without mirrors Front-seat height…
-
Page 131: Weights
Weights Unladen weight 199 kg, DIN unladen weight, ready for road, 90 % load of fuel, without optional extras Permissible gross weight 405 kg Maximum payload 201 kg Riding specifications Top speed >200 km/h with power reduction 155 km/h…
-
Page 133: Service
Service Service BMW Motorrad service … . 130 BMW Motorrad service quality ..130 BMW Motorrad mobility services — roadside assistance ….130 BMW Motorrad service network .
-
Page 134: Bmw Motorrad Service
To ensure that your BMW is al- BMW Motorrad mobility ably an authorised BMW Motor- ways in optimum condition, BMW rad dealer.
-
Page 135: Bmw Motorrad Service
BMW Service place to look after you and your advance when the time for a ser- The BMW Service is carried out motorcycle in more than 100 vice is approaching, on the basis once a year; the extent of servi- countries.
-
Page 136: Confirmation Of Mainten
Confirmation of maintenance work BMW Pre-delivery BMW Running-in Check Check Completed Completed Odometer reading Next service at the latest or, if logged beforehand, Odometer reading Stamp, signature Stamp, signature…
-
Page 137
BMW Service BMW Service BMW Service Completed Completed Completed Odometer reading Odometer reading Odometer reading Next service Next service Next service at the latest at the latest at the latest or, if logged beforehand, or, if logged beforehand, or, if logged beforehand,… -
Page 138
BMW Service BMW Service BMW Service Completed Completed Completed Odometer reading Odometer reading Odometer reading Next service Next service Next service at the latest at the latest at the latest or, if logged beforehand, or, if logged beforehand, or, if logged beforehand,… -
Page 139
BMW Service BMW Service BMW Service Completed Completed Completed Odometer reading Odometer reading Odometer reading Next service Next service Next service at the latest at the latest at the latest or, if logged beforehand, or, if logged beforehand, or, if logged beforehand,… -
Page 140
BMW Service BMW Service BMW Service Completed Completed Completed Odometer reading Odometer reading Odometer reading Next service Next service Next service at the latest at the latest at the latest or, if logged beforehand, or, if logged beforehand, or, if logged beforehand,… -
Page 141: Confirmation Of Service
Confirmation of service The table is intended as a record of maintenance and repair work, the installation of optional accessories and, if appropriate, special campaign (recall) work. Item Odometer Date reading…
-
Page 142
Item Odometer Date reading… -
Page 143
Brake fluid Technical data, 125 Abbreviations and symbols, 6 Checking fluid level, front, 85 Warning for bulb failure, 31 Checking fluid level, rear, 86 Engineering details, 66 Reservoir, front, 13 Self-diagnosis, 58 Case Reservoir, rear, 13 Operation, 73 Warnings, 33 Brake pads Chain Accessories… -
Page 144
Coolant Engine Fuel Checking fill level, 87 Filler neck, 13 Control, 17 Fill-level indicator, 13 Fill-level indicator, 23 Starting, 56 Refuelling, 62 Topping up, 87 Technical data, 119 Technical data, 120 Warning for Warning for engine overtemperature, 30 Warning for fuel down to electronics, 31 Currency, 7 reserve, 30… -
Page 145
Motorcycle Handlebar fittings Jump starting, 106 care, 111 General view, left side, 16 Cleaning, 111 General view, right side, 17 Laying up, 114 Keys, 38 Hazard warning flashers Parking, 61 Control, 16 Restoring to use, 114 Operation, 44 Lights Multifunction display, 18 Headlight Control, 16 Overview, 22… -
Page 146
Service, 130 Engine, 119 Rear-wheel drive Service toolkit Engine oil, 120 Technical data, 122 Stowage, 14 Frame, 126 Redline warning Service-due indicator, 25 Fuel, 120 Indicator, 18 Spark plugs Rear-wheel drive, 122 Switching on, 59 Technical data, 125 Running gear, 122 Refuelling, 62 Speedometer, 18 Spark plugs, 125… -
Page 147
Trim panels Vehicle identification number Installing centre trim panel, 105 Position on the motorcycle, 13 Removing centre trim panel, 104 troubleshooting chart, 116 Warning lights, 18 Turn indicators Overview, 24 Control, 16 Warnings Operation, 44 Mode of presentation, 27 Type plate With ABS, 33 Position on the motorcycle, 13 With anti-theft alarm, 32…
【SERVICE RESET】2016 BMW F800 R SERVICE LAMP RESET
Release time:
2022-01-12
Background
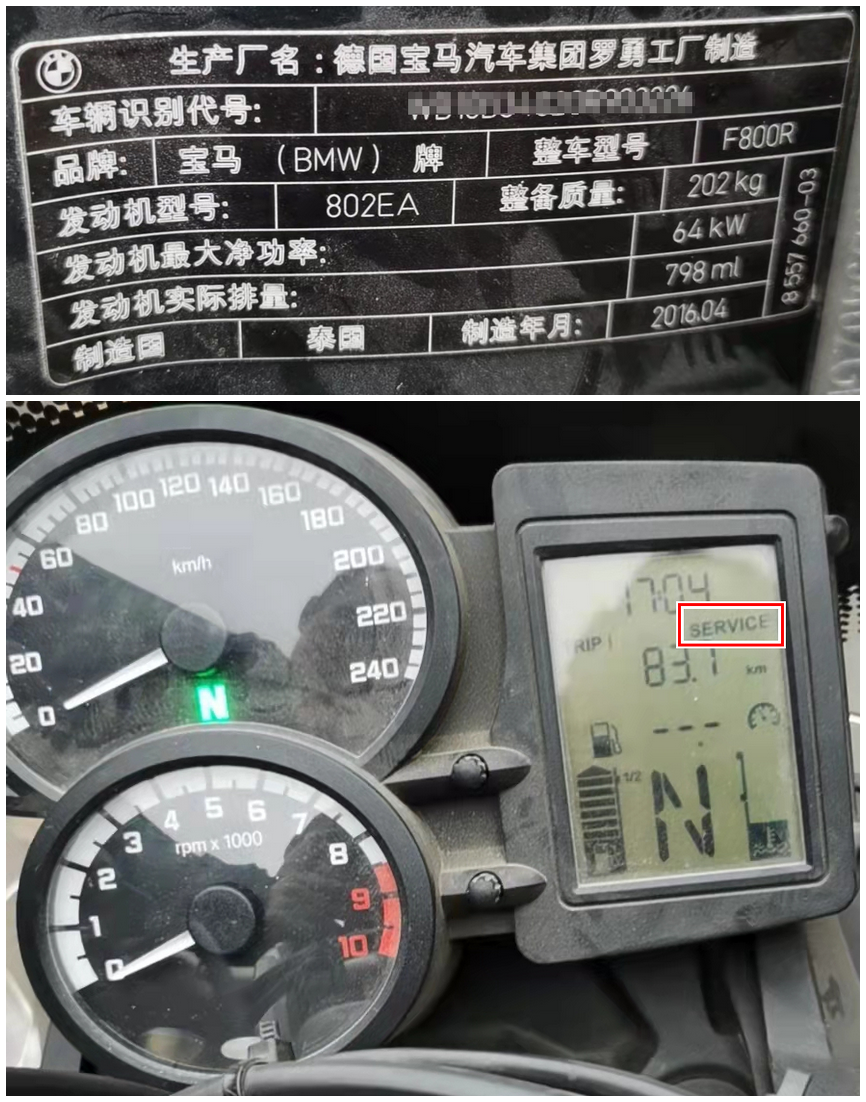
Background: A 2016 BMW F800 R, its maintenance time is up, the dashboard shows a“SERVICE” for maintenance tips.
Preparation
Preparation: MS80, M001A, M040
Tips
Tips: After finishing related maintenance items, pls follow below steps to remove maintenance tips.
Solutions
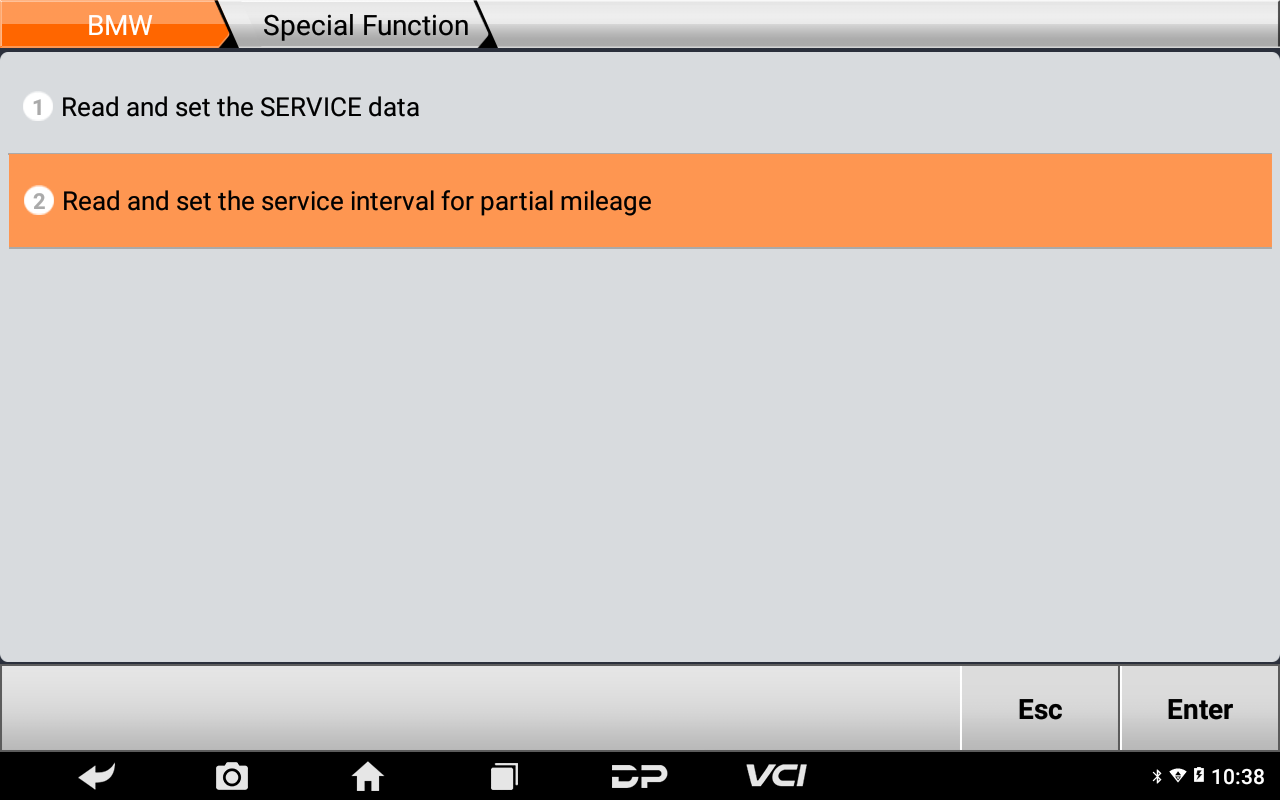
Solutions: using OBDSTAR MS80 to operate on【Read and set the SERVICE data】, 【Read and set the service interval for partial mileage】.
Details Steps:
①Connect MS80 to Motorcycle, enter into【MOTO DIAG】;
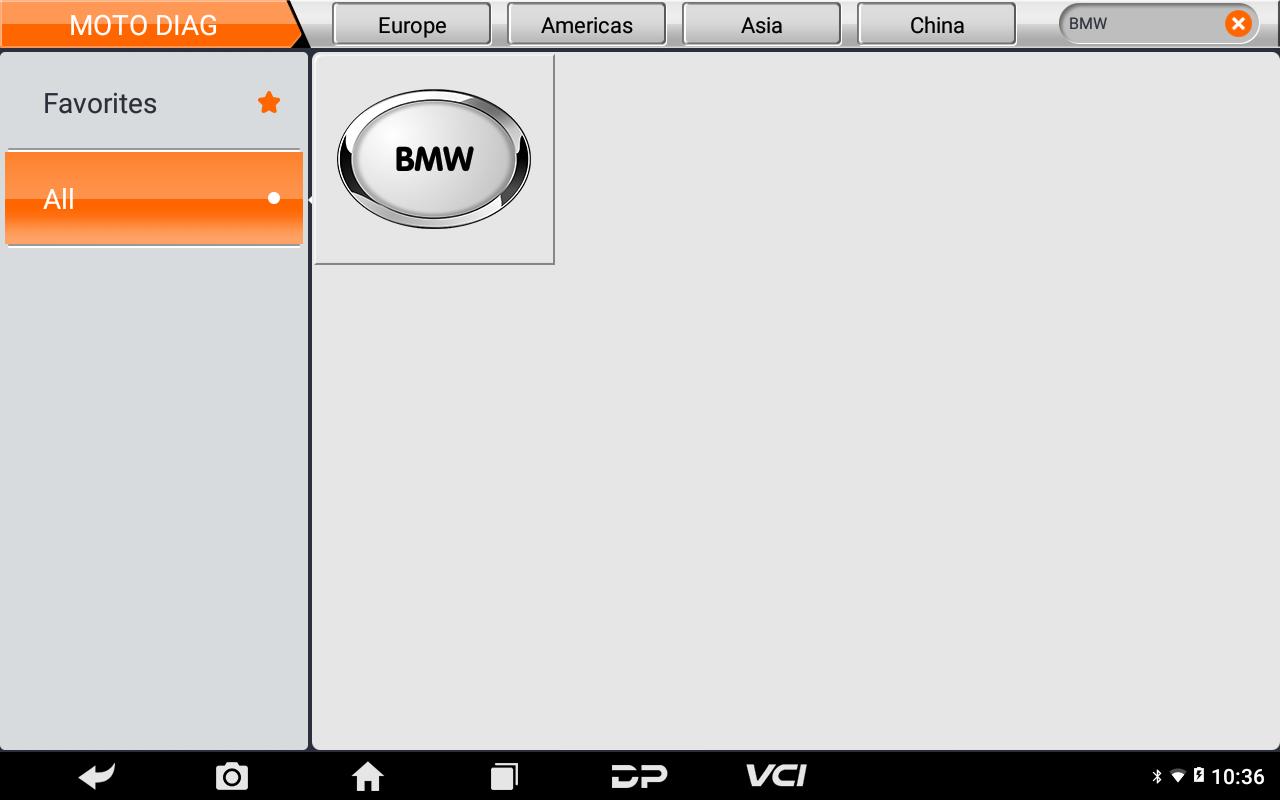
②Click【All】, input letters such“BMW” in search bar, click【BMW】;
Tips: by searching keywords, find out related models quickly.
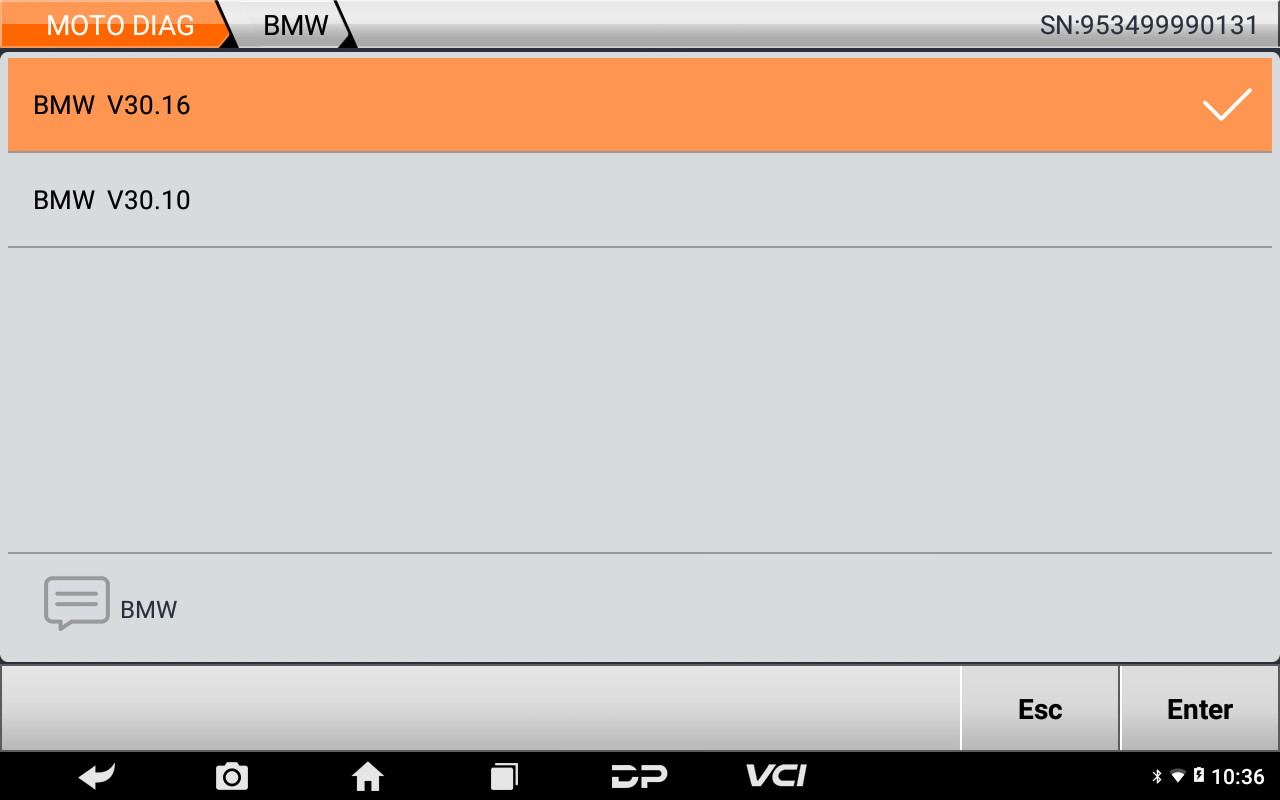
③Click the newest BMW edition;
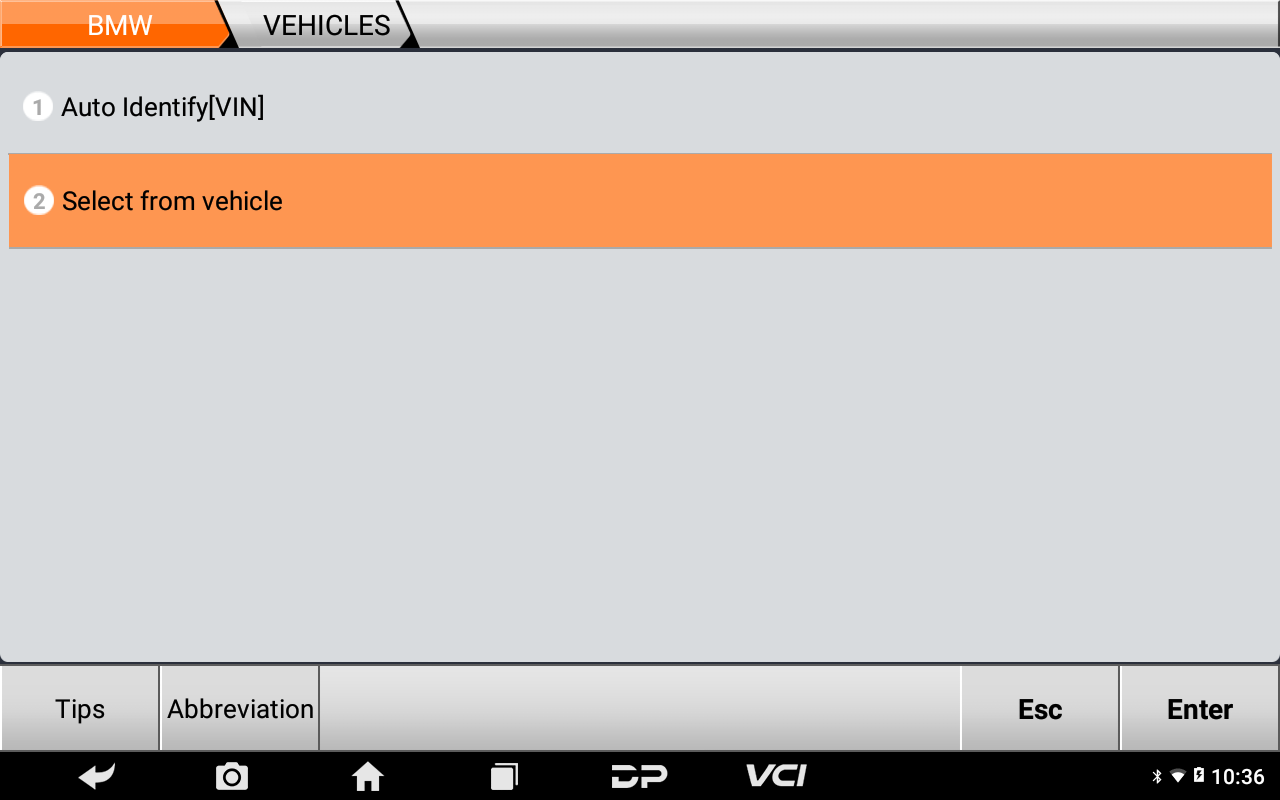
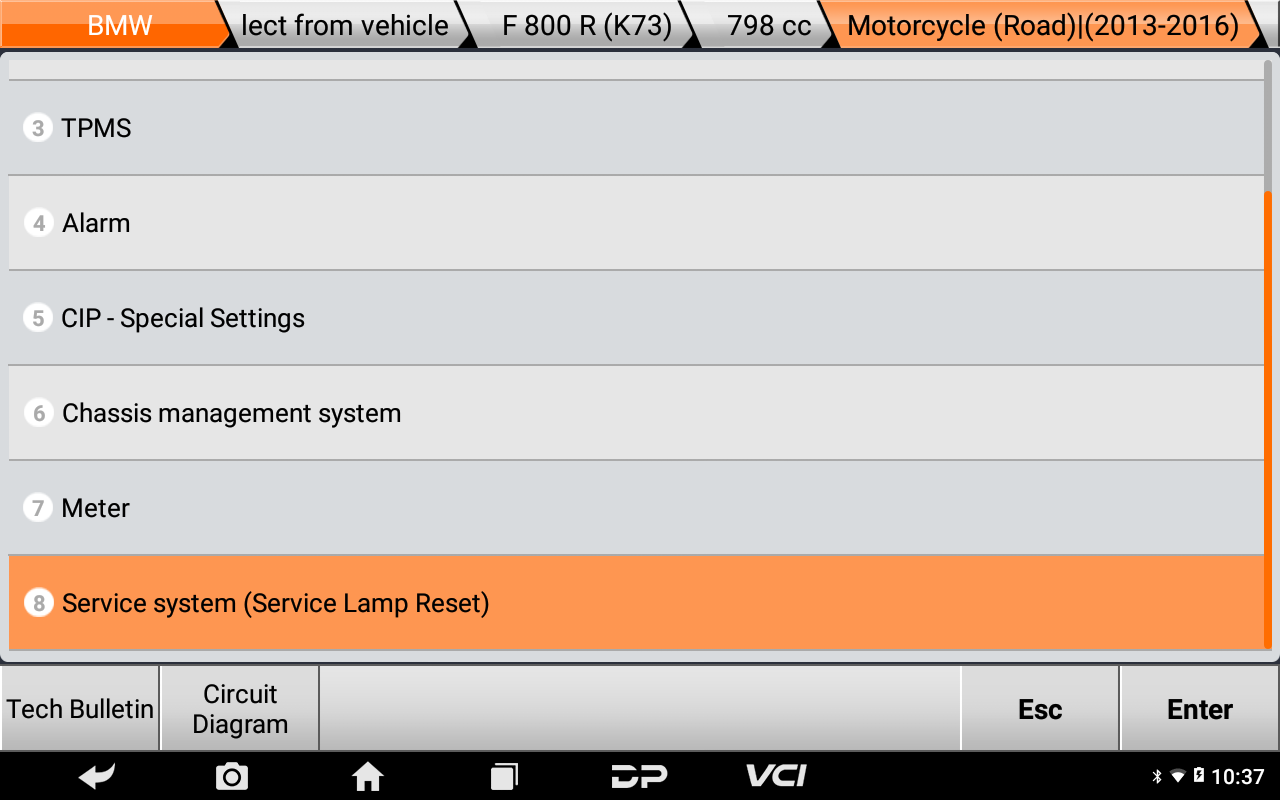
④Click【Select from vehicle】,【F】,【F 800 R(K73)】;
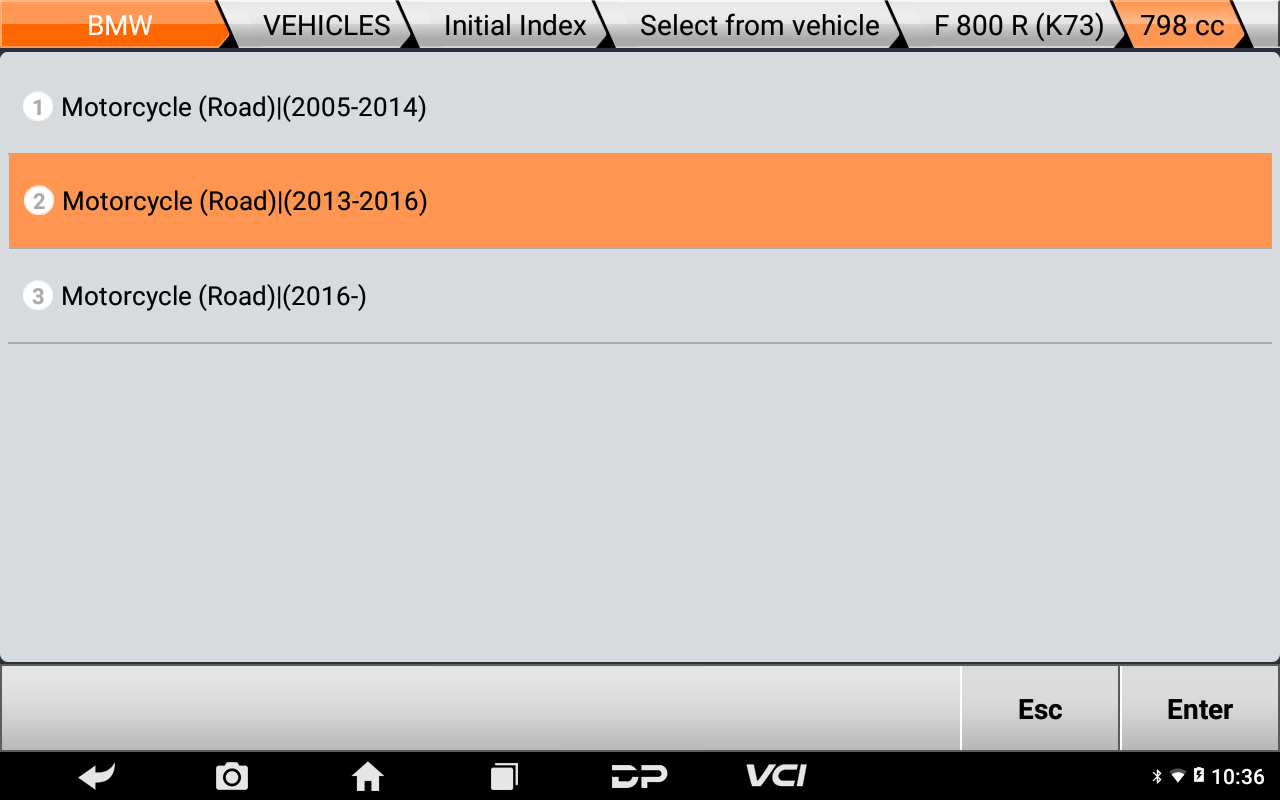
⑤Click【Motorcycle(Road)|(2013-2016)】;
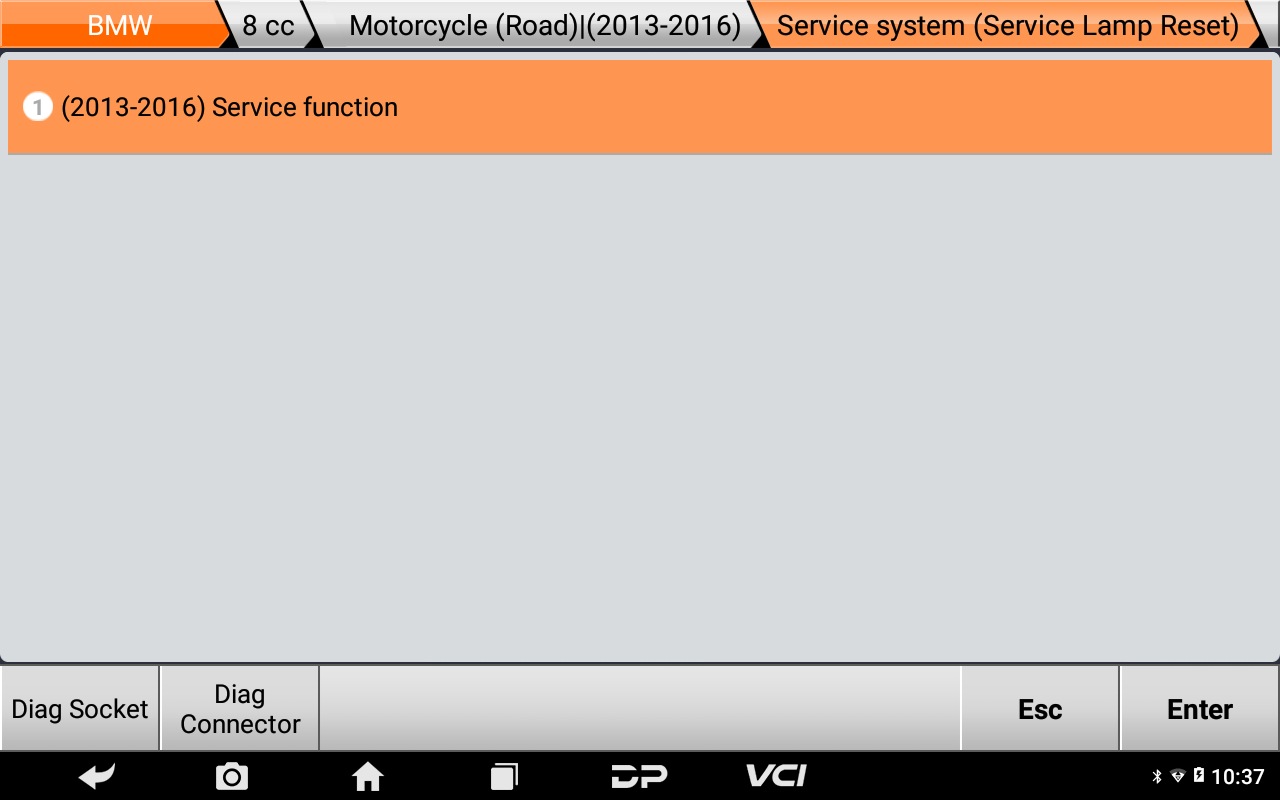
⑥Click【Service system(Service Lamp Reset)】;
Tips: can click【Diag Socket】or【Diag Connector】check diag socket or cable information.
⑦Click【(2013-2016)Service function】;
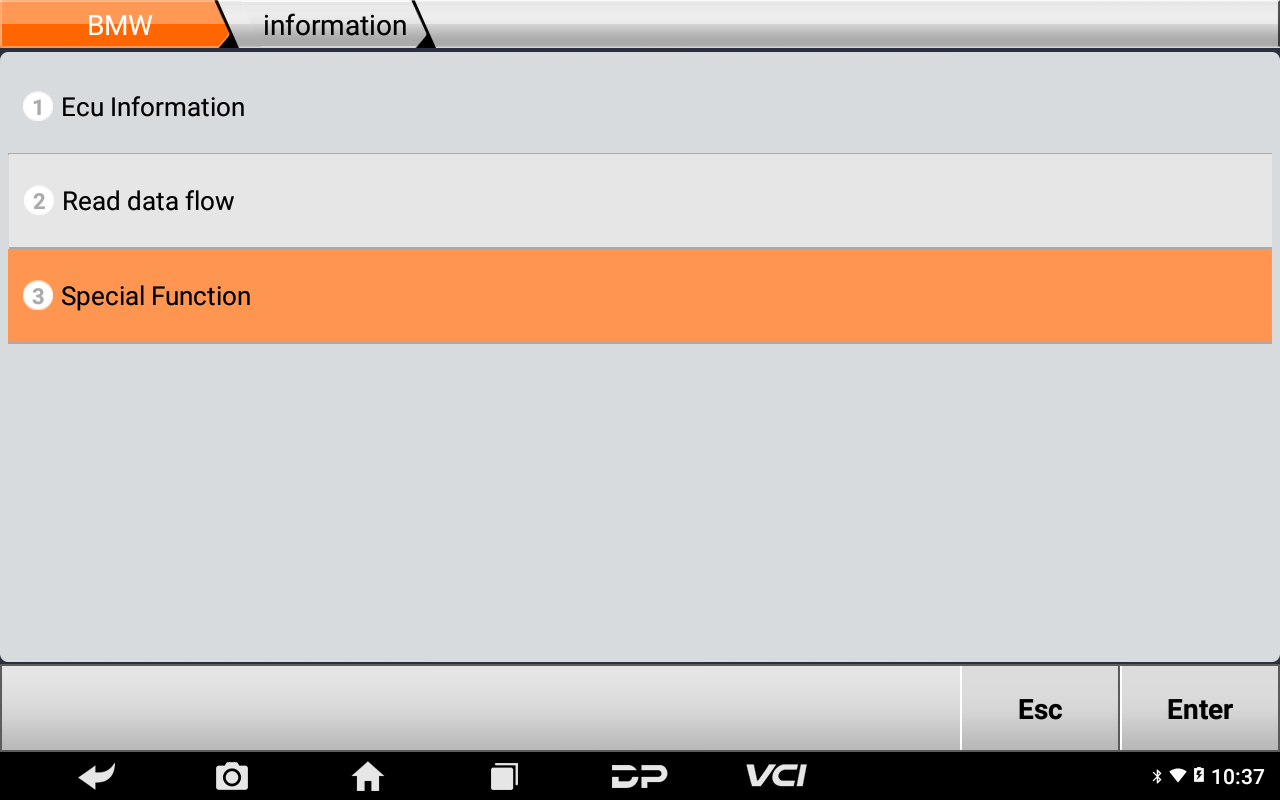
⑧Click【Special Function】;
⑨Read note, click【Agree】;
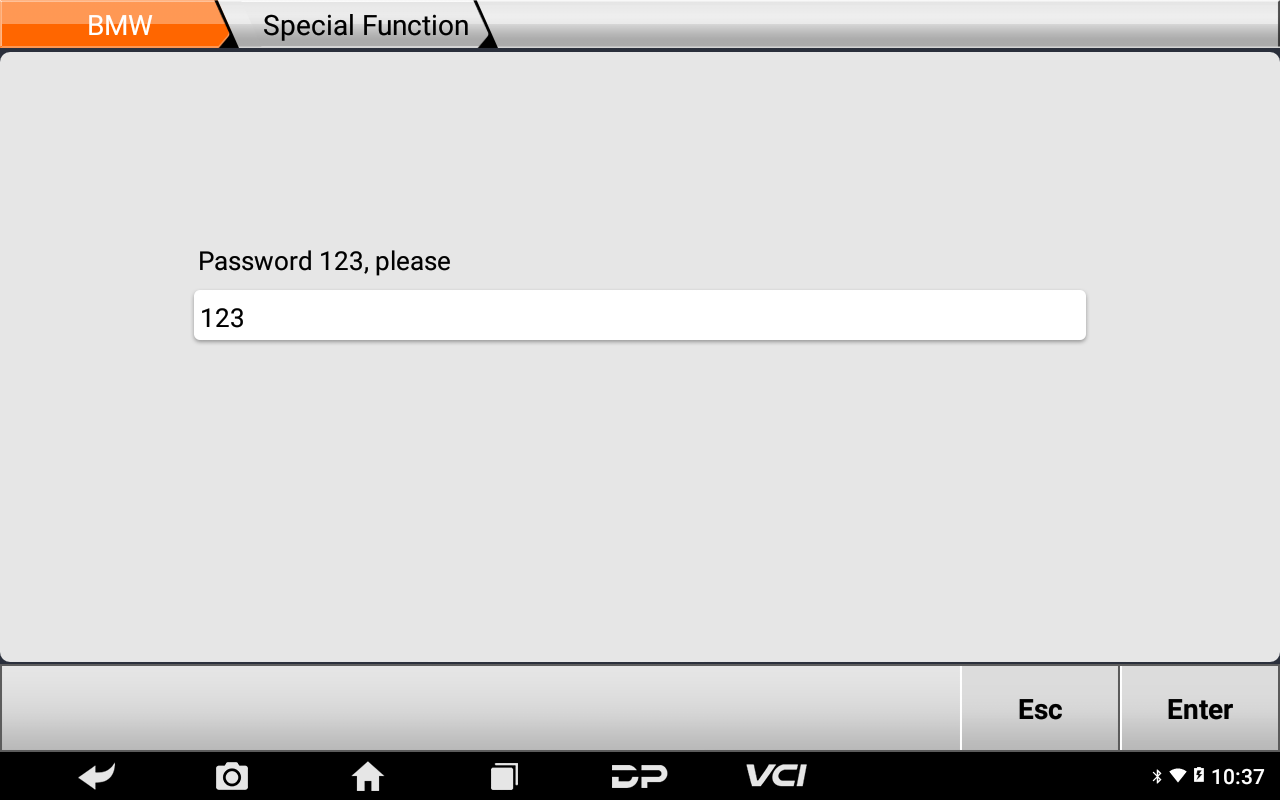
⑩Input 123, click【Enter】;
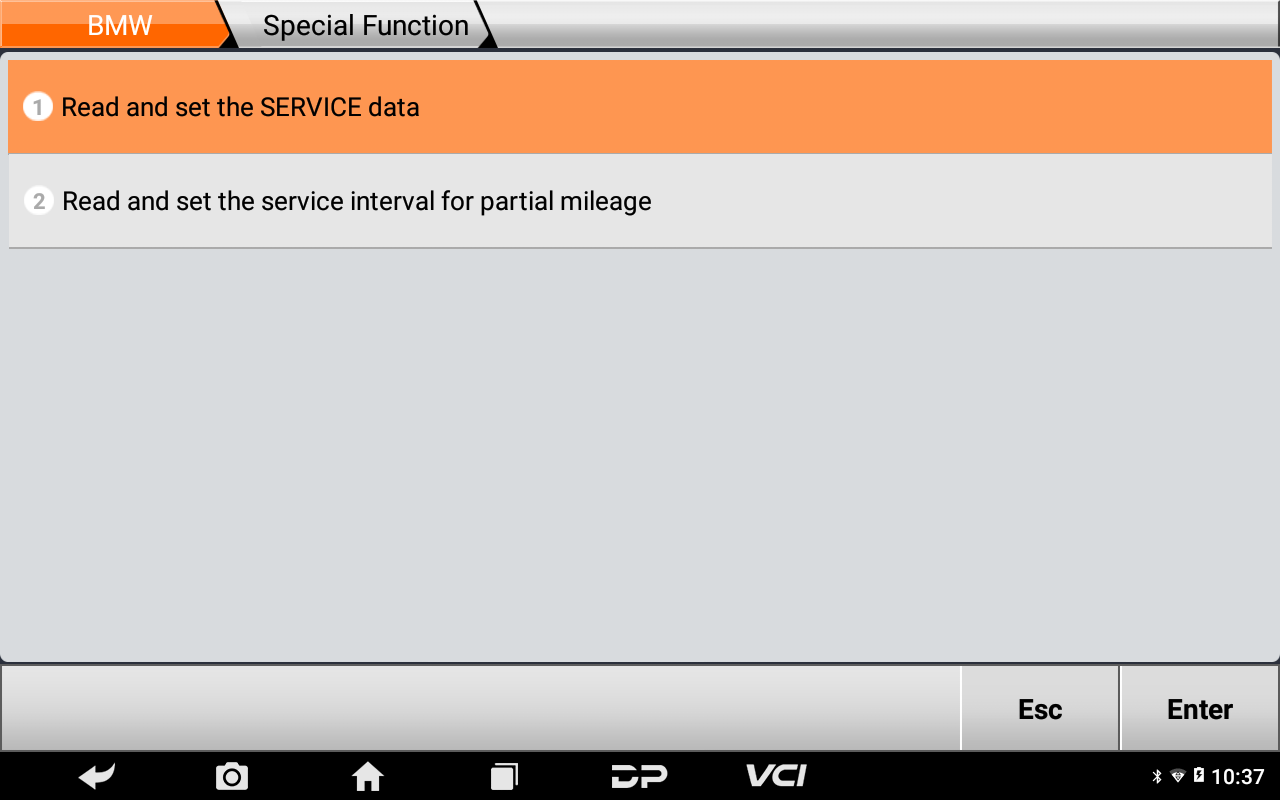
⑪Click【Read and set the SERVICE data】;
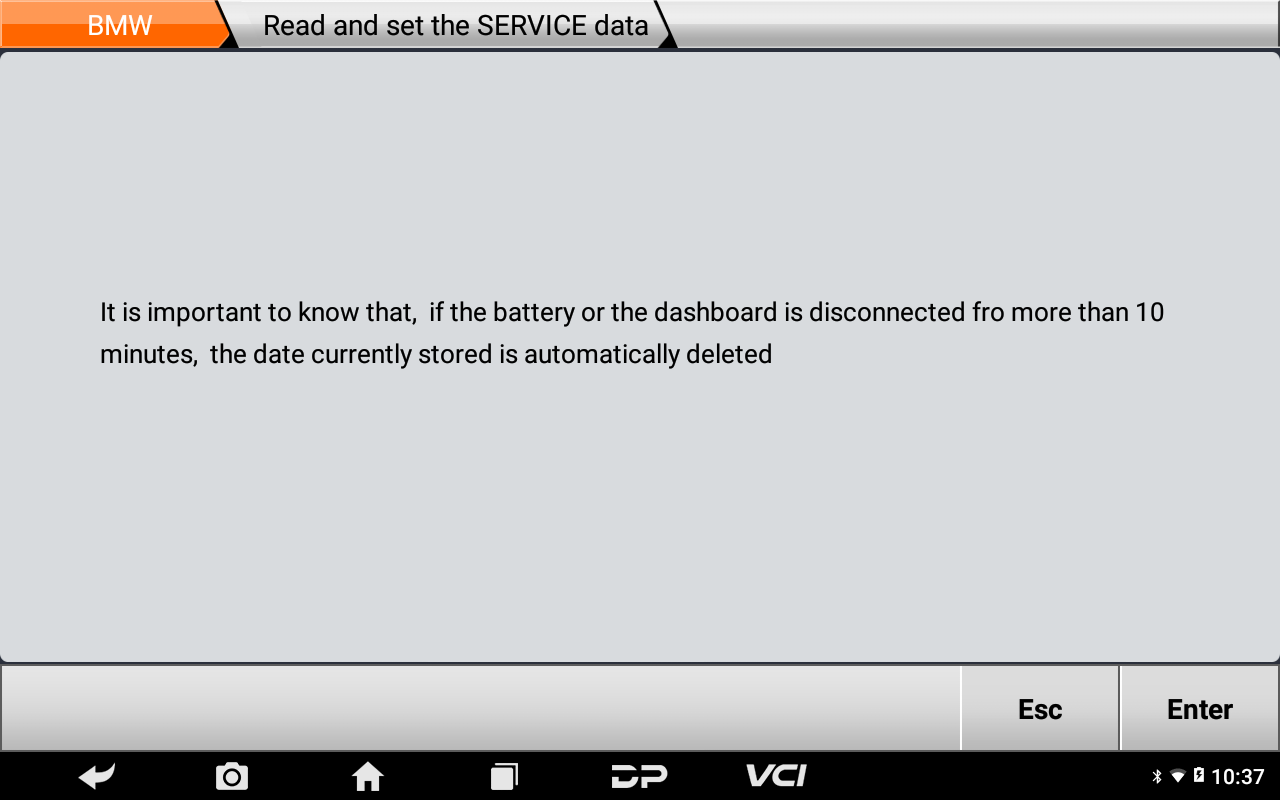
⑫Read note below, click【Enter】;
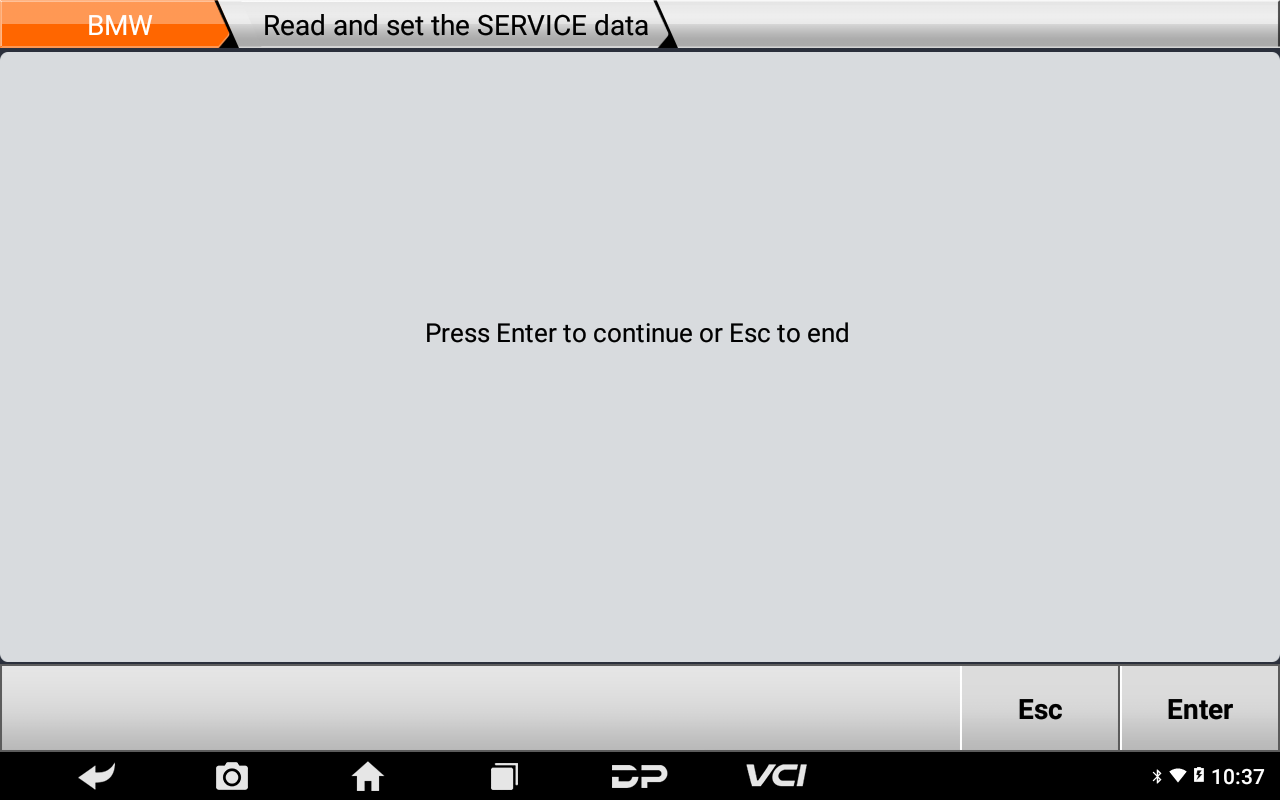
⑬Click【Enter】;
⑭Click【Enter】;
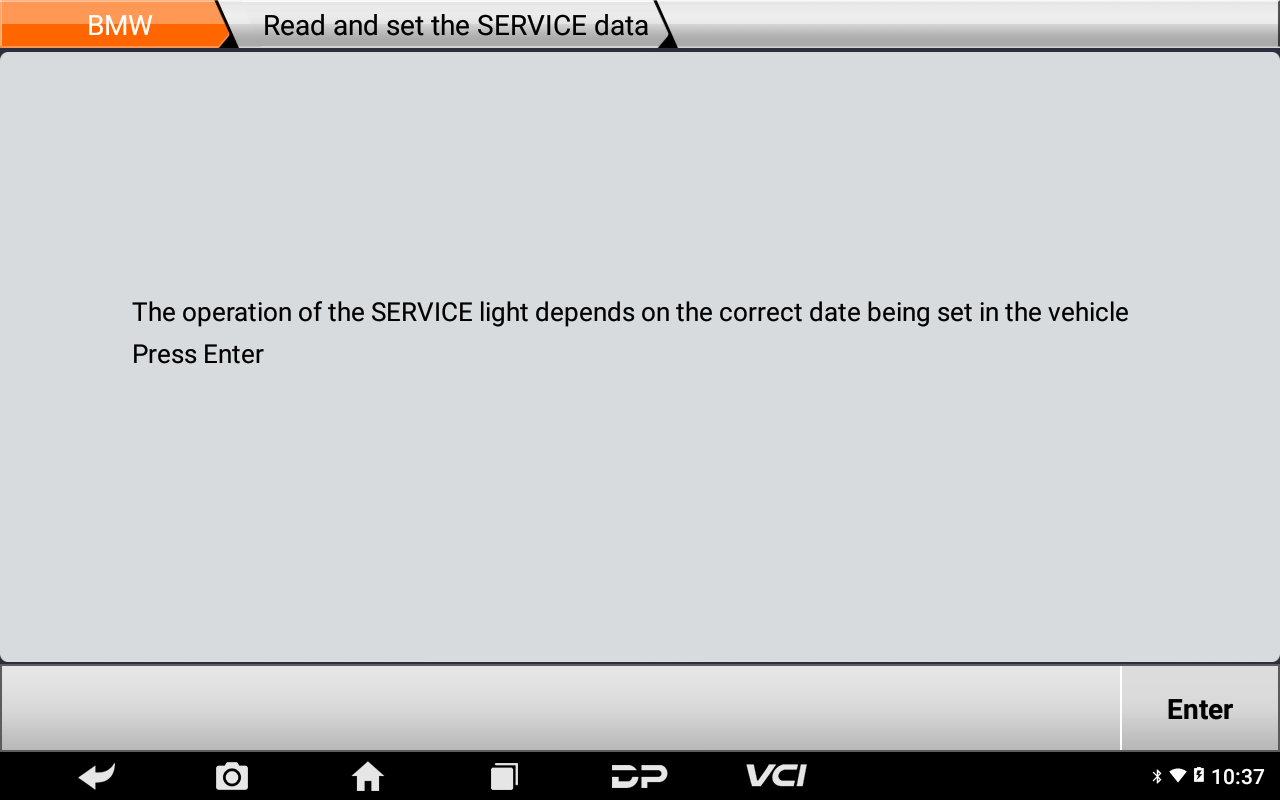
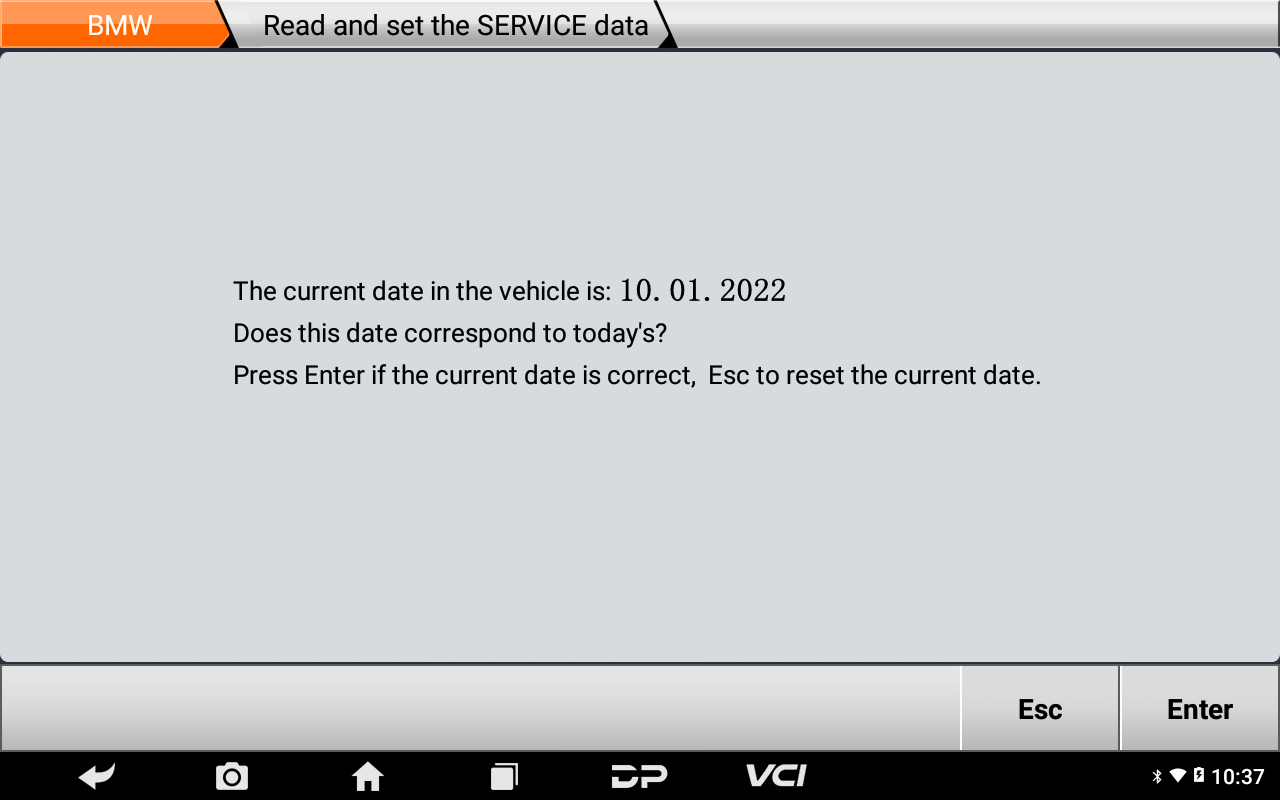
⑮Confirm current date, click【Enter】;
Tips: if the current date is incorrect, pls click Esc to reset it.
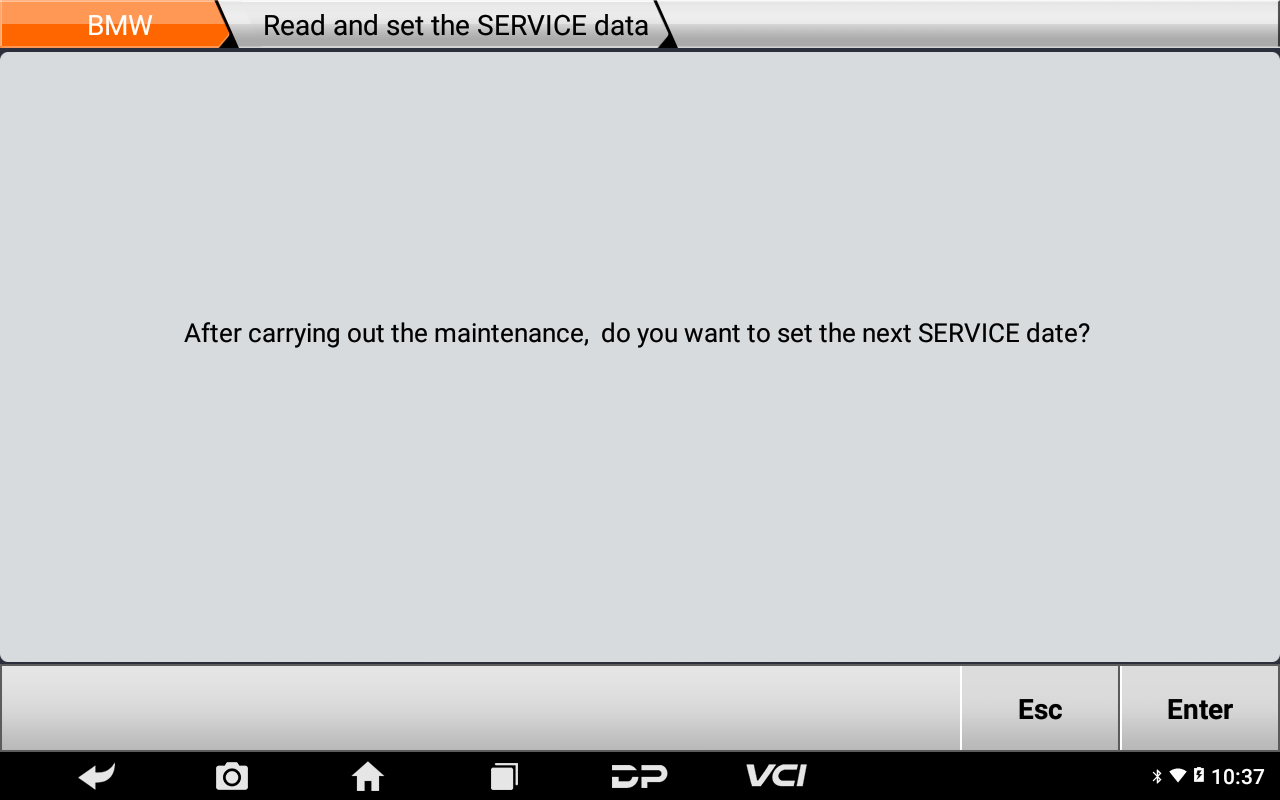
⑯Click【Enter】;
⑰Click【Enter】;
⑱Insert date in format such as 30102022, click【Enter】;
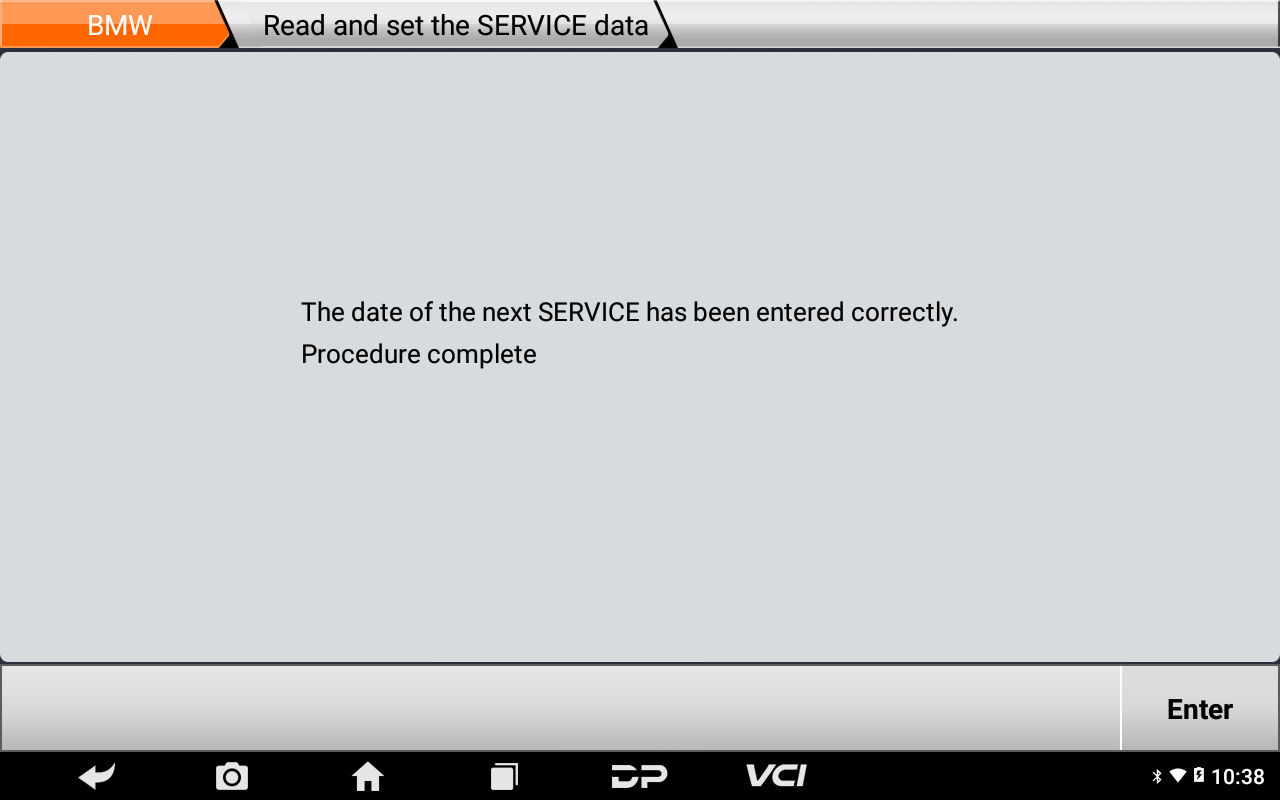
⑲Click【Enter】;
⑳Click【Enter】;
㉑Click【Enter】;
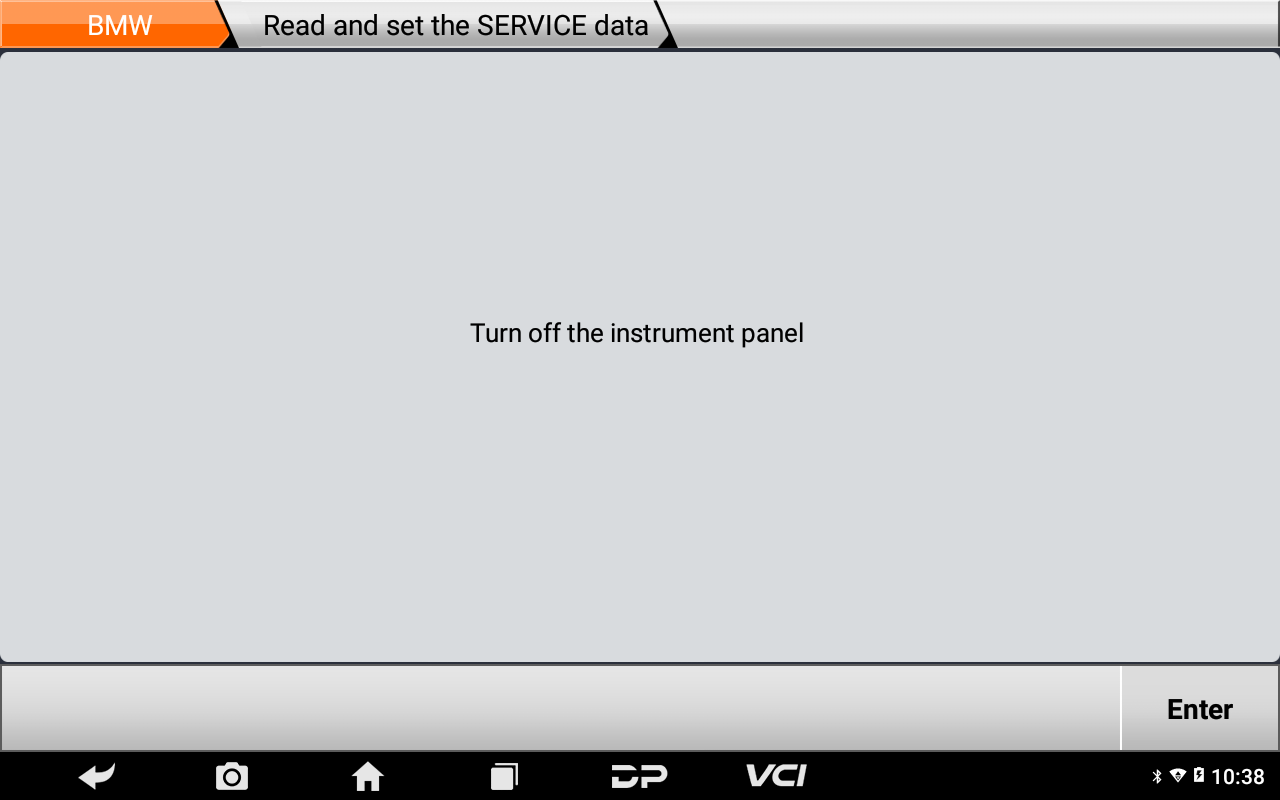
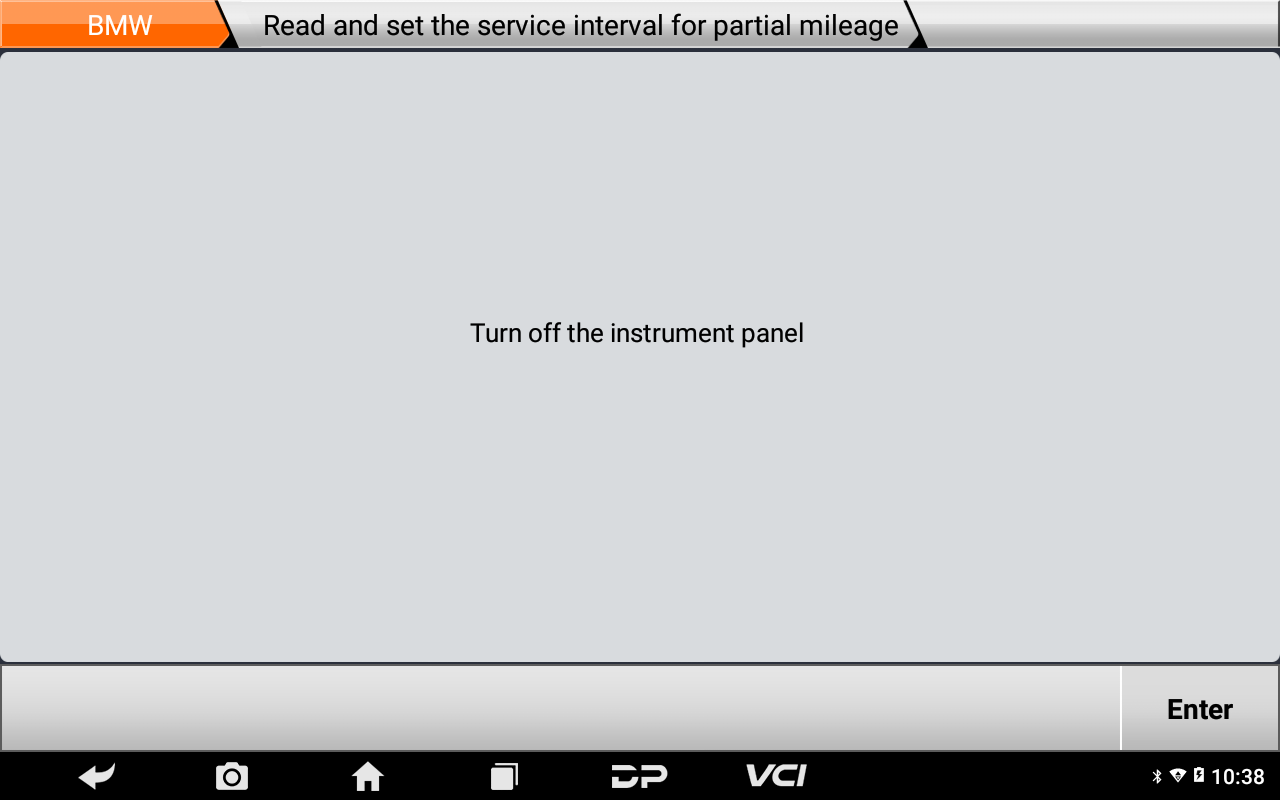
㉒Turn off the instrument panel, click【Enter】;
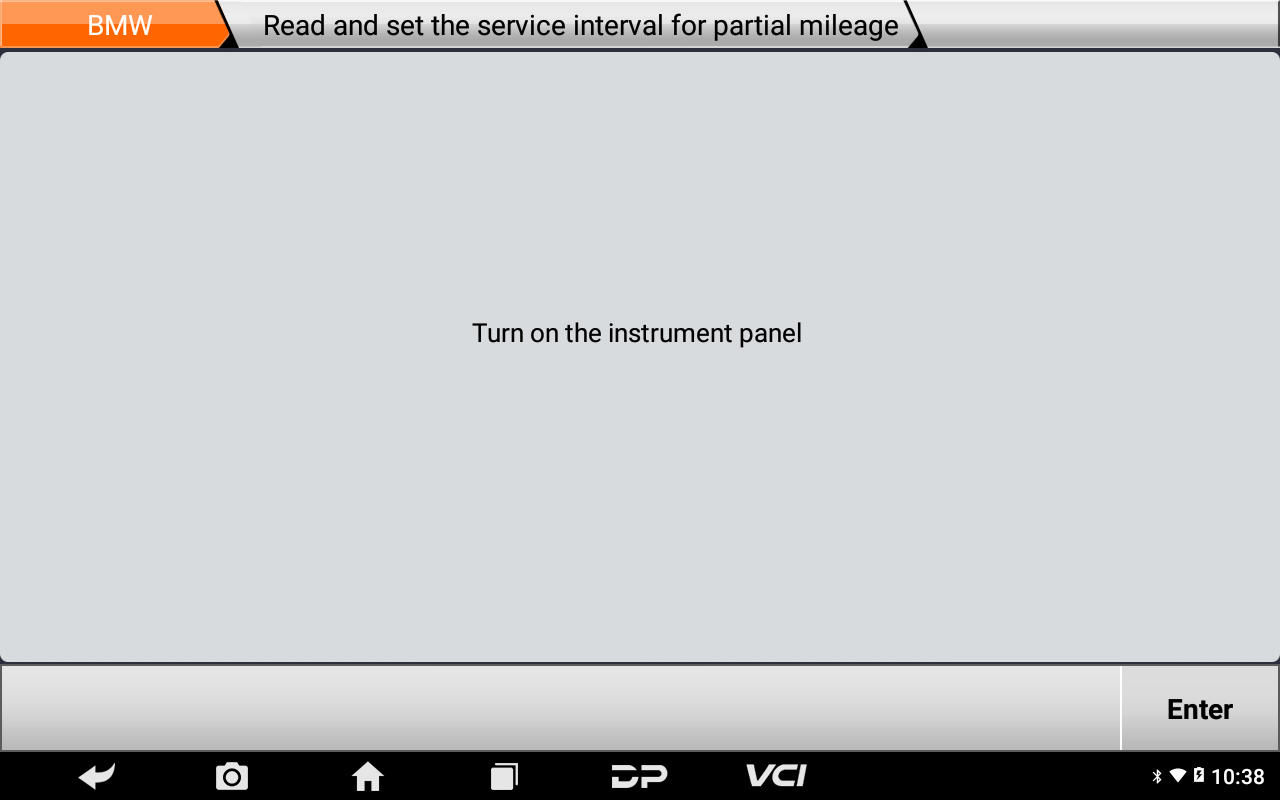
㉓Turn on the instrument panel, click【Enter】;
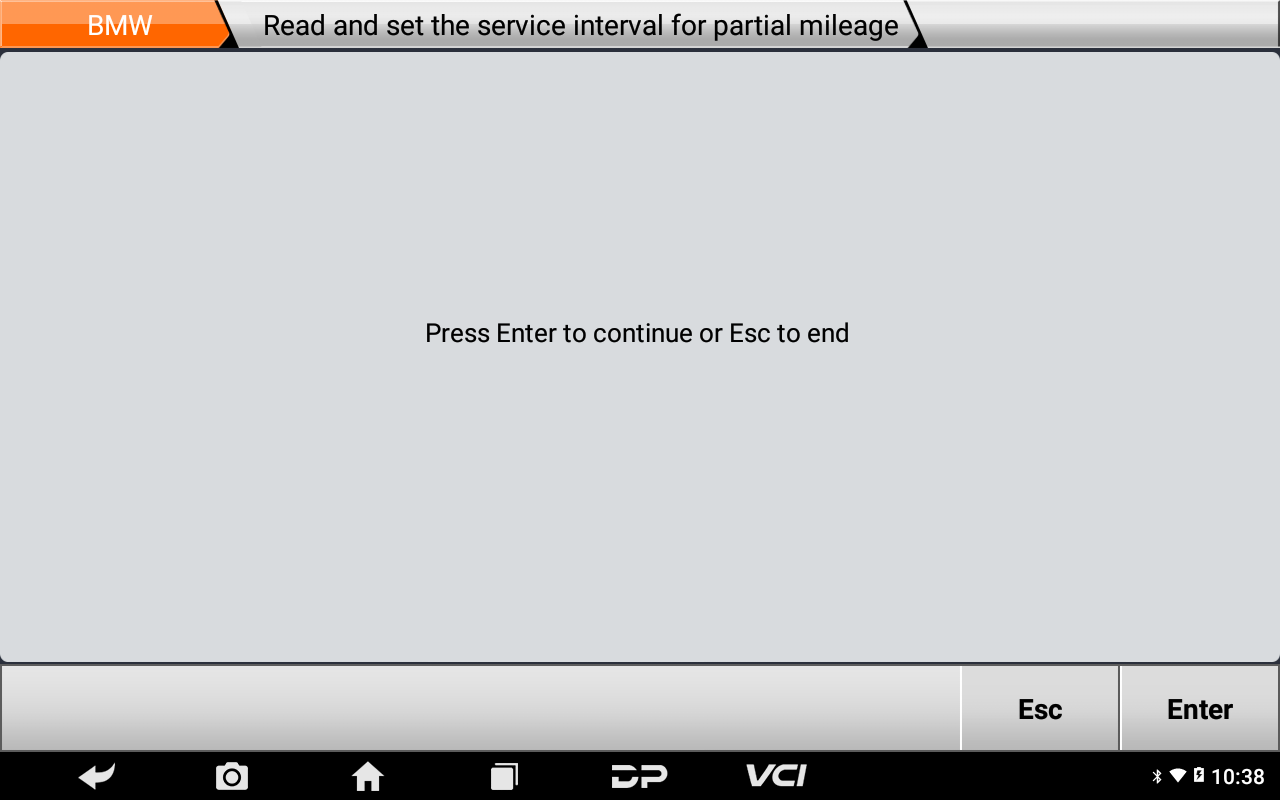
㉔Click【Read and set the service interval for partial mileage】;
㉕Click【Enter】;
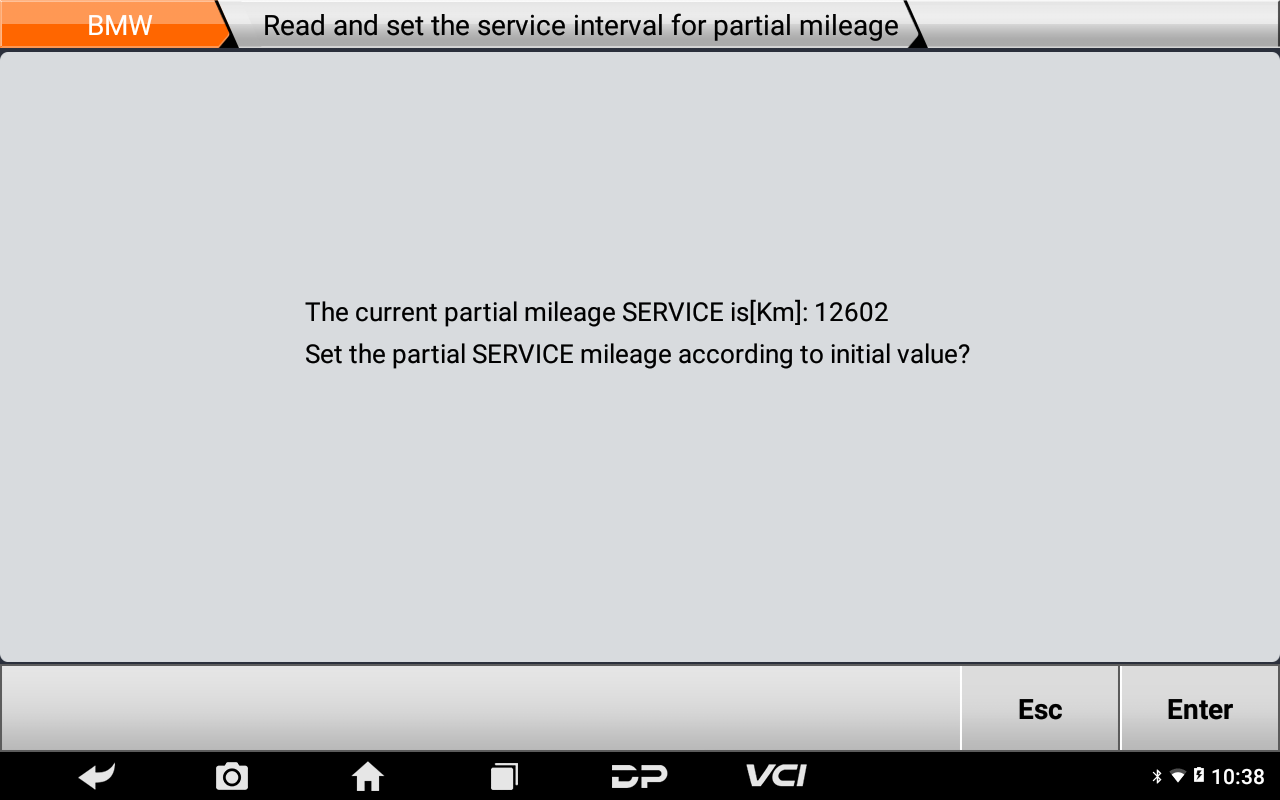
㉖Click【Enter】;
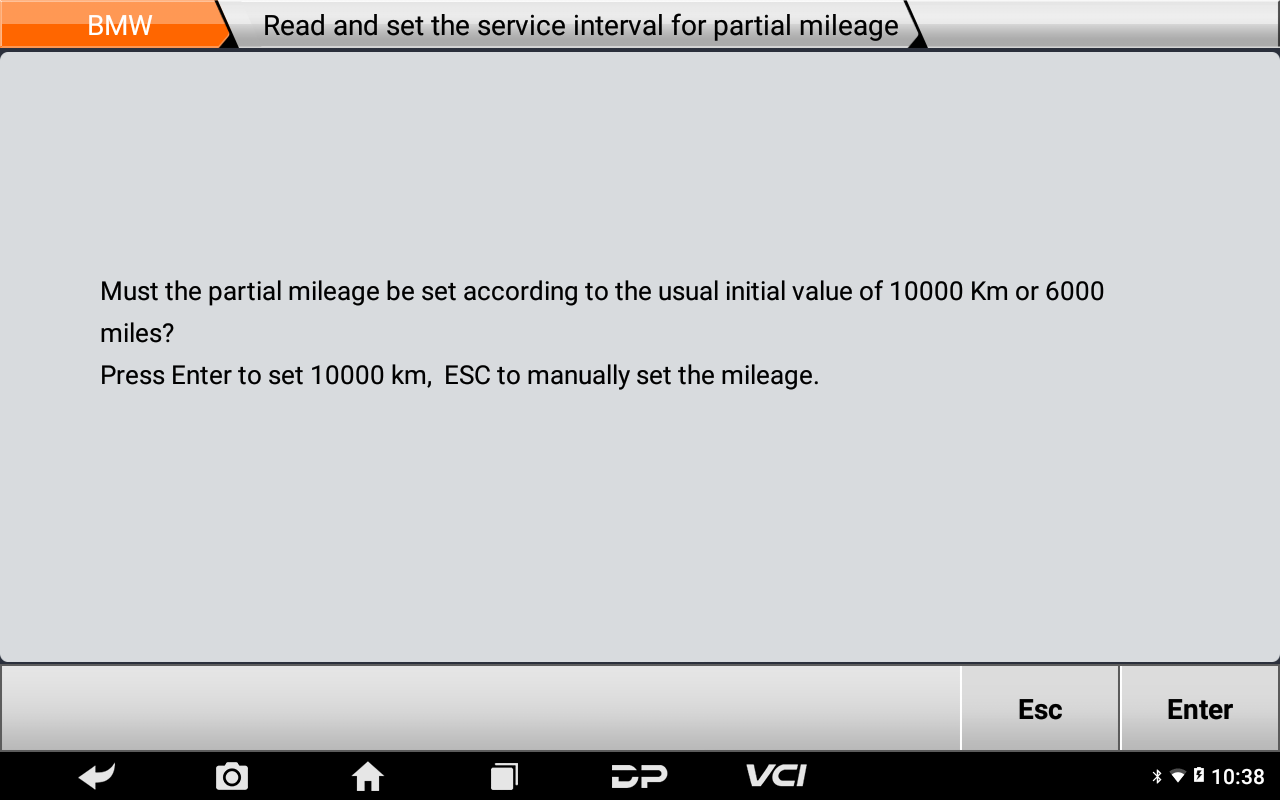
㉗Click【Enter】to reset service mileage;
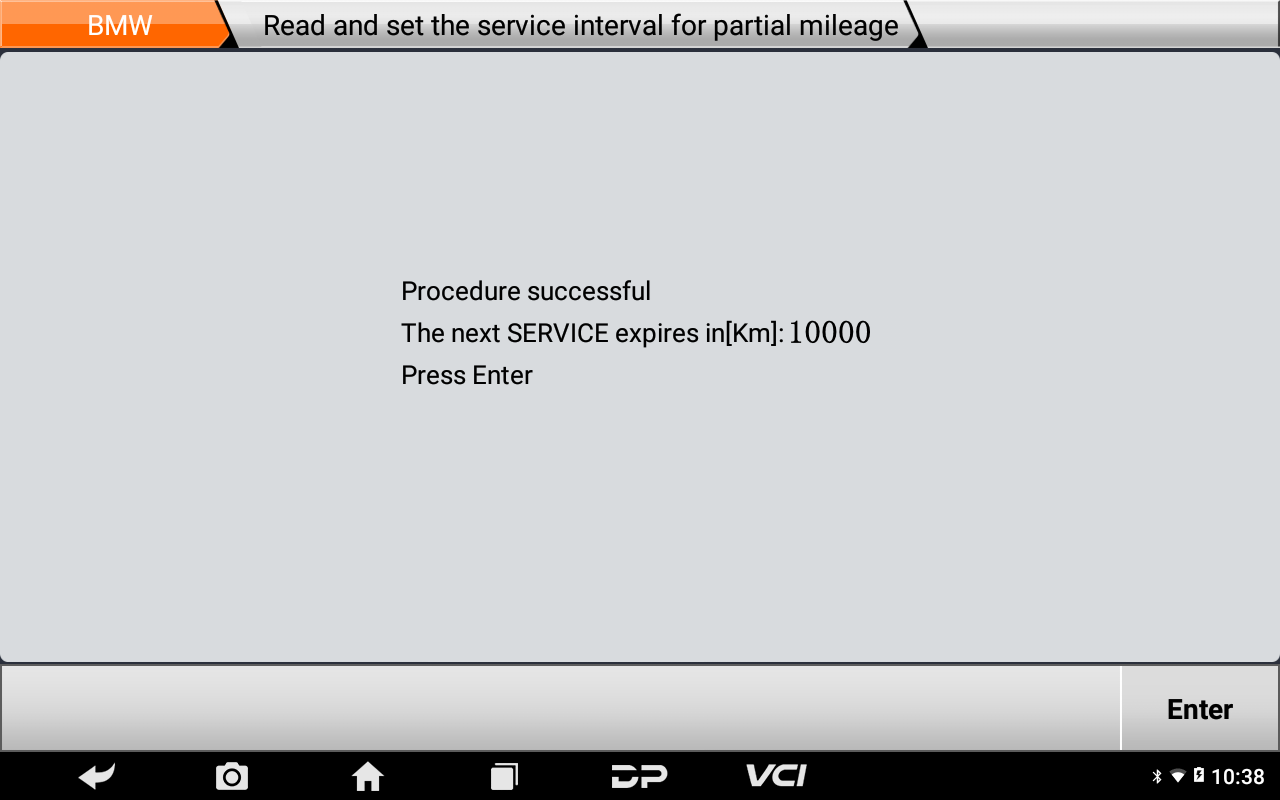
㉘Procedure successful, click【Enter】;
㉙Turn off the instrument panel, click【Enter】;
㉚Turn on the instrument panel, click【Enter】;
㉛Operation done.
Summary
Pls strictly follow your device tips in your operation process.

