Greetings Dear Members,
I have a hp pavilion 15 cs3153cl system and for the last couple of days I am experiencing screen flickering when I boot up the system move the mouse a but and then goes black or when I am doing a teams meeting, I have to restart it a few times to get it to work. No changes were made to the system, however, I did notice from the event viewer that
I am getting the iommu has detected an error I tried researching but I am not able to find what exactly causes this issue.
The OS is windows 11.
For Now, I have disabled hardware acceleration from the browsers because previously the flickering that occurred on this system was due to hardware acceleration that was enabled again and reinstalled the graphics adaptors but the same is occurring again
TIA
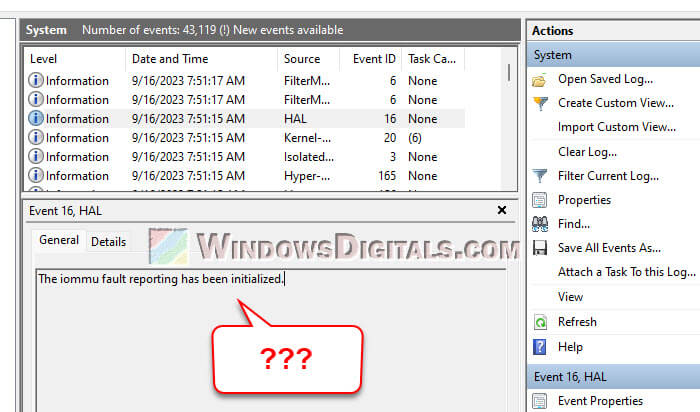
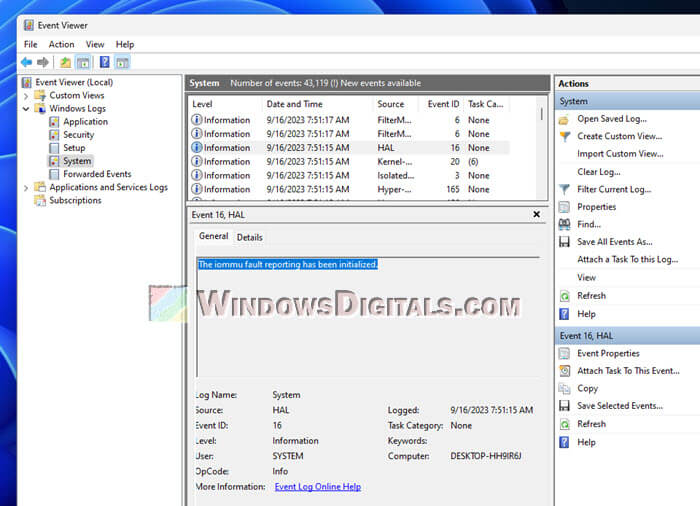
If you’ve looked into the Event Viewer in Windows 11/10, specifically under Windows Logs > System, you might have come across an “Information” event labeled as “Event 16, HAL” with the description “The iommu fault reporting has been initialized.” This message can be confusing, raising questions like what it means and whether it’s an indicator of potential issues. This article aims to clear up this particular event, explaining its meaning and if users should be worried about its presence in their system logs.
Also see: Windows 11/10 Computer Blue Screen When Idle (Fix)
What is IOMMU and Fault Reporting?
To comprehend the message “The iommu fault reporting has been initialized,” it’s crucial to first understand what IOMMU is. IOMMU stands for Input-Output Memory Management Unit, a vital component in modern computing systems. Its primary function is to handle and manage memory requests from peripheral devices, like graphics cards or network cards, to the main system memory.
The importance of IOMMU stems from its ability to:
- Virtualize devices: In a virtualized environment, multiple operating systems run concurrently on a single physical machine. IOMMU aids in mapping memory between these virtual machines and the actual hardware, ensuring smooth and secure operations.
- Enhance system security: By isolating device access and controlling which parts of memory a device can read or write to, IOMMU prevents potential unauthorized access to sensitive memory regions.
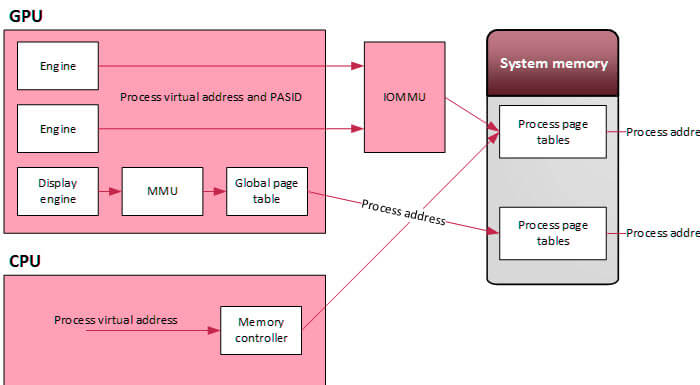
Fault reporting, on the other hand, is a mechanism within the IOMMU that detects and notifies the system of any abnormalities or “faults” during memory transactions. The initialization of this reporting signifies that the system is now equipped to monitor and log such faults, allowing for better diagnosis of system issues.
Linked issue: The system has rebooted without cleanly shutting down first
Why is this event important?
While “The iommu fault reporting has been initialized” might seem like a routine system message, it carries significance for several reasons:
- System stability and security: As previously mentioned, IOMMU plays a pivotal role in ensuring that peripheral devices interact securely with the system’s main memory. By initializing fault reporting, the system is better prepared to identify and log any unexpected or unauthorized memory transactions. This can be crucial in preempting potential hardware malfunctions or security breaches.
- Diagnostics and troubleshooting: For IT professionals and savvy users, the initialization of IOMMU fault reporting offers a diagnostic tool. In the case of system instability, crashes, or unexplained behavior, these logs can help pinpoint the root cause. It becomes especially important in environments that rely heavily on virtualization.
- Ensuring optimal function of virtual machines (VMs): VMs rely on the IOMMU to function seamlessly. The initialization of fault reporting ensures that if any issues arise related to memory mapping between VMs and hardware, they are promptly reported, allowing for swift resolution.
Related resource: How to Reduce Hardware Reserved Memory in Windows 11/10
What to do when you encounter this event?
When you see the “The iommu fault reporting has been initialized” message in the Event Viewer, it’s an informational message. This means:
- The system has successfully set up the IOMMU’s fault reporting mechanism.
- The system is ready to detect and report any memory access anomalies by peripheral devices.
For most users, encountering the “The iommu fault reporting has been initialized” message in the Event Viewer doesn’t necessitate any action. It’s an informational event, signaling that a system process is functioning as it should. However, if you’re curious or troubleshooting:
- Review related logs: After clicking on the event, the bottom pane in Event Viewer will provide more details. Look for any accompanying warnings or errors in proximity to this event.
- Update hardware drivers: Outdated drivers can sometimes conflict with IOMMU operations. Regularly checking for and installing the latest drivers for your hardware components can preempt potential issues.
- Consult IT help: If you suspect that the event is tied to a larger system problem, or if you observe related errors or warnings, it might be beneficial to consult with an IT professional or knowledgeable friend.
Related concern: Why is my memory usage so high when nothing is running?
Common misconceptions and frequently asked questions
When you encounter technical jargon or system messages, it’s natural to have questions or misconceptions. Let’s address some of these to clear up any concerns or confusion you might have regarding the “The iommu fault reporting has been initialized” event.
- Is this event a sign of an error or malfunction? No, the event is informational and indicates that a particular system process related to IOMMU fault reporting has been set up successfully.
- Do I need to take any action when I see this event? Generally, no action is needed. However, if you’re experiencing system issues and are troubleshooting, this event might be one of many you review.
- Is this event exclusive to Windows 11/10? While you might see this event in Windows 11/10, IOMMU and its associated fault reporting could be present in Windows Server or other operating systems, albeit with different logging mechanisms and messages.
Summary
In short, the “”Event 16, HAL: The iommu fault reporting has been initialized” event you’re seeing is simply Windows notifying that it has initialized the fault reporting related to the IOMMU. This is typically an informational event and doesn’t suggest any errors or problems with your system. If your system is running fine and you don’t notice any issues, you can generally ignore such informational events.
ПК ребутается в некоторых играх
Crysty
Пользователь
Регистрация:
23.06.2014
Сообщения: 1249
Рейтинг: 440

Регистрация:
23.06.2014
Сообщения: 1249
Рейтинг: 440
Приветствую работяги!
Подскажите, вдруг кто сталкивался или знает как решить:
Где то месяц назад нужно было обновить биос на новую версию. Биос успешно обновил, но после этого начал испытывать проблемы с перезагрузкой ПК в некоторых играх. То есть условно говоря, запускаю какую то игру, все работает, работает — потом БАЦ, перезагрузка. В некоторых играх перезагрузка происходит сразу после захода непосредственно в лобби/сервер/матч. При этом это не синий экран смерти, а просто обычный банальный ребут.
В обычное время ПК не перезагружается и работает в целом как часы. Во всяких программах типа Фотошопа, Лайтрума, для 3д модделинга тоже все норм
Мой пк:
Ryzen 7 3700x
2070 Super
24 RAMPower supply 700+Протестированные игры:
Спойлер
Warzone/Cold War, Dota 2, Destiny 2, GTFO, Cyberpunk 2077, Red Dead Online, GTA V — перезагрузок нет
Predator: Hunting Grounds(перезагрузка стабильно раз в 2 матча), RUST(перезагрузка где то через 1-2 минуты после захода на сервер), Necromunda:Hired Gun(перезагрузилась 1 раз за 20 часов игры), Biomutant(перезагрузилась пару раз за 10 часов игры)
Смотрел логи винды — никаких ошибок перезагрузки нет. Едиснтвенное что он пишет, так это ошибка в неком IOMMU:
Инициализован отчет об ошибке IOMMU.
Источник — HAL
Инициализован отчет об ошибке IOMMU.
Почитав в интернете нашел что это нечто связанное с производительностью вирутальной машины, хотя я ее не юзаю.
Что пробовал еще:
- обновлял драйвера видеокарты — не помогло
- обновлял драйвера чипсета — не помогло
- обновлял винду — не помогло
- пробовал измерять и мониторить температуру проца и видюхи — все в пределах нормы
- пробовал даунгрейдить биос до дефолта и до версии которая была у меня изначально — не помогло
- пробовал запустить проверку памяти — не помогло
- пробовал менять память местами, запускать без одной плажки, менял их — не помогло
Думаю еще сделать стресс тест видуху и проца, чтобы наверняка
На этом больше ничего не пробовал. Находил в сети информацию что подобное может быть из за каких то проблем с напряжением, то есть например во время обработки данных условная видеокарта запрашивает большее напряжение чем ей разрешено использовать или типа того. Думал что возможно проблема с процом или видюхой, но чето маловероятно ибо в каких то играх все работает как часы, а в некоторых оно все падает.Кто то советовал сделать андер волтаж проца, чтобы снизить пиковые частоты работы ЦПУ, но чет идея сомнительная ибо работает только турбобустинг, да и работает он при всех приложениях, так что будь проблем в этом, то он бы отрубался постоянно.Еще раз говорю, все началось после ОБНОВЛЕНИЯ биоса. То есть вероятно какой то параметр поменялся, но вот какой — история умалчиваетВообщем вдруг кто сталкивался или знает как решить — буду премного благодарен!

Регистрация:
06.10.2015
Сообщения: 8624
Рейтинг: 3034
Нарушения: 105

Crysty сказал(а):↑
Приветствую работяги!
Подскажите, вдруг кто сталкивался или знает как решить:
Где то месяц назад нужно было обновить биос на новую версию. Биос успешно обновил, но после этого начал испытывать проблемы с перезагрузкой ПК в некоторых играх. То есть условно говоря, запускаю какую то игру, все работает, работает — потом БАЦ, перезагрузка. В некоторых играх перезагрузка происходит сразу после захода непосредственно в лобби/сервер/матч. При этом это не синий экран смерти, а просто обычный банальный ребут.
В обычное время ПК не перезагружается и работает в целом как часы. Во всяких программах типа Фотошопа, Лайтрума, для 3д модделинга тоже все норм
Мой пк:
Ryzen 7 3700x
2070 Super
24 RAM
Power supply 700+
Протестированные игры:
Спойлер
Warzone/Cold War, Dota 2, Destiny 2, GTFO, Cyberpunk 2077, Red Dead Online, GTA V — перезагрузок нет
Predator: Hunting Grounds(перезагрузка стабильно раз в 2 матча), RUST(перезагрузка где то через 1-2 минуты после захода на сервер), Necromunda:Hired Gun(перезагрузилась 1 раз за 20 часов игры), Biomutant(перезагрузилась пару раз за 10 часов игры)
Смотрел логи винды — никаких ошибок перезагрузки нет. Едиснтвенное что он пишет, так это ошибка в неком IOMMU:
Инициализован отчет об ошибке IOMMU.
Источник — HAL
Инициализован отчет об ошибке IOMMU.
Почитав в интернете нашел что это нечто связанное с производительностью вирутальной машины, хотя я ее не юзаю.
Что пробовал еще:
- обновлял драйвера видеокарты — не помогло
- обновлял драйвера чипсета — не помогло
- обновлял винду — не помогло
- пробовал измерять и мониторить температуру проца и видюхи — все в пределах нормы
- пробовал даунгрейдить биос до дефолта и до версии которая была у меня изначально — не помогло
- пробовал запустить проверку памяти — не помогло
- пробовал менять память местами, запускать без одной плажки, менял их — не помогло
Думаю еще сделать стресс тест видуху и проца, чтобы наверняка
На этом больше ничего не пробовал. Находил в сети информацию что подобное может быть из за каких то проблем с напряжением, то есть например во время обработки данных условная видеокарта запрашивает большее напряжение чем ей разрешено использовать или типа того. Думал что возможно проблема с процом или видюхой, но чето маловероятно ибо в каких то играх все работает как часы, а в некоторых оно все падает.
Кто то советовал сделать андер волтаж проца, чтобы снизить пиковые частоты работы ЦПУ, но чет идея сомнительная ибо работает только турбобустинг, да и работает он при всех приложениях, так что будь проблем в этом, то он бы отрубался постоянно
Вообщем вдруг кто сталкивался или знает как решить — буду премного благодарен!
Нажмите, чтобы раскрыть…
Чо по напряжениям бп? Просадки есть под нагрузкой?
Какой вообще бпшник?

Регистрация:
10.05.2013
Сообщения: 5324
Рейтинг: 2640
![]()
БП вероятнее всего
И вероятность дуратского биоса видюхи тоже есть, но вряд ли на 2070
Crysty
Пользователь
Регистрация:
23.06.2014
Сообщения: 1249
Рейтинг: 440
Регистрация:
23.06.2014
Сообщения: 1249
Рейтинг: 440
Ra(ägyptischer Gott sonne) сказал(а):↑
БП вероятнее всего
И вероятность дуратского биоса видюхи тоже есть, но вряд ли на 2070
Нажмите, чтобы раскрыть…
ну я тоже думал что бп, но проблемы начались именно после апдейта родного биоса матери на более новый. До этого все работало прекрасно
Tizik
Супермодератор
Регистрация:
04.08.2014
Сообщения: 8042
Рейтинг: 5864

Регистрация:
04.08.2014
Сообщения: 8042
Рейтинг: 5864
Crysty сказал(а):↑
ну я тоже думал что бп, но проблемы начались именно после апдейта родного биоса матери на более новый. До этого все работало прекрасно
Нажмите, чтобы раскрыть…
так откати биос
Crysty
Пользователь
Регистрация:
23.06.2014
Сообщения: 1249
Рейтинг: 440
Регистрация:
23.06.2014
Сообщения: 1249
Рейтинг: 440
Tizik сказал(а):↑
Нажмите, чтобы раскрыть…
откатывал до дефолта и до изначальной версии которая была при покупке матери. Проблема не пропала
Регистрация:
10.05.2013
Сообщения: 5324
Рейтинг: 2640
![]()
Сменил биос — появилась проблема
Вернул старый — проблема осталасьСтранноЯ щас совсем тупую банальную хрень предложу.Поменяй сата слот на материнке от дисков, и переставь оперативку местами
Tizik
Супермодератор
Регистрация:
04.08.2014
Сообщения: 8042
Рейтинг: 5864
Регистрация:
04.08.2014
Сообщения: 8042
Рейтинг: 5864
Crysty сказал(а):↑
ну завтра еще проведу пару тестов, сообщу. Блок чифтековский на 700 или на 700+, нужно будет уточнить, а то так не помню
откатывал до дефолта и до изначальной версии которая была при покупке матери. Проблема не пропала
Нажмите, чтобы раскрыть…
А второй биос у материнки есть?
Crysty
Пользователь
Регистрация:
23.06.2014
Сообщения: 1249
Рейтинг: 440
Регистрация:
23.06.2014
Сообщения: 1249
Рейтинг: 440
Ra(ägyptischer Gott sonne) сказал(а):↑
Сменил биос — появилась проблема
Вернул старый — проблема осталась
Странно
Я щас совсем тупую банальную хрень предложу.
Поменяй сата слот на материнке от дисков, и переставь оперативку местами
Нажмите, чтобы раскрыть…
делал, не помогло. Тут больше похоже что при обновлении на новую версию, какие то параметры поменялись, типа настройки электропитания. Прикол в том что часть этих настроек не поменяются обратно при сбросе/даунгрейде биоса
Регистрация:
10.05.2013
Сообщения: 5324
Рейтинг: 2640
![]()
Crysty сказал(а):↑
делал, не помогло. Тут больше похоже что при обновлении на новую версию, какие то параметры поменялись, типа настройки электропитания. Прикол в том что часть этих настроек не поменяются обратно при сбросе/даунгрейде биоса
Нажмите, чтобы раскрыть…
Ну настройки электропитания есть в винде, и в биоса сберегайки всякие, пробовал их шевелить?
Crysty
Пользователь
Регистрация:
23.06.2014
Сообщения: 1249
Рейтинг: 440
Регистрация:
23.06.2014
Сообщения: 1249
Рейтинг: 440
Ra(ägyptischer Gott sonne) сказал(а):↑
Ну настройки электропитания есть в винде, и в биоса сберегайки всякие, пробовал их шевелить?
Нажмите, чтобы раскрыть…
не не, я имел ввиду что могли поменяться настройки напряжения, или какой нибудь уровень LLC. Само электро питание выставлено на макс произхводительность, а смена режима не приносит успехов
Tizik
Супермодератор
Регистрация:
04.08.2014
Сообщения: 8042
Рейтинг: 5864
Регистрация:
04.08.2014
Сообщения: 8042
Рейтинг: 5864
Crysty сказал(а):↑
нет, увы, у меня мать от асусов(асус прайм б450), у них вроде нет такой фишки как у гигабайтов
Нажмите, чтобы раскрыть…
разгонял что-то?
Crysty
Пользователь
Регистрация:
23.06.2014
Сообщения: 1249
Рейтинг: 440
Регистрация:
23.06.2014
Сообщения: 1249
Рейтинг: 440
Что я планирую сделать:
Попробую завтра сделать стресс тесты проца и видюхи и параллельно промониторить напряжение на них, может увижу какие то дропы. Потом думаю поиграться с LLC и отключить IOMMU(по дефолту он вроде включен в биосе) ибо у меня не используются никакие вирутальные машины. Ибо при ребуте он инициирует ошибку именно с IOMMU
Tizik сказал(а):↑
Нажмите, чтобы раскрыть…
сам лично нет. Заметил только что проц по кд работает на максимальной частоте или на близкой к ней, то есть 4,2-4,4, то есть включен турбобустинг, он же вообщем то авторазгон. Это было включено все и до обновы биосы и работало как часы
Crysty
Пользователь
Регистрация:
23.06.2014
Сообщения: 1249
Рейтинг: 440
Регистрация:
23.06.2014
Сообщения: 1249
Рейтинг: 440
Ra(ägyptischer Gott sonne) сказал(а):↑
Ну настройки электропитания есть в винде, и в биоса сберегайки всякие, пробовал их шевелить?
Нажмите, чтобы раскрыть…
забыл ответить нормально на это. Менял это все еще сразу как только появился первый ребут, то есть почти месяц назад — результатов ноль
Регистрация:
10.05.2013
Сообщения: 5324
Рейтинг: 2640
![]()
Crysty сказал(а):↑
вообщем, если до сих пор интересно, то вот делал:
делал стресс тест проца, видюхи и общий стресс тест цпю+гпю+цепи питания матери+блок питания в OCCT. Забавно что проблем при тесте никаких)) Все работает стабильно, без проблем, температруа в норме. Потребляемая энергия на 100% нагрузки у ГПЮ порядка 200-230 W, у проца от 65-75, что тоже в целом в пределах нормы.
Пробовал заново обновить чипсет с оф сайта АМД и после этого отключить PBO(он же буст оввердрайв). Затем протестил еще раз в Predator: Hunting Grounds — увы, безуспешно, каждый раз ловил ребут.
Сейчас перепроверил все на физ повреждения, но ничего интересного не нашел — конденсаторы везде в норме, все кабеля присоединены. На всякий случай все переподключил.
Теперь планирую попробовать заменить совй чифтек на другой чифтек, а также возможно протестировать все на другой матери. Но до сих пор не понимаю как от обновления биоса могло пойти столько проблем, если по идее он не должен затрагивать никакие пользовательские параметры…
забыл ответить нормально на это. Менял это все еще сразу как только появился первый ребут, то есть почти месяц назад — результатов ноль
Нажмите, чтобы раскрыть…
Тебе нужно именно линию по 12 вольтам проверить
Отклонения с 0.5 вроде норм, но больше в одну или другую сторону — капут Это надо уточнить
metro (2)
Пользователь
Регистрация:
08.05.2021
Сообщения: 4
Рейтинг: 0
![]()
Регистрация:
08.05.2021
Сообщения: 4
Рейтинг: 0
по температуре что показывает,охлаждается чем?в пред.биосе такого не было?пробовал сбросить настройки БИОСа?лично я думаю проблема либо в биосе или перегрев если с охладом все норм то откатывай биос,кстати может кому-то спасу время и нервы не обновляйтесь на последнюю версию драйвера нвидиа,через минут 15-20 квадратики крч там накосячили с драйверами так что откатывайтесь если обновили примерно текст ошибки что-то DPC_WATCHDOG_VIOLATION потом винда синий экран показывает и все мертвый вис.
![]()
Регистрация:
23.08.2021
Сообщения: 1
Рейтинг: 0
![]()
Регистрация:
01.08.2022
Сообщения: 1
Рейтинг: 0
Мне тоже было бы интересно узнать о результате. Я столкнулся с такой же проблемой. Но после каких действий неизвестно (так как ребутит только в определенных играх). На многих форумах пишут, что больше всего шансов, что проблема с питанием… Но тут есть 1 но. Проблема была в первый раз замечена в NMS. И периодически проблема сама по себе исчезала после апдейтов игры. Что выглядит очень подозрительно… Если проблема в моей системе, то почему апдейты игры могли это исправить…
Тема закрыта
-
Заголовок
Ответов Просмотров
Последнее сообщение
-

Пидж
21 Sep 2023 в 23:16Сообщений: 2
21 Sep 2023 в 23:16
-
Сообщений: 1
21 Sep 2023 в 22:59
-
Сообщений: 6
21 Sep 2023 в 22:56Сообщений:6
Просмотров:15
-
Сообщений: 4
21 Sep 2023 в 22:44Сообщений:4
Просмотров:13
-
S30N1K
21 Sep 2023 в 22:43Сообщений: 15
21 Sep 2023 в 22:43Сообщений:15
Просмотров:23


You will find solutions to HAL_IOMMU_INTERNAL_ERROR Blue Screen of Death error in Windows 10 here. This BSOD issue having bugcheck value 0x000001D9 leads the desktop to freeze and hang. Frequent Reboot of PC also occurs when this stop error appears.
HAL IOMMU INTERNAL ERROR in Windows 10 mostly happens because of corrupt, old and incompatible device drivers. Conflicts between similar applications and malware infection are also the main reasons for this BSOD. Furthermore, if the system runs with memory problems, low disk space, problematic areas in HDD, corrupted Windows Image files it can face the error. In the below section, we will be discussing some effective and proven workarounds that can potentially help to resolve HAL_IOMMU_INTERNAL_ERROR BSOD in Windows 10. See the list of workarounds first –
Here is how to fix HAL_IOMMU_INTERNAL_ERROR BSOD in Windows 10 –
1] Disable Automatic Restart
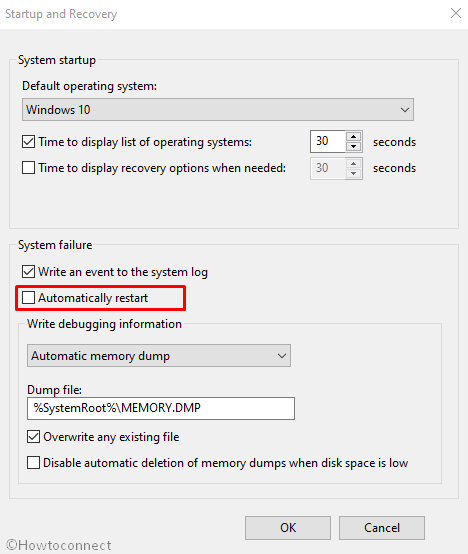
With a confirmed HAL_IOMMU_INTERNAL_ERROR BSOD, Windows PC will have a tendency to perform Automatic restarting. This will be the most annoying problem you could ever come across. Unless this gets a fix, you cannot deploy other resolutions as well. Therefore, this solution comes at the top of the priority. Disabling the Automatic Restarting is not a complex job and you can proceed in the below steps –
Step-1: Navigate to the Desktop area after saving the running programs. Use Win+D hotkey press together and head to the place immediately.
Step-2: Right click on This PC icon. Choose Properties option from there to allow opening the System window.
Step-3: When it is visible on the screen, select Advanced system settings from the left side of the window.
Step-4: As the System Properties wizard appears, click on Advanced tab.
Step-5: Scroll a little down in the tab and reach Startup and Recovery section. When you see the Settings option here, hit it straightway.
Step-6: After a new wizard appears, go to its System failure part and uncheck the box for “Automatically restart”
Step-7: Lastly, select the Ok to save these changes.
Now windows will not go for rebooting automatically. Hence, there will be enough opportunity for you to deploy the upcoming resolutions and resolve the issue accordingly.
2] Resolve all the Memory problems including poor areas in RAM
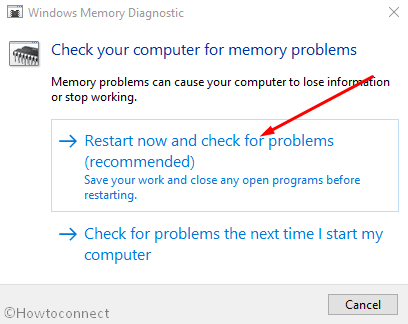
Windows can suffer from memory issue due to wrong allocation of it and the presence of poor segments in the RAM. With these sorts of problems in the Windows, BSOD errors like HAL_IOMMU_INTERNAL_ERROR commonly occur. Luckily, we have the Windows Memory Diagnostic to deal with these troubles and fix the errors. Let’s proceed to the handy utility in the below process –
- Press Windows and S keys and invoke Taskbar Search.
- In the empty text box located here, type “Memory” and wait for results to load finally.
- Select Windows Memory Diagnostic Desktop app from the results to proceed.
- Select the option “Restart now and check for problems (recommended)”.
- Then windows will prepare for the first cycle of rebooting.
- Subsequently, you will find blue screen upfront detecting memory issues with the rate of progress in percentage.
- When the info shows 100%, windows will Restart for the second time.
- Finally, you can check the diagnosis report in the Notification area of the System Tray.
3] Update Drivers to fix HAL_IOMMU_INTERNAL_ERROR BSOD
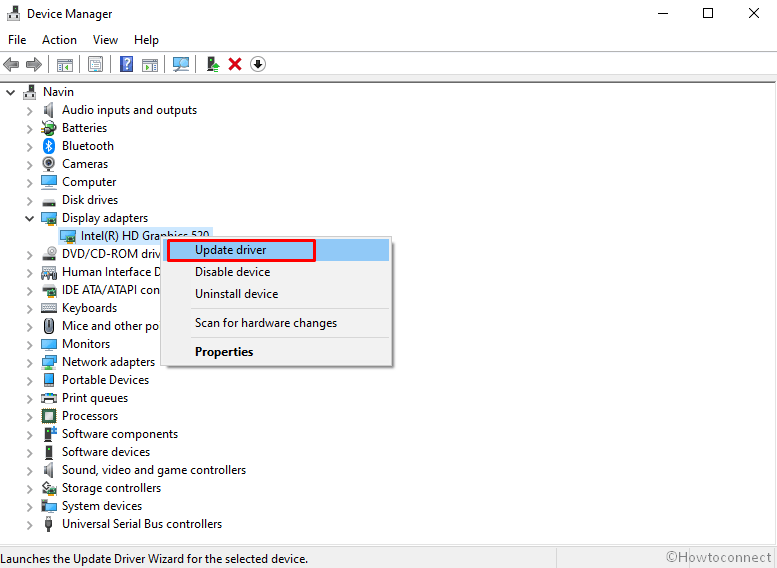
HAL_IOMMU_INTERNAL_ERROR BSOD is the result of outdated and corrupt device drivers mostly. Every time we come across a critical issue, they play a greater role there. We really should not allow such a driver on the computer which is old and defective. The Windows Device Manager is a top-notch app in this regard and it shows them with a yellow accent if needs to be updated. To accomplish the workaround, move with below steps –
- Right click on Start menu and choose Run to invoke the window.
- In the text box provided here, write devmgmt.msc and eventually hit Enter key.
- Device Manager will hit on display and you have to watch closely in the console for any exclamation marks in the device’s list.
- Prior to expanding the device, right click on the drivers having Yellow warning icon on it.
- Select Update driver option and follow the other guidelines coming to display until these all get updated.
4] Detect the Malware in Full System and dismiss them using Windows Security
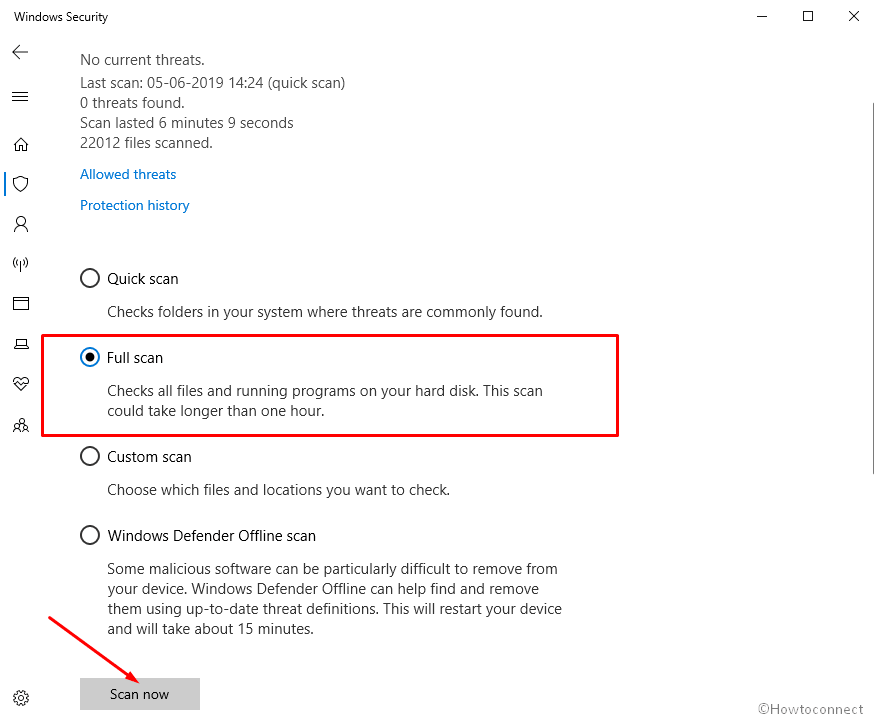
All over the web, Malware is present and often it exists in disguise. You can be easy prey to them after making a visit to a website or clicking link coming in emails. Sometimes inserting a USB can also be risky. Once they get entrance to the system, cause the necessary files to be removed or infected. As a result, many issues come up including HAL_IOMMU_INTERNAL_ERROR. You can avoid this malignant consequence by making regular scanning in Windows security. The default tool can also dismiss all the threats in the most effective way. Follow the below guidelines to complete the task –
- Click on Show hidden icon arrow from the right side of the taskbar.
- Select Shield icon from there and let the system open Windows Security app.
- Moving on to the App, select Virus & threat protection option.
- Now, click on Scan options link to reveal available methods.
- Check the radio button allocated for Full scan and then select Scan now option.
- After the detection gets over, you will be shown a result. If there is any malware present, hit Clean threats option located here.
- Go to the next page, among three options, select Remove first and then Start actions to dismiss all these viruses.
5] Load the Basic Programs only by Booting Device in Safe Mode
In all critical times, Booting in the Safe Mode came out as savior in Windows 10 including previous versions. In this startup procedure, the device starts with only the basic processes and hence, the problems get resolved immediately. Let’s give this renowned utility an attempt following below instructions –
Step#-1: Invoke Run dialog by pressing Win+R hotkeys together.
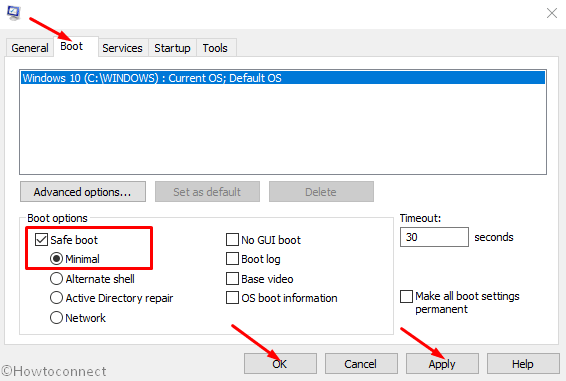
Step#-2: In the provided typing box, write msconfig using the keyboard and select System Configuration Desktop app once visible.
Step#-3: In the App UI, jump to Boot tab and straightway get at its second half.
Step#-4: Here, you can see the Boot options area. Now, check the box before Safe Boot and activate all the grayed out options.
Step#-5: Hit the radio button before Minimal option and proceed forward.
Step#-6: Select Apply button first and then Ok to save these changes.
Step#-7: Get inside of the Safe Mode on the further move.
6] Use Windows Blue Screen Troubleshooter to solve HAL_IOMMU_INTERNAL_ERROR
Since HAL IOMMU INTERNAL ERROR causes serious damages to the system, Microsoft technicians came up with a built-in tool for resolving this issue effectively. The utility named Blue Screen Troubleshooter and it is accessible through the settings app. Proceed with the below instructions to deploy the tool –
- Open Windows Settings app by pressing Win+I hotkeys altogether.
- From the app UI, head to Update & Security tile and eventually click on it.
- When the page loads completely, choose Troubleshoot located in the left pane, and jump on the adjacent side.
- Reach out to Blue Screen there and expand it by clicking.
- Hit Run the Troubleshooter option from the extended pane.
The utility will now detect and fix all the Stop errors. In the end, there should not be any HAL_IOMMU_INTERNAL_ERROR in the system.
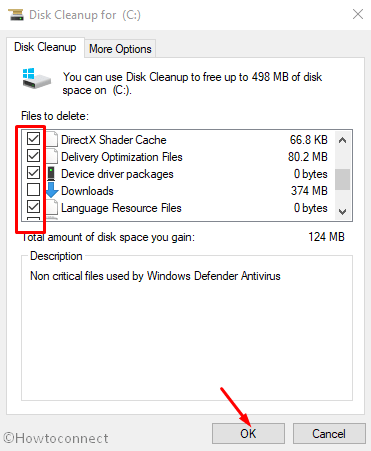
7] Delete the temporary and junk files from storage and make more space in it
Temporary files as stored in the Hard Disk, once grow bigger will occupy huge space in it. The ultimate result is, the storage runs in low space and operation gets slow down. In the process, HAL_IOMMU_INTERNAL_ERROR also hitched up. Using Disk Cleanup tool can be thoroughly beneficial to delete the junks in one platform. Here is how to proceed –
- Open Run dialog box.
- In the search box provided, type cleanmgr and press Enter from keyboard.
- A small popup window will float in and ask you to choose preferable Drive to run a cleanup. Select C: by doing a click on dropdown menu and then press Enter.
- Disk Cleanup Utility will come ahead slowly after calculating the space it can make free from the drive.
- When the wizard appears, come down to the bottom and click on Clean up system files.
- Once again, that small popup window will appear asking for the desired drive. Choose C: like before and press Enter key.
- When Disk Cleanup for C: comes ahead, reach Files to delete area.
- Check all the boxes available here and keep Downloads as it was.
- Hit Ok button and let the Cleanup start.
- Wait until this process ends automatically as this might take several minutes.
8] Disconnect external Hard drives to fix HAL_IOMMU_INTERNAL_ERROR
Some people come across HAL_IOMMU_INTERNAL_ERROR BSOD when an additional Hard Drive joins the system. Good news folks, Issue resolved easily as well just after disconnecting the external USB or other peripheral only. Follow the below guidelines and give a momentarily pause by disconnecting –
- Isolate all the Hardware accessories including the External HDD.
- Keep them at a separate and safe location to avoid damage.
- Now, restart the windows in the usual method.
- After completing the rebooting when you can see Desktop, make a check for the error.
- If resolved properly, start connecting them one after another.
- At this moment after connecting all, launch the web browser from windows.
- Visit Maker’s Webpage for each and Download the Latest drivers.
- Install the drivers in windows to use easily.
9] Settle up the bad areas present in Hard Disk
Prolonged use causes to form problematic areas inside a Disk Drive. When this happens, the system runs in various problems including HAL_IOMMU_INTERNAL_ERROR. The Disk Checking Utility comes handy to resolve these sectors automatically. See the method in detail –
- Press Win+S to call in Taskbar search and type cmd.exe. When Command Prompt appears in the result, right click on it.
- Choose “Run as Administrator” and also select “Yes” Once UAC prompts for your consent.
- In the Black Elevated Prompt, type following syntax and parameters –
chkdsk C: /f /r /x
- Press the Enter button when you have finished typing. This process will take a little longer as we have added three more notations instead of chkdsk only which would show disk status only.
- After the task is finished, Restart the device and upon coming back to operation, check if there is an error present.

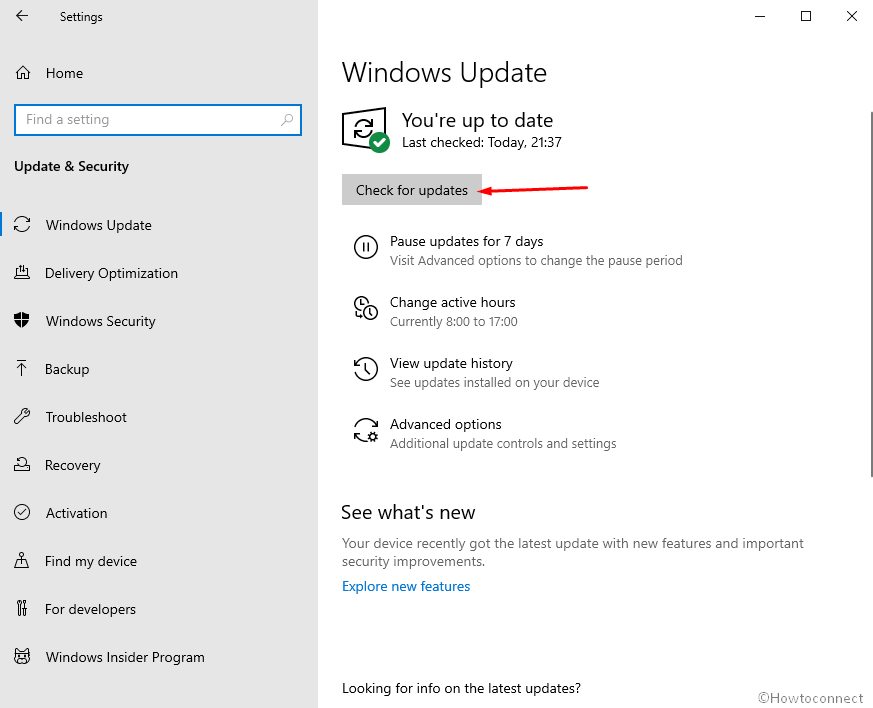
10] Install available Update Patches to solve HAL IOMMU INTERNAL ERROR
Any update patch contains fixing of existing bugs, quality improvements, the introduction of latest features. Installing these will give the OS a big blow and strength to fight vulnerabilities like HAL IOMMU INTERNAL ERROR. An Outdated Windows 10 is prone to get affected always. Follow the below guidelines to install them –
- Manage to Load the Settings page of Update & Security as shown in the above workaround.
- Select Windows Update available in the left pane.
- Navigating to the corresponding right, click on Check for updates link ignoring “You’re up to date” dialogue.
- Upon finishing the downloading, click on Install.
- Reboot the Windows once asked and update the OS.
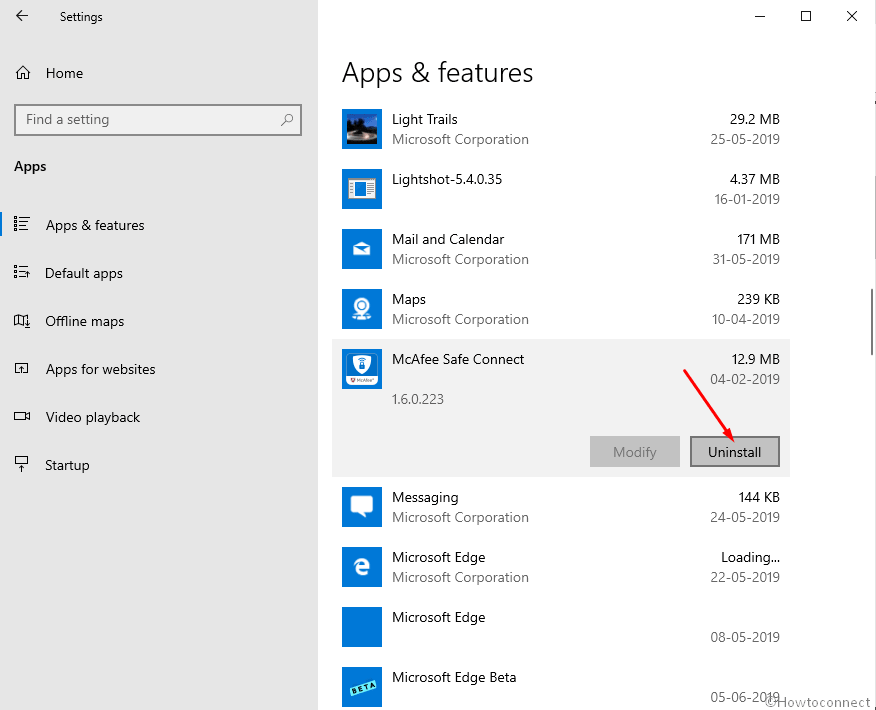
11] Uninstall similar programs to eliminate conflicts
Having the same applications often become risky they tend to collide with one another. Meanwhile, the necessary OS files get eradicated and HAL_IOMMU_INTERNAL_ERROR evolves. In these cases, uninstalling comes ahead first. When we remove one of these, the action reduces the risk of collision between them. Follow the below guidelines to uninstall an App –
- Access Windows Settings app using any convenient method stated above.
- When on the Home page, roll the cursor to Apps and click on it eventually.
- On the next page after appears, choose Apps & features on the left wing and shift to the right.
- Once all the Apps be visible, reach out to applications colliding with each other.
- Select each and hit Uninstall option from the expanded pane.
- If User Account Control prompts for authentication, select Yes to proceed.
- Follow the on-screen guidelines until finally removed.
- Restart the device and once powers up next, do check for the error in the system.
- If resolved, you can Launch Microsoft Store and Download the deleted app again.
12] Undo recent changes by System Restore
Performing a System Restore directs you back to the state where you were. We often install an app or uninstall some for the necessity of work. These actions leave marks in Windows Registry and when they go wrong, HAL IOMMU INTERNAL ERROR is imminent. Therefore, to Undo these changes, perform the below tasks –
- Open the Taskbar search (commonly Win+S) using any of the above instructions.
- Type rstrui in the text area and hit the Enter button.
- Once the System Restore Wizard appears on the screen, select Next.
- From the consequent page, click on Show more restore points and reveal all the points you have created beforehand.
- Choose the last one in the list and click on Next.
- After the following page cuts your view, click Finish.
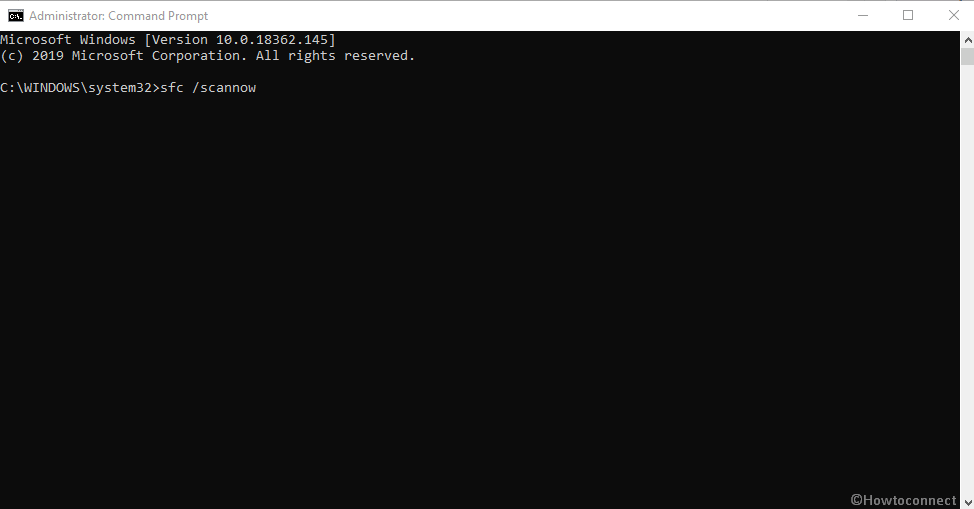
13] Recover missing DLL files and corrupted resources using System File Checker
So many vulnerabilities occur in Windows 10 and sometimes in worst extent, system resources are erased. In the same way, DLL files often go missing. When these cases happen, HAL_IOMMU_INTERNAL_ERROR BSOD comes in. System File Checker comes handy to fix these components once executed in the Elevated Command Prompt. To access the utility, follow the below instructions –
- Open the Taskbar search by pressing on Win+S keys.
- In the search box given here, type cmd.exe and select Run as administrator from the right flyout.
- After User Account Control asks for your consent, provide approval by choosing Yes.
- On the Black Elevated Command Prompt window, type underneath code and hit Enter key –
sfc /scannow
- System File Checker will be activated and start detecting file corruption and missing DLL ones. Fixing will also start automatically.
- Though this process is a little time-consuming, do not terminate abnormally and let it end by itself. After all these files are okay, there should not be any.
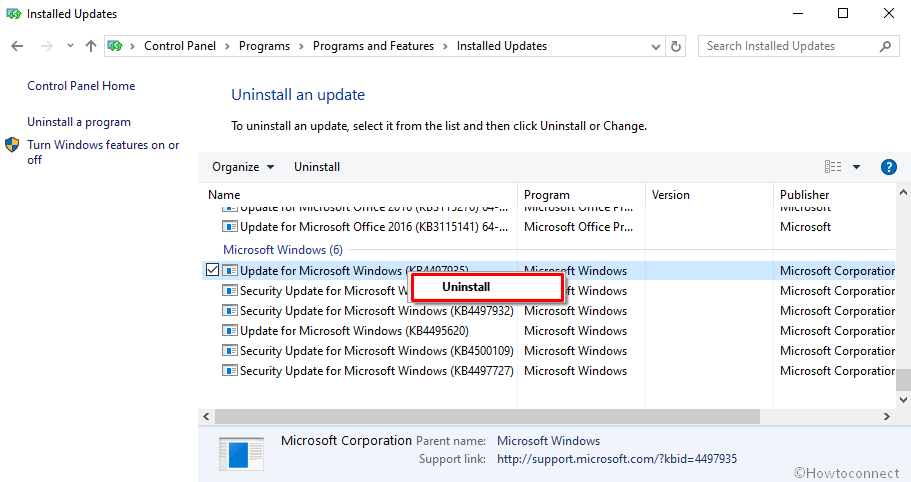
14] Uninstall the troublesome Windows Update
Sometimes Windows update creates the Blue screen HAL IOMMU INTERNAL ERROR. Uninstalling the files will be enough as to resolve the issue or prevent it. To complete the task, move with the following guidelines –
- Press Windows key.
- Once Start menu becomes visible on display, choose Gear cog.
- From App UI, move ahead to Update & Security and click on it.
- From the following page after loaded, select Windows Update and shift to the corresponding side.
- Click on View update history link.
- Select Uninstall updates and let a window unroll from Control Panel.
- Reach the last received patch and do a right click on it.
- Select Uninstall and follow on-screen instructions until they get removed completely.
15] Remove all the Third Party Anti-Virus Programs
In virus issues, you might have used a free anti-virus solution as a safeguard. This is okay until Windows Security arrives. Since the tool is the default for Windows 10 and also very effective, there is no need of using a third party program in this regard. Moreover, most of these programs, due to conflict, often cause HAL_IOMMU_INTERNAL_ERROR BSOD. Therefore, if you have such applications, uninstall using the following guidelines –
- Type appwiz.cpl in the Windows search and Enter
- Select Third Party Anti-virus app in the list.
- Hit Uninstall option visible at the top ribbon.
- Next steps will be as shown in the display until it gets uninstalled completely.
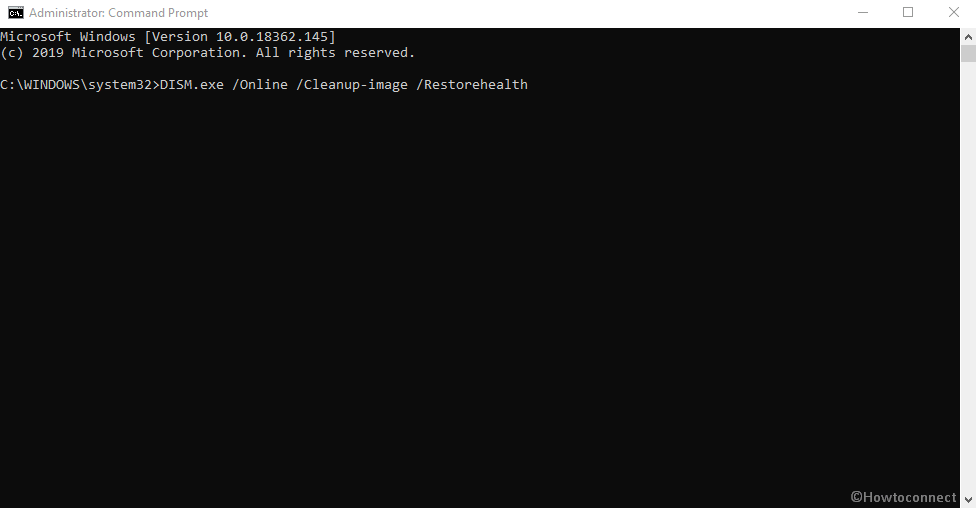
16] Run the DISM tool in Command Prompt for fixing defective Windows image files
When Windows Image files fall into corruption, it might cause HAL_IOMMU_INTERNAL_ERROR. As a fix, DISM tool will be the best-suited utility. Here is the procedure –
- Rght click on Taskbar and select Task Manager from the appearing menu.
- From the app once loaded fully, select File located at the top left corner.
- Choose Run new task when seen and let Run dialog appear.
- In the empty writing field, cmd and move down later on.
- Mark the checkbox below the Open saying “Create this task with administrative privileges”.
- After Pressing Enter key, you will be straightaway guided to Elevated Command Prompt.
- At the black window, type following command where a cursor winks –
DISM.exe /Online /Cleanup-image /Restorehealth
- Hit Enter key and let the Tool fix corrupt Windows image files. The process may be lengthy, wait until it gets over automatically.
- When ends, Restart the windows and after coming back to operation, check if the error resolved.
Till this point, we have elaborated almost all the effective resolutions hoping to resolve HAL IOMMU INTERNAL ERROR in Windows 10. Hopefully, the issue is no more prevalent in your system and you are working smoothly. If the issue still persists, we can suggest only the last resort – Reinstalling Windows 10. This will be the ultimate solution to all the existing problems and if done accurately, no issue will be evolving next.
Methods:
1] Disable Automatic Restart
2] Resolve all the Memory problems
3] Update Drivers
4] Detect the Malware in Full System
5] Load the Basic Programs only by Booting Device in Safe Mode
6] Use Windows Blue Screen Troubleshooter
7] Delete the temporary and junk files
8] Disconnect external Hard drives
9] Settle up the bad areas present in Hard Disk
10] Install available Update Patches
11] Uninstall similar programs to eliminate conflicts
12] Undo recent changes by System Restore
13] Recover missing DLL files and corrupted resources using System File Checker
14] Uninstall the troublesome Windows Update
15] Remove all the Third Party Anti-Virus Programs
16] Run the DISM tool
That’s all!!
Repair any Windows problems such as Blue/Black Screen, DLL, Exe, application, Regisrty error and quickly recover system from issues using Reimage.

От одного до десяти, насколько важен для вас компьютер? Сегодня они являются основными инструментами для работы, учебы или развлечения.
Отсутствие обслуживания на вашем компьютере может вызвать проблемы, а система выдает ошибки, но еще важнее знать, как их исправить. Вот почему вы узнаете здесь как исправить ошибку HAL_IOMMU_INTERNAL_ERROR в Windows 10 .
Это одна из самых распространенных ошибок среди пользователей Windows. То, что, без сомнения, приводит в отчаяние не одного человека. Но не беспокойся! Потому что в этой статье вы найдете все, что вам нужно знать. Готовы исправить эту досадную ошибку?
Что касается операционных систем, Windows просто нет противников. C’est ле операционная система le самый используемый в мире . Это не менее важно, учитывая его характеристики и функции.
Эта операционная система дала много поводов для разговоров, и есть много причин для ее использования. Однако эта система, как и все остальные, не без проблем .
Количество ошибки как Windows 10 может генерировать может быть огромным. Причины? Разные. От проблем с оборудованием до проблем с программным обеспечением. С вашей стороны, это то, как вы можете решить одно или другое.
Какие есть решения?
Теперь, если есть что указать, это легкость, с которой эти ошибки могут быть исправлены . Поскольку это наиболее используемая операционная система, информация останется. Так что вы можете посещать разные страницы или смотреть видео, чтобы найти решение.
Кроме того, в Windows есть очень эффективный инструмент для устранения неполадок. Это облегчит любой процесс, который вам нужно выполнить с помощью других программ.
Исправить ошибку HAL_IOMMU_INTERNAL_ERROR в Windows 10
Но что происходит, когда ошибка действительно мешает вам искать решение? У многих людей компьютеры достигли точки, в которой он постоянно перезагружается . Хуже всего … появляется синий экран .
Для многих это часто бывает катастрофой. Этот экран — «синий экран смерти». Обычно это происходит, когда на жестком диске вашего компьютера есть серьезные ошибки, которые мешают его работе.
Однако ошибка HAL_IOMMU_INTERNAL_ERROR отличается. Если это правда, что ваш компьютер будет постоянно перезагружаться и появится синий экран, это не значит, что все потеряно!
Что ты можешь сделать?
К счастью, есть несколько шагов, которые вы можете предпринять для таких неудобных и безнадежных ситуаций. Вам просто нужно обратить внимание и выбрать тот вариант, который вам больше всего нравится.
Первое, что нужно сделать, это убедитесь, что на вашем компьютере установлены последние версии программ. . Обычно это одна из основных причин ошибки HAL_IOMMU_INTERNAL_ERROR в Windows 10. Об этом вы можете:
- Щелкните правой кнопкой мыши меню Windows, затем выберите «Диспетчер устройств». Перейдите на вкладку «Действие» и нажмите «Обновить драйвер».
- Скачайте программы для анализа вашего компьютера, вашего операционная система и характеристики, позволяющие определить, какие драйверы обновлять. TweakBit Driver Updater — один из наиболее рекомендуемых для этой задачи.
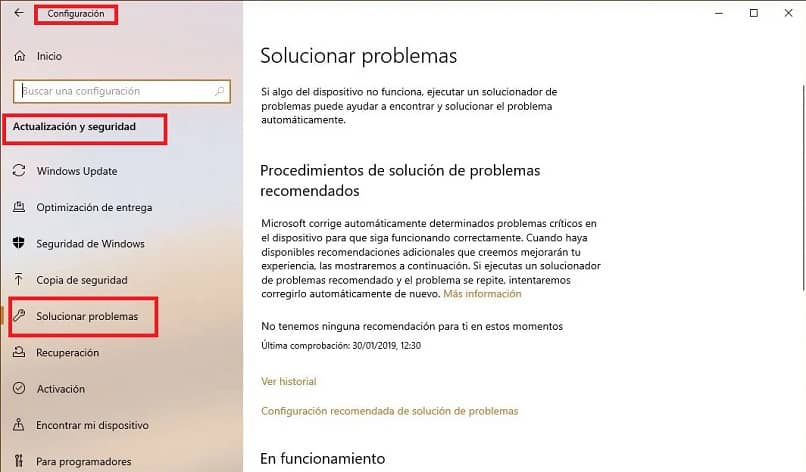
Другие просто предпочитают полагаться на навыки средства устранения неполадок Windows . Если вы хотите исправить ошибку HAL_IOMMU_INTERNAL_ERROR таким образом, вам необходимо:
- Щелкните меню «Пуск» и войдите в «Настройки».
- Прокрутите вниз и перейдите в раздел «Обновление и безопасность».
- Нажмите на опцию » помощь » .
Наконец, еще один способ исправить ошибку HAL_IOMMU_INTERNAL_ERROR в Windows 10 — это используйте командную консоль . Правильный способ сделать это:
- Откройте меню «Пуск» и введите «CMD».
- Щелкните «Командная строка», чтобы получить доступ к консоли (щелкните правой кнопкой мыши и обязательно запустите ее от имени администратора).
- Введите команду sfc / scannow .
В течение нескольких минут ваш компьютер будет просканирован. Эта функция выявляет ошибки и, если возможно, автоматически исправляет их, устраняя ошибку.
Какое решение вы предпочитаете?
Как вы можете видеть, Исправить ошибку HAL_IOMMU_INTERNAL_ERROR в Windows 10 несложно . Есть ряд гораздо более сложных решений, но они очень эффективны. Наслаждайтесь их применением на практике!