Developers transitioning to M1 Mac and newer processors have repeatedly faced the Bad CPU type error when installing development tools such as Android Studio or the Java SDK.
While this does not necessarily mean that their CPU is unsupported, but is rather linked to changes in the newer processor’s architecture.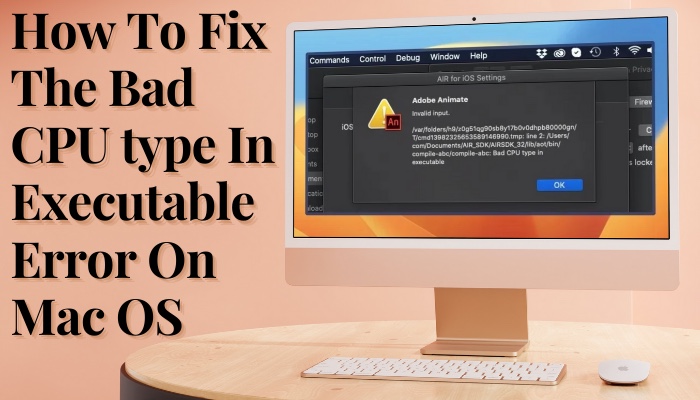
You can easily fix this issue within minutes, and it will not require installing any third-party apps. Just follow alongside me as I lay out the steps.
So, let’s start.
What Causes the Bad CPU Type Error on Mac OS?
You get the BAD CPU Type error on a Mac when you run a 32-bit application on a Mac. Newer versions of Mac OS only support 64-bit apps. Additionally, if you run X86 apps on ARM-based Macs such as the Macbook Air, you will also get this error.
Many users have reported getting this error when running Android Studio and Z-shell. Sometimes you also get an error 86. These programs are made for Intel CPUs and hence cannot run instructions on an ARM processor such as Apple Silicon.
Starting from Mac OS Catalina, Apple decided to drop the support for 32-bit apps. It was announced on October 2019. The last OS to support 32-bit apps was Mojave which was released a year earlier.
Apple informed the developers to transition to the 64-bit starting in 2014. All updates need to be using the newer standard after that period.
You will also encounter the same error if you run applications made for Intel processors in M1, M2, or newer Macs.
Apple transitioned to M1 processors in November 2020. It was now using an architecture similar to the smartphone processors. That meant any existing apps written for the Intel-based Macs would simply not run on the newer models.
Here’s a complete guide on how to check CPU usage on Mac.
To fix the Bad CPU type error on Mac, update your application to the latest version so that it is running 64-bit code. Also, install Rosetta if you are on Mac M1 or later models. This should ensure the application will run correctly.
Here are the methods to fix the Bad CPU type executable error on Mac OS:
1. Update the App to 64-bit
The App Store will show you if your application needs an update. You can select Update All Applications or select the specific app and update it individually.
Before proceeding with the update, google if the 32-bit app you are using received a 64-bit update. If the Developer did not update the app, then you have to use a different method to run the app on your Mac.
Note: Mac OS 10.14 Mojave is the last version that supports 32-bit applications.
Here are the steps to update your app on Mac OS:
Depending on how fast your internet speeds are, the time remaining will be shown. Open the app once the update is finished.
We also fixed the high CPU usage with the kernel task process on Mac OS. Do check it out.
2. Install Rosetta 2
To run older apps on Apple Silicon-based Macs, you will need Rosetta 2 installed. It translates the instructions present in any application’s code to run on the new processor.
This will enable any old app to run on Mac M1. Code editors, Software SDK, Runtimes, etc. will run flawlessly with Rosetta 2 handling all the translations. But expect the raw performance to be less than an app that is built natively for Apple Silicon.
Follow the steps to install Rosetta 2 on Mac M1 or later:
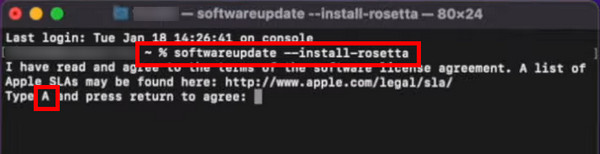
- Press Command + Space and type Terminal. Click to open it.
- Now type in softwareupdate –install-rosetta and press the Return key.
- Press A when prompted on the Terminal.

You will see the progression of the app as it continues to be installed. A restart is not necessary but will not harm your system if you do it.
Now launch the app you were using earlier. It should work correctly.
Some users have reported the mds_stores process using up their CPU on Mac OS. If you face the same issue check out our separate article.
3. (Bonus) Emulate an older Mac OS to run the unsupported app
You can run a separate operating system inside your Mac as if it was just another app. It is also known as Virtualization.
Parallels is an app that allows you to run any OS, Windows, Linux, or another version of Mac OS within your Mac. Since you want to run a 32-bit app, install Mac OS Mojave. This supports the old version of the app natively.
Unless the application you are using is critical for your business or operations, move on to a modern app.
A good substitute for the app may be already present in the App Store. If you need the old app specifically, request the Developer to build a 64-bit version or one optimized for Apple Silicon. Then you are guaranteed to use it for years going forward.
Boot Camp is a utility built on Mac to install Windows. Read our detailed guide on how to set up Bootcamp properly and save your precious time from troubleshooting.
Frequently Asked Questions
What does bad CPU type in executable mean?
A bad CPU type in executable means that you are running an app that is incompatible with your CPU. Normally this happens if you are running an X86 app on an Apple Silicon based Mac.
How to run 32-bit games on Mac?
To run 32-bit apps on Mac, install Mac OS Mojave. Use an external HDD or SSD to store the OS files and games. That way, your existing files on newer Mac OS will remain safe.
How do I run two operating systems on Mac?
By installing the Mac OS on different drives, you can run two instances of Mac OS. They can be the same or different versions. To switch between the OS, use the Startup Disk app and set which volume to use and then restart your Mac.
Final Words
As you saw in the article, a Bad CPU Type error points to a mismatch between the application’s code, operating system version, and the type of processor you are running on your Mac.
And you can easily fix the error with minimal fuss, keeping your main focus on productive work.
That’s all for today. Goodbyes for now.
MacOS Catalina (v10.15) and newer versions only support 64-bit applications. Additionally, Apple has recently transitioned Macs from Intel’s x86-64 processors to ARM64 architecture.
So, if you’re on an older Mac sporting an Intel chip or you’re trying to run a program coded for the wrong architecture, you’ll face the Bad CPU Type in Executable error.
You can usually solve this error by using the 64-bit version of the program and additionally installing Rosetta if necessary. We’ve detailed these and more solutions in the article below.
Table of Contents
What causes the Bad CPU Type in Executable Error?
As stated, 32-bit programs are no longer supported on Macs, starting with macOS Catalina. In addition to this, attempting to run programs designed for Intel processors leads to incompatibility in newer ARM64-based Macs which can also cause this error.
Since 32-bit code or incompatible architecture is no longer acceptable on v10.15 and later, developers should update the source accordingly. As a consumer, you can try some of the solutions we’ve listed below.
Use 64-bit Build
Whether it’s an application or a CLI tool that you’re encountering this error on, the easiest way to resolve it is to use a version compiled for ARM64 architecture.
Sometimes, even after installing the 64-bit version of the program, you may still face this error. In such cases, there are likely additional issues that you can resolve with the solutions listed below.
Set Zsh as Default Shell
Zsh (Z shell) is supposed to be the default login and interactive shell in macOS Catalina and later versions. But sometimes, this may not be the case due to unintentional changes, which can ultimately lead to issues like the Bad CPU Type in Executable error. So, you can set Zsh as the default shell with the following steps:
- Click on the Apple Menu and select System Preferences > Users & Groups.

- Press the lock and input your account credentials.
- From the user list on the left pane, control-click your user name and select Advanced Options.
- Select Zsh from the Login shell menu and press OK to apply the changes.


Install Rosetta 2
You may be aware of the Mac transition to Apple silicon that Tim Cook announced in June 2020. Macs used Intel processors for almost 15 years before recently switching to Apple-designed ARM64 CPUs. Many programs designed to run on Intel processors haven’t yet been revised for the new silicon chips.
Apple understands this, which is why Rosetta, a dynamic binary translator, was reintroduced as Rosetta 2 in macOS Big Sur. The first time you try to run an incompatible program, you will automatically be prompted to install Rosetta 2. Here, you can press Install and input your account credentials to fix the issue. But this is via the GUI.

The Terminal doesn’t automatically detect that Rosetta is missing. As such, if you attempt to execute an incompatible program via the terminal, you’ll encounter the Bad CPU Type in Executable error. You can resolve such issues by manually installing Rosetta 2 with the following steps:
- Press Command + Spacebar to bring up the spotlight, type
terminal, and press Enter. - Execute the following command in the terminal:
softwareupdate --install-rosetta
- Type a and press Enter to accept the license agreement.
- You should see a message stating Install of Rosetta 2 finished successfully. As Rosetta works automatically in the background, you should be able to run previously incompatible programs without any issues now.


Update macOS
In macOS versions earlier than Monterey 12.1, some binaries were still compiled for x86 processors. But the non-ARM binaries have been updated in the newer versions. So if you’re on an older macOS version, now may be a good time to update your Mac. Here are the steps to do so:
- Click on the Apple Menu from the top left corner.
- Select System Preferences > Software Update > Upgrade / Update Now.

- Install the latest available update and restart your Mac.

Some macOS users are reportedly getting the “bad CPU type in executable” error when running commands from the Terminal. This issue is most often met in macOS 10.15 “Catalina” and macOS 11 “Big Sur”.

As it turns out, this particular issue can occur due to several different common scenarios. Here’s a list of potential culprits that might be triggering this error code:
- Old, non-compatible programs – Since Catalina, macOS dropped support for 32-bit executables. So if your program did not made it to 64-bit or some of its libraries are still 32-bit, it may not run properly.
- Rosetta 2 not installed – Apple M1 is an ARM-based chip, different from the Intel processors used in the prior devices. Software needs to be translated from x86 instructions to ARM via Rosetta 2 to be able to run on M1-based devices. Double check that Rosetta 2 is installed on your system.
Update your software
As it turns out, one of the most common instances that might trigger this problem is your software of choice is built for 32-bit system. “bad CPU type in executable”, despite being vague, is just a simple message indicates that your software is not compatible.
Most modern software has a built-in update mechanism, but if it does not, try grabbing the latest version of your software from its official website to see whether the error message goes away.
Install Rosetta 2
When macOS tries to run an app that is not built for Apple-made chip (Apple Silicon), macOS will prompt to install Rosetta 2 to automatically translate the app from x86 to ARM instructions.
But if you run commands in the Terminal, there is no automatic detection for missing Rosetta.
In rare cases, users who recover their Mac from a backup won’t get Rosetta 2 during the restoration process.
If you haven’t been prompted to install Rosetta 2, please manually install it by running the following command.
/usr/sbin/softwareupdate --install-rosetta --agree-to-licenseOnce you got Rosetta installed, you can run the entire terminal app using Rosetta by opening Get Info on Terminal.app in Finder and check the Open using Rosetta box. This way, Terminal and any command or binary it tries to run will go through Rosetta, so you don’t have to worry about manually open each of them manually.
Find all 32-bit executables in your Mac
Now that you know the problem is all about the software is not compatible with the processor and overall architecture, you may ask : How do I know which program I need to reinstall/replace?
Most, if not all, programs you can run from Terminal app are placed in a system path. $PATH environment variable contains all of those path. Here’s a quick command you can run in Terminal to list any 32-bit binaries in your $PATH on macOS-based device.
find `echo $PATH | tr ":" "n"` -perm +1111 -exec file {} ; | grep i386Code language: PHP (php)
Replace all of those programs with 64-bit compatible binaries and you should be good to go.
Replace software with native ARM builds
To find programs which are not compatible with the system (64-bit ready), we can go to System Information > Software. Here you have to inspect Applications and Legacy Software section for any 32-bit software as in the screenshot below.

When searching for 64-bit or ARM-native software, look for something with “SiMac” or “Apple Silicon” or “ARM64”.
Fix bad CPU type in executable for Android Studio
If you’re an Android application developer, you should be looking for solutions to fix your code. In that case, ValueInBrief post is an excellent guide, which may save you hours of debugging time. Quick summary, the solution involved setting renderscriptSupportModeEnabled to false or switch from androidx libraries to the old support libraries. Consult the original post for detailed guide.
When macOS tries to run an app that is not built for Apple silicon, macOS will prompt to install Rosetta 2 to automatically translate the app to Apple silicon.
In Terminal, there is no automatic detection for missing Rosetta to run older architecture command line tools.
If you haven’t been prompted for any other app already, manually install Rosetta 2:
softwareupdate --install-rosetta
If you need to run a universal binary in the previous architecture, use arch and specify the architecture. You need to manually specify the architecture for binaries that need to run other binaries that are not built for Apple silicon, like Homebrew.
arch -x86_64 …
e.g. arch -x86_64 brew install packagename
Alternatively, you can run the entire Terminal app using Rosetta by opening Get Info on Terminal.app in Finder and checking ‘Open using Rosetta’. This way will Terminal and every binary it tries to run through Rosetta, so Apple silicon binaries won’t be supported and performance will be impacted, but you don’t need to specify the architecture to run old binaries.
To switch an existing zsh terminal to x86_64 use this command:
arch -x86_64 zsh
The «error=86, Bad CPU type in executable» is a common issue faced by Android Studio users when running the app on a different architecture than it was built for. This error is generated when the native libraries in the APK are built for a different architecture than the device they are being run on. The architecture of the device and the APK should match to avoid this error.
Method 1: Update Android Studio
To fix the «Cause: error=86, Bad CPU type in executable» issue in Android Studio, you can try updating your Android Studio to the latest version. Here are the steps to do it:
- Open Android Studio and go to «Help» in the menu bar.
- Click on «Check for Updates» and wait for the process to complete.
- If there is a new version available, click on «Update» and follow the instructions to install the update.
- Once the update is installed, restart Android Studio and check if the issue is resolved.
Here is an example code for updating Android Studio:
// Check for updates
Help > Check for Updates

// Install the update
Help > Update
The Help > Check for Updates menu option checks for updates and if there is a new version available, you can install it by clicking on Help > Update.
By updating Android Studio to the latest version, you can resolve the «Cause: error=86, Bad CPU type in executable» issue and enjoy the latest features and improvements in Android Studio.
Method 2: Verify your system requirements
To fix the «Cause: error=86, Bad CPU type in executable» issue in Android Studio, you can verify your system requirements. Follow the steps below to verify your system requirements:
-
Check your system requirements to ensure your computer meets the minimum requirements to run Android Studio. You can find the system requirements on the Android Studio download page.
-
Verify that your computer’s processor is compatible with the version of Android Studio you are trying to install. You can check your processor type by following these steps:
If the output is «i386» or «i686», your processor is 32-bit. If the output is «x86_64», your processor is 64-bit.
-
Check that your computer’s operating system is compatible with the version of Android Studio you are trying to install. You can find the operating system requirements on the Android Studio download page.
-
Ensure that you have installed the required software dependencies for Android Studio. These dependencies include Java Development Kit (JDK), Android SDK, and Android Virtual Device (AVD) Manager.
-
If you have verified your system requirements and still encounter the «Cause: error=86, Bad CPU type in executable» issue, try downloading and installing a different version of Android Studio. You can find previous versions of Android Studio on the Android Studio download page.
By following these steps, you should be able to fix the «Cause: error=86, Bad CPU type in executable» issue in Android Studio.
Method 3: Change the Build Variant
To fix the «Cause: error=86, Bad CPU type in executable» issue in Android Studio, you can try changing the Build Variant. Here are the steps:
-
In Android Studio, open the «Build Variants» window by clicking on the «Build Variants» tab in the left sidebar.
-
In the «Build Variants» window, select the variant that matches your device’s CPU architecture. For example, if your device has an ARM CPU, select the «arm» variant.
-
After selecting the appropriate variant, rebuild your project by going to «Build» > «Rebuild Project» in the top menu bar.
-
Once the project is rebuilt, try running it on your device again. The error should be resolved.
Here is an example of changing the Build Variant in the build.gradle file:
android {
    defaultConfig {
        // ...
        ndk {
            // Select the appropriate ABI for your device's CPU architecture
            abiFilters 'armeabi-v7a', 'arm64-v8a', 'x86', 'x86_64'
        }
    }
    // ...
}
In this example, the ndk block is used to specify the ABI filters for the project. You can select the appropriate ABI filters based on your device’s CPU architecture.
Another example of changing the Build Variant is through the Android Studio UI:
-
Click on the «Build Variants» tab in the left sidebar.
-
Select the appropriate variant from the dropdown menu.
-
Rebuild the project by clicking on the «Make Project» button in the top toolbar.
-
Run the project on your device.
By following these steps, you should be able to fix the «Cause: error=86, Bad CPU type in executable» issue in Android Studio by changing the Build Variant.
Method 4: Set the Target CPU Architecture
To fix the «Cause: error=86, Bad CPU type in executable» issue in Android Studio, you can set the target CPU architecture in your project settings. Here are the steps to do it:
- Open your Android Studio project.
- Click on the «File» menu and select «Project Structure».
- In the left panel, select «app».
- In the right panel, select the «Flavors» tab.
- Under «Target CPU Architecture», select the appropriate architecture for your device. For example, if you are running on an Intel-based device, select «x86».
- Click «OK» to save your changes.
Here is an example of how to set the target CPU architecture in your build.gradle file:
android {
    defaultConfig {
        ndk {
            abiFilters "armeabi-v7a", "x86"
        }
    }
}
This will set the target CPU architecture to «armeabi-v7a» and «x86».
You can also set the target CPU architecture in your AndroidManifest.xml file:
<uses-sdk
    android:minSdkVersion="14"
    android:targetSdkVersion="21"
    android:hardwareAccelerated="true"
    android:glEsVersion="0x00020000"
    android:required="true"
    android:screenOrientation="portrait"
    android:resizeableActivity="false"
    android:supportsRtl="true"
    android:vmSafeMode="false"
    android:debuggable="false"
    android:testOnly="false"
    android:extractNativeLibs="true"
    android:hasCode="true"
    android:targetCpuAbi="x86" />
This will set the target CPU architecture to «x86».
By setting the target CPU architecture, you can ensure that your app is compatible with the device you are running it on, and avoid the «Cause: error=86, Bad CPU type in executable» issue in Android Studio.
Method 5: Use ABI Management in Android Studio
To fix the «Cause: error=86, Bad CPU type in executable» issue in Android Studio, you can use the ABI Management feature. This feature allows you to select which ABIs (Application Binary Interfaces) your app will support. Here are the steps to use ABI Management in Android Studio:
- Open your project in Android Studio.
- Click on «File» in the top menu, then select «Project Structure».
- In the Project Structure window, select «app» under «Modules» on the left side.
- Click on the «Flavors» tab.
- Under «Advanced Options», check the box next to «Enable ABI management».
- Click on the «Default» tab.
- Select the ABIs that you want to support, then click «OK».
Here’s an example of how to select the ABIs in the build.gradle file:
android {
    defaultConfig {
        ndk {
            abiFilters "armeabi-v7a", "x86"
        }
    }
}
In this example, the app will support the armeabi-v7a and x86 ABIs.
You can also set the ABIs using the Android Studio UI. Here’s how:
- Open your project in Android Studio.
- Click on «File» in the top menu, then select «Project Structure».
- In the Project Structure window, select «app» under «Modules» on the left side.
- Click on the «Flavors» tab.
- Under «Advanced Options», check the box next to «Enable ABI management».
- Click on the «Default» tab.
- Click on the «Select ABIs» button.
- Select the ABIs that you want to support, then click «OK».
Once you’ve selected the ABIs, you can build and run your app. This should fix the «Cause: error=86, Bad CPU type in executable» issue.