I got it working with the following code:
import axios from 'axios';
import config from '../../configuration.json';
import qs from 'qs';

const baseURL = config['baseUrl_local'];
let authTokenRequest;

/**
  * @description axios instance for ajax requests
*/

var client = axios.create({
    baseURL: baseURL,
    headers: {
        appID: 8,
        version: "1.1.0",
        empID: localStorage.getItem('empID'),
        token: localStorage.getItem('accessToken')
    }
});

/**
 * @description this method calls a requestNewToken method to issue a
 new token to the client
*/

 function getAuthToken() {
   if (!authTokenRequest) {
     authTokenRequest = requestNewToken();
     authTokenRequest.then(resetAuthTokenRequest, resetAuthTokenRequest);
   }

   return authTokenRequest;
 }

/**
  * @description this method requests the server to issue a new token,
  the server response is updated in local storage accessToken
*/

function requestNewToken() {
  var newToken = request({
  method: "post",
  url: '/sign-in',
  data:  qs.stringify({
         "userName":localStorage.getItem('userName'),
         "password":localStorage.getItem('password')
         })
  }).then((res)=>{
  if(res.status == "success"){
    localStorage.setItem('accessToken',res.data.accessToken);
    //if featureArray is present in response object, update the
    featureArray in local storage
    if(res.data.features){
      localStorage.setItem(
      'featureArray',
     JSON.stringify(res.data.features));
    }
    client = axios.create({
     baseURL: baseURL,
     headers: {
          appID: 8,
          version: "1.1.0",
          empID: localStorage.getItem('empID'),
          token: localStorage.getItem('accessToken')
      }
   });
 } else {
  window.location = "/logout";
 }
});

 return newToken;
}

function resetAuthTokenRequest() {
  authTokenRequest = null;
 }

/**
  * @description if any of the API gets 401 status code, this method
   calls getAuthToken method to renew accessToken
  * updates the error configuration and retries all failed requests
  again
*/

client.interceptors.response.use(undefined, err => {
  const error = err.response;
  // if error is 401
  if (error.status===401 && error.config &&
  !error.config.__isRetryRequest) {
  // request for a new token
  return getAuthToken().then(response => {
   // update the error config with new token
   error.config.__isRetryRequest = true;
   error.config.headers.token= localStorage.getItem("accessToken");
   return client(error.config);
  });
 }
});

/**
 * @description wrapper for making ajax requests
 * @param {object} object with method,url,data etc.
*/

const request = function(options) {
  const onSuccess = function(response) {
    return response.data;
  }
 const onError = function(error) {
  //console.error('Request Failed:', error.config);
   if (error.response) {
  //console.error('Status:',  error.response.status);
  //console.error('Data:',    error.response.data);
  //console.error('Headers:', error.response.headers);
  } else {
  console.error('Error Message:', error.message);
  }
 return Promise.reject(error.response || error.message);
 }

return client(options)
        .then(onSuccess)
        .catch(onError);
        options
}

export default request;
[EDIT] Its 2019, Here is yet another implementation for the same. The above solution is great but does not work well with multiple failed request, in turn it calls getToken with the updated token as well.
 import axios from "axios";

 /* @internal */
 import config from "../config";
 import TokenService from "./token_service"; // Could You please provide code from this file too?

class Request {
    constructor() {
        this.baseURL = config.baseUrl;
        this.isRefreshing = false;
        this.failedRequests = [];
        this.tokenService = new TokenService();
        this.client = axios.create({
            baseURL: config.apiServerBaseUrl,
            headers: {
               clientSecret: this.clientSecret,
            },
        });
        this.beforeRequest = this.beforeRequest.bind(this);
        this.onRequestFailure = this.onRequestFailure.bind(this);
        this.processQueue = this.processQueue.bind(this);
        this.client.interceptors.request.use(this.beforeRequest);
        this.client.interceptors.response.use(this.onRequestSuccess,
this.onRequestFailure);
}

beforeRequest(request) {
    const token = TokenService.getAccessToken();
    request.headers.Authorization = `Token ${token}`;
    return request;
}

static onRequestSuccess(response) {
    return response.data;
}

async onRequestFailure(err) {
    const { response } = err;
    if (response.status === 401 && err && err.config && !err.config.__isRetryRequest) {
        if (this.isRefreshing) {
            try {
                const token = await new Promise((resolve, reject) => {
                    this.failedRequests.push({ resolve, reject });
                });
                err.config.headers.Authorization = `Bearer ${token}`;
                return this.client(err.config);
            }
            catch (e) {
                return e;
            }
        }
        this.isRefreshing = true;
        err.config.__isRetryRequest = true;
        return new Promise((resolve, reject) => {
            this.tokenService.refreshAccessToken().then((token) => {
                this.tokenService.setAccessToken(token);
                err.config.headers.Authorization = `Bearer ${token}`;
                this.isRefreshing = false;
                this.processQueue(null, token);
                resolve(this.client(err.config));
            }).catch((e) => {
                this.processQueue(e, null);
                reject(err.response);
            });
        });
    }
    throw response;
}

processQueue(error, token = null) {
    this.failedRequests.forEach((prom) => {
        if (error) {
            prom.reject(error);
        } else {
            prom.resolve(token);
        }
       });
        this.failedRequests = [];
    }

}

const request = new Request();

export default request.client;
401 error, or «Unauthorized», indicates that the client is not authenticated and is not authorized to access a specific resource. In an API context, this typically means that the client needs to provide valid authentication credentials in order to access the requested data. When using Axios in React, it’s important to handle these 401 errors properly in order to maintain the integrity of the application and ensure that users are able to properly authenticate and access the resources they need.
Method 1: Global Axios Error Handling
To handle 401 errors globally in Axios and React, you can use Axios Interceptors. Interceptors are functions that can be registered globally or on a single request, and they will be executed for every request/response. Here’s how to add a 401 interceptor globally:
import axios from 'axios';

axios.interceptors.response.use(
  response => response,
  error => {
    if (error.response.status === 401) {
      // Handle 401 error here
    }
    return Promise.reject(error);
  }
);
In this code, we’re adding a response interceptor to Axios that will execute whenever there’s an error. If the error is a 401 error, we can handle it however we want (e.g. redirect to login page, show a message to the user, etc.). If it’s not a 401 error, we simply reject the promise so that the error can be handled elsewhere in the application.
You can also add a request interceptor to Axios that will add an Authorization header to every request:
import axios from 'axios';

axios.interceptors.request.use(
  config => {
    const token = localStorage.getItem('token');
    if (token) {
      config.headers.Authorization = `Bearer ${token}`;
    }
    return config;
  },
  error => Promise.reject(error)
);
In this code, we’re adding a request interceptor to Axios that will add an Authorization header to every request if there’s a token in local storage. This can help prevent 401 errors from occurring in the first place.
Overall, using Axios interceptors is a powerful way to handle errors and modify requests globally in your application.
Method 2: Catch Error at API Call Level
To handle a 401 (Authentication Error) in axios and react, you can catch the error at the API call level. Here’s how you can do it:
- Import axios in your component:
import axios from 'axios';- Create a function to make the API call:
const fetchData = async () => {
  try {
    const response = await axios.get('https://example.com/api/data');
    console.log(response.data);
  } catch (error) {
    if (error.response.status === 401) {
      console.log('Authentication Error');
      // handle authentication error here
    } else {
      console.log(error);
    }
  }
};- Call the fetchData function when needed:
In the above code, we are using the async/await syntax to make the API call. We are catching any errors that occur and checking if the error response status is 401. If it is, we log an authentication error message and handle the error accordingly. If it’s not a 401 error, we log the error message to the console.
Note that you can also handle the error globally using axios interceptors. However, this approach allows you to handle the error at the API call level.
Method 3: Use Axios Interceptors
To handle 401 errors in Axios and React, you can use Axios Interceptors. Axios Interceptors allow you to intercept requests or responses before they are handled by then or catch. You can use this to check for authentication errors and handle them accordingly.
Here are the steps to handle 401 errors in Axios and React using Axios Interceptors:
- Import Axios and create an instance of it:
import axios from 'axios';

const instance = axios.create({
  baseURL: 'https://your-api-url.com'
});- Create an Axios Interceptor for requests:
instance.interceptors.request.use(
  config => {
    const token = localStorage.getItem('token');
    if (token) {
      config.headers.Authorization = `Bearer ${token}`;
    }
    return config;
  },
  error => Promise.reject(error)
);
This interceptor adds the Authorization header to requests if a token is present in the local storage.
- Create an Axios Interceptor for responses:
instance.interceptors.response.use(
  response => response,
  error => {
    if (error.response.status === 401) {
      localStorage.removeItem('token');
      window.location.href = '/login';
    }
    return Promise.reject(error);
  }
);
This interceptor checks for a 401 error in responses. If a 401 error is detected, it removes the token from local storage and redirects the user to the login page.
- Use the Axios instance to make API calls:
instance.get('/api/data')
  .then(response => console.log(response.data))
  .catch(error => console.log(error));
This example uses the Axios instance to make a GET request to the /api/data endpoint. If the request is successful, the response data is logged to the console. If there is an error, it is also logged to the console.
By using Axios Interceptors, you can handle authentication errors in a centralized and consistent way throughout your application.
Method 4: Implement a Custom Axios Instance
To handle 401 (Authentication Error) in Axios and React, we can implement a custom Axios instance. This will allow us to intercept the response from the server and handle the error in a centralized location.
Here are the steps to implement a custom Axios instance:
- Import Axios and create a new instance with
create()method.
import axios from 'axios';

const instance = axios.create({
  baseURL: 'https://api.example.com',
});- Add an interceptor to the instance with
interceptorsproperty. This will intercept the response from the server.
instance.interceptors.response.use(
  response => response,
  error => {
    if (error.response.status === 401) {
      // handle 401 error
    }
    return Promise.reject(error);
  }
);- Use the custom Axios instance in your React component.
import React, { useEffect, useState } from 'react';

function MyComponent() {
  const [data, setData] = useState(null);

  useEffect(() => {
    instance.get('/data')
      .then(response => setData(response.data))
      .catch(error => console.log(error));
  }, []);

  return (
    <div>
      {data && <p>{data}</p>}
    </div>
  );
}
In the above example, we are using the custom Axios instance to make a GET request to /data. If the response from the server is successful, we set the data in the component state. If there is an error, we log the error to the console.
By implementing a custom Axios instance, we can handle 401 (Authentication Error) in a centralized location and avoid duplicating code throughout our application.
![]()
i can’t handle the 401 Unauthorized error. but before that axios always console.log() the POST 401 (Unauthorized) error. i don’t want to see that. how to fix it.

This is the error i got as result.. i use Next.js / React
Error: Request failed with status code 401
    at createError (eval at evalScript (http://localhost:3000/_next/next-dev.bundle.js:36657:9), <anonymous>:971:16)
    at settle (eval at evalScript (http://localhost:3000/_next/next-dev.bundle.js:36657:9), <anonymous>:2964:13)
    at XMLHttpRequest.handleLoad (eval at evalScript (http://localhost:3000/_next/next-dev.bundle.js:36657:9), <anonymous>:813:8)
![]()
This is a regular HTTP response, not an issue in Axios.
You should check the documentation of the API you’re using in order to solve your problem.
![]()
Hi @Chathula, I also research about to handle this. You can using validateStatus config in this case.
See about this here !
![]()
@Vietworm I’l give a try!
Thank you!!
![]()
validateStatus work Fine
Thank you
![]()
getting this error how can solve it
![]()
@Bilal112 Did you try catching the error with error.response.data.error? See example:
this.$http.$post('url', user).then((response) => {
  //
})
.catch((error) => {
  this.showErrors(error.response.data.error)
})
Btw, i’m using Nuxtjs and axios module.
erdemoflaz reacted with heart emoji
![]()
login = () => {
axios.post(«https://192.168.0.10:8244/authenticateUser/1.0.0/outh», {
headers: {
«Content-Type»: «application/json»,
«Accept»: «application/json»,
«Authorization»: «Bearer df498c83-1c88-308e-a224-5408dd67bb7f»
},
data: {
«authKey»: «YWRtaW46YWRtaW4=»,
«clientId»: «dWZkSHJnd05ZUjNDTXVpa3NDakJ4anNvaWZZYTpqcks5ZmFjZjBBbHRLVzY1UFVNZjl0OWRSck1h»,
«username»: «KPFACTORS/Alok.Suman»,
«passkey»: «Alok@123»
}
})
.then(response => response.json())
.then(response => console.log(«hi» + response))
.catch(err => console.log(«error » + err));
};
![]()
Some APIs have property like «apikey» and you should indicate that property when you are using axios.
You should look your API’s doc for properties and also you can use Postman for indicate your url, header, params etc. easily.
@rubennorte, @lephuhai, @AlokSuman thank you 
componentDidMount () {
    axios
      .get("https://api.hurriyet.com.tr/v1/newsphotogalleries?$top=20", {
        params : {"$top": "20"},
        headers : {"apikey": "b21x5457136cxa5fdafc7v1x645526vb"}})
        .then(news => console.log(news))
}
![]()
i received some different response in postman while the same thing i get an error in axios
![]()
i received some different response in postman while the same thing i get an
Hi
What is the error
waqar
![]()
@Bilal112
that’s my error
Request failed with status code 401 at createError (E:\React Native\EximApp\EximApp\node_modules\axios\lib\core\createError.js:16) at settle (E:\React Native\EximApp\EximApp\node_modules\axios\lib\core\settle.js:17) at XMLHttpRequest.handleLoad
while with postman that my response
{ "error": "Unauthorised" }
![]()
@Bilal112
that’s my error
Request failed with status code 401 at createError (E:\React Native\EximApp\EximApp\node_modules\axios\lib\core\createError.js:16) at settle (E:\React Native\EximApp\EximApp\node_modules\axios\lib\core\settle.js:17) at XMLHttpRequest.handleLoadwhile with postman that my response
{ "error": "Unauthorised" }
check this
| validateStatus: (status: number) => status >= 200 && status < 300, |
line 39, axios just get status in range 200-300
if you change status on backend, you can get your response like in postmant
hope this can help you guys
![]()
Added debugger to check the object, so this is how the error object looks like.
Refer screenshot. Right side(under scope)

![]()
axios
locked and limited conversation to collaborators
May 22, 2020
Answer by Sonny Villegas
Please be sure to answer the question. Provide details and share your research!,This is correct and working code solution,
Uncertainities of orbital elements queried from JPL Horizons
And then add the fields to the form you want to send :
let bodyFormData = new FormData();
bodyFormData.set('email',this.state.email);
bodyFormData.set('password', this.state.password);
And then you can use axios post method (You can amend it accordingly)
axios({
    method: 'post',
    url: 'http://127.0.0.1:8000/api/login',
    data: bodyFormData,
    config: { headers: {'Content-Type': 'multipart/form-data' }}
    })
    .then(function (response) {
        //handle success
        console.log(response);
    })
    .catch(function (response) {
        //handle error
        console.log(response);
    });
Answer by Holland Torres
This is the error i got as result.. i use Next.js / React,See about this here !,that’s my error
Request failed with status code 401 at createError (E:\React Native\EximApp\EximApp\node_modules\axios\lib\core\createError.js:16) at settle (E:\React Native\EximApp\EximApp\node_modules\axios\lib\core\settle.js:17) at XMLHttpRequest.handleLoad
Error: Request failed with status code 401
    at createError (eval at evalScript (http://localhost:3000/_next/next-dev.bundle.js:36657:9), <anonymous>:971:16)
    at settle (eval at evalScript (http://localhost:3000/_next/next-dev.bundle.js:36657:9), <anonymous>:2964:13)
    at XMLHttpRequest.handleLoad (eval at evalScript (http://localhost:3000/_next/next-dev.bundle.js:36657:9), <anonymous>:813:8)
Answer by Krew Bowen
#javascript
#jquery
,
#javascript
#nodejs
#commandline
,
#javascript
#promises
#howto
axios.post('http://10.0.1.14:8001/api/logout',request_data, {
          headers: {
              'Content-Type': 'application/json',
              'Authorization': 'Bearer '+token
          },
      })
      .then((response) => {
        console.log('response',response.data)

      })
      .catch((error) => {
        alert('error',error.response)
        dispatch(userUpdateProfileFail())

      })

  // console.log('----cheers---------',data)
dispatch(userUpdateProfileSuccess(data))
Answer by Josie Franco
Why there’s even token mentioned? I’m registering and logging in, I don’t need token.
Here’s my code to login page.,Hello,
I’ve got a problem. On application (React) I have register and login pages, they were working fine before, but I updated my nodejs and also created new strapi project, made all same settings as my previous one, and now everytime I try using axios.post to register or login, i get error xhr.js:177 POST http://localhost:1338/auth/local 401 (Unauthorized) or same error but GET. To be more precise Here’s error and message:,Also, I’m using 1338 port, so that’s not the case. Also with Postman it works fine, I can register and login, everything…
Hello,
I’ve got a problem. On application (React) I have register and login pages, they were working fine before, but I updated my nodejs and also created new strapi project, made all same settings as my previous one, and now everytime I try using axios.post to register or login, i get error xhr.js:177 POST http://localhost:1338/auth/local 401 (Unauthorized) or same error but GET. To be more precise Here’s error and message:
error: "Unauthorized"
message: "Invalid token."
Why there’s even token mentioned? I’m registering and logging in, I don’t need token.
Here’s my code to login page.
axios
.post('http://localhost:1338/auth/local', {
identifier: this.state.userName,
password: this.state.userPassword
 })
.then(response => {
// Handle success.
console.log('Well done!');
login(response.data.jwt);
})
.catch(error => {
// Handle error.
console.log('An error occurred:', error.response);
});
Answer by Presley Diaz
If you want to use interceptors to handle 401 error here is code snippet.,tl;dr — It was a problem with CORS and how it was setup, so axios never got the information back from the browser. You have to sort it out from the server side.,if you have a similar problem, you’ll see it in the browser console. The browser will prevent you from accessing a different url over ajax.
If you want to use interceptors to handle 401 error here is code snippet.
axios.interceptors.response.use(response => {
   return response;
}, error => {
  if (error.response.status === 401) {
   //place your reentry code
  }
  return error;
});
This works:
// Add a 401 response interceptor
window.axios.interceptors.response.use(function (response) {
    return response;
}, function (error) {
    if (401 === error.response.status) {
        // handle error: inform user, go to login, etc
    } else {
        return Promise.reject(error);
    }
});
Answer by Mya Calhoun
How to see axios error response JSON in React,The list could have gone on and on, but they all ask for the sample simple question:,JS Axios – how to get response body in event of error?
axios.get('EndpointWithAuthorizedError')
    .then((response) => {})
    .catch((error) => {
        console.log(error);
    })
Answer by Nina Medrano
Answer by Brixton Graham
Axios lets us intercept request and response, former is used when we want to add additional configuration (headers, data etc) while the latter is used when we want to perform some action or modify the response (log errors, logout on 401 etc).,Here, we will intercept and add auth headers to all requests that will be made using Axios instance.,If status code is 401, redirect user to Login route. If we keep client side authentication states, reset them.
1const requestHandler = request => {
2  request.headers['Authorization'] = getAuthHeader();
3
4  return request;
5}
6
7axios.interceptors.request.use(request => requestHandler(request));
Answer by Anais Reyna
The first code example I will show is how to set up an Axios request interceptor. The example is written inside of a React application, but I expect the process to be similar regardless of which JavaScript framework (or not) you’re using.,This particular code lives at the root of the React application in its index.js file inside the src/ folder.,So that’s one example of an Axios response interceptor on the client side, now let’s look at one on the server side.
In the example above, axios is imported at the top of the file with ES6 import syntax, then it’s ready to be used. I’m using ES6 arrow functions in my example, but it translates to basic JavaScript as:
axios.interceptors.request.use( function(successfulReq) { ...modify code; return successfulReq; }, function(error) { ...return Promise.reject(error); });Answer by Azalea Lambert
The client is banned for some reason. Some applications use 401 Unauthorized Errors to restrict access requests from specific IP addresses, so if authentication is not the issue, a server-side ban could be the problem.,Since the 401 Unauthorized Error is a client error response code, it’s best to start by troubleshooting any potential client-side issues that could be causing this error. Here are a handful of tips to try on the browser or device that is giving you problems.,If you aren’t running a CMS application — or even if you are, but you’re confident the 401 Unauthorized Error isn’t related to that — here are some additional tips to help you troubleshoot what might be causing the issue on the server-side of things.
In this tutorial, I will show you how to work with Axios Interceptors: eject, error, 401 status, handling infinite loop and Refresh Token example.
Related Post:
– Axios request: Get/Post/Put/Delete example
– Axios File Upload example
– React Refresh Token with Axios Interceptors
– React + Redux: Refresh Token with Axios Interceptors
– Vue Refresh Token with Axios Interceptors
– Vue 3 Refresh Token with Axios Interceptors
Contents
- Axios interceptors Overview
- Axios interceptors Error
- Axios interceptors Eject
- Axios interceptors for 401 status
- Axios interceptor Infinite loop
- Axios Interceptors with Refresh Token example
- Conclusion
- Further Reading
Axios interceptors Overview
An Interceptor can be understood as a filter of http requests and responses before they are actually sent or received.
This allows us to manipulate the header, body, parameters of the requests sent to the server as well as check the responses received from the server for the most reasonable.
We can intercept requests or responses before they are handled by then or catch.
// Request interceptor
axios.interceptors.request.use((config) => {...});

// Response interceptor
axios.interceptors.response.use((response) => {...});
You can also get request errors or response errors in Axios interceptors:
– Request:
axios.interceptors.request.use(
  (config) => {
    // Do something before request is sent
    return config;
  },
  (error) => {
    // Do something with request error
    return Promise.reject(error);
  });
– Response:
axios.interceptors.response.use(
  (response) => { // Any status code from range of 2xx
    // Do something with response data
    return response;
  },
  (error) => { // Any status codes outside range of 2xx
    // Do something with response error
    return Promise.reject(error);
  });
Axios interceptors Eject
You can add an Interceptors to an instance of Axios.
const instance = axios.create(...);
const myInterceptor = instance.interceptors.request.use(...);
And then, remove the interceptor:
axios.interceptors.request.eject(myInterceptor);
Axios interceptors for 401 status
If we want to handle 401 status on interceptor response or ANOTHER_STATUS_CODE, just check error.response.status like this:
axios.interceptors.response.use(
  (response) => {
    return res;
  },
  async (error) => {
    if (error.response) {
      if (error.response.status === 401) {
        // Do something, call refreshToken() request for example;
        // return a request
        return axios_instance(config);
      }

      if (error.response.status === ANOTHER_STATUS_CODE) {
        // Do something
        return Promise.reject(error.response.data);
      }
    }

    return Promise.reject(error);
  }
);
Axios interceptor Infinite loop
In case the request is failed again, and the server continue to return 401 status code, it may go to Infinite loop. How to handle this?
We use a flag call _retry on original Request (config). _retry is set to true right after the first time we meet 401 status.
axios.interceptors.response.use(
  (response) => {
    return res;
  },
  async (error) => {
    const originalConfig = error.config;
    if (error.response) {
      if (error.response.status === 401 && !originalConfig._retry) {
        originalConfig._retry = true;

        // Do something, call refreshToken() request for example;
        // return a request
        return axios_instance(config);
      }

      if (error.response.status === ANOTHER_STATUS_CODE) {
        // Do something
        return Promise.reject(error.response.data);
      }
    }

    return Promise.reject(error);
  }
);
Axios Interceptors with Refresh Token example
In previous posts, we have implement JWT refresh token on server side:
- Spring Boot JWT Refresh Token example
- Node.js JWT Refresh Token example with MySQL/PostgreSQL
- Node.js JWT Refresh Token example with MongoDB
The diagram shows flow of how we implemented Authentication process with Access Token and Refresh Token.
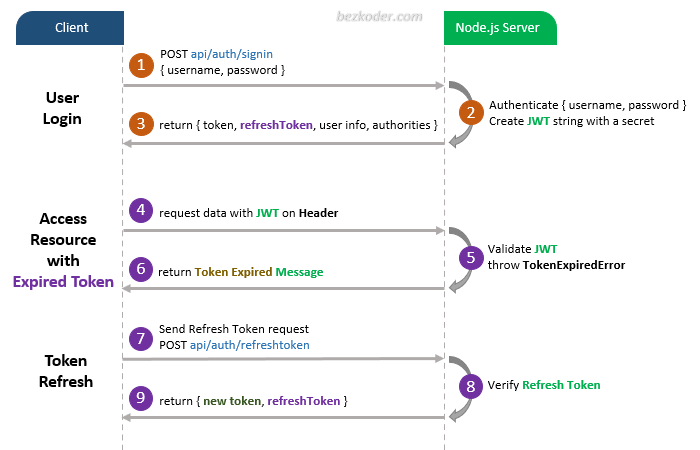
– A legal JWT must be added to HTTP Header if Client accesses protected resources.
– A refreshToken will be provided at the time user signs in.
This is Client that we’re gonna create:
– Login and receive access Token and refresh Token:
– Access resource successfully with accessToken.
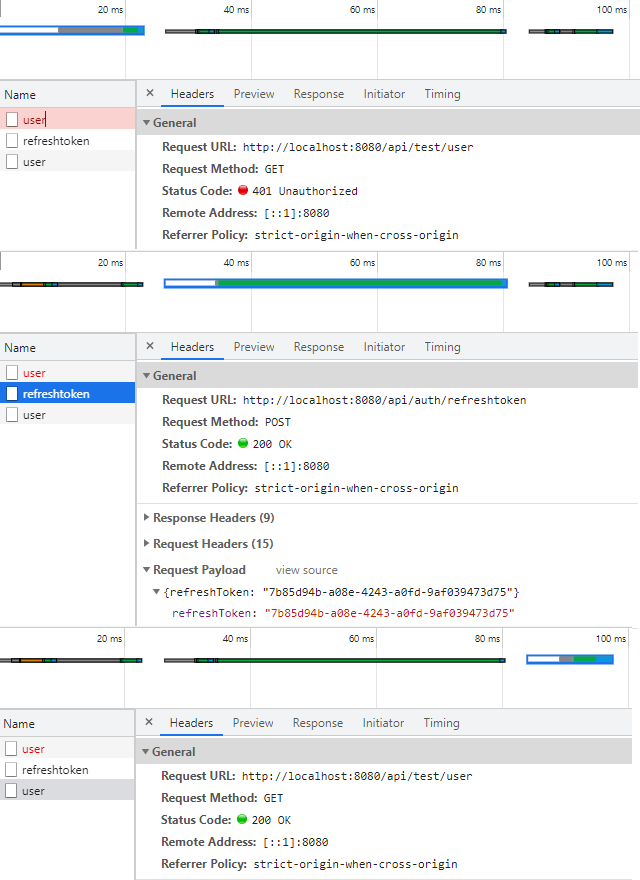
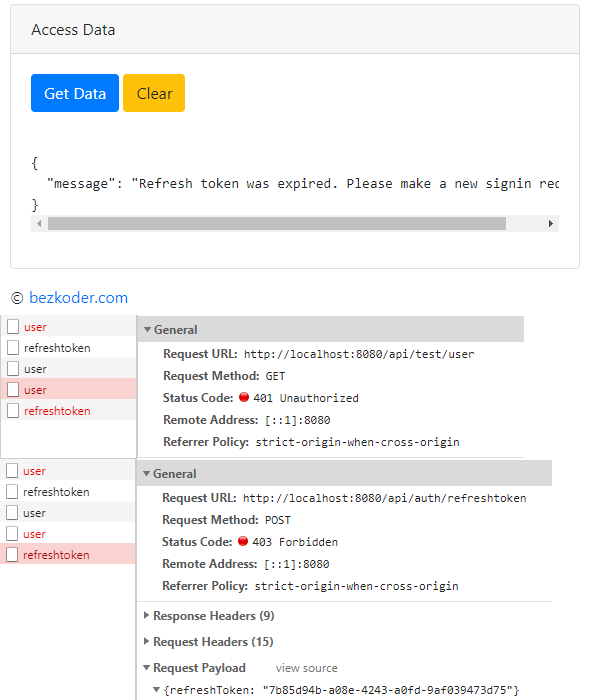
– Continue to access resource with accessToken but when the server returns response telling that the accessToken is expired.
Interceptor automatically sends /refreshtoken request, get new accessToken.
– Wait for the Refresh Token expired, send a new Request.
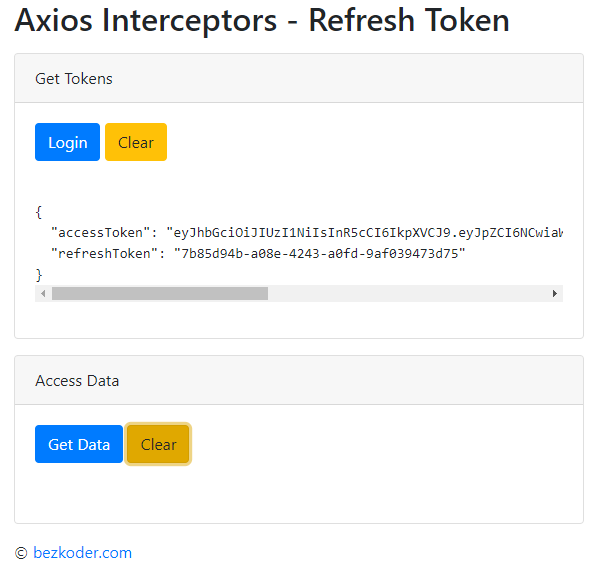
Implement Refresh Token using Axios Interceptors
First we create HTML file with following code.
index.html
<!DOCTYPE html>
<html>
  <head>
    <meta charset="utf-8" />
    <meta name="viewport" content="width=device-width, initial-scale=1" />
    <title>Axios Interceptors - Refresh Token</title>
    <link
      rel="stylesheet"
      href="https://cdn.jsdelivr.net/npm/[email protected]/dist/css/bootstrap.min.css"
    />
  </head>
  <body>
    <div class="container my-3" style="max-width: 600px">
      <h2>Axios Interceptors - Refresh Token</h2>

      <div class="card mt-3">
        <div class="card-header">Get Tokens</div>
        <div class="card-body">
          <button class="btn btn-primary" onclick="login()">Login</button>
          <button class="btn btn-warning" onclick="clearOutput1()">
            Clear
          </button>
        </div>
        <div class="card-body" id="getResult1"></div>
      </div>

      <div class="card mt-3">
        <div class="card-header">Access Data</div>
        <div class="card-body">
          <button class="btn btn-primary" onclick="getData()">Get Data</button>
          <button class="btn btn-warning" onclick="clearOutput2()">
            Clear
          </button>
        </div>
        <div class="card-body" id="getResult2"></div>
      </div>

      <p class="mt-3">
        ©
        <a href="https://www.bezkoder.com" target="_blank">bezkoder.com</a>
      </p>
    </div>

    <script src="https://unpkg.com/axios/dist/axios.min.js"></script>

    <script src="main.js"></script>
  </body>
</html>
Now we use Axios Interceptors to work with Refresh Token.
main.js
function getLocalAccessToken() {
  const accessToken = window.localStorage.getItem("accessToken");
  return accessToken;
}

function getLocalRefreshToken() {
  const refreshToken = window.localStorage.getItem("refreshToken");
  return refreshToken;
}

const instance = axios.create({
  baseURL: "http://localhost:8080/api",
  headers: {
    "Content-Type": "application/json",
  },
});

instance.interceptors.request.use(
  (config) => {
    const token = getLocalAccessToken();
    if (token) {
      config.headers["x-access-token"] = token;
    }
    return config;
  },
  (error) => {
    return Promise.reject(error);
  }
);

instance.interceptors.response.use(
  (res) => {
    return res;
  },
  async (err) => {
    const originalConfig = err.config;

    if (err.response) {
      // Access Token was expired
      if (err.response.status === 401 && !originalConfig._retry) {
        originalConfig._retry = true;

        try {
          const rs = await refreshToken();
          const { accessToken } = rs.data;
          window.localStorage.setItem("accessToken", accessToken);
          instance.defaults.headers.common["x-access-token"] = accessToken;

          return instance(originalConfig);
        } catch (_error) {
          if (_error.response && _error.response.data) {
            return Promise.reject(_error.response.data);
          }

          return Promise.reject(_error);
        }
      }

      if (err.response.status === 403 && err.response.data) {
        return Promise.reject(err.response.data);
      }
    }

    return Promise.reject(err);
  }
);

function signin() {
  return instance.post("/auth/signin", {
    username: "zkoder",
    password: "12345678",
  });
}

function refreshToken() {
  return instance.post("/auth/refreshtoken", {
    refreshToken: getLocalRefreshToken(),
  });
}

function getUserContent() {
  return instance.get("/test/user");
}

async function login() {
  var resultElement = document.getElementById("getResult1");
  resultElement.innerHTML = "";

  try {
    const res = await signin();

    const { accessToken, refreshToken } = res.data;
    window.localStorage.setItem("accessToken", accessToken);
    window.localStorage.setItem("refreshToken", refreshToken);

    resultElement.innerHTML =
      "<pre>" +
      JSON.stringify({ accessToken, refreshToken }, null, 2) +
      "</pre>";
  } catch (err) {
    resultElement.innerHTML = err;
  }
}

async function getData() {
  var resultElement = document.getElementById("getResult2");
  resultElement.innerHTML = "";

  try {
    const res = await getUserContent();

    resultElement.innerHTML =
      "<pre>" + JSON.stringify(res.data, null, 2) + "</pre>";
  } catch (err) {
    resultElement.innerHTML = "<pre>" + JSON.stringify(err, null, 2) + "</pre>";
  }
}

function clearOutput1() {
  var resultElement = document.getElementById("getResult1");
  resultElement.innerHTML = "";
}

function clearOutput2() {
  var resultElement = document.getElementById("getResult2");
  resultElement.innerHTML = "";
}
Conclusion
Today we’ve known the way to work with Refresh Token using Axios Interceptors. I also show you how to use Axios Interceptors eject, error along with handling 401 status and infinite loop.
You will need back-end code that implements JWT with Refresh Token in one of following tutorials:
- Spring Boot JWT Refresh Token example
- Node.js JWT Refresh Token example with MySQL/PostgreSQL
- Node.js JWT Refresh Token example with MongoDB
You can also apply this in:
– React Refresh Token with Axios Interceptors
– React + Redux: Refresh Token with Axios Interceptors
– Vue Refresh Token with Axios Interceptors
– Vue 3 Refresh Token with Axios Interceptors
Further Reading
– Axios request: Get/Post/Put/Delete example
– Axios File Upload example
– Nodejs Express + React/Angular/Vue:
- Node.js Express + React: JWT Authentication & Authorization example
- Node.js Express + Angular 8: JWT Authentication & Authorization example
- Node.js Express + Angular 10: JWT Authentication & Authorization example
- Node.js Express + Angular 11: JWT Authentication & Authorization example
- Node.js Express + Angular 12: JWT Authentication & Authorization example
- Node.js Express + Angular 13: JWT Authentication & Authorization example
- Node.js Express + Angular 14: JWT Authentication & Authorization example
- Node.js Express + Vue.js: JWT Authentication & Authorization example
– Spring Boot + React/Angular/Vue:
- React + Spring Boot: JWT Authentication & Authorization example
- Angular 8 + Spring Boot: JWT Authentication & Authorization example
- Angular 10 + Spring Boot: JWT Authentication & Authorization example
- Angular 11 + Spring Boot: JWT Authentication & Authorization example
- Angular 12 + Spring Boot: JWT Authentication & Authorization example
- Angular 13 + Spring Boot: JWT Authentication & Authorization example
- Angular 14 + Spring Boot: JWT Authentication & Authorization example
- Vue + Spring Boot: JWT Authentication & Authorization example