[Материнская плата] Возможные Q-CODE(коды ошибок) и их устранение
Пожалуйста, проверьте, поддерживает ваша плата Q-CODE или нет:

С помощью распространенных Q-CODE можно определить распрестраненные проблемы при установке компонентов в материнскую плату.
Пожалуйста, следуйте таблице Q-CODE ниже для устранения неисправности:
|
Распространенные Q-CODE для плат на базе Intel |
Распространенные Q-CODE для плат на базе AMD |
ошибка CPU |
ошибка памяти |
ошибка графической карты |
Другое |
|
00,D0 |
V |
||||
|
53,55 |
F9 |
V |
|||
|
D6 |
V |
||||
|
B0,99,15,53, |
V |
V |
|||
|
D6 |
V |
V |
|||
|
00,19,30,40,55 |
V |
V |
V |
||
|
A0,A2 |
A0,A2 |
Ненормальная загрузка устройства |
|||
|
B2 |
B2 |
Внешнее устройство работает неверно |
|||
|
A9 |
A9 |
Загрузка в BIOS |
|||
|
AA |
AA |
Загрузка в систему |
Устранение неполадок с CPU
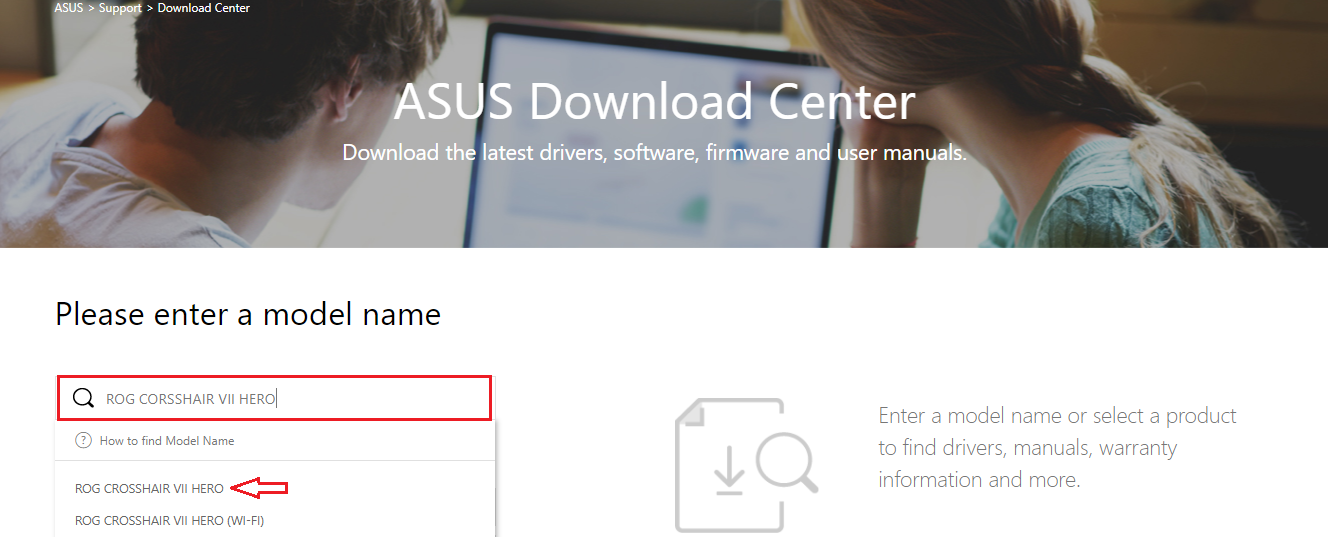
1. Войдите в ASUS Центр-загрузки для проверки совместимости вашей платы и процессора:
a. Введите наименование модели платы в поисковой строке (Например: ROG CROSSHAIR VII HERO), затем выберите ее из выпадающего меню и нажмите.
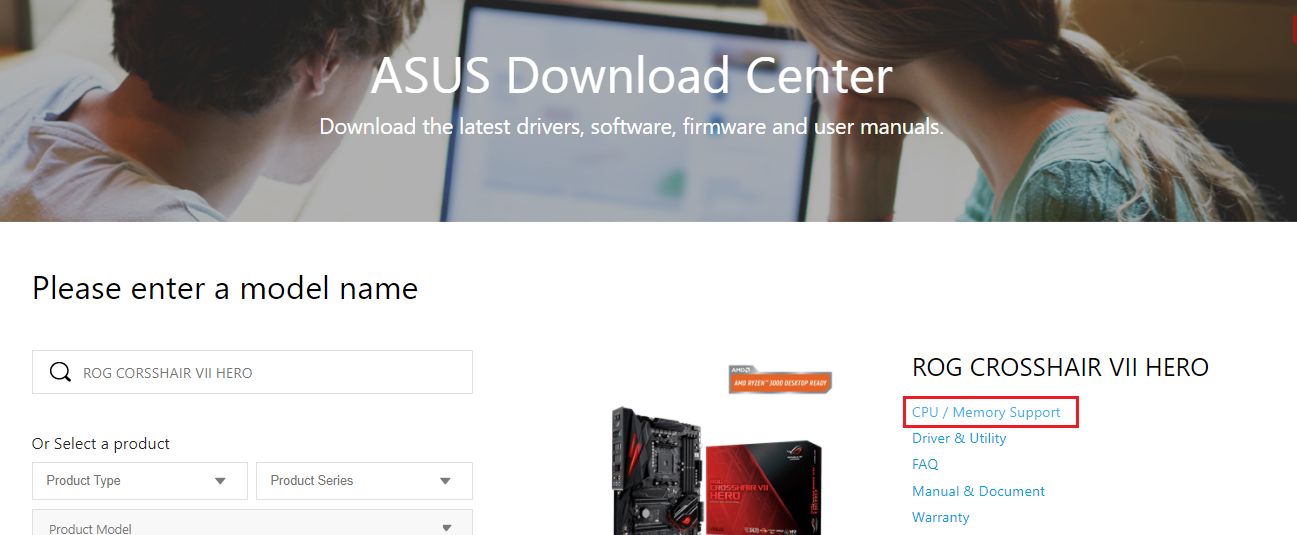
b. Пожалуйста, нажмите на [Поддержка Процессора/ Память], как показано ниже:
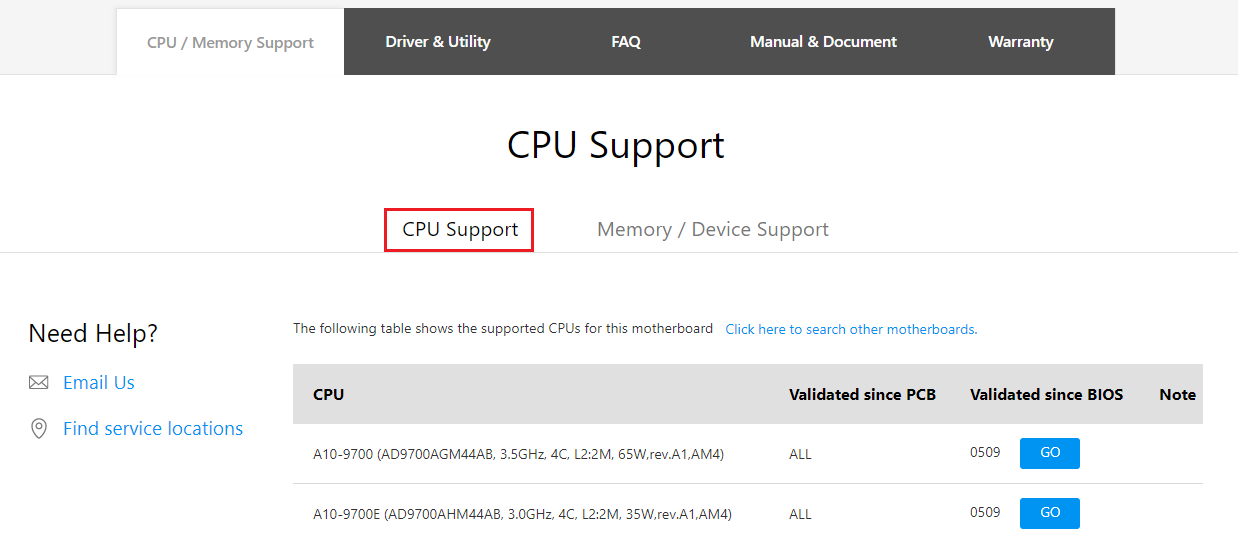
c. Кликните на [Поддержка процессоров] и проверьте, есть ваш CPU в списке совместимости QVL или нет, также проверьте версию BIOS рекомендуемую к установке (версия должна быть такой, как указана или новее).
2. Попробуйте переустановить CPU и проверьте контакты CPU на наличие грязи. Если они имеются, очистите контакты.
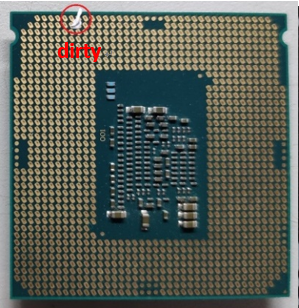
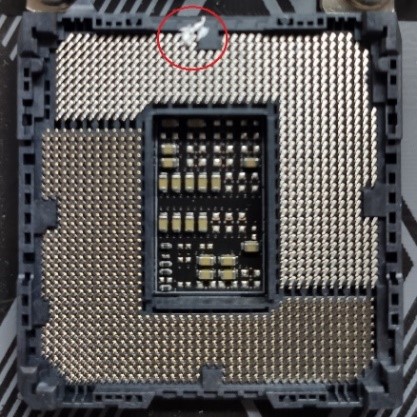
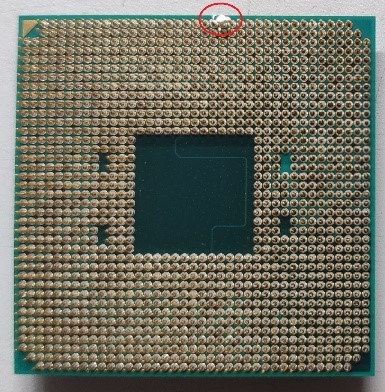
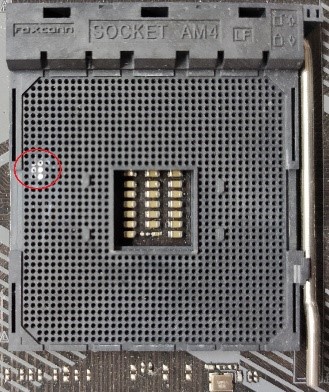
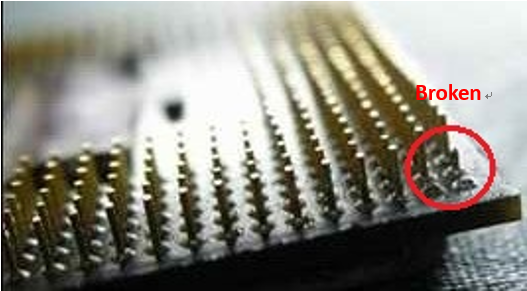
3. Проверьте CPU контакты на наличие повреждений. Если они имеются, пожалуйста, замените на новый процессор.
Устранение неисправности с памятью
1. Переустановите планку памяти, и убедитесь, что она подключена верно и до конца.
Неверная установка:
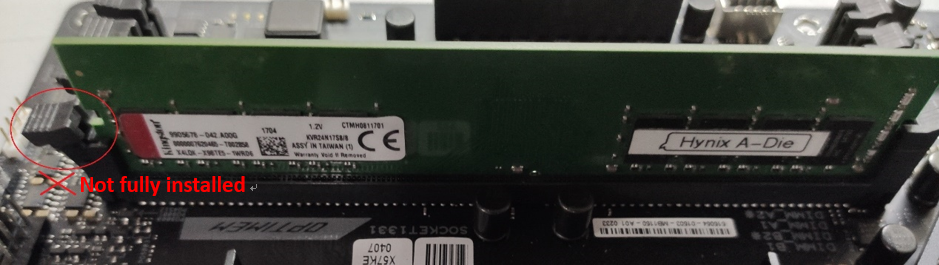
Верная установка:

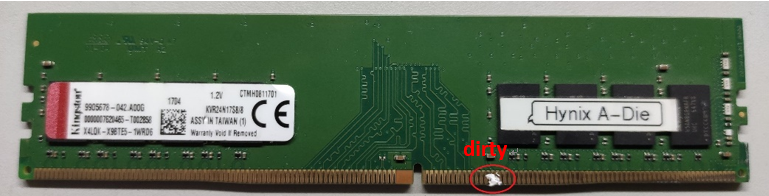
2. Проверьте, не загрязнены ли контакты памяти или слот на материнской плате как показано ниже. Если да, очистите и попробуйте снова.

3. Если вы используете 2 и более планок, попробуйте подключить хотя бы одну планку и загрузитесь с ней. Если система запускается хотя бы с одной планкой памяти, попробуйте каждую из них по отдельности, чтобы выявить неисправную планку.
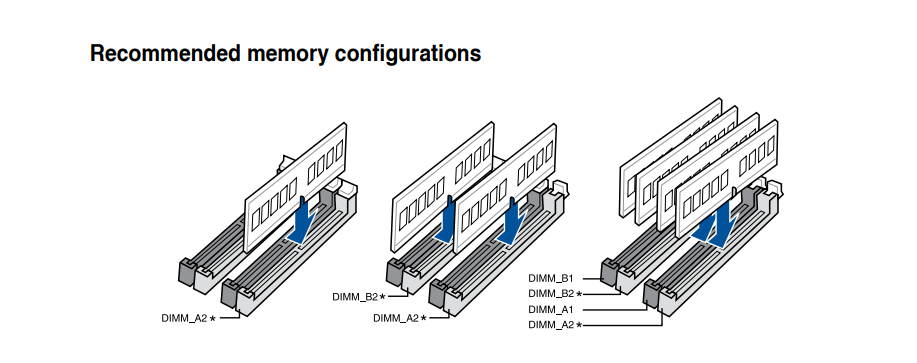
4. Предлагаемые конфигурации памяти смотрите в руководстве пользователя вашей модели, как показано на рисунке ниже, затем повторите попытку:
Можете воспользоваться ссылкой: Какс качать руководство
5. Если проблема не может быть решена после выполнения шагов 1–4, замените на заведомо исправную память и повторите попытку.
Устранение неполадок с графической картой
1. Интегрированная графика (встроенная) выходит из строя. Пожалуйста, попробуйте переустановить процессор
2. Неправильный вывод на экран дополнительной видеокарты:
a. Попробуйте переустановить видеокарту
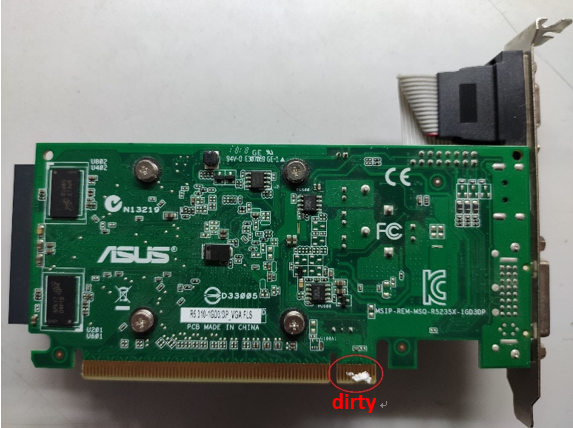
b. Проверьте, нет ли грязи на контакте PCI-E материнской платы или контакте видеокарты, как показано на рисунке ниже. Если да, очистите их и попробуйте еще раз

c. Если внешняя графическая карта имеет интерфейс питания, убедитесь, что интерфейс питания правильно подключен, как показано ниже:

d. Если ваша проблема не может быть решена после выполнения шагов a ~ c, замените на исправную видеокарту и повторите попытку.
Устранение неполадок загрузки
1. Пожалуйста, повторно подключите кабель SATA к материнской плате и жесткому диску соответственно.
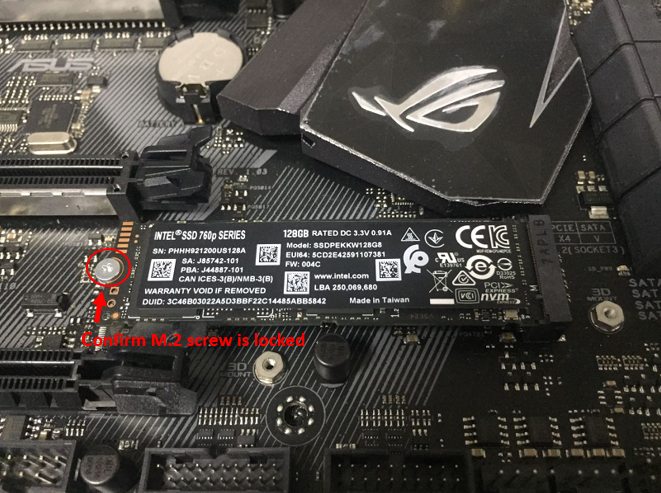
2. Если установлен M.2 SSD, снова подключите M.2 SSD и убедитесь, что винт M.2 заблокирован.
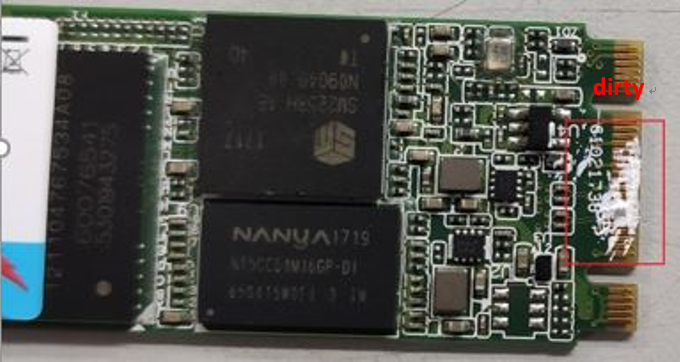
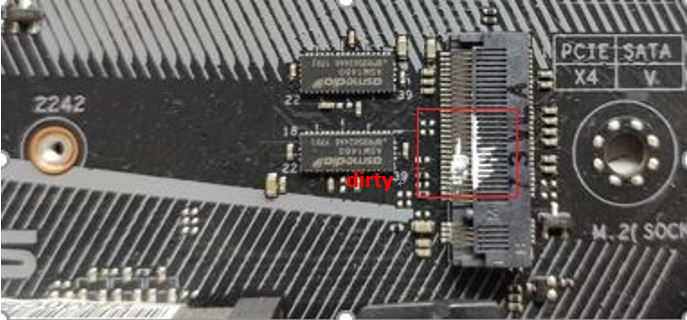
3. Проверьте, нет ли грязи на позолоченных контактах M.2 SSD или M.2 слота материнской платы, как показано на изображении ниже. Если обнаружена грязь, очистите контакты и попробуйте еще раз.
4. Если шаги 1–3 не могут решить вашу проблему, замените на исправный кабель SATA, порт SATA или жесткий диск SATA (M.2 SSD) и повторите попытку.
Устранение неполадок с внешними устройствами
1. Выключите питание и удалите все внешние устройства (например, карту PCI-E, карту Raid и т. д.) от материнской платы.
2. Затем попробуйте перезагрузить компьютер. Если он включается, проблема может быть в удаленных внешних устройствах. Повторно подключайте внешние устройства одно за другим, пока не обнаружите, какое внешнее устройство или кабель вызывает проблему.
Проблема загрузки в BIOS
Если CODE — A9, значит компьютер вошел в BIOS
1. Если монитор неисправен, выполните следующие действия для устранения неполадок:
a. Убедитесь, что монитор подключен правильно, и убедитесь, что световой индикатор монитора горит, что означает, что кабель питания монитора подключен правильно. Убедитесь, что внешний кабель питания подключен нормально. Пожалуйста, попробуйте включить, выключить, проверьте, может ли монитор отображать. Если вы выключаете и включаете монитор, на мониторе отображается «нет сигнала», это означает, что монитор подключен верно.
b. Убедитесь, что сигнальный кабель (VGA / DVI / HDMI / DisplayPort) правильно подключен к монитору, а также убедитесь, что другой конец сигнального кабеля подключен к выходу дисплея (видеокарта) компьютера. Попробуйте снова подключить кабель дисплея с двух сторон и убедитесь, что все контакты не погнуты.
c. Убедитесь, что изображение на мониторе правильное. Например, если он в настоящее время подключен к компьютеру через интерфейс HDMI, вы должны выбрать выход дисплея монитора как выход дисплея HDMI.
d. Замените кабель того же типа (VGA / DVI / HDMI / DisplayPort) для повторной проверки.
e. Подключите монитор к другому компьютеру и убедитесь, что монитор работает нормально, чтобы устранить проблему с монитором.
2. Если на мониторе отображается BIOS, следуйте инструкциям Устранение неполадок загрузки, проверьте жесткий диск или SSD на исправность.
Вопросы и ответы:
Q1.Как узнать, поддерживает плата Q-CODE или нет?
A1: Вы можете проверить следующие три варианта:
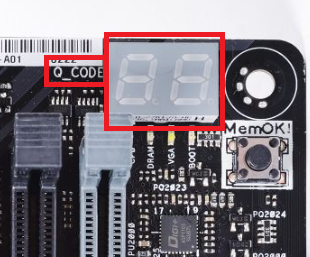
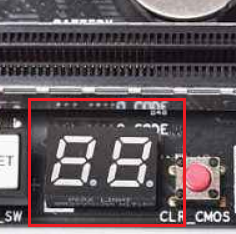
Вариант 1: проверьте наличие Q-кода на материнской плате, который обычно находится на левом верхнем или нижнем крае материнской платы, как показано на рисунке ниже:
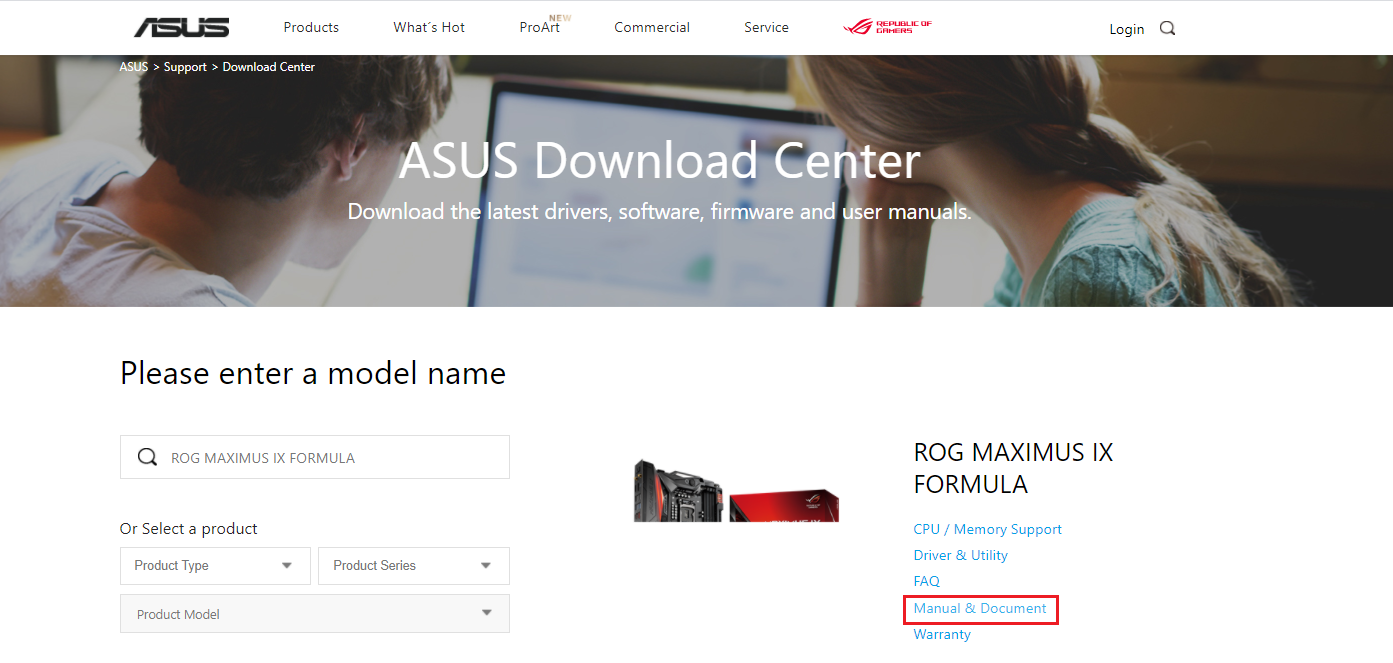
Вариант 2. Войдите в ASUS Центр-загрузок, скачайте руководство пользователя и проверьте там ASUS Q-CODE
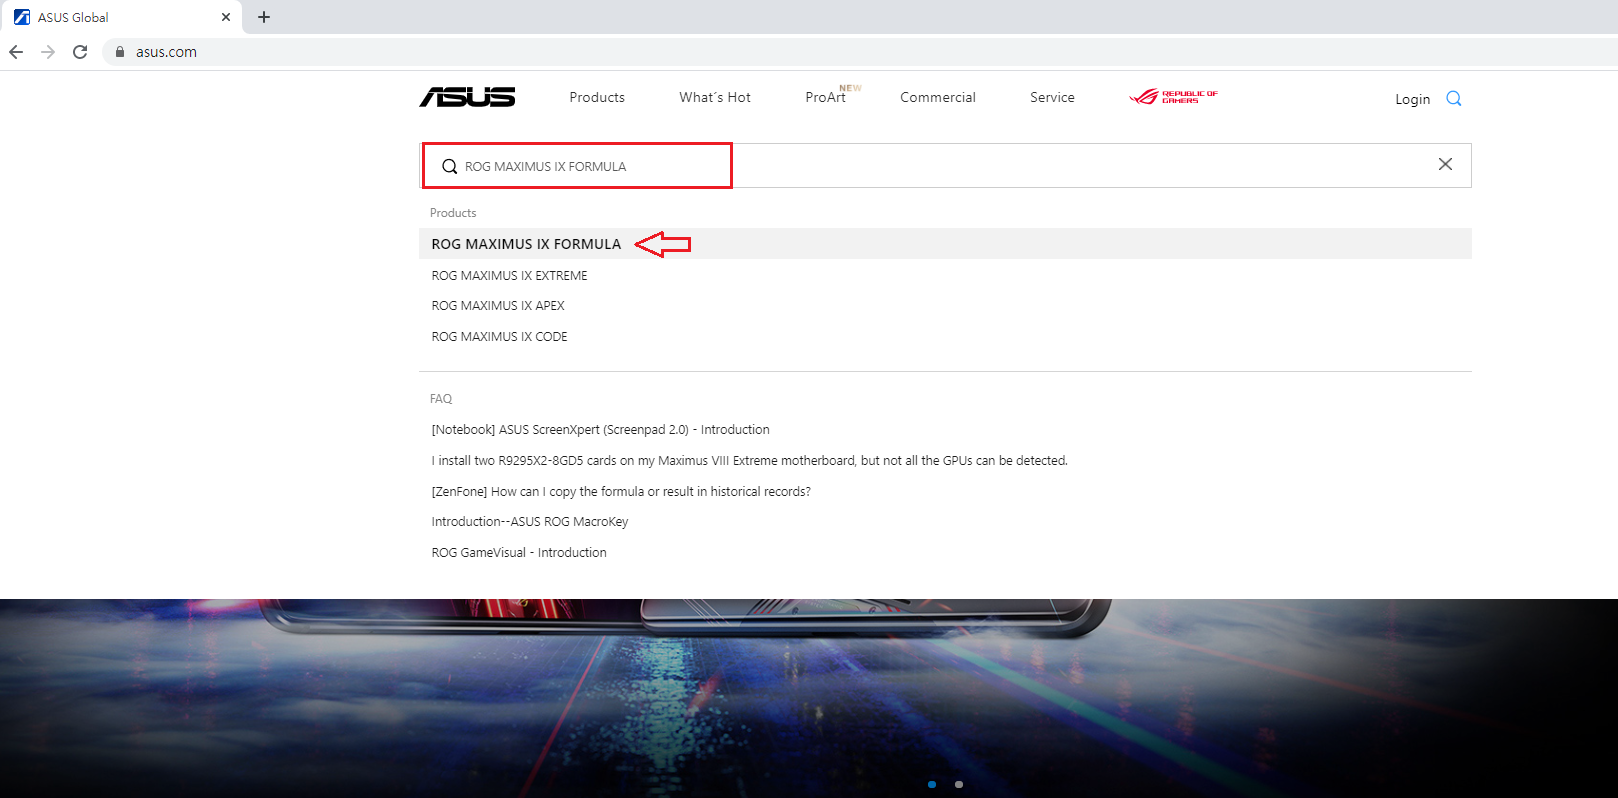
1) Нажмите на , затем введите название модели материнской платы (например, ROG MAXIMUS IX FORMULA), выберите название модели в выпадающем меню, как показано ниже:
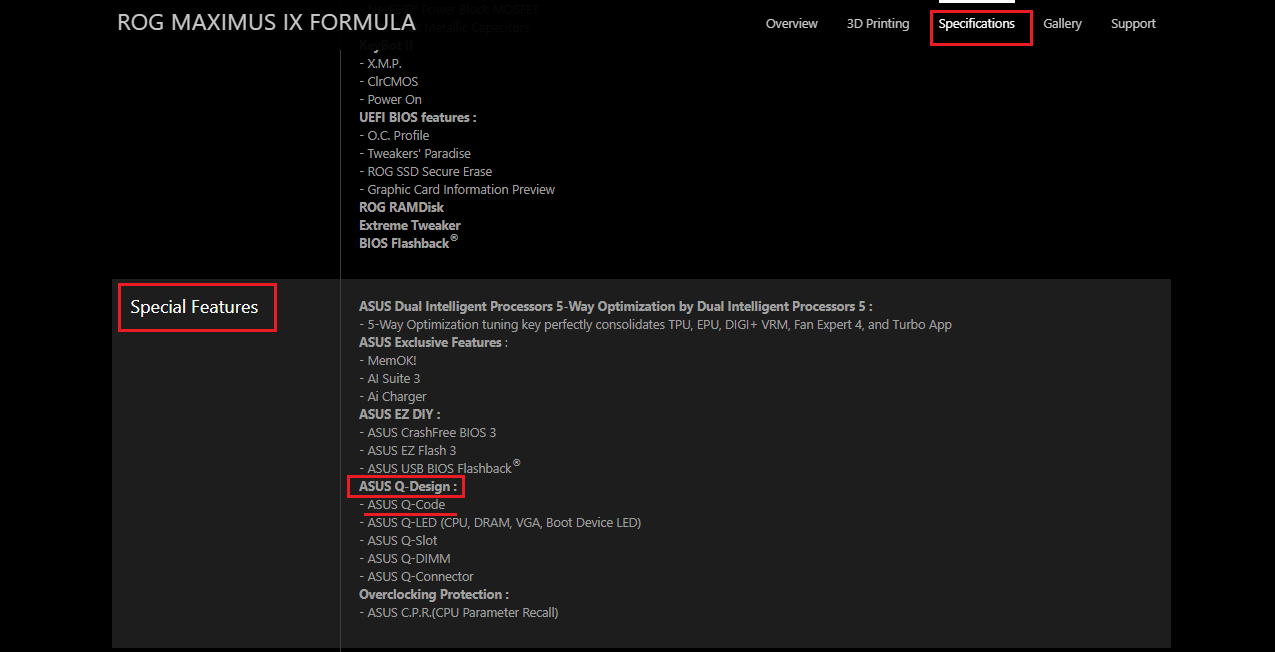
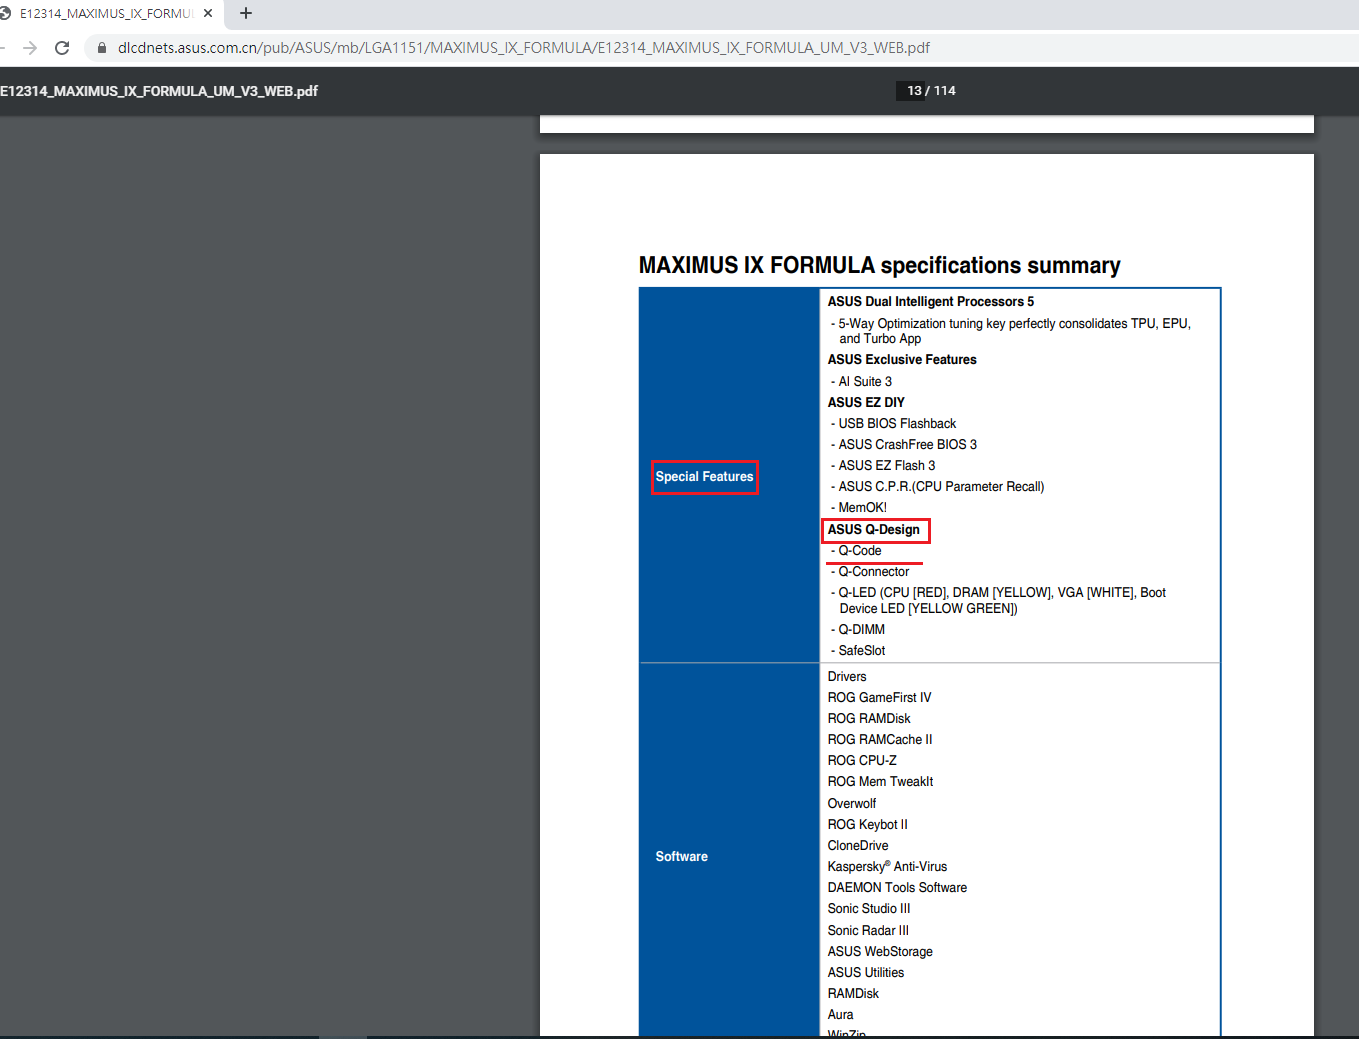
2) Нажмите [Характеристики], найдите [Special Features]- [ASUS Q-Design], и проверьте, есть ли параметр [ASUS Q-CODE]
Вариант 3. Войдите в ASUS Центр-загрузок, скачайте руководство пользователя и проверьте там ASUS Q-CODE
Скачайте мануал
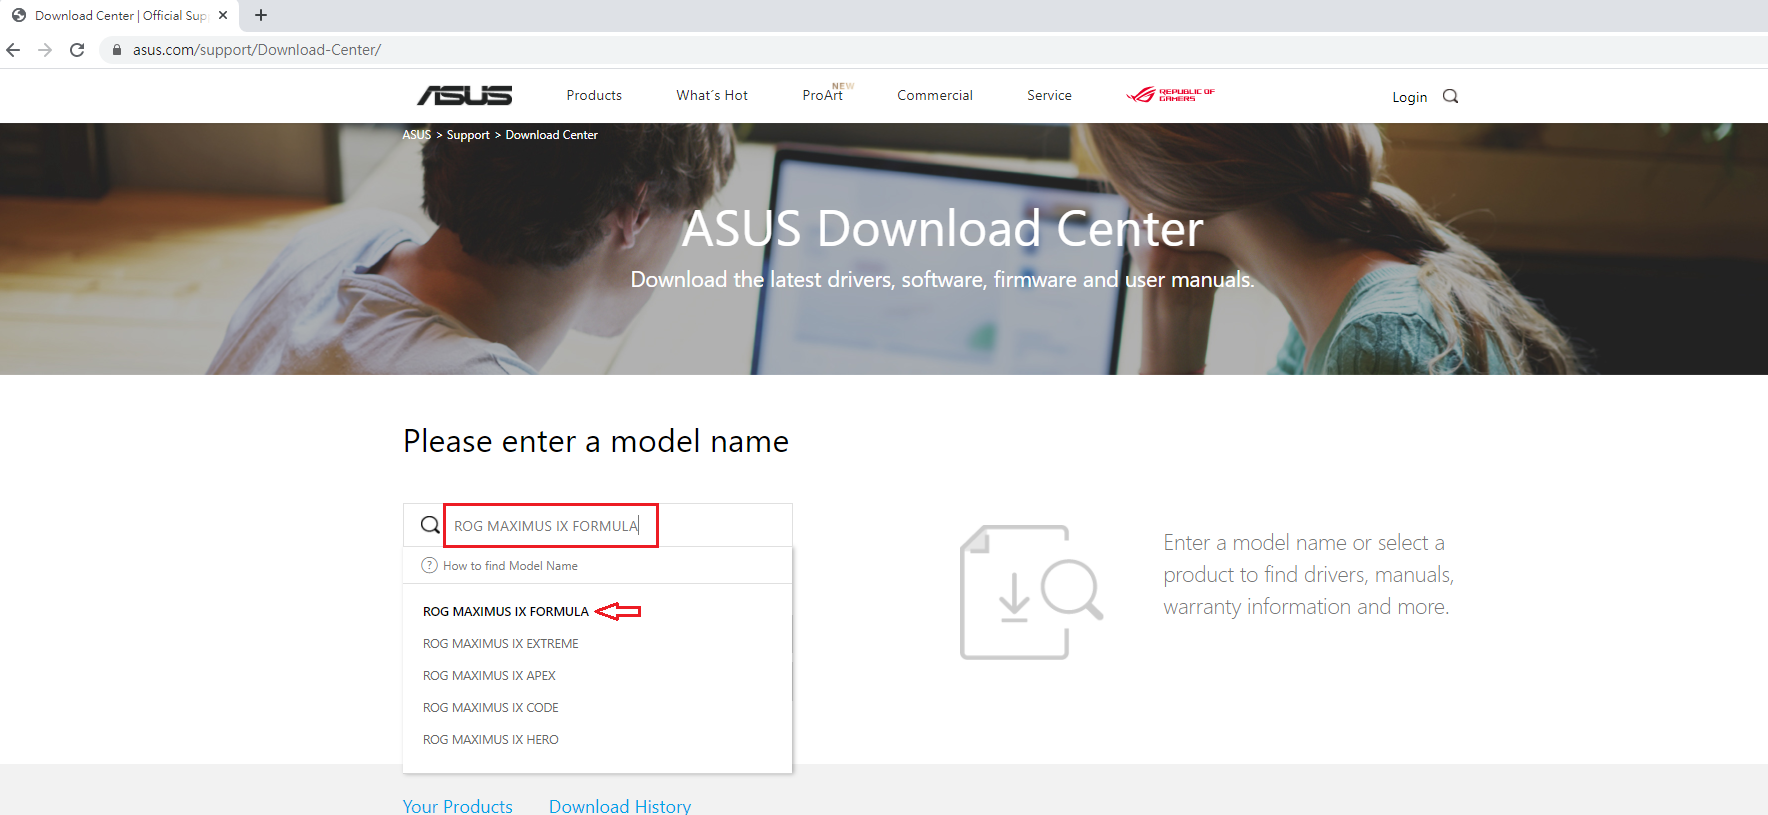
1) Введите название модели материнской платы (например, ROG CROSSHAIR VII HERO), затем выберите название модели в раскрывающемся списке, как показано ниже:
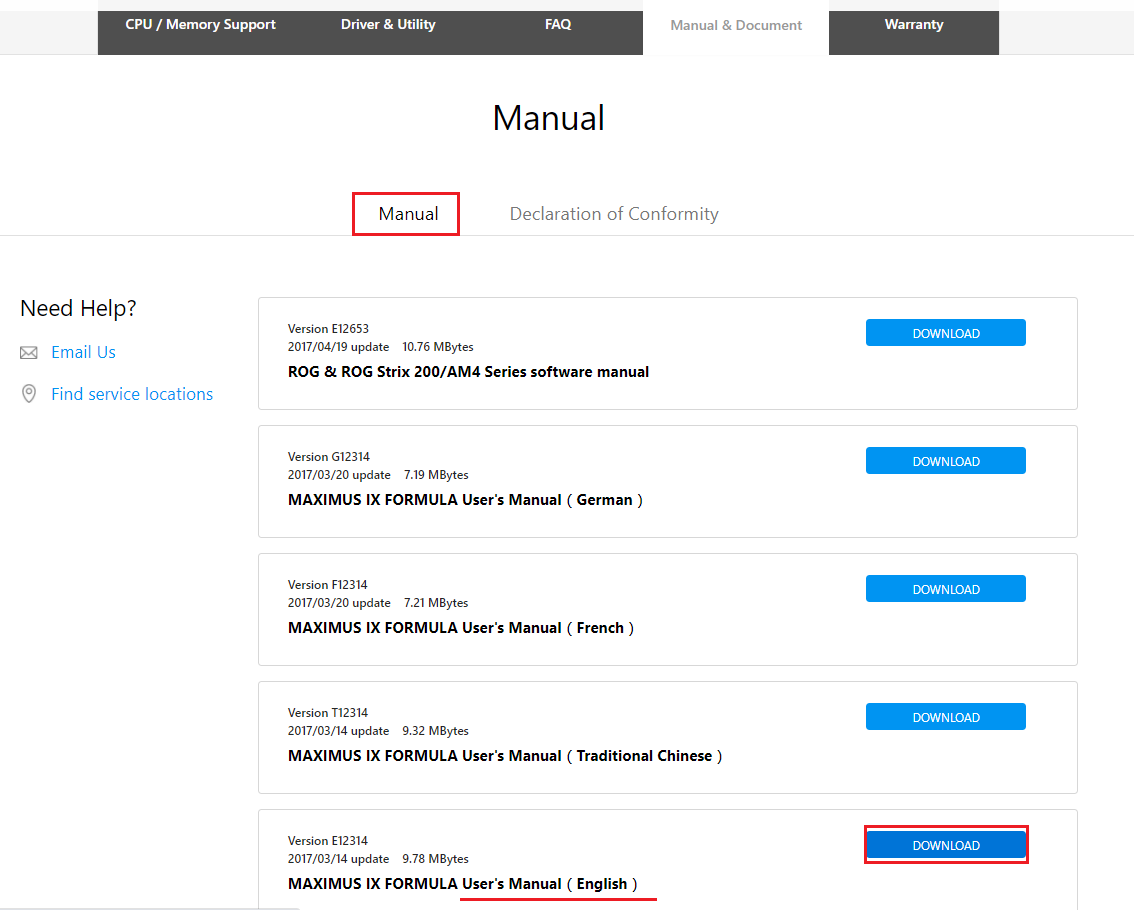
2) Нажмите [Руководства и документы]
3) Нажмите [Руководство пользователя], найдите User’s Manual(English, затем нажмите [СКАЧАТЬ]):
4) Найдите [Special Features] — [ASUS Q-Design], и проверьте [Q-CODE]
Q2: Что делать, если Qпроблема так и не решилась?
A2: Пожалуйста, попробуйте очистить CMOS, как это сделать описано тут: Как очистить CMOS
Если проблема по-прежнему не может быть устранена, свяжитесь с нами Служба поддержки
Code
Description
S3 Resume is stared (S3 Resume PPI is called by the DXE IPL)
E0
S3 Boot Script execution
E1
Video repost
E2
OS S3 wake vector call
E3
Reserved for future AMI progress codes
E4 – E7
S3 Resume Failed
E8
E9
S3 Resume PPI not Found
S3 Resume Boot Script Error
EA
EB
S3 OS Wake Error
Reserved for future AMI error codes
EC – EF
Recovery condition triggered by firmware (Auto recovery)
F0
Recovery condition triggered by user (Forced recovery)
F1
Recovery process started
F2
Recovery firmware image is found
F3
Recovery firmware image is loaded
F4
F5 – F7
Reserved for future AMI progress codes
Recovery PPI is not available
F8
Recovery capsule is not found
F9
Invalid recovery capsule
FA
Reserved for future AMI error codes
FB – FF
DXE Core is started
60
NVRAM initialization
61
62
Installation of the PCH Runtime Services
CPU DXE initialization is started
63 – 67
PCI host bridge initialization
68
System Agent DXE initialization is started
69
System Agent DXE SMM initialization is started
6A
6B – 6F
System Agent DXE initialization (System Agent module specific)
PCH DXE initialization is started
70
PCH DXE SMM initialization is started
71
PCH devices initialization
72
PCH DXE Initialization (PCH module specific)
73 – 77
ACPI module initialization
78
CSM initialization
79
7A – 7F
Reserved for future AMI DXE codes
A-2
(continued on the next page)
Appendix
The most common Asus motherboard light code is 00, which means there is no error and that the system is starting up normally. Other common codes include:
- 50-54: Memory initialization errors
- 55: Memory not installed
- 56-57: Invalid CPU type or speed/CPU mismatch
- 62: Installation of the PCH Runtime Services
- 76: PCH DXE Initialization (PCH Module Specific)
- 99: Super IO Initialization
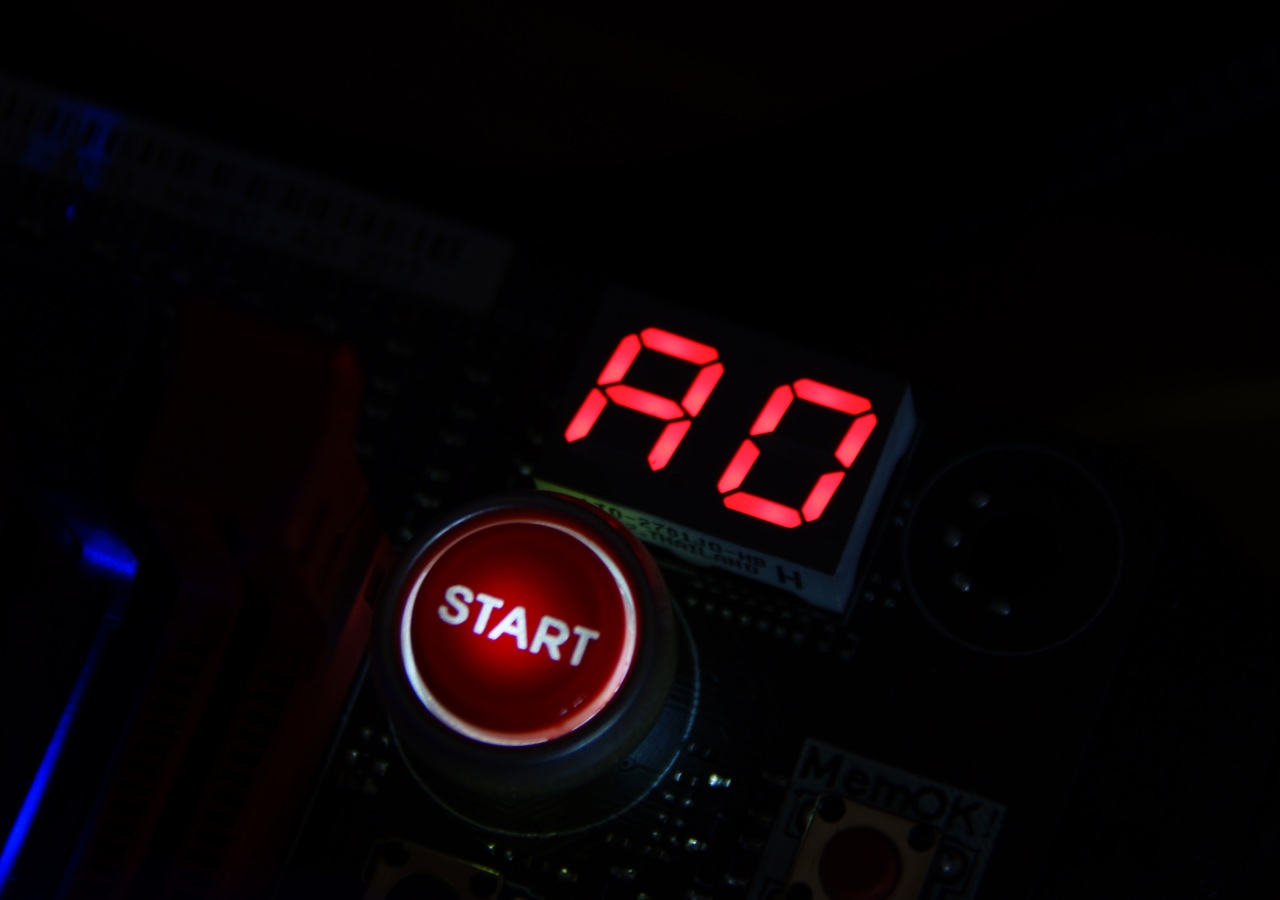
- A0: IDE Initialization Is Started
- A2: IDE Detect
Other common Asus Motherboard Light Codes include the BOOT_DEVICE_LED, VGA_LED, DRAM_LED, and CPU_LED. These four post-state LEDs will indicate if there is a fault stopping the BIOS from Posting. Most newer ASUS motherboards (the B250F, for example) have, other than the RGB LEDs, four solid- 4 post-state LED indicators designed close to the 24-pin connector and a standby power LED next to the SATA ports.
If you see one of these codes, you can try troubleshooting the problem by following the instructions in this article.
In this article, you will learn about ASUS motherboard light codes, their meaning, and the required troubleshooting steps for these LED codes.
Most Common Asus Light Q-Codes and Meaning
| Code | Description |
|---|---|
| 00 | Not used |
| 01 | Power on. Reset type detection (soft/hard). |
| 02 | AP initialization before microcode loading |
| 03 | System Agent initialization before microcode loading |
| 04 | PCH initialization before microcode loading |
| 06 | Microcode loading |
| 07 | AP initialization after microcode loading |
| 08 | System Agent initialization after microcode loading |
| 09 | PCH initialization after microcode loading |
| 0A | Initialization after microcode loading |
| 0B | Cache initialization |
| 0C – 0D | Reserved for future AMI SEC error codes |
| 0E | Microcode not found |
| 0F | Microcode not loaded |
| 10 | PEI Core is started |
| 11 – 14 | Pre-memory CPU initialization is started |
| 15 – 18 | Pre-memory System Agent initialization is started |
| 19 – 1C | Pre-memory PCH initialization is started |
| 2B – 2F | Memory initialization |
| 30 | Reserved for ASL (see ASL Status Codes section below) |
| 31 | Memory Installed |
| 32 – 36 | CPU post-memory initialization |
| 37 – 3A | Post-Memory System Agent initialization is started |
| 3B – 3E | Post-Memory PCH initialization is started |
| 4F | DXE IPL is started |
| 50 – 53 | Unspecified memory initialization error |
| 54 | Invalid memory type or incompatible memory speed |
| 55 | Memory not installed |
| 56 | Invalid CPU type or Speed |
| 57 | CPU mismatch |
| 58 | CPU self test failed or possible CPU cache error |
| 59 | CPU micro-code is not found or micro-code update is failed |
| 5A | Internal CPU error |
| 5B | Reset PPI is not available |
| 5C – 5F | Reserved for future AMI error codes |
| E0 | S3 Resume is stared (S3 Resume PPI is called by the DXE IPL) |
| E1 | S3 Boot Script execution |
| E2 | Video repost |
| E3 | OS S3 wake vector call |
| E4 – E7 | Reserved for future AMI progress codes |
| E8 | S3 Resume Failed |
| E9 | S3 Resume PPI not Found |
| EA | S3 Resume Boot Script Error |
| EB – EF | Reserved for future AMI error codes |
| F0 | Recovery condition triggered by firmware (Auto recovery) |
| F1 | Recovery condition triggered by user (Forced recovery) |
| F2 | Recovery process started |
| F3 | Recovery firmware image is found |
| F4 | Recovery firmware image is loaded |
| F5 – F7 | Reserved for future AMI progress codes |
| F8 | Recovery PPI is not available |
| F9 | Recovery capsule is not found |
| FA | Invalid recovery capsule |
| FB – FF | Reserved for future AMI error codes |
| 60 | DXE Core is started |
| 61 | NVRAM initialization |
| 62 | Installation of the PCH Runtime Services |
| 63-67 | CPU DXE initialization is started |
| 68 | PCI host bridge initialization |
| 69 | System Agent DXE initialization is started |
| 6A | System Agent DXE SMM initialization is started |
| 6B | System Agent DXE initialization (System Agent module specific) |
| 6C | PCH DXE initialization is started |
| 6D | PCH DXE SMM initialization is started |
| 6E | PCH devices initialization |
| 6F | PCH DXE Initialization (PCH module specific) |
| 70 | ACPI module initialization |
| 71 | CSM initialization |
| 72 | Reserved for future AMI DXE codes |
| 73 | Boot Device Selection (BDS) phase is started |
| 74 | Driver connecting is started |
| 75 | PCI Bus initialization is started |
| 76 | PCI Bus Hot Plug Controller Initialization |
| 77 | PCI Bus Enumeration |
| 78 | PCI Bus Request Resources |
| 79 | PCI Bus Assign Resources |
| 7A | Console Output devices connect |
| 7B | Console input devices connect |
| 7C | Super IO Initialization |
| 7D | USB initialization is started |
| 7E | USB Reset |
| 7F | USB Detect |
| 90 | USB Enable |
| 91 | Reserved for future AMI codes |
| 92 | IDE initialization is started |
| 93 | IDE Reset |
| 94 | IDE Detect |
| 95 | IDE Enable |
| 96 | SCSI initialization is started |
| 97 | SCSI Reset |
| 98 | SCSI Detect |
| 99 | SCSI Enable |
| 9A | Setup Verifying Password |
| 9B | Start of Setup |
| 9C | Reserved for ASL (see ASL Status Codes section below) |
| 9D | Setup Input Wait |
| 9F | Reserved for future AMI codes |
| A0 | IDE initialization is started |
| A1 | IDE Reset |
| A2 | IDE Detect |
| A3 | IDE Enable |
| A4 | SCSI initialization is started |
| A5 | SCSI Reset |
| A6 | SCSI Detect |
| A7 | SCSI Enable |
| A8 | Setup Verifying Password |
| A9 | Start of Setup |
| AA | Reserved for ASL (see ASL Status Codes section below) |
| AB | Setup Input Wait |
| Code | Description |
|---|---|
| AC | Reserved for ASL (see ASL Status Codes section below) |
| AD | Ready To Boot event |
| AE | Legacy Boot event |
| AF | Exit Boot Services event |
| B0 | Runtime Set Virtual Address MAP Begin |
| B1 | Runtime Set Virtual Address MAP End |
| B2 | Legacy Option ROM Initialization |
| B3 | System Reset |
| B4 | USB hot plug |
| B5 | PCI bus hot plug |
| B6 | Clean-up of NVRAM |
| B7 | Configuration Reset (reset of NVRAM settings) |
| B8-BF | Reserved for future AMI codes |
| D0 | CPU initialization error |
| D1 | System Agent initialization error |
| D2 | PCH initialization error |
| D3 | Some of the Architectural Protocols are not available |
| D4 | PCI resource allocation error. Out of Resources |
| D5 | No Space for Legacy Option ROM |
| D6 | No Console Output Devices are found |
| D7 | No Console Input Devices are found |
| D8 | Invalid password |
| D9 | Error loading Boot Option (LoadImage returned error) |
| DA | Boot Option is failed (StartImage returned error) |
| DB | Flash update is failed |
| DC | Reset protocol is not available |
| 0X01 | System is entering S1 sleep state |
| 0X02 | System is entering S2 sleep state |
| 0X03 | System is entering S3 sleep state |
| 0X04 | System is entering S4 sleep state |
| 0X05 | System is entering S5 sleep state |
| 0X10 | System is waking up from the S1 sleep state |
| 0X20 | System is waking up from the S2 sleep state |
| 0X30 | System is waking up from the S3 sleep state |
| 0X40 | System is waking up from the S4 sleep state |
| 0XAC | System has transitioned into ACPI mode. Interrupt controller is in PIC mode |
| 0XAA | System has transitioned into ACPI mode. Interrupt controller is in APIC mode |
How Do You Confirm Your Asus Motherboard Supports the Q-Led Indicator?
Before we dive into troubleshooting what these codes are, you should know that not all Asus motherboards are designed with light code. Especially for older Asus models, they may only have beep codes. So you should first verify that your unit supports LED debug codes.
There are three ways to check that your Asus motherboard supports Q-LED indicators:
- By inspecting your motherboard to find the Q-LED indicator interface
- By visiting the ASUS official website, and
- By checking the Asus user manual.
Check your motherboard
- Look at the area where you have the 24-pin power supply interface or memory slot on your motherboard to confirm if you can find the Q-LED indicator.
- If you see it there, then your Asus build supports the feature. However, some older models like Z97-mark_ S have their Q-LED light located on their respective slot (The VGA_LED light near the PCIE slot, for example)
Via the ASUS Official website
- You can check if your model supports ASUS Q-LED by looking at the official website.
- First, navigate to the search bar on the website and type in your model name.
- On the result page, you click “Specifications,” find “Special Features,” then “ASUS Q-Design” Check if the ASUS Q-LED is supported for the model.
Via User Manual
- You first want to download the user manual for your motherboard through the ASUS Support Center.
- On the page, input your model name, and select “Manual & Document.”
- Then, you click “Manual,” find your model in Manual (English), and download it.
- On the manual, search for “Special features > ASUS Q-Design > Q-LED
Now that you’ve verified that your Asus motherboard supports Q-LED codes, you can now learn about the various Asus motherboard light codes and how to debug them.
Asus Motherboard Light Codes – Meaning & Fixes
DRAM light (quick flashing on the Power LED)
If your Q-LED indicators have quick flashing on the power LED or show the DRAM light, try the following steps to solve the problem:
Step 1: Remove the power cord
Step 2: Confirm your memory card is fully installed or try to re-install it. While you try to re-install it, clean the memory card fingers and the slot on the motherboard if necessary.
Step 3: You can also follow the recommended memory configurations in your user manual to change your memory to other slots.
If the light continues to flash after you have completed the preceding steps, you must replace your DRAM with one from the support list (QVL list) of your motherboard, which is available from the Asus support site.
VGA light (Slow flashing on Power LED)
If the VGA light is on or you find the power LED slowly flashing, consider trying the following debug fixes:
Step 1: Check and reconnect the display cable between your monitor and the VGA output. Before doing anything else, ensure the power cord is removed.
Step 2: Unplug the PCI-E power cable and the external graphics card
Step 3: Clean the graphics card fingers and slots before re-installing them back
Step 4: Reconnect the display cable to your monitor and the VGA output and see if the problem is solved.
Meanwhile, if you use a newer Asus motherboard model, check on the AMD website to see if your CPU supports the integrated graphics display.
Boot light (Super slow flashing on Power LED)
If the BOOT light is on or the power LED is flashing super slowly (8-second blinking sequence, for example), it means something went wrong during the system booting process. To solve the issue, follow these steps:
Step 1: Go to the Advance mode in BIOS and check if your booting device is there and in the first booting priority
Step 2: Turn off the system and remove the power and confirm the boot device is well installed
Step 3: Also consider removing your HDD, SSD, or M.2 SSD, clean and re-install them back to check if there are any damaged parts
If your booting device is not working anymore, change it and try again.
CPU light
When the CPU light remains in the Q-LED indicators, follow these debugging steps:
Step 1: First, remove the power cord, loosen the four cooler pins, and remove the cooler without pulling the CPU out of the heatsink
Step 2: Flip the retention arm to loosen the metal clamp that holds the CPU in place
Step 3: Lift the socket lid
Step 4: Use two fingers to lift the CPU out of its socket. Lift it directly upward and take the CPU out.
Step 5: Check and clean the CPU contacts if there is any dust on them. You can also check whether the CPU pins are bent or not.
If they are damaged, you will have to contact Asus customer service for the repair process.
Step 6: Matching the nubbins in the corner of the CPU socket can help you place the CPU back easily
Step 7: Install your cooler firmly and properly in the right position.
If, after trying the above steps, the CPU light remains on, you can consider upgrading your BIOS to the latest version via the Asus website. Also, confirm that your CPU is on the CPU support list for your motherboard.
How do I disable the Q-Code LED light on my Asus motherboard?
You can also disable the LED code light on your Asus motherboard. You’d have the motivation to do this when the light keeps coming on, even when there is no issue with your motherboard.
First, make sure you have the latest BIOS version installed on your computer. Then follow these steps:
Step 1: Restart your system and load it into your BIOS
Step 2: Click the AURA ON/OFF (F4) button in the upper-right corner of the screen. This will pop up four different lighting options, each with their own
Step 3: You can use “Stealth Mode” to turn everything off, but if you like to use the hardware RGB lighting (using Aura), then there are no issues.
The stealth mode, however, will disable every LED on the motherboard except the red Q-Code LED, which will still be functional.
If you want to disable the red light code, follow these steps:
Step 1: Switch to the Advanced tab on the BIOS
Step 2: Click ROG Effects.
Step 3: There are two motherboard LED options on this page, but only change the Onboard LED to Disabled for the remaining LEDs to be disabled. Also, change the Q-Code LED function to disabled after posting.
Step 4: Save the settings by clicking Exit in the top right corner
Step 5: Save Changes and Reset
Once you accept the change, your computer will reboot normally with all the changes active.
P.S.: Even after disabling ASUS light codes on your motherboard, you may still notice some tiny LEDs on the board, but you will barely notice them – they are less distracting (that’s even when they are not covered by cables or overshadowed by other hardware.
In Summary
ASUS motherboards are designed with four solid-state LED indicators, usually near the 24-pin connector (CPU_LED) and a standby power LED next to the SATA ports.
These light codes are BOOT_DEVICE_LED, VGA_LED, DRAM_LED, and CPU_LED; they all have different meanings and debugging steps. Their function is to indicate when there is a fault stopping the BIOS from posting.
However, most older or cheaper motherboards usually don’t have any sort of debug code displays, so they use beeps instead.
I have recently bought Asus ROG Strix B650E-E Gaming WiFi (with AMD Ryzen 9 7950X installed) and I got G.Skill Trident Z5 RGB Black DDR5 6400MHz x4 (all ram slots inserted).
I have gotten Q-code 15, C5, and a bunch others so I tried a bios update. Success, now I only get error code A0. The main problem still persist.
Main problem being that whenever I start my computer it does not go past the BIOS screen. It just keep running and nothing happens, no signal to keyboard or monitors or anything. Then if I hold the power button and shut it down then wait 10 sec and start. Then it only stays in the mentioned state for 1 to maybe 3 minutes and then proceeds to start up normally. When I get stuck (now after bios update) I get A0.
Anyone had similar experience? I have led myself to believe this is not a hardware problem, but rather a software problem. I have disconnected all non-critical components (as well as stripping down RAM) to see if it helps (it did not).
В данном материале будут собраны таблицы с описанием POST кодов для разных материнских плат.
Зачем? Чтобы вам не надо было качать (или искать в далёком углу шкафа) руководство пользователя. Просто нажимаете название своей материнской платы и открывается нужная таблица.
Материал будет пополняться со временем.
Версия 3 от 30.06.2014
Материнские платы ASUS
Линейка Republic of Gamers
Rampage IV Extreme
Rampage IV Black Edition
Maximus VI Impact
Maximus VI Gene
Maximus VI Hero
Maximus VI Formula
Maximus VI Extreme
Maximus VII Gene
Maximus VII Ranger
Maximus VII Hero
Crosshair V Formula-Z
Серия Z87 (на базе чипсета Z87)
Z87-Deluxe
Серия Z97 (на базе чипсета Z97)
Z97-Deluxe
На базе чипсетов AMD
A88X-Pro
Материнские платы MSI
На базе чипсета Z87
Z87 MPower Max (Z87 MPower Max AC)
Z87 MPower (Z87 MPower SP)
Z87 XPower
На базе чипсета Z97
Z97 MPower
Z97 MPower Max AC
Z97 XPower AC
Материал скоро будет дополнен.