[Материнская плата] Возможные Q-CODE(коды ошибок) и их устранение
Пожалуйста, проверьте, поддерживает ваша плата Q-CODE или нет:

С помощью распространенных Q-CODE можно определить распрестраненные проблемы при установке компонентов в материнскую плату.
Пожалуйста, следуйте таблице Q-CODE ниже для устранения неисправности:
|
Распространенные Q-CODE для плат на базе Intel |
Распространенные Q-CODE для плат на базе AMD |
ошибка CPU |
ошибка памяти |
ошибка графической карты |
Другое |
|
00,D0 |
V |
||||
|
53,55 |
F9 |
V |
|||
|
D6 |
V |
||||
|
B0,99,15,53, |
V |
V |
|||
|
D6 |
V |
V |
|||
|
00,19,30,40,55 |
V |
V |
V |
||
|
A0,A2 |
A0,A2 |
Ненормальная загрузка устройства |
|||
|
B2 |
B2 |
Внешнее устройство работает неверно |
|||
|
A9 |
A9 |
Загрузка в BIOS |
|||
|
AA |
AA |
Загрузка в систему |
Устранение неполадок с CPU
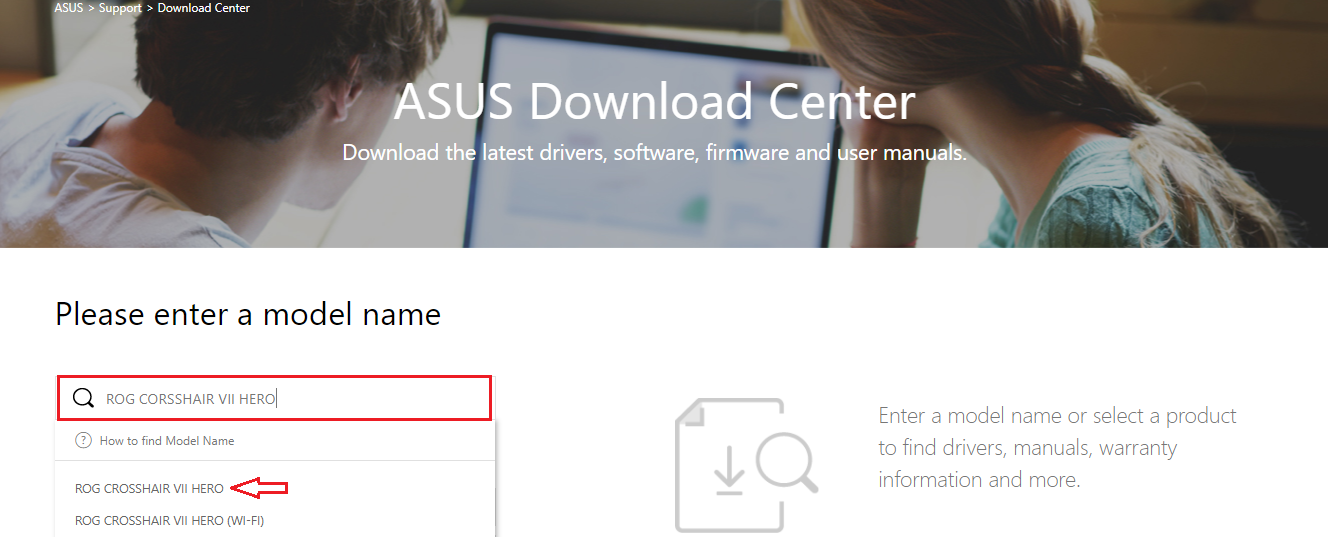
1. Войдите в ASUS Центр-загрузки для проверки совместимости вашей платы и процессора:
a. Введите наименование модели платы в поисковой строке (Например: ROG CROSSHAIR VII HERO), затем выберите ее из выпадающего меню и нажмите.
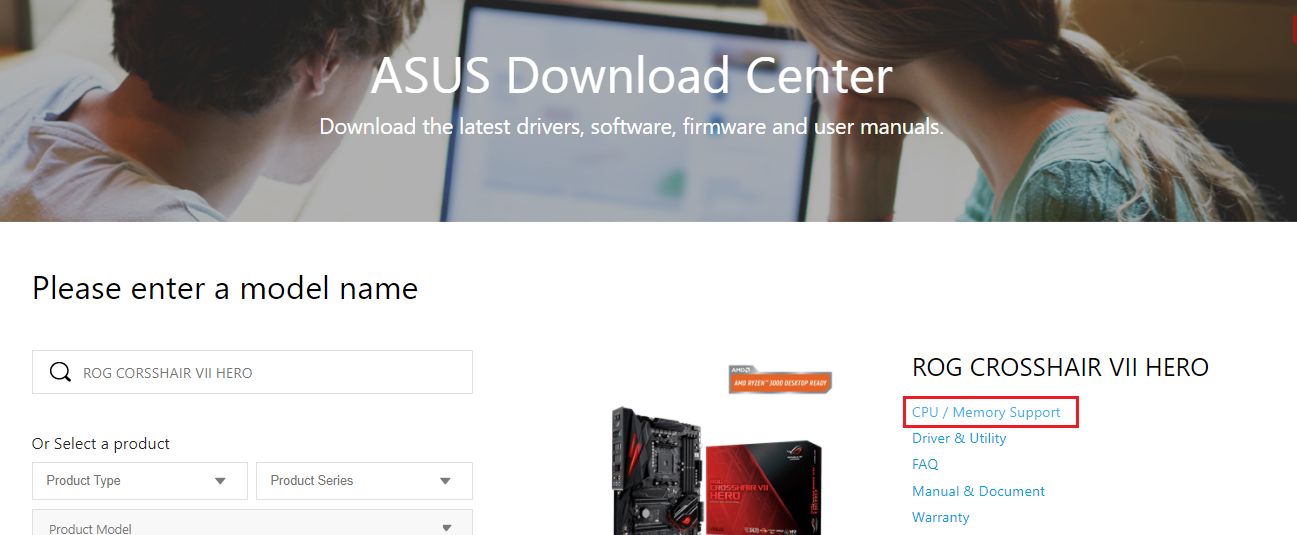
b. Пожалуйста, нажмите на [Поддержка Процессора/ Память], как показано ниже:
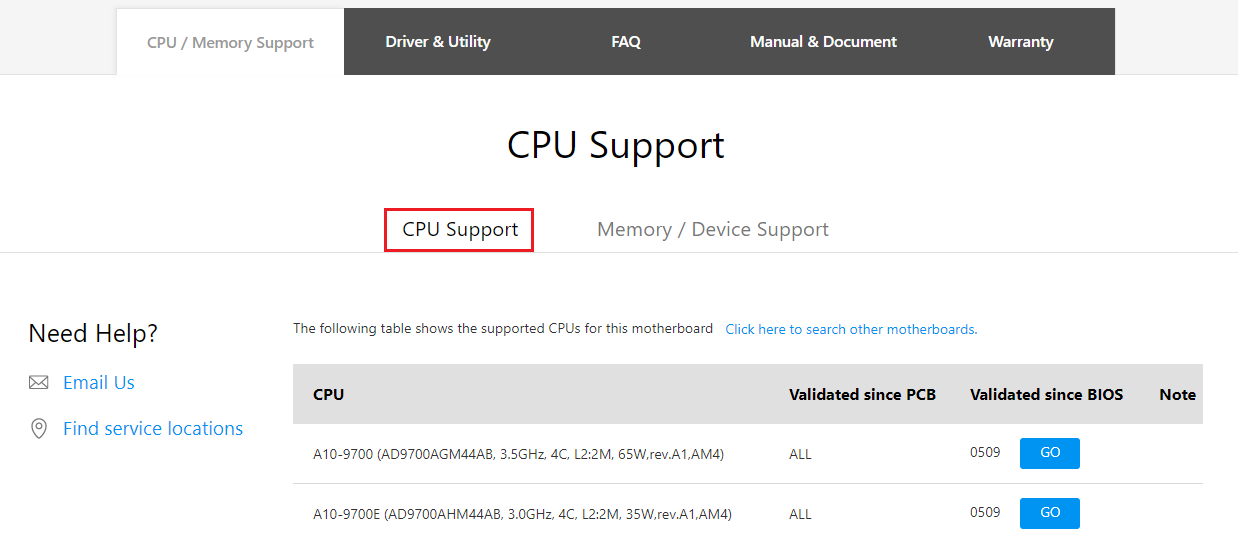
c. Кликните на [Поддержка процессоров] и проверьте, есть ваш CPU в списке совместимости QVL или нет, также проверьте версию BIOS рекомендуемую к установке (версия должна быть такой, как указана или новее).
2. Попробуйте переустановить CPU и проверьте контакты CPU на наличие грязи. Если они имеются, очистите контакты.
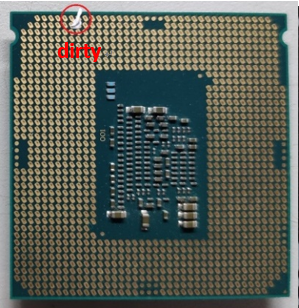
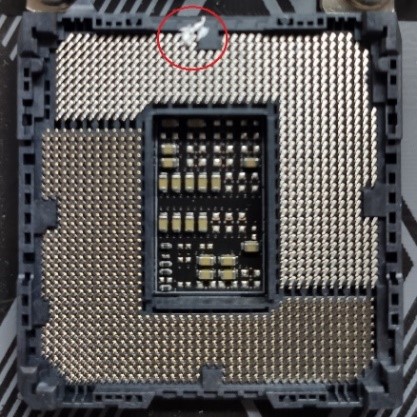
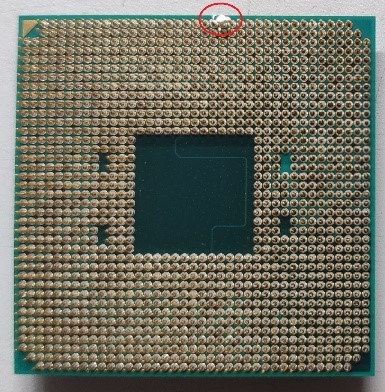
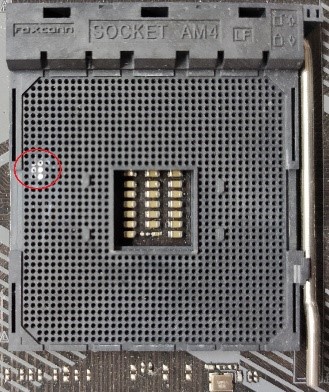
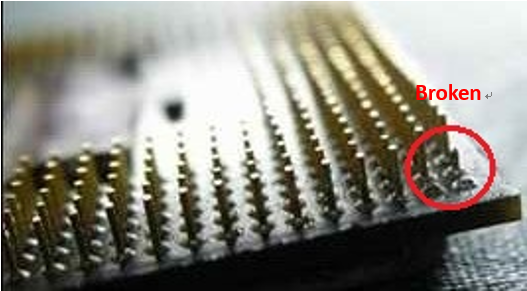
3. Проверьте CPU контакты на наличие повреждений. Если они имеются, пожалуйста, замените на новый процессор.
Устранение неисправности с памятью
1. Переустановите планку памяти, и убедитесь, что она подключена верно и до конца.
Неверная установка:
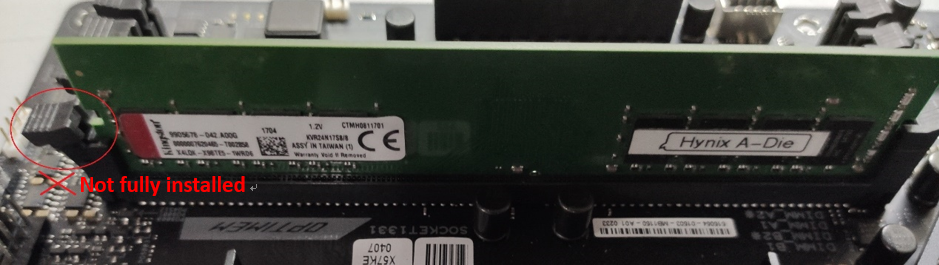
Верная установка:

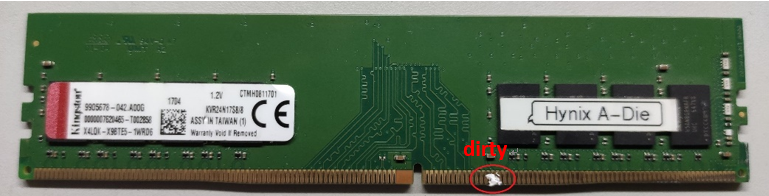
2. Проверьте, не загрязнены ли контакты памяти или слот на материнской плате как показано ниже. Если да, очистите и попробуйте снова.

3. Если вы используете 2 и более планок, попробуйте подключить хотя бы одну планку и загрузитесь с ней. Если система запускается хотя бы с одной планкой памяти, попробуйте каждую из них по отдельности, чтобы выявить неисправную планку.
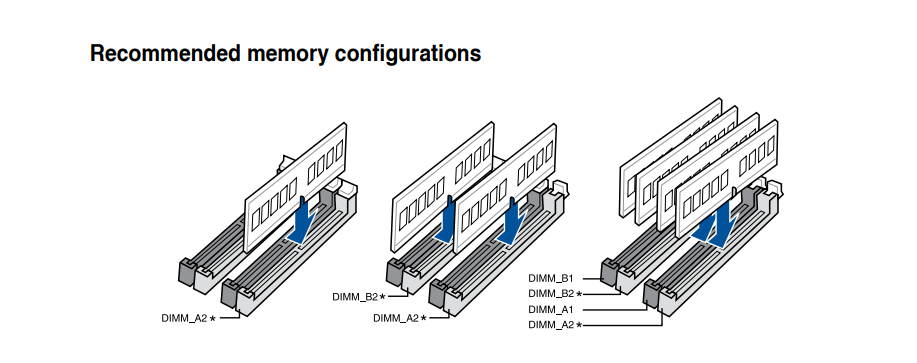
4. Предлагаемые конфигурации памяти смотрите в руководстве пользователя вашей модели, как показано на рисунке ниже, затем повторите попытку:
Можете воспользоваться ссылкой: Какс качать руководство
5. Если проблема не может быть решена после выполнения шагов 1–4, замените на заведомо исправную память и повторите попытку.
Устранение неполадок с графической картой
1. Интегрированная графика (встроенная) выходит из строя. Пожалуйста, попробуйте переустановить процессор
2. Неправильный вывод на экран дополнительной видеокарты:
a. Попробуйте переустановить видеокарту
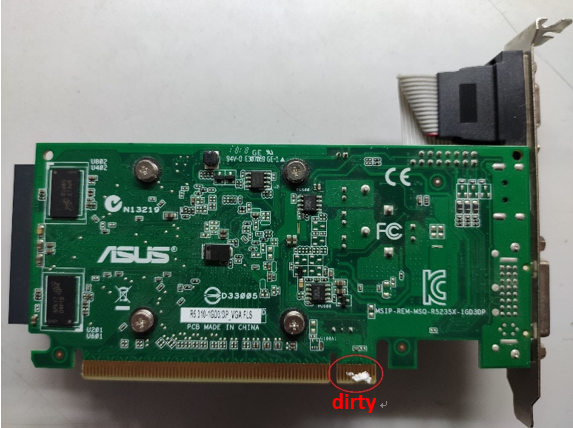
b. Проверьте, нет ли грязи на контакте PCI-E материнской платы или контакте видеокарты, как показано на рисунке ниже. Если да, очистите их и попробуйте еще раз

c. Если внешняя графическая карта имеет интерфейс питания, убедитесь, что интерфейс питания правильно подключен, как показано ниже:

d. Если ваша проблема не может быть решена после выполнения шагов a ~ c, замените на исправную видеокарту и повторите попытку.
Устранение неполадок загрузки
1. Пожалуйста, повторно подключите кабель SATA к материнской плате и жесткому диску соответственно.
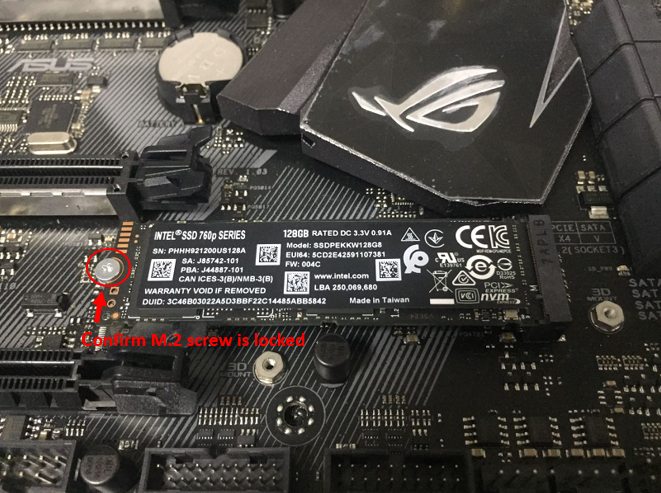
2. Если установлен M.2 SSD, снова подключите M.2 SSD и убедитесь, что винт M.2 заблокирован.
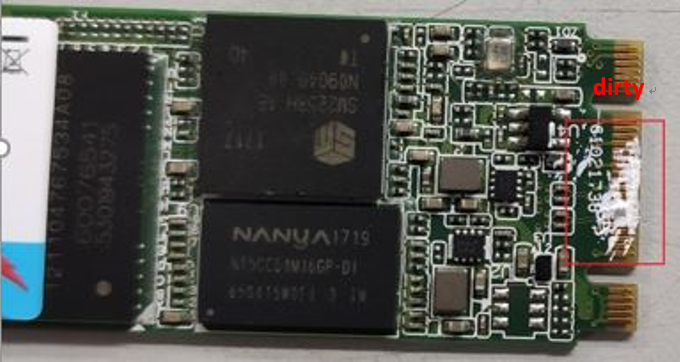
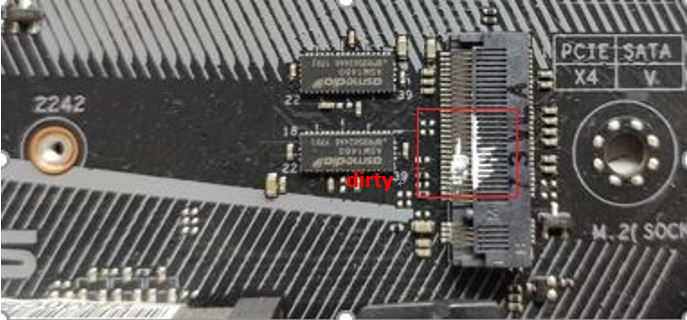
3. Проверьте, нет ли грязи на позолоченных контактах M.2 SSD или M.2 слота материнской платы, как показано на изображении ниже. Если обнаружена грязь, очистите контакты и попробуйте еще раз.
4. Если шаги 1–3 не могут решить вашу проблему, замените на исправный кабель SATA, порт SATA или жесткий диск SATA (M.2 SSD) и повторите попытку.
Устранение неполадок с внешними устройствами
1. Выключите питание и удалите все внешние устройства (например, карту PCI-E, карту Raid и т. д.) от материнской платы.
2. Затем попробуйте перезагрузить компьютер. Если он включается, проблема может быть в удаленных внешних устройствах. Повторно подключайте внешние устройства одно за другим, пока не обнаружите, какое внешнее устройство или кабель вызывает проблему.
Проблема загрузки в BIOS
Если CODE — A9, значит компьютер вошел в BIOS
1. Если монитор неисправен, выполните следующие действия для устранения неполадок:
a. Убедитесь, что монитор подключен правильно, и убедитесь, что световой индикатор монитора горит, что означает, что кабель питания монитора подключен правильно. Убедитесь, что внешний кабель питания подключен нормально. Пожалуйста, попробуйте включить, выключить, проверьте, может ли монитор отображать. Если вы выключаете и включаете монитор, на мониторе отображается «нет сигнала», это означает, что монитор подключен верно.
b. Убедитесь, что сигнальный кабель (VGA / DVI / HDMI / DisplayPort) правильно подключен к монитору, а также убедитесь, что другой конец сигнального кабеля подключен к выходу дисплея (видеокарта) компьютера. Попробуйте снова подключить кабель дисплея с двух сторон и убедитесь, что все контакты не погнуты.
c. Убедитесь, что изображение на мониторе правильное. Например, если он в настоящее время подключен к компьютеру через интерфейс HDMI, вы должны выбрать выход дисплея монитора как выход дисплея HDMI.
d. Замените кабель того же типа (VGA / DVI / HDMI / DisplayPort) для повторной проверки.
e. Подключите монитор к другому компьютеру и убедитесь, что монитор работает нормально, чтобы устранить проблему с монитором.
2. Если на мониторе отображается BIOS, следуйте инструкциям Устранение неполадок загрузки, проверьте жесткий диск или SSD на исправность.
Вопросы и ответы:
Q1.Как узнать, поддерживает плата Q-CODE или нет?
A1: Вы можете проверить следующие три варианта:
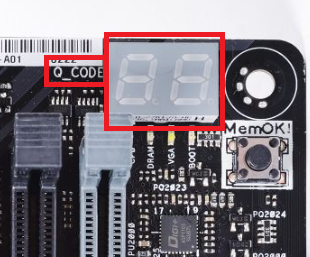
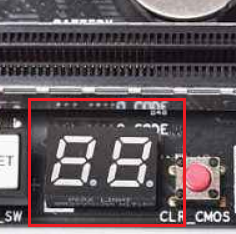
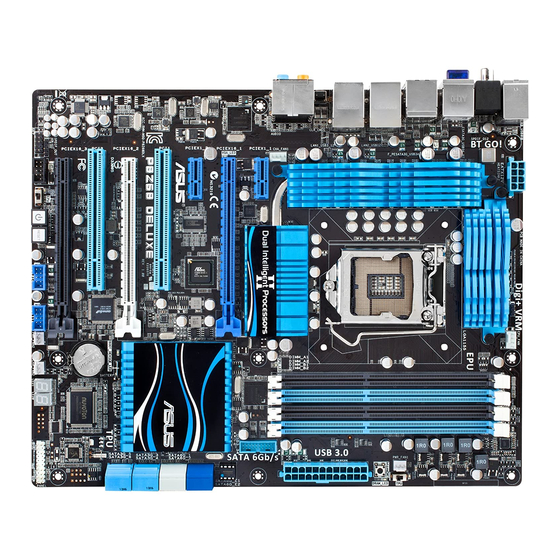
Вариант 1: проверьте наличие Q-кода на материнской плате, который обычно находится на левом верхнем или нижнем крае материнской платы, как показано на рисунке ниже:
Вариант 2. Войдите в ASUS Центр-загрузок, скачайте руководство пользователя и проверьте там ASUS Q-CODE
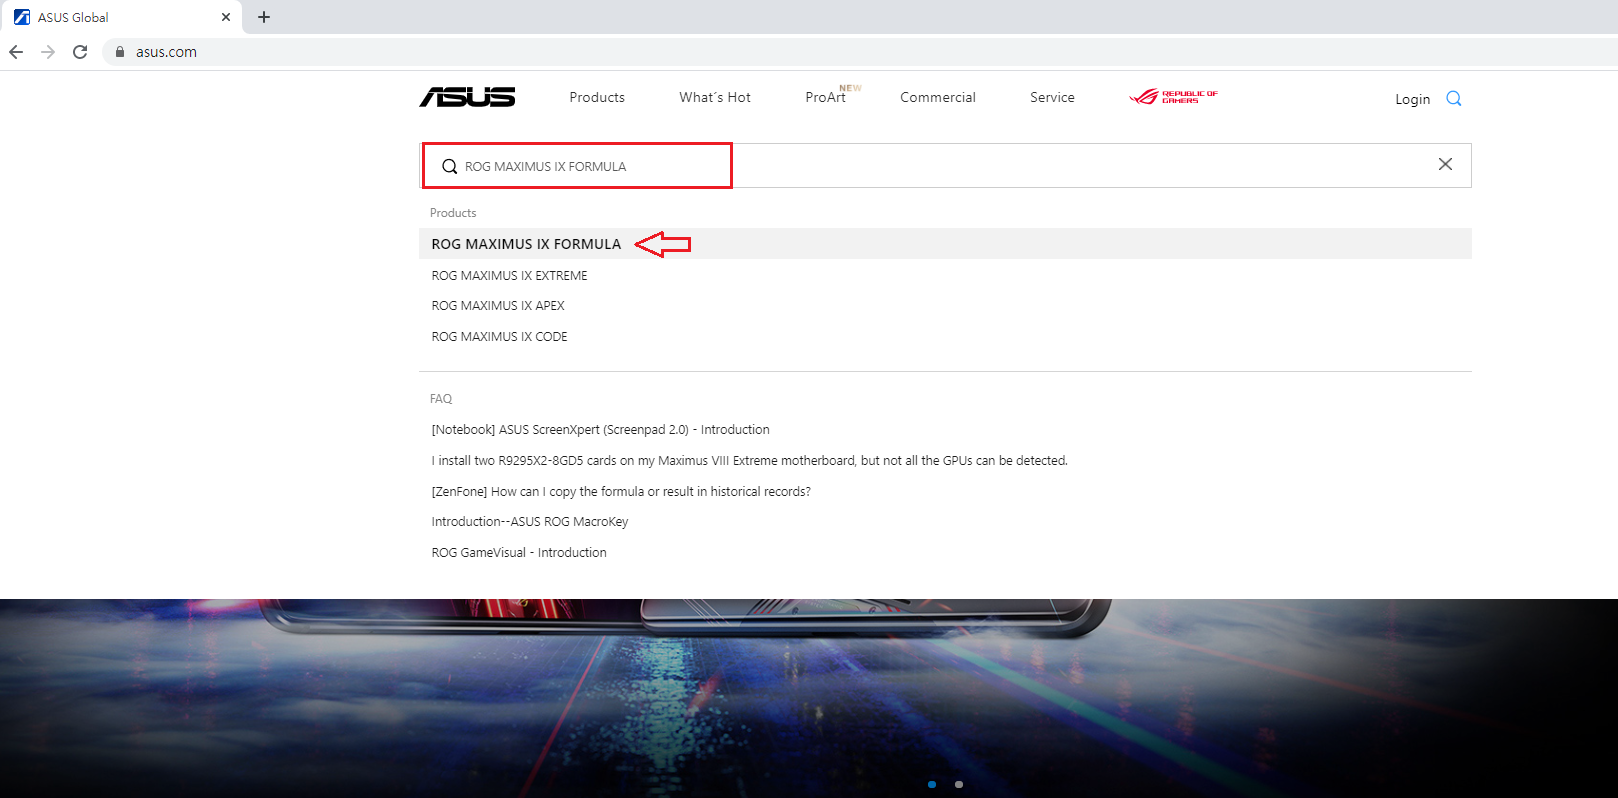
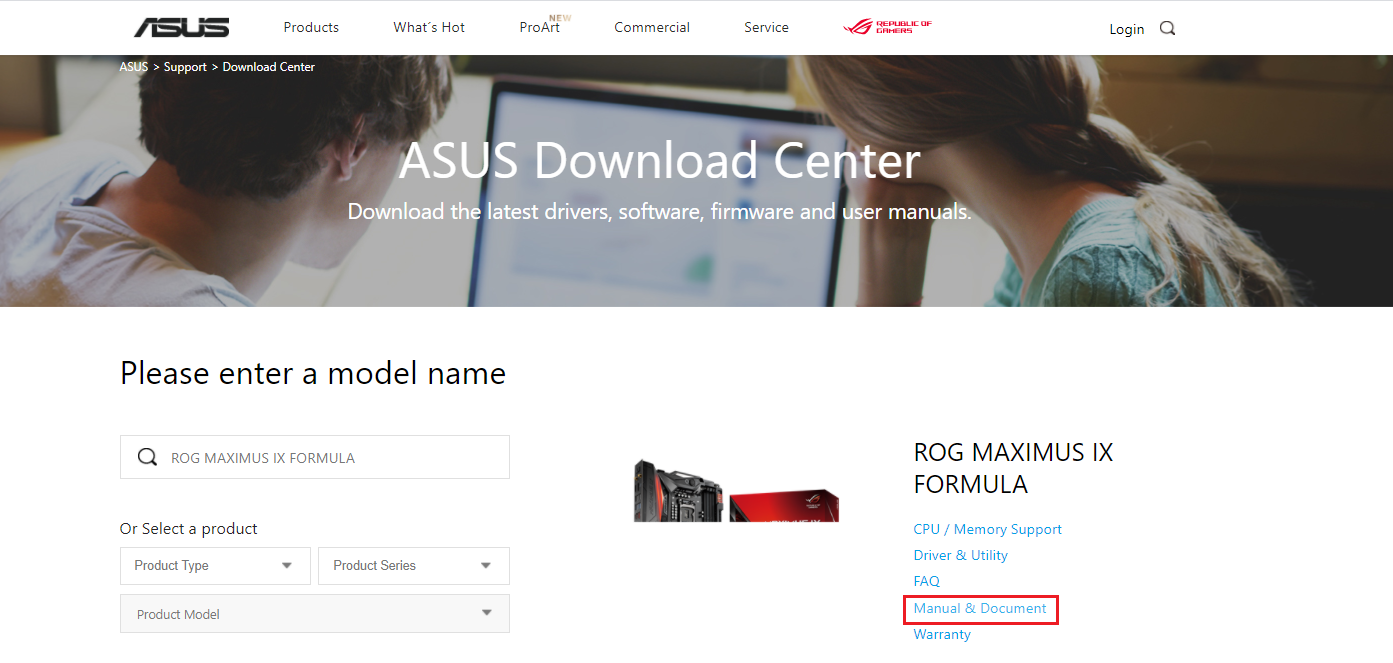
1) Нажмите на , затем введите название модели материнской платы (например, ROG MAXIMUS IX FORMULA), выберите название модели в выпадающем меню, как показано ниже:
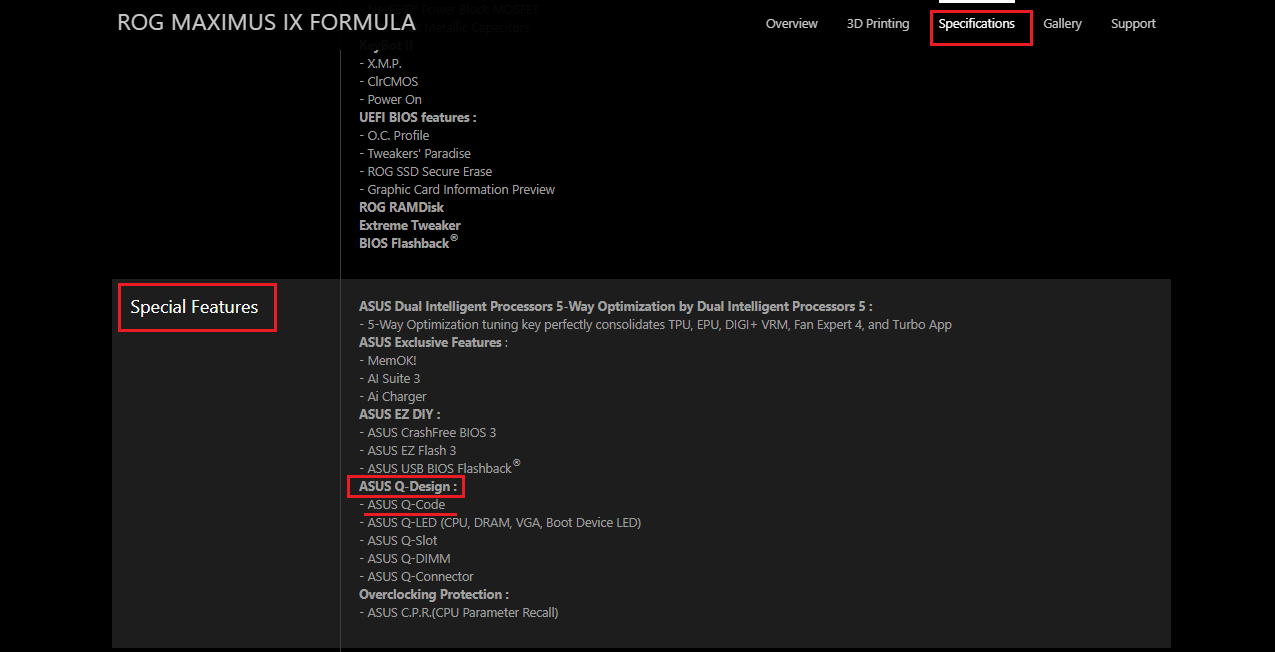
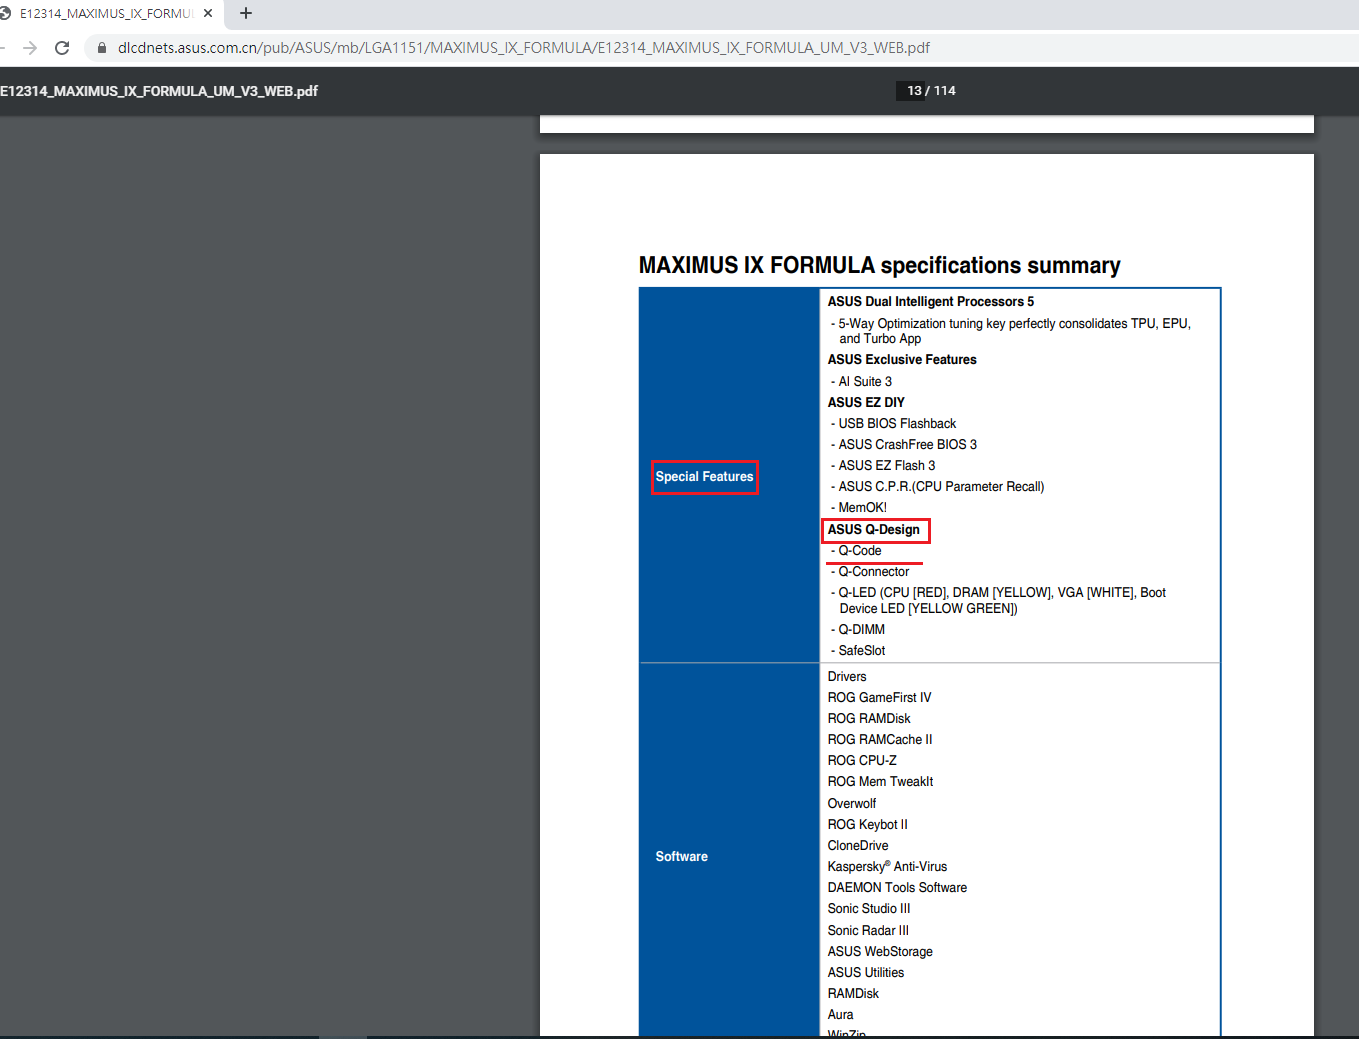
2) Нажмите [Характеристики], найдите [Special Features]- [ASUS Q-Design], и проверьте, есть ли параметр [ASUS Q-CODE]
Вариант 3. Войдите в ASUS Центр-загрузок, скачайте руководство пользователя и проверьте там ASUS Q-CODE
Скачайте мануал
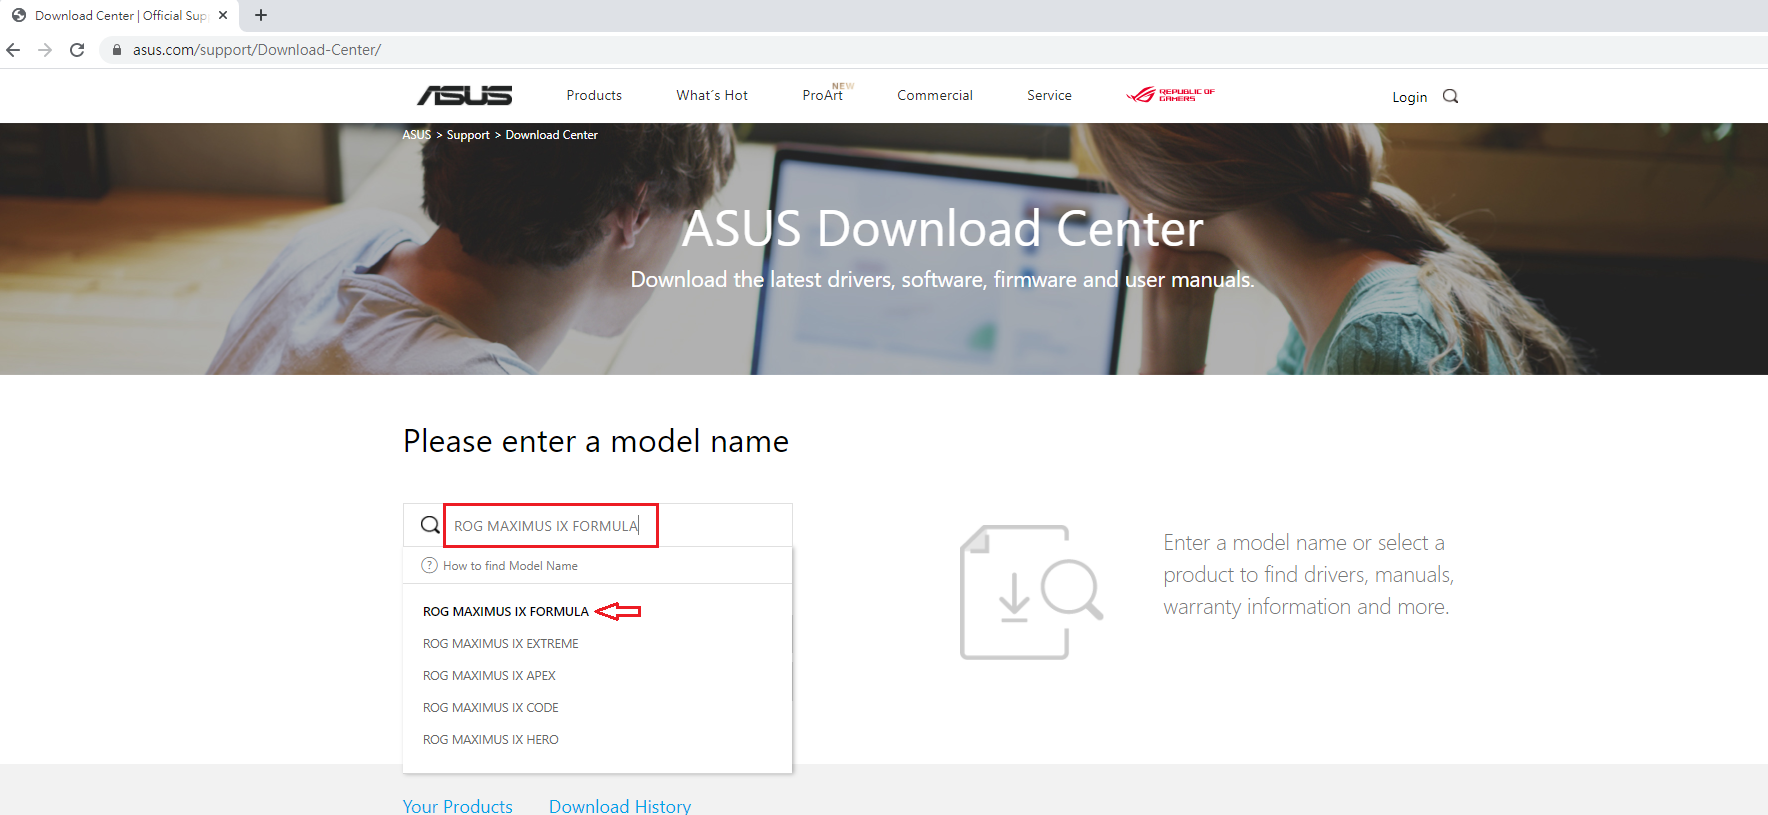
1) Введите название модели материнской платы (например, ROG CROSSHAIR VII HERO), затем выберите название модели в раскрывающемся списке, как показано ниже:
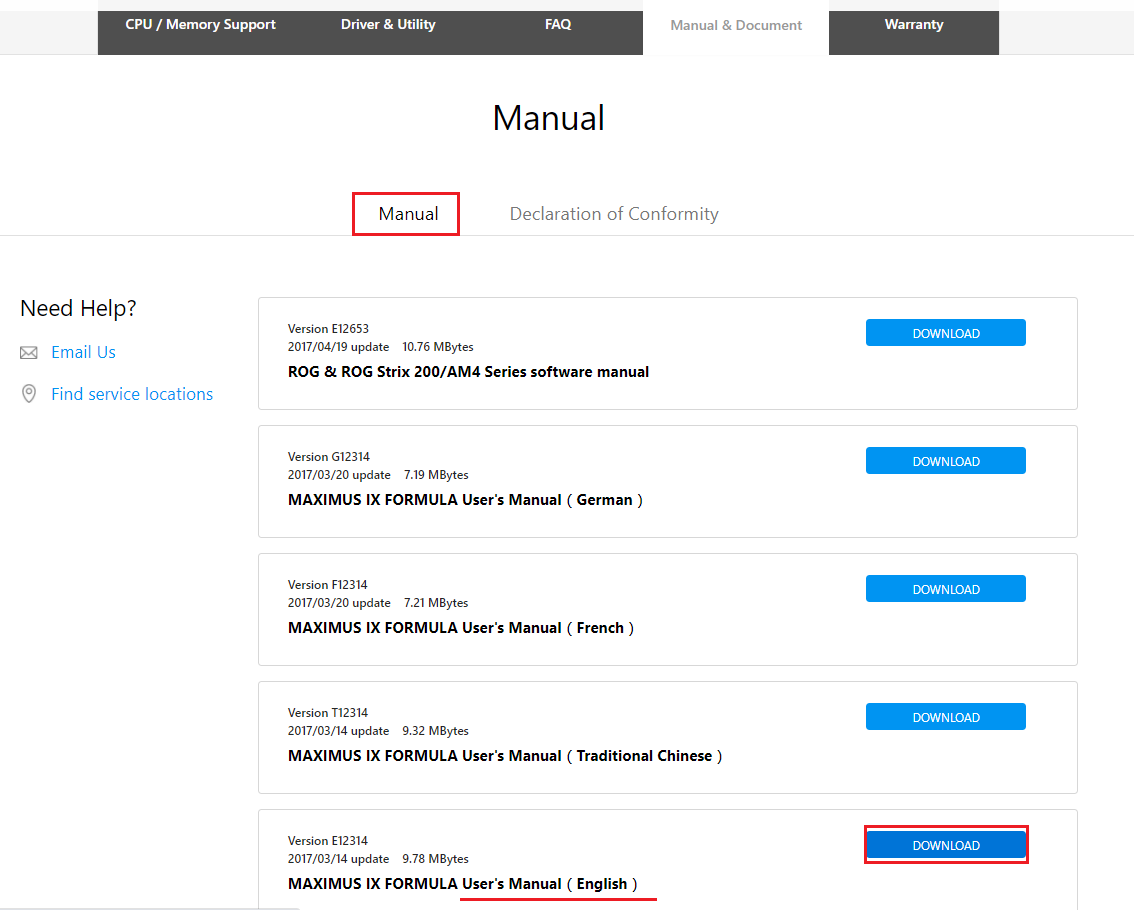
2) Нажмите [Руководства и документы]
3) Нажмите [Руководство пользователя], найдите User’s Manual(English, затем нажмите [СКАЧАТЬ]):
4) Найдите [Special Features] — [ASUS Q-Design], и проверьте [Q-CODE]
Q2: Что делать, если Qпроблема так и не решилась?
A2: Пожалуйста, попробуйте очистить CMOS, как это сделать описано тут: Как очистить CMOS
Если проблема по-прежнему не может быть устранена, свяжитесь с нами Служба поддержки
Q-Code table (continued)
Code
Description
31
Memory Installed
32 – 36
CPU post-memory initialization
37 – 3A
Post-Memory System Agent initialization is started
3B – 3E
Post-Memory PCH initialization is started
3F – 4E
OEM post memory initialization codes
4F
DXE IPL is started
Memory initialization error. Invalid memory type or incompatible memory
50 – 53
speed
54
Unspecified memory initialization error
55
Memory not installed
56
Invalid CPU type or Speed
57
CPU mismatch
58
CPU self test failed or possible CPU cache error
59
CPU micro-code is not found or micro-code update is failed
5A
Internal CPU error
5B
Reset PPI is not available
5C – 5F
Reserved for future AMI error codes
E0
S3 Resume is stared (S3 Resume PPI is called by the DXE IPL)
E1
S3 Boot Script execution
E2
Video repost
E3
OS S3 wake vector call
E4 – E7
Reserved for future AMI progress codes
E8
S3 Resume Failed
E9
S3 Resume PPI not Found
EA
S3 Resume Boot Script Error
EB
S3 OS Wake Error
EC – EF
Reserved for future AMI error codes
F0
Recovery condition triggered by firmware (Auto recovery)
F1
Recovery condition triggered by user (Forced recovery)
F2
Recovery process started
F3
Recovery firmware image is found
F4
Recovery firmware image is loaded
F5 – F7
Reserved for future AMI progress codes
F8
Recovery PPI is not available
F9
Recovery capsule is not found
FA
Invalid recovery capsule
FB – FF
Reserved for future AMI error codes
60
DXE Core is started
61
NVRAM initialization
62
Installation of the PCH Runtime Services
2-22
Chapter 2: Hardware information
-
Contents
-
Table of Contents
-
Bookmarks
Quick Links
Related Manuals for Asus P8Z68 DELUXE
Summary of Contents for Asus P8Z68 DELUXE
-
Page 1
P8Z68 Deluxe… -
Page 2
Product warranty or service will not be extended if: (1) the product is repaired, modified or altered, unless such repair, modification of alteration is authorized in writing by ASUS; or (2) the serial number of the product is defaced or missing. -
Page 3: Table Of Contents
Contents Contents ……………………iii Notices ……………………vi Safety information ………………… vii About this guide ………………….. viii P8Z68 Deluxe specifications summary …………..x Chapter 1: Product introduction Welcome! ………………..1-1 Package contents………………1-1 Special features………………1-2 1.3.1 Product highlights……………. 1-2 1.3.2 Dual Intelligent Processors 2 with DIGI+ VRM ……
-
Page 4: Contents
3.5.7 APM ………………3-24 Monitor menu ………………. 3-25 Boot menu ………………..3-28 Tools menu ………………..3-29 3.8.1 ASUS EZ Flash 2 Utility …………3-29 3.8.2. ASUS O.C. Profile …………..3-30 Exit menu ………………..3-31 3.10 Updating BIOS ………………3-32 3.10.1 ASUS Update utility…………..
-
Page 5
Contents 4.3.5 EPU ………………. 4-10 4.3.6 FAN Xpert……………… 4-11 4.3.7 Probe II………………4-12 4.3.8 Audio configurations…………..4-13 RAID configurations …………….4-14 4.4.1 RAID definitions ……………. 4-14 4.4.2 Installing Serial ATA hard disks ……….4-15 4.4.3 Setting the RAID item in BIOS ……….4-15 4.4.4 Intel Rapid Storage Technology Option ROM utility …. -
Page 6: Notices
Complying with the REACH (Registration, Evaluation, Authorisation, and Restriction of Chemicals) regulatory framework, we published the chemical substances in our products at ASUS REACH website at http://csr.asus.com/english/REACH.htm. DO NOT throw the motherboard in municipal waste. This product has been designed to enable proper reuse of parts and recycling.
-
Page 7: Safety Information
Safety information Electrical safety • To prevent electrical shock hazard, disconnect the power cable from the electrical outlet before relocating the system. • When adding or removing devices to or from the system, ensure that the power cables for the devices are unplugged before the signal cables are connected. If possible, disconnect all power cables from the existing system before you add a device.
-
Page 8: About This Guide
Where to find more information Refer to the following sources for additional information and for product and software updates. ASUS websites The ASUS website provides updated information on ASUS hardware and software products. Refer to the ASUS contact information. Optional documentation Your product package may include optional documentation, such as warranty flyers, that may have been added by your dealer.
-
Page 9: Conventions Used In This Guide
Conventions used in this guide To ensure that you perform certain tasks properly, take note of the following symbols used throughout this manual. DANGER/WARNING: Information to prevent injury to yourself when trying to complete a task. CAUTION: Information to prevent damage to the components when trying to complete a task.
-
Page 10: P8Z68 Deluxe Specifications Summary
** Hyper DIMM support is subject to the physical characteristics of individual CPUs. Some hyper DIMMs only support one DIMM per channel. Please refer to Memory QVL for details. *** Refer to www.asus.com or this user manual for the Memory QVL (Qualified Vendors Lists) Expansion slots 2 x PCI Express 2.0 x16 slots (single at x16 or dual at x8/x8 mode)
-
Page 11
— MemOK! — AI Suite II — AI Charger — Anti Surge — Disk Unlocker — ASUS EFI BIOS EZ Mode featuring friendly graphics user interface ASUS Quiet Thermal Solution: — ASUS Fanless Design: Heat-pipe solution — ASUS Fan Xpert… -
Page 12
BIOS features 64 Mb Flash ROM, EFI AMI BIOS, PnP, DMI 2.0, WfM 2.0, SM BIOS 2.5, ACPI 2.0a, Multi-language BIOS, ASUS EZ Flash 2, ASUS CrashFree BIOS 3, F12 PrintScreen Function Manageability WfM 2.0, DMI 2.0, WOL by PME, WOR by PME, PXE… -
Page 13: Chapter 1: Product Introduction
® The motherboard delivers a host of new features and latest technologies, making it another standout in the long line of ASUS quality motherboards! Before you start installing the motherboard, and hardware devices on it, check the items in your package with the list below.
-
Page 14: Special Features
MHz frequency as default. Complete USB 3.0 Integration ASUS facilitates strategic USB 3.0 accessibility for both the front and rear panel – 4 USB 3.0 ports in total. Experience the latest plug & play connectivity at speeds up to 10 times faster than USB 2.0.
-
Page 15: Dual Intelligent Processors 2 With Digi+ Vrm
Z68 Express Chipset natively supports the next-generation Serial ATA (SATA) ® interface, delivering up to 6.0 Gb/s data transfer. ASUS provides extra SATA 6.0 Gb/s ports with enhanced scalability, faster data retrieval, and double the bandwidth of current bus systems.
-
Page 16: Asus Exclusive Features
ASUS Fan Xpert ASUS Fan Xpert intelligently allows you to adjust both the CPU and chassis fan speeds according to different ambient temperatures caused by different climate conditions in different geographic regions and your PC’s loading. The built-in variety of useful profiles offer flexible controls of fan speed to achieve a quiet and cool environment.
-
Page 17: Asus Ez Diy
ASUS EZ-Flash 2 ASUS EZ Flash 2 is a user-friendly utility that allows you to update the BIOS without using a bootable floppy disk or an OS-based utility. 1.3.6…
-
Page 18
The motherboard is European Union’s Energy-related Products (ErP) ready, and ErP requires products to meet certain energy efficiency requirement in regards to energy consumptions. This is in line with ASUS vision of creating environment-friendly and energy-efficient products through product design and innovation to reduce carbon footprint of the product and thus mitigate environmental impacts. -
Page 19: Chapter 2: Hardware Information
Before you install or remove any component, ensure that the ATX power supply is switched off or the power cord is detached from the power supply. Failure to do so may cause severe damage to the motherboard, peripherals, or components. ASUS P8Z68 Deluxe…
-
Page 20: Motherboard Overview
Motherboard overview 2.2.1 Motherboard layout Refer to 2.2.7 Internal connectors and 2.3.10 Rear panel connection for more information about rear panel connectors and internal connectors. Chapter 2: Hardware information…
-
Page 21: Layout Contents
USB 2.0 connectors (10-1 pin USB1112, USB1314) 2-28 Reset switch 2-15 Power-on switch 2-15 EPU switch 2-18 IEEE 1394a port connector (10-1 pin IE1394_2) 2-29 Front panel audio connector (10-1 pin AAFP) 2-31 Digital audio connector (4-1 pin SPDIF_OUT) 2-29 ASUS P8Z68 Deluxe…
-
Page 22: Central Processing Unit (Cpu)
Contact your retailer immediately if the PnP cap is missing, or if you see any damage to the PnP cap/socket contacts/motherboard components. ASUS will shoulder the cost of repair only if the damage is shipment/ transit-related.
-
Page 23: System Memory
The motherboard comes with four Double Data Rate 3 (DDR3) Dual Inline Memory Modules (DIMM) slots. A DDR3 module is notched differently from a DDR or DDR2 module. DO NOT install a DDR or DDR2 memory module to the DDR3 slot. Recommended memory configurations ASUS P8Z68 Deluxe…
-
Page 24: Memory Configurations
• For system stability, use a more efficient memory cooling system to support a full memory load (4 DIMMs) or overclocking condition. P8Z68 Deluxe Motherboard Qualified Vendors Lists (QVL) DDR3 2200(O.C.) MHz capability DIMM socket support (Optional) Chip…
-
Page 25
P8Z68 Deluxe Motherboard Qualified Vendors Lists (QVL) DDR3 2133(O.C.) MHz capability DIMM socket support (Optional) Chip Chip Vendor Part No. Size Timing Voltage Brand 1 DIMM 2 DIMM 4 DIMM G.SKILL F3-17600CL9D-4GBTDS(XMP) 4GB(2 x 2GB) 9-9-9-24 1.65 • • * The above QVL is for the DDR3 2200 MHz memory module. Due to CPU behavior, DDR3 2200 MHz memory module will run at DDR3 2133 MHz frequency. -
Page 26
P8Z68 Deluxe Motherboard Qualified Vendors Lists (QVL) DDR3 1600 MHz capability DIMM socket support (Optional) Chip Chip Vendor Part No. Size Timing Voltage Brand 1 DIMM 2 DIMM 4 DIMM G.SKILL F3-14400CL6D-4GBFLS(XMP) 4GB(2 x 2GB) 6-8-6-24 1.65 • • G.SKILL… -
Page 27
P8Z68 Deluxe Motherboard Qualified Vendors Lists (QVL) DDR3 1600 MHz capability (continued) DIMM socket support Chip (Optional) Vendor Part No. Size Chip NO. Timing Voltage Brand 1 DIMM 2 DIMM 4 DIMM Super Talent WB160UX6G8(XMP) 6GB(3 x 2GB) DS — •… -
Page 28
P8Z68 Deluxe Motherboard Qualified Vendors Lists (QVL) DDR3 1333 MHz capability (continued) DIMM socket support (Optional) Vendor Part No. Size Chip Brand Chip NO. Timing Voltage 1 DIMM 2 DIMM 4 DIMM G.SKILL F3-10666CL9D-8GBRL 8GB ( 2x DS — 9-9-9-24 •… -
Page 29
P8Z68 Deluxe Motherboard Qualified Vendors Lists (QVL) DDR3 1333 MHz capability (continued) DIMM socket support (Optional) Vendor Part No. Size Chip Brand Chip NO. Timing Voltage 1 DIMM 2 DIMM 4 DIMM AQ12M72E8BKH9S DS SAMSUNG K4B2G0846B-HCH9 (ECC) — • •… -
Page 30
P8Z68 Deluxe Motherboard Qualified Vendors Lists (QVL) DDR3 1066 MHz capability DIMM socket support Chip (Optional) Vendor Part No. Size Chip NO. Timing Voltage Brand 1 DIMM 2 DIMM 4 DIMM Crucial CT12864BA1067.8FF SS MICRON D9KPT • • • Crucial CT12864BA1067.8SFD… -
Page 31: Expansion Slots
PCIe 2.0 x16_3 slot [black] (at x4 mode, compatible with PCIe x1 and x4 devices) PCI Express operating mode VGA configuration PCIe 2.0 x16_1 PCIe 2.0 x16_2 Single VGA/PCIe card (Recommend for single VGA) Dual VGA/PCIe card ASUS P8Z68 Deluxe 2-13…
-
Page 32
• In single VGA card mode, use the PCIe 2.0 x16_1 slot (navy blue) for a PCI Express x16 graphics card to get better performance. • In CrossFireX™ or SLI™ mode, use the PCIe 2.0 x16_1 and PCIe 2.0 x16_2 slots for PCI Express x16 graphics cards to get better performance. -
Page 33: Onboard Switches
The illustration below shows the location of the onboard power-on switch. Reset switch Press the reset switch to reboot the system. ASUS P8Z68 Deluxe 2-15…
-
Page 34
BIOS default settings. A messgae will appear during POST reminding you that the BIOS has been restored to its default settings. • We recommend that you download and update to the latest BIOS version from the ASUS website at www.asus.com after using the MemOK! function. 2-16 Chapter 2: Hardware information… -
Page 35
You may use the TurboV and Auto Tuning feature in the TurboV EVO application, adjust the BIOS setup program, or enable the TPU switch at the same time. However, the system will use the last setting you have made. ASUS P8Z68 Deluxe 2-17… -
Page 36
EPU switch Turning this switch to Enable will automatically detect the current PC loadings and intelligently moderate the power consumption. For ensuring the system performance, turn the switch setting to Enable when the system is powered off. • The EPU LED (O2LED2) near the EPU switch lights when the switch setting is turned to Enable. -
Page 37: Onboard Leds
This user-friendly design provides an intuitional way to locate the root problem within a second. ID LEDs The ID LEDs provide an elegant embellishment to the motherboard design. ASUS P8Z68 Deluxe 2-19…
-
Page 38
TPU LED The TPU LED lights when the TPU switch is turned to Enable. EPU LED The EPU LED lights when the EPU switch is turned to Enable. 2-20 Chapter 2: Hardware information… -
Page 39: Q-Code Leds
15 – 18 Pre-memory System Agent initialization is started 19 – 1C Pre-memory PCH initialization is started 1D – 2A OEM pre-memory initialization codes 2B – 2F Memory initialization Reserved for ASL (see ASL Status Codes section below) ASUS P8Z68 Deluxe 2-21…
-
Page 40
Q-Code table (continued) Code Description Memory Installed 32 – 36 CPU post-memory initialization 37 – 3A Post-Memory System Agent initialization is started 3B – 3E Post-Memory PCH initialization is started 3F – 4E OEM post memory initialization codes DXE IPL is started Memory initialization error. -
Page 41
IDE initialization is started IDE Reset IDE Detect IDE Enable SCSI initialization is started SCSI Reset SCSI Detect SCSI Enable Setup Verifying Password Start of Setup Reserved for ASL (see ASL Status Codes section below) Setup Input Wait ASUS P8Z68 Deluxe 2-23… -
Page 42
Q-Code table (continued) Code Description Reserved for ASL (see ASL Status Codes section below) Ready To Boot event Legacy Boot event Exit Boot Services event Runtime Set Virtual Address MAP Begin Runtime Set Virtual Address MAP End Legacy Option ROM Initialization System Reset USB hot plug PCI bus hot plug… -
Page 43: Internal Connectors
You must install Windows XP Service Pack 3 or later versions before using Serial ATA hard disk drives. The Serial ATA RAID feature is available only if you are using ® Windows XP SP3 or later versions. ASUS P8Z68 Deluxe 2-25…
-
Page 44
Intel Z68 Serial ATA 3.0 Gb/s connectors (7-pin SATA3G_3–6 [blue]) ® These connectors connect to Serial ATA 3.0 Gb/s hard disk drives and optical disc drives via Serial ATA 3.0 Gb/s signal cables. If you installed Serial ATA hard disk drives, you can create a RAID 0, 1, 5, and 10 ®… -
Page 45
DVD and load the driver during OS installation. For 32/64bit Windows XP OS, load first the Marvell shared library driver, and then load Marvell 91xx SATA Controller Driver. For Windows Vista / Windows 7 OS, load only the Marvell 91xx SATA Controller Driver. ASUS P8Z68 Deluxe 2-27… -
Page 46
USB 3.0 connector, you can have a front panel USB 3.0 solution. You can connect the ASUS front panel USB 3.0 box to this connector to obtain the front panel USB 3.0 solution. -
Page 47
This connector is for an additional Sony/Philips Digital Interface (S/PDIF) port(s). Connect the S/PDIF Out module cable to this connector, then install the module to a slot opening at the back of the system chassis. The S/PDIF module is purchased separately. ASUS P8Z68 Deluxe 2-29… -
Page 48
• The CPU_FAN connector supports the CPU fan of maximum 1A (12 W) fan power. • Only the CPU_FAN, CHA_FAN 1 and CHA_FAN 2 connectors support the ASUS FAN Xpert feature. • If you install two VGA cards, we recommend that you plug the rear chassis fan cable to the motherboard connector labeled CHA_FAN1 or CHA_FAN2 for better thermal environment. -
Page 49
ATX power connectors (24-pin EATXPWR; 8-pin EATX12V) These connectors are for ATX power supply plugs. The power supply plugs are designed to fit these connectors in only one orientation. Find the proper orientation and push down firmly until the connectors completely fit. ASUS P8Z68 Deluxe 2-31… -
Page 50
1000W power or above to ensure the system stability. • If you are uncertain about the minimum power supply requirement for your system, refer to the Recommended Power Supply Wattage Calculator at http://support.asus. com/PowerSupplyCalculator/PSCalculator.aspx?SLanguage=en-us for details. PSU Suggested List AcBel PC7030… -
Page 51: System Panel Connector
Pressing the power switch for more than four seconds while the system is ON turns the system OFF. • Reset button (2-pin RESET) This 2-pin connector is for the chassis-mounted reset button for system reboot without turning off the system power. ASUS P8Z68 Deluxe 2-33…
-
Page 52: Building Your Computer System
Building your computer system 2.3.1 Additional tools and components to build a PC system 1 bag of screws Philips (cross) screwdriver PC chassis Power supply unit Intel LGA 1155 CPU Intel LGA 1155 compatible CPU Fan DIMM SATA hard disk drive SATA optical disc drive (optional) Graphics card (optional) The tools and components in the table above are not included in the motherboard package.
-
Page 53: Cpu Installation
2.3.2 CPU installation The LGA1156 CPU is incompatible with the LGA1155 socket. DO NOT install a LGA1156 CPU on the LGA1155 socket. ASUS P8Z68 Deluxe 2-35…
-
Page 54
2-36 Chapter 2: Hardware information… -
Page 55: Cpu Heatsink And Fan Assembly Installation
2.3.3 CPU heatsink and fan assembly installation Apply the Thermal Interface Material to the CPU heatsink and CPU before you install the heatsink and fan if necessary. To install the CPU heatsink and fan assembly ASUS P8Z68 Deluxe 2-37…
-
Page 56
To uninstall the CPU heatsink and fan assembly 2-38 Chapter 2: Hardware information… -
Page 57: Dimm Installation
2.3.4 DIMM installation To remove a DIMM ASUS P8Z68 Deluxe 2-39…
-
Page 58: Motherboard Installation
2.3.5 Motherboard installation The diagrams in this section are for reference only. The motherboard layout may vary with models, but the installation steps remain the same. 2-40 Chapter 2: Hardware information…
-
Page 59
DO NOT overtighten the screws! Doing so can damage the motherboard. ASUS P8Z68 Deluxe 2-41… -
Page 60: Atx Power Connection
2.3.6 ATX Power connection 2-42 Chapter 2: Hardware information…
-
Page 61: Sata Device Connection
2.3.7 SATA device connection ASUS P8Z68 Deluxe 2-43…
-
Page 62: Front I/O Connector
2.3.8 Front I/O Connector To install ASUS Q-Connector To install USB 2.0 Connector To install front panel audio connector AAFP USB 2.0 To install USB 3.0 Connector USB 3.0 2-44 Chapter 2: Hardware information…
-
Page 63: Expension Card Installation
2.3.9 Expension Card installation To install PCIe x16 cards To install PCIe x1 cards To install PCI cards ASUS P8Z68 Deluxe 2-45…
-
Page 64: Rear Panel Connection
2.3.10 Rear panel connection Rear panel connectors 1. PS/2 keyboard/mouse combo port 9. Optical S/PDIF Out port 2. Coaxial S/PDIF Out port 10. External SATA port 3. USB 2.0 ports 5 and 6 11. Power External SATA port 4. Bluetooth module* 12.
-
Page 65
Front Speaker Out Front Speaker Out Pink Mic In Mic In Mic In Mic In Orange – – Center/Subwoofer Center/Subwoofer Black – Rear Speaker Out Rear Speaker Out Rear Speaker Out Gray – – – Side Speaker Out ASUS P8Z68 Deluxe 2-47… -
Page 66: Audio I/O Connections
2.3.11 Audio I/O connections Audio I/O ports Connect to Headphone and Mic Connect to Stereo Speakers Connect to 2.1 channel Speakers 2-48 Chapter 2: Hardware information…
-
Page 67
Connect to 4.1 channel Speakers Connect to 5.1 channel Speakers Connect to 7.1 channel Speakers When the DTS Surround Sensation UltraPC function is enabled, ensure to connect the rear speaker to the gray port. ASUS P8Z68 Deluxe 2-49… -
Page 68: Starting Up For The First Time
Starting up for the first time After making all the connections, replace the system case cover. Be sure that all switches are off. Connect the power cord to the power connector at the back of the system chassis. Connect the power cord to a power outlet that is equipped with a surge protector. Turn on the devices in the following order: Monitor External SCSI devices (starting with the last device on the chain)
-
Page 69: Chapter 3: Bios Setup
BIOS setup Knowing BIOS The ASUS UEFI BIOS offers a user-friendly interface that goes beyond traditional keyboard-only BIOS controls to enable more flexible and convenient mouse input. Users can easily navigate the UEFI BIOS with the same smoothness as their operating system.
-
Page 70: Ez Mode
CPU/chassis/power fan speed the system, or enters the Advanced Mode EFI BIOS Utility — EZ Mode Exit/Advanced Mode P8Z68 Deluxe English BIOS Version : 0209 Build Date : 03/04/2011 CPU Type : Genuine Intel(R) CPU 0 @ 3.10GHz…
-
Page 71: Advanced Mode
Monitor For displaying the system temperature, power status, and changing the fan settings. Boot For changing the system boot configuration Tool For configuring options for special functions Exit For selecting the exit options and loading default settings ASUS P8Z68 Deluxe…
-
Page 72: Menu Items
Menu items The highlighted item on the menu bar displays the specific items for that menu. For example, selecting Main shows the Main menu items. The other items (Ai Tweaker, Advanced, Monitor, Boot, Tool, and Exit) on the menu bar have their respective menu items.
-
Page 73: Main Menu
RAM to clear the BIOS password. See section 2.3.7 Jumper for information on how to erase the RTC RAM. The Administrator or User Password items on top of the screen show the default • Not Installed. After you set a password, these items show Installed. ASUS P8Z68 Deluxe…
-
Page 74: Administrator Password
Administrator Password If you have set an administrator password, we recommend that you enter the administrator password for accessing the system. Otherwise, you might be able to see or change only selected fields in the BIOS setup program. To set an administrator password: Select the Administrator Password item and press <Enter>.
-
Page 75: Ai Tweaker Menu
DRAM DATA REF Voltage on CHA Auto DRAM CTRL REF Voltage on CHA Auto DRAM DATA REF Voltage on CHB Auto DRAM CTRL REF Voltage on CHB Auto CPU Spread Spectrum Auto Version 2.00.1201. Copyright (C) 2010 American Megatrends, Inc. ASUS P8Z68 Deluxe…
-
Page 76
Ai Overclock Tuner [Auto] Allows you to select the CPU overclocking options to achieve the desired CPU internal frequency. Select any of these preset overclocking configuration options: [Auto] Loads the optimal settings for the system. [Manual] Allows you to individually set overclocking parameters. [X.M.P.] If you install memory modules supporting the eXtreme Memory Profile (X.M.P.) Technology, choose this item to set the profiles supported by your… -
Page 77: Dram Timing Control
Allows you to enable or disable the Enhanced Intel SpeedStep Technology (EIST). ® [Disabled] Disables this function. [Enabled] The operating system dynamically adjusts the processor voltage and core frequency which may result in decreased average consumption and decreased average heat production. ASUS P8Z68 Deluxe…
-
Page 78
Turbo Mode [Enabled] This item appears only when you set the EIST item to [Enabled]. [Enabled] Allows processor cores to run faster than marked frequency in specific condition. [Disabled] Disables this function. The following five items appear only when you set the EIST and Turbo Mode items to [Enabled]. -
Page 79
Reducing phase number under light system loading to increase VRM efficiency [Standard] Proceeds phase control depending on the CPU loading. [Optimized] Loads the ASUS optimized phase tuning profile. [Extreme] Proceeds the full phase mode. [Manual Adjustment] Allows manual adjustment. -
Page 80
CPU Voltage [Offset Mode] [Manual Mode] Allows you to set a fixed CPU voltage. [Offset Mode] Allows you to set the Offset voltage. Offset Mode Sign [+] This item appears only when you set the CPU Voltage item to [Offset Mode]. To offset the voltage by a positive value. -
Page 81
0.395x to 0.630x with a 0.005x interval. Different ratio might enhance DRAM overclocking ability. CPU Spread Spectrum [Auto] [Auto] Automatic configuration. [Disabled] Enhances the BCLK overclocking ability. [Enabled] Sets to [Enabled] for EMI control. ASUS P8Z68 Deluxe 3-13… -
Page 82: Advanced Menu
Advanced menu The Advanced menu items allow you to change the settings for the CPU and other system devices. Be cautious when changing the settings of the Advanced menu items. Incorrect field values can cause the system to malfunction. EFI BIOS Utility — Advanced Mode Exit Main Ai Tweaker…
-
Page 83: Cpu Configuration
<-> keys to adjust the ratio. The valid value ranges vary according to your CPU model. Intel Adaptive Thermal Monitor [Enabled] [Enabled] Enables the overheated CPU to throttle its clock speed to cool down. [Disabled] Disables the CPU thermal monitor function. ASUS P8Z68 Deluxe 3-15…
-
Page 84
Hyper-threading [Enabled] The Intel Hyper-Threading Technology allows a hyper-threading processor to appear as two logical processors to the operating system, allowing the operating system to schedule two threads or processes simultaneously. [Enabled] Two threads per activated core are enabled. [Disabled] Only one thread per activated core is enabled. -
Page 85: System Agent Configuration
Back Advanced\ PCH Configuration > PCH Configuration Enabled/Disabled the High Precision Event Timer. High Precision Timer Enabled High Precision Timer [Enabled] Allows you to enable or disable the High Precision Event Timer. Configuration options: [Enabled] [Disabled] ASUS P8Z68 Deluxe 3-17…
-
Page 86: Sata Configuration
SATA 6G_1 (Gray) Not Present Hot Plug Disabled SATA 6G_2 (Gray) Not Present Hot Plug Disabled SATA 3G_3 (Blue) ASUS CB-521 ATAPI Hot Plug Disabled →←: Select Screen ↑↓: Select Item SATA 3G_4 (Blue) Not Present Enter: Select +/-: Change Opt.
-
Page 87
S.M.A.R.T. Status Check [Enabled] S.M.A.R.T. (Self-Monitoring, Analysis and Reporting Technology) is a monitor system. When read/write of your hard disk errors occur, this feature allows the hard disk to report warning messages during the POST. Configuration options: [Enabled] [Disabled] ASUS P8Z68 Deluxe 3-19… -
Page 88: Usb Configuration
3.5.5 USB Configuration The items in this menu allow you to change the USB-related features. EFI BIOS Utility — Advanced Mode Exit Ai Tweaker Main Advanced Monitor Boot Tool Back Advanced\ USB Configuration > USB Configuration Enables Legacy USB support. AUTO option disables legacy support if no USB Devices: USB devices are connected.
-
Page 89: Onboard Devices Configuration
[HD] Sets the front panel audio connector (AAFP) mode to high definition audio. [AC97] Sets the front panel audio connector (AAFP) mode to legacy AC’97 ASUS P8Z68 Deluxe 3-21…
-
Page 90
SPDIF Out Type [SPDIF] [SPDIF] Sets to [SPDIF] for SPDIF audio output. [HDMI] Sets to [HDMI] for HDMI audio output. Renesas USB 3.0 Controller [Enabled] [Enabled] Enables the USB 3.0 controller. [Disabled] Disables the controller. Bluetooth Controller [Enabled] [Enabled] Enables the onboard bluetooth controller. [Disabled] Disables the controller. -
Page 91
Change Settings [IO=3F8h; IRQ=4] Allows you to select the Serial Port base address. Configuration options: [IO=3F8h; IRQ=4] [IO=2F8h; IRQ=3] [IO=3E8h; IRQ=4] IO=2F8h; IRQ=3] [IO=3E8h; IRQ=4] ] [IO=3E8h; IRQ=4] IO=3E8h; IRQ=4] ] [IO=2E8h; IRQ=3] IO=2E8h; IRQ=3] ] ASUS P8Z68 Deluxe 3-23… -
Page 92: Apm
3.5.7 EFI BIOS Utility — Advanced Mode Exit Main Ai Tweaker Advanced Monitor Boot Tool Back Advanced\ APM > Restore AC Power Loss Power Off Specify what state to go to when power is re-applied after a power Power On By PCI Disabled failure (G3 state).
-
Page 93: Monitor Menu
(RPM). If the fan is not connected to the fan speed in rotations per minute (RPM). If the fan is not connected to the motherboard, the field shows N/A. Select Ignore if you do not wish to display the detected speed. ASUS P8Z68 Deluxe 3-25…
-
Page 94
CPU Q-Fan Control [Enabled] [Disabled] Disables the CPU Q-Fan control feature. [Enabled] Enables the CPU Q-Fan control feature. CPU Fan Speed Low Limit [600 RPM] This item appears only when you enable the CPU Q-Fan Control feature and allows you to disable or set the CPU fan warning speed. -
Page 95
The onboard hardware monitor automatically detects the voltage output through the onboard voltage regulators. Select Ignore if you do not want to detect this item. Anti Surge Support [Enabled] This item allows you to enable or disable the Anti Surge function. Configuration options: [Disabled] [Enabled] ASUS P8Z68 Deluxe 3-27… -
Page 96: Boot Menu
Full Screen Logo [Enabled] [Enabled] Enables the full screen logo display feature. [Disabled] Disables the full screen logo display feature. Set this item to [Enabled] to use the ASUS MyLogo 2™ feature. Wait For ‘F1’ If Error [Enabled] [Disabled] Disables this function. [Enabled] The system waits for the <F1>…
-
Page 97: Tools Menu
3.8.1 ASUS EZ Flash 2 Utility Allows you to run ASUS EZ Flash 2. When you press <Enter>, a confirmation message appears. Use the left/right arrow key to select between [Yes] or [No], then press <Enter> to confirm your choice.
-
Page 98: Asus O.c. Profile
Ai Tweaker Main Advanced Monitor Boot Tool Back Tool\ ASUS O.C. Profile > O.C. Profile Configuration Save BIOS settings to Profile Setup Profile 1 Status : Not Installed Setup Profile 2 Status : Not Installed Setup Profile 3 Status :…
-
Page 99: Exit Menu
This option allows you to enter the EZ Mode screen. Launch EFI Shell from filesystem device This option allows you to attempt to launch the EFI Shell application (shellx64.efi) from one of the available filesystem devices. ASUS P8Z68 Deluxe 3-31…
-
Page 100: Updating Bios
BIOS in the future. Copy the original motherboard BIOS using the ASUS Update or BIOS Updater utilities. 3.10.1 ASUS Update utility The ASUS Update is a utility that allows you to manage, save, and update the motherboard BIOS in Windows environment. The ASUS Update utility allows you to: ®…
-
Page 101
To update the BIOS through the Internet: From the ASUS Update screen, select Update BIOS from Internet, and then click Next. Select the ASUS FTP site nearest you to avoid network traffic. If you want to enable the BIOS downgradable function and auto… -
Page 102
The screenshots in this section are for reference only. The actual BIOS information vary by models. • Refer to the software manual in the support DVD or visit the ASUS website at www.asus.com for detailed software configuration. 3-34 Chapter 3: BIOS setup… -
Page 103: Asus Ez Flash 2 Utility
3.10.2 ASUS EZ Flash 2 utility The ASUS EZ Flash 2 feature allows you to update the BIOS without having to use a bootable floppy disk or an OS-based utility. Before you start using this utility, download the latest BIOS from the ASUS website at www.asus.com.
-
Page 104: Asus Crashfree Bios 3 Utility
The BIOS file in the motherboard support DVD may be older than the BIOS file published on the ASUS official website. If you want to use the newer BIOS file, download the file at support.asus.com and save it to a USB flash drive.
-
Page 105: Asus Bios Updater
3.10.4 ASUS BIOS Updater The ASUS BIOS Updater allows you to update BIOS in DOS environment. This utility also allows you to copy the current BIOS file that you can use as a backup when the BIOS fails or gets corrupted during the updating process.
-
Page 106
The BIOS Updater backup screen appears indicating the BIOS backup process. When BIOS backup is done, press any key to return to the DOS prompt. ASUSTek BIOS Updater for DOS V1.18 [2010/04/29] Current ROM Update ROM BOARD: P8Z68 Deluxe BOARD: Unknown VER: 0204 VER:… -
Page 107
Select the Load Optimized Defaults item under the Exit BIOS menu. See Chaper 3 of your motherboard user manual for details. • Ensure to connect all SATA hard disk drives after updating the BIOS file if you have disconnected them. ASUS P8Z68 Deluxe 3-39… -
Page 108
3-40 Chapter 3: BIOS setup… -
Page 109: Chapter 4: Software Support
The contents of the support DVD are subject to change at any time without notice. Visit the ASUS website at www.asus.com for updates. 4.2.1 Running the support DVD Place the support DVD into the optical drive.
-
Page 110: Obtaining The Software Manuals
The software manual files are in Portable Document Format (PDF). Install the Adobe ® Acrobat Reader from the Utilities menu before opening the files. ® Click the Manual tab. Click ASUS Motherboard Utility Guide from the manual list on the left. The Manual folder of the support DVD appears. Double-click the folder of your selected software.
-
Page 111: Software Information
4.3.1 AI Suite II AI Suite II is an all-in-one interface that integrates several ASUS utilities and allows users to launch and operate these utilities simultaneously. Installing AI Suite II To install AI Suite II on your computer Place the support DVD to the optical drive.
-
Page 112: Digi+ Vrm
The actual performance boost may vary depending on your CPU specification. • Do not remove the thermal module. The thermal conditions should be monitored. Refer to the software manual in the support DVD or visit the ASUS website at www.asus.com for detailed software configuration. Chapter 4: Software support…
-
Page 113: Bt Go
BT Turbo Key, Pocket Media, and Reset/Off functions. • Refer to the software manual in the support DVD or visit the ASUS website at www.asus.com for detailed software configuration. •…
-
Page 114: Turbov Evo
After installing AI Suite II from the motherboard support DVD, launch TurboV EVO by clicking Tool > TurboV EVO on the AI Suite II main menu bar. Refer to the software manual in the support DVD or visit the ASUS website at www.asus.com for detailed software configuration.
-
Page 115
You will requested to restart the system. Click Yes to make the change take effect. CPU Ratio Click to activate the CPU Ratio Applies all changes Click to restore immediately all start-up settings Undoes all changes without applying ASUS P8Z68 Deluxe… -
Page 116: Auto Tuning
The CPU Ratio bars show the status of the CPU cores, which vary with your CPU model. Auto Tuning ASUS TurboV EVO includes two auto tuning modes, providing the most flexible auto-tuning options. • The overclocking result varies with the CPU model and the system configuration.
-
Page 117
Click Stop if you want to cancel the Overclocking process. TurboV automatically adjusts and saves BIOS settings and restarts the system. After re-entering Windows, a message appears indicating auto tuning success. Click OK to exit. ASUS P8Z68 Deluxe… -
Page 118: Epu
Select From the Last Reset to show the total CO2 that has been reduced since you *• click the Clear button • Refer to the software manual in the support DVD or visit the ASUS website at www.asus.com for detailed software configuration. 4-10 Chapter 4: Software support…
-
Page 119: Fan Xpert
However, the fan will speed up when the temperature exceeds 70°C. User: Allows you to configure the CPU fan profile under certain limitations. • Refer to the software manual in the support DVD or visit the ASUS website at www.asus.com for detailed software configuration. ASUS P8Z68 Deluxe…
-
Page 120: Probe Ii
Loads your saved Loads the default Applies your configuration threshold values changes for each sensor Refer to the software manual in the support DVD or visit the ASUS website at www.asus.com for detailed software configuration. 4-12 Chapter 4: Software support…
-
Page 121: Audio Configurations
Realtek HD Audio Manager for Windows XP Exit button Configuration options Minimize button Control settings window Information button Refer to the software manual in the support DVD or visit the ASUS website at www.asus.com for detailed software configuration. ASUS P8Z68 Deluxe 4-13…
-
Page 122: Raid Configurations
RAID configurations The motherboard supports the following SATA RAID solutions: Intel Rapid Storage Technology with RAID 0, RAID 1, RAID 10 and RAID 5 support. ® • Mavell RAID utility with RAID 0 and RAID 1 support. ® • • You must install Windows XP Service Pack 3 or later versions before using Serial ®…
-
Page 123: Installing Serial Ata Hard Disks
None defined. Physical Devices: Port Device Model Serial # Size Type/Status(Vol ID) ST3160812AS 9LS0HJA4 149.0GB Non-RAID Disk ST3160812AS 9LS0F4HL 149.0GB Non-RAID Disk ST3160812AS 3LS0JYL8 149.0GB Non-RAID Disk ST3160812AS 9LS0BJ5H 149.0GB Non-RAID Disk [↑↓]-Select [ESC]-Exit [ENTER]-Select Menu ASUS P8Z68 Deluxe 4-15…
-
Page 124: Creating A Raid Set
The navigation keys at the bottom of the screen allow you to move through the menus and select the menu options. The RAID BIOS setup screens shown in this section are for reference only and may not exactly match the items on your screen. The utility supports maximum four hard disk drives for RAID configuration.
-
Page 125
WARNING: ALL DATA ON SELECTED DISKS WILL BE LOST. Are you sure you want to create this volume? (Y/N): Press <Y> to create the RAID volume and return to the main menu, or <N> to go back to the CREATE VOLUME menu. ASUS P8Z68 Deluxe 4-17… -
Page 126
Deleting a RAID set Take caution when deleting a RAID set. You will lose all data on the hard disk drives when you delete a RAID set. To delete a RAID set: From the utility main menu, select 2. Delete RAID Volume and press <Enter>. The following screen appears: Intel(R) Rapid Storage Technology — Option ROM — v10.0.0.1032 Copyright(C) 2003-10 Intel Corporation. -
Page 127: Marvell Raid Utility
Press <Space> to select the hard drives to be included in the RAID array. An asterisk (*) appears in front of the selected hard drive. After selecting all the drives needed for the RAID array, press <Enter> to continue. ASUS P8Z68 Deluxe 4-19…
-
Page 128
Marvell BIOS Setup (c) 2009 Marvell Technology Group Ltd. Configure->Select free disksCreate Virtual Disk HBA 0: Marvell 0 RAID Level : RAID 0 Virtual Disks Max Size(MB) : 305253 ├ └ Free Physical Disks Stripe Size : 64KB ├ PD 0: ST3160812AS Gigabyte Rounding : 1G └… -
Page 129
Stripte Size │ └ PD 8: ST3160812AS RAID Mode RAID0 │ └ Free Physical Disks Size 304128MB BGA Status Number of PDs Members ▶ ▶ Help Delete the selected virtual disk. ENTER: Operation F10: Exit/Save ESC: Return ASUS P8Z68 Deluxe 4-21… -
Page 130
The following warning message appears: Delete Virtual Disk Do you want to delete this virtual disk ? Press <Y> to delete the selected RAID array. The following warning message appears: Delete MBR Do you want to delete MBR from this virtual disk ? Press <Y>… -
Page 131: Intel Smart Response Technology
Select the size allocated for SSD caching. c. Select which HDD for caching. d. Enhanced mode:WRITE THROUGH, write to SSD and HDD at the same time. Maximized mode:WRITE BACK, write to SSD and write back to HDD in a later time. ASUS P8Z68 Deluxe 4-23…
-
Page 132
Select Disable Acceleration to disabled this function and Select Change Mode to switch accleration mode to Enhanced/ Maximus. ntel Smart Response ® • Only Intel internal SATA ports (gray and blue) support l l Technology. ntel Smart Response Technology, you need an SSD (>18.6GB) ®… -
Page 133: Creating A Raid Driver Disk
Go to the Make Disk menu, and then click Intel AHCI/RAID Driver Disk to create a RAID driver disk. Select USB floppy disk drive as the destination disk. Follow the succeeding screen instructions to complete the process. Write-protect the floppy disk to avoid a computer virus infection. ASUS P8Z68 Deluxe 4-25…
-
Page 134: Installing The Raid Driver During Windows ® Os Installation
4.5.3 Installing the RAID driver during Windows OS installation ® To install the RAID driver in Windows ® During the OS installation, the system prompts you to press the F6 key to install third- party SCSI or RAID driver. Press <F6>, and then insert the floppy disk with RAID driver into the USB floppy disk drive. When prompted to select the SCSI adapter to install, select the RAID driver for the corresponding OS version.
-
Page 135: Using A Usb Floppy Disk Drive
Product ID (PID) are displayed. Browse the contents of the RAID driver disk to locate the file txtsetup.oem. Double-click the file. A window appears, allowing you to select the program for opening the oem file. ASUS P8Z68 Deluxe 4-27…
-
Page 136
Use Notepad to open the file. Find the [HardwareIds.scsi.iaAHCI_DesktopWorkstationServer] and [HardwareIds.scsi.iaStor_DesktopWorkstationServer] sections in the txtsetup.oem file. Type the following line to the bottom of the two sections: id = “USB\VID_xxxx&PID_xxxx”, “usbstor” [HardwareIds.scsi.iaAHCI_DesktopWorkstationServer] id= “PCI\VEN_8086&DEV_1C02&CC_0106”,”iaStor” id= “USB\VID_03EE&PID_6901”, “usbstor” [HardwareIds.scsi.iaStor_DesktopWorkstationServer] id= “PCI\VEN_8086&DEV_2822&CC_0104”,”iaStor” id= “USB\VID_03EE&PID_6901”, “usbstor”… -
Page 137: Multiple Gpu Technology Support
For Windows XP, go to Control Panel > Add/Remove Programs. For Windows Vista, go to Control Panel > Programs and Features. Select your current graphics card driver/s. For Windows XP, select Add/Remove. For Windows Vista, select Uninstall. Turn off your computer. ASUS P8Z68 Deluxe…
-
Page 138: Installing Two Crossfirex™ Graphics Cards
5.1.3 Installing two CrossFireX™ graphics cards The following pictures are for reference only. The graphics cards and the motherboard layout may vary with models, but the installation steps remain the same. Prepare two CrossFireX-ready graphics cards. Insert the two graphics card into the PCIEX16 slots.
-
Page 139: Installing The Device Drivers
In the Catalyst Control Center window, click Graphics Settings > CrossFireX > Configure. From the Graphics Adapter list, select the graphics card to act as the display GPU. Select Enable CrossFireX. Click Apply, and then click OK to exit the window. ASUS P8Z68 Deluxe…
-
Page 140: Nvidia ® Sli™ Technology
NVIDIA SLI™ technology ® The motherboard supports the NVIDIA SLI™ (Scalable Link Interface) technology that ® allows you to install multi-graphics processing units (GPU) graphics cards. Follow the installation procedures in this section. 5.2.1 Requirements • In SLI mode, you should have two identical SLI-ready graphics cards that are NVIDIA ®…
-
Page 141: Installing The Device Drivers
You can launch the NVIDIA Control Panel by the following two methods. Right click on the empty space of the Windows desktop ® and select NVIDIA Control Panel. The NVIDIA Control Panel window appears (See Step B5). ASUS P8Z68 Deluxe…
-
Page 142
If you cannot see the NVIDIA Control Panel item in step (A), select Personalize. From the Personalization window, select Display Settings. From the Display Settings dialog box, click Advanced Settings. Chapter 5: Multiple GPU technology support… -
Page 143
Start the NVIDIA Control Panel. The NVIDIA Control Panel window appears. Enabling SLI settings From the NVIDIA Control Panel window, select Set SLI Configuration. Click Enable SLI and set the display for viewing SLI rendered content. When done, click Apply. ASUS P8Z68 Deluxe… -
Page 144
Chapter 5: Multiple GPU technology support… -
Page 145: Asus Contact Information
+1-812-282-3777 +1-510-608-4555 Web site usa.asus.com Technical Support Telephone +1-812-282-2787 Support fax +1-812-284-0883 Online support support.asus.com ASUS COMPUTER GmbH (Germany and Austria) Address Harkort Str. 21-23, D-40880 Ratingen, Germany +49-2102-959911 Web site www.asus.de Online contact www.asus.de/sales Technical Support Telephone +49-1805-010923* Support Fax…
Suffering a POST Error code 94 on Asus P8Z68 Deluxe (not Gen3) and tried everything to solve
-
Thread startersaberasus007
-
Start date
You should upgrade or use an alternative browser.
-
#1
Thank you in advance for your time in reading this and any time in trying to provide a solution, is greatly appreciated.
My Setup
Asus P8Z68 Deluxe (not Gen3) Bios 3304
Corsair AX1200 (not i version, so no corsair link)
Intel Ci7-2600K (not overclocked, at defaults)
Corsair Veng. 2x4GB 1600 DDR 3 (also at defaults and tried xmp, no overclocking)
EVGA 580 SC
Soundblaster X-fi Titanium Champion Series
Plextor SATA Optical DVD Burner
LG SATA Blu-Ray Optical Burner
Samsung SATA Optical DVD Burner
Hitachi or Western Digital or Seagate (tried all — Sata II and III drives)
Windows XP (32bit) or Windows 7 (64bit)
I have been googling this problem till I am seeing things. Here is my problem.
Whenever I start my computer up for the first time each day (I have the unit plugged into a Belkin Surge Protector Strip — which test ok). I flip on the power to the belkin strip first, then press the power on switch on the HAF-X case. All fans (including the GPU and CPU, Case fans) power up. Inside the case it sometimes will initially go through all 4 LED indicators, sometimes not (can’t remember) (DRAM, VGA, CPU, actually the other I think is boot), then it will stop with the VGA LED on the motherboard remains lit and on the LED Post Error Code on the motherboard will list Code 94. The Keyboard never powers up (you know the usual flash of one or all of the indicators — Scroll Lock, Num Lock, Caps Lock). It use to beep 1, beep beep beep. That has stopped now, speaker still is working, as when the system boots properly I get the usual single beep.
My display shows no signal being received and so I do not even get a POST info on the screen. Note: The hard drive is receiving power.
This has me stumped. I have tried:
*Changing PCI-E slots
*Changed Video Card from EVGA 580 to brand new EVGA 670.
*Unplugged all fans except of course the cpu fan (and of course left the 6 and 8 pin for the gpu on) to eliminate in case a power cable was bad (modular psu, so disconnected all but the 24 pin, 8 pin cpu, 8 and 6 pin GPU). During testing of this, also made sure no drives (Optical or HD) getting power. All USB devices disconnected (no flash drives, mouse, etc).
*Disconnected all USB devices
*Changed/tested with different HD from Seagate, WD, Hitachi, SATA II and III
*Unplugged front panel IO connectors for USB 2.0 and 3.0
*Ran Intel Processor Diagnostic Tool — Full test — no errors
*Ran memtest86 — all memory, all test — 7 passes no errors
*Problem does not occur when I do a reboot of Windows (for example a new driver install requiring a reboot, or simply restarting)
* Curiously, sometimes the problem does not occur at all when I do a cold boot, probably 4 out of every 8-10 cold boots.
*Verified Temps — CPU not exceeding 40 in idle (using stock coolor), GPU normal, Mobo under 40 C
*All fans are free of dust/grime, as well as on the mobo and the cards, memory and anything else
*Have refreshed the bios in case bios was corrupted with same v3304 posted on Asus website (can’t go to the newest since I run both Xp and 7 and the bios are specific 1 version is for XP the other if you have Windows 7 — Asus doesn’t notate why two different bios downloads or if this is strictly if you are trying to install it from Windows, so I have not upgraded to the latest).
*Since the issue occurs before POST have ruled out a windows issue (don’t use sleep or hibernate in Windows either).
*Have tried with CPU PLL voltage Enabled.
*Tried using both XMP Memory Profile (which sets memory to 9-9-9-24-2T DDR3 1600) and pressed the mem button on motherboard (which sets memory to 9-9-9-24-1T DDR 3 1333 not 1600). Memory is Corsair Veng. with 1.5V 9-9-9-24-2T 1600mhz rating dual channel kit 2x4GB
*Checked seating of GPU, memory, sound card. CPU hasn’t been moved around, change in heat sink/fan, in same place when first installed almost 2 years ago.
*This system has been going for nearly 2 years without any issues, only change was from LianLi PC-92 case to HAF-X, all parts remain the same.
*Have tried several different changes in the bios including wake on for PCI-E, PCI, have reduced iGPU on CPU to only 32mb,
*Have tried spare cables (provided with psu by corsair) 8pin for CPU and 6 and 8 pin for GPU
*Have replaced power supply with a Thermal Take 850W brand new from Best Buy, still fails on cold boot.
*Have done a reset of cmos including removing battery for more than 30 minutes
*Have not yet done a bread boarding (taking mobo out of case and booting it on a flat table) — hoping to solve issue without having to.
*Tested Samsung monitor on another computer and used the ACER monitor from that computer to verify it is not the monitor and have even changed HDMI cables and tried both HDMI ports on the video card.
*Corsair Tech Support just went straight to RMA, did not answer if there was an issue with PSU. Asus also simply went to RMA. EVGA the same. All three companies didn’t provide answers and just simply said to RMA their product. These responses did not help resolve issue. Also Asus you get recertified motherboard, EVGA recertified 580, and Corsair if AX1200 not in stock or any recertified then will replace with AX1200i (chance of 1200i is less than 10%, more likely to get a recertified).
*Tried HD on different SATA port (once on Intel and once on the JMicron — to rule out SATA port issue — motheboard board is a B3 Step — so no cougar point initial release issues)
*Nothing in bios is set beyond the standard settings for all parts, no overclocking of ram or cpu, no changes to bclkc or multiplier beyond what the cpu allows in terms of turbo boost 2.0.
*System has been working with the 3304 bios since it was released so didn’t just start up due to a bio update. So bios has been working for some time.
*Checked for any loose cables, any loose molex/sata power connectors, checked cables fully in on modular PSU. Checked to make sure mobo isn’t touching case and only the mobo headers for the type of mobo are mounted in the case and screwed down correctly. video card appears to be fully seated in slot (know there were some issues with older HAF-X cases, mine is just 3 months old — bought from Newegg brand new (not open box) in July 2013.
*There are absolutely no issues, no errors, no BSOD’s, no lag, no issues at all while in Windows. Games run fine, not dropping fps or anything. So if there was an issue with the hardware, it hasn’t affected the performance of Windows 7 or XP, actually have been riding a near error free Windows 7 since Nov 2012.
*No other error or beep codes have been displayed except for error code I think A2 but that no longer appears, just the 94 error code with the VGA led on mobo remaing lit.
*Not using Asus Q-Connect, power, reset, speaker, etc. all plugged straight into mobo
*Disabled the Marvel Sata RAID controller chip
*Set CPU DIGI+VRM to Standard
So that leaves me with the motherboard as a possible culprit. However the only way to test that would be to remove the cpu and mount it in a recertified exact rev1.00 P8Z68 Deluxe (I buy mobo’s in pairs so that if one goes down, I just switch over to other while defective unit is rma’d — my version of advanced replacement). However looking at the work they did, it appears 2 pins are just a micron out of a line (so it shouldn’t be an issue, but they didn’t give me back my board — serial numbers are different). I have checked all caps and chips looking for damage like bulges, leaking, burnt/scarred or any other kind of damage.
It could still be an issue with the video card maybe not sitting properly in the slot, but having moved it to 2 different slots and tried 2 different video cards, it would seem unlikely the video card itself is bad.
Bios corruption is also a possibility. However a reflash plus cmos reset and reset to defaults should have cleared this up. I can’t flash to newest version till I know why they have one version for XP and one version for Win 7/8 (only thing different in description is the version of Intel Rapid Storage, xp is a lower version that win 7 — so this could be the reason).
Please help my finger is getting tired of pushing the power on/off button (holding it down for 4 seconds to power off).
Thank you for reading this long message, I appreciate your time and any effort in providing a solution.
![]()
-

alexoiu
To summarize, 2 different boards, 2 different power supplies and graphics cards — same issue?
If yes, then I’d say that one of the other components is the culprit.
I suggest testing the board with only CPU, CPU fan, graphics card, single RAM stick, DVD drive, keyboard and mouse connected. See if still the same.
If yes, then take the board outside the case and test again.
![]()
-
- Nov 1, 2012
-
- 39,825
-
- 249
-
- 126,990
-
#2
To summarize, 2 different boards, 2 different power supplies and graphics cards — same issue?
If yes, then I’d say that one of the other components is the culprit.
I suggest testing the board with only CPU, CPU fan, graphics card, single RAM stick, DVD drive, keyboard and mouse connected. See if still the same.
If yes, then take the board outside the case and test again.
-
#3
only thing I see is that they require your xp and 7 to have different IRST driver versions)?
Anyhow here are some of the new test done:
*Tried different power strip surge protector
*Tried different wall socket
*Had only PSU and video card plugged into the power strip
*Only video card with 1 memory (4GB) inserted (memory was in the last or furthest slot — B2)
*Breadboarded (taken totally out of case and placed on card board
*Used newest psu
*Only had keyboard and mouse in use beyond the hard drive (hard drive was unplugged almost the entire time, only plugged in when I did the install of the
newest IRST DRIVERs before doing a bios update)
*Cleared Cmos again and removed battery for nearly 45 minutes, then told it to load defaults
*Turned off the Marvell controller
*Turrned on power on by pci, pcie
*USB 3.0 ports started to act funny and not always work with a usb 2.0 corsair flash voyager drive (actually was more like 90% of the time, but I tried this
before the computer had gone into the OS so outside the ball park chance that the drivers (even though the bios should have enabled them) weren’t loading from
the OS.
*flashed the bios to 3603 Win 7 version
*put video card back into the recommended slot
*no sound card or any other devices (not even fans) hooked up or plugged in. No optical drives, nothing (mouse — usb, keyboard ps2, Geforce580, 1 stick of
ram, and of course the cpu and its fan/heatsink combo, hard drive only when doing irst update).
*paused after turning on power strip surge protector
*paused after strip was turned on before I would turn power on for the computer via the power/reset switches on mobo
*after error would wait till cpu fan stopped spinning and counter to 5 before starting computer back up, sometimes worked, sometimes didn’t
sometimes the system cycled 2 times through all the led’s before loading
*checked on the tightnest of the heatsink (with gentle, very gentle) to see if loose noticeable anywhere
*as before could not always but in most cases, if I unplugged the psu cable on the back of the psu and flipped switch on power strip then plug back in, could
generate the 94 error, before either a reset/power of/on via the switches on the mobo would get me to post and then of course get into windows (getting into
windows is not the problem, the problem is getting system to post)
*Tried a 3rd monitor, no difference
*Mobo was completely out of the case, did not even use cases power switch or reset switch, only mobo to turn on or reset
*Kept all settings in the bios at default (except for disable marvel, on board sound, com port, option roms)
*bios backed up and then flashed via the ez-flash 2 in the bios via a usb flash drive (no hard drive plugged in)
*Keyboard and mouse were basic/generic — meaning no fancy macro buttons, switches, special function keys
So only test not performed was the removal of the cpu heatsink/fan and the cpu (only because it was late when I finished all the above and dididn’t want to
rush removal and reinsertion of the cpu due to being tired). But as mentioned the IPDT still passes all test.
I don’t know if getting a new bios chip from Asus would result in any changes and don’t want to risk removing the one on the recently returned identical board
that was repaired (I wish I knew what was wrong with the board they sent me — meaning why the other owner return it, so I know what to watch for in terms of
their problem reoccuring. also got no diagnostic or any kind of notice they even tested the board. Only found a sticker with ACI 3/21/12 on it. They had
said they were getting to the repair of my motherboard — specifically replacement of the socket — special situation where they waived the service fee).
So for me it would seem that either the bios is corrupted and flashing it won’t make a difference, the cpu was slightly moved during the change of cases but of
course I would think it would either fail the IPDT or not work at all, or there is something on the motherboard that will only work once it has been turned on
and off or you get lucky and it works on first try (which then would sort of rule out any issue of the system not getting enough power to a part of the mobo, I
would think)
I hate the thought of removing the cpu, since that is where you can damage your pins, so easily. I haven’t removed a cpu since I set up my HTPC and I almost
bent a pin despite how careful I was.
Anyhow any other thoughts based on the recent testing?
![]()
-
- Nov 1, 2012
-
- 39,825
-
- 249
-
- 126,990
-
#4
-
#5
Any last suggestions or ideas?
![]()
-
- Nov 1, 2012
-
- 39,825
-
- 249
-
- 126,990
-
#6
-
#7
So I guess the issue is solved, sort of. It was the mobo, but whether it was the bios corrupted or an actual part on the motherboard won’t be known. If I send it in, then I will never know. So I am keeping an eye out for a socket 1155 cpu to go cheap to buy and test. Frys had the 2600k on sale for $145 the other day while supplies last, and well the supplies didn’t last long enough for me to get one.
![]()
-
- Nov 1, 2012
-
- 39,825
-
- 249
-
- 126,990
-
#8
Similar threads
- Advertising
- Cookies Policies
- Privacy
- Term & Conditions
Куратор(ы):
DrDEVIL666
| Автор | Сообщение | |||
|---|---|---|---|---|
|
||||
|
Куратор темы Статус: Не в сети |
Прочтите FAQ При обсуждении просьба соблюдать правила как Конференции, так и раздела Материнские платы. Прежде чем задать вопрос, заполните Конфигурацию компьютера в Профиле, включая ОС Последний раз редактировалось ADDD 14.05.2012 1:06, всего редактировалось 14 раз(а). |
| Реклама | |
|
Партнер |
|
33LeD31 |
|
|
Member Статус: Не в сети |
Вопрос к владельцам «ASUS Maximus IV Extreme-Z»,кто нибудь обновлял\прошивал BIOS функцией «USB BIOS Flashback»(в режиме standby power). |
|
AlexManax |
|
|
Member Статус: Не в сети |
33LeD31 писал(а): Вопрос к владельцам «ASUS Maximus IV Extreme-Z»,кто нибудь обновлял\прошивал BIOS функцией «USB BIOS Flashback»(в режиме standby power). Да. МЕ не восстанавливается. Добавлено спустя 55 секунд: Endiger писал(а): еще Discriptor’a нет… иными словами похоже штатные «AISuitII и EZFLASH2» сливают только регион «bios» Вот, наконец-то. =) |
|
shinso |
|
|
Junior Статус: Не в сети |
кстати на счет версии биоса 3203 шил прям в винде 1 раз асусовой родной утилитой. и почему то удалили мой комент к обновлению от Риалтека. там указана поддержка |
|
lymar |
|
|
Junior Статус: Не в сети |
Уважаемые товарищи форумчане, подскажите пожалуйста. http://ru.asus.com/Motherboards/Intel_S … /#download Стоит ли менять прошивку? в чем плюсы биос 3202 PS Сильно не пинайте, первый раз прошивать планирую, боязно немнога |
|
Endiger |
|
|
Member Статус: Не в сети |
упоминание об обязательном слитии образа текущей прошивки, перед обновлением на прошивку v.3.x.x.x (ME8) (напр. 3202 / 3203 и т.п.) Скачиваем с оффицального сайта AMI amiflash (для скачивания тыкаем в «I Agree«) Распаковываем архив, и открываем программу: Тыкаем ОК, затем Save, и сохраням образ текущей прошивки в надежное место. Для интересующихся почему не сделать backup штатными AISuite2/EZFLASH2, — эти программы сливают только образ региона «bios» (включая nvram), чего не достаточно для отката на прошивки с ME7 (v.0.x.x.x) Теперь в случае корявой прошивки (глюкавой работы после обновления) или просто желании откатится на прошлую прошивку, скачиваем архив ME Firmware 7.1.20.1119 Все, теперь перезагружаемся и радуемся, если все получилось:) Добавлено спустя 5 минут 11 секунд: Последний раз редактировалось DrDEVIL666 05.04.2012 11:21, всего редактировалось 1 раз. |
|
lymar |
|
|
Junior Статус: Не в сети |
POST проходит(есть один зв сигнал), затем черный экран и так стоит, нажимаешь на перезагрузку, снова пост проходит, и только после этого картинка асуса Endiger вы свою ASUS P8Z68 DELUXE /GEN3 обновили до 3202. Есть положительные стороны прошивки?, а то по отзывам ее только ругают за корявый русский язык(но это помоему не принципиально) Последний раз редактировалось lymar 04.04.2012 14:51, всего редактировалось 1 раз. |
|
Endiger |
|
|
Member Статус: Не в сети |
lymar писал(а): POST проходит(есть один зв сигнал), затем черный экран и так стоит, нажимаешь на перезагрузку, снова пост проходит, и только после этого картинка асуса *без разгона попробуй. |
|
lymar |
|
|
Junior Статус: Не в сети |
lymar писал(а): *без разгона попробуй.*если есть беспроводная клава/мышь, попробуй с проводными*отключи bluetooth*может быть брак платы, если виснет при включении с горящим VGA_LED Спасибо, попробую |
|
Endiger |
|
|
Member Статус: Не в сети |
lymar писал(а): вы свою ASUS P8Z68 DELUXE /GEN3 обновили до 3202. Есть положительные стороны прошивки?, а то по отзывам ее только ругают за корявый русский язык(но это помоему не принципиально) особенности этой прошивки описал 2-3 станицами ранее, читай |
|
Penetron |
|
|
Junior Статус: Не в сети |
lymar нажимаешь на перезагрузку, снова пост проходит, и только после этого картинка асуса Именно такой случай был на форуме «хобота», участник описывал точно такой-же эффект. |
|
demol |
|
|
Member Статус: Не в сети |
Друзья, всем добрый вечер! |
|
Endiger |
|
|
Member Статус: Не в сети |
demol попробуй сбросить настройки, затем поменять частоту памяти до 1600, и там же параметр Turbo Ratio установить в «By Per Core». |
|
demol |
|
|
Member Статус: Не в сети |
Endiger писал(а): demol попробуй сбросить настройки, затем поменять частоту памяти до 1600, и там же параметр Turbo Ratio установить в «By Per Core». Спасибо вроде помогло, напряжение в норме и множитель в нагрузке до 37 не поднимается |
|
405grdt |
|
|
Junior Статус: Не в сети |
Помогите пожалуйста,срочно нужна прошивка,слитая FPT от материнской платы P8Z68-V LE. |
|
vmPROgR |
|
|
Member Статус: Не в сети |
Сейчас словил глюк: |
|
Sabornik |
|
|
Member Статус: Не в сети |
vmPROgR Какие программы мониторинга у Вас установлены одновременно? |
|
vmPROgR |
|
|
Member Статус: Не в сети |
Sabornik писал(а): vmPROgR Какие программы мониторинга у Вас установлены одновременно? Кроме ASUS AI Suite II, больше ничего. AIDA64 portable-версия. |
|
Sabornik |
|
|
Member Статус: Не в сети |
vmPROgR Не имеет значения, что AIDA portable. Конфликт неизбежен. |
") У меня тоже стоит AI Suite II и по необходимости я мониторю ей, но кроме неё установлена Open Hardware Monitor и если мне нужно запустить эту прогу, то я из трея для AI Suite делаю выход и только в этом случае глюков не вижу, но скорее всего с AIDA64 это не пройдёт.
У меня тоже стоит AI Suite II и по необходимости я мониторю ей, но кроме неё установлена Open Hardware Monitor и если мне нужно запустить эту прогу, то я из трея для AI Suite делаю выход и только в этом случае глюков не вижу, но скорее всего с AIDA64 это не пройдёт.|
vmPROgR |
|
|
Member Статус: Не в сети |
Sabornik писал(а): vmPROgR Не имеет значения, что AIDA portable. Конфликт неизбежен. AIDA64 в момент глюка не была запущена, какие конфликты? После перезагрузки все нормально стало. Просто, что-то мне эта материнская плата все больше и больше не нравится. То USB отваливается когда настольную лампу выключаешь, то просто так отвалится, уже из-за глюка с USB, перепаял кабель на геймпаде, вроде провод шевелил появлялся, пропадал, а потом смотрю также и веб-камера себя ведет, то материнская плата -60С, про работу с памятью вообще молчу. |
|
Sealxo |
|
|
Member Статус: Не в сети |
Обновилась «Virtu Software»: Пытался обновить и я свой системник, но выдаёт ошибку сервиса Virtu. В чём причина? |
 )
)—
Кто сейчас на конференции |
|
Сейчас этот форум просматривают: Cyber74, id_000 и гости: 21 |
| Вы не можете начинать темы Вы не можете отвечать на сообщения Вы не можете редактировать свои сообщения Вы не можете удалять свои сообщения Вы не можете добавлять вложения |