Коды ошибок, актуальные для Canon imagePROGRAF iPF670, iPF605, iPF770, iPF750, iPF710, iPF650, iPF700, iPF785, iPF610, iPF765, iPF680, iPF760, iPF510, iPF780, iPF600, iPF500, iPF685, iPF720, iPF670e, iPF671, iPF671e (для картриджей PFI-102, PFI-104, PFI-107).
Check printing results
Call for service.
Call for service.
После проверки датчика деталей в сервисном меню, замените деталь, указанную в ошибке.
Проверьте загруженные данные перед повтором печати.
Проверьте количество бумаги.
Exchange for the compatible paper to HP-GL/2.
The memory is full.
Check if there is the non-image area of the print. Verify the transmitted data before reprinting.
The memory is full.
The memory is full.
The parameter is out of range.
Verify the transmitted data before reprinting.
This command is not supported.
Delete unwanted data
Delete unneeded jobs stored in Personal Boxes.
Now printing without saving data.
Delete unneeded jobs stored in Personal Boxs.
Prepare to replace the ink.
Renew the C ink tank
Prepare to replace the ink.
Renew the M ink tank.
Prepare to replace the ink.
Renew the Y ink tank.
Prepare to replace the ink.
Renew the MBK ink tank.
Prepare to replace the ink.
Renew the BK ink tank.
Replace the ink tank.
Renew the C ink tank.
Replace the ink tank.
Renew the M ink tank.
Replace the ink tank.
Renew the Y ink tank.
Replace the ink tank.
Renew the MBK ink tank.
Replace the ink tank.
Renew the BK ink tank.
Check ink tank.
Attach the C ink tank.
Check ink tank.
Attach the M ink tank.
Check ink tank.
Attach the Y ink tank.
Check ink tank.
Attach the MBK ink tank.
Check ink tank.
Attach the BK ink tank.
Check the media size check. Change the media size.
Delete unwanted data.
Press the stop button to cancel the print job. Delete print jobs from the queue.
Delete unneeded jobs stored on the hard disk.
Press Online to clear error.
Clean the printhead. Identify the nozzles in a nozzle check pattern. Replace the printhead.
Lift the release lever and reload the paper.
Check the leading end of paper. Reload the paper.
Lift the release lever and align leading edge with orange line.
Check the sheet length. Check to see if paper has not jammed.
Lift the release lever and reload the paper.
Check the right edge of paper. Check the paper type.
Lift the release lever and reload the paper.
Check the left edge of paper.
Check the paper type.
Press Online to clear the error and readjust printhead.
Check the paper on which a pattern is printed for smears. Check the environment for interferences from outside light.
Clean the printhead.
Press Online to clear the error and readjust printhead.
Check the paper on which a pattern is printed for smears. Check the environment for interferences from outside light.
Clean the printhead.
Lift the release lever and replace paper with A4/ LTR (vertical) or larger.
Replace with A4/Letter or any larger-sized paper.
Lift the release lever and replace paper with A3/ Ledger (vertical) or larger.
Replace with A3/11″x17″ or any larger-sized paper.
Lift the release lever and replace roll with 10 in. wide or larger roll.
Replace with roll media at least 10 inches in width.
Remove paper and press Load/Eject.
Remove the paper jam and reload the paper.
Lift the release lever and reload paper.
Reload the paper.
Check supported paper sizes.
Replace with larger-sized paper.
Check supported paper sizes.
Replace with smaller-sized paper.
Press Online to clear the error.
Replace with adjustable media.
Lift the release lever.
Correct the skew in the paper and reload it.
Reload paper.
Reload the paper
Press Load/Eject and reload the paper.
Reload the paper
Lift the release lever and reload the paper.
Reload the roll media.
Press Online to clear the error.
Check to see if paper has not jammed.
Press Load/Eject and load sheets.
Load cut sheets at the paper tray port.
Press OK, remove the sheets, and load a roll.
Replace with roll media.
Press Load/Eject and load a roll.
Load roll media.
Turn printer off and install roll feed unit.
Install the roll media unit.
Lift the release lever and replace the roll.
Renew the supply of roll media.
Press Load/Eject and reload the paper.
Check the type of paper that can be fed and reload the paper.
Press Load/Eject and remove the roll.
Load cut sheets at the paper tray port.
03130031-2E23
Turn off printer, wait, then turn on again.
Check the cutter unit.
03130031-2E14
Turn off printer, wait, then turn on again.
Replace the main controller PCB
03130031-2E16
Turn off printer, wait, then turn on again.
Check the mist fan.
03130031-2E17
Turn off printer, wait, then turn on again.
Check the suction fan.
03130031-2E20
Turn off printer, wait, then turn on again.
Check the purge unit.
03130031-2E22
Turn off printer, wait, then turn on again.
Check the purge unit.
03130031-2E23
Turn off printer, wait, then turn on again.
Check the purge unit.
03130031-2E25
Turn off printer, wait, then turn on again.
Check the carriage unit. Check the linear encoder for smears.
03130031-2E26
Turn off printer, wait, then turn on again.
Check the carriage unit and surrounding parts.
03130031-2E27
Turn off printer, wait, then turn on again.
Check the carriage unit and surrounding parts.
03130031-2E1F
Turn off printer, wait, then turn on again.
Check the purge unit.
03130031-2E2A
Turn off printer, wait, then turn on again.
Check the feed roller encoder and surrounding part. Check to see if paper has not jammed.
03130031-2E29
Turn off printer, wait, then turn on again.
Check the roll feed unit. Check roll media. Check to see if paper has not jammed in the printer.
03130031-2E2E
Turn off printer, wait, then turn on again.
Check the roll feed unit.
03130031-4027
Turn off printer, wait, then turn on again.
Check the carriage unit and surrounding parts.
03130031-2E13
Turn off printer, wait, then turn on again.
03130031-2F32
Turn off printer, wait, then turn on again.
Replace the multi sensor unit.
03130031-2F3A
Turn off printer, wait, then turn on again.
Check the ink supply unit.
03130031-2F3B
Turn off printer, wait, then turn on again.
Remove the ink tanks and then reload them. Check the main controller PCB.
03130031-2F70
Turn off printer, wait, then turn on again.
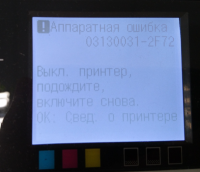
03130031-2F71
Turn off printer, wait, then turn on again.
03130031-2F72
Turn off printer, wait, then turn on again.
03130031-260E
Turn off printer, wait, then turn on again.
Check the carriage unit and surrounding parts. Replace the main controller PCB.
03130031-2618
Turn off printer, wait, then turn on again.
Check the power supply unit.
03130031-260F
Turn off printer, wait, then turn on again.
Turn off printer and check roll feed unit
Replace the roll feed unit.
Turn off printer, wait a while, then turn it on again.
Transmit valid ROM data.
Turn off printer, wait a while, then turn it on again.
Verify the validity of MID data before transferring it.
03130031-2F2B
Turn off printer, wait, then turn on again.
Open top cover and replace the printhead.
Replace printhead
Open top cover and replace the right printhead.
Replace printhead
Open top cover and replace the right printhead.
Replace printhead
03800500-2F40
Turn off printer, wait, then turn on again.
Проверьте блок очистки печатающей головки и окружающие детали.
Проверьте датчик управления головкой и окружающие детали.
Убедитесь, что печатающая головка установлена правильно.
Если визуально все чисто и корректно подключено, нужно пробовать:
Заменить датчик управления головкой.
Заменить главную плату контроллера.
Замените печатающую головку.
Замените каретку.
03800500-2F2F
Turn off printer, wait, then turn on again.
Замените датчик управления печатающей головкой.
Замените печатающую головку.
Identify the head management sensor unit
Replace the head management sensor unit
Replace the printhead
03800500-2F30
Turn off printer, wait, then turn on again.
Замените датчик управления печатающей головкой.
Замените печатающую головку.
Identify the head management sensor unit
Replace the head management sensor unit
Replace the printhead
Press OK and replace ink tank.
Renew the Bk ink tank
Press OK and replace ink tank.
Renew the Y ink tank
Press OK and replace ink tank.
Renew the M ink tank
Press OK and replace ink tank.
Renew the C ink tank
Press OK and replace ink tank.
Renew the MBk ink tank
Press OK and replace ink tank.
Renew the MBk ink tank
Press OK and replace ink tank.
Replace with a fully replenished Bk ink tank
Press OK and replace ink tank.
Replace with a fully replenished Y ink tank
Press OK and replace ink tank.
Replace with a fully replenished M ink tank
Press OK and replace ink tank.
Replace with a fully replenished C ink tank
Press OK and replace ink tank.
Replace with a fully replenished MBk ink tank
Press OK and replace ink tank.
Replace with a valid Bk ink tank
Press OK and replace ink tank.
Replace with a valid Y ink tank
Press OK and replace ink tank.
Replace with a valid M ink tank
Press OK and replace ink tank.
Replace with a valid C ink tank
Press OK and replace ink tank.
Replace with a valid MBk ink tank
Press OK and replace ink tank.
Replace with a valid MBk ink tank
Press OK and check ink tank.
Install a Bk ink tank
Press OK and check ink tank.
Install a Y ink tank
Press OK and check ink tank.
Install a M ink tank
Press OK and check ink tank.
Install a C ink tank
Press OK and check ink tank.
Install a MBk ink tank
Press OK and check ink tank.
Install a MBk ink tank
Turn off printer, wait a while, and turn it on again.
Close the top cover and turn on the printer again.
Turn off printer, wait a while, and turn it on again.
Close the ink tank cover and turn on the printer again.
Replace the maintenance cartridge.
Renew the maintenance cartridge.
Cartridge capacity.
Replace the maintenance cartridge.
Replace the maintenance cartridge.
Replace the maintenance cartridge.
Renew the maintenance cartridge.
Replace the maintenance cartridge.
Renew the maintenance cartridge.
Check roll position.
Online: Print Load/Eject:
Change Paper
Check to see if a borderless printing spacer is installed. Reload the paper.
Check paper size setting.
Online: Print
Load/Eject: Change Paper
Check the paper size. Change the paper size.
Online: Print
Stop: Stop Printing
Load/Eject: Change Paper
Renew the supply of roll media.
Lift the release lever and reload the paper.
Cut paper manually. Check the cutter.
Press Online to clear the error.
Check the multi sensor.
Check the head management sensor.
Online: Print
Stop: Stop Printing
Load/Eject: Change Paper
Exchange for the compatible paper to HP-GL/2 before reprinting.
Delete unwanted data on your computer to resume printing.
Press Stop to cancel printing.
Delete unneeded jobs stored in Personal Boxes.
Cannot save. Delete unwanted data on your computer to resume printing.
Press Stop to cancel printing.
Press OK to reformat
Press the [OK] button to start reformatting the hard disk. When formatting is finished, the printer automatically restarts.
Turn off printer, wait a while, and turn it on again.
Invalid files will be deleted.
Restart the printer. Only the corrupted files will be deleted, and the printer will restart.
Turn off printer, wait, then turn on again.
Check the head management sensor. Replace the head management sensor. Replace the printhead.
Turn off printer, wait, then turn on again.
Check the pinch roller and surrounding part. Replace the pinch roller pressure drive unit.
Install printhead.
Install the printhead.
Replace the printhead.
Check the maintenance cartridge.
Install the maintenance cartridge.
Lift the release lever and reload the paper.
Check the cutter unit and surrounding part. Replace the cutter.
Renew the supply of roll media.
Manually rewind roll all the way and press OK.
Check the pick-up unit and roll media. Check to see if paper has not jammed.
Load cut sheets at the paper tray port.
Check the media size. Change the media size.
Confirm usage cond. of the paper.
Reload the paper.
Reload the roll media.
Chapter 8
Display message
Hardware error.
03800500-2F40
Turn off printer, wait, then turn on again.
Hardware error.
03800500-2F41
Turn off printer, wait, then turn on again.
Hardware error.
03800500-2F42
Turn off printer, wait, then turn on again.
Hardware error.
03800500-2F43
Turn off printer, wait, then turn on again.
Hardware error.
03800500-2F44
Turn off printer, wait, then turn on again.
Hardware error.
03800500-2F47
Turn off printer, wait, then turn on again.
Clean right P Head
Press Online to clear error.
Execute printhead cleaning.
If this message is still displayed, replace
the printhead.
Printing stopped.
Clean left P Head
Press Online to clear error.
Execute printhead cleaning.
If this message is still displayed, replace
the printhead.
Printing stopped.
Ink tank is empty.
Press OK and replace ink tank.
Remaining level of the ink cannot be
correctly detected.
Check ink tank.
Ink tank is empty.
Press OK and replace ink tank.
Remaining level of the ink cannot be
correctly detected.
Check ink tank.
Ink tank is empty.
Press OK and replace ink tank.
Remaining level of the ink cannot be
correctly detected.
Check ink tank.
Ink tank is empty.
Press OK and replace ink tank.
Remaining level of the ink cannot be
correctly detected.
Check ink tank.
Ink tank is empty.
Press OK and replace ink tank.
Remaining level of the ink cannot be
correctly detected.
Check ink tank.
8-10
Code*
Condition detected
03800500-2F40
The non-discharge of all colors and chips
(A/B, EVEN/ODD) and nozzles is
detected.
03800500-2F41
About all chips and nozzles of one color,
the non-discharge is detected.
03800500-2F42
About single line (A or B) and all nozzles
(1280-nozzles) of one color, the non-
discharge is detected.
03800500-2F43
About single chip (A or B, EVEN or ODD)
and all nozzles (640-nozzles) of one color,
the non-discharge is detected.
03800500-2F44
The non-discharge of the EVEN or ODD
line (640-nozzles) is detected.
03800500-2F47
Head management sensor failure
The APCCHK signal of head management
sensor is out of range.
03800501-280D
Printhead1 non-discharge detection error
03800501-2828
Printhead1 non-discharge error (printhead
replacement)
03800502-280E
Printhead2 non-discharge detection error
03800502-2829
Printhead2 non-discharge error (printhead
replacement)
03810101-2501
Y ink tank empty
03810101-2511
Unidentified status of Y ink tank (refill ink
tank detection)
03810102-2502
M ink tank empty
03810102-2512
Unidentified status of M ink tank (refill ink
tank detection)
03810103-2503
C ink tank empty
03810103-2513
Unidentified status of C ink tank (refill ink
tank detection)
03810104-2500
BK ink tank empty
03810104-2510
Unidentified status of BK ink tank (refill
ink tank detection)
03810105-2508
GY ink tank empty
03810105-2518
Unidentified status of GY ink tank (refill
ink tank detection)
Action
Check the ink tube unit and surrounding parts.
Check the purge unit and surrounding parts.
Check the head management sensor and surrounding
parts.
Check the flexible cable unit and surrounding parts.
Check that the printhead is installed correctly.
Replace the head management sensor.
Replace the main controller PCB.
Replace the printhead.
Replace the carriage unit.
Check the head management sensor and
surrounding parts.
Check the flexible cable unit and surrounding parts.
Check that the printhead is installed correctly.
Replace the main controller PCB.
Replace the printhead.
Replace the carriage unit.
Check the head management sensor and surrounding
parts.
Check the flexible cable unit and surrounding parts.
Check that the printhead is installed correctly.
Replace the main controller PCB.
Replace the printhead.
Replace the carriage unit.
Check the head management sensor and surrounding
parts.
Check the flexible cable unit and surrounding parts.
Check that the printhead is installed correctly.
Replace the main controller PCB.
Replace the printhead.
Replace the carriage unit.
Check the head management sensor and surrounding
parts.
Check that the printhead is installed correctly.
Replace the main controller PCB.
Replace the printhead.
Replace the carriage unit.
Check the head management sensor and surrounding
parts.
Replace the head management sensor.
Replace the main controller PCB.
Clean the printhead.
Identify the nozzles in a nozzle check pattern.
Replace the right printhead.
Execute printhead cleaning.
Check nozzles with nozzle check pattern.
Replace the printhead.
Clean the printhead.
Identify the nozzles in a nozzle check pattern.
Replace the left printhead.
Execute printhead cleaning.
Check nozzles with nozzle check pattern.
Replace the printhead.
Renew the Y ink tank.
Invalidate the ink remaining detection function or
replace the ink tank.
Renew the M ink tank.
Invalidate the ink remaining detection function or
replace the ink tank.
Renew the C ink tank.
Invalidate the ink remaining detection function or
replace the ink tank.
Renew the BK ink tank.
Invalidate the ink remaining detection function or
replace the ink tank.
Renew the GY ink tank.
Invalidate the ink remaining detection function or
replace the ink tank.
iPF750 непрерывная закачка чернил из баков
После сброса памперса после печати 2 чертежей идет закачка чернил
| Сообщение #1
Отправлено 01 октября 2013 — 10:36
Здравствуйте.
Решили на днях попробовать сбросить памперс, до этого год печатали без проблем. Сразу после покупки использовали не оригинальные чернила.
После сброса памперса, плоттер стал в день по 2 раза делать закачку чернил из баков. В сервис центре сказали, что это из-за засора головы. Промыка как аппратно, так и в ручную результатов не принесла и в итоге, плоттер заявил — меняйте ПГ.
После установки новой ПГ плоттер стал закачивать чернила из баков почти после каждого чертежа.
Может кто сталкивался с данной проблемой.
P.S. Тест сопел показывает, некоторое размытие в пигметном секторе. Может чернила не очень и они забивают головку, в следствии чего, плоттер пытается закачать больше чернил?
- Наверх of the page up there ^
-
0
| Сообщение #2
Отправлено 01 октября 2013 — 15:28
Alex…
Hottha
Вполне возможно идут прочистки. Если пигменту уже год, то думаю пора менять. В противном случае исчерпаете какой нибуть счётчик прочисток на голове, и он потребует менять снова.
Epson: 7900, 2100, L800, R220, T50, R2000 Canon: 4840, 4940, 7240, 5340, 6240, ipf510 HP: 8100, 6510, 510 и т.д. и.т.п всё работает на dctec.
- Наверх of the page up there ^
-
0
| Сообщение #3
Отправлено 02 октября 2013 — 09:07
Hottha
Меня пигмент на другого производителя? До этого всё было нормально.. Я не в курсе, а пигмент в течении времени меняет свои свойства?
- Наверх of the page up there ^
-
0
| Сообщение #4
Отправлено 02 октября 2013 — 10:58
Freeman Pro.
Конечно меняет. Образуется осадок из частиц пигмента, которые слепившись между собой идут в ПГ и залепляют её наглухо и безвозвратно.
Все чернила меняют свои физико-химические показатели после года. А принтер постоянно контролирует качество печати датчиком. И если необходимо, то запускает прочистку.
Надо было найти причину выхода предыдущей ПГ и устранить её. А потом только ставить новую. Менять чернила надо было до смены ПГ. Теперь уже просто необходимо. Не на нового производителя а на свежего. Это ИМХО.
Если бы сообщили марку и срок чернил, как заправляете, скан дюз и т.п. — то вам бы помогли. Ну а раз хотите играть в партизанов — играйте дальше. Удачи.
Цветные мелки — широкоформатная печать из нашего детства.
- Наверх of the page up there ^
-
0
| Сообщение #5
Отправлено 03 октября 2013 — 18:42
Hottha
Марка чернил INKBANK, покупаем в компании «всё о принтере» они сами возят и разливают в литровые бутылки. Даты разлива нет. Мы заказываем. К нам приходят и в течении 3-4 месяцев бутылка уходит. Изначально хотели принтер посадить на краску OCP, но сами продавцы (из другой компании) сказали что оригинальные чернила в Россию не возят, всё подделка.
INKBANK заправляли 5 принтеров CANON, HP (формат А3). Все нормально и адекватно работают и по сей день в течении 2-х лет. Печатающие готовки на них тоже не вылетаю. До этого на маленьких принтерах использовали INKMaATE нам они не понравились, и приходилось раз в 2 недели чистить в ручную головы. Проблема только в пигментом. водяные чернила печатаю на УРА.
Завтра от сканирую и выложу сканы. дюз.
- Наверх of the page up there ^
-
0
| Сообщение #6
Отправлено 02 декабря 2016 — 12:06
serxyziv@mail.ru
Здравствуйте. У меня проблема с непрерывной закачкой чернил из баков, стоит ПЗК, попробовал прочистить штангу по которой ездит каретка, смазал маслом для бытовой техники. Не помогает. Полгода назад была такая проблема, я поставил пустые картриджи на 102 mbk (матовый черный), попечатал день них и проблема на полгода исчезла. Тест дюз через сервисное меню показывает идеальные дюзы, все пропечатывается, а вот закачка через обычный режим идет непрерывно.
Сегодня попробовал поставить один картридж 102mbk оригиналку, но проблема не исчезла с непрерывной закачкой чернил. Не знаю, что делать. Кто сталкивался с этой проблемой и как ее решил?
- Наверх of the page up there ^
-
1
| Сообщение #7
Отправлено 30 июня 2017 — 15:38
Colorit77
Здравствуйте! Canon iPF770 стал качать чернила, при включении и после закачки выдает аппаратную ошибку 03800500-2F40. И просит выключит и включить снова. Затем все повторяется. В сервисном режиме дюзы печатает кроме одного цвета (MBK), вообще ни одной черточки. Пробовал снимать головку, он ее не видит после установки назад. Кто -нибудь сталкивался с такой проблемой?
- Наверх of the page up there ^
-
0
| Сообщение #8
Отправлено 25 июля 2017 — 10:09
WWM
Похоже, что это болезнь. Наш iPF670 заболел этим же сегодня вдруг с утра сразу после включения. До этого спокойно отпечатал более 100 квадратов заправленными оригиналами. Вел себя прекрасно.
А сегодня на панели пишет, что закачивает чернила из баков, в драйвере — что идет очистка головки. Потом выдает аппаратную ошибку и просит выключить и включить.
Выключали. Успели напечатать метр фото и опять то же самое.
Одной из возможных причин производитель указывает «Проверьте, не используются ли не оригинальные чернила и т.д.». Еще одна причина — банальная поломка.
И что теперь?
Это такая защита или дефект?
Прикрепленные изображения
- Наверх of the page up there ^
-
0
| Сообщение #9
Отправлено 12 января 2018 — 07:56
Gadyu
Здравствуйте.Принтер IPF770 проблема такая же. Был в СЦ с этой болезнью поменяли правый карман вроде месяц попечатал и история повторилась. Если у кого нашлось решение напишите пожалуйста.
- Наверх of the page up there ^
-
0
| Сообщение #10
Отправлено 12 января 2018 — 08:29
WWM
сюдаеще загляните
Надо понимать, пока что разгадка этой загадки в стадии предположений и гипотез
Нет системы в «случайных» решениях, поэтому нет однозначной причины
Наше мнение — ошибка производителя в программном обеспечении
- Наверх of the page up there ^
-
0
| Сообщение #11
Отправлено 30 января 2018 — 15:53
palmoman
Нет там никакой ошибки. Либо забивается голова либо плохо работает гидравлика. В любом случае лечить надо по тесту дюз из сервисного режима, а не фотографии экрана. Ошибка на нем говорит о том, что не все дюзы работают. Это или голова или гидравлика.
- Наверх of the page up there ^
-
0
| Сообщение #12
Отправлено 12 февраля 2018 — 12:38
tipu
Всем, Всем, Всем, не бесплатная консультация по теме canon canon IPF 670, canon IPF 750 … и по головке canon pf-04
- Наверх of the page up there ^
-
0
- ← Предыдущая тема
- iPF500, iPF600, iPF605, iPF610, iPF700, iPF710, iPF755, iPF6100, iPF8100
- Следующая тема →
- Вы не можете создать новую тему
- Вы не можете ответить в тему
1 человек читают эту тему
0 пользователей, 1 гостей, 0 скрытых пользователей
Скачать обновленную версию бесплатной программы PrintHelp 2023, купить Код Сброса —
Коды ошибок, актуальные для Canon imagePROGRAF iPF670, iPF605, iPF770, iPF750, iPF710, iPF650, iPF700, iPF785, iPF610, iPF765, iPF680, iPF760, iPF510, iPF780, iPF600, iPF500, iPF685, iPF720, iPF670e, iPF671, iPF671e (для картриджей PFI-102, PFI-104, PFI-107).
Check printing results
Call for service.
Call for service.
После проверки датчика деталей в сервисном меню, замените деталь, указанную в ошибке.
Проверьте загруженные данные перед повтором печати.
Проверьте количество бумаги.
Exchange for the compatible paper to HP-GL/2.
The memory is full.
Check if there is the non-image area of the print. Verify the transmitted data before reprinting.
The memory is full.
The memory is full.
The parameter is out of range.
Verify the transmitted data before reprinting.
This command is not supported.
Delete unwanted data
Delete unneeded jobs stored in Personal Boxes.
Now printing without saving data.
Delete unneeded jobs stored in Personal Boxs.
Prepare to replace the ink.
Renew the C ink tank
Prepare to replace the ink.
Renew the M ink tank.
Prepare to replace the ink.
Renew the Y ink tank.
Prepare to replace the ink.
Renew the MBK ink tank.
Prepare to replace the ink.
Renew the BK ink tank.
Replace the ink tank.
Renew the C ink tank.
Replace the ink tank.
Renew the M ink tank.
Replace the ink tank.
Renew the Y ink tank.
Replace the ink tank.
Renew the MBK ink tank.
Replace the ink tank.
Renew the BK ink tank.
Check ink tank.
Attach the C ink tank.
Check ink tank.
Attach the M ink tank.
Check ink tank.
Attach the Y ink tank.
Check ink tank.
Attach the MBK ink tank.
Check ink tank.
Attach the BK ink tank.
Check the media size check. Change the media size.
Delete unwanted data.
Press the stop button to cancel the print job. Delete print jobs from the queue.
Delete unneeded jobs stored on the hard disk.
Press Online to clear error.
Clean the printhead. Identify the nozzles in a nozzle check pattern. Replace the printhead.
Lift the release lever and reload the paper.
Check the leading end of paper. Reload the paper.
Lift the release lever and align leading edge with orange line.
Check the sheet length. Check to see if paper has not jammed.
Lift the release lever and reload the paper.
Check the right edge of paper. Check the paper type.
Lift the release lever and reload the paper.
Check the left edge of paper.
Check the paper type.
Press Online to clear the error and readjust printhead.
Check the paper on which a pattern is printed for smears. Check the environment for interferences from outside light.
Clean the printhead.
Press Online to clear the error and readjust printhead.
Check the paper on which a pattern is printed for smears. Check the environment for interferences from outside light.
Clean the printhead.
Lift the release lever and replace paper with A4/ LTR (vertical) or larger.
Replace with A4/Letter or any larger-sized paper.
Lift the release lever and replace paper with A3/ Ledger (vertical) or larger.
Replace with A3/11″x17″ or any larger-sized paper.
Lift the release lever and replace roll with 10 in. wide or larger roll.
Replace with roll media at least 10 inches in width.
Remove paper and press Load/Eject.
Remove the paper jam and reload the paper.
Lift the release lever and reload paper.
Reload the paper.
Check supported paper sizes.
Replace with larger-sized paper.
Check supported paper sizes.
Replace with smaller-sized paper.
Press Online to clear the error.
Replace with adjustable media.
Lift the release lever.
Correct the skew in the paper and reload it.
Reload paper.
Reload the paper
Press Load/Eject and reload the paper.
Reload the paper
Lift the release lever and reload the paper.
Reload the roll media.
Press Online to clear the error.
Check to see if paper has not jammed.
Press Load/Eject and load sheets.
Load cut sheets at the paper tray port.
Press OK, remove the sheets, and load a roll.
Replace with roll media.
Press Load/Eject and load a roll.
Load roll media.
Turn printer off and install roll feed unit.
Install the roll media unit.
Lift the release lever and replace the roll.
Renew the supply of roll media.
Press Load/Eject and reload the paper.
Check the type of paper that can be fed and reload the paper.
Press Load/Eject and remove the roll.
Load cut sheets at the paper tray port.
03130031-2E23
Turn off printer, wait, then turn on again.
Check the cutter unit.
03130031-2E14
Turn off printer, wait, then turn on again.
Replace the main controller PCB
03130031-2E16
Turn off printer, wait, then turn on again.
Check the mist fan.
03130031-2E17
Turn off printer, wait, then turn on again.
Check the suction fan.
03130031-2E20
Turn off printer, wait, then turn on again.
Check the purge unit.
03130031-2E22
Turn off printer, wait, then turn on again.
Check the purge unit.
03130031-2E23
Turn off printer, wait, then turn on again.
Check the purge unit.
03130031-2E25
Turn off printer, wait, then turn on again.
Check the carriage unit. Check the linear encoder for smears.
03130031-2E26
Turn off printer, wait, then turn on again.
Check the carriage unit and surrounding parts.
03130031-2E27
Turn off printer, wait, then turn on again.
Check the carriage unit and surrounding parts.
03130031-2E1F
Turn off printer, wait, then turn on again.
Check the purge unit.
03130031-2E2A
Turn off printer, wait, then turn on again.
Check the feed roller encoder and surrounding part. Check to see if paper has not jammed.
03130031-2E29
Turn off printer, wait, then turn on again.
Check the roll feed unit. Check roll media. Check to see if paper has not jammed in the printer.
03130031-2E2E
Turn off printer, wait, then turn on again.
Check the roll feed unit.
03130031-4027
Turn off printer, wait, then turn on again.
Check the carriage unit and surrounding parts.
03130031-2E13
Turn off printer, wait, then turn on again.
03130031-2F32
Turn off printer, wait, then turn on again.
Replace the multi sensor unit.
03130031-2F3A
Turn off printer, wait, then turn on again.
Check the ink supply unit.
03130031-2F3B
Turn off printer, wait, then turn on again.
Remove the ink tanks and then reload them. Check the main controller PCB.
03130031-2F70
Turn off printer, wait, then turn on again.
03130031-2F71
Turn off printer, wait, then turn on again.
03130031-2F72
Turn off printer, wait, then turn on again.
03130031-260E
Turn off printer, wait, then turn on again.
Check the carriage unit and surrounding parts. Replace the main controller PCB.
03130031-2618
Turn off printer, wait, then turn on again.
Check the power supply unit.
03130031-260F
Turn off printer, wait, then turn on again.
Turn off printer and check roll feed unit
Replace the roll feed unit.
Turn off printer, wait a while, then turn it on again.
Transmit valid ROM data.
Turn off printer, wait a while, then turn it on again.
Verify the validity of MID data before transferring it.
03130031-2F2B
Turn off printer, wait, then turn on again.
Open top cover and replace the printhead.
Replace printhead
Open top cover and replace the right printhead.
Replace printhead
Open top cover and replace the right printhead.
Replace printhead
03800500-2F40
Turn off printer, wait, then turn on again.
Проверьте блок очистки печатающей головки и окружающие детали.
Проверьте датчик управления головкой и окружающие детали.
Убедитесь, что печатающая головка установлена правильно.
Если визуально все чисто и корректно подключено, нужно пробовать:
Заменить датчик управления головкой.
Заменить главную плату контроллера.
Замените печатающую головку.
Замените каретку.
03800500-2F2F
Turn off printer, wait, then turn on again.
Замените датчик управления печатающей головкой.
Замените печатающую головку.
Identify the head management sensor unit
Replace the head management sensor unit
Replace the printhead
03800500-2F30
Turn off printer, wait, then turn on again.
Замените датчик управления печатающей головкой.
Замените печатающую головку.
Identify the head management sensor unit
Replace the head management sensor unit
Replace the printhead
Press OK and replace ink tank.
Renew the Bk ink tank
Press OK and replace ink tank.
Renew the Y ink tank
Press OK and replace ink tank.
Renew the M ink tank
Press OK and replace ink tank.
Renew the C ink tank
Press OK and replace ink tank.
Renew the MBk ink tank
Press OK and replace ink tank.
Renew the MBk ink tank
Press OK and replace ink tank.
Replace with a fully replenished Bk ink tank
Press OK and replace ink tank.
Replace with a fully replenished Y ink tank
Press OK and replace ink tank.
Replace with a fully replenished M ink tank
Press OK and replace ink tank.
Replace with a fully replenished C ink tank
Press OK and replace ink tank.
Replace with a fully replenished MBk ink tank
Press OK and replace ink tank.
Replace with a fully replenished Bk ink tank
Press OK and replace ink tank.
Replace with a fully replenished Y ink tank
Press OK and replace ink tank.
Replace with a fully replenished M ink tank
Press OK and replace ink tank.
Replace with a fully replenished C ink tank
Press OK and replace ink tank.
Replace with a fully replenished MBk ink tank
Press OK and replace ink tank.
Replace with a valid Bk ink tank
Press OK and replace ink tank.
Replace with a valid Y ink tank
Press OK and replace ink tank.
Replace with a valid M ink tank
Press OK and replace ink tank.
Replace with a valid C ink tank
Press OK and replace ink tank.
Replace with a valid MBk ink tank
Press OK and replace ink tank.
Replace with a valid MBk ink tank
Press OK and check ink tank.
Install a Bk ink tank
Press OK and check ink tank.
Install a Y ink tank
Press OK and check ink tank.
Install a M ink tank
Press OK and check ink tank.
Install a C ink tank
Press OK and check ink tank.
Install a MBk ink tank
Press OK and check ink tank.
Install a MBk ink tank
Turn off printer, wait a while, and turn it on again.
Close the top cover and turn on the printer again.
Turn off printer, wait a while, and turn it on again.
Close the ink tank cover and turn on the printer again.
Replace the maintenance cartridge.
Renew the maintenance cartridge.
Cartridge capacity.
Replace the maintenance cartridge.
Replace the maintenance cartridge.
Replace the maintenance cartridge.
Renew the maintenance cartridge.
Replace the maintenance cartridge.
Renew the maintenance cartridge.
Check roll position.
Online: Print Load/Eject:
Change Paper
Check to see if a borderless printing spacer is installed. Reload the paper.
Check paper size setting.
Online: Print
Load/Eject: Change Paper
Check the paper size. Change the paper size.
Online: Print
Stop: Stop Printing
Load/Eject: Change Paper
Renew the supply of roll media.
Lift the release lever and reload the paper.
Cut paper manually. Check the cutter.
Press Online to clear the error.
Check the multi sensor.
Check the head management sensor.
Online: Print
Stop: Stop Printing
Load/Eject: Change Paper
Exchange for the compatible paper to HP-GL/2 before reprinting.
Delete unwanted data on your computer to resume printing.
Press Stop to cancel printing.
Delete unneeded jobs stored in Personal Boxes.
Cannot save. Delete unwanted data on your computer to resume printing.
Press Stop to cancel printing.
Press OK to reformat
Press the [OK] button to start reformatting the hard disk. When formatting is finished, the printer automatically restarts.
Turn off printer, wait a while, and turn it on again.
Invalid files will be deleted.
Restart the printer. Only the corrupted files will be deleted, and the printer will restart.
Turn off printer, wait, then turn on again.
Check the head management sensor. Replace the head management sensor. Replace the printhead.
Turn off printer, wait, then turn on again.
Check the pinch roller and surrounding part. Replace the pinch roller pressure drive unit.
Install printhead.
Install the printhead.
Replace the printhead.
Check the maintenance cartridge.
Install the maintenance cartridge.
Lift the release lever and reload the paper.
Check the cutter unit and surrounding part. Replace the cutter.
Renew the supply of roll media.
Manually rewind roll all the way and press OK.
Check the pick-up unit and roll media. Check to see if paper has not jammed.
Load cut sheets at the paper tray port.
Check the media size. Change the media size.
Confirm usage cond. of the paper.
Reload the paper.
Reload the roll media.
-
12-26-2019
#1

Senior Tech
100+ Posts
- Rep Power
- 21
canon ipf 680 03800500-2f47 error
Canons not usually my thing, but asked to look at it anyway. Originally had ‘printhead error’ after installing new printhead, no error code. Didn’t know what else to think, so had customer get another one in case it was bad out of the box. He put in another one & came up with 03800500-2f47. I cleaned out the head management sensor & around it the best I could & reseated connection. Did nozzle check in service mode & it got a 03800500-2f30 error. Manual didn’t enlighten me too much about it. Power cycled it again in regular mode, & it went to ‘printhead error again with no error code.
First, I’m thinking of replacing the head mgmt. sensor. Is there anything else I should worry about checking ? Second is, since it said ph error again, did it get spoiled & now it needs another one ? Or hopefully it’s only because of what ever error they have already ? I hope I don’t need another one.
Thanks to all who have expert insight to this potential problem.
-
12-26-2019
#2
Senior Tech
250+ Posts
- Rep Power
- 0
Re: canon ipf 680 03800500-2f47 error
Originally Posted by tmw
Canons not usually my thing, but asked to look at it anyway. Originally had ‘printhead error’ after installing new printhead, no error code. Didn’t know what else to think, so had customer get another one in case it was bad out of the box. He put in another one & came up with 03800500-2f47. I cleaned out the head management sensor & around it the best I could & reseated connection. Did nozzle check in service mode & it got a 03800500-2f30 error. Manual didn’t enlighten me too much about it. Power cycled it again in regular mode, & it went to ‘printhead error again with no error code.
First, I’m thinking of replacing the head mgmt. sensor. Is there anything else I should worry about checking ? Second is, since it said ph error again, did it get spoiled & now it needs another one ? Or hopefully it’s only because of what ever error they have already ? I hope I don’t need another one.
Thanks to all who have expert insight to this potential problem.hello in service mode you must delete the spindle error history, also check the firmware version if it is an old firmware try to update to the latest firmware version
-
12-26-2019
#3
Senior Tech
250+ Posts
- Rep Power
- 0
Re: canon ipf 680 03800500-2f47 error
if the problem persists rule out with carriage pcb or main board
-
12-26-2019
#4
Senior Tech
100+ Posts
- Rep Power
- 21
Re: canon ipf 680 03800500-2f47 error
Thank you for replying so quickly. I still wonder though, do I have to worry about a spoiled print head ?
-
12-26-2019
#5
Senior Tech
250+ Posts
- Rep Power
- 0
Re: canon ipf 680 03800500-2f47 error
Originally Posted by tmw
Thank you for replying so quickly. I still wonder though, do I have to worry about a spoiled print head ?
the ink cartridges are original?
-
12-27-2019
#6
Senior Tech
100+ Posts
- Rep Power
- 21
Re: canon ipf 680 03800500-2f47 error
The cartridges are original.
Also, have looked for spindle error history in the manual under service mode. Haven’t spotted it yet. Could it be called something else ?
-
09-15-2022
#7
Technician
- Rep Power
- 32
Re: canon ipf 680 03800500-2f47 error
Originally Posted by wcanonw
if the problem persists rule out with carriage pcb or main board
I am able to print in Service mode. Firmware on my IPF785 is up to date at Version 1.5 Cleaned the print head, any other suggestions?? Thanks for your help in advance.
Mark


")