The 
button means animation player has been turned on (ALt + A is shortcut, press again to turn off).
You can see whether animation is playing looking at the frame numbers in the bottom left of the 3D View:
Note numbers in the bottom left change and sometimes become orange — that’s the keyframe of the selected object is on adjacent frame.
The simplest way to see the timeline is to switch screen layout from Default to Animation, the timeline will be in the bottom.
System Information
Operating system: Windows 10 Home
Graphics card: Geforce GTX 1050
Blender Version
Broken: (2.80, e5e885d0ec, blender2.7, 2018-12-23, as found on the splash screen) NOTE AND POSSIBLE BUG: It says «Branch: 2.7» on the splash screen even though it’s obviously 2.8 (see screenshot  )
)
Worked: 2.79b release
Short description of error
When either the front or back play buttons are pressed, the playback cursor doesn’t move and the animation doesn’t play. However, the «X Anim Player» symbol at the bottom of the screen still shows.
Exact steps for others to reproduce the error
Based on the default startup or an attached .blend file (as simple as possible).
The only time I’ve ever found this bug is in this file: IRP#2.blend
Just press one of the play buttons and you can see the bug.
**System Information**
Operating system: Windows 10 Home
Graphics card: Geforce GTX 1050
**Blender Version**
Broken: (2.80, e5e885d0ecb9, blender2.7, 2018-12-23, as found on the splash screen) NOTE AND POSSIBLE BUG: It says «Branch: 2.7» on the splash screen even though it’s obviously 2.8 (see screenshot  )
Worked: 2.79b release
**Short description of error**
When either the front or back play buttons are pressed, the playback cursor doesn’t move and the animation doesn’t play. However, the «X Anim Player» symbol at the bottom of the screen still shows.
**Exact steps for others to reproduce the error**
Based on the default startup or an attached .blend file (as simple as possible).
The only time I’ve ever found this bug is in this file: [IRP#2.blend](https://archive.blender.org/developer/F6450209/IRP_2.blend)
Just press one of the play buttons and you can see the bug.
$begingroup$
My question is:
I have a Error: Anim PLayer
That happens if i play my scene (ALT+A) (New Scene too)
In Cycles and Blender Game i have the same Error.
For the Render i use the Render Presets
I get this error…
I have tried other versions of Blender but all Versions same problem.
Good to know:
Blender Version: 2.75
Windows-7 64 Bit
AMD Six Core
AMD Radeon HD 7770
Thanks for every Answer 
Andre
asked Aug 1, 2015 at 20:46
![]()
$endgroup$
1
$begingroup$
It isn’t an error. It shows it is playing. If you push the button it stops the animation.
answered Aug 1, 2015 at 20:51
![]()
gladysgladys
2,8841 gold badge15 silver badges26 bronze badges
$endgroup$
1
$begingroup$
The
button means animation player has been turned on (ALt + A is shortcut, press again to turn off).
You can see whether animation is playing looking at the frame numbers in the bottom left of the 3D View:
Note numbers in the bottom left change and sometimes become orange — that’s the keyframe of the selected object is on adjacent frame.
The simplest way to see the timeline is to switch screen layout from Default to Animation, the timeline will be in the bottom.
answered Aug 1, 2015 at 21:30
![]()
Mr ZakMr Zak
10.8k4 gold badges26 silver badges75 bronze badges
$endgroup$
Comment Actions
The playback speed is bad specifically because of the Boolean modifier in Exact mode (this is know to be slow — if you disable the modifier or have it in Fast mode, playback should be realtime)
FBX export takes a while (but it finishes on my side):
FBX export starting... '/lichtwerk/01_projects/0072_BORG_BlenderFoundationTracker/BORG_Produktion/08_Bugtracker_reports/T98187/HangryCandy Ani (Run) 2.fbx'
(bpy.data.armatures['metarig.001'], 'POSE')
(bpy.data.armatures['metarig.001'], 'POSE')
(bpy.data.armatures['metarig.001'], 'POSE')
(bpy.data.armatures['metarig.001'], 'POSE')
(bpy.data.armatures['metarig.001'], 'POSE')
(bpy.data.armatures['metarig.001'], 'POSE')
(bpy.data.armatures['metarig.001'], 'POSE')
(bpy.data.armatures['metarig.001'], 'POSE')
(bpy.data.armatures['metarig.001'], 'POSE')
(bpy.data.armatures['metarig.001'], 'POSE')
(bpy.data.armatures['metarig.001'], 'POSE')
(bpy.data.armatures['metarig.001'], 'POSE')
(bpy.data.armatures['metarig.001'], 'POSE')
(bpy.data.armatures['metarig.001'], 'POSE')
(bpy.data.armatures['metarig.001'], 'POSE')
(bpy.data.armatures['metarig.001'], 'POSE')
(bpy.data.armatures['metarig.001'], 'POSE')
(bpy.data.armatures['metarig.001'], 'POSE')
(bpy.data.armatures['metarig.001'], 'POSE')
(bpy.data.armatures['metarig.001'], 'POSE')
(bpy.data.armatures['metarig.001'], 'POSE')
export finished in 378.5348 sec.
Can you confirm the above?
$begingroup$
I have imported an fbx that contains an animation.
However, it doesn’t play in Blender.
I don’t see why.
Can anybody help?
Thank you!
Here is the fbx.

asked Dec 13, 2020 at 0:20
![]()
tmightytmighty
8371 gold badge9 silver badges25 bronze badges
$endgroup$
5
$begingroup$
Unfortunately the fbx file doesn’t seem to contain any useful animation data. You can check the animation data with the graph editor.

On the other hand, if you check Force Connect Children and Automatic Bone Orientation, bone orientations will be aligned.

answered Dec 13, 2020 at 5:48
![]()
tetiitetii
1,3661 gold badge6 silver badges14 bronze badges
$endgroup$
$begingroup$
I have imported an fbx that contains an animation.
However, it doesn’t play in Blender.
I don’t see why.
Can anybody help?
Thank you!
Here is the fbx.
asked Dec 13, 2020 at 0:20
![]()
tmightytmighty
8371 gold badge9 silver badges25 bronze badges
$endgroup$
5
$begingroup$
Unfortunately the fbx file doesn’t seem to contain any useful animation data. You can check the animation data with the graph editor.
On the other hand, if you check Force Connect Children and Automatic Bone Orientation, bone orientations will be aligned.
answered Dec 13, 2020 at 5:48
![]()
tetiitetii
1,3661 gold badge6 silver badges14 bronze badges
$endgroup$
![]()
17:52 28.02.2022
2
ответов
что за ошибка-то? Anim Player в статус баре пишется, когда запущена анимация
17:55 28.02.2022
Sergey Shcherbakov
что за ошибка-то? Anim Player в статус баре пишетс…
Анимации нет, и крестик перед надписью
18:05 28.02.2022
Похожие вопросы
Знатоки Блендера подскажите пожалуйста, почему происходит так, что при проигрывание анимации в Cycles всё в порядке, но когда ставлю рендерить эту же анимацию происходит такой косяк: Камера идёт по кругу вокруг одной цифры, но счётчик перестаёт работать. Причём если поставить определённую цифру, то он начнёт рендер с неё, но с изначальной позиции. Для счётчика был использован плагин LeoMoon Text Counter, думаю дело в нём, попробовал запечь анимацию по советам из интернета, но не помогло. Заснял видео чтобы было наглядней.
Решение
Надо было просто обновить данный аддон в ручную, стояла версия 1.3.2, а сейчас уже 1.3.4 в котором как раз указано решение этого случая. Спасибо пользователю Frosty за решение.
#статьи
- 31 май 2022
-

0
Разбираем ситуации, с которыми сталкивается большинство пользователей программы.
Иллюстрация: Nakaridore / Freepik / Pngwing / Annie для Skillbox Media
Считает игры произведениями искусства и старается донести эту идею до широких масс. В свободное время стримит, рисует и часами зависает в фоторежимах.
Во время работы в Blender зачастую встречаются проблемы «на ровном месте». В лучшем случае они существенно замедляют процесс моделирования, в худшем — приводят к откату на предыдущую стадию проекта или к полной его переделке. Подобные ситуации случаются со всеми, но именно новичков они приводят в замешательство, так как опытные пользователи уже знают, как их решить. В этом материале мы разбираем несколько распространённых проблем в Blender и предлагаем способы их устранения.
Во время работы над проектом пользователь рано или поздно заметит, что приближение и перемещение по осям с помощью колёсика мыши не срабатывает. Угол обзора достигает определённой точки и блокируется.
Причина. Камера обзора во вьюпорте привязана к условной точке, вокруг которой она двигается по принципу поводка. Когда пользователь крутит колёсико мыши и перемещается в пространстве, в какой-то момент он может приблизиться к этой точке вплотную. После этого блокируется не только масштабирование, но и перемещение по осям. В итоге камера будет вращаться только вокруг объекта. Попытка переключения на другой объект не сбросит привязку камеры — она по‑прежнему будет лишь вращаться вокруг нового объекта, а приближение и перемещение останутся заблокированными.
Решение. Выделяем объект и нажимаем клавишу Numpad . (Del) — это зафиксирует камеру на объекте, и приближение с перемещением по осям заработают в обычном режиме.
Примечание
Если номерной клавиатуры нет (как в случае с ноутбуками), существует несколько универсальных решений:
- В меню Правка (Edit) — Настройки (Preferences) — Ввод (Input) отметить галочкой пункт Эмулировать цифровую панель Numpad (Emulate Numpad). После этого основные цифровые клавиши заработают так же, как на Numpad-клавиатуре.
- Подключить экранную клавиатуру. Эта функция находится в параметрах Windows в разделе Специальные возможности — Клавиатура — Использовать экранную клавиатуру. По умолчанию панель Numpad не отображается, но её можно включить в параметрах (кнопка расположена в правом нижнем углу экранной клавиатуры). По аналогичному принципу подключается ассистивная клавиатура на macOS.
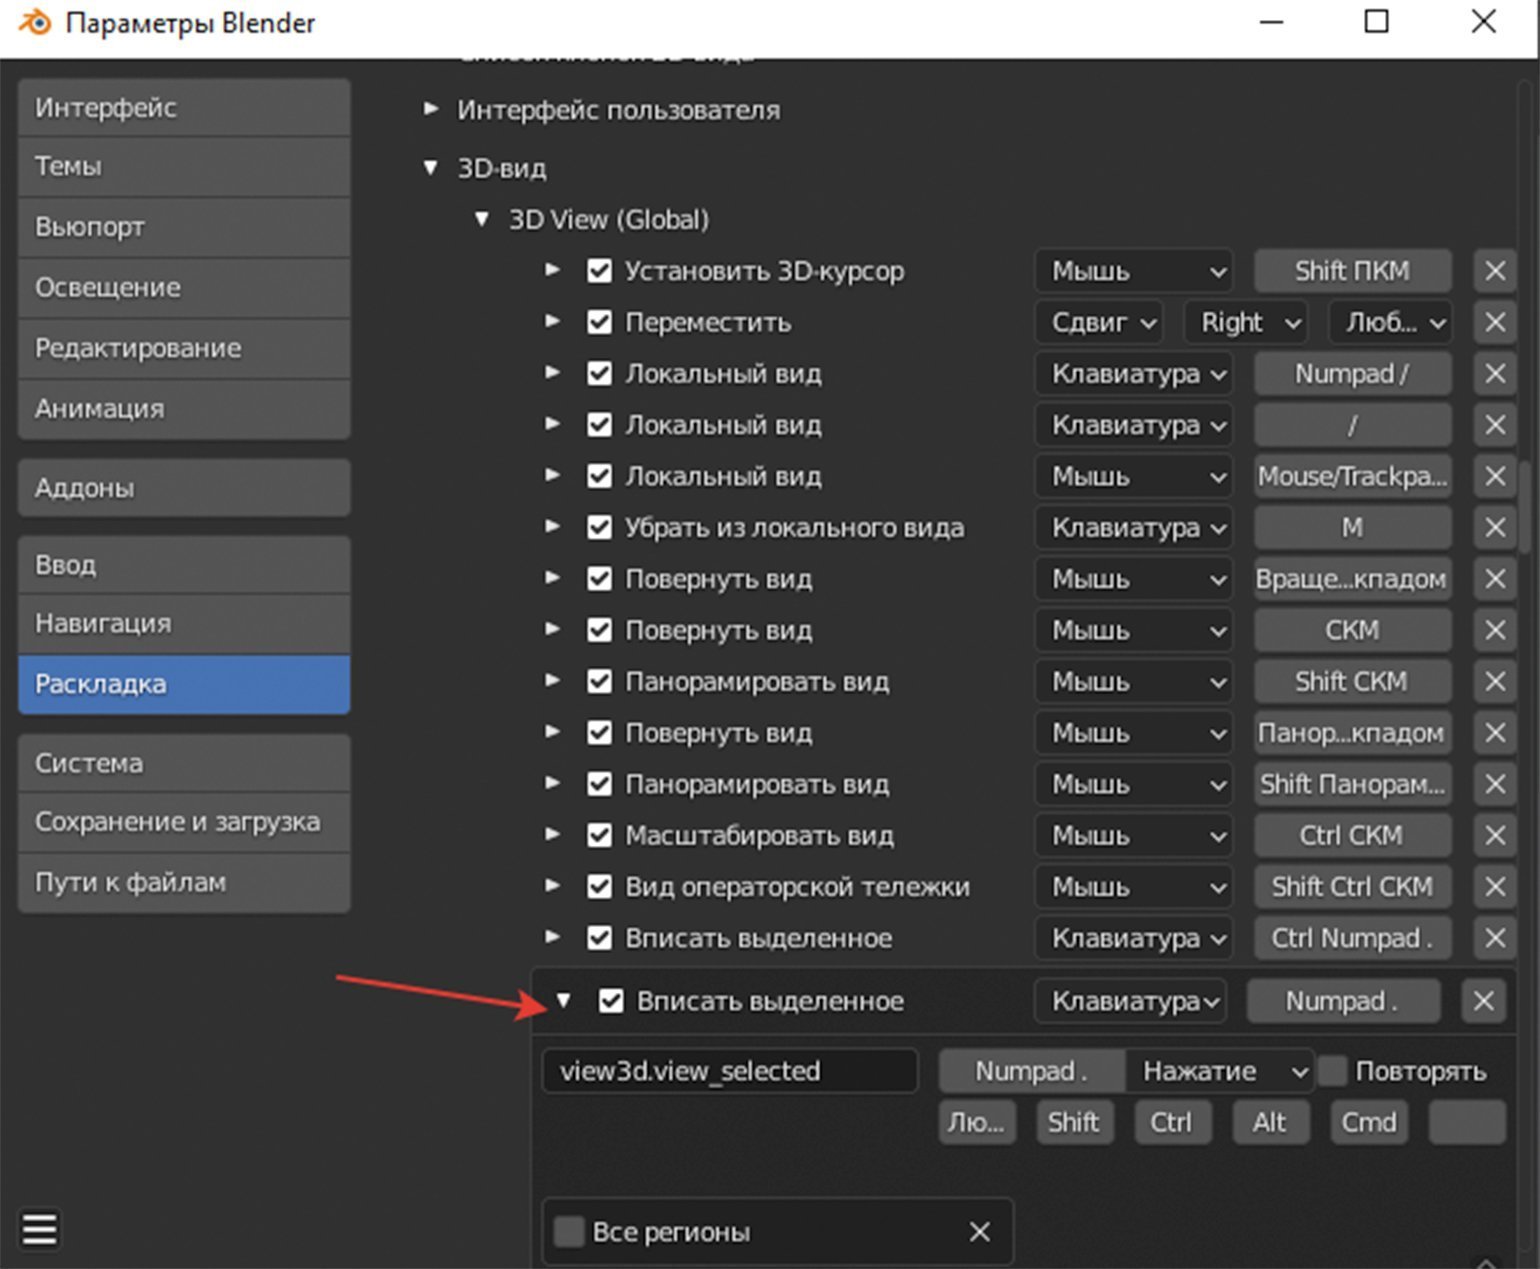
- Также на конкретное действие можно назначить новую клавишу: Правка (Edit) — Настройки (Preferences) — Раскладка (Keymap) — 3D вид (3D View) — 3D View (Global) — Вписать выделенное (View Selected).
Скриншот: Леон Балбери для Skillbox Media

Пользователь обнаруживает проблему во время последующих корректировок модели или непосредственно при создании UV-развёртки.
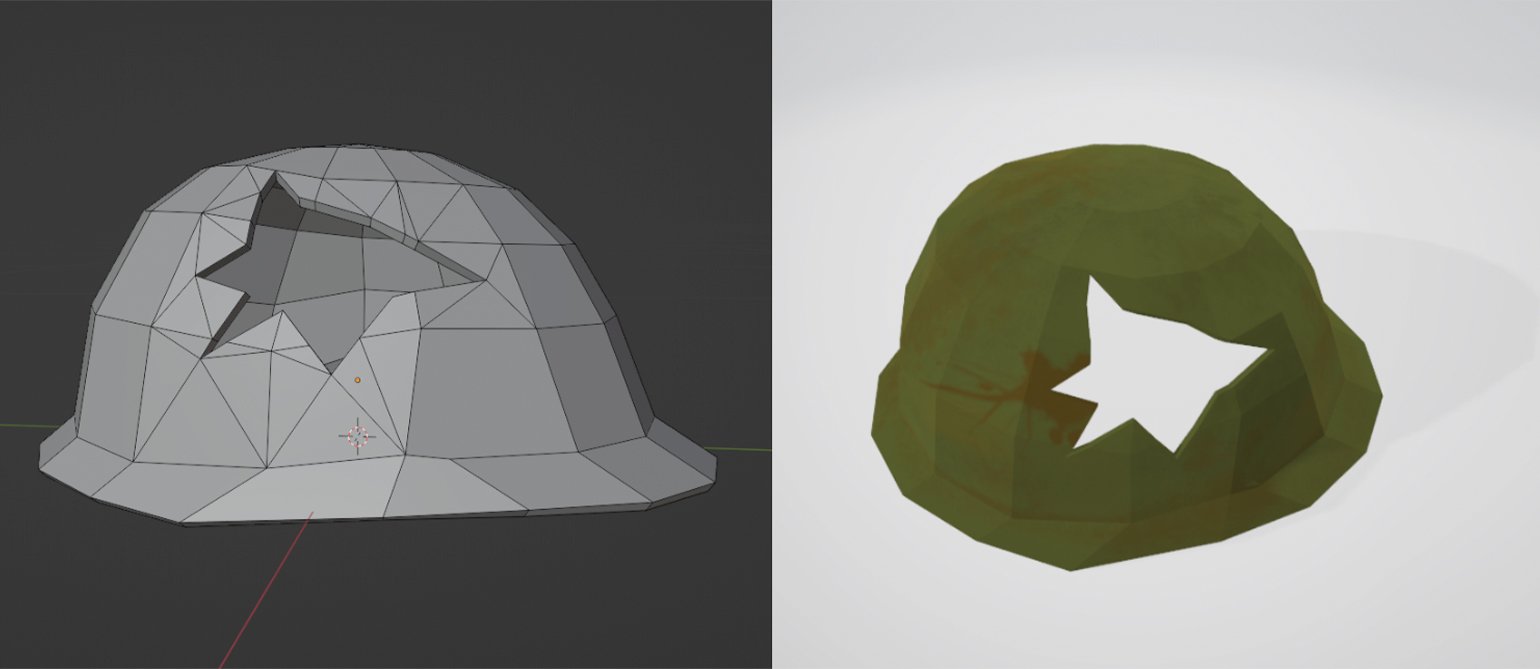
Причина. Подобные «сюрпризы» возникают из-за специфики экструдирования в Blender при отмене операции. Если пользователь начал процесс экструдирования Вершин (Vertices), Рёбер (Edges) или Граней (Faces) с помощью клавиши E и по привычке отменил действие, нажав ПКМ/Esc — операция всё равно считается выполненной. Продублированную геометрию можно увидеть, если включить отображение сетки во вьюпорте.
Решение. Помимо удаления лишних элементов вручную, можно отменить операцию через CTRL + Z или зайти в меню Правка (Edit), нажать Отменить по истории…(Undo History…) и указать, какую именно операцию нужно отменить. Если лишние грани обнаружены слишком поздно, выделяем объект (А), затем в Режиме редактирования (Edit Mode) заходим во вкладку Меш (Mesh) — Очистка (Merge) — Объединить по расстоянию (Merge by Distance). Данная операция убирает лишнюю геометрию.
Примечание
Операция Объединить по расстоянию (Merge by Distance) незаменима при удалении лишних вершин в объектах со сложной геометрией. Если её применить, в левом нижнем углу появится окно настроек; с ними можно экспериментировать, постепенно увеличивая значение. Главное — не переборщить, иначе пострадает качество модели.
Причина. В отличие от стандартных мешей, у отредактированных объектов параметры масштаба относительно каждой оси могут отличаться. Из-за того, что срез на гранях рассчитывается исходя из этих параметров, угол также меняется.
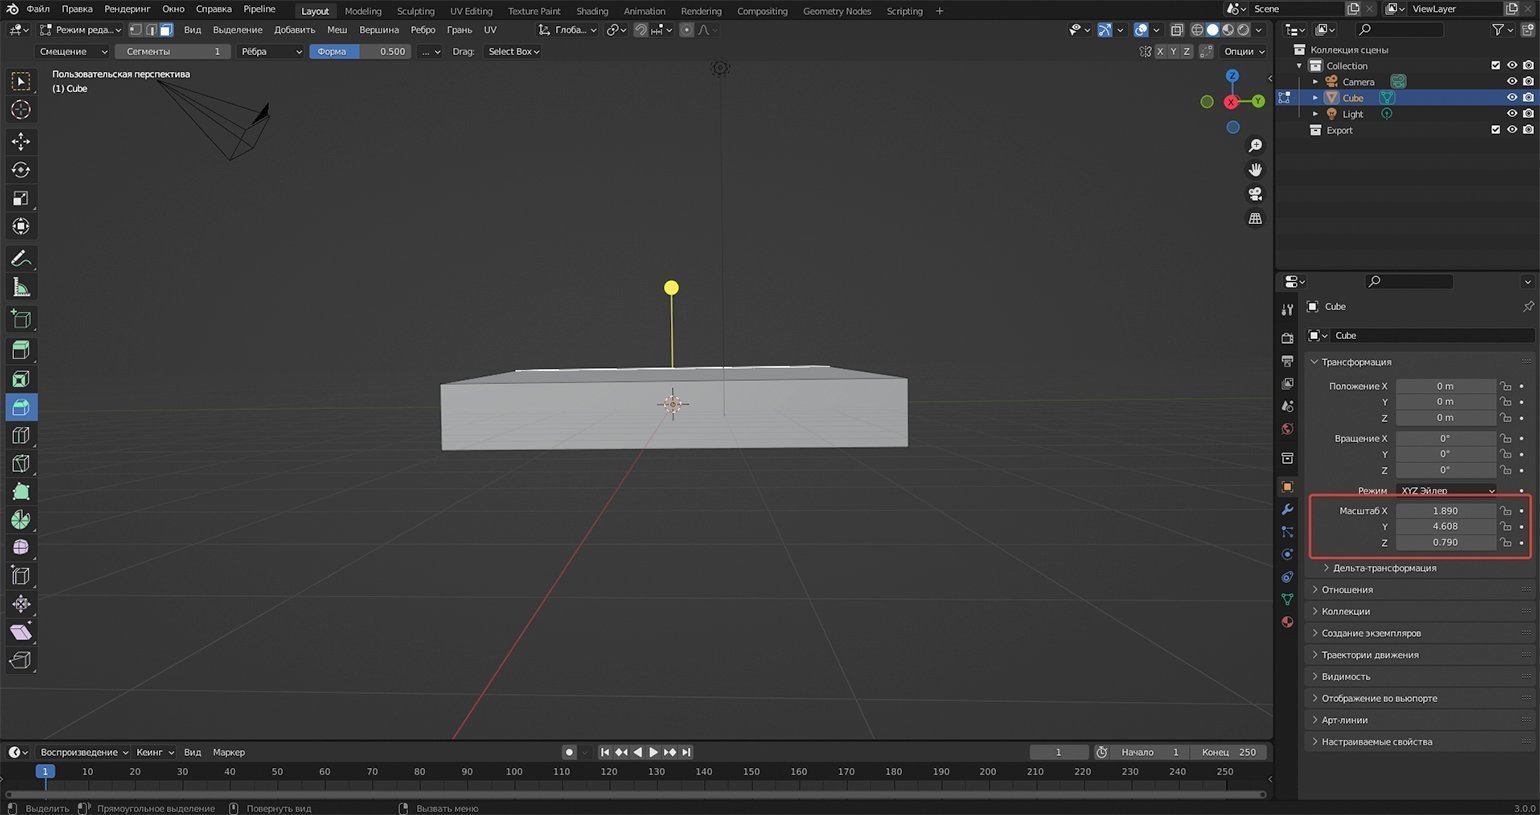
Скриншот: Леон Балбери для Skillbox Media
Решение. Параметры объекта нужно привести к единому знаменателю. Переходим в Объектный режим (Object Mode) и нажимаем Ctrl + A; во всплывающем меню выбираем Вращение и масштаб (Rotation & Scale). Таким образом, произойдёт сброс параметров, после чего срез с каждой стороны будет под углом в 45॰.
Коллаж: Леон Балбери для Skillbox Media
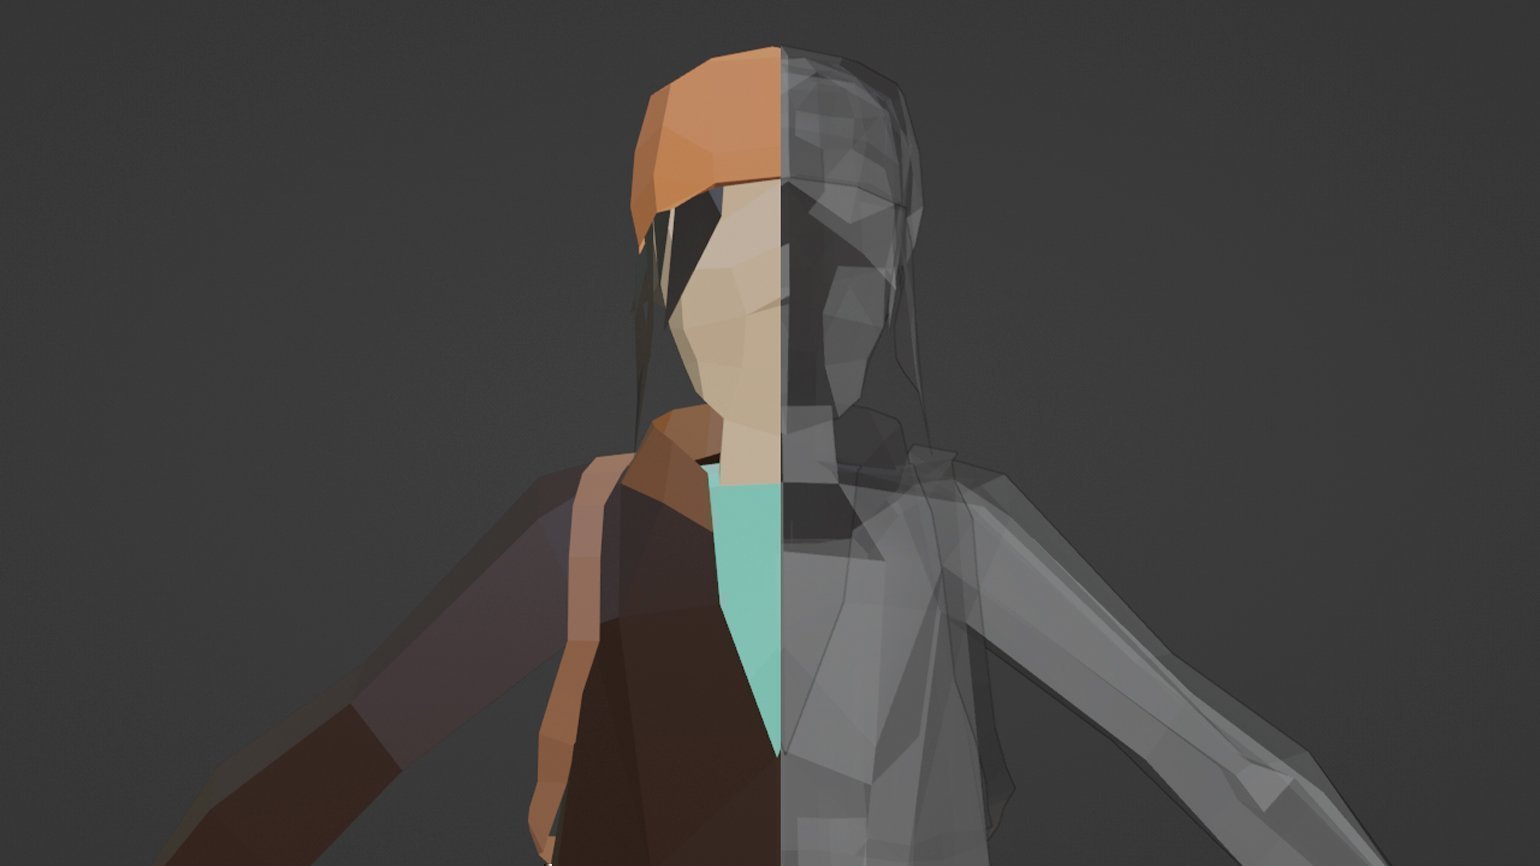
Даже если модель корректно отображается в режиме просмотра материалов, проблему выдают разные дефекты шейдеров, которые периодически возникают при освещении и текстурировании. Отсутствие нормалей можно заметить не только после экспорта модели в другую программу, но и в самом вьюпорте, если выбрать Сплошной тип затенения (Solid) — значок с белым кругом в правой верхней части окна, — а затем включить Полупрозрачность (X‑Ray) при помощи Alt + Z.
Примечание
Также можно зайти в настройки типа затенения и отметить галочкой опцию Не рисовать задние грани (Backface Culling). В этом случае пустые участки будут более заметными.
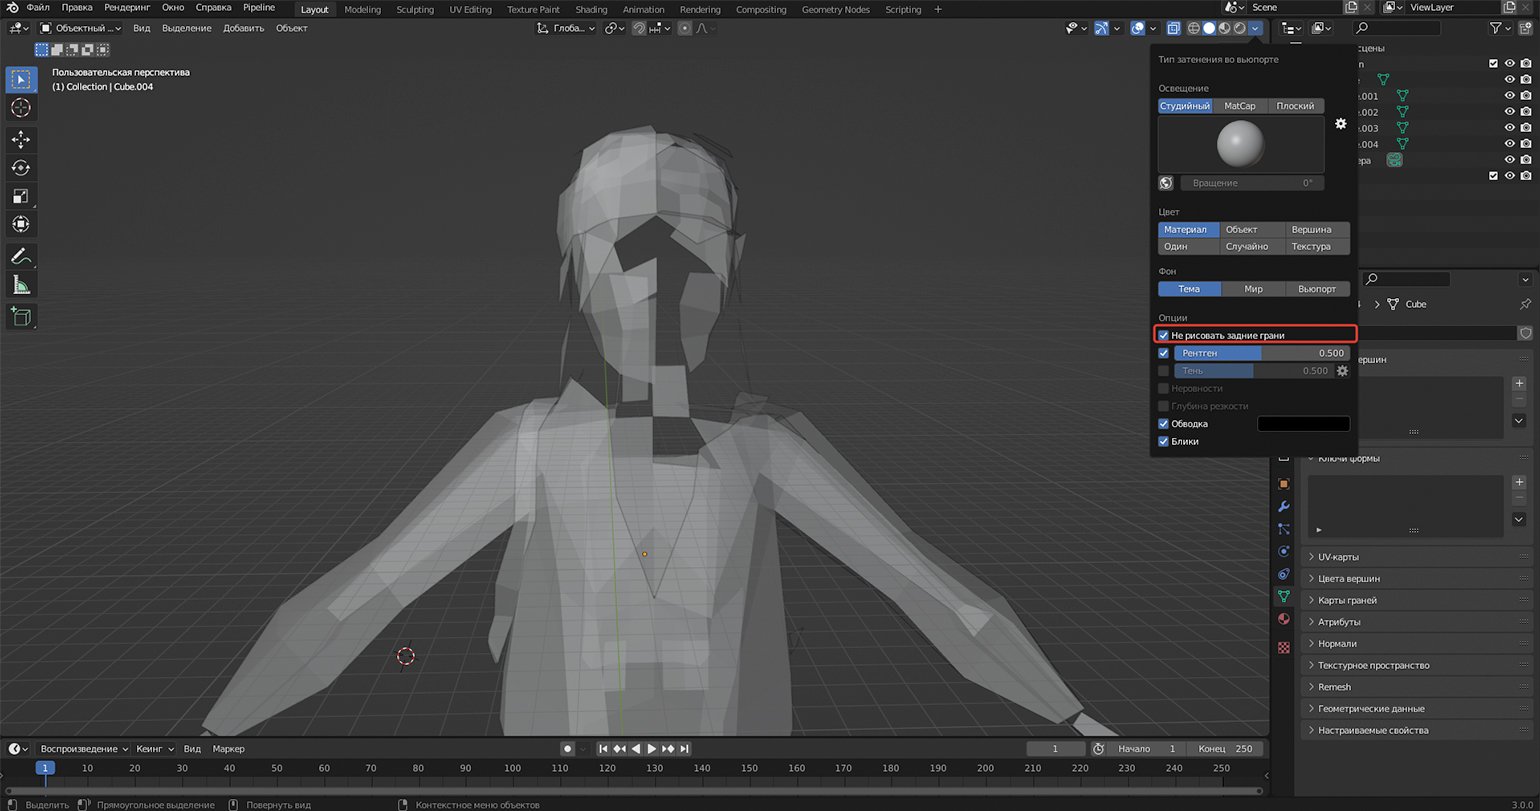
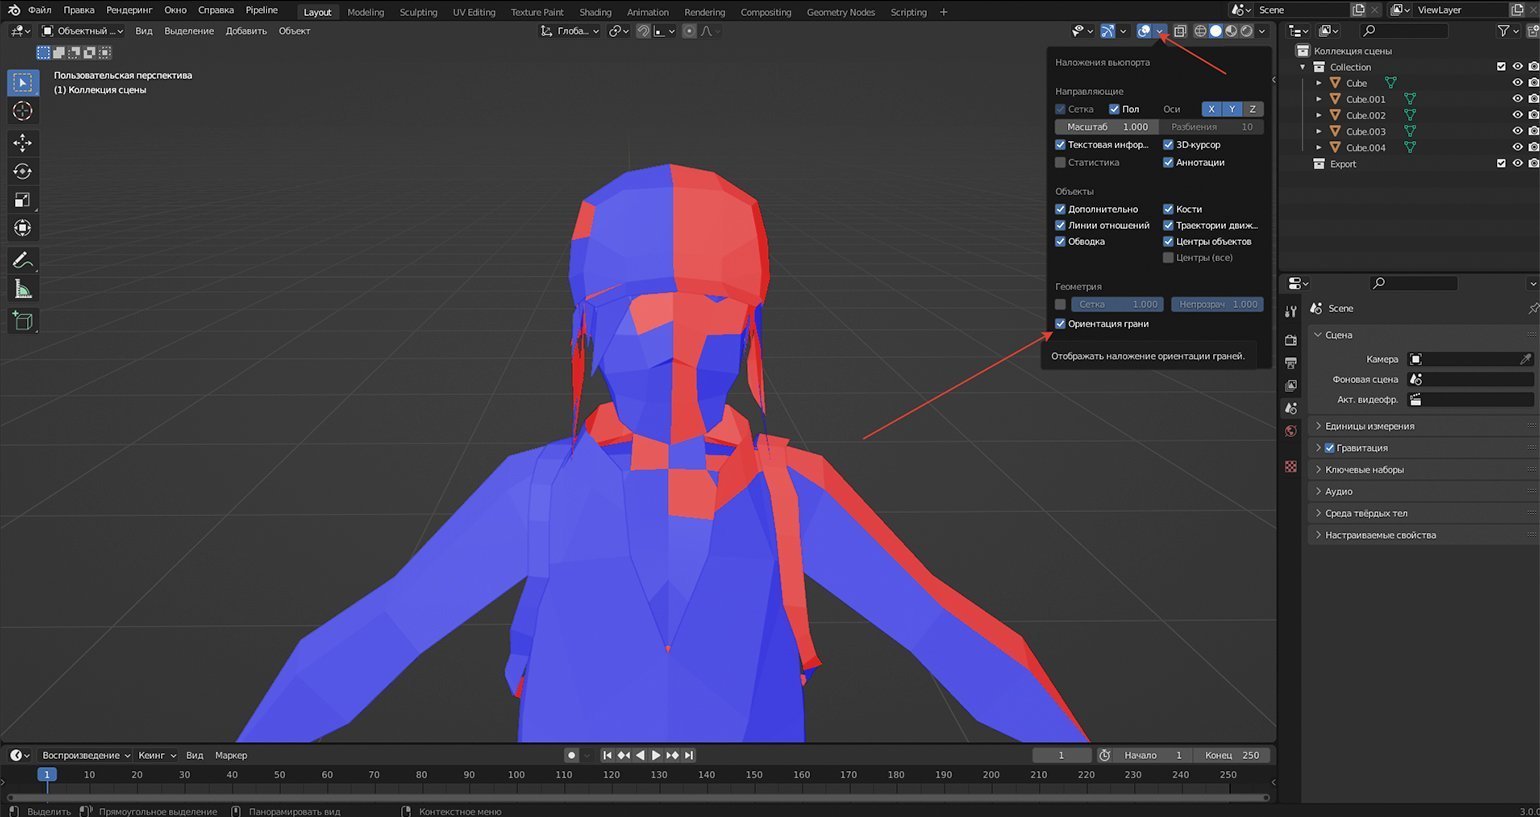
Скриншот: Леон Балбери для Skillbox Media
Причина. При сборке модели отдельные грани выстроены с изнаночной стороны.
Решение. Выбираем Сплошной тип затенения (Solid) во вьюпорте, открываем настройки Наложения вьюпорта (Overlays) и в опциях геометрии выставляем галочку напротив пункта Ориентация грани (Face Orientation). Теперь все вывернутые грани отмечены красным. Выделяем их в режиме редактирования, жмём Alt + N и выбираем Отразить (Flip). Теперь, когда на модели не осталось ни одного красного участка, можно смело экспортировать её в другие программы.
Скриншот: Леон Балбери для Skillbox Media
Примечание
Важно знать, что меши по типу Плоскости (Plane) изначально состоят из одной нормали. Поэтому во время создания объектов вроде лепестков, травинок, ремешков, прядей волос (для низкополигональных персонажей) помните, что у них всё равно существует изнанка. Следовательно, они будут отображаться лишь с одного ракурса (например, в Unreal Engine). Чтобы объект стал двусторонним, используйте модификатор Объёмность (Solidify). Если при создании элементов окружения важна экономия полигонов, моделируйте плоскости таким образом, чтобы их очертания отображались с каждого ракурса.
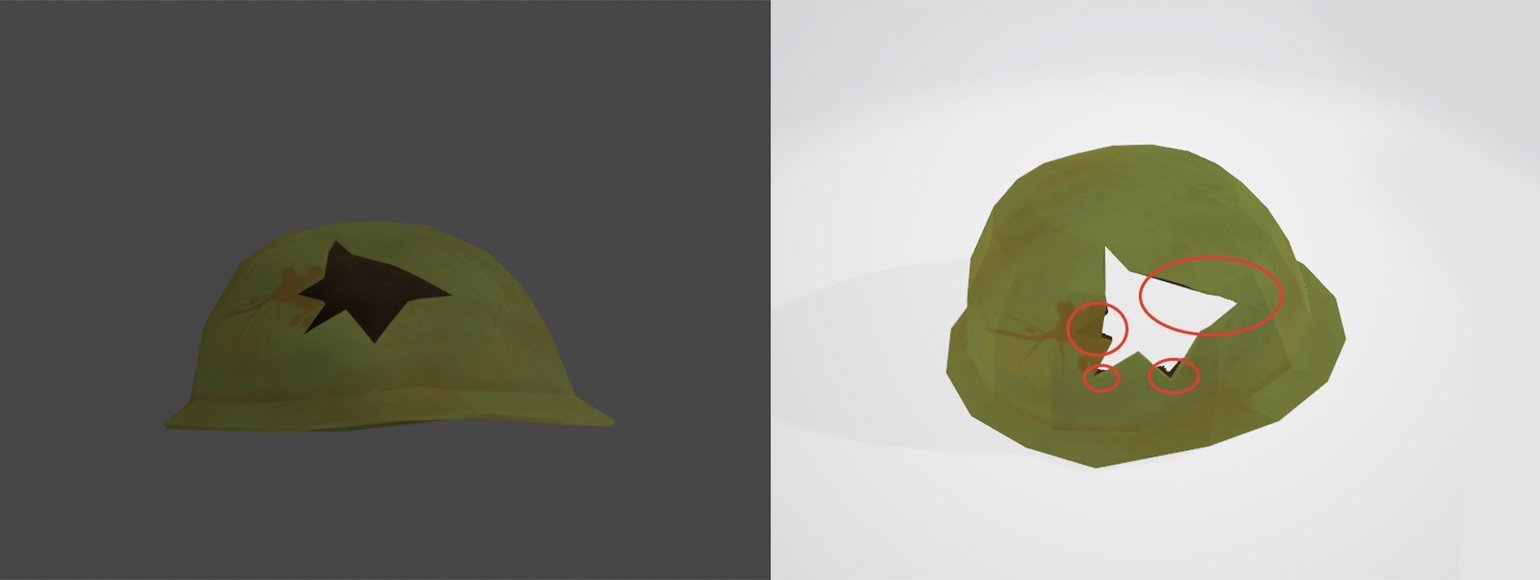
Скриншот: Леон Балбери для Skillbox Media
Причина. Часто эти изъяны возникают из-за топологии. Как правило, сетка модели состоит из треугольников и четырёхугольников, но иногда встречаются и многоугольники, известные как «нгоны» (от англ. N-gon). С последними не возникает проблем в Blender, но другие программы, в том числе игровые движки, плохо воспринимают подобную геометрию. На примере выше сетку из четырёхугольников разрезали инструментом Нож (Knife). В результате образовались многоугольники, из-за которых модель может некорректно отображаться в сторонних программах.
Решение. Разбиваем геометрию на проблемных участках. Для этого переходим в Режим редактирования (Edit Mode), выделяем многоугольные грани и нажимаем Ctrl + T. После этого нгоны превратятся в скопления треугольников.
Скриншот: Леон Балбери для Skillbox Media
Рассмотренные ситуации подтверждают тот факт, что в Blender существует немало «подводных камней». И часто виной тому не ошибки пользователей, а их неосведомлённость в специфике некоторых операций. Зная особенности программы, начинающий 3D-художник сможет потратить время не на поиск и решение проблем, а на совершенствование своих навыков.
Учись бесплатно:
вебинары по программированию, маркетингу и дизайну.
Участвовать

Научитесь: Профессия 3D-художник
Узнать больше
Loading
Animation can be a complex process that requires a deep understanding of the software being used. Whether you are a professional animator or a hobbyist, it’s important to be aware of the common problems that can arise when working with Blender.
This article will provide a general overview of some of the most frequently encountered issues and provide tips on how to avoid them. With the right knowledge and a little bit of practice, anyone can master the art of animation and create stunning visual effects using Blender.
These are the main problems we will be looking at:
- Animation stops at 250 frames
- Cannot insert keyframe
- Animation is blurry
- Animation bar (timeline) is gone
- Choppy, jittery animation playback
- The animation doesn’t play
- Keyframe not showing
- Keyframe not working
- Animation is not moving when playing
- Animation is not rendering
Let’s now head into a definitive guide of how to solve all of these frequently faced animation problems.
Animation stops at 250 frames
One of the most common animation problems faced in Blender is the animation itself stopping at 250 frames, which is the default number of frames for an animation, and luckily enough this is one of the easiest ones to solve as well.
To change the number of frames, simply head to the timeline editor and edit the «End» value for the keyframes at the top-right of the editor.
Another method to accomplish this is to head to the «Output Properties» section marked by a printer icon in the Properties panel. Here, underneath «Frame Range», change the end value for the frames just as before.
Cannot insert keyframe
Being unable to insert a keyframe is also a commonly faced problem. A keyframe is a point in time where a specific property of an object or animation is recorded. This property can be the object’s location, rotation, or other attributes. To insert a keyframe, simply hit I on your keyboard after manipulating an object, data field, etc. This brings up a menu to select which attribute to insert a keyframe for.
It is possible that after selecting the attribute the following error pops up:
To avoid this, make sure you have selected the object in either the 3D viewport or the Outliner as well as that the cursor is hovering over the 3D viewport when you press I.
If you are unable to insert a keyframe for a data field, it is likely that the value is not animatable:
Animation is blurry
There can be multiple reasons an animation looks blurry when rendered, so let’s quickly go through some of them now:
Motion Blur
Many animations make the use of motion blur for added realism or dramatic effect in their video, especially in scenes with lots of fast-paced movement. In often cases, an animation can look overly-blurry if the motion blur is too intense.
Motion blur settings can be found in the «Render Properties» tab denoted by a camera icon in the properties outliner. The «Shutter» setting is key here, as it sets the amount of time between the camera shutter opening and closing.
The lower the shutter value, the less motion blur will be visible in your animation.
Similarly, changing the «Max Blur» also changes the radius that the motion blur affects your scene, and hence reducing this value also reduces the overall blur in an animation.
Sample Count
A lower sample count is bound to make your render more pixelated and hence more blurry, with this effect being felt even more in animations. Lower sample counts give an uneven «grainy» effect on the render, and since this grain might not be consistent between frames this might lead to extra visible blur in an image sequence.
To fix this issue, simply change the render sampling number under the «Render Properties» tab.
This setting can be changed in the same way when using the Eevee render engine as well.
Light Paths
In Cycles, reducing the light paths are a very effective way to significantly reduce render times of images, which is preferable for animation renders with many hundreds of frames.
However, a low light path count can also lead to more blurry animations. Try playing around with the total number of light paths in your scene, found under the «Render Properties» tab in the properties panel, until the blurring is reduced.
The individual number of light paths for diffuse, transmission, etc. can also be changed individually in order to get higher quality for certain parts of your scene compared to others.
Animation bar (timeline) is gone
If the animation bar is gone or you can’t find it, you simply need to reopen the timeline editor in a new area or switch an existing area to display the timeline.
In order to open the timeline in a new area, hover over a corner of your 3D workspace until a + shaped cursor appears. Hold and drag this corner to create a new area. This area can now be set to show the timeline of your animation by opening the «Editor Type» dropdown and selecting «Timeline» editor under the animation section.
Choppy, jittery animation playback
Similar to a blurry animation, a choppy or jittery animation could be caused due to a multitude of reasons.
One of the most common reasons is if the scene is too complex or has too many elements, causing the software to struggle with rendering it smoothly.
Simplifying the animation or reducing the number of elements can help resolve this issue. This includes reducing the number of particles for any particle systems (especially in the viewport), or even reducing the number of polys for a detailed mesh.
Another way to simplify a scene is by changing textures or lighting in the scene. This includes reducing transmission surfaces or adjusting materials with high amounts of subsurface scattering.
When working with the Cycles rendering engine, always ensure that the render device is set to «GPU Compute» and not «CPU», as in most cases the CPU is significantly slower at computing. Changing this one option can make a major difference in render times and can hence improve choppy playback.
The animation doesn’t play
The shortcut to play an animation in Blender is the Spacebar key. In case this does not play the animation, you can press the «Play Animation» button shown as a right-facing arrow at the top of the timeline editor.
It is also important to ensure the animated keyframes are within the starting and end keyframe numbers, shown at the top-right corner of the timeline.
If the above solutions do not work, it is possible that there may be a problem with the computer’s performance. This can be resolved by closing other programs and increasing the amount of memory allocated to Blender, or simplifying the scene as mentioned above.
Lastly, it is possible that a problem may exist in the file itself. In this case, it may be necessary to go back to a previous save or start a new file to ensure that the animation will play properly.
Keyframe is not showing
The keyframe not showing in the timeline can be for one simple reason: by default, the timeline editor only shows keyframes for selected objects. Hence, to solve this problem, ensure you’ve selected the animated object(s) in the 3D viewport or in the object outliner.
If you would like to see the keyframes of all objects at all times, even if they are deselected, simply disable the «Only Keyframes from Selected Channels» under the «View» dropdown in the top-left corner of the timeline editor.
If the animation type is set to non-linear, certain keyframes might also only be visible in the «Non-linear animation» editor, instead of the timeline editor.
Keyframe is not working
Most of the times, a keyframe not working may be solved by making sure that you have selected the correct object or bone that you want to animate. Keyframes will only be applied to the selected object or bone.
Moreover, make sure to check that you apply the keyframe for the correct attribute. For example, if you change the location of an object, ensure that you select the «Location» attribute from the menu after you press the I key.
Keyframes could also not work if you have muted the channel that you have animated. To unmute this, follow these steps:
- On the left side of the timeline editor, locate and press the small > arrow to open the summary menu at the side of the editor.
- Click on the «Summary» tab to expand all the animation channels and select the object you are currently animating.
- Enable the small checkbox next to the animated attribute by clicking on it once (ensure it is checked), or right click on the attribute and select «Unmute channel».
Animation not moving when playing
To solve this issue, make sure the animated keyframes are within the range of start and end frames for the animation.
Once more, another common reason for the issue might be due to the scene being too complex and the hardware not being able to handle the number of elements. To solve this, reduce the number of particles, simplify textures, etc.
Always double-check that you are on the latest version of Blender, as this may also cause issues with animation playback.
Animation is not rendering
By far, one of the most common of all these problems faced by beginner users is the animation itself not rendering, and the issue mostly lies behind render settings.
First, ensure you have selected a valid output folder for the rendered animation to be saved to. Unlike a single frame or image render, the user does not need to manually save the rendered image as each frame is automatically saved to the output folder before the software moves onto the next frame. To change the output folder, simply head to the output tab in the properties editor (indicated by a printer icon), select the file icon underneath the «Output» heading, and use the Blender File View to locate an output folder.
It is also preferred to render the animation as a series of PNG images rather than a single FFmpeg video, which can be changed using the dropdown for the «File Format» settings. This way, if you face any issues halfway through the render, you will not need to render the first frames again as they are all already individually saved.
In order to convert the series of PNG images into a single animated video, you must:
- Open a new Blender «Video Editing» file
- Drag and drop the sequence of images onto the timeline
- Change the output settings to match that of the original animation, and set the file format to a movie format, for example FFmpeg video.
- Render the animation as usual and the video editor will compile the PNG sequence into a singular video.
Following this simple workflow helps avoid a lot of different issues regarding the animation not rendering.
As mentioned before, an animation may also have difficulty rendering if the scene is too complex for your PC or laptop’s hardware to handle. Try simplifying the scene and, if you are working with the Cycles render engine, ensure you are rendering using the GPU and not CPU.
Final thoughts
And there you have it — we’ve gone over some of the most commonly occurring problems faced while animating in Blender, why they might occur, and how to solve them. Quite often, problems might arise due to a mix of the above mentioned factors, so always try to troubleshoot in a few different ways.
Thanks for your time!