When my application is running i am getting the android runtime error java.lang.IndexOutOfBoundsException. How to handle it?
The following is my stack trace:
07-05 17:34:31.906: ERROR/AndroidRuntime(657): Uncaught handler: thread main exiting due to uncaught exception
07-05 17:34:31.937: ERROR/AndroidRuntime(657): java.lang.IndexOutOfBoundsException
07-05 17:34:31.937: ERROR/AndroidRuntime(657):     at java.util.LinkedList.get(LinkedList.java:453)
07-05 17:34:31.937: ERROR/AndroidRuntime(657):     at com.ibkr.roadbrake.RB_UpcomingExits$UpcomingResultsListViewAdapter2.getView(RB_UpcomingExits.java:2232)
07-05 17:34:31.937: ERROR/AndroidRuntime(657):     at com.ibkr.roadbrake.RB_UpcomingExits$8.onClick(RB_UpcomingExits.java:3921)
07-05 17:34:31.937: ERROR/AndroidRuntime(657):     at android.view.View.performClick(View.java:2364)
07-05 17:34:31.937: ERROR/AndroidRuntime(657):     at android.view.View.onTouchEvent(View.java:4179)
07-05 17:34:31.937: ERROR/AndroidRuntime(657):     at android.view.View.dispatchTouchEvent(View.java:3709)
07-05 17:34:31.937: ERROR/AndroidRuntime(657):     at android.view.ViewGroup.dispatchTouchEvent(ViewGroup.java:852)
07-05 17:34:31.937: ERROR/AndroidRuntime(657):     at android.view.ViewGroup.dispatchTouchEvent(ViewGroup.java:884)
07-05 17:34:31.937: ERROR/AndroidRuntime(657):     at android.view.ViewGroup.dispatchTouchEvent(ViewGroup.java:884)
07-05 17:34:31.937: ERROR/AndroidRuntime(657):     at android.view.ViewGroup.dispatchTouchEvent(ViewGroup.java:884)
07-05 17:34:31.937: ERROR/AndroidRuntime(657):     at android.view.ViewGroup.dispatchTouchEvent(ViewGroup.java:884)
07-05 17:34:31.937: ERROR/AndroidRuntime(657):     at android.view.ViewGroup.dispatchTouchEvent(ViewGroup.java:884)
07-05 17:34:31.937: ERROR/AndroidRuntime(657):     at android.view.ViewGroup.dispatchTouchEvent(ViewGroup.java:884)
07-05 17:34:31.937: ERROR/AndroidRuntime(657):     at com.android.internal.policy.impl.PhoneWindow$DecorView.superDispatchTouchEvent(PhoneWindow.java:1659)
07-05 17:34:31.937: ERROR/AndroidRuntime(657):     at com.android.internal.policy.impl.PhoneWindow.superDispatchTouchEvent(PhoneWindow.java:1107)
07-05 17:34:31.937: ERROR/AndroidRuntime(657):     at android.app.Activity.dispatchTouchEvent(Activity.java:2061)
07-05 17:34:31.937: ERROR/AndroidRuntime(657):     at com.android.internal.policy.impl.PhoneWindow$DecorView.dispatchTouchEvent(PhoneWindow.java:1643)
07-05 17:34:31.937: ERROR/AndroidRuntime(657):     at android.view.ViewRoot.handleMessage(ViewRoot.java:1691)
07-05 17:34:31.937: ERROR/AndroidRuntime(657):     at android.os.Handler.dispatchMessage(Handler.java:99)
07-05 17:34:31.937: ERROR/AndroidRuntime(657):     at android.os.Looper.loop(Looper.java:123)
07-05 17:34:31.937: ERROR/AndroidRuntime(657):     at android.app.ActivityThread.main(ActivityThread.java:4363)
07-05 17:34:31.937: ERROR/AndroidRuntime(657):     at java.lang.reflect.Method.invokeNative(Native Method)
07-05 17:34:31.937: ERROR/AndroidRuntime(657):     at java.lang.reflect.Method.invoke(Method.java:521)
07-05 17:34:31.937: ERROR/AndroidRuntime(657):     at com.android.internal.os.ZygoteInit$MethodAndArgsCaller.run(ZygoteInit.java:860)
07-05 17:34:31.937: ERROR/AndroidRuntime(657):     at com.android.internal.os.ZygoteInit.main(ZygoteInit.java:618)
07-05 17:34:31.937: ERROR/AndroidRuntime(657):     at dalvik.system.NativeStart.main(Native Method)
![]()
asked Jul 5, 2011 at 12:11
![]()
so… in getCount method of your adapter …. do this
public int getCount(){

  int size = 1;
  if(arralyst !=null){

    size = arraylist.size();
  }
  return size;
}
answered Jul 5, 2011 at 12:19
![]()
success_anilsuccess_anil
3,6593 gold badges27 silver badges31 bronze badges
1
It means you are trying to access an item in an array over it’s limit. That is to say you are trying to access the 6th element in a 5-element list.
Hope that makes sense, unless you post some code I cannot help you further…
answered Jul 5, 2011 at 12:14
![]()
1
The IndexOutOfBoundsException means that you are trying to access an element in an array (or List) which does not exist. Here an example:
    int[] array = {0,1,2};
    Log.v("Name", array[5]);
This example code tries to access the sixth element of the array, but only three elements exist.
Search your class and function in the StackTrace which cause the error and then check why you get the exception.
answered Jul 5, 2011 at 12:17
![]()
GerdGerd
791 silver badge9 bronze badges
If you have a header or footer view in the list — don’t forget to adjust the click position when getting an item in your UpcomingResultsListViewAdapter2.
answered Jul 5, 2011 at 12:20
![]()
JBMJBM
2,9302 gold badges24 silver badges28 bronze badges
Besides the obvious — explicitly accessing an index which doesn’t exist — this error commonly occurs when you are iterating over a List and within your loop, you remove an element:
for (Foo foo : list) {
    if (isBar(foo)) {
        list.remove(foo);
    }
}
The iterator doesn’t know about the changes, and it can throw an exception.
answered Jul 5, 2011 at 12:20
![]()
Zack MarrapeseZack Marrapese
12.1k9 gold badges51 silver badges69 bronze badges
While trying to run my app on handset, when I am trying to go from one activity to other its throwing error Unfortunately app has stopped ! & When I checked in Logcat I’m getting following error messages…
12-07 03:12:57.958  17518-17518/com.android.mads.madses E/AndroidRuntime﹕ FATAL EXCEPTION: main
    Process: com.android.mads.madses, PID: 17518
    java.lang.NoClassDefFoundError: Failed resolution of: Landroid/support/v7/internal/widget/TintManager;
            at android.support.design.widget.TabLayout$TabView.<init>(TabLayout.java:1145)
            at android.support.design.widget.TabLayout.createTabView(TabLayout.java:635)
            at android.support.design.widget.TabLayout.addTabView(TabLayout.java:669)
            at android.support.design.widget.TabLayout.addTab(TabLayout.java:365)
            at android.support.design.widget.TabLayout.addTab(TabLayout.java:340)
            at android.support.design.widget.TabLayout.setTabsFromPagerAdapter(TabLayout.java:624)
            at android.support.design.widget.TabLayout.setupWithViewPager(TabLayout.java:595)
            at com.android.mads.madses.RegisterActivity.onCreate(RegisterActivity.java:35)
            at android.app.Activity.performCreate(Activity.java:5953)
            at android.app.Instrumentation.callActivityOnCreate(Instrumentation.java:1128)
            at android.app.ActivityThread.performLaunchActivity(ActivityThread.java:2267)
            at android.app.ActivityThread.handleLaunchActivity(ActivityThread.java:2388)
            at android.app.ActivityThread.access$800(ActivityThread.java:148)
            at android.app.ActivityThread$H.handleMessage(ActivityThread.java:1292)
            at android.os.Handler.dispatchMessage(Handler.java:102)
            at android.os.Looper.loop(Looper.java:135)
            at android.app.ActivityThread.main(ActivityThread.java:5312)
            at java.lang.reflect.Method.invoke(Native Method)
            at java.lang.reflect.Method.invoke(Method.java:372)
            at com.android.internal.os.ZygoteInit$MethodAndArgsCaller.run(ZygoteInit.java:901)
            at com.android.internal.os.ZygoteInit.main(ZygoteInit.java:696)
     Caused by: java.lang.ClassNotFoundException: Didn't find class "android.support.v7.internal.widget.TintManager" on path: DexPathList[[zip file "/data/app/com.android.mads.madses-2/base.apk"],nativeLibraryDirectories=[/vendor/lib, /system/lib]]
            at dalvik.system.BaseDexClassLoader.findClass(BaseDexClassLoader.java:56)
            at java.lang.ClassLoader.loadClass(ClassLoader.java:511)
            at java.lang.ClassLoader.loadClass(ClassLoader.java:469)
            at android.support.design.widget.TabLayout$TabView.<init>(TabLayout.java:1145)
            at android.support.design.widget.TabLayout.createTabView(TabLayout.java:635)
            at android.support.design.widget.TabLayout.addTabView(TabLayout.java:669)
            at android.support.design.widget.TabLayout.addTab(TabLayout.java:365)
            at android.support.design.widget.TabLayout.addTab(TabLayout.java:340)
            at android.support.design.widget.TabLayout.setTabsFromPagerAdapter(TabLayout.java:624)
            at android.support.design.widget.TabLayout.setupWithViewPager(TabLayout.java:595)
            at com.android.mads.madses.RegisterActivity.onCreate(RegisterActivity.java:35)
            at android.app.Activity.performCreate(Activity.java:5953)
            at android.app.Instrumentation.callActivityOnCreate(Instrumentation.java:1128)
            at android.app.ActivityThread.performLaunchActivity(ActivityThread.java:2267)
            at android.app.ActivityThread.handleLaunchActivity(ActivityThread.java:2388)
            at android.app.ActivityThread.access$800(ActivityThread.java:148)
            at android.app.ActivityThread$H.handleMessage(ActivityThread.java:1292)
            at android.os.Handler.dispatchMessage(Handler.java:102)
            at android.os.Looper.loop(Looper.java:135)
            at android.app.ActivityThread.main(ActivityThread.java:5312)
            at java.lang.reflect.Method.invoke(Native Method)
            at java.lang.reflect.Method.invoke(Method.java:372)
            at com.android.internal.os.ZygoteInit$MethodAndArgsCaller.run(ZygoteInit.java:901)
            at com.android.internal.os.ZygoteInit.main(ZygoteInit.java:696)
    Suppressed: java.lang.ClassNotFoundException: android.support.v7.internal.widget.TintManager
            at java.lang.Class.classForName(Native Method)
            at java.lang.BootClassLoader.findClass(ClassLoader.java:781)
            at java.lang.BootClassLoader.loadClass(ClassLoader.java:841)
            at java.lang.ClassLoader.loadClass(ClassLoader.java:504)
            ... 22 more
     Caused by: java.lang.NoClassDefFoundError: Class not found using the boot class loader; no stack available
Can anybody please help?
Code:
Main RegisterActivity (Parent Tab Activity)
package com.android.mads.madses;

import android.os.Bundle;
import android.support.design.widget.TabLayout;
import android.support.v4.app.Fragment;
import android.support.v4.app.FragmentManager;
import android.support.v4.app.FragmentPagerAdapter;
import android.support.v4.view.ViewPager;
import android.support.v7.app.AppCompatActivity;
import android.support.v7.widget.Toolbar;

import java.util.ArrayList;
import java.util.List;


public class RegisterActivity extends AppCompatActivity{
    private Toolbar toolbar;
    private TabLayout tabLayout;
    private ViewPager viewPager;

    @Override
    protected void onCreate(Bundle savedInstanceState) {
        super.onCreate(savedInstanceState);
        setContentView(R.layout.activity_register);

        toolbar = (Toolbar) findViewById(R.id.toolbar);
        setSupportActionBar(toolbar);
        getSupportActionBar().setDisplayHomeAsUpEnabled(true);

        viewPager = (ViewPager) findViewById(R.id.viewpager);
        setupViewPager(viewPager);

        tabLayout = (TabLayout) findViewById(R.id.tabs);
        tabLayout.setupWithViewPager(viewPager);
    }

    private void setupViewPager(ViewPager viewPager) {
        ViewPagerAdapter adapter = new ViewPagerAdapter(getSupportFragmentManager());

        adapter.addFrag(new LoginInfoFragment(), "LoginInfo");
        adapter.addFrag(new PersonalInfoFragment(), "PersonalInfo");
        adapter.addFrag(new ContactInfoFragment(), "ContactInfo");
        adapter.addFrag(new VechicleInfoFragment(), "VechicleInfo");
        viewPager.setAdapter(adapter);
    }

    class ViewPagerAdapter extends FragmentPagerAdapter {
        private final List<Fragment> mFragmentList = new ArrayList<>();
        private final List<String> mFragmentTitleList = new ArrayList<>();

        public ViewPagerAdapter(FragmentManager manager) {
            super(manager);
        }

        @Override
        public Fragment getItem(int position) {
            return mFragmentList.get(position);
        }

        @Override
        public int getCount() {
            return mFragmentList.size();
        }

        public void addFrag(Fragment fragment, String title) {
            mFragmentList.add(fragment);
            mFragmentTitleList.add(title);
        }

        @Override
        public CharSequence getPageTitle(int position) {
            return mFragmentTitleList.get(position);
        }
    }


}
One of the Fragment Activity (all other fragment have same code)
package com.android.mads.madses;

import android.support.v4.app.Fragment;
import android.os.Bundle;
import android.view.LayoutInflater;
import android.view.View;
import android.view.ViewGroup;

/**
 * Created by Administrator on 07-12-2015.
 */
public class VechicleInfoFragment extends Fragment{

    public VechicleInfoFragment(){

    }

    @Override
    public void onCreate(Bundle savedInstanceState) {

        super.onCreate(savedInstanceState);
    }

    @Override
    public View onCreateView(LayoutInflater inflater, ViewGroup container,
                             Bundle savedInstanceState) {
        // Inflate the layout for this fragment
        return inflater.inflate(R.layout.fragment_vechicleinfo , container, false);
    }
}
Login Activity (Here when i click ‘Dont have an account? Signup here’ app stopped)
package com.android.mads.madses;

import android.app.Activity;
import android.app.ProgressDialog;
import android.content.Intent;
import android.graphics.Paint;
import android.support.v7.app.AppCompatActivity;
import android.os.Bundle;
import android.util.Log;
import android.view.Menu;
import android.view.MenuItem;
import android.view.View;
import android.widget.Button;
import android.widget.EditText;
import android.widget.Toast;

import com.android.mads.app.AppConfig;
import com.android.mads.app.AppController;
import com.android.mads.helper.SQLiteHandler;
import com.android.mads.helper.SessionManager;
import com.android.volley.Request;
import com.android.volley.Response;
import com.android.volley.VolleyError;
import com.android.volley.toolbox.StringRequest;

import org.json.JSONException;
import org.json.JSONObject;

import java.util.HashMap;
import java.util.Map;

public class LoginActivity extends Activity {

    private EditText ed_email, ed_password;
    private Button btn_login, btn_newUser;
    private ProgressDialog pDialog;

    private SessionManager session;
    private SQLiteHandler db;

    private static final String TAG = LoginActivity.class.getSimpleName();

    @Override
    protected void onCreate(Bundle savedInstanceState) {
        super.onCreate(savedInstanceState);
        setContentView(R.layout.activity_login);

        ed_email = (EditText) findViewById(R.id.edtxt_login_email);
        ed_password = (EditText) findViewById(R.id.edtxt_login_password);
        btn_login = (Button) findViewById(R.id.btn_login);
        btn_newUser = (Button) findViewById(R.id.btn_login_newUser);
        pDialog = new ProgressDialog(this);

        session = new SessionManager(getApplicationContext());
        db = new SQLiteHandler(getApplicationContext());

        if (session.isLoggedIn()) {
            Intent i = new Intent(LoginActivity.this, HomeActivity.class);
            startActivity(i);
            finish();
        }

        btn_login.setOnClickListener(new View.OnClickListener() {
            @Override
            public void onClick(View v) {
                String email = ed_email.getText().toString();
                String password = ed_password.getText().toString();

                if (email.isEmpty() || password.isEmpty()) {
                    Toast.makeText(LoginActivity.this, "Please Enter Details", Toast.LENGTH_LONG);
                } else {
                    checkLogin(email, password);
                }
            }
        });

        btn_newUser.setPaintFlags(btn_newUser.getPaintFlags() | Paint.UNDERLINE_TEXT_FLAG);
        btn_newUser.setOnClickListener(new View.OnClickListener() {
            @Override
            public void onClick(View v) {
                Intent i = new Intent(LoginActivity.this, RegisterActivity.class);
                startActivity(i);
                finish();
            }
        });

    }

    public void checkLogin(final String email, final String password) {
        String tag_req = "login_request";
        pDialog.setMessage("Logging In...");
        showDialog();

        final StringRequest strR = new StringRequest(
                Request.Method.POST, AppConfig.LOGIN_URL,
                new Response.Listener<String>() {
                    @Override
                    public void onResponse(String response) {
                        hideDialog();

                        try {
                            JSONObject jsb = new JSONObject(response);
                            boolean error = jsb.getBoolean("error");
                            if (!error) {
                                String uid = jsb.getString("uid");

                                JSONObject user = jsb.getJSONObject("user");
                                String fname = user.getString("fname");
                                String lname = user.getString("lname");
                                String email = user.getString("email");
                                String dob = user.getString("dob");
                                String address = user.getString("address");
                                String bloodgroup = user.getString("bloodgroup");
                                String contact1 = user.getString("contact1");
                                String contact2 = user.getString("contact2");
                                String vechiclename = user.getString("vechiclename");
                                String fueltype = user.getString("fueltype");
                                String mileage = user.getString("mileage");
                                String created_at = user.getString("created_at");
                                db.addUser(uid, fname, lname, email, dob,
                                        address, bloodgroup, contact1, contact2,
                                        vechiclename, fueltype, mileage, created_at);

                                session.setLogin(true);

                                Intent i = new Intent(LoginActivity.this, HomeActivity.class);
                                startActivity(i);
                                finish();
                            } else {
                                String error_msg = jsb.getString("error_msg");
                                Toast.makeText(LoginActivity.this, error_msg, Toast.LENGTH_LONG).show();
                            }
                        } catch (JSONException e) {
                            e.printStackTrace();
                        }
                    }
                },
                new Response.ErrorListener() {
                    @Override
                    public void onErrorResponse(VolleyError error) {
                        Log.d("TAG ", error.getMessage());
                    }
                }
        ) {
            public Map<String, String> getParams() {
                Map<String, String> p = new HashMap<String, String>();
                p.put("tag", "login");
                p.put("email", email);
                p.put("password", password);

                return p;
            }
        };

        AppController.getmInstance().addToRequestQueue(strR, tag_req);

    }

    public void showDialog() {
        if (!pDialog.isShowing()) {
            pDialog.show();
        }
    }

    public void hideDialog() {
        if (pDialog.isShowing()) {
            pDialog.dismiss();
        }
    }
}
build.gradle
    apply plugin: 'com.android.application'

android {
    compileSdkVersion 23
    buildToolsVersion "23.0.1"

    defaultConfig {
        applicationId "com.android.mads.madses"
        minSdkVersion 15
        targetSdkVersion 23
        versionCode 1
        versionName "1.0"
    }
    buildTypes {
        release {
            minifyEnabled false
            proguardFiles getDefaultProguardFile('proguard-android.txt'), 'proguard-rules.pro'
        }
    }
}

dependencies {
    compile fileTree(dir: 'libs', include: ['*.jar'])
    compile 'com.android.support:appcompat-v7:23.1.1'
    compile 'com.android.support:design:23.1.1'
    compile project (":volley")
}
Overview
When building Android apps, your app is bound to crash from time to time or exhibit strange unexpected behavior. You know you have experienced a runtime exception when you see this in your emulator or device:

Don’t worry though! This is totally normal and there’s a specific set of steps you can take to solve these. Refer to our guide below and/or these debugging slides for more a detailed look at debugging crashes and investigating unexpected problems with your app.
Debugging Mindset
As an Android developer, you’ll need to cultivate a «debugging mindset» as well as build up defensive programming practices that make writing error-prone code less likely. In addition, you’ll often find yourself in the role of a coding investigator in order to understand where and why an app is crashing or not working as expected. A few key principles about debugging are captured below:
- Just because a program runs, doesn’t mean it’s going to work as you expected. This class of issues are known as runtime errors. This is contrast to compile-time errors which prevent an app from running and are often easier to catch.
- Think of debugging as an opportunity to fill gaps in knowledge. Debugging is an opportunity to understand your app better than you did before and hopefully sharpen your ability to write correct code in the future by programming defensively.
- Debugging is a vital part of the software development process. Often you may find yourself on some days spending more time debugging crashes or unexpected behavior then writing new code. This is entirely normal as a mobile engineer.
Debugging Principles
The following high-level principles should be applied when faced with an unexpected app behavior during investigation:
- Replicate. Convince yourself that there is an issue in the code that can be repeatedly reproduced by following the same steps. Before assuming the code is broken, try restarting the emulator, trying the app on a device and/or fully re-building the app.
- Reduce. Try to isolate or reduce the code surrounding the issue and figure out the simplest way to reproduce what’s occurring. Comment out or remove extraneous code that could be complicating the issue.
- Research. If you are running into a major unexpected issue, you are probably not alone. Search Google for the behavior using any descriptive identifiers. Visit the issue tracker for the component you are seeing issues with. Search stackoverflow for posts about the same issue.
Armed with this mindset and the above principles, let’s take a look at how to debug and investigate issues that arise within our apps.
Debugging Procedure
When you see your app crash and close, the basic steps for diagnosing and resolving this are outlined below:
- Find the final exception stack trace within the Android Monitor (logcat)
- Identify the exception type, message, and file with line number
- Open the file within your app and find the line number
- Look at the exception type and message to diagnose the problem
- If the problem is not familiar, google around searching for answers
- Make fixes based on the proposed solutions and re-run the app
- Repeat until the crash no longer occurs
This process nearly always starts with an unexpected app crash as we’ll see below.
Witnessing the Crash
Suppose we were building a simple movie trailer app called Flixster that lets the users browse new movies and watch trailers from Youtube. Imagine we ran the app, and we wanted to play the trailer and we saw this crash instead:

First off though when you see the crash dialog, don’t press OK on that dialog until after you’ve already went through these steps below to identify the stacktrace details.
Setting Up Error Filter
First, within Android Studio, be sure to setup your Android Monitor to filter for «Errors» only to reduce noise:

- Select «Error» as the log level to display
- Select «Show only selected application» to filter messages
This will set you up to see only serious issues as they come up.
Note: See this blog post for improving the coloring of errors or logs in LogCat and for other related tools.
Find the Stack Trace
Now let’s go into Android Studio and select open up the «Android Monitor». Expand the monitor so you can read the log messages easily.
- Scroll to the bottom of the error looking for a line that says
Caused byall the way at the bottom of the stack trace block. The «original cause» towards the bottom of the block is the important part of the error, ignore most of the rest of the stack trace above that. - Locate that bottom-most
Caused byline as well as the line that has the blue link with the name of your activity i.eVideoActivity.java:13. Copy them onto your clipboard and paste them both into a separate text file for easy review.
In this case the bottom-most «Caused by» line and the adjacent blue file link copied together looks like:
Caused by: java.lang.NullPointerException: Attempt to invoke virtual method
 'java.lang.String android.content.Intent.getStringExtra(java.lang.String)'
 on a null object reference
      at com.codepath.flixster.VideoActivity.<init>(VideoActivity.java:13)
Note that the top part of the stack trace block above that line noting FATAL EXCEPTION and the first portion with the java.lang.RuntimeException are much more generic errors and are less useful than that final bottom-most «Caused by» exception captured above which points to the real culprit.
Identify the Exception
Next, we need to identify the actual issue that this stack trace is warning us about. To do this, we need to identify the following elements of the problem:
- File name
- Line number
- Exception type
- Exception message
Consider the exception we copied above:
This exception needs to be translated to identifying the following elements:
| Element | Identified culprit |
|---|---|
| Filename | VideoActivity.java |
| Line Number | Line 13 |
| Exception Type | java.lang.NullPointerException |
| Exception Message | Attempt to invoke virtual method 'java.lang.String android.content.Intent.getStringExtra(java.lang.String)' on a null object reference |
Open the Offending File
Next, we need to open up the offending file and line number. In this case, the VideoActivity.java to line 13 which looks like this:
public class VideoActivity extends YouTubeBaseActivity{
    // -----> LINE 13 is immediately below <--------
    String videoKey = getIntent().getStringExtra("video_key");

    // ...
    protected void onCreate(Bundle savedInstanceState) {
       // ....
    }
}
Therefore, we know the crash is happening on line 13:
String videoKey = getIntent().getStringExtra("video_key");
This is a great first step to now solving the problem because we know exactly where the exception is being triggered.
Diagnose the Problem
Next, we need to use the exception type and message to diagnose the problem at that line. The type in this case is java.lang.NullPointerException and the message was Attempt to invoke virtual method 'java.lang.String android.content.Intent.getStringExtra(java.lang.String)' on a null object reference.
The type is the most important part because there are a limited number of types. If the type is java.lang.NullPointerException then we know that some object is null when it shouldn’t be. In other words, we are calling a method on an object or passing an object that is null (has no value). This usually means we forgot to set the value or the value is being set incorrectly.
The message above gives you the specifics that the method getStringExtra is being called on a null object. This tell us that getIntent() is actually null since this is the object getStringExtra is being called on. That might seem strange, why is the getIntent() null here? How do we fix this?
Google for the Exception
Often we won’t know what is going wrong even after we’ve diagnosed the issue. We know that «getIntent() is null and shouldn’t be». But we don’t know why or how to fix.
At this stage, we need to google cleverly for the solution. Any problem you have, stackoverflow probably has the answer. We need to identify a search query that is likely to find us answers. The recipe is generally a query like android [exception type] [partial exception message]. The type in this case is java.lang.NullPointerException and the message was Attempt to invoke virtual method 'java.lang.String android.content.Intent.getStringExtra(java.lang.String)' on a null object reference.
We might start by googling: android java.lang.NullPointerException android.content.Intent.getStringExtra(java.lang.String). These results get returned.
You generally want to look for «stackoverflow» links but in this case, the first result is this other forum.
Scroll to the bottom and you will find this message by the original author:
I realize my mistake now. I was calling the getIntent() method outside of the onCreate method.
As soon as I moved the code calling getIntent() inside the onCreate method it’s all working fine.
Let’s give this solution a try! He seems to suggest the issue is that getIntent() is being called outside of the onCreate block and we need to move it inside that method.
Address the Problem
Based on the advice given on stackoverflow or other sites from Google, we can then apply a potential fix. In this case, the VideoActivity.java can then be changed to:
public class VideoActivity extends YouTubeBaseActivity{
    // ...move the call into the onCreate block
    String videoKey; // declare here
    protected void onCreate(Bundle savedInstanceState) {
       // ....
       // set the value inside the block
       videoKey = getIntent().getStringExtra("video_key");
    }
}
Now, we can run the app and see if things work as expected!
Verify the Error is Fixed
Let’s re-run the app and try this out again:

Great! The exception seems to have been fixed!
Rinse and Repeat
Sometimes the first fix we try after googling doesn’t work. Or it makes things worse. Sometimes the solutions are wrong. Sometimes we have to try different queries. Here’s a few guidelines:
- It’s normal to have to try 3-4 solutions before one actually works.
- Try to stick with stackoverflow results from Google first
- Open up multiple stackoverflow pages and look for answers you see repeated multiple times
- Look for stackoverflow answers that have a green check mark and many upvotes.
Don’t get discouraged! Look through a handful of sites and you are bound to find the solution in 80% of cases as long as you have the right query. Try multiple variations of your query until you find the right solution.
In certain cases, we need to investigate the problem further. The methods for investigating why something is broken are outlined below.
Investigation Methodologies
In addition to finding and googling errors, often additional methods have to be applied to figure out what is going wrong. This usually becomes helpful when something isn’t as we expected in the app and we need to figure out why. The three most common investigation techniques in Android are:
- Toasts — Using toasts to alert us to failures
- Logging — Using the logging system to print out values
- Breakpoints — Using the breakpoint system to investigate values
Both methods are intended for us to be able to determine why a value isn’t as we expect. Let’s take a look at how to use each.
Let’s start with the same app from above and suppose we are trying to get the app so that when the image at the top of the movie details page is clicked, then the movie trailer begins playing.
public class InfoActivity extends YouTubeBaseActivity {
    private ImageView backdropTrailer;
    private String videoKey;

    protected void onCreate(Bundle savedInstanceState) {
        super.onCreate(savedInstanceState);
        setContentView(R.layout.activity_info);
        // ...
        backdropTrailer = (ImageView) findViewById(R.id.ivPoster);
        // Trigger video when image is clicked
        backdropTrailer.setOnClickListener(new View.OnClickListener() {
            @Override
            public void onClick(View view) {
                // Launch youtube video with key if not null
                if (videoKey != null) {
                    Intent i = new Intent(InfoActivity.this, VideoActivity.class);
                    i.putExtra("videoKey", videoKey);
                    startActivity(i);
                }
            }
        });
    }
}
Unfortunately when testing, we see that the trailer does not come up as expected when we run the app and click the top image:
Why doesn’t the video launch when you click on the image as expected? Let’s investigate.
Notifying Failure with Toasts
The video activity isn’t launching when the user presses the image but let’s see if we can narrow down the problem. First, let’s add a toast message to make sure we can begin to understand the issue. Toasts are messages that popup within the app. For example:
Toast.makeText(this, "Message saved as draft.", Toast.LENGTH_SHORT).show();
would produce:
In InfoActivity.java, we will add the following toast message inside the onClick listener method:
public class InfoActivity extends YouTubeBaseActivity {
    // ...
    protected void onCreate(Bundle savedInstanceState) {
        super.onCreate(savedInstanceState);
        setContentView(R.layout.activity_info);
        // ...
        backdropTrailer = (ImageView) findViewById(R.id.ivPoster);
        backdropTrailer.setOnClickListener(new View.OnClickListener() {
            @Override
            public void onClick(View view) {
                // Launch youtube video with key if not null
                if (videoKey != null) {
                    Intent i = new Intent(InfoActivity.this, VideoActivity.class);
                    i.putExtra("videoKey", videoKey);
                    startActivity(i);
                } else {
                    // ----> ADD A TOAST HERE. This means video key is null
                    Toast.makeText(InfoActivity.this, "The key is null!", Toast.LENGTH_SHORT).show();
                }
            }
        });
    }
}
With the toast added, running this again, we see the problem is confirmed:
The problem is that the youtube video key is null where as it should have a value. We haven’t fixed the problem, but we at least know what the initial issue is.
Using a toast message we can easily notify ourselves when something goes wrong in our app. We don’t even have to check the logs. Be sure to add toasts whenever there are failure cases for networking, intents, persistence, etc so you can easily spot when things go wrong.
Investigating using Logging
Next, let’s fix the problem the toast clarified for us. We now know the problem is that the youtube video key is null where as it should have a value. Let’s take a look at the method that fetches the video key for us:
public void fetchMovies(int videoId) {
    // URL should be: https://api.themoviedb.org/3/movie/246655/videos?api_key=KEY
    String url = "https://api.themoviedb.org/3/movie" + movie_id + "/videos?api_key=" + KEY;
    client.get(url, new JsonHttpResponseHandler(){
        @Override
        public void onSuccess(int statusCode, Headers headers, JSON response) {
            JSONArray movieJsonResults = null;
            try {
                movieJsonResults = response.getJSONArray("results");
                JSONObject result = movieJsonResults.getJSONObject(0);
                // Get the key from the JSON
                videoKey = result.getString("key");
            } catch (JSONException e) {
                e.printStackTrace();
            }
        }
    });
}
This method is somehow not fetching the key that we’d expect. Let’s start by logging inside the onSuccess method to see if we are getting inside there as we expect.
The Android logger is pretty easy to use. The log options are as follows:
| Level | Method |
|---|---|
| Verbose | Log.v() |
| Debug | Log.d() |
| Info | Log.i() |
| Warn | Log.w() |
| Error | Log.e() |
They are sorted by relevance with Log.i() being the least important one. The first parameter of these methods is the category string (can be any label we choose) and the second is the actual message to display.
We can use the logger by adding two lines to the code: one at the top before the network call and one inside onSuccess to see if they both display:
Log.e("VIDEOS", "HELLO"); // <------------ LOGGING
client.get(url, new JsonHttpResponseHandler(){
    @Override
    public void onSuccess(int statusCode, Headers headers, JSON response) {
        JSONArray movieJsonResults = null;
        try {
            // LOG the entire JSON response string below
            Log.e("VIDEOS", response.toString()); // <------------ LOGGING
            movieJsonResults = response.getJSONArray("results");
            JSONObject result = movieJsonResults.getJSONObject(0);
            videoKey = result.getString("key");
        } catch (JSONException e) {
            e.printStackTrace();
        }
    }
});
When running the app, the first log does show up as expected but the one inside onSuccess does not show up at all in the Android monitor:
Notice that we see HELLO but no other line logs. This means that we now know that the onSuccess method is never called. This means our network request sent out is failing for some reason. We are one step closer to fixing this issue.
Investigating using Breakpoints
In order to investigate why the network request sent out is failing, we are going to bring out the most powerful debugging tool we have which is the breakpointing engine in Android Studio which allows us to stop the app and investigate our environment thoroughly.
First, we have to decide at which points we want to stop the app and investigate. This is done by setting breakpoints. Let’s set two breakpoints to investigate the network request:
Now, we need to run the app using the «debugger» rather than the normal run command:
Once the debugger connects, we can click on the movie to trigger the code to run. Once the code hits the spot with a breakpoint, the entire code pauses and let’s us inspect everything:
Here we were able to inspect the URL and compare the URL against the expected value. Our actual URL was «https://api.themoviedb.org/3/movie246655/videos?api_key=KEY» while the expected URL was «https://api.themoviedb.org/3/movie/246655/videos?api_key=KEY». Extremely subtle difference. Can you spot it?
Then we can hit «resume» () to continue until the next breakpoint or stop debugging () to end the session.
Breakpoints are incredibly powerful and worthy of additional investigation. To learn more about breakpoints, check out this official Android Guide on debugging and this third-party breakpoints guide.
Fixing the Issue
Now that we know the issue is the URL being incorrectly formed, we can fix that in the original code in InfoActivity.java:
public void fetchMovies(int videoId) {
    // ADD trailing slash to the URL to fix the issue
    String url = "https://api.themoviedb.org/3/movie/" + // <----- add trailing slash
       movie_id + "/videos?api_key=" + KEY;
    client.get(url, new JsonHttpResponseHandler(){
      // ...same as before...
    });
}
and remove any old log statements we don’t need. Now, we can try running the app again:
Great! The video now plays exactly as expected!
Wrapping Up
In this section, we looked at three important ways to investigate your application:
- Toasts — Display messages inside the app emulator. Good for notifying you of common failure cases.
- Logs — Display messages in the Android monitor. Good to printing out values and seeing if code is running.
- Breakpoints — Halt execution of your code with breakpoints and inspect the entire environment to figure out which values are incorrect or what code hasn’t run.
With these tools and the power of Google, you should be well-equipped to debug any errors or issues that come up as you are developing your apps. Good luck!
References
- http://andressjsu.blogspot.com/2016/07/android-debugging.html
- https://developer.android.com/studio/debug/index.html
- http://blog.strv.com/debugging-in-android-studio-as/
- https://www.youtube.com/watch?v=2c1L19ZP5Qg
- https://docs.google.com/presentation/d/1DUigTm6Uh43vatHkB4rFkVVIt1zf7zB7Z5tpGTy2oFY/edit?usp=sharing
Definition
Some information relates to prerelease product that may be substantially modified before it’s released. Microsoft makes no warranties, express or implied, with respect to the information provided here.
Base class for all unchecked exceptions thrown by the Android frameworks.
Remarks
Portions of this page are modifications based on work created and shared by the Android Open Source Project and used according to terms described in the Creative Commons 2.5 Attribution License.
Constructors
A constructor used when creating managed representations of JNI objects; called by the runtime.
Fields
Properties
Returns the cause of this throwable or null if the cause is nonexistent or unknown.
(Inherited from Throwable) Class (Inherited from Throwable) Handle
The handle to the underlying Android instance.
(Inherited from Throwable) JniIdentityHashCode (Inherited from Throwable) JniPeerMembers LocalizedMessage
Creates a localized description of this throwable.
(Inherited from Throwable) Message
Returns the detail message string of this throwable.
(Inherited from Throwable) PeerReference (Inherited from Throwable) StackTrace (Inherited from Throwable) ThresholdClass
This API supports the Mono for Android infrastructure and is not intended to be used directly from your code.
This API supports the Mono for Android infrastructure and is not intended to be used directly from your code.
Methods
Appends the specified exception to the exceptions that were suppressed in order to deliver this exception.
(Inherited from Throwable) Dispose() (Inherited from Throwable) Dispose(Boolean) (Inherited from Throwable) FillInStackTrace()
Fills in the execution stack trace.
(Inherited from Throwable) GetStackTrace()
Provides programmatic access to the stack trace information printed by #printStackTrace() .
(Inherited from Throwable) GetSuppressed()
Returns an array containing all of the exceptions that were suppressed, typically by the try -with-resources statement, in order to deliver this exception.
(Inherited from Throwable) InitCause(Throwable)
Initializes the cause of this throwable to the specified value.
(Inherited from Throwable) PrintStackTrace()
Prints this throwable and its backtrace to the standard error stream.
(Inherited from Throwable) PrintStackTrace(PrintStream)
Prints this throwable and its backtrace to the standard error stream.
(Inherited from Throwable) PrintStackTrace(PrintWriter)
Prints this throwable and its backtrace to the standard error stream.
(Inherited from Throwable) SetHandle(IntPtr, JniHandleOwnership)
Sets the Handle property.
(Inherited from Throwable) SetStackTrace(StackTraceElement[])
Sets the stack trace elements that will be returned by #getStackTrace() and printed by #printStackTrace() and related methods.
(Inherited from Throwable) ToString() (Inherited from Throwable) UnregisterFromRuntime() (Inherited from Throwable)
Explicit Interface Implementations
| IJavaPeerable.Disposed() | (Inherited from Throwable) |
| IJavaPeerable.DisposeUnlessReferenced() | (Inherited from Throwable) |
| IJavaPeerable.Finalized() | (Inherited from Throwable) |
| IJavaPeerable.JniManagedPeerState | (Inherited from Throwable) |
| IJavaPeerable.SetJniIdentityHashCode(Int32) | (Inherited from Throwable) |
| IJavaPeerable.SetJniManagedPeerState(JniManagedPeerStates) | (Inherited from Throwable) |
| IJavaPeerable.SetPeerReference(JniObjectReference) | (Inherited from Throwable) |
Extension Methods
Performs an Android runtime-checked type conversion.
Источник
Полное руководство по обработке исключений в Java
Исключение — ошибка, которая нарушает нормальную работу программы. Java обеспечивает надежный объектно-ориентированный способ обработки исключений. Именно его мы и будем изучать в этом руководстве.
Обработка исключений в Java. Краткий обзор
Исключение может возникнуть в разного рода ситуациях: неправильные входные данные, аппаратный сбой, сбоя сетевого соединения, ошибка при работе с базой данных и т.д. Именно поэтому любой Java программист должен уметь правильно обрабатывать исключения, понимать причины их появления и следовать лучшим практикам работы с исключениями даже в небольших проектах.
Java — объектно-ориентированный язык программирования, поэтому всякий раз, когда происходит ошибка при выполнении инструкции, создается объект-исключение, а затем нормальный ход выполнения программы останавливается и JRE пытается найти кого-то, кто может справиться (обработать) это исключение. Объект-исключение содержит много информации об отладке, а именно номер строки, где произошло исключение, тип исключения и т.д.
Что и как происходит, когда появляется ошибка
Когда в методе происходит исключение, то процесс создания объекта-исключения и передачи его в Runtime Environment называется «бросать исключение».
После создания исключения, Java Runtime Environment пытается найти обработчик исключения.
Обработчик исключения — блок кода, который может обрабатывать объект-исключение.
Логика нахождения обработчика исключений проста — прежде всего начинается поиск в методе, где возникла ошибка, если соответствующий обработчик не найден, то происходит переход к тому методу, который вызывает этот метод и так далее.
У нас есть 3 метода, каждый из которых вызывает друг-друга: А -> В -> С (А вызывает В, а В вызывает С). Если исключение появляется в методе C, то поиск соответствующего обработчика будет происходить в обратном порядке: С -> В -> А (сначала там, где было исключение — в С, если там нет обработчика, то идем в метод В — если тут тоже нет, то идем в А).
Если соответствующий обработчик исключений будет найден, то объект-исключение передаётся обработчику.
Обработать исключение — значит «поймать исключение».
Если обработчик исключений не был найден, то программа завершает работу и печатает информации об исключении.
Обратите внимание, что обработка исключений в Java — это фреймворк, который используется только для обработки ошибок времени выполнения. Ошибки компиляции не обрабатываются рамках обработки исключений.
Основные элементы обработки исключений в Java
Мы используем определенные ключевые слова в для создания блока обработки исключений. Давайте рассмотрим их на примере. Также мы напишем простую программу для обработки исключений.
- Бросить исключение ( throw ) — ключевое слово, которое используется для того, чтобы бросить исключение во время выполнения. Мы знаем, что Java Runtime начинает поиск обработчика исключений как только оно будет брошено, но часто нам самим нужно генерировать исключение в нашем коде, например, в программе авторизации, если какое-то поле null . Именно для таких случаем и существует возможность бросить исключение.
- throws — когда мы бросаем исключение в методе и не обрабатываем его, то мы должны использовать ключевое слово throws в сигнатуре метода для того, чтобы пробросить исключение для обработки в другом методе. Вызывающий метод может обработать это исключение или пробросить его еще дальше с помощью throws в сигнатуре метода. Следует отметить, что пробрасывать можно сразу несколько исключений.
- Блок try-catch используется для обработки исключений в коде. Слово try — это начало блока обработки, catch — конец блока для обработки исключений. Мы можем использовать сразу несколько блоков catch при одном try . catch в качестве параметра принимает тип исключения для обработки.
- finally — необязательная завершающая конструкция блока try-catch . Как только исключение остановило процесс исполнения программы, в finally мы можем безопасно освободить какие-то открытые ресурсы. Следует отметить, что finally блок выполняется всегда — не смотря на появление исключительной ситуации.
Давайте посмотрим простую программу обработки исключений в Java.
А в консоле эта программа напишет такое:
Обратите внимание, что метод testException() бросает исключение, используя ключевое слово throw , а в сигнатуре метода используется ключевое слово throws , чтобы дать понять вызывающему методу тип исключений, которые может бросить testException() .
Важные моменты в обработке исключений:
- Нельзя использовать блоки catch или finally без блока try .
- Блок try также может быть использован только с catch блоком, или только с finally блоком, или с тем и другим блоком.
- Мы можем использовать несколько блоков catch только с одним try .
- try-catch блоки могут быть вложенными — этим они очень похожи на if-else конструкции.
- Мы можем использовать только один, блок finally в одном try-catch .
Иерархия исключений в Java
Java исключения являются иерархическими, а наследование используется для категоризации различных типов исключений. Throwable — родительский класс в иерархии Java исключений. Он имеет два дочерних объекта — Error и Exception . Исключения далее разделены на проверяемые исключения и исключения времени выполнения.
- Error — это тип ошибок, которые выходят за рамки вашей программы, их невозможно предвидеть или обработать. Это может быть аппаратный сбой, «поломка» JVM или ошибка памяти. Именно для таких необычных ситуаций есть отдельная иерархия ошибок. Мы должны просто знать, что такие ошибки есть и не можем справиться с такими ситуациями. Примеры Error : OutOfMemoryError и StackOverflowError .
- Проверяемые исключения (Checked Exceptions) — тип исключений, которые мы можем предвидеть в программе и попытаться обработать, например, FileNotFoundException . Мы должны поймать это исключение и написать внятное и полезное сообщение пользователю о том, что произошло (также желательно логировать ошибки). Exception — родительский класс всех проверяемых исключений (Checked Exceptions). Если мы бросили проверяемое исключение, то должны поймать его в том же методе или должны пробросить его с помощью ключевого слова throws .
- Runtime Exception — это ошибки программиста. Например, пытаясь получить элемент из массива, мы должны проверить длину массива, прежде чем пытаться получить элемент — в противном случае это может быть брошен ArrayIndexOutOfBoundException . RuntimeException — родительский класс для всех Runtime исключений. Если мы сами бросаем Runtime Exception в методе, то не обязательно указывать в сигнатуре метода ключевое слово throws .
На рисунке 1 представлена иерархия исключений в Java:
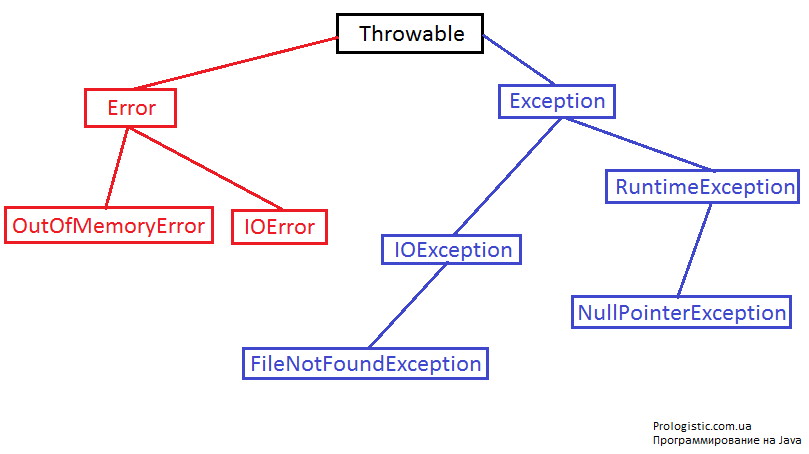
Рисунок 1 — Иерархия исключений в Java
Полезные методы в обработке исключений
Класс Exception и все его подклассы не содержат какие-либо методы для обработки исключений. Все предоставляемые методы находятся в базовом классе Throwable . Подклассы класса Exception созданы для того, чтобы определять различные виды исключений. Именно поэтому при обработке исключений мы можем легко определить причину и обработать исключение в соответствии с его типом.
Полезные методы класса Throwable :
- public String getMessage() — этот метод возвращает сообщение, которое было создано при создании исключения через конструктор.
- public String getLocalizedMessage() — метод, который переопределяют подклассы для локализации конкретное сообщение об исключении. В реализации Throwable класса этот метод просто использует метод g etMessage() , чтобы вернуть сообщение об исключении ( Throwable на вершине иерархии — ему нечего локализировать, поэтому он вызывает getMessage()) .
- public synchronized Throwable getCause() — этот метод возвращает причину исключения или идентификатор в виде null , если причина неизвестна.
- public String toString() — этот метод возвращает информацию о Throwable в формате String .
- public void printStackTrace() — этот метод выводит информацию трассировки стека в стандартный поток ошибок, этот метод перегружен и мы можем передать PrintStream или PrintWriter в качестве аргумента, чтобы написать информацию трассировки стека в файл или поток.
Автоматическое управление ресурсами и улучшения блока перехвата ошибок в Java 7
Если вам нужно перехватывать много исключений в одном блоке try-catch , то блок перехвата будет выглядеть очень некрасиво и в основном будет состоять из избыточного кода. Именно поэтому в Java 7 это было значительно улучшено и теперь мы можем перехватывать несколько исключений в одном блоке catch .
Источник
Exceptions in coroutines
Cancellation and Exceptions in coroutines (Part 3) — Gotta catch ’em all!

We, developers, usually spend a lot of time polishing the happy path of our app. However, it’s equally important to provide a proper user experience whenever things don’t go as expected. On one hand, seeing an application crash is a bad experience for the user; on the other hand, showing the right message to the user when an action didn’t succeed is indispensable.
Handling exceptions properly has a huge impact on how users perceive your application. In this article, we’ll explain how exceptions are propagated in coroutines and how you can always be in control, including the different ways to handle them.
If you prefer video, check out this talk from KotlinConf’19 by Florina Muntenescu and I:
⚠️ In order to follow the rest of the article without any problems, reading and understanding Part 1 of the series is required.
Coroutines: First things first
Cancellation and Exceptions in Coroutines (Part 1)
A coroutine suddenly failed! What now? 😱
When a coroutine fails with an exception, it will propagate said exception up to its parent! Then, the parent will 1) cancel the rest of its children, 2) cancel itself and 3) propagate the exception up to its parent.
The exception will reach the root of the hierarchy and all the coroutines that the CoroutineScope started will get cancelled too.
While propagating an exception can make sense in some cases, there are other cases when that’s undesirable. Imagine a UI-related CoroutineScope that processes user interactions. If a child coroutine throws an exception, the UI scope will be cancelled and the whole UI component will become unresponsive as a cancelled scope cannot start more coroutines.
What if you don’t want that behavior? Alternatively, you can use a different implementation of Job , namely SupervisorJob , in the CoroutineContext of the CoroutineScope that creates these coroutines.
SupervisorJob to the rescue
With a SupervisorJob , the failure of a child doesn’t affect other children. A SupervisorJob won’t cancel itself or the rest of its children. Moreover, SupervisorJob won’t propagate the exception either, and will let the child coroutine handle it.
You can create a CoroutineScope like this val uiScope = CoroutineScope(SupervisorJob()) to not propagate cancellation when a coroutine fails as this image depicts:
If the exception is not handled and the CoroutineContext doesn’t have a CoroutineExceptionHandler (as we’ll see later), it will reach the default thread’s ExceptionHandler . In the JVM, the exception will be logged to console; and in Android, it will make your app crash regardless of the Dispatcher this happens on.
💥 Uncaught exceptions will always be thrown regardless of the kind of Job you use
The same behavior applies to the scope builders coroutineScope and supervisorScope . These will create a sub-scope (with a Job or a SupervisorJob accordingly as a parent) with which you can logically group coroutines (e.g. if you want to do parallel computations or you want them to be or not be affected by each other).
Warning: A SupervisorJob only works as described when it’s part of a scope: either created using supervisorScope or CoroutineScope(SupervisorJob()) .
Job or SupervisorJob? 🤔
When should you use a Job or a SupervisorJob ? Use a SupervisorJob or supervisorScope when you don’t want a failure to cancel the parent and siblings.
In this case, if child#1 fails, neither scope nor child#2 will be cancelled.
In this case, as supervisorScope creates a sub-scope with a SupervisorJob , if child#1 fails, child#2 will not be cancelled. If instead you use a coroutineScope in the implementation, the failure will get propagated and will end up cancelling scope too.
Watch out quiz! Who’s my parent? 🎯
Given the following snippet of code, can you identify what kind of Job child#1 has as a parent?
child#1 ’s parentJob is of type Job ! Hope you got it right! Even though at first impression, you might’ve thought that it can be a SupervisorJob , it is not because a new coroutine always gets assigned a new Job() which in this case overrides the SupervisorJob . SupervisorJob is the parent of the coroutine created with scope.launch ; so literally, SupervisorJob does nothing in that code!
Therefore, if either child#1 or child#2 fails, the failure will reach scope and all work started by that scope will be cancelled.
Remember that a SupervisorJob only works as described when it’s part of a scope: either created using supervisorScope or CoroutineScope(SupervisorJob()) . Passing a SupervisorJob as a parameter of a coroutine builder will not have the desired effect you would’ve thought for cancellation.
Regarding exceptions, if any child throws an exception, that SupervisorJob won’t propagate the exception up in the hierarchy and will let its coroutine handle it.
Under the hood
If you’re curious about how Job works under the hood, check out the implementation of the functions childCancelled and notif y Cancelling in the JobSupport.kt file.
In the SupervisorJob implementation, the childCancelled method just returns false , meaning that it doesn’t propagate cancellation but it doesn’t handle the exception either.
Dealing with Exceptions 👩🚒
Coroutines use the regular Kotlin syntax for handling exceptions: try/catch or built-in helper functions like runCatching (which uses try/catch internally).
We said before that uncaught exceptions will always be thrown. However, different coroutines builders treat exceptions in different ways.
Launch
With launch, exceptions will be thrown as soon as they happen. Therefore, you can wrap the code that can throw exceptions inside a try/catch , like in this example:
With launch, exceptions will be thrown as soon as they happen
Async
When async is used as a root coroutine (coroutines that are a direct child of a CoroutineScope instance or supervisorScope ), exceptions are not thrown automatically, instead, they’re thrown when you call .await() .
To handle exceptions thrown in async whenever it’s a root coroutine, you can wrap the .await() call inside a try/catch :
In this case, notice that calling async will never throw the exception, that’s why it’s not necessary to wrap it as well. await will throw the exception that happened inside the async coroutine.
When async is used as a root coroutine, exceptions are thrown when you call .await
Also, notice that we’re using a supervisorScope to call async and await . As we said before, a SupervisorJob lets the coroutine handle the exception; as opposed to Job that will automatically propagate it up in the hierarchy so the catch block won’t be called:
Furthermore, exceptions that happen in coroutines created by other coroutines will always be propagated regardless of the coroutine builder. For example:
In this case, if async throws an exception, it will get thrown as soon as it happens because the coroutine that is the direct child of the scope is launch . The reason is that async (with a Job in its CoroutineContext ) will automatically propagate the exception up to its parent ( launch ) that will throw the exception.
⚠️ Exceptions thrown in a coroutineScope builder or in coroutines created by other coroutines won’t be caught in a try/catch!
In the SupervisorJob section, we mention the existence of CoroutineExceptionHandler . Let’s dive into it!
CoroutineExceptionHandler
The CoroutineExceptionHandler is an optional element of a CoroutineContext allowing you to handle uncaught exceptions.
Here’s how you can define a CoroutineExceptionHandler , whenever an exception is caught, you have information about the CoroutineContext where the exception happened and the exception itself:
Exceptions will be caught if these requirements are met:
- When ⏰: The exception is thrown by a coroutine that automatically throws exceptions (works with launch , not with async ).
- Where 🌍: If it’s in the CoroutineContext of a CoroutineScope or a root coroutine (direct child of CoroutineScope or a supervisorScope ).
Let’s see some examples using the CoroutineExceptionHandler defined above. In the following example, the exception will be caught by the handler:
In this other case in which the handler is installed in a inner coroutine, it won’t be caught:
The exception isn’t caught because the handler is not installed in the right CoroutineContext . The inner launch will propagate the exception up to the parent as soon as it happens, since the parent doesn’t know anything about the handler, the exception will be thrown.
Dealing with exceptions gracefully in your application is important to have a good user experience, even when things don’t go as expected.
Remember to use SupervisorJob when you want to avoid propagating cancellation when an exception happens, and Job otherwise.
Uncaught exceptions will be propagated, catch them to provide a great UX!
Источник
RuntimeException exceptions in Java are the ones that would occur while running your Android Application on the device or Emulator. The of the most common such exception is NullPointerException.
NullPointerException occurs when you call a function on an Object that is null, so just make sure of what line number that error occurred and see what object has a function called on it and see how it can be null. Let’s see an example,
@Override
10    protected void onCreate(Bundle savedInstanceState) {
11
12       Button myButton = findViewById(R.id.button2);
13       myButton.setOnClickListener(new View.OnClickListener() {
14        @Override
15        public void onClick(View v) {
16            System.out.println("Button Clicked!");
17          }
18       });
19
20       setContentView(R.layout.activity_main);
21        super.onCreate(savedInstanceState);
    }
2021-04-23 23:53:40.123 7489-7489/com.example.myapplication
E/AndroidRuntime: FATAL EXCEPTION: main
Process: com.example.myapplication, PID: 7489
java.lang.RuntimeException: Unable to start activity ComponentInfo{com.example.myapplication/com.example.myapplication.MainActivity}:
java.lang.NullPointerException: Attempt to invoke virtual method 'void
android.view.View.setOnClickListener(android.view.View$OnClickListener)' on a null object reference
at android.app.ActivityThread.performLaunchActivity(ActivityThread.java:3449)
at android.app.ActivityThread.handleLaunchActivity(ActivityThread.java:3601)
at android.app.servertransaction.LaunchActivityItem.execute(LaunchActivityItem.java:85)
at android.app.servertransaction.TransactionExecutor.executeCallbacks(TransactionExecutor.java:135)
at android.app.servertransaction.TransactionExecutor.execute(TransactionExecutor.java:95)
at android.app.ActivityThread$H.handleMessage(ActivityThread.java:2066)
at android.os.Handler.dispatchMessage(Handler.java:106)
at android.os.Looper.loop(Looper.java:223)
at android.app.ActivityThread.main(ActivityThread.java:7656)
at java.lang.reflect.Method.invoke(Native Method)
at com.android.internal.os.RuntimeInit$MethodAndArgsCaller.run(RuntimeInit.java:592)
at com.android.internal.os.ZygoteInit.main(ZygoteInit.java:947)
Caused by: java.lang.NullPointerException: Attempt to invoke virtual method 'void android.view.View.setOnClickListener(android.view.View$OnClickListener)' on a null object reference
at com.example.myapplication.MainActivity.onCreate(MainActivity.java:13)
Here the error occurred at line number 13 of MainActivity.java so the object myButton and that’s because the line number 20 — setContentView(R.layout.activity_main); needs to be set before line number 13 or else we will not get the View Object that has the button!
Have Questions? Post them here!
I am a beginner Android developer and I have a runtime error in my code: when I want to run it in a emulator or a device it show «force close» massage. My log is here:
http://upir.ir/934/1_5e07a.jpg
My Java code:
 public class Third extends Activity

 {

protected void onCreate(Bundle savedInstanceState) {
        super.onCreate(savedInstanceState);
    Button d = (Button) findViewById(R.id.btn4);

    d.setOnClickListener(new OnClickListener() {

                @Override
                public void onClick(View arg0) {
                    dialog();
                }
    });
}

public void dialog(){

    final Dialog dialog = new Dialog(Third.this);
    dialog.setContentView(R.layout.dialog);
    dialog.setTitle("واحد عدد وارد شده را انتخاب کنید");
    dialog.show();
    RadioGroup rg = (RadioGroup) dialog.findViewById(R.id.rg);

    final RadioButton rb1 = (RadioButton) dialog.findViewById(R.id.rb1);
    final RadioButton rb2 = (RadioButton) dialog.findViewById(R.id.rb2);
    rg.setOnCheckedChangeListener(new OnCheckedChangeListener() {

        @Override
        public void onCheckedChanged(RadioGroup arg0, int arg1) {
            if(rb1.isChecked()) {
                dialog.dismiss();
                Button t = (Button)findViewById(R.id.btn5);
                t.setOnClickListener(new OnClickListener() {
                    public void onClick(View arg0) {
                    EditText ft1 = (EditText)findViewById(R.id.f3);
    TextView foot = (TextView)findViewById(R.id.foot);
    TextView mile = (TextView)findViewById(R.id.mile);
    TextView inch = (TextView)findViewById(R.id.inch);
    TextView yard = (TextView)findViewById(R.id.yard);
    TextView  mm = (TextView)findViewById(R.id.millymeter);
    TextView  dm = (TextView)findViewById(R.id.decimeter);
    TextView  mim = (TextView)findViewById(R.id.micrometer);
    TextView  nm = (TextView)findViewById(R.id.nanometer);
    TextView  hand = (TextView)findViewById(R.id.hand);
    TextView iron = (TextView)findViewById(R.id.iron);
    TextView point = (TextView)findViewById(R.id.point);
    if(ft1.getText().toString().length() == 0 ){return;}
    int first = Integer.parseInt(ft1.getText().toString());
    double equal = first *0.0328;
    DecimalFormat formatf = new DecimalFormat("#.####");
    String x = formatf.format(equal)+" فوت";
    foot.setText(x);
    first = Integer.parseInt(ft1.getText().toString());
    equal = first * 0.000005;
    DecimalFormat formatm = new DecimalFormat("#.####");
    x = formatm .format(equal)+"مایل";
    mile.setText(x);
    equal = first * 0.393;
    DecimalFormat formati = new DecimalFormat("#.####");
    x = formati.format(equal)+"اینچ";
    inch.setText(x);
    equal = first * 0.0109;
    DecimalFormat formaty = new DecimalFormat("#.#####");
    x = formaty.format(equal)+"یارد";
    yard.setText(x);
    equal = first / 10;
    DecimalFormat formatmi = new DecimalFormat("#.##");
    x = formatmi.format(equal)+"دسی متر";
    dm.setText(x);
    int equalmm = first * 10;
    x = equalmm+"میلی متر";
    mm.setText(x);
    int equalm = first * 10000;
    x = equalm+"میکرو متر";
    mim.setText(x);
    int equaln = first * 10000000;
    x = equaln + "نانو متر";
    nm.setText(x);
    equal = first * 0.098;
    DecimalFormat formath = new DecimalFormat("#####.#####");
    x = formath.format(equal)+"هَند";
    hand.setText(x);
    equal = first * 19;
    x = equal+"آیرون";
    iron.setText(x);
    equal = first * 28;
    x = equal+"پوینت";
    point.setText(x);
}

        });
        }
You need to inflate your activity with a layout resource first before you can use the findViewById() method to retrieve views. If there’s no layout, then there are no views which could possibly be found.