Автоматизированное оборудование, используемое для уборки в жилых помещениях, оборудуется блоком самодиагностики. Коды ошибок воспроизводятся голосом, отображаются цифровыми данными на дисплее или миганием светодиода, расположенного на крышке корпуса. Например, возникающая на роботах iRobot Roomba ошибка зарядки 5 указывает на проблемы с программным обеспечением контроллера батареи. Подробное описание кодов неисправностей и способы устранения приведены в инструкции по эксплуатации.

Ошибка зарядки 1, отображаемая одиночной вспышкой светового индикатора, указывает на отсутствие контакта в цепи питания. Одновременно на дисплее отображается текстовое сообщение Err 1. Оборудование поставляется в продажу со специальным предохранителем, расположенным в нише аккумуляторной батареи. Пользователю требуется перевернуть робот и открыть пластиковую крышку, зафиксированную 2 винтами с крестообразной головкой.

Внутри отсека размещена батарея, которую необходимо снять. После удаления защитной вставки, выполненной из пластика желтого цвета, аккумулятор устанавливается на штатное место (логотип iRobot располагается в направлении крышки). При корректном включении оборудования зуммер проиграет мелодию.
Голосовое сообщение об ошибке 1 указывает на вывешивание корпуса робота, при котором фронтальный ролик теряет контакт с поверхностью пола. Пользователь переносит оборудование вручную, рекомендуется проверить ниши колес и удалить забившуюся в полости грязь. На части роботов сообщение о проблеме 1 указывает на потерю связи с полом левого колеса с индивидуальным моторным приводом.
Ошибка 2
Голосовая ошибка 2 указывает на неисправность в приводе центральных резиновых валков. Ремонт заключается в снятии и чистке элементов, закрепленных пластиковой прямоугольной рамкой. На торцах щеток расположены подшипниковые узлы, рекомендуется удалить намотавшиеся внутри волосы и шерсть.

Двойное мигание лампы сигнализирует об ошибке зарядки, возникшей из-за перегрева элементов батареи. Оборудование снимается с зарядной базы на 1-2 часа, после снижения температуры аккумулятора процедура восстановления емкости батареи возобновляется. Проблема возникает при поломке зарядного адаптера или при использовании нештатного устройства.
Сброс кода, записанного в память устройства, выполняется принудительной перезагрузкой (кнопки Spot и Dock).
Роботы, оборудованные звуковым сигнализатором, подают двойной короткий сигнал, указывающий на проблему с приводом чистящих узлов. Пользователю необходимо очистить щетки робота, параллельно удаляется загрязнение с поверхности приводных валов.
Ошибка 5
Звуковая ошибка 5 (пятикратный короткий сигнал зуммером или голосовым сообщением) указывает на заклинивание привода боковых колес. Руководство по эксплуатации рекомендует выключить питание робота и очистить полость под колесом от набившегося мусора. Дополнительно проверяется вращение колеса и связанных с ним механизмов. На части роботов голосовое предупреждение указывает на потерю контакта с полом правого колеса.

Пятикратная световая индикация (с отображением на дисплее кода Err 5) указывает на проблему при подключении к зарядному устройству Румба. Пользователю требуется проверить работу диодного индикатора, расположенного на корпусе напольной станции, а также протереть мягкой салфеткой металлические контактные пятаки, расположенные на зарядном блоке и днище робота. При повторной проблеме Error 5 рекомендуется сделать сброс настройки оборудования выключением питания боковым тумблером (или одновременным нажатием на 10 сек. клавиш Spot и Dock).
Техникой какого производителя пользуетесь дома?
Ошибка 6
Ошибка 6, отображаемая 6-кратной вспышкой диода, возникает при перегреве батареи. Инструкция рекомендует прекратить зарядку аккумулятора до снижения температуры. При повторном возникновении проблемы требуется обратиться в сервисный центр.

Голосовое сообщение о проблеме 6 указывает на некорректную работу сенсоров перепада высоты пола. Проблема возникает при зависании оборудования на ступеньках лестницы, высотный датчик фиксирует перепад высоты, но корректировка траектории невозможна. Для устранения проблемы необходимо перенести оборудование на ровную поверхность или протереть стекла сенсоров мягкой салфеткой без применения моющего средства.
Другие ошибки
Проблема 3, отображающаяся только световым индикатором, указывает на ошибку при зарядке батареи или поломку аккумулятора. Для восстановления работоспособности изделия рекомендуется сбросить настройки робота. Самостоятельное исправление внутреннего дефекта батареи невозможно, требуется обратиться в сервисную службу.

4-кратное мигание диода, возникающее при зарядке, происходит при использовании неоригинального зарядного устройства. Для устранения последствий требуется произвести перезагрузку робота (одновременным нажатием и удержанием на протяжении 12 секунд клавиш Spot и Dock) и установить оригинальный адаптер питания, поставляемый совместно с оборудованием.
Повторяющиеся 7-кратные вспышки индикатора в процессе уборки сигнализируют о перегреве аккумуляторной батареи во время разрядки. Техническая документация рекомендует остановить уборку и охладить элемент питания естественным способом на протяжении 1-2 часов. При повторном возникновении проблемы требуется обратиться в сервисный центр для диагностики причины неисправности.
В случае заедания или потери контакта боковых колес с поверхностью пола подается 7-кратный звуковой сигнал. Робот вручную убирается с неровной поверхности в другую рабочую зону. Дополнительно проверяется состояние редукторов и двигателей, при обнаружении загрязнения полости или оси требуется очистка узла. Заклинивание фронтального ролика отображается подачей 8 звуковых сигналов. Пользователь демонтирует узел из нижней части корпуса, а затем удаляет набившийся в нише мусор.
Голосовое сообщение об ошибке 8 указывает на засорение фильтра или отсутствие подачи воздуха к турбине. Для восстановления работоспособности требуется очистить колбу от пыли и промыть фильтрующие элементы. Дополнительно рекомендуется осмотреть каналы подачи воздуха и удалить из них застрявший мусор.
Заклинивание подвижного бампера или загрязнение защитного экрана сенсоров поиска препятствий включает голосовой информирующий блок, который сообщает о возникновении неисправности 9. Для устранения неисправности требуется осмотреть оборудование, удалить попавшие под демпфер частицы мусора и протереть фронтальное дымчатое стекло влажной салфеткой.
При использовании робота в протяженном помещении возникает проблема с обнаружением препятствий, робот подает голосовое сообщение об ошибке 10. При отсутствии голосового блока проблема передается 11-кратным сигналом зуммера. Рекомендуется убирать площадь по секторам, ограничивая зоны переносным инфракрасным датчиком виртуальной стены. Рекомендуется проверить подвижность бампера вручную, поскольку вторичной причиной появления ошибки является заклинивание фронтального демпфера.

На части роботов встроенный зуммер регистрирует проблемы с сенсорами падения с помощью подачи 12 коротких звуковых сигналов. Для устранения неполадки требуется удалить налет пыли, сформировавшийся на защитных стеклянных вставках, расположенных по периметру днища оборудования. Голосовой подсказчик сообщает пользователю о необходимости восполнения заряда батареи. Оборудование размещается на напольной станции вручную или выводится с помощью пульта дистанционного управления или приложения, установленного на смартфоне.
Roombas save us from the monotony of doing daily and weekly vac-ups.
But despite all their glory, they’re far from perfection.
Errors still happen.
Such as the pesky charging error 3.
“How can I resolve charging error 3?”
Continue reading to discover:
- 5 quick ways to solve charging error 3.
- Reasons why your Roomba keeps saying “charging error 3”.
- How to check for damage in your Roomba’s charging system.
- And much much more…
Why does my Roomba keep saying charging error 3?
The reason why your Roomba shows charging error 3 is because of a faulty charging system. This charging error also indicates that your Roomba needs a battery replacement. While others need a reset/reboot action.
#1: Check the charger and the power outlet
This may seem too obvious. But if your Roomba is showing charging error 3 over and over, it could be that your charger is faulty.
Note: Use a wall outlet to charge your Roomba’s Home Base.
A wall outlet carries a more stable electricity voltage. Minor electrical interruptions can cause charging problems to your Roomba.
That’s why it’s worthy to check if the power outlets are working.
Make sure the power cord doesn’t need replacement, too.
Remember that daily use causes wear and tear to these items. Even more so if you’ve been using your Roomba for a long time.
The right charging system gives life to your Roomba. Without it, your robot vacuum cleaner is as good as junk.
You might also like: Roomba Not Charging: 9 Ways To Fix It In 30 Seconds
#2: Clean the battery charging points
Dust, dirt, debris, gunk: you name it.
The bottom line is, they’re bad for everyone – including your Roomba.
Sure, your Roomba can handle dirt, But too much of it still causes charging error 3.
“But I clean my Roomba!”
Of course, you do.
But your Roomba needs more than skin-deep cleaning.
And besides, wiping down the covers of your Roomba doesn’t really clean it. Truth is, you’re missing the most important sections.
And these are the Roomba’s charging points and terminals.
“What are those?”
Charging points are those tiny metal strips that allow electricity to flow.
They give your Roomba a charge.
They’re also easy to miss because of their size. But you should clean your Roomba’s charging ports regularly.
Cleaning them only takes a few minutes, anyway.
And you only need the following household products:
- Melamine foam.
- A soft, dry cloth.
- Rubbing alcohol.
Follow the steps to clean the charging poles:
- Put a little alcohol on the melamine foam.
- Wipe the charging poles with the damp melamine foam.
- Dry the charging poles using a soft, dry cloth.
- Wipe the Home Base’s charging entries and terminals.
Check out this video to properly clean your Roomba’s charging points:
#3: Perform a factory reset
If cleaning the charging ports didn’t work, it’s now time to reset your Roomba.
A factory reset will erase all your Roomba’s memory and data. But it’s also a solution that guarantees results in minutes.
Plus, it’ll make your Roomba work like new.
Warning: You cannot reverse the effects of a factory reset.
Resetting Wi-Fi-connected Roombas is very easy.
Here’s how to reset Roomba E-series, and I and S series, and Roomba 600, 800, 900 series:
- Go to the iRobot Home App on your smartphone.
- Open “Settings” from the selection menu.
- Choose “Factory reset.”
- The reset is complete when the Roomba restarts.
Note: Your smartphone and Roomba should connect to the same internet network.
For Roomba’s with the “CLEAN” button, a factory reset is more straightforward.
Here’s how to do it:
- Locate the “CLEAN” button.
- Press and hold the “CLEAN” button for 10 seconds.
- Release the button when the Roomba’s LED starts flashing.
The Roomba takes about 1 minute to complete a factory reset. Re-configure your preferred settings after it’s done.
#4: Replace the Roomba’s battery
You’ve done everything, so far. But the problem still stands.
Then, it must be an internal problem.
Don’t forget that Roomba’s charging error 3 is a battery-related concern.
With proper maintenance, your Roomba can last hundreds of charges.
But what if your Roomba is nearing the last of those hundreds of charges?
That’s why you need to open your Roomba’s battery panel next.
“But I’m no handyman!”
Don’t worry, if you can hang a picture, you’re overqualified to do this!
You only need a few things before starting:
- Tri-point screwdriver.
- (Optional) Rubber gloves.
- Standard Phillips #1 screwdriver.
Next, follow these steps to replace the Roomba’s battery:
- Flip over your Roomba.
- Loosen the screws under using a screwdriver.
- Remove the old battery pack.
- Carefully put in a fresh set of batteries.
- Don’t forget to remove the new battery’s yellow tag.
- Reassemble.
Note: Some Roomba replacement battery kits come with some extra spinning brush. Don’t forget to attach them too.
#5: Replace your Roomba’s motherboard
Warning: This voids your iRobot warranty.
This is a more technical fix but it’s the one that works without fail.
According to iRobot, charging error 3 means you need to get a new Roomba.
But let’s face it, Roombas cost an arm and a leg.
A Roomba’s motherboard isn’t that much expensive, in comparison.
Many people experience the same problem and replacing the motherboard works wonders. You might want to consider this, too.
There’re so many DIY videos on the internet about replacing this part of the Roomba.
Work up your internet search prowess and check them out.
Charging error 3 is a fairly common problem with the Roomba 520, 891, and I, j series robot vacuums and other models manufactured by iRobot.
Like charging error 8 and charging error 5, it usually pops up when there’s a problem with the charging unit itself.
But it can also be triggered by other issues, such as low battery power or an internal bad connector connection.
Well, this guide will break down what error 3 means on Roomba and what you need to do to get back your vacuum working again.
Let’s dive into it…
Why does Roomba Charging Error 3 occur?
There are several reasons that can trigger this issue.
Typically, when a Roomba displays ‘Charging Error 3’, it indicates that the charging system isn’t working correctly. Eithe Roomba can’t establish a connection with the charging dock, or the battery is damaged and needs to be replaced.
Aside from these, bad internal connector connections also matter!
Richard Smith shared his experience with us:
He said:
“I cleaned whatever corrosion I could find on the motherboard as suggested in another post and put the Roomba back together and had the same charging error 3. Next I took the motherboard completely out, removing and re-inserting all connectors, and then reassembed Roomba and the charging error was gone. So I presume the problem may have been a bad connector connection on the board on the front edge as I had only unplugged the back edge connectors the first time and hinged the board over to get to the underside.”
[Anyway, make sure to read all the comments on this article. You might find some valuable insights.]
How to fix Roomba Charging Error 3?
- Check the charging dock to ensure it is functioning correctly.
- Clean the charging connectors on both the Roomba and the Home Base.
- If cleaning the connectors does not resolve the issue, consider performing a factory reset.
Step 1: Clean the charging connectors
As mentioned, one of the main reasons your Roomba is showing you this error is that it can’t connect itself with the home base.
This typically happens due to the dirty charging contacts.
In this case, the first step you should take is to clean the charging terminals. Here’s how:
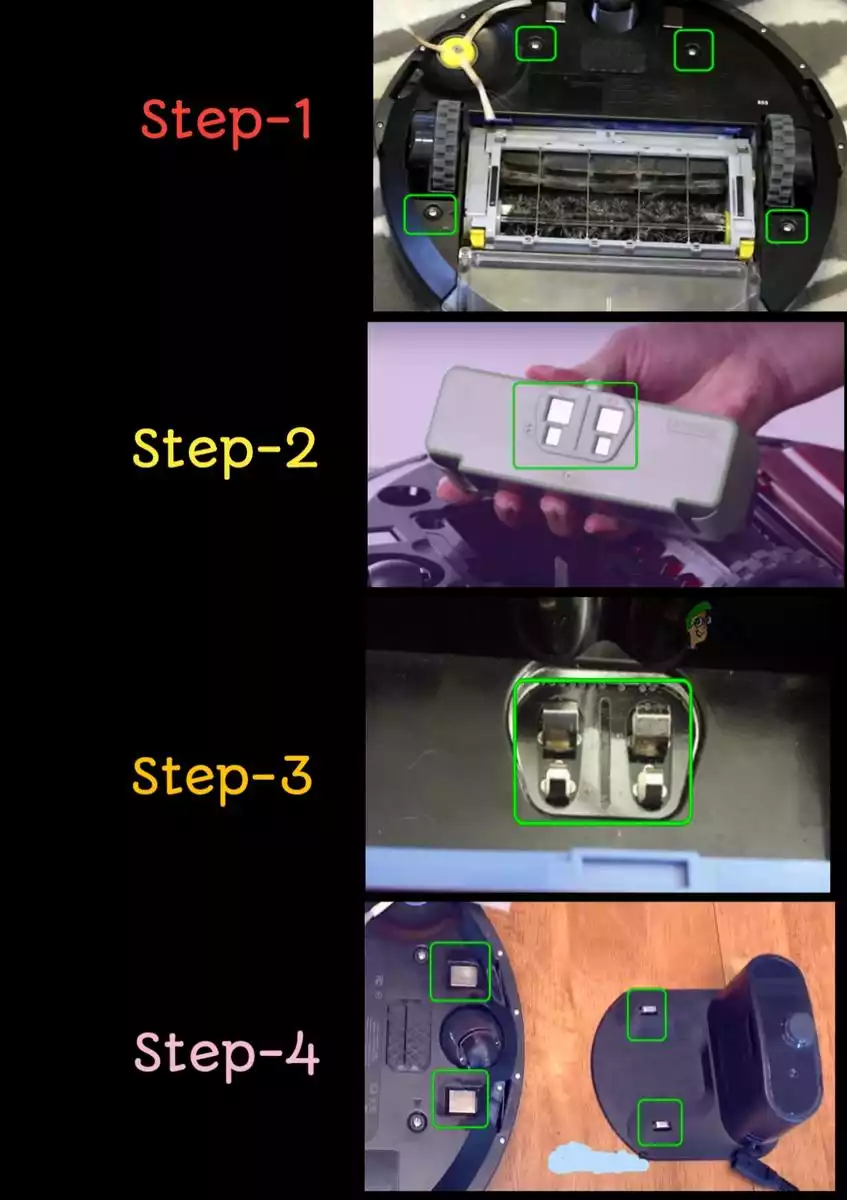
- Remove the bottom cover and the four screws.
- Then check whether any connections or terminals are broken and, if so, make the necessary repairs.
- Wipe the battery terminals and dock connections with a pink or magic eraser.
- Reattach the bottom cover and reinstall the battery.
Now charge your vacuum for 12 hours and check if Error 3 has been resolved. If this doesn’t work for you, move to the next step.
Be sure to clean the charging points of the home base and the Roomba.
Step 2: Check the charger if it’s damaged

Often a malfunctioning charging cord triggers this issue.
If the charging cord is not providing a consistent power supply to the Roomba, it can result in charging errors.
So, possible that the dock’s charging cord is malfunctioning or somehow damaged!
Here’s how to check it:
- Closely inspect your charger and power cord for any damage that may be causing an electrical short.
- If you see any damage or defects, replace the power cord ASAP.
Pro Tip: Charging Error 3 is often caused by loose internal connections or corrosion buildup in the motherboard components. For a better understanding of the issue, I suggest checking all the comments on this article.
Step 3: Reset your Roomba

If none of the above methods work, factory reset your Roomba. Hopefully, this will fix the problem.
Here’s how to do that:
- For 20 seconds, press and hold the “CLEAN,” “SPOT CLEAN,” and “HOME” buttons.
- Hold them until the White Ring Light spins around the “CLEAN” button.
- Let the button go and wait some time. The Roomba is now resetting itself, which might take up to 1.5 minutes.
Remember: after a factory reset, you will need to reconfigure your Roomba and remap your house as if it were a brand-new robot.
Step 4: Replace the motherboard! (Video Guide)
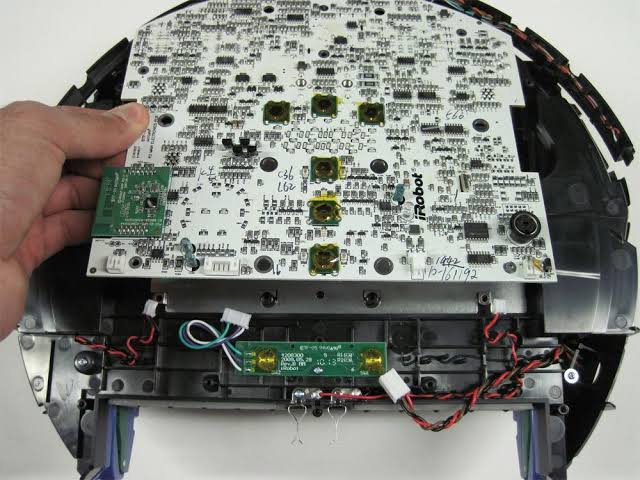
If none of the above-mentioned methods work, you need to replace your Roomba’s motherboard with a new one.
You can do it yourself If you have some technical knowledge. But first, you have to buy a motherboard from Amazon or an iRobot store.
If you have bought a motherboard, follow this video guide:
Article Summary
If your Roomba is displaying the “Charging Error 3” message, there are a few things you can try to get it back up and running:
- First, check the charging contacts on the Roomba and the charging dock. Please make sure they are clean and free of debris.
- Try charging the Roomba in a different outlet.
- If you have another Roomba charging dock, use it.
- If you have a spare battery, try using that in the Roomba. Or replace the battery with a new one.
- Finally, if nothing works, try resetting your device.
Note: According to the manufacturer, iRobot, the battery of the Roomba may last up to two hours after being fully charged. You can charge it up to 400 times, equating to two to four years of use.
If you still have questions, feel free to comment here and share your experience with me. Stay healthy and be happy with your cleaning assistant. See you in the next article. Goodbye!
F.A.Q.s
Q: Can a faulty power outlet cause Roomba charging error 3?
Yes, a faulty power outlet can sometimes lead to Roomba charging error 3.
If the power outlet is not providing consistent power supply or if there is an issue with the electrical connection, the Roomba may have trouble charging correctly.
Try plugging the charging dock into a different outlet to determine if the error is due to the power source.
Q: Does Roomba this error indicate a battery problem?
While Roomba error 3 is primarily related to charging and the docking system, it can indirectly indicate a battery problem.
If the Roomba is unable to establish a proper charging connection, it may not receive sufficient power to charge the battery properly.
In such cases, the battery may not reach its full capacity or may drain quickly.
Q: Are there any firmware updates that can fix Roomba error 3?
Sometimes, firmware updates released by the manufacturer can address known issues, including charging errors.
Check the manufacturer’s website or the Roomba mobile app for any available firmware updates. Updating the firmware may help resolve Roomba charging error 3 if it is caused by a software-related issue.

Vacuum master from Gazipur, Bangladesh! He knows vacuums inside and out and has been fixing them for ages. When he’s not busy repairing vacuums, Mizanur writes these super helpful guides for Homespoiler.com. His guides are packed with all sorts of tips and tricks to help people fix their vacuums and keep them running smoothly. More about him.
Вы можете столкнуться с ошибкой Roomba 5 или Err5, если на клеммах аккумулятора или док-станции скопился нагар или пыль. Более того, глубоко разряженный аккумулятор (который следует заряжать от лабораторного источника питания) также может вызвать проблему.
Проблема возникает, когда робот Roomba пользователя не заряжается с ошибкой 5, что означает, что любой из модулей зарядки (кабель для зарядки, док-станция, аккумулятор, материнская плата, зарядные терминалы и т. Д.) Робота Roomba не работает.
Ошибка Roomba 5
Вы можете исправить ошибку Roomba 5, очистив клеммы аккумулятора / док-станции или зарядив аккумулятор лабораторным источником питания (как обсуждается ниже), но перед этим убедитесь, что зарядный кабель (подключающий док-станцию к источнику питания) не отключен. неисправен.
Очистите контакты аккумулятора и клемм
Вы можете столкнуться с ошибкой зарядки робота Roomba 5, если на клеммах аккумулятора или док-станции скопился углерод (или пыль). В этом контексте очистка контактов аккумулятора и клемм док-станции может решить проблему.
- Выкрутите 4 винта в нижней части устройства и снимите нижнюю крышку.
Отверните нижние винты робота Roomba.
- Затем убедитесь, что желтая бирка батареи полностью удалена (если это новый блок).
- Теперь проверьте, не погнут ли какие-либо контакты или клеммы, затем выпрямите клеммы.
- Затем очистите клеммы аккумулятора и контакты док-станции розовым / волшебным ластиком (тем, что используется с графитными карандашами).
Очистите клеммы аккумуляторной батареи робота Roomba
- Теперь вставьте аккумулятор и снова установите нижнюю крышку.
Очистите батарейные блоки робота-пылесоса Roomba
- Затем очистите точки зарядки робота Roomba.
Очистите точки зарядки док-станции и робота Roomba
- Теперь поставьте Roomba на зарядку как минимум на 16 часов, а затем проверьте, не исчезла ли ошибка Roomba 5.
- Если это не помогло, проверьте, помогает ли очистка аккумулятора и стыковочных клемм медицинским спиртом (или вы можете попробовать нанести немного уксуса с помощью зубной щетки) ошибку Roomba.
Если проблема не устраняется, проверьте, решает ли проблему включение Roomba на зарядку (пока кнопка «Очистить» не замигает зеленым) путем прямого подключения кабеля питания (без док-станции).
Кнопка очистки мигает зеленым при полной зарядке
Вы также можете попробовать лабораторный источник питания для прямой зарядки аккумулятора и проверить, устраняет ли это ошибку 5 (если аккумулятор был сильно разряжен). Если ошибка 5 все еще существует, возможно, вам придется использовать запасную батарею. Даже если это не сработало, возможно, домашний блок или материнская плата робота Roomba были повреждены, и вам, возможно, придется заменить их (по одному).
- If you discover that your Roomba won’t charge, start by cleaning the metal charging contacts on the Roomba and charging station.
- You should also clean the wheels to ensure the Roomba isn’t riding too high to reach the contacts on the charging station.
- Here are the top seven ways to troubleshoot a Roomba that won’t charge.
The chief advantage of a robot vacuum like your Roomba is the freedom and convenience it offers — you no longer need to dedicate time to a menial household chore. But you need to clean and maintain your vacuum occasionally, or it will not perform at its peak (or might stop working entirely).
And sometimes, unexpected issues crop up. Your Roomba might inexplicably stop charging, for example. If this has happened to you, not to worry. Here are seven of the most common solutions to try when your Roomba is not charging even though it’s on its charging station.
In order to charge properly, your Roomba must make solid electrical contact with the charging station. It does that via a couple of small metal plates — one set on the Roomba itself, and a matching pair on the charging station. When your Roomba isn’t charging, this is the first place to look, because not only can they get dirty and covered in grime, but the metal can oxidize over time. Use a soft, damp cloth to clean the contacts and the area around them, then dab a clean cloth in some rubbing alcohol and polish the contacts until they look clean and there is no debris in the way.
iRobot
Clean the wheels
You should clean the wheels in the same way — both the main driving wheels and the unpowered caster wheel in front. While it might not be obvious how grime on the wheels can interfere with charging, if the height of the underside of the Roomba changes because of accumulated dirt on the wheels, the contacts might have trouble making a secure connection to start the charging process.
iRobot
Reboot your Roomba
Sometimes your charging problem might be software-related rather than in hardware. If that’s the case for you, rebooting your Roomba — also known as performing a soft reset — could get it up and running quickly. This is easy to do, so try it before moving on to more complicated fixes.
The method to reset your Roomba varies depending upon which model you own, so if you’re in doubt, check your user guide. But most Roomba models (such as S, I, and 900 Series versions) can be reset by holding the Home, Spot Clean, and Clean buttons simultaneously. Wait until you see a light appear around the Clean button, then let go. If you have a 600 or 800 series Roomba, press those same buttons but wait until you hear the vacuum beep.
Reseat the battery
It’s possible that the Roomba won’t charge because the battery isn’t seated properly inside the vacuum. Of course, if your Roomba is brand new, be sure you’ve pulled the plastic tab, if there is one. But if you’ve had the Roomba for a while, the battery may no longer be properly aligned. Turn the Roomba upside down, remove the screws for the battery cover and remove the battery. Reposition it carefully and screw it back into place.
iRobot
Move the charging station
If the Roomba still won’t accept a charge, it’s possible that the charging station isn’t powered on properly. An easy way to test this is to move the plug to another wall outlet. Or make sure that the outlet isn’t controlled by a wall switch.
Replace the battery
If the Roomba has been on cleaning duty for a while, the battery may have lost its ability to hold a charge. It should last for hundreds of cleaning cycles, which can add up to several years of regular use. But eventually, all batteries stop working. You can order a replacement battery from iRobot or get a compatible model from another brand and swap it out. Your Roomba should be essentially as good as new afterwards.
If you’ve tried everything in this list and your Roomba still refuses to accept a change from the charging station, you probably have a pretty serious hardware problem with the charging station or an internal power component in the Roomba itself, and it’s unlikely you’ll be able to fix it yourself. Contact iRobot’s customer support for assistance.
Dave Johnson
Freelance Writer
Dave Johnson is a technology journalist who writes about consumer tech and how the industry is transforming the speculative world of science fiction into modern-day real life. Dave grew up in New Jersey before entering the Air Force to operate satellites, teach space operations, and do space launch planning. He then spent eight years as a content lead on the Windows team at Microsoft. As a photographer, Dave has photographed wolves in their natural environment; he’s also a scuba instructor and co-host of several podcasts. Dave is the author of more than two dozen books and has contributed to many sites and publications including CNET, Forbes, PC World, How To Geek, and Insider.
Read more
Read less