![]()
![]()
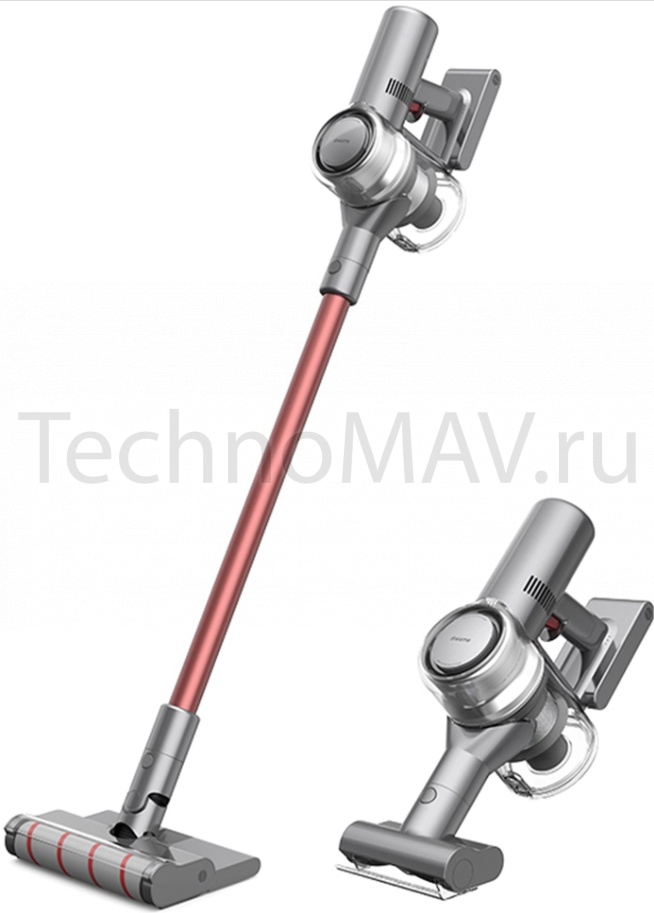
Пылесос Xiaomi DreameV11 Vacuum Cleaner. Инструкция на русском. Как пользоваться, как включить
Пылесос DreameV11 Vacuum Cleaner беспроводной
Техника безопасности
Во избежание телесных травм в результате несчастного случая, таких как поражение током или воспламенение, вызванных неправильным использованием, пожалуйста, внимательно прочитайте инструкцию по эксплуатации перед использованием.
Осторожно
Данная продукция не может быть использована людьми с ограниченными физическими, сенсорными или интеллектуальными возможностями, а также лицами, не имеющими соответствующего опыта и знаний (включая детей), за исключением случаев, когда есть куратор или руководитель, обеспечивающие безопасное использование продукции.
Детям запрещается использовать данное изделие для работы или в качестве игрушки; при использовании изделия рядом с детьми необходимо быть очень внимательными, детям запрещается чистить или ремонтировать изделие без присутствия куратора.
Запрещено использование на открытом воздухе или влажных поверхностях, используйте только на сухих поверхностях внутри помещений; не прикасайтесь к штепсельной вилке или какой-либо части изделия мокрыми руками.
Во избежание воспламенения, взрыва или получения травм, пожалуйста, перед использованием проверьте литиевую батарею и зарядное устройство на наличие повреждений; запрещается использовать пылесос, если литиевая батарея или зарядное устройство повреждены.
Мягкая роликовая щетка пылесоса , аккумулятор, металлическая соединительная штанга и основной блок пылесоса являются токоведущими деталями, пожалуйста, не погружайте их в воду или другие жидкости во время очистки; после ежедневной чистки, пожалуйста, убедитесь, что все фильтрующие устройства полностью сухие.
При чистке мягкой роликовой щетки, пожалуйста, выключите основной блок, чтобы вращающаяся валиковая щетка не нанесла повреждений пользователю; не используйте изделие без установки каких-либо комплектующих. Используйте только оригинальное зарядное устройство, пожалуйста, не используйте неофициальный адаптер, так как это может привести к возгоранию литиевой батареи.
Не используйте изделие для всасывания воды и легковоспламеняющихся или взрывоопасных жидкостей, таких как бензин и т.д.; не используйте изделие для всасывания токсичных растворов, таких как хлорный отбеливатель, аммиак, канализационные чистящие средства или другие жидкости.
Запрещается использовать пылесос для очистки пыли от гипсокартона, каминной золы и пепла, а также для втягивания дыма или зажигательных средств, таких как угли, окурки или спички.
Не используйте пылесос для уборки острых предметов, таких как стекло, гвозди, шурупы, монеты, так как это может привести к повреждению пылесоса.
Не используйте пылесос для сбора острых и твердых предметов, таких как стекло, гвозди, винты или монеты, которые могут повредить устройство.
Пожалуйста, удерживайте каналы воздушного потока и движущиеся части устройства подальше от волос, свободной одежды, пальцев и других частей тела; не направляйте металлическую соединительную тягу или другие детали на глаза, уши или в рот.
Запрещается класть какие-либо предметы на всасывающее отверстие.
Не используйте пылесос, если всасывающее отверстие закупорено; пыль, хлопчатая бумага, волосы или другие предметы могут привести к ослаблению воздушного потока, пожалуйста, своевременно проводите чистку.
Пожалуйста, не облокачивайте пылесос на неустойчивые поверхности, такие как стул или обеденный стол, чтобы не повредить пылесос или не нанести травм пользователю в результате падения пылесоса; при повреждении или неисправности пылесоса в результате падения, обратитесь к официальному сервисному представителю, пожалуйста, не выполняйте разборку самостоятельно.
Пожалуйста, заряжайте батарею в строгом соответствии с инструкциями; при неправильной зарядке и превышении указанного диапазона температур, батарея может быть повреждена.
Пожалуйста, вытащите штепсельную вилку перед техническим обслуживанием или ремонтом, в ситуации если устройство не будет использовано в течении длительного времени.
Пожалуйста, будьте предельно внимательны при использовании изделия для чистки лестниц. Не проводите сборку, не заряжайте и не используйте данное изделие на улице, в ванной комнате или около бассейна. Предупреждение об опасности возгорания:
Пожалуйста, не наносите на фильтр данного устройства какие-либо ароматизаторы — химические вещества в таких продуктах являются легковоспламеняющимися и могут привести к возгоранию изделия. Пожалуйста, прочитайте и сохраните эти инструкции.
Компания Dreame Trading (Tianjin) Co., Ltd. настоящим заявляем, что данное оборудование соответствует требованиям всех действующих директив ЕС и европейских стандартов с изменениями и дополнениями.
Данное устройство предназначено только для домашнего использования.
Меры предосторожности при хранении и транспортировке:
• В течение короткого периода, например одного месяца, пылесос рекомендуется хранить при температуре от 20 до 50 ° C и относительной. влажности 60 % ± 5 %. В течение длительного времени храните пылесос при 40 41 температуре окружающей среды от 0 ° C до 25 ° C.
• Утилизируйте пылесос надлежащим образом. Когда его срок службы подойдет к концу, утилизируйте пылесос в соответствии с местными законами и правилами страны или региона, в котором он используется.
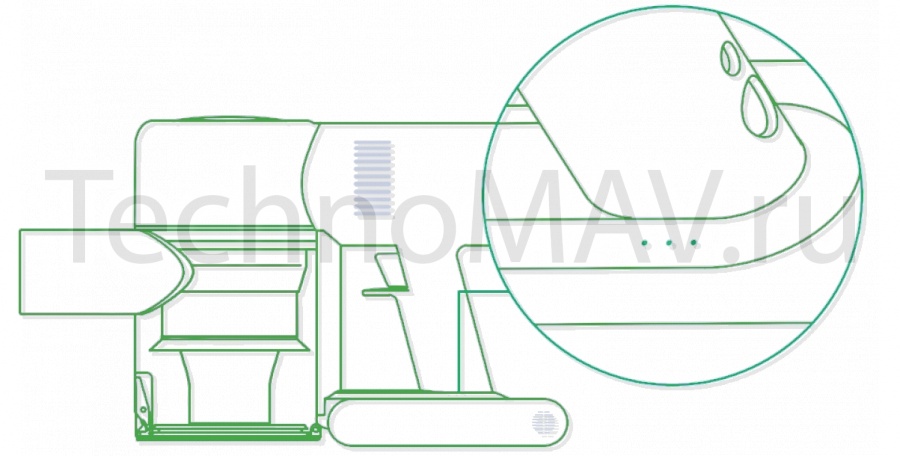
Обзор устройства беспроводного пылесоса DreameV11 Vacuum Cleaner

Дисплей
Разъем для зарядки
Кнопка включения и выключения
· Нажмите, чтобы включить
· Отпустите, чтобы выключить
Кнопка для очистки мусорного контейнера
Циклонный двигатель
Кнопка разблокировки удлинительной трубки
Система фильтрации HEPA
Удлинительная трубка
Кнопка для съема насадки
Щетка с мягким валиком
Аксессуары пылесоса DreameV11 Vacuum Cleaner, беспроводной

Адаптер питания
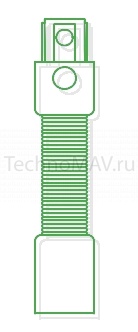
Удлинитель шланга
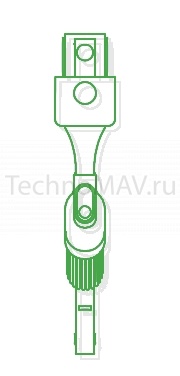
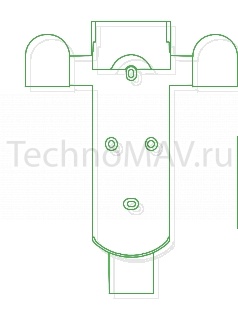
Щелевая насадка «2 в 1»
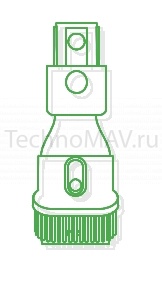
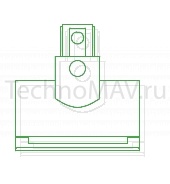
Насадка-щетка «2 в 1»
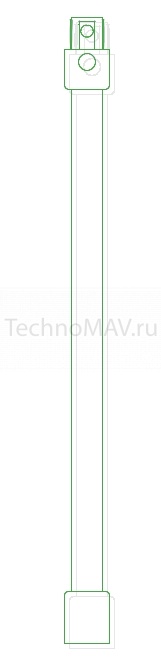
Удлинительная трубка
Крепление для зарядки и хранения «2 в 1» (включая 2 винта и 2 розетки)
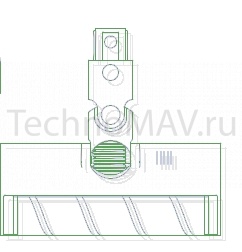
Щетка с мягким валиком
Моторизированная щетка против клещей
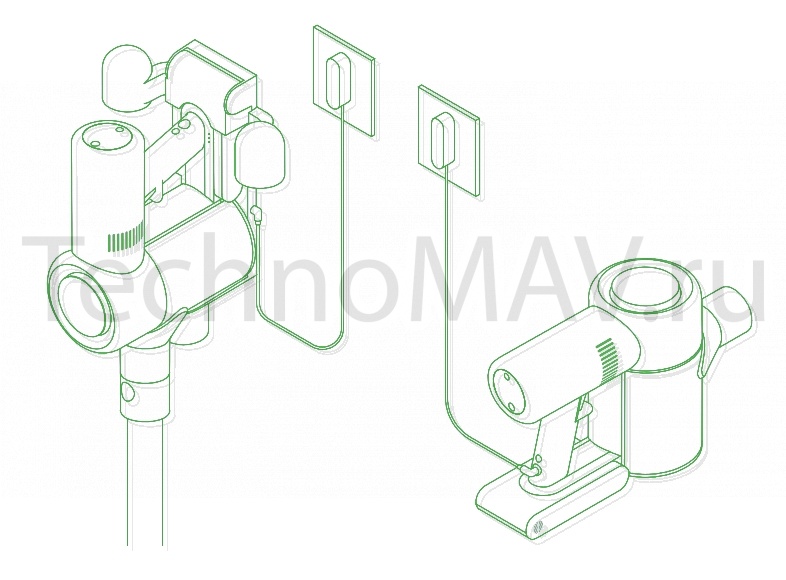
Зарядка беспроводного пылесоса DreameV11 Vacuum Cleaner
Примечание.
• Перед первым использованием полностью зарядите пылесос. Это займет около 4 часов.
• Не используйте пылесос во время зарядки.
• Продолжительное использование пылесоса в турборежиме приводит к нагреванию аккумулятора и увеличению времени зарядки. Подождите 30 минут, чтобы пылесос остыл, прежде чем заряжать его.
Индикатор состояния аккумулятора беспроводного пылесоса DreameV11 Vacuum Cleaner
 Низкий уровень заряда аккумулятора
 Средний уровень заряда аккумулятора
 Почти полный уровень заряда аккумулятора
 Полный уровень заряда аккумулятора
Примечание: Как только пылесос будет полностью заряжен, индикатор погаснет, а через 5 минут пылесос перейдет в энергосберегающий режим.
 Выкл.
Выкл.  Мигание
 Вкл.
Вкл.
Введение в функции экрана дисплея беспроводного пылесоса DreameV11 Vacuum Cleaner
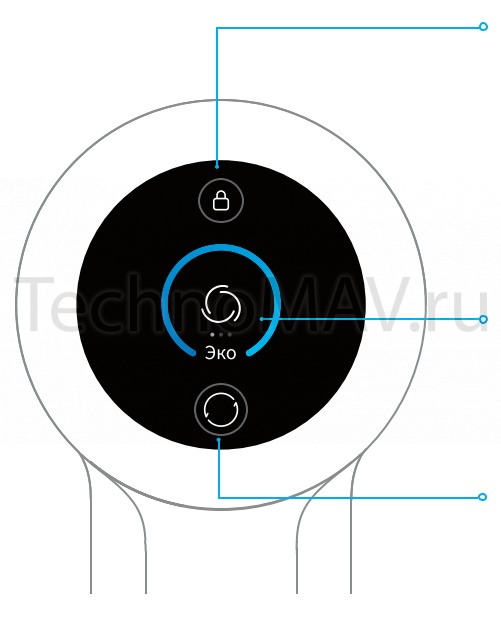
1. Электронная блокировка/Сброс фильтра · Нажмите, чтобы переключиться в рабочий режим · Нажмите и удерживайте в течение 1,5 секунды, чтобы войти в интерфейс сброса фильтра
2. Индикатор заряда батареи · Синий: уровень заряда батареи более 20% · Красный: уровень заряда батареи менее 20%
3. Переключатель/Настройка языка · Нажмите, чтобы переключить режим эко, режим мед, режим турбо · Нажмите и удерживайте в течение 3 секунд, чтобы войти в интерфейс настройки языка
Примечание:
Вам необходимо обратить внимание на какие-либо неисправности при использовании продукта, на экране появится соответствуещее всплывающее сообщение. Вы должны следовать инструкциям на экране, чтобы поддерживать нормальную производительность.
Настройка языка беспроводного пылесоса DreameV11 Vacuum Cleaner
Вы можете установить язык отображения подсказок следующими необходимыми способами.
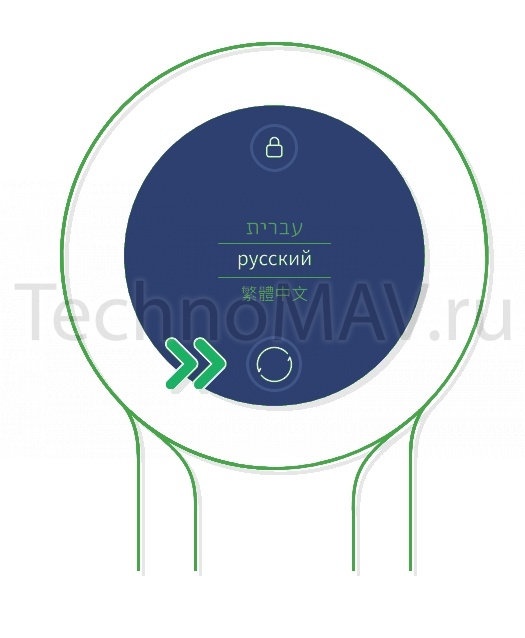
Нажмите  и удерживайте в течение 3 секунд, чтобы войти в интерфейс выбора языка,
нажмите , чтобы прокрутить список языков, выберите соответствующий язык, а затем
нажмите и удерживайте в течение 3 секунд, чтобы сохранить настройки
Примечание:
если в течение более 5 секунд не будет выполнено никаких действий, оно автоматически выйдет из интерфейса настройки языка, и информация на дисплее будет отключена.
Режим уборки беспроводного пылесоса DreameV11 Vacuum Cleaner
Есть два режима работы пылесоса, которые можно выбрать в соответствии с вашими потребностями.
Режим 1: режим прерывистой уборки
Нажмите и удерживайте переключатель пылесоса, чтобы начать работу, и отпустите его, чтобы немедленно остановить.
Режим 2: режим непрерывной уборки (электронная блокировка)
В режиме ожидания нажмите кнопку электронной блокировки, чтобы переключиться в режим непрерывной уборки, а затем однократно нажмите переключатель, чтобы перевести пылесос в режим непрерывной уборки. Используйте электронную блокировку, чтобы освободить пальцы и избежать их усталости, вызванной удержанием переключателя.

Примечание:
• В этом режиме, однократно нажмите переключатель, чтобы приостановить работу или начать снова, режим работы пылесоса не изменится.
• Нажмите на электронную блокировку еще раз, чтобы выйти из режима непрерывной уборки.
Использование разных насадок беспроводного пылесоса DreameV11 Vacuum Cleaner
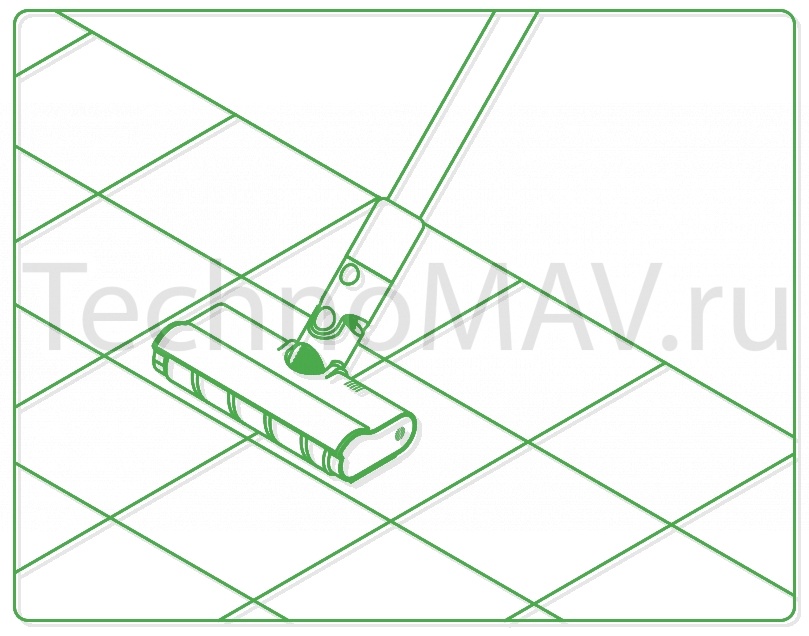
Щетка с мягким валиком
подходит для уборки твердых поверхностей, таких как пол, плитка, мрамор, а также для уборки крупных кусков грязи и мусора. Кроме того, щетку с мягким валиком можно прикрепить прямо к пылесосу.
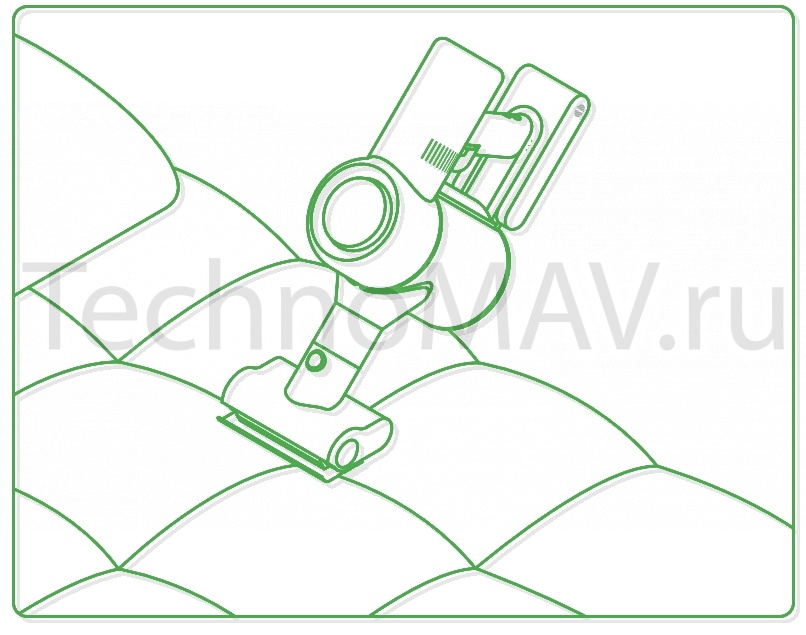
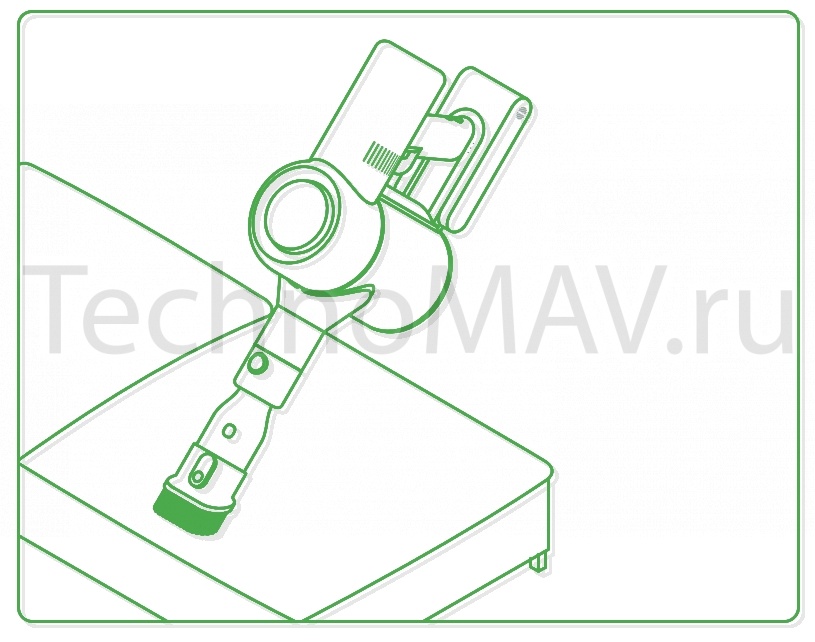
Электрическая щетка против клещей
сильные вибрации обеспечивают глубокое очищение для удаления клещей и пыли с матрасов и тканевых поверхностей.
Насадка-щетка «2 в 1»
подходит для уборки пыли и клещей с кроватей, диванов и другой мебельной ткани.
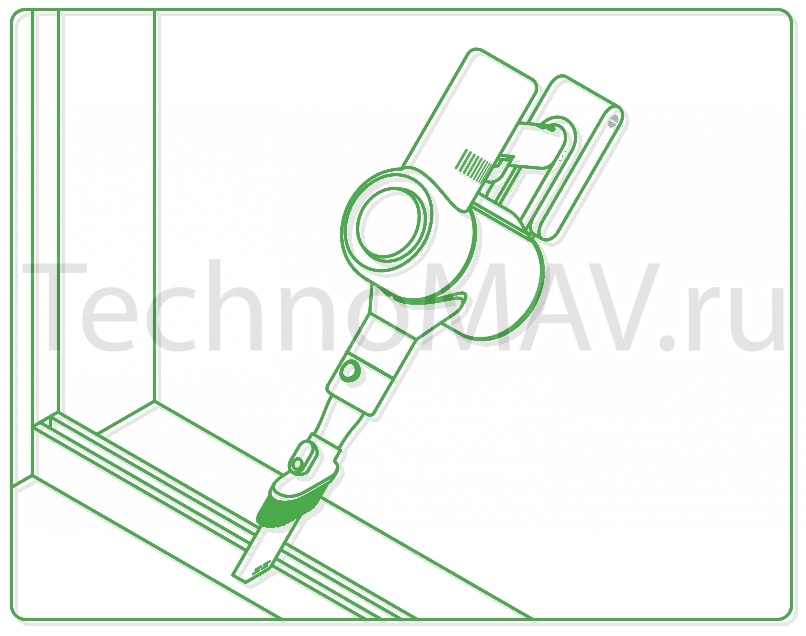
Щелевая насадка «2 в 1»
подходит для уборки в узких щелях, углах дверей и окон, на лестницах и в других труднодоступных местах.
эластичный мягкий шланг
используйте для очистки труднодоступных углов.

Примечание:
• Если какая-либо из вращающихся частей застрянет, пылесос может автоматически выключиться. Чтобы продолжить использование, удалите все посторонние предметы.
• Пылесос автоматически выключится, когда двигатель перейдет в режим защиты от перегрева. Подождите, пока температура двигателя нормализуется, прежде чем продолжить использование.
Примечание: Вам необходимо обратить внимание на какие-либо неисправности при использовании продукта, на экране появится соответствуещее всплывающее сообщение. Вы должны следовать инструкциям на экране, чтобы поддерживать нормальную производительность.

Заблокирован воздуховод
проверьте, не заблокированы ли пылесборник, удлинитель и сопло мягкого ролика.
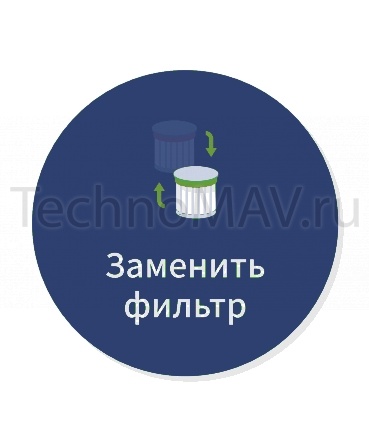
Для замены фильтра
обратитесь к разделу руководства по техническому обслуживанию [Очистка HEPA-фильтра, чтобы снять фильтр и заменить его.
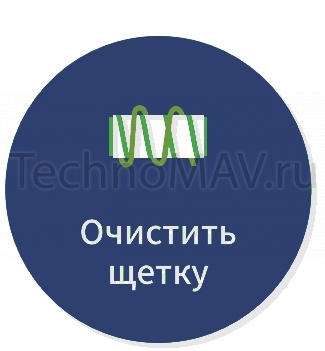
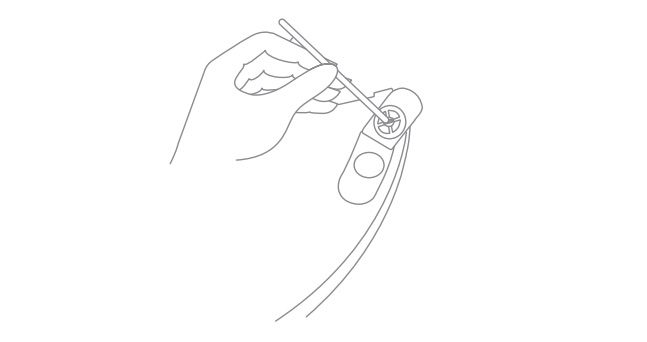
Очистите щетку
обратитесь к разделу руководства по техническому обслуживанию [Сопло мягкого ролика, чтобы очистить волокнистый материал и волосы, намотанные на щетку валика.
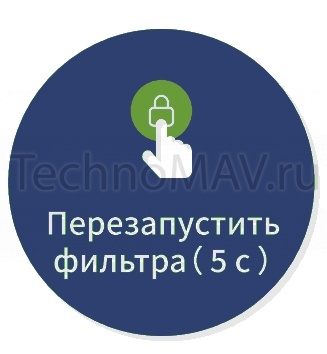
Сброс фильтра нажмите  и удерживайте в течение 5 секунд, чтобы открыть экран обратного отсчета сброса фильтра. Когда на экране появляется
  , это означает, что сброс выполнен успешно.
Низкий заряд батареи
пожалуйста, зарядите как можно скорее.

Перегрев батареи
пожалуйста, подождите и продолжайте использовать после того, как температура двигателя станет нормальной.
Ошибка батареи
пожалуйста, свяжитесь с нашим сервисом для устранения проблемы.
Батарея разряжена
пожалуйста, зарядите как можно скорее.
Технические характеристики беспроводного пылесоса DreameV11 Vacuum Cleaner
| Вакуумный пылесос | ~ | ~ | ~ |
| Модель | WN6 | Номинальное напряжение | 25.2V |
| Номинальная мощность | 450W | Номинальное напряжение | 25.2V |
| Щетка с мягким валиком | ~ | Электрическая щетка против клещей | ~ |
| Модель | DM001 | Модель | DM002 |
| Номинальная мощность | 40W | Номинальная мощность | 20W |
| Адаптер питания | ~ | ~ | ~ |
| Модель | ~ | YLS0241u-x300080(u=A or B,x=E or U) | ~ |
| Номинальное входное напряжение | ~ | 100-240V ~,50/60 Hz ,0.8 A Max | ~ |
| Номинальное выходное напряжение | ~ | 30 V 800m A | ~ |
Данное устройство содержит аккумуляторы, которые должны заменять только квалифицированные специалисты или специалисты сервисного отдела.
Данное устройство содержит несменный аккумуляторы.
Компания Dreame Technology (Tianjin) Limited настоящим заявляет, что данное оборудование соответствует требованиям всех действующих директив ЕС и европейских стандартов с изменениями и дополнениями. Информация об утилизации и переработке отходов электрического и электронного оборудования
Все изделия, обозначенные символом раздельного сбора отработанного электрического и электронного оборудования (WEEE, директива 2012/19/ EU), следует утилизировать отдельно от несортируемых бытовых отходов. С целью охраны здоровья и защиты окружающей среды такое оборудование необходимо сдавать на переработку в специальные пункты приема электрического и электронного оборудования, определенные правительством или местными органами власти. Правильная утилизация и переработка помогут предотвратить возможные негативные последствия для окружающей среды и здоровья человека. Чтобы узнать, где находятся такие пункты сбора и как они работают, обратитесь в компанию, занимающуюся установкой оборудования, или в местные органы власти.
Фильтр пылесоса
Система фильтрации HEPA.
Завершает обработку HEPA-фильтр 12-го класса, улавливающий частицы размером до 0.3 мкм.
1. Блокировка или сброс фильтра:
· Нужно нажать, чтобы переключиться в рабочий режим.
· Нужно нажать и удерживать в течение 1,5 секунды, чтобы войти в режим сброса фильтра.
Для замены фильтра Очистка HEPA-фильтра, снять фильтр и заменить его.
Для сброса фильтра нажмите и удерживайте в течение 5 секунд, чтобы открыть экран обратного отсчета сброса фильтра. Когда на экране появляется , это означает, что сброс выполнен успешно.
Состоянии фильтров можно увидеть на встроенном OLED дисплее.

Все части фильтров можно чистить и промывать холодной водой.
Если пылесос не работает должным образом,
см. приведенную ниже таблицу устранения неполадок.
| Ошибки | Возможные причины | Возможные причины |
| Пылесос не работает | Пылесос разряжен или имеет низкий уровень заряда аккумулятора. | Полностью зарядите пылесос, а затем продолжите использование. |
| Пылесос не работает | Режим защиты от перегрева, вызванный блокировкой. | Режим защиты от перегрева, вызванный блокировкой. |
| Пылесос не работает | Заблокировано отверстие для всасывания или вентиляционный канал. | Очистите отверстие для всасывания или вентиляционный канал от мусора. |
| Слабая мощность всасывания | Отсек для пыли заполнен или засорен блок HEPA-фильтра. | Опустошите отсек для пыли и очистите блок HEPA-фильтра. |
| Слабая мощность всасывания | Насадка заблокирована. | Очистите насадку от мусора. |
| Двигатель издает странный шум | Основное отверстие для всасывания или шланг заблокированы. | Очистите основное отверстие для всасывания или шланг от мусора. |
| После включения пылесоса первый индикатор горит красным | Аккумулятор поврежден. | Аккумулятор поврежден. |
| После включения пылесоса первый индикатор мигает красным | Адаптер питания несовместим с устройством. | Используйте только оригинальный адаптер питания, чтобы заряжать пылесос. |
| Индикатор состояния аккумулятора не горит во время зарядки | Адаптер не подключен к пылесосу. | Обратитесь за помощью в отдел послепродажного обслуживания. |
| Индикатор состояния аккумулятора не горит во время зарядки | Аккумулятор полностью заряжен и перешел в спящий режим. | Обратитесь за помощью в отдел послепродажного обслуживания. |
| Индикатор состояния аккумулятора не горит во время зарядки | Если проблема не устраняется после исключения двух вышеупомянутых возможных причин, | Обратитесь за помощью в отдел послепродажного обслуживания. |
| Устройство заряжается медленно | Слишком низкая или слишком высокая температура аккумулятора. | Подождите, пока температура аккумулятора нормализуется, а затем продолжите использование. |
Любая техника нуждается в надлежащем уходе, особенно роботы-пылесосы Xiaomi, которые непосредственно контактируют с различными загрязнениями. Если игнорировать элементарные правила эксплуатации, прописанные производителем в инструкции, то пользователь может быть огорчен тем, что гаджет стал хуже функционировать или вовсе не реагирует на команды.
Ошибка пылесоса Xiaomi «Проверьте и прочистите фильтр» – одна из типичных проблем, с которыми сталкиваются владельцы аппарата. В приложении Mi home данная ошибка отображается как «Внутренняя ошибка. Сбросьте параметры системы». Этот сигнал тревоги ни в коем случае не говорит о критическом состоянии аппарата – он просто требует к себе некоторого внимания. Разберемся, что делать в этом случае и нужно ли сразу обращаться в сервисную службу за помощью. Вне зависимости от модели робота-пылесоса Xiaomi, действия выполняются по одному алгоритму:
- Очистка HEPA-фильтра робота-пылесоса
- Промывка слоя пенопласта
- Промывка фильтра грубой очистки
- Очистка линии всасывания
- Проверка состояния всех расходников в приложении Mi Home
- Замена вентилятора

Сейчас мы разберем проблему «Проверьте и прочистите фильтр» подробно на примере одного из популярных домашних помощников — робота-пылесоса Xiaomi Mi Robot Vacuum-Mop (Mijia Sweeping Robot 1C).
Очистка фильтра
Контейнер для мусора любого пылесоса Xiaomi предусматривает картридж HEPA-фильтр, а более продвинутые модификации – дополнительные слои пены и фильтр предварительной очистки. Очистка фильтра Xiaomi Mi Robot Vacuum-Mop (Mijia 1C) выполняется следующим образом:
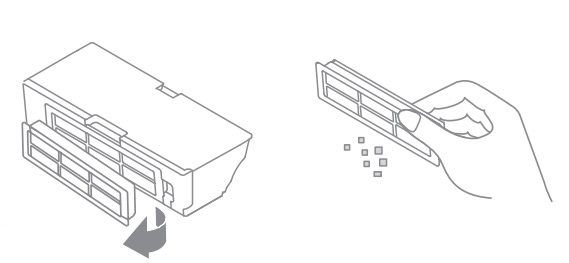
- Путем аккуратного постукивания можно удалить крупный сор.
- За счет создания обратной тяги обычным пылесосом (если он стоит в резерве дома).
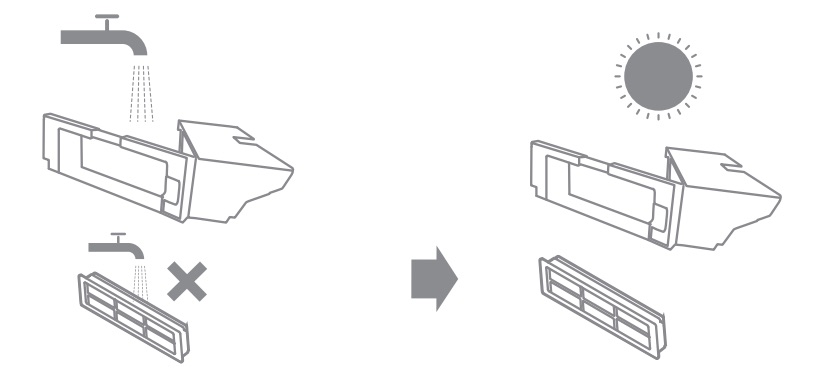
- Некоторые модели HEPA-фильтров можно мыть под проточной водой. При этом отжим или любые другие механические воздействия не допускаются – влага должна высохнуть естественным путем. Фильтр устанавливается на место только после полного высыхания.

Избежать сильного загрязнения HEPA-фильтра можно, если своевременно опорожнять контейнер для пыли робота-пылесоса Xiaomi Mi Robot Vacuum-Mop. Желательно, чтобы он не наполнялся более половины своего объема, так как, кроме проблем с фильтром, заметно падает эффективность всасывания и мощность пылесоса. Частота опорожнения резервуара Xiaomi Mijia Sweeping Robot 1C зависит от частоты использования прибора, площади уборки и присутствия в доме животных. Однако ожидать, что HEPA-фильтр прослужит долго, не приходится – через определенный срок они подлежат замене.
При возникновении ошибки «Проверьте и прочистите фильтр» следует обратить внимание и на другие фильтрующие элементы, предусмотренные в модели робота-пылесоса Xiaomi Vacuum-Mop (Mijia 1C):
- Слой пенопласта хорошо моется водой и легко меняется при износе.
- Промывка фильтра грубой очистки – несложная операция, которая схожа с действиями с фильтром HEPA. Этот элемент подлежит замене с периодичностью, которую указал производитель в руководстве по эксплуатации.
При обработке фильтров не стоит забывать, что линия всасывания тоже требует внимания. Чтобы пылесос работал эффективно, нужно удалить все частицы, которые могут препятствовать движению воздуха.
Мы рекомендуем дополнительно проверить состояние всех расходников в приложении Mi Home.

Неисправность вентилятора
Не исключено, что все манипуляции с фильтрами не дадут положительного результата, и ошибка останется. В этом случае причиной служит выход из строя вентилятора.
Этот механизм чувствителен к загрязнениям, поэтому при неправильной эксплуатации может отказать. Естественный износ – вторая причина, которая приводит к появлению ошибки «Проверьте и прочистите фильтр» у робота-пылесоса Xiaomi Mi Robot Vacuum-Mop (Mijia Sweeping Robot 1C). Продлить срок службы вентилятору можно, если содержать в чистоте отсек под контейнером пылесборника.
В обоих случаях потребуется замена вентилятора, так как его ремонт нецелесообразен. Эту процедуру лучше доверить профессионалам из специализированного сервисного центра, чтобы к существующей проблеме не добавились новые.

Обращайтесь к нам по адресу:
г. Уфа, Индустриальное шоссе, 4А, корпус 3, офис 17
dreame Cordless Vacuum Cleaner User Manual
Safety Instructions
To prevent accidents including electric shock or fire caused by improper use, please read this manual carefully before use and retain it for future reference
Warning
This product can be used by children aged from 8 years and above and persons with physical, sensory, intellectual deficiencies, or limited experience or knowledge under the supervision of a parent or guardian to ensure safe operation and to avoid any risk of hazards. Cleaning and maintenance shall not be made by children without supervision.
The vacuum cleaner is not a toy. Children shall not play with or operate this product. Please exercise caution when using the vacuum cleaner near children. Do not allow children to clean or maintain the vacuum cleaner unless supervised by a parent or guardian.
Do not use the vacuum cleaner outdoors or on wet surfaces. Only use the vacuum cleaner on dry indoor surfaces. Do not touch the plug or any part of the vacuum cleaner with wet hands.
Do not use the vacuum cleaner outdoors or on wet surfaces. Only use the vacuum cleaner on dry indoor surfaces. Do not touch the plug or any part of the vacuum cleaner with wet hands.
The smart multi-brush bar, battery, metal connector pin, and vacuum cleaner are electrically conductive and should not be immersed in water or other liquid. Make sure to dry all filters after cleaning.
Prevent injury caused by moving parts. Turn off the vacuum cleaner before cleaning the smart multibrush bar. The smart multi-brush bar, dust compartment and filter must all be properly installed before using the vacuum cleaner.
Only use the original charging adapter. Never use an unoriginal adapter, as this may cause the lithium battery to catch fire.
Do not use the vacuum cleaner to pick up flammable or combustible liquids, such as gasoline, or bleach, ammonia, drain cleaners or other liquids.
Do not use the vacuum to pick up sharp or hard objects, such as glass, nails, screws, or coins, which may damage the machine.Do not use the vacuum cleaner to pick up drywall particles, ashes like fireplace ash, or smoking or burning materials such as coal, cigarette butts or matches.
Check the area to be cleaned before use. To prevent the openings from being blocked, clear the larger paper, spitball, plastic cloth or sharp objects (such as glass, nails, screws, coins, etc.) and any object which is larger than openings.
Keep hair, loose clothing, fingers and other parts of the body away from the vacuum cleaner’s openings and moving parts. Do not point the hose, wand or tools at your eyes or ears or put them in your mouth.
Do not put any object into the vacuum cleaner’s openings. Do not use the vacuum cleaner with any opening blocked. Keep free of dust, lint, hair, or other items which may reduce airflow.
Do not rest the vacuum cleaner against a chair, table, or other unstable surface, as this may cause damage to the machine or personal injury. If the vacuum cleaner becomes damaged from being knocked over or is otherwise malfunctioning, please contact our authorized service department. Never attempt to disassemble the device on your own.
All instructions in the manual for recharging the battery must be strictly followed. Failure to properly charge the battery within the specified temperature range could damage the battery.
Please be extra careful when using the vacuum cleaner to clean stairs
Make sure the vacuum cleaner is unplugged when not used for extended periods as well as prior to performing any maintenance or repairs.
Do not install, charge, or use this product outdoors, in bathrooms, or around a pool.
Fire Hazard Warning: Do not apply any type of fragrance to the vacuum cleaner’s filter. These types of products are known to contain flammable chemicals which may cause the vacuum cleaner to catch fire.
This product is designed for home use only.
Only use the original charger (Model YLS0251B-E300080 (EU) / YLS0241A-U300080 (UK) / YLS0241A-A300080 (AU)). Failing to do so may cause the lithium-ion battery to catch fire.
Only use the approved battery type (Model P2032-7S1P-BW/P2032-7S1P-BWA). Failing to do so may cause the lithium-ion battery to catch fire.
We Dreame Trading (Tianjin) Co.,Ltd. , hereby, declares that this equipment is in compliance with the
applicable Directives and European Norms, and amendments. The full text of the EU declaration of conformity is available at the following internet address: www.dreame-technology.com
Product Overview
Part Names

Accessories
Introduction of Display Screen

Note: If the vacuum cleaner cannot work normally, the display will show an error message. Please refer to the troubleshooting part to find your solution.
Setting Language
Press and hold the button ![]() for 3 seconds to open the language list, then press the button
for 3 seconds to open the language list, then press the button ![]() to scroll through the language to select the desired one. Press and hold the button
to scroll through the language to select the desired one. Press and hold the button ![]() for 3 seconds to use the selected language.
for 3 seconds to use the selected language.
Note: The display screen will turn to the main page if there is no operation for more than 15 seconds.
Switching Suction Level
Press the button ![]() to switch between three suction levels of eco, med/auto, and turbo.The corresponding suction level will be highlighted on the display screen.
to switch between three suction levels of eco, med/auto, and turbo.The corresponding suction level will be highlighted on the display screen.
Only when using the smart multi-brush bar, the auto mode will be activated and the notification of “Auto” will appear on the display screen. The vacuum cleaner will then automatically switch the suction level between the floor/tile and the carpet.
Note:
- Stop the vacuum cleaner at any time while cleaning. Then it will continue to use the last selected suction level when started again.
- Connecting the smart multi-brush bar to the vacuum cleaner will activate the Auto Mode. In this mode, the vacuum cleaner can automatically adjust its suction level depending on the surface type.
Installation
Vacuum Installation Diagram

Accessories Installation Diagram


2-in-1 Charging & Storage Mount Installation Diagram
The 2-in-1 charging & storage mount is an optional accessory. You can install it based on your needs.
- The 2-in-1 charging & storage mount should be installed in a cool, dry place with an electrical outlet nearby. Prior to installing, ensure that there are no electrical wires or pipes in the space directly behind where the mount will be installed.
- The bottom of the mounting template sticker should be level and at least 103cm from the ground, and its top should have at least 30cm* of clearance above it. (*30cm: Leave enough space just in case you may need to purchase the replaceable battery in the future.)
- Use a power drill with an 8 mm drill bit to drill a hole into each hole marker on the mounting template sticker, then insert a wall plug into each hole.
- Align the position holes on the mount with the holes on the wall. Fasten it to the wall with the included screws.


Charging
Fully charge the vacuum cleaner before using it for the first time.
Note: Fully charging will take about 4 hours. Vacuuming at Turbo mode for a prolonged period will cause the battery to heat up, which increases charging time. Allow the vacuum cleaner to cool down for 30 minutes before charging it.
Charging Methods
- Charging the vacuum cleaner with the charger.

- Charging the vacuum cleaner on the charging mount.


Displaying Battery Status
Display Screen
The number on the display screen represents the current battery level in a percentage during charging. When the number turns into 100, the battery is fully charged.

LED Battery Status Indicator
When charging, the three indicators flash and then turn bright constantly in sequence considering the battery condition. When the charging is completed, the three indicators keep solid light.

Note: Once the vacuum cleaner is fully charged, the indicator will turn off after 5 minutes, and the vacuum cleaner will enter the energy-saving mode.
How to Use
Working Methods
There are two working methods for the vacuum cleaner, which can be selected based on your needs.
Note:
- In this mode, briefly press the on/off switch to suspend the operation or start again, and the working mode of the vacuum cleaner will not change.
- Click the electronic lock again to quit the Continuous Cleaning mode.
Using Different Attachments
Smart Multi-brush Bar
For cleaning floors such as marble, tile, and short pile carpet. When Auto mode is activated, the vacuum cleaner can automatically adjust its suction level depending on the surface type.
Note: The smart multi-brush bar can be attached directly to the vacuum cleaner.
Mini Electric Brush
For vacuuming dirt, pet hair, and other stubborn debris from sofas, bedding, and other fabric surfaces.
Note: It is not recommended to vacuum on the fragile surfaces, such as silk.
2-in-1 Brush Nozzle
For vacuuming curtains, keyboards, ceilings, sofas, vehicle interiors, coffee tables, etc.
Crevice Nozzle
Suitable for vacuuming cracks, corners of doors and windows, stairs, and other hardto-reach places.
Extension Hose
Use for hard-to-reach corner cleaning.

Note:
- If any rotating part becomes stuck, the vacuum cleaner may shut off automatically. Remove any trapped foreign objects, then resume use.
- When the motor runs overheated, the vacuum cleaner will automatically shut off. Wait until the battery temperature returns to normal, then resume use.
Care & Maintenance
Tips:
- Always use genuine parts to keep your warranty from being voided.
- If the filter or nozzle becomes clogged, the vacuum cleaner will stop working shortly after being turned on. Clear the tube to restore functionality.
- If the vacuum cleaner will not be used for an extended period, fully charge it, unplug its charger, and store it in a cool, low-humidity environment away from direct sunlight. To avoid over-discharging the battery, recharge the vacuum cleaner at least once every 3 months.
Cleaning the Vacuum Cleaner
Wipe the vacuum cleaner with a soft dry cloth.
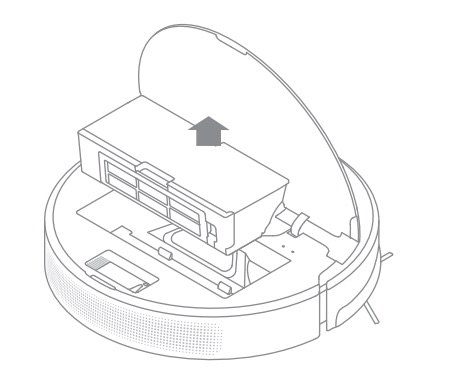
Cleaning the Dust Compartment, Pre-filter, and Cyclone Assembly
The vacuum cleaner’s cleaning ability will be reduced if the dust compartment is filled to the “MAX” mark. To regain performance, empty the dust compartment in a timely manner.
Before emptying the compartment, make sure the vacuum cleaner is disconnected from the power, and do not press its power button.
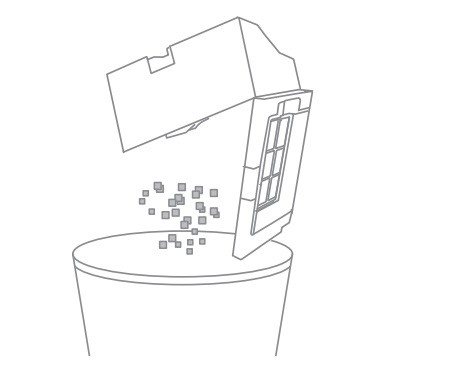
- Press the dust compartment bottom cover release button, then empty the contents.

- Push the dust compartment release switch in the direction indicated by the arrow, then gently remove the dust compartment from the vacuum cleaner.

- Remove the pre-filter first, then lift the handle of the cyclone assembly and turn to counterclockwise until it stops, then pull to lift out the cyclone assembly.

- . Rinse the cyclone assembly, pre-filter and dust compartment until they are clean. After washing, air dry at least 24 hours .


Note:
- It is recommended to clean the dust compartment once every month.
- It is recommended to clean the pre-filter at least once every 3 months and the cyclone system at least once every 6 months.
Installing the Dust Compartment, Pre-filter, and Cyclone Assembly
- Insert the cyclone assembly vertically into the dust compartment, and make sure that the handle of the cyclone assembly line up with the slot on the left side of the dust compartment. Turn the handle clockwise until it locks, then flip the handle down.
- Place the pre-filter with its front side facing up into the cyclone assembly.

- Slightly tilt the dust compartment so its slot aligns with the clip on the vacuum cleaner. Then gently push the dust compartment until it clicks into place.


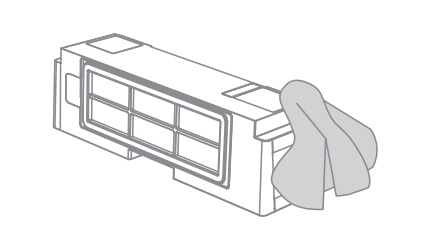
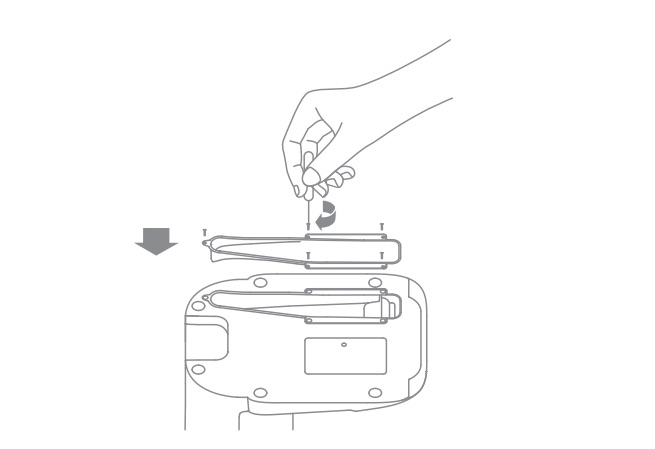
Cleaning the HEPA Filter
It is recommended to clean the HEPA filter once every 4 to 6 months.
- Remove the dust compartment as shown in the figure.

- Remove the HEPA filter from the vacuum cleaner by pulling it down in the direction shown in the figure.

- Clean the HEPA filter with clean water.
Make sure you rotate the HEPA filter 360° to thoroughly and remove all dust caught in the filter. Lightly tap the filter several times to remove any excess dirt.
- Allow the HEPA filter to air dry for 24 hours.


Note:
- Only use clean water to wash the filter. Do not use detergent.
- Do not attempt to clean the HEPA filter with a brush or finger.
Installing the HEPA Filter
- Insert the HEPA filter into the vacuum cleaner and gently press down, as illustrated.

- Reinstall the dust compartment.


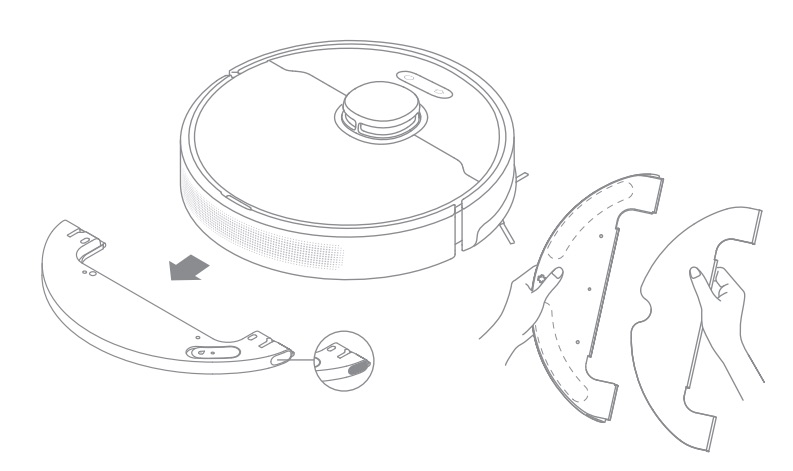
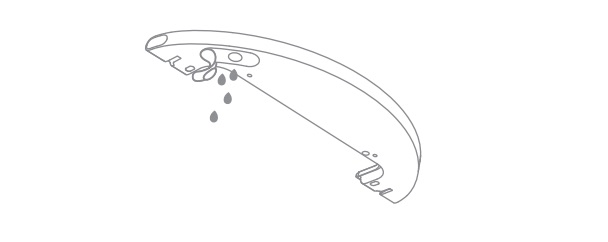
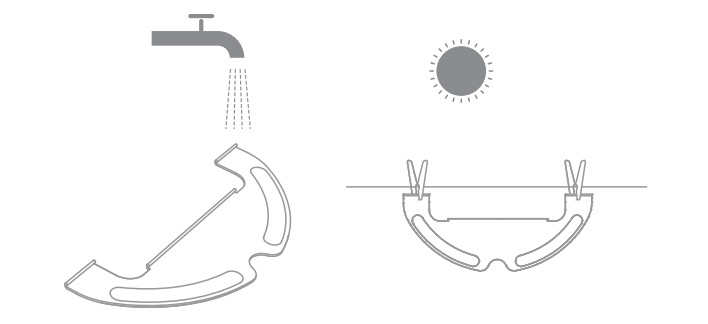
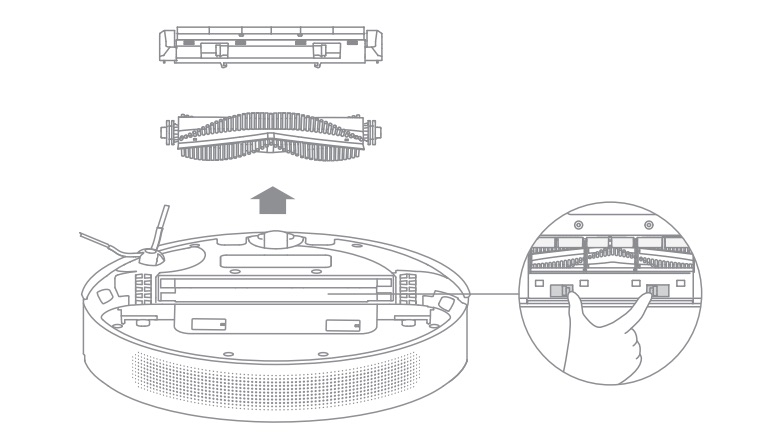
Cleaning the Smart Multi-brush Bar
- Turn the lock counterclockwise until it stops, then remove the roller brush from the smart multi-brush bar.

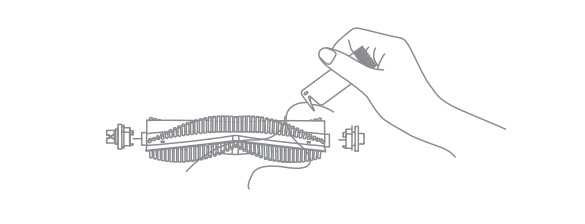
- Use scissor to cut off the hairs and fibers that stick on the roller brush. Wipe the dust from the notch and transparent cover with a dry cloth or paper towel. Thoroughly dry before use.

- When it is dirty, rinse the roller brush with clean water until it is clean.

- Stand the roller brush upright for at least 24 hours until it is fully dry.


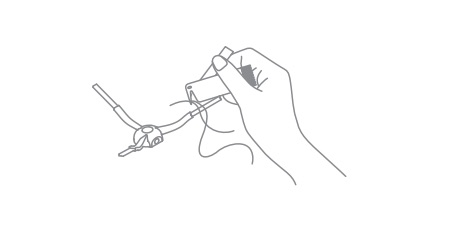
Cleaning the Mini Electric Brush
- Use a coin as illustrated to rotate the lock counterclockwise until you hear a click.

- After unlocking the roller brush, remove it from the mini electric brush, then rinse and clean the brush head.

- Stand the roller brush upright in a well ventilated area for at least 24 hours until it is fully dry.

- Once the mini roller brush is dry, reinstall it by following the disassembly steps in reverse.


Battery Pack
The vacuum cleaner contains a removable rechargeable lithium-ion battery pack which has a limited number of recharge cycles. After extended use, the battery pack may no longer hold a charge. If this happens, it means the battery pack has reached the end of its life cycle and needs to be replaced.
- Press down the battery pack release button and slide the battery pack to the right, as illustrated, to remove it.
- Install the new battery pack.


Specifications
|
Vacuum Cleaner |
|||
| Model | VTE1 | Charge Voltage | 30 V |
| Rated Power | 450 W | Rated Voltage | 25.2 V |
| Charging Time | Approx. 4 hours | Rated Capacity | 2800 mAh |
|
Mini Electric Brush |
|||
| Model | DM002 | ||
| Rated Power | 20 W | Rated Voltage | 25.2 V |
|
Smart Multi-brush Bar |
|||
| Model | ASF1 | ||
| Rated Power | 40 W | Rated Voltage | 25.2 V |
|
Charger |
|||
| Model | YLS0241A-AE300080 (AEU) / YLS0241A-U300080 (UK) / | ||
| Input | 100-240 V~50/60 Hz 0.8 A max | ||
| Output | 30 V 800 mA | ||
|
Rechargeable Lithium-ion Battery Pack |
|||
| Model | P2032-7S1P-BWA | Nominal Voltage | 25.2 V |
| Rated Capacity | 2800 mAh | Energy | 70.56 Wh |
FAQ
If the vacuum cleaner is not working properly, please refer to the troubleshooting table below.
|
Errors |
Possible Causes |
Solutions |
| Vacuum cleaner does not work | Vacuum cleaner is out of battery or low on power. | Fully charge the vacuum cleaner, then resume use. |
| Overheat protection mode triggered by a blockage. | Clean the suction openings or air duct. Wait until the vacuum cleaner cools down, then reactivate it. | |
| Suction opening or air duct is blocked. | Clear any blockages from suction opening or air duct. | |
| Weak suction force. | Dust compartment is full and/or HEPA filter assembly is clogged. | Empty the dust compartment and clean the HEPA filter assembly |
| Attachment is blocked. | Clear any blockages in the attachment. | |
| Motor makes a strange noise. | Main suction opening or extension rod is blocked. | Clear any blockages in main suction opening or extension rod. |
| The first indicator is red after turning on the vacuum cleaner | Battery pack is damaged. | Please contact after-sales service to arrange maintenance. |
| The first indicator blinks red when charging the vacuum cleaner. | The charger is incompatible. | Only use the original charger to charge the vacuum cleaner. |
| The battery indicator does not light when charging. | The charger is not plugged into the vacuum cleaner well. | Check whether the charger is properly plugged into the vacuum cleaner. |
| The battery is charged and switches to Sleep mode automatically. | The vacuum cleaner runs normal. | |
| If the problem persists after ruling out the above two possibilities. | Please contact the after sales service department for maintenance | |
| Charging too slow | Battery temperature is too low or too high. | Wait until the battery’s temperature returns normal, then resume use. |
The lithium-on battery pack contains substances that are hazardous to the environment. Before disposing of the vacuum cleaner, please first remove the battery pack, then discard, or recycle it in accordance with local laws and regulations of the country or region it is used in.
Troubleshooting
If the vacuum cleaner is not working properly, the screen display will show an error message.
Please refer to the troubleshooting table to find your solution.
|
Error Icon |
Error Message |
Solutions |
 |
Battery overheating | Please wait and continue to use after motor temperature is normal. |
 |
Roller brush stuck | Refer to the maintenance guide [Cleaning the Smart Multi-brush Bar] section to clean the fiber material and hairs wrapped around the roller brush. |
 |
Air duct blocked | Check whether the dust compartment, extension rod, and smart multi-brush bar are blocked. |
 |
Error | Please contact our after-sales service personnel for maintenance. |
WEEE Information
![]() All products bearing this symbol are waste electrical and electronic equipment (WEEE as in directive 2012/19/EU) which should not be mixed with unsorted household waste. Instead, you should protect human health and the environment by handing over your waste equipment to a designated collection point for the recycling of waste electrical and electronic equipment, appointed by the government or local authorities. Correct disposal and recycling will help prevent potential negative consequences to the environment and human health. Please contact the installer or local authorities for more information about the location as well as terms and conditions of such collection points.
All products bearing this symbol are waste electrical and electronic equipment (WEEE as in directive 2012/19/EU) which should not be mixed with unsorted household waste. Instead, you should protect human health and the environment by handing over your waste equipment to a designated collection point for the recycling of waste electrical and electronic equipment, appointed by the government or local authorities. Correct disposal and recycling will help prevent potential negative consequences to the environment and human health. Please contact the installer or local authorities for more information about the location as well as terms and conditions of such collection points.
Documents / Resources
References

Smart Robot Vacuum Cleaners | Dreame Official Site

Reset filter
Press and hold for 5
seconds to enter the filter
reset countdown screen.
When appears on the
screen, it indicates that the
reset is successful.
The battery runs out
Please charge as soon as
possible.
Battery Error
Please contact our
after-sales service
personnel for
maintenance.
更换滤芯
参 考 维 护 保 养【 清 洁 滤
芯】部分拆下滤芯更换。
Replace the filter
Refer to the maintenance
guide [Cleaning HEPA
Filter] section to remove
the filter and replace it.
Low battery
Please charge as soon as
possible.
Battery overheating
Please wait and
continue to use after
motor temperature is
Air duct blocked
Check whether the dust
compartment, extension
rod, and soft roller nozzle
are blocked.
Clean the brush
Refer to the maintenance
guide [Soft Roller Nozzle]
section to clean the fiber
material and hairs
wrapped around the roller
brush.
10 11
How to Use
If you need to pay attention to any abnormality during the use of the product, the
screen will push a prompt message. You should follow the instructions on the screen
to keep the performance normal.
This product contains batteries that can only be replaced by qualied technicians or
after-sales service.
This product contains batteries that are non-replaceable.
WEEE Information
Specications
All products bearing this symbol are waste electrical and electronic
equipment (WEEE as in directive 2012/19/EU) which should not be mixed
with unsorted household waste. Instead, you should protect human
health and the environment by handing over your waste equipment to
a designated collection point for the recycling of waste electrical and
electronic equipment, appointed by the government or local authorities.
Correct disposal and recycling will help prevent potential negative
consequences to the environment and human health. Please contact the
installer or local authorities for more information about the location as
well as terms and conditions of such collection points.
Vacuum Cleaner
Power Adapter
Soft Roller Nozzle Mini-Motorized Nozzle
DM001
Model
Model
VVN6
450W
40W
Rated Voltage
Rated Power
Rated Power
Model
Output 30V 800mA
Input 100-240V~, 50/60Hz, 0.8A Max
YLS0241u-x300080(u=A or B,x=E or U)
Model
Rated Power
25.2V
DM002
20W
Роботам-пылесосам от компании Xiaomi свойственны адекватная цена и хорошее качество. Однако в процессе работы пылесоса пользователь может столкнуться с проблемами и ошибками, которые чаще всего вызваны неправильной настройкой или эксплуатацией, а в некоторых случаях заводским браком. Когда появляется ошибка, то на экране отображается соответствующий код, а к каждому из кодов существует расшифровка, которая поможет решить проблему.
Навигация по странице
- Как избежать ошибок в работе
- Признаки неправильной работы пылесоса
- Что делать, если ошибка все-таки произошла?
- Расшифровка всех кодов и устранение проблемы
- Часто задаваемые вопросы
Как избежать ошибок в работе
Чтобы избежать ошибок при использовании любой модели робота-пылесоса от Xiaomi, достаточно тщательно за ним следить и не позволять механизму засоряться. Необходимо вовремя менять фильтры и щетки, не затягивая с их заменой до последнего момента.
Обязательно нужно постоянно убирать пыль с датчиков, так как попадание мусора внутрь чревато поломкой механизма. Также всегда следите, чтобы при уборке на полу не было лишних предметов, — их попадание внутрь быстро приведет к поломке.

Признаки неправильной работы пылесоса
Роботы-пылесосы от Xiaomi просты в использовании, поэтому о сбое в работе вы узнаете сразу. На устройстве замигает красная лампочка, а сам пылесос издаст громкий звуковой сигнал. Затем устройство сообщит код ошибки: он либо высветится на экране, либо будет издан с помощью звукового оповещения. Данный код необходимо запомнить или записать: он поможет разобраться, что конкретно в работе устройства пошло не так.
Перед устранением проблемы обратите внимание на расположение пылесоса. Довольно распространенная причина звукового сигнала в том, что были закрыты датчики высоты или механизмы засорились пылью.
Что делать, если ошибка все-таки произошла?
Не паниковать! С большей частью ошибок вы сможете справиться самостоятельно в домашних условиях, главное — внимательно изучить устройство и понять, что именно вызвало проблему.
Все модели роботов-пылесосов Xiaomi имеют одинаковые коды ошибок. Найдите в таблице ниже тот код, который высвечивается на экране вашего устройства, и действуйте строго по инструкции.

Иногда обычный сброс настроек пылесоса помогает решить множество ошибок.
Расшифровка всех кодов и устранение проблемы
| Код ошибки | Расшифровка | Инструкция по устранению проблемы |
|---|---|---|
| 1 | Что-то мешает функионированию лазера. | Поверните лазер таким образом, чтобы его работу ничего не загораживало. Протрите датчики от пыли и уберите все лишнее. |
| 2 | Неправильная работа датчика столкновения. | Очистите от пыли и немного прижмите датчик столкновений. Если в него попали посторонние предметы, прижмите датчик несколько раз до их полного удаления. Если ничего лишнего не попадало в датчик, поместите пылесос в другое место. |
| 3 | Колесико застряло в воздухе. | Поместите пылесос на ровное место и слегка прокрутите колесико. |
| 4 | Датчик падения не чувствует пола. | Поместите устройство на более устойчивую поверхность, либо почистите датчик падения если он засорился. |
| 5 | Загрязнение основной щетки. | Вытяните щетку и крепление оси, а после очистите их от пыли и грязи. |
| 6 | Загрязнение боковых щеток. | Достаньте боковые щетки и очистите их от грязи. |
| 7 | Не работает колесико. | Осмотрите колесико и убедитесь, что ничего лишнего не попало внутрь. Вытащите посторонние предметы и переместите пылесос на другое место; либо извлеките и почистите колесико от грязи. |
| 8 | Пылесосу недостаточно места. | Пылесос застрял и ему недостаточно пространства: поставьте его в другое место. |
| 9 | Не установлен фильтр или пылесборник. | Замените компоненты, либо проверьте, правильно ли вы их установили. Обратите внимание, что после промывки фильтра ему необходимо просохнуть в течение суток. |
| 10 | Ошибка фильтра. | Убедитесь, что в фильтре нет мусора и пыли; проверьте, хорошо ли фильтр просох после промывки. |
| 11 | Повышенное магнитное поле. | Поместите пылесос подальше от виртуальной стены. |
| 12 | Недостаточно заряда. | Поставьте устройство на зарядку. |
| 13 | Проблема с поступлением заряда. | Проверьте, чтобы между пылесосом и док-станцией было надежное соединение. Если не поможет, протрите компоненты с помощью сухой ткани. |
| 14 | Ненормальная температура батареи. | Температура аккумулятора слишком высокая или слишком низкая. Отключите устройство от сети и дождитесь нормализации температуры. |
| 15 | Ошибка в датчике определения. | Уберите пыль с датчика расстояния. |
| 16 | Устройство стоит на неровной поверхности. | Переместите пылесос, установив его на ровную гладкую поверхность. |
| 17 | Ошибка в работе боковых щеток. | Вытяните и очистите боковые щетки либо сделайте сброс системы. |
| 18 | Ошибка в работе вентилятора втягивания. | Сделайте сброс настроек пылесоса. |
| 19 | У док-станции нет питания. | Проверьте подключение станции к сети; с помощью сухой ткани протрите контакты станции и пылесоса. |
| 20 | Внутренняя ошибка устройства. | Перезагрузите пылесос либо сбросьте настройки. |
| 21 | Ошибка в работе лазерного дальномера. | Дальномер прижат или ему мешают посторонние предметы. Уберите лишние предметы или переместите устройство. |
| 22 | Невозможность зарядки пылесоса. | Протрите контактные зоны для зарядки робота сухой тканью, удалите пыль. |
| 23 | Неправильная работа док-станции. | Протрите от пыли зону передачи док-станции. Избавьтесь от мусора на контактных зонах. |
Часто задаваемые вопросы
Нужно ли заряжать батарею полностью, а затем разряжать до конца в первые три зарядки?
Не нужно. Аккумулятор в пылесосе без эффекта памяти, поэтому достаточно просто полностью зарядить батарею при первом использовании.

Как сделать сброс устройства?
На корпусе есть кнопка «Reset» – нажмите на нее и подержите несколько секунд. Робот автоматически сбросит систему, в том числе настройки синхронизации, сети, режим уборки. Далее нужно будет заново подключить пылесос к Wi-Fi через Mi Home с помощью смартфона.

Что делать, если не получается сбросить систему?
Одновременно зажмите кнопки «Home» и «Reset» до тех пор, пока робот не издаст звуковое оповещение – после этого начнется принудительный сброс настроек.

Уборка по расписанию не работает, что делать?
Убедитесь, что уровень заряда робота больше 20%.
Почему робот не включается?
Возможно, низкий уровень заряда. Подключите устройство к док-станции. Также проблема может быть в слишком высокой или слишком низкой температуре аккумулятора, — подождите, пока температура батареи нормализуется.
Таким образом, большая часть ошибок в работе робота-пылесоса решается самостоятельно и в домашних условиях. Зачастую проблема кроется либо в неправильной установке устройства, либо в большом количестве мусора на датчиках или внутри пылесоса. Если же вы все сделали по инструкции, а ошибка продолжает появляться, рекомендуем обратиться в сервисный центр, так как самостоятельная разборка робота может привести к еще более серьезной поломке.
This manual applies to the Dreame D10 and D10 Plus Robot Vacuum.
D10 Robot Vacuum Preparations Before Use
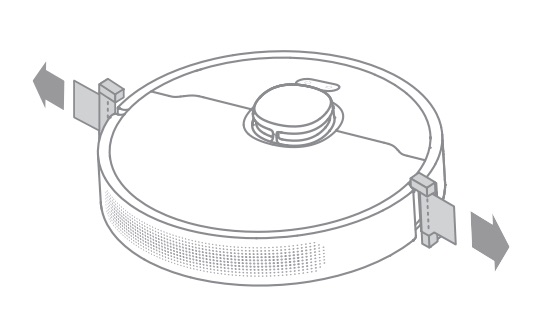
1. Remove the protective strips
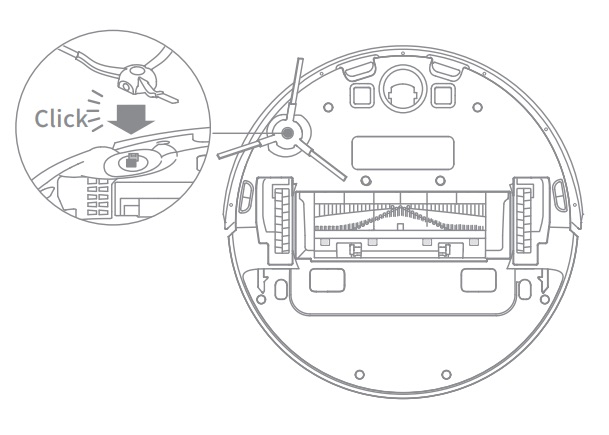
2. Install the side brush
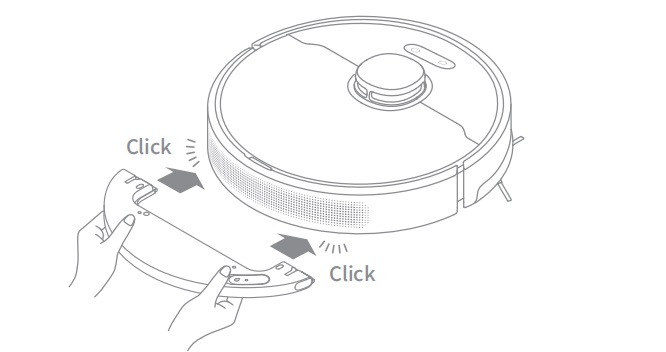
Note: Install the side brush until it clicks into place.
3. Connect to a power outlet and start charging
Place the base on level ground against the wall and connect it to a power outlet. Place the robot onto the base to charge. The robot will turn on automatically and begin charging. It is recommended to fully charge your robot before first-time use.
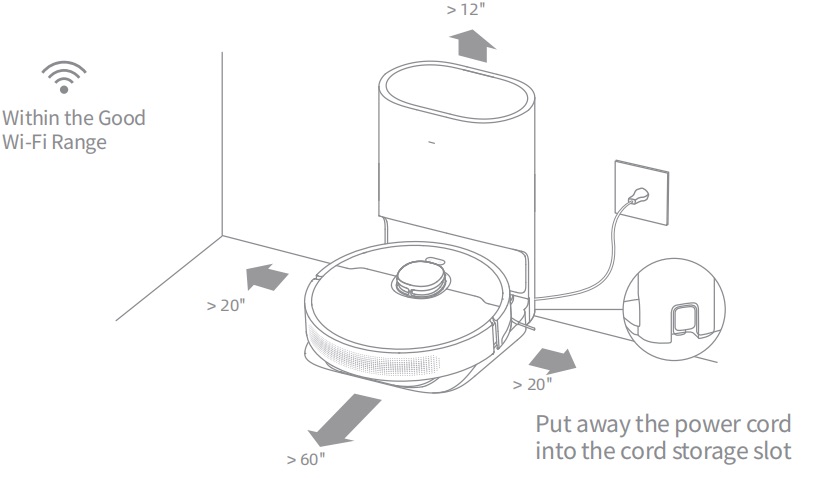
Note:
- Keep the immediate area 1.5 m in front of the base and 0.5 m to its both sides clear of objects.
- Make sure that no objects might block the signaling area.
About the D10 Auto-Empty Base
It is recommended that the robot set out from the base before cleaning. Do not move the base while the robot is cleaning. This ensures that the robot returns to base smoothly.
After the robot completes the cleaning task and automatically returns to the base, the base will start auto-empty. More settings can be operated on the APP.
How to connect Dreame D10 to Phone?
The Dreame W10 Robot Vacuum works with the Mi Home app, which can be used to control the appliance and make it interact with other smart devices.
Or use Dreame official app, Dreamehome.
D10 Robot Vacuum connects to Mi Home APP
Open the Mi Home app, and tap ” ![]() ” in the upper-right corner to go to the Add Device page. Then, tap “
” in the upper-right corner to go to the Add Device page. Then, tap “![]() ” in the upper-right corner, scan the QR code on the robot to add “Dreame Bot W10”, and then connect the device as prompted.
” in the upper-right corner, scan the QR code on the robot to add “Dreame Bot W10”, and then connect the device as prompted.
D10 Robot Vacuum connects to Dreamehome APP
Open the Dreamehome APP and click on the “+” in the upper right corner to enter the “Add Device” page. Then select Dreame W10 and follow the instructions to connect to Robot Vacuum.
Note: If the robot cannot connect to your phone, Reset the Wi-Fi network and try again.
How To Reset D10 Robot Vacuum Wifi?
Simultaneously press and hold the buttons and until you hear a voice prompt saying, “Waiting for the network configuration.” Once the Wi-Fi indicator is blinking slowly, the Wi-Fi has been successfully reset.
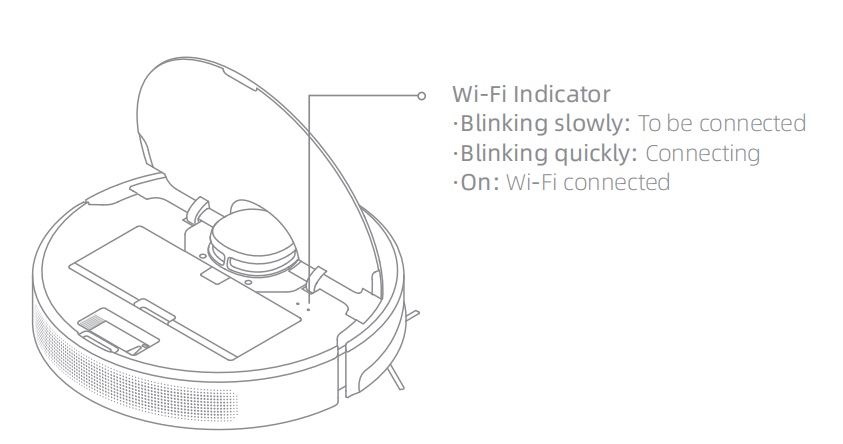
Note: If your robot cannot connect to the app successfully, reset the Wi-Fi and add the device again.
How To Restarting Dreame D10?
If the robot stops responding or cannot be turned off, press and hold down the button![]() for 10 seconds to forcefully turn it off. Then press and hold the button
for 10 seconds to forcefully turn it off. Then press and hold the button ![]() for 3 seconds to turn the robot on.
for 3 seconds to turn the robot on.
Turn On/Of
Press and hold the button ![]() for 3 seconds to turn on the robot. Once the power indicator turns solid white, the robot is on standby. To turn off the robot, press and hold the button
for 3 seconds to turn on the robot. Once the power indicator turns solid white, the robot is on standby. To turn off the robot, press and hold the button![]() for 3 seconds when the robot is not moving.
for 3 seconds when the robot is not moving.
Start Cleaning
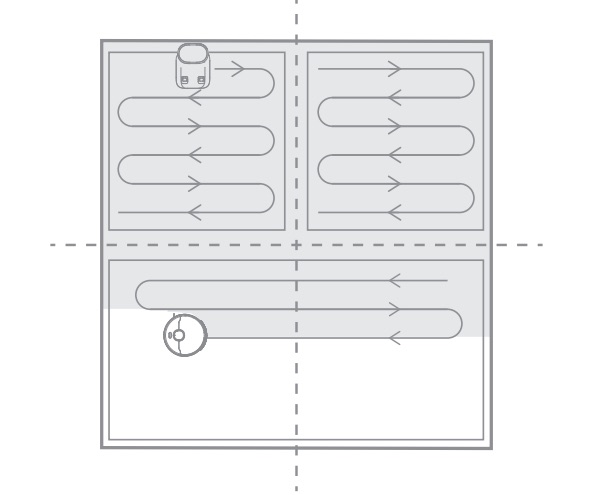
Press the button ![]() briefly to turn on the robot. Upon activation, the robot will accurately map out a route, methodically clean along the edges and walls, then finish by cleaning each room in an S-shaped pattern to ensure a thorough job.
briefly to turn on the robot. Upon activation, the robot will accurately map out a route, methodically clean along the edges and walls, then finish by cleaning each room in an S-shaped pattern to ensure a thorough job.
Cleaning Mode
Dreame Bot D10 Plus has four cleaning modes: Quiet, Standard, Strong, and Turbo. The default mode is Standard. You can specify the cleaning mode in the app.
Pause/Sleep Mode
Pause: Press any button briefly to pause the robot during cleaning.
Sleep Mode: If the robot pauses for more than 10 minutes, it automatically enters the sleep mode, and the power indicator and charging indicator will go off. To wake up the robot, press any button.
Note:
- The robot will turn off automatically if left in Sleep Mode for more than 12 hours.
- If the robot is paused and placed onto the base, the current cleaning task will end.
Spot Clean Mode
When the robot is paused or in Standby Mode, press and hold the button ![]() for 3 seconds to start Spot Clean Mode. In this mode, it will clean a square-shaped area of 1.5×1.5 meters directly around the robot. When the spot cleaning is done, the robot will automatically return to its original location and power off.
for 3 seconds to start Spot Clean Mode. In this mode, it will clean a square-shaped area of 1.5×1.5 meters directly around the robot. When the spot cleaning is done, the robot will automatically return to its original location and power off.
Note: Activating Spot Clean Mode will end the current cleaning task of the robot.
Additional App Functions
Follow the instructions on the app interface to use more functions. The version of the app might have been updated; please follow the instructions based on the current app version.
Use the Mopping Function
It is recommended that all floors are vacuumed at least three times before the first mopping session to achieve a better cleaning effect.
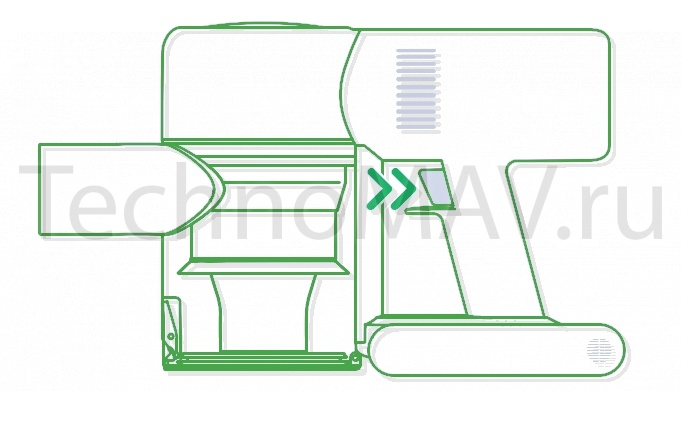
1) Dampen the mop pad and wring out excess water. Insert the mop pad into the slot of the water tank as shown in the figure, and paste the pad firmly.
2) Open the water tank lid, fill the tank with water, then securely close the lid.
Note: Do not use detergent or disinfectant.
3) Align the mopping module as indicated by the arrow, then slide it into the back of the robot until it clicks into place. Press the button or use the app to start cleaning.
Note:
- It is not recommended to use the mopping function on carpets.
- Use the app to adjust the water flow as required.
4) Press the two side clips inwards and slide the water tank backwards to separate it from the robot.

Note: When the robot is charging or not in use, remove the mopping module, pour out all the remaining water in the tank, and clean the mop pad to prevent mildew or odors.
Dreame D10 How to Routine Maintenance?
Clean the Dust Bin
Clean after each use
1. Open the robot cover, then press the dust bin clip to remove the dust bin.
2. Open the bin cover and empty the bin as shown in the diagram.
3. Clean the dust intake.
Clean the Filter
1. Remove the filter and tap its basket gently.
2. Do not wash the filter. Only the dust bin is washable. Thoroughly dry it before re-installing.
Note:
- Do not attempt to clean the filter with brushes or fingers.
- Rinse the dust bin with clean water only. Do not use any detergent.
- Only use the dust bin and filter when they are completely dry.
- The filter is recommended to be cleaned every two weeks and replaced every three months.
Clean the Mopping Module
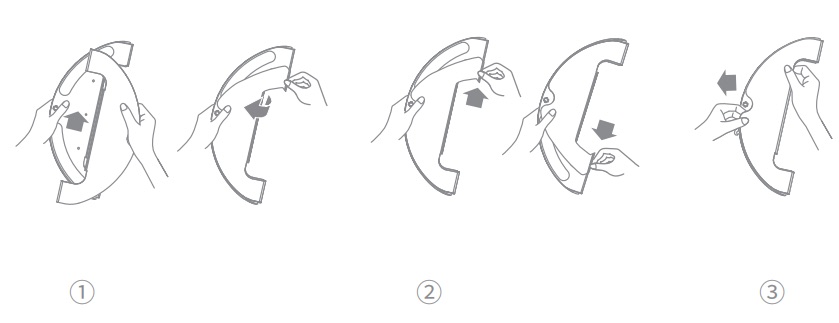
1. Press the two release clips on the side of the water tank, remove the mopping module, and pull the mop pad off the mopping module.
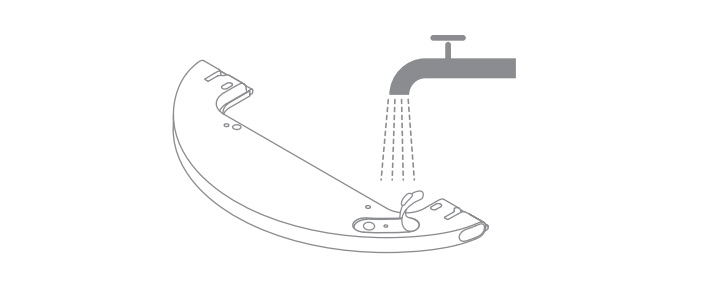
2. Pour out the water in the tank. Clean with only water and leave out to air dry before re-installing.
Note: Do not expose the tank to the sun directly
3. Clean the mop pad with water only and leave to air dry before re-installing.
Note:
- Remove the pad from the mopping module before cleaning it, and make sure dirty water does not flow back into the water outlet to avoid clogging.
- For optimal performance, it is recommended to replace the mop pad every 3-6 months.
4. If slow water flow occurs, or the volume is not well-distributed, clean the air hole in the cover of the water tank.
Clean the Main Brush
Press the brush guard clips inwards to remove the brush guard and lift the brush out of the robot.
Pull out the brush covers as shown in the diagram. Use the included cleaning tool to remove any hairs tangled in the brush.
Note: Do not pull out the hair tangled in the main brush excessively. Otherwise, the brush may be damaged.
Clean the Side Brush
Pull out the side brushes and use the cleaning tool to remove any hair tangled on the brush.
Clean the Main Wheel/Universal Wheel
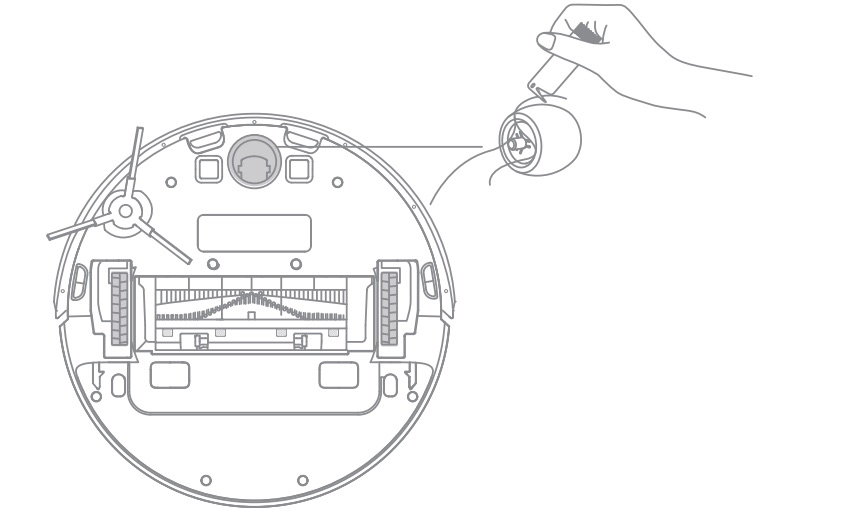
Note: Use a tool such as a small screwdriver to separate the axle and tire of the universal wheel.
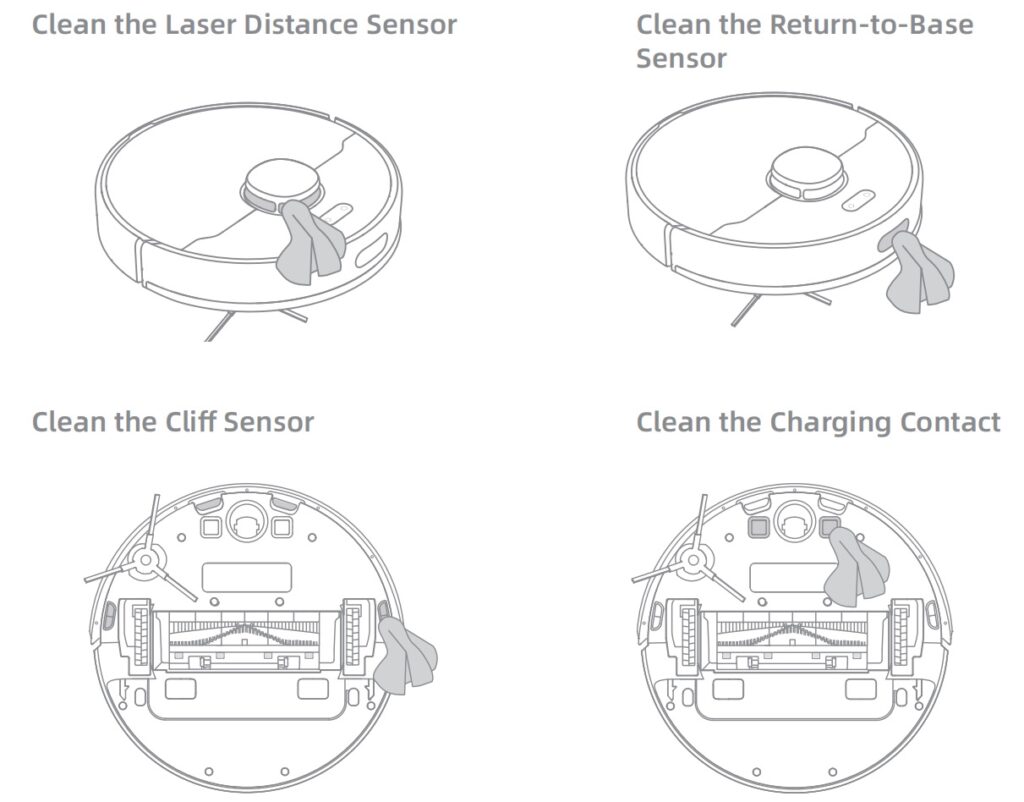
Clean the Sensor
Note: Wet cloths can damage sensitive elements within the robot and base. Please use dry rags for cleaning.
Replace the Dust Collection Bag
According to the status indicator (blinking orange) and app prompts, replace it with a new one when the dust collection bag is full. It is recommended to replace the bag every 4-6 weeks.
1. Discard the dust collection bag
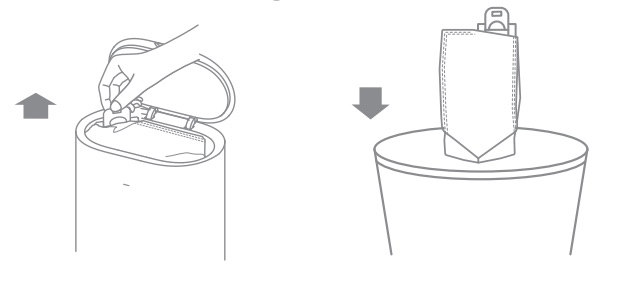
Note: When taking out the dust collection bag, close the dust bag handle to avoid dust leaking out.
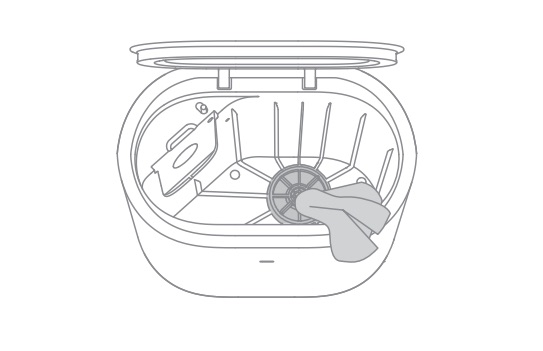
2. Wipe the filter with a dry cloth
3. Install a new dust collection bag
4. Close the upper cover of auto-empty base
Note: Do not close the base forcelly, if the upper cover of base cannot be closed and the dust collection bag is not installed.
Clean the Air Duct
If the air duct is blocked, please clean it according to the following steps.
1. Unscrew mounting screws on the air duct cover and remove the cover plate.
2. Check whether the air duct is blocked by foreign objects. If any, clean them.
3. Reinstall the air duct cover as shown in the diagram.
![]()
Login
Cart


Global (EN)
-
Cordless Stick Vacuum
- R10
- P10 Pro
- P10
- T30 Neo
- T30
- T20
- T10
- V12 Pro
- V11
- V10
- V9
-
Robot Vacuum and Mop
- L20 Ultra
- L10 Ultra
- L10s Ultra
- L10s Pro
- L10 Pro
- W10 Pro
- W10
- Z10 Pro
- D10s Plus
- D10s Pro
- D10s
- D10 Plus
- D9 Pro
- D9 Max
- D9
- F9
-
Wet and Dry Vacuum
- M12
- H12 Pro
- H12
- H11 Max
- H11
-
Hair Dryer
- Hair Artist
- Hair Glory
-
Roboticmower
- A1
-
About Us
- Our Story
- Where to Buy Dreame
-
Login -
Language
Currency

Search
New snacks on sale now for a limited time! Use code NEW for 15% off.
We use cookies on our website to give you the best shopping experience. By using this site, you agree to its use of cookies.
I agree
Search our shop
What are you looking for?
When the vacuum cleaner fails to work normally, the display will prompt an abnormal message. Please read the screen content and deal with the abnormal situation in accordance with the following table.
Air duct blocked
Check whether the dust cup, filter, HEPA filter element, connecting rod, floor brush and suction head are blocked.
Roller brush blocked
Check whether the roller brush is entangled or blocked by foreign objects
The turntable is blocked.
Check whether the mop hanger is entangled or blocked by foreign objects.
Low battery
please charge as soon as possible
The battery is exhausted
please charge as soon as possible
The battery is overheated
please wait for the battery temperature to be normal before continuing to use
Adapter error
Please use the original power adapter
Fault code
Please contact after-sales service for repair
If you own a Dreame H11 wet and dry vacuum cleaner, you may have encountered the error code E4 on the screen display.
This error indicates that there is a problem with the battery or the charging system of the vacuum.
In this blog post, we will explain all the possible reasons why this error occurs and how to solve each issue step by step 🙂
Dreame H11 Error E4 – In a Nutshell
The error code E4 on your Dreame H11 vacuum cleaner means that there is a problem with the battery or the charging system. This could be caused by several factors, such as a faulty battery, a damaged charger, a loose connection, a dirty contact, or a low ambient temperature.
To fix this error, you need to check each component and make sure they are working properly.
You will have to:
- Replace the battery or the charger if they are defective
- Clean the battery contacts
- Adjust the room temperature if it is affecting the charging process.
How to fix Dreame H11 Error E4
Let’s take a closer look at each troubleshooting step.
Step 1: Check the battery
The first thing you need to do is to check the battery of your Dreame H11 vacuum cleaner.
The battery is located at the bottom of the handle assembly and can be removed by pressing the release button:
- Inspect the battery for any signs of damage, such as cracks, leaks, swelling, or corrosion.
- Check the voltage of the battery using a multimeter. The normal voltage range for the Dreame H11 battery is between 21V and 25V. If the voltage is lower than 21V, it means that the battery is discharged and needs to be charged. If the voltage is higher than 25V, it means that the battery is overcharged and may be damaged.
If you find any damage or abnormal voltage on your battery, you should replace it with a new one.
You can buy a replacement battery from Dreametech’s official website or authorized dealers.
Do not use a battery from other brands or models as it may not be compatible with your Dreame H11 vacuum cleaner.
Step 2: Check the charger
The next thing you need to do is to check the charger of your Dreame H11 vacuum cleaner.
Inspect the charger for any signs of damage, such as cracks, burns, or fraying.
Just like you did in step 1, you can also check the output voltage of the charger using a multimeter.
The normal output voltage range for the Dreame H11 charger is between 26V and 28V. If the output voltage is lower than 26V or higher than 28V, it means that the charger is defective and needs to be replaced.
You can buy a replacement charger from Dreametech’s official website or authorized dealers.
Do not use a charger from other brands or models as it may not be compatible with your Dreame H11 vacuum cleaner.
Step 3: Check the connection
Check the connection between the battery and the charger of your Dreame H11 vacuum cleaner.
The connection is made by inserting the charging port on the handle assembly into the charging slot on the charger.
You should make sure that the connection is secure and not loose or wobbly and that there are no obstacles or foreign objects blocking or interfering with the connection.
If you find any loose or blocked connection between your battery and your charger, you should fix it by tightening or clearing it. You may need to use a small tool such as a screwdriver or a toothpick to do so.
Step 4: Check the contact
The fourth thing you need to do is to check the contact between the battery and the handle assembly of your Dreame H11 vacuum cleaner.
The contact is made by two metal pins on the bottom of the handle assembly that touch two metal plates on the top of the battery.
Make sure that the contact is clean and not dirty or corroded.
If you find any dirty or blocked contact between your battery and your handle assembly,
you should clean it by wiping it with a soft cloth or a cotton swab dipped in alcohol.
Step 5: Check the temperature
The temperature of the environment where you are charging your Dreame H11 vacuum cleaner can have a huge impact on the charging process.
The optimal temperature range for charging your Dreame H11 vacuum cleaner is between 5°C and 40°C.
If the temperature is lower than 5°C, it may cause the battery to discharge faster and reduce its lifespan. If the temperature is higher than 40°C, it may cause the battery to overheat and damage its components.
If you find that the temperature of your environment is too low or too high for charging your Dreame H11 vacuum cleaner, you should adjust it by moving to a warmer or cooler place.
Avoid exposing your Dreame H11 vacuum cleaner to direct sunlight or extreme heat sources.
What To Do If None of The Steps Help
If you have followed all the steps above and still get the error code E4 on your Dreame H11 vacuum cleaner, it means that there is a more serious problem with your device that requires professional assistance.
In this case, you should contact Dreametech via phone, email, or online chat.
Before you contact Dreametech, you should check if your Dreame H11 vacuum cleaner is still under warranty.
The warranty period for the Dreame H11 vacuum cleaner is 12 months from the date of purchase.
If your device is still under warranty, you may be eligible for a free repair or replacement service.
You will need to provide proof of purchase and the serial number of your device to claim the warranty service.
If your device is not under warranty, you may still be able to get a repair or replacement service from Dreametech, but you may have to pay for it.
Conclusion
I hope this blog post has helped you understand and fix the error code E4 on your Dreame H11 vacuum cleaner 🙂
If you have any questions or feedback, please feel free to contact us.
Thank you for reading!
-
My name is Brenda Pearlman, and my friends always joke about the “pearl” part. Why? Because I am a clean freak, who likes to see everything shine like a pearl, lol.
With years of using my vacuum to clean almost everything in the house, I have discovered tips and tricks that I want to share with you!
I am looking forward to helping you make your home shine 🙂View all posts