На чтение 3 мин Просмотров 4.5к. Опубликовано
Adobe – транснациональная компания, которая в основном известна своими мультимедийными продуктами. Эти продукты предлагают очень обширный список функций, которые используются в современном мире развлечений. Adobe Premiere и Photoshop должны быть самыми известными и используемыми продуктами Adobe до сих пор. Возможности, предлагаемые в Photoshop, не имеют себе равных. Между тем Adobe Premiere не на шаг отстает в мире программного обеспечения для редактирования видео. Хотя эти двое преуспевают в том, что они делают, определенные проблемы с ними часто беспокоят пользователей. Одна из проблем, с которыми вы можете столкнуться при использовании Adobe Premiere, – это сообщение об ошибке « Файл не открывается из-за ошибки заголовка ». 
Сообщение об ошибке обычно появляется, когда вы пытаетесь импортировать изображения в Premiere. Это может быть связано с несколькими причинами, одна из которых – неправильный формат расширения файла. Тем не менее, с указанным сообщением об ошибке можно легко справиться с помощью нескольких простых решений, которые мы предоставим ниже. Они также устранили проблему для других.
Содержание
- Что вызывает сообщение «Невозможно открыть файл из-за ошибки заголовка» в Adobe Premiere?
- Решение 1. Измените расширение файла изображения
- Решение 2. Измените цветовой режим на RGB
Что вызывает сообщение «Невозможно открыть файл из-за ошибки заголовка» в Adobe Premiere?
Как мы уже упоминали, ошибка возникает, когда вы используете импортер для импорта файлов изображений в Adobe Premiere. Это может быть вызвано следующими факторами:
- Расширение файла изображения: для большинства пользователей проблема было вызвано расширением файла изображения. Это можно исправить, изменив расширение файла изображения.
- Режим цвета изображения: Сообщение об ошибке также может быть вызвано тем, что изображения, которые вы пытаетесь Импорт имеют CMYK или другие цветовые режимы. Чтобы решить эту проблему, вам потребуется Photoshop для изменения цветового режима изображений.
- Изображение повреждено: Другой причиной ошибки может быть повреждение файл изображения. Если загружаемое изображение повреждено или повреждено, вы можете получить указанное сообщение об ошибке. В таком случае вам просто нужно будет использовать другое изображение.
Теперь, когда вы знаете причины указанного сообщения об ошибке, давайте перейдем к решения, которые вы можете реализовать для устранения ошибки. Пожалуйста, попробуйте следовать им в том же порядке, как указано.
Решение 1. Измените расширение файла изображения
Иногда сообщение об ошибке может быть вызвано форматом файла изображения .JPEG. У большинства пользователей была эта проблема, и она была решена после того, как они изменили расширение файла изображения. Поэтому, чтобы решить эту проблему, просто измените расширение изображения с .JPEG на .PNG. Вот как это сделать:
- Чтобы изменить расширение, убедитесь, что опция « Скрыть расширения для файлов известных типов » не отмечена..
- Для этого откройте Проводник .
- Нажмите Файл на в правом верхнем углу и выберите “ Изменить папку и параметры поиска “.
- Перейдите на вкладку Просмотр и снимите флажок ” Скрыть расширения для известных типов файлов ‘.

- Нажмите Применить , а затем нажмите OK .
- Теперь перейдите в каталог, в котором расположены файлы изображений, и измените расширение с .jpg в .PNG . Если. PNG не помогло вам, попробуйте изменить его на .PSD .
- Повторите импорт.

Решение 2. Измените цветовой режим на RGB
Adobe Premiere очень осторожно с цветовыми режимами. Он принимает только RGB. Поэтому, если вы пытаетесь импортировать изображения с другим цветовым режимом, вы получите сообщение об ошибке. Следовательно, вам необходимо убедиться, что файлы изображений находятся в цветовом режиме RGB. Вот как это сделать:
- Откройте Adobe Photoshop .
- Откройте файл изображения.
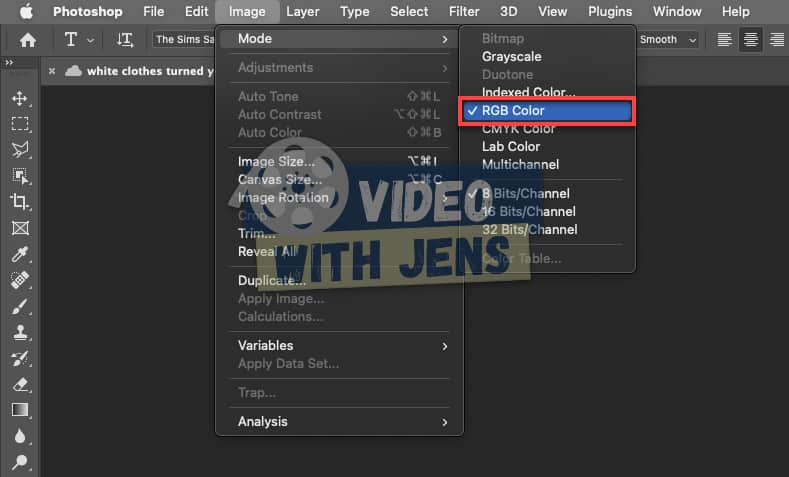
- Теперь нажмите Изображение > Mode и выберите Цвет RGB .
- Сохраните файл изображения.
- Посмотрите, поможет ли это решить проблему.

I’m trying to import an .srt subtitle file into a large feature film Premiere Pro project and I’m getting an error message saying «The file cannot be be opened because of a header error».
Does anyone have any idea what this may be?
Below are the first few lines from the .srt file in case there’s an obvious formatting issue:
1
00:00:01,360 —> 00:00:03,080
You happy boss?
2
00:00:05,920 —> 00:00:10,440
Ok, so I think we’re good to go, and we’re just going to do a quick soundcheck.
3
00:00:11,120 —> 00:00:13,240
Tell us about this village cinema.
4
00:00:14,080 —> 00:00:15,720
Oh aye, yeah the cinema is going to be great.
5
00:00:16,000 —> 00:00:20,319
Yeah, going to do it my way though, yeah, confiscate mobile phones on entry.
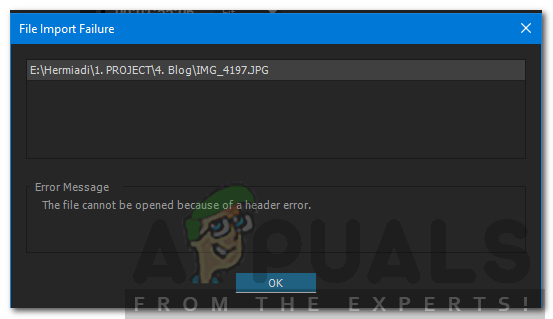
Unable to import your image(s) to Premiere Pro? Does “The File Cannot Be Opened Because of a Header Error” pop up?
After a bunch of research, I’ve finally found out what’s causing it (and how to solve it.)
Read on to find out!
“The file cannot be opened because of a header error” in Premiere Pro occurs when you are trying to import an image that’s corrupt or has an unsupported color mode. Many people have reported fixing it by renaming the file name extension or transcoding into a supported color mode.
Now that you know what triggers this error, I’ll show you three ways to fix it depending on what’s causing the error:
1. Change the Image Filename Extension
Many people getting this error solved it by simply changing the filename extension of the image, causing problems.
Usually, JPEGs have caused the error; however, I would test renaming the filename extension if you have another file type.
Here’s how to do it on Windows: Check out this article if you are using macOS.
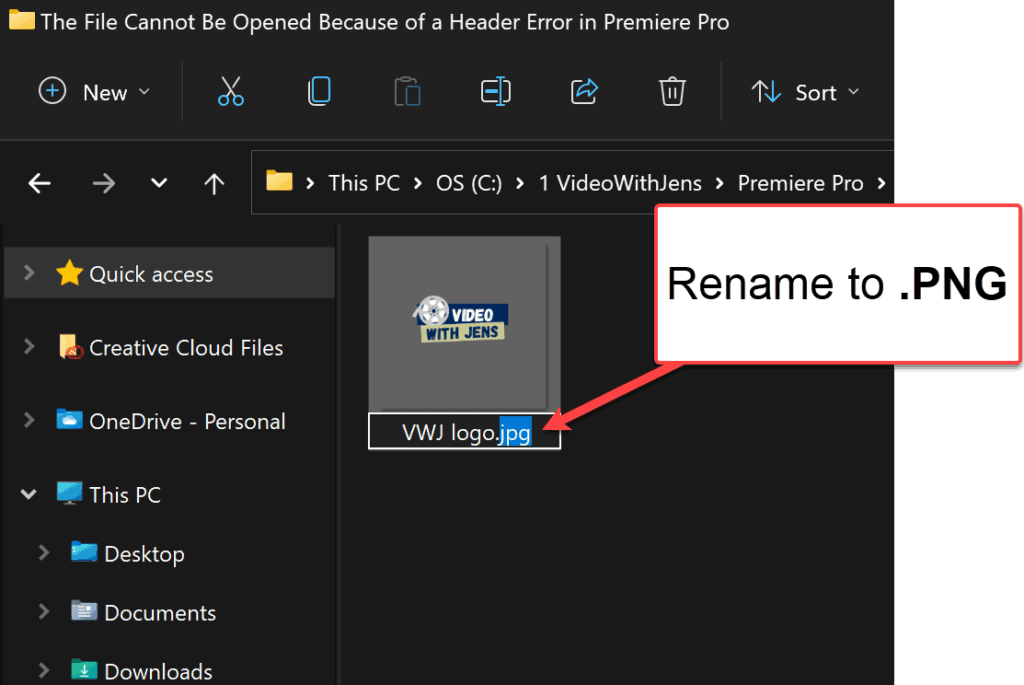
- Open the folder containing your image in your file system.
- Click on View > Show, and enable File name extensions.
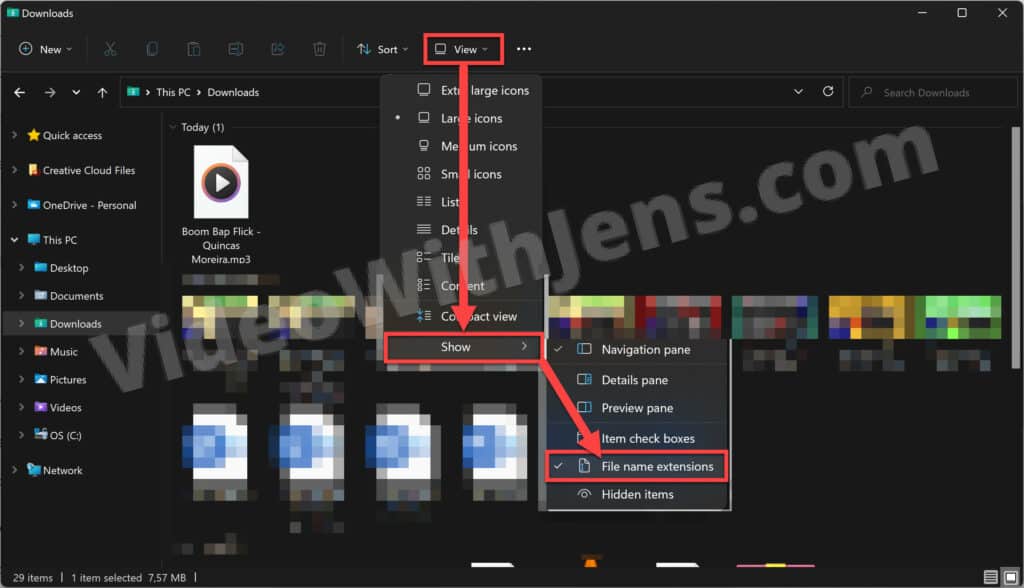
- Right-click the image file > Show > Show more options > Rename.
- Change the filename extension from .jpg to .png.
If changing to .png did not work, test .PSD also.
Check solution two if changing the filename extension did not fix the header error.
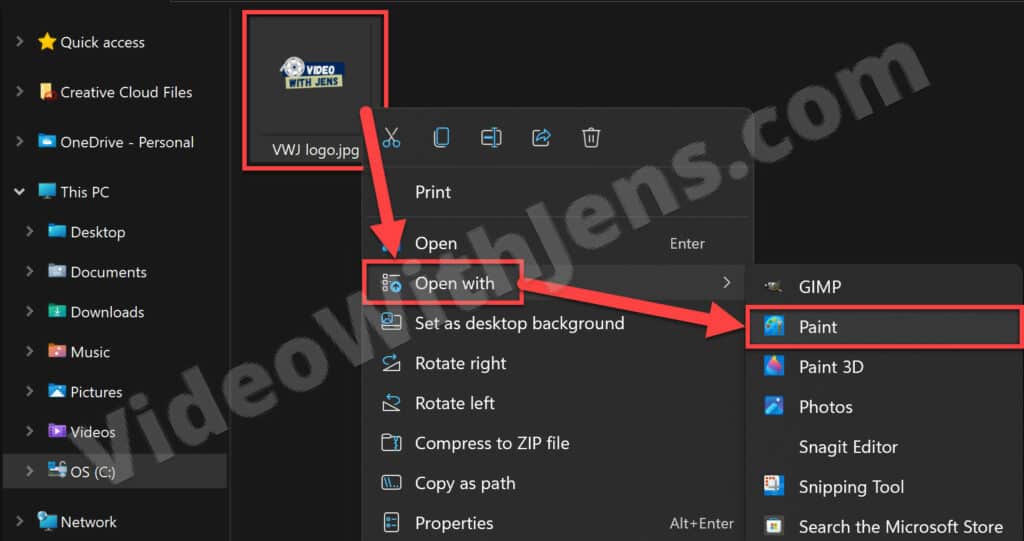
2. Re-Export Image in Another Program
The header error may also be triggered because the image is corrupt, making it unreadable to Premiere.
Luckily, this is easy to fix.
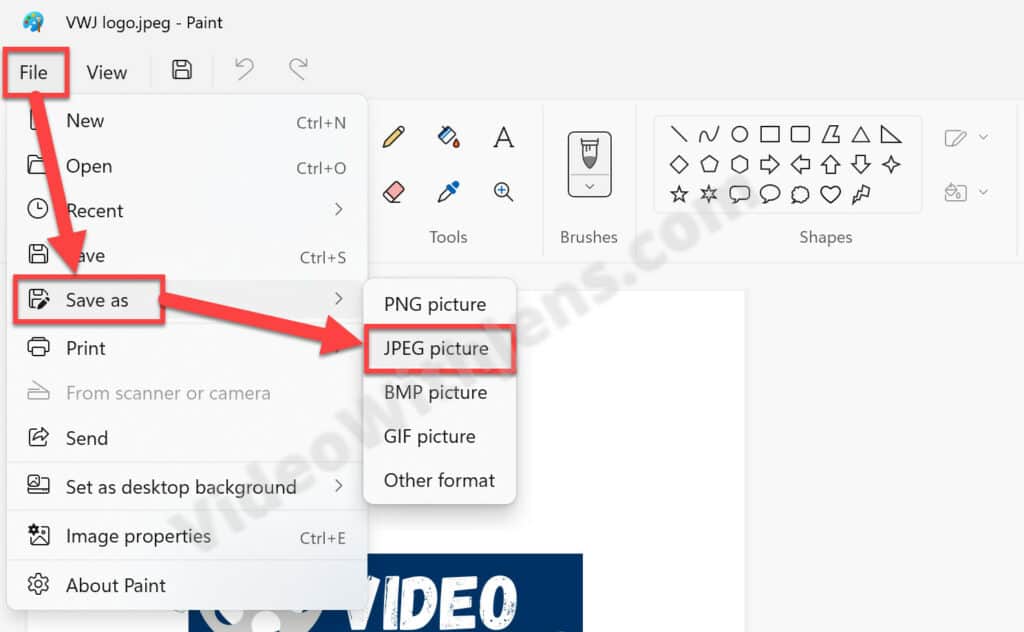
Open the image in an online converter (opens in a new tab) or simply a software like Paint, and convert/re-export the image to the same file format.
In Paint, you can do it like this:
- Right-click the image in your file system.
- Select Open with > Paint.
(Continues below)
- Inside Paint, click on File > Save as > JPEG picture.
- Set a file location and import it to Premiere Pro.
Voilà!
3. Change Color Mode to RGB
According to the internet, Premiere Pro only supports the RGB color mode.
So, if your image has been inside a program like Photoshop at any point, it may have an unsupported color mode like CMYK or LAB.
To fix this:
- Import the image to Photoshop.
- Click on Image > Mode > RBG Color.
- Export the image, and import it to Premiere Pro.
Check out this list of the most common errors in Premiere Pro and how to fix them; I recommend bookmarking it to solve errors quickly in the future.
That’s it! I hope you solved “The File Cannot Be Opened Because of a Header Error” using the solutions mentioned in this article!
“The file cannot be opened because of a header error” is a common error message that many users of Adobe Premiere Pro may encounter when trying to import a file, especially JPG formats. This file import failure can be frustrating and can prevent you from being able to access your file. In this article, I will provide some methods you can follow to fix this issue and get your file to open correctly in Premiere Pro.
1. Open the JPG File in Paint
The first solution you can try is opening the JPG image in a basic image editing software such as Microsoft Paint and saving it again without making any changes. To give this a try, follow these steps:
- Launch Microsoft Paint on your computer.
- In Paint, go to the File menu and select “Open.”
- Navigate to the location of the JPG image that you are having trouble with, select it, and click “Open.”
- The image should now be displayed in the Paint window.
- Go to the File menu and select “Save As” then click on JPEG picture
- Choose a location to save the image and click “Save“
After following these steps, try importing the saved JPG image into Premiere Pro. It’s possible that this simple method will resolve the header error and allow you to use the image in your project.
2. Convert the JPG File to PNG
If the first method didn’t work for you, don’t worry! Try to convert the JPG file to PNG format when you export the file from Microsoft Paint or Photoshop. Here’s how you can do this inside Photoshop:
- Open the JPG image in Photoshop.
- Go to the File menu and select “Save As…” or use the shortcut Ctrl + Shift + S
- From the list of export options, select “PNG” and hit Save
Adobe is a multinational company that is mostly known for its multimedia products. These products offer a very vast list of features that are utilized in today’s modern world of entertainment. Adobe Premiere and Photoshop have to be the most famous and used products of Adobe so far. The features offered in Photoshop can’t be rivaled with. In the meantime, Adobe Premiere is not a step behind in the world of video editing software. While these two excel at what they do, certain issues with them trouble its users often. One of the issues that you might come around while using Adobe Premiere is the ‘The file cannot be opened because of a header error’ error message.
The error message usually pops up while you are trying to import images to Premiere. This can be due to a few reasons, one of them being the wrong file extension format. Nonetheless, the said error message can be easily dealt with via a few simple solutions that we will be provided down below. These have fixed the issue for others as well.
Like we mentioned, the error occurs when you are using the importer to import image files into Adobe Premiere. This can be caused due to the following factors —
- Image File Extension: For most of the users, the issue was caused by the extension of the image file. This can be fixed by changing the extension of the image file.
- Picture Color Mode: The error message can also be caused if the pictures that you are trying to import have the CMYK or other color modes. To solve this, you will need Photoshop to change the color mode of the pictures.
- Image is corrupted: Another cause of the error can be a corruption of the image file. If the picture that is being uploaded is corrupt or damaged, you might get the said error message. In such a case, you will just have to use a different image.
Now that you are aware of the causes of the said error message, let us get into the solutions that you can implement to resolve the error. Please try to follow them in the same order as provided.
Solution 1: Change Image File Extension
The error message can sometimes be caused due to the .JPEG format of the image file. Most of the users had this issue and it was resolved after they changed the extension of the image file. Therefore, to fix the issue, just change the extension of the image from .JPEG to .PNG. Here’s how to do it:
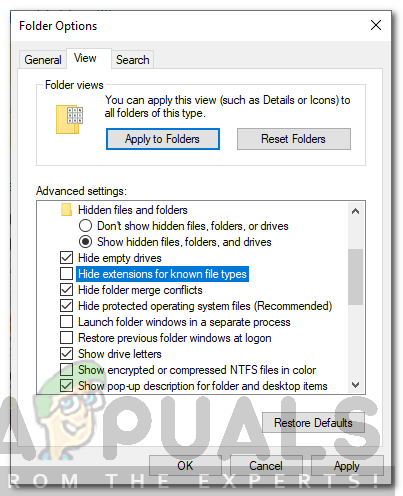
- To change the extension, make sure the ‘Hide extensions for known file types’ option is unticked.
- To do that, open up the File Explorer.
- Click on File on the top right corner, and select ‘Change folder and search options’.
- Switch to the View tab and untick ‘Hide extensions for known file types’.

Folder Options - Click Apply and then hit OK.
- Now navigate to the directory where the image files are located and change the extension from .jpg to .PNG. If .PNG does not fix it for you, try changing it to .PSD.
- Try importing again.
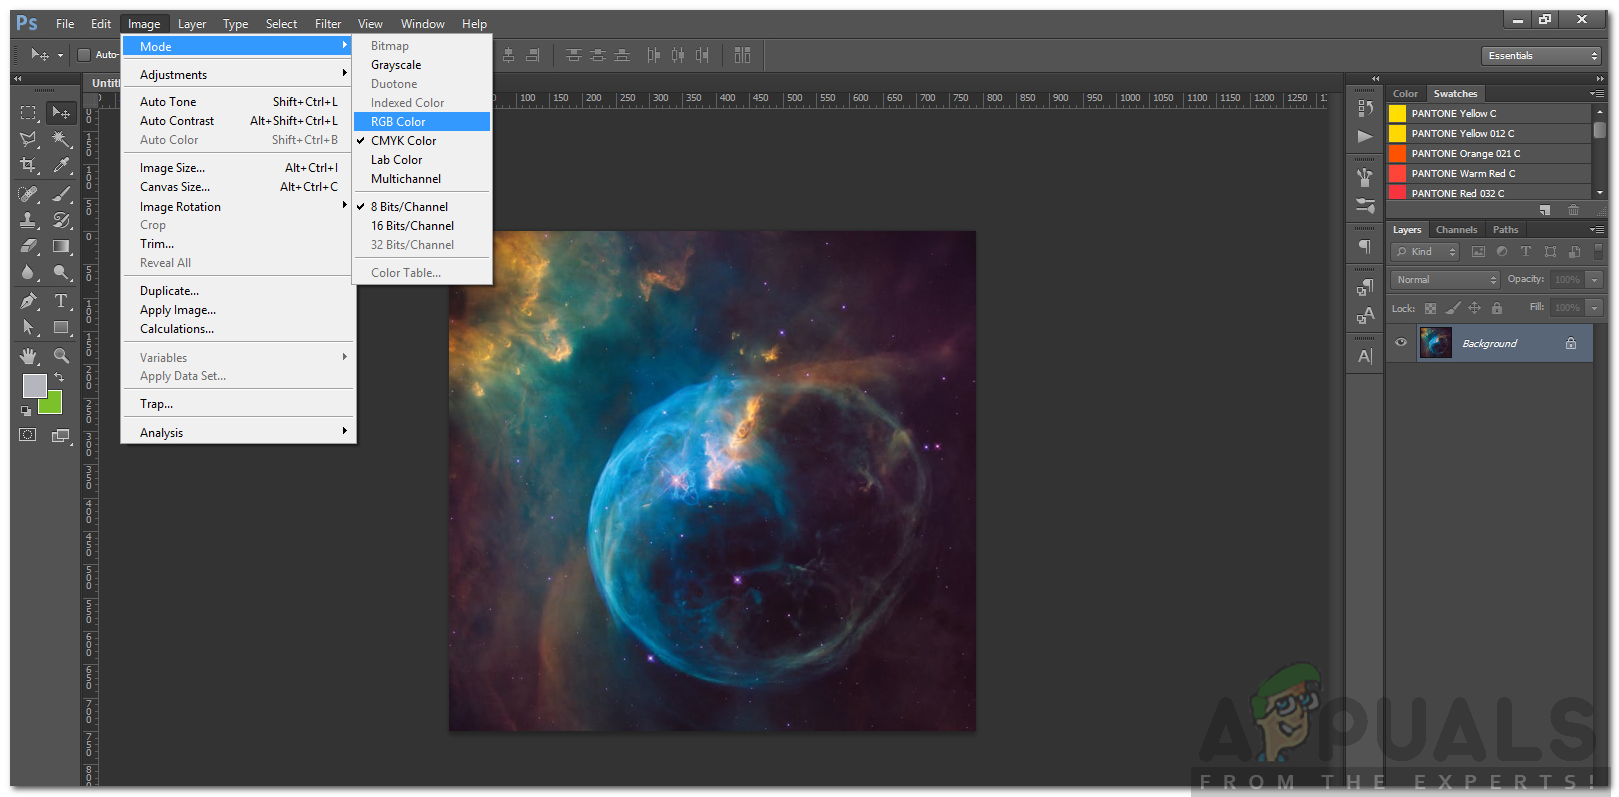
Solution 2: Change Color Mode to RGB
Adobe Premiere is very careful with the color modes. It only accepts RGB. Therefore, if you are trying to import images that have a different color mode, you will get the error message. Hence, you will have to make sure that the image files are in RGB color mode. Here’s how to do it:
- Open up Adobe Photoshop.
- Open up the image file.
- Now, click on Image > Mode and select RGB Color.

Changing Color Mode - Save the image file.
- See if it helps resolve the issue.

Kevin Arrows
Kevin Arrows is a highly experienced and knowledgeable technology specialist with over a decade of industry experience. He holds a Microsoft Certified Technology Specialist (MCTS) certification and has a deep passion for staying up-to-date on the latest tech developments. Kevin has written extensively on a wide range of tech-related topics, showcasing his expertise and knowledge in areas such as software development, cybersecurity, and cloud computing. His contributions to the tech field have been widely recognized and respected by his peers, and he is highly regarded for his ability to explain complex technical concepts in a clear and concise manner.
Back to top button