Устранить ошибку 2100012c при обнулении принтеров Epson: возможно, пока вы выполняете процесс обнуления принтера, возникнет ошибка данного кода. Что это означает и как ее поправить
С течением
времени появляется необходимость
обнуления данных принтеров. Обнуление
заключается в том, чтобы дать принтеру
понять, что на самом деле он не распечатал
свой лимит страниц и что ему не нужно
техническое обслуживание. Как правило,
необходимо выполнить обнуление принтера,
когда он уже распечатал около 15000 страниц,
по крайней мере , принтеры марки Epson .
Единственное,
что нужно иметь в виду перед обнулением
принтера, это подключить его перед
выполнением работы. Помните, что никакой
другой принтер может быть подключен к
компьютеру в этот момент, так как это
может изменить программу другого
принтера. Представьте себе программное
обеспечение принтера Epson L200 на Epson TX-
115, именно поэтому может возникнуть
ошибка 2100012c.
Ошибка 2100012c
возникает при сбросе принтера по двум
причинам: вы используете adjustment program,
которая не подходит для этого принтера
или к компьютеру подключен другой
принтер.
Очень редко эта
ошибка возникает, потому что принтер
не подключен непосредственно к принтеру
или потому что мы не указали, через
какрой порт подключен принтер. Что
делать в такой ситуации? Обычно при
обнулении в верхней части диалогового
окна показано, для каких моделей принтеров
подходит данная программа сброса.
Следует посмотреть там.
При
выполнении обнуления этого и любого
другого принтера Epson, нельзя подключать
другой принтер к компьютеру. Необходимо
включить и подключить к компьютеру
только тот принтер, который подлежит
настройкам.
This error code appears if you have more than one potentially compatible printer connected to your computer when you try to use the reset utility.
Solutions:
- Make sure you only have the target printer (ie: the one you wish to reset) connected to your computer and turned on.
- Try selecting the specific port that your target printer is connected on rather than “Auto Select” (Via “Settings” button in AdjProg utility)
- This option is a last ditch attempt if all else fails:
- Prepare everything for resetting (ie: input key, etc…)
- Turn printer off, wait 5 seconds and turn printer on
- Wait 2 or 3 seconds then try to reset waste ink counter
This method sometimes works around any power saving or similar issues that stop the printer communicating properly
2. Reset the Waste ink counter value
1. Replace the ink pad
There are two solutions that you can use, namely replacing the ink pad with a new one and modifying the waste ink reservoir. Ink pads for the Epson L1300 can be purchased in online stores easily, but if you have trouble replacing the ink pads because you have to disassemble the printer, an alternative solution is to modify the waste ink reservoir. Choose one of the two solutions below.
1.a. Replace the ink pad with a new one
Follow the procedure shown in the image below, how to disassemble the printer and replace the waste ink pad.
Step 1. Removing the Paper Support Assy

Step 2. Removing Stacker Assy

Step 3. Removing the Front Decoration Plate Left/Right

Step 4. Removing the Rear Housing

Step 5. Removing the Panel Unit


Step 6. Removing the Decoration Plate Left/Right


Step 7. Remove the Upper Housing


Step 8. Pull out the Waste Ink Tube from the Joint Tube
Step 9. Remove the screw that secure the Shield Plate Holder, and remove the Shield Plate Holder.
Step 10. Remove the five screws secure the Printer Mechanism.

Step 11. Handling the Printer Mechanism

Step 12. Removing the Waste Ink Pad


1.b. Modification of the waste ink reservoir
For those of you who find it difficult to replace the waste ink pads because they are inexperienced in disassembling the printer, we recommend following the following alternative solution, namely by modifying the waste ink reservoir. The modification is to transfer the waste ink reservoir to a transparent plastic bottle that is placed outside the printer. Here’s how to modify the waste ink reservoir. Please pay attention to the mechanism in the image below.

(1) Remove the ink tank, you will see a door.
(2) Remove the bolt to open the door.
(3) After the door opens, you will see a terminal. This terminal connects two pipes. The waste ink pipe from the pump, and the pipe leading to the waste ink reservoir (see image below).
 |
| Waste ink disposal mechanism in the Epson L1300 |
The modification we will do is divert the waste ink to the ink pad, diverted to a transparent plastic bottle that is placed outside the printer. Here’s how to do it.
— Set the transportation lock to the locked position.

— Remove the ink tank, then remove the screw and open the drain hose terminal cover.

— Remove the drain hose from the pump.

— Drain the ink pad by using a hose and injection device. To drain the ink pad can be done by installing a hose in the drain terminal, then with the injection tool we suck the ink from the ink pad.

— Divert waste ink disposal by installing a new hose.

— Turn on the printer and do the Head Cleaning. Head cleaning is done to check the installation of a new drain hose. If the waste ink has flowed into the storage bottle, the ink pad modification has been successfully carried out.

— Spruce up the ink drain hose installation.

— Set the transportation lock to the unlocked position. Finish.
As shown in Figure 6, before modification is done, we recommend draining the ink pad using a hose and injection device. If necessary, you can close the drain hose that leads to the ink pad.
This modification was made with the aim to divert the waste ink receptacle outside the printer. The length of the hose and the size of the waste ink container, can be replaced with a larger size according to conditions. If you encounter problems during repair, please read the Epson L1300 Service Manual.
After the waste ink pad modification is complete, the next step is to reset the Main pad counter to zero. To reset the Epson L1300, the Epson Adjustment Program tool is used.
2. Reset the Waste ink counter value

Reset the Epson L1300 printer
- Connect the USB cable and turn on the printer.
- Download Adjustment Program Epson L1300
- Extract file
- Open Adjprog.
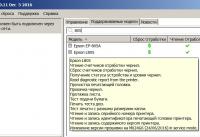
(2) Port – select USB port Epson L1300 or use Auto selection – OK
(3) Particular Adjustment Mode

(4) Double click Waste Ink Pad Counter
Check the value of the Main pad counter before reset.
(5) Checkbox: Main Pad Counter
(6) Click Check – OK
As shown in the figure below, the Main pad counter value is 11809 point or 100%. Reset is done to reset the Main pad counter to zero.

Note: Wait for the power light to stop flashing, before performing the next command.
(7) Checkbox: Main Pad Counter
(8) Click Initialization
(9) When the OK button is clicked, counter will be initialized – OK
(10) Please turn off the printer. Turn off the printer first, then press OK

Note: Turn on the printer, and wait for the power light to stop blinking, before carrying out the next instruction.
Check the Main pad counter after reset. If the Main pad counter value changes to zero, it means that the reset has been successfully performed.
(11) Checkbox: Main Pad Counter
(12) Click Check – OK

(13) Press the Finish button to end the process.
To repair the Epson L1300 printer for the error «A printer’s ink pad is at the end of its service life» was done in two stages, beginning with draining the ink pad and installing an outer drain tube, followed by resetting the waste ink counter, has been completed. For additional information, also read the paragraph questions and answers below.
Questions and Answers
Q: When using the Adjustment Program the message «Communication error! Error Code xxxxxxxx» appears. What to do?
A: Communication error! Error Code: xxxxxxxx occurs because the printer is not ready to accept commands from the Adjustment Program because it is still busy processing the previous command.

So when the printer receives the command example «Main pad counter -> Check», the power light will blink for about 60 seconds. The printer can process the next command example «Main pad counter -> Initialization» after 60 seconds have passed. Communication error! Error Code: xxxxxxxx occurs because the second command «Main pad counter -> Initialization» is done while the printer is still processing the previous command. So wait for the power light to stop flashing, then run the next command.
If you have trouble doing it yourself, we recommend asking for help from the nearest Epson Service Center or the nearest printer repair professional.
Reset Utility: Communication error
Contents
Customers attempting to use an Epson Adjustment utility may find that they get an error like this:

There are a couple of error codes and a few possible causes listed below…
Error Code: 20000010 or 20000011
1. Make sure you have your printer connected directly to the computer using a USB cable.
Note: The reset utility will not work over a network connection
2. If you are trying to run the utility on Vista or Windows 7 it often will not work. You may need to run the utility in compatiblity mode.
The solution is as follows:
- Download the Adjustment utility as you would normally and set your systems date/time as required by the instructions
- Right click on the “Adjprog” and select “Properties“
- Choose “compatibility” and select “windows xp“.
- Find and select “Run as Administrator” (if you have this option)
- Click OK at the bottom
Additional notes regarding Windows 7 are available via this article
This “How to…” video should also help explain how to set compatibility mode.
Error Code: 21000012c or 20000107
This error code appears if you have more than one potentially compatible printer connected to your computer when you try to use the reset utility.
Solutions:
- Make sure you only have the target printer (ie: the one you wish to reset) connected to your computer and turned on.
- Try selecting the specific port that your target printer is connected on rather than “Auto Select”
(Via “Settings” button in AdjProg utility)
Error Code: 21000068
This error code appears on utilities that have not been unlocked properly and as such cannot be used.
This is particularly common for Adjustment programs that were supposedly released for the PX810FW and a few T60, T50 versions too.
There is no solution that makes these utilities work so there is no point continuing to try. The best solution now is usually to check compatibility for your printer using the WICReset tool and, if compatible, use that instead.
Updated on 25 February 2022
Was this article helpful?
Related Articles
Решено
Help. Помогите найти Adjusment program для L805
Не могу найти Adjusment program
| Сообщение #1
Отправлено 03 января 2017 — 15:36
Друзья, помогите. Нужна Adjusment program для L805. Требуется тонкая настройка, для L800 не работают.
- Наверх of the page up there ^
-
0
| Сообщение #2
Отправлено 03 января 2017 — 16:17
sanek943
- Наверх of the page up there ^
-
0
| Сообщение #3
Отправлено 03 января 2017 — 16:22
stamp69
Спасибо, но эту пробовал — не работает (выдаёт ошибку)
- Наверх of the page up there ^
-
0
| Сообщение #4
Отправлено 03 января 2017 — 16:43
sanek943
 stamp69 сказал:
какую?
- Наверх of the page up there ^
-
0
| Сообщение #5
Отправлено 04 января 2017 — 06:23
stamp69
Вот что пишет
communication error!
error code: 2100012c
- Наверх of the page up there ^
-
0
| Сообщение #6
Отправлено 06 января 2017 — 13:14
Nikolai67
С диска Ц папку с названием принтера удалял?
- Наверх of the page up there ^
-
0
| Сообщение #7
Отправлено 06 января 2017 — 13:24
stamp69
Дрова ставил на только что установленную систему.
- Наверх of the page up there ^
-
0
| Сообщение #8
Отправлено 06 января 2017 — 14:19
Роман67
stamp69, В какой ОС пытались работать ?
stamp69 сказал:
Спасибо, но эту пробовал — не работает (выдаёт ошибку)
Притом запросто , так АР для ТХ650 не работает с РХ660 , так же уходит в ошибку , хотя эти аппараты по функционалу одинаковы .
stamp69, Вам дорога в ИЗВЕСТНЫЙ МАГАЗИН !
Кому суждено быть повешеным,тот не утонет! Если просвистела , то не моя ! То , что вы на свободе — не ваша заслуга , а наша недоработка!
NANO3 , Epson SP1410 , PX660. Чернила : оригинал L800 , WWM EVEREST , Revcol EP390 .
- Наверх of the page up there ^
-
0
| Сообщение #9
Отправлено 06 января 2017 — 14:37
stamp69
Пытался в семёрке и экспишке. А по поводу магазина — насколько можно быть уверенным в том что получишь то что нужно?
- Наверх of the page up there ^
-
0
| Сообщение #10
Отправлено 07 января 2017 — 12:45
romanM
Нет в доступе на л805, купите в магазине 2Manuals, вроде называется, про шару забудьте
Делаю СНПЧ на всё, что в руки попадает, и это работает!
- Наверх of the page up there ^
-
0
| Сообщение #11
Отправлено 07 января 2017 — 13:39
root
stamp69 сказал:
ЧТО конкретно вы хотите настроить?
Проверяли доступные настройки в PrintHelp?
Прикрепленные изображения
- Наверх of the page up there ^
-
0
| Сообщение #12
Отправлено 07 января 2017 — 17:40
stamp69
конкретно нужно
head angular adjustment
Bi-D adjustment
PF/EJ adjustment
PW adjustment
- Наверх of the page up there ^
-
-1
| Сообщение #13
Отправлено 07 января 2017 — 20:23
romanM
Из драйвера сделайте, что не так?
Делаю СНПЧ на всё, что в руки попадает, и это работает!
- Наверх of the page up there ^
-
-1
| Сообщение #14
Отправлено 08 января 2017 — 09:16
stamp69
И где в драйвере такие настройки?
- Наверх of the page up there ^
-
1
| Сообщение #15
Отправлено 13 февраля 2017 — 09:52
Usver2
stamp69 сказал:
Нужна Adjusment program для L805. Требуется тонкая настройка
Тонкую настройку не пробовал но вот памперс сбросила
http://resetters.ru/…=1
- Наверх of the page up there ^
-
2
| Сообщение #16
Отправлено 11 апреля 2017 — 15:24
kofanov49
Есть ли у кого нибудь adjustment program для sx425w
- Наверх of the page up there ^
-
0
| Сообщение #17
Отправлено 11 апреля 2017 — 15:32
Роман67
kofanov49, ДЕРЖИ , правда рабочая или нет , не знаю .
Кому суждено быть повешеным,тот не утонет! Если просвистела , то не моя ! То , что вы на свободе — не ваша заслуга , а наша недоработка!
NANO3 , Epson SP1410 , PX660. Чернила : оригинал L800 , WWM EVEREST , Revcol EP390 .
- Наверх of the page up there ^
-
0
- ← Предыдущая тема
- L100, L200, L800
- Следующая тема →
- Вы не можете создать новую тему
- Вы не можете ответить в тему
2 человек читают эту тему
0 пользователей, 2 гостей, 0 скрытых пользователей
Скачать обновленную версию бесплатной программы PrintHelp 2023, купить Код Сброса —