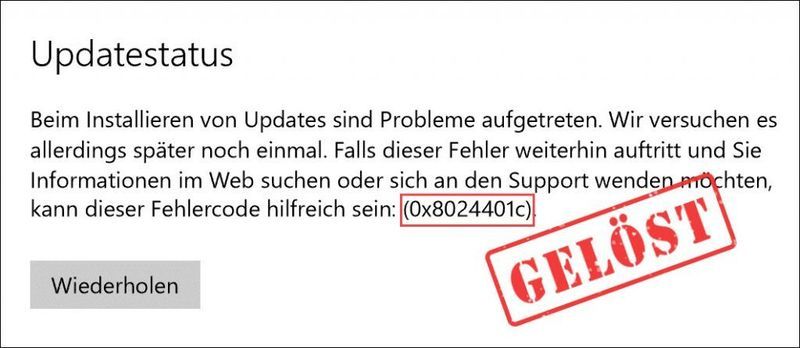
У одного из заказчиков столкнулись с проблемой обновлений новых ПК с Windows 10 1607 и Windows Server 2016 с внутреннего WSUS сервера (на Windows Server 2012 R2). Компьютеры Windows 10 появляются в консоли WSUS, но при запуске поиска обновлений, клиент очень долго пытается их найти и возвращает ошибку 0x8024401c.
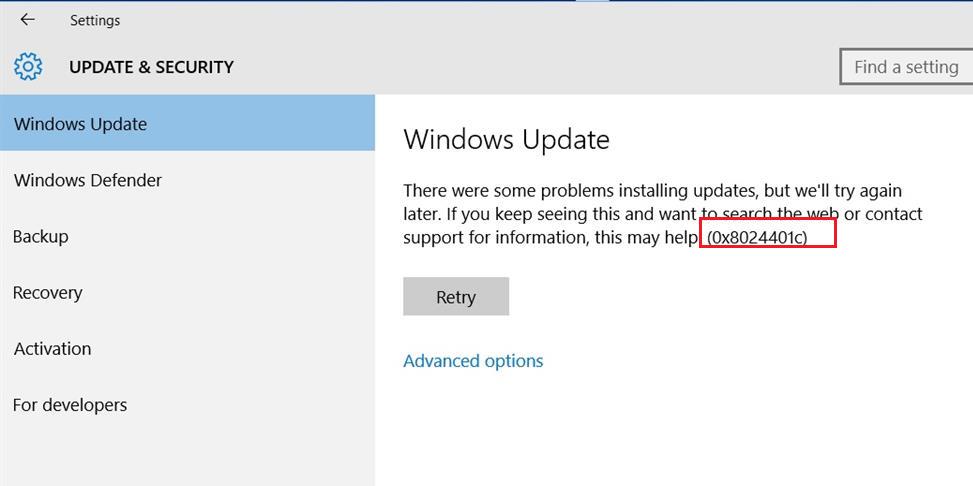
There were some problems installing updates, but we’ll try again later. If you keep seeing this and want to search the web or contact support for information, this may help: (0x8024401c)
Согласно списка кодов ошибок центра обновления Windows ошибка 0x8024401C означает превышение таймаута ответа от клиента: WU_E_PT_HTTP_STATUS_REQUEST_TIMEOUT — HTTP status 408 — the server timed out waiting for the request.
В новом журнале логов службы Windows Update Windows 10 при этом также периодически фиксируется ошибка, связанная с таймаутом ответа WSUS.
2017-05-30 14:11:24:870  816 1244 WS WARNING: There was an error communicating with the endpoint at 'http://msk-wsus:8530/ClientWebService/client.asmx'.
2017-05-30 14:11:24:870  816 1244 WS WARNING: There was an error receiving the HTTP reply.
2017-05-30 14:11:24:870  816 1244 WS WARNING: The operation did not complete within the time allotted.
2017-05-30 14:11:24:870  816 1244 WS WARNING: The operation timed out
Сама страница ‘
http://msk-wsus:8530/ClientWebService/client.asmx
‘ при этом с клиента доступна и открывается, т.е. возникает такое ощущение, что сервер WSUS или клиент просто не успевают выполнить некую операцию и клиент отваливается по таймауту. Возможно при инициирующем сканировании, новому клиенту WSUS прилетает слишком большой список обновлений, в результате чего достигаются некие лимиты рабочего процесса IIS.
Чтобы решить проблему с клиентами, мне пришлось сначала установить на сервере WSUS обновление KB3159706 (на сервере должен быть установлен Wndows Server 2012 R2 Update 1).
В статье KB3159706 (Update enables ESD decryption provision in WSUS in Windows Server 2012 and Windows Server 2012 R2) обратите внимание на ручные действия, которые нужно выполнить после установки обновления (иначе может перестать открываться консоль WSUS).
- Выполнить команду
"C:\Program Files\Update Services\Tools\wsusutil.exe" postinstall /servicing

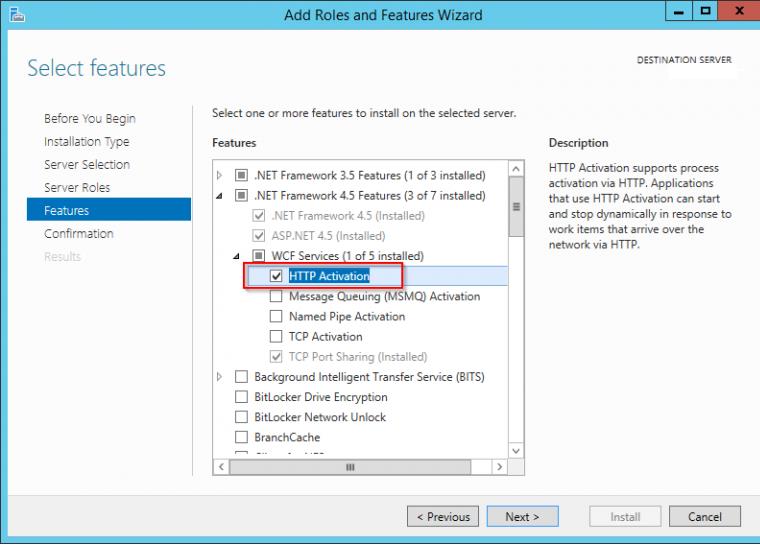
- Проверить, установлен ли компонент.NET Framework 4.5 -> HTTP Activation (
Get-WindowsFeature -Name NET-WCF-HTTP-Activation45
), и если он отсутствует, установить:
- Если на WSUS используется SSL, нужно выполнить редактирование файла C:\Program Files\Update Services\WebServices\ClientWebService\Web.config в соответствии с рекомендациями в статье (в нашем случае этот пункт выполнять не пришлось).
- Отредактируйте файл config ( C:\Program Files\Update Services\WebServices\ClientWebService\web.config ), заменив строку
<httpRuntime maxRequestLength="4096" />
на
<httpRuntime maxRequestLength="204800" executionTimeout="7200"/> - Осталось перезапустить службу WSUS с помощь PoSh:
Get-Service -Name WsusService | Restart-Service -Verbose

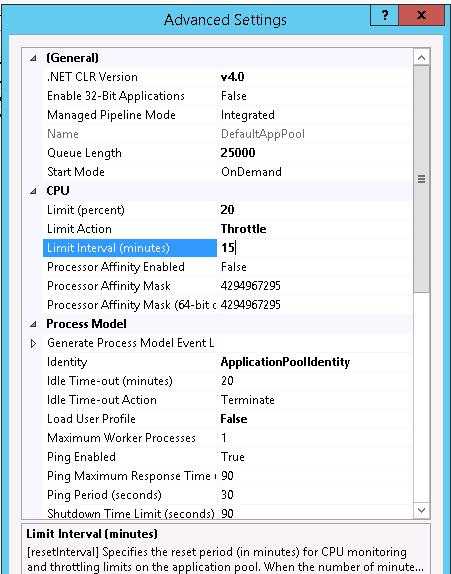
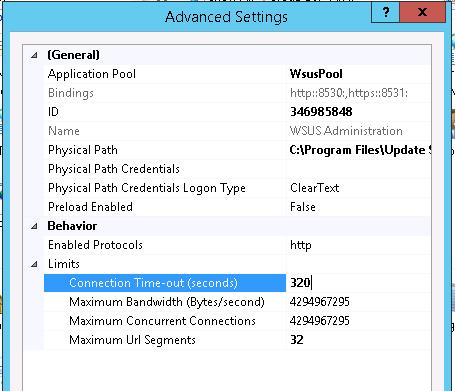
Далее с помощью консоли IIS Manager нужно внести следующие изменения в настройки пула WsusPool (Application Pools -> WsusPool -> Advanced settings)
- Private Memory Limit (KB) – 0 (было 1258015, убирается лимит на использование памяти рабочим процессов WSUS, в результате служба может использовать более 1,2 Гб памяти)
- Queue Length — 25000 (увеличиваем длину очереди к пулу приложения с 10000)
- Limit Interval (minutes) — 15 (увеличиваем с 5 минут до 15 минут время для сброса счетчиков и выполнения CPU Throttling)
- Service Unavailable Response — TcpLevel (при старом значение HttpLevel клиенту возвращается ошибка HTTP 503, теперь соединение просто сбрасывается)
Затем в настройках сайта WSUS Administration -> Advanced settings нужно изменить значение Connection Time-out со 180 до 320.
 Осталось перезапустить IIS:
IISReset
Теперь мы увеличили таймауты и ресурсы сервера, требуемые клиентам Windows 10 для поиска и проверки обновлений на сервере обновлений WSUS. На следующий день – все клиенты смогли обнаружить и установить все требуемые обновления.
If you see the Windows Update error 0x8024401c in your computer when running the Windows Update, you run into a problem installing the updates and have no idea what to do. No worries! There are fixes to the issue.
How do I fix 0x8024401c in Windows? Try these fixes:
- Check the network settings
- Update drivers
- Modify the setting in Registry Editor
- Repair system files
- Perform a clean boot
Why does 0x8024401c happen on my computer?
Why does the error occur? the error 0x8024401c usually occurs when you have problems installing or downloading the Windows updates in your computer.
The causes generally are the improper Internet connection, or the server timed out waiting for the request. Another reason is likely because of the inappropriate device drivers in your computer.
You can try the methods below to fix 0x8024401c in your computer.
Note: All the screenshots below are shown on Windows 10, and the fixes apply to Windows 8 & 7.
Method 1: Check the network settings to fix 0x8024401c
As mentioned above, the network issue can cause the 0x8024401c error, so you can check the following two settings of the network to fix the error.
1. Switch network connection in your computer
As many people know, switching the network connection fixes the issue.
Thus, if you are connecting to WiFi in your computer, you can try switching the WiFi connection to wired connection or Ethernet connection and try the Windows Update to see if it works. If you are using the wired connection, you can change to WiFi connection, then try the Windows Update again to see if it works.
2. Uncheck IPv6 network
If switching your network doesn’t work, you can try to uncheck the IPv6 network, and make your computer go with IPv4 network. Follow the instructions to do that:
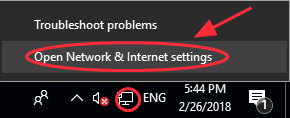
1) Right click the Internet Icon at the bottom right corner on your computer, and click Open Network & Internet settings.
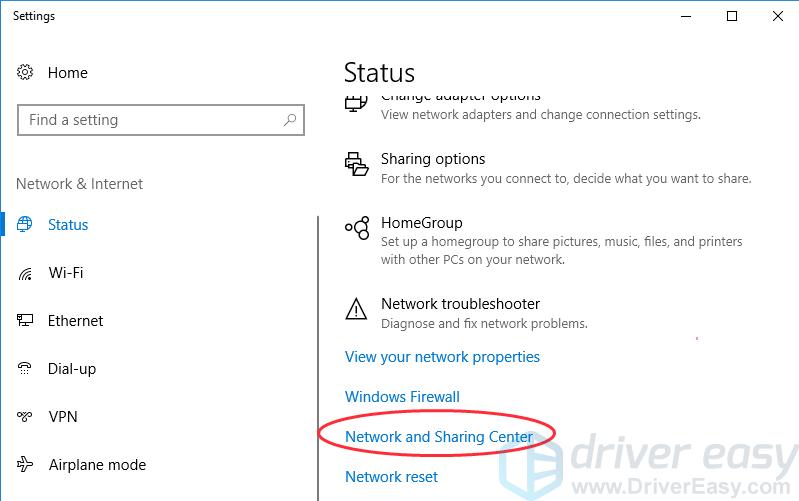
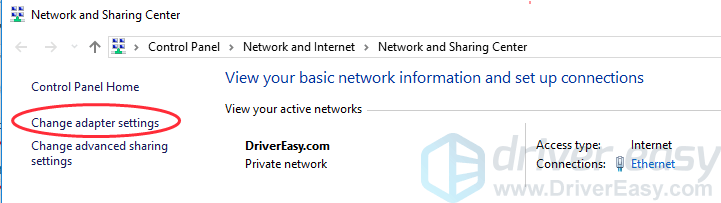
2) Click Network and Sharing Center.
3) Click Change adapter settings.
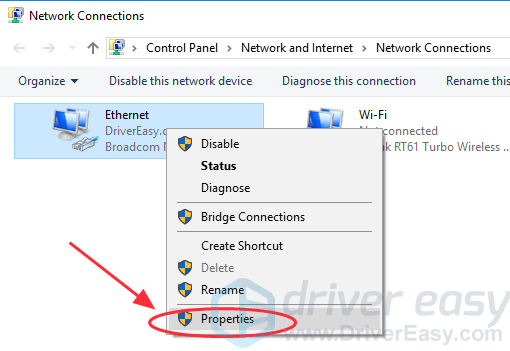
4) Right click the network connection (LAN, Ethernet or WiFi) that you are currently connecting, then click Properties.
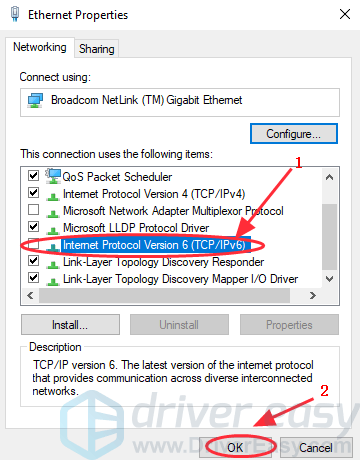
5) In the popup pane, uncheck Internet Protocol Version 6 (TCP/IPv6). Then OK to save the setting.
6) Restart your computer and try to update your Windows again.
Method 2: Update drivers to fix 0x8024401c
The missing or outdated drivers in your computer can also stop the Windows Update from working, so you can update the drivers in your computer to fix it.
There are two ways you can update the drivers: manually or automatically.
Manual driver update – You can update your drivers manually by going to the manufacturer’s website and searching for the most recent correct driver.
Automatic driver update – If you don’t have the time, patience or computer skills to update your network card driver manually, you can, instead, do it automatically with Driver Easy. Driver Easy will automatically recognize your system and find the correct drivers for it:
1) Download and install Driver Easy.
2) Run Driver Easy in your computer, and click Scan Now. Driver Easy will then scan your computer and detect any problem drivers.

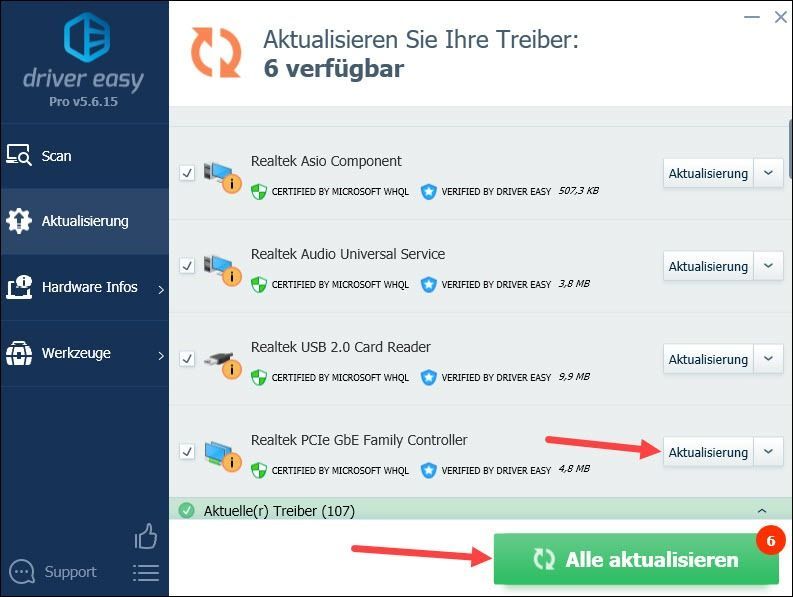
3) Click the Update button next to the flagged network card to automatically download and install the correct version of its driver (you can do this with the FREE version).
Or click Update All to automatically download and install the correct version of all drivers that are missing or outdated. (This requires Pro version – You’ll be prompted to upgrade if you click Update All.)
4) After updating all the drivers, restart your PC and try Windows Update again.
Method 3: Modify the setting in Registry Editor to fix 0x8024401c
You can try to modify the settings in Registry Editor to fix Modify the setting in Registry Editor to fix 0x8024401c in your computer. Follow these steps:
1) Press the Windows logo key  + R at the same time on your keyboard.
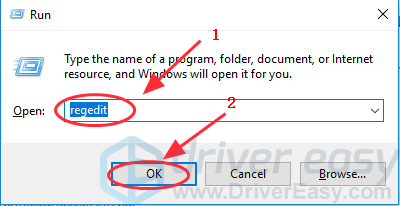
2) Type regedit in the Run box, and click OK.
3) Go to HKEY_LOCAL_MACHINE > Software > Policies > Microsoft > Windows > WindowsUpdate.
4) Click AU in WindowsUdpate, and find UseWUServer.
5) Replace whatever is in the registry value data on the right pane with 0 (zero).
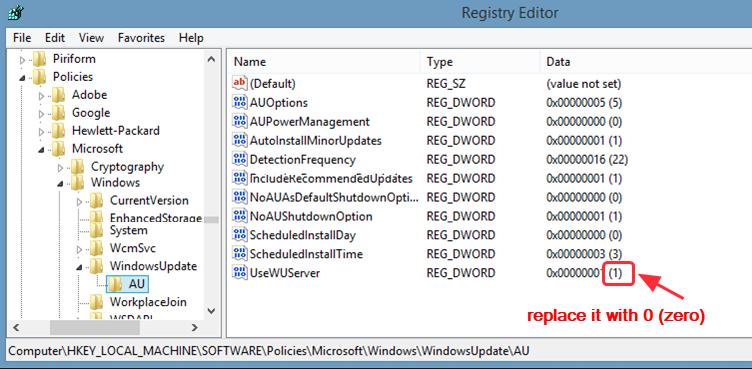
6) Click OK to save.
7) Restart the computer and try to install the update again.
Method 4: Repair system files
The 0x8024401c error may be related to system files. When the system files were broken or corrupted, it may cause a Blue screen issue.
There are 2 ways to solve it. Here’s how:
- Option 1- Automatically (Recommended)
Use a repair tool to check various areas in your computer to determine the cause of Windows common issues. It will deal with issues related to system errors, critical system files and find the right fix for you. - Option 2 – Manually
System File Checker is a built-in tool to check for corrupt, damaged system files and manage to restore them if there’re any. However, this tool can only diagnose major system files, and won’t deal with damaged DLL, Windows Registry key, etc.
Option 1 – Automatically (Recommended)
Fortect is a computer repair software that can diagnose problems on your computer and fix them immediately.
It is tailored to your specific system and is working in a private and automatic way. It will first check hardware-related issues to identify problems, and then security issues, and finally it detects programs that crash, missing system files. Once complete, it will find a solution to your specific problem.
- Download and install Fortect.
- Open Fortect and click Yes to run a free scan of your PC.

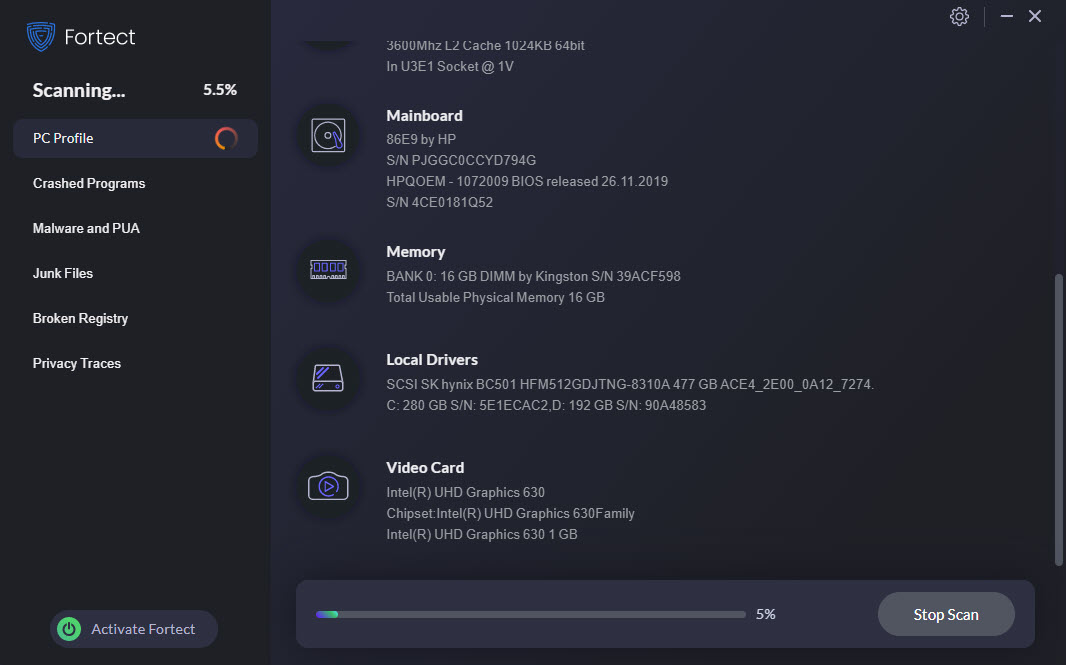
- Fortect will scan your computer thoroughly. This may take a few minutes.

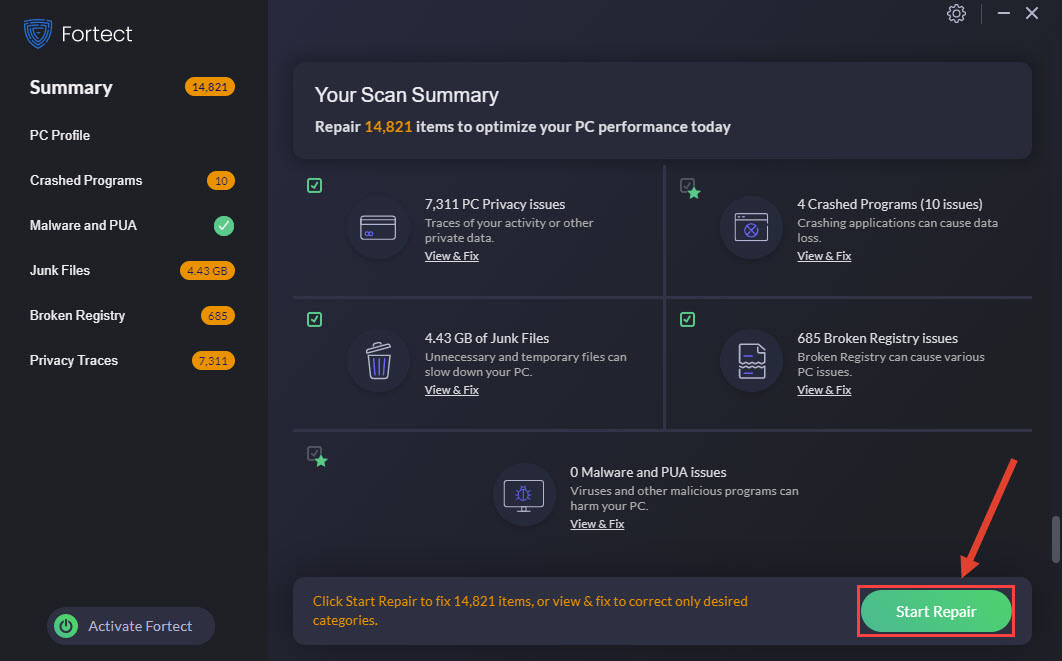
- Once done, you’ll see a detailed report of all the issues on your PC. To fix them automatically, click START REPAIR. This requires you to purchase the full version. But don’t worry. If Fortect doesn’t solve the issue, you can request a refund within 60 days.

The Pro version of Fortect comes with 24/7 technical support. If you need any assistance, please contact Fortect support:
Email: support@fortect.com
Option 2 – Manually
The SFC (System File Checker) is a Windows utility that helps automatically check and repair the corrupted or incomplete system files, so you can run an SFC scan in your system and let it be automatically repaired if there are any issues.
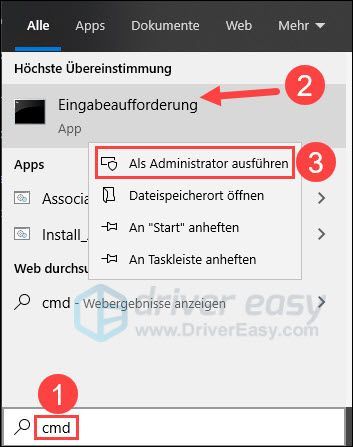
1) Type cmd in the search box.
2) Right-click Command Prompt, and select Run as administrator.
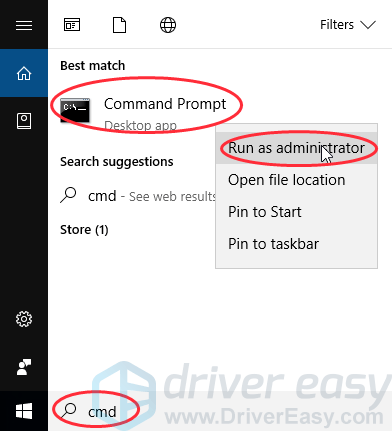
3) Type sfc /scannow in the window, and press Enter.
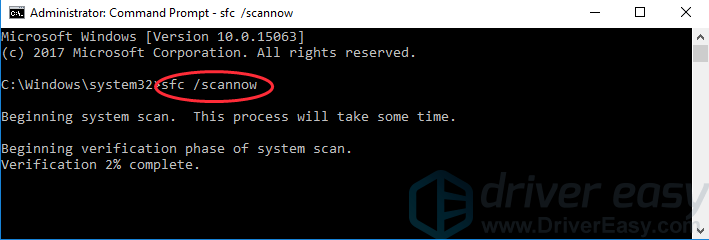
4) This process can take some time, and it will try to automatically fix the issues after scanning. So don’t close the window until verification 100% complete. After it’s completed, restart your PC and try updating Windows again.
Method 5: Perform a clean boot
You can perform a clean boot in your system. Try the steps:
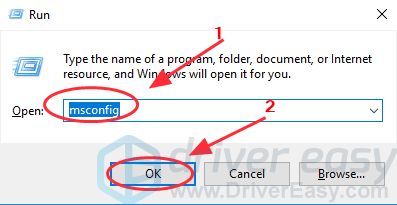
1) Press the Windows logo key + R at the same time on your keyboard.
2) Type msconfig in the Run box and click OK.
3) Click the Services tab, and check the box next to Hide all Microsoft services.
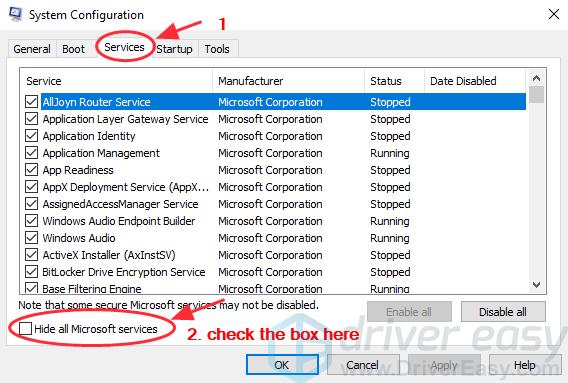
4) Click Disable all, then click OK.
5) Restart your system and check for the updates.
These are the useful methods to fix Windows Update error 0x8024401c. If you have any further questions, feel free to comment below and we’ll see what more we can do to help.
The error 0x8024401c is caused when Windows cannot download and install any Windows updates as it cannot connect to Microsoft’s Windows update servers. Causes for it can be internet connection issues or server timed-out waiting.
The issue was encountered by many users when Microsoft launched Windows 10 technical preview and allowed users to test it. However, the problem wasn’t exclusive to the technical preview and has been encountered by Windows 10 users and users for earlier versions of Windows.
Sometimes the cause for the error 0x8024401c is on the user’s side when they do not have a stable internet connection to download the Windows update. The error can also occur due to missing system files and problematic drivers.
How do I resolve Windows 10 update error with code 0x8024401c?
No doubt, the error 0x8024401c is a significant issue, and Microsoft has released several bug fixes and improvements to fix it. However, if you are facing a Windows update on your computer and want to fix it, this article could be of great help to you.
Methods to fix the Windows update error 0x8024401c
- Check the network settings
- Update drivers
- Modify the setting in Registry Editor
- Run the SFC Scan
- Perform a clean boot
Method 1: Check your network settings to fix 0x8024401c
The most common cause behind the windows update error is the unstable network connection. So, first, let us check that and fix it using the two settings:
1. Switch the network connection in your computer
2. Uncheck IPv6 network
1. Switch the network connection in your computer
Switching between Wi-Fi and ethernet connection could be the key to fixing Windows update errors. Before that, turn the Wi-Fi off on your computer and then turn it on again. If it doesn’t work, then try switching.
If you are using Wi-Fi, try to reconnect to your internet connection using an ethernet cable. In case you are using an ethernet cable, then try to connect your computer using Wi-Fi.
After switching between the network, try to update to Windows 10. Hopefully, the error would have been fixed.
2. Uncheck IPv6 network
Two types of IP addresses are available for any system: IPv4 and IPv6. These addresses are used to identify your system on the network, similar to your house address.
Sometimes, the IPv6 address can cause issues and restrict Windows from connecting to the Windows update server. Unchecking the IPv6 network can help you fix the error.
Step 1. Right-click on the Internet icon given on the bottom right corner of your screen.

Step 2. Click on the Open Network & Internet Settings option.
Step 3. Move to the Network and Sharing Center option in the Status panel.
Step 4. In the Network and Sharing Center window, click on Change adapter settings on the left side.
Step 5. Right-click on the type of connection you are currently using, e.g., Wi-Fi, LAN, or Ethernet. Click on Properties.
Step 6. Scroll down and navigate to Internet Protocol Version 6 (TCP/IPv6) in the Properties window and uncheck the box.
Step 7. Click OK button.
Step 8. Restart your computer. Once the system restarts, check for windows updates.
Method 2: Update drivers
The Windows update error 0x8024401c can occur if the drivers installed in your computer aren’t compatible or are problematic.
Drivers for peripheral devices such as printers, ethernet cards, etc., can obstruct Windows updates if they are problematic.
1. Manual Update
You should always install generic drivers available on the original driver manufacturers’ website. Here is how you can do it:
Step 1. Press Windows + X keys together.

Step 2. Navigate to the Device Manager.
Step 3. Right-click on the driver that isn’t working correctly.
Step 4. Uninstall the driver.
Step 5. Go to the driver manufacturer’s website and download the driver using the information of your operating system and processor.
Step 6. Install the driver and restart your computer. Check for updates.
2. Automatic update
Manually downloading each driver after checking its compatibility is a cumbersome task. Also, if you install the wrong one, then there is a strong chance of failure.
Using third parties such as DriverFix and Driver Easy can automatically install and update compatible drivers on your PC, thereby freeing you of the complex decision process.
You won’t have to constantly check every driver for an update as this software can automatically do that for your PC.
DriverFix

Step 1. Go to the DriverFix website and download and install it.
Step 2. Run the software and wait for it to check your computer requirements and faulty drivers.
Step 3. After the system scanning is done, you can see a list of problematic drivers.
Step 4. You can choose the drivers you wish to update. The software will do the update for you.
Step 5. Restart your computer. Check if you can update Windows 10.
Driver Easy

Step 1. Go to the Driver Easy website and download and install the software.
Step 2. Run the Driver easy application and click on Scan Now to begin scanning your PC for all possible driver fixes.
Step 3. You can see a list of drivers that require an update. Click on the Update button next to each driver to update them individually. Alternatively, you can also click on the Update All button to update all the drivers at once.
Step 4. Restart your computer once the process completes and check if the Windows update error 0x8024401c is fixed.
Method 3: Modify the system’s setting in Registry Editor to fix 0x8024401c
Missing or defective system files can also cause the Windows update error 0x8024401c. You can modify these files in the HKEY_LOCAL_MACHINE -> Software -> Policies -> Microsoft -> Windows -> WindowsUpdate -> AU folder and fix them using the Registry Editor.
Step 1. Press Windows and R keys together to open the Run dialog box.

Step 2. In the box next to the Open: label, type regedit, and press enter.
Step 3. Navigate the following path: HKEY_LOCAL_MACHINE -> Software -> Policies -> Microsoft -> Windows -> WindowsUpdate -> AU
Step 4. Look for UseWUServer on the right side of the window.
Step 5. Right-click the file and replace the registry value data given on the far-right with 0 (zero).
Step 6. Click OK to save the changes.
Step 7. Restart the computer and check if the Windows Update now works.
Method 4: Run SFC Scan to fix 0x8024401c error
Windows comes with a System File Checker (SFC) Utility tool to automatically check and repair any missing, corrupt, or incomplete system files using the sfc/ scannow command.
Use the System File Checker utility tool to fix the system files and hopefully fix Windows Update 0x8024401c error. Follow these steps given to run the System File Checker utility tool scan:
Step 1. Press Windows key icon and type cmd in the search box of Windows to open the command prompt.
Step 2. For the command prompt, select Run as Administrator from the right side. Or, right-click on the command prompt and select Run as Administrator option.
Step 3. Type in the command line of cmd, sfc /scannow and press Enter key.

Step 4. Allow the OS to complete the sfc /scannow process and repair the system files. Plugin the computer into a charger so that it doesn’t shut down in the middle of the process.
Step 5. Once the process is 100% complete, restart your computer and try to update Windows again.
Method 5: Perform a clean system boot to fix 0x8024401c
We hope that you can fix Windows update 0x8024401c error by now and that the above fixes were helpful. However, if you are stuck with it, here’s another method: a clean boot to help you fix the error.
Step 1. Press the Windows key + R key together to open the run dialog box.
Step 2. Next to the Open: label, type msconfig, and press enter.

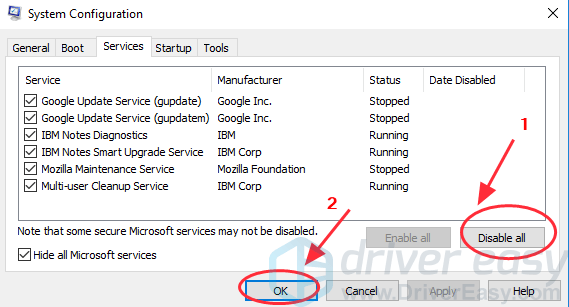
Step 3. In the open System Configuration window, navigate to the Services tab and scroll down to the bottom of the window.
Step 4. Check the Hide all Microsoft Services checkbox.
Step 5. Click on the Disable all button to disable all other services and then click OK.

Step 6. Restart your computer. Check if the Windows update works correctly.
Корпорация Майкрософт регулярно выпускает обновления для Windows, необходимые вашему компьютеру, чтобы воспользоваться преимуществами последних исправлений безопасности и исправлений. На большинстве ПК служба Windows Update запускается автоматически по расписанию, предлагая вам ожидающие обновления, требующие вашего внимания.
К сожалению, служба обновления не всегда работает должным образом, вызывая такие ошибки, как 0x8024401c, как результат . Если обновления системы заблокированы на вашем компьютере из-за кода ошибки 0x8024401c, узнайте, как решить эту проблему, не обращаясь за помощью к профессионалу.

Для некоторых из следующих решений вам потребуется поработать с настройками системного реестра. Поэтому рекомендуется создайте точку восстановления системы перед тем, как начать операцию по устранению неполадок. Если вы сделаете какие-либо ошибки, вы можете откатить Windows 10 и начать заново.
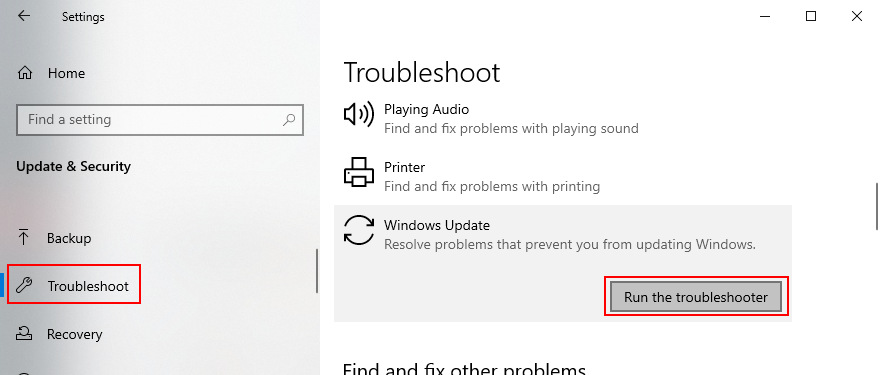
1. Используйте средство устранения неполадок Центра обновления Windows
Средство устранения неполадок Центра обновления Windows запускает быстрое сканирование вашего компьютера для выявления и решения распространенных проблем, которые мешают правильной работе инструмента обновления системы. Вот как это можно использовать:
- Нажмите клавишу Win , найдите Настройки устранения неполадок и нажмите Enter
- Нажмите Дополнительные средства устранения неполадок .
- Найдите и выберите Центр обновления Windows

- Нажмите кнопку Запустить средство устранения неполадок .
- Следуйте инструкциям мастера и разрешите Windows применить любые исправления.
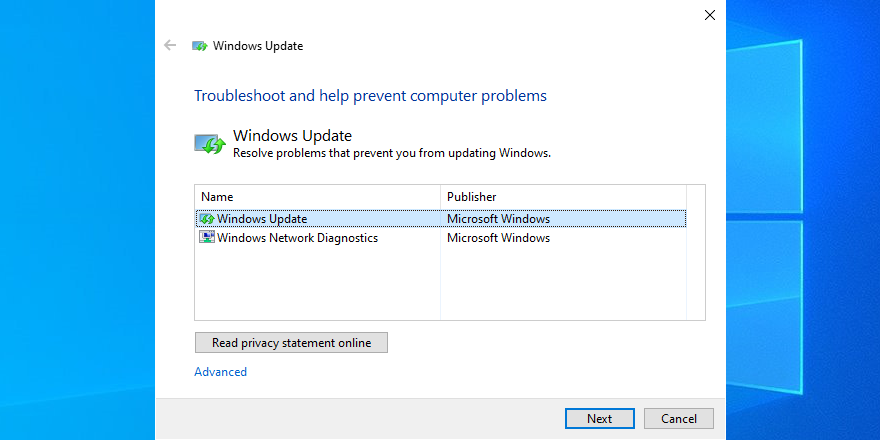
2. Используйте диагностику Центра обновления Windows
Другие проблемы с Центром обновления Windows можно решить с помощью диагностики Центра обновления Windows:
- Войдите в Windows 10, используя учетную запись администратора.
- Загрузите диагностику Центра обновления Windows со страницы официальный сайт
- Запустите приложение и выберите Центр обновления Windows

- Нажмите Далее и следуйте пошаговым инструкциям.
- Снова запустите приложение и выберите Диагностика сети Windows .
- Нажмите Далее и следуйте оставшимся шагам.
- Перезагрузите компьютер.
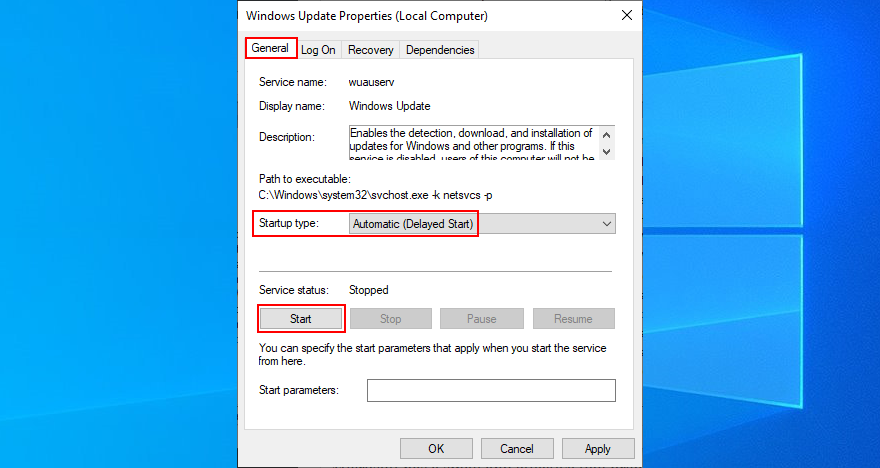
3. Проверить услуги
Некоторые системные службы привязаны к Центру обновления Windows, и их работа должна быть разрешена. Другие могут конфликтовать с приложением, и их следует отключить, чтобы оставаться в безопасности. Вот что вам нужно сделать:
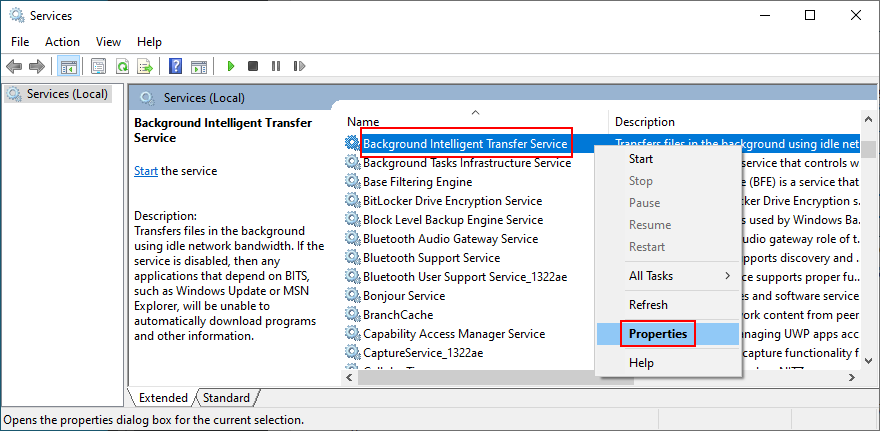
- Нажмите кнопку Пуск , введите Службы и откройте это приложение.
- Щелкните правой кнопкой мыши Центр обновления Windows и выберите Свойства

- Установите для Тип запуска значение Автоматический (отложенный запуск) и нажмите кнопку Пуск

- Нажмите Применить
- Найдите записи Фоновая интеллектуальная служба передачи и Готовность приложения и установите одинаковые параметры
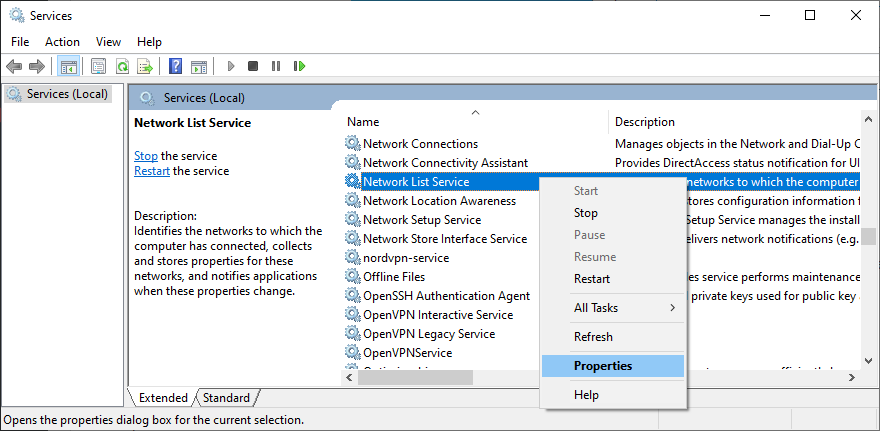
- Найдите Службу списка сетей и откройте ее свойства

- Установите для Тип запуска значение Отключено и нажмите Остановить
- Нажмите Применить и выйдите на рабочий стол.

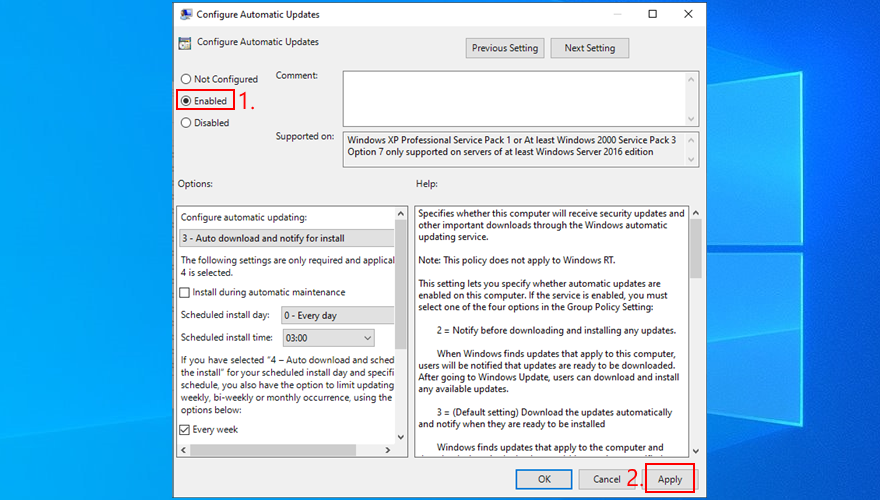
4. Проверьте групповую политику
Вам следует перейти в редактор локальной групповой политики, чтобы убедиться, что Центр обновления Windows может работать на вашем компьютере. В противном случае вы можете получить ошибку 0x8024401c.
- Нажмите кнопку Пуск , найдите изменить групповую политику и нажмите Enter
- Перейдите в следующее расположение: Конфигурация компьютера > Административные шаблоны > Компоненты Windows > Центр обновления Windows
- Дважды щелкните Настроить автоматическое обновление , чтобы просмотреть его свойства.
- Выберите Включено , нажмите Применить и выйдите на рабочий стол

5. Сбросить Центр обновления Windows из командной строки
Вы можете очистить кеш Центра обновления Windows, сбросив все программные компоненты, задействованные в его службах, благодаря среде командной строки:
- Обязательно войдите в Windows 10, используя учетную запись администратора.
- Нажмите клавишу Windows , введите cmd и откройте приложение Командная строка .
- Введите эти команды и нажимайте Enter после каждой строки:
- Перезагрузите компьютер.
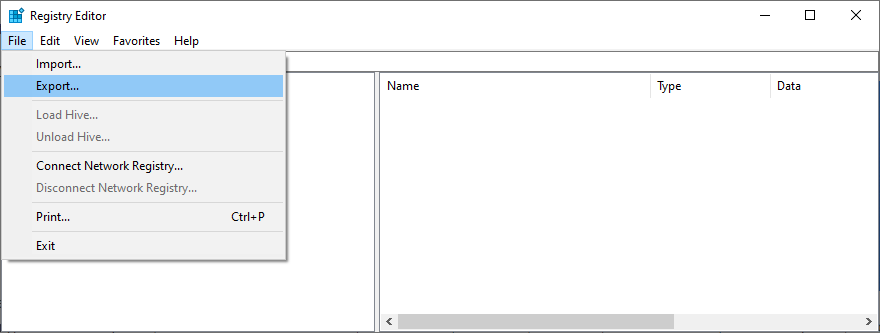
6. Проверьте настройки реестра
Используя редактор реестра, вы должны проверить некоторые записи, которые влияют на Центр обновления Windows, чтобы убедиться, что все в рабочем состоянии. Вот что вам нужно сделать:
- Нажмите клавиши Windows + R , введите regedit и нажмите Enter для откройте редактор реестра . При появлении запроса от UAC (Контроль учетных записей пользователей) нажмите Да
- Откройте меню Файл и выберите Экспорт

- Создать резервную копию реестра. файл , указав имя файла и каталог для сохранения.
- Перейдите в следующее место:
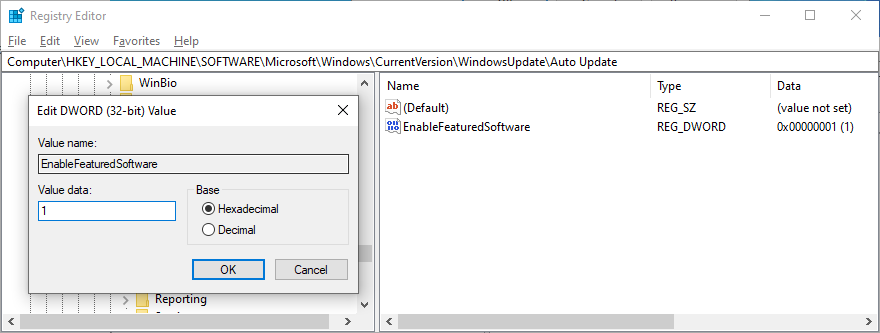
Компьютер \ HKEY_LOCAL_MACHINE \ SOFTWARE \ Microsoft \ Windows \ CurrentVersion \ WindowsUpdate \ Auto Update
- Проверьте, существует ли EnableFeaturedSoftware . В таком случае убедитесь, что для параметра Данные установлено значение 0x00000001 (1) . В противном случае дважды щелкните его запись, установите Данные значения на 1 и Базовый на Шестнадцатеричный , затем нажмите ОК
- Однако, если EnableFeaturedSoftware не существует, вы должны создать его:
- Выберите Изменить > Создать > Значение DWORD (32-битное)
- Введите запись EnableFeaturedSoftware и дважды щелкните ее.
- Установите для Данные значения значение 1 и Базовое значение Шестнадцатеричное , затем нажмите ОК
.
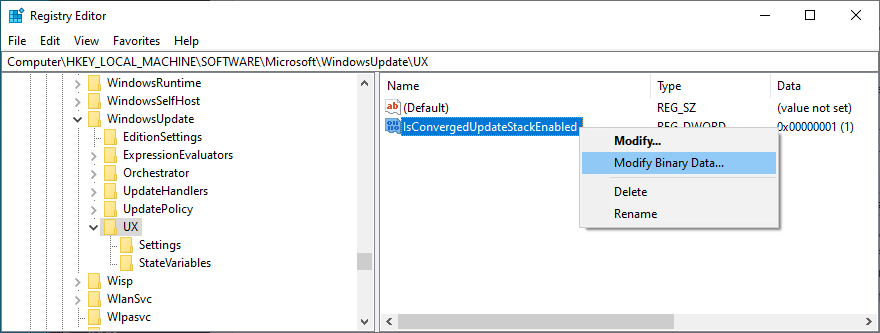
- Перейдите в это место:
HKEY_LOCAL_MACHINE \ SOFTWARE \ Microsoft \ WindowsUpdate \ UX
- Дважды щелкните IsConvergedUpdateStackEnabled , установите Значение данные на 0 и Базовый . на Шестнадцатеричный , затем нажмите ОК
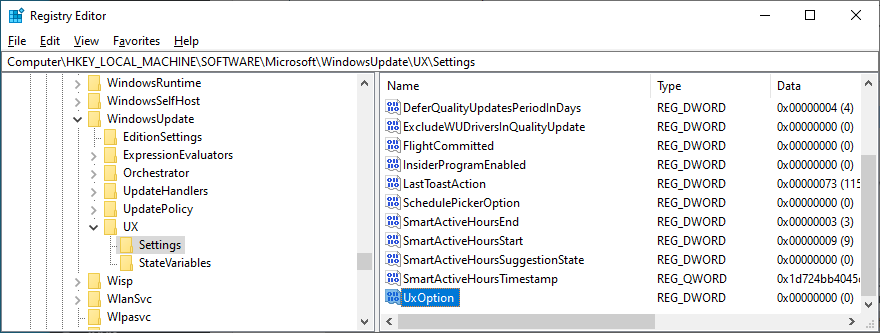
- Теперь перейдите по этому адресу:
HKEY_LOCAL_MACHINE \ SOFTWARE \ Microsoft \ WindowsUpdate \ UX \ Settings
- Дважды щелкните UxOption , установите Данные значения на 0 и Базовый на Шестнадцатеричный , затем нажмите OK
- Затем посетите:
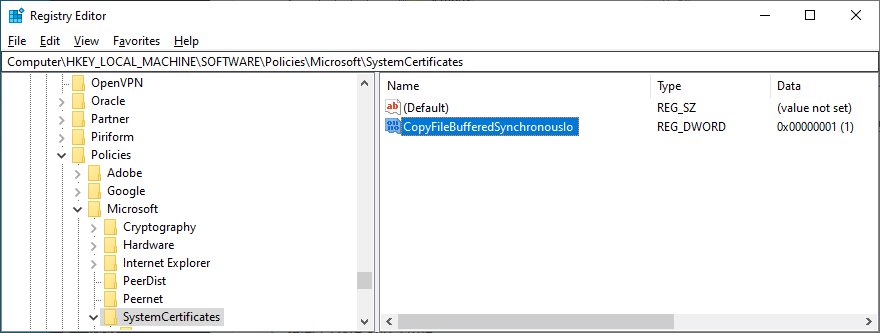
HKEY_LOCAL_MACHINE \ SOFTWARE \ Policies \ Microsoft \ SystemCertificates
- Проверьте, существует ли CopyFileBufferedSynchronousIo . Поэтому убедитесь, что для его данных установлено значение 0x00000001 (1) . Или дважды щелкните запись, установите Данные значения на 1 и Базовый на Шестнадцатеричный , затем нажмите ОК
- Если CopyFileBufferedSynchronousIo не существует:
- Выберите Изменить > Создать > Значение DWORD (32-битное)
- Переименуйте запись в CopyFileBufferedSynchronousIo и дважды щелкните ее.
- Установите для Данные значения значение 1 и Базовое значение Шестнадцатеричное , затем нажмите ОК
.
- Выйти на рабочий стол.
7. Обновите сетевые драйверы
Если у вас возникли проблемы с подключением к сети, вам следует проверить сетевые драйверы, поскольку они могут быть устаревшими, особенно если у вас все еще есть стандартные драйверы, потому что вы никогда не выполняли обновление.
Самый быстрый и безопасный способ-использовать приложение для обновления драйверов для одновременного обновления всех устаревших драйверов. Однако, если вы не хотите устанавливать какие-либо сторонние программы, вы можете обратиться к диспетчеру устройств:
- Нажмите клавиши Windows + R , введите devmgmt.msc и нажмите Enter
- Нажмите кнопку со стрелкой рядом с Сетевые адаптеры , чтобы развернуть эту группу.
- Щелкните правой кнопкой мыши сетевой интерфейс и выберите Обновить драйвер

- Нажмите Автоматический поиск драйверов и подождите.

Если поиск в Интернете ничего не дал, вы можете посетить веб-сайт производителя сетевого адаптера, чтобы найти, загрузить и установить последнюю версию. Однако это рискованно, потому что вы можете случайно установить неподдерживаемый драйвер.
8. Откатите сетевые драйверы
С другой стороны, вы могли случайно загрузить и установить драйвер, несовместимый с вашим сетевым адаптером или операционной системой. Это может повредить все ваши интернет-соединения, поэтому лучше вернуться к предыдущей версии. Вот как:
- Щелкните правой кнопкой мыши кнопку Пуск и выберите Диспетчер устройств
- Дважды щелкните сетевой адаптер, чтобы открыть его свойства.
- Перейдите на вкладку Драйвер .
- Нажмите кнопку Откатить драйвер и следуйте пошаговым инструкциям.
.
Если вы не можете нажать Откатить драйвер , потому что кнопка неактивна, откат невозможен, поскольку на вашем компьютере не сохранен предыдущий драйвер.
9. Отключите периферийные устройства
Аппаратные компоненты, которые недавно были подключены к вашему настольному компьютеру или ноутбуку, могут не полностью поддерживать вашу операционную систему. В свою очередь, это может повлиять на ваши приложения, подключения к Интернету и системные инструменты, такие как Центр обновления Windows, что приведет к ошибке 0x8024401c.
Обратите внимание на любое новое оборудование, подключенное к компьютеру, например веб-камеру, адаптер Wi-Fi, флеш-накопитель или карту памяти. Отсоедините их кабели, перезагрузите компьютер и проверьте, можете ли вы запустить Центр обновления Windows. Вы также должны попробовать подключить устройства к другим портам USB, если они не работают должным образом.
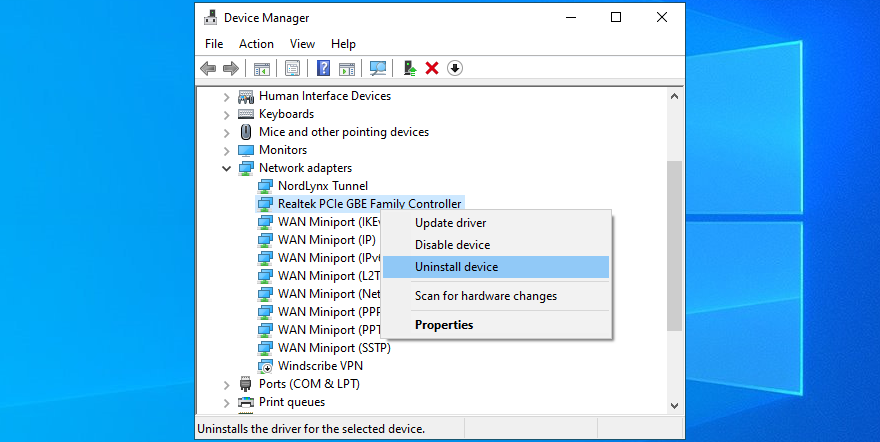
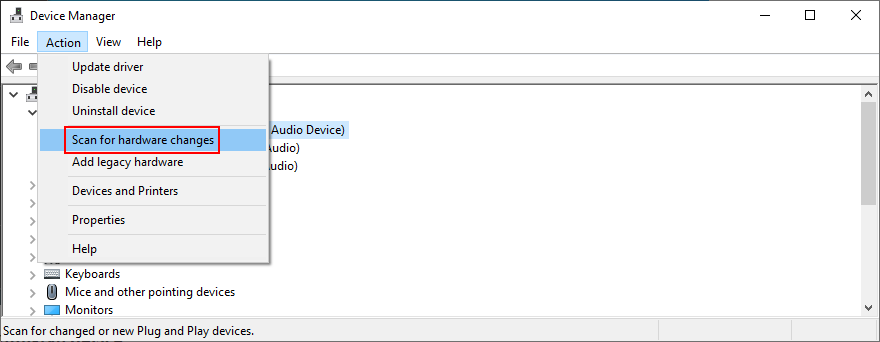
10. Переустановите устройства
Еще один способ справиться с периферийными устройствами-переустановить их на ПК с Windows 10. Это стало возможным через диспетчер устройств, так как вам просто нужно удалить адаптеры. После перезагрузки компьютера Windows автоматически установит все отсутствующие устройства. Вот что вам нужно сделать:
- Нажмите кнопку Пуск , выполните поиск по запросу Диспетчер устройств и нажмите Ввод
- Ищите устройства с желтым восклицательным знаком.
- Щелкните его правой кнопкой мыши и выберите Удалить устройство

- Откройте меню Действие и выберите Сканировать на предмет изменений оборудования

- Перезагрузите компьютер с Windows.
.
11. Проверьте свой жесткий диск на наличие ошибок
Возможно, на вашем жестком или твердотельном диске произошел сбой оборудования или поврежденные сектора. Это может повлиять на всю вашу систему, включая службу Windows Update. Но вы можете обратиться к CHKDSK (Проверить диск), чтобы найти и исправить любые проблемы:
- Нажмите кнопку Пуск , найдите Командная строка и выберите Запуск от имени администратора (нажмите Да , если запрашивается UAC )
- Примите во внимание букву раздела Windows и введите
chkdsk c:/f/r(если это неc:, замените его правильной буквой)
- CHKDSK попросит вас подтвердить планирование инструмента при следующей загрузке Windows. Согласитесь, набрав y и нажав Enter
- Перезагрузите компьютер и дождитесь, пока CHKDSK выполнит свою работу.

12. Исправить поврежденные системные файлы
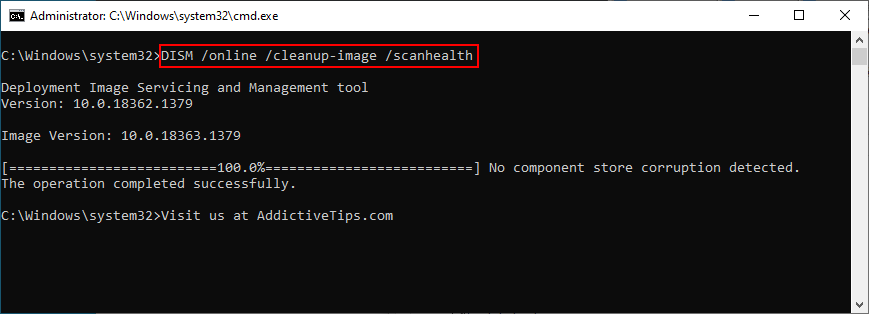
В Windows 10 могли быть повреждены, изменены или отсутствовали файлы, необходимые для Центра обновления Windows. Без принятия мер вы будете продолжать видеть код ошибки 0x8024401c. Но вы можете решить эту проблему, запустив DISM (Обслуживание образов развертывания и управление ими), а затем SFC (Проверка системных файлов) :
- Нажмите клавишу Win , введите CMD , выберите Командная строка и нажмите Запуск от имени администратора
- Напишите
DISM/online/cleanup-image/scanhealthи нажмите Enter
- При обнаружении каких-либо проблем запустите
DISM/online/cleanup-image/restorehealth, чтобы исправить их. - Перезагрузите компьютер и запустите командную строку с повышенными правами.
- Введите
sfc/scannowи нажмите клавишу Enter
- Перезагрузите рабочую станцию перед тем, как попробовать Центр обновления Windows.

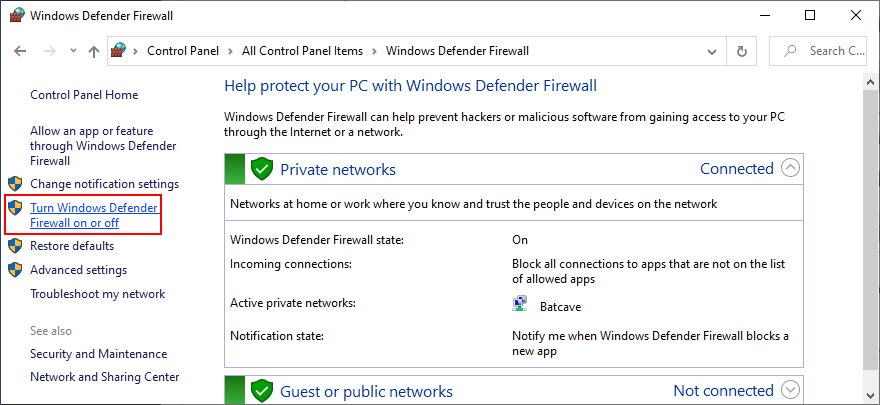
13. Проверьте настройки брандмауэра
Ваш брандмауэр фильтрует интернет-трафик, разрешая и запрещая доступ к процессам и службам. Если вы случайно испортили настройки брандмауэра, это может объяснить, почему Центр обновления Windows выдает вам такие ошибки, как 0x8024401c. Если у вас не установлен сторонний брандмауэр, вот что вы можете сделать с брандмауэром Защитника Windows.
Как временно отключить брандмауэр:
- Убедитесь, что вы вошли в систему с учетной записью администратора в Windows 10.
- Нажмите кнопку Пуск , введите проверить статус брандмауэра и нажмите Enter
- Нажмите Включение или отключение брандмауэра Защитника Windows

- В разделе Настройки частной сети и Настройки общедоступной сети выберите Отключить брандмауэр Защитника Windows и нажмите ОК
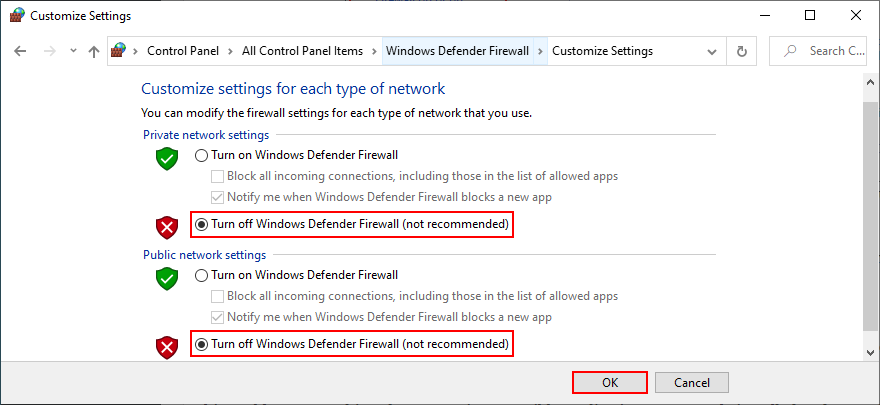
Попробуйте запустить Центр обновления Windows прямо сейчас. Если этот шаг окажется успешным, не отключайте брандмауэр, потому что это означает, что ваш компьютер останется уязвимым для атак вредоносного ПО. Вместо этого вы можете восстановить настройки брандмауэра по умолчанию, чтобы отменить любые индивидуальные настройки, которые могли вызвать ошибку Центра обновления Windows.
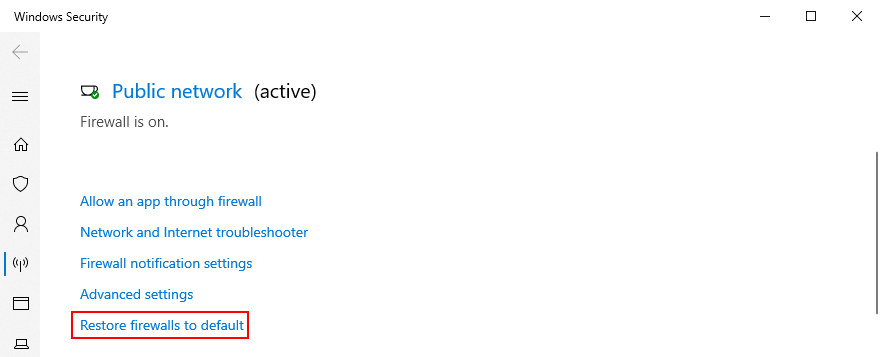
Как восстановить настройки брандмауэра по умолчанию:
- Press the Win key, type firewall, and open Firewall & network protection
- Scroll down to the bottom of the page and click Restore firewalls to default

- Click Restore defaults and click Yes to confirm
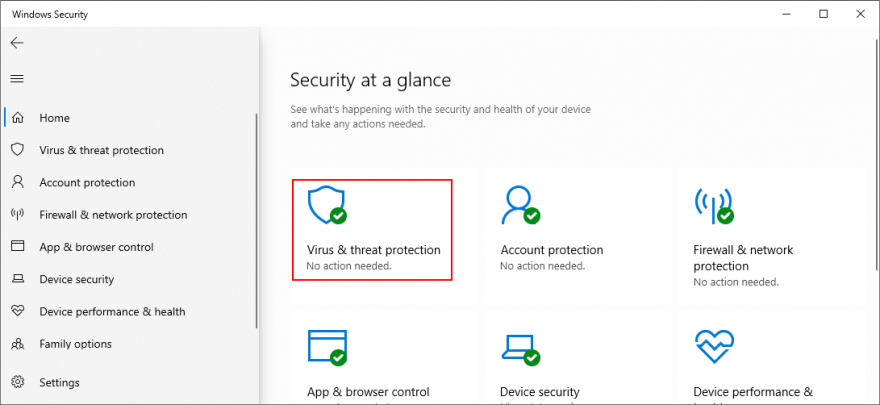
14. Запустите сканирование на наличие вредоносных программ
A malicious agent could have hijacked your PC and deactivated critical files that Windows Update needs to work properly. Unless you have a third-party security solution installed, here’s how to find and remove malware using Windows Defender:
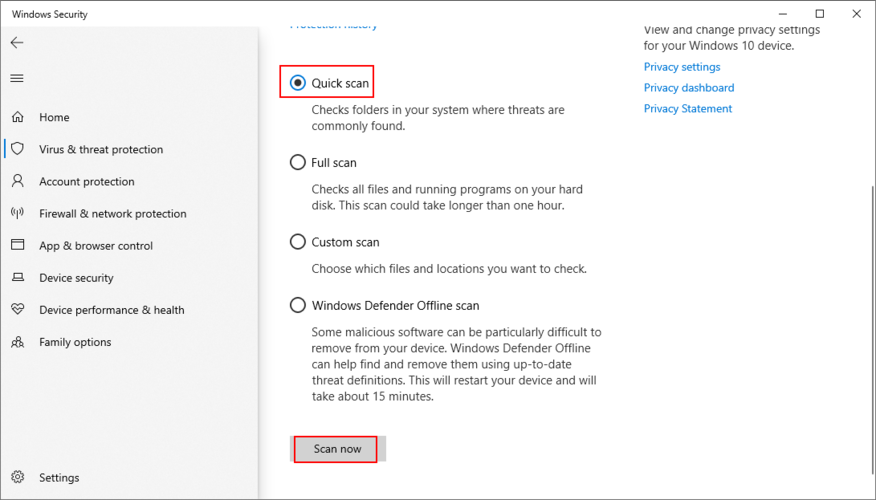
- Click the Start button, write Windows Security, and open this tool
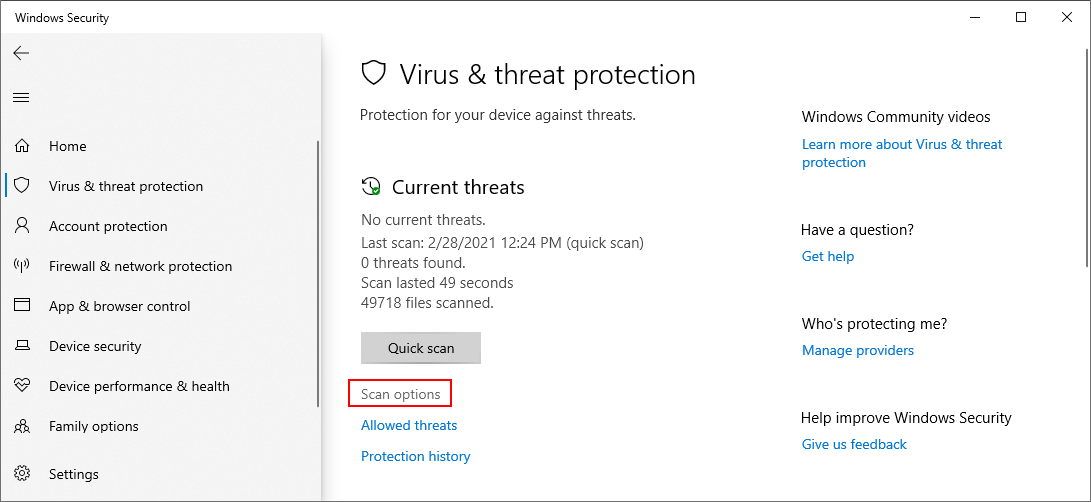
- Pick Virus & threat protection
- Нажмите Параметры сканирования

- Select Quick scan and click Scan now

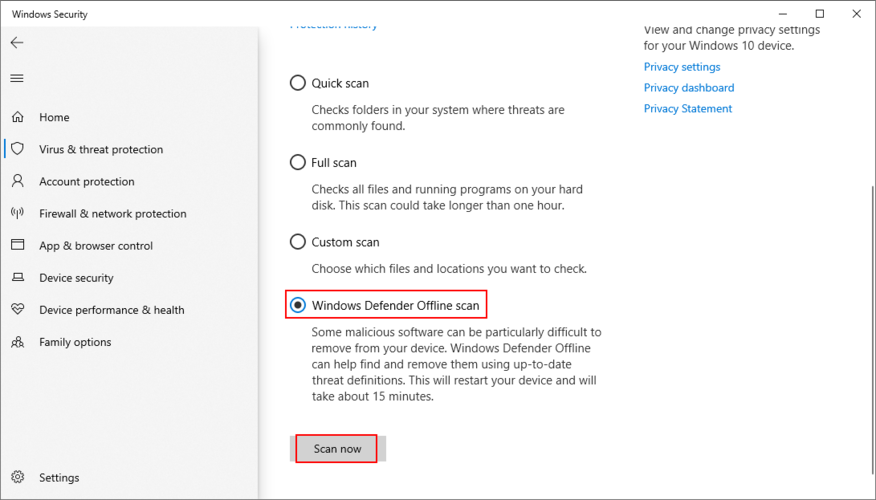
- If the scanner doesn’t find any threats, pick Windows Defender Offline scan and click Scan now
- Make sure to quarantine or remove any files identified as threats by Defender. If you think it makes a mistake, add those files to the whitelist to exclude them from further scans
- Restart your PC
15. Uninstall recent software
Programs you installed on your computer lately might cause software conflicts with Windows Update which culminate in error 0x8024401c. So you should uninstall any recent and suspicious applications, especially if you started experiencing Windows Update issues right after adding them to your PC. Вот как:
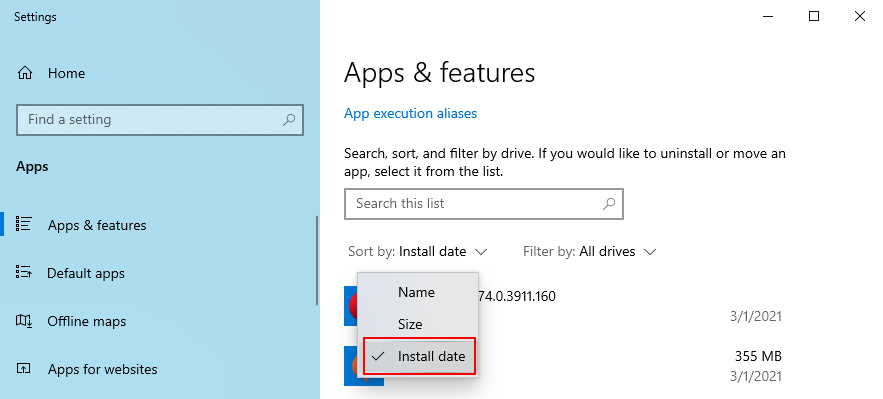
- Right-click the Start button and select Apps and Features
- Click Sort by and select Install date to view recent programs first

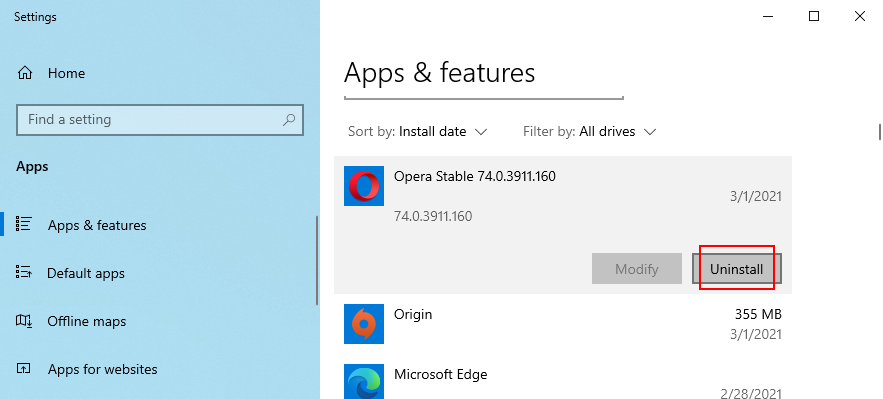
- Select the first app in the list and click Uninstall
- Click Uninstall again to confirm
- Перезагрузите компьютер.
16. Удалить системные обновления
Certain Windows updates can cripple your operating system and prevent it from accessing further updates. You should remove it from your PC to get rid of error code 0x8024401c. Вот что вам нужно сделать:
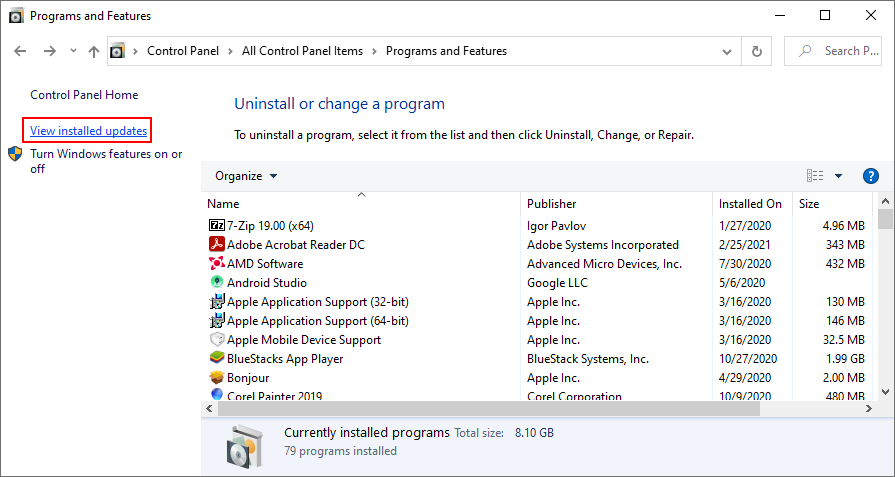
- Press Win key + R, enter appwiz.cpl, and hit the Enter key
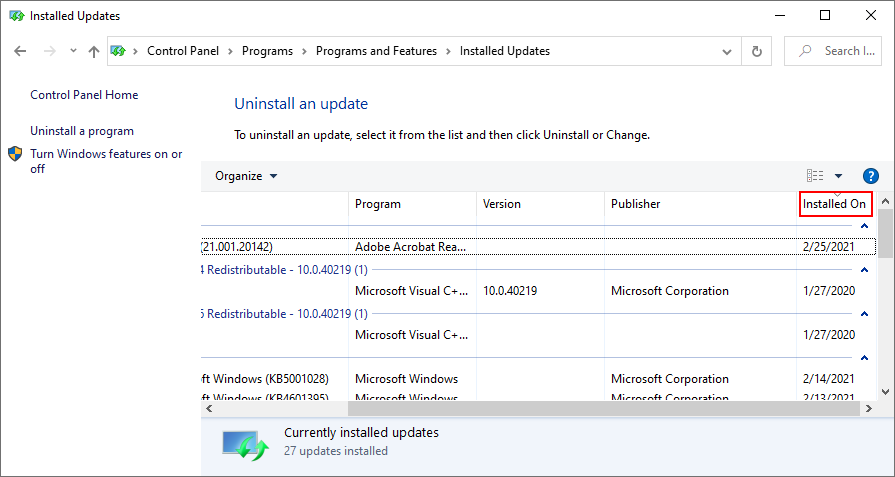
- Click View installed updates

- Click the Installed On column to view the newest updates first
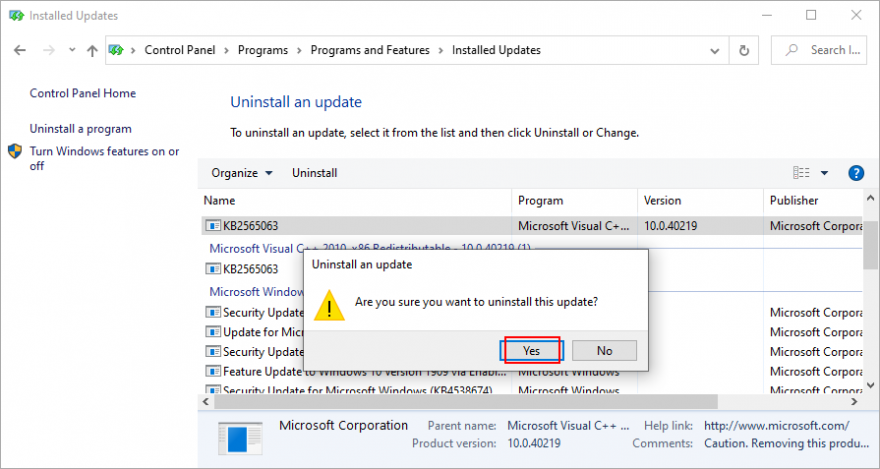
- In the Microsoft Windows category, double-click the first update
- Click Yes to confirm the update

- Reboot your PC
17. Check the disk space
If you don’t have enough free space on the system drive, Windows Update won’t be able to download and install anything. But you can fix this problem by increasing the volume size with the help of a partition manager like Disk Management.
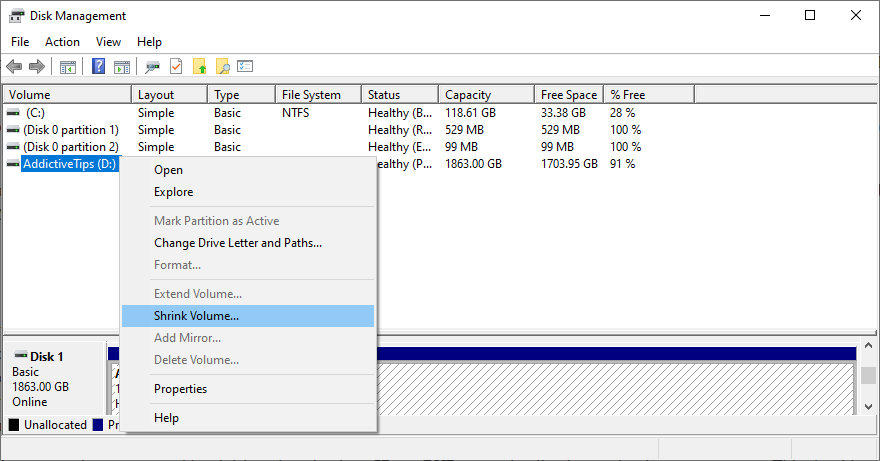
How to use Disk Management:
- Right-click the Start button and go to Disk Management
- Select a local drive where Windows is not installed
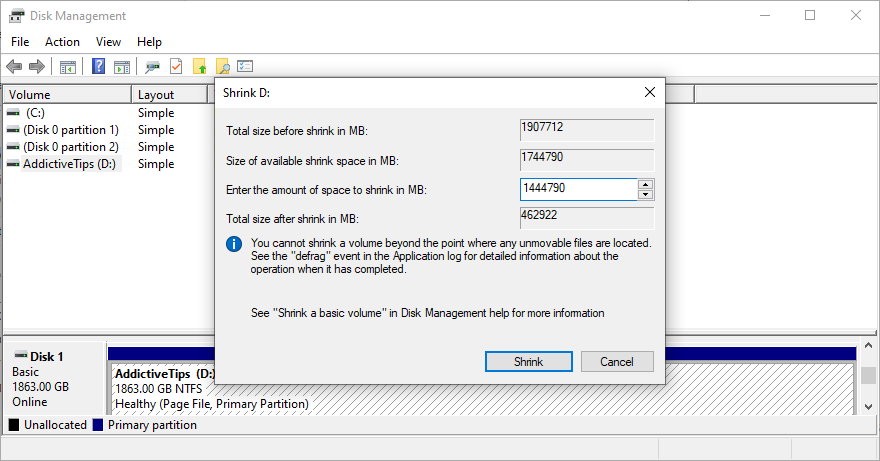
- Right-click the entry and choose Shrink Volume

- Set the new partition size and click Shrink
- Return to the main window and select the Windows partition
- Right-click the entry and pick Extend Volume
- Follow the on-screen instructions and restart your computer
If you don’t have enough room on another volume to increase the Windows drive size, you can uninstall large applications and games you don’t play anymore, in order to clear up your disk space.
Furthermore, you should move large files to an external disk, burn them to DVDs, or upload them to a cloud storage account. As far as junk files and unnecessary data is concerned, you can turn to a system cleaner like Disk Cleanup.
How to use Disk Cleanup:
- Sign in to Windows 10 using an administrator account
- Go to Downloads and Recycle Bin. Make sure to copy or restore any important files since these folders will be cleared
- Press Win key + R, type control panel, and press Enter
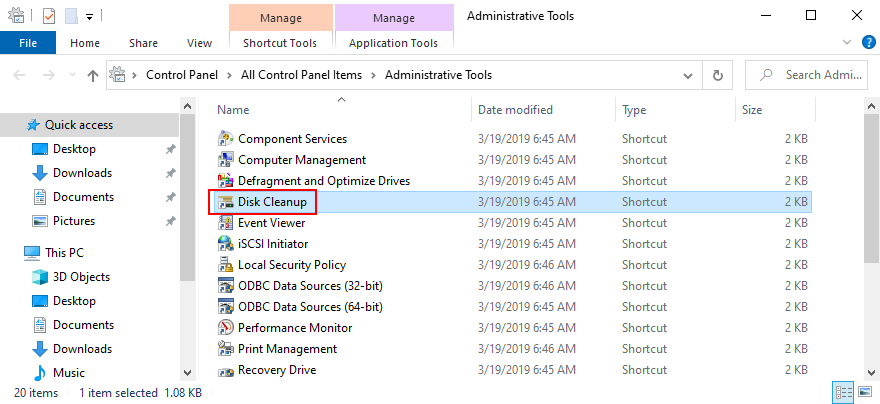
- Select Administrative Tools
- Double-click to open Disk Cleanup
- Choose the partition where Windows is installed (default C:) and click OK
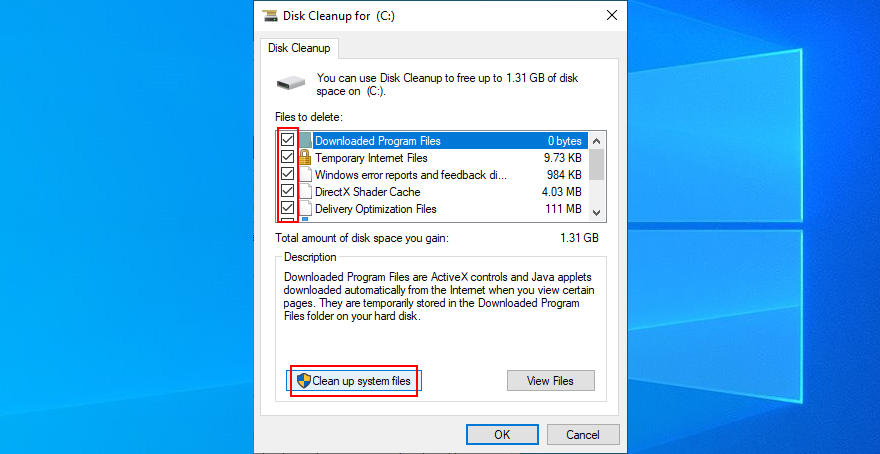
- Select all items at Files to delete and click Clean up system files

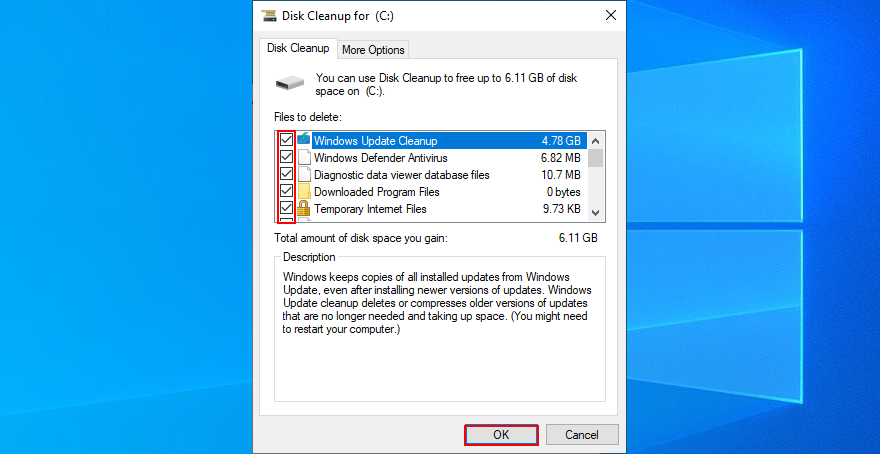
- Disk Cleanup starts a file search. Once it finishes, pick all items again and click OK
- Patiently wait while Windows deletes all junk files. Then, restart your computer

18. Check your Internet connection
Windows Update error 0x800705b4 could be caused by network connectivity problems, so you should verify the stability of your Internet connection and make it faster. Here are some suggestions:
- Reboot your router
- Move your device closer to the router
- Connect to a 5Ghz Wi-Fi network
- Disconnect other devices from your wireless network
- Terminate applications that use a lot of network bandwidth, such as torrenting clients and streaming services
- Run the Internet Connections troubleshooter
- Empty the DNS cache or change DNS servers
- Set up a wired Internet connection
- Run a ping test in both wired and wireless mode
- Check your VPN or proxy settings
- Contact our ISP
19. Use System Restore
If you can’t identify the software event that led to Windows Update error 0x8024401c, you can use System Restore to roll back Windows 10 to a checkpoint that was recorded before you started having PC problems. But you will lose all applications installed after recording the restore point.
How to use System Restore:
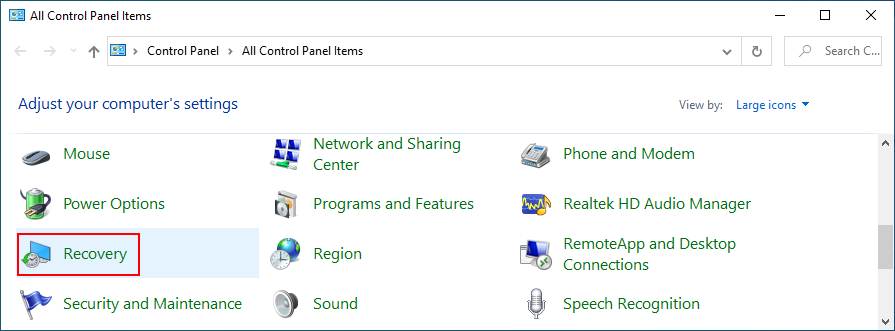
- Click the Start button, search for Control Panel, and open this app
- Visit the Recovery section

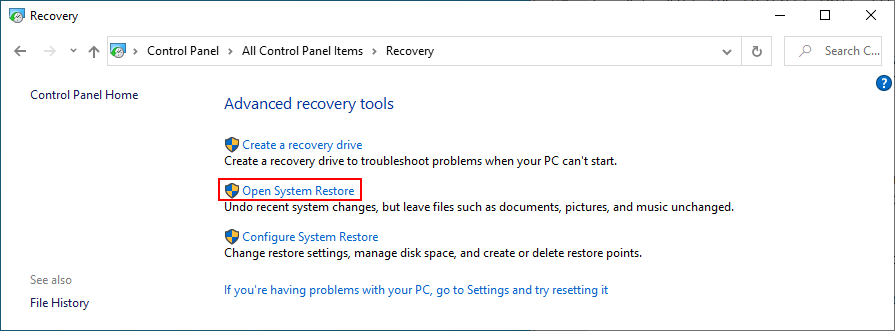
- Click Open System Restore (you need administrator rights)
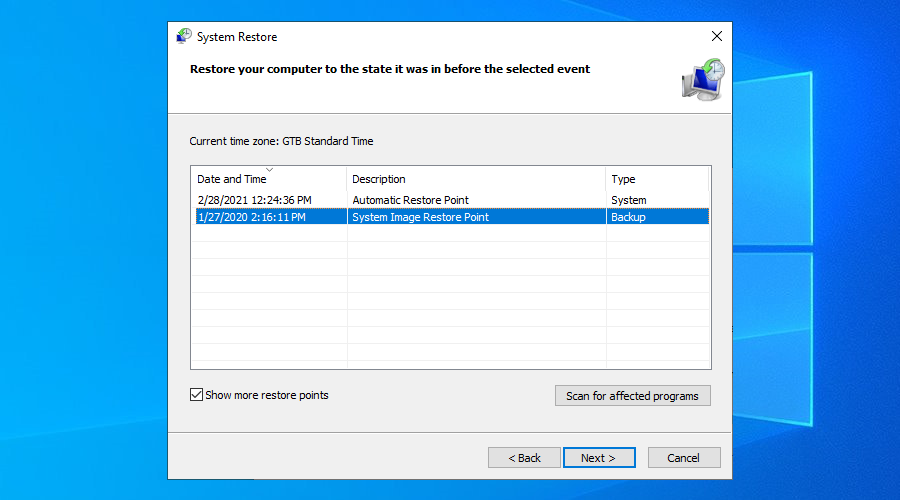
- Select a restore point or click Show more restore points for more options. You can also click Scan for affected programs to see which applications will disappear
- Click Next and follow the steps

- Your PC will reboot after the system restore
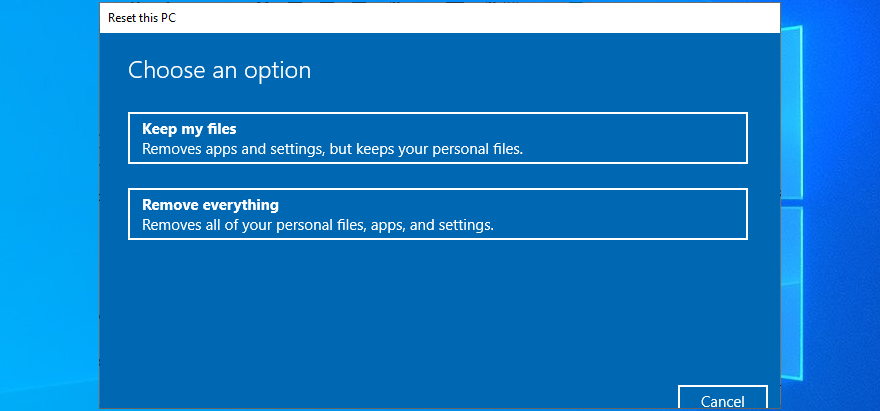
20. Reset your PC
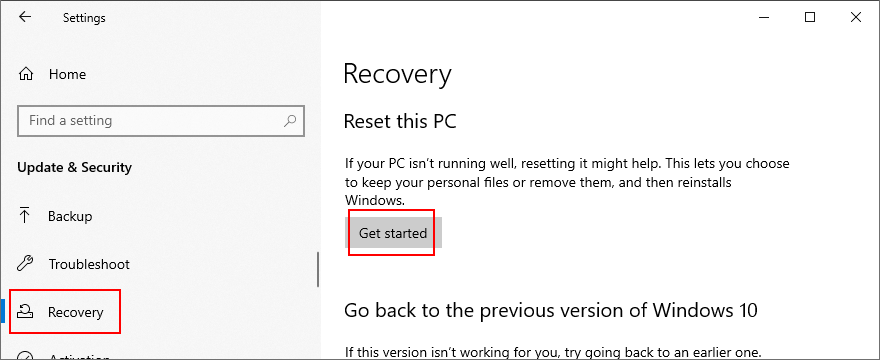
If System Restore fails to work, you can reset Windows 10 to factory mode without losing your personal files. However, this will uninstall all your applications and restore all computer settings to default, which means that you will have to spend a little time to set up your PC afterward. Вот что вам нужно сделать:
- Press the Win key, search for Recovery options, and hit the Enter key
- At Reset this PC, click Get started

- Choose Keep my files and follow the step-by-step instructions

Windows Update error 0x8024401c can be solved
To recap, 0x8024401c is a Windows 10 error code that stops Windows Update and blocks system updates on your computer. However, you can try to fix it by using the Windows Update troubleshooter and Windows Update Diagnostic, as well as by checking Services, Group Policy and system registry settings.
It’s also a good idea to reset Windows Update from the Command Prompt, update or roll back your network drivers, unplug peripheral devices, reinstall devices, check your hard disk and operating system for errors and file corruption, verify firewall settings, or run a malware scan.
Moreover, you can uninstall recent software and malfunctioning system updates, check your free disk space, verify the quality of your Internet connection, roll back Windows 10 to a previous checkpoint using System Restore, and reset your PC to default settings if everything else fails.
How did you finally manage to get rid of error 0x8024401c and restore Windows Update? Let us know in the comments below.
Попробуйте наш инструмент устранения неполадок
Выберите операционную систему
Выберите язык програмирования (опционально)
В некоторых случаях при поиске и загрузке обновлений Windows код ошибки 0x8024401c происходит с вышеуказанным уведомлением.
0x8024401c означает WU_E_PT_HTTP_STATUS_REQUEST_TIMEOUT и может произойти на клиентском компьютере, который обновляется через WSUS (службы обновления Windows Server). В этой статье мы покажем вам, что вы можете с этим поделать.
Попробуйте эти решения:
В этой статье представлены в общей сложности 5 решений. Вам не нужно выполнять их все. Работайте с решениями по порядку, пока не найдете то, которое работает.
- Подключиться к службе обновления Windows через Интернет сбросить настройки сети Обновите драйверы вашего устройства Проверьте и восстановите системные файлы Измените свой реестр (для Microsoft Surface)
Методы применяются к Windows 10 . Во-первых, убедитесь, что ваше интернет-соединение в порядке. Лучше всего использовать один подключение по локальной сети вместо беспроводной сети при запуске обновления Windows.
Решение 1. Подключитесь к службе обновления Windows через Интернет.
Если вы получите сообщение об ошибке 0x8024401c подключение к внутреннему WSUS можно отключить. Попробуйте настроить параметры в реестре, чтобы ваш компьютер мог подключаться к службе обновления Windows через Интернет.
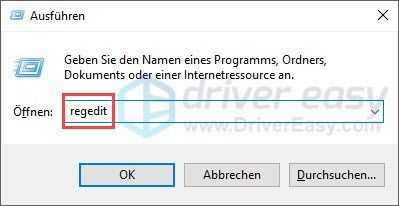
1) На клавиатуре одновременно нажмите Windows-Лого-Вкус + R , Дайте regedit один и нажмите кнопку Введите ключ вызвать редактор реестра.
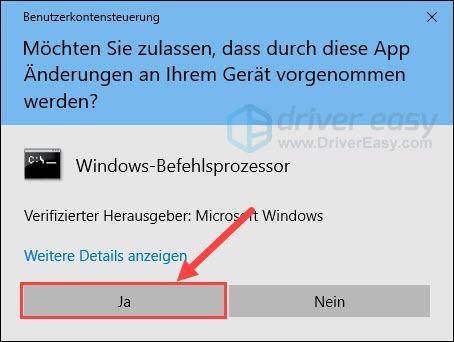
2) Нажмите И , когда появится диалоговое окно контроля учетных записей.

3) Перейдите к на левой панели навигации Компьютер> HKEY_LOCAL_MACHINE> ПРОГРАММНОЕ ОБЕСПЕЧЕНИЕ> Политики> Microsoft> Windows> WindowsUpdate> AU .
4) Двойной щелчок ИспользоватьWUServer в нужном районе.
5) Установите значение на 0 и нажмите В ПОРЯДКЕ .
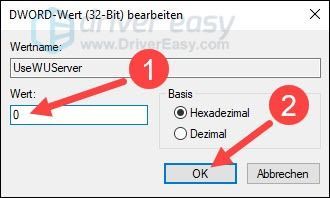
5) Перезагрузите компьютер и проверьте, работает ли обновление Windows без ошибок.
Решение 2. Сбросьте настройки сети
Ошибка 0x8024401c могут быть вызваны проблемами с сетью. В этом случае вы можете попробовать сбросить настройки сети.
1) Сохраните важные файлы и изменения в вашей системе, так как позже потребуется перезагрузка.
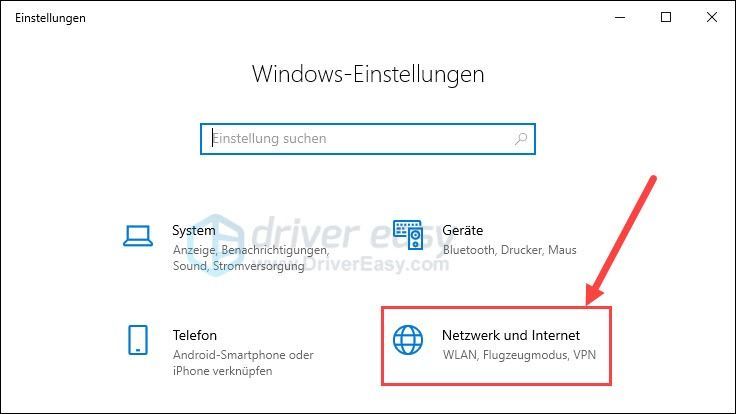
2) На клавиатуре одновременно нажмите Вкус логотипа Windows + I (письмо я ) и выберите сеть и Интернет вне.
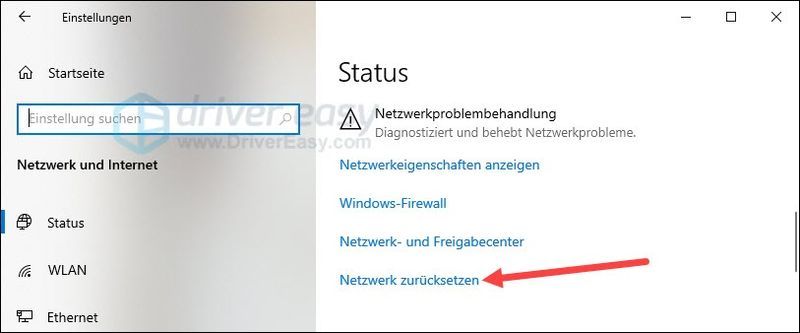
3) На правой панели прокрутите вниз и нажмите сбросить сеть .
4) Нажмите сбросить сейчас .
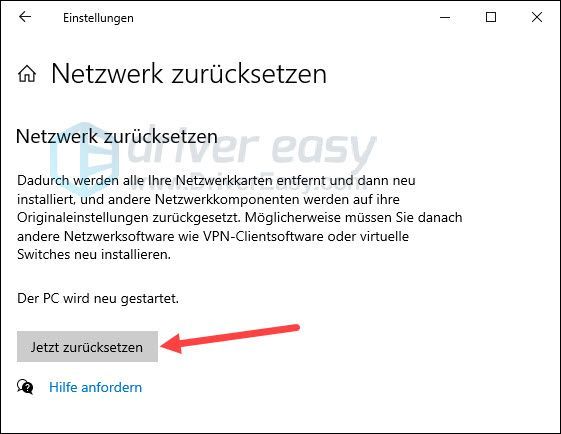
5) Нажмите И .

6) Просто перезагрузите компьютер.
7) Проверьте, можете ли вы снова загрузить и установить обновления Windows.
Решение 3. Обновите драйверы вашего устройства
Ошибка 0x8024401c также может исходить от драйверов вашего устройства, которые устарели или повреждены. Рекомендуется обновить драйверы устройств, особенно сетевой драйвер.
Вы можете проверить драйверы вашего устройства вручную обновите, если хотите, посетив веб-сайт производителя каждого устройства, найдя страницы загрузки драйверов, найдя нужные драйверы один за другим и т. д.
Но если вам трудно иметь дело с драйверами устройств или у вас просто нет времени, мы рекомендуем взять их с собой. Драйвер Легкий обновить.
один) Скачать и установите драйвер Easy.
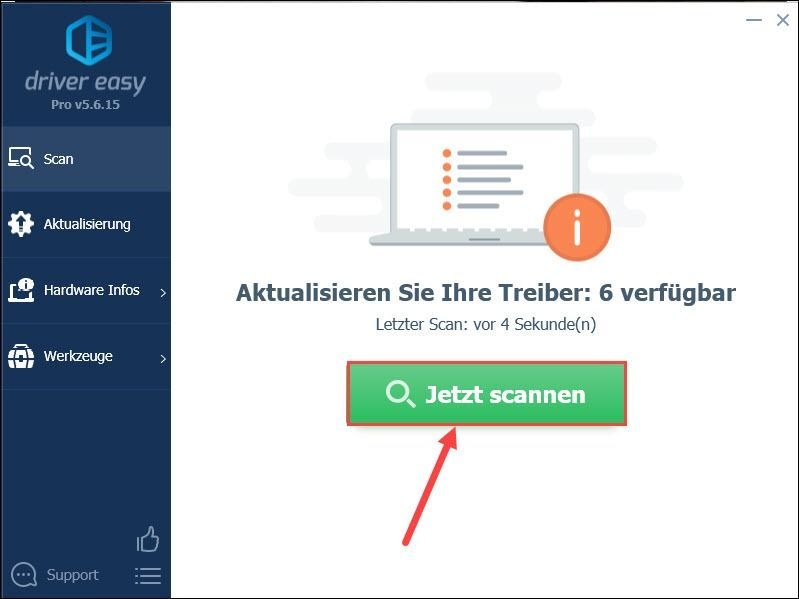
2) Бежать Драйвер Легкий выключить и нажать Сканировать сейчас . Все проблемные драйверы в вашей системе будут обнаружены в течение минуты.
3) Если ты умрешь БЕСПЛАТНАЯ версия в Driver Easy нажмите Обновлять рядом с выделенным устройством, драйвер которого вы хотите обновить, чтобы загрузить последнюю версию драйвера. Тогда вам придется установить их вручную.
У вас уже есть Driver Easy на PRO-версия обновлено, просто нажмите Обновить все для автоматического обновления всех проблемных драйверов устройств в вашей системе.
4) Перезагрузите компьютер и посмотрите, сможете ли вы запустить обновление Windows без ошибок 0x8024401c.
Решение 4. Проверьте и восстановите системные файлы
Код ошибки 0x8024401c во время обновления Windows также может быть связано с повреждением системных файлов, связанных с обновлением Windows. Используйте средство проверки системных файлов Windows для проверки и восстановления системных файлов.
1) На клавиатуре одновременно нажмите Windows-Лого-Вкус + S чтобы открыть окно поиска.
2) Войти команда один, щелкните правой кнопкой мыши командная строка и выбрать Выполнить от имени администратора вне.
3) Нажмите И , когда отображается диалоговое окно контроля учетных записей.
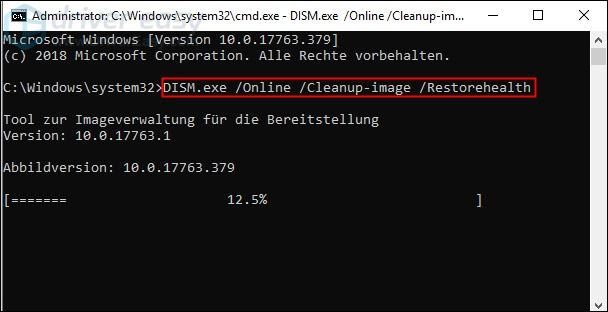
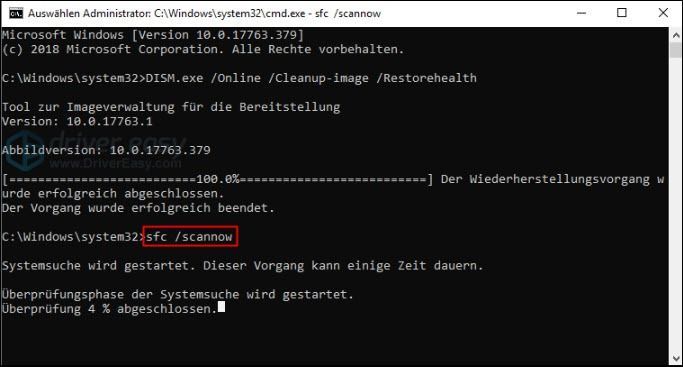
4) Войти DISM.exe/Online/Cleanup-image/Restorehealth один и нажмите кнопку Введите ключ .
Дождитесь завершения процесса.
|_+_| 
5) Войти sfc/scannow один и нажмите кнопку Введите ключ для проверки и восстановления системных файлов.
|_+_| 
6) Перезагрузите компьютер и проверьте, правильно ли загружаются и устанавливаются обновления Windows.
Если Windows не смогла автоматически восстановить проблемные системные файлы, вы можете Переизображение попробуйте выполнить более глубокое сканирование на вашем компьютере и избавиться от коррупции.
Переизображение это профессиональное программное обеспечение для восстановления Windows. Он может тщательно сканировать вашу систему, чтобы обнаружить поврежденные и отсутствующие файлы программного обеспечения Windows, а затем выполнить ремонт. С ним ваша система будет восстановлена практически до исходного состояния, при этом ваши программы и настройки не потеряются.
один) Скачать и установить Reimage.
2) Бежать Переизображение выключить и нажать И .
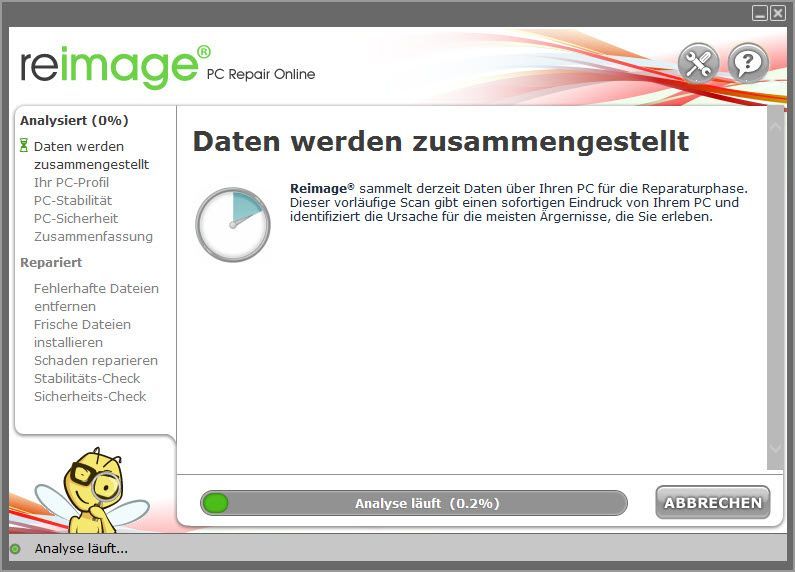
3) Сканирование запускается автоматически и занимает несколько минут. Дождитесь окончания процесса анализа.
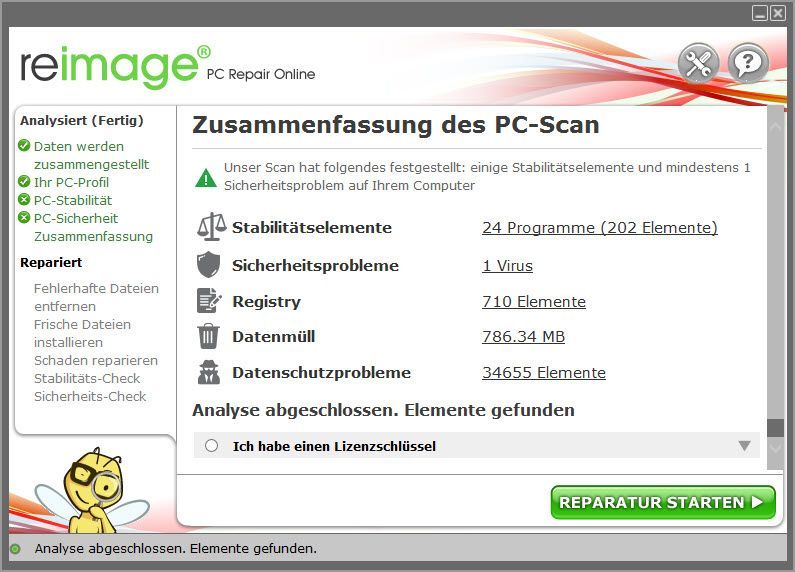
4) После бесплатного сканирования в вашей системе будет сгенерирован отчет, в котором будет указано, в каком состоянии находится ваша система и какие у нее проблемы.
Для автоматического восстановления системы нажмите НАЧАТЬ РЕМОНТ .
(Для этого требуется полная версия Reimage, которая также включает бесплатную техническую поддержку и 60-дневная гарантия возврата денег содержит.)
Решение 5. Измените реестр (для Microsoft Surface)
Если вы получаете сообщение об ошибке на Microsoft Surface 0x8024401c выполните следующие действия, чтобы изменить реестр и исправить эту ошибку.
1) На клавиатуре одновременно нажмите Windows-Лого-Вкус + R , Дайте regedit один и нажмите кнопку Введите ключ .

2) Нажмите И , когда попросили о приеме.
3) Введите строку выше КомпьютерHKEY_LOCAL_MACHINESYSTEMControlSet001Servicesmrvlpcie8897 один и нажмите кнопку Введите ключ .
|_+_| 
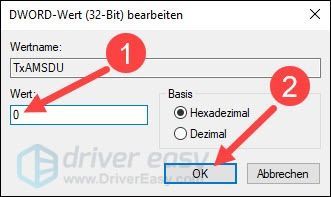
4) Найдите запись на правой панели TxAMSDU и двойной щелчок ты на нем.
5) Измените значение с 1 на 0 и нажмите, чтобы подтвердить В ПОРЯДКЕ .
6) Перезагрузите Microsoft Surface и повторите попытку обновления Windows.
Надеюсь, вам помогло одно из приведенных выше решений. Если у вас есть другие вопросы, пожалуйста, оставьте комментарий ниже.
- Windows 10
- Центр обновления Windows