In this guide, we will show you various methods to fix the ADB Sideload not working Cannot Read File error. OEMs release software upgrades for their devices throughout the course of the support period. And this is perhaps the easiest way to install these updates. Just head over to Settings > System and hit the Install button. However, this might not always come in handy.
Suppose the OEM is taking ages in releasing an OTA update for your region but you have managed to get hold of the update’s ZIP file. Or if you are planning to downgrade to an earlier security patch. Then in both these cases, you could manually flash the update via two different methods- via Fastboot Method or via ADB Sideload. For the Fastboot method to work, you will need to checkmark two major prerequisites.
The first one is a device-specific tool (Mi Flash Tool for Xiaomi, Android Flash Tool for Pixel, etc). Next up, you would require an unlocked bootloader. It is the latter requirement of an unlocked bootloader that many users prefer not to try out the Fastboot way of flashing firmware and instead opt for the sideload process. This is because you don’t even need to step into custom development as the entire process is carried out right from the stock environment itself.
But even then, you might occasionally face an issue or two. In this regard, the most common one is when the sideload command isn’t able to recognize the firmware update file. If you are also currently getting bugged with this issue, then fret not. In this guide, we will make you aware of numerous methods that shall help you fix the ADB Sideload not working cannot read file error. Follow along.
How to Fix ADB Sideload not working: Cannot Read File Error
Do note that there’s no universal fix as such. You will have to try out each of the below-mentioned workarounds and see which one works best in your favor. Moreover, your data may or may not be wiped, depending on the firmware file that you are flashing.
But still, it’s better to take a device backup beforehand just to be on the safer side. Droidwin and its members wouldn’t be held responsible in case of a thermonuclear war, your alarm doesn’t wake you up, or if anything happens to your device and data by performing the below steps.
FIX 1: Use Google’s ADB Drivers
There are a plethora of ADB and Fastboot Drivers doing the rounds. However, most of them have a binary or two missing and hence could conflict with the execution of commands. Therefore, it is recommended to only use the official drivers provided by Google.
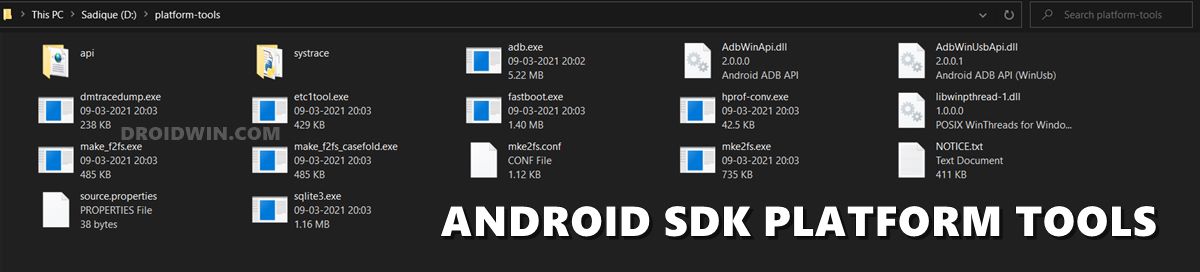
So download the Android SDK Platform Tools and extract it to any convenient location on your PC. This shall give you the platform-tools folder. So try the sideload process inside this folder and see if it fixes the ADB Sideload not working Cannot Read File error.
FIX 2: Verify ADB Connection
Next up, also verify that the ADB Connection between your device and the PC has been successfully established. Here’s how it could be done:
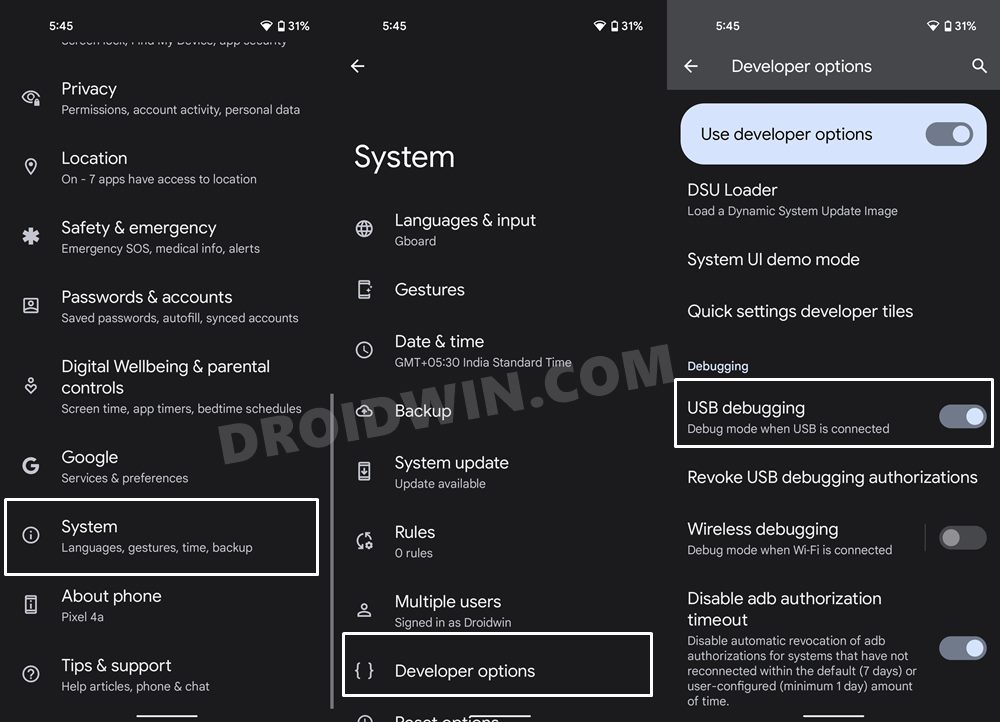
- To begin with, enable USB Debugging on your device. For that, go to Settings > About Phone > Tap on Build Number 7 times > Go back to Settings > System > Advanced > Developer Options > Enable USB Debugging

- Now connect your device to the PC via USB cable.
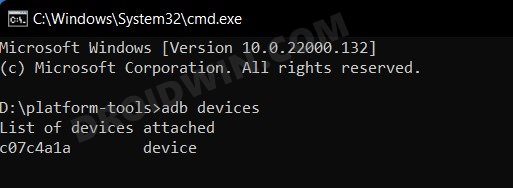
- Then head over to the platform-tools folder, type in CMD in the address bar, and hit Enter. This will launch the Command Prompt.

- Type in the following command in the CMD window to verify the ADB Connection
adb devices

- If you get the alphanumeric ID followed by the ‘device’ keyword, then the connection stands successful. You may now proceed with the ADB sideload process and you wouldn’t get the Cannot Read File error this time around.

NOTE: If you are getting an unauthorized keyword, then you will have to first approve the connection. For that, have a look at your device, you might have got a prompt, tap on Authorize. However, if you are getting any other error messages, then do check out our guide on How to Fix All ADB and Fastboot Errors.
FIX 3: Verify File Name and Location
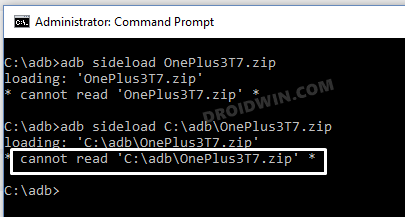
Two of the most common reasons why you are getting this error could be the fact that you are either typing the incorrect/incomplete name of the file or the file isn’t present in the correct directory. In this regard, it is recommended to shorten the name of the firmware file, and name it something like ‘update’, so that the complete name becomes update.zip.
Along the same lines, you should also double-check that this update.zip file is present inside the platform-tools folder. If that’s well and good, then you may execute the adb sideload update.zip command to carry out the sideload process (assuming all the other requirements are met) and then check if it fixes the ADB Sideload not working Cannot Read File error.
FIX 4: Try USB Tweaks
Custom Development and USB 3.0 Ports always have a love-hate relationship. So it’s better to avoid this fiasco and instead opt for the USB 2.0 Port. Likewise, it is also recommended that you use the official USB cable that came shipped in with your device.
FIX 5: Use Full ROM (Not Incremental)
OEM releases two different update packages- a complete firmware package and an incremental one. If you are already on stock firmware, then an incremental OTA update package might do the job, but that isn’t always the case.
So to avoid any confusion regarding this, it is recommended that you sideload the fill firmware file and then see if it fixes the ADB Sideload not working Cannot Read File error. [If you aren’t sure which one is incremental and which one is full firmware, then just check out their sizes, the larger one will be the full firmware].
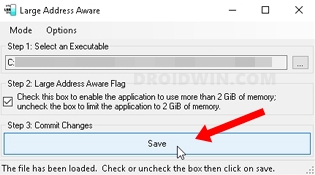
FIX 6: Make Windows Aware of “Large ADB Address”
By default, ADB on Windows is not linked to being “large address aware”. So when you try to perform ADB Sideload on a large file, then it would fail to allocate enough memory for the file. To fix this, you will have to make your PC aware of this large address. To do so, please refer to our comprehensive tutorial on ADB Unable to Allocate Bytes Error: How to Fix.
FIX 7: For Unlocked Bootloader
If you have your device’s bootloader unlocked, then a much better approach will be to take the help of the TWRP Recovery, granted your device does support this custom recovery. All this has been explained in depth in our guide, do check it out: How to Use ADB Sideload in TWRP Recovery. For shorter instructions, the below instructions should be sufficient.
- Start off by downloading the TWRP for your device from the official site or from XDA Developers.
- Then name this file to twrp, so that the complete name becomes twrp.img.
- After that, transfer this twrp.img to the platform-tools folder. Likewise, also transfer the update.zip (firmware file) to this folder.
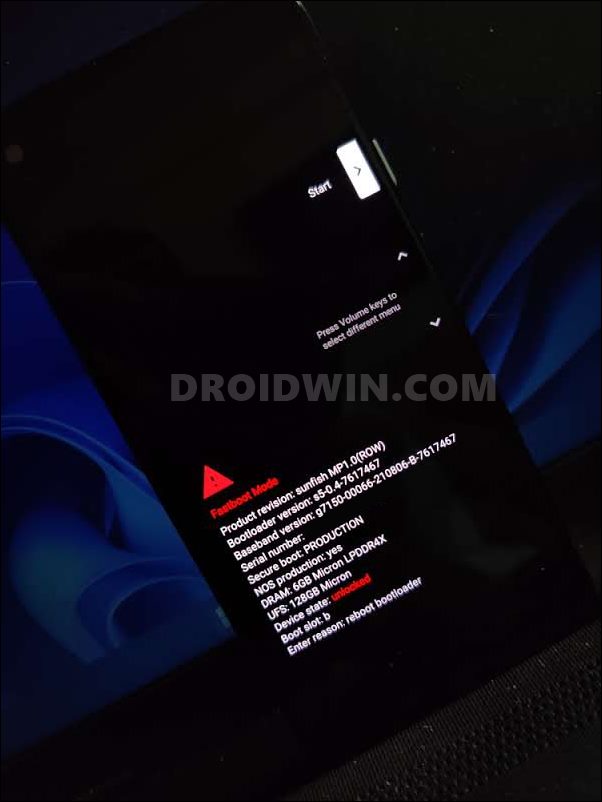
- Now open CMD inside this folder and type in the below command to boot your device to Fastboot Mode:
adb reboot bootloader

- After that, execute the below command to temporary boot your device to TWRP:
fastboot boot twrp.img
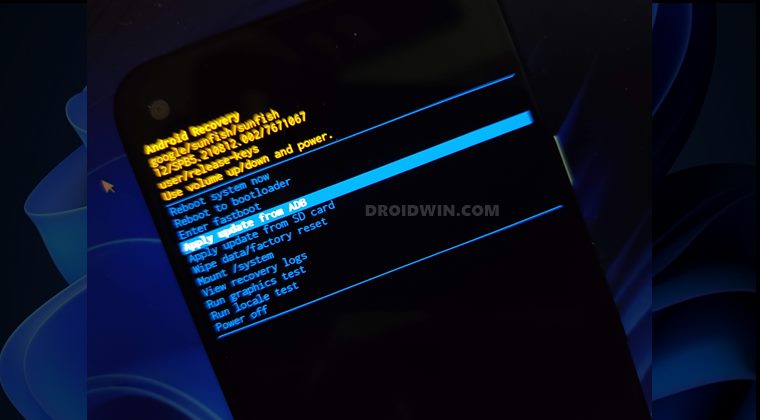
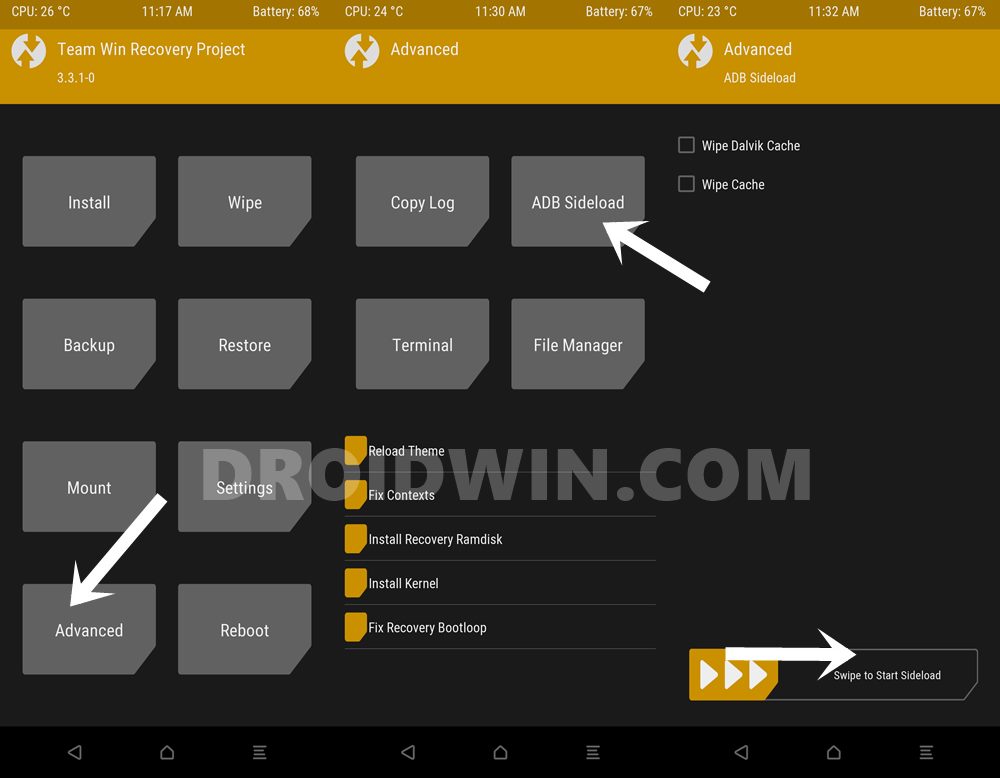
- Once booted to TWRP, go to Advanced > Sideload and perform a right swipe to start the sideload.

- Then go to the CMD window and execute the below command to flash the firmware via sideloading:
adb sideload update.zip
- Once the flashing is complete, you may reboot the device to OS via the Reboot > System option in TWRP.
So with this, we round off this guide on how you could fix the ADB Sideload not working Cannot Read File error. We have listed seven different methods for the same. Do let us know in the comments which one spelled out success for you. Likewise, all your queries are welcomed in the comments section below.
About Chief Editor

Sadique Hassan
administrator
A technical geek by birth, he always has a keen interest in the Android platform right since the birth of the HTC Dream. The open-source environment always seems to intrigue him with the plethora of options available at his fingertips. “MBA by profession, blogger by choice!”
В этом руководстве мы покажем вам различные способы исправления ошибки боковой загрузки ADB, которая не работает, не удается прочитать файл. OEM-производители выпускают обновления программного обеспечения для своих устройств в течение периода поддержки. И это, пожалуй, самый простой способ установки этих обновлений. Просто зайдите в «Настройки»> «Система» и нажмите кнопку «Установить». Однако это не всегда может пригодиться.
Предположим, что OEM-производитель долго выпускает OTA-обновление для вашего региона, но вам удалось получить ZIP-файл обновления. Или если вы планируете перейти на более раннее исправление безопасности. Затем в обоих этих случаях вы можете вручную установить обновление двумя разными способами — с помощью метода Fastboot или с помощью боковой загрузки ADB. Чтобы метод Fastboot работал, вам необходимо отметить два основных предварительных условия.

Первый — это инструмент для конкретного устройства (Mi Flash Tool для Xiaomi, Android Flash Tool для Pixel и т. д.). Далее вам потребуется разблокированный загрузчик. Это последнее требование к разблокированному загрузчику, поэтому многие пользователи предпочитают не пробовать способ быстрой загрузки прошивки, а вместо этого выбирают процесс боковой загрузки. Это потому, что вам даже не нужно переходить к пользовательской разработке, поскольку весь процесс выполняется прямо из самой стандартной среды.
Но даже в этом случае вы можете иногда сталкиваться с проблемой или двумя. В связи с этим наиболее распространенным является случай, когда команда боковой загрузки не может распознать файл обновления прошивки. Если вы также в настоящее время получаете прослушивание с этой проблемой, то не волнуйтесь. В этом руководстве мы расскажем вам о многочисленных методах, которые помогут вам исправить неработающую боковую загрузку ADB, не удается прочитать файл. Следуйте вместе.
Обратите внимание, что универсального решения как такового не существует. Вам нужно будет попробовать каждый из нижеперечисленных обходных путей и посмотреть, какой из них лучше всего работает в вашу пользу. Более того, ваши данные могут или не могут быть стерты, в зависимости от файла прошивки, который вы прошиваете.
Но все же лучше заранее сделать резервную копию устройства, чтобы быть в безопасности. Droidwin и его участники не будут нести ответственность в случае термоядерной войны, если ваш будильник не разбудит вас, или если что-то случится с вашим устройством и данными, выполнив следующие шаги.
ИСПРАВЛЕНИЕ 1. Используйте драйверы Google ADB
Существует множество драйверов ADB и Fastboot. Однако у большинства из них отсутствует один или два двоичных файла, и, следовательно, они могут конфликтовать с выполнением команд. Поэтому рекомендуется использовать только официальные драйверы, предоставленные Google.
Поэтому загрузите Android SDK Platform Tools и извлеките его в любое удобное место на вашем ПК. Это даст вам папку с инструментами платформы. Поэтому попробуйте процесс боковой загрузки внутри этой папки и посмотрите, исправляет ли он неработающую ошибку ADB Sideload Cannot Read File.
ИСПРАВЛЕНИЕ 2: проверьте подключение ADB
Затем также убедитесь, что соединение ADB между вашим устройством и ПК успешно установлено. Вот как это можно сделать:
- Для начала включите отладку по USB на вашем устройстве. Для этого перейдите в «Настройки»> «О телефоне»> «Семь раз нажмите на номер сборки»> «Вернитесь в «Настройки»> «Система»> «Дополнительно»> «Параметры разработчика»> «Включить отладку по USB».
- Теперь подключите ваше устройство к ПК через USB-кабель.
- Затем перейдите в папку инструментов платформы, введите CMD в адресной строке и нажмите Enter. Это запустит командную строку.
- Введите следующую команду в окне CMD, чтобы проверить устройства ADB Connectionadb.
- Если вы получаете буквенно-цифровой идентификатор, за которым следует ключевое слово «устройство», то соединение установлено успешно. Теперь вы можете продолжить процесс боковой загрузки ADB, и на этот раз вы не получите ошибку Cannot Read File.
ПРИМЕЧАНИЕ. Если вы получаете неавторизованное ключевое слово, вам необходимо сначала одобрить соединение. Для этого взгляните на свое устройство, возможно, вы получили приглашение, нажмите «Авторизовать». Однако, если вы получаете какие-либо другие сообщения об ошибках, ознакомьтесь с нашим руководством «Как исправить все ошибки ADB и Fastboot».
ИСПРАВЛЕНИЕ 3. Проверьте имя и расположение файла
Две из наиболее распространенных причин, по которым вы получаете эту ошибку, могут заключаться в том, что вы либо вводите неправильное/неполное имя файла, либо файл отсутствует в правильном каталоге. В связи с этим рекомендуется сократить имя файла прошивки и назвать его как-то вроде «обновление», чтобы полное имя стало update.zip.
В том же духе вы также должны дважды проверить, что этот файл update.zip присутствует в папке platform-tools. Если это хорошо и хорошо, то вы можете выполнить adb неопубликованная загрузка update.zip команду для выполнения процесса боковой загрузки (при условии, что все остальные требования соблюдены), а затем проверьте, исправляет ли она ошибку боковой загрузки ADB, которая не работает, не удается прочитать файл.
ИСПРАВЛЕНИЕ 4. Попробуйте настройки USB
Индивидуальная разработка и порты USB 3.0 всегда связаны между собой любовью и ненавистью. Так что лучше избежать этого фиаско и вместо этого выбрать порт USB 2.0. Кроме того, также рекомендуется использовать официальный USB-кабель, который входит в комплект поставки вашего устройства.
ИСПРАВЛЕНИЕ 5. Используйте полное ПЗУ (не инкрементное)
OEM выпускает два разных пакета обновлений — полный пакет встроенного ПО и добавочный. Если вы уже используете стандартную прошивку, то добавочный пакет обновления OTA может помочь, но это не всегда так.
Поэтому, чтобы избежать путаницы в этом отношении, рекомендуется загрузить заполненный файл встроенного ПО, а затем посмотреть, исправляет ли он неработающую ошибку ADB Sideload Cannot Read File. [If you aren’t sure which one is incremental and which one is full firmware, then just check out their sizes, the larger one will be the full firmware].
ИСПРАВЛЕНИЕ 6. Уведомление Windows о «большом адресе ADB»
По умолчанию ADB в Windows не связан с «осведомленностью о больших адресах». Поэтому, когда вы пытаетесь выполнить боковую загрузку ADB для большого файла, ему не удастся выделить для файла достаточно памяти. Чтобы это исправить, вам нужно будет сообщить вашему компьютеру об этом большом адресе. Для этого обратитесь к нашему подробному руководству по ошибке ADB Unable to Allocate Bytes: как исправить.
ИСПРАВЛЕНИЕ 7: для разблокированного загрузчика
Если у вас разблокирован загрузчик вашего устройства, то гораздо лучше будет воспользоваться помощью TWRP Recovery, если ваше устройство поддерживает это пользовательское восстановление. Все это было подробно объяснено в нашем руководстве, обязательно ознакомьтесь с ним: Как использовать боковую загрузку ADB в TWRP Recovery. Для более коротких инструкций должно быть достаточно приведенных ниже инструкций.
- Начните с загрузки TWRP для вашего устройства с официальный сайт или от разработчиков XDA.
- Затем назовите этот файл twrp, чтобы полное имя стало twrp.img.
- После этого перенесите этот twrp.img в папку platform-tools. Аналогично, также перенесите в эту папку update.zip (файл прошивки).
- Теперь откройте CMD внутри этой папки и введите приведенную ниже команду, чтобы загрузить ваше устройство в режим быстрой загрузки: adb reboot bootloader
- После этого выполните приведенную ниже команду, чтобы временно загрузить ваше устройство в TWRP: fastboot boot twrp.img
- После загрузки в TWRP перейдите в «Дополнительно»> «Боковая загрузка» и выполните свайп вправо, чтобы начать боковую загрузку.
- Затем перейдите в окно CMD и выполните приведенную ниже команду, чтобы прошить прошивку через боковую загрузку: adb sideload update.zip
- После завершения перепрошивки вы можете перезагрузить устройство в ОС с помощью параметра «Перезагрузка»> «Система» в TWRP.
Итак, на этом мы завершаем это руководство о том, как вы можете исправить неработающую ошибку ADB Sideload «Не удается прочитать файл». Мы перечислили семь различных методов для одного и того же. Дайте нам знать в комментариях, какой из них принес вам успех. Кроме того, все ваши вопросы приветствуются в разделе комментариев ниже.
Loading
Pixel Phone Help
Sign in
Google Help
- Help Center
- Community
- Pixel Phone
- Privacy Policy
- Terms of Service
- Submit feedback
Send feedback on…
This help content & information
General Help Center experience
- Help Center
- Community
- Troubleshoot
Pixel Phone
According to Google’s «Get Android 12» guide,
The easiest way to get Android 12 Beta on a Google Pixel device is to enroll your device in the Android Beta for Pixel program.
but also
Alternatively, you can flash or manually install the latest Android 12 Beta build on your Pixel device. These approaches can be useful when you need more control over testing, such as for automated testing or regression testing.
I had previously joined the beta program to test Android 11 developer preview so for Android 12, I thought I’d try the flashy way.
I followed this guide to flash the update to my Pixel 3XL. However, when I finally typed the adb sideload command and pressed «Enter», it gave
adb sideload ~/Downloads/crosshatch-spb4.210715.011-factory-cbdbee68.zip
adb: sideload connection failed: no devices/emulators found
adb: trying pre-KitKat sideload method...
adb: pre-KitKat sideload connection failed: no devices/emulators found
and adb devices doesn’t find any devices connected, although my Pixel 3XL is indeed connected through the cable, and is in recovery mode, up to step 6 of the guide. How do I get pass the error?