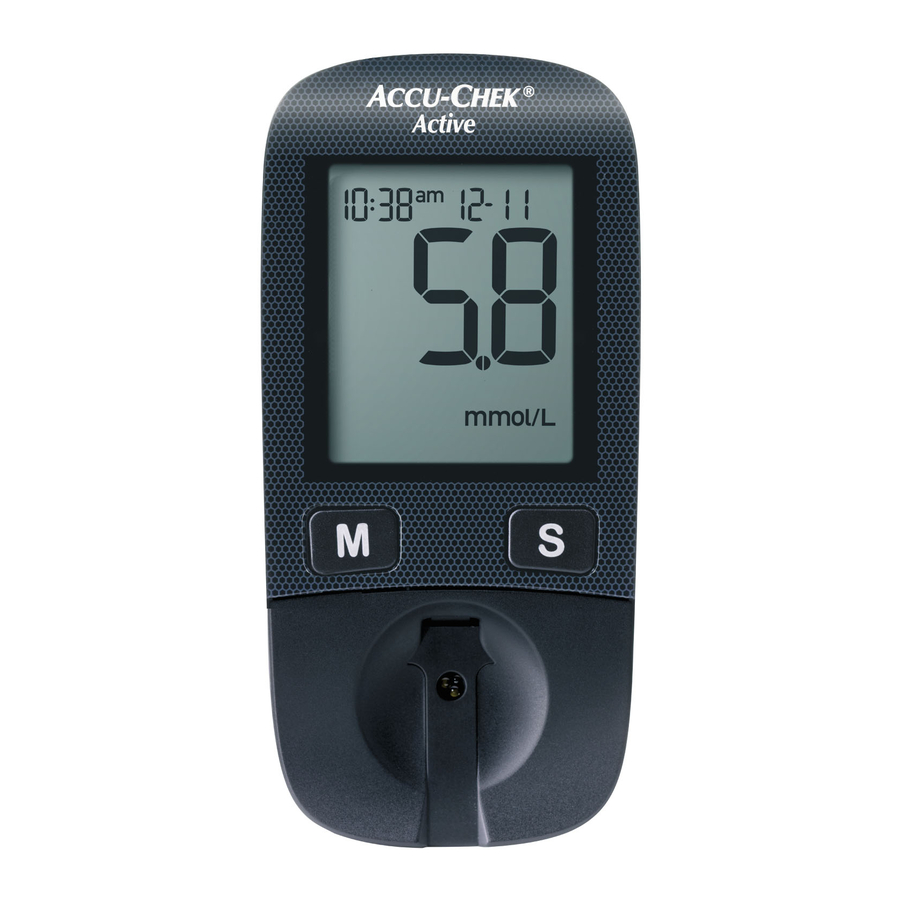
SIZE
97.8 x 46.8 x 19.1 mm
WEIGHT
50 g (with battery)
TEST TIME
5 seconds
MEMORY
500 test results with date and time
Benefits and Features
- Just two buttons are used to operate the meter for intuitive handling
- Large and easy-to-read display
- In- or out-of-meter dosing for simple testing
- Under-dosing alerts, re-dose option in 10 seconds
- Pre-meal and post-meal markers are available
- Post-meal alert reminds you to test 2 hours after eating
- 500 test results are stored in memory
- See averages of all blood test results over 7, 14, 30 and 90 days
- Changing the battery doesn’t mean losing the date and time settings
- Blood glucose readings in your meter can be uploaded to Accu-Chek Connect Online diabetes management system or Accu-Chek Smart Pix Software diabetes management system via Micro USB cable. For more information, kindly contact Accu-Chek ExtraCare Line at 6272 9200
Additional Specifications
Model:
Accu-Chek Active (Model GB)
Serial number:
Unique serial number is printed on a label on the device and stored in non-volatile memory
Measuring principle:
Mutant variant of the glucose dehydrogenase quinone protein (Mut. Q-GDH 2, modified variant of EC 1.1.5.2), acinetobacter spec; photometric end-point measurement
Measuring time:
Approximately 5 seconds (blood application with test strip within the meter)
Approximately 8 seconds (blood application with test strip outside the meter)
Operating Temperature:
+8 to +42 °C (+46.4 °F to +107.6 °F)
Humidity:
15 — 85 % relative humidity
Storage conditions without battery:
-25 to +70 °C (-13 °F to +158 °F)
Memory capacity:
Up to 500 values with date and time
Test averages:
7, 14, 30, 90 days
Data transfer:
Via USB interface (with Micro USB cable)
Dimensions:
97.8 x 46.8 x 19.1 mm
Weight:
46 g without battery, 50 g with battery
Display:
96 segments LCD display with symbols
Beep tone:
Yes (Factory setting ON)
Battery:
1 X 3-volt lithium batteries (CR 2032)
Battery life:
Approximately 1000 measurements
Auto power off:
30 or 90 seconds according to operating status
Underdosing detection:
Yes
Altitude independence:
0 — 4,000 m
Measuring range:
0.6 mmol/L – 33.3 mmol/L
Sample dosing:
Blood application on the middle of the test pad. The test strip (and its components) has the function to spread the blood above the test area in a quick and hygienic way
Dosing options:
Blood can be applied to already inserted test strip, or a test strip outside the meter. Outside of the meter dosing is helpful to minimise the risk of contamination when a meter has multiple users (e.g. in a hospital) and, in case of alternative site testing, to facilitate blood application
Re-dosing capability:
Additional blood can be added to the test strip within 10 seconds after applying the first drop (applies for inside mode)
Hematocrit range:
20 – 55 % (within-meter mode), 20 – 70 % (outside-meter mode)
Test strip stability:
The test strips remain stable at least up to the expiry date printed on the test strip vial, even after opening (the test strip vial must be closed tightly after each test strip is removed)
How to use Accu-Chek Active blood glucose meter
Testing your blood glucose is an essential part of managing diabetes. The Accu-Chek Active blood glucose meter can help to make it convenient by giving you fast, hassle-free, and accurate1,2 results in 4 simple steps.
- Insert new test strip into meter
- Prick your finger
- Apply blood drop on green pad of the strip
- Read blood glucose results
Reference:
1. Freckman G. et al. J Diabetes Sci Journal 2012, 6 (5):1060-75
2. ISO 15197:2013
- Manuals
- Brands
- Accu-Chek Manuals
- Blood Glucose Meter
- ACTIVE
- User manual
-
Contents
-
Table of Contents
-
Bookmarks
Quick Links
Prüfmittelnummer n/a
R2/1 – man_cover_06658768001_01_EN_ Format 127 x 154 mm – Black
R2/2 – man_cover_06658768001_01_EN_ Format 127 x 154 mm – PMS 287 CVC
User’s Manual
Blood Glucose Meter
Related Manuals for Accu-Chek Active
Summary of Contents for Accu-Chek Active
-
Page 1: Blood Glucose Meter
Prüfmittelnummer n/a R2/1 – man_cover_06658768001_01_EN_ Format 127 x 154 mm – Black R2/2 – man_cover_06658768001_01_EN_ Format 127 x 154 mm – PMS 287 CVC User’s Manual Blood Glucose Meter…
-
Page 2
This User’s Manual features three types of warning: This symbol indicates a possible risk of injury or of damage to your own health or the health of others. This symbol draws attention to actions that could result in damage to the meter. This symbol draws your attention to important information. -
Page 3: Table Of Contents
Contents Contents Intended use � � � � � � � � � � � � � � � � � � � � � � � � � � � � � � � � � � � � � � � � � � � � � � � � � � � � � � � � � � � � � � � � 2 About this User’s Manual �…
-
Page 4: Intended Use
People with diabetes can use this system • Only use the Accu‑Chek Active meter with to self‑test their blood glucose. Healthcare Accu‑Chek Active test strips that are approved professionals can use this system to check by Roche Diagnostics.
-
Page 5: About This User’s Manual
About this User’s Manual About this User’s Manual Read this User’s Manual carefully and completely before testing blood glucose for the first time. If you have any questions, please contact your customer support and service centre (see page 63). This User’s Manual will provide you with all the information you need to operate, troubleshoot and care for your blood glucose meter.
-
Page 6: Getting To Know The Blood Glucose Monitoring System
Getting to know the blood glucose monitoring system Getting to know the blood glucose monitoring system The Accu-Chek Active blood glucose meter and its components 1. Display 6. Locking catch displays the current and saved test results or opens the battery compartment cover device messages 7.
-
Page 7
Getting to know the blood glucose monitoring system Buttons of the blood glucose meter Overview of the M and S button functions: M button S button Press the M button to Press the S button to turn the meter on and call up turn the meter on and call up saved values settings, e.g. -
Page 8
Getting to know the blood glucose monitoring system The main features • Short testing time • Memory The meter needs only approximately 5 seconds The meter automatically saves up to 500 test for each test. results with the time and date of the test and all other information that is important for the test. -
Page 9: Checking The Unit Of Measurement
Steps before testing Steps before testing Unpacking the contents Check that the contents of the package are complete. You will find a list with the contents on the box. If anything is missing, please contact your customer support and service centre (see page 63). Checking the unit of measurement Test results can be displayed in two different units of measurement (mg/dL or mmol/L).
-
Page 10: Checking The Display
Steps before testing Checking the display You can check if all of the display elements are properly displayed, by carrying out a full display check. mg/dL meter mmol/L meter With the meter turned off, press Compare the elements displayed on your meter with the display the M and S buttons at the same shown here.
-
Page 11
Steps before testing Inserting the code chip A code chip is used to give the meter information about the properties of the test strips. This is why each test strip box contains a code chip. • Each time you open a new test strip box, you must replace the old code chip from the meter with the new… -
Page 12: Changing Settings
Changing settings Changing settings Overview You can make changes to the meter settings for the time format, time, date and beep. The meter is delivered with the date and time pre‑set. You may need to adjust the settings to your time zone.
-
Page 13
Changing settings Go to the next setting Turning the meter off Order of the settings Turning off Time format Time (hour) Time (minute) Year Date (month) Press the M and S buttons briefly at the same time. Date (day) When the final display appears on the display, the modified settings are also saved. -
Page 14: Setting The Time Format
Changing settings Setting the time format You can choose between two formats: 24-hour format Time from 0:00 to 23:59, date in the day‑month format (DD‑MM) Time from 12:00 to 11:59 followed by am or pm, date in the month‑day 12-hour format format (MM‑DD) When you change the time format, the time and date are changed accordingly.
-
Page 15: Setting The Time And Date
Changing settings Setting the time and date 24-hour format Setting the hours 24-hour format 12-hour format 12-hour format The hours flash on the display. Press the M button to set the Press the S button. Next come hours. the minutes. 24-hour format Setting the minutes�…
-
Page 16
Changing settings 24-hour format Setting the month 24-hour format 12-hour format 12-hour format The month flashes on the Press the M button to set the Press the S button. Next comes display. month. the day. 24-hour format Setting the day 24-hour format 12-hour format 12-hour format… -
Page 17
Changing settings Setting the beep Beep is on Turning the beep on or off Beep is off The beep symbol appears Press the M button briefly to turn The beep symbol appears together with (on) on the the beep on or off. together with (off) on the display. -
Page 18: Testing Blood Glucose
Testing blood glucose Using the Accu‑Chek Active meter, you can test blood glucose in two different ways. You can either apply the blood drop to the test field while the test strip is in the meter (see page 19), or you can remove the test strip from the meter and then apply the blood drop to the test field (see page 20).
-
Page 19
Testing blood glucose Testing blood glucose Turning the meter on mg/dL meter mmol/L meter Take a test strip from the test The meter turns on and first Following the display check, the strip container. Close the test performs a default display check code number is displayed (689 is strip container again (approx. -
Page 20
Testing blood glucose If you missed the code number on the display after sliding in the test strip, remove the test strip from the meter and slide it in again. Check that this code number is Following the code number, the the same as the code number on test strip symbol and the flashing the label of the test strip… -
Page 21
Testing blood glucose Applying blood With test strip in the meter mg/dL meter mmol/L meter Lance the side of a fingertip with Apply the blood drop to the The test is over in approximately your lancing device. centre of the green field and then 5 seconds. -
Page 22: Applying Blood
Testing blood glucose Applying blood With test strip outside the meter Lance the side of a fingertip with When the test strip and the The test strip and blood drop your lancing device. flashing blood drop symbols are symbols flash afterwards on the displayed: display.
-
Page 23: Turning The Meter Off
Testing blood glucose Turning the meter off Turn off mg/dL meter mmol/L meter Gently slide the test strip into the The test is over in approximately Remove the test strip from the test strip guide in the direction of 8 seconds. The test result meter.
-
Page 24: Notes On Blood Glucose Testing
Testing blood glucose Notes on blood glucose testing Incorrect results can cause the wrong therapy recommendation to be made and so produce serious adverse health effects. Therefore, follow the following instructions: • Use only test strips which are within the use by date. • The test strips are sensitive to humidity and moisture.
-
Page 25
Testing blood glucose Marking test results You can mark test results to describe certain events connected to the test result or particular characteristics of the test result. You can only mark a test result while the test strip is still in the meter and the test result is being displayed. -
Page 26
Testing blood glucose mg/dL meter No marker Control Before meal mmol/L Test reminder meter Other In the example above, the Before meal marker ( symbol) was selected. After meal After choosing the desired marker, you can turn the meter off. The test result is saved together As long as the test result is being displayed on the display, you can with the marker. -
Page 27
Testing blood glucose Setting a test reminder mg/dL If the meter is switched on at meter the time of the test reminder, the meter cancels the test reminder. If you perform a blood glucose test up to 1 hour before a test reminder, the meter cancels the test reminder. -
Page 28
Testing blood glucose Checking your test results The test strip itself allows you to estimate the test result through colour comparison and thus also to check the displayed result. After the blood glucose test The label on the test strip container shows blood glucose values in mg/dL and mmol/L next to each coloured dot. -
Page 29
Testing blood glucose Symbols before, during or after a blood glucose test The following symbols can appear on the display before, during or after a test. For further information, please refer to the “Symbols, problems and error messages” chapter (see page 52). Symbol Meaning The battery is almost empty. -
Page 30
Testing blood glucose Evaluating test results Blood glucose results are influenced, amongst others, by nutritional choices, medicine taken, state of health, stress and physical activity. • Do not change your therapy without talking about it with your healthcare professional first. • If the blood glucose result is above or below the target range that you have set together with your healthcare professional, please contact your healthcare professional. -
Page 31
Testing blood glucose Did you bend the test strip while sliding it into the meter? Did you apply the blood drop immediately after it formed? Did you bend or move the test strip before or during the test? Are the test strips past their use by date (check next to the symbol on the test strip container label and also the symbol on your meter’s display)? -
Page 32: Using The Meter As A Diary
Using the meter as a diary Using the meter as a diary The meter can save up to 500 test results with the time and the date and calculate averages from the saved test results. The meter automatically saves all test results. If all the memory locations are occupied, the oldest test result is deleted to create space for the new one when you perform a new blood glucose test.
-
Page 33
Using the meter as a diary Order of the saved test results In increasing order up to the to the averages oldest test result (memory location 500) In decreasing order down to the newest test result (memory location 1) mg/dL meter mmol/L meter Press the M button to retrieve the older test results. -
Page 34: Retrieving Averages
Using the meter as a diary Retrieving averages The averages calculated by the meter are calculated for 3 groups of test results and for 4 time periods per group. The meter calculates the averages in the following order: Group Test results Period (days) All test results Only test results which have been marked with…
-
Page 35
Using the meter as a diary Order of the averages Before meal mg/dL (7, 14, 30, 90 = number of days taken into account) meter All results Results marked with (Before meal) mmol/L meter “Before meal”… -
Page 36
Using the meter as a diary Back Turn off No average To go back to the saved test To turn the meter off: If there are no test results saved results: for the selected average, three Press the M button and S button dashes are displayed. -
Page 37: Analysing Test Results On The Pc
Analysing test results on the PC Analysing test results on the PC The meter has a built‑in USB (Universal Serial Bus) port for transferring saved test results to a computer (PC) that is equipped accordingly. Roche Diagnostics offers a variety of special diabetes management hardware and software products which enhance the integrated diary functions of your meter.
-
Page 38
Analysing test results on the PC If the meter is off, it is turned on when it gets connected to the Once the connection to the computer. computer has been successfully established, the meter transfers Read the User’s Manual of the software in use. There you will find all all saved test results. -
Page 39: If The Transfer Is Unsuccessful
Analysing test results on the PC The meter is supplied with electricity via the USB cable while it is connected to the computer. Nonetheless, there must be a battery in the meter. To turn the meter off, unplug the For approximately 3 seconds, USB connector from the meter is displayed.
-
Page 40: Checking Your Meter
• the meter with the code chip inserted • the Accu‑Chek Active test strips that belong to the code chip • Accu‑Chek Active control solution Control 1 (low glucose concentration) or Control 2 (high glucose concentration) • a clean, dry paper towel • the concentration table for the control solutions (see label on the test strip container)
-
Page 41
Checking your meter Carrying out a control test mg/dL meter mmol/L meter Read the package insert which The meter turns on and first Following the display check, the comes with the control solutions. performs a default display check code number is displayed (689 is (approx. -
Page 42
Checking your meter mmol/L meter mg/dL meter When the flashing blood drop is Hold the bottle downwards at an The test starts. The flashing displayed on the display and the angle. hourglass symbol indicates that beep sounds, you have approx. the test is in progress. -
Page 43
Checking your meter These figures mmol/L meter are only examples Accu‑Chek Active Control ® Level mg/dL mmol/L 40-70 2�2-3�9 135-182 7�5-10�1 Control solution Unit of mg/dL used measurement meter While the result of the control After marking the result as a… -
Page 44
Checking your meter Sources of inaccurate control tests If the result of the control test is outside the specified concentration range, repeat the control test. If the result of the second test is also outside the concentration range, check the following points. If your responses to the questions below are different from those given, make the respective corrections when you perform the next test. -
Page 45
Checking your meter Are the test strip guide and measurement window clean? Has the control solution been open for less than 3 months? Once opened, control solutions keep for only 3 months. They must not be used after this period. Have you read the section “Treating the control solutions properly”… -
Page 46: Cleaning The Meter
Cleaning the meter Cleaning the meter If the meter is dirty, it may be necessary to clean it. Healthcare professionals using the meter to test several patients’ blood glucose must also read the instructions on disinfection (see page 49). • Use only cold water as a cleaning agent. • Clean the meter using a lightly moistened cloth or a lightly moistened cotton swab.
-
Page 47
Cleaning the meter Cleaning the measurement window CLICK Carefully dab the measurement Place the cover straight and Slide the cover closed. The cover window and its surrounding area centred onto the meter. must audibly CLICK into place. using a lightly moistened cloth or In doing so, the guides on the cotton swab. -
Page 48: Changing The Battery
Changing the battery Changing the battery When the battery symbol appears on the display for the first time, the battery is almost empty. You can perform approximately 50 more tests with the battery. Change the battery as soon as possible. The battery has already lost a lot of power and changeable conditions (e.g.
-
Page 49
Changing the battery Never throw batteries into a fire. They may explode. CLICK Dispose of used batteries in an environmentally friendly way at a collection depot or through your dealer. Place the battery compartment Press the battery compartment cover back on again. The two cover closed. -
Page 50: Testing Blood Glucose In More Than One Patient
• Patients and medical staff are potentially at risk of becoming infected if the same Accu‑Chek Active meter is used to test blood glucose in more than one patient. All objects that come into contact with human blood are potential sources of infection.
-
Page 51: Disinfecting The Meter
Testing blood glucose in more than one patient Disinfecting the meter The following parts of the meter may become contaminated: • the case • the cover • the measurement window The meter, the cover and the measurement window must be carefully cleaned and disinfected after every use (see the “Cleaning the meter”…
-
Page 52: Test And Storage Conditions
Test and storage conditions Test and storage conditions So that the meter works reliably and you obtain accurate test results, make sure that the following conditions are met. Temperature • Do not use test results obtained at the limits of • For blood glucose tests and control tests the the permitted temperature range as a basis for temperature must be between +8 and…
-
Page 53
Test and storage conditions Light conditions Avoid sudden changes in light conditions while Do not perform a test when the meter and the testing. The flash of a camera, for example, can test strips are exposed to direct sunlight. Go to a lead to incorrect test results. -
Page 54: Symbols, Problems And Error Messages
Symbols, problems and error messages Symbols, problems and error messages In addition to test results, time and date, other symbols and error messages also appear in your meter’s display. The following provides an overview of all symbols and error messages. Please pay attention to all symbols and error messages when you use the meter.
-
Page 55
Symbols, problems and error messages Symbol Meaning When an average is displayed (memory): the symbol is preceded by the number of days taken into account. Together with error message E‑5: The meter is exposed to too much light. Flashing – A test is in progress or an average is being calculated. The beep is turned on. -
Page 56
• There is no code chip in the meter. Insert the code chip that belongs to the Accu‑Chek Active test strips you are currently using. Averages cannot be calculated because • you have not set the time and date, • only test results without a time and date are saved,… -
Page 57
Symbols, problems and error messages Symbol Meaning The test result has been lost from memory. Decimal point: displayed by mmol/L meters and is part of the test result (e.g. 8.2 mmol/L is displayed as The meter is connected to a computer (PC). The meter has been disconnected from the computer (PC). -
Page 58
Symbols, problems and error messages Problems Problem Cause and solution The meter will not turn on. • The battery is empty or there is no battery in the meter. Insert a new battery. • You have inserted the battery the wrong way round. Remove the battery and place it in the battery compartment as shown there. -
Page 59: Error Messages
Symbols, problems and error messages Error messages When an error occurs, an error message appears on the display and two beeps sound. Turn the meter off. Depending on the situation, either briefly press the M button and S button or remove the test strip from the meter to turn the meter off.
-
Page 60
• The incorrect code chip is currently in the meter. Remove the code chip and insert the code chip that belongs to the Accu‑Chek Active test strips you are currently using. • While the test was in progress, you connected the meter to a computer that was on. -
Page 61: Disposing Of Your Meter
Disposing of your meter Disposing of your meter During blood glucose testing the meter may come into contact with blood. Used meters therefore carry a risk of infection. After having removed the battery, please dispose of your used meter according to the regulations applicable in your country.
-
Page 62: Technical Data And System Components
You will find information on how the system works, on the test principle and on reference methods in the Accu‑Chek Active test strip package insert. Measuring interval 10–600 mg/dL (0.6–33.3 mmol/L) Blood volume 1–2 µL (1 µL (microlitre) = 1 thousandth of a millilitre)
-
Page 63
Interference on other electrically‑driven equipment is not anticipated. Performance The performance data for the Accu‑Chek Active system (Accu‑Chek Active analysis meter with Accu‑Chek Active test strips) was obtained using capillary blood from diabetic patients (method comparison, accuracy), venous blood (repeatability) and control solution (reproducibility). Calibration and… -
Page 64: System Components
Use only these test strips when you test blood glucose using the Accu‑Chek Active meter. Accu-Chek Active control solutions Use only these control solutions when you carry out control tests using the Accu‑Chek Active meter and the respective test strips.
-
Page 65: Customer Support And Service Centre
Customer Support and Service Centre Information service and troubleshooting For questions on how to operate your Accu‑Chek Active meter, or regarding implausible test results, or if you suspect the meter or test strips to be defective, contact your Roche Diagnostics customer support and service centre.
-
Page 66
#11-01 Central Plaza Abu Dhabi Singapore, 168730 www.accu-chekarabia.com Accu-Chek ExtraCare line: 6272 9200 www.accu-chek.com.sg South Africa Roche Products (Pty) Ltd. Diagnostics Division 9 Will Scarlet Road, Ferndale P.O. Box 1927, Randburg 2125 Accu-Chek Customer Care Centre: 080-DIABETES (Dial 080-34-22-38-37) www.diabetes.co.za… -
Page 67: Alphabetical Index
Index Index display 4 display check sources of error drop (symbol) control test 42 alternative sites 23 testing blood glucose 28 apple core (symbol) 23 storage conditions 50 electromagnetic field 51, 58, apple (symbol) sun (symbol) error messages 57 applying blood 19, 20, symbols (display) 52 exp (symbol)
-
Page 71: Explanation Of Symbols
Explanation of symbols Various symbols are featured on the packaging and type plate of the meter. Their meanings are as follows: Symbol Meaning Consult instructions for use Caution, refer to safety‑related notes in the instructions for use accompanying this product. Biological Risks –…
-
Page 72
For more information contact ©2013 Roche Diagnostics ACCU‑CHEK is a trademark of Roche. Roche Diagnostics GmbH Sandhofer Strasse 116 68305 Mannheim, Germany www.accu‑chek.com…
SIZE
97.8 x 46.8 x 19.1mm
WEIGHT
50 g
FAST
Results in 5 seconds
MEMORY
500 test results
ALERTS
For expired strips
Benefits and Features
- Just two buttons are used to operate the meter, for intuitive handling.
- Large and easy-to-read display.
- In- or out-of-meter for simple and comfortable testing.
- Safety features include underdosing alerts, re-dose option in 10 seconds, and test strip expiration warnings
- The visual double check lets you see your recent test result.
- Post-meal alert reminds you to test 2 hours after eating.
- Pre-meal and post-meal markers are available.
- 500 test results are stored in memory.
- See averages of all blood test results over 7, 14, 30 and 90 days.
- Fulfills 100 % of the accuracy requirements of DIN EN ISO 15197:2003.1
- Date and time are preset for faster setup.
- Changing the battery doesn’t mean losing the date and time settings.
- Transfer data from the meter to your PC using a USB cable. You will need an
Accu-Chek® diabetes management solution on the PC to analyze the data. - 30 % smaller than previous Accu-Chek® Active meters with a 10 % bigger display.
Additional Specifications
Model:
Accu-Chek® Active (Model GU)
Serial number:
Unique serial number is printed on a label on the device and stored in non-volatile memory
Measuring principle:
Mutant variant of the glucose dehydrogenase quinone protein (Mut. Q-GDH 2, modified variant of EC 1.1.5.2), acinetobacter spec; photometric end-point measurement
Measuring time:
Approximately 5 seconds (blood application with test strip within the meter)
Approximately 8 seconds (blood application with test strip outside the meter)
Temperature:
+8 to +42 °C (+46.4 °F to +107.6 °F)
Humidity:
Up to 93 % relative humidity
Storage conditions without battery:
-25 to + 70 °C (-13 °F to +158 °F)
Memory capacity:
Up to 500 values with date and time
Test averages:
7, 14, 30, 90 days
Data transfer:
Via USB interface (with Micro-USB cable)
Automatic coding:
Via code chip (batch specific code chip)
Warning:
Strip expiry warning (data is stored in the code chip)
Dimensions:
97.8 x 46.8 x 19.1 mm
Weight:
46 g without battery, 50 g with battery
Display:
96 segments LCD display with symbols
Beep tone:
Yes (Factory setting ON)
Battery:
1 battery, type CR 2032
Battery life:
Approximately 1000 measurements or one year (whichever comes first)
Auto power off:
30 or 90 seconds according to operating status
Underdosing detection:
Yes
Altitude independence:
0–4,000m (0-13,123 feet)
Measuring range:
10 mg/dL – 600 mg/dL, 0.6 mmol/L – 33.3 mmol/L
Sample types:
Capillary blood
If the test strip is removed from the meter to apply blood:
Venous blood anticoagulated with lithium heparin or ammonium heparin or EDTA, arterial blood and blood from neonates
Sample dosing:
Blood application on to the middle of the test pad. The test strip (and its components) has the function to spread the blood above the test area in a quick and hygienic way
How to use Accu-Chek® Active blood glucose meter
Testing your blood glucose is an essential part of managing diabetes. The Accu-Chek® Active blood glucose meter can help to make it convenient by giving you fast, hassle-free, and accurate results in 4 simple steps.
- Insert the glucose test strip
- Prick your finger with the lancet to draw out a blood drop.
- Carefully touch the blood drop onto the green field of the test strip.
- Read the blood glucose result.
Accu chek active — одно из самых популярных глюкометров, которые используются для контроля уровня сахара в крови у пациентов с диабетом. Однако, как и любое другое устройство, иногда оно может выдавать ошибки. Одной из частых ошибок, с которой могут столкнуться пользователи Accu chek active, является «ошибка end».
Ошибка end на глюкометре Accu chek active может возникать по нескольким причинам. Возможно, вы покупали тест-полоски неправильного типа или просто ошиблись в выборе кодировки при использовании тест-полосок. Возможно, тест-полоска была повреждена или хранится не в соответствии с инструкцией.
Чтобы решить проблему с ошибкой end на глюкометре Accu chek active, вам нужно сначала проверить, правильно ли вы используете тест-полоски. Убедитесь, что вы выбрали правильную кодировку и что тест-полоска не повреждена. Также проверьте, что тест-полоски хранятся в соответствии с инструкцией — в сухом и прохладном месте, защищенном от прямых солнечных лучей.
Если после проверки вы все еще получаете ошибку end, попробуйте заменить тест-полоски на новые. Если проблема сохраняется, обратитесь в сервисный центр Accu chek для получения подробной консультации и помощи.
Содержание
- Лечение ошибки end на Accu chek active
- Возможные причины ошибки end
- Как исправить ошибку end на Accu chek active
Лечение ошибки end на Accu chek active
Ошибка end на глюкометре Accu chek active указывает на исчерпание заряда батареи. Это может произойти по истечении срока службы батареи или при неправильной установке батарейного блока. Чтобы исправить эту ошибку и продолжить использование глюкометра, следуйте следующим рекомендациям:
- Проверьте правильность установки батарейного блока. Убедитесь, что положительный и отрицательный контакты батареи соответствуют маркировке внутри отсека для батарей.
- Если батареи установлены правильно, попробуйте заменить их на новые.
- Если после замены батарей ошибка end все равно не исчезает, возможно, есть проблема с контактами батареи или блок питания. Рекомендуется обратиться к сервисному центру или к производителю глюкометра.
Важно помнить, что при возникновении ошибки end не следует пытаться самостоятельно разбирать или ремонтировать глюкометр, так как это может привести к неправильной работе или повреждению устройства.
Для избежания возникновения ошибки end в будущем рекомендуется следить за зарядом батареи и заменять ее заранее, а также при покупке новой батареи обращать внимание на срок годности.
Возможные причины ошибки end
Ошибка «end» на глюкометре Accu Chek Active может возникнуть по разным причинам. Рассмотрим наиболее распространенные из них:
-
Истек срок годности тест-полосок.
Тест-полоски используются для измерения уровня глюкозы в крови. Если истек срок годности этих полосок, то они могут давать неправильные результаты или вызывать ошибку «end». Проверьте дату истечения срока годности тест-полосок и замените их при необходимости.
-
Неправильное использование глюкометра.
Ошибка «end» может появиться, если не были выполнены все необходимые действия при проведении теста. Убедитесь, что вы правильно вставили тест-полоску в глюкометр и провели необходимые манипуляции для анализа крови. Внимательно следуйте инструкциям, указанным в руководстве пользователя.
-
Несоответствие вида тест-полосок и глюкометра.
Глюкометры могут быть совместимы только с определенными видами тест-полосок. Если вы использовали неподходящие тест-полоски, то это может вызвать ошибку «end». Убедитесь, что используемые вами тест-полоски соответствуют модели глюкометра Accu Chek Active.
-
Технические проблемы с глюкометром.
Возможно, ошибку «end» вызывает неисправность глюкометра. В этом случае, обратитесь к сервисному центру или свяжитесь с производителем для получения помощи и решения проблемы.
В случае возникновения ошибки «end» рекомендуется проверить все указанные причины и принять соответствующие меры для их устранения. Если проблема не уходит, лучше обратиться к специалисту для дополнительной консультации.
Как исправить ошибку end на Accu chek active
Ошибка «end» на глюкометре Accu chek active может возникать по разным причинам, и проблема может быть различной типа в зависимости от ситуации. В этом разделе представлены несколько возможных решений для исправления данной ошибки.
-
Проверьте правильность вставленной тест-полоски. Убедитесь, что тест-полоска надежно вставлена в глюкометр и находится в правильном положении. При вставке обратите внимание на то, чтобы контакты тест-полоски и глюкометра соответствовали друг другу.
-
Убедитесь, что используемая тест-полоска подходит для данного глюкометра. У Accu chek active есть свои собственные тест-полоски, и использование других полосок может привести к ошибке. Удостоверьтесь, что вы используете правильные тест-полоски, совместимые с данным глюкометром.
-
Проверьте срок годности тест-полосок. Использование просроченных тест-полосок может вызвать ошибку «end». Убедитесь, что тест-полоски не просрочены, и если они просрочены, замените их на новые.
-
Перезапустите глюкометр. В некоторых случаях ошибка «end» может быть вызвана неполадкой в программном обеспечении глюкометра. Попробуйте выключить глюкометр, подождать несколько секунд, а затем включить его снова.
-
Свяжитесь с технической поддержкой. Если вы пробовали все вышеперечисленные методы и ошибка «end» все еще возникает, рекомендуется обратиться в сервисный центр или связаться с технической поддержкой производителя глюкометра Accu chek active для получения дополнительной помощи и рекомендаций.
Обратите внимание, что эти решения являются общим руководством и могут не сработать во всех случаях. Если у вас возникла ошибка «end» на глюкометре Accu chek active, рекомендуется обратиться за помощью к специалисту или сервисному центру.
На чтение 3 мин Опубликовано Обновлено
Ошибки в работе глюкометра могут возникать по разным причинам. Одной из таких ошибок является ошибка end. При возникновении этой ошибки на дисплее глюкометра появляется сообщение «end», которое указывает на некорректное завершение измерения уровня глюкозы в крови. Возникновение ошибки end может быть вызвано различными факторами и требует незамедлительного исправления для получения точных результатов измерений.
Такие причины ошибки end могут включать:
- Неправильное применение тест-полосок;
- Неправильное состояние глюкометра;
- Некачественные тест-полоски;
- Неправильное хранение тест-полосок;
- Использование просроченных тест-полосок.
Для исправления ошибки end необходимо принять ряд мер. Важно убедиться в корректном применении тест-полосок, проверить состояние глюкометра, использовать только качественные тест-полоски и хранить их в соответствии с требованиями производителя. Если причиной ошибки end является просроченные тест-полоски, необходимо заменить их на новые.
В случае, если причина ошибки end не может быть устранена самостоятельно, рекомендуется обратиться к специалисту или подробно изучить инструкцию по эксплуатации глюкометра Accu chek active и следовать ее рекомендациям по исправлению ошибки. Важно не игнорировать ошибку end, так как это может повлечь ошибочные результаты измерений, что может быть опасно для здоровья пациента.
Accu chek active: причины ошибки end
Ошибка «end» на приборе Accu chek active может произойти по разным причинам. Ниже приведены некоторые из них:
- Истек срок годности тест-полосок или контрольного раствора. В этом случае необходимо заменить их новыми.
- Неправильное подключение или неисправность ленты с контактами. Убедитесь, что лента правильно вставлена в прибор и контакты чистые и целые.
- Ошибка при проведении анализа. Повторите измерение, следуя инструкциям в руководстве пользователя. Убедитесь, что вы следуете правильной процедуре и правильно вводите данные.
Если вы продолжаете получать ошибку «end» на приборе Accu chek active, несмотря на выполнение вышеперечисленных рекомендаций, рекомендуется обратиться в техническую поддержку производителя или квалифицированного специалиста для дальнейшей помощи и возможного ремонта прибора.
Способы исправления ошибки end
Ошибка «end» на глюкометре Accu chek active может возникать по нескольким причинам. В этом разделе мы рассмотрим несколько способов исправления этой ошибки:
- Проверьте правильность введенных данных. Убедитесь, что вы правильно ввели данные перед выполнением теста. Проверьте номер питательной полоски и убедитесь, что он соответствует номеру, отображенному на глюкометре.
- Замените питательную полоску. Если вы уверены, что правильно ввели данные, попробуйте заменить питательную полоску новой. Проверьте, не истек ли срок годности полоски, и убедитесь, что она хранится в правильных условиях.
- Очистите рабочую область. Перед повторной попыткой выполнить тест убедитесь, что рабочая область глюкометра и ваша рука сухие и чистые. Влага, пыль или грязь на рабочей области могут привести к ошибке «end».
- Обратитесь в службу поддержки. Если ни один из вышеуказанных способов не помог, рекомендуется обратиться в службу поддержки Accu chek или связаться с вашим врачом для получения дальнейших инструкций.
Не забывайте, что возможные причины и способы исправления ошибки «end» могут варьироваться в зависимости от модели и версии глюкометра Accu chek active. Всегда следуйте инструкциям, предоставленным производителем глюкометра и проконсультируйтесь с врачом, если ошибка продолжает возникать.