So I’m working on a big project with tons of 4k footage and every time I try to render or export I get this error (file name changed for client privacy):
«Export Error
Error compiling movie.
Accelerated Renderer Error
Unable to produce frame.
Writing with exporter: H.264
Writing to file: \\?\C:\Users\User\Desktop\video file.mp4
Writing file type: H264
Around timecode: 00:00:44:09 — 00:00:45:01
Rendering at offset: 44.375 seconds
Component: H.264 of type Exporter
Selector: 9
Error code: -1609629690″
I tried multiple solutions that others have found useful, namely exporting to a different location, turning off CUDA (see below), and editing things at the time codes that the errors are referenced to be in (changes nothing).
I’ve updated my NVIDIA graphics card drivers (both to game ready and studio ready drivers), updated premiere CC, all the normal things to look out for as far as I know.
Still get it. Also, when rendering without cuda it gives me blocks of weird checkered graphics throughout the video: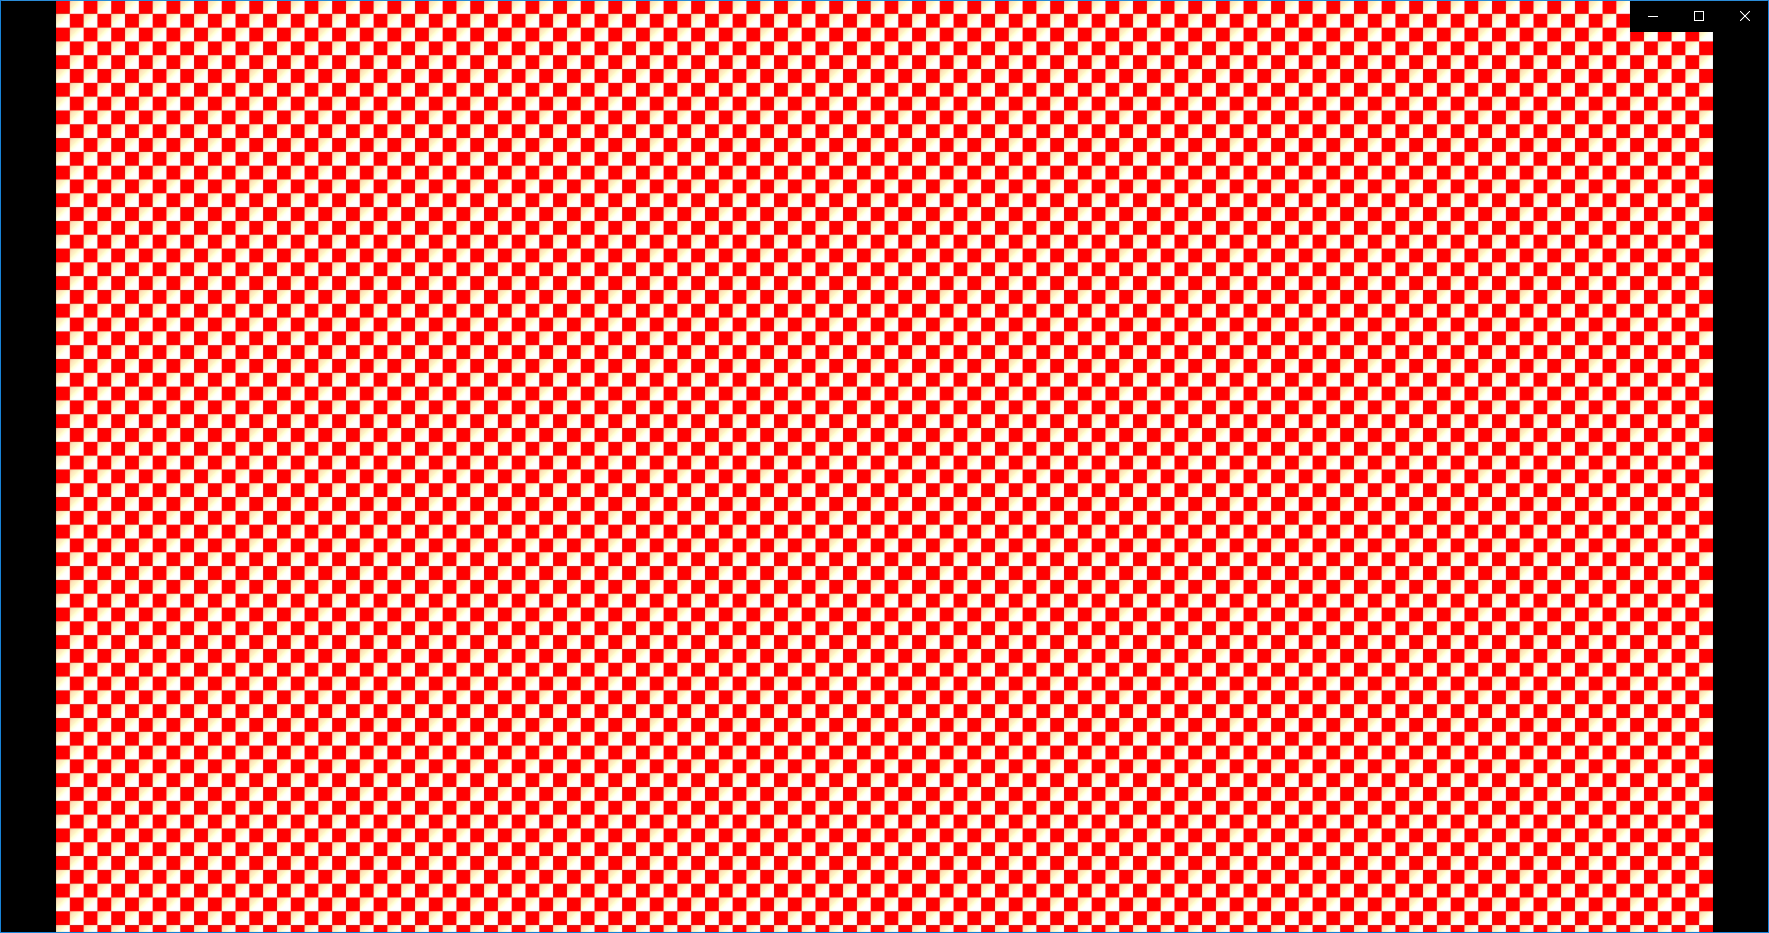
Never ever seen that before. But obviously eliminates that option.
As far as I can tell, removing my color grade with Lumetri is the only thing that lets it render and export as normal, but that’s obviously an issue because this is a lot of v-log footage that I can’t just export without a grade.
I would transcode all the footage, but this is a BIG session, so I’d be doing that with just so many files that I don’t want to do that if I can help it, and I am already using proxies so I’d have to go through that again too.
I can export on my other system at home just fine (I’ll post those specs too if need be) but I don’t think it’s as powerful CPU or GPU wise as this system, so I don’t know what’s happening.
System Specs:
Windows 10 Home 64-bit
Intel i7-4790K 4. GHz (8CPUs)
16 GB RAM
NVIDIA GeForce GTX 1080
Premiere CC 2019 (current version up to date)
Any help would be greatly appreciated. Thank you for your time.
Are you getting the Accelerated Renderer Error code -1609629690?
If so, you are not alone!
The “Accelerated Renderer Error” is part of the “Error compiling movie” category, with error code -1609629690, and is “Unable to produce frame.”
After doing tons of research on how to fix it, I’ve created the list below containing the most common solutions shared across the internet.
Here’s a video I’ve made about the error:
Before getting to the actual solutions, are you meeting Premiere Pro’s system requirements?
1. Meet System Requirements
Since this error comes from accelerated rendering, it indicates your GPU is causing it.
Therefore, making sure your GPU meets Premiere Pro’s requirements is essential.
The requirements are as follows:
- 2 GB of GPU memory.
- This is the absolute minimum.
- 4 GB memory for HD and some 4K media.
- 6 GB memory for 4k and higher.
Here’s a video explaining how to check your GPU specifications:
2. Reboot Computer
This is an obvious solution, but I thought I would mention it just in case you haven’t done it yet.
Doing a quick reboot of your machine is known to solve many bugs.

3. Close Adobe Creative Cloud Services
A user at the Adobe community reported that closing all Adobe Creative Cloud applications and services running in the background solved the accelerated renderer error.
To do this, click on the Windows key on your keyboard, or Start in the taskbar, then search and open Task Manager. On macOS, I think the equivalent program is the “Activity Monitor”; here’s a tutorial on how to open it.
Then locate all the services and applications which belong to the Adobe Creative Cloud. The services have the same logo, and the applications are Premiere Pro, Media Encoder, Photoshop, etc.
Click on them, and then End Task.

Once that is done, you can launch Premiere Pro (since you closed it).
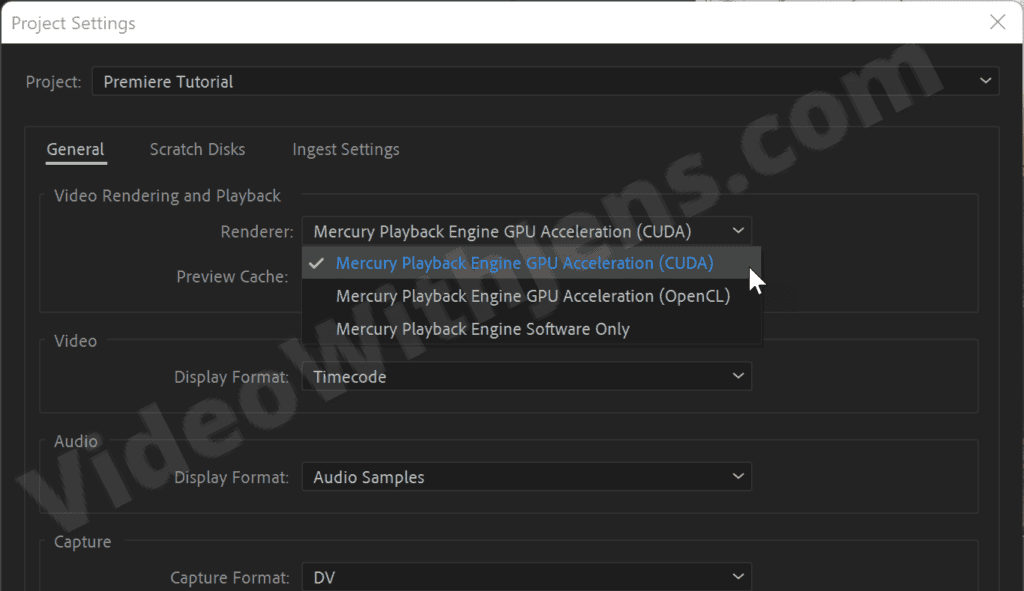
Then, open your project, click on File > Project Settings > General, and set Renderer against CUDA or OPEN CL.
4. Check the Timecode
If you look closely at the error, it includes a Timecode where the error was triggered while rendering your project.
Check the timecode in the sequence if there is anything that stands out.
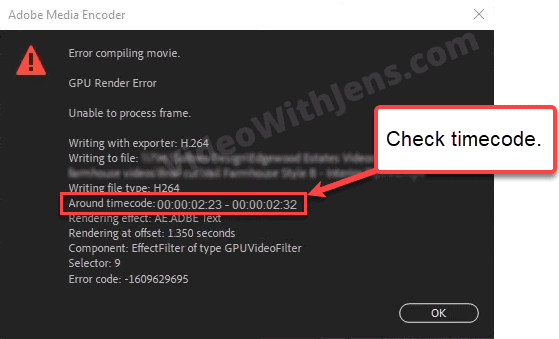
Things that could trigger the error are:
- Effects.
- Graphic designs.
- Color adjustments.
- Sound design.
- Titles/text.
- Corrupt clips.
- Corrupt images.
- Etc.
If you find any element that sticks out, troubleshoot by removing it and test if you area ble to export.
- If it works, congratulations! But then, you know what caused it, and you can try another less demanding GPU effect or something.
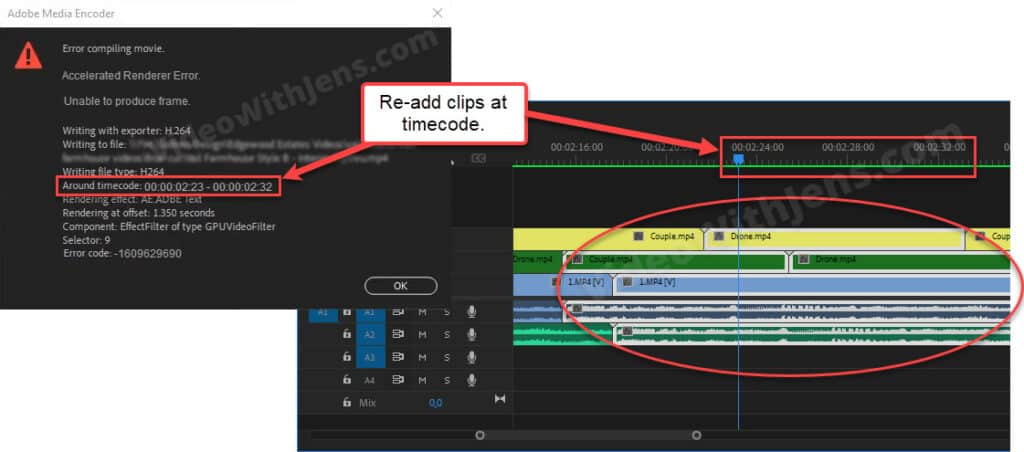
People have reported that simply re-adding the clips that are located at the timecode fixed their issue. Here’s what that would look like:
If you are using any images created by any free online tool, it may be corrupt. In that case, importing the image to software like Photoshop and exporting it from there could fix the issue.
Also, ensure that the image’s file name contains no special characters.
If this solution didn’t solve the error code -1609629690, I would try smart rendering next:
5. Smart Rendering
Smart rendering is quite genius, as instead of rendering the video when you click Export, you can actually “pre-render” it and export your project using these files.
This should lift off some weight from your GPU, hopefully enough not to trigger the error.
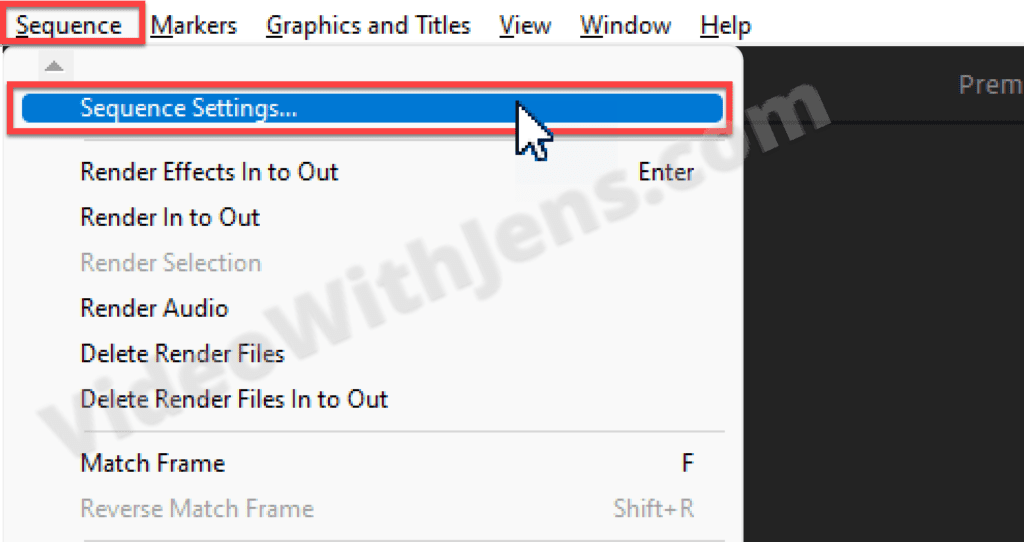
To do this, click on Sequence (top left-hand corner) > Sequence Settings:
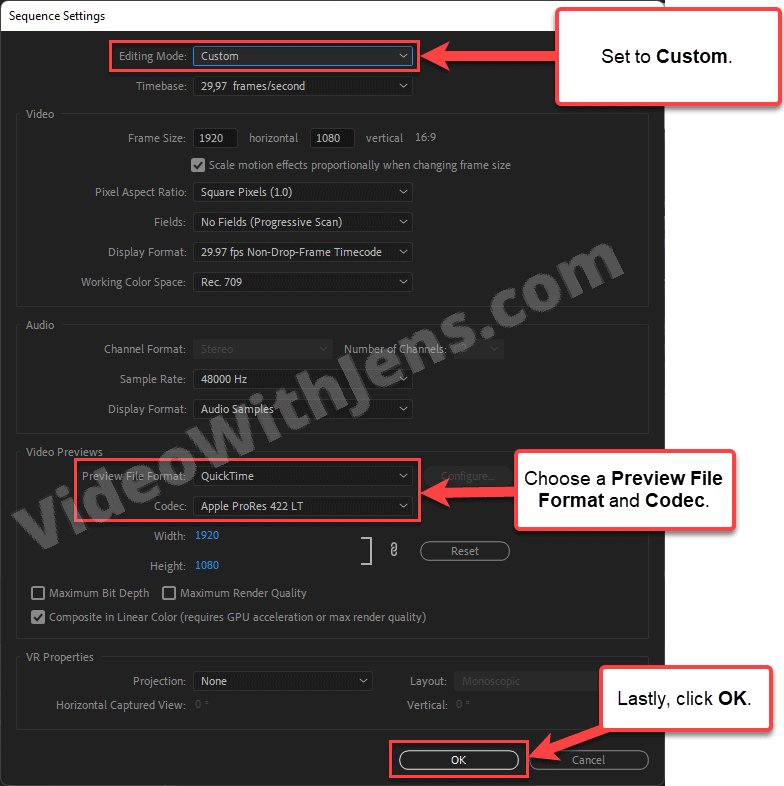
Then, set the Editing Mode against Custom, and choose a Preview File Format and Codec.
I usually set them against QuickTime and Apple ProRes 422 LT; however, if your video is high-quality, consider choosing ProRes 4444 or any higher-quality codec.
Once that is done, click OK:
Next, select your Timeline Panel (sequence), and click on Markers (menubar) > Clear In and Out.
- You won’t be able to do this if you’ve not created any in or outpoints. In that case, you can proceed to the next step.
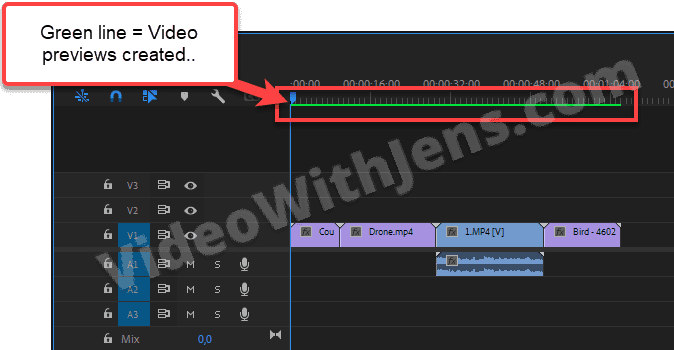
Then, click on Sequence > Render In to Out, and wait for it to finish:

Once the rendering is finished, the line above your sequence should be green:
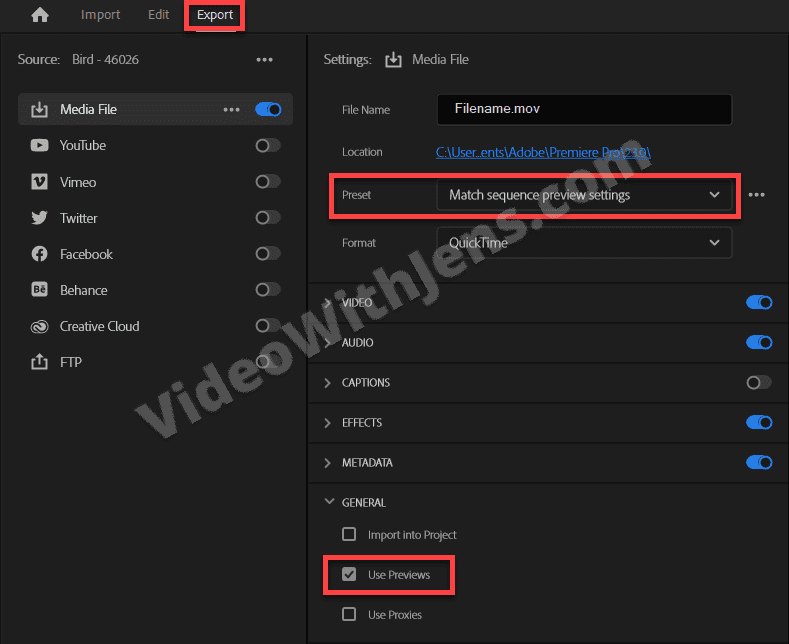
Lastly, head to the Export tab inside Premiere, set Preset against Match sequence preview settings, and enable Use Previews under General.
Once that is done, you can hopefully export without facing the accelerated render error!
6. Delete Video Previews
On the contrary, if you already were using the smart render function, it’s worth trying to export without them.
You could try to uncheck the smart render options in the export tab. However, users have reported that deleting the video previews helped them solve the error.
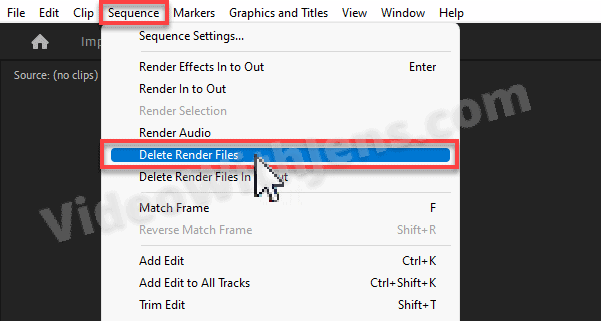
To delete video previews, click on Sequence > Delete Render Files:
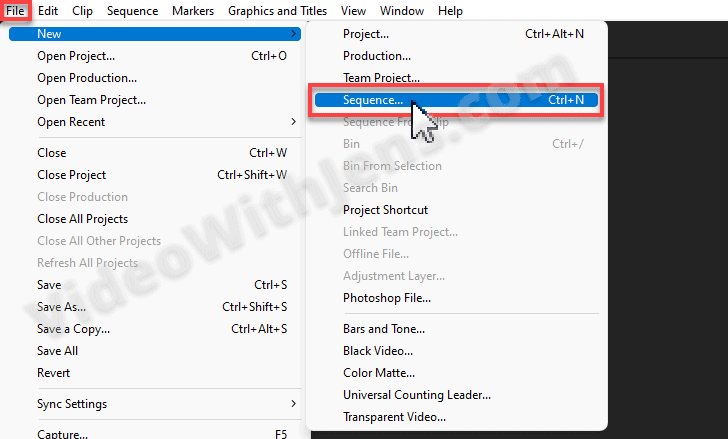
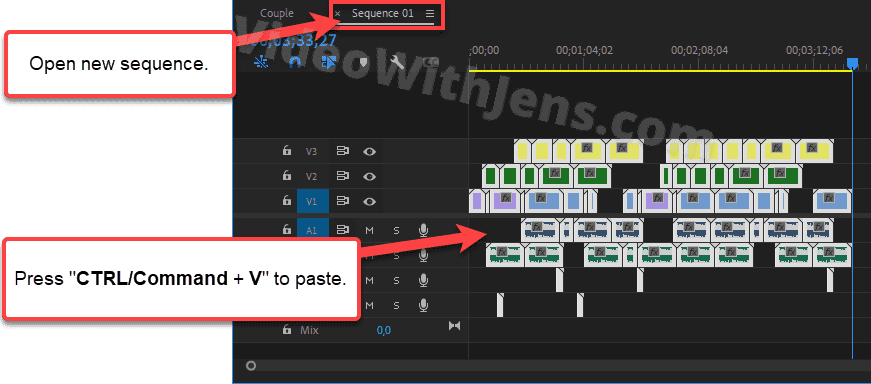
7. Copy Clips to New Sequence
Someone will always recommend trying this method if you face any issues inside Premiere.
This is a quick way to fix a corrupt sequence, which happens occasionally.
Click on File > New > Sequence:
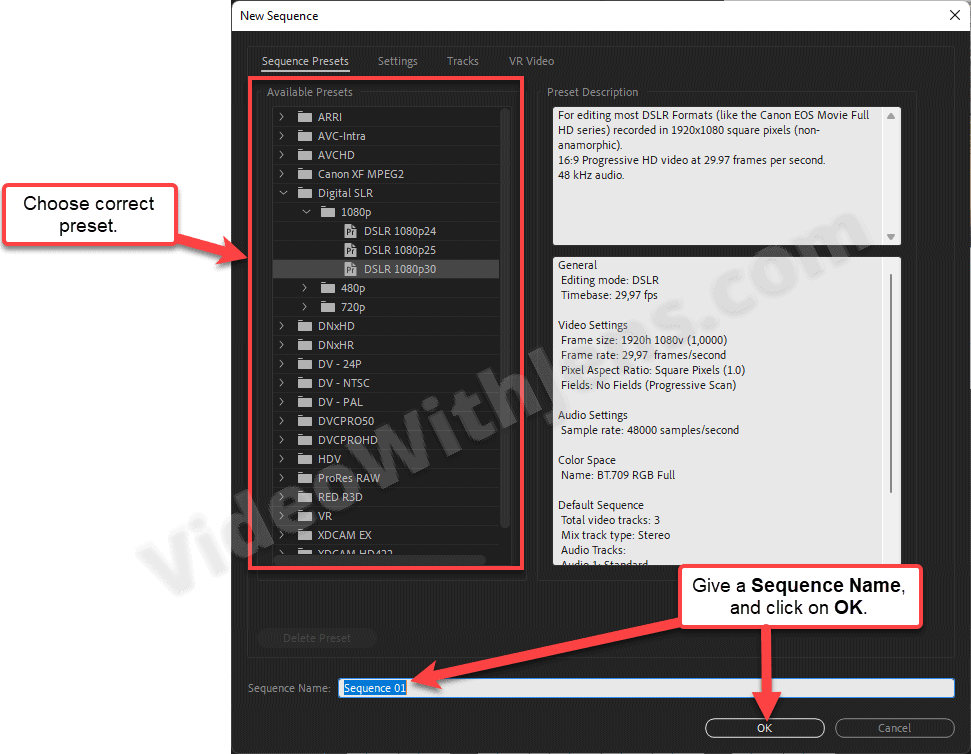
Then choose a Sequence Preset, give it a name, and click on OK:
Now, we want to copy the clips from the old sequence into the new one.
To do this, open the old sequence, and press the keyboard shortcut “CTRL/Command + A” to select all clips.
Then press “Ctrl/Command + C” to copy the selected clips.
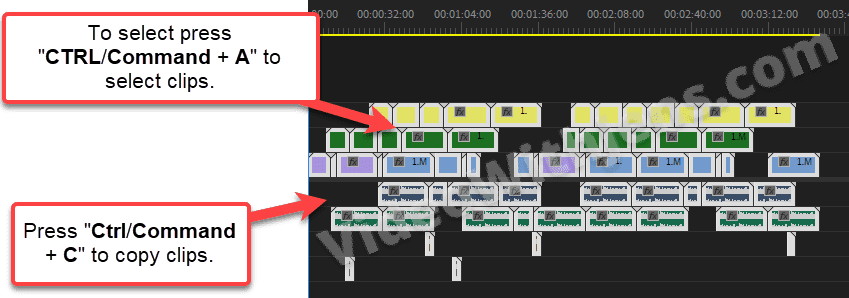
Now, open the new sequence, and press “Ctrl/Command + V” to paste the copied clips into the timeline.
NB: You may have to re-adjust the audio levels.
Next up, it’s time to export!
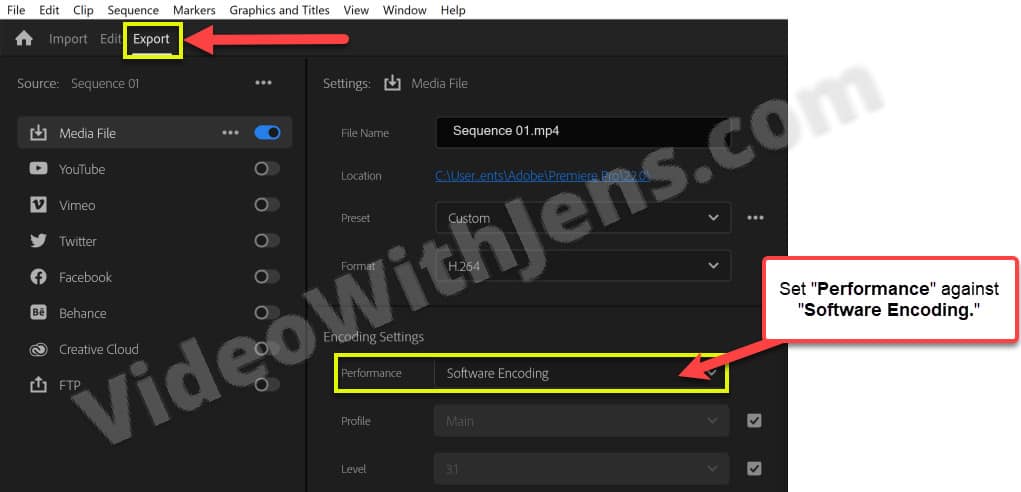
8. Use Software Encoding (Quick temporary solution)
Using software encoding is more of a workaround than a solution.
However, it’s great if you don’t have time to troubleshoot what’s causing the error because it will most likely work.
There are two ways to enable it, the first is for export, and the second is for rendering sequence:
8.1 Enable Software Encoding for Export
To do this, locate the Encoding Settings in the Export tab, and set Performance against Software Encoding.
Doing this, only the CPU will encode the video, which is excellent as the GPU most commonly causes the -1609629690 error.
CONS: Longer encoding times.
8.2 Enable Software Encoding for Rendering
If you are getting the error while trying to render clips or effects in the sequence, you’ll have to do it this way:
Click on File > Project Settings > Media, and set Renderer against .”..Software Only” > click OK:
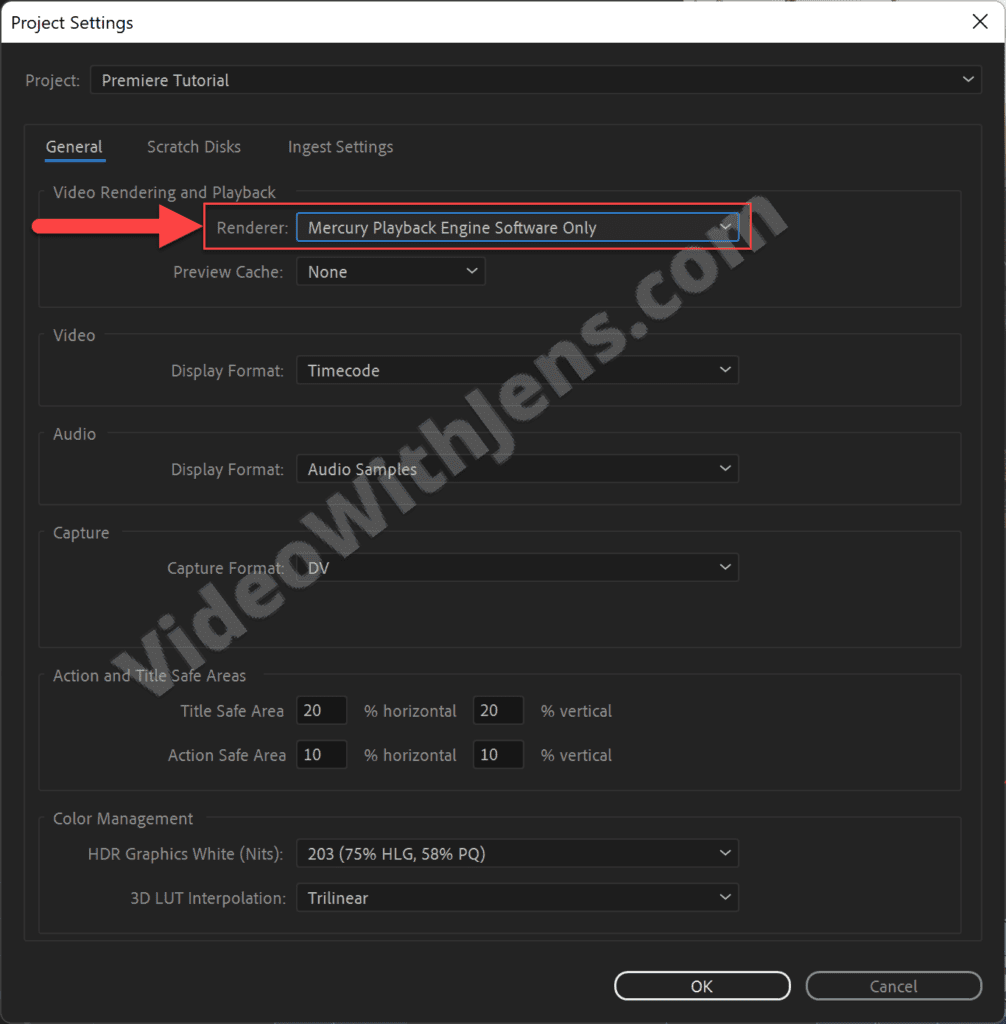
If it didn’t solve the error, it sometimes works to disable GPU decoding.
Go to Edit > Preferences > Media, uncheck Hardware accelerated decoding, and restart Premiere Pro.
9. Export and Import again
This solution is quite genius and definitely worth testing.
Since exporting a sequence filled with clips, effects, color grading, etc., can be pretty demanding, a lack of computational power may cause the Accelerated Renderer Error.
Therefore, dividing the encoding process into two operations instead of one can help lift some weight off your GPU.
To do this, start by creating a duplicate sequence as we did here in case this doesn’t work.
Then, try to remove something quite demanding to encode. That could be lumetri, effects, graphical design, etc.
I also recommend using smart rendering, as shown above, and setting the format to something like QuickTime > DNxHR to preserve quality (as double compression is not optimal).
Lastly, once the project is exported, import it again, and apply the effect you removed.
- Then, hopefully, you can export it without issues.
10. Update Drivers
Since your GPU triggers this error, it is essential to ensure its driver is up-to-date.
Here’s a link to some manufacturer’s websites: (the driver section)
- AMD drivers.
- NVIDIA drivers.
- Intel drivers.
11. NVIDIA GPU: Change to Studio Driver
If you have an NVIDIA graphics card, some people have solved the error by changing from a game-ready driver to a studio driver.
This can quickly be done from within the GeForce Experience application.
If you can’t see the three dots like in the image shown below, go to the next step.
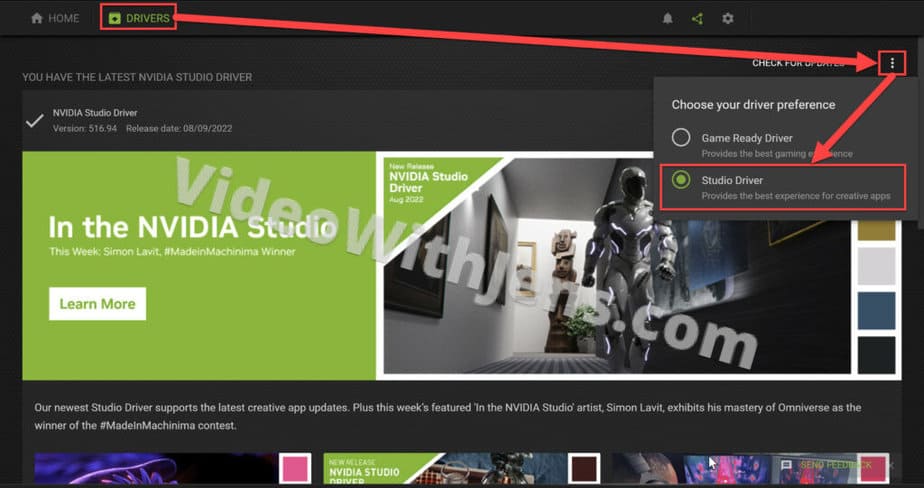
If you can’t see the option to switch from Game Ready Driver to Studio Driver, you must update the GeForce Experience.
This can be done by manually downloading the latest driver version, as GeForce Experience is included in the installation file. Here’s a link to the NVIDIA driver download section.

12. Update or Downgrade Premiere Pro
You should also ensure that Premiere Pro is up-to-date, as the error you are facing may have been solved in a recent update.
Another possibility is to downgrade Premiere Pro to an older version. This is useful if the error started appearing after updating Premiere.
I will show you how to do both of these things.
12.1 Update Premiere Pro
Open the Adobe Creative Cloud application on your computer, and go to Apps > Updates.
Then, if there are any available updates, you should see an Update button on the right side of Premiere Pro. In that case, click on the button.
If it says Open, you are up-to-date!

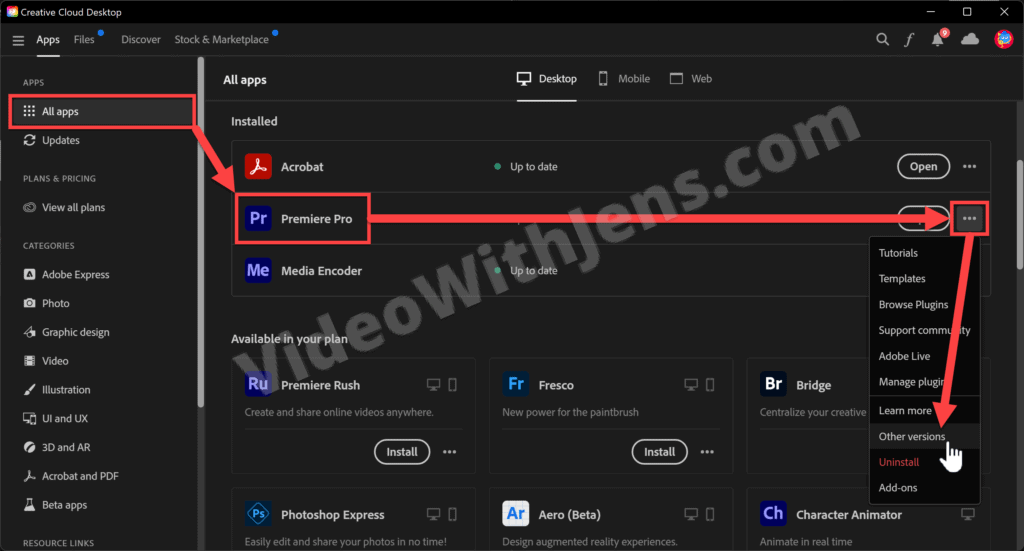
12.2 Downgrade Premiere Pro
To install an older version of Premiere Pro, open the Adobe Creative Cloud application on your computer.
Then, go to Apps > All apps, and click on the three dots on the right side of Premiere Pro.
Click on Other versions in the drop-down menu, and install the previous one.
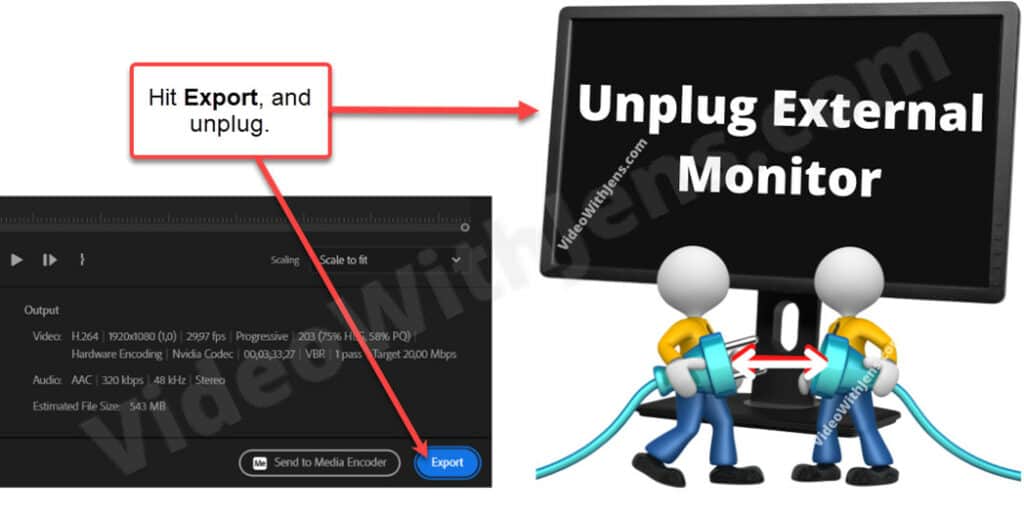
13. Unplug External Monitor
This is one of those clever solutions reported to have worked for some users.
If you have an external monitor plugged into your computer, unplug it while exporting. This will give the GPU a little bit more VRAM.
Click on Export and immediately unplug the monitor.
This error is part of the “Error compiling movie” group of export/render errors; I have written an article about it here.
SOLUTION:
It’s a long read …
Hi Neil,
More diagnostics.
I managed to get a new 3060Ti. Installed, DDU prior drivers (complete wipe) to make sure they were gone, unplugged network cable to make sure Win10 didn’t try to install drivers from internet. Installed the GPU, installed the new nVidia SD drivers, started Adobe, enabled GPU Accelerated, started the render and … drum roll … same exact problem.
Switch to Software and no issues with render, just a lot slower even on an AMD 5950X.
Not one to give up, I downloaded the latest CUDA 11.4.2 drivers from nVidia. Opened Pr, selected GPU Accelerated, Render In and Out made no difference still failed.
So, I disable the track that has my Ae project import (simple logo Ae project). Try again, and viola, GPU render In/Out completes is just a few minutes. A clue!
Sooo, now I bring up Ae and open the «offending» project, I save it of as a different name and then do an export to Adobe Media Encoder with queue item set to H.264 and Renderer set to GPU Acceleration CUDA. Media starts and then fails with the exact same error:
— Encoding Time: 00:04:37
09/14/2021 11:36:03 AM : Encoding Failed
————————————————————
Export Error
Error compiling movie.
Accelerated Renderer Error
Unable to produce frame.
Writing with exporter: H.264
Writing to file: \\?\D:\After Effects Projects\SimHorizonLogoNonRotating2021_AME\Sim Horizon Logo.mp4
Writing file type: H264
Around timecode: 00:04:48:17 — 00:04:48:26
Rendering at offset: 288.567 seconds
Component: H.264 of type Exporter
Selector: 9
Error code: -1609629695
————————————————————
So in Me, I select Software Only … thinking this will work … but it doesn’t, same exact error but sooner??
————————————————————
— Encoding Time: 00:00:15
09/14/2021 11:43:31 AM : Encoding Failed
————————————————————
Export Error
Error compiling movie.
Accelerated Renderer Error
Unable to produce frame.
Writing with exporter: H.264
Writing to file: \\?\D:\After Effects Projects\SimHorizonLogoNonRotating2021_AME\Sim Horizon Logo.mp4
Writing file type: H264
Around timecode: 00:00:00:11 — 00:00:00:13
Rendering at offset: 0.133 seconds
Component: H.264 of type Exporter
Selector: 9
Error code: -1609629695
————————————————————
Next I try Ae export to Me using Apple ProRes 422 LT with GPU Acceleration and same error, very early.
————————————————————
— Encoding Time: 00:02:10
09/14/2021 11:51:17 AM : Encoding Failed
————————————————————
Export Error
Error compiling movie.
Accelerated Renderer Error
Unable to produce frame.
Writing with exporter: Apple ProRes MXF OP1a
Writing to file: D:\After Effects Projects\SimHorizonLogoNonRotating2021_AME\Sim Horizon Logo_1.mxf
Around timecode: 00:00:00:01 — 00:00:00:06
Rendering at offset: 0.033 seconds
Component: Apple ProRes MXF OP1a of type Exporter
Selector: 17
Error code: -1609629695
————————————————————
So now I start looking at what specifically is in my Ae project that seems to be triggering this error. I disable a Transform Effect and BINGO, Ae project renders without any errors (GPU Accelerated or Software).
So I render the Ae project to Apple Pro Res 4444 with RGB + Alpha. I add the Ae output to my Pr project (remove the Ae Import project). Do a full render in/out with GPU acceleration, all good … VERY fast with GPU Acceleration (to be exact Software was 7 hours, GPU was 14 mins). So the FINAL test, Export the project to YouTube 4K UHD MP4 with GPU acceleration enabled … again, super fast, video file created, no errors!
Soooo … this journey ends on a positive note, a solution!
However, the actual reason for the error remains a mystery and I really would like an Engineer to look at this and report back on why this happened? Please see attached image for the FX that caused this nightmare … if you or an engineer sees anything wrong with it, please report back.
Also, please add my request to get MUCH better error reporting mechanism rather than -1609629695 … not helpful at all, may as well have an error message that says «It Broke» … just as useless 
Cheers, Rob.
Adobe Premier Pro is a sophisticated video editing software that allows users to edit their videos. It is an intensive program requiring raw CPU and GPU power. Users using the software complained about How Do I Fix Accelerated Renderer Error. The reason for this error is due to GPU overload. Sometimes CPU can also contribute to this error; GPU is the most likely cause. If you are looking to fix premiere pro not rendering then you are at the right article. Here you will know about the troubleshooting methods to resolve this error. So, let’s get started!

Table of Contents
How Do I Fix Accelerated Renderer Error in Adobe Premiere Pro
Before we get to fixing Premiere Pro error 1609629690, let us see some of the reasons why this particular issue.
- Hardware rendering issues
- Graphics card Power Management issues
- Outdated Adobe premiere pro
- Outdated Graphics card driver
- Corrupt media files
- Video format codec issues
- Custom Preset issues
- H.264 and HVEC audio decoder issues
System Requirements for Adobe Premiere Pro
Before following this guide make sure you have at least the Minimum requirements for running Adobe Premiere Pro software
Minimum Requirements
- Processor: Intel® 6th Generation or newer CPU/ AMD Ryzen
- Operating System: Windows 10 (64 bit) version 1909 or higher
- RAM: 8 GB
- GPU: Nvidia Geforce™ GTX 970/ AMD Radeon™ Pro 5500M
- Storage: 8 GB of available hard-disk space for installation; additional free space required during installation (will not install on removable flash storage)
- Additional high-speed drive(s) for media
- Display: 1920 x 1080
- Network Storage Connection: 1 Gigabit Ethernet (HD only)
Here are the troubleshooting methods to fix Error 1609629690 in Adobe Premiere Pro.
Method 1: Update Graphics Driver
Graphics Card manufacturers release graphics driver software around the clock to address game issues, software issues, performance issues, etc. It is recommended that you update your graphics card drivers if you encounter the error 1609629690. This will solve your query on How Do I Fix Accelerated Renderer Error. Follow our guide on 4 Ways to Update Graphics Drivers Windows 10 and implement the steps given in the article to successfully update the graphics driver.

Method 2: Update Adobe Premiere Pro
Adobe Premiere Pro also releases an update around the clock for fixing technical as well as performance issues.
1. Double-click the Adobe Premiere Pro application on Desktop to launch it.

2. Now, select the Help button and click on Updates…

3. This will check for updates, and download and install them automatically.
Also Read: Fix Adobe Software You Are Using Is Not Genuine Error
Method 3: Create a New project
Users searching for How Do I Fix Accelerated Renderer Error need to be aware that the issue can be resolved by creating a new project. Follow the steps below:
1. Launch the Adobe Premiere Pro application.
2. Click on File in the top left corner, navigate to New and click on Project…

3. Finally, name the project to whatever you want and click OK.
4. After the new project is created simply import the previous file by using drag and drop and see if the error is resolved.
Method 4: Export Video File
You can try changing the location of the file because many users have suggested that changing the location helped them resolve the error. Follow the steps below:
1. Launch Adobe Premiere Pro and click on File and select the Save As… option to save the edited project.

2. A dialog box will appear asking to Save Project. Enter the File name in the text box, select the save destination to Desktop and click on Save.

3. Then, go to Export Settings, select the Output tab and click on Export.
Also Read: How to Disable Adobe AcroTray.exe at Startup
Method 5: Change Rendering to Software Mode
By default, Adobe Premiere Pro sets the software to hardware rendering, try changing it to software rendering and see if it fixes the issue.
Note: The underlying issue will be solved by following the method, but please note that software rendering takes a very long time to complete compared to hardware rendering.
1. Open the project that is causing errors, then select File. Click on Project Settings followed by General… option as shown.

2. In the General tab, click on the Renderer dropdown and choose Mercury Playback Engine Software Only. Click on OK to save the task.

3. Finally, check if Premiere Pro not rendering issue has been resolved.
Method 6: Switch Power Management Mode to Maximum
Power management is a feature offered in GPU. The possible options in power management mode in both Nvidia Control Panel and AMD Radeon Software are to save battery, provide maximum performance, and balanced mode. For Adobe Premier Pro, the GPU must be set to use maximum performance mode since power savings can degrade the output quality of the file and cause errors. Users questioning How Do I Fix Accelerated Renderer Error can try this method. To change to maximum performance mode,
Option I: On Nvidia Control Panel
1. Hit the Windows key, type NVIDIA Control Panel, then click on Open.

2. Click on Manage 3D Settings in the left pane.
3. Set the Power management mode to Prefer maximum performance.

Also Read: Fix NVIDIA Driver Not Compatible with this Version of Windows
Option II: On AMD Radeon Software
1. Press Windows + Q to launch the Search bar, type AMD Radeon Software and click on Run as Administrator.

2. Click on the cog icon present on the top-right side of the interface. Now, under the Graphics section click on the Gaming option.
![]()
3. On the next screen, click Global Settings.
4. Make changes to Global Graphics as needed to maximize performance. It will be applied to all apps on the system.
Method 7: Try Different File Format or Codec
The rendering error occurs if your computer does not have a certain codec, try using a different codec and export it. Users also reported that H.264 and H.265 audio codec can cause errors particularly. These formats will provide a good experience when exporting but for editing purposes, it may encounter issues such as the rendering error.
1. Open Adobe Premiere Pro and select File, click on Export, then navigate to Media.

2. Under Export tab, click on the Format dropdown and select another format & click Export.

Also Read: Top 21 Best Alternatives to Adobe InDesign
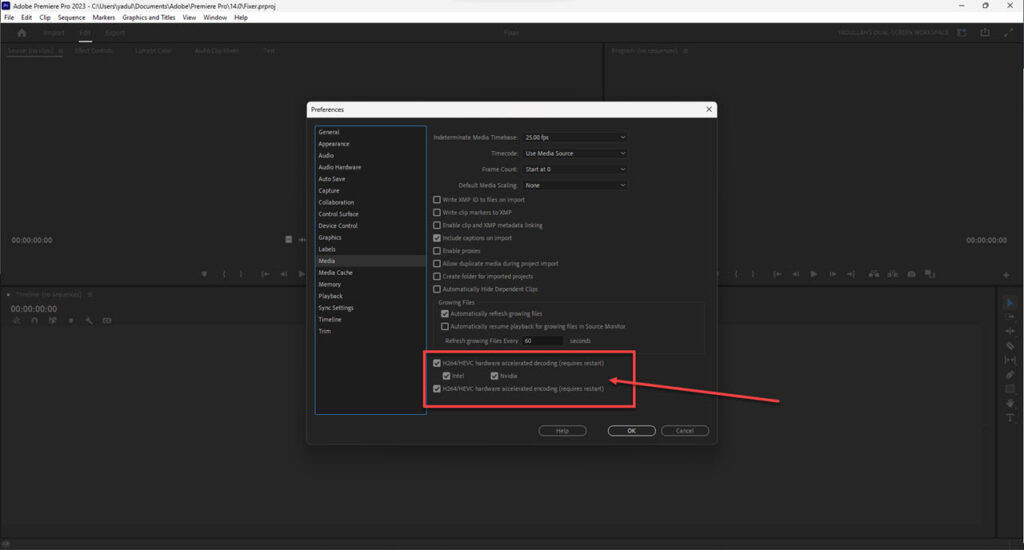
Method 8: Disable Hardware Decoding of H.264 and HVEC Media
On PC, sometimes there exist a hardware bottleneck when codec rendering settings are enabled. Due to that, errors can occur.
1. Launch the Adobe Premiere Pro app.
2. Then select Edit and click on Preferences and navigate to Media….

3. Disable two checkboxes named:
- H264/HEVC hardware accelerated decoding (requires restart)
- H264/HEVC hardware accelerated encoding (requires restart)

4. Click OK to save changes.
5. Finally, restart the PC and see if the error is resolved.
Frequently Asked Questions (FAQs)
Q1. How do I fix the render error in Adobe Premiere Pro?
Ans. A simple restart will fix the problem, if the issue is still not solved, then follow the above guide.
Q2. What is accelerated render error?
Ans. Accelerated render error is usually caused by an error with the GPU. Make sure you meet the requirements before you run Adobe premiere Pro or export it.
Q3. What is the renderer error 1609629690?
Ans. It means that the GPU cannot handle the graphics, you can either replace your graphics card or change the computer to avoid this error.
Recommended:
- Fix Alexa Error 10 2 17 5 1 in Echo Dot
- What Does Imaging a Computer Mean?
- Why is Adobe Shockwave Crashing All the Time?
- 25 Best Adobe Premiere Pro Free Alternatives
We hope the above article on how do I fix accelerated renderer error in Adobe Premier Pro was helpful and you were able to solve the issue. Let us know which one of the methods described above worked for you. If you have any suggestions or queries please let us know in the comment section below.
Premiere Pro is one of the most popular video editing programs in the world and part of Adobe’s famed Creative Cloud suite of productivity and design programs. However, as much effort as Adobe has put into its video editor to make the program easy to use, it still is notorious for random bugs and glitches from time to time.
In this article, we’re talking about the accelerated renderer error in Premiere Pro, its causes and what you can do to fix the problem.
What causes accelerated renderer error?
The error can be triggered by a number of issues. Some of the most common causes include:
- Hardware compatibility issues.
- Outdated Premiere Pro version.
- Outdated GPU driver.
- Corrupt source media files or media cache.
- Incompatible video codec/format.
- H.264 and HVEC decoder issues.
Also read: How to fix Premiere Pro error ‘There was an error decompressing audio’?
Here are seven fixes you can try out.
Restart your computer
Restarting your computer can often be the simplest solution when dealing with such errors. Rebooting your machine often fixes seemingly random issues, especially when dealing with hardware issues.
Update your GPU drivers
Outdated GPU drivers can also cause this issue in particular. While you should update all your drivers, take special care of your display drivers if you run into an error like this.
Step 1: Right-click Start and select Device Manager from the menu.
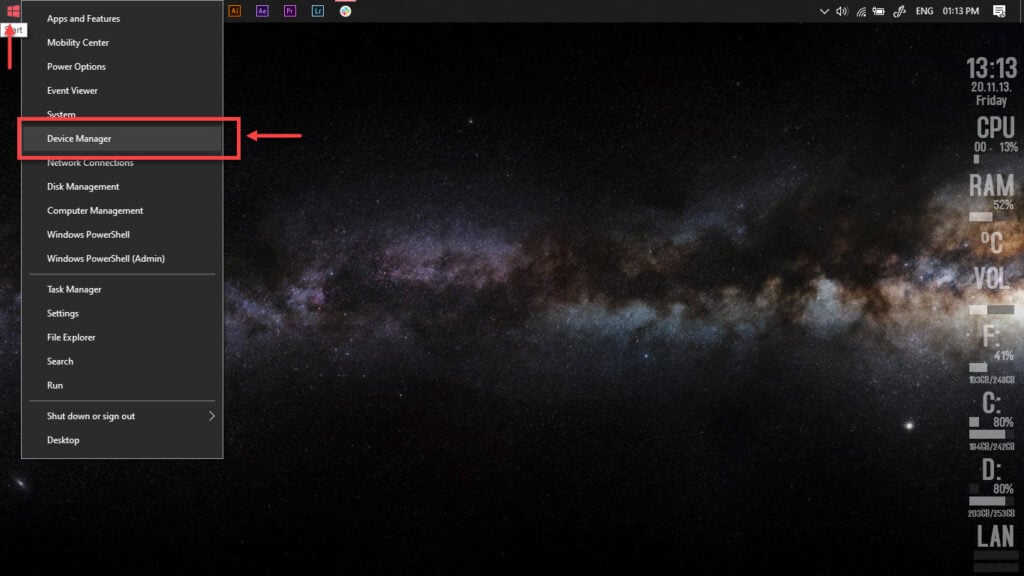
Step 2: Under Display Adaptors, find your graphics card’s name, right-click on it and click on Update Drivers.

Step 3: Click on Search automatically for drivers. Windows will then automatically look for and download the latest drivers for your particular GPU.
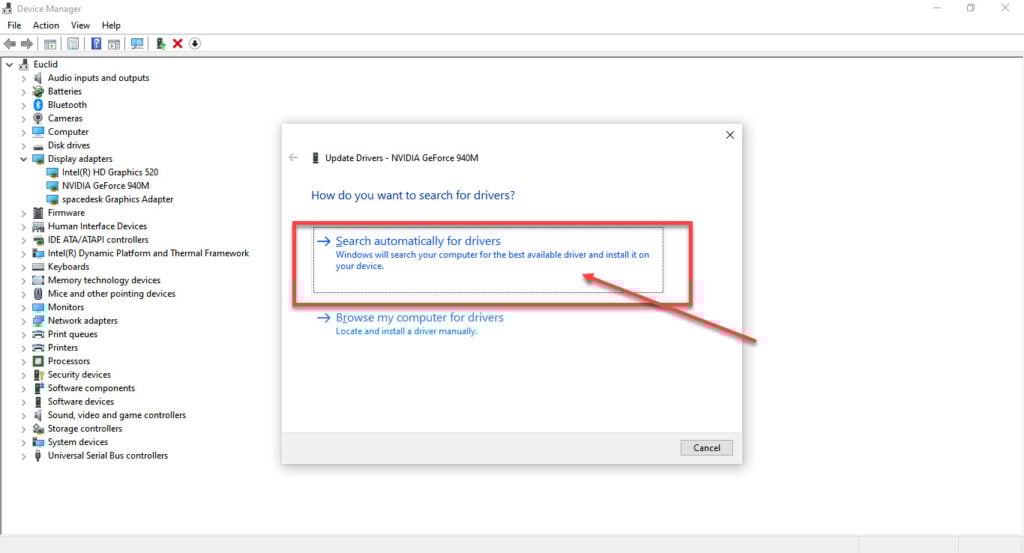
While this should help resolve the error, in case it doesn’t, click Uninstall device and restart your PC to force Windows to install the required drivers. You can then update them later. Alternatively, you can also remove your GPU and reinsert it if you can.
Also read: What is Hyberbeam? Top 3 alternatives
Change the Premiere renderer
Changing the Premiere render engine to software only can also help resolve the error. Here’s how.
Step 1: Open Premiere, click on Edit, followed by Preferences and then Media.

Step 2: Uncheck any hardware encoding options.
Restart Premiere and the error should be gone.
Clear the media cache
A corrupt media cache is the cause of a lot of different headaches in the program. Try clearing it to see if that makes a difference.
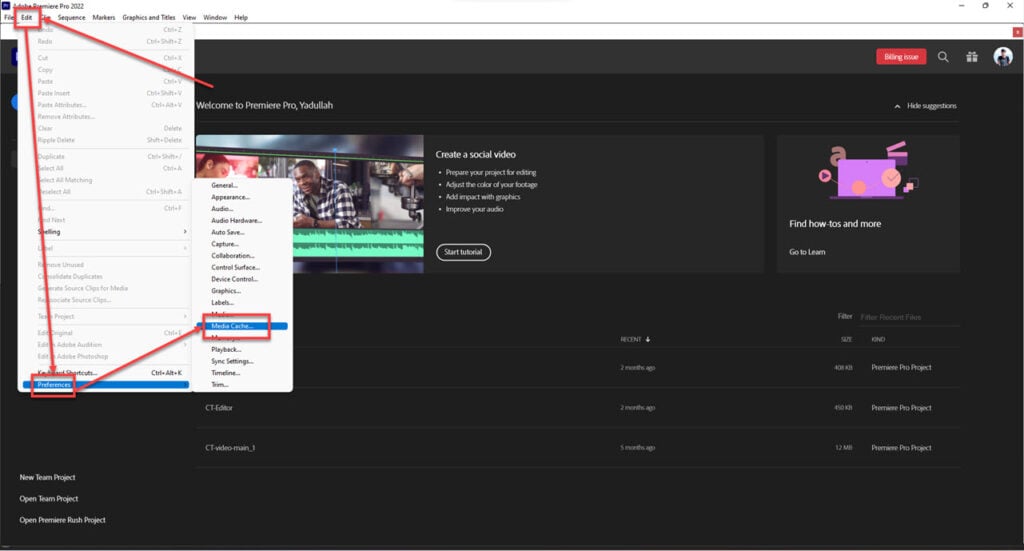
Step 1: Open Premiere Pro and head over to Edit, followed by Preferences and then Media Cache.
Step 2: Under Media Cache, click the Delete button to clear out your media cache.
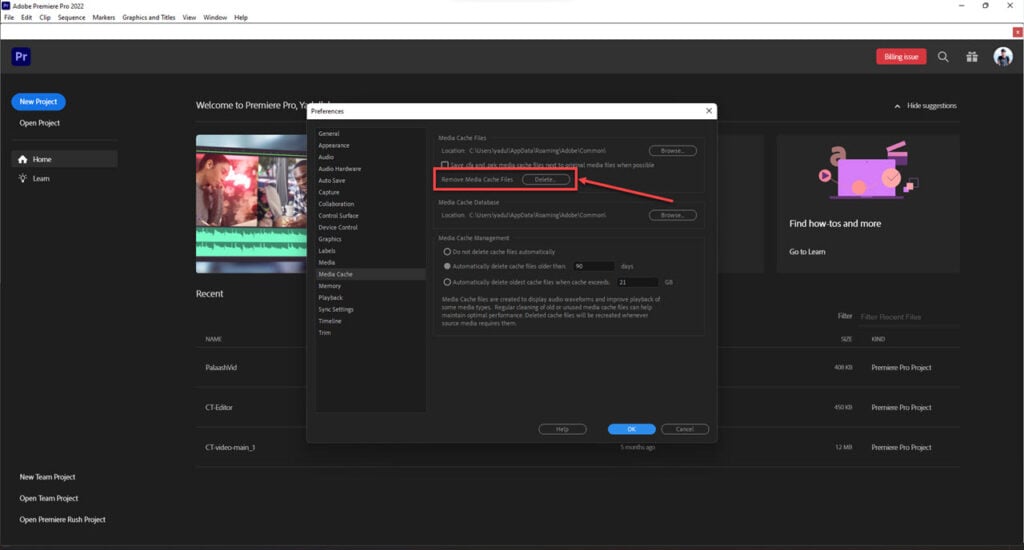
Now restart Premiere and it should work just fine. Alternatively, you can just rename the old media cache and let Premiere generate a new one.
Also read: Error: Initializer element is not constant: Quick Fix
Check the video format and codec
Check and see if the video format and codec that you’re trying to support are actually supported. You can refer to this page for a list of all supported video formats and codecs.
If the video you’re trying to import isn’t compatible with Premiere, you’re going to have to convert it into another format. We recommend using MP4 with H264 encoding as that’s the most hassle-free format and codec in Premiere.
Update Premiere
Updating Premiere might also fix your issue. You can do this from the Creative Cloud dashboard by checking for any available updates. If there are any updates available, install them right away and restart Premiere to see if that fixes the problem.
Reinstall Premiere
Try reinstalling the software from scratch to fix your issues if nothing else works. Reinstalling Premiere is also rather easy, although we recommend you do it from the Creative Cloud panel and not through Windows settings.
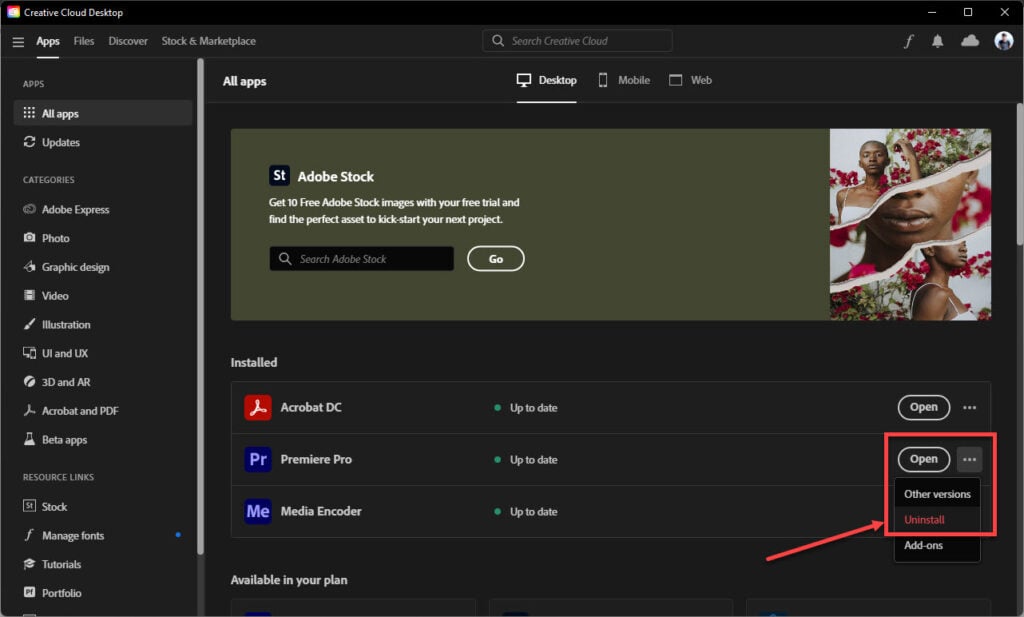
All you have to do is open Creative Cloud. head over to All Apps and you’ll see Premiere listed below. Click the three horizontal dots next to it and select Uninstall. Once the uninstallation is complete, you can use the Creative Cloud panel to install Premiere again and hopefully resolve any issues you’re facing.
Also read: File type is unsupported compression type in Premiere Pro: 5 Fixes