-
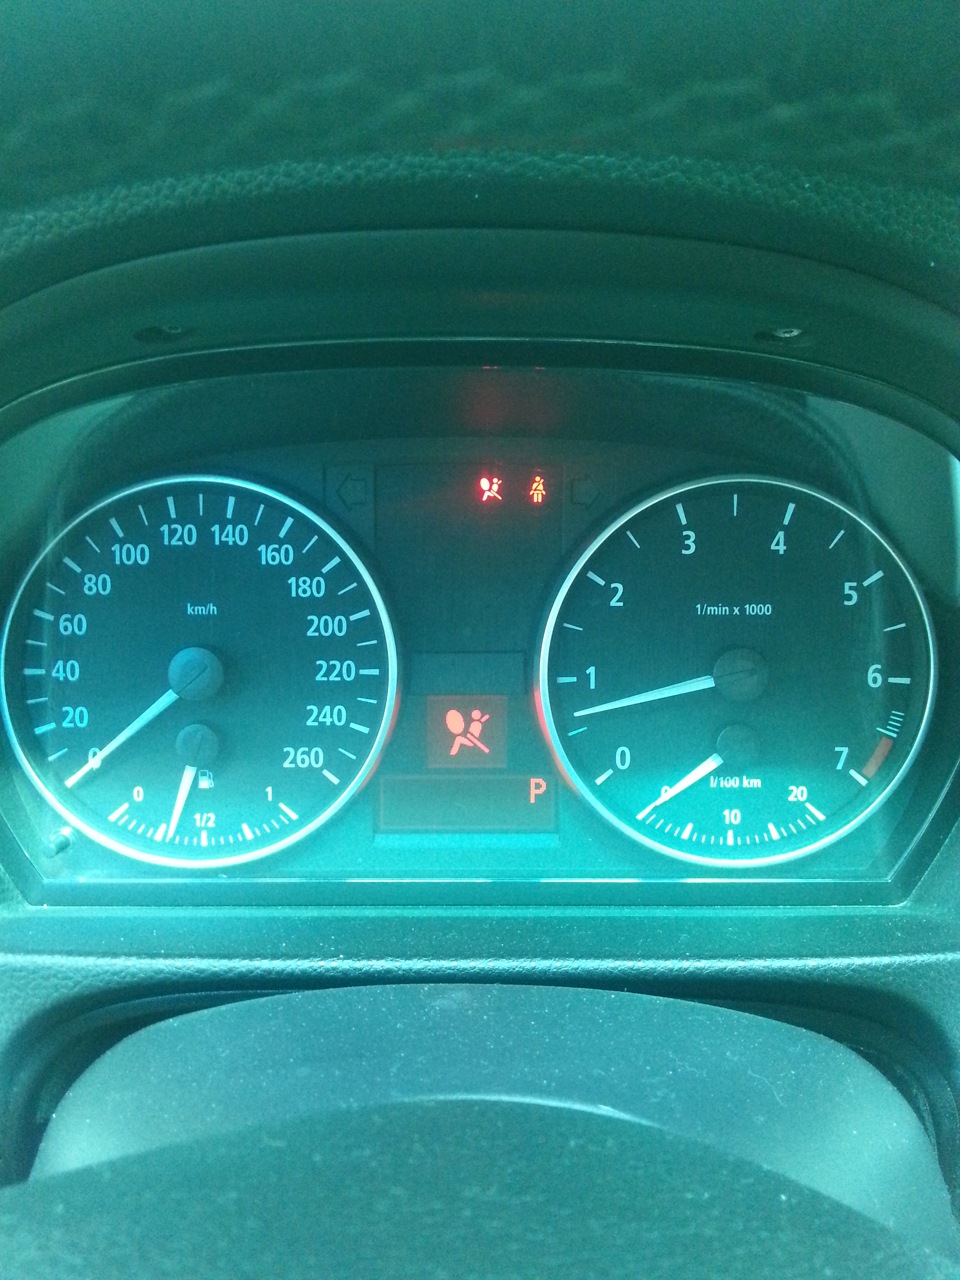
Е90 n46. Загорелся значок ‘подушки’. Сначала желым, потом красным. Почитал инпой, ошибка 93c2. Кто знает, что такое, как лечить?
-
У меня тоже загорелись «подушки» красным цветом. Но ошибку выдал 93b3, знакомый специалист, протестив, сказал. что где-то обрыв провода до подушки пассажира, только вот пока руки не дошли разобрать и посмотреть. Машина 320d 2007 г.
-
и у меня загорелась 93C2
 — не знаю что делать
 -

- Регистрация:
- 12 окт 2021
- Сообщения:
- 2
- Пол:
- Мужской
- Регион:
- Москва
Все те же симптомы , беременный мужик и ошибка 93C2 !!! Толком нет решения проблемы !!!
1. Ставить обманку ?
Обрыва нет ( проверил лично )
2. Отключать программно мат присутствия?
3. Замена мат. придутствия?
Прошу помощи в решении , можно в личку ( заранее спасибо)
320 i 2006 год.
 — не знаю что делать
Поделиться этой страницей
We’re gonna be working on the car BMW E90 on the airbag systems with Autel MaxiSys , this is a warning and advice, if you’re not sure of what you are doing, please don’t do it, don’t touch airbags can be dangerous. I take no responsibility for anything that you do based on my information on what I’m doing here, if you do it, do it at your own responsibility, so yeah that’s just a quick warning and now let’s go to crack on.
Hi everybody, all my followers be welcome to another video, so I had to skip but I don’t know which we’re going to go first by the 207, it’s just over there, you only see the front of it, the part for it is over there, unfortunately the owner is going to take away because I don’t have wheel max or wheel bolt locking key for it, so I can’t take the wheels out I was looking to see if I could do the job without taking the wheels, probably I could would be an absolute nightmare, so I spoke with the owner and he’s going to take the car elsewhere to remove the wheel bolts or the security ones.
Yes I know there is some sort of a universal keys I can buy that kind of feeds different types of a security bolts I don’t have nothing like that, it’s not my problem, I’m he’s going to try to sort that out in the meantime he’s going to pick up the car very shortly, in the meantime, we’re gonna work on this 2008 BMW 320i, I believe this is the 90 or some other and the problem with this is let me show you.
I mean actually start the car. That’s my problem, as you can see, we have a airbag light issue. As you can imagine the first thing we’re gonna do is scan the car.
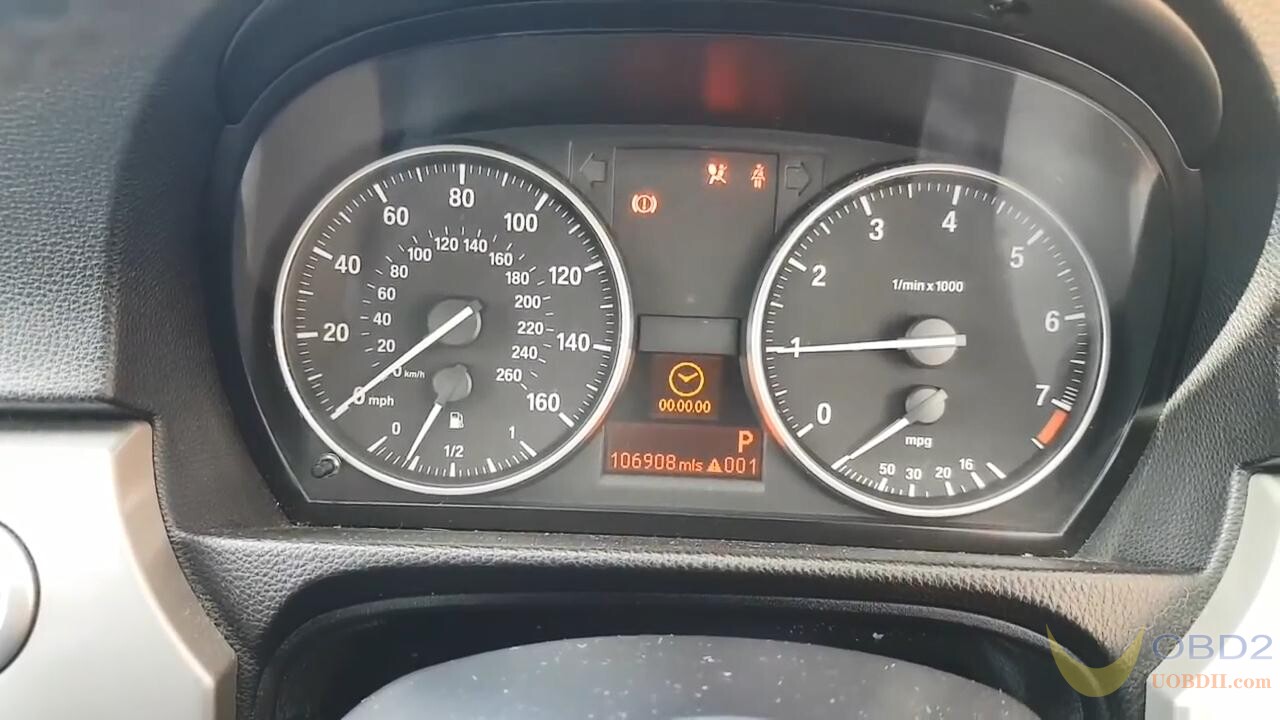


Okay, go to “menu”, it’s gonna go to my airbag unit, that’s going to be most likely “body”.
Let’s kind of see why we have.


Okay, so a quite simple I guess, so under voltage that’s below battery a seat marked of passenger seat occupancy detector faulty.

Let me speak with the owner because well we’re gonna do a couple checks just before, just in case he’s a wiring problem, or if he’s a sensor problem.
Most of you are already saying out loud just feed a emulator for the seat I don’t know yet what I’m gonna do let’s go to find out where the owner see what he wants to do.
But let’s go do a couple checks first and then we’ll go from there.
Okay, that was quick to take the wheels, the bolts off, anyway spoke with the owner of this car and I explained to him what the problem is with the passenger seat, although we can say we are boarding the system, we are really not because the airbags will still function so basically he wants to go the bypass route and so the occupancy sensor on there is mainly because if someone is on the passenger seat if the car detects that someone is in there, he obviously shines the line for the seatbelt, and if you have an accident that airbag will deploy if someone is on the seat if the car doesn’t detect no one on the seat and you have an accident, the airbags will not deploy, if we go the bypass route, what happens is if they ever have an accident, even if someone is not on that seat all the airbags will deploy because we’re going to tell the car that there is someone on that seat all the time.
As far as I’m aware but I’m not gonna go to bypass route anyway, I’ve never installed one of those bypass, we’re going to try something slightly different here, which will do the same thing really.
So just stay tuned and we’re gonna change tools and I’ll show you what we are going to do.
OK, and after a couple of hours a we’ve been doing other stuff, but look at all absent so we’re going to clear the codes.

Because the light will not go off until they clear the code,
So read the codes again, no fault detected my airbag light is off.

I’m going to go back it’s going to go into “Live data”.

So as you can see in there a front passenger seat occupancy detection: passenger seat sensor and airbag active which means obviously the airbag is gonna work regardless of someone on the seat or not, but the airbags will work that’s why the owner wants to do, so that’s what we did.

Now I haven’t completed yet we’re going to have to still put everything back on, but nevertheless I’ll show you what I’ve done.
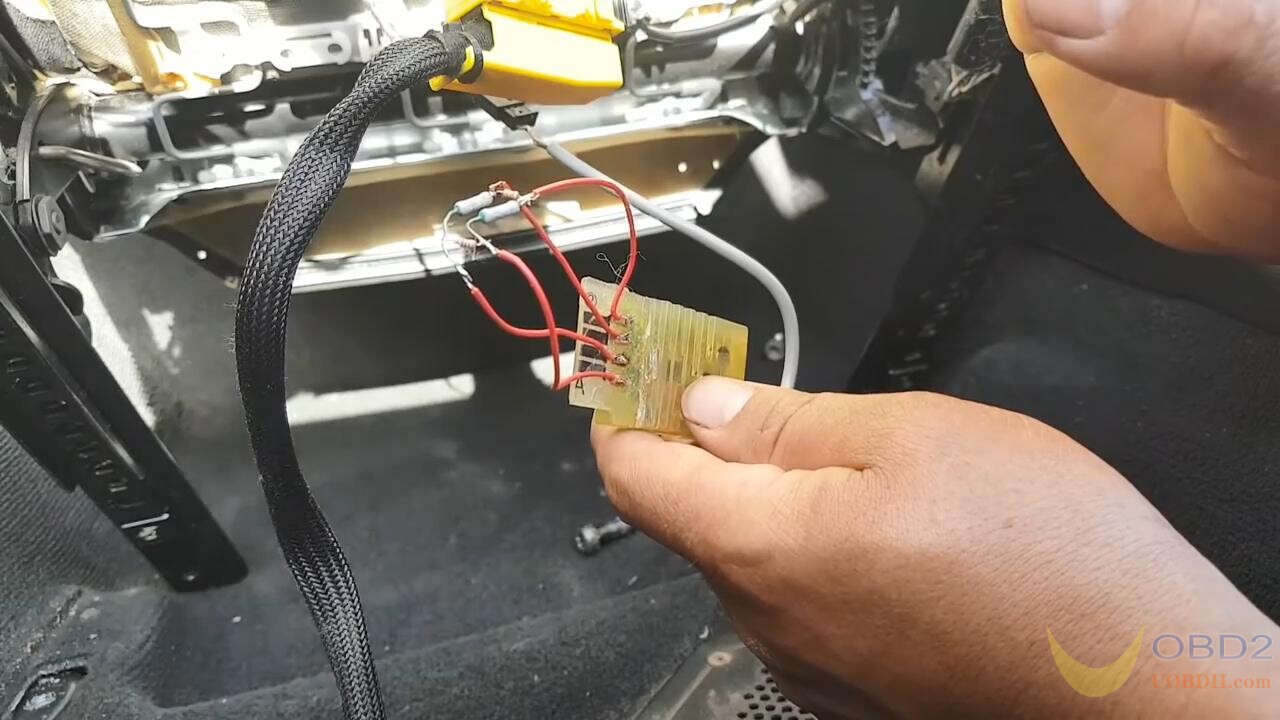
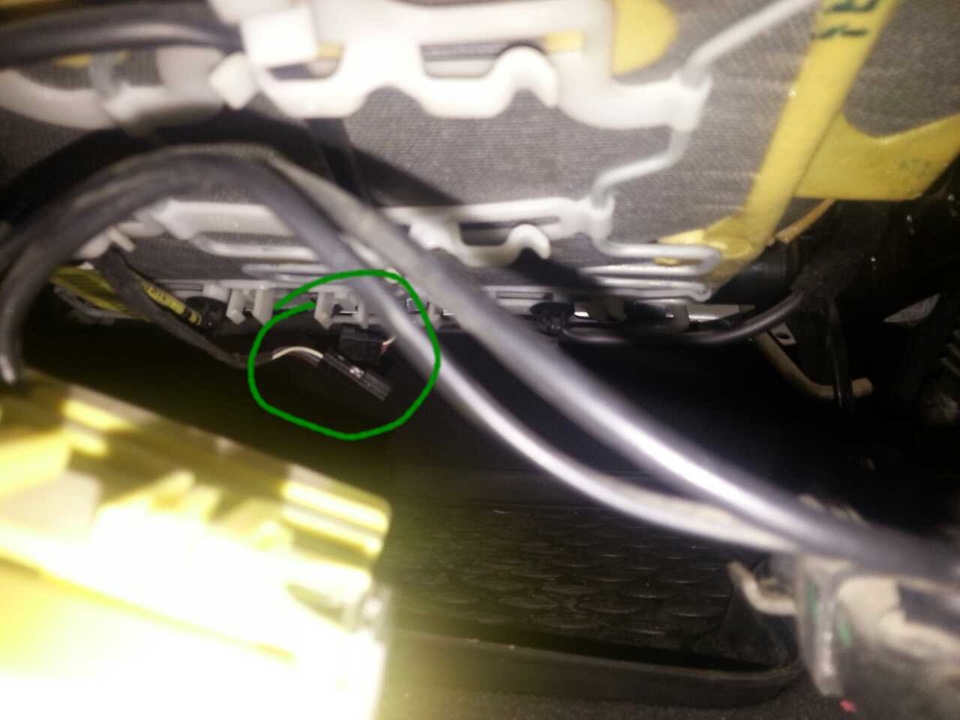
And before some of you are going to start to shout that this could be done through coding possibly I couldn’t do it, um coding would fail every single time, the car has been flashed in 2011, my Titan files for the MC’s expert a version 40 which is a quite old version to be honest, I’m now loading a version 52 or 60 some other so hopefully it will give me a different a different options to code on the module, but the module would just not take any coding, nevertheless the OC3 I think it was not active, it was another couple things for the say that were not active, so I do have a feeling that someone already tried to deactivate this but obviously didn’t work even because when I go underneath here, the sensor was already plugged, but the plague was not on this place which is this little thing here, let me show you the sense of the plague, cause here on this little square goes here on this little square, and this was just hanging off and the cable was slightly ripped, pull down so someone has been here before me and I believe someone coded these off and it didn’t work, so what I’ve decided to do was to know I haven’t done any more later, so as you can see, this is the original sensor, and here these four traces is where the actually map that goes down under the seat is connected, so I took these off as you’ve seen in there so I had to take all these off.


Pull the base out to expose this and carry out and then I’ve done this little circuitry here which simulates the seat with someone there, basically he simulates the map with someone in there so now rocket science car is no more than four resistors as you can see,
these are they are connected, so they are like a square, so we have 21k ohms, one year, then you jump these two with a 1k ohms actually these ones, sorry I’m lying now, this is 1k ohms, this is supposed to be 2k ohms, I didn’t have a2KM, so I put 2.7 ohms so these two here on the sides are 2.7 but he’s doing the work, so it doesn’t really bother me, so one came here then you jump these two with 2k ohms and then from here you take one wire to the first bin or to the first trace, then from the other one you take another one to the second trace and so forth, and this is always connected, so now I know is working, we are going to tie this up a little bit, so I’m not going to put this under the seat again, I’m going to somehow put these underneath here somehow.
But yeah that’s what we’re gonna arrange these 2 look slightly better and put everything back on and that’s about it really so, I don’t know yet how I’m going to do this, I’m gonna have to find a way I guess I don’t know yet how I will find a way.
Let me see how we’re gonna do this.
This is very important check that you have power in grounds here, so the way the sensor works, you just have a power and a ground and a Lin bus, so the way this communicates with the airbag module is with a Lin bus, so make sure as the first thing you want to do is check powers and grounds because if for any reason, there’s a broken wire and you don’t have power in grounds, obviously this is not going he’s not going to work so the first thing I’ve done, let’s make sure I had power in grounds is these three pins here okay, so the first pin I believe is ground, the second pin I believe is voltage and the last pin is Lin bus communication, okay, so make sure you have that, and then obviously only then move forward if you don’t have power and ground make sure you get the power and ground sorted first before you go any forward.


Okay, and I decided to pull these out again so this is the final result so I’ve done this with a melted plastic glue, I’ve just did this setup, it doesn’t look very good, but I decided that I would be putting it back where it belongs, which is right here, I’ll just pull this leatherback and I’m gonna put it right here, so that’s where I’ve cut the sensor as you can see the matte, that’s the mat that comes under the seat I used to be right there, so we’re going to put these in the same place, hold on a second there is exactly where he belongs so we’re going to put everything back on now put the seat in place, connect everything and do a final test.


Okay, everything’s done and I just have the Autel MaxiSys is there to show you something, so for you guys that know a little bit about this, you probably in the background saying haha, that’s not gonna work just yet well and it didn’t, because from the moment you tell the car that someone is in the seat all the time, the seatbelt warning does not goes off until you buckle the seat belt, so that’s another issue and so that we have to sort now forget about to try to short the contacts for the buckle or whatever it doesn’t work like that, even I don’t know exactly how it works.
I think there’s a couple ways I could do this, but the best way to do it I could probably try to open this and switch these inside the buckle here, open it and just trigger the inside all the time at the play, forget about it, the issue sends a pulse voltage to the buckle, I’m not sure how he works I didn’t dig into it and the reason why I didn’t is because literally I’ve just go to the car, the air bag module I called to the module as if this contact does not exist for that, I’ve used Autel MaxiSys, but you can use MaxiSys expert if you want and all you need to do is hat JKBF to the VO, in this case is a keyword, or HO-Wort, what whatever is I’m gonna show you.


So, HO-Wort, that one I have OI12 is for seatbelt warning as you might have seen as you might have seen in there the good thing with Autel MaxiSys gives you a list of all the options so, the belt contact which is the first one we disable that and we disabled the belt warning I didn’t really have to do that one, because the contact is disabled, but I just did both nice and quick, it’s a little bit late I’ve been busy with other stuff and you do that on the MaxiSys by coming down here. Go there and then press “Edit”, you can do this with the NCS expert, if you want.


So once that is done obviously the mat still needs to be there, so that’s how we did it, for the seatbelt guys, if you don’t have the Autel MaxiSys, you can actually buy one, as well for the mat sensor as well for the seat occupancy sensor, you can buy an emulator for both for the seatbelt warning and for the Matt obviously I decided to do it this way, so we triggered the sensor at the at the math module and we coded the seatbelt contact off and I’m going to start the car just to show you. Yeah, so the reason why the bonnet is open because I had the factory charging. Okay, so obviously it’s on because my seatbelt I didn’t not disabled, the driver seat belt, so I’m going to put the belt I’m going to see it goes off.
That’s it problem solved.

Знатоки подскажите что к чему, буду рад любой информации.
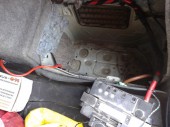
Смотрел аккумулятор и увидел отсоедененый провод
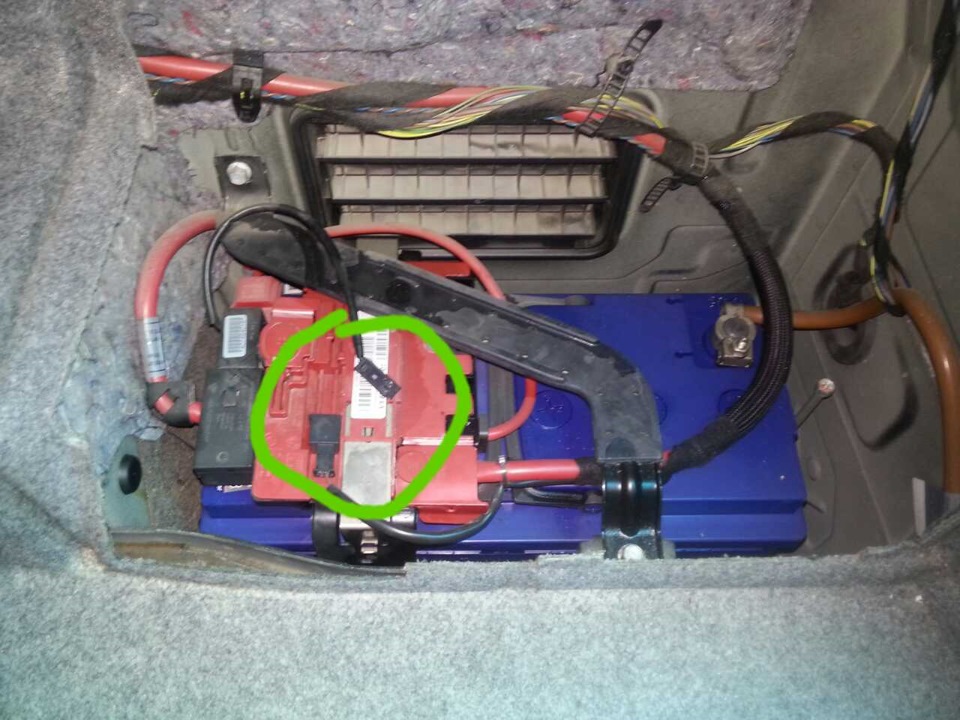
Подсоединил провод
Завел машину и сразу выскочила ошибка (беременный мужик) и (пристигните ремень)
Хотя все пристегнуто
Отсоединил обратно этот провод, но ошибка не пропала. Теперь постоянно выскакивает
Так же нашол отсоедененный провод под пассажирским сиденьем
Ну собственно мысль [не мешай машине ездить] зачем лез туда…)

Думаю отсоединить все как было, и удалить ошибки… Все же интересно, что за провода и для чего их отсоединили…
Краткая предыстория. Висела ошибка подушки (беременный мужик). На электронной диагностике приговорили и защитную клемму и мат пассажира. Почитал ошибки сам. Ошибка по клемме следующая:
0x93B2 ZK10 / Security battery clampe
…
Resistance too large (ZK)
Вычитал на форумах, что может быть неконтакт в разъеме у провода, который к пиропатрону идет. От того подуха может гореть на панели.
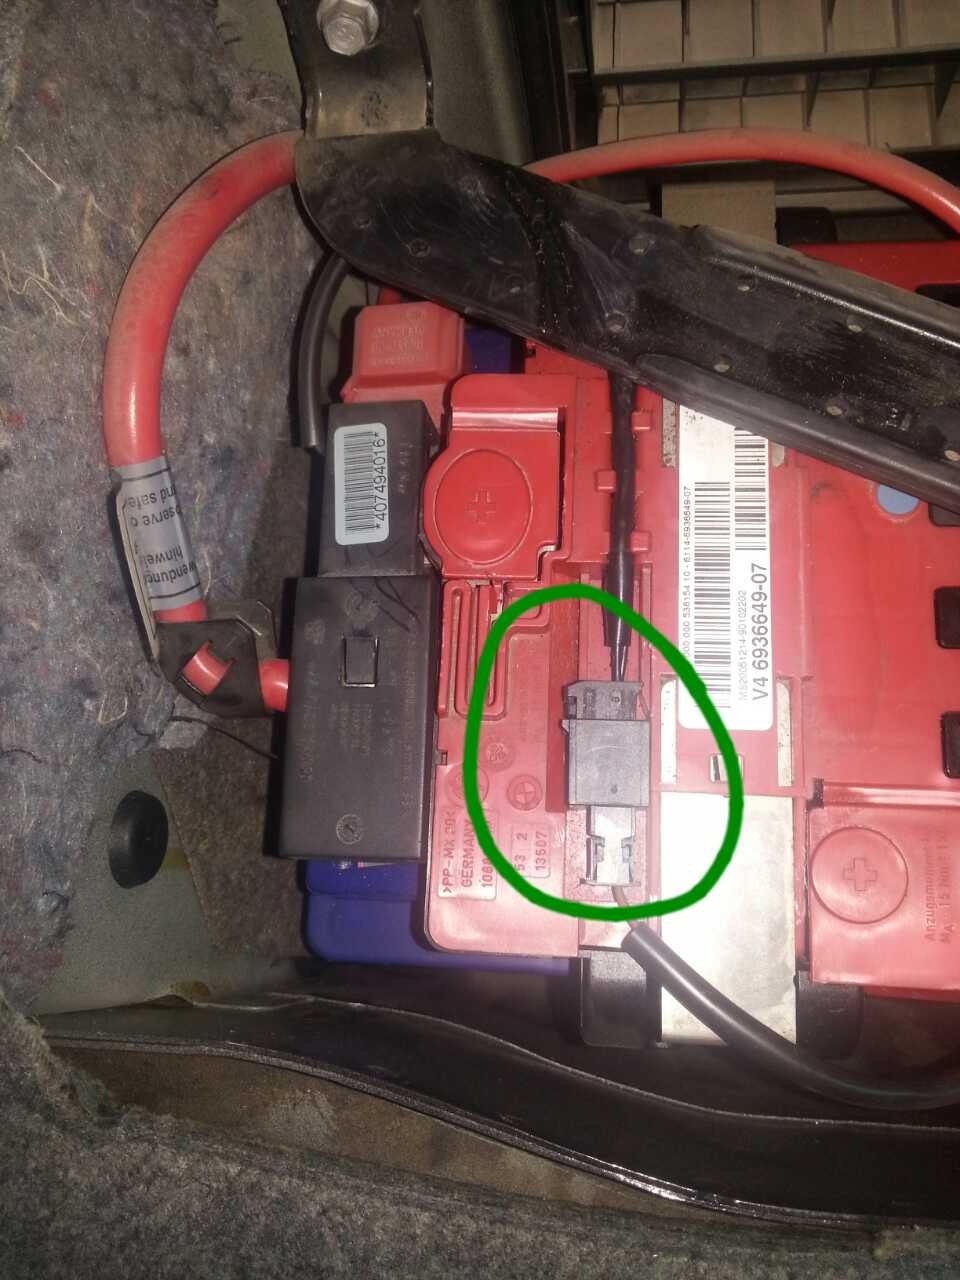
Снял токораспределитель (монтажный блок) с аккумулятора и пиропатрон, заметил, что в месте присоединения к пиропатрону двухжильный провод на соплях держится. Пошевелил — он вообще отпал.
Фоток нет, но и так понятно. Картинки аккумуляторов с пиропатронами все потерялись у меня в 2015 году, когда жесткий полетел.
Сам разъем с пиропатроном там одно целое. Есть схема. Проводок тот, который от разъема 17 идет к пиропатрону. 3 — монтажный блок, он без пиропатрона продается. Отдельно пиропатрон не нашел нигде.
Еще есть ремонтный провод НПБ для клеммы акб (№ 3). Но он похоже для другой стороны от разъема.
Пиропатрон скорее всего вместе с плюсовым проводом. И выглядит он по-другому сейчас (новый номер 61 12 9 217 031). Фото есть.
Еще есть в его составе ремонтный провод для клеммы 61 12 9 130 178. Фото есть.
В тисе написано, что при замене плюсового провода у машин до 03/2006, нужно использовать ремонтный провод клеммы. Разъем 17 не нужен. Скорее всего мне нужен был плюсовой провод 61 12 9 217 031 (новый 9000р) и рем. провод 61 12 9 130 178 (1600р). Фото старого номера плюсового провода не нашел — 61 12 6 988 974. Но скорее всего он такой же, т.к. снят с производства только в 2009-м. Самый старый плюсовой провод — 61 12 6 938 495 (до 03/2006), 8000р, но фото не нашел — не понятно, с пиропатроном он или без, и с проводком ли.
По совету одноклубников решено было просто припаять проводок.
Ремонт
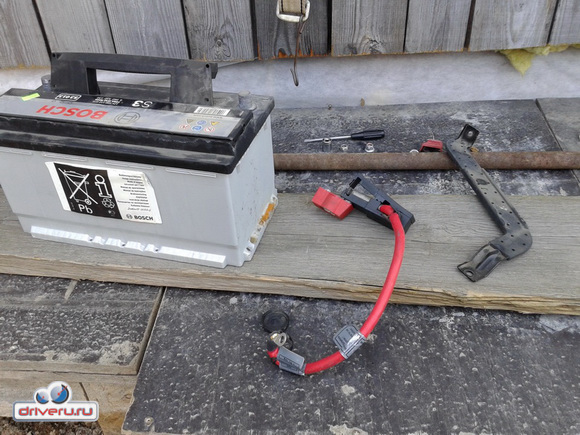
Достал аккум, разъем на пиропатроне с крышечкой, откидывается вверх. Оголил проводки. Места крайне мало, паять не стал, просто скрутил. Изолировать тоже не стал, иначе не защелкнется. И так только с одной стороны защелкнулась. Колхоз, однозначно, но надеюсь не рванет пиропатрон в случае короткого замыкания (?)
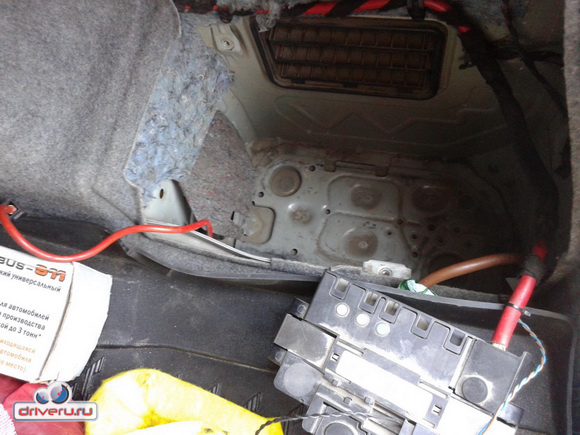
После сброса ошибок беременный мужик исчез, ошибка по безопасной клемме больше не появляется. Теперь пузатый появляется только, если кто-нибудь садится на пассажирское сиденье. Ошибка SBE Seat Mat.
Продолжение следует.
Спасибо, что поделились ссылкой на эту страницу!
#1
![]()
denis357i8
-
- Beginner
-
- 2 сообщений
Новичок


- E 90
- Беларусь
Отправлено 01 Ноябрь 2022 — 03:39
В один день заметил что увеличился расход с 9,5 на 12,5 примерно. Просканировал машину показала ошибки по лямбда зондам а именно 2ca3 2ca3 p1101 p1100. Съездил к электрику говорит надо менять две лямбды перед катализатором, сказал что из за них и еще машина плохо заводиться на холодную. Я купил бушный зонды, но так получилось что они оказались с универсала и там фишки другие. Обрезав датчик соединил с своими фишками и все установил. В процессе появились другие ошибки 2с9D p0050 и моментами начали плавать обороты. Я решил что может не то подсоединил и впроцессе всего обнаружил еще ошибки которые появились но вроде сбросились и остались по зондам. Машина bmw 3series e90 двигатель n46 на 150 сил
Вопрос в чем, сейчас купил новые лямбды, планирую заменить их решиться ли проблема, до того как менял лямбды первый раз обороты не плавали, после в вмешательств началось. Машина заводилась и до расхода топлива не лучшим образом не знаю влияет ли на это.
Прикрепленные файлы
- Наверх
#2
![]()
Jurun
Отправлено 02 Ноябрь 2022 — 12:04
В один день заметил что увеличился расход с 9,5 на 12,5 примерно. Просканировал машину показала ошибки по лямбда зондам а именно 2ca3 2ca3 p1101 p1100. Съездил к электрику говорит надо менять две лямбды перед катализатором, сказал что из за них и еще машина плохо заводиться на холодную. Я купил бушный зонды, но так получилось что они оказались с универсала и там фишки другие. Обрезав датчик соединил с своими фишками и все установил. В процессе появились другие ошибки 2с9D p0050 и моментами начали плавать обороты. Я решил что может не то подсоединил и впроцессе всего обнаружил еще ошибки которые появились но вроде сбросились и остались по зондам. Машина bmw 3series e90 двигатель n46 на 150 сил
Вопрос в чем, сейчас купил новые лямбды, планирую заменить их решиться ли проблема, до того как менял лямбды первый раз обороты не плавали, после в вмешательств началось. Машина заводилась и до расхода топлива не лучшим образом не знаю влияет ли на это.
2CA3 Отопление датчика кислорода 2 перед катализатором
P1101 Датчик массового расхода воздуха вне диапазона самотестирования
p1100 — датчик расхода воздуха перемежающийся сигнал
2c9d bmw
Ошибка в работе системы подогрева второго кислородного контроллера. Пользователю надо проверить провод датчика и работу нагревательного элемента
Ошибка P0050 — Нагреватель датчика кислорода 1, банк 2 — неисправность электрической цепи
- Наверх
#3
![]()
denis357i8
denis357i8
-
- Beginner
-
- 2 сообщений
Новичок
- E 90
- Беларусь
Отправлено 02 Ноябрь 2022 — 12:03
Первые ошибки уже не актуальны их уже нет как и старых лямбда зондов. Новые не подошли фишки как и сказал и обрезал и скрутил и припоял к новым бушным зондам и вылетели новые ошибки типо мол с проводокой. Расход топлива не поменялся плюс начали плавать обороты на холостых.
Первые ошибки уже не актуальны их уже нет как и старых лямбда зондов. Новые не подошли фишки как и сказал и обрезал и скрутил и припоял к новым бушным зондам и вылетели новые ошибки типо мол с проводокой. Расход топлива не поменялся плюс начали плавать обороты на холостых.
2CA3 Отопление датчика кислорода 2 перед катализатором P1101 Датчик массового
расхода воздуха вне диапазона самотестированияp1100 — датчик расхода воздуха перемежающийся сигнал
2c9d bmw
Ошибка в работе системы подогрева второго кислородного контроллера. Пользователю надо проверить провод датчика и работу нагревательного элементаОшибка P0050 — Нагреватель датчика кислорода 1, банк 2 — неисправность электрической цепи
Если я поменяю на новые лямбда зонды оба перед катализатором проблемы с расходом топлива пропадут и заводкой авто?
- Наверх