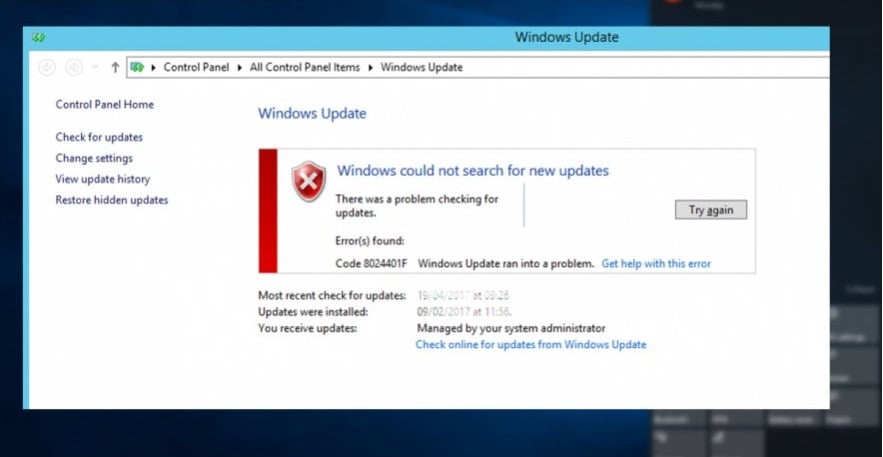
Пользователи Windows сталкиваются с ошибкой 0x8024001F во время установки отложенного ранее обновления для системы. Некоторые утверждают, что подобная ошибка возникает лишь с определенными обновлениями, другие — со всеми отложенными апдейтами.
К сожалению, ошибка 0x8024001F способна появляться на всех современных версиях ОС Windows, начиная от уже старенькой «семерки» и заканчивая самыми последними сборками Windows 10. В сегодняшней статье мы посмотрим, как избавиться от этой ошибки.
Причины ошибки 0x8024001F
- Самый обычный баг в работе Центра обновления Windows.
- Повреждение системных файлов Windows.
- Вмешательство стороннего антивируса в процесс обновления.
Как исправить ошибку 0x8024001F?
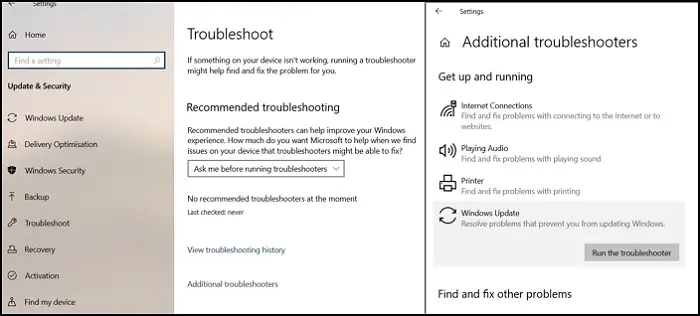
Метод №1 Используем встроенное средство устранения неполадок
В Windows можно найти системное средство устранения неполадок. К сожалению, подобное средство от Майкрософт не часто выполняет возложенную на него задачу, тем не менее временами оно все же может помочь разрешить возникшую проблему.
Для запуска средства устранения неполадок вам понадобится сделать следующее (пример для Windows 10):
- нажмите Windows+I на клавиатуре для открытия Параметров системы;
- далее откройте раздел «Обновление и безопасность»;
- перейдите в подраздел «Устранение неполадок» в левой части окна;
- кликните на пункт «Центр обновления Windows» и нажмите на кнопку «Запустить средство устранения неполадок»;
- подождите, пока средство просканирует вашу систему, а затем следуйте инструкциям на экране.
Применив предложенное решение, проверьте, получится ли у вас обновить Windows и появится ли ошибка 0x8024001F.
Метод №2 Запускаем в работу SFC и DISM
Возможно, вы не можете нормально обновить Windows по причине повреждения системных файлов. Тут вам на выручку идут System File Checker и DISM. Эти средства несколько отличаются по своему функционалу, но, проще говоря, они помогут вам вернуть прежнюю работоспособность системы.
Чтобы использоваться SFC и DISM, вам необходимо придерживаться следующих шагов:
- кликните на панель задач правой кнопкой мыши и выберите пункт «Командная строка (администратор)»;
- выполните следующие две команды:
- Dism.exe /online /cleanup-image /scanhealth
- Dism.exe /online /cleanup-image /restorehealth
- перезагрузите свой компьютер;
- снова откройте Командную строку;
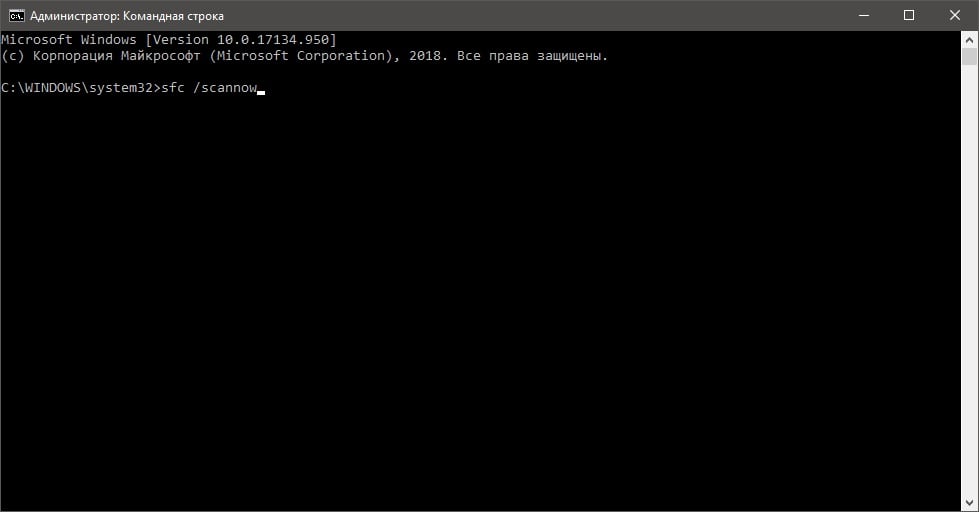
- пропишите команду «sfc /scannow» и нажмите Ввод;
- еще раз перезагрузите компьютер по окончанию работы средства.
Воспользовавшись услугами SFC и DISM, попробуйте обновить свою Windows. На этот раз ошибки 0x8024001F может и не быть.
Метод №3 Удаляем сторонний антивирус (если применимо)
А вы знали, что некоторые антивирусные программы могут препятствовать различным операциям в Windows? Например, сторонние антивирусы могут запросто блокировать процесс загрузки и установки обновлений для системы. К подобным антивирусам можно причислить McAfee, AVAST, Sophos и другие. Мы рекомендуем вам отключить или же и вовсе удалить свой антивирус, а затем посмотреть, изменится ли ситуация с ошибкой.
Метод №4 Восстановление системы (для Windows 10)
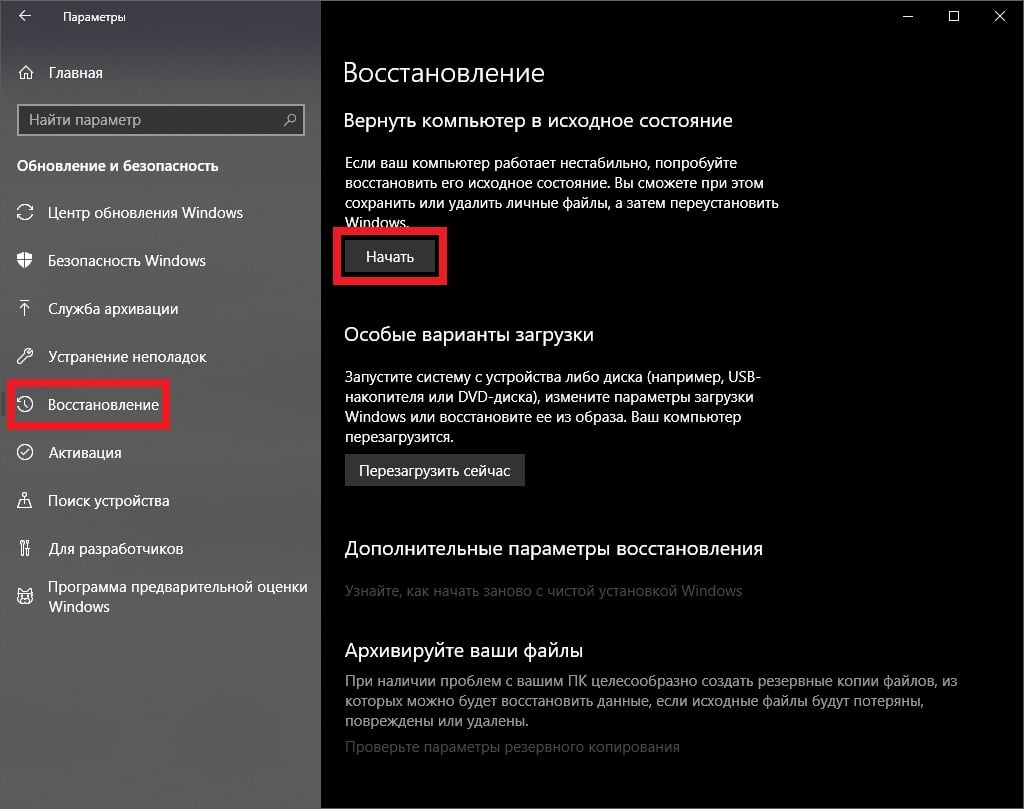
Если вам так и не удалось избавиться от ошибки при обновлении системы, то мы рекомендуем воспользоваться возвратом компьютера в исходное состояние. Проще говоря, вы можете переустановить свою ОС Windows 10, не удаляя при этом своих личных данных. Выполняется эта операция следующим образом:
- нажмите Windows+I;
- откройте раздел «Обновление и безопасность»;
- перейдите в раздел «Восстановление»;
- кликните на кнопку «Начать» в разделе «Вернуть компьютер в исходное состояние»;
- далее выберите опцию «Сохранить мои файлы»;
- и наконец-то, нажмите на кнопку «Сброс».
Подождите возвращения вашего ПК в исходное состояние. Войдя в Windows, проверьте, была ли устранена ошибка 0x8024001F.
Download Windows Speedup Tool to fix errors and make PC run faster
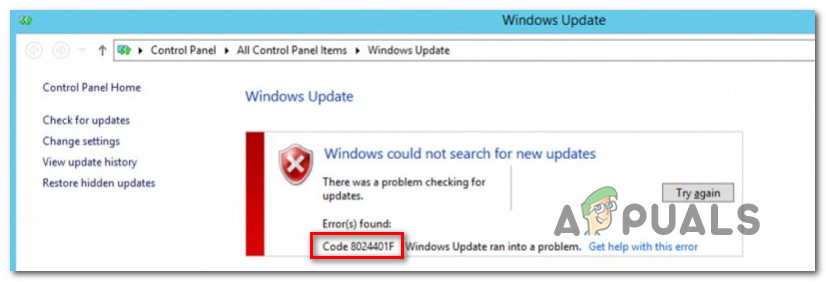
Windows Update error 0x8024001 is one of the issues that show up when the Windows Update client fails to detect an update. When an update is available, Windows 10 OS connects with Microsoft Update service, and in return, figures out what should be downloaded. If there is an issue with it, it results in Windows Update Client failed to detect; Error 0x8024001f.
0x8024001F
WU_E_NO_CONNECTION
Operation did not complete because the network connection was unavailable.

What’s causing Windows Update Error 0x8024001f?
There can be multiple causes for this error to occur, but it’s mostly when the client on the PC cannot connect to Microsoft Server and get the right set of updates.
Windows has a dedicated component or Windows Update Client responsible for figuring out everything related to Windows Update. In this case, it can be the misconfigured client or corrupt configuration file. Fortunately, it can be resolved by addressing those issues.
First check your internet connections and ensure that they are working fine. Then follow these suggestions to fix issues related to the Windows Update Client:
- Run the Windows Update troubleshooter
- Run the Network troubleshooters
- Reset Windows Update Agent
- Reset Windows Update components
- Run DISM and SFC Commands.
You will need a user account with administrator permission to follow these suggestions.
1] Run the Windows update troubleshooter
Windows offers a built-in troubleshooter that can take care of the misconfigured client, helping it download it.
Go to Windows 10 Settings (Win + I) > Update and Security > Troubleshoot > Additional troubleshooter. Select Windows Update from the list, and click on the Run the troubleshooter button. Once the wizard completes the procedure, click on Check for Update button, and the error should not occur.
2] Run the Network troubleshooter
Run the Network troubleshooters and see if they help.
3] Reset Windows Update Agent
Windows Update Agent or the client can be reset to its default settings. It will reset & repair all Windows Update-related components & registry keys, detect corruptions, replace corrupted system files, fix corrupted system image, Reset Winsock settings, and so on.
4] Reset Windows Update Components
If you do not want to rely on any script, you can reset all the Windows Update components manually. The list includes the following:
- Stop Windows Update Services
- Delete the qmgr*.dat files.
- Flush the SoftwareDistribution and catroot2 folders
- Reset the BITS service and the Windows Update service to the default security descriptor
- Re-register the BITS files, and the Windows Update related DLL files
- Delete incorrect Registry values
- Reset Winsock
- Restart Windows Update Services.
5] Run DISM and SFC Commands
Run SFC and see if it helps.
Else, you can fix corrupted Windows Update system files using DISM Tool.
I hope the post helps you resolve the issue.
Ashish holds a Bachelor’s in Computer Engineering and is a veteran Windows and Xbox user. He has work experience as a Database and Microsoft.NET Developer. He has been a Microsoft MVP (2008-2010) and excels in writing tutorials to improve the day-to-day experience with your devices.
Several Windows users have been reaching us with questions after seeing the 8024001f error code when trying to install a pending Windows Update. While some user reports that this issue only occurs with an update or so, other affected users are saying that this error code is recurring with every WIndows update that they try to install. As it turns out, the issue is not exclusive to Windows 10 as it’s also reported to occur on Windows 10, Windows 8.1 and Windows 7.
What’s causing the Error Code 0x8024001f on Windows?
We investigated this particular issue by looking at various user reports and at the repair strategies that are commonly being used by other affected users to fix this problem. As it turns out, several different scenarios might end up producing this error code. Here’s a shortlist of culprits that might spawn this error:
- Common WU glitch – In most cases, this particular error code will occur due to a glitch that is MS engineers are already aware of. For generic situations like this one, you should be able to resolve the issue simply by running the Windows Update Troubleshooter and applying the recommended fix.
- System File corruption – It’s also possible that you’re encountering this issue because a WU component or some dependency is affected by corruption. If this scenario is applicable, you should be able to resolve the issue by running a series of utilities capable of resolving system file corruption (DISM and SFC).
- Interfering 3rd party AV – If you’re using a 3rd party AV to secure your computer, you may have picked an overprotective suite that’s blocking the connection between your WU component and Microsoft’s servers. In this case, you can resolve the issue by disabling the real-time protection while the update is being installed or by uninstalling the 3rd party suite altogether.
- Underlying corruption issue – In more severe cases, you might be dealing with a more severe corruption issue that cannot be removed conventionally. In a situation like this, the only viable fix is to reset every OS component. You can do this either by performing a repair install (in-place repair) or a clean install.
If you’re currently struggling to resolve this error message, this article will provide you with several troubleshooting steps that should end up resolving the issue. Down below, you’ll find a collection of potential fixes that other affected users have successfully used to get the issue resolved. Each of the methods featured below is confirmed to work by at least one affected user.
For the best results, we advise you to follow the methods below in the same order that we arranged them in. Eventually, you should stumble upon a fix that will resolve the issue regardless of the culprit that’s causing the problem.
Let’s begin!
Method 1: Run the Windows update troubleshooter
Before we advance to more complicated strategies, you should start by testing is your Windows installation is not capable of resolving the issue automatically. If the issue you’re facing is common, chances are you will be able to resolve the issue simply by running the Windows Update troubleshooter.
This built-in utility contains a selection of repair strategies that will automatically be applied if the scan reveals a situation that is already covered by an included fix.
Several Windows users that were also encountering this issue have reported that they managed to resolve the issue indefinitely after running the Windows Update troubleshooter. Here’s a quick guide on running the Windows Update Troubleshooter to resolve the 8024001f Windows Update error code:
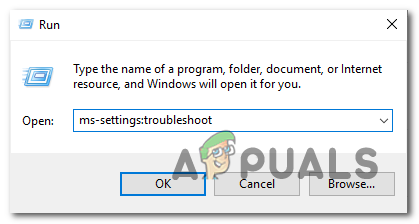
- Open up a Run dialog box by pressing Windows key + R. After you do this, type “ms-settings-troubleshoot” and press Enter to open up the Troubleshooting tab of the Settings app.

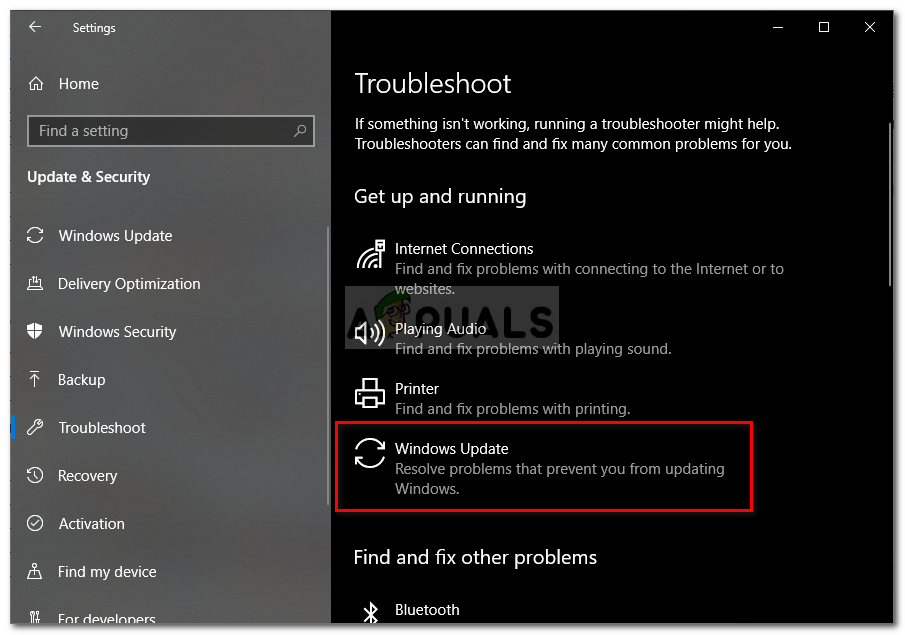
Opening the Troubleshooting tab of the Settings app via a Run box - Once you’re inside the Troubleshooting tab, move over to the right-hand pane of the Settings screen, then move down to the GetupGet up and running section. After you get there, click on Windows Update, then click Run the Troubleshooter from the newly appeared context menu.

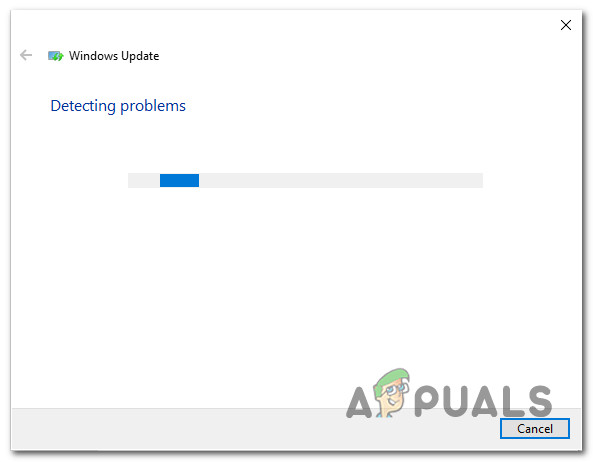
Running Windows Update Troubleshooter - After you manage to start the utility, wait patiently until the initial scan is finished. This will determine whether any of the repair strategies apply to your current situation.

Detecting problem with Windows Update - If a viable fix is identified, you’ll see a new window which that will prompt you to Apply this fix if a recommended strategy is identified. If you see the ‘Apply this fix‘ button, click it and follow the on-screen instructions to enforce the fix if other steps are needed.

Apply this fix - Once the recommended fix is successfully applied, restart your computer and see if the 8024001f Windows Update error is resolved at the next system startup.

If you’re still encountering the same issue, move down to the next method below.
Method 2: Run DISM and SFC scans
According to various user reports, this particular problem can also occur due to some degree of System File corruption. Keep in mind that Windows Update (WU) relies on a lot of dependencies, so there are a lot of system files that might end up triggering this behavior if certain system folders are tainted by corruption.
As it turns out, in situations like this you should be able to resolve the issue by running a couple of utilities capable of fixing logical errors and system corruption DISM (Deployment Image Servicing and Management) and SFC (System File Checker).
Both tools are capable of resolving errors of this kind, but they go about it in different ways – DISM relies on WU to download healthy copies for the files that need to be replaced, while SFC uses a locally cached copy to fetch the required files.
Keep in mind that while DISM is a newer utility, SFC is better at fixing logical errors, so the official recommendation is to run both scans. Here’s a quick guide on running both SFC and DISM scans from an elevated CMD window to resolve the 8024001f Windows Update error:
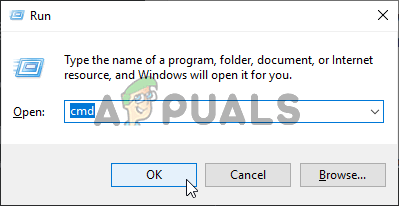
- Open up a Run dialog box by pressing Windows key + R. Once you’re inside the newly opened window, type “cmd” inside the text box and press Ctrl + Shift + Enter to open up a Command Prompt with admin access.

Running Command Prompt Note: If you see the UAC (User Account Control) prompt, click Yes to grant administrative access.
- Inside the elevated CMD window, enforce the following command and press Enter to initiate a DISM scan:
Dism.exe /online /cleanup-image /scanhealth
Dism.exe /online /cleanup-image /restorehealth
Note: Keep in mind that DISM needs a reliable internet connection to download healthy copies to replace corrupted files that are causing issues. The first command (scanhealth) will initiate a scan to look for system inconsistencies, while the second command (restorehealth) will replace inconsistencies found with the first scan.
- Once the DISM scan is complete, restart your computer and continue with the steps below.
Note: Even if no errors were fixed, you should continue with the SFC scan. - At the next startup sequence, follow the first step once again to open up another elevated command prompt. Next, type the following command and press Enter to initiate an SFC scan:
sfc /scannow
Note: Don’t interrupt the SFC process after you start the initial scan. Doing so might expose your system to other logical errors that might trigger other similar issues in the future.
- After the SFC scan is complete, restart your computer once again and see if the issue is resolved at the next system startup.
If you’re still encountering the 8024001f Windows Update error when you try to install a Windows update, move down to the next method below.
Method 3: Disabling / Uninstalling 3rd party AV (if applicable)
If you’re using a 3rd party AV or firewall to protect you for malware infections, chances are you’re encountering the 8024001f error because your security solution is overprotective. There are several 3rd party suites (McAfee, AVAST, Sophos and a few more) that are singled out by affected users for causing this problem.
If this scenario applies to your current situation, you can resolve the issue by either disabling the real-time protection or by uninstalling the overprotective security suite and reverting to the built-in utility (Windows Security, former Windows Defender).
In case you’re currently using a 3rd party suite that you suspect might be responsible for the apparition of the 8024001f error code, you should disable the real-time protection of the security suite and attempt to do the update again.
But keep in mind that the steps of disabling the real-time protection of the AV will be different depending on which security suite you’re using. But in most cases, you should be able to disable the active protection directly from the taskbar menu.

Once the real-time protection is disabled, see if the issue is resolved by trying to install the update that was previously failing once again.
If the same error is still occurring and you’re using an AV client with an included firewall, chances are the security rules have remained in place even after you disabled the real-time protection. In this case, you’ll need to uninstall the program altogether to confirm that it’s not causing the WU interruption.
To uninstall your active security scanner and ensure that you’re not leaving behind any leftover files that might still cause the same behavior, follow this step-by-step article (here).
Once the 3rd party AV is removed, restart your computer and see if the issue is resolved at the next system startup.
If the same 8024001f error code is still occurring, move down to the next method below.
Method 4: Perform a repair install
If none of the methods below have allowed you to resolve the issue, chances are you’re dealing with an underlying system corruption issue that cannot be resolved conventionally. If this scenario is applicable, the only viable fix is to reset every component of your Windows OS installation.
Several affected users have reported that they managed to resolve issue indefinitely either by performing a repair install or by doing a clean install.
If you’re looking for a quick route, you should go for a clean install. This is a super straightforward method of refreshing every OS component, but the major downside is that it will make you lose all personal files including apps, games, personal media, and user preferences.
A repair install (in-place repair) should be the preferred approach since it will allow you to keep all your data. Sure, the procedure is a little more tedious, but you’ll be allowed to keep most user preferences, personal media, applications, and games.