В процессе обновления Windows есть шанс увидеть ошибку 8024001B. Как правило, на подобный код жалуются владельцы таких операционных систем, как Windows 7 и Windows 8.1. Тем не менее появление ошибки также возможно и на современных сборка Windows 10.
Что вызывает ошибку 8024001B?
Подобную ошибку зачастую вызывают некорректно работающие компоненты Центра обновления Windows. Почему они начали работать неправильно — сложно определить. Может быть, из-за какого-то бага, возможно — они были повреждены. Так или иначе работу компонентов можно восстановить, выполнив процедуру их сброса.
Также ошибка 8024001B способна появляться в результате повреждения некоторых системных файлов Windows. Тут на выручку вам придется либо System File Checker, либо точка восстановления системы, которая была автоматически создана Windows. При наличии повреждению что-то должно помочь.
Методы решения ошибки 8024001B
Метод №1 Средство устранения неполадок
Итак, давайте для начала попытаемся положиться на автоматизированные системные средства, предназначенные для решения всевозможных неполадок. Нажмите на клавиатуре Windows+I для открытия окошка с Параметрами системы. Теперь перейдите в раздел «Обновление и безопасность», далее — в подраздел «Устранение неполадок».
В открытом подразделе перед вами предстанет обширный список из различных компонентов системы. Найдите и выберите компонент «Центр обновления Windows». Затем нажмите на кнопку «Запустить средство устранения неполадок». Все, что вам нужно дальше делать — это следовать инструкциям на экране и пытаться избавиться от ошибки 8024001B.
Метод №2 Сброс компонентов Центра обновления
В большинстве случаев никто не любит заниматься подобным делом, ведь на его выполнение требуется много сил и времени. Сброс компонентов Центра обновления Windows, как правило, производится при помощи Командной строки и целой кучи различных команд.
Тем не менее вы можете использовать «батник» собственного производства для подобной задачи. Нажмите на клавиатуре Windows+R. Пропишите в пустой строчке открывшегося окошка значение notepad и нажмите Enter.
Теперь копируйте все нижеуказанные команды и вставьте их в открытое окошко Блокнота:
@echo off
::Сброс центра обновлений
::GamesQA.ru:: Checking and Stopping the Windows Update services
set b=0:bits
set /a b=%b%+1
if %b% equ 3 (
goto end1
)net stop bits
echo Checking the bits service status.
sc query bits | findstr /I /C:»STOPPED»
if not %errorlevel%==0 (
goto bits
)
goto loop2:end1
cls
echo.
echo Cannot reset Windows Update since «Background Intelligent Transfer Service» (bits) service failed to stop.
echo.
pause
goto Start:loop2
set w=0:wuauserv
set /a w=%w%+1
if %w% equ 3 (
goto end2
)
net stop wuauserv
echo Checking the wuauserv service status.
sc query wuauserv | findstr /I /C:»STOPPED»
if not %errorlevel%==0 (
goto wuauserv
)
goto loop3:end2
cls
echo.
echo Cannot reset Windows Update since «Windows Update» (wuauserv) service failed to stop.
echo.
pause
goto Start:loop3
set app=0
:appidsvc
set /a app=%app%+1
if %app% equ 3 (
goto end3
)
net stop appidsvc
echo Checking the appidsvc service status.
sc query appidsvc | findstr /I /C:»STOPPED»
if not %errorlevel%==0 (
goto appidsvc
)
goto loop4:end3
cls
echo.
echo Cannot reset Windows Update since «Application Identity» (appidsvc) service failed to stop.
echo.
pause
goto Start:loop4
set c=0:cryptsvc
set /a c=%c%+1
if %c% equ 3 (
goto end4
)
net stop cryptsvc
echo Checking the cryptsvc service status.
sc query cryptsvc | findstr /I /C:»STOPPED»
if not %errorlevel%==0 (
goto cryptsvc
)
goto Reset:end4
cls
echo.
echo Cannot reset Windows Update since «Cryptographic Services» (cryptsvc) service failed to stop.
echo.
pause
goto Start:Reset
Ipconfig /flushdns
del /s /q /f «%ALLUSERSPROFILE%\Application Data\Microsoft\Network\Downloader\qmgr*.dat»
del /s /q /f «%ALLUSERSPROFILE%\Microsoft\Network\Downloader\qmgr*.dat»
del /s /q /f «%SYSTEMROOT%\Logs\WindowsUpdate\*»if exist «%SYSTEMROOT%\winsxs\pending.xml.bak» del /s /q /f «%SYSTEMROOT%\winsxs\pending.xml.bak»
if exist «%SYSTEMROOT%\winsxs\pending.xml» (
takeown /f «%SYSTEMROOT%\winsxs\pending.xml»
attrib -r -s -h /s /d «%SYSTEMROOT%\winsxs\pending.xml»
ren «%SYSTEMROOT%\winsxs\pending.xml» pending.xml.bak
)if exist «%SYSTEMROOT%\SoftwareDistribution.bak» rmdir /s /q «%SYSTEMROOT%\SoftwareDistribution.bak»
if exist «%SYSTEMROOT%\SoftwareDistribution» (
attrib -r -s -h /s /d «%SYSTEMROOT%\SoftwareDistribution»
ren «%SYSTEMROOT%\SoftwareDistribution» SoftwareDistribution.bak
)if exist «%SYSTEMROOT%\system32\Catroot2.bak» rmdir /s /q «%SYSTEMROOT%\system32\Catroot2.bak»
if exist «%SYSTEMROOT%\system32\Catroot2» (
attrib -r -s -h /s /d «%SYSTEMROOT%\system32\Catroot2»
ren «%SYSTEMROOT%\system32\Catroot2» Catroot2.bak
):: Reset Windows Update policies
reg delete «HKCU\SOFTWARE\Policies\Microsoft\Windows\WindowsUpdate» /f
reg delete «HKCU\SOFTWARE\Microsoft\Windows\CurrentVersion\Policies\WindowsUpdate» /f
reg delete «HKLM\SOFTWARE\Policies\Microsoft\Windows\WindowsUpdate» /f
reg delete «HKLM\SOFTWARE\Microsoft\Windows\CurrentVersion\Policies\WindowsUpdate» /f
gpupdate /force:: Reset the BITS service and the Windows Update service to the default security descriptor
sc.exe sdset bits D:(A;;CCLCSWRPWPDTLOCRRC;;;SY)(A;;CCDCLCSWRPWPDTLOCRSDRCWDWO;;;BA)(A;;CCLCSWLOCRRC;;;AU)(A;;CCLCSWRPWPDTLOCRRC;;;PU)sc.exe sdset wuauserv D:(A;;CCLCSWRPWPDTLOCRRC;;;SY)(A;;CCDCLCSWRPWPDTLOCRSDRCWDWO;;;BA)(A;;CCLCSWLOCRRC;;;AU)(A;;CCLCSWRPWPDTLOCRRC;;;PU)
:: Reregister the BITS files and the Windows Update files
cd /d %windir%\system32
regsvr32.exe /s atl.dll
regsvr32.exe /s urlmon.dll
regsvr32.exe /s mshtml.dll
regsvr32.exe /s shdocvw.dll
regsvr32.exe /s browseui.dll
regsvr32.exe /s jscript.dll
regsvr32.exe /s vbscript.dll
regsvr32.exe /s scrrun.dll
regsvr32.exe /s msxml.dll
regsvr32.exe /s msxml3.dll
regsvr32.exe /s msxml6.dll
regsvr32.exe /s actxprxy.dll
regsvr32.exe /s softpub.dll
regsvr32.exe /s wintrust.dll
regsvr32.exe /s dssenh.dll
regsvr32.exe /s rsaenh.dll
regsvr32.exe /s gpkcsp.dll
regsvr32.exe /s sccbase.dll
regsvr32.exe /s slbcsp.dll
regsvr32.exe /s cryptdlg.dll
regsvr32.exe /s oleaut32.dll
regsvr32.exe /s ole32.dll
regsvr32.exe /s shell32.dll
regsvr32.exe /s initpki.dll
regsvr32.exe /s wuapi.dll
regsvr32.exe /s wuaueng.dll
regsvr32.exe /s wuaueng1.dll
regsvr32.exe /s wucltui.dll
regsvr32.exe /s wups.dll
regsvr32.exe /s wups2.dll
regsvr32.exe /s wuweb.dll
regsvr32.exe /s qmgr.dll
regsvr32.exe /s qmgrprxy.dll
regsvr32.exe /s wucltux.dll
regsvr32.exe /s muweb.dll
regsvr32.exe /s wuwebv.dll
regsvr32.exe /s wudriver.dll
netsh winsock reset
netsh winsock reset proxy
:: Set the startup type as automatic
sc config wuauserv start= auto
sc config bits start= auto
sc config DcomLaunch start= auto:Start
net start bits
net start wuauserv
net start appidsvc
net start cryptsvc
Как только команды окажутся в Блокноте, нажмите на пункт «Файл» в строке меню и выберите пункт «Сохранить как…». Задайте создаваемому файлу любое имя, например, Сброс центра обновлений, и измените его расширение с .txt на .bat (это очень важно!), а затем сохраните файл в удобное место на компьютере.
В итоге у вас должен получиться, к примеру, файл Сброс центра обновлений.bat. Кликните на этот файл дважды левой кнопкой мыши, после чего начнется автоматический процесс сброса компонентов Центра обновления Windows. Дождитесь его окончания и проверьте наличие ошибки 8024001B.
Метод №3 Восстановление системы
В крайнем случае можно попробовать воспользоваться точкой восстановления. Зачастую после восстановления системы никакие ошибки не должны вас больше беспокоить. Хорошо, нажмите на клавиатуре Windows+R и выполните команду rstrui. В появившемся окошке вам необходимо выбрать точку, на момент создания которой ошибки 8024001B не наблюдалось, и запустить процесс восстановления системы. Процесс очень прост и не займет много времени. Также помните: ваш компьютер может перезагружаться при восстановлении.
Мы надеемся, что данные методы помогли вам в решении ошибки 8024001B.
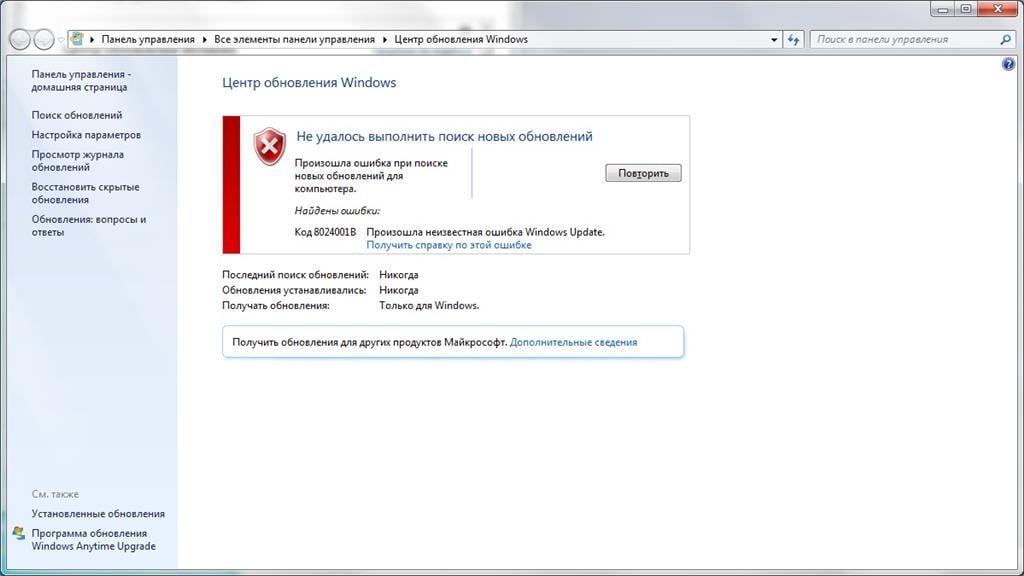
Some Windows users have been reaching us with questions after being unable to update their machines with the latest Windows Update. As it turns out, whenever they try to scan for new updates, they end up seeing the 8024001B error code accompanied by the message “There was a problem checking for updates“. This error appears before the scanning procedure is completed, so affected users never get to see which updates need to be installed. In most cases, this issue is reported to occur on Windows 7 and Windows 8.1

What’s causing the Windows Update Error Code 8024001B?
We investigated this particular issue by looking at various user reports and by testing out the various repair strategies that are being recommended by other users that have already managed to get to the bottom of this issue and fix it. After this analysis, we can conclude that multiple causes might be responsible for this behavior. here’s a shortlist with potential culprits:
- Glitched WU component – As some users have reported, this error code might also be triggered in situations where one or more WU component becomes stuck in a limbo state (the OS thinks the component is open, when in fact it’s not). In this case, you should be able to resolve the issue by resetting all WU components or by using the Windows Update troubleshooter.
- System File Corruption – As it turns out, system file corruption can also be responsible for the apparition of this error code during a WU installation. If one or more WU dependencies becomes corrupted, the entire update operation might be affected. In this case, you should be able to resolve the issue by going for a repair install (or clean install).
- Unidentified interference – In more special circumstances, this error might occur due to an unidentified culprit. It’s possible that a driver update interfered with the WU operation. Since these conflicts are not easy to pinpoint, the ideal approach is to use System Restore to bring back your machine state to a point where this issue was not occurring.
If you’re currently encountering the same Windows Update 8024001B error code and one of the scenarios presented above seem applicable, then this article will likely help you in resolving the issue. Down below, you’ll find a collection of methods that other users in a similar situation have successfully used to bypass the error code and install the Windows Updates normally.
If you want to remain as efficient as possible, we advise you to follow the instructions below in the same order as we arranged them in (via efficiency and difficulty). Eventually, you will get to a reparation procedure that will fix the problem regardless of the scenario that applies to you.
Let’s begin!
Method 1: Running the Windows Update troubleshooter
As you saw in the section above, multiple sections might end up triggering this error message. But, in the vast majority of possible scenarios, the issue is caused by a WU component (not an outside process or service).
Because of this, you should start your troubleshooting guide by seeing if you Windows is not capable of resolving the issue automatically (without any manual setting on your side). This can be achieved by running the Windows Update troubleshooter.
If the problem you’re dealing with is already documented by Microsoft, then the Windows Update troubleshooter should already include a repair strategy that will take care of the issue automatically. Several Windows users that were also struggling to resolve the 8024001B error have reported that they managed to get to the bottom of this issue by running this utility and applying the recommended repair strategy.
If you’re unsure on how to make use of the Windows Update troubleshooter utility, follow the instructions below for step by step instructions:
- Open up a Run dialog box by pressing Windows key + R. Next, type ‘control.exe /name Microsoft.Troubleshooting’ and press Enter to open up the Troubleshooting tab of the classic Control Panel interface.

Accessing the classic Control Panel interface Note: When you see the UAC (User Account Prompt), click Yes to grant administrative privileges.
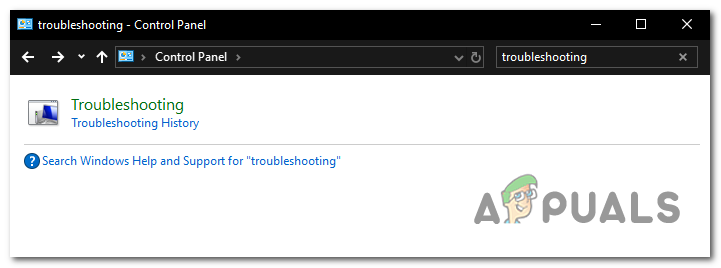
- Once you’re inside the classic Control Panel interface, use the text box in the top-right corner to search for ‘troubleshooting”. Next, from the list of results on the left-hand side, click on Troubleshooting.

Accessing the Troubleshooting option from the Classic Control Panel interface - Once you’re inside the Troubleshooting window, move over to the right-hand side menu and click on System and Security. Then, from the list of Troubleshooting strategies, click on Windows Update (under Windows).

Accessing the Windows Update troubleshooter - Once the Windows Update troubleshooter window is open, start by clicking on the Advanced link, then ensure that the box associated with Apply repairs automatically is checked. Then, click Next to advance to the next menu.

Ensuring that the repairs are applied automatically by Windows Update - Wait for the problems to be detected by your utility. If a viable repair strategy is found, you will be presented with it on the next screen. To take advantage of this, click on Apply this fix and wait for the procedure to complete.

Apply this fix - If your computer doesn’t restart automatically, trigger it yourself and see if the issue is resolved at the next system startup by attempting to update your computer once again.
If the operation still fails with the same 8024001B error, move down to the next method below.
Method 2: Resetting every WU component
Another fairly common scenario that might end up triggering the 8024001B error is a WU (Windows Update) inconsistency that is effectively stopping your computer ability to find and install new updates.
We observed this behavior with several affected users and in the vast majority of cases, they managed to get it resolved by resetting all components and dependencies involved in this process.
If you think this scenario might be applicable, follow the instructions below for step by step instructions on resetting every Windows Update component manually (from an elevated CMD prompt). Here’s a quick guide on how to do this:
- Press Windows key + R to open up a Run dialog box. Next, type “cmd” inside the text box and press Ctrl + Shift + Enter to open up the Elevated Command Prompt. In case you’re prompted by the UAC (User Account Control), click Yes to grant admin access.

Running Command Prompt - Once you find your way inside the elevated CMD window, type the following command in order and press Enter after each command to stop every essential WU service:
net stop wuauserv
net stop cryptSvc
net stop bits
net stop msiserver
Note: After you finish running these commands, you will have effectively stopped all essential Windows Updates services from running (Windows Update, MSI Installer service, Cryptographic service, and the BITS service)
- After you manage to disable all these services, run the following commands in the same CMD prompt and press Enter after each command to rename the SoftwareDistribution and Catroot2 folders:
ren C:\Windows\SoftwareDistribution SoftwareDistribution.old
ren C:\Windows\System32\catroot2 Catroot2.old
Note: These two folders are important since they are responsible for storing the update files that are being used by the Windows updating component. Renaming them essentially forces your OS to create new instances that will take their place and bypass any sort of file corruption.
- Once you get past step 3, type the final commands in order and press Enter after each one to restart the same services that you previously disabled:
net start wuauserv
net start cryptSvc
net start bits
net start msiserver
- Attempt to search for updates once again to see if you’re still dealing with the error code 8024001B.
If the same issue is still occurring, move down to the next potential fix below.
Method 3: Using the System Restore utility
In case you only started to experience this behavior recently, a recent system change might have brought about this issues with the WU component. A 3rd party service or process might very well be responsible for the apparition of this issue.
Since creating a list with all potential culprits is not possible, we will showcase a cost-efficient approach – using the System Restore utility.
This tool is capable of using a previously created snapshot to restore the entire computer state to a previous point in time where the factors that contributed to the apparition of the 8024001B error were not present.
Keep in mind that by default, Windows is configured to regularly save System Restore snapshots at important actions (such as the installation of a critical update, a driver installation, etc.) Unless you modified this default behavior, you should have plenty of restore points to choose from.
IMPORTANT: Before you start using this utility, consider the fact that any changes you made since the restore point were created will be lost if you use it to restore the machine state to a previous point in time. This includes installed apps, drivers, 3rd party applications, games, etc.
If you understand the repercussions and you still want to proceed, follow the instructions below to initiate the restoring process:
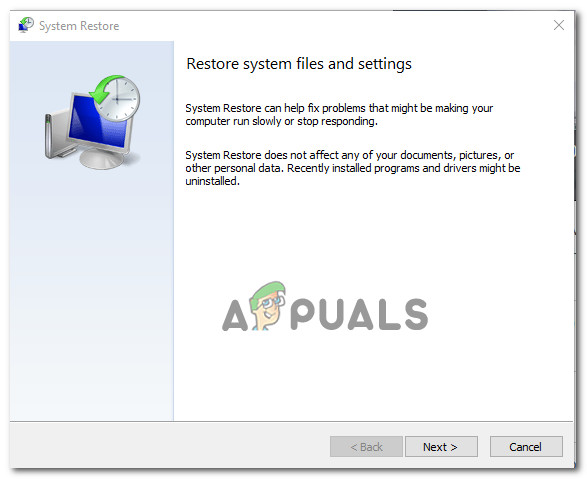
- Press Windows key + R to open up a Run dialog box. Then, type ‘rstrui’ inside the text box and press Enter to open up the System Restore menu.

Opening the System Restore wizard via Run box - After you arrive at the initial System Restore screen, click Next to advance to the next screen.

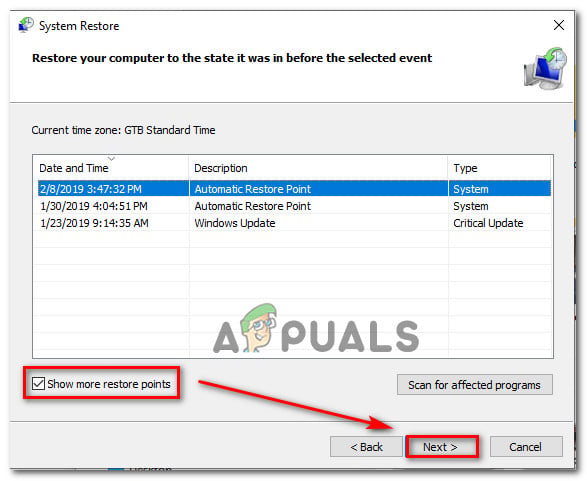
Using System Restore - At the next screen, start by ensuring that the box associated with Show more restore points are checked. After you do this, start comparing the dates of each saved restore point and select the one that is older than the apparition of this issue. With the correct system restore selected, click Next to advance to the next menu.

Restoring your system to a previous point in time - Once you get to this point, the utility is ready to go. All that’s left to do now is to initiate the restoring process by clicking on Finish.
- After a couple of seconds, your computer will restart and the previous state will be mounted. When the process is finished, attempt to search for updates again and see if the same issue is still occurring.
If you’re still seeing the 8024001B error code, move down to the final method below
Method 4: Refreshing every OS component
If none of the instructions above have allowed you to bypass the 8024001B error, you can conclude that you’re dealing with some type of system file problem that cannot be resolved conventionally. If this scenario is applicable, the only viable fix that should take care of the problem is to follow a procedure that will refresh every Windows component.
A complete system file reset can only be achieved by two procedures – a clean install or a repair install (in-place repair).
A clean install is easier to perform, but the major downside is that it will not allow you to keep any of your files (apps, games, personal media, user preferences, etc.)
If you’re looking for the most efficient approach, you should go for a repair install (in-place upgrade). It’s a more tedious procedure, but it will only touch system components, allowing you to keep any personal data (including applications and games.
Are you having trouble installing Windows Updates and getting the error code 8024001b? It can be a daunting task trying to figure out why this is happening, especially if tech isn’t your thing. Don’t worry though – I’m here to help!
In this article, I’ll go over exactly what error code 8024001b means, common causes for this type of issue and how you can fix it. With my personal experience as both an IT professional and software consultant combined with years of research studying this problem, I believe we can solve it together.
By the end of this article you should not only have gained insight into the reasons why you’re receiving this error message but also have the tools needed to get rid of it completely! So let’s jump in and start solving that pesky windows update issue now
Understanding Windows Update Error 8024001B
As computer users, we all know the dreaded feeling of seeing an error message pop up on our screens. One of the most common Windows Update errors is 8024001B. This error can occur when trying to download and install updates for your Windows operating system. But what exactly causes this error and how can you fix it?
One possible cause of Error 8024001B is a problem with your internet connection. If your connection drops during the update process or if there are issues with your network adapter, this could be why you are seeing this error message. To troubleshoot this issue, try resetting your router or modem, restarting your computer, or running a diagnostic tool to check for any networking problems.
Another potential culprit could be corrupted system files on your computer. These files may have become damaged due to malware infections, hardware failures, or other issues that can arise over time from regular use of a computer. To fix these types of errors in Windows Update, you may need to run a scan using the System File Checker (SFC) tool. This will look for faulty system files and attempt to repair them automatically.
Finally, Error 8024001B may indicate that there is already another update being installed on your device at the same time as the one causing the error message – effectively creating conflict between two updating processes occurring simultaneously! In such cases where multiple updates seemingly coincide in their installation procedures , it’s best to patiently wait until one has finished installing before starting another update operation so as not to give rise again into conflicts as described above !
In conclusion, understanding what causes Windows Update Error 8024001B and how to resolve it can save you time and frustration when attempting to keep your operating system up-to-date with its latest patches – which are essential in keeping our machines running smoothly! By troubleshooting connectivity issues or performing scans using diagnostic tools like SFC along with ensuring downloads don’t overlap by waiting until one has fully installed before starting the next update, you can successfully tackle this problem with relative ease. So don’t let error messages get in your way- take charge of your computer and keep it running smoothly!
Resolving the Windows Update Error 8024001B: Step-by-Step Solutions
If you’ve ever experienced the frustrating Windows Update Error 8024001B, you’re not alone. This error code typically occurs when your system is trying to install updates but there’s an issue with one or more of those updates. Fortunately, resolving this problem isn’t too difficult if you know what steps to take.
One solution involves manually downloading and installing the problematic update(s). To do so, start by identifying which update(s) are causing the error message to appear. You can usually find this information within the Windows Update interface itself. Once you’ve identified the culprit(s), search for them online and download them from a trusted source (such as Microsoft’s website). Then, install these updates on your own instead of relying on Windows Update to do it for you.
Another possible fix involves resetting certain components related to Windows Updates itself. First, open an elevated Command Prompt by right-clicking on it in your Start menu and selecting “Run as administrator.” In that window, type “net stop wuauserv” followed by “net stop cryptSvc” then “net stop bits” then “net stop msiserver.” Press enter after each command line. Next, navigate to C:WindowsSoftwareDistributionDataStore and delete all its contents (but don’t delete any folders themselves). Finally restart all stopped services using command prompt except Msiserver net start wuauserv net start cryptSvc net start bits”.
The last thing you could try is performing what’s called a system restore; essentially going back in time before this issue started happening at all. To access System Restore click Start > Settings > Update & Security > Recovery > Open System Restore > Select date before Error occurred> Next> Finish . Note: Your files will be safe but newly installed programs may disappear
Hopefully these solutions help resolve your Windows Update Error 8024001B once and for all! Remember though – always make sure that any downloads you’re installing are coming from a trusted source, and never hesitate to reach out to tech support if you need additional assistance.

Author
Matt
Matt is a self confessed Otaku with a keen interest in anime and Japanese culture. He uses a variety of social media platforms like TikTok and Snapchat, and when he’s not playing with his phone he’s usually reading through Seinen manga like One-Punch Man.
It is not at all strange that we have to face different errors while using a computer. But we cannot deny that the update error 0x8024001B in Windows can be too annoying..
It is essential to keep our system and its applications updated mainly for security reasons. However, when an error does not allow us to update the apps or, as in this case, the operating system. We must urgently take care of solving the problem and a little further down, we will show you the methods that we can apply to find the solution.
Remember that if by any chance Windows doesn’t work after updating, we already have a detailed guide so you can skip this annoying inconvenience..
Solution to update error 0x8024001B in Windows
Restart your computer
On too many occasions, restarting the computer is the most effective and simple solution to solve a large number of errors. So this is what we’ll do first, because it’s very simple. We will restart the computer and check if the error appears again.
Run troubleshooter
There is a specific troubleshooter for Windows update, which will help us solve the error 0x8024001B..
In Windows 11 we are going to go to Settings, then System and click on Troubleshoot. Next, we go to Other troubleshooters and click Run.
If we are using Windows 10 we will have to enter Settings and go to Update and security> Troubleshoot> Additional troubleshooters. To finish, we will choose Windows Update and click on Run the troubleshooter.
Reset Windows update agent to default
Another option would be to run the Reset tool, Microsoft’s Windows Update Agent. It is responsible for restoring and repairing all the components and registry keys related to Windows Update; detects corruptions, replaces damaged and corrupted files, resets Winsock settings, etc.
Repair system files
We will have to click on «Start» and then we will write «CMD», in the right panel we will choose «Run as administrator» to open the command prompt.
Next, we will have to write the following: sfc /scannow and press Enter. In case this command does not work, we will have to try this: DISM /Online /Cleanup-Image /RestoreHealth
Then we restart the computer and check if the problem persists. We should now be able to install any update without the 0x8024001B error.
What’s causing the Windows Update Error Code 8024001B?
We investigated this particular issue by looking at various user reports and by testing out the various repair strategies that are being recommended by other users that have already managed to get to the bottom of this issue and fix it. After this analysis, we can conclude that multiple causes might be responsible for this behavior. here’s a shortlist with potential culprits:
If you’re currently encountering the same Windows Update 8024001B error code and one of the scenarios presented above seem applicable, then this article will likely help you in resolving the issue. Down below, you’ll find a collection of methods that other users in a similar situation have successfully used to bypass the error code and install the Windows Updates normally.
If you want to remain as efficient as possible, we advise you to follow the instructions below in the same order as we arranged them in (via efficiency and difficulty). Eventually, you will get to a reparation procedure that will fix the problem regardless of the scenario that applies to you.
Let’s begin!
Method 1: Running the Windows Update troubleshooter
As you saw in the section above, multiple sections might end up triggering this error message. But, in the vast majority of possible scenarios, the issue is caused by a WU component (not an outside process or service).
Because of this, you should start your troubleshooting guide by seeing if you Windows is not capable of resolving the issue automatically (without any manual setting on your side). This can be achieved by running the Windows Update troubleshooter.
If the problem you’re dealing with is already documented by Microsoft, then the Windows Update troubleshooter should already include a repair strategy that will take care of the issue automatically. Several Windows users that were also struggling to resolve the 8024001B error have reported that they managed to get to the bottom of this issue by running this utility and applying the recommended repair strategy.
If you’re unsure on how to make use of the Windows Update troubleshooter utility, follow the instructions below for step by step instructions:
If the operation still fails with the same 8024001B error, move down to the next method below.
Method 2: Resetting every WU component
Another fairly common scenario that might end up triggering the 8024001B error is a WU (Windows Update) inconsistency that is effectively stopping your computer ability to find and install new updates.
We observed this behavior with several affected users and in the vast majority of cases, they managed to get it resolved by resetting all components and dependencies involved in this process.
If you think this scenario might be applicable, follow the instructions below for step by step instructions on resetting every Windows Update component manually (from an elevated CMD prompt). Here’s a quick guide on how to do this:
If the same issue is still occurring, move down to the next potential fix below.
Method 3: Using the System Restore utility
In case you only started to experience this behavior recently, a recent system change might have brought about this issues with the WU component. A 3rd party service or process might very well be responsible for the apparition of this issue.
Since creating a list with all potential culprits is not possible, we will showcase a cost-efficient approach – using the System Restore utility.
This tool is capable of using a previously created snapshot to restore the entire computer state to a previous point in time where the factors that contributed to the apparition of the 8024001B error were not present.
Keep in mind that by default, Windows is configured to regularly save System Restore snapshots at important actions (such as the installation of a critical update, a driver installation, etc.) Unless you modified this default behavior, you should have plenty of restore points to choose from.
IMPORTANT: Before you start using this utility, consider the fact that any changes you made since the restore point were created will be lost if you use it to restore the machine state to a previous point in time. This includes installed apps, drivers, 3rd party applications, games, etc.
If you understand the repercussions and you still want to proceed, follow the instructions below to initiate the restoring process:
If you’re still seeing the 8024001B error code, move down to the final method below
Method 4: Refreshing every OS component
If none of the instructions above have allowed you to bypass the 8024001B error, you can conclude that you’re dealing with some type of system file problem that cannot be resolved conventionally. If this scenario is applicable, the only viable fix that should take care of the problem is to follow a procedure that will refresh every Windows component.
A complete system file reset can only be achieved by two procedures – a clean install or a repair install (in-place repair).
A clean install is easier to perform, but the major downside is that it will not allow you to keep any of your files (apps, games, personal media, user preferences, etc.)
If you’re looking for the most efficient approach, you should go for a repair install (in-place upgrade). It’s a more tedious procedure, but it will only touch system components, allowing you to keep any personal data (including applications and games.
Fix: Windows Update Error “We Couldn’t Connect to the Update Service”[SOLVED] One of the Update Services is not Running Properly in Windows UpdateLast Free Update For Windows 7 Released, KB4534310 And KB45343140 Are The Final…How to Update the Windows Update Agent to the Latest Version