Try creating a new Outlook profile
by Sagar Naresh
Sagar is a web developer and technology journalist. Currently associated with WindowsReport and SamMobile. When not writing, he is either at the gym sweating it out or playing… read more
Updated on
- Outlook error 0x80190194 appears when you try to download the Offline Address Book.
- This could be because of corrupt Outlook cache or data files.
- You can try clearing the data inside the Offline Address Book and possibly resolve the issue.
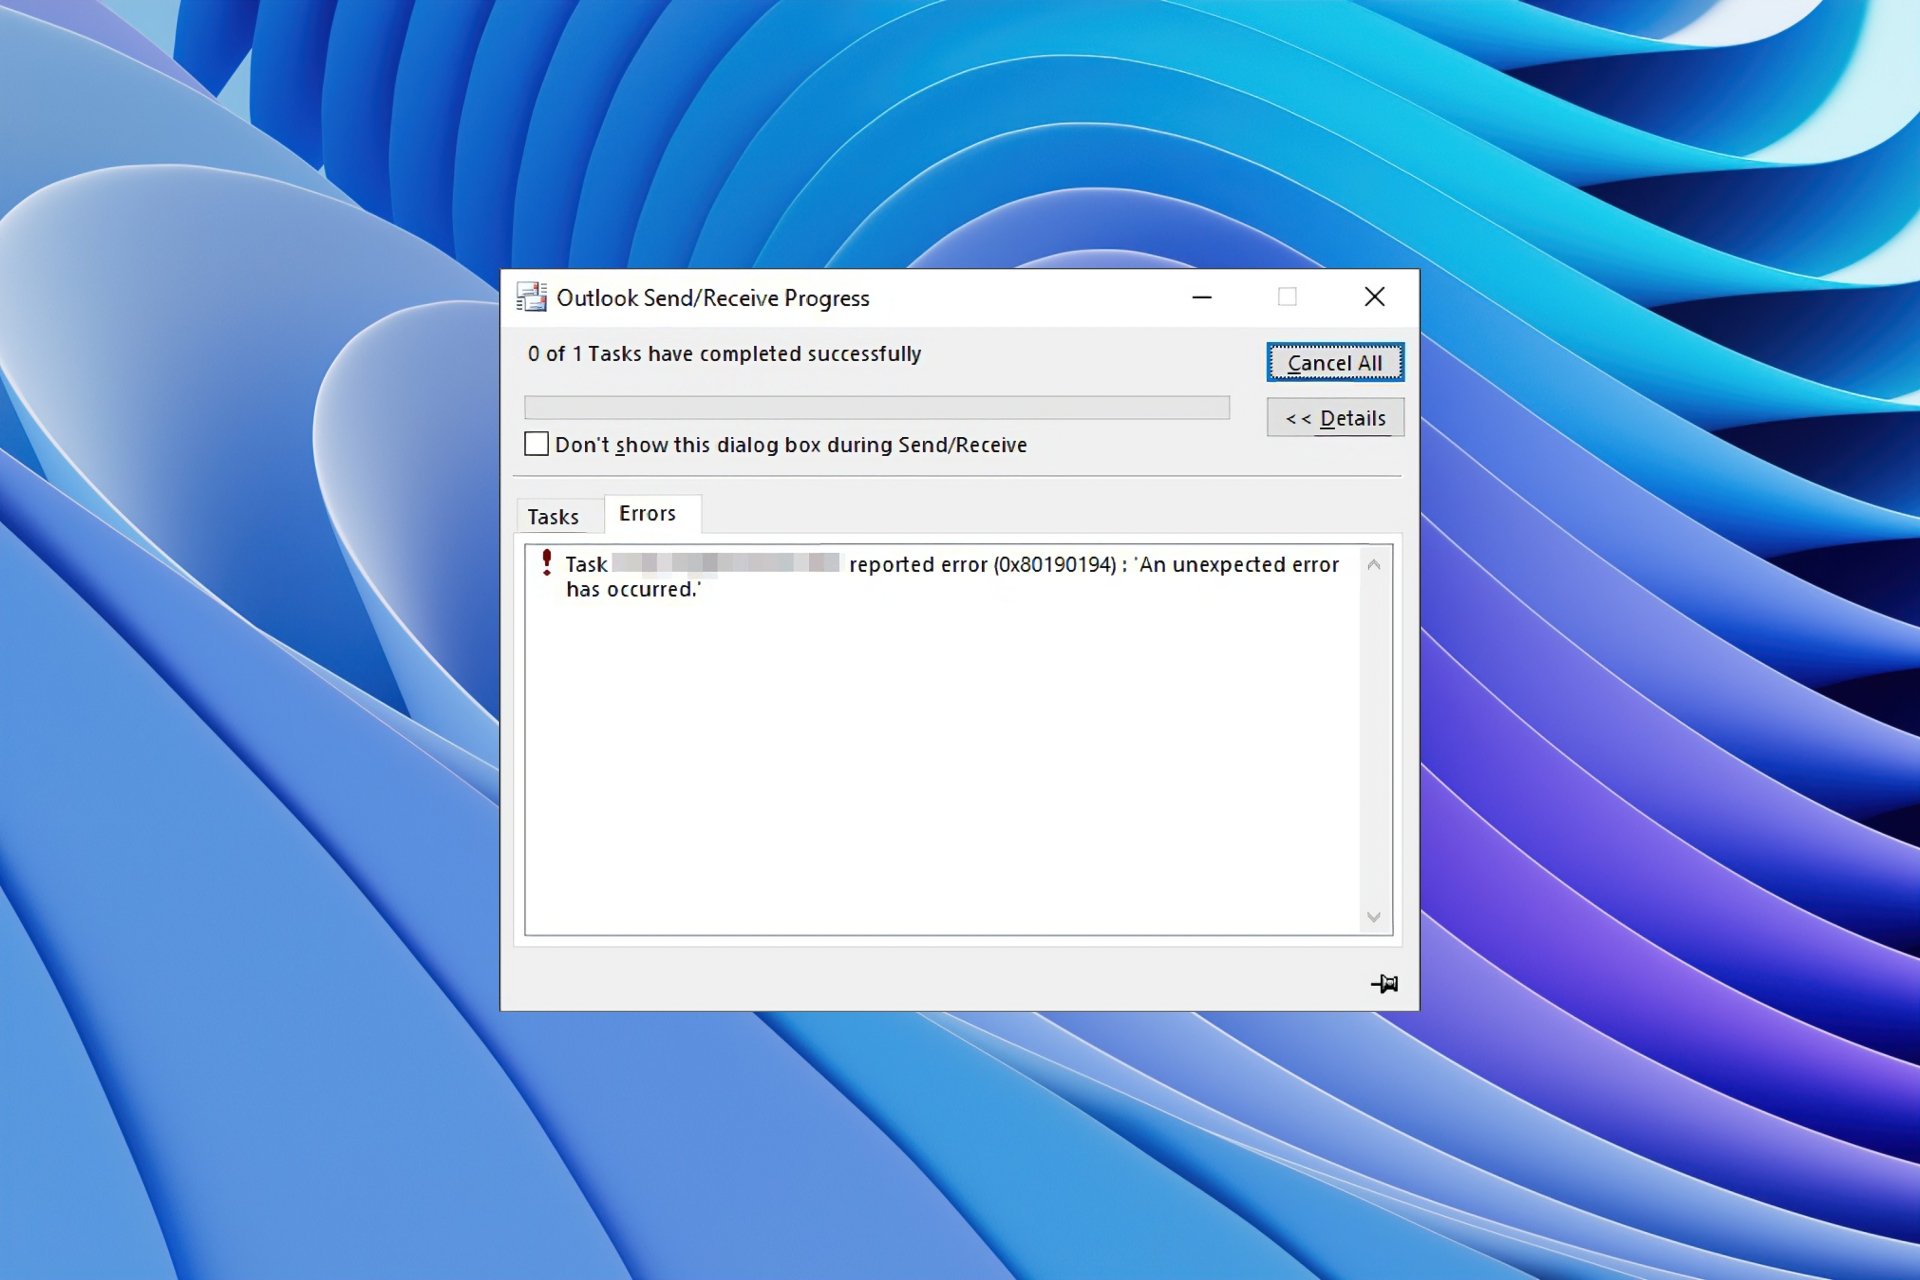
The MS Outlook error 0x80190194 is one of the most common errors that users have been reporting when using the email client.
This error happens when a user is trying to send or receive an email via Outlook or when they are trying to download the offline address book.
In this guide, we will give you many solutions to help you resolve the MS Outlook error code 0x80190194. We will also list down the reasons that could trigger this issue. So, let us get right into it.
What is causing MS Outlook error 0x80190194?
We researched the internet and found a bunch of solutions that are responsible for the Outlook 0x80190194 error.
- Corrupt Outlook folder: If your Outlook email client’s AppData folder goes corrupt, you will come across the error 0x80190194.
- Corrupt offline address book: Chances are that the Offline Address Book (OAB) you are trying to download is partially corrupt.
- Corrupt Outlook profile: This issue, apart from being related to the address book, is also associated with the corrupt Outlook profile.
- Problematic Outlook cache files: Also, corrupt cache files can give rise to multiple issues on your PC.
Now, let us look at the solutions that will help you resolve Outlook error 0x80190194.
How can I fix the Outlook 0x80190194 error?
- What is causing MS Outlook error 0x80190194?
- How can I fix the Outlook 0x80190194 error?
- 1. Rename the Outlook folder
- 2. Clear the contents of the OAB folder
- 3. Create a new Outlook profile
1. Rename the Outlook folder
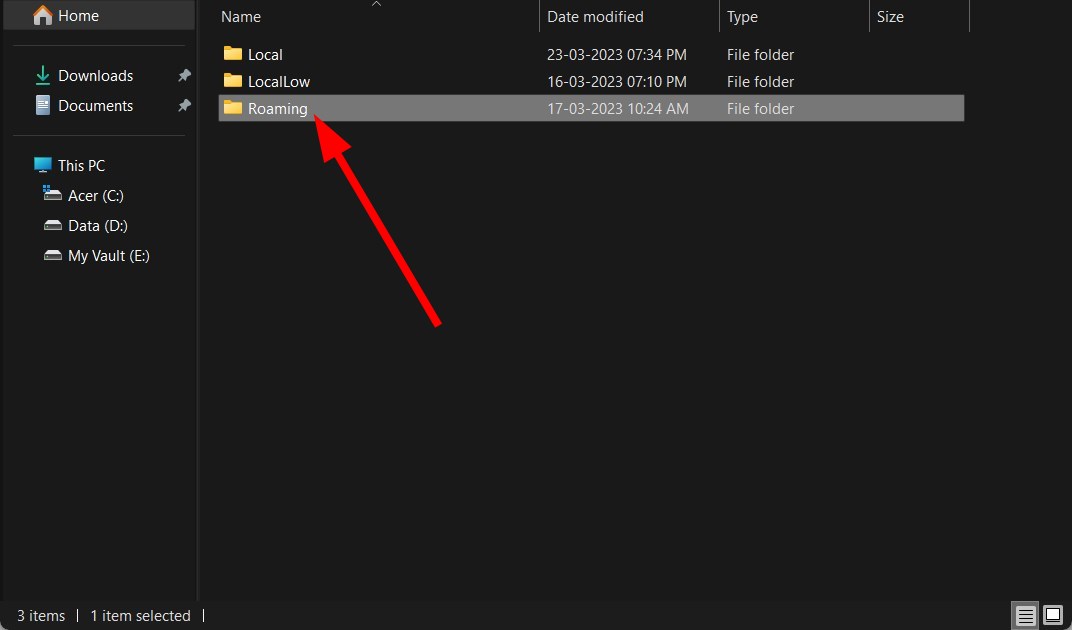
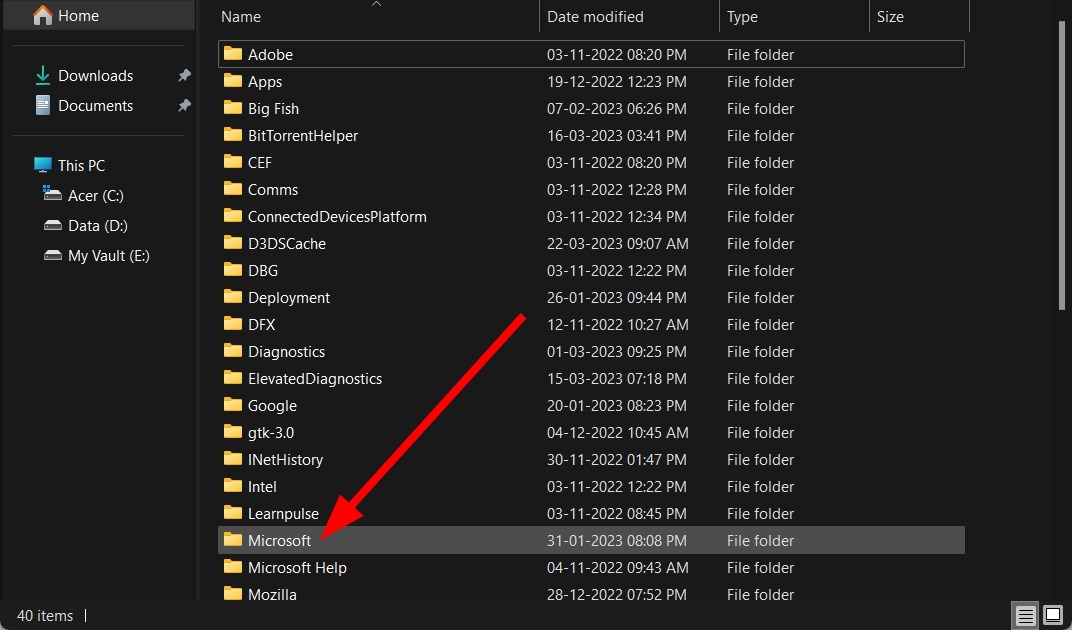
- Press the Win + R keys to open the Run dialogue.
- Type %appdata% and press Enter.

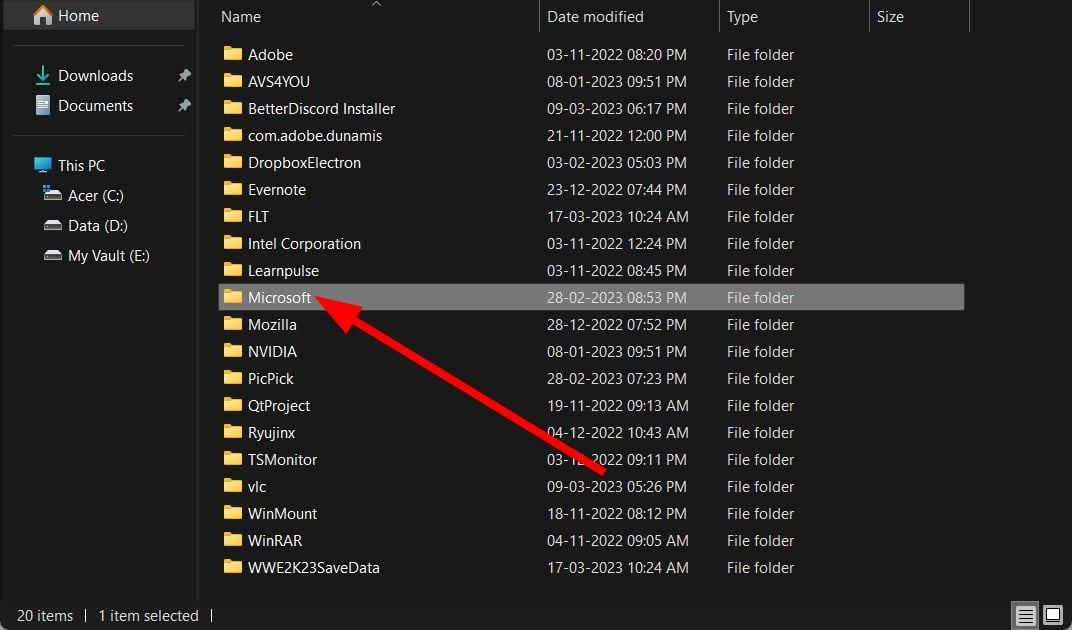
- Locate the Roaming folder.

- Open the Microsoft folder.
- Look for an entry named Outlook.
- Rename the Outlook entry to Outlook.old. Unfortunately, this will force your system to create the Outlook folder from scratch.
- Restart your PC.


You should be able to fix the Outlook error 0x80190194 after renaming the Outlook folder, as shown above.
2. Clear the contents of the OAB folder
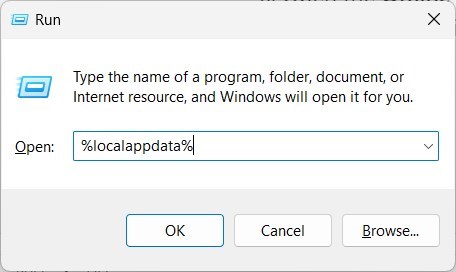
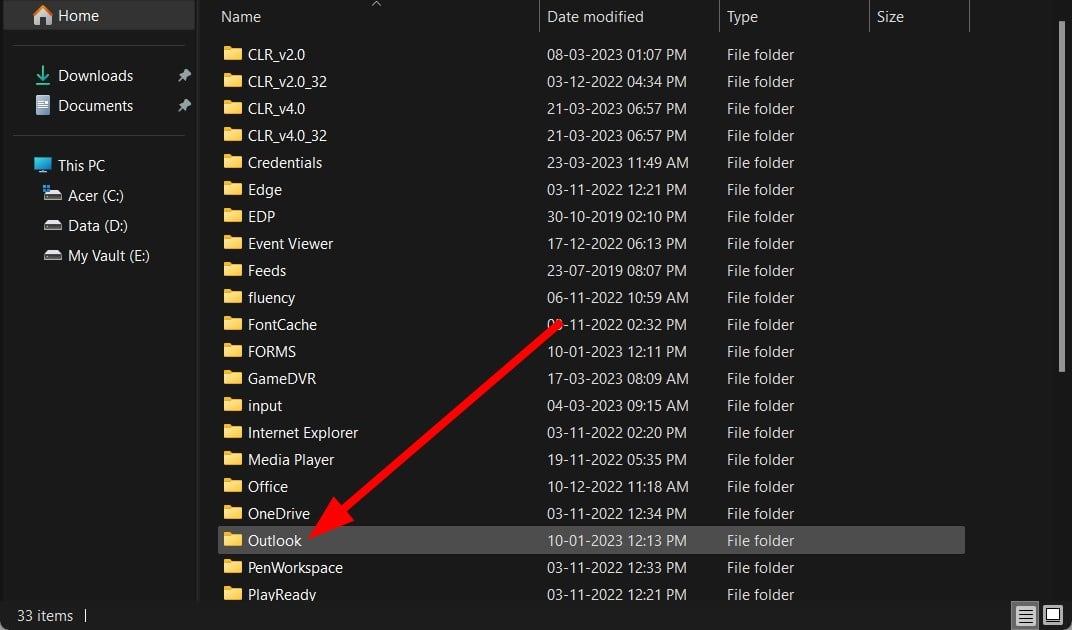
- Close the Outlook program if it is running.
- Press Win + R keys to open the Run dialogue.
- Type %localappdata% and press Enter.
- Click on Microsoft.
- Open the Outlook folder.
- Open the Offline Address Book folder.
- Select all files inside the folder.
- Delete all files.
- Restart your PC and check if this fixes the issue or not.
- Fix: Keyboard Shortcuts are not Working in Outlook
- Outlook Calendar not Allowing Edits: 3 Ways to Fix it
- Outlook Calendar not Showing Holidays? Here’s How to Fix it
- How to Fix Outlook Could not Create the Work File
- Outlook Calendar is Not Syncing? Here’s What You Can Do
3. Create a new Outlook profile
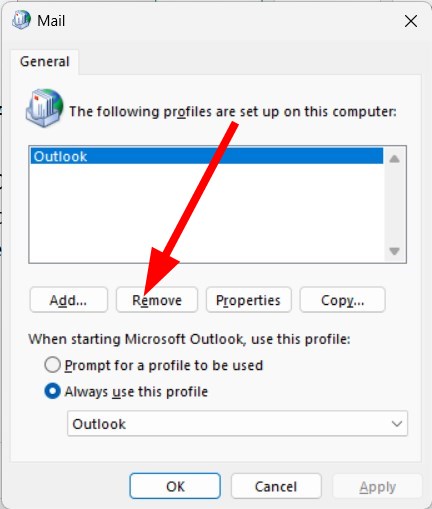
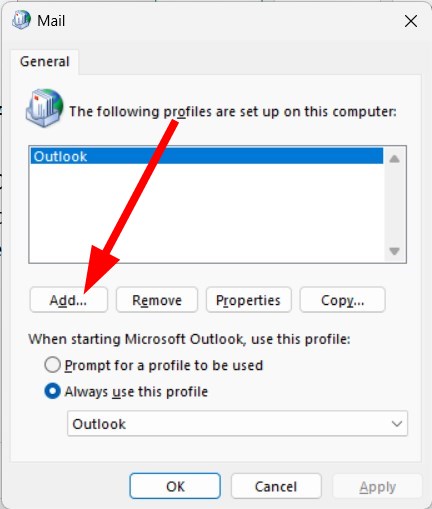
- Close all instances of Outlook.
- Press the Win + R keys to open the Run dialogue.
- Type control mlcfg32.cpl and press Enter.
- Click on Show Profiles.

- Select your Outlook profile and click on Remove.

- After removing the profile, click on Add.
- Specify a name for the profile and click OK.
- Follow the on-screen instructions and click Finish.
- Return to the Mail dialogue box and select Always use this profile.
- Click Apply.
- Restart your PC.


If nothing works, it might be that your Outlook profile is having some issue or is corrupt. Because of this, you are getting the Outlook error 0x80190194.
Create a new Outlook profile and download the Offline Address Book to see if this fixes the issue.
Speaking of address books, we have a great guide on how to update the global address list, so you might want to check it out.
That is it from us in this guide. We have a guide that explains some tips to help you fix the slow speed of Outlook email clients.
You can also check out our guide that gives you some tips to save Outlook folders to a desktop or hard drive.
Some Outlook 2016 users have reported that for them the client crashes as soon as they try to open it. This can be fixed by applying the solutions mentioned in our guide.
If you are getting the Outlook error code 0x8004011c, you should check out our guide that gives a bunch of solutions to fix the error.
Is the Outlook inbox button not working for you? If so, check out our guide that explains four methods to fix the problem.
Feel free to let us know in the comments below which one of the above solutions helped you resolve the problem.
![]()
How to fix the issue reported by «error code 0x80190194»
Special Offer
Instructions
The following steps should fix the 0x80190194 issue:
- Step 1.Download Outbyte PC Repair application See more information about Outbyte uninstall instructions EULA Privacy Policy
- Step 2.Install and launch the application
- Step 3.Click the Scan Now button to detect issues and abnormalities
- Step 4.Click the Repair All button to fix the issues
| Compatibility | Win 11, 10, 8, 7 |
| Download Size | 21.2 MB |
| Requirements | 300 MHz Processor, 256 MB RAM, 50 MB HDD |
Limitations: trial version offers an unlimited number of scans, backups and restores of your Windows system elements for free. Registration for the full version starts from USD 29.95.
Installation: When you install software, it gives our advertisers a chance to speak to you. ALL OFFERS ARE OPTIONAL. There is no obligation to accept. Simply choose to decline the offer if you are not interested. If you are interested and choose to accept, you’ll help us to offer more software in the future. Again, there is no obligation to accept any offers. You have the option to decline all advertisements and still install and use the software for free.
Web Companion is your first line of defence. With hundreds of thousands of new virus strands created every day, Ad-Aware Web Companion is the perfect complement to your antivirus and web browser security.
A malfunction reported by «error code 0x80190194» may happen due to a number of different factors. Common causes include incorrectly configured system settings or irregular entries in the system elements, to name a few. Such issues may be resolved with special software that repairs system elements and tunes system settings to restore stability.
The article provides details on what the issue means, potential causes, and ways to resolve the issue.
- 1Meaning of the «error code 0x80190194»
- 2Causes of the «error code 0x80190194»
- 3Ways to repair the «error code 0x80190194»
Meaning of the «error code 0x80190194»
«Error code 0x80190194» is an issue name that usually contains details of the malfunction, including why it occurred, which system component or application malfunctioned, along with some other information. The numerical code in the issue name usually contains data that can be deciphered by the manufacturer of the component or application that malfunctioned. The issue with using this code may occur in many different locations within the system, so even though it carries some details in its name, it is still difficult for a user to pinpoint and fix the issue cause without specific technical knowledge or appropriate software.
Causes of the «error code 0x80190194»
If you have received this warning on your PC, it means that there was a malfunction in your system operation. «Error code 0x80190194» is one of the issues that users get as a result of the incorrect or failed installation or uninstallation of software that may have left invalid entries in your system elements, improper system shutdown due to a power failure or another factor, someone with little technical knowledge accidentally deleting a necessary system file or system element entry, as well as a number of other causes.
Ways to repair the «error code 0x80190194»
For an immediate fix of such issues, advanced PC users may be able to repair it by manually editing system elements, and others may want to hire a technician to do it for them. However, since any manipulations with Windows system elements carry a risk of rendering the operating system unbootable, whenever a user is in any doubt of their technical skills or knowledge, they should use a special type of software that is meant to repair Windows system elements without requiring any special skills from the user.
The following steps should help fix the issue:
- Download Outbyte PC Repair application Special offer. See more information about Outbyte uninstall instructions EULA Privacy Policy
- Install and launch the application
- Click the Scan Now button to detect potential issue causes
- Click the Repair All button to fix found abnormalities
The same application can be used to run preventative measures to reduce the chance of this or other system issues appearing in the future.
If you are receiving an error code 0x80190194 – 0x90019 while using the Media creation tool then this article will help you to fix this. Sometimes you may get “There was a problem running this tool” error with the following error codes, 0x8007005-0x9002, 800704DD – 0x90016, or 0x80070015. You may get different error codes according to the problem, but you can use the following resolutions to fix the above-mentioned error codes.
You may receive this error due to several reasons, like a disabled process, incorrect settings, corrupted registry entries, OS conflict, and antivirus issues. You can use the following resolution methods to fix this issue.
Solution 1: Run Media Creation Tool in elevated mode:
We all know the Media Creation Tool is used to download the latest version of Windows ISO or to create a bootable Pendrive of Windows 10. If you are getting errors while creating or downloading the Windows bootable image, then the first step of resolution is to open the tool in elevated mode.
Once you downloaded the Media creation tool, just right-click on the tool .exe file and choose Run as administrator. Make sure you are using an admin account, if you don’t have admin access, then you may get these types of errors.

Solution 2: Check the Required Services are running:
To create a bootable image using the Media Creation Tool, the following services must be enabled and in running condition. If any of the services is disabled state then you may receive this error. So before running the tool make sure all the services are running.
Open run command by pressing Windows + R and type Services.msc and hit enter, this command will open the Services Management Console.
Now look for the following services one by one, and right-click on the service, and choose properties. In the Properties window under the General tab, click on the startup type dropdown menu and choose Automatic. And then Start the service. Do the same steps for all the following services.
Windows Update
Background Intelligent Transfer Service
Server
Workstation
TCP/IP NetBIOS Helper
IKE and AuthIP IPsec Keying Modules

Once you started all the required services, then close the service management console and try to run the Media Creation Tool.
Solution 3: Modify the Registry Settings:
Note: Modifying the Registry is risky, and it causes irreversible damage to your OS Installation Follow the steps correctly. Friendly advice Before Modifying Registry Creating Restore Point is recommended.
Open Run command by pressing Windows + R and type Regedit and hit enter, this command will open the Registry Editor Console.
Now navigate to the following registry path.
Computer\HKEY_LOCAL_MACHINE\SOFTWARE\Microsoft\Windows\CurrentVersion\WindowsUpdate\OSUpgrade
If you are not able to find the OSUpgrade Registry key, then right-click on the WindowsUpdate registry key and choose New > Key and name it as OSUpgrade.
Then right-click on the OSUpgrade registry key and choose New > DWORD (32-bit) value, and name the DWORD as AllowOSUpgrade.
Double click on the AllowOSUpgrade DWORD and modify the value data as 1 and click on OK.

Close the registry editor and restart the system once.
Solution 4: Run the Windows Update TroubleShooter:
Open Windows Settings by pressing Windows + I and Go to System > Troubleshoot > Other troubleshooters in Windows 11.
If you are using Windows 10, Go to Update & Security > Troubleshoot > Additional Troubleshooters.
Look for Windows Update Troubleshooter and click on Run.

Follow the on-screen instruction and complete the troubleshooting, Next restart the system once and try to run the Tool.
Solution 5: Check Media Creation Tool Permission:
First, download the Media Creation Tool from the Official Link. Right-click on the Media Creation Tool.exe and choose Properties from the Context Menu.
Under the Properties window click on the General tab.
Now under the General tab, you can see the Security option, Check the Unblock.

Click on Apply and OK. Run the Tool once again now you can run the tool without any error.
Solution 6: Disable Antivirus:
Sometimes the Antivirus may block the tool, if there is any conflict, Disabling the Antivirus temporarily will fix the issue. Disable the antivirus and run the Media creation tool, this will fix the error code 0x80190194 – 0x90019.
Enable or Disable Windows Security Center in Windows 10
Related: How to fix Media Creation Tool Error 0x80072F76-0x20017?
Recently I was working on the issue but could not find the solution anywhere so sharing this simple solution.
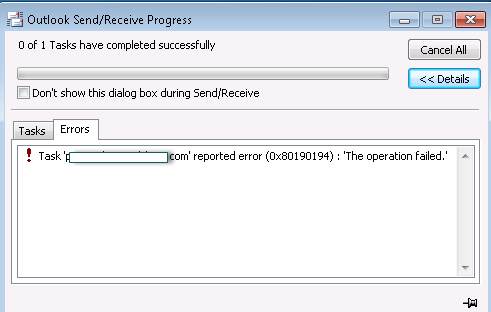
Issue: Unable to download OAB and getting the following error in outlook. ! Task ’email’ reported error (0x80190194) : ‘The operation failed.’
Troubleshooting:
-Check the bitsadmin by running the following command.
bitsadmin /list /verbose
ERROR FILE: https://webmail.domain.com/OAB/0f598966-fe8e-4792-8b1c-be019ae396cb/oab.xml -> C:UsersPrabhatAppDataLocalMicrosoftOutlookoab2.xml
ERROR CODE: 0x801901f4 – HTTP status 500: An unexpected condition prevented the server from fulfilling the request.
ERROR CONTEXT: 0x00000005 – The error occurred while the remote file was being processed.
DESCRIPTION: Microsoft Outlook Offline Address Book Directory JOB
FILES: 0 / UNKNOWN WORKING https://webmail.domain.com/OAB/0f598966-fe8e-4792-8b1c-be019ae396cb/oab.xml -> C:UsersPrabhatAppDataLocalMicrosoftOutlookoab2.xml -Search the error 0x801901f4 over internet.
-Checked the configuration. -Restarted the FDS, SA and Bits services but no luck.
-Checked the authenticated users permission at the below locations but no luck
C:Program FilesMicrosoftExchange ServerV14ExchangeOAB
C:Program FilesMicrosoftExchange ServerV14 >client access > OAB
-Ran the below command but no luck.
Set-OabVirtualDirectory OAB* -BasicAuthentication $True
Get-OfflineAddressBook | Update-OfflineAddressBook
Update-FileDistributionService -Identity <insert server name> -Type “OAB”
–Tested outlook 2010 and 2013
-Tested different laptops.
-Tested different database.
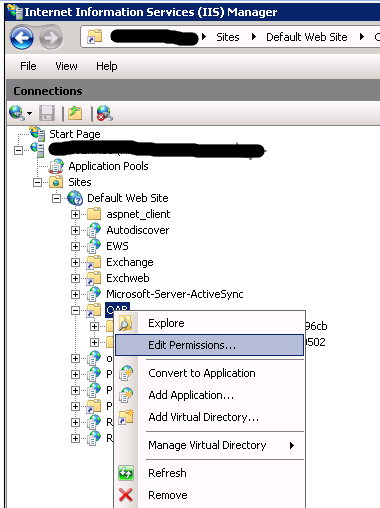
Resolution: On all the exchange server performed the below steps:
- Open the IIS Manager
-
Expand it to Default web site à OAB

-
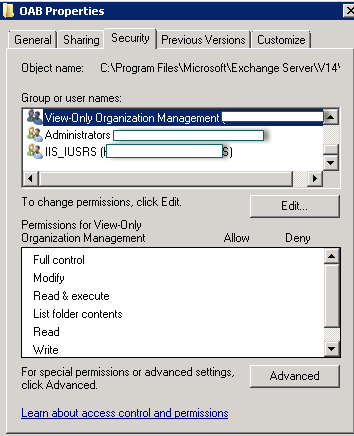
Right click edit permissions and go to Security tab
-
Added authenticated users with Read & Execute, List folder contents and Read.
- Clicked apply, ok then ok.
- On the command prompt ran the IISReset.
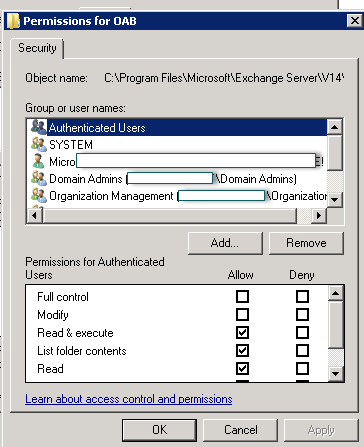
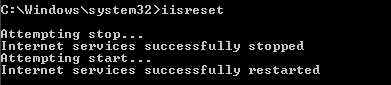
This fixed my issue and OAB started downloading.
Conclusion: Even if we have permission on the file and folder level, we might still need to configure the permissions in IIS Manager.
Prabhat Nigam
Microsoft Solution Architect | Exchange Server
Team@MSExchangeGuru
")
Posted May 11th, 2014 under Exchange 2007, Exchange 2010, OAB, Outlook, Tech Buzz, Tips.
RSS 2.0 feed.
Leave a response, or trackback.
Автор:
Roger Morrison
Дата создания:
24 Сентябрь 2021
Дата обновления:
12 Сентябрь 2023

Содержание
- Переустановка программного обеспечения Zune
- Обновите прошивку Zune
В Код ошибки C00D133C (80190194) встречается в Windows, когда пользователи пытаются обновить устройство Zune до последней версии программного обеспечения. Продукты Zune были сняты с производства в 2012 году, но некоторые пользователи все еще активно их используют. Подтверждено, что эта проблема возникает в Windows 7, Windows 8.1 и Windows 10.

Имейте в виду, что продукты Zune были сняты с производства с 2012 года, поэтому проблем ожидать не стоит. Если у вас давно установлено программное обеспечение Zune, вам следует начать это руководство по устранению неполадок, удалив текущую сборку, а затем переустановив программное обеспечение Zune по официальным каналам.
Если это не сработало, скорее всего, вы видите Код ошибки C00D133C из-за проблемы с прошивкой. Другими словами, обновление прошивки не может быть установлено, потому что серверы Zune были выключены. В этом случае вам нужно будет настроить свой собственный виртуальный веб-сервер с помощью Abyss (или другого эквивалента) и выполнить несколько других настроек, чтобы заставить программное обеспечение Zune поверить в то, что веб-серверы все еще работают, чтобы можно было обновить прошивку.
Если вы пытались подключить устройство Zune несколько раз, и конечный результат был одинаковым, вероятно, вы столкнулись с каким-либо типом повреждения, которое в конечном итоге повлияло на установку пакета Zune. Несколько затронутых пользователей увидели Код ошибки C00D133C (80190194) подтвердили, что им удалось решить эту проблему, удалив текущую версию программного обеспечения Zune, а затем переустановив последнюю версию, используя официальные каналы.
Если этот сценарий применим, следуйте приведенным ниже инструкциям, чтобы переустановить программное обеспечение Zune и посмотреть, поможет ли это решить вашу проблему. Код ошибки C00D133C:
- Перво-наперво физически отключите устройство Zune от вашего компьютера.
- Нажмите Клавиша Windows + R открыть p a Бегать диалоговое окно. Затем введите ‘Appwiz.cpl’ и нажмите Войти открыть Программы и особенности меню.
- Как только вы окажетесь внутри Программы и особенности прокрутите список установленных приложений вниз и найдите Zune Software.
- Когда вы его увидите, щелкните его правой кнопкой мыши и выберите Удалить в появившемся контекстном меню, затем следуйте инструкциям на экране, чтобы завершить удаление.
- После завершения удаления перезагрузите компьютер и дождитесь завершения следующего запуска.
- После завершения следующего запуска загрузите последнюю версию Zune, нажмите да на UAC (Контроль учетных записей пользователей), затем следуйте инструкциям на экране, чтобы завершить установку.
Примечание: Скорее всего, для установки потребуется загрузить дополнительное программное обеспечение — в этом случае щелкните Скачать и дождитесь завершения процесса. - После завершения установки снова подключите устройство Zune и посмотрите, устранена ли проблема.


Обновите прошивку Zune
Если переключение на последнюю версию не помогло, есть большая вероятность, что вы видите C00D133C из-за проблемы с прошивкой. Имейте в виду, что серверы Microsoft Zune больше не выпускаются, поэтому больше не существует автоматического способа обновления прошивки Zune. Поэтому вам придется делать это вручную.
Если этот сценарий применим, вы сможете решить эту проблему, загрузив и распаковав последнюю версию прошивки Zune вручную, а затем вручную перепрограммировав текущую прошивку вашего устройства Zune на сделанную на заказ.
Если этот сценарий кажется применимым, следуйте приведенным ниже инструкциям:
- Перейдите по этой ссылке Dropbox, содержащей последнюю версию прошивки Zune, и загрузите ZuneFirmware.zip архив. Оказавшись внутри, нажмите значок загрузки, затем нажмите Прямая загрузка и дождитесь завершения операции.
- После завершения загрузки используйте такой инструмент, как 7zip, WinZip или WinRar, чтобы извлечь содержимое ZuneFirmware.zip.
- Затем посмотрите в меню панели задач и закройте все, что публикуется Microsoft (например, Skype, Oneplus, OneNote, Office и т. Д.). Если оставить такие программы открытыми, это может помешать работе, которую мы собираемся выполнить.
- Затем перейдите к папке, которую вы только что извлекли, дважды щелкните по ней Часть 1 — Веб-сервер Abyss, дважды щелкните setup.exe, щелкните да в командной строке UAC и следуйте инструкциям на экране, чтобы установить Инструмент Abyss Webserver. Установка довольно проста, поэтому у вас не должно возникнуть проблем с ее завершением.
- После завершения установки вы должны увидеть всплывающий значок на панели задач, сообщающий вам, что программное обеспечение было успешно установлено. Оставьте инструмент открытым, затем откройте браузер по умолчанию, введите следующий адрес внутри панели навигации и нажмите Войти:
127.0.0.1
- Если вы в конечном итоге увидите страницу, в подписи которой написано На базе веб-сервера Abyss X1, вы попали в нужное место.
Примечание: Если вы не видите эту страницу, перезагрузите компьютер, чтобы программа Abyss вступила во владение при следующем запуске компьютера.
- Затем вернитесь в папку, которую вы ранее извлекли на шаге 2, дважды щелкните Часть 2 — Файлы прошивки Zune.
- Оказавшись внутри, нажмите Ctrl + A чтобы выбрать все, затем щелкните выбранный элемент правой кнопкой мыши и выберите «Копировать», чтобы сделать выбор.
- Затем перейдите в следующее место и вставьте файлы, которые вы ранее скопировали на шаге 8, внутрь:
Локальный диск (C :)> Веб-сервер Abyss> htdocs
Примечание: Местоположение веб-сервера Abyss будет другим, если вы установили его в произвольном месте.
- Если вы хотите подтвердить, что операция была успешно завершена, вернитесь в свой браузер, откройте 127.0.0.1 и посмотрите, отображаются ли только что загруженные вами файлы. Если да, то все в порядке!
- После того, как вы закончите с этим, вернитесь в папку Zune Firmware, дважды щелкните на ZuneПрошивка и скопируйте хозяева файл.
- Далее нажмите Клавиша Windows + R открыть Бегать диалоговое окно. Внутри текстового поля вставьте «% SystemRoot% System32 drivers etc ‘И ударил Войти для автоматического перехода к местоположению hosts.text файл.
Примечание: Это расположение будет одним и тем же независимо от конфигурации вашего компьютера или версии Windows.
- Как только вы окажетесь в нужной папке, щелкните правой кнопкой мыши пустое место и вставьте файл hosts, который вы ранее скопировали на шаге 11. Когда вас спросят, хотите ли вы заменить файл, нажмите на Заменить файл в месте назначения, предоставить доступ администратора и дождаться завершения процесса.
- Затем снова откройте приложение Zune. На этот раз вам не будет подсказывать то же самое Код ошибки C00D133C.
- Вместо этого вам будет предложено выполнить обновление на другом экране. Сделайте это, нажав Принять, затем дождитесь завершения процесса и наслаждайтесь использованием устройства Zune.


