-
Home
-
News
- How to Fix Windows Update Error 0x80070641 on Your PC
By Alin |
Last Updated
If you are trying to update your Windows system and encounter the error code 0x80070641, you can read this post of MiniTool Partition Wizard to fix this issue. It tells you the causes and solutions of this common Windows update problem.
What Causes the Error 0x80070641
The Windows update error 0x80070641 is usually related to the Windows Installer service, which may be corrupted and prevent you from installing the latest Windows updates. In addition, there are some other possible reasons for this issue, such as:
- Corrupted or missing Windows system files
- Malware or virus infection
- Missing, disabled, or inaccessible Windows Installer service
- Damaged or outdated Windows Installer files
- Windows registry issues
How to repair the Windows update error 0x80070641? There are some methods you can try.
Way 1. Restart the Windows Installer Service
You can try restarting the Windows Installer service to fix the error code 0x80070641. Follow the detailed steps below.
Step 1. Press Win + R to open the Run box. Then type services.msc and press Enter.
Step 2. In the pop-up Services window, scroll down and locate Windows Installer.
Step 3. Then click Restart the service. If the service is stopped, click Start.
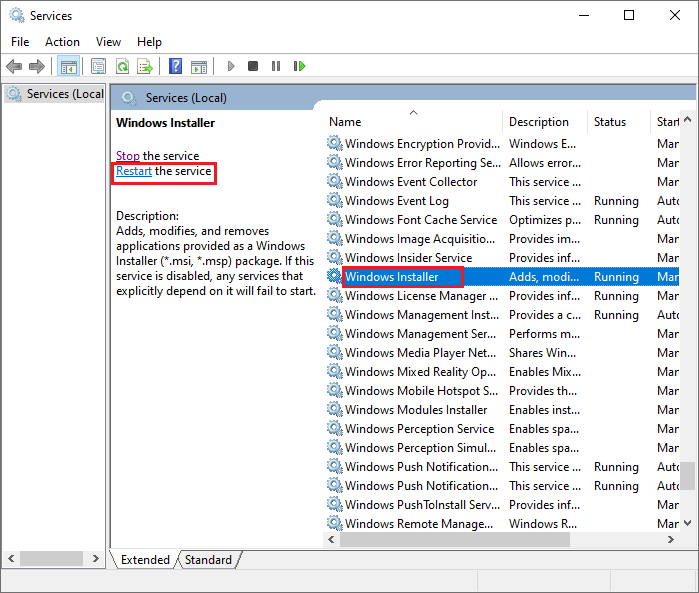
Step 4. Once done, reboot your computer and try to run the Windows update again.
Way 2. Run the Windows Update Troubleshooter
To fix the error 0x80070641, you can use the built-in Windows update troubleshooter to detect and fix common problems with Windows update. To run this tool, follow these steps:
Step 1. Right-click the Windows icon and select Settings. Then click Update & Security > Troubleshoot > Additional troubleshooters.
Step 2. In the prompted window, click Windows Update and select Run the troubleshooter.
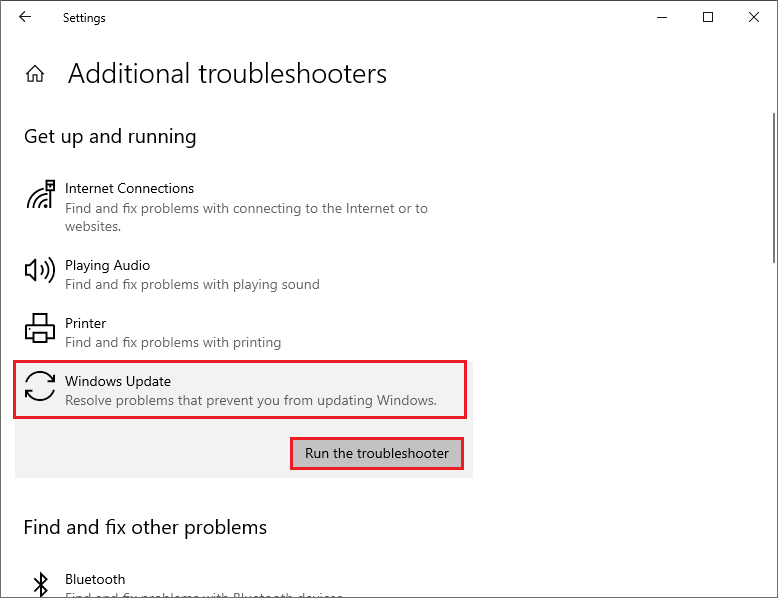
Step 3. Then follow the on-screen instructions to complete the process. Once done, reboot your PC and try to run Windows update again.
Way 3. Reset the Windows Update Components
To get rid of the error code 0x80070641, you can manually reset the Windows update components with the following steps.
Step 1. In the Run command box, type cmd and press Ctrl + Shift + Enter to run Command Prompt as administrator.
Step 2. Then type the following commands one by one and press Enter after each one.
net stop cryptsvc
net stop bits
net stop msiserver
net stop wuauserv
ren C:WindowsSoftwareDistribution SoftwareDistribution.old
ren C:WindowsSystem32catroot2 Catroot2.old
net stop cryptsvc
net start bits
net stop msiserver
net start wuauserv
Step 3. Once done, close the command prompt window and restart your PC.
Way 4. Run SFC
The corrupted or missing system files can cause the Windows update error 0x80070641. To check and repair these files, you can run SFC (System File Checker) with these steps.
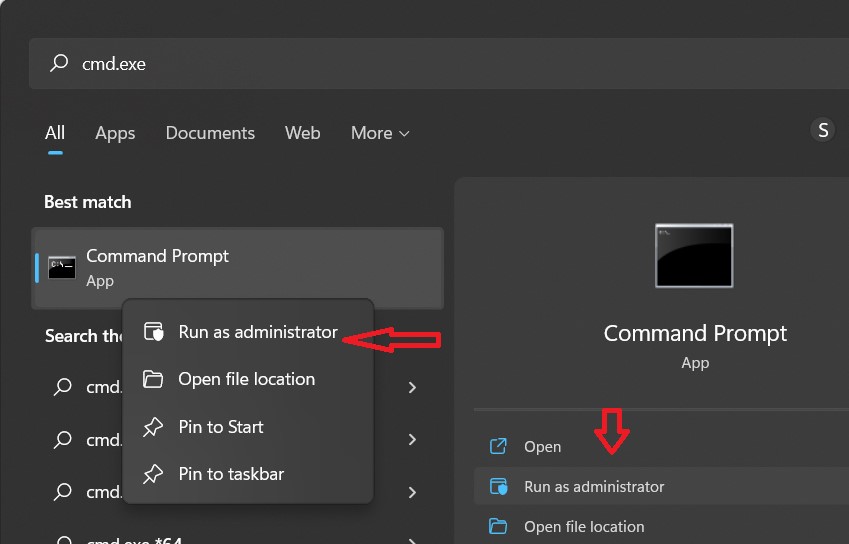
Step 1. Run Command Prompt as administrator. In the command prompt window, type the following command and press Enter.
sfc /scannow
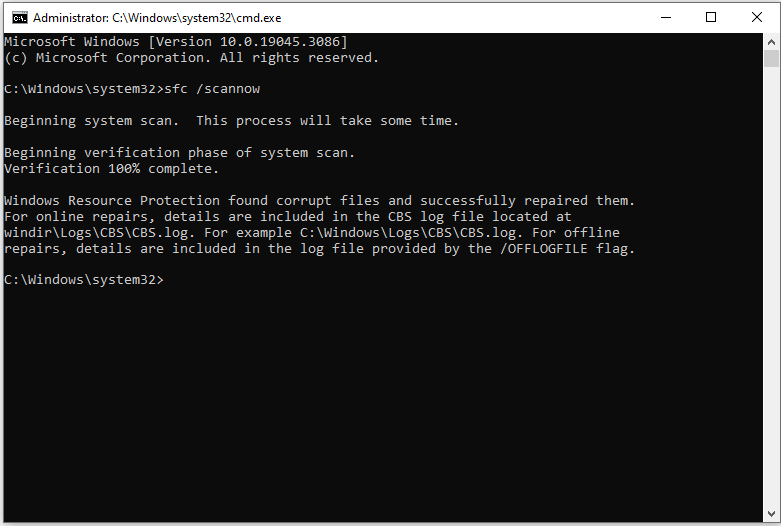
Step 2. Wait for the scan to complete. Once done, reboot your system.
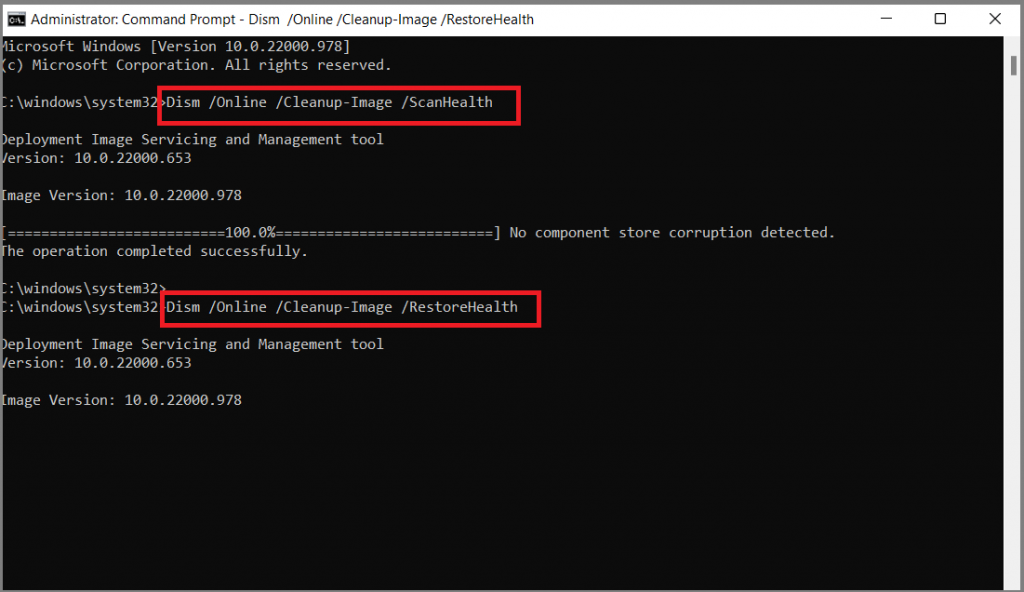
Step 3. If the issue still exists, run Command Prompt as administrator again. Then run the following commands and press Enter after each one.
DISM /Online /Cleanup-Image /CheckHealth
DISM /Online /Cleanup-Image /ScanHealth
DISM /Online /Cleanup-Image /RestoreHealth
Step 4. Once the process completes, restart your computer and check if the issue is fixed.
You can also use MiniTool Partition Wizard to check the partition for errors. Besides, it can also help you recover data and missing partitions, manage partitions, migrate OS to another disk, etc. Just click the following download button to have a try!
MiniTool Partition Wizard FreeClick to Download100%Clean & Safe
In addition to the above methods, you can try manually downloading and installing the latest Windows updates or scanning your system for viruses to resolve the error code 0x80070641.
Conclusion
You can follow the methods described in this post to fix the Windows update error 0x80070641. We hope that you can solve your problem successfully. Do you have any suggestions or nice methods to fix the error 0x80070641? You can feel free to leave a comment below.
About The Author
Position: Columnist
Alin is a new member of MiniTool. Her articles are mainly about disk & partition management, data recovery, and hard disk issues. She is enthusiastic about acquiring computer knowledge and helping users to solve problems with computers. To provide more useful and professional solutions, she will keep learning and know more computer knowledge.
- Remove From My Forums
-
Question
-
Error code: 0x80070641
Info: This Error will come while Deployment of the office patches
First Check Windows Installer Services.
Re -register the Windows Installer by following method.
Click Start, click Run, type msiexec /Unregister
(check service -It must be gone after above command.)
Then type msiexec /regserver
********************************
Regards,
Sohail Patel(MCSE,SMS2003)
-
Edited by
Tuesday, March 10, 2009 3:01 PM
-
Edited by
Answers
-
Run this command «msiexec /regserver» in the logon script and you are done.
Regds,»A journey of a thousand miles begins with a single step.»
-
Marked as answer by
Sohail Patel
Thursday, February 12, 2009 2:51 PM
-
Marked as answer by
Windows Update Error Code 0x80070641 is relatively common and can be caused by several factors in windows 10 and windows 11 PC. It is mainly caused due to a corrupted driver, program, or system files. Moreover, if your PC is infected with malware, it could likely cause the windows update error 0x80070641, Many users have reported that they cannot install the updates “2021-10 .NET 5.0.11 Security Update for Windows 11 and windows 10 for x64 Client (KB5007051)” & “2021-10 .NET Core 3.1.20 Update for Windows 11 for x64 Client (KB5007050)” on Windows 11 and windows 10 due to windows update error code 0x80070641.

Windows Update Error Code 0x80070641 Returns With Following Error
Windows Installer problem Error error 0x80070641.
Error Code 0x80070641 Installation Failure.
Windows Update Error 0x80040641.
0x80070641 the windows installer service could not be accessed.
Update Error 0x80070641 in windows 10.
Update Error 0x80070641 in Windows 11.
Here are some methods to fix this Windows 11 Update Error Code 0x80070641. Follow them and get fix this windows update error 0x80070641 easily.
Method 1 – SFC Scan to fix Windows 10 Update Error Code 0x80070641
- Firstly, right click on Command Prompt window and select Run as Administrator
- Type sfc /scannow and hit Enter

- After completion of the scan, restart your computer
- Finally, check for the issue is solved
We suggest you to chat with our experts.
Method 2 – DISM Scan to fix Windows 10 Update Error 0x80070641
- Firstly, right click on Command Prompt and select Run as Administrator
- After that, type the following commands and Press the Enter key after each command
DISM.exe /Online /Cleanup-image /Scanhealth
DISM.exe /Online /Cleanup-image /Restorehealth
- To close the Administrator
- Type Exit in the Command Prompt window and then press Enter
Method 3 – Repair .NET Framework
To resolve the windows update error in Windows 11 and windows 10 update, is to repair the .NET Framework.
To do that:
- Firstly, Download and Run the Microsoft .NET Framework Repair Tool
- Secondly, Accept the License terms and click Next.
- Finally, Click Next again, at “”Recommended changes” screen.
Manually Install the Failed Updates.
You can download manually .NET Framework the fix the Windows 11 Update Error 0x80070641 on Windows 11 , windows 10 update, is to download and install manually the updates.
To do that:
- Download the corresponding SDK installer package from the following links: *
- Download .NET 6 – Click Here
- Download .NET 5 – Click Here
- Download .NET 3.1 – Click Here
Still not working.
Reset the windows components
Disclaimer: We recommend you to do the back up before we proceed these steps, during reset Windows 11 and windows 10 installation means that all your files and settings will be lost during the reset process.
Windows 10 – Reset your PC
- Select Start > Settings > System > Recovery. Open Recovery settings.
- Next to Reset this PC, select Reset PC. Then choose from the options and/or settings in the table below.
Windows 11 – Reset your PC
- Select Start > Settings > System > Recovery. Open Recovery settings.
- Next to Reset this PC, select Reset PC. Then choose from the options and/or settings in the table below.
In Conclusion,
If you have problem in following this methods, then we suggest you to choose a Technical Support from us to help you better. I am sure they will give you the best solutions to resolve this Windows Update Error completely. You can also visit our website for more information.

Windows Update Error Code 0x80070641 is fairly common and can be caused by several factors in windows 10 and windows 11 PC. It’s substantially caused due to a spoiled motorist, program, or system lines. also, if your PC is infected with malware, it could probably beget the windows update error 0x80070641, many customers have reported that they cannot install the updates “ 2021- 10. NET5.0.11 Security Update for Windows 11 and windows 10 for x64 customer (KB5007051)” & “2021- 10. NET Core3.1.20 Update for Windows 11 for x64 customer (KB5007050)” on Windows 11 and windows 10 due to windows update error code 0x80070641.

[KB9199236]-How to Fix Windows Update Error Code 0x80070641?
Then are some styles to fix this error code 0x80070641. Follow them and get fix this windows update error 0x80070641 fluently.
Method 1 – SFC overlook to fix error code 0x80070641
- Originally, right click on Command Prompt window and elect Run as director
- Type sfc/ scannow and hit Enter
- SFC overlook to fix Error Code 0x80070641
- After the checkup is completed, renew your computer
- Eventually, check for the issue is answered
We suggest you to chat with our experts.
Method 2 – DISM overlook to fix Error Code 0x80070641
- Firstly, right click on Command Prompt and elect Run as director
- After that, type the following commands and Press the Enter key after each command
DISM.exe /Online /Cleanup-image /Scanhealth
DISM.exe /Online /Cleanup-image /Restorehealth
- To close the director
- Type Exit in the Command Prompt window and also press Enter
Method 3 – form. NET Framework
To resolve the windows update error code 0x80070641 in Windows 11 and windows 10 update, is to repair the. NET Framework.
To do that
Download and Run the Microsoft. NET Framework Repair Tool
Accept the License terms and click Next.
Click Next again, at “” Recommended changes ” screen.
Manually Install the Failed Updates.
You can download manually. NET Framework the fix the windows update error 80070641 on Windows 11, windows 10 update, is to download and install manually the updates.
To do that
Download the corresponding SDK installer package from the following links *
- Download .NET 6 – Click Here
- Download .NET 5 – Click Here
- Download .NET 3.1 – Click Here
Still not working.
Reset the windows factors
Disclaimer: We recommend you to do the reverse up before we do these way, during reset Windows 11 and windows 10 installation means that all your lines and settings will be lost during the reset process.
Windows 10 – Reset your PC
- Select launch> Settings> System> Recovery. Open Recovery settings.
- Coming to Reset this PC, elect Reset PC. also choose from the options and/ or settings in the table below.
Windows 11 – Reset your PC
- Select Start> Settings> System> Recovery. Open Recovery settings.
- Coming to Reset this PC, elect Reset PC. also choose from the options and/ or settings in the table below.
In Conclusion,
Still, also we suggest you to choose a Technical Support from us to help you better, If you have problem in following this styles. I’m sure they will give you the stylish results to resolve this Windows Update Error Code 0x80070641 fully. You can also visit our website for further information.

Не удалось получить доступ к службе установщика Windows Installer — как исправить
 При установке программ и компонентов Windows, распространяемых в виде установщика с расширением .MSI вы можете столкнуться с ошибкой «Не удалось получить доступ к службе установщика Windows Installer». С проблемой можно столкнуться в Windows 10, 8 и Windows 7.
В этой инструкции подробно о том, как исправить ошибку «Не удалось получить доступ к службе установщика Windows Installer» — представлено несколько способов, начиная с более простых и часто более эффективных и заканчивая более сложными.
Примечание: прежде чем приступать к следующим шагам, рекомендую проверить, а есть ли на компьютере точки восстановления (панель управления — восстановление системы) и использовать их, если они в наличии. Также, если у вас отключены обновления Windows, включите их и выполните обновление системы, часто это решает проблему.
Проверка работы службы «Установщик Windows», её запуск при необходимости
Первое, что следует проверить — не отключена ли служба «Установщик Windows» по какой-либо причине.
Для этого выполните следующие простые шаги
- Нажмите клавиши Win+R на клавиатуре, введите services.msc в окно «Выполнить» и нажмите Enter.
- Откроется окно со списком служб, найдите в списке «Установщик Windows» и дважды нажмите по этой службе. Если служба отсутствует в списке, посмотрите, есть ли там Windows Installer (это одно и то же). Если же нет и её, то о решении — далее в инструкции.

- По умолчанию, тип запуска для службы должен быть установлен в положение «Вручную», а обычное состояние — «Остановлена» (она запускается только в процессе установки программ).
- Если у вас Windows 7 или 8 (8.1), а тип запуска для службы Установщик Windows установлен в «Отключено», измените на «Вручную» и примените настройки.
- Если у вас Windows 10 и тип запуска установлен «Отключена», вы можете столкнуться с тем, что изменить тип запуска в этом окне нельзя (такое может быть и в 8-ке). В этом случае выполните шаги 6-8.
- Запустите редактор реестра (Win+R, ввести regedit).
- Перейдите к разделу реестраи дважды нажмите по параметру Start в правой панели.
- Установите для него значение 3, нажмите Ок и перезагрузите компьютер.


Также, на всякий случай проверьте тип запуска службы «Удаленный вызов процедур RPC» (от него зависит работа службы установщика Windows) — он должен быть установлен в «Автоматически», а сама служба — работать. Также на работу могут влиять отключенные службы «Модуль запуска процессов DCOM-сервера» и «Сопоставитель конечных точек RPC».
В следующем разделе описывается, как вернуть службу «Установщик Windows», но, помимо этого, предложенные исправления также возвращают и параметры запуска службы по умолчанию, что может помочь в решении проблемы.
Если нет службы «Установщик Windows» или «Windows Installer» в services.msc
Иногда может оказаться, что службы «Установщик Windows» отсутствует в списке служб. В этом случае вы можете попробовать восстановить её, использовав reg-файл.
Скачать такие файлы вы можете со страниц (на странице вы найдете таблицу со списком служб, скачайте файл для Windows Installer, запустите его и подтвердите объединение с реестром, после выполнения слияния, перезагрузите компьютер):
Проверьте политики службы установщика Windows
Иногда твики системы и изменение политик установщика Windows могут привести к рассматриваемой ошибки.
Если у вас Windows 10, 8 или Windows 7 Профессиональная (или Корпоративная), вы можете проверить, не были ли изменены политики установщика Windows следующим образом:
- Нажмите клавиши Win+R и введите gpedit.msc
- Перейдите к разделу Конфигурация компьютера — Административные шаблоны — Компоненты — Установщик Windows.
- Убедитесь, что для всех политик установлено «Не задана». Если это не так, дважды нажмите по политике с заданным состоянием и установите его в «Не задано».
- Проверьте политики в аналогичном разделе, но в «Конфигурация пользователя».

Если на вашем компьютере установлена домашняя редакция Windows, путь будет следующим:
- Зайдите в редактор реестра (Win+R — regedit).
- Перейдите к разделуи проверьте, есть ли в нем подраздел с именем Installer. Если есть — удалите его (правый клик по «папке» Installer — удалить).
- Проверьте наличие аналогичного раздела в
Если приведенные способы не помогли, попробуйте восстановить работу службы установщика Windows вручную — 2-й способ в отдельной инструкции Служба установщика Windows недоступна, также обратите внимание и на 3-й вариант, он может сработать.
А вдруг и это будет интересно:
Почему бы не подписаться?
Рассылка новых, иногда интересных и полезных, материалов сайта remontka.pro. Никакой рекламы и бесплатная компьютерная помощь подписчикам от автора. Другие способы подписки (ВК, Одноклассники, Телеграм, Facebook, Twitter, Youtube, Яндекс.Дзен)
Спасибо за правильное направление.
В службе при перезапуске выдавало ошибку, обратил внимание путь к файлу был неправильный исправил в реестре заработало!
Источник
[Ошибка:] Не удалось получить доступ к службе установщика windows installer
Всем привет! Спешу поделится полезной статьей и видео уроком на тему: «Как безопасном режиме удалить приложение?» если вылетает ошибка:
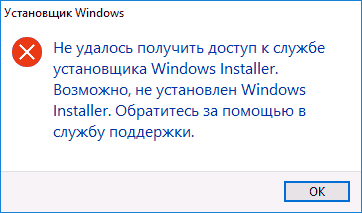
Не удалось получить доступ к службе установщика Windows Installer. Возможно не установлен Windows Installer. Обратитесь за помощью в службу поддержки

К данной ошибки и видео я подошел и решил описать после того, как мне на работу принесли ноутбук который после включение начинал тупить так, что даже выключение компьютера занимало около 20 минут. После включения я сразу увидел что в диспетчере задач было около 2000 тыс и количество росло каждую минуту, процесс которые плодили относились к Java. Было принято решение снести это приложение как и другие, но в безопасно режиме!
Запуск Windows Installer в обычном режиме Windows
Но отступлюсь от статьи и скажу, что если данная ошибка может возникает в обычной загрузке windows если она по какой то причине остановилась, то нужно зайти в службы и запустить Установщик Windows:

- нажимаем на клавиатуре комбинацию WIN+R (или пуск выполнить)
- вводим команду services.msc
- ищем в списке службу Установщик Windows
- Запускаем ее
- все
Но моя статья о том как это сделать в безопасно режиме, потому как там по умолчанию отключена данная служба.
Приступаем к решению проблемы с ошибкой —
Не удалось получить доступ к службе установщика Windows Installer (в безопасном режиме)
- Перезагружаем компьютер в безопасный режим
- Открываем реестр
- Ищем ветку [HKEY_LOCAL_MACHINE\SYSTEM\CurrentControlSet\Control\SafeBoot\Minimal]
- Кликаем на ветке Minimal и выбираем пункт создать раздел
- и создаем раздел MSIServer
- Открываем Панель управления -> Администрирование -> службы
- Ищем службу ->Установщик Windows
- Запускаем ее
- Далее идем в панель Установка и удаление программ
- удаляем программы
- говорим спасибо или пишем в комментариях если не получилось или есть вопросы.
Ну и по нашим новым обычаям я выкладываю свое видео как это сделать, для тех кто не любит читать )))
The Windows Installer service could not be accessed
В данном видео Вы знаете как исправить ошибку: не получен доступ к windows installer, не удается получить доступ к windows installer, windows installer, windows installer не устанавливается, windows installer errors, windows installer запустить, доступ к службе windows installer, ошибка windows installer при установке, ошибка windows installer windows 7, ошибка пакета windows installer, служба windows installer, установщика windows installer
Источник
Не удалось получить доступ к службе установщика Windows Installer

Иногда происходит так, что при установке какой-либо программы вы получаете системное сообщение Windows о невозможности получить доступ к этой службе:
Не удалось получить доступ к службе установщика Windows Installer. Возможно, не установлен Windows Installer. Обратитесь за помощью в службу поддержки.
Для начала определимся что такое Windows Installer. Это системная служба, которая отвечает за установку, изменение и удаление программ, которые имеют расширение .msi. Существует несколько причин возникновения этой проблемы. Рассмотрим их ниже.
Первая причина, по которой может возникнуть эта ошибка кроется в ограничении ваших прав пользователя на данном компьютере. В этом случае следует попробовать установить программу с правами администратора (это делается через правый щелчок мыши по иконке приложения).
Вторая причина может скрываться в настройках системных служб, так что проверьте их. Делается это так: «Пуск» — «Панель управления» — «Система и безопасность» — «Администрирование» — «Службы».

В открывшемся окне «Службы (локальные)» в самом низу списка находим раздел «Установщик Windows» и дважды кликаем по этому пункту левой кнопкой мышки.

Откроется окно настройки службы установщика, нам нужна вкладка «Общие». В строке «Тип запуска» должно быть установлено «Вручную». И убедитесь в том, что в качестве исполняемого файла значится:
Вместо C может стоять, например, буква D — это буквы локальных дисков.
Теперь переходим на вкладку «Зависимости». В большом окне Данная служба зависит от следующих компонентов должно быть написано «Удаленный вызов процедур (RPC)», как на изображении ниже:

Третья причина может крыться сопоставлении программы для файлов с расширением .msi. Открываем меню «Пуск» — «Панель управления» — «Программы» — «Программы по умолчанию» — «Задать сопоставление». Если у вас сопоставление не задано, или там указан не Windows Installer, необходимо исправить это, как показано на картинке ниже:
Источник