Download Windows Speedup Tool to fix errors and make PC run faster
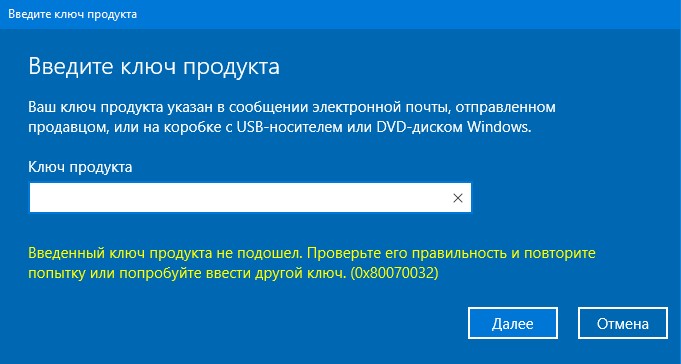
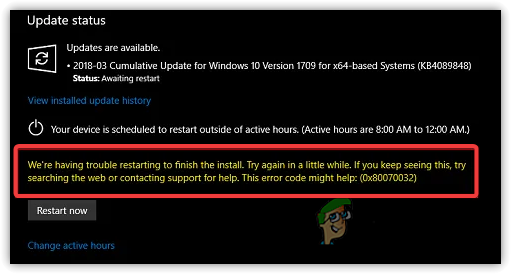
At times while trying to update Windows, the process might get stuck and return the error code 0x80070032. If you encounter the Windows Update error 0x80070032, then read through this article for the resolution.

We’re having trouble restarting to finish the install (0x80070032)
The error is caused when a specific Windows update is stuck, and you need to pass through it. To resolve Windows Update error 0x80070032, try the following solutions sequentially:
- Restart the computer
- Uninstall the latest update
- Reset Windows Update components
- Run the Windows Update troubleshooter
1] Restart the computer
The first approach the solving this problem should be to simply restart the computer. If this helps, it could save you a lot of time.
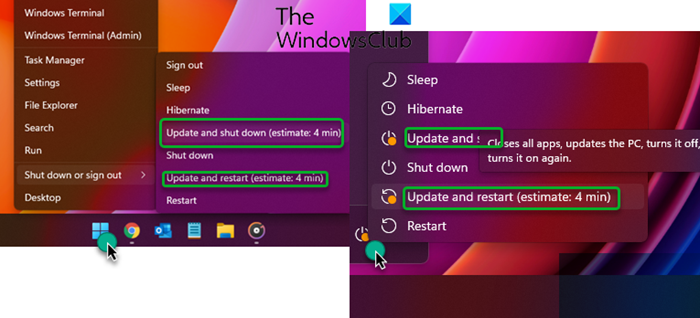
You could use the Restart button that you see in Settings or use the Update and shut down or Update and restart options from the WinX Menu or the Start Menu.
2] Uninstall the latest update
In case the latest update is problematic, or the file is corrupt, it will cause the Windows Update error 0x80070032. To resolve this error, simply uninstalling the current update will be helpful for most users. The procedure to uninstall updates on Windows 11 is as follows:
- Right-click on the Start button and select Settings.
- In the Settings window, go to the Windows Update tab on the list on the left-hand side.
- In the right pane, click on Update history. The Update history page will show the list of recent updates.
- If you scroll down a little, you will find the option to Uninstall updates.
- Click on it to open the page to open the Installed updates page in the Control Panel.
- Simply right-click on the latest updates and select uninstall.
3] Reset Windows Update components
If uninstalling the latest update doesn’t work, then you can consider resetting Windows Update components. Doing so will change the settings related to Windows Updates to default.
4] Run the Windows Update troubleshooter
The Windows Update troubleshooter is an excellent tool for diagnosing issues related to Windows Updates and resolving them if possible. The procedure to run the Windows update troubleshooter in Windows 11 is as follows:
- Right-click on the Start button and select Settings.
- In the Settings window, go to the System tab on the list on the left-hand side.
- In the right pane, scroll down and select Troubleshoot. In the next window, select Other troubleshooters.
- This will open the list of built-in troubleshooters for Windows 11.
- From the list, click on Run corresponding to the Windows Update troubleshooter.
The troubleshooter will start detecting problems and resolve them if in scope.
Please let us know if this helped you in the comment section.
NOTE: Error 0x80070032 can also be seen for – WslRegisterDistribution failed | Microsoft Store | When copying files | Windows Backup.
How do I fix Windows Update failed to install?
If Windows Update fails to install or will not download on Windows PC, then first, run the System File Checker and DISM tool, delete temporary files, use Windows Update troubleshooter, and try again. If that doesn’t help in any way, reset the Catroot folder, delete the SoftwareDistribution folder, and set the Windows Update service to Automatic or Manual, Background Intelligence Transfer Service to Manual, etc.
What is 0x80070032 file history?
Error 0x80070032 for File History occurs when you try to turn on the Automatic backup my files option. So, if you receive this error and want to fix the 0x80070032 backup error on your Windows PC, then delete the old backups, and then try again. You may also need to reset or delete all backup settings and reconfigure the File History backup to fix this error.
Hope this is helpful.
Anand Khanse is the Admin of TheWindowsClub.com, a 10-year Microsoft MVP (2006-16) & a Windows Insider MVP (2016-2022). Please read the entire post & the comments first, create a System Restore Point before making any changes to your system & be careful about any 3rd-party offers while installing freeware.
Windows 10 attracts users in large numbers because of its amazing GUI and prominent features. Although there’s no doubt when it comes to its popularity; however, it is not the best version of Windows.
This version comes with various flaws, such as error 0x80070032, which are worth noting by Microsoft. Microsoft claims that Windows 10 will revolutionize the Operating System world.
However, most users are unable to take this. This is because users experience problems with Windows 10 in some way or another.
What Is Error 0x80070032? How Does It Happen?
After you install Windows 10, the PIN sometimes stops working, showing an error 0x80070032. If it occurs, you cannot log in to Windows using your PIN passcode and don’t know what to do. Keep on reading further.
Windows 10 OS comes with a feature called Windows Hello for the sake of protection. It is an access control and biometric identity which enables logging into Windows through fingerprint, facial recognition, iris, or PIN passcode.
Unfortunately, Hello is not available for Windows 10 users. Older devices, which do not have the necessary hardware elements, like iris or fingerprint scanners, have to buy biometric USB iris/fingerprint scanners or forget about Windows Hello.
Normally, iris, facial, or fingerprint recognition login is accompanied by PIN passcodes. This is the most protected way to sign in to Windows 10 as a PIN passcode is simpler to memorize, while the facial contours, fingerprint, or iris of the user are very hard to counterfeit.
On Windows Hello, users come across problems like PIN passwords or fingerprints that would not work. The most common login error is the PIN 0x80070032 error. Most users claim that this issue occurred after they installed Windows 10 Fall Creators Update when compromised fingerprint or PIN login.
The most common issue with Windows 10 is “Apps won’t sync in Windows 10“, which shows up along with the error 0x80070032 code.
It even flashes a message which says, “We can’t sync at the moment. But you may find more info about this error code at www.windowsphone.com.”
The most affected application by this error code is Windows 10 Mail application. As per records, users cannot synchronize their accounts using the Mail application as this app turns non-operational. Here, you will get to learn how to resolve this issue.
Microsoft has investigated the error 0x80070032, but they have not announced the official approval of this bug or its patch. There are various reasons why your PIN stops working while flashing the error 0x80070032.
It shows up on your computer screen as “Something went wrong. Try again later. Error code: 0x80070032.” So, look at various solutions to eliminate this annoying error code.

PS: Regarding the Windows Update Error 0x80070020, here are your top solutions.
Reasons Why the Error Code 0x80070032 Occurs
Microsoft servers are the main reason for initiating this issue with the Mail application. Here, the accounts of users do not sync with servers properly.
Besides, here is the full review of Unsecapp.exe for the WMI Client Application for your reference.
Remove the NGC Folder’s Content to Eliminate 0x80070032
If you cannot log into Windows 10 using your PIN, try signing into your account and removing the NGC folder’s content.
Before you do that, you need to take the folder’s ownership. To perform this action, go through the instructions listed below.
Steps to get rid of the error 0x80070032:
- 1: First, you must log into Windows 10 with your password.
- 2: Tap Windows + X keys and choose ‘File Explorer.’
- 3: Now, go to C:WindowsServiceProfilesLocalServiceAppDataLocalMicrosoft.
- 4: Next, right-tap on the folder NGC and choose ‘Properties.’
- 5: Navigate to the tab ‘Security,’ select ‘Advanced,’ and then look for the section ‘Owner.’

- 6: Tap on the link ‘Change‘ and type in the user or administrator and object names.
- 7: Choose ‘Check Names‘ and hit ‘O.K.’
- 8: Check against the option ‘Replace Owner on subcontainers and Objects,’ After this, select ‘Apply‘ and press O.K. to save the changes.
- 9: Next, see if you can access this NGC folder. Mark all the stored files in the folder if you can and remove those files.
- 10: Tap Windows + I keys to open Settings.
- 11: Now, open the ‘Account Settings‘ tab and choose ‘Sign-in Options.’
- 12: Select ‘Add a PIN‘ by following the on-screen instructions to set a PIN.
Resolve the 0x80070032 Error Using ‘I Forgot My PIN.’
Another method to eliminate the error 0x80070032 is by choosing the option ‘I forgot my PIN.’ To perform this action, you have to follow the following procedure.
Steps to eliminate the error 0x80070032:
- 1: Tap Windows + I keys to open Settings on your system.
- 2: Select the section ‘Accounts‘ and then choose ‘Sign-in options.’
- 3: Find the ‘PIN‘ tab and tap on ‘I forgot my PIN.’

- 4: Tap on ‘Continue‘ to confirm your action.
- 5: Now, you need to type in a new PIN. Once you have entered the passcode, press O.K.
- 6: You could be asked to type your Microsoft account passcode. In that case, change the account type from Microsoft to Local and try all the steps again.
Resolve the Error 0x80070032 Through PIN Recreation
This is another effective way to get rid of the error code 0x80070032. It is performed by recreating the PIN.
By the way, if you are facing an issue with ERR_CERT_DATE_INVALID, click to read more.
Steps to get rid of the error 0x80070032:
- 1: Tap Windows + I keys to open Settings.
- 2: Go to the section ‘Accounts‘ and then ‘Sign-in Options.’
- 3: Navigate to the PIN section and choose ‘Remove.’

- 4: Tap on ‘Remove‘ to confirm your action.
- 5: Type in your account’s password and hit O.K.
- 6: Once done, tap on ‘Add‘ and enter a new PIN.
- 7: Tap O.K. to save it and see if the issue persists or not;
Note: If you are a Dell user facing the error 0x80070032 on your system, try eliminating the security tools from Dell Data Protection. Also, remove their leftovers or temporary files through Windows Registry or Reimage.
Solutions for Fixing the Error 0x80070032 on Mail
Here are various fixes that can assist you in resolving the issue with the Mail application on Windows 10 systems.
Method 1: Switch to Microsoft from a Local Account
This method is great for resolving the error code problem on Windows. Follow the instructions to get rid of this annoying Error.
1: Firstly, you have to switch from Microsoft to a local account. To do so, visit ‘Settings‘ with the help of Cortana. Within the ‘Settings‘ tab, look for ‘Accounts‘ to open the settings associated with the user accounts.

2: Next, you have to choose ‘Sign in with a local account‘ instead, which you will find under the account’s right-pane window. After that, enter the password of the present Microsoft account. Tap on ‘Next‘ to create a new local account.

3: Type in the local account’s details, such as username and passcode. Next, tap on the tab ‘Next‘ again. In the next tab, you will see a button branded as ‘Sign out and finish.’ Select this button to sign out of your Microsoft account.

4: Next, repeat the steps. Visit ‘Settings‘ and choose ‘Accounts.’ Then, select ‘Sign in‘ with a Microsoft account instead. Type in the local account’s password, along with the username and password of the Microsoft account, for signing in again. See if you could check Mail by syncing the account.

Method 2: Reinstall Mail
Try this one out if the primary method cannot offer you a proper fix to the error code problem. Here, you have to reinstall Mail to fix the syncing problem. To perform this action, follow some simple steps listed below.
1: Visit PowerShell from the search results once you have searched for it. Right-tap on this tab and choose ‘Run as Administrator.’ Please note that opening this tab as an administrator is significant, or you will face an error.

2: Within the PowerShell tab, type the command.
Get-appxprovisionedpackage – online | where-object {$ .packagename – like “*windowscommunicationsapps*”} |remove – appxprovisionedpackage – online

Once you have executed this command, close PowerShell and install the Mail application again from Windows Store.
After you have installed this application, run the same, and check whether the error 0x80070032 has been resolved.
Repair Errors Automatically
Here, we have tried our best to offer the best solutions to fix this annoying error code 0x80070032. Users can fix this issue using the solutions mentioned here.
Automatic software is best if you do not like to struggle with repair techniques. There are lots of repair tools available online for fixing Windows-related errors.
So, choose the best one and eliminate your issue. However, it is recommended to use the above-listed methods to fix the Error.
Также в случае других причин, можно попробовать решить проблему следующими способами.
1. Не загружается обновление.
- Отключаем антивирус и VPN.
- Пробуем снова запустить обновление.
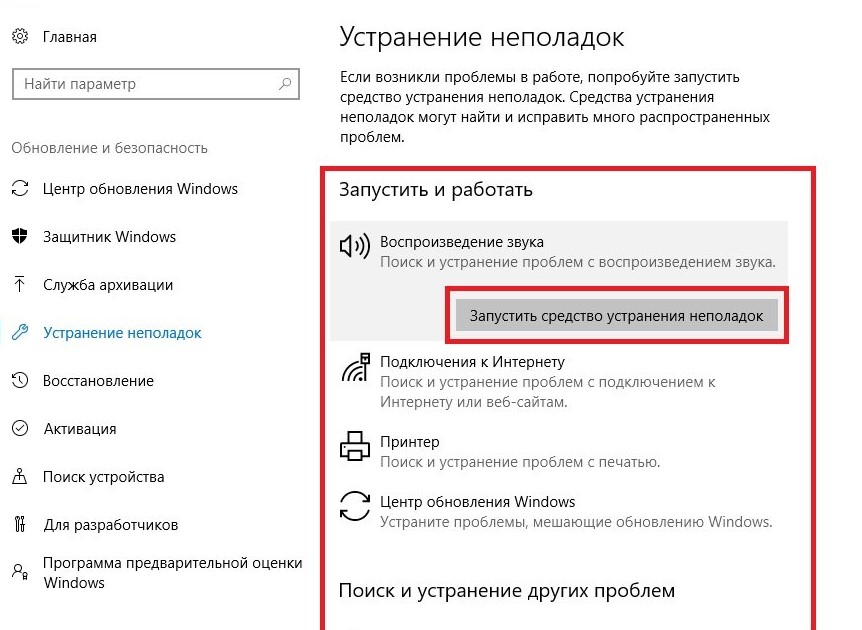
- В случае возникновения ошибки, можно воспользоваться встроенными инструментами системы. Для этого необходимо нажать комбинацию клавиш Win+I, открыть «Параметры», зайти в пункт «Обновление и безопасность» и найти «Устранение неполадок». Далее выбираем «Центр обновления Windows» и нажимаем «Запустить средство устранения неполадок».
Есть и специальная утилита, которая позволяет решить проблему — Windows 10 Update Troubleshooter.
2. Обновление зависает на стадии до 95%.
В этом случае сбоят файлы обновления. Чтобы устранить причину, в папке Download пользователю необходимо удалить все загруженные файлы, перезапустить компьютер и возобновить процедуру обновления.
Если не поможет, пробуем следующее решение:
- Переходим в «Пуск»;
- Выбираем «Службы» и ищем пункт «Оптимизация доставки»;
- Далее нажимаем «Свойства», устанавливаем ручной тип запуска.
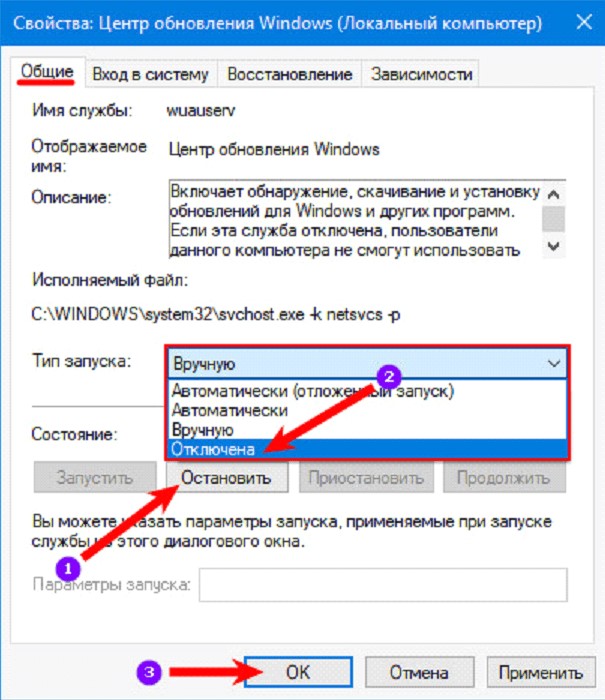
Затем необходимо перезагрузить ПК и попробовать обновить систему заново. Если сбой сохраняется, «Тип запуска» меняем на «Автоматический (отложенный запуск)» и останавливаем службу «Центр обновления Windows»:
- «Пуск»;
- «Службы»;
- «Центр обновления Windows» — «Остановить».
Далее снова перезагружаем компьютер и запускаем обновление, загрузка должна пойти в нормальном режиме.
3. Ошибка 0x80070032 при установке Windows 10.
Во время установки ОС также может возникнуть код ошибки 0x80070032. Например, проблема может возникнуть на этапе подготовки к настройке Windows. Что делать в этом случае?
- Выключаем ПК, удерживая кнопку питания;
- Включаем компьютер и активируем безопасный режим;
- При необходимости заходим в свою учетную запись.
Далее пользователю необходимо зайти в меню «Пуск», «Восстановление» и нажать «Запуск восстановления системы». Предварительно нужно убедиться, что сканеры антивирусных программ отключены.
Выбираем одну из ранних точек восстановления системы и нажимаем «Далее». Затем выполняем пошаговые инструкции для процесса восстановления системы.
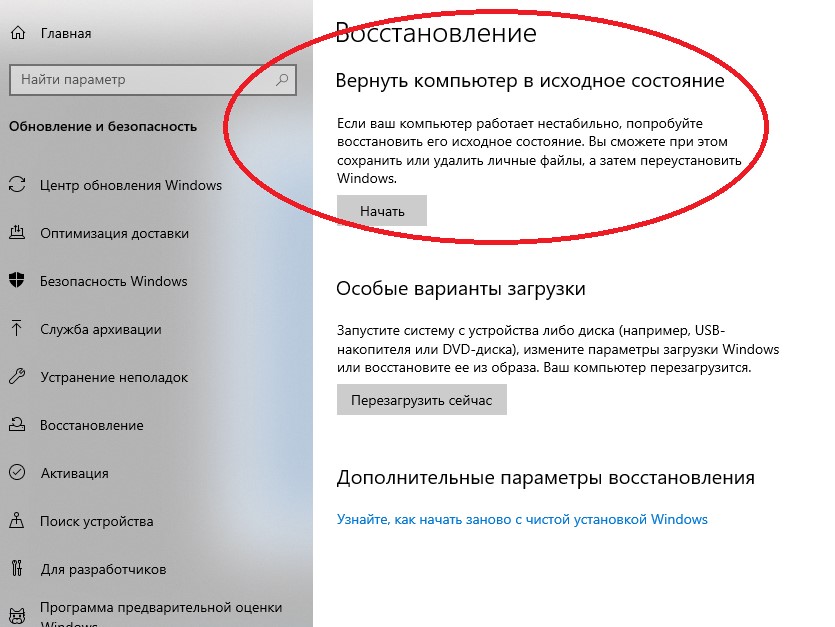
Указанные действия в большинстве случаев устраняют ошибку зависания установки Windows, даже если восстановление системы не будет завершено успешно. После входа в учетную запись, отключаем антивирусы и запускаем процесс обновления операционной системы.
Другие сбои установки или обновления Windows и методы решения
В некоторых случаях при попытке установить или обновить ОС ошибка 0x80070032 может вызывать синий «экран смерти». В этом случае проблема может быть более серьезная, и пользователю стоит просто удалить проблемное обновление с системного диска и повторить процедуру с более корректными файлами.
В некоторых ситуациях пользователю Windows 10 бывает проще всего временно приостановить обновление системы. Для этого в Центре обновления действует опция Приостановить обновление на 7 дней. Она затрагивает в том числе и пакеты безопасности. Операционная система перестанет выполнять проверку и установку дополнений на протяжении недели. В крайности, пользователь может и вовсе отключить обновления.
Отличным подспорьем в диагностике сбоев Windows являются команды DISM (управление компонентами ОС). На всякий случай перед работой с ними необходимо создать точку восстановления.
Так, команда CheckHealth позволяет обнаруживать потенциальные повреждения. Данная команда используется только для поиска повреждений, но не выполняет операций исправления проблем.
The error often arises due to lack of drive space, interference of Windows Defender, corrupted system files, and outdated system drivers. These are the most common contributors factors behind the update stuck. The error occurs when the pending update is successfully installed, and you have to restart for the changes to take effect. However, if the error occurs, the changes may not affect even if you restart the computer, but it is good to give it a try and restart the computer.
According to our research, there can be many reasons why you are getting a 0x80070032 error, we have listed some of the main ones below:-
- Corrupted System Files- Corrupted System Files are one of the main culprits that can trigger a 0x80070032 error. Most crucial files can get corrupted due to the sudden shutdowns. Fortunately, some commands help in restoring corrupted files.
- Interference of third-party antivirus- As per the affected users, Windows Defender or even third-party antivirus software blocks the essential files that might be important for Windows updates. Therefore, you must disable the antivirus temporarily to see if this fixes Error Code: 0x80070032.
- Stopped Windows Update Services- Sometimes, Windows update Services stop automatically if they might not be in use. To avoid this, you need to restart the service by following the below method.
- Corrupted Files in Software Distribution Folder- There is a good possibility that the content in the software distribution folder is corrupted. It is a folder that stores temporary data that may require Windows during the update.
- Outdated Hardware Driver- As per our research, if there is an outdated third-party driver downloaded from the manufacturer’s website can trigger this Error: 0x80070032. So make sure your drivers are up-to-date.
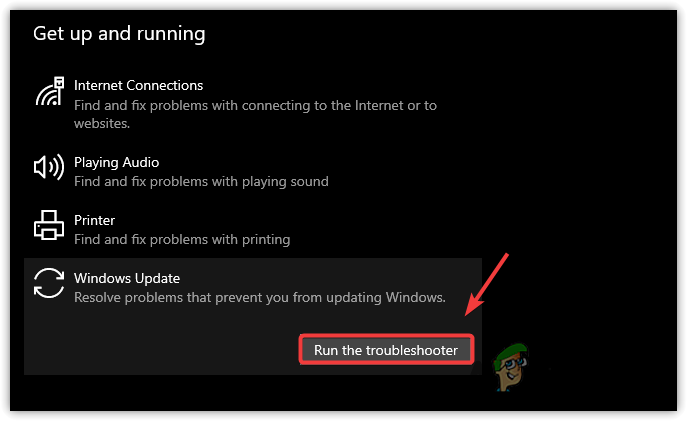
1. Run Windows Update Troubleshooter
Windows Update Troubleshooter is a utility that allows users to fix issues regarding Windows updates. Most Windows Update errors can be fixed by running the Windows Update troubleshooter.
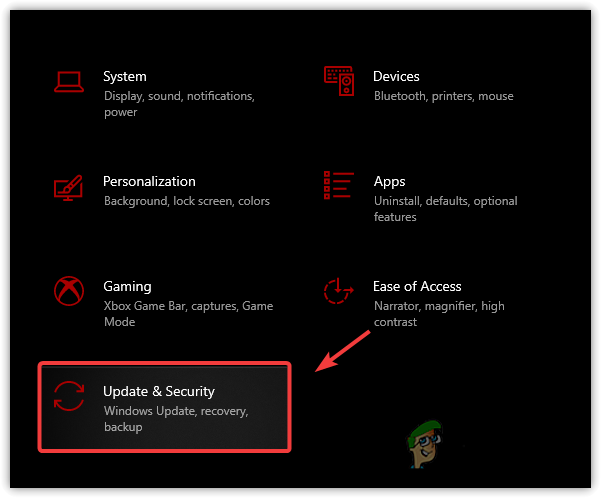
- To run Windows Update Troubleshooter, launch Settings by pressing the Win + I on the keyboard
- Navigate to Update & Security

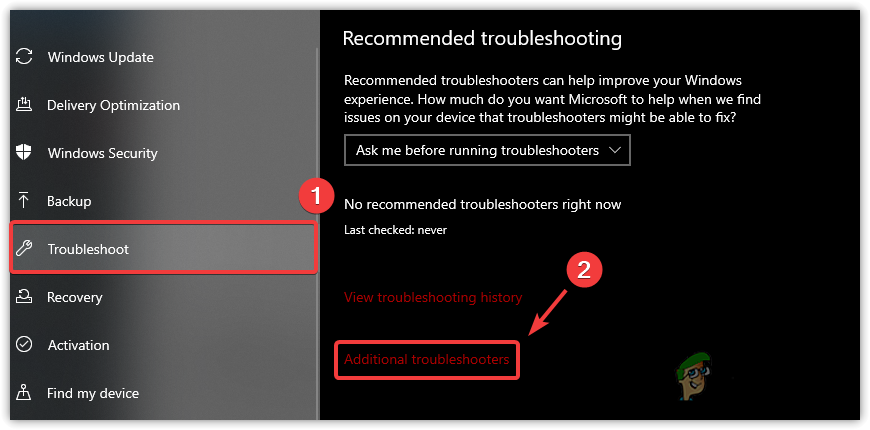
Navigating to Windows Update Security - Click Troubleshoot from the left pane
- Click View Additional Troubleshooter

Go to Additional Troubleshooter - Select Windows Update and click Run The Troubleshooter

Run Windows Update Troubleshooter - It will automatically start detecting and fixing problems
- Once done, try to update Windows.
2. Reset the Windows Update Components
The second and most effective method on the list is resetting Windows Update components, resetting Windows update components clear the temporary files, restarting the Windows services, and replacing the corrupted ones with the default. Below are the steps to reset Windows Update Components:-
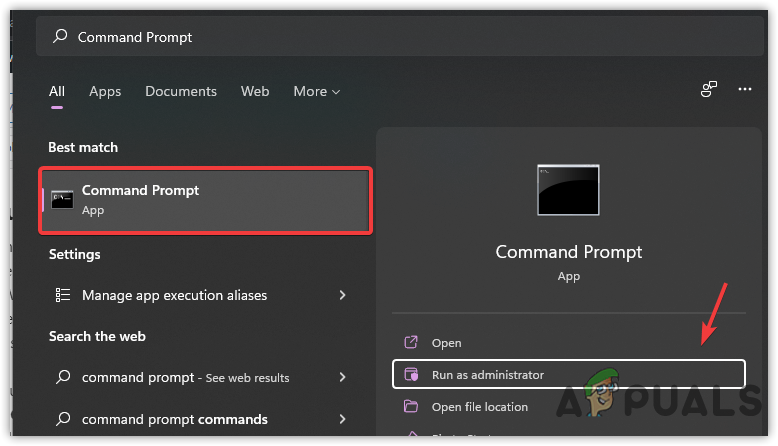
- Click Start Menu and type Command Prompt
- Press the Ctrl + Shift + Enter to launch the terminal as an administrator

Launch Command Prompt As Administrator - Insert the following commands and press Enter after each command
net stop bits
net stop wuauserv
net stop appidsvc
net stop cryptsvc
ren C:\Windows\SoftwareDistribution SoftwareDistribution.old
ren C:\Windows\System32\catroot2 catroot2.old
netsh winsock reset
net start bits
net start wuauserv
net start appidsvc
net start cryptsvc
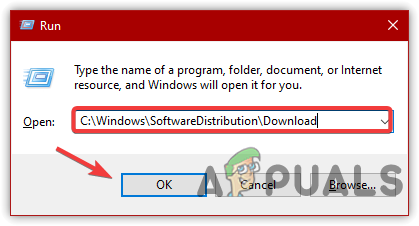
- Press the Windows + R to open Run Program
- Enter the below path and press Enter
C:\Windows\SoftwareDistribution\Download
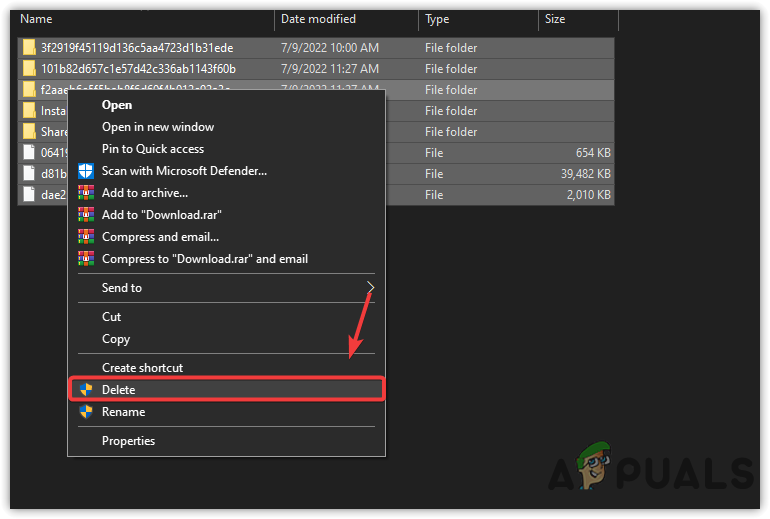
Opening Software Distribution Folder - Now select all the files by pressing Ctrl + A on the keyboard
- Right-click on the files and select Delete

Clearing Software Distribution Folder - Once done, check if the error is still causing.
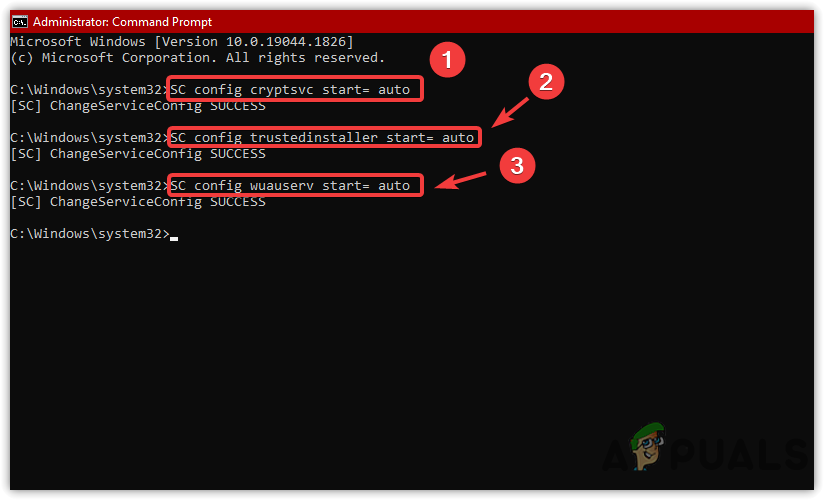
3. Set Windows Update Services to run Automatically
If the issue persists, try setting up the Windows update services to start automatically. This method allows users to update Windows instantly when they restart. Follow the steps to set Windows updates services to run automatically:-
- Type Command Prompt in the search bar
- Right-click on it and choose Run As Administrator
- Once the command prompt is opened, put the following commands and hit the Enter key after each line of code
SC config cryptsvc start= auto
SC config trustedinstaller start= auto
SC config wuauserv start= auto

Setting up the Windows Services to Start Automatically - Once done, restart your computer and see if your Windows is updating.
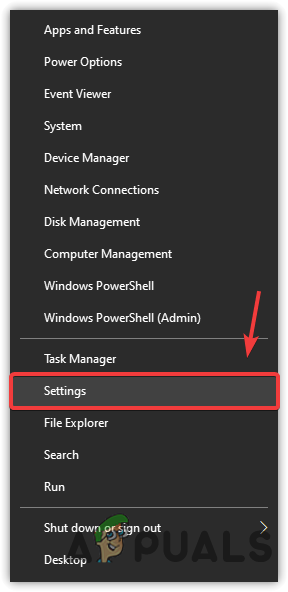
4. Uninstall the Latest Update
Sometimes the windows update is corrupt or problematic, which may cause Error: 0x80070032, which is why you will need to uninstall the recent Windows update. Uninstalling the recent update will fix this error if the error arises due to the corrupt Windows update.
- To uninstall the latest Updates, press Win + X on the keyboard
- Click Settings from the listed options

Choose Settings - Go to Update & Security
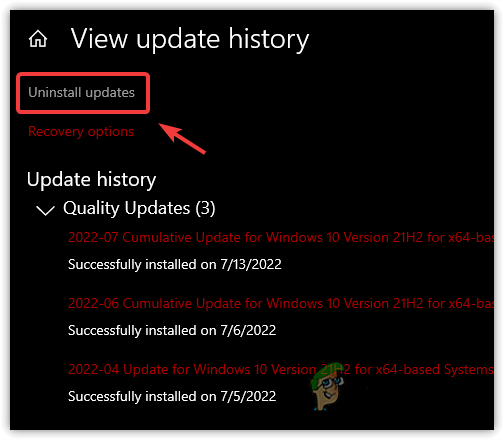
- Click on View Update History then click Uninstall Updates

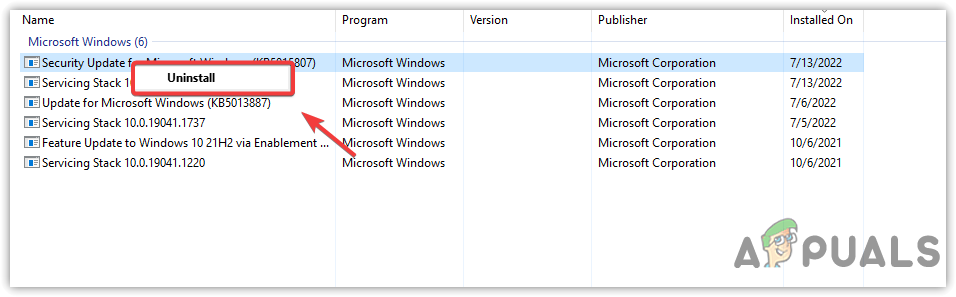
Click Uninstall Updates - Select the Update you want to Uninstall
- Then, right-click on the Update and click Uninstall

Uninstalling Windows Update - Once done, check if the error is resolved.
5. Disable Windows Defender Temporarily
Another solution to fix the Windows update error is temporarily disabling the antivirus. Usually, the type of error occurs due to the interference of the third-party antivirus or Windows Defender. Generally, antivirus software can block Windows updates for some reasons. Therefore, we advise you to disable the antivirus as it can aid in fixing Windows update errors.
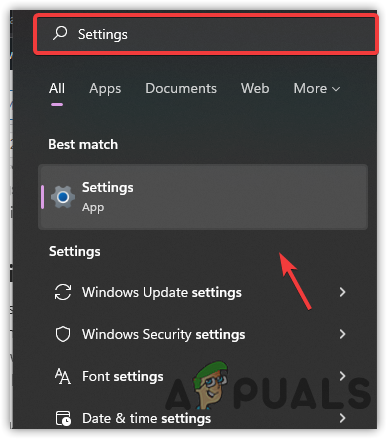
- To disable Windows Defender, click Start Menu and type Settings in the search bar
- Open Settings and navigate to Update & Security

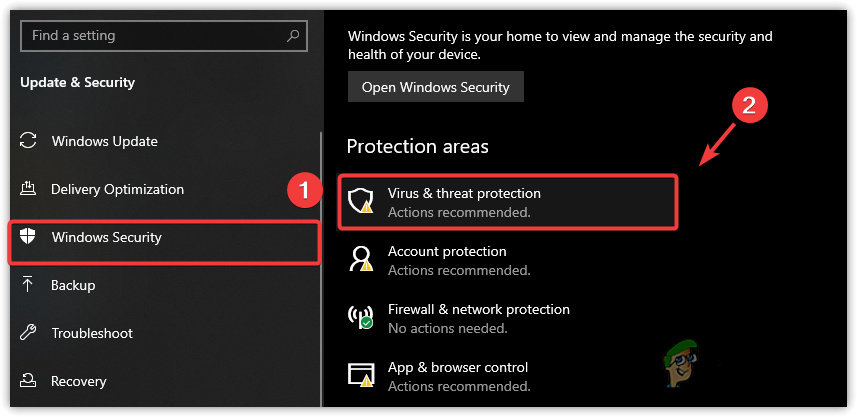
Open Settings - Click Windows Security from the left sidebar and click Virus and Threat Protection

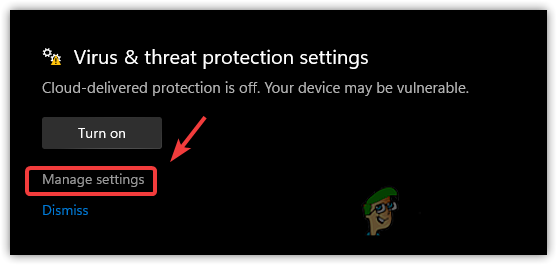
Navigate to Virus & Threat Protection - Click Manage Settings to navigate advanced security settings

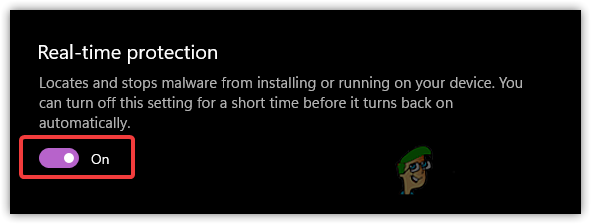
Click Manage Settings - Turn off Real-Time Protection

Disable Real-Time Protection - Click Yes when asked for permissions
- Once done, check if the error is fixed.
6. Restart Windows Update Services
As we told before, windows services stop automatically, which can trigger Error: 0x80070032. Windows services are necessary to complete the installation of regular updates. According to the affected users, restarting the service can fix the error even if the services are working fine.
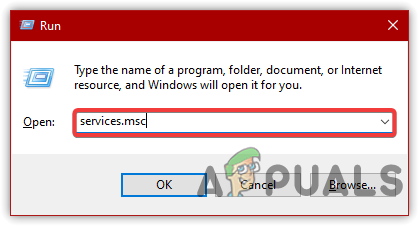
- To restart Windows update Service, launch the Run Program by pressing the Win +R
- Type services.msc and press Enter
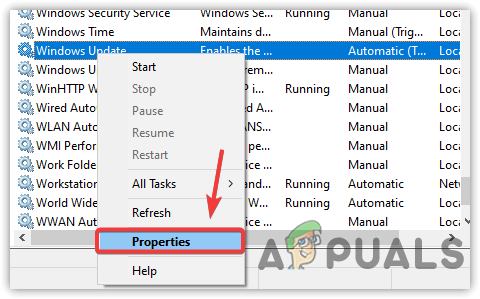
Open Services Window - A services Window should open, find and right-click on the Windows Update service then select Properties

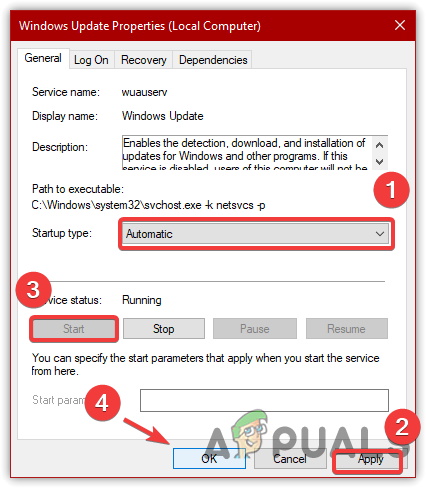
Click Properties - Change the Startup type from Manual to Automatic then click Apply
- Now if the service is stopped, click the Start button under Service Status

Restart Windows Update Service - Once done, check if the error is resolved.
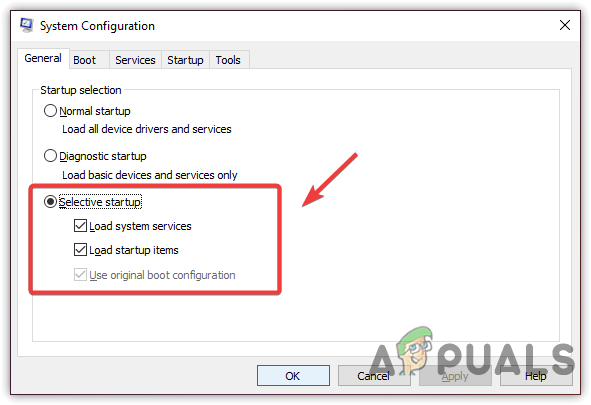
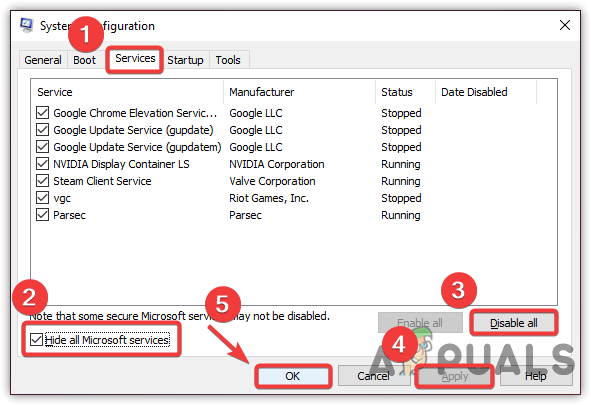
7. Perform a Clean Boot
If any third-party software is interfering with the Windows Update, performing a clean boot will fix this issue. A clean boot is a troubleshooting technique that allows users to find problematic software. It is a process of starting Windows with a minimum of drivers and services. It also disables the third-party items that load at the startup because they can interfere with Windows services and other required components.
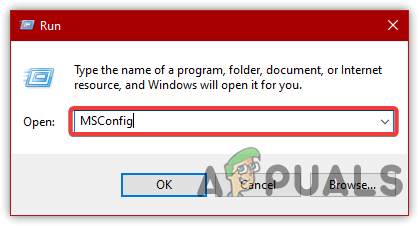
- To perform a clean boot, press the Win + R keys at the same time to open Run Program
- Type MSConfig and press Enter
Open MS Configuration - Click on Selective Startup and go to the Services tab

Click Selective Startup - Click Hide All Microsoft Services then click Disable All
- Click Apply then click OK
Performing a Clean Boot - Once done, restart your computer and check if the Error Code: 0x80070032 persists.
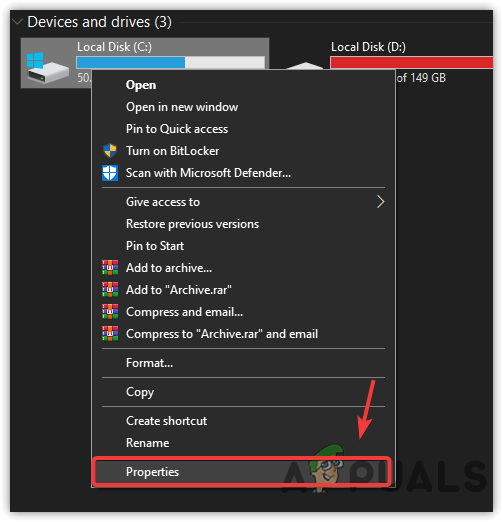
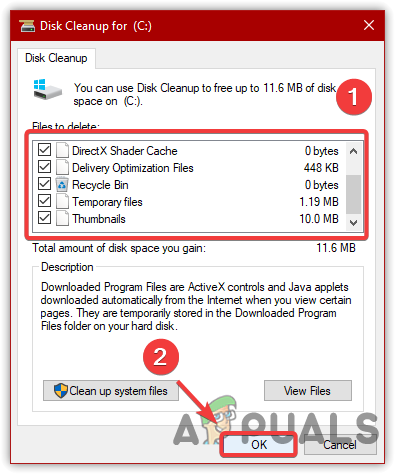
8. Free Up Drive Space
Another problem that could cause this error is the lack of drive space. Microsoft launches cumulative updates every month or week to fix bugs and improve Windows security to protect the computer system. Therefore, you need to check if there is enough space in the drive for the upcoming Windows update. If there is, proceed to the next solution; otherwise, free up some space by deleting temporary files or clearing the recycle bin.
To remove all the temporary files, press the Win + E on the keyboard to launch Windows Explorer
- Click This PC from the left pane
- Right-click on the drive, where Windows has installed
- Select Properties from the listed options

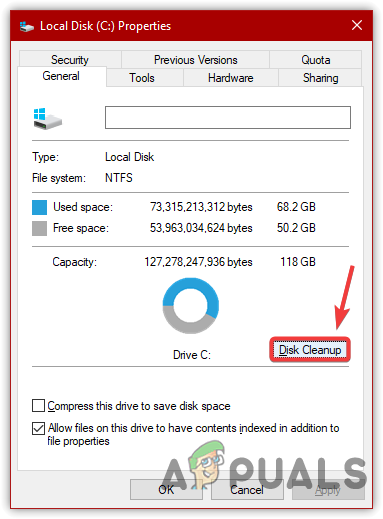
Select Properties - Click Disk Cleanup, a short window will appear

Click Disk Cleanup - Select all the files and click OK

Deleting Temporary Data - Again a short Window will appear
- Click Delete Files to confirm the action
- Once done, try to update Windows and see if the error persists.
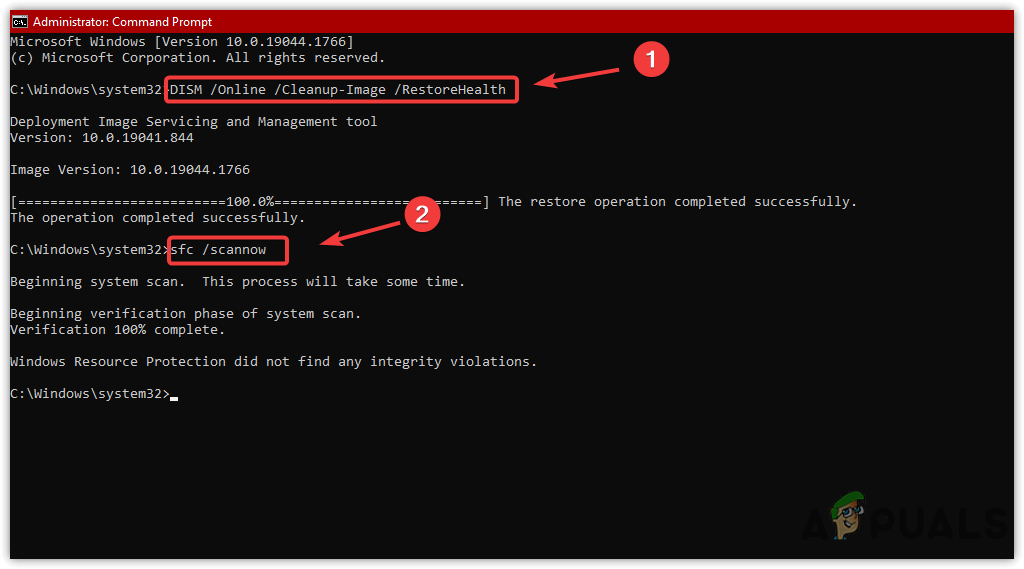
9. Run SFC or DISM
SFC or System File Checker is a command-line utility used to repair corrupted files on Windows. While, DISM, or Deployment Image Servicing and Management, has three commands that allow users to restore corrupted Windows images. These commands are mighty for restoring DLL files or .exe files. If you want to know more, read this article How to Use DISM to Repair Corrupted Files.
- Type Command Prompt in the search bar
- Click Run As Administrator from the right pane
Launching Command Prompt as Administrator - Click Yes when Windows prompts to UAC
- After launching the terminal, copy and paste the following commands
DISM /Online /Cleanup-Image /RestoreHealth
sfc /scannow

Running Repair Commands - After inserting the following commands, go to Windows update and see if the error is resolved.

10. Check For the Drivers Update
At some point, outdated drivers from a third party may trigger this error. If you have any hardware that needs a driver update, then we recommend you to update the driver. Additionally, you can also disconnect the peripheral devices to see if this fixes Error Code: 0x80070032. To update the driver, follow the methods mentioned in this article How to Update Drivers.
If all else fails to fix this error, you can try resetting the Windows OS by visiting here.

Hamza Mohammad Anwar
Hamza Mohammad Anwar is an intermediate JavaScript web developer with a focus on developing high-performance applications using MERN technologies. His skill set includes expertise in ReactJS, MongoDB, Express NodeJS, and other related technologies. Hamza is also a Google IT Certified professional, which highlights his competence in IT support. As an avid problem-solver, he recreates errors on his computer to troubleshoot and find solutions to various technical issues.
Question
Issue: How to fix Windows update error 0x80070032?
Hello. I tried to install the Windows update that was recently released but I could not. I received the 0x80070032 error. What can I do?
Solved Answer
Windows is the most popular operating system. It offers a user-friendly interface, customization abilities, built-in troubleshooters, and many other functions. Microsoft regularly releases updates to add new functions and increase the security of the OS. That is why it is extremely important to install the updates as soon as they come out.[1]
However, quite often users face issues when trying to install Windows updates. Recently, people started seeing the 0x80070032 error. Users describe seeing this error code when trying to install the latest updates. While it is unknown why exactly this error appears, there are some general reasons this could be happening.
Windows updates can fail to install because of corrupted files, Windows update components, and services, outdated drivers, etc. In this guide, you will find 7 steps that should definitely help you take care of this problem. Users should fix update error issues immediately to not put their operating system at risk.
Manual troubleshooting can be a lengthy process, so you can also use a maintenance tool like FortectMac Washing Machine X9 to scan your machine. This powerful software can fix most system errors, BSODs,[2] corrupted files, and registry[3] issues. Otherwise, follow the step-by-step instructions below.

Solution 1. Repair Corrupted System Files
Fix it now!
Fix it now!
To repair damaged system, you have to purchase the licensed version of Fortect Mac Washing Machine X9.
Use Command Prompt commands to repair system file corruption:
- Open Command Prompt as administrator
- Use the following command and press Enter:
sfc /scannow

- Reboot your system
- If SFC returned an error, then use the following command lines, pressing Enter after each:
DISM /Online /Cleanup-Image /CheckHealth
DISM /Online /Cleanup-Image /ScanHealth
DISM /Online /Cleanup-Image /RestoreHealth
Solution 2. Run the Update Troubleshooter
Fix it now!
Fix it now!
To repair damaged system, you have to purchase the licensed version of Fortect Mac Washing Machine X9.
- Press the Windows + X keys and go to Settings
- Go to Update and Security
- Click Troubleshooter
- Select Additional troubleshooters

- Run the Update troubleshooter
- Restart
Solution 3. Reset Windows Update Components
Fix it now!
Fix it now!
To repair damaged system, you have to purchase the licensed version of Fortect Mac Washing Machine X9.
- Open Command Prompt as administrator again
- Copy and paste the following commands, pressing Enter after each:
net stop bits
net stop wuauserv
net stop appidsvc
net stop cryptsvc
Del “%ALLUSERSPROFILE%\Application Data\Microsoft\Network\Downloader\*.*”
rmdir %systemroot%\SoftwareDistribution /S /Q
rmdir %systemroot%\system32\catroot2 /S /Q
regsvr32.exe /s atl.dll
regsvr32.exe /s urlmon.dll
regsvr32.exe /s mshtml.dll
netsh winsock reset
netsh winsock reset proxy
net start bits
net start wuauserv
net start appidsvc
net start cryptsvc

- Restart your PC
Solution 4. Set Windows Services to Run Automatically
Fix it now!
Fix it now!
To repair damaged system, you have to purchase the licensed version of Fortect Mac Washing Machine X9.
- Press the Windows key + R to open the Run box
- Type cmd and press Ctrl + Shift + Enter to open up an elevated Command Prompt
- If you’re prompted by the User Account Control (UAC), click Yes at the window
- Type the following commands and hit Enter after each one:
SC config trustedinstaller start=auto
SC config bits start=auto
SC config cryptsvc start=auto

- Perform a system reboot and check if the issue persists
Solution 5. Install the Update Manually
Fix it now!
Fix it now!
To repair damaged system, you have to purchase the licensed version of Fortect Mac Washing Machine X9.
Whenever Windows updates fail to install automatically, you can always try doing it manually. First, you need to find out which KB number is relevant to you.
- Right-click Start button and pick Settings
- Go to Update & Security
- On the right, locate and click View update history

- From the list, note the KB number that fails to install with the error code
- Go to Microsoft Update Catalog page, type in the KB number and press Search

- Download the update and install it manually
Solution 6. Update Drivers
Fix it now!
Fix it now!
To repair damaged system, you have to purchase the licensed version of Fortect Mac Washing Machine X9.
- In the search box on the taskbar, enter device manager, then select Device Manager
- Select a category to see the names of devices, then right-click the one you’d like to update
- Select Search automatically for updated driver software
- Select Update Driver

- If Windows doesn’t find a new driver, you can try using an automatic tool like DriverFix which can find the best drivers for your system
Solution 7. Update via Media Creation Tool
Fix it now!
Fix it now!
To repair damaged system, you have to purchase the licensed version of Fortect Mac Washing Machine X9.
- Download Windows 10 installation media from the official website
- Open the tool once it installed
- Agree to license terms
- Choose Upgrade this PC now

- Wait for the update to be installed
Repair your Errors automatically
ugetfix.com team is trying to do its best to help users find the best solutions for eliminating their errors. If you don’t want to struggle with manual repair techniques, please use the automatic software. All recommended products have been tested and approved by our professionals. Tools that you can use to fix your error are listed bellow:
do it now!
Download Fix
Happiness
Guarantee
do it now!
Download Fix
Happiness
Guarantee
Compatible with Microsoft Windows
Compatible with OS X
Still having problems?
If you failed to fix your error using FortectMac Washing Machine X9, reach our support team for help. Please, let us know all details that you think we should know about your problem.
Fortect — a patented specialized Windows repair program. It will diagnose your damaged PC. It will scan all System Files, DLLs and Registry Keys that have been damaged by security threats.Mac Washing Machine X9 — a patented specialized Mac OS X repair program. It will diagnose your damaged computer. It will scan all System Files and Registry Keys that have been damaged by security threats.
This patented repair process uses a database of 25 million components that can replace any damaged or missing file on user’s computer.
To repair damaged system, you have to purchase the licensed version of Fortect malware removal tool.To repair damaged system, you have to purchase the licensed version of Mac Washing Machine X9 malware removal tool.
Private Internet Access is a VPN that can prevent your Internet Service Provider, the government, and third-parties from tracking your online and allow you to stay completely anonymous. The software provides dedicated servers for torrenting and streaming, ensuring optimal performance and not slowing you down. You can also bypass geo-restrictions and view such services as Netflix, BBC, Disney+, and other popular streaming services without limitations, regardless of where you are.
Malware attacks, particularly ransomware, are by far the biggest danger to your pictures, videos, work, or school files. Since cybercriminals use a robust encryption algorithm to lock data, it can no longer be used until a ransom in bitcoin is paid. Instead of paying hackers, you should first try to use alternative recovery methods that could help you to retrieve at least some portion of the lost data. Otherwise, you could also lose your money, along with the files. One of the best tools that could restore at least some of the encrypted files – Data Recovery Pro.