Are you bothered by the error code 0x80070017? How to fix it successfully? Like plenty of other users, you may also be confused about this annoying error too. Today, you will get some methods to fix the error 0x80070017 from MiniTool.
Causes for Error Code 0x80070017
The error code 0x80070017 is one of the most common errors that you may encounter. The error 0x80070017 can occur to you when installing, updating, as well as restoring Windows. The methods to fix error 0x80070017 occurring when installing and updating Windows are not applicable for the one that happens when restoring.
Therefore, if you encounter the error when restoring Windows, you need to refer to this guide. While for other two cases, you can refer to the methods given in this post. To fix the error successfully, you need to find out the possible causes behind the error.
In most cases, error 0x80070017 results from file corruption. However, there are multiple factors that can give rise to the error too. They could be one of the following elements.
- Windows Registry is corrupted.
- CD-ROM drive is faulty.
- There are some bad sectors on the hard drive.
- Malware or virus infects the Windows
- The hardware is incompatible (outdated or incorrect) with Windows.
- Antivirus programs conflict with Windows OS.
Having known these possible causes, you can try these methods to fix the error now.
You may also like this: Top 7 Fixes to Windows Couldn’t Be Installed Error 0x80300024
Fix 1: Disable Antivirus Programs for Temporary
After you encounter the error 0x80070017, you should immediately disable antivirus programs on your computer for temporary. Due to user reports, the appearance of error code: 0x80070017 is because of a conflict between the antivirus programs and the Windows operating system.
Hence, it is probably a quick way to fix the error. If the error is fixed successfully, you can update your Windows OS in Settings. Alternatively, you can also uninstall the antivirus program completely to eliminate the conflict.
However, if the error is not solved, you can exclude the antivirus program conflict element at least and try other solutions as soon as possible.
You may also like this: 9 Methods to Windows 10 Installation BSOD Error 0XC000021A
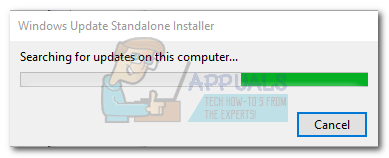
Fix 2: Run Windows Update Troubleshooter
Windows Update Troubleshooter is a built-in utility that can help you solve many problems such as Windows could not find a driver for your network adapter, the error 0x80070017, Ethernet not working, etc.
Here are steps to run Windows update troubleshooter.
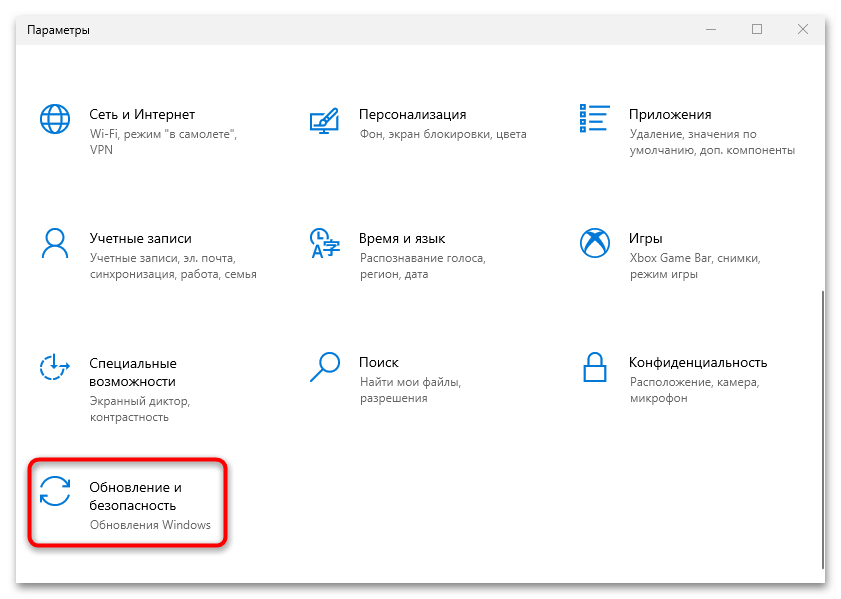
Step 1: Press Win and I keys to open Windows Settings, and then click on Update & Security icon on the main page.
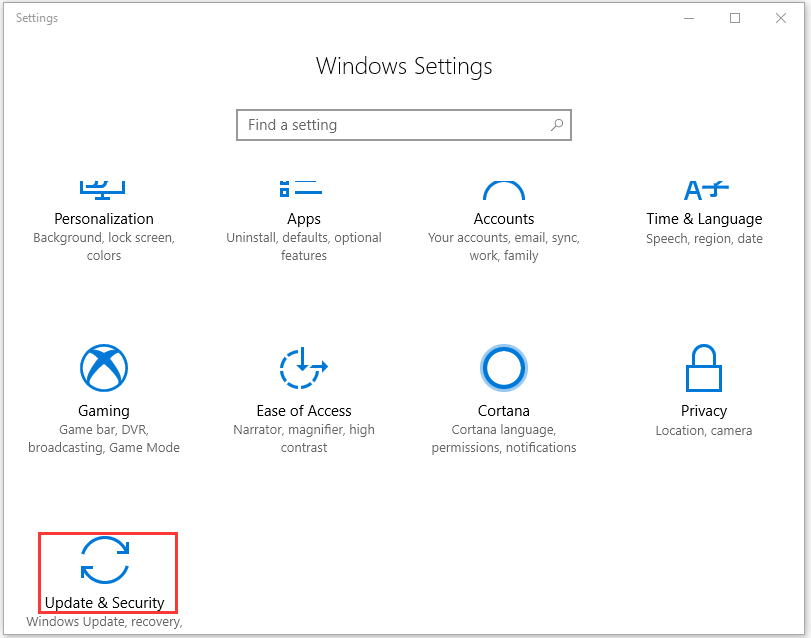
Step 2: Under the Update & Security section, click on Troubleshoot. After that, go to the right side of the page and click on Windows Update. In the pop-up window, click Run as troubleshooter.
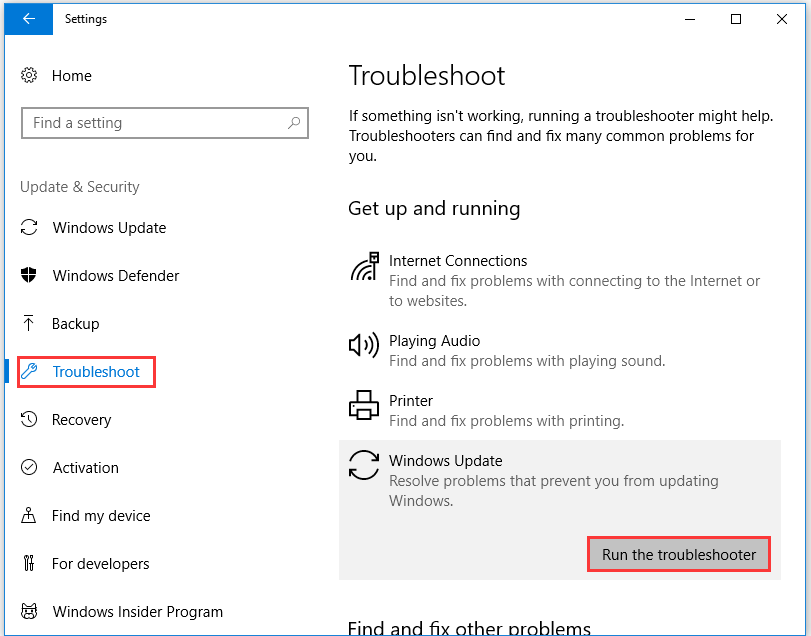
Step 3: The Troubleshooter will run automatically to detect possible issues with Windows Update. You just need to wait for a while and then follow the on-screen instruction to finish the operation.
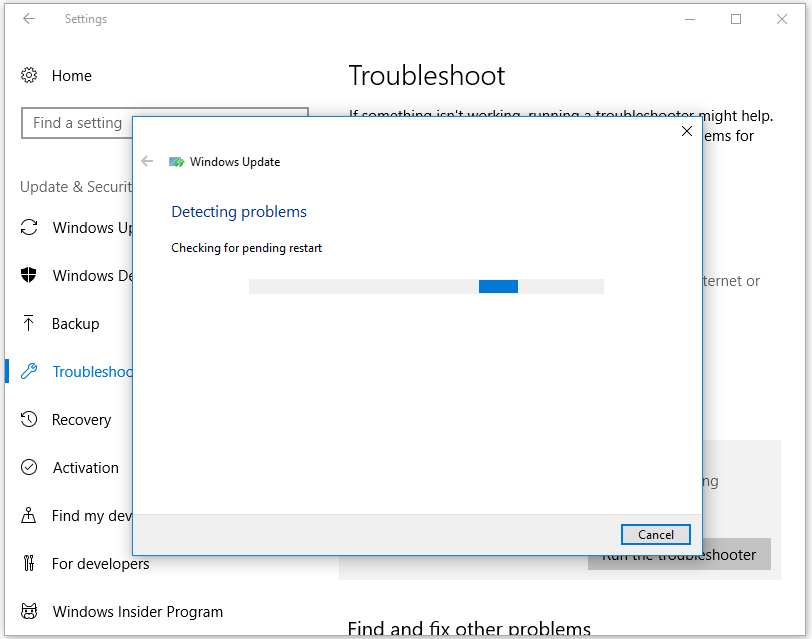
When the whole process ends, check if the error 0x80070017 still appears on your computer.
Fix 3: Use Windows Update Catalog to Update Windows
If the Windows Troubleshooter doesn’t fix the Windows update error 0x80070017, you can download the Windows update file manually and install them on your computer. This operation requires you access the Windows Update Catalog and find the specific update by typing the kb number.
Here are specific steps for that.
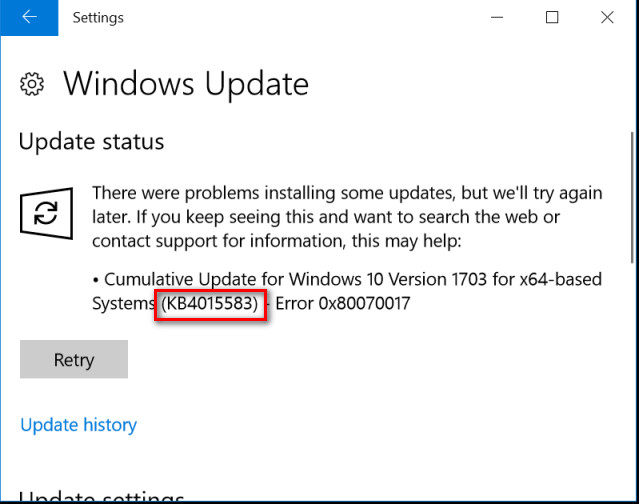
Step 1: Go to Windows update section of Settings to identify the specific update that is failing to install and copy the KB number.
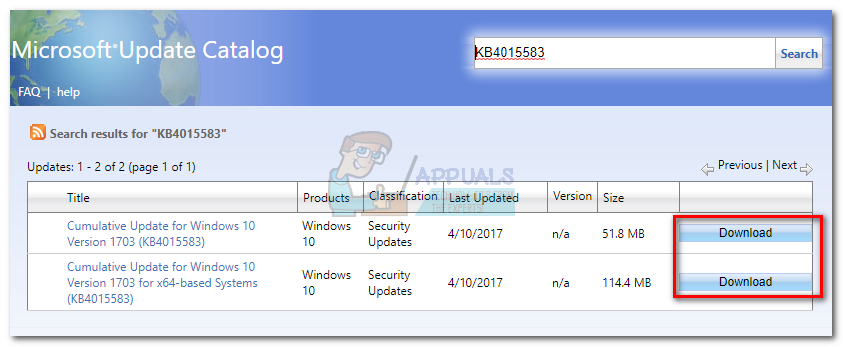
Step 2: Visit the Windows Update Catalog website and paste the KB number into the search bar. Then, click on the Search button to go on.

Step 3: Click the Download button related to the architecture your system. For example, if you have a 32-bit system, don’t download the x64 version because it will not install properly.
Tip: If you disable the Internet Explorer before downloading the new update, the download will not begin.
Step 4: After the .msu file is downloaded to your computer, open it and follow the on-screen instruction to install it.
Step 5: Finally, reboot your computer and go to Windows update to check if the update is applied.
Fix 4: Reset Windows Update Components
It is likely that Windows Update components not working properly leads to the error 0x80070017. Fortunately, you are able to fix the faulty components by resetting them. Here’s how to do.
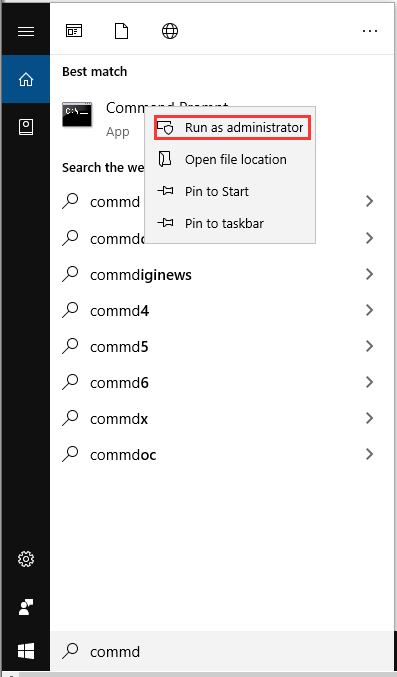
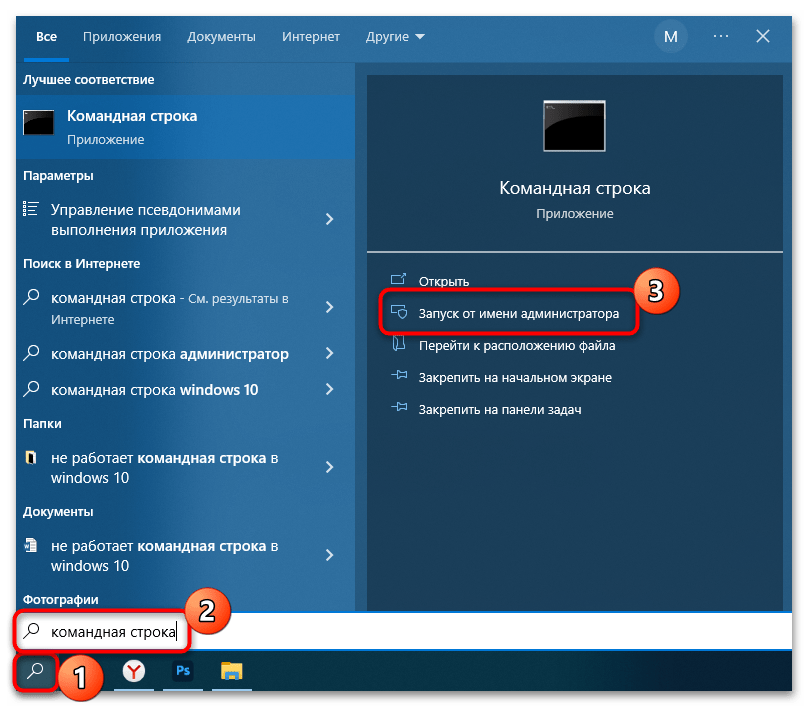
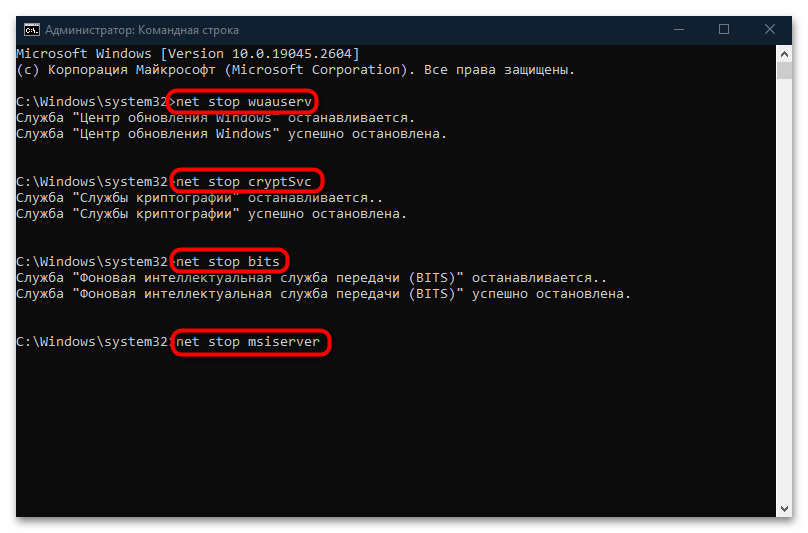
Step 1: Run Command Prompt as administrator in the search box.
Step 2: After the prompt window pops up, type the following commands one by one and press Enter after each.
- net stop wuauserv
- net stop cryptSvc
- net stop bits
- net stop msiserver
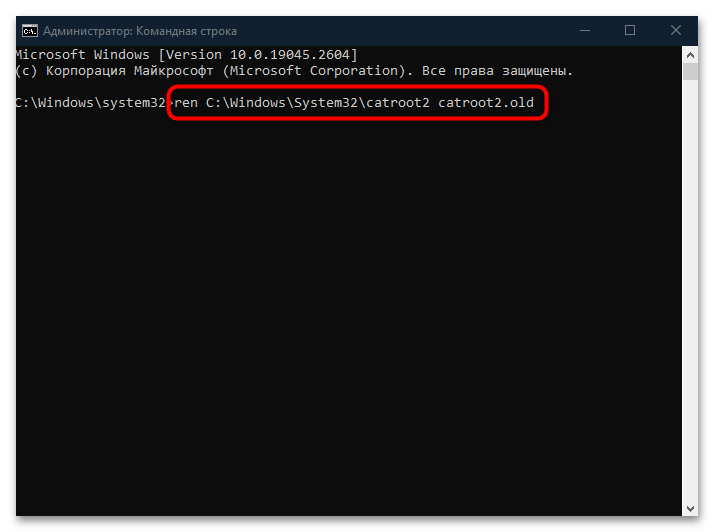
- Ren C:WindowsSoftwareDistribution SoftwareDistribution.old
- Ren C:WindowsSystem32catroot2 Catroot2.old
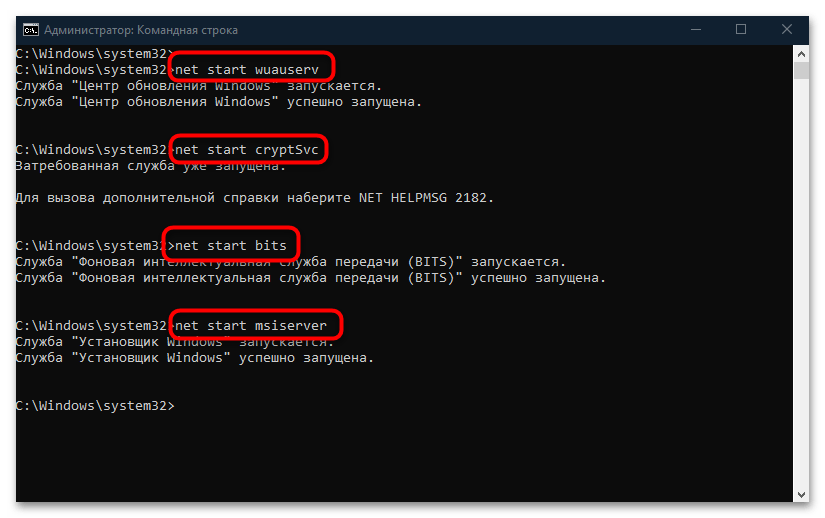
- net start wuauserv
- net start cryptSvc
- net start bits
- net start msiserver
After running all these commands, all services related to Windows Update will be restarted and the Windows Update error 0x80070017 should be fixed successfully. If you would like to run these orders automatically, you cancreate a Windows Update reset script.
With this script, all the Windows Update related services will be restarted in an automatic way.
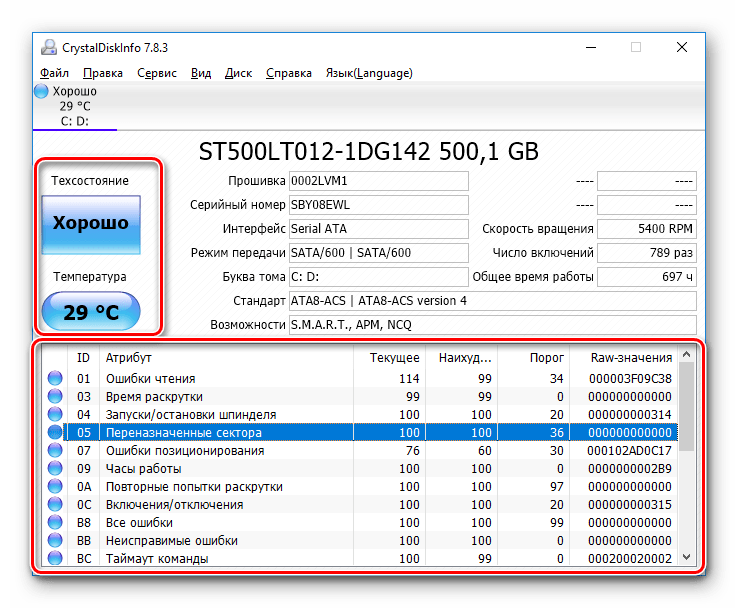
Fix 5: Check Hard Drive for Bad Sectors
As mentioned earlier, bad sectors on the hard drive can result in the error code: 0x80070017. Hence, it is necessary to check your hard drive for any bad sector when you encounter the error. How to find bad sectors? You need a professional program to do that.
With the Surface Test feature, MiniTool Partition Wizard can help you check if there are any bad sectors on your hard drive with ease. The process won’t take you much time, so you don’t worry about the time to consume.
Actually, this software enables you to clean up your computer, fix file system error, check SSD health, recover missing data, and so forth. So, don’t hesitate to download it now.
MiniTool Partition Wizard FreeClick to Download100%Clean & Safe
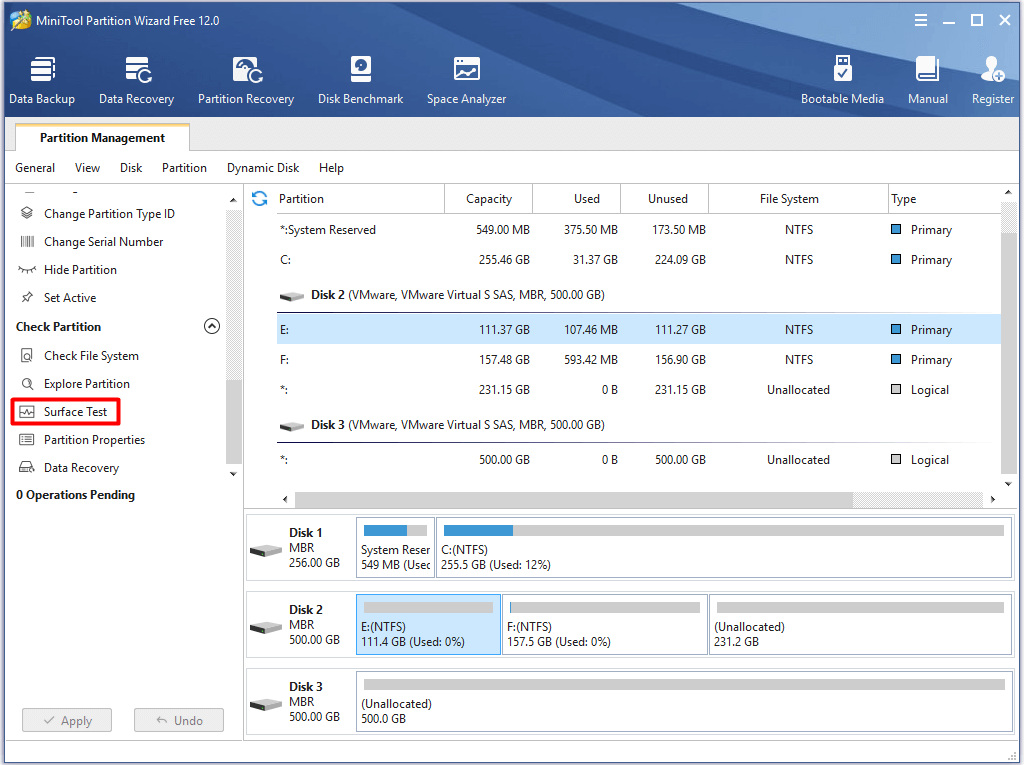
Step 1: After installation, launch MiniTool Partition Wizard to enter its main interface. Choose the target disk or drive, and then click on Surface Test in the left action panel.
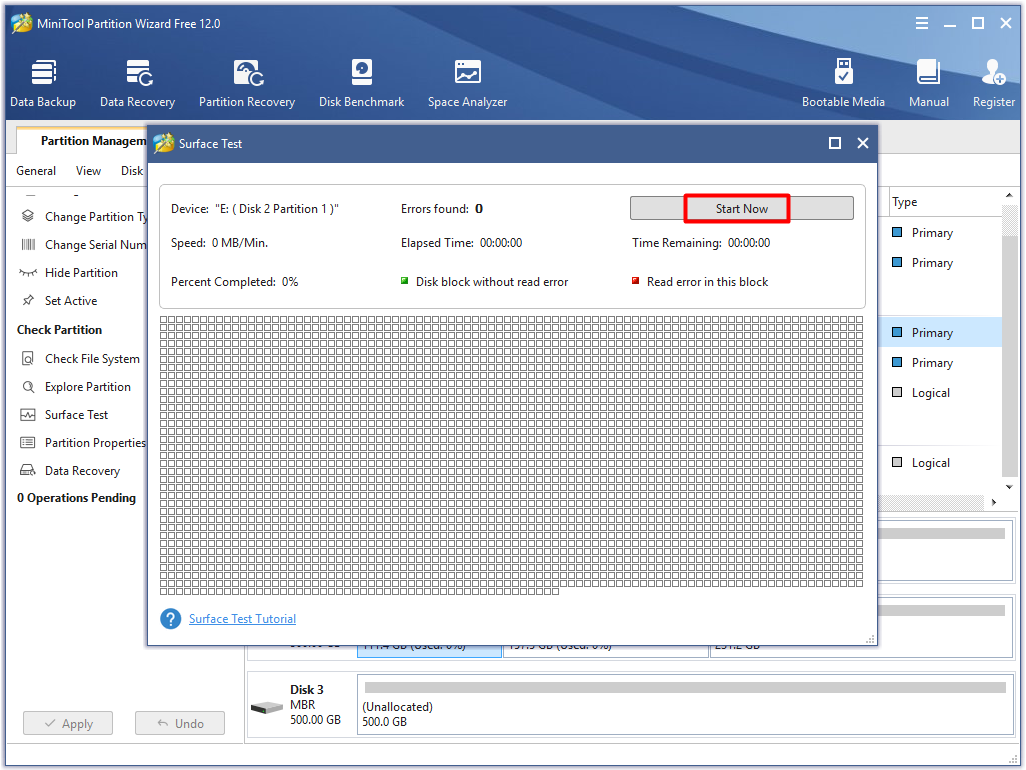
Step 2: In the next window, click on the Start Now button to begin the scan process.
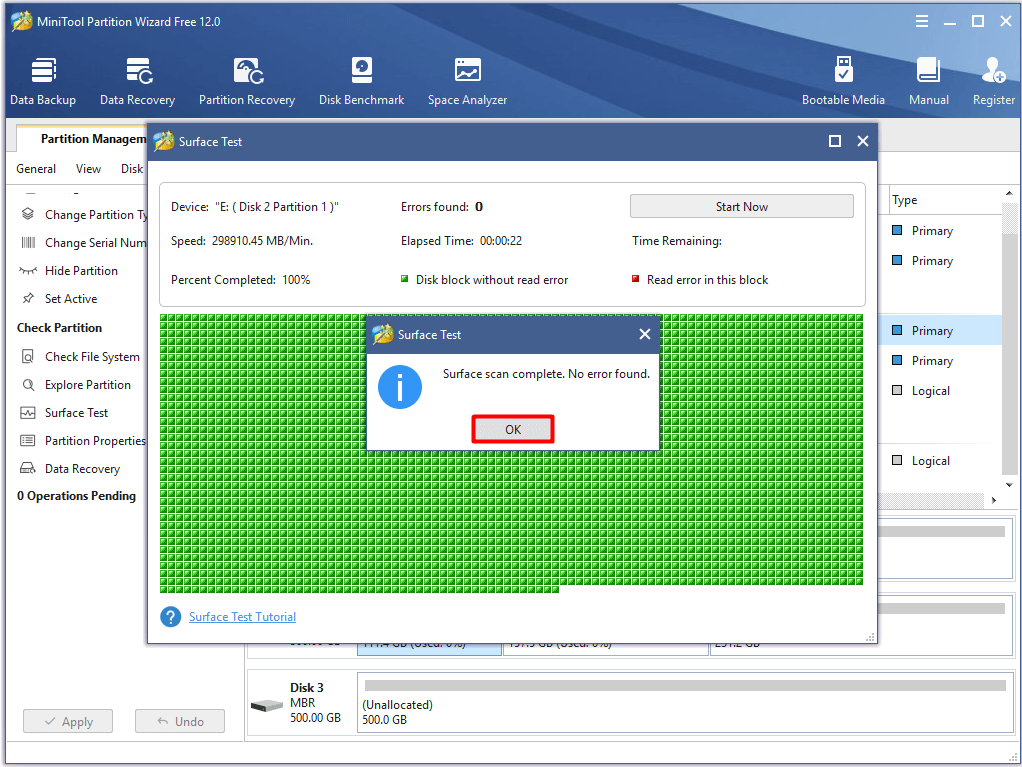
Step 3: Once you click the Start Now button, the software will immediately scan your disk automatically. When the scan process ends, you will receive a message that wil tell you if there are any bad sectors on your drive or disk. If it says “No error found”, you can skip the following steps and try other solutions to fix your issue. If it says “xx errors found”, you should carry out the steps below to continue.
Tip: As the physical bad sectors on your hard drive are unable to be fixed, you need to run the CHKDSK command to prevent them from being read and written. In this way, you can go on using your disk smoothly.
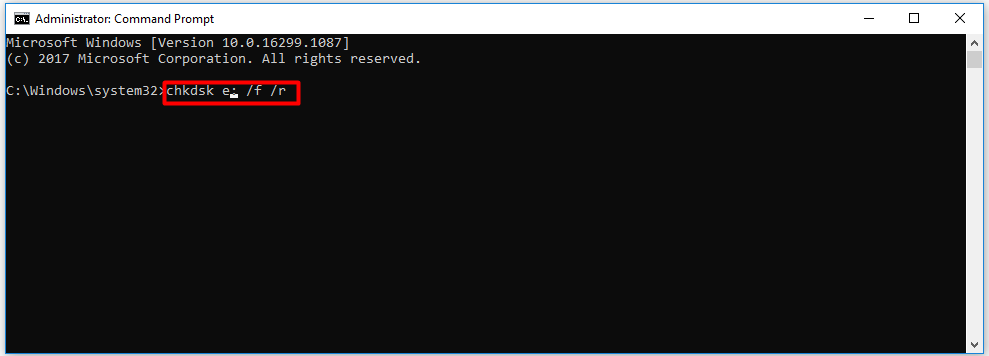
Step 4: Run Command Prompt as administrator in the search box.
Step 5: In the pop-up prompt window, type chkdsk n: /f/r (n represents the drive to scan and fix) and press the Enter key. After that, the program will scan and fix any detected errors with your hard disk.
Fix 6: Install Windows via Flash Stick
As you know, error 0x80070017 will occur when you install/reinstall Windows. The optical drive (DVD drive or installation media) can go bad so that it will fail to read the contents of your Windows installation media disk and cause the 0x80070017 error.
Hence, you can fix this issue by burning the Windows ISO to a flash drive to make the drive bootable. Alternatively, you can also create a bootable USB via Windows Media Creation Tool. After that, you are able to install Windows 10 via bootable USB with ease by following the guide.
Fix 7: Perform a Clean Boot
You can also perform a clean boot to fix the 0x80070017 error. In the clean environment, unnecessary programs will not run. Therefore, if the Windows update error 0x80070017 is fixed successfully, you can find the exact program that causes the error by re-enabling them one by one until you encounter the issue again. Here’s how to do.
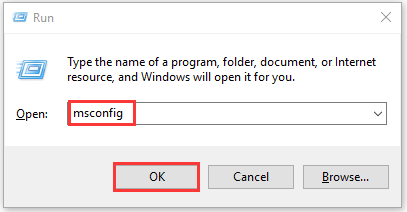
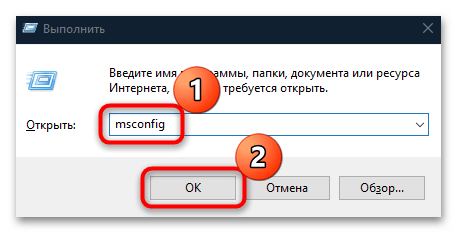
Step 1: Open the Run window by pressing Win and R key, and then type msconfig and click on OK.
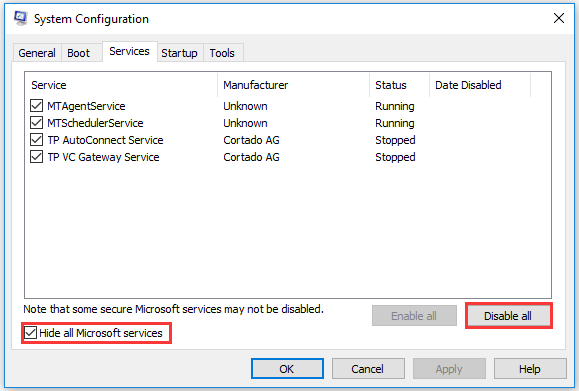
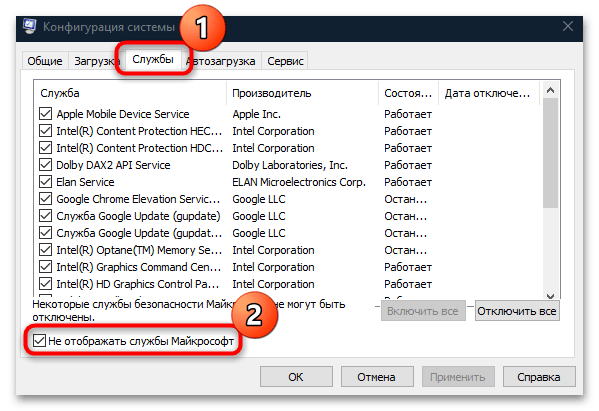
Step 2: Navigate to the Services tab, and then check the Hide all Microsoft services checkbox and choose Disable all option.
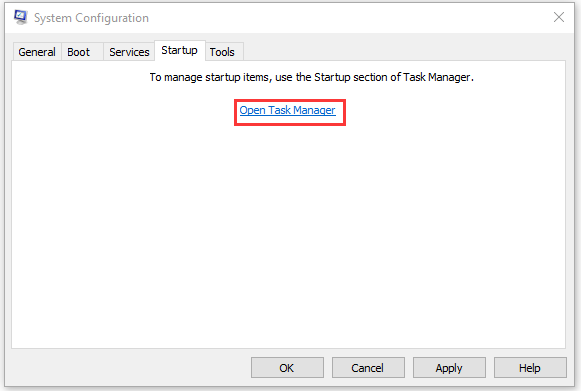
Step 3: Go to the Startup tab and click on Open Task Manager.
Step 4: In the Task Manager page, right click the startup application and choose Disable from the given menu. Repeat this operation to disable all the startup applications in the list.
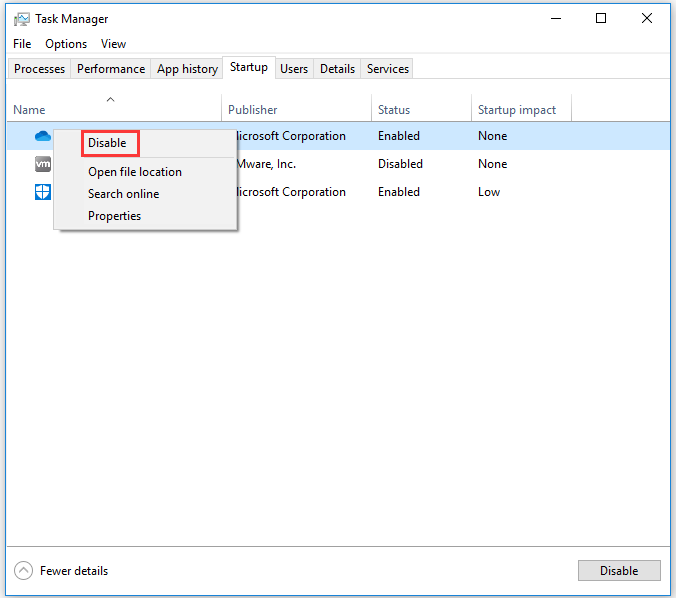
Step 5: After disabling all startup applications, return to the System Configuration window and click on Apply and OK to save the change and carry out the operation. Then restart your computer and check if the error is solved.
With the methods offered by this post of MiniTool, I fixed the error 0x80070017 successfully. Are you still bothered by this annoying issue? Now, read the post to get troubleshooting methods. Click to Tweet
Conclusion
In conclusion, this post mainly talks about the possible causes and corresponding solutions to error code 0x80070017. All of these methods are available for you, so pick one randomly.
If you have any new thoughts on the error 0x80070017, you can share them with us in the comment area. With any doubt about MiniTool software, you can contact us directly by writing an email to [email protected].
Error Code 0x80070017 FAQ
What is error code 0x80070017?
The error 0x80070017 results in file corruption in most cases, so it is also called CRC error. It indicates that files being copied from installation source get modified, corrupted or damaged during the process of reaching the destination drive.
Where the 0x80070017 error will take place?
The error code 0x80070017 will appear on Windows 7/8/8.1/10 operating systems when you are installing/reinstalling, updating, restoring Windows. It will occur to both Windows and laptops. In a word, it is a very common error.
What causes the error 0x80070017?
There are multiple factors that can cause the error 0x80070017. For instance, the virus or malware infection with damaged system files, outdated system drivers, corrupted Windows Registry, faulty DVD, compatibility issues with hardware or program,etc.
How to fix error 0x80070017?
There are 7 available methods to fix error 0x80070017.
- Disable antivirus programs temporarily
- Run Windows Update Troubleshooter
- Utilize Windows Update Catalog to update Windows
- Reset Windows update components
- Check hard drive for bad sectors
- Install Windows through flash stick
- Perform a clean boot
Ошибка 0x80070017 является одной из самых неприятных проблем, которые могут появиться во время довольно важного процесса для любого пользователя — установки операционной системы Windows. Показывает ошибка свое лицо во время распаковки файлов Windows, после их копирования на ваш HDD или SDD. В сообщении ошибки вы можете прочитать следующую информацию:
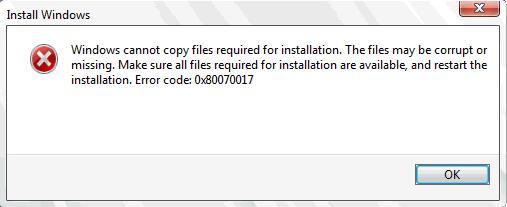
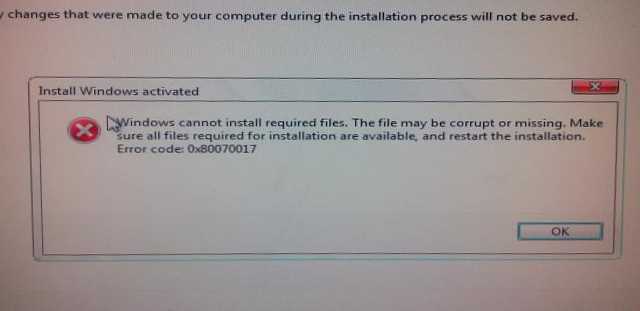
Windows не удалось установить необходимые файлы. Возможно, файл поврежден или отсутствует. Убедитесь, что имеются все файлы, необходимые для установки, и перезапустите установку. Код ошибки: 0x80070017
Причиной для ошибки могли послужить несколько факторов:
- поврежденный носитель для записанного образа Windows;
- некорректно записанный образ Windows;
- поврежденный образ Windows;
- различные загрязнения на поверхности диска;
- проблемы с оперативной памяти;
- проблемы с жестким диском
Как вы могли убедиться, список причин для появления ошибки 0x80070017 довольно внушителен. Тем не менее эта проблема далеко не новая. Существует ряд решений, которые могут помочь каждому пользователю преодолеть ошибку и установить наконец-то таки нужную ему версию Windows.
Способы решения ошибки 0x80070017
Способ №1 Протереть диск
Давайте начнем с самого просто способа. Если вы записали образ Windows на оптический диск, то мы рекомендуем вам присмотреться к нему и убедиться, нет ли на нем грязи или пыли. Нужно сказать, что ошибка 0x80070017 может появляться просто из-за того, что некоторые файлы с диска не могут быть прочтены из-за всевозможных загрязнителей.
Протрите диск мягкой тканью, а затем повторите процесс установки Windows. Вам совет может показаться глупым, так как вы наверняка записывали операционную систему на совершенно новую болванку, но поверьте — «преграды» на поверхности диска легко могут вызвать проблемы подобного типа. Если же вы очистили поверхность диска, но ошибка 0x80070017 не исчезла — она появляется вследствие чего-то другого.
Способ №2 Использование другого образа Windows
Если вы загрузили свой образ Windows с торрент-трекера(в чем мы вас не осуждаем), то знайте, что он мог оказаться попросту нерабочим. Качая контент с торрент-сайтов, вам всегда нужно быть готовым к таким сюрпризам. Возможно, создатель раздачи или человек, стоящий за созданием образа с дистрибутивом Windows, неплохо напортачил в каком-то из аспектов, вследствие чего установка Windows с такого образа не представляется возможной.
Мы рекомендуем вам воспользоваться другой раздачей, чтобы проверить, появится ли ошибка 0x80070017 на ней. Найдите другую, более популярную и проверенную раздачу, запишите образ Windows еще раз и повторите процесс установки Windows. Если же ошибка 0x80070017 повторяется даже с другим образом, то давайте двигаться дальше.
Способ №3 Использование другой программы для записи образа
Попробуйте использовать другую программу для записи образа Windows. Некоторое пользователи отмечают, что зачастую ошибка встречается после записи образа с помощью такой программы, как Nero. Мы же рекомендуем вам воспользоваться утилитой под названием UltrаISO. Она хоть и немного менее дружелюбна к новым пользователям, но с ней у вас не должно возникнуть никаких проблем. Если вы используете USB-флешку для создания установочного носителя Windows, то мы рекомендуем прибегнуть к услугам утилиты Rufus.
Заметка: также стоит сказать, что простой перенос образа Windows на пустой диск или отформатированную флешку — это не создание установочного носителя. Вам обязательно необходимо воспользоваться специализированным программным обеспечением, например, которое мы упомянули выше.
Способ №4 Изменение носителя для образа Windows
Если вы встретились с ошибкой 0x80070017 во время установки Windows с помощью диска, то стоит задуматься, а не лежит ли вина на вашем CD/DVD-приводе. Возможно, ему не удалось корректно справиться с записью диска для создания установочного носителя Windows. Или, например, у него даже не получается нормально считать информацию, записанную на диске.
Попробуйте создать установочный носитель Windows на USB-флешке. Если все прошло нормально — ошибка 0x80070017 определенно возникала по вине привода, установленного в вашем компьютере. Довольно старенькие приводы зачастую начинают работать с горем пополам, так что, возможно, вам пора задуматься о смене привода.
Способ №5 Проверка оперативной памяти
Ошибка 0x80070017 также может быть признаком неправильно работающей оперативной памяти. Проверить это можно очень просто, если у вас установлено больше одной планки ОЗУ в материнской плате: отключите ПК, откройте системный блок, выньте одну из планок RAM из материнской платы и запустите ПК. Попробуйте теперь снова осуществить установку операционной системы Windows. Если ошибка повторяется, то измените планку ОЗУ на другую и снова повторите процесс.
Если на другой планке ОЗУ процесс установки Windows прошел гладко, то, к сожалению, вы нашли виновника ошибки 0x80070017 — сбоящая планка оперативной памяти. Чтобы как следует убедиться в ее неправильной работе, вы можете подвергнуть ее проверке с помощью такого программного обеспечения, как Memtest86+. Данная утилита просканирует ОЗУ на различные ошибки и сбои при ее работе, чтобы вы смогли вынести ей окончательный диагноз.
Способ №6 Проверка жесткого диска
Если вы попробовали выполнить все вышеуказанное, но ошибка 0x80070017 при установке Windows так и не может отстать от вас, то, возможно, проблема заключается в вашем жестком диске. Появление битых секторов на жестком диске вполне может вызвать какие-то проблемы во время установки ОС. Разумеется, что при установке Windows производится копирование, распаковка и удаление различных данных на жестком диске.
Мы рекомендуем вам воспользоваться программой под названием VictoriaHDD, с помощью которой можно проверить работоспособность своего жесткого диска, найти на нем поврежденные сектора и даже попытаться восстановить их. Хотя, все зависит от состояния самого диска. Жесткий диск редко является причиной ошибки 0x80070017, но некоторые пользователи все же отмечают, что такая возможность вполне возможна.
Содержание
- Способ 1: Встроенное средство устранения неполадок
- Способ 2: Очистка кеша обновлений
- Способ 3: Обновление драйверов
- Способ 4: Диагностика HDD-диска
- Способ 5: Восстановление системных файлов
- Способ 6: Отключение стороннего антивируса
- Способ 7: Выполнение чистой загрузки
- Способ 8: Ручная установка обновлений
- Вопросы и ответы
Способ 1: Встроенное средство устранения неполадок
Если во время попытки обновления появляется ошибка под кодом 0x80070017, то в первую очередь стоит использовать автоматическое средство, которое способно найти проблемы в работе «Центра обновления», отвечающего за установку последних версий ОС и патчей.
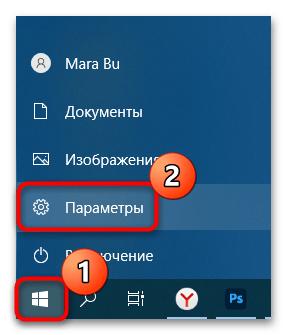
- Нажмите на кнопку «Пуск» и выберите «Параметры» из появившегося меню.
- Перейдите в раздел «Обновление и безопасность».
- Далее кликните по вкладке «Устранение неполадок» на панели слева, затем на ссылку «Дополнительные средства устранения неполадок».
- Найдите в списке компонентов «Центр обновления Windows» и нажмите на эту строку – появится кнопка, запускающая встроенное средство.
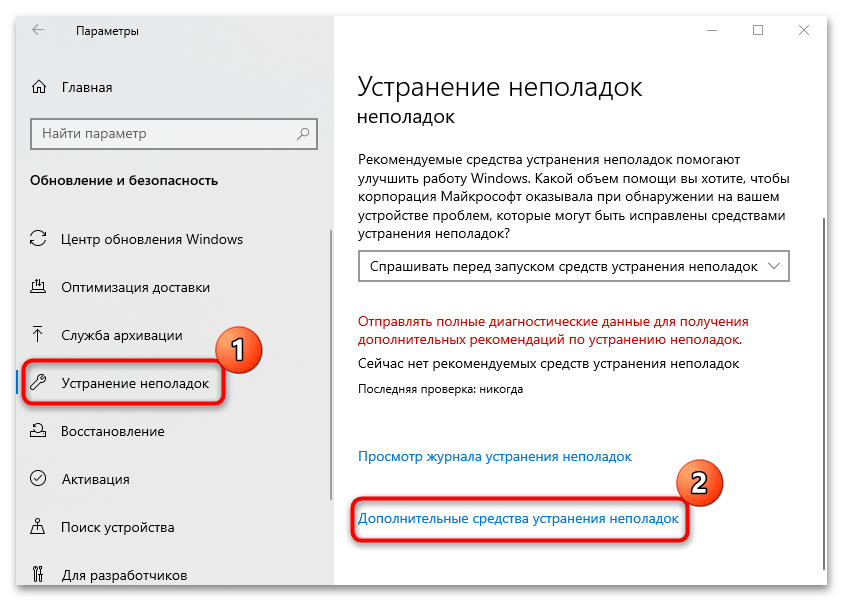
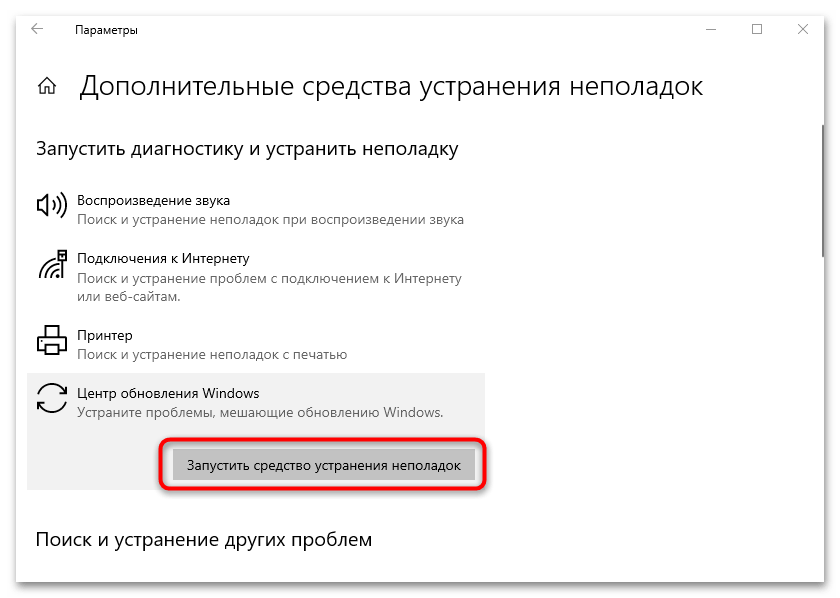
Дождитесь, пока проверка завершится. Если неполадки будут выявлены, вы получите соответствующее уведомление, а также варианты действий по их исправлению.
Способ 2: Очистка кеша обновлений
Если встроенное средство не принесло нужного результата, можете попробовать вручную очистить папки с кешем обновлений, которые хранятся на системном локальном диске. Самый простой способ сделать это – использовать консольные команды. Причем с помощью этого метода вы перезапустите некоторые службы, которые отвечают за обновление системы, включая «Центр обновления»:
- Запустите «Командную строку» от имени администратора, введя соответствующий запрос в строке системного поиска и выбрав нужный тип запуска из главного меню.
- Приостановите работу некоторых служб, выполнив специальные команды. По очереди вводите следующие запросы, нажимая на клавишу «Enter» после каждого из них:
net stop wuauserv
net stop cryptSvc
net stop bits
net stop msiserver - Далее переименуйте каталоги с кешем и данными апдейтов, создав таким образом резервную копию. Если даже что-то пойдет не так, то все файлы можно будет восстановить, вернув папкам актуальные имена. Выполните две команды:
Ren C:\Windows\SoftwareDistribution SoftwareDistribution.old
Ren C:\Windows\System32\catroot2 Catroot2.old - Снова запустите все необходимые для автоматического обновления службы, вставив следующие команды и нажав на клавишу ввода после каждой из них:
net start wuauserv
net start cryptSvc
net start bits
net start msiserver
После этого в разделе с обновлениями «Параметров» выполните поиск актуальных апдейтов. При условии, что те будут найдены, начнется их загрузка, а новые папки для хранения файлов система создаст автоматически. Старые впоследствии можно будет удалить, чтобы освободить место на диске.
Способ 3: Обновление драйверов
Попробуйте обновить программное обеспечение для устройств и оборудования, которые используются в системе. Если какие-то драйверы устарели, то это может вызывать различные ошибки при попытке обновить систему. Используйте встроенные средства операционной системы (раздел с обновлениями «Параметров», включая «Необязательные исправления» или «Диспетчер устройств»), а также официальные утилиты от производителей (что особенно актуально для дискретных видеокарт) или специализированные программы. Обо всех способах мы писали более детально отдельно.
Подробнее: Как проверить обновления драйверов в Windows 10

Способ 4: Диагностика HDD-диска
Выполните проверку жесткого диска, если, конечно, именно он, а не SSD, используется в качестве системного раздела. При появлении битых секторов возможны проблемы с установкой различного программного обеспечения, в частности при инсталляции апдейтов для ОС. Переходите по ссылке ниже, чтобы узнать, как выполнить диагностику диска с использованием встроенных и сторонних средств.
Подробнее: Выполнение диагностики жесткого диска в Windows 10
Способ 5: Восстановление системных файлов
Также нередки ошибки и тогда, когда целостность системных файлов по каким-то причинам была нарушена. Например, данные были повреждены в результате деятельности вредоносного ПО или системных сбоев. В Windows 10 встроены и утилиты, с помощью которых можно проверить, так ли это, а также восстановить все в автоматическом режиме. Процедура довольно простая, особенно если следовать инструкции по ссылке ниже.
Подробнее: Использование и восстановление проверки целостности системных файлов в Windows 10

Если после запуска/использования инструмента проверки системных файлов SFC вновь появляется ошибка, воспользуйтесь утилитой DISM для восстановления хранилища (места, откуда SFC берет резервные файлы), затем снова запустите SFC.
Способ 6: Отключение стороннего антивируса
Если вы используете на своем компьютере антивирусное программное обеспечение от сторонних разработчиков, приостановите работу такого софта на время проведения процедуры обновления системы. Вполне вероятно, защитные приложения по ошибке блокируют инсталляцию апдейтов, считая такие действия подозрительными.
Как правило, приостановка работы стороннего антивируса возможна через контекстное меню значка софта в трее. Нажмите на иконку правой кнопкой мыши и выберите пункт «Выход» или «Закрыть». Скорее всего, понадобится еще и подтвердить действие.
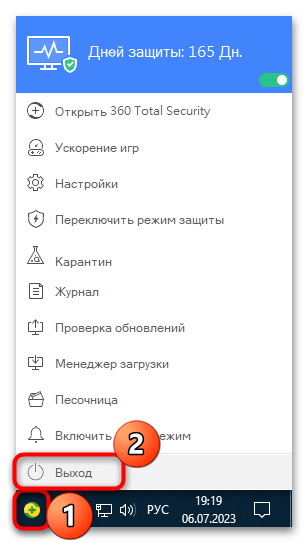
Если у вашего приложения такой функции не предусматривается, ознакомьтесь с нашим руководством на сайте, где описан алгоритм действий по деактивации наиболее популярных антивирусов.
Подробнее: Отключение антивируса
Способ 7: Выполнение чистой загрузки
Ошибки при попытке обновления происходят и из-за конфликта с программным обеспечением, которое дополнительно было установлено. Искать такой софт иногда нет смысла, но можно попробовать выполнить чистую загрузку операционной системы, предварительно отключив сторонние процессы и службы:
- Одновременно нажмите на клавиши «Win + R», затем в текстовом поле окна «Выполнить» введите
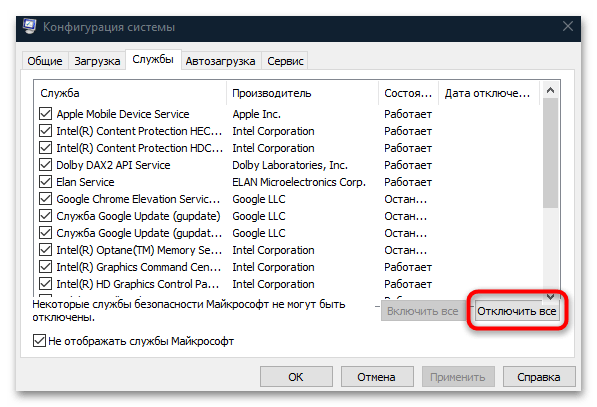
msconfigи нажмите на клавишу «Enter». - На вкладке «Службы» оснастки «Конфигурация системы» отметьте пункт «Не отображать службы Майкрософт».
- Убедитесь, что все пункты отмечены, и нажмите на кнопку «Отключить все».
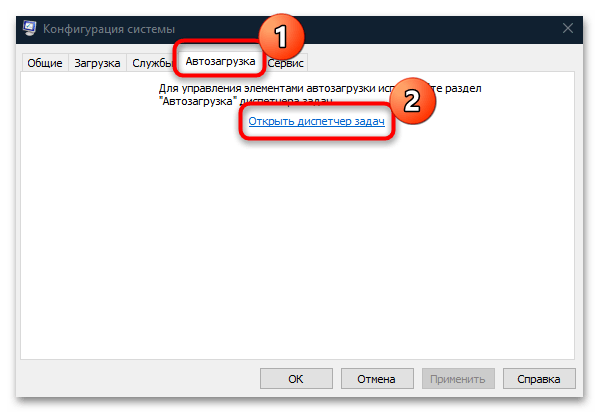
- Затем переключитесь на вкладку «Автозагрузка» и перейдите к другому встроенному средству – «Диспетчеру устройств», нажав на соответствующую ссылку.
- Поочередно отключите все программы, которые запускаются вместе с системой, выбирая каждую из них и нажимая на кнопку отключения.
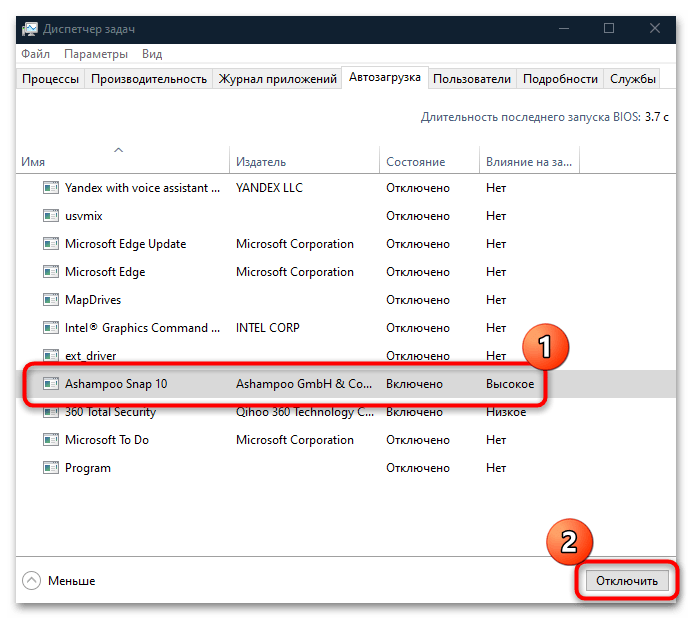
После того как все лишнее отключено, перезагрузите систему, а затем попытайтесь вновь выполнить установку обновлений. Если все прошло успешно, значит, сторонний софт препятствовал этому.
Способ 8: Ручная установка обновлений
При условии, что вы знаете, с каким именно апдейтом происходит рассматриваемая ошибка, можете установить его вручную. Как правило, все обновления размещаются на официальном сайте Microsoft, откуда можно скачать их, затем, запустив установочный файл, отдельно инсталлировать нужные патчи. Таким образом, вы обойдете «Центр обновления», при использовании которого появляется ошибка под кодом 0x80070017. Рекомендуем изучить этот вопрос более детально, перейдя по ссылке.
Подробнее: Устанавливаем обновления для Windows 10 вручную
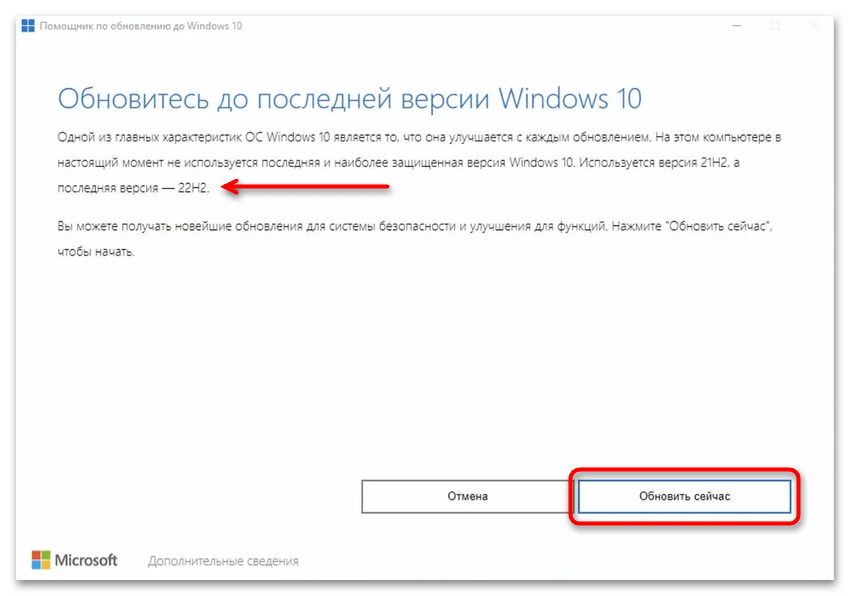
Кроме того, можете воспользоваться утилитой Update Assistant, которую предлагает Microsoft. Она предназначена для помощи в обновлении до актуальной версии «десятки» в обход «Центра обновления Windows». Скачать средство можно с официального сайта, после чего останется его запустить и посмотреть, предлагается ли выполнить обновление. Если да, нажмите на «Обновить сейчас» и дождитесь дальнейших инструкций от приложения.
Скачать Update Assistant с официального сайта
Во время установки или обновления Windows до актуальной версии, Центр обновления может неожиданно прервать процесс и выдать код ошибки 0x80070017. Он отобразится в окне Центра обновлений, но при попытке открыть подробности ошибки, вы увидите только лишь сообщение о том, что системе не удалось завершить установку. В этом материале мы постараемся максимально подробно разобрать причины возникновения проблем во время установки Windows и ее обновлений, а также расскажем, как исправить ошибку 0x80070017.
Что означает ошибка 0x80070017
Ошибка 0x80070017 чаще всего говорит о том, что программе установки не удалось считать с носителя ту или иную часть файлов, необходимых для успешного завершения процесса обновления. Часто подобную проблему можно наблюдать при установке Windows с DVD диска или флеш-накопителя. Проблемы с чтением носителя становятся причиной появления ошибки 0x80070017 и как следствие причиной прерывания процесса. Ниже мы рассмотрим несколько способов, которые позволят исправить проблемы с ошибкой 0x80070017 и успешно завершить как чистую установку Windows, так и ее обновление.
Как устранить ошибку 0x80070017 при установке Windows
Вероятность получить ошибку 0x80070017 именно во время установки Windows гораздо выше, чем во всех остальных случаях. Все дело в том, что установка обновлений происходит при помощи скачивания определенных файлов из сети и распаковки их внутри самого жесткого диска, а чистая установка Windows производится при помощи самых разных внешних носителей. Именно они зачастую и провоцируют появление ошибки.
Если установка производится с DVD диска и в процессе процедур вы видите ошибку 0x80070017, стоит извлечь диск из привода и проверить его визуально. К проблемам считывания информации может приводить загрязнение зеркальной поверхности диска. Очистите его и попробуйте повторить попытку установки.
Если диск имеет серьезные царапины на зеркальной поверхности, рекомендуем отказаться от установки Windows с этого носителя и создать установочный флеш-накопитель. Вероятность проблем во время установки с флешки значительно ниже. Для создания установочной флешки вам понадобится ISO-образ Windows и фирменная утилита USB Download Tools от компании Microsoft. Скачать ее можно по этой ссылке.
Как устранить ошибку 0x80070017 при обновлении Windows
Иногда может возникать ситуация, при которой ошибка 0x80070017 возникает даже при установке обновлений Windows. Чаще всего это вызвано отдельными системными ошибками. Чтобы избавиться от них и нормализовать работу Центра обновлений, выполните следующие несложные шаги:
- Запустите Командную строку (делать это необходимо от имени Администратора, воспользовавшись специальным пунктом контекстного меню, доступного по нажатию правой клавишей мыши на иконке Командной строки)
- Поочередно впишите следующие команды, после каждой нажимая клавишу Enter:
net stop wuauserv
CD %systemroot%\SoftwareDistribution
Ren Download Download.old
net start wuauserv
Если все сделано правильно, то после возврата в Центр обновления и повторного запуска установки, ошибка 0x80070017 больше не побеспокоит вас.
The error code 0x80070017 usually refers to bad install media. Typically, it will occur in one of two cases: when trying to install/reinstall Windows or when installing a Windows update. This error code can be encountered with any Windows version regardless of your system specifications.
If you get this error while installing/reinstalling Windows, you’ll see it as follows:
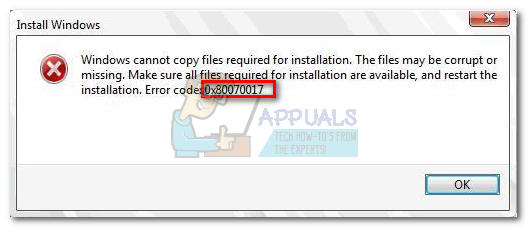
Windows cannot copy files required for installation. The files may be corrupt or missing. Make sure all files required for installation are available and restart the installation. Error code 0x80070017.
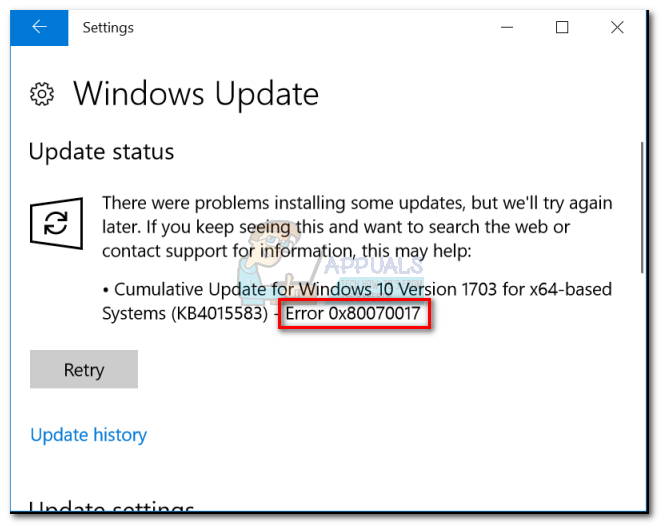
You might also encounter the 0x80070017 error after a Windows Update fails.
Essentially, the error 0x80070017 is signaling that the files that are being copied from the disk (or cloud) are not transitioning into your hard drive with the same structure. This could either mean that the original files are being modified, changed or corrupted while being copied to their destination. But most of the time, you’ll deal with corrupted files or bad sectors.
Because there are two different scenarios in which the error 0x80070017 can be encountered, we have created two separate troubleshooting guides. Please follow the methods appropriate to your situation. Use Method 1 and Method 2 if you’re seeing the error when installing / reinstalling Windows. If you’re seeing the error after a Windows update failed, follow Method 3 and Method 4.
The 0x80070017 error appears when installing / reinstalling Windows
The 0x80070017 error is one of the most common error codes encountered when users try to install a fresh copy of Windows. Although this can be a drive problem, most of the time it will be a bad disk. Since the error code is signaling an error during install or corrupted media installer, you should start your troubleshooting quest by making sure that the Windows ISO is optimal.
Method 1: Re-burn the ISO file optimally with integrity check
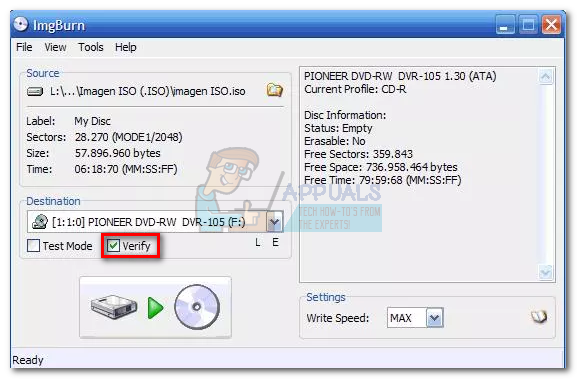
DVDs are prone to develop bad sectors over the years, so there’s a high chance that you’re dealing with a bad Windows installer DVD. If you have the means, start your troubleshooting quest by burning the ISO to a new disk. Then, do a clean re-install from it.
Note: Make sure you burn the DVD with a reliable burner such as ImgBurn at an optimal burning speed (4x, max 8x). If possible, instruct your burner software to verify the integrity of the DVD at the end of the writing cycle. In ImgBurn, this is done by checking the box next to Verify.
If you’re getting the same 0x80070017 error at the exact same place from the new disk, you might be dealing with a corrupted ISO file. In that case, re-download the ISO file and burn it to a new disk.
Note: If you have a viable Windows license, you can visit Microsoft’s website and insert your product key to receive the ISO file (for Windows 7) or use the Media Creation Tool (for Windows 8, 10) to download the ISO. You can use these links to fetch the official Windows installation ISO and then burn it to a new disk.
Method 2: Installing Windows from a flash stick
If Method 1 didn’t work, you should turn your attention towards your DVD drive. Although this is less common, the optical drive can go bad and trigger the 0x80070017 error while failing to read the contents of your Windows installation media disk. However, we can avoid using a faulty optical drive by transferring the Windows installation ISO to a flash disk and making it bootable.
Depending on your Windows version, the next steps will be different. Microsoft has developed a dedicated software capable of making your USB bootable for installation purposes, but it only works with Windows 8.1 and Windows 10. If you have an older Windows version follow the second guide.
1. Windows 8.1 and Windows 10
If you own a licensed copy of Windows 8.1 or Windows 10, you can use the Windows Media Creation tool to create a bootable USB. This way, you can avoid using your DVD drive when performing re-installing your OS. The setup is extremely easy, just make sure you have a working internet connection, sufficient data storage on your computer and a blank USB external drive of 8 GB or more. Here’s a quick guide to using the Media Creation Tool:
- Download the Media Creation Tool from Microsoft’s website.

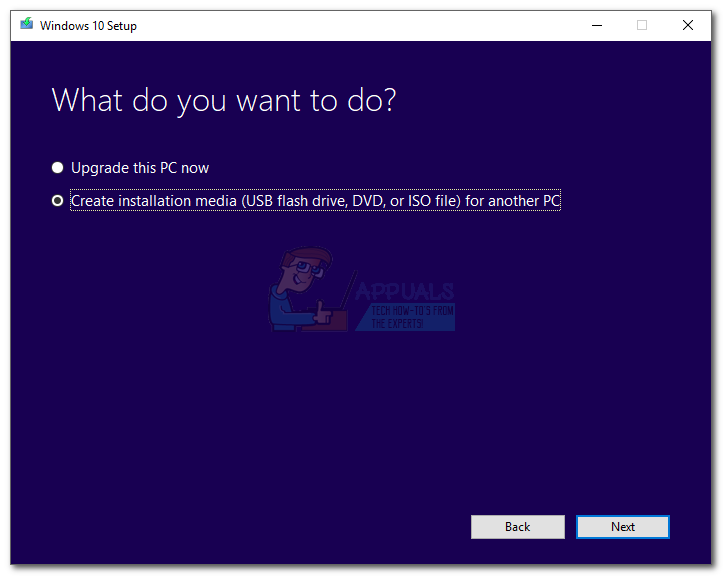
- Start the Media Creation Tool and hit Accept to agree to the license terms. Then select Create installation media for another PC and hit Next.

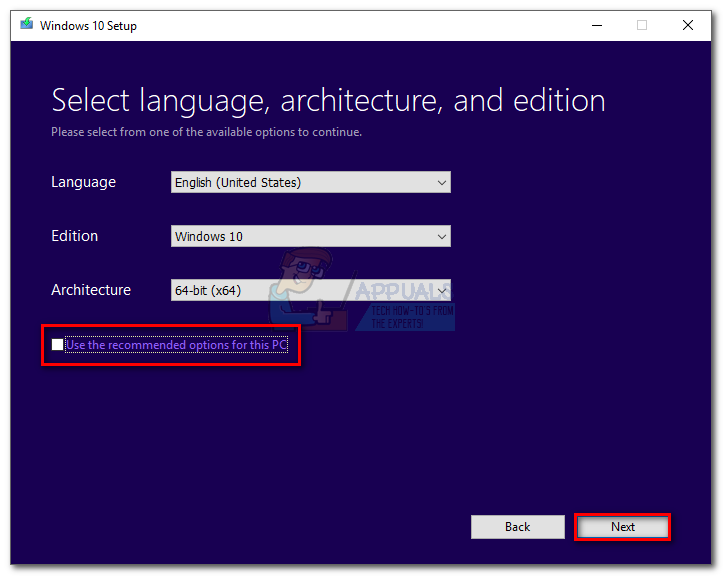
- In the next window, you’ll need to select your Language, Windows version, and Architecture. You can also automate the process by checking the box next to Use the recommended options for this PC. But keep in mind that this will automatically set the edition to Windows 10. If you have Windows 8, set it manually.
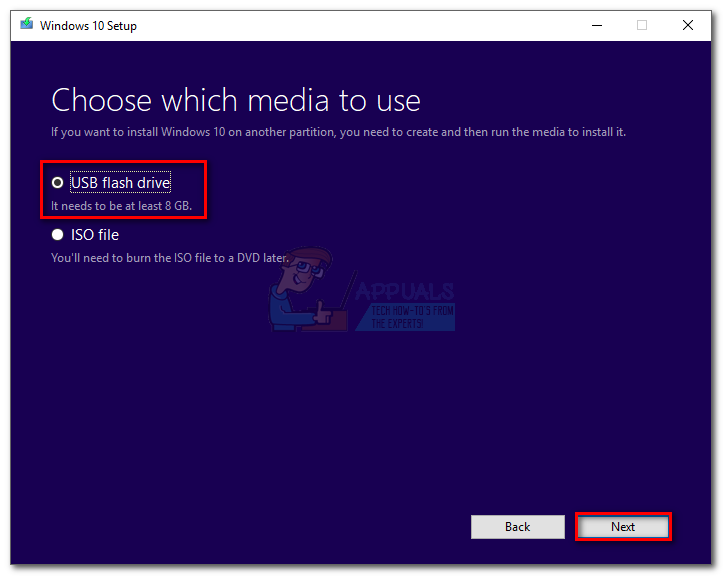
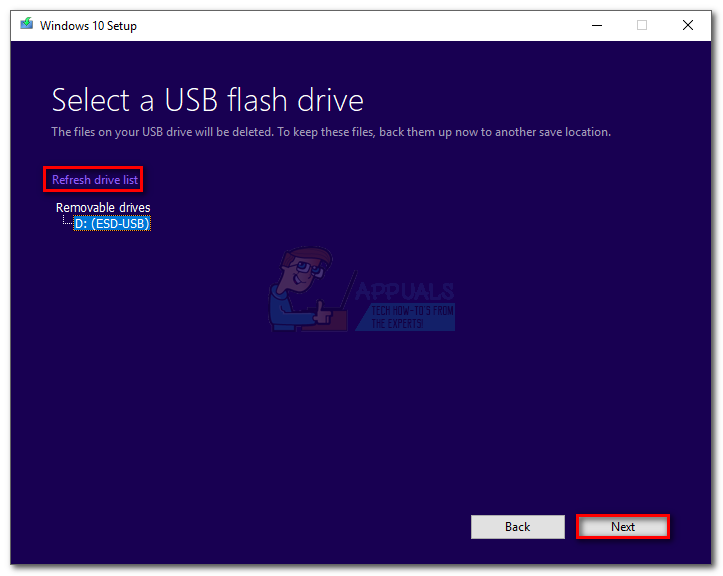
- Select USB flash drive an hit Next.
- Now insert your flash USB disk, select it inside the Media creation tool and hit Next to continue. You might need to hit refresh a few times until it becomes visible.
Note: Keep in mind that the previous contents of your USB flash drive will be lost. If you have anything important on the drive, move it before using the Media creation tool with the flash drive. - The software will automatically format your flash drive, download the Windows image and make it bootable.
- At the end of the process, your flash drive should become bootable. Restart your device and re-install Windows from it.
Note: If it doesn’t boot up, enter your BIOS / UEFI settings and make the USB first on the boot priority list.

 Note: Keep in mind that the previous contents of your USB flash drive will be lost. If you have anything important on the drive, move it before using the Media creation tool with the flash drive.
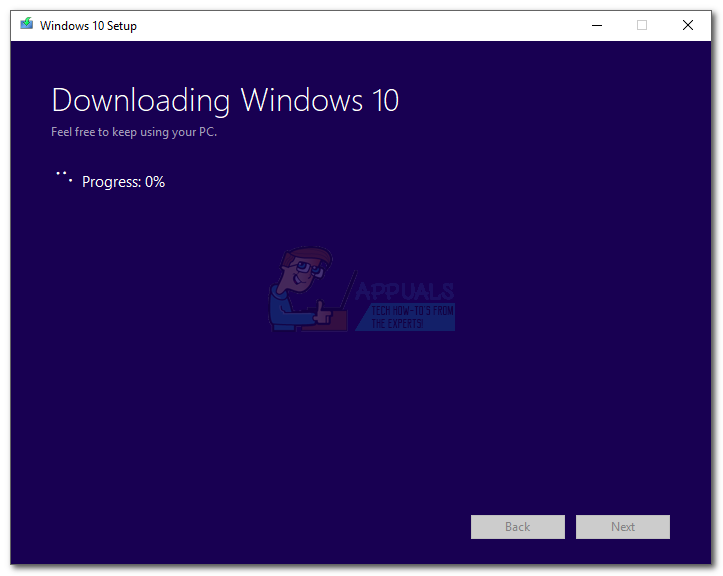
2. Windows XP, Windows Vista, Windows 7
Unfortunately, Microsoft has not officially provided the means of making Windows 7 or older bootable from a flash drive. Because of this, we are forced to use a 3rd party solution in order to keep things simple.
If you have a valid Windows license key but you don’t have the ISO file, you can visit this link and enter your Windows product key. You will then be able to download the official ISO file to your computer.
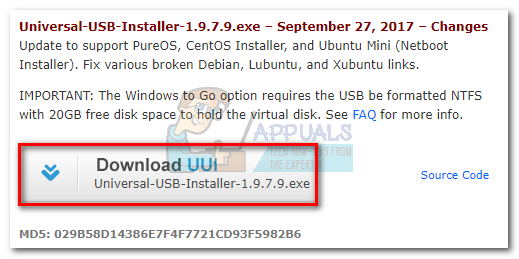
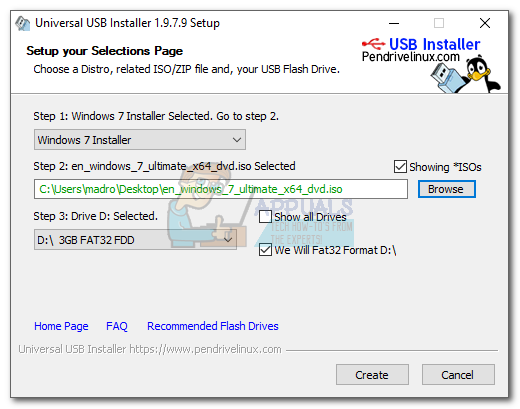
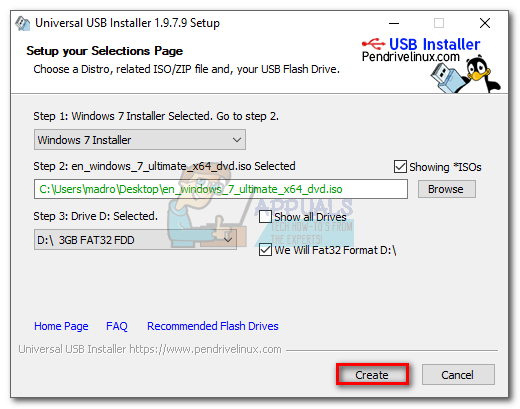
Once you have secured the ISO file, it’s time to make copy it to a flash drive and make it bootable. By far, the easiest and most reliable solution I was able to find is by using the Universal USB Installer. Here’s a quick guide to using it:
- Download the Universal USB installer from this link.

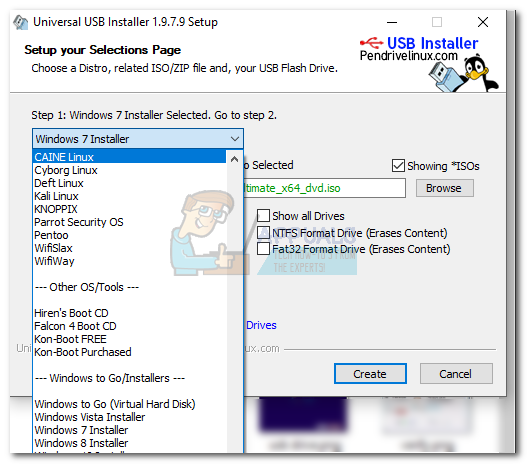
- Open Universal USB installer and access the drop-down menu under Step 1. Then, select the installer appropriate to your Windows version.

- Move down to Step 2 and hit the Browse button. Then, select your Windows ISO file and hit Open to load it into the Universal USB Installer.

- At Step 3, use the drop-down menu to select your flash drive. Make sure it has enough space to accommodate the ISO image. Finally, check the box next to We Will Fat32 Format.
- Once everything is in order, click the Create button and wait for your flash drive to become bootable.
- Boot from your USB drive and install Windows that way. The installation should succeed without the 0x80070017 error.

The error 80070017 appears when Installing a Windows Update
If you’re seeing the error 80070017 after a Windows update fails, your computer is either having problems when fetching the update files or when it tries to install them on your system. In situations like this, the fault is usually on the Microsoft servers responsible for deploying the updates, but that’s not a given fact.
You have two ways forward: you either run the Windows update troubleshooter and hope that it fixes the issue automatically or apply the Windows update manually via the Windows Update Catalog.
Method 3: Running the Windows Update troubleshooter
Windows Update Troubleshooter is not particularly effective, but some users have reported that it managed to eliminate the 80070017 error. Before you use this tool, make sure your internet connection is functioning properly. Then, follow the steps below:
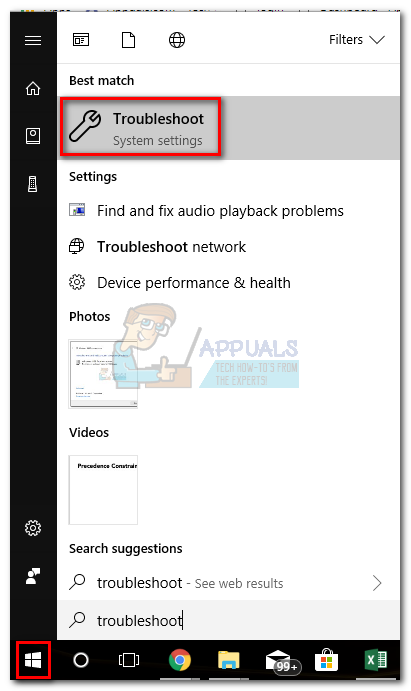
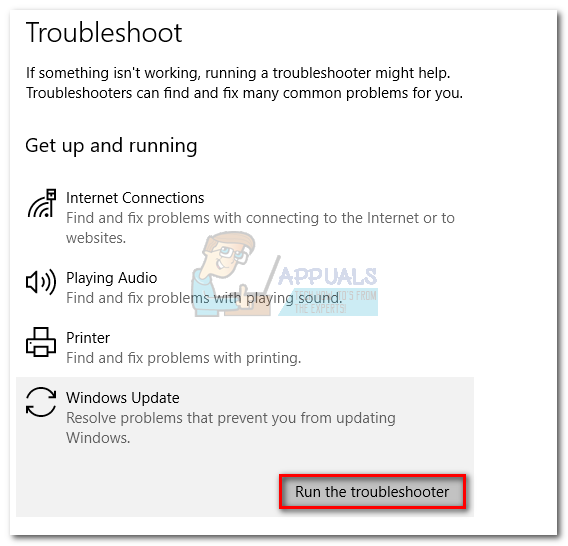
- Press the Windows start bar in the bottom-left corner, search for “troubleshoot” and access the Troubleshoot tool.

- Select Windows Update, then click on Run the troubleshooter.

- If the troubleshooter manages to find an underlying problem, you will be prompted to restart.

- After the restart, return to the Windows Update menu and attempt to re-apply the update.
Method 4: Update manually via Windows Update Catalog
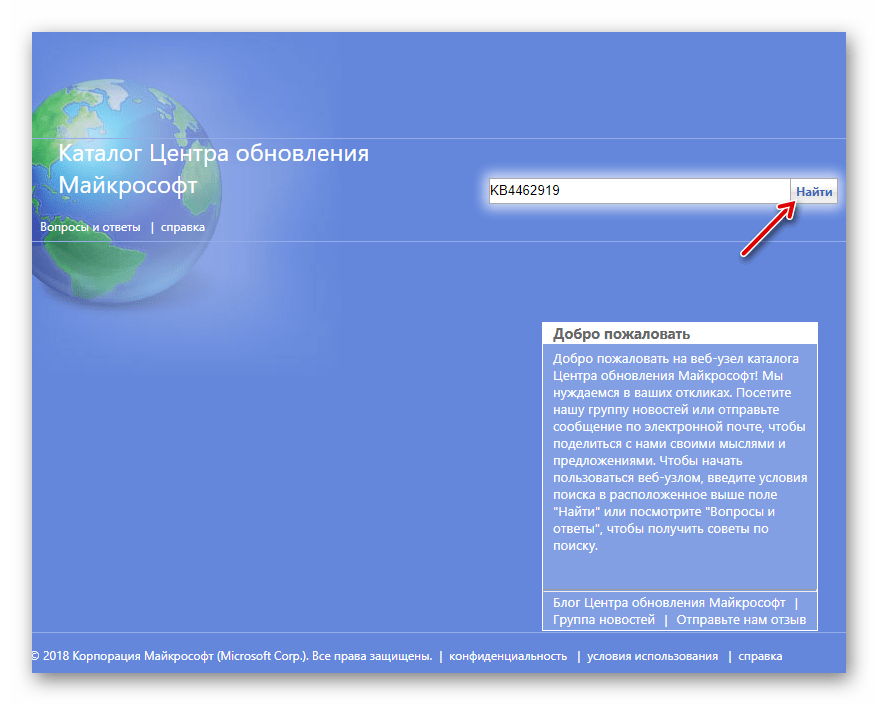
If the Update troubleshooter didn’t solve the problem, you can download the Windows update files manually and install them on your system. You’ll need to access the Windows Update Catalog and search for that specific update by the kb number. Here’s a step-by-step guide on how to do this:
- First, go to Windows update and identify the update the is failing to install and copy the KB number. You’ll need later to query the Microsoft Update Catalog.

- Next, visit the Windows Update Catalog website and paste the KB number into the search bar.

- Now click the Download button associated with the architecture of your system. Do not download the x64 version if you have a 32-bit architecture because it will not install correctly.
 Note: If you disabled Internet Explorer on your system, the download will not start. Alternatively, you can open the link in Edge.
 - Once the .msu file is downloaded to your system, open it and follow the on-screen prompts to install it.

- Restart your system and return to Windows update to see if the update is applied.

 Note: If you disabled Internet Explorer on your system, the download will not start. Alternatively, you can open the link in Edge.