Reading time: 5 Minutes
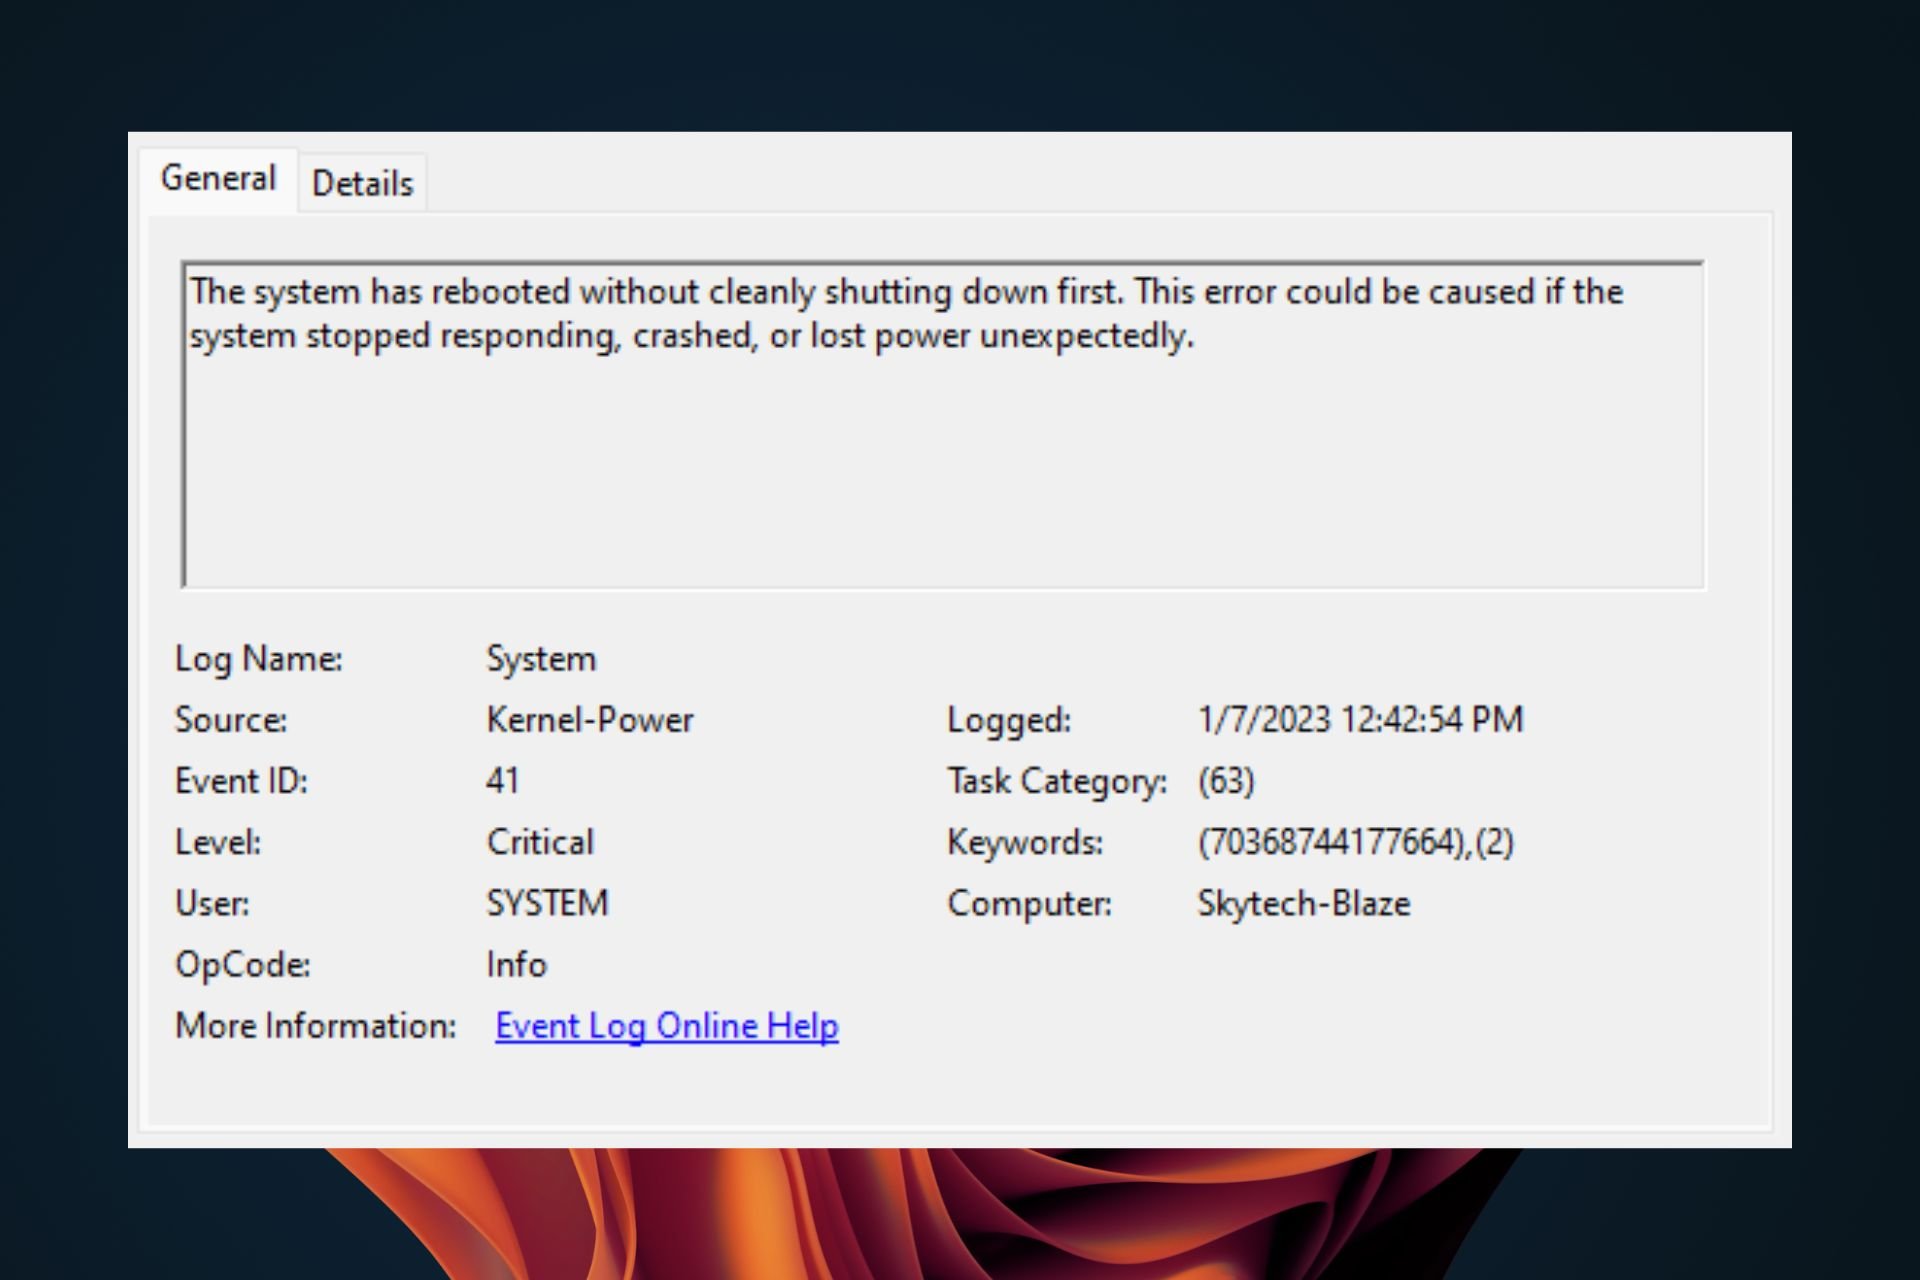
Are you experiencing sudden reboots on your system without warning? If so, you may be encountering a Kernel-Power error, which is commonly associated with activities that consume a lot of resources, such as gaming. This error may occur after installing an antivirus program or hardware devices. Some users report experiencing random crashes with codes such as (70368744177664),(2).
In the next section, we will recommend remarkable suggestions to fix this problem. But before that, let’s first understand what the (70368744177664),(2) error is and its causes.
What is (70368744177664),(2)?
The Kernel-Power error (70368744177664),(2) is a random issue that occurs when your system crashes or loses power unexpectedly. This error is associated with system data corruption or memory/driver incompatibility issues.
Why Does (70368744177664),(2) Happen on Windows 10/11?
There are several causes of the (70368744177664),(2) error. Sometimes, it may occur because of an incompatible third-party antivirus program. Some startup programs and drivers could also trigger the BSOD (70368744177664),(2) error on Windows 10/11. Based on recently reported cases, this issue seems to affect Windows 10/11 and Windows 8.
Below, we have summarized the major causes of the Kernel-Power 70368744177664,(2) error:
- Failing RAM: Some users who have encountered this issue discovered that a faulty RAM stick was the cause. You can avoid the problem by underclocking your RAM regularly or replacing the failing RAM stick with a new one.
- Enabled Fast Startup: While Fast Startup is a useful Windows feature, it can also trigger many problems, including the (70368744177664),(2) error.
- BIOS bug: You are likely to encounter this problem if you haven’t updated your BIOS to the latest version.
- Fail-Safe: Most modern PCs come with a fail-safe that automatically restarts or shuts down to avoid permanent damage to your system.
- Insufficient PSU: Sometimes, when you are running resource-draining tasks, your PC may crash. The problem usually occurs because the power supply unit may be incapable of providing sufficient power. So, if you can’t upgrade to a better PSU, get rid of some non-essential components.
Now, that we know the potential culprits, let’s discuss the troubleshooting steps you may want to try.
How to Fix the (70368744177664),(2) Error on Windows 10/11?
If the BSOD (70368744177664),(2) error is giving you sleepless nights, try these tricks to isolate the cause of the issue. You can try all of them or see which applies to your situation, then proceed with the suggestions:
Solution 1: Install the Latest Updates
Before proceeding with other solutions, ensure you have installed the latest system updates. Sometimes, an outdated third-party antivirus program (referred to as third-party antivirus program) could cause incompatibility issues with your Windows version. Once you have installed the available updates, especially the latest version of the antivirus software, restart your PC and check if the problem persists.
Other than installing updates, you may also want to physically check your hard drive, RAM, and other hardware components that are not connected correctly.
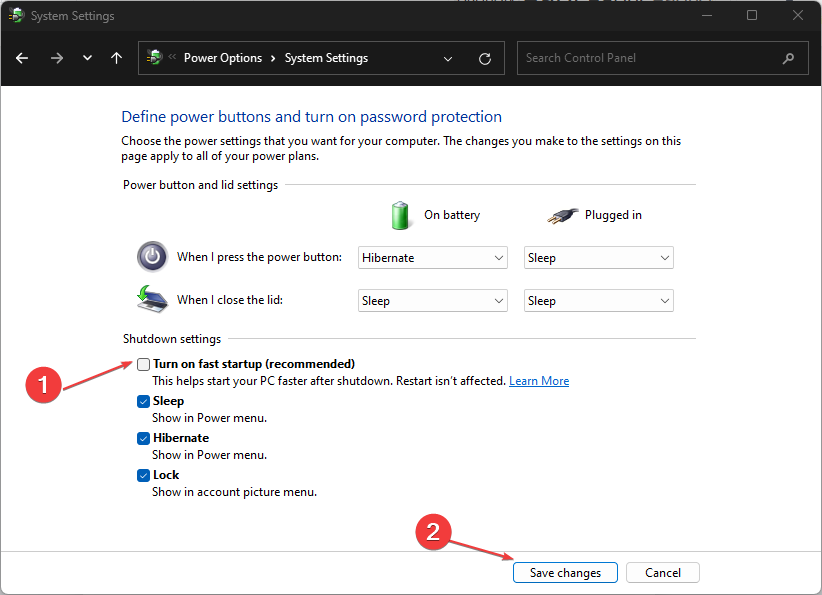
Solution 2: Turn Off Fast Startup
If you are not doing anything too demanding on your CPU and you still encounter the Kernel BSOD (70368744177664),(2), the Fast startup feature could be the culprit. Disabling this feature usually resolves the problem. Here is how to do it:
- Go to Start, then choose the Control Panel option.
- Now, navigate to the Power Options menu and click Choose what the power buttons do.
- Select Change settings that are currently available.
- After that, choose the Shutdown Settings option, and then turn off the Fast start feature.
Solution 3: Customize Power Settings
If you are running resource-intensive processes on your PC, your Power Supply Unit (PSU) may be underpowered, causing your system to crash and display the Kernel BSOD (70368744177664),(2) error.
One way to resolve power issues is to change your Power settings. The Power Plan feature in Windows 10/11 can help you manage how your PC consumes power. To change the advanced Power settings, follow the steps below:
- Type ‘power options’ into the search box and hit Enter.
- After that, select Power & sleep settings from the list of results.
- Now, navigate to the Related settings option on the right pane and click Additional power settings.
- Once the Power Options window opens, choose the Change when the computer sleeps option.
- Next, click on the Change advanced power settings option.
- Finally, choose settings that reflect how you want your device to manage power.
In addition to adjusting your Power settings, consider removing any unnecessary device, such as additional HDD, optical drive, and non-critical peripherals, among others.
Solution 4: Reduce CPU Overclocking Frequencies
As you already know, the Kernel BSOD (70368744177664),(2) can be triggered by component heating. So, if you use your PC mainly to play games or surf the internet, underclocking your CPU or GPU is a smart option. Some affected users have reported success after reducing their overclocking frequencies.
Solution 5: Update Drivers
Device drivers facilitate the smooth communication between your software and hardware components. So, without them, your computer may not function properly. As mentioned earlier, an incompatible driver could cause the (70368744177664),(2) error on Windows 10/11. If that is the case, check for outdated or corrupted drivers, and then update them accordingly.
Ideally, Windows should detect and install drivers automatically using an array of built-in tools. But sometimes, you may need to update a device driver yourself. Fortunately, you have several options to do so, including using the Device Manager or Windows Update.
But before doing that, you may need to check for and fix corrupted disk by running the chkdsk command. To run the Check Disk scan on your main drive, type the following command into the command prompt window and press Enter:
chkdsk /f C:
Important Note: Manually updating your drivers can be risky and time-consuming. For a safer and more efficient process, consider using a specific driver updater tool (Driver Updater tool). It will scan your PC for outdated, missing, or corrupted drivers, and then update them to their latest and most stable versions.
Solution 6: Update the BIOS
Sometimes, the BIOS can get corrupted, causing the (70368744177664),(2) error on Windows 10/11. Some users have reported that the problem disappeared as soon as they updated their motherboard BIOS. This trick might work for you, too.
Updating the BIOS can improve the efficiency of your system in many ways. It supports new processors, updates a corrupted UEFI environment, overwrites a bug, or even adds new features and functions.
The simplest way to update or reset the BIOS is restarting your PC, and then booting to the BIOS setup options. But you should keep in mind that updating your BIOS version will depend on the motherboard model.
Quick Fix: Repair Corrupted System Files
If none of the above methods worked for you, and you suspect that system file corruption is to blame, consider scanning for and cleaning the damaged sections. We recommend that you try using a reliable PC cleaning tool, such as the one referenced by Outbyte PC Repair.
Besides checking for memory corruption, this tool will also get rid of junk files that eat up your RAM. Actually, the PC repair application can fix many computer errors and optimize your PC for top performance. So, it’s much better than resolving the problem manually.
There you have it. We hope that the above solutions helped you to fix the issue. You may also need to check this article on how to fix slow startup on Windows 10/11.
Give us some love and rate our post!
Hardware failure is the most common cause of this issue
by Claire Moraa
Claire likes to think she’s got a knack for solving problems and improving the quality of life for those around her. Driven by the forces of rationality, curiosity,… read more
Updated on
- A kernel power error means a problem with the motherboard or power supply unit (PSU), and it is time to replace either one or both.
- You can run a series of tests, including PSU, memory, and hardware, to check whether your hardware components are in good health.
XINSTALL BY CLICKING THE DOWNLOAD FILE
To fix Windows PC system issues, you will need a dedicated tool
SPONSORED
Fortect is a tool that does not simply clean up your PC, but has a repository with several millions of Windows System files stored in their initial version. When your PC encounters a problem, Fortect will fix it for you, by replacing bad files with fresh versions. To fix your current PC issue, here are the steps you need to take:
- Download Fortect and install it on your PC.
- Start the tool’s scanning process to look for corrupt files that are the source of your problem
- Right-click on Start Repair so the tool could start the fixing algorythm
- Fortect has been downloaded by 0 readers this month, rated 4.4 on TrustPilot
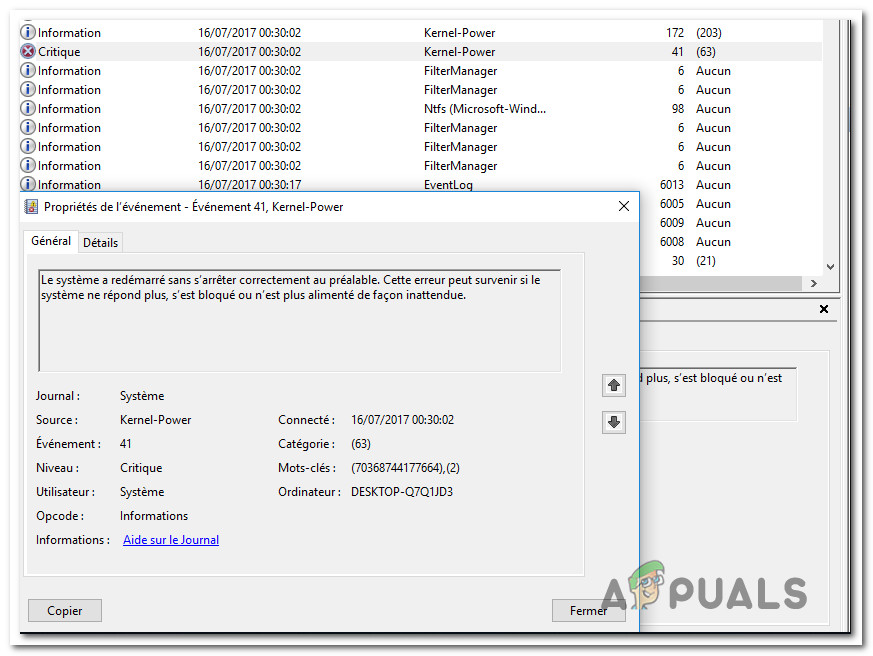
You’ve got a kernel-power (70368744177664),(2) attack. This is when the operating system decides it can’t continue with whatever it was supposed to be doing, and the system completely crashes. It keeps doing so, making it impossible to do anything.
In general, it’s good practice to reboot your computer after a kernel panic. It’s not always necessary, but it’s worth trying every time if you’re having random crashes. If this step proves insufficient, stay tuned for more solutions.
What does kernel power 41 63 mean?
A kernel power error 41 63 is a message displayed by your OS when it encounters an unrecoverable problem with your computer’s hardware or software that causes it to crash or freeze. It can also occur when an application unexpectedly quits, freezes, or crashes.
Some of its triggers include:
- Faulty memory – Your computer may have faulty RAM installed. This can cause all sorts of problems, including Kernel Power errors and other blue screens of death errors.
- Software problems – Software conflicts are another common cause for kernel power errors because they can lead to incompatible programs or services running simultaneously on your computer.
- Hardware changes – If you have recently added new hardware or updated your drivers, you may experience kernel power errors because your system doesn’t recognize the new hardware properly.
- Infected files or viruses – Viruses can sometimes cause kernel power errors by corrupting key system files, causing them not to run properly when needed by Windows at startup time.
- Failing PSU – The most common cause of a kernel-power error such as (70368744177664),(2) is a bad or failing PSU (power supply unit). The PSU is responsible for providing the voltage to all components in your computer.
How do I fix the kernel power error?
Try the following preliminary steps before moving on to the slightly advanced solutions:
- Check for available Windows updates and install them where necessary.
- Disable any overclocking software.
- Ensure your RAM stick is seated properly.
- Run a memory diagnostic check.
- Check whether your CPU is overheating.
- Test your PSU for issues.
- Perform a stress test on your hardware.
1. Run the power troubleshooter
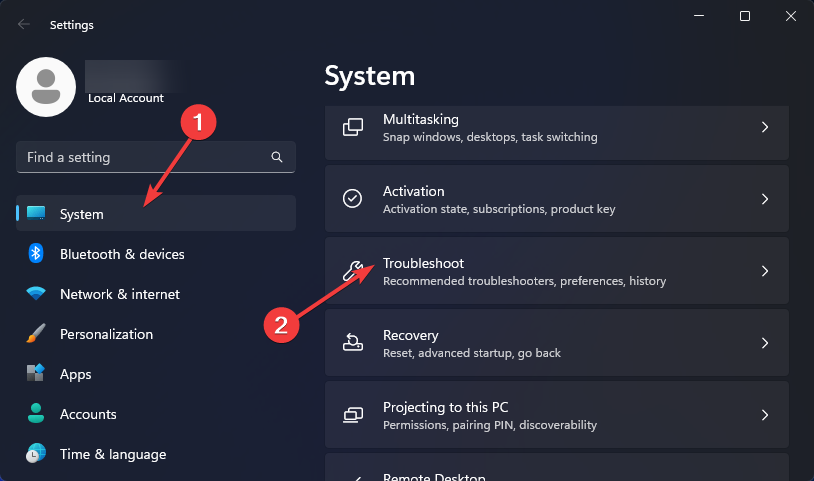
- Hit the Windows key and click on Settings.

- Click on System on the left pane then Troubleshoot on the right pane.

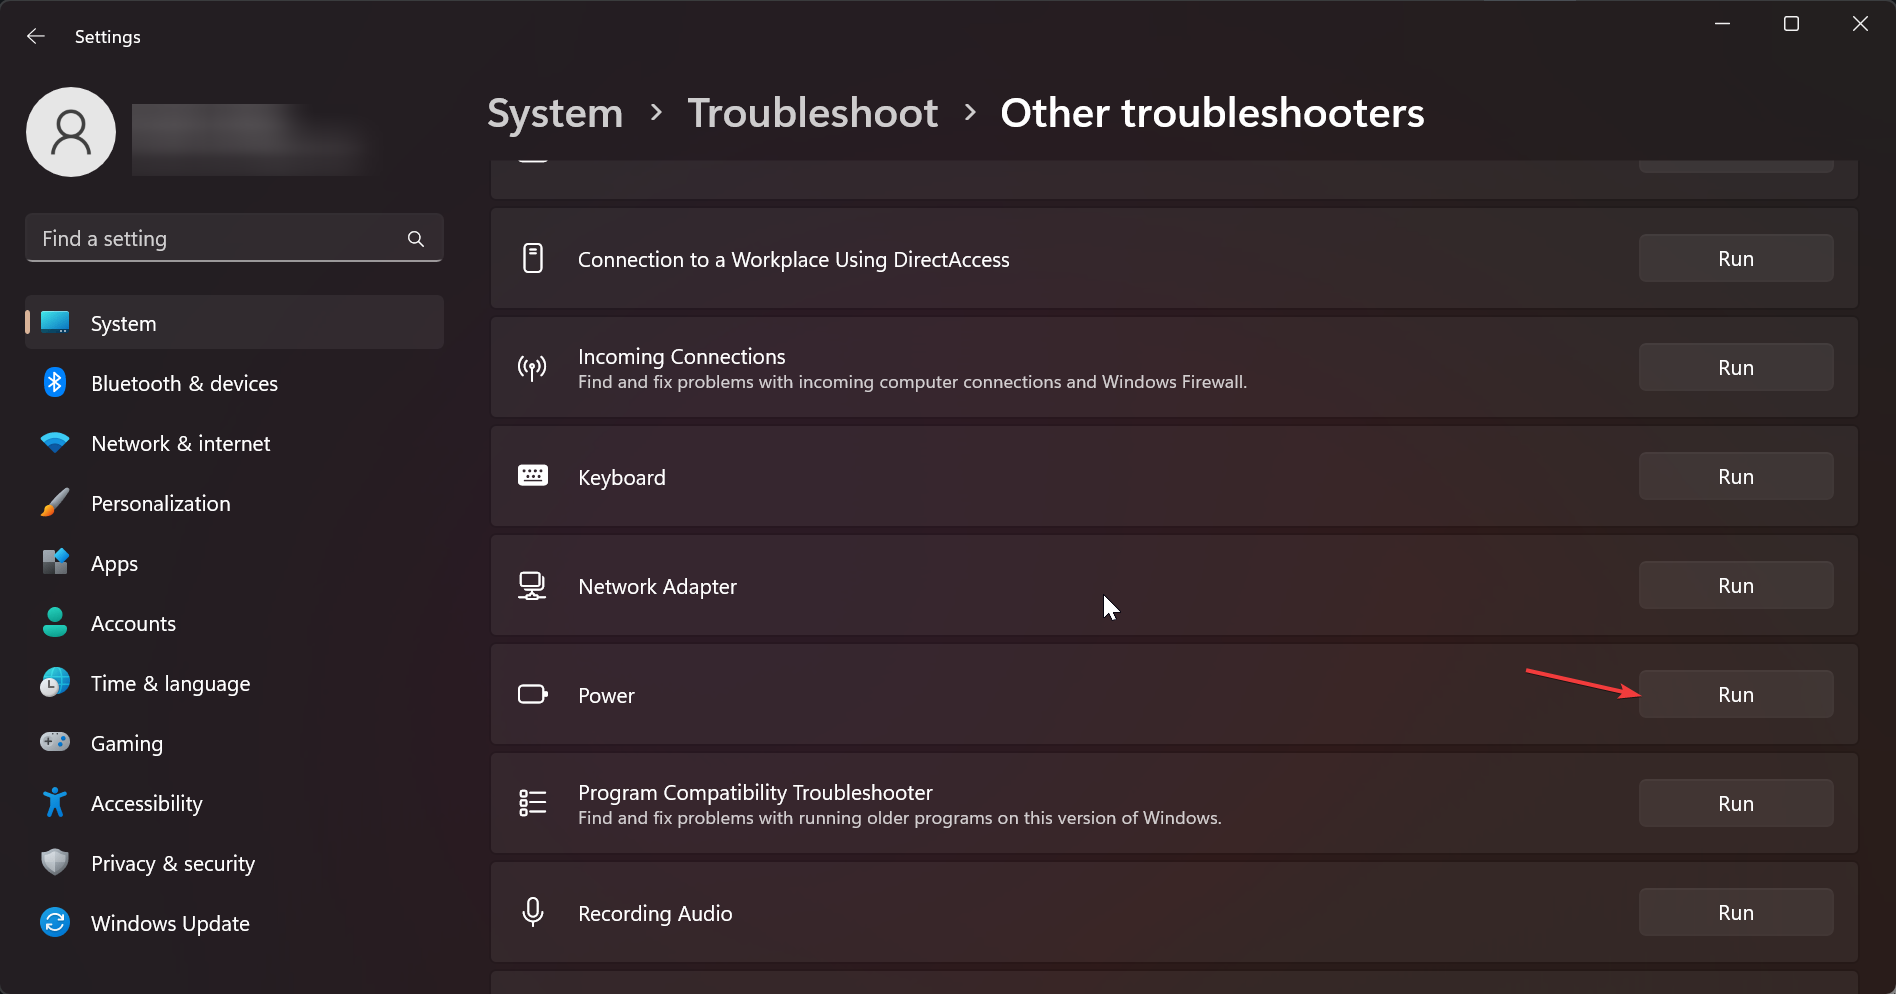
- Select Other troubleshooters.

- Scroll down, locate Power, and click the Run button.


2. Disable Fast startup
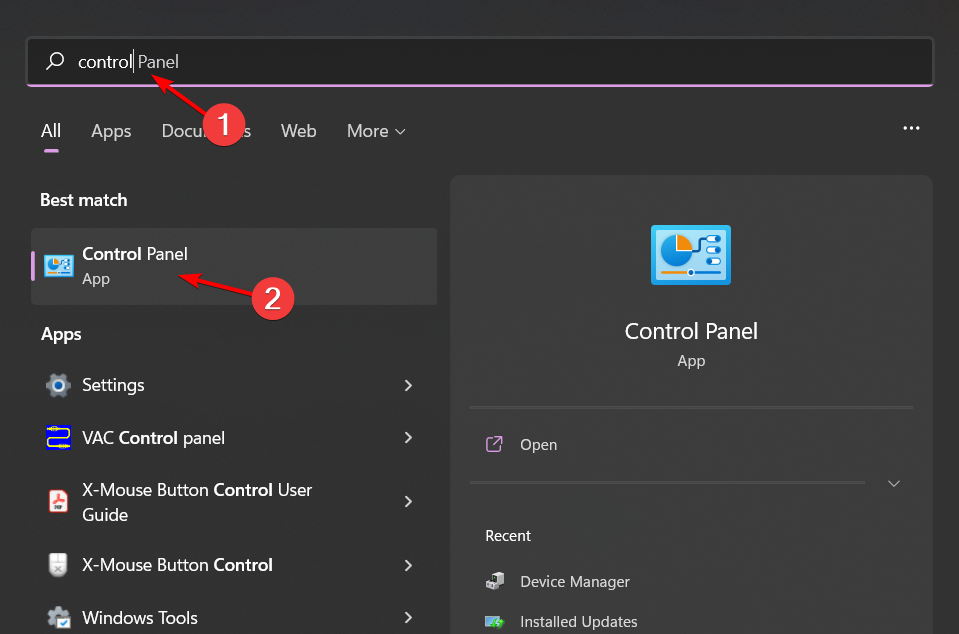
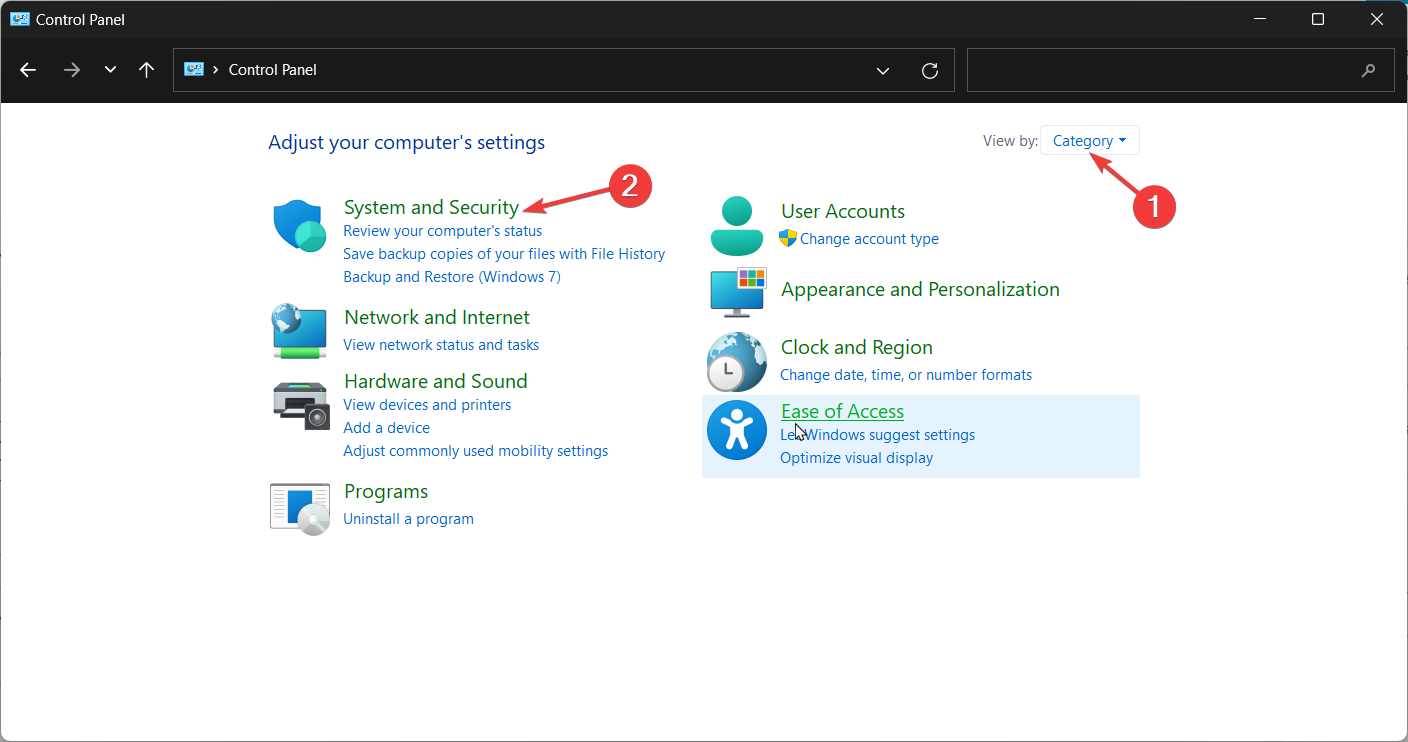
- Hit the Windows key, type Control Panel in the search bar, and click Open.

- Click on System and Security.

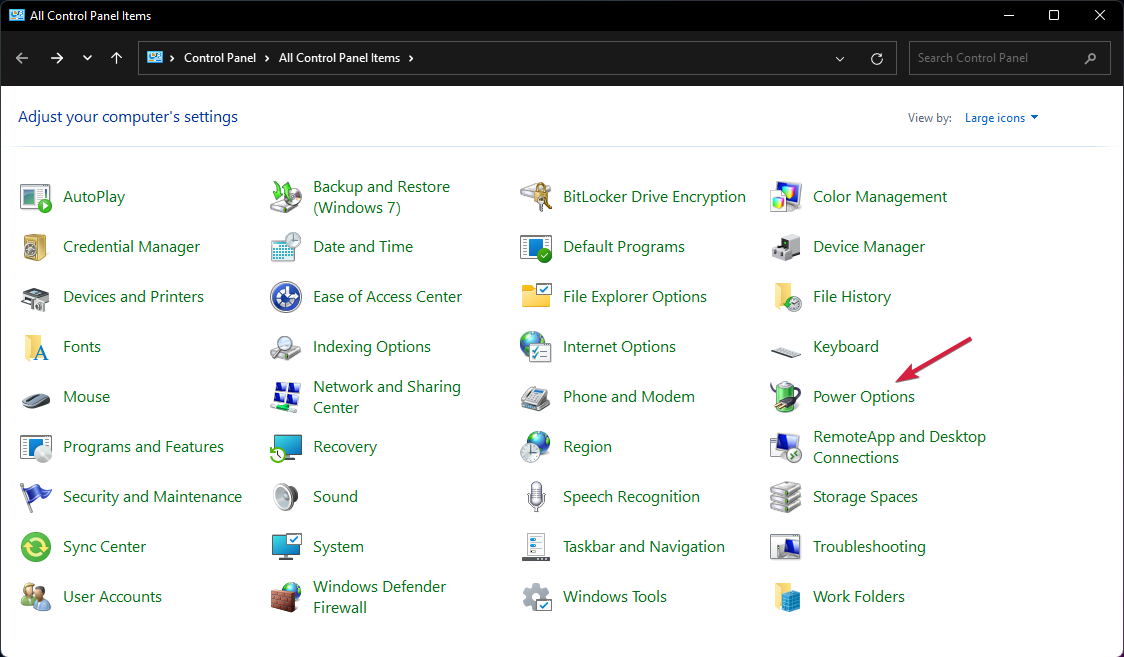
- Next, select Power Options.

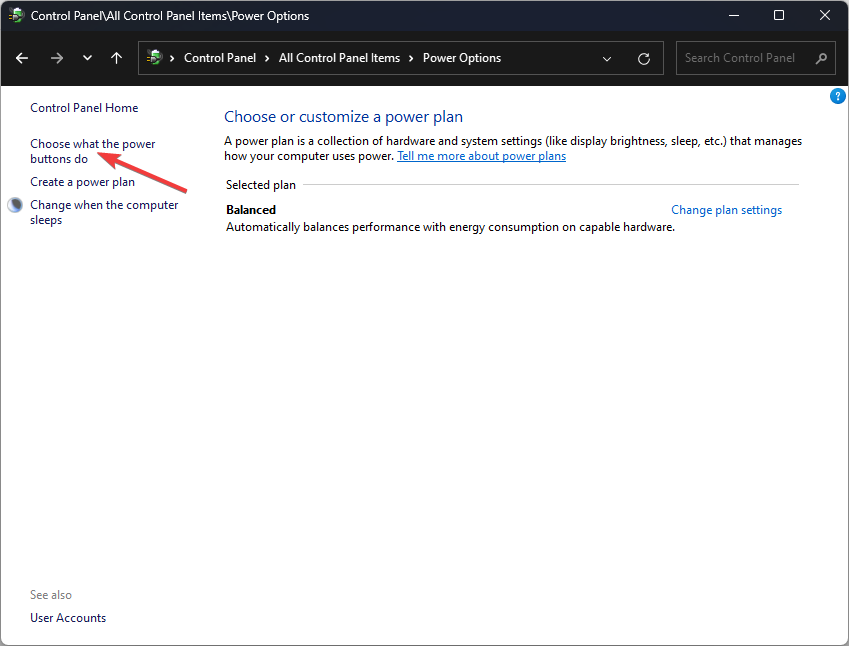
- Click on Choose what the power buttons do from the list of options on the left.

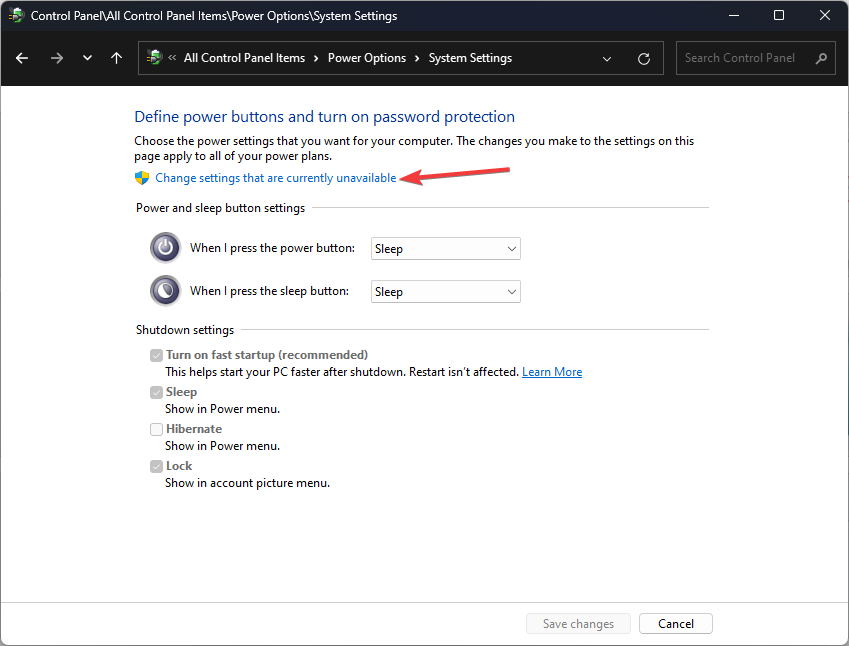
- Select Change settings that are currently unavailable.
- Now, untick the checkbox for Turn on fast startup and then click on Save changes.

3. Run the CHKDSK command
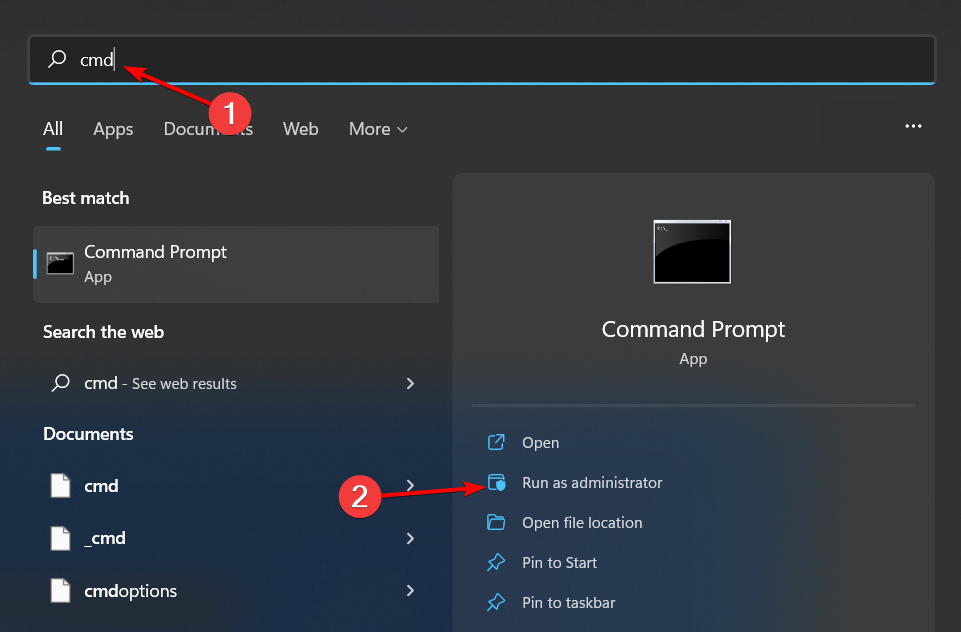
- Hit the Windows key, type cmd in the search bar, and click Run as administrator.

- Type the following command, replace the C letter with your drive’s letter, and press Enter:
chkdsk C: /f
In case CHKDSK gets stuck or takes a long time to complete, proceed to the following step.
4. Run the DISM and SFC commands
- Click on the Start Menu icon, type cmd in the search bar, and click Run as administrator.
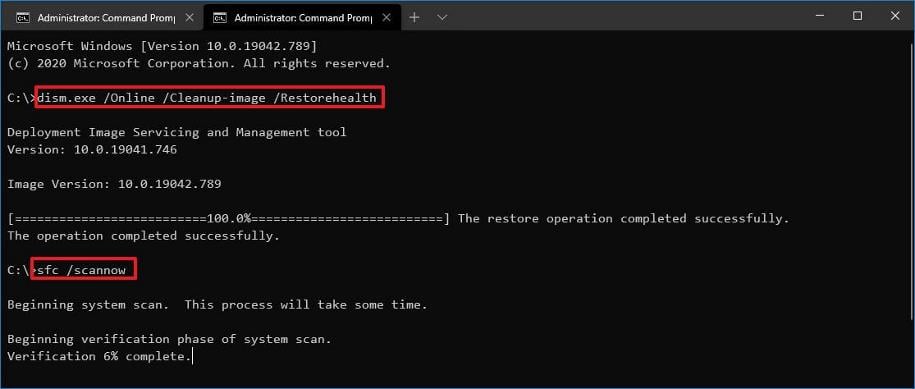
- Type the following commands and press Enter after each one:
DISM.exe /Online /Cleanup-Image /Restorehealthsfc /scannow
- Restart your PC.
If you want to get rid of all your Windows system issues, including the error in question, you should try dedicated software.
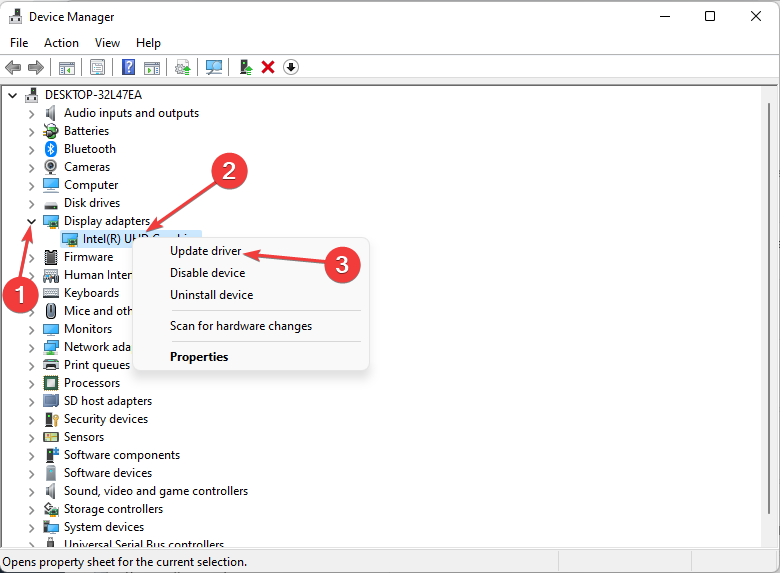
5. Update your graphic driver
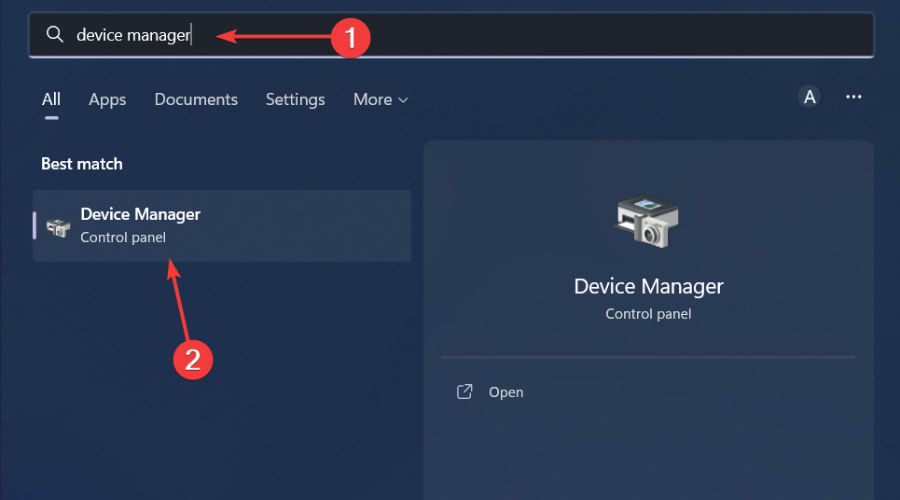
- Click on the Start Menu icon, type Device Manager in the search bar, and click Open.
- Navigate to Display adapters and find your graphics card. Right-click on your graphics card and select Update driver.

- Select Search automatically for drivers.


Windows may not always install the correct drivers, and while you can easily download them from the manufacturer’s website, there are also third-party driver updater tools that can help you find and update the latest versions of your graphics card drivers automatically.
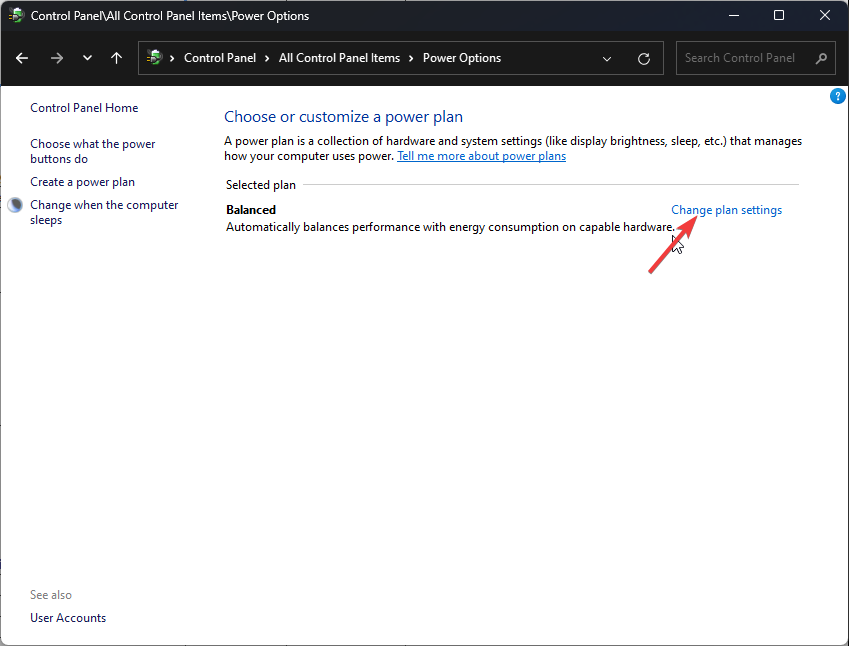
6. Restore default power plans
- Click on the Start Menu icon, type Control Panel in the search bar, and click Open.
- Navigate to Power Options and click to Open.
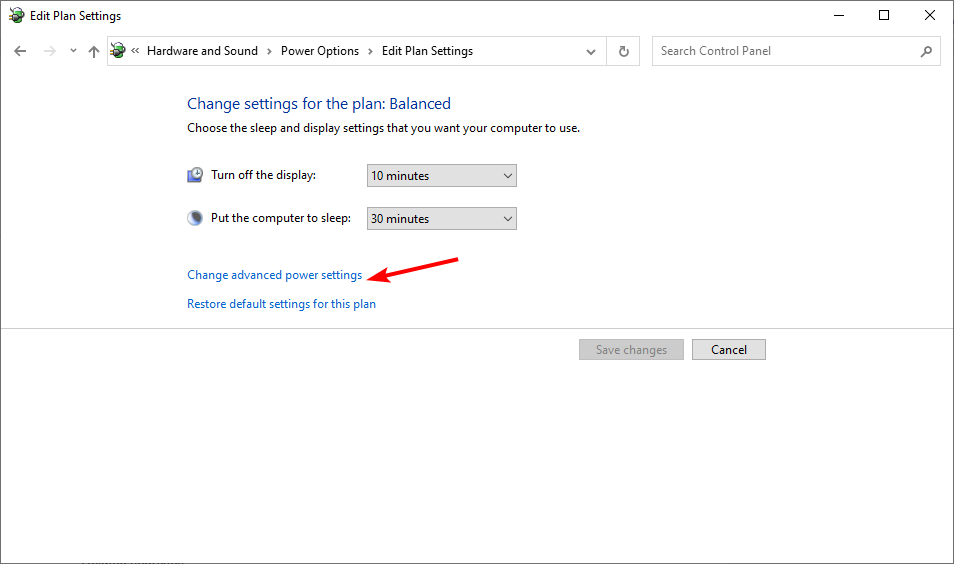
- Select Change plan settings.
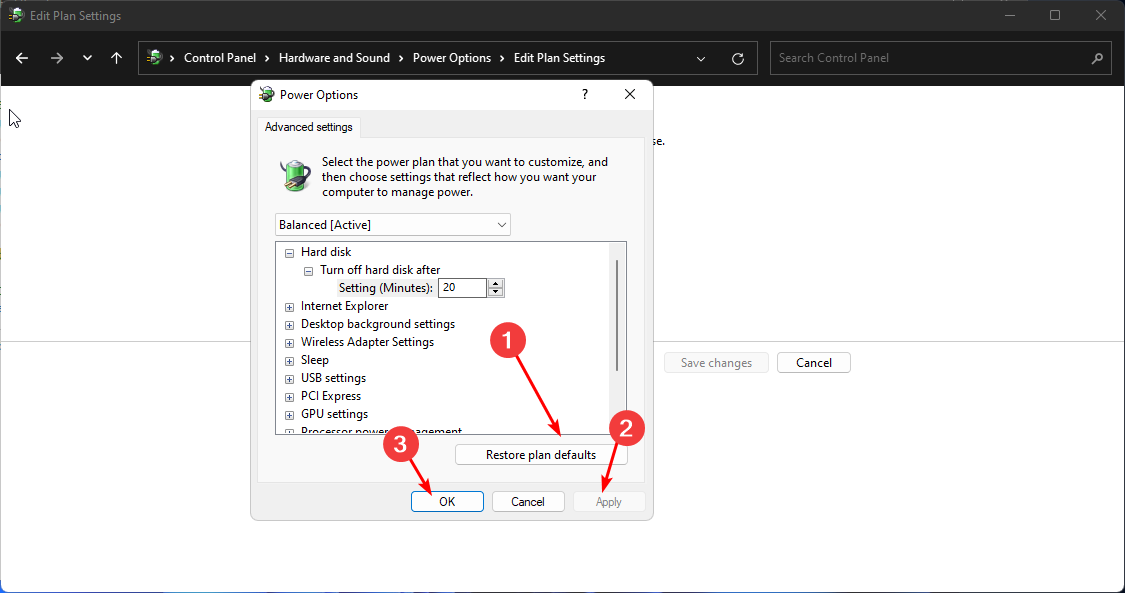
- Click on Change advanced power settings.

- In the Power Options dialog box that appears, select Restore defaults then click Apply and OK to save changes.

7. Update BIOS
- The process of updating BIOS will differ depending on your motherboard. For this step, we shall be updating the HP motherboard.
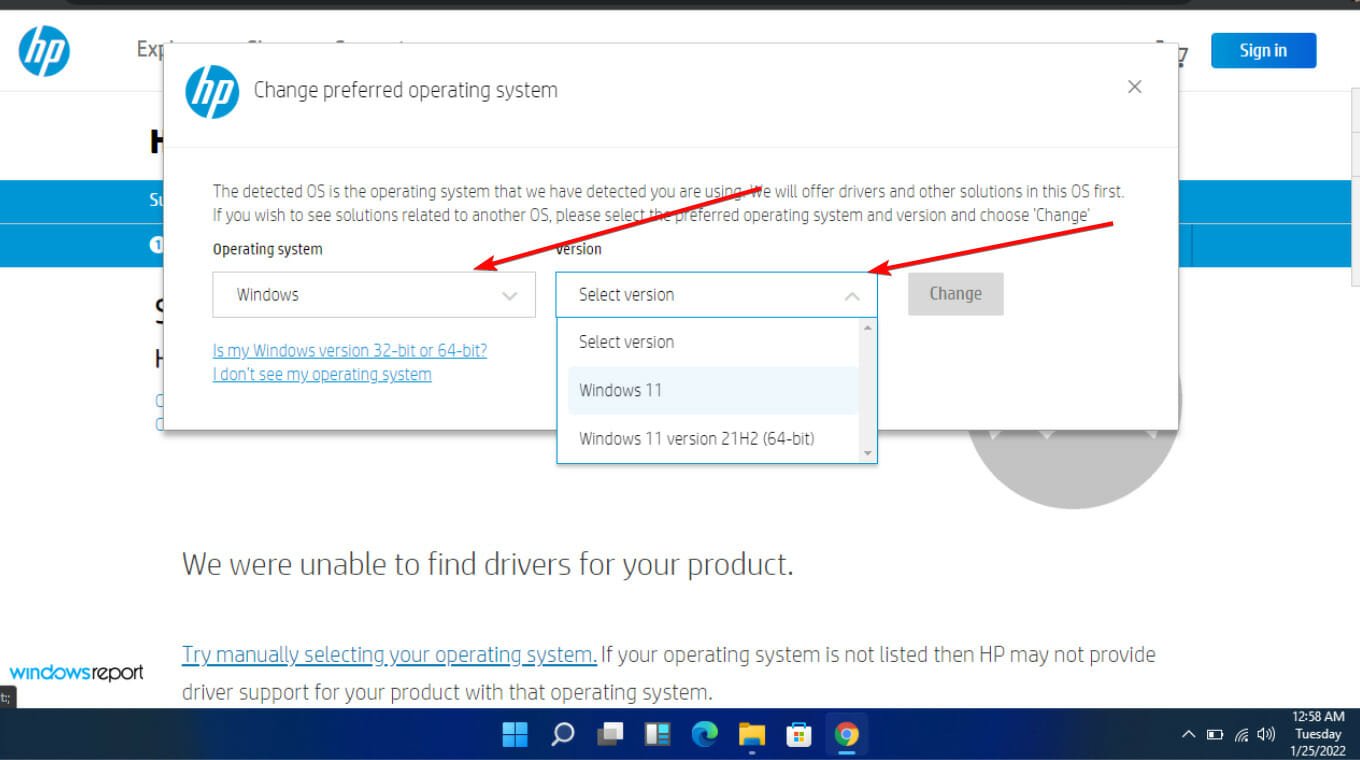
- Navigate to the HP driver and software download website.
- Choose laptop or desktop, depending on the type of computer you’re using.

- Enter your exact serial number or your exact computer model.
- Select your OS and OS version, then click Submit.
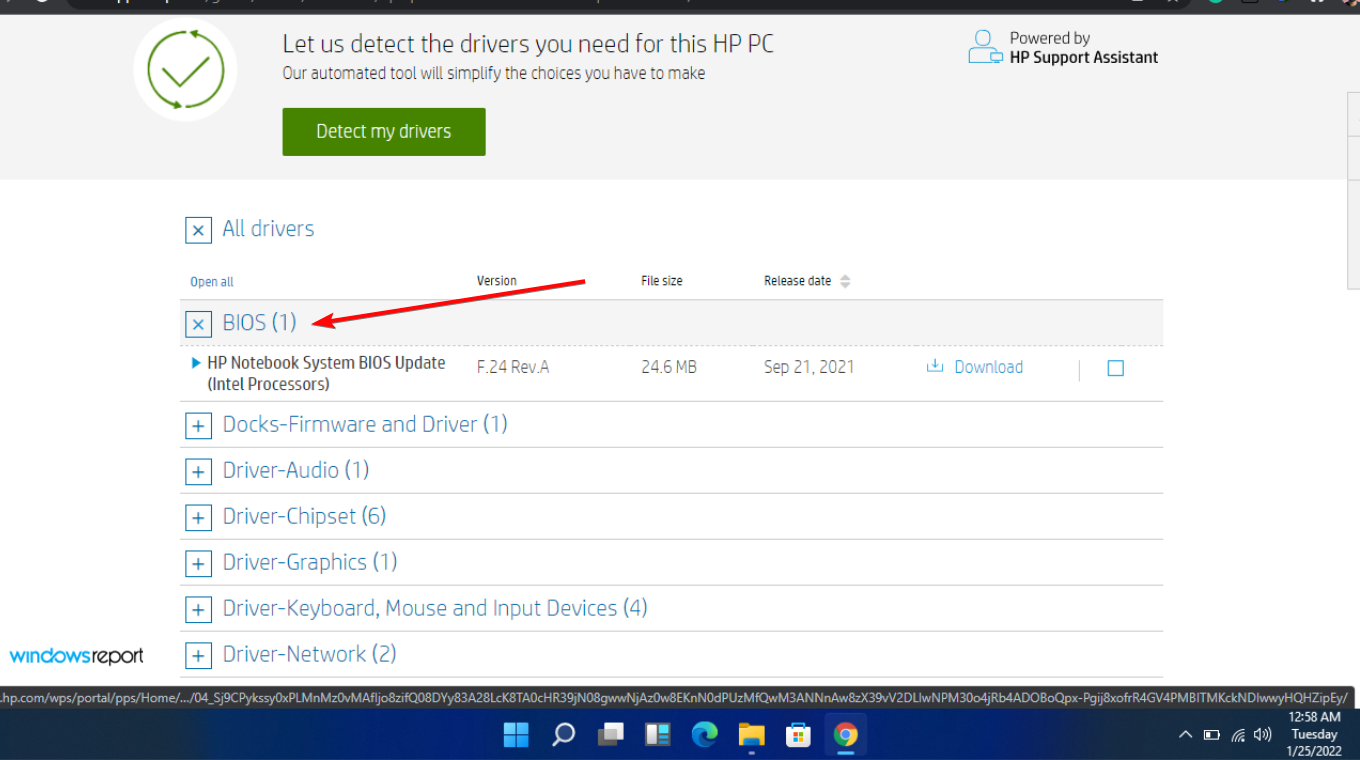
- Click on All drivers and then expand BIOS to see available updates.
- Click the download icon.
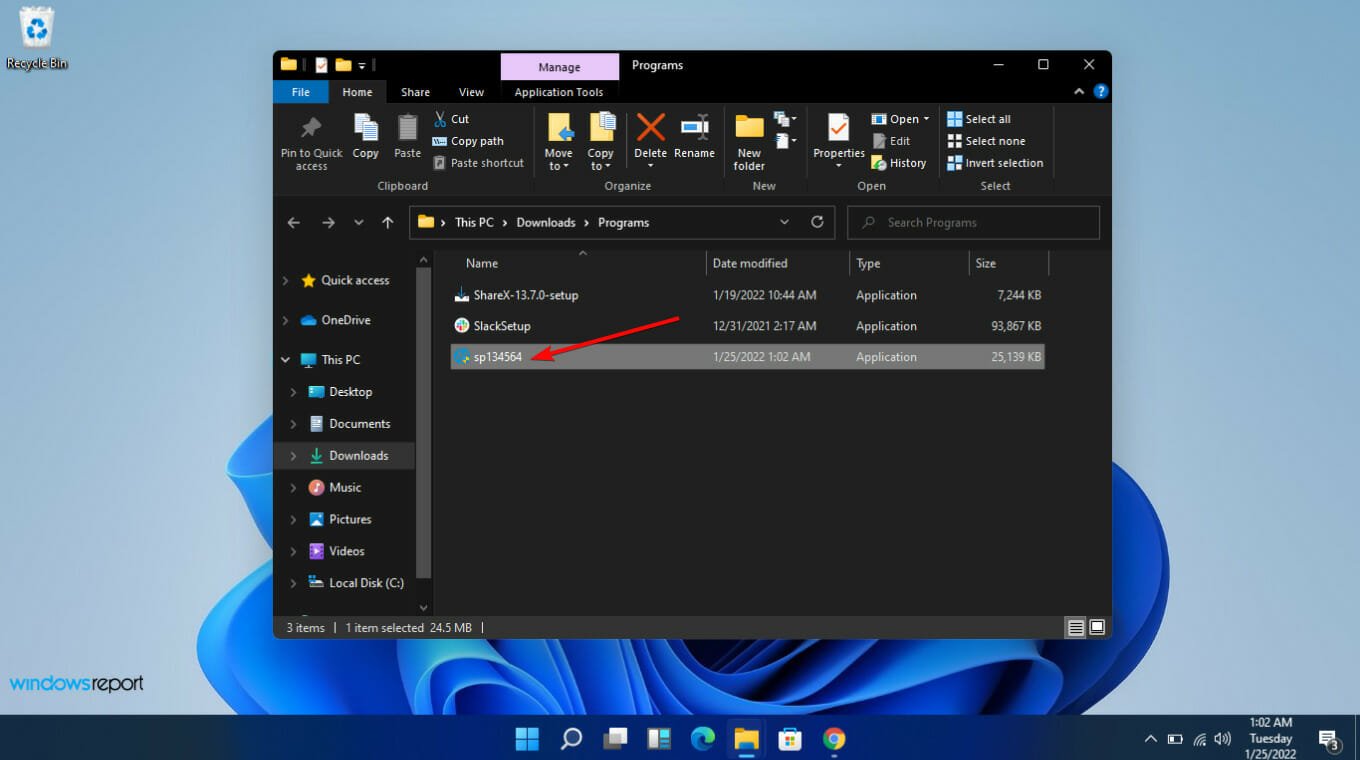
- Install the .exe file, following the on-screen instructions.
- Restart your PC.


Kernel power errors such as the (70368744177664),(2) issue are fairly common on computers but can usually be fixed easily. For instance, check out how we resolved the kernel power 41 error.
Leave any further questions, thoughts, or suggestions in the comment section below.
![]()
Ваша система перезагружается без предупреждения? Возможно, вы только что установили антивирусную программу или какое-то оборудование, а затем ваш компьютер начал перезагружаться, не выключаясь. Если это так, то вы можете столкнуться с ошибкой Kernel-Power, распространенной проблемой, связанной с такими действиями, как игра, требующими переименований. Некоторые пользователи жаловались, что (70368744177664), (2) сбои происходят случайным образом.
В следующем разделе мы порекомендуем замечательные предложения по устранению этой проблемы. Но перед этим давайте сначала разберемся, что такое ошибка (70368744177664), (2) и ее причины.
Что такое (70368744177664), (2)?
Мощность ядра (70368744177664), (2) равна случайная ошибка, которая возникает, если ваша система неожиданно выходит из строя или теряет питание. Эта ошибка связана с повреждением системных данных или несовместимостью памяти / драйверов.
Почему возникает (70368744177664), (2) в Windows 10?
Существует несколько причин ошибки (70368744177664), (2). Иногда это может произойти из-за несовместимой сторонней антивирусной программы. Некоторые запускаемые программы и драйверы также могут вызывать ошибку BSOD (70368744177664), (2) в Windows 10. Судя по недавно зарегистрированным случаям, эта проблема, похоже, затрагивает Windows 10 и Windows 8.
Совет для профессионалов: сканирование ваш компьютер на предмет проблем с производительностью, ненужных файлов, вредоносных приложений и угроз безопасности
, которые могут вызвать системные проблемы или снижение производительности.
Бесплатное сканирование для ПК: проблемы с загрузкой
Специальное предложение. Об Outbyte, инструкции по удалению, лицензионное соглашение, политика конфиденциальности.
Ниже мы суммировали основные причины ошибки Kernel-Power 70368744177664, (2):
- Отказ ОЗУ. Некоторые пользователи, столкнувшиеся с этой проблемой, обнаружили, что виновником является неисправный накопитель ОЗУ. Вы можете избежать этой проблемы, регулярно понижая частоту ОЗУ или заменяя неисправный RAM-накопитель на новый.
- Включен быстрый запуск: хотя быстрый запуск является полезной функцией Windows, он может также вызывают множество проблем, включая ошибку (70368744177664), (2).
- Ошибка BIOS: вы, вероятно, столкнетесь с этой проблемой, если не обновили BIOS до последняя версия.
- Отказоустойчивость: большинство современных ПК оснащены отказоустойчивым устройством, которое автоматически перезагружается или выключается, чтобы избежать необратимого повреждения вашей системы.
- Недостаточно блока питания. Иногда, когда вы выполняете задачи по восстановлению памяти, ваш компьютер может давать сбой. Проблема обычно возникает из-за того, что блок питания может не обеспечивать достаточную мощность. Итак, если вы не можете перейти на более качественный блок питания, избавьтесь от некоторых несущественных компонентов.
Теперь, когда мы знаем потенциальных виновников, давайте обсудим шаги по устранению неполадок, которые могут вам понадобиться. чтобы попробовать.
Как исправить ошибку (70368744177664), (2) в Windows 10?
Если ошибка BSOD (70368744177664), (2) дает вам бессонные ночи, попробуйте эти уловки, чтобы изолировать причину вопроса. Вы можете попробовать все из них или посмотреть, какой из них подходит к вашей ситуации, а затем перейти к предложениям:
Решение 1. Установите последние обновления.
Прежде чем пробовать что-либо еще, убедитесь, что у вас установлены последние обновления. Иногда сторонняя антивирусная программа может быть устаревшей, что делает ее несовместимой с вашей версией Windows. После установки доступных обновлений, особенно последней версии антивирусного программного обеспечения, перезагрузите компьютер и проверьте, сохраняется ли проблема.
Помимо установки обновлений, вы также можете физически проверить свой жесткий диск, ОЗУ и другие аппаратные компоненты, которые не подключены правильно.
Решение 2. Отключите быстрый запуск
Если вы не делаете ничего слишком требовательного к вашему процессору, но все еще сталкиваетесь с BSOD ядра (70368744177664), (2 ), виновником может быть функция быстрого запуска. Отключение этой функции обычно решает проблему. Вот как это сделать:
Решение 3. Настройте параметры питания
Если вы запускаете на своем ПК процессы, требующие перезагрузки, вы, скорее всего, будете работать с недостаточно мощным блоком питания, что приведет к его сбою с BSOD ядра (70368744177664), (2).
Один из способов решения проблем с питанием — изменить настройки питания. Функция Power Plan в Windows 10 может помочь вам управлять потреблением энергии вашим компьютером. Чтобы изменить дополнительные параметры питания, выполните следующие действия:
Помимо настройки параметров питания, рассмотрите возможность удаления всех ненужных устройств, таких как дополнительный жесткий диск, оптический привод и другие устройства. -критические периферийные устройства, среди прочего.
Решение 4. Уменьшите частоту разгона ЦП
Как вы уже знаете, BSOD ядра (70368744177664), (2) может быть вызван нагревом компонентов. Итак, если вы используете свой компьютер в основном для игр или серфинга в Интернете, снижение частоты процессора или графического процессора — разумный вариант. Некоторые затронутые пользователи сообщили об успехе после снижения частоты разгона.
Решение 5. Обновите драйверы
Драйверы устройств обеспечивают бесперебойную связь между программным обеспечением и компонентами оборудования. Так что без них ваш компьютер может работать некорректно. Как упоминалось ранее, несовместимый драйвер может вызвать ошибку (70368744177664), (2) в Windows 10. В этом случае проверьте наличие устаревших или поврежденных драйверов, а затем обновите их соответствующим образом.
В идеале, Windows должна автоматически обнаруживать и устанавливать драйверы с помощью набора встроенных инструментов. Но иногда вам может потребоваться обновить драйвер устройства самостоятельно. К счастью, у вас есть несколько вариантов для этого, в том числе с помощью диспетчера устройств или Центра обновления Windows.
Но перед этим вам может потребоваться проверить и исправить поврежденный диск, выполнив команду chkdsk. Чтобы запустить сканирование «Проверка диска» на основном диске, введите следующую команду в окне командной строки и нажмите Enter:
chkdsk / f C:
Важный совет. Обновление драйверов вручную может быть рискованным и трудоемким. Безопасный и эффективный способ выполнить эту задачу — использовать средство обновления драйверов. Он просканирует ваш компьютер на наличие устаревших, отсутствующих или поврежденных драйверов, а затем обновит их до последних и наиболее стабильных версий.
Решение 6. Обновите BIOS
Иногда BIOS может быть поврежден, что приводит к ( 70368744177664), (2) ошибка в Windows 10. Некоторые пользователи сообщают, что проблема исчезла, как только они обновили BIOS своей материнской платы. Этот трюк может сработать и для вас.
Обновление BIOS может улучшить эффективность вашей системы во многих отношениях. Он поддерживает новые процессоры, обновляет поврежденную среду UEFI, перезаписывает ошибку или даже добавляет новые функции и возможности.
Самый простой способ обновить или сбросить BIOS — это перезагрузить компьютер, а затем загрузить параметры настройки BIOS. Но вы должны иметь в виду, что обновление вашей версии BIOS будет зависеть от модели материнской платы.
Быстрое исправление: восстановление поврежденных системных файлов
Если ни один из вышеперечисленных методов не помог вам, и вы подозреваете, что повреждение системного файла вызвано виноват, подумайте о сканировании и очистке поврежденных участков. Мы рекомендуем вам попробовать использовать надежный инструмент для очистки ПК, например Outbyte PC Repair.
Помимо проверки на повреждение памяти, этот инструмент также поможет избавиться от ненужных файлов, которые занимают вашу оперативную память. На самом деле, приложение для ремонта ПК может исправить многие компьютерные ошибки и оптимизировать ваш компьютер для максимальной производительности. Так что это намного лучше, чем решать проблему вручную.
Вот и все. Мы надеемся, что приведенные выше решения помогли вам решить проблему. Вам также может потребоваться прочитать эту статью о том, как исправить медленный запуск в Windows 10.
YouTube видео: Как исправить ошибку (70368744177664), (2) в Windows 10
09, 2023
Some users have been having a critical Power Kernel BSOD (Blue Screen of Death) crash where the system automatically restarts without any warning. Most affected users are reporting that the issue is occurring when they playing a game or doing something that drains a lot of system resources. Upon investigating the issue, some affected users have discovered recurring Critical Kernel-Power error inside the Event Viewer. In most reported cases, the issue is encountered on Windows 10 and Windows 8.
What is causing the Power Kernel BSOD (70368744177664) error?
We investigated this particular issue by looking at various user reports and the repair strategies that are commonly used to resolve this particular Event Viewer error. Based on our investigations, there are several common scenarios that are known to trigger the Power Kernel BSOD (70368744177664) error:
- Fast startup is enabled – Several users that have been encountering this particular BSOD while the computer was in idle reported that the issue was no longer occurring after they disabled Fast Startup.
- BSOD is caused by failing RAM – As several users have reported, this particular issue can be caused by a failing RAM stick. If this scenario is applicable, you can resolve the issue by investing in a new RAM stick or by underclocking the RAM frequency.
- Automatic fail-safe is triggered – Most motherboard models include a fail safe that will automatically restart or shutdown themselves when certain temperatures are being reached. This is done in order to avoid permanent damage to your components. In this case, using a temperature monitoring program and buying aftermarket cooler (if needed) might resolve the issue.
- BIOS but – As it turns out, this particular issue can also be triggered by a BIOS bug commonly encountered on MSI and ASUS motherboards. The bug was already patched, so you can resolve the issue (if this scenario is applicable) by updating your BIOS to the latest version available.
- Insufficient PSU – If the crash happens during resource-draining tasks, the issue might be caused in those instances where the power supply unit is incapable of providing enough power. In this case, you can either remove some none-essential components or upgrade to a more powerful PSU.
If you’re currently looking for ways to prevent the Kernel BSOD (70368744177664) error from ever occurring again, this article will provide you with several troubleshooting steps. Down below, you’ll find a collection of methods that other users in a similar situation have successfully used to either circumvent or resolve this particular error message.
For the best results, follow the potential fixes in the order that they are presented in. One of them is bound to resolve the issue in your particular scenario.
Method 1: Disabling Fast startup
if you’re encountering random Kernel BSOD (70368744177664) system crashes and you’re not doing anything too demanding while this issue occurs (your CPU is Idle), this issue might be caused by Windows 10’s Fast startup feature.
We have found over a dozen of reports with users that we’re no longer encountering the Kernel BSOD (70368744177664) after they disabled Fast Startup from their Power Options menu. This seems to point towards a scenario where the issue is caused by a glitch or bug with the Fast Startup feature.
Until Microsoft decides to patch this problem, you can prevent any further Kernel BSOD (70368744177664) system crashes by disabling the Fast Startup feature from your Power options menu. Here’s a quick guide on how to do this:
- Press Windows key + R to open up a Run dialog box. Then, type “powercfg.cpl” and hit Enter to open up the Power Options menu.
- Inside the Power Options menu, use the left-hand side menu to click on Choose what the power buttons do.
- Inside the System Settings menu, click on Change settings that are currently unavailable.
- Next, uncheck the box associated with Turn on fast startup (recommended) and click on Save changes (at the bottom of this window).
- Restart your computer and see if the issue is still occurring after the next startup is complete.

If the issue was still not resolved, move down to the next method below.
Method 2: Reducing GPU / CPU overclocking frequencies
Another common reason why other affected users encountered the Kernel BSOD (70368744177664) error is an overclocked CPU or GPU that triggers instability. In most cases, the BSOD crash ends up being triggered by component overheating.
A couple of affected users have reported that the issue was no longer occurring after they reduced their overclocking frequencies (CPU and/or GPU). If you’re working with custom frequencies and voltages for your GPU or CPU, try reverting to the default values (even if the system looks stable while in full load).
Note: You might also want to check your fans, re-apply thermal compound on your CPU, dust and airflow just to cross them off your potential culprit list.
Try using the system with the default frequencies and voltages value for a while and see if the Kernel BSOD (70368744177664) error returns. If the BSOD crash doesn’t return, gradually raise the values (if you wish to overclock again) until and be careful to avoid stepping outside the stable state.
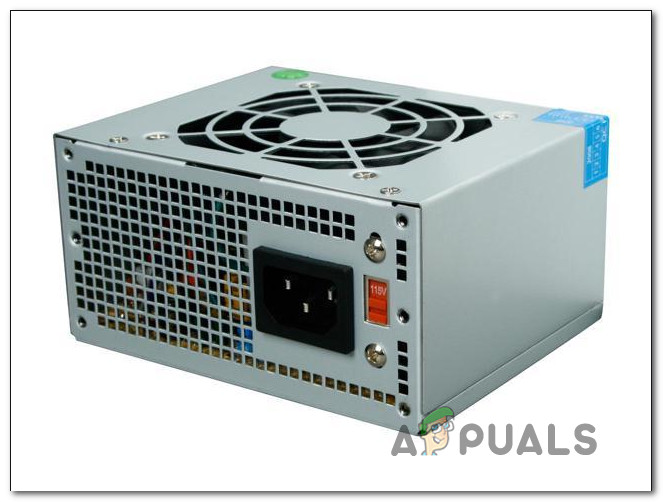
Method 3: Replacing the PSU
Another popular reason why this error occurs is due to insufficient power that can be provided by your PSU (power supply unit). If you’re working with an underpowered PSU and you notice that your computer is crashing with the Kernel BSOD (70368744177664) error when it’s tasked with doing something resource-demanding, one possible reason for this is that your system needs more power than your PSU is capable of supplying.
You can test out this theory by removing any devices that are not essential (optical drive, additional HDD, non-critical peripherals, etc.) It also helps to underclock any frequencies from your GPU, RAM or CPU (if you previously overclocked).
If you noticed that the issue is no longer occurring after you’ve eased the burden of your PSU, you’ll need to invest into a more powerful unit if you want to accommodate all your PC’s components.
Method 4: Updating motherboard BIOS
Some users have reported that the issue was no longer occurring after they updated their motherboard BIOS. This suggests that the issue can also be caused by a BIOS but that ends up crashing the system.
But keep in mind that the steps of updating your BIOS version will be specific to the motherboard model that you’re dealing with. Most manufacturers will have proprietary software that needs to be used to update the BIOS – Asus has E-Z flash, MSI has MFlash, and so on.
In order to update your motherboard BIOS version, you’ll need to look for specific steps related to your particular model. And if you haven’t done this before, we recommend that you outsource this task to an IT technician as this procedure might end up bricking your system.
Method 5: Dealing with failing RAM
As it turns out, this particular issue can also be triggered by a failing RAM stick or by a custom frequency or voltage higher than your RAM stick is capable of maintaining in full load. Several affected users that we’re struggling to resolve the Kernel BSOD (70368744177664) error have reported that the issue was finally fixed after they either replaced their current RAM stick with a new one or reverted the custom voltages & frequencies to the default.
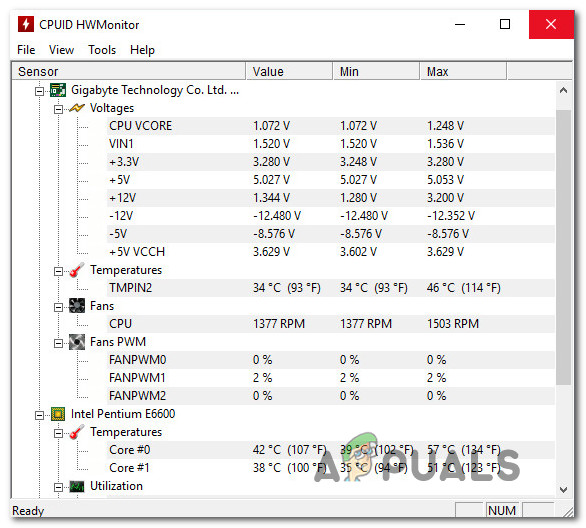
If you’re currently overclocking your RAM voltages & frequencies, try to revert to the default values and see if the issue is still occurring. You should also consider using a program like HWmonitor to keep an eye on your voltages and overall temperatures while your computer is in full load.
If you found that your system stability has improved once you have reverted your RAM to the default voltage & frequency values, you have two choices:
- Stick with the default voltage & frequency.
- Buy superior RAM capable of withstanding higher frequencies & voltages.

Kevin Arrows
Kevin Arrows is a highly experienced and knowledgeable technology specialist with over a decade of industry experience. He holds a Microsoft Certified Technology Specialist (MCTS) certification and has a deep passion for staying up-to-date on the latest tech developments. Kevin has written extensively on a wide range of tech-related topics, showcasing his expertise and knowledge in areas such as software development, cybersecurity, and cloud computing. His contributions to the tech field have been widely recognized and respected by his peers, and he is highly regarded for his ability to explain complex technical concepts in a clear and concise manner.
Windows is one of the most popular operating systems but users have been recently getting the ‘Power Kernel BSOD Error Code (70368744177664),(2) Event ID 41’ error while trying to launch their computer or sometimes randomly while using their computers. We will be addressing and fixing this error in today’s post and hopefully, you will not get the error anymore after going through these solutions.

What Causes the ‘Power Kernel BSOD Error Code (70368744177664),(2)’ Error on Windows 10?
After carefully analyzing user experiences and going through normal repair strategies, we concluded that the following are the most common triggers behind this error.
- Fast Startup: If you have enabled Fast Startup on your computer, the ‘Power Kernel BSOD Error Code (70368744177664),(2)’ error might be triggered while trying to launch it. This is because the error is mostly related to a power failure and it most commonly occurs while launching the computer with Fast Startup enabled.
- Outdated Device Drivers: This error can also show up if there are any outdated device drivers on your computer and any incompatibilities with the latest operating system or a program can cause a power failure that can end up in a Power Kernel BSOD.
- CPU Overclock: If you are a fan of overclocking but you have pushed your CPU clock to an amount that cannot be supported by other components on the computer, this error might be triggered. It is best to check and configure your CPU overclock for optimal power delivery.
- Power Settings: If the Power CFG that you are using on your computer hasn’t been configured properly, this error message can be seen on the screen. It is best to check and reconfigure these power settings using the guide below to fix the ‘Power Kernel BSOD Error Code (70368744177664),(2)’ error on your computer.
- Outdated Bios: Latest Bios updates increase the functionality of the motherboard and often contain some bug and glitch fixes. Therefore, it is best for you to try and update your Bios version to the latest available one to fix the ‘Power Kernel BSOD Error Code (70368744177664),(2)’ issue on your computer.
- Unseated Components on the Motherboard: If while putting the computer together, a cable or any other hardware component wasn’t properly seated in their slot, the ‘Power Kernel BSOD Error Code (70368744177664),(2)’ error might be triggered while startup up the computer. It is best to check for any such components and seat them properly.
- PSU Failure: The ‘Power Kernel BSOD Error Code (70368744177664),(2)’ error most commonly occurs due to a power kernel failure and these failures are almost always a result of a power surge or improper power delivery from the PSU. It is best to check for a PSU failure with such a BSOD error.
Now that you know of the most probable culprits behind this error, we can move on towards implementing the fixes.
Before you start:
- Press “Windows + I” keys on the keyboard to open “Settings” and choose “Update and Security”.

Click on Update and Security - Navigate to the “Windows Update” tab from the left side of the screen and select “Check for Updates”.

Check for updates - When the Windows is updated, check if your system still crashes with the Error Code (70368744177664),(2).


Solution 1: Disable Fast startup
- Hit “Win + R” keys on the keyboard to open the run box, type “powercfg.cpl” and hit enter to launch the Power Options menu.

Typing in “powercfg.cpl” - From the left pane of the window, click on the “Choose what the power buttons do” option and then select “Change settings that are currently unavailable”.

Change settings that are currently unavailable - Now uncheck the box parallel to “Turn on fast startup” and apply the changes.
Disabling Fast startup - When the changes have been saved, restart your computer and check if the error persists.


Solution 2: Update device drivers
- Navigate to your favorite browser and download Driver Easy.
- Double-click on the downloaded executable file and install the tool by following the on-screen instructions.
- Click the “Scan Now” button to start the scanning process.

Start Scanning - Now a list will appear that will be comprising all of the outdated drivers on your computer. It is up to you that you update them selectively or collectively by clicking the “Update All” button at the bottom.

Click on Update all Button - When the drivers are updated successfully, restart your computer and check if the issue is resolved or not.


Solution 3: Reduce CPU Overclocking frequency
- On your keyboard, hit “Windows + I” keys simultaneously to open “Settings” and select “Update and Security”.
Choose Update and Security - From the left pane, click on “Recovery” and then select “Restart Now” under the heading of Advanced Startup.

Choose Restart now option - Click on “Troubleshoot” and then select “Advanced Options”.

Choose Advanced Options - Now select “UEFI Firmware Settings” and click on “Restart”.

Click on UEFI Firmware Settings - Press the BIOS boot key as soon as the machine’s logo appears on the screen.
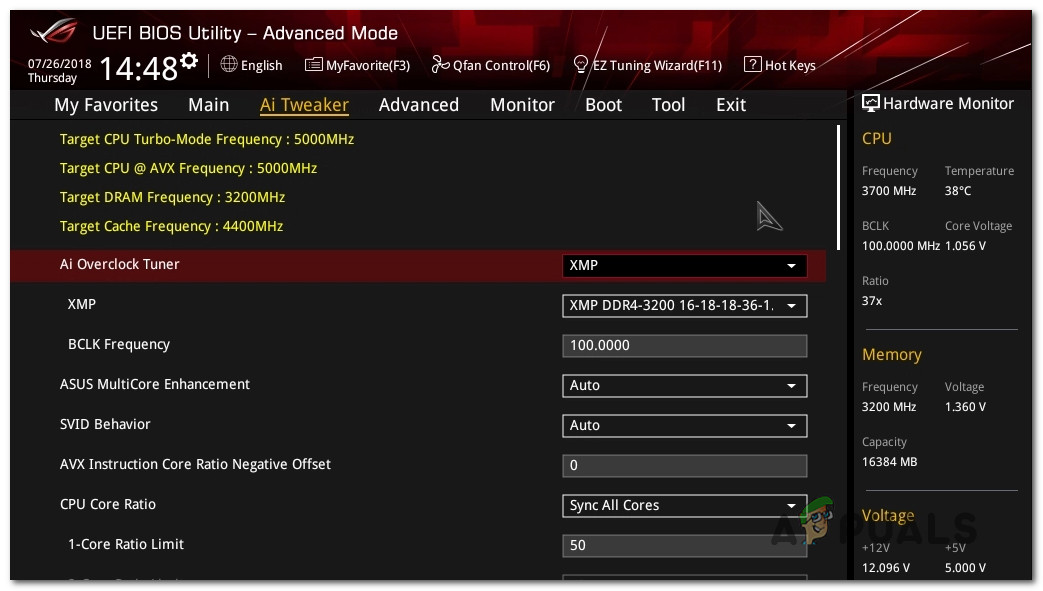
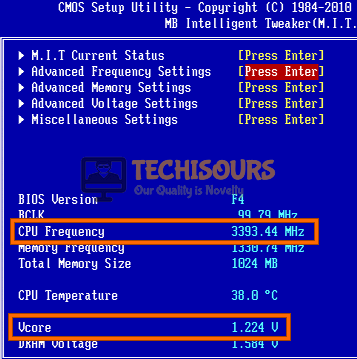
Note: Different computers/Laptops have different BIOS boot keys like DEL, F2, ESC, etc. - After entering the BIOS, navigate to “CMOS Setup utility” and select “MB Intelligent Tweaker”.
- Now locate and reduce your “CPU Frequency” and set its value slightly lower then it was set before.
- Now locate and set your “Vcore” to “1.28 V”.

Reduce CPU Overclocking frequency - Apply the changes and restart your computer to verify that the Error Code (70368744177664) (2) persists.


Solution 4: Tweak Power Settings
- Hit “Win + R” keys on the keyboard to open the run box. Type “powercfg.cpl” and hit enter to launch the Power Options menu.
Typing in “powercfg.cpl” - From the left pane of the window, click on the “Change when the computer sleeps”.
Choose computer sleep option - Now set the time of “Turn off display” and “Put the computer to sleep” according to your wish and restart your computer to check if the error has been rectified.
Tweak Power Settings


Solution 5: Update the BIOS
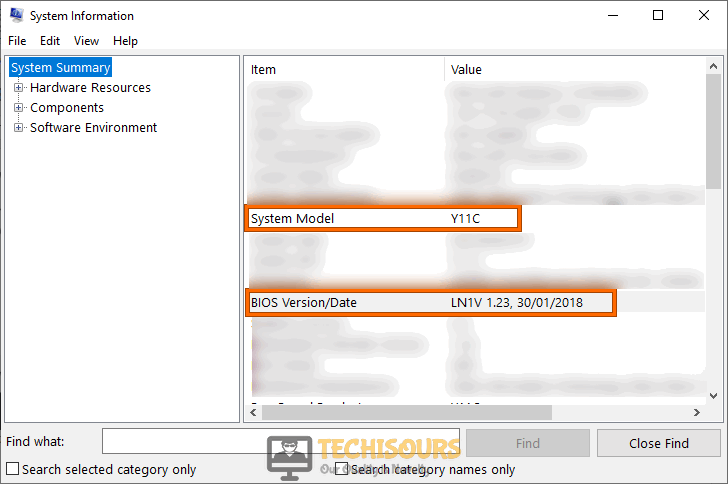
- Click on the Search button in the taskbar and search for System Information.

Click System Information - Note down the System Model and BIOS version of your computer.

Check BIOS version - Now launch your favorite browser and type your computer’s manufacturer name, your computer’s model name, and BIOS in the search bar and open a relevant link.
- Find the BIOS update file and download it after making sure that it is up to date.
- Now right-click on the downloaded BIOS files and click Extract Here.
- Plug-in a USB drive in your computer and copy the BIOS files into that USB drive.
- Now restart your computer and enter BIOS settings.
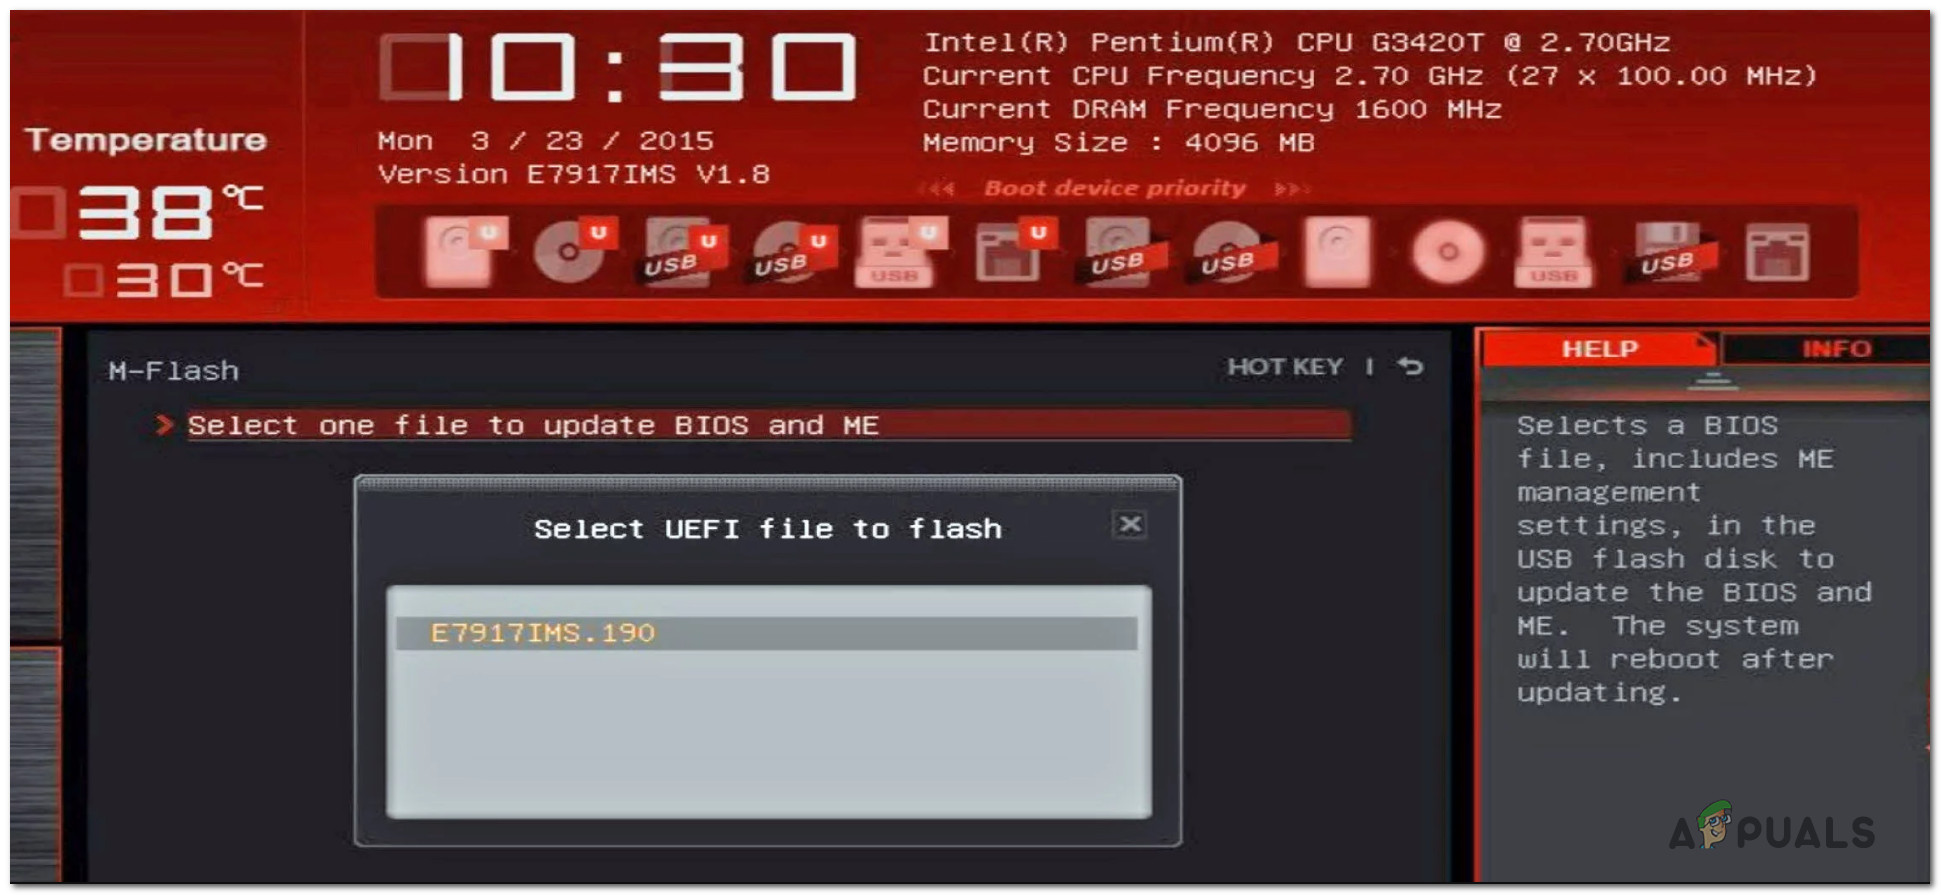
Note: Every computer has a different procedure to enter BIOS settings. - Go to the Boot tab and select the USB drive you have inserted.
- Now navigate to the Advanced tab and select the Start Flash option and it will start your update.
- Do not turn off your computer while the BIOS is updating. The computer will restart automatically after the update is fully installed.

Solution 6: Repair corrupted system files
Using Command Prompt:
- Navigate to the search bar of your system and type “Command Prompt”. Right-click on the Command prompt option and choose “Run as Administrator”.

Run Command Prompt - Now type the following commands and hit enter to execute them:
sfc /scannow
DISM.exe /Online /Cleanup-image /Restorehealth
- We also recommend you to run the CHKDSK utility to scan your disks for any corrupted files. Please execute the following command in the command prompt and see if the issue is resolved.
Note: X represents the letter of your source drive.chkdsk X: /f /r

Using Third-party tool:
- Launch your favorite browser and download MalwareBytes.
- Double-click on the setup file you just downloaded and follow the onscreen instructions to install the tool.
- Now launch the tool and click on the “Scan” button to start scanning for corrupted system files and fix them automatically.

Scan for corrupted files - When the scanning procedure is completed, hopefully, Error Code (70368744177664) (2) would be resolved on your computer.

Solution 7: Reseat components in CPU
- Take the power adapter of your computer out of the socket and detach all the peripheral devices from it.
- Open the side lid of the CPU, disconnect the RAM from its port and clean it with the help of a glint.
- After cleaning the RAM insert it back into your system and make sure that it is seated at its place with appropriate connections.

Reseat RAM - Now locate the hard drive and the SATA port. Detach the cables connected to your hard drive, clean the ports with a clean cloth, and afterward reattach the cables. Make sure that SATA cables are inserted into the correct port.
- Now disconnect your GPU from its ports and reconnect it carefully so that the connections are made properly.
- After re-connecting everything, reboot your computer and see if the issue is resolved.
Solution 8: Modify memory clock
If you notice that your RAM heats up easily, we recommend you to follow the steps in this solution.
- Follow the procedure explained in Solution 3 to open “MB Intelligent Tweaker” in your BIOS.
- Drop the “Memory Frequency” to a value slightly lower then it was set before. Some people have suggested that switching it from 3600 to 3533 rectified Error Code (70368744177664) (2).

Modify memory clock

Solution 9: Replace components in CPU
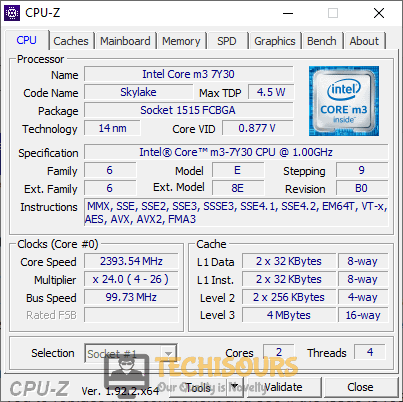
- Launch your favorite browser and download CPU-Z.
- Double-click on the setup file you just downloaded and follow the onscreen instructions to install the tool.
- Now launch the tool and carefully observe important parameters such as “VCore”, “RAM Frequency”, “RAM voltage” and “CPU Frequency” etc.

Monitor components in CPU - If you notice that these values are changing unexpectedly or the temperature of any component is increasing beyond its limit, then we recommend you to replace that component and see if the issue is resolved.
Solution 10: Check for PSU failure
In some cases, users have reported that they encountered this error and the only solution that helped them get around it was to replace their PSU with a new one. Troubleshooting of PSU failure is a very hectic task that is why we always recommend our community to use the OCCT stress testing tool. Download and install this tool on our computer and run it to stress tests your CPU, GPU, and motherboard to find out if there is any fault in them which triggers (70368744177664),(2) issue on your computer.
As an alternative to OCCT, you can borrow a PSU from your friend and connect it to your computer for testing purposes and see if you encounter the same error again. If you can use your computer normally on this PSU without encountering any error, then it is confirmed that there is a fault in your old PSU and it needs to be replaced.
If you are still unable to fix this issue, you can contact us for any further assistance.

Alan is a hardcore tech enthusiast that lives and breathes tech. When he is not indulged in playing the latest video games, he helps users with technical problems that they might run into. Alan is a Computer Science Graduate with a Masters in Data Science.