Ошибка HTTP 413 Request Entity Too Large появляется, когда пользователь пытается загрузить на сервер слишком большой файл. Размер определяется относительно лимита, который установлен в конфигурации. Изменить его может только администратор сервера.
Что делать, если вы пользователь
Если вы видите ошибку 413, когда пытаетесь загрузить файл на чужом сайте, то вам нужно уменьшить размер передаваемых данных. Вот несколько ситуаций.
- Если вы пытались загрузить одновременно несколько файлов (форма позволяет так делать), попробуйте загружать их по одному.
- Если не загружается изображение, уменьшите его размер перед загрузкой на сервер. Можно сделать это с помощью онлайн-сервисов — например, Tiny PNG.
- Если не загружается видео, попробуйте сохранить его в другом формате и уменьшить размер. Можно сделать это с помощью онлайн-сервисов — я использую Video Converter.
- Если не загружается PDF-документ, уменьшите его размер. Можно сделать это с помощью онлайн-сервисов — я обычно использую PDF.io.
Универсальный вариант — архивация файла со сжатием. Ошибка сервера 413 появляется только в том случае, если вы пытаетесь одновременно загрузить слишком большой объем данных. Поэтому и выход во всех ситуациях один — уменьшить размер файлов.
Комьюнити теперь в Телеграм
Подпишитесь и будьте в курсе последних IT-новостей
Подписаться
Исправление ошибки сервера 413 владельцем сайта
Если вы владелец сайта, который при загрузке файлов выдает ошибку 413, то необходимо изменить конфигурацию сервера. Порядок действий зависит от используемых технологий.
Чтобы понять, что стало причиной ошибки, нужно посмотреть логи. Это поможет сэкономить время. Вот подробная инструкция, которая рассказывает, как посмотреть логи в панели управления Timeweb. В зависимости от того, какая информация будет в логах, вы поймете, как исправлять ошибку 413.
Увеличение разрешенного размера для загрузки файлов на Nginx и Apache
На Nginx максимально допустимый размер файла задан в параметре client_max_body_size. По умолчанию он равен 1 МБ. Если запрос превышает установленное значение, пользователь видит ошибку 413 Request Entity Too Large.
Параметр client_max_body_size находится в файле nginx.conf. Для его изменения нужен текстовый редактор — например, vi.
Подключитесь к серверу через SSH и выполните в консоли следующую команду:
Во встроенном редакторе vi откроется файл nginx.conf. В разделе http добавьте или измените следующую строку:
client_max_body_size 20M;
Сохраните и закройте файл. Затем проверьте конфигурацию файла:
Перезагрузите сервер следующей командой:
После перезагрузки будет действовать новая конфигурация с увеличенным лимитом на размер загружаемого файла.
На Apache опция, устанавливающая максимально допустимый размер загружаемого файла, называется LimitRequestBody. По умолчанию лимит не установлен (равен 0).
На CentOS главный конфиг располагается по адресу /etc/httpd/conf/httpd.conf. На Debian/Ubuntu — по адресу /etc/apache2/apache2.conf.
Значение задается в байтах:
LimitRequestBody 33554432
Эта запись выставляет максимально допустимый размер 32 МБ.
Изменить конфиги можно также через панель управления. Я пользуюсь ISPmanager, поэтому покажу на ее примере.
- Раскройте раздел «Домены» и перейдите на вкладку «WWW-домены».
- Выберите домен, на котором появляется ошибка, и нажмите на кнопку «Конфиг».

Появится вкладка с конфигами Apache и Nginx. Вы можете редактировать их вручную, устанавливая лимит на размер загружаемого файла.
Исправление ошибки на WordPress
На WordPress ошибку можно исправить двумя способами.
Способ первый — изменение разрешенного размера в файле functions.php. Этот файл отвечает за добавление функций и возможностей — например, меню навигации.
- Откройте файловый менеджер.
- Перейдите в папку public.html.
- Откройте директорию wp-content/themes.
- Выберите тему, которая используется на сайте с WordPress.
- Скачайте файл functions.php и откройте его через любой текстовый редактор.
В панели управления на Timeweb можно также воспользоваться встроенным редактором или IDE — путь будет такой же, как указан выше: public.html/wp-content/themes/ваша тема/functions.php.
В конце файла functions.php добавьте следующий код:
@ini_set( 'upload_max_size' , '256M' );

@ini_set( 'post_max_size', '256M');

@ini_set( 'max_execution_time', '300' );
Сохраните изменения и загрузите модифицированный файл обратно на сервер. Проверьте, появляется ли ошибка 413.

Второй способ — изменение файла .htaccess. Это элемент конфигурации, который способен переопределять конфигурацию сервера в плане авторизации, кэширования и даже оптимизации. Найти его можно через файловый менеджер в папке public.html.
Скачайте файл на компьютер, на всякий случай сделайте резервную копию. Затем откройте .htaccess в текстовом редакторе и после строчки #END WORDPRESS вставьте следующий код:
php_value upload_max_filesize 999M

php_value post_max_size 999M

php_value max_execution_time 1600

php_value max_input_time 1600
Сохраните файл и загрузите его обратно на сервер с заменой исходного файла. То же самое можно сделать через встроенный редактор или IDE в панели управления Timeweb.
Исправление ошибки при использовании PHP-скрипта
Если файлы загружаются с помощью PHP-скрипта, то для исправления ошибки 413 нужно отредактировать файл php.ini. В нем нас интересуют три директивы.:
- upload_max_filesize — в ней указан максимально допустимый размер загружаемого файла (значение в мегабайтах);
- post_max_size — максимально допустимый размер данных, отправляемых методом POST (значение в мегабайтах);
- max_execution_time — максимально допустимое время выполнения скрипта (значение в секундах).
Например, если я хочу, чтобы пользователи могли загружать файлы размером до 20 МБ, то я делаю так:
max_execution_time = 90

post_max_size = 20M

upload_max_filesize = 20M
Если все значения указаны верно, то файлы с допустимым размером будут загружаться на сервер без ошибок.
То же самое можно сделать через панель управления. Например, в ISPmanager порядок будет такой:
- Авторизуйтесь с root-правами.
- В левом меню раскройте раздел «Настройки web-сервера» и перейдите на вкладку «PHP».
- Выберите используемую версию и нажмите на кнопку «Изменить».

На экране появится список параметров. Они отсортированы по алфавиту. Установите необходимые значения для параметров max_execution_time, post_max_size и upload_max_filesize. Изменения применяются автоматически.

Приходилось ли вам сталкиваться с сообщением об ошибке 413 request entity too large при работе в интернете? Эта ошибка довольно распространена и может быть вызвана несколькими различными причинами. В этой статье мы рассмотрим её значение, способы устранения проблем и случаи, когда она может возникнуть.

Что означает ошибка 413 Request Entity Too Large
Ошибка 413 — это код состояния http, который указывает на то, что у сервера не получилось обработать запрос, поскольку объект запроса (данные, отправленные клиентом) слишком велик. Другими словами, когда вы пытаетесь получить доступ к веб-сайту или веб-странице, ваш браузер отправляет запрос с изображениями или видео, размер которых превышает возможности сервера.
Наиболее распространенной причиной её возникновения является то, что на сервере установлено ограничение на величину загружаемых файлов. Оно нужно для того, чтобы предотвратить одновременную отправку слишком большого количества данных любым пользователем, а также в целях безопасности. Этот лимит можно регулировать в зависимости от ваших конкретных потребностей, но если он слишком мал, то вы можете часто сталкиваться с этой ошибкой.
Исправление ошибки сервера 413: для владельцев сайта
Для начала стоит изучить логи сервера – файлы, в которых записываются происходящие на нём события. Они содержат сведения о запросах к серверу и его ответы.
Логи также могут содержать информацию об ошибках и других проблемах, возникших на веб-сервере во время его работы. Они предоставляют бесценную информацию о работе вашего сайта и полезны для выявления проблем или потенциальных угроз безопасности. Анализируя их, вы можете улучшить производительность или усилить безопасность.
Когда определите причину неисправности, можете выбрать соответствующий способ решения проблемы.
Увеличение лимита размера для загрузки файлов на Apache, Nginx
Одним из наиболее распространенных ограничений на хостинге является лимит на величину загружаемых файлов. Если сайт требует от пользователей загрузки больших файлов, то может понадобиться оптимизировать параметры на серверах apache и nginx.
Процесс включает в себя внесение изменений в конфигурационных файлах, поэтому действовать будем в текстовом редакторе.
Выполняем подключение по SSH, пишем команду, чтобы открыть нужный файл.
vi /etc/nginx/nginx.conf
Находим раздел http и меняем строку
client_max_body_size 20M;
Если этой строки нет, её нужно вписать.
Сохраняем изменения и закрываем файл, после чего выполняем проверку.
$ sudo nginx -t
Затем отправляем сервер на перезагрузку, после чего изменения вступят в силу
# nginx -s reload
На Apache лимит обычно отсутствует вообще, то есть равен 0. Нам нужна опция, определяющая максимальную величину для файлов, которые загружают администраторы или пользователи, она называется «LimitRequestBody». Ищем его в главном конфигурационном файле.
Теперь выражаем значение в байтах. В данном случае мы указали лимит в 32 МБ.
LimitRequestBody 33554432
Также изменения можно провести в панели управления. Рассмотрим, как исправить ошибку 413 в ISPmanager.
В вертикальном меню слева ищем раздел «Домены», в нём кликаем на вкладку «WWW-домены».
Кликаем на домен, который выдаёт ошибку, нажимаем кнопку «Конфиг».

Откроются поля с конфигами Apache и Nginx, где мы можем устанавливать подходящие значения.
Исправление ошибки 413 на WordPress
Если вы используете WordPress, то существуют плагины, позволяющие увеличить максимальный размер загружаемых файлов, чтобы избежать этой проблемы в будущем.
Предусмотрено два варианта действий.
- В functions.php
- Заходим в файловый менеджер и открываем папку public.html.
- Открываем директорию wp-content/themes.
- Выбираем тему, применяемую на рассматриваемой странице.
- Скачиваем файл functions.php, открываем его в текстовом редакторе.
- Добавляем в конце его следующие значения.
@ini_set( ‘upload_max_size’ , ‘256M’ );
@ini_set( ‘post_max_size’, ‘256M’);
@ini_set( ‘max_execution_time’, ‘300’ );
Сохраняем изменения, выходим и выполняем проверку.

- Редактирование .htaccess.
Этот файл расположен в той же папке, скачиваем его на ПК.
Открываем в редакторе и находим строку #END WORDPRESS. После неё добавляем строки.
php_value upload_max_filesize 999M
php_value post_max_size 999M
php_value max_execution_time 1600
php_value max_input_time 1600
Сохраняем изменения, файл загружаем обратно.
Изменения также можно внести через панель управления или встроенный редактор.
Исправление ошибки 413 при использовании PHP-скрипта
Если на вашем сайте используются php-скрипты, то регулировка лимита также поможет уменьшить количество ошибок, связанных с загрузкой больших файлов.
Нам требуется внести изменения в файл php.ini.
Находим соответствующие директивы и меняем параметры, как в примере.
max_execution_time = 90
post_max_size = 20M
upload_max_filesize = 20M
Второй способ редактирования – через панель управления.
- Заходим и авторизовываемся как суперпользователь.
- В вертикальном меню кликаем на «Настройки web-сервера», а в правой части окна выбираем «PHP».
- Открываем нужную версию, нажимаем кнопку «Изменить».
Вы увидите перечень параметров в алфавитном порядке для удобного поиска. Поставьте значения, аналогичные примеру выше.

Исправление ошибки сервера 413: для пользователя
По сути, рекомендация для пользователей одна – необходимо сделать файлы для загрузки маленькими. А способы для разных форматов могут отличаться.
- Когда требуется загрузка сразу нескольких файлов, загружать их следует по очереди, даже если функционалом предусмотрена возможность массовой загрузки.
- Сжимайте картинки перед загрузкой, это можно сделать практически в любом редакторе или онлайн-сервисе.
- Измените формат видео и тоже попробуйте его сжать.
- Для загрузки документов актуальна архивация с сжатием.
Использование сжатых форматов, таких как zip, также может помочь значительно уменьшить общий размер файлов, сохраняя при этом одинаковый уровень качества для всех типов данных, упомянутых выше, тем самым устраняя шансы столкнуться с ошибкой 413 в будущем.
I am trying to upload 30MB file on my server and its not working.
-
When I upload 30MB file, the page loads «Page Not Found«
-
When I upload a 3MB file, I receive «413 Request Entity Too Large» with nginx/0.6.32
I am trying to find nginx so I can increase «client_max_body_size» but I am unable to find nginx installed on my server. I even tried running:
vi /etc/nginx/nginx.conf
or
vi /usr/local/nginx/conf/nginx.conf
to check if the config file exists, but I couldnt find it on my server.
Is there anyway to resolve this issue? Or do I have to installed nginx on my server.
EDIT:
I have made all necessary changes in my php.ini files,
post_max_size 128M
upload_max_filesize 100M
memory_limit 256M
Thanks,
Raju
asked Jun 19, 2014 at 12:12
![]()
Raju VishwasRaju Vishwas
1,9413 gold badges13 silver badges8 bronze badges
5
Source: cybercity
Edit the conf file of nginx:
nano /etc/nginx/nginx.conf
Add a line in the http, server or location section:
client_max_body_size 100M;
Don’t use MB it will not work, only the M!
Also do not forget to restart nginx:
systemctl restart nginx
![]()
Bip Lob
4912 gold badges6 silver badges15 bronze badges
answered Jun 20, 2016 at 7:26
![]()
DieterDieter
2,6111 gold badge9 silver badges3 bronze badges
5
-in php.ini (inside /etc/php.ini)
 max_input_time = 24000
 max_execution_time = 24000
 upload_max_filesize = 12000M
 post_max_size = 24000M
 memory_limit = 12000M
-in nginx.conf(inside /opt/nginx/conf)
client_max_body_size 24000M
Its working for my case
answered Nov 12, 2014 at 5:28
![]()
ArunArun
1,02111 silver badges13 bronze badges
5
First edit the Nginx configuration file (nginx.conf)
Location: sudo nano /etc/nginx/nginx.conf
Add following codes:
http {
        client_max_body_size 100M;
}
Then Add the following lines in PHP configuration file(php.ini)
Location: sudo gedit /etc/php5/fpm/php.ini
Add following codes:
memory_limit = 128M
post_max_size = 20M
upload_max_filesize = 10M
answered May 25, 2017 at 6:43
![]()
SanaullaSanaulla
1,34914 silver badges13 bronze badges
1
sudo nano /etc/nginx/nginx.conf
Then add a line in the http section
http {
    client_max_body_size 100M;
}
don’t use MB only M.
systemctl restart nginx
then for php location
sudo gedit /etc/php5/fpm/php.ini
for nowdays maximum use php 7.0 or higher
sudo nano /etc/php/7.2/fpm/php.ini //7.3,7.2 or 7.1 which php you use
check those increasing by your desire .
memory_limit = 128M
post_max_size = 20M
upload_max_filesize = 10M
restart php-fpm
service php-fpm restart
answered Jun 9, 2020 at 9:00
![]()
albus_severusalbus_severus
3,6361 gold badge14 silver badges25 bronze badges
I add the changes directly to my virtualhost instead the global config of nginx, like this:
   server {
     client_max_body_size 100M;
     ...
   }
And then I change the params in php.ini, like the comments above:
   max_input_time = 24000
   max_execution_time = 24000
   upload_max_filesize = 12000M
   post_max_size = 24000M
   memory_limit = 12000M
and what you can not forget is to restart nginx and php-fpm, in centos 7 is like this:
  systemctl restart nginx
  systemctl restart php-fpm
answered Mar 20, 2019 at 15:59
![]()
EvanEvan
1,00211 silver badges12 bronze badges
Please enter domain nginx file :
nano /etc/nginx/sites-available/domain.set
Add to file this code
client_max_body_size 24000M;
If you get error use this command
nginx -t
answered Apr 2, 2015 at 6:14
![]()
I got the same error and fixed it with the below steps.
-
At first, edit the nginx.conf file.
vi /etc/nginx/nginx.conf
At the HTTP section, added the below line.
http {

    client_max_body_size 100M;
}
- Finally restarted Nginx with the below command.
systemctl restart nginx
answered Jun 18, 2021 at 12:28
![]()
Hiren ParghiHiren Parghi
1,7951 gold badge21 silver badges30 bronze badges
Assuming that you made the necessary changes in your php.ini files:
You can resolve the issue by adding the following line in your nginx.conf file found in the following path:
/etc/nginx/nginx.conf
then edit the file using vim text editor as follows:
vi /etc/nginx/nginx.conf
and add client_max_body_size with a large enough value, for example:
client_max_body_size 20MB;
After that make sure you save using :xi or :wq
And then restart your nginx.
That’s it.
Worked for me, hope this helps.
![]()
Brad Koch
19.3k19 gold badges111 silver badges137 bronze badges
answered Feb 4, 2016 at 14:58
![]()
I got the upload working with above changes. But when I made the changes I started getting 404 response in file upload which lead me to do further debugging and figured out its a permission issue by checking nginx error.log
Solution:
Check the current user and group ownership on /var/lib/nginx.
$ ls -ld /var/lib/nginx
drwx——. 3 nginx nginx 17 Oct 5 19:31 /var/lib/nginx
This tells that a possibly non-existent user and group named nginx owns this folder. This is preventing file uploading.
In my case, the username mentioned in «/etc/nginx/nginx.conf» was
user vagrant;
Change the folder ownership to the user defined in nginx.conf in this case vagrant.
$ sudo chown -Rf vagrant:vagrant /var/lib/nginx
Verify that it actually changed.
$ ls -ld /var/lib/nginx
drwx------. 3 vagrant vagrant 17 Oct  5 19:31 /var/lib/nginx
Reload nginx and php-fpm for safer sade.
$ sudo service nginx reload
$ sudo service php-fpm reload
The permission denied error should now go away. Check the error.log (based on nginx.conf error_log location).
$ sudo nano /path/to/nginx/error.log
answered Oct 11, 2017 at 19:19
![]()
Anyone looking for a solution for Apache2 (Ubuntu 18 for me), you can edit:
/etc/apache2/apache2.conf
And find/edit the line:
LimitRequestBody 7000000 #7mb
answered May 30, 2022 at 7:24
![]()
George GGeorge G
7,44312 gold badges45 silver badges59 bronze badges
Just open this file and —
sudo vim /etc/nginx/nginx.conf
Add a line in the http, server or location section:
client_max_body_size 100M;
Then check nginx is okey or not by the following command
sudo nginx -t
If everything looks fine then you will get
nginx: the configuration file /etc/nginx/nginx.conf syntax is ok
nginx: configuration file /etc/nginx/nginx.conf test is successful
Then restart nginx
sudo systemctl restart nginx
I hope your purpose is served 
answered Sep 8, 2022 at 10:51
![]()
In my case, I was using nginx along with letsencrypt to put a ssl layer in front of my spring boot application.
Putting clint_max_body_size property in «/etc/nginx/nginx.conf» did not work for me.
Instead, I put this property inside the site specific conf file.
sudo nano /etc/nginx/sites-available/mywebsite.com
server {
    ...
    client_max_body_size 3M;
    ...
}
Post saving the above, restarted the nginx server and it worked !
sudo service nginx stop
sudo service nginx start
answered Oct 31, 2022 at 1:51
![]()
Open file/etc/nginx/nginx.conf
Add or change client_max_body_size 0;
answered Mar 12, 2018 at 9:38
![]()
Tai HoTai Ho
5464 silver badges9 bronze badges
Use:
php -i
command or add:
phpinfo();
to get the location of configuration file.
Update these variables according to your need and server
max_input_time = 24000
max_execution_time = 24000
upload_max_filesize = 12000M
post_max_size = 24000M
memory_limit = 12000M
On Linux you will need to restart nginx / apache and phpfpm service so the new ini settings are loaded. On xampp, ammps you can restart these from control panel that comes with such applications.
![]()
Stephen Rauch♦
47.9k31 gold badges107 silver badges136 bronze badges
answered Nov 24, 2018 at 15:46
![]()
First of all you need to pay attention to the response status code:
If it is returned by php, then you’ll need to change:
In either
Or
If it is returned by nginx, then you need to add «client_max_body_size 22M;» directive to the .conf file of your website.
If it is returned by Modsecurity, then you need to change «SecRequestBodyLimit» directive in /etc/nginx/modsec/modsecurity.conf file to something like «SecRequestBodyLimit 23068672» (It is written in bytes)
answered Jul 8 at 7:06
![]()
When building and maintaining a website, you’re bound to encounter some unexpected HTTP errors here and there. Problems like these are tough to avoid, and some are trickier to resolve than others.

If you’re experiencing a «413 Request Entity Too Large» error, the good news is that this issue is quick and simple to address — you just need to do a bit of server reconfiguration. And no, you don’t need to be a technical expert. Let’s learn how.

A 413 HTTP error code occurs when the size of a client’s request exceeds the server’s file size limit. This typically happens when a client attempts to upload a large file to a web server, and the server responds with a 413 error to alert the client.
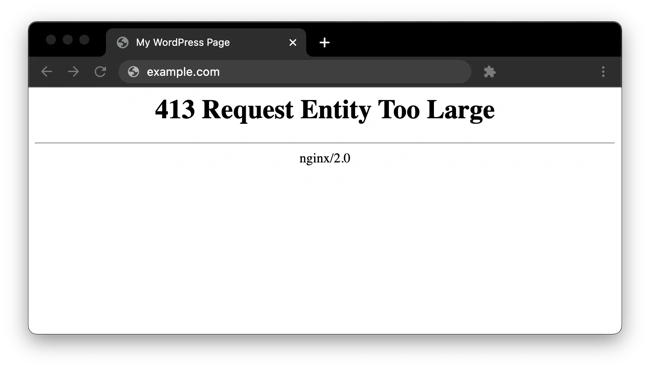
Web servers place size limits on uploads to prevent users from overwhelming the server and exceeding storage permissions. This limit usually isn’t an issue, and common website files should stay well under it. However, especially large file uploads may occasionally exceed the limit, resulting in a message like this:
While you can reduce the size of your upload to get around the error, it’s also possible to change your file size limit with some server-side modification.
Why does the «413 request entity too large» error happen?
The «413 Request Entity Too Large» error occurs when the size of a client’s request exceeds the server’s file size limit. This error typically happens if you attempt to upload an overly large file. The server responds with a 413 error message to indicate that the entity being sent is too large.
Here are a few examples:
- Uploading large media files, such as images, videos, or audio files
- Submitting form data with large file attachments
- Making API requests with large payloads
- Using content management systems like WordPress with default size limits
The «413 Request Entity Too Large» error is also known by different names, such as:
- Status Code 413
- Error 413
- HTTP Error Code: 413
- 413 Request Entity Too Large
- 413 Payload Too Large
- Entity Too Large 413
- 413 Request Entity Too Big
- HTTP Error 413
Keep in mind that you can only fix this error if you own the website where the error happened. If it happened on an external website or app you’re using, you should try to reduce your file size or reach out to their owner or customer support team.
How to Fix a “413 Request Entity Too Large” Error
Let’s go over some ways you can resolve HTTP error 413. First, we’ll go over some device-agnostic, server-agnostic, and hosting-agnostic methods. We’ll then walk you through how to fix a 413 error on your WordPress website and on Nginx and Apache servers specifically.
1. Reset File permissions
In some cases, the «413 Request Entity Too Large» error can be caused by incorrect file permissions on your server, so resetting these permissions could help. Here’s how to do it (some technical expertise recommended):
- Access your server files: Depending on your hosting provider, you can access your server files in different ways. Common methods include using an FTP client or accessing the file manager through your hosting control panel (such as cPanel).
- Locate the root directory: Navigate to the root directory of your website where the server files are stored. This is typically named public_html or www.
- Select the files and folders: Select all the files and folders within the root directory.
- Change permissions: Right-click on the selected files and folders and choose the «Permissions» or «Properties» option. This may open a dialog box where you can modify the permissions, depending on your specific server.
- Set permissions: Set the permissions to the appropriate values. You can either manually enter these values (like 644 or 755) or use checkboxes or dropdown menus depending on your file manager.
After resetting the file permissions, try uploading the file again. If the permissions were the cause of the issue, the error should no longer occur.
Word of warning: Be careful when modifying file permissions, as setting incorrect permissions can potentially compromise the security and functionality of your website. This is especially critical if you’re running a WordPress website, because WordPress is known to have some security vulnerabilities.
2. Manually Upload the File through FTP
Uploading the file via FTP (File Transfer Protocol) can be a good approach, but I recommend it as a last resort if you’re running a WordPress website, or if you have access to your Apache and Nginx servers. I offer several solutions below for those use cases.
But if those don’t apply to you, or you’ve already tried various methods, FTP is worth trying. It’ll allow you to circumvent restrictions imposed by web interfaces or form submissions. Plus, it will allow you to transfer the file to the server and manually control the upload. That said, this method won’t work if uploads are subject to server-imposed limits.
Otherwise, let’s try it. Here’s how:
- Obtain your FTP credentials: This will probably be the hardest part, but it’s also the most important. First, you need your server address, username, password, and port number, which will allow you to transfer files later.
- Install an FTP client: Then, choose an FTP client that best suits your needs. Popular options include FileZilla, Cyberduck, or WinSCP.
- Launch the FTP client: Open your FTP client and enter the FTP server address, username, password, and port number you obtained earlier.
- Connect to the FTP server: Click on the «Connect» or «Quick Connect» button to connect to the FTP server. The FTP client will connect to your website’s server if you’ve provided the correct credentials.
- Navigate to the target directory: Once connected, the FTP client will display the directories and files on your server. Navigate to the folder where you want to upload the file. This could be the root directory or a specific folder.
- Upload the file: Drag and drop the file from your computer into the FTP client’s remote server directory. The file transfer will begin.
I also recommend setting file permissions, if it’s not done automatically. Right-click on the uploaded file in the FTP client and select «Properties» or «Permissions.» Make sure the file permissions are correct to allow access only to the right users.
If you’re running on an Unix-like system, permissions are typically number 644 for files. «644» is a common default permission that allows you, the owner, to read and modify the file, while group members and other users can read it. (Here’s what the numbers mean, if you’re curious.)
Once the file is uploaded via FTP, access your website and see if the uploaded file works as intended without triggering the «413 Request Entity Too Large» error.
3. Contact Your Hosting Provider
If you’ve tried several methods or you’d prefer to not mess with server files or FTPs, reach out to your hosting provider. They have control over the server settings that may be causing the error. They also have the technical expertise to make changes without harming your website, a huge plus.
If you’ve exceeded the file size limit imposed by your hosting plan without realizing it, they can confirm the limits or increase the size limit if necessary (by upgrading your plan, for instance).
Your hosting provider may also be using a content delivery network (CDN) to enhance your website’s performance. The problem is that CDN servers may have their own file size limits, which could trigger a 413 error. Your website host could help you navigate these limitations or even adjust the CDN settings for you.
Next, we’ll show you how to fix a 413 error by increasing your size limit with a WordPress setup, as well as with an Apache or Nginx server configuration.
All methods require some edits to your server files, so we recommend creating a backup before attempting the steps below.
How to Fix Error 413 in WordPress
Themes and plugins are common causes of the 413 error with the WordPress content management system. Fortunately, there are several ways to increase your WordPress upload size limit enough to let these larger files through. As long as you do not exceed the limits of your hosting plan, you can try any of the following:
Method 1: Modify PHP.ini
The easiest method to increase your upload limit is by modifying your server’s PHP.ini file. Here, you can change your limit through the cPanel interface without any coding. To do this:
1. In your cPanel menu, select MultiPHP INI Editor under Software.

2. In the window that appears, choose your domain from the dropdown menu.
3. Change the values of the following parameters to your preference:
- max_execution_time (maximum time to upload, in seconds)
- upload_max_filesize (maximum upload size, in megabytes)
- post_max_size (maximum post size, in megabytes)
4. When finished, click Apply.
Method 2: Modify .htaccess
If your WordPress site is hosted on an Apache server, it’s also possible to increase your server’s limit via .htaccess, a file that contains many directives for the server. See the solution below.
Method 3: Modify functions.php
You can also try increasing your size limit via the functions.php file of your current WordPress theme.
If you want to make this change permanent, we recommend trying the above approaches first. With this approach, you’ll need to update functions.php whenever you update or change your current theme.
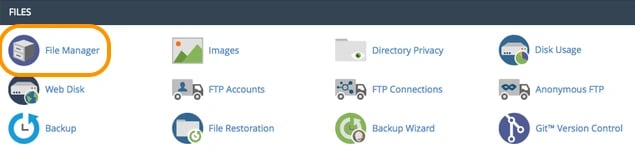
1. In your cPanel menu, select File Manager under Files.
2. Navigate to the folder of your current theme inside your root WordPress directory (public_html by default). Open this theme file.
3. Select functions.php and click the Edit icon.
4. Copy the code below and paste it at the end of the file
@ini_set( ‘upload_max_size’ , ’64M’ );
@ini_set( ‘post_max_size’, ’64M’);
@ini_set( ‘max_execution_time’, ‘300’ );
5. Click Save.
This code sets the maximum allowed size of your WordPress uploads and posts to 64 megabytes. You can change this number to something larger or smaller if you need, as long as you do not exceed your hosting plan’s storage limit.
It also sets the maximum period your uploads can take to 300 seconds. Feel free to change this as well.
How to Fix 413 Request Entity Too Large in Nginx
Nginx server settings can be modified inside the file nginx.conf. Open this file and check for the directive client_max_body_size. Then, change the value (in megabytes) to your maximum file size preference.
If you do not see this directive in nginx.conf, you can add it to the end of a server, location, or http block like so:
server {
...
client_max_body_size 64M;
}
This allows for a 64-megabyte upload. Set this number to your preference, save the file, then reload Nginx for the change to take effect.
How to Fix Error 413 in Apache
Change the size limit on an Apache server by updating your .htaccess file like so:
1. In your cPanel menu, select File Manager under Files.
2. In your root WordPress directory (public_html by default), locate .htaccess. Depending on your settings, the .htaccess file may be hidden.
3. Select .htaccess and click the Edit icon.
4. Copy and paste the code below at the bottom of your .htaccess file:
php_value upload_max_filesize 64M
php_value post_max_size 64M
php_value max_execution_time 300
php_value max_input_time 300
5. Click Save and reload Apache.
Doing this sets the maximum allowed size of your WordPress uploads and posts to 64 megabytes and sets the maximum file upload time to 300 seconds. You can change both of these values to your preference.
Still getting a 413?
After trying one or more of the solutions above, you still may encounter a 413 error when uploading large files, even if these files are below your new size limit.
In this case, the issue may stem from your CDN’s servers or some other restriction set by your hosting provider. As mentioned, reach out to your hosting support, detailing the problem and the steps you’ve taken so far to resolve it. It may be that you’ve exceeded your plan’s file size limit without realizing. Or, your configurations may have inadvertently caused another error.
If you use a CDN to improve your site’s performance, this may also be the cause of your issue — the CDN servers you’re using may impose file size limits that are too small. Since you probably can’t modify these servers’ files directly, you should consult the documentation for your CDN provider or contact product support to resolve the error.
If all else fails, consider uploading alternative files, reducing the size of your current file, or upgrading your storage plan. If you find yourself needing to upload a massive amount of data, more likely than not there’s a workaround.
Fixing a 413 Error
While HTTP errors can be frustrating, many are quickly solvable including a 413. By finding and tackling this issue now, you’ll have one less thing to worry about while building out your website. If your site allows users to upload their own content, changing your upload size limit solves this problem too — just make sure you’re not exceeding the limits set by your hosting plan.
As for the best option, we recommend WordPress users modify their server’s PHP.ini file first if possible, since this can easily be done through your hosting panel. Otherwise, choose the option that matches your server software.
This post was originally published in January 2021 and has been updated for comprehensiveness.
This article was written by a human, but our team uses AI in our editorial process. Check out our full disclosure to learn more about how we use AI.

Sometimes, a website shows annoying errors confusing users while browsing. If browsing other sites makes you annoyed when it comes to your site, things are very different. Many types of website errors occur, some generic and others specific to WordPress. One such error is 413.
Error 413 belongs to the family of HTTP 4xx status codes, which identify errors connected to the request made by the client. In this article, you will see what the “413 Request Entity Too Large” error is and how you can fix it in your WordPress.
- What Is the “Error 413 Request Entity Too Large” Error?
- Why Does “413 Request Entity Too Large” Error Occur?
- Fixing the “413 Request Entity Too Large” Error in WordPress
HTTP Error 413 indicates that the server cannot manage the request made, and this is because it involves a file or a block of data or, again, a group of files that are too large compared to the maximum limit that the server can manage.
The browser window generally displays the message “413 Request Entity Too Large”. This problem can occur if you try to upload too large files via the browser, exceeding the limits imposed by the webmaster for security reasons or others.
Why Does the “413 Request Entity Too Large” Error Occur?
Error 413 Request Entity Too Large occurs when you try to upload a file that exceeds the maximum upload limit set on your web server. In other words, when you try to upload a file that is too large, the web server returns an error message informing the user that “413 Request Entity Too Large”.
The message shown to the user may vary depending on the web server and the client. The following are the most common messages that indicate the occurrence of this error:
- Error 413
- HTTP Error 413
- HTTP Code: 413
- Request Entity Too Large
- 413. That’s an error.
Fixing the “413 Request Entity Too Large” Error in WordPress
As you know, error 413 usually occurs when you upload a large file to your web server and your hosting provider has set a limitation on file size.
One of the common problems webmasters encounter when managing WordPress is allowing the webserver to allow file uploads via the Media Library. However, if your Nginx-powered website is not configured to allow the uploading of large files, the upload process will mostly fail.
I will show you some of the easiest methods to increase the file upload size and fix the 413 Request Entity Too Large error in WordPress.
- Reset File Permissions
- Manually Upload the File via FTP
- Increase Upload File Size
- Modify Your Functions.php File
- Modify Your .htaccess File
- Modify Your nginx.conf File
- Contact Your Hosting Provider
Fixing Errors is Easier With Cloudways
Get rid of WordPress errors with a cloud host built to deliver a hassle-free experience with incredible speeds.
1. Reset File Permissions
It might be possible that you are encountering this error due to limited access to a file and upload permission. So, it would be great to check the WordPress file/folder permissions and set the recommended permission, then try uploading the file to your site.
You can set the permissions from an FTP Client like FileZilla, and if your hosting provider offers any file permission reset option, then you can fix it from there.
2. Manually Upload the File via FTP
It’s a good idea to consider FTP to upload your large file, but please note that if you are uploading a file via FileZilla, it takes more time.
Here, you will need to access your web server and upload the file by drag and drop. Therefore, first, you need to check whether your hosting provider offers server credentials or SFTP access to your web server.
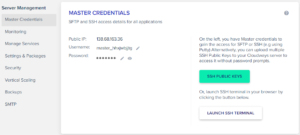
Now, you need the FileZilla FTP Client to access your web files, so download it if you don’t have one. Then, open FileZilla and fill the respective fields; Host, Username, Password, and Port. You can see in the below screenshot that I pasted my server IP, Username, Password, and 22 as a port number.
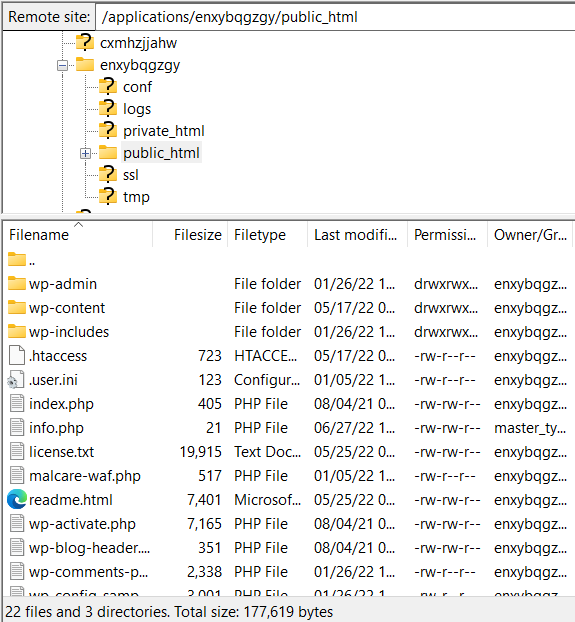
Next, drag the file you want to upload to your website from your local desktop (left-side) and drop it into your web server’s folder. In my case, the webserver folder path is /applications/dbname/public_html/wp-content/uploads. If you want to upload any plugin then the folder path is /applications/dbname/public_html/wp-content/plugins.
3. Increase Upload File Size
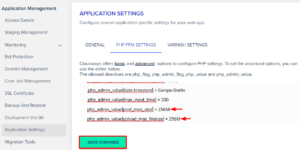
Many good WordPress hosting providers offer the file size settings feature on their platform that lets users increase the maximum upload size value, maximum execution time, post max size, and more.
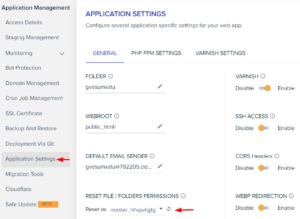
Now, let’s look at how you can increase your upload file size from the hosting dashboard. Cloudways offers application and server settings from which you can increase your file upload settings. From the Application Management panel, I have to remove comment “;” from three values and increase the upload and post max size to 256M & execution time to 300.
php_admin_value[post_max_size] = 256M

php_admin_value[upload_max_filesize] = 256M

php_admin_value[max_execution_time] = 300
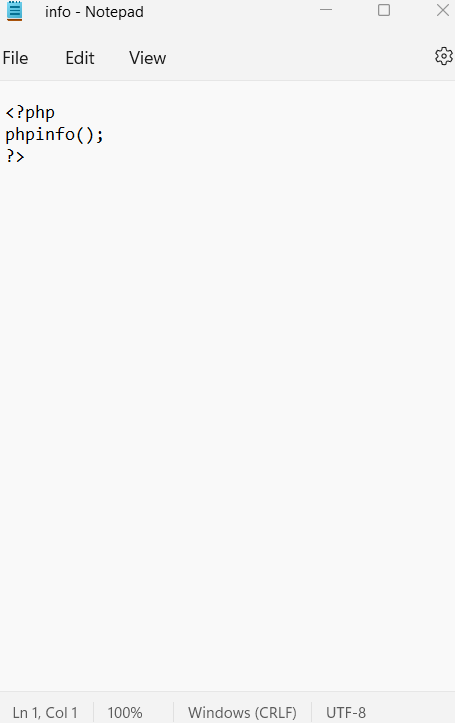
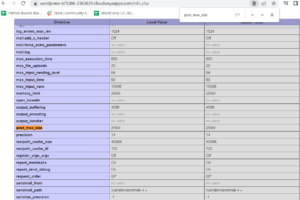
To check whether the file size value is updated or not, you need to create an info.php file on your desktop and upload it to your website folder via FileZilla. Now, open any file editor like Notebook, paste the following code, and save it as info.php.
<?php

phpinfo();

?>
Now, upload it to your site’s public_html folder.
In the next step, open your browser and run this URL “www.yoursite.com/info.php”. In my case, the URL is https://wordpress-675386-2363839.cloudwaysapps.com/info.php. Search for the PHP admin values that you updated; if the values are changed, you have successfully increased the file size. After this, try to upload your file and check whether the issue has been resolved or not.
If your hosting provider doesn’t offer any feature to modify the file upload size, move to the next method.
4. Modify Your Functions.php File
You can edit your theme’s functions.php file and increase the file upload size. But before that, you will need to create a backup of your entire WordPress site for data recovery. Backups help you recover your web files if something goes wrong.
You need an FTP Client like FileZilla to access your site’s file. So, connect your server via FileZilla and go to your active theme folder. You will find the theme files in the wp-content folder and in my case, the source path is “/applications/enxybqgzgy/public_html/wp-content/themes/twentynineteen”. Next, find the functions.php and click View/Edit.
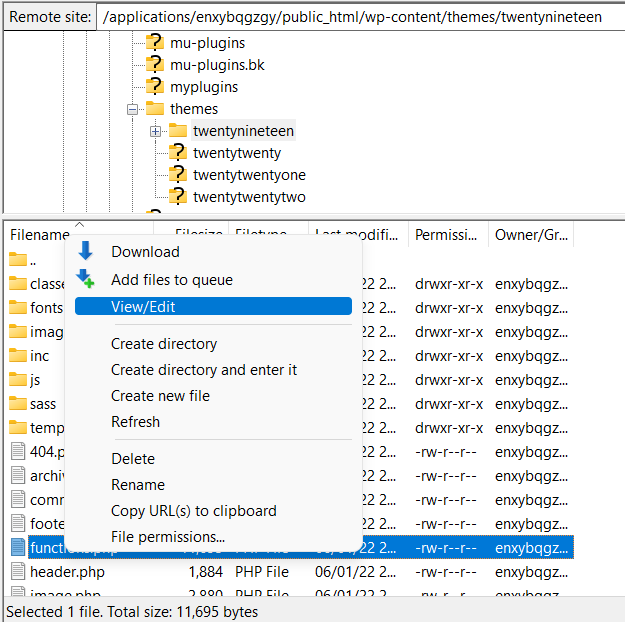
Next, paste the following lines of code into your file and save it. This will define the max upload size in Megabytes. Replace the numbers as per your requirement.
@ini_set( 'upload_max_size' , '256M' );

@ini_set( 'post_max_size', '256M');

@ini_set( 'max_execution_time', '300' );
After this, check open info.php on your browser “www.yoursite.com/info.php” and check whether the values are updated or not, then try uploading your file.
In case this doesn’t work, then move to the next method.
5. Modify Your .htaccess File
If your website is hosted on LAMP Stack (using Apache web server and PHP), you can increase the max upload size from your .htaccess file.
Again, you need to access your .htaccess file from an FTP client like FileZilla and go to the public_html folder. Search for the .htaccess file, and if you do not see the .htaccess file, it’s probably hidden. Hence, navigate to FileZilla menus > Server and click Force Showing Hidden Files.
Now View/Edit the .htaccess file in a code editor or Notepad and add the following lines.
php_value post_max_size 256M

php_value memory_limit 256M

php_value max_execution_time 300
Choose a number and size that is suitable for your site and file. Next, open info.php ““www.yoursite.com/infor.php”” on your browser to check the updated sizes as we did in the previous step.
6. Modify Your nginx.conf File
The above troubleshooting method is for Apache web server, but if you are running your website on LEMP (NGINX as a web server and PHP), you need to edit nginx.conf i.e., located in /etc/nginx/ and add the following line of code to the file.
http {

client_max_body_size 100M;

}
7. Contact Your Hosting Provider
If you tried all the above and are still facing the issues, then it would be good to contact your hosting support and ask them to fix this issue ASAP. Several hosting providers offer 24/7 support chat and ticket assistance to help their customers.
Reliable WordPress Hosting Starting from $11/month
Enjoy hassle-free hosting on a cloud platform with guaranteed performance boosts.
Summary
Error 413 Request Entity Too Large is related to the size of the client request. There are multiple ways to fix this error you have read in this article. The most common way is to reduce the file size or to change the web server settings to increase the upload file size. If you know any other methods that can help fix the HTTP 413 Error, then please comment in the section below.
Frequently Asked Questions
Q. How do I fix Error 413 Request Entity Too Large?
A. The most common way to fix the HTTP 413 Error is to increase the media file maximum upload size. Other ways are: resetting file permissions, uploading files using an FTP client, and modifying your files (fuctions.php/.htaccess/nginx.config).
Q. What does “HTTP Error 413” mean?
A. If a user gets this error it is because he’s uploading a file that is too large. When a webmaster receives this report, what he can do is ask the user to reduce the file size and try to upload it again.