Появление сообщения об ошибке 401 Unauthorized Error («отказ в доступе») при открытии страницы сайта означает неверную авторизацию или аутентификацию пользователя на стороне сервера при обращении к определенному url-адресу. Чаще всего она возникает при ошибочном вводе имени и/или пароля посетителем ресурса при входе в свой аккаунт. Другой причиной являются неправильные настройки, допущенные при администрировании web-ресурса. Данная ошибка отображается в браузере в виде отдельной страницы с соответствующим описанием. Некоторые разработчики интернет-ресурсов, в особенности крупных порталов, вводят собственную дополнительную кодировку данного сбоя:
- 401 Unauthorized;
- Authorization Required;
- HTTP Error 401 – Ошибка авторизации.
Попробуем разобраться с наиболее распространенными причинами возникновения данной ошибки кода HTTP-соединения и обсудим способы их решения.
Причины появления ошибки сервера 401 и способы ее устранения на стороне пользователя
При доступе к некоторым сайтам (или отдельным страницам этих сайтов), посетитель должен пройти определенные этапы получения прав:
- Идентификация – получение вашей учетной записи («identity») по username/login или email.
- Аутентификация («authentic») – проверка того, что вы знаете пароль от этой учетной записи.
- Авторизация – проверка вашей роли (статуса) в системе и решение о предоставлении доступа к запрошенной странице или ресурсу на определенных условиях.
Большинство пользователей сохраняют свои данные по умолчанию в истории браузеров, что позволяет быстро идентифицироваться на наиболее часто посещаемых страницах и синхронизировать настройки между устройствами. Данный способ удобен для серфинга в интернете, но может привести к проблемам с безопасностью доступа к конфиденциальной информации. При наличии большого количества авторизованных регистрационных данных к различным сайтам используйте надежный мастер-пароль, который закрывает доступ к сохраненной в браузере информации.
Наиболее распространенной причиной появления ошибки с кодом 401 для рядового пользователя является ввод неверных данных при посещении определенного ресурса. В этом и других случаях нужно попробовать сделать следующее:
- Проверьте в адресной строке правильность написания URL. Особенно это касается перехода на подстраницы сайта, требующие авторизации. Введите правильный адрес. Если переход на страницу осуществлялся после входа в аккаунт, разлогинитесь, вернитесь на главную страницу и произведите повторный вход с правильными учетными данными.
- При осуществлении входа с сохраненными данными пользователя и появлении ошибки сервера 401 проверьте их корректность в соответствующих настройках данного браузера. Возможно, авторизационные данные были вами изменены в другом браузере. Также можно очистить кэш, удалить cookies и повторить попытку входа. При удалении истории браузера или очистке кэша потребуется ручное введение логина и пароля для получения доступа. Если вы не помните пароль, пройдите процедуру восстановления, следуя инструкциям.
- Если вы считаете, что вводите правильные регистрационные данные, но не можете получить доступ к сайту, обратитесь к администратору ресурса. В этом случае лучше всего сделать скриншот проблемной страницы.
- Иногда блокировка происходит на стороне провайдера, что тоже приводит к отказу в доступе и появлению сообщения с кодировкой 401. Для проверки можно попробовать авторизоваться на том же ресурсе с альтернативного ip-адреса (например, используя VPN). При подтверждении блокировки трафика свяжитесь с провайдером и следуйте его инструкциям.
Некоторые крупные интернет-ресурсы с большим количеством подписчиков используют дополнительные настройки для обеспечения безопасности доступа. К примеру, ваш аккаунт может быть заблокирован при многократных попытках неудачной авторизации. Слишком частые попытки законнектиться могут быть восприняты как действия бота. В этом случае вы увидите соответствующее сообщение, но можете быть просто переадресованы на страницу с кодом 401. Свяжитесь с администратором сайта и решите проблему.
Иногда простая перезагрузка проблемной страницы, выход из текущей сессии или использование другого веб-браузера полностью решают проблему с 401 ошибкой авторизации.
Устранение ошибки 401 администратором веб-ресурса
Для владельцев сайтов, столкнувшихся с появлением ошибки отказа доступа 401, решить ее порою намного сложнее, чем обычному посетителю ресурса. Есть несколько рекомендаций, которые помогут в этом:
- Обращение в службу поддержки хостинга сайта. Как и в случае возникновения проблем с провайдером, лучше всего подробно описать последовательность действий, приведших к появлению ошибки 401, приложить скриншот.
- При отсутствии проблем на стороне хостинг-провайдера можно внести следующие изменения в настройки сайта с помощью строки Disallow:/адрес проблемной страницы. Запретить индексацию страницам с ошибкой в «rоbоts.txt», после чего добавить в файл «.htассеss» строку такого типа:
Redirect 301 /oldpage.html http://site.com/newpage.html.
Где в поле /oldpage.html прописывается адрес проблемной страницы, а в http://site.com/newpage.html адрес страницы авторизации.
Таким образом вы перенаправите пользователей со всех страниц, которые выдают ошибку 401, на страницу начальной авторизации.
- Если после выполнения предыдущих рекомендаций пользователи при попытках авторизации все равно видят ошибку 401, то найдите на сервере файл «php.ini» и увеличьте время жизни сессии, изменив значения следующих параметров: «session.gc_maxlifetime» и «session.cookie_lifetime» на 1440 и 0 соответственно.
- Разработчики веб-ресурсов могут использовать более сложные методы авторизации и аутентификации доступа для создания дополнительной защиты по протоколу HTTP. Если устранить сбой простыми методами администрирования не удается, следует обратиться к специалистам, создававшим сайт, для внесения соответствующих изменений в код.
Хотя ошибка 401 и является проблемой на стороне клиента, ошибка пользователя на стороне сервера может привести к ложному требованию входа в систему. К примеру, сетевой администратор разрешит аутентификацию входа в систему всем пользователям, даже если это не требуется. В таком случае сообщение о несанкционированном доступе будет отображаться для всех, кто посещает сайт. Баг устраняется внесением соответствующих изменений в настройки.
Дополнительная информация об ошибке с кодом 401
Веб-серверы под управлением Microsoft IIS могут предоставить дополнительные данные об ошибке 401 Unauthorized в виде второго ряда цифр:
- 401, 1 – войти не удалось;
- 401, 2 – ошибка входа в систему из-за конфигурации сервера;
- 401, 3 – несанкционированный доступ из-за ACL на ресурс;
- 401, 501 – доступ запрещен: слишком много запросов с одного и того же клиентского IP; ограничение динамического IP-адреса – достигнут предел одновременных запросов и т.д.
Более подробную информацию об ошибке сервера 401 при использовании обычной проверки подлинности для подключения к веб-узлу, который размещен в службе MS IIS, смотрите здесь.
Следующие сообщения также являются ошибками на стороне клиента и относятся к 401 ошибке:
- 400 Bad Request;
- 403 Forbidden;
- 404 Not Found;
- 408 Request Timeout.
Как видим, появление ошибки авторизации 401 Unauthorized не является критичным для рядового посетителя сайта и чаще всего устраняется самыми простыми способами. В более сложной ситуации оказываются администраторы и владельцы интернет-ресурсов, но и они в 100% случаев разберутся с данным багом путем изменения настроек или корректировки html-кода с привлечением разработчика сайта.
HTTP response status code 401 Unauthorized is a client error that is returned by the server to indicate that the HTTP request has to be authenticated, and that appropriate login credentials have not yet been received.
Usage
When the 401 Unauthorized error message is received, the client understands that valid login credentials need to be supplied in advance of being granted access to the requested resource. It may be that the client needs to first log in to the system, or alternatively, supply credentials as part of the HTTP request. It may also be that the login credentials are not valid. It is relevant to distinguish this from 403 Forbidden, which informs the client that the action is not allowed.
When the server sends a 401 Unauthorized response, it must include the WWW-Authenticate response header. This informs the client as to what authorization methods it allows. IANA has a list of the standard authentication schemes, varying in both security and popularity. The specifications for common Authentication schemes can be found at the following links:
-
BasicThis type of authentication is the transmission of credentials and ID/Password pairs RFC 7617.
-
BearerThis authentication, also known as token authentication, relies on security tokens that are generated by the server and returned to the client following a successful login. The client is responsible for sending these tokens in any subsequent attempt to access secure resources RFC 6750.
-
DigestHTTP Digest access authentication is a challenge-response protocol that can be used to authenticate resource requests RFC 7616.
-
HOBAShort for HTTP Origin-Bound Authentication, is a scheme that does not require the server to maintain a list of stored passwords, and thus is not vulnerable to phishing attacks RFC 7486.
-
MutualMutual authentication, also known as two-way authentication, is similar to the basic and digest authentication schemes, with the difference that the server is guaranteed to know the client’s encrypted password. Essentially, the client and server authenticate each other before the interaction continues RFC 8120.
-
AWS4-HMAC-SHA256This is an authentication algorithm designed to provide authentication information to Amazon Web Services AWS S3 API Reference.
More than one Authentication method can be specified by the server, either on multiple lines or a single, comma-delimited line. When the client has the credentials required, they are sent to the server using the Authorization request header.
Note
Search engines like Google will not index a URL with 401 Unauthorized response status, and consequently, URLs that have been indexed in the past but are now returning this HTTP status code will be removed from the search results.
Example
In the example, the client requests a resource and the server responds with the 401 Unauthorized status code to indicate that the resource is protected. As part of the response, the server indicates that it supports both basic authorization and mutual authorization. The client responds by stating that it is providing a username:password pair using the basic authentication protocol, which is specified in the Authorization header. Finally, the server responds by transmitting the requested resource.
Initial request
GET /documents/tech-news HTTP/1.1
Host: www.example.re
Initial response
HTTP/1.1 401 Unauthorized
WWW-Authenticate: Basic; realm=”Documents”
WWW-Authenticate: Mutual
Next request, including Authorization
GET /documents/tech-news HTTP/1.1
Host: www.example.re
Authorization: Basic RXhhbXBsZTphaQ==
Final response
HTTP/1.1 200 OK
Content-Type: application/pdf
Content-Length: 25000

<PDF document included in message body>
Code references
.NET
HttpStatusCode.Unauthorized
Rust
http::StatusCode::UNAUTHORIZED
Rails
:unauthorized
Go
http.StatusUnauthorized
Symfony
Response::HTTP_UNAUTHORIZED
Python3.5+
http.HTTPStatus.UNAUTHORIZED
Java
java.net.HttpURLConnection.HTTP_UNAUTHORIZED
Apache HttpComponents Core
org.apache.hc.core5.http.HttpStatus.SC_UNAUTHORIZED
Angular
@angular/common/http/HttpStatusCode.Unauthorized
Takeaway
The 401 Unauthorized status code indicates that authorization is required to access the requested resource. The server will inform which Authentication method(s) it supports and the client is required to authenticate itself before access is granted. Several common authentication schemes exist.
See also
- RFC 7235
Last updated: August 2, 2023
Уровень сложности
Сложный
Время на прочтение
12 мин
Количество просмотров 4.4K
Это главы 39 и 40 раздела «HTTP API & REST» моей книги «API». Второе издание книги будет содержать три новых раздела: «Паттерны API», «HTTP API и REST», «SDK и UI‑библиотеки». Если эта работа была для вас полезна, пожалуйста, оцените книгу на GitHub, Amazon или GoodReads. English version on Substack.
Глава 39. Работа с ошибками в HTTP API
Рассмотренные в предыдущих главах примеры организации API согласно стандарту HTTP и принципам REST покрывают т.н. «happy path», т.е. стандартный процесс работы с API в отсутствие ошибок. Конечно, нам не менее интересен и обратный кейс — каким образом HTTP API следует работать с ошибками, и чем стандарт и архитектурные принципы могут нам в этом помочь. Пусть какой-то агент в системе (неважно, клиент или гейтвей) пытается создать новый заказ:
POST /v1/orders?user_id=<user_id> HTTP/1.1
Authorization: Bearer <token>
If-Match: <ревизия>

{ /* параметры заказа */ }
Какие потенциальные неприятности могут ожидать нас при выполнении этого запроса? Навскидку, это:
-
Запрос не может быть прочитан (недопустимые символы, нарушение синтаксиса).
-
Токен авторизации отсутствует.
-
Токен авторизации невалиден.
-
Токен валиден, но пользователь не обладает правами создавать новый заказ.
-
Пользователь удалён или деактивирован.
-
Идентификатор пользователя неверен (не существует).
-
Ревизия не передана.
-
Ревизия не совпадает с последней актуальной.
-
В теле запроса отсутствуют обязательные поля.
-
Какое-то из полей запроса имеет недопустимое значение.
-
Превышены лимиты на допустимое количество запросов.
-
Сервер перегружен и не может ответить в настоящий момент.
-
Неизвестная серверная ошибка (т.е. сервер сломан настолько, что диагностика ошибки невозможна).
Исходя из общих соображений, соблазнительной кажется идея назначить каждой из ошибок свой статус-код. Скажем, для ошибки (4) напрашивается код 403, а для ошибки (11) — 429. Не будем, однако, торопиться, и прежде зададим себе вопрос с какой целью мы хотим назначить тот или иной код ошибки.
В нашей системе в общем случае присутствуют три агента: пользователь приложения, само приложение (клиент) и сервер. Каждому из этих акторов необходимо понимать ответ на три вопроса относительно ошибки (причём для каждого из акторов ответ может быть разным):
-
Кто допустил ошибку (конечный пользователь, разработчик клиента, разработчик сервера или какой-то промежуточный агент, например, программист сетевого стека).
-
Не забудем учесть тот факт, что и конечный пользователь, и разработчик клиента могут допустить ошибку намеренно, например, пытаясь перебором подобрать пароль к чужому аккаунту.
-
-
Можно ли исправить ошибку, просто повторив запрос.
-
Если да, то через какое время.
-
-
Если повтором запроса ошибку исправить нельзя, то можно ли её исправить, переформулировав запрос.
-
Если ошибку вообще нельзя исправить, то что с этим делать.
На один из этих вопрос в рамках стандарта HTTP ответить достаточно легко: регулировать желаемое время повтора запроса можно через параметры кэширования ответа и заголовок Retry-After. Также HTTP частично помогает с первым вопросом: для определения, на чьей стороне произошла ошибка, используется первая цифра статус-кода (см. ниже).
Со всеми остальными вопросами, увы, ситуация сильно сложнее.
Клиентские ошибки
Статус-коды, начинающиеся с цифры 4, индицируют, что ошибка допущена пользователем или клиентом (или, по крайней мере, сервер так считает). Обычно, полученную 4xx повторять бессмысленно — если не предпринять дополнительных действий по изменению состояния сервиса, этот запрос не будет выполнен успешно никогда. Однако из этого правила есть исключения, самые важные из которых — 429 Too Many Requests и 404 Not Found. Последняя по стандарту имеет смысл «состояния неопределённости»: сервер имеет право использовать её, если не желает раскрывать причины ошибки. После получения ошибки 404, можно сделать повторный запрос, и он вполне может отработать успешно. Для индикации персистентной ошибки «ресурс не найден» используется отдельный статус 410 Gone.
Более интересный вопрос — а что всё-таки клиент может (или должен) сделать, получив такую ошибку. Как мы указывали в главе «Разграничение областей ответственности», если ошибка может быть исправлена программно, необходимо в машиночитаемом виде индицировать это клиенту; если ошибка не может быть исправлена, необходимо включить человекочитаемые сообщения для пользователя (даже просто «попробуйте начать сначала / перезагрузить приложение» лучше с точки зрения UX, чем «неизвестная ошибка») и для разработчика, который будет разбираться с проблемой.
С восстановимыми ошибками в HTTP, к сожалению, ситуация достаточно сложная. С одной стороны, протокол включает в себя множество специальных кодов, которые индицируют проблемы с использованием самого протокола — такие как 405 Method Not Allowed (данный глагол неприменим к указанному ресурсу), 406 Not Acceptable (сервер не может вернуть ответ согласно Accept-заголовкам запроса), 411 Length Required, 414 URI Too Long и так далее. Код клиента может обработать данные ошибки и даже, возможно, предпринять какие-то действия по их устранению (например, добавить заголовок Content-Length в запрос после получения ошибки 411), но все они очень плохо применимы к ошибкам в бизнес-логике. Например, мы можем вернуть 429 Too Many Requests при превышении лимитов запросов, но у нас нет никакого стандартного способа указать, какой именно лимит был превышен.
Частично проблему отсутствия стандартных подходов к возврату ошибок компенсируют использованием различных близких по смыслу статус-кодов для индикации разных состояний (либо и вовсе выбор произвольного кода ошибки и придания ему нового смысла в рамках конкретного API). В частности, сегодня де-факто стандартом является возврат кода 401 Unauthorized при отсутствии заголовков авторизации или невалидном токене (получение этого кода, таким образом, является сигналом для приложения предложить пользователю залогиниться в системе), что противоречит стандарту (который требует при возврате 401 обязательно указать заголовок WWW-Authenticate с описанием способа аутентификации пользователя; нам неизвестны реальные API, которые выполняют это требованием).
Однако таких кодов, которые могут отражать нюансы одной и той же проблемы, в стандарте очень мало. Фактически, мы приходим к тому, что множество различных ошибок в логике приложения приходится возвращать под очень небольшим набором статус-кодов:
-
400 Bad Requestдля всех ошибок валидации запроса (некоторые пуристы утверждают, что, вообще говоря,400соответствует нарушению формата запроса — невалидному JSON, например — а для логических ошибок следует использовать код422 Unprocessable Content; в постановке задачи это мало что меняет); -
403 Forbiddenдля любых проблем, связанных с авторизацией действий клиента; -
404 Not Foundв случае, если какие-то из указанных в запросе сущностей не найдены либо раскрытие причин ошибки нежелательно; -
409 Conflictпри нарушении целостности данных; -
410 Goneесли ресурс был удалён; -
429 Too Many Requestsпри превышении лимитов.
Разработчики стандарта HTTP об этой проблеме вполне осведомлены, и отдельно отмечают, что для решения бизнес-сценариев необходимо передавать в метаданных либо теле ответа дополнительные данные для описания возникшей ситуации («the server SHOULD send a representation containing an explanation of the error situation, and whether it is a temporary or permanent condition»), что (как и введение новых специальных кодов ошибок) противоречит самой идее унифицированного машиночитаемого формата ошибок. (Отметим, что отсутствие стандартов описания ошибок в бизнес-логике — одна из основных причин, по которым мы считаем разработку REST API как его описал Филдинг в манифесте 2008 года невозможной; клиент должен обладать априорным знанием о том, как работать с метаинформацией об ошибке, иначе он сможет восстанавливать своё состояние после ошибки только перезагрузкой.)
Дополнительно, у проблемы есть и третье измерение в виде серверного ПО мониторинга состояния системы, которое часто полагается на статус-коды ответов при построении графиков и уведомлений. Между тем, ошибки, скрывающиеся под одним статус кодом — например ввод неправильного пароля и истёкший срок жизни токена — могут быть очень разными по смыслу; повышенный фон первой ошибки может говорить о потенциальной попытке взлома путём перебора паролей, а второй — о потенциальных ошибках в новой версии приложения, которая может неверно кэшировать токены авторизации.
Всё это естественным образом подводит нас к следующему выводу: если мы хотим использовать ошибки для диагностики и (возможно) восстановления состояния клиента, нам необходимо добавить машиночитаемую метаинформацию о подвиде ошибки и, возможно, тело ошибки с указанием подробной информации о проблемах — например, как мы предлагали в главе «Описание конечных интерфейсов»:
POST /v1/coffee-machines/search HTTP/1.1

{
  "recipes": ["lngo"],
  "position": {
    "latitude": 110,
    "longitude": 55
  }
}
→
HTTP/1.1 400 Bad Request
X-OurCoffeeAPI-Error-Kind:⮠
  wrong_parameter_value

{
  "reason": "wrong_parameter_value",
  "localized_message":
    "Что-то пошло не так.⮠
    Обратитесь к разработчику приложения.",
  "details": {
    "checks_failed": [{
      "field": "recipe",
      "error_type": "wrong_value",
      "message":
        "Value 'lngo' unknown.⮠
        Did you mean 'lungo'?"
    }, {
      "field": "position.latitude",
      "error_type": "constraint_violation",
      "constraints": {
        "min": -90,
        "max": 90
      },
      "message":
        "'position.latitude' value⮠
        must fall within⮠
        the [-90, 90] interval"
    }]
  }
}
Также напомним, что любые неизвестные 4xx-статус-коды клиент должен трактовать как ошибку 400 Bad Request, следовательно, формат (мета)данных ошибки 400 должен быть максимально общим.
Серверные ошибки
Ошибки 5xx индицируют, что клиент, со своей стороны, выполнил запрос правильно, и проблема заключается в сервере. Для клиента, по большому счёту, важно только то, имеет ли смысл повторять запрос и, если да, то через какое время. Если учесть, что в любых публично доступных API причины серверных ошибок, как правило, не раскрывают — в абсолютном большинстве кодов 500 Internal Server Error и 503 Service Unavailable достаточно для индикации серверных ошибок (второй код указывает, что отказ в обслуживании имеет разовый характер и есть смысл автоматически повторить запрос), или можно вовсе ограничиться одним из них с опциональным заголовком Retry-After.
Для внутренних систем, вообще говоря, такое рассуждение неверно. Для построения правильных мониторингов и системы оповещений необходимо, чтобы серверные ошибки, точно так же, как и клиентские, содержали подтип ошибки в машиночитаемом виде. Здесь по-прежнему применимы те же подходы — использование широкой номенклатуры кодов и/или передача типа ошибки заголовком — однако эта информация должна быть вырезана гейтвеем на границе внешней и внутренней систем, и заменена на общую информацию для разработчика и для конечного пользователя системы с описанием действий, которые необходимо выполнить при получении ошибки.
POST /v1/orders/?user_id=<user id> HTTP/1.1
If-Match: <ревизия>

{ parameters }
→
// Ответ, полученный гейтвеем
// от сервиса обработки заказов,
// метаданные которого будут
// использованы для мониторинга
HTTP/1.1 500 Internal Server Error
// Тип ошибки: получен таймаут от БД
X-OurCoffeAPI-Error-Kind: db_timeout
{ /* Дополнительные данные, например,
     какой хост ответил таймаутом */ }
// Ответ, передаваемый клиенту.
// Детали серверной ошибки удалены
// и заменены на инструкцию клиенту.
// Поскольку гейтвей не знает, был
// ли в действительности сделан заказ,
// клиенту рекомендуется попробовать
// повторить запрос и/или попытаться
// получить актуальное состояние
HTTP/1.1 500 Internal Server Error
Retry-After: 5
{
"reason": "internal_server_error",
"localized_message": "Не удалось⮠
получить ответ от сервера.⮠
Попробуйте повторить операцию
или обновить страницу.",
"details": {
"can_be_retried": true,
"is_operation_failed": "unknown"
}
}
Вот здесь мы, однако, вступаем на очень скользкую территорию. Современная практика реализации HTTP-клиентов такова, что безусловно повторяются только немодифицирующие (GET, HEAD, OPTIONS) запросы. В случае модифицирующих запросов разработчик должен написать код, который повторит запрос — и для этого разработчику нужно очень внимательно прочитать документацию к API, чтобы убедиться, что это поведение допустимо и не приведёт к побочным эффектам.
Теоретически идемпотентные методы PUT и DELETE можно вызывать повторно. Практически, однако, ввиду того, что многие разработчики упускают требование идемпотентности этих методов, фреймворки работы с HTTP API по умолчанию перезапросов модифицирующих методов, как правило, не делают, но некоторую выгоду из следования стандарту мы всё же можем извлечь — по крайней мере, сама сигнатура индицирует, что запрос можно повторять.
Что касается более сложных ситуаций, когда мы хотим указать разработчику, что он может безопасно повторить потенциально неидемпотентную операцию, то мы могли бы предложить формат описания доступных действий в теле ошибки… но практически никто не ожидает найти такое описание в самой ошибке. Возможно, потому, что с ошибками 5xx, в отличие от 4xx, программисты практически не сталкиваются при написании клиентского кода, и мало какие тестовые среды позволяют такие ошибки эмулировать. Так или иначе, описывать необходимые действия при получении серверной ошибки вам придётся в документации. (Имейте в виду, что эти инструкции с большой долей вероятности будут проигнорированы. Таков путь.)
Организация системы ошибок в HTTP API на практике
Как понятно из вышесказанного, фактически есть три способа работать с ошибками HTTP API:
-
Расширительно трактовать номенклатуру статус-кодов и использовать новый код каждый раз, когда требуется индицировать новый вид ошибки. (Автор этой книги неоднократно встречал ситуации, когда при разработке API просто выбирался «похоже выглядящий» статус безо всякой оглядки на его описание в стандарте.)
-
Полностью отказаться от использования статус-кодов и вкладывать описание ошибки в тело и/или метаданные ответа с кодом
200. Этим путём идут почти все RPC-фреймворки.-
2а. Вариантом этой стратегии можно считать использование всего двух статус-кодов ошибок (
400для любой клиентской ошибки,500для любой серверной), опционально трёх (те же плюс404для статуса неопределённости).
-
-
Применить смешанный подход, то есть использовать статус-код согласно его семантике для индикации рода ошибки и вложенные (мета)данные в специально разработанном формате для детализации (подобно фрагментам кода, предложенным нами в настоящей главе).
Как нетрудно заметить, считать соответствующим стандарту можно только подход (3). Будем честны и скажем, что выгоды следования ему, особенно по сравнению с вариантом (2а), не очень велики и состоят в основном в чуть лучшей читабельности логов и большей прозрачности для промежуточных прокси.
Глава 40. Заключительные положения и общие рекомендации
Подведём итог описанному в предыдущих главах. Чтобы разработать качественный HTTP API, необходимо:
-
Описать happy path, т.е. составить диаграмму вызовов для стандартного цикла работы клиентского приложения.
-
Определить каждый вызов как операцию над некоторым ресурсом и, таким образом, составить номенклатуру URL и применимых методов.
-
Понять, какие ошибки возможны при выполнении операций и каким образом клиент должен восстанавливаться из какого состояния.
-
Решить, какая функциональность будет передана на уровень протокола HTTP [какие стандартные возможности протокола будут использованы в сопряжении с какими инструментами разработки] и в каком объёме.
-
Опираясь на решения 1-4, разработать конкретную спецификацию.
-
Проверить себя: пройти по пунктам 1-3, написать псевдокод бизнес-логики приложения согласно разработанной спецификации, и оценить, насколько удобным, понятным и читабельным оказался результирующий API.
Позволим себе так же дать несколько советов по code style:
-
Не различайте пути с
/на конце и без него и примите какую-то рекомендацию по умолчанию (мы рекомендуем все пути заканчивать на/— по простой причине, это позволяет разумно описать обращение к корню домена какГЛАГОЛ /). Если вы решили запретить один из вариантов (скажем, пути без слэша в конце), при обращении по второму варианту должен быть или редирект или однозначно читаемая ошибка. -
Включайте в ответы стандартные заголовки —
Date,Content-Type,Content-Encoding,Content-Length,Cache-Control,Retry-After— и вообще старайтесь не полагаться на то, что клиент правильно догадывается о параметрах протокола по умолчанию. -
Поддержите метод
OPTIONSи протокол CORS на случай, если ваш API захотят использовать из браузеров. -
Определитесь с правилами выбора кейсинга параметров (и преобразований кейсинга при перемещении параметра между различными частями запроса) и придерживайтесь их.
-
Всегда оставляйте себе возможность обратно-совместимого расширения операции API. В частности, всегда возвращайте корневой JSON-объект в ответах эндпойтов — потому что приписать новые поля к объекту вы можете, а к массивам и примитивам — нет.
-
Отметим также, что пустая строка не является валидным JSON, поэтому корректнее возвращать пустой объект
{}там, где ответа не подразумевается (или статус204 No Contentс пустым телом, но тогда эндпойнт нельзя будет расширить в будущем).
-
-
Для всех
GET-запросов указывайте политику кэширования (иначе всегда есть шанс, что клиент или промежуточный агент придумает её за вас). -
Не эксплуатируйте известные возможности оперировать запросами в нарушение стандарта и не изобретайте свои решения для «серых зон» протокола. В частности:
-
не размещайте модифицирующие операции за методом
GETи неидемпотентные операции заPUT/DELETE; -
соблюдайте симметрию
GET/PUT/DELETEметодов; -
не позволяйте
GET/HEAD/DELETE-запросам иметь тело, не возвращайте тело в ответе методаHEADили совместно со статус-кодом204 No Content; -
не придумывайте свой стандарт для передачи массивов и вложенных объектов в query — лучше воспользоваться HTTP-глаголом, позволяющим запросу иметь тело, или, в крайнем случае, передать параметры в виде Base64-кодированного JSON-поля;
-
не размещайте в пути и домене URL параметры, по формату требующие эскейпинга (т.е. могущие содержать символы, отличные от цифр и букв латинского алфавита); для этой цели лучше воспользоваться query-параметрами или телом запроса.
-
-
Ознакомьтесь хотя бы с основными видами уязвимостей в типичных имплементациях HTTP API, которыми могут воспользоваться злоумышленники:
-
CSFR
-
SSRF
-
HTTP Response Splitting
-
Unvalidated Redirects and Forwards
и заложите защиту от этих векторов атак на уровне вашего серверного ПО. Организация OWASP предоставляет хороший обзор лучших security-практик для HTTP API.
-
В заключение хотелось бы сказать следующее: HTTP API — это способ организовать ваше API так, чтобы полагаться на понимание семантики операций как разнообразным программным обеспечением, от клиентских фреймворков до серверных гейтвеев, так и разработчиком, который читает спецификацию. В этом смысле экосистема HTTP предоставляет пожалуй что наиболее широкий (и в плане глубины, и в плане распространённости) по сравнению с другими технологиями словарь для описания самых разнообразных ситуаций, возникающих во время работы клиент-серверных приложений. Разумеется, эта технология не лишена своих недостатков, но для разработчика публичного API она является выбором по умолчанию — на сегодняшний день скорее надо обосновывать отказ от HTTP API чем выбор в его пользу.
What is a 401 error?
The proper 401 Error meaning is an HTTP status code that indicates the request lacks valid authentication credentials for the requested resource. It means that the server knows about the client but the client doesn’t have sufficient permissions to access the resource and is not authorized to do so without proper authentication.
If you are a web developer, admin, or regular user, knowing the importance of the 401 Error is crucial because it helps you diagnose and troubleshoot issues related to authentication and access control.
For example, if you are an administrator, it will help you implement effective security measures. Meanwhile, for regular users, it will be beneficial for them to understand the reason behind denied access to certain resources.

401 Error variations
Here are some of the 401 error variations which indicate the same:
- HTTP Error 401
- Access denied
- 401 Unauthorized Error
- 401 Authorization Required
- 401 Unauthorized
Understanding HTTP Status codes
If you are a non-techie and don’t know exactly what are HTTP status codes, they can be understood as a set of standardized three-digit numbers used by web servers to communicate the outcome of a client’s request.
This means they provide you with the status or information about the success redirection, type of errors, and other states of the request-response cycle.
These status codes play a crucial role in web communication as they provide important feedback, indicating whether a request was successful or encountered any problems. With the assistance of these codes, one can readily take appropriate actions based on the response received from the server.
Now, when discussing the 4xx series status codes, such as 401 errors, they are typically classified as client error codes. This series indicates that the client’s request has failed or is invalid due to certain reasons. These error codes generally represent the issues or errors caused by the client’s request or a lack of proper authentication.
Some examples of 4xx Series error codes
As we have already discussed, the 4xx series is called client-side errors which includes some of the popular error codes that you might have familiar with.
- 400 (Bad Request Error)
- 403 (Forbidden)
- 404 (Not Found)
Now, let us focus on 401 Error. This error is specifically used when the client is unable to provide valid authentication credentials to access a resource. Its main purpose is to show the client that the requested resources require valid credentials to proceed further.
What causes 401 Error?
Some of the most common scenarios when you might face a 401 Error message:
- Missing or invalid credentials: If you are unable to provide authentic credentials due to any reasons or provide incurred or expired credentials, a 401 error will be triggered.
- Unauthorized access attempt: When you try to access a resource that requires authentication, but the provided credentials do not grant sufficient permission, a 401 Error will be returned.
- Revoked or Expired tokens: If you use an expired or outdated authentication token, the server may respond with a 401 error.
- Corrupt or outdated Browser cache and cookies: If you ever see a 401 error, it’s usually because your browser’s cache and cookies are outdated or corrupted. This can cause trouble with authorization. If your browser doesn’t have the correct authentication credentials (or any at all), the server won’t accept your request. Just remember to keep your browser’s cache and cookies up to date to avoid running into these kinds of errors.
- Incorrect or Outdated URL: Sometimes, in a rush, you might mistakenly enter the wrong URL or encounter a situation where the URL has been changed. This can trigger a 401 error as a result.
- Plugin conflicts: Sometimes, a 401 error can happen because of a plugin issue. For example, if you are using a firewall or security plugin that might mistakenly think your login attempt is suspicious and block access with a 401 error to keep the page safe.
How a 401 Error affect the user experience?
The 401 Error code can have various impacts on the user experience. It typically results in the user being denied access to the requested resource or receiving an error page instead. The error message associated with the 401 Error should provide guidance on how to resolve the issue or provide appropriate instructions.
Now that you have obtained a solid understanding of the 401 unauthorized error and its background, let’s delve into the methods to resolve and fix this issue.
- Ensure the URL is correct
- Check Authentic credentials
- Clear your browser cache and cookies
- Flush Your DNS cache
- Disable WordPress Plugins
- Check out your website’s .htaccess file
- Check the WWW-Authenticate header
1. Ensure the URL is correct
One of the most common mistakes that many users make is typing an incorrect URL in the browser’s address bar. Therefore, it’s important to take a moment and carefully enter the correct URL, ensuring that there are no misspelled or outdated entries.
If you happen to enter a wrong, outdated, or misspelled URL, you might encounter an “Error code 401” message. But there’s no need to worry! This error simply indicates that the URL you were trying to access doesn’t exist, resulting in a “401 unauthorized access” response from the server.
Let us understand it with an example, Suppose you have bookmarked a page or saved its address in your browsers, but things can change over time. The page’s address might have been updated or even deleted.
To investigate it further, you can try going to the website’s homepage and looking for a link to the page that is causing the “Unauthorized 401” error. If the page opens correctly through that link, make sure to compare the URL of the page with the one that initially gave you the error.
2. Ensure correct Authentication credentials
Sometimes, you might come across the frustrating 401 Error code when you’re trying to access a locked resource, such as a password-protected page. It basically means that your authentication credentials are not valid, and as a result, you’re denied access to the page you’re trying to open.
Here’s what you can do to tackle this issue. Take your time to double-check if you are logged in with the correct login credentials such as the user ID and password or not.
If you’re confident that you’ve entered the details correctly, you might want to consider changing your password. This could help ensure that you have the right credentials to access the resource without any hiccups.
However, in case you are unable to access your password-protected website, Check out our complete guide on “How To Easily Reset WordPress & Start Over?“.
3. Clear your browser cache and cookies
Without a doubt, browser cache and cookies are intended to enhance your online experience by speeding up website loading. However, there are occasions when they can also be the culprit behind triggering errors.
Specifically, corrupted or outdated cache files and cookies can result in unexpected interruptions or browsing issues. To resolve this, the best course of action is to completely clear your browser’s cache and cookies.
If you are using Chrome browser, follow the steps given below:
Read: 🚩 Browser Market Share & Usage Statistics
Step 1: Depending on your browser, Go to the settings menu.
In Google Chrome, for example, you can find the settings menu by clicking on the three vertical dots located in the upper right corner of the window.
Step 2: To proceed, select “More tools” and then click on “Clear browsing data”.

Step 3: A pop-up window will be displayed, and you can choose all three options located under the “Basic” section as depicted in the picture below. These options consist of “Browsing history,” “Cookies and other site data,” and “Cached images and files.
Step 4: Click on “Clear data” to initiate the process.

By doing so, any corrupt or invalid information stored locally in your browser will be completely erased. This ensures that if it was causing the authentication issue, it won’t occur again.
4. Flush your DNS Cache
Similar to your browser cache and cookies, the DNS cache is also stored locally on your computer. Although it is uncommon for a DNS cache to trigger a 401 error, it is worth giving it a try as a troubleshooting step.
For Windows 10 and Windows 11 users:
Step 1: Open the Run command by pressing the Windows key and R. Alternatively, you can search for it in the Start menu.
Step 2: Type “cmd” and hit Enter to open the Command Prompt.

Step 3: Once the Command Prompt window is open, type “ipconfig/release” to release your current IP address.

Step 4: Next, type “ipconfig/flushdns” to release the DNS cache.
Step 5: Type “ipconfig /renew” to obtain a new IP address.

Step 6: Type “netsh int ip set dns” and hit Enter to reset your IP settings.
Step 7: Finally, type “netsh winsock reset” to restore the Winsock Catalog.

Step 8: After completing these steps, restart your computer to ensure the changes take effect.
For MacOS users:
Step 1: First of all, open the system preference options on your Mac. If you have Gas Mask installed, it can make searching for system-related tasks easier.
Step 2: Next, navigate to the Ethernet tab and click on the advanced options.
Step 3: Under the TCP/IP tab, you will find the option to release a DHCP lease. Clicking on this option will allow you to clear out the local DNS on your Mac.

Step 4: Go to Utilities > Terminal and enter the command to clear the local DNS cache.
Step 5: The command for flushing the local DNS cache is “dscacheutil -flushcache”.
Step 6: Once you have entered the command, there will be no separate success or failure message that pops up. However, in most cases, the cache will be cleared without any major issues.
5. Disable WordPress Plugins
It is important to note that the cause of the 401 error may not always lie with your browser, but rather with your WordPress plugins. If you are experiencing difficulties accessing your WordPress site, it is possible that certain plugin(s) are responsible for this issue.
Especially, security plugins have a reputation for causing these types of problems. These plugins are designed to block access and return a 401 error message if they detect any suspicious activity.
Another possibility is that there may be compatibility issues with certain plugins. Some plugins can conflict with your website and trigger such issues. In such cases, the best course of action is to disable all the installed WordPress plugins and check if this resolves the issue.
Step 1: Log in to your WordPress admin dashboard
Step 2: Navigate to the “Plugins” menu option on the left-hand side of the dashboard.
Step 3: A list of installed plugins will be displayed. Take note of the currently active plugins or make a list if needed.
Step 4: Select all the plugins by ticking the checkboxes next to their names or use the “Bulk Actions” dropdown menu to select all.
Step 5: From the “Bulk Actions” dropdown menu, choose “Deactivate” and click the “Apply” button. This will deactivate all the selected plugins simultaneously.

Step 6: Once the deactivation process is complete, try accessing your website and check if the 401 error is resolved.
If the error is no longer occurring, it indicates that one or more of the plugins were causing the issue. You can then proceed with identifying the conflicting or incompatible plugins by reactivating them one by one and testing the website after each activation until the error reappears. This way, you can pinpoint the specific plugin causing the conflict.
If you find the defective plugin, consider either updating it to a newer version or reaching out to the plugin developer for support. Alternatively, you may need to find an alternative plugin that serves a similar purpose but does not cause conflicts.
6. Check out your website’s .htaccess file
You might be surprised to learn, especially if you are not aware of it, that the hosting panel is not the only place where you can set a password for your website. Another method is by configuring the code in the .htaccess file.
If you have previously set a password through the .htaccess file but have either forgotten about it or it was added through a plugin, it’s essential to check or examine your website’s .htaccess file to determine if it is causing the issue.
Let us see how you can proceed.
If your web hosting provider offers you cPanel accessibility, it will become easy for you to locate WordPress .htaccess files without using an FTP client.
1. To do this, first, you need to login into your cPanel as shown below:

2. Lookout for the Files section and click on the File Manager option as shown.

3. Now you will be able to see a list of all the core files displayed on your screen. Select and click on the public_html folder to open.

4. Now if you have an existing .htacess file available, it will reflect in the public_html or htdocs folder, if not then either it is hidden or doesn’t exist yet.

However, if your WordPress .htaccess file is hidden, you can unhide it by simply going to the Settings section located at the top right corner of the “files manager window” as shown in the image below:

A preferences window will pop out as shown in the picture below:

Now simply, check the ” Show Hidden Files (dotfiles)” box and click on Save. All the hidden files will start reflecting on your file manager window.
Read: 🚩 WordPress .htaccess File: How to Create And Edit it?
Now when you right-click on the .htaccess file and select the edit option, Its content should look similar to this:
AuthType Basic
AuthName "Permission required"
AuthUserFile ../../.htpasswd
require valid-user
The login credentials for the protection are stored in a file called “.htpasswd.” This file contains the encrypted password and the associated username.
If you no longer require the protection, you can remove the corresponding code from the .htaccess file and save the changes to confirm.
If the above troubleshooting methods don’t work, this means the issue is from the server side.
The “WWW-Authenticate” header is an HTTP response header that is used to indicate the type of authentication required for accessing a resource on a web server. When a server sends a “401 Unauthorized” status code, it includes the “WWW-Authenticate” header to specify the authentication scheme that the client needs to use in order to access the requested resource.
This header provides information to the client about the authentication method that should be used, such as Basic Authentication or Digest Authentication. It typically includes a challenge, which is a value that the client needs to include in subsequent requests to authenticate itself.
To check the “WWW-Authenticate” header, you can follow these steps:
Step 1: Open your web browser and navigate to the desired web page that generates a 401 error code.
Step 2: Right-click anywhere on the page and select “Inspect” or “Inspect Element” from the context menu. This will open the browser’s developer tools.
Step 3: In the developer tools, navigate to the “Network” tab.

Step 4: Refresh the page by pressing the “F5” key or clicking the refresh button in the browser.
Step 5: Look for the request corresponding to the resource you want to check in the list of network requests. It should have a “401 Unauthorized” status code.
Step 6: Click on the request to view its details.
Step 7: In the headers section, locate the “WWW-Authenticate” header. This header will provide information about the authentication scheme required for accessing the resource.

Step 8: The value of the “WWW-Authenticate” header will indicate the authentication method to be used, such as “Basic”, “Digest”, or others.
You can also refer to HTTP Authentication Scheme Registry for more information about page authentication methods.
Comparison: 401 vs 403 Error
The 401 Error differentiates itself by focusing specifically on the lack of valid authentication credentials. It indicates that the client needs to provide proper authentication to gain access to the resource, while the 400 and 403 errors highlight other issues, such as invalid requests or insufficient permissions.
Here is a comparison table between a 401 error and a 403 error:
| Error Code | Error Name | Meaning or authentication information |
|---|---|---|
| 401 | Unauthorized | Indicates the need for authentication. |
| The client lacks valid credentials |
| Error Code | Error Name | Meaning of authentication information. |
|---|---|---|
| 403 | Forbidden | Indicates that the client is authenticated, but lacks the necessary permissions to access the requested resource |
In summary, a 401 error signifies the need for authentication, while a 403 error indicates that the client is authenticated but lacks the necessary permissions to access the requested resource.
Real-world Examples of 401 Errors
Examples from popular websites or web applications
- Social media platform: If a user attempts to access a private profile or restricted content without logging in or providing valid credentials, a 401 Error may be returned.
- Cause: The user attempts to view a private post without logging in or providing valid credentials.
- Resolution: The platform returns a 401 Error and prompts the user to log in or create an account to gain access to the restricted content.
- Online banking: When a client tries to access account information or perform financial transactions without proper authentication, a 401 Error can occur.
- Cause: The user tries to access account details or perform financial transactions without providing the correct authentication credentials.
- Resolution: The banking system returns a 401 Error and directs the user to enter valid login credentials to access their account securely.
By analyzing real-world examples of 401 Errors, it becomes evident that these errors occur when accessing sensitive or restricted resources, emphasizing the importance of proper authentication and authorization.
Conclusion
A “401 Error” is triggered when the client lacks or is unable to provide valid authentication credentials to access a password-protected resource. Additionally, you may have noticed that this error is primarily caused by the client side, making it easily fixable. However, it can also be triggered from the server side, although this is rare.
So, in this post, we have compiled some of the best 7 troubleshooting methods that you can try to fix 401 errors.
- Ensure the URL is correct
- Check Authentic credentials
- Clear your browser cache and cookies
- Flush Your DNS cache
- Disable WordPress Plugins
- Check out your website’s .htaccess file
- Check the WWW-Authenticate header
We hope the methods mentioned above will help you fix the 401 error and resolve your issues. If you have any queries or would like to suggest any additional methods, please let us know in the comment section below.
Save your time, money, and resources, and give your website mammoth growth with WPOven’s best wordpress vps hosting.
- 24X7 WordPress Expert support
- Cloudflare integration
- High-end Security
- Datacentres around the world, etc.
You can have all these features and much more in a single plan with unlimited Free migrations, unlimited staging, and a 14-day risk-free guarantee, Signup Now!
Frequently Asked Questions
How do I fix a 401 error?
You can fix a 401 error by following these methods:
1. Ensure the URL is correct
2. Check Authentic credentials
3. Clear your browser cache and cookies
4. Flush Your DNS cache
5. Disable WordPress Plugins
6. Check out your website’s .htaccess file
7. Check the WWW-Authenticate header
What is the reason for 401 unauthorized error?
The reason for the 401 unauthorized error are:
1. Missing or invalid credentials
2. Unauthorized access attempt
3. Revoked or Expired tokens
4. Corrupt or outdated Browser cache and cookies
5. Incorrect or Outdated URL
6. Plugin conflicts
What is an example of a 401 error?
An example of a 401 error is If a user attempts to access a private profile or restricted content on a social media platform without logging in or providing valid credentials, a 401 Error may be returned.
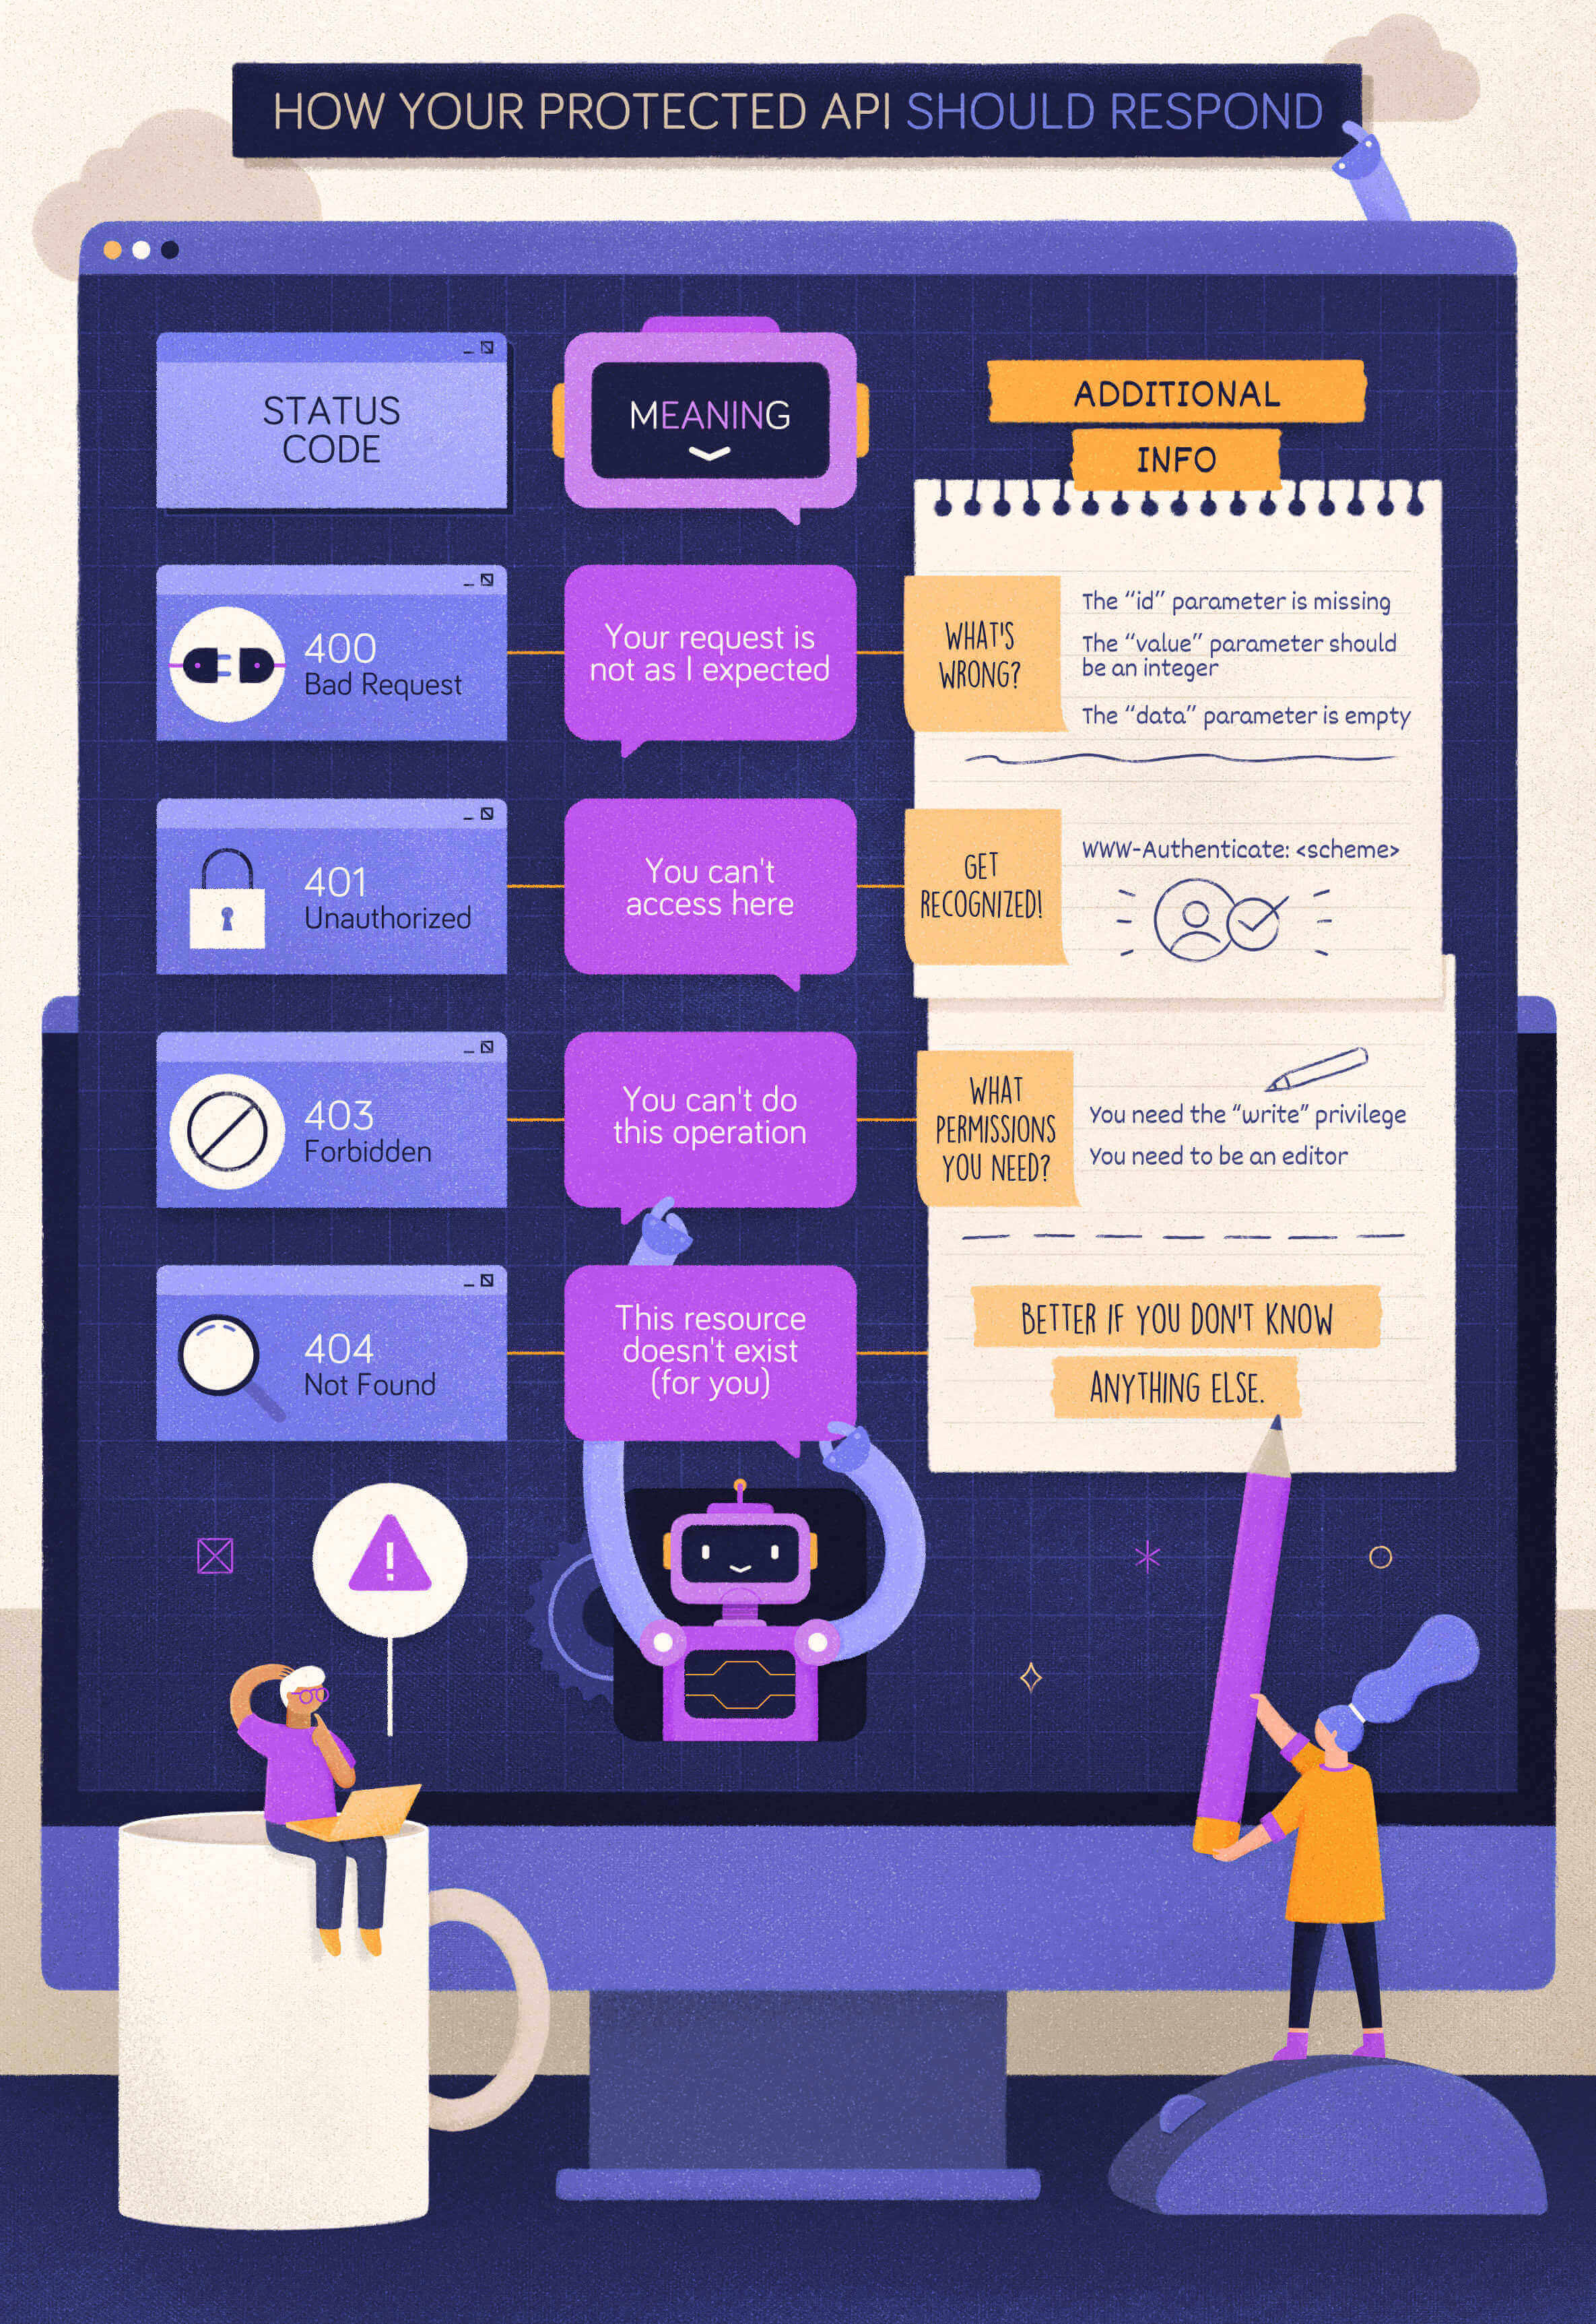
Assume your Web API is protected and a client attempts to access it without the appropriate credentials. How do you deal with this scenario? Most likely, you know you have to return an HTTP status code. But what is the more appropriate one? Should it be 401 Unauthorized or 403 Forbidden? Or maybe something else?
As usual, it depends 🙂. It depends on the specific scenario and also on the security level you want to provide. Let’s go a little deeper.
If you prefer, you can watch a video on the same topic:
Web APIs and HTTP Status Codes
Before going into the specific topic, let’s take a quick look at the rationale of HTTP status codes in general. Most Web APIs are inspired by the REST paradigm. Although the vast majority of them don’t actually implement REST, they usually follow a few RESTful conventions when it comes to HTTP status codes.
The basic principle behind these conventions is that a status code returned in a response must make the client aware of what is going on and what the server expects the client to do next. You can fulfill this principle by giving answers to the following questions:
- Is there a problem or not?
- If there is a problem, on which side is it? On the client or on the server side?
- If there is a problem, what should the client do?
This is a general principle that applies to all the HTTP status codes. For example, if the client receives a 200 OK status code, it knows there was no problem with its request and expects the requested resource representation in the response’s body. If the client receives a 201 Created status code, it knows there was no problem with its request, but the resource representation is not in the response’s body. Similarly, when the client receives a 500 Internal Server Error status code, it knows that this is a problem on the server side, and the client can’t do anything to mitigate it.
In summary, your Web API’s response should provide the client with enough information to realize how it can move forward opportunely.
Let’s consider the case when a client attempts to call a protected API. If the client provides the appropriate credentials (e.g., a valid access token), its request is accepted and processed. What happens when the client has no appropriate credentials? What status code should your API return when a request is not legitimate? What information should it return, and how to guarantee the best security experience?
Fortunately, in the OAuth security context, you have some guidelines. Of course, you can use them even if you don’t use OAuth to secure your API.
«The basic principle behind REST status code conventions is that a status code must make the client aware of what is going on and what the server expects the client to do next»
Tweet This

When to Use 400 Bad Request?
Let’s start with a simple case: a client calls your protected API, omitting a required parameter. In this case, your API should respond with a 400 Bad Request status code. In fact, if that parameter is required, your API can’t even process the client request. The client’s request is malformed.
Your API should return the same status code even when the client provides an unsupported parameter or repeats the same parameter multiple times in its request. In both cases, the client’s request is not as expected and should be refused.
Following the general principle discussed above, the client should be empowered to understand what to do to fix the problem. So, you should add in your response’s body what was wrong with the client’s request. You can provide those details in the format you prefer, such as simple text, XML, JSON, etc. However, using a standard format like the one proposed by the Problem Details for HTTP APIs specifications would be more appropriate to enable uniform problem management across clients.
For example, if your client calls your API with an empty value for the required data parameter, the API could reply with the following response:
HTTP/1.1 400 Bad Request
Content-Type: application/problem+json
Content-Language: en

{
  "type": "https://myapi.com/validation-error",
  "title": "Validation error",
  "detail": "Your request parameters are not valid.",
  "invalid-params": [
    {
      "name": "data",
      "reason": "cannot be blank."
    }
  ]
}
When to Use 401 Unauthorized?
Now, let’s assume that the client calls your protected API with a well-formed request but no valid credentials. For example, in the OAuth context, this may fall in one of the following cases:
- An access token is missing.
- An access token is expired, revoked, malformed, or invalid for other reasons.
In both cases, the appropriate status code to reply with is 401 Unauthorized. In the spirit of mutual collaboration between the client and the API, the response must include a hint on how to obtain such authorization. That comes in the form of the WWW-Authenticate header with the specific authentication scheme to use. For example, in the case of OAuth2, the response should look like the following:
HTTP/1.1 401 Unauthorized
WWW-Authenticate: Bearer realm="example"
You have to use the Bearer scheme and provide the realm parameter to indicate the set of resources the API is protecting.
If the client request does not include any access token, demonstrating that it wasn’t aware that the API is protected, the API’s response should not include any other information.
On the other hand, if the client’s request includes an expired access token, the API response could include the reason for the denied access, as shown in the following example:
HTTP/1.1 401 Unauthorized
WWW-Authenticate: Bearer realm="example",
                  error="invalid_token",
                  error_description="The access token expired"
When to Use 403 Forbidden?
Let’s explore a different case now. Assume, for example, that your client sends a request to modify a document and provides a valid access token to the API. However, that token doesn’t include or imply any permission or scope that allows the client to perform the desired action.
In this case, your API should respond with a 403 Forbidden status code. With this status code, your API tells the client that the credentials it provided (e.g., the access token) are valid, but it needs appropriate privileges to perform the requested action.
To help the client understand what to do next, your API may include what privileges are needed in its response. For example, according to the OAuth2 guidelines, your API may include information about the missing scope to access the protected resource.
Try out the most powerful authentication platform for free.Get started →
Security Considerations
When you plan how to respond to your client’s requests, always keep security in mind.
How to deal with response details
A primary security concern is to avoid providing useful information to potential attackers. In other words, returning detailed information in the API responses to attempts to access protected resources may be a security risk.
For example, suppose your API returns a 401 Unauthorized status code with an error description like The access token is expired. In this case, it gives information about the token itself to a potential attacker. The same happens when your API responds with a 403 Forbidden status code and reports the missing scope or privilege.
In other words, sharing this information can improve the collaboration between the client and the server, according to the basic principle of the REST paradigm. However, the same information may be used by malicious attackers to elaborate their attack strategy.
Since this additional information is optional for both the HTTP specifications and the OAuth2 bearer token guidelines, maybe you should think carefully about sharing it. The basic principle on sharing that additional information should be based on the answer to this question: how would the client behave any differently if provided with more information?
For example, in the case of a response with a 401 Unauthorized status code, does the client’s behavior change when it knows that its token is expired or revoked? In any case, it must request a new token. So, adding that information doesn’t change the client’s behavior.
Different is the case with 403 Forbidden. By informing your client that it needs a specific permission, your API makes it learn what to do next, i.e., requesting that additional permission. If your API doesn’t provide this additional information, it will behave differently because it doesn’t know what to do to access that resource.
Don’t let the client know…
Now, assume your client attempts to access a resource that it MUST NOT access at all, for example, because it belongs to another user. What status code should your API return? Should it return a 403 or a 401 status code?
You may be tempted to return a 403 status code anyway. But, actually, you can’t suggest any missing permission because that client has no way to access that resource. So, the 403 status code gives no actual helpful information. You may think that returning a 401 status code makes sense in this case. After all, the resource belongs to another user, so the request should come from a different user.
However, since that resource shouldn’t be reached by the current client, the best option is to hide it. Letting the client (and especially the user behind it) know that resource exists could possibly lead to Insecure Direct Object References (IDOR), an access control vulnerability based on the knowledge of resources you shouldn’t access. Therefore, in these cases, your API should respond with a 404 Not Found status code. This is an option provided by the HTTP specification:
An origin server that wishes to «hide» the current existence of a forbidden target resource MAY instead respond with a status code of 404 (Not Found).
For example, this is the strategy adopted by GitHub when you don’t have any permission to access a repository. This approach avoids that an attacker attempts to access the resource again with a slightly different strategy.
How to deal with bad requests
When a client sends a malformed request, you know you should reply with a 400 Bad Request status code. You may be tempted to analyze the request’s correctness before evaluating the client credentials. You shouldn’t do this for a few reasons:
- By evaluating the client credentials before the request’s validity, you avoid your API processing requests that aren’t allowed to be there.
- A potential attacker could figure out how a request should look without being authenticated, even before obtaining or stealing a legitimate access token.
Also, consider that in infrastructures with an API gateway, the client credentials will be evaluated beforehand by the gateway itself, which doesn’t know at all what parameters the API is expecting.
The security measures discussed here must be applied in the production environment. Of course, in the development environment, your API can provide all the information you need to be able to diagnose the causes of an authorization failure.
Recap
Throughout this article, you learned that:
400 Bad Requestis the status code to return when the form of the client request is not as the API expects.401 Unauthorizedis the status code to return when the client provides no credentials or invalid credentials.403 Forbiddenis the status code to return when a client has valid credentials but not enough privileges to perform an action on a resource.
You also learned that some security concerns might arise when your API exposes details that malicious attackers may exploit. In these cases, you may adopt a more restricted strategy by including just the needed details in the response body or even using the 404 Not Found status code instead of 403 Forbidden or 401 Unauthorized.
The following cheat sheet summarizes what you learned: