С помощью xView можно быстро и удобно проверить объект на корректность геометрии. Внутри данного инструмента можно найти список наиболее частых недочетов. Именно такие недочеты при проверке объекта будут подсвечиваться для быстрого исправления.
Причем, для отображения ошибок не нужно находиться в режиме редактирования. Все будет подсвечиваться на уровне целого объекта. Правда, данный инструмент работает только с Editable/Edit Poly и Editable/Edit Mesh. Выбрать нужный режим инструмента можно в Views – xView или нажав на «+».

1. Show Statistics
Включение отображения статистики сцены или отдельных (изолированных) объектов. Также включается горячей клавишей «7».

Узнать, как посмотреть число других подобъектов, и познакомиться с модификаторами, для которых важно отслеживать число полигонов, можно в статье «5 модификаторов, меняющие количество полигонов 3ds Max».
2. Face Orientation
В этом режиме подсвечиваются задние стороны фейсов (Face). Но подсветка будет видна только в том случае, если задняя сторона направлена в камеру. Поэтому для поиска такой ошибки придется повращать объект.

3. Overlapping Faces
Подсвечивание взаимопроникающих фейсов. Они считаются таковыми, если хотя бы одна вершина одной грани лежит в плоскости другой. Нажав Click Here To Configurate, можно установить считаемое расстояние Tolerance от вершины до плоскости перекрывающей грани.

[banner-art]
4. Open Edges
Подсвечивание ребер, которые не имеют полигона с одной из сторон. Так же можно сказать, что подсвечиваются края (Border). Причем подсветку видно даже если край не направлен в камеру.

5. Multiple Edges
В зависимости от типа объекта подсвечивает разные подобъекты. В Editable/Edit Mesh подсвечиваются ребра, к которым прилегает больше двух полигонов. В Editable/Edit Poly подсвечиваются ребра, которые прилегают к перевернутому полигону.

6. Isolated Vertices
Подсветка точек (Vertex), которые не имеют соединения с ребрами или гранями.

7. Overlapping Vertices
Показывает точки, перекрывающие друг друга. Точки могут считаться таковыми, если находятся в одинаковых или очень близких координатах. Расстояние, которое будет помечать расположение как ошибку можно регулировать параметром Tolerance.

8. T-Vertices
Подсвечивание точек, которые имеют только 3 входящих ребра или прилегающие грани, а не 4.

При этом, T-Vertex считаются и угловые точки примитива Box. Это не является ошибкой, но программа их все равно отмечает.
9. Missing UVW Coordinates
Выделение граней, у которых нет UVW координат. 3ds Max имеет встроенную защиту от таких ошибок, но она может возникнуть при импорте геометрии.
10. Flipped UVW Faces
Помечает координатные фейсы с перевернутой нормалью. Работает подобно Face Orientation, но только для объектов с текстурными координатами.

11. Overlapped UVW Faces
Подсвечивание фейсов, которые совпадают с другими фейсами на UVW координатах.
Геометрия объекта здесь не воспринимается.

12. Select Results
Автоматически выделяет подсвеченные подобъекты. Чтобы выделение стало активным, понадобится перейти в режим редактирования этих подобъектов.

13. See-Through
Показывает подсветку подобъектов сквозь геометрию. Однако в случае Face Orientation это может не работать.
14. Auto Update
Автоматически обновляет отображение подсветки в случае изменения подобъектов. Если отключить этот режим, то подсветка будет отображаться и обновляться только по нажатию кнопки Click Here To Update.

15. Display on Top
Перемещает текстовую панель в верхнюю часть рабочей области. Если эта функция отключена, то текст будет находиться внизу.

16. Configure
Открывает диалоговое окно настройки для режимов, где такое окно есть. Эту функцию обычно заменяет кнопка Click Here To Configurate на текстовой панели.
Вот такой несложный, но крайне полезный инструмент можно использовать в своей работе. Наиболее часто он применяется к импортируемым объектам, которые по каким-то причинам было испорчены. Так же xView крайне полезен при работе с функциями, сильно ломающими сетку, типа Boolean. Поэтому, если вы не уверены в моделях, которые находятся в сцене, не стесняйтесь их проверять.

- Блоги
- Уроки
![]()
Отображение ошибок в геометрии при помощи xView
Наткнулся на полезный обзор функции решил поделиться.
Очень полезная функция о существовании которой надо знать.
xview 3dmax fix geometry
Комментарии (7)
![]()
Спасибо, не знал. теперь буду пользоваться.
![]()
СделатЬ — поделитЬся.
![]()
Да как-то проще это автоматом делать в netfabb или Magics.
![]()
прочитал как XnView и крепко задумался
![]()
А не проще вслепую выделить все вертексы и свелдить?
![]()
не всегда это работает. К примеру если есть совпадающие плоскости — не сработает.
![]()
Старые функции и и из-за малой эффективности ими редко кто пользуется! Проще перейти на подобъекты Border и нажать Ctrl+A, чтоб увидеть где есть разрывы!

A free diagnostic plugin for 3ds Max®
WATCH DEMO
1
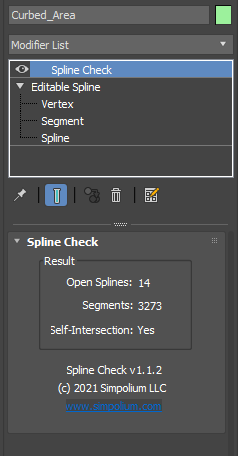
After the installation, Spline Check will be available in 3ds Max modifier stack
2
Identifies the number of open splines and displays them in the viewport
3
Displays the number of total segments of the spline
How it works
- Location – After the installation, Spline Check will be available in 3ds Max modifier stack.
- Open Splines – Identifies the number of open splines and displays them in the viewport.
- Segments – Displays the number of total segments of the spline.
- Self-Intersection – Detects a spline Self-Intersection.
* 2nd place winner in CheckMate Tools Contest
– Tested with 3ds Max 9.0 sp2 – 3Ds Max 2012
Installation:
Option 1: (Easiest with max runing)
– Go to MAXScript -> Run Script
And choose the provided file: pX Tools-SceneInspector.mcr
Max automatically will create a copy of this macro in your user macros directory permanently.
Option 2: (need max restart)
– Look for your user macros directory (Configure System Paths-> Additional Macros)
– Copy there the provided file: pX Tools-SceneInspector.mcr
– Restart max application.
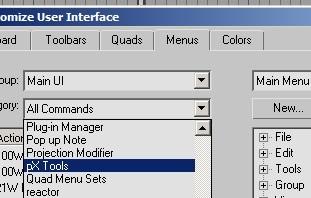
Once installed, you can find the menu shortcut called SceneInspector within category pX Tools. Drag and drop it to your desired menu group or toolbar.
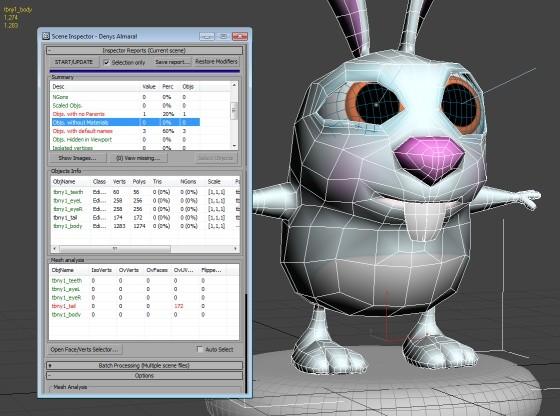
Current scene inspection
Open your max file and click your shortcut to SceneInspector macro, then click START/UPDATE button.
Selection only (check box): Check Selection only if you want to run the inspection only for selected objects.
Save Report (button): When completed, the process allows us to save reports as HTML, XML, CSV.
Restore Modifiers (button) restores all modifications needed for inspection so the scene objects go back to their original state.

Wait until the process is completed, and examine the results in the following tables:
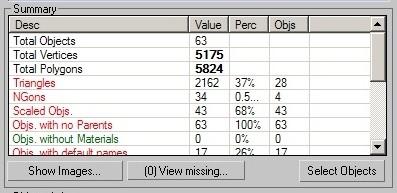
Summary report:
Lists total and summarized values (Value), percent from the total (Perc) and amount of objects affected (Objs). The Description part (Desc) will appear in red for problematic values, black for neutral or green for ok.
Clicking the Select Objects button will select all the affected objects by the currently selected item in the list. The same action occurs using the Double-Click.
ViewMissing button shows all missing files for the current scene.
Show Images button displays rendered scene image and Viewport captures.
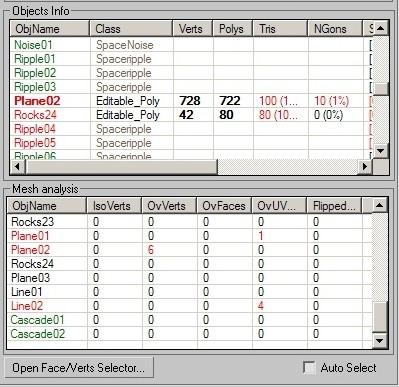
Objects Info and Mesh analysis reports:
Objects Info lists all inspected object properties and polygon counts, tris, NGons. This info is obtained quickly without too many computing calculations. Mesh analysis lists only geometric objects and their mesh analysis results. These are the most computing expensive calculations for detecting problems like overlapping faces/vertices and flipped faces.
Problematic values are shown in the red color.
Objects names (ObjName) color legend is defined as follows:
Red object name: At least one problem listed in this table.
Bold-red object name: At least one problem including the default object name problem.
Black object name: No problem in this table, but it does have a problem in the other.
Green object name: No problems found in any of the two tables.
Double-click to select the associated object with the current item. You can also check Auto Select for select associated objects with a single click.
Open Face/Verts Selector: (Sub-Object Selection mini-tool)
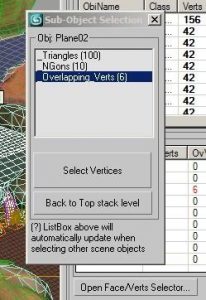
After it has finished processing the scene, this Sub-Object Selection mini-tool is automatically opened, or you can manually open it clicking Open Face/Verts Selector button. This is a very useful feature to go object by object in selecting problematic faces or vertices as results from the recently processed scene.
It automatically updates when an object is selected, showing a list of the possible selections you can highlight. Try clicking the Select Vertices/Faces button.
Since it is uncomfortable to select another object when a sub-object face/verts is selected, a second button will help you go back quickly to the top of the object Stack so you can select another object from the scene.
Remember, you can also invoke single object selection directly from Object Info and Mesh analysis tables by double-clicking them.
Batch Processing (Multiple scene files)

The second section of this tool is Batch Processing. Use the Scan folders button to search for .MAX scenes inside subdirectories recursively starting by a specified folder.
As button names indicate that they can be added as single files, remove selected, remove all and click Open file to load the scene into max.
Click the START button to process all listed files.
NOTE: The process can’t be paused, if you want to abort, hold the ESC key for a few seconds. Maxscript didn’t support multithreading or any solution to refresh user input from visual controls while running intensive calculations code.
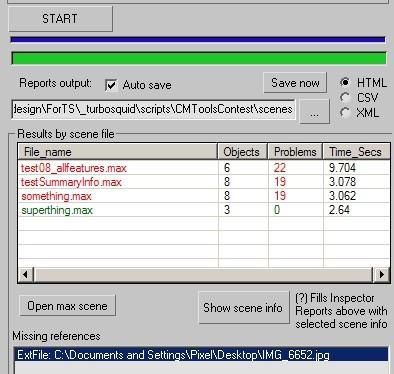
Batch processing results/autosave reports:
After it has finished processing all files, a message is shown with a beep alert.
Auto save checkbox checked reports will be saved automatically with the chosen format (HTML|CSV|XML). If you would like to save the reports using another format, select it and click the Save now button. Reports will be generated again with the desired file format.
File names are created automatically with the following format:
“siRep_” + FileNumber + MaxFileName + “.html|.csv|.xml”
For example scene test08_allfeatures.max report file name will be: siRep_1_test08_allfeatures.html
The table Results by scene file shows the processed scenes with minimum info: objects count, the number of problems found, and processing time in seconds.
Select an item from this list and click Show scene info button. This fills the Inspector Reports section above with all test results. Scroll up to check Summary, Object Info and Mesh Analysis.
If you want to open any scene from the list, click the Open max scene button.
Missing references shows a list of any missing file/DLLs/XRefs detected when opening each scene file.
Options
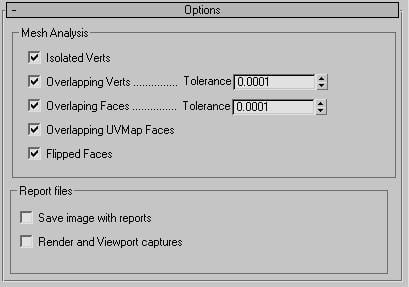
Check/uncheck options in order to disable Mesh Analysis tests and set the Tolerance values.
Specify if you want to generate Render and Viewport captures and if you want to save them with reports.
The tool will remember these options for all the current sessions of the Max application.
3ds Max Tools
This page contains the latest installer for all of our 3ds Max tools and technologies for CheckMate and PixelSquid.
Included Tools
CheckMate Artist Inspection Tools (v3.25)
The CheckMate Artist Inspection Tools allow you to pre-flight your model directly inside of 3ds Max so you can check for technical defects that would prevent your work from being accepted as part of our CheckMate catalog. Instead of having to manually review your work when you’ve completed your model, you can run these tools to check dozens of aspects of your effort, from review for overlapping faces and nGons, to stripped texture paths and object naming. With the click of a button, you’ll be able to identify any corrections needed to hit the technical aspect of the CheckMate process, whether you are looking to provide a model that is CheckMate Lite, CheckMate Pro or PixelSquid quality.
Finally, it’s worth noting that these are the same tools that the TurboSquid inspection team uses when we review a CheckMate submission. By running these tools beforehand, your inspection will take less time and you can continue to build more great model content instead of trying to fix a broken product.

PixelSquid Studio Tools (v3.25)
The PixelSquid Studio Tool is a scripted plug-in that will help you prepare your models for use within a PixelSquid spinner, and includes all of the proper render settings, lights and animated camera for V-Ray 2.x, 3.x, and 4.x users. It also comes with multiple calibrated HDRI image-based Studio lighting and stage rigs with different lighting conditions (interior, exterior, product shots, etc.) that not only help you ensure your models look great when submitted and rendered out for PixelSquid spinners, but also make lighting a one-click process.
