Всем привет.
Многим наверное знакома проблема температурной ошибки, выскакивающей когда надо и не надо.
Замучила она меня вконец и я решил с ней разобраться ‘по-взрослому’ :-))))
Много писать не буду скажу только тезисно:
1. Внес изменения в прошивку взяв из ЭТОГО поста .
РЕЗУЛЬТАТ: не помогло, т.к. проблема у меня была в другом, но полезно в целом. Лучше внести.
2. Обмотал головку хотенда лентой ФУМ.
РЕЗУЛЬТАТ: очень помогло в плане стабильности удержания температуры- стоит показатель как вкопанный теперь. Пару слов о ФУМ: это второпластовая лента. Фторопласт обладает высокой температурной стойкостью -температура течения — 297 градусов, разрушения-более 300. Очень рекомендую. Никаких силиконовых кожухов и прочей дряни. Дешево и сердито.
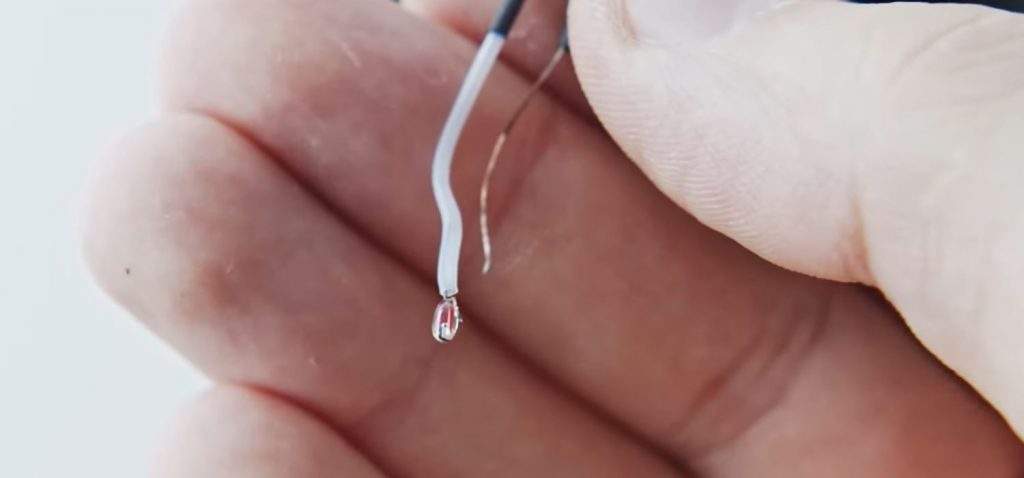
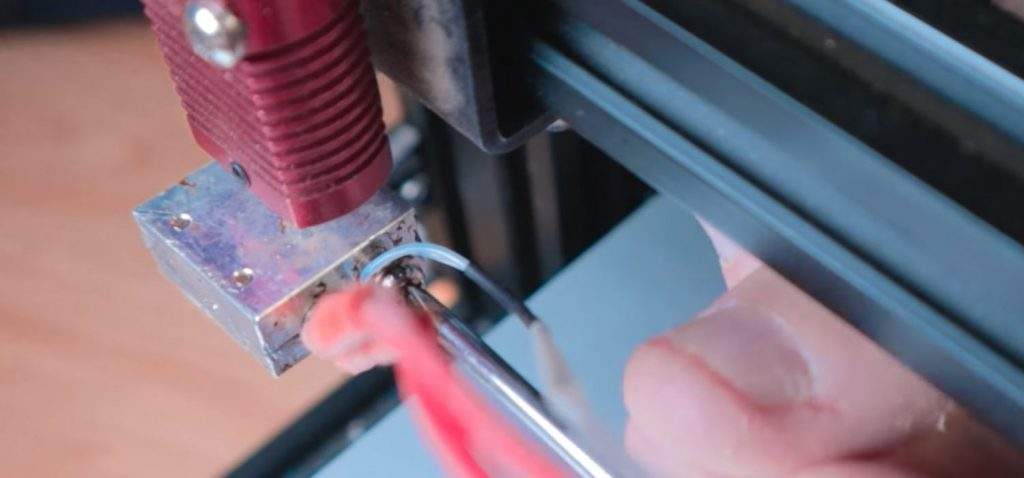
3. САМОЕ ГЛАВНОЕ: выяснена причина трудных пусков принтера иногда и необъяснимых вылетов с этим RUNAWAY в процессе работы: оголенные провода патронного нагревателя –замыкали об корпус его же гильзы!!! Очень рекомендую проверить. И обмотать той же ФУМ-кой например. Поясняющую картинку- приложил.

Конечный результат всех стараний: температура набирается быстро, стоит как вкопанная, вылетов нет.
Всем бобра! 
If you are in the 3D printing field, you might have heard about thermal runaway protection. It definitely stirred up a fuss in the 3D printing community because of its importance and lack of implementation in 3D printers as a safety feature.
This article will guide you on what you need to know about thermal runaway protection.
Thermal runaway protection is a safety feature in your 3D printer which turns the heating systems off if it noticed some kind of fault. If your thermistor is slightly disconnected, it can feed incorrect temperatures to your 3D printer. This has resulted in fires in some cases.
You definitely don’t want to be on the wrong end of thermal runaway protection, so this article will guide you through testing and fixing the thermal runaway feature on your 3D printer.
What is Thermal Runaway Protection and Why Is It Important?
To prevent your 3D printer from thermal runaway problems, the manufacturers have added a safety feature which is known as thermal runaway protection.
This feature is designed to stop the printing process whenever it detects a problem in the printer, especially if the temperature is getting out of control.
This is the best solution to protect your printer, before you start the printing process make sure that this safety feature is activated in the printer’s firmware.
A thermal runaway is one of the most dangerous and frustrating problems that can occur during the printing process. Thermal runaway error is a situation in which the printer can’t maintain the right temperature and may heat up to an extreme level.
Despite all other issues that occur due to this problem, the major threat is that the printer can catch fire which is not so uncommon in this situation.
Basically, thermal runaway protection does not protect the thermal runaway error directly but it aborts the reasons that can cause this problem.
It means that if thermal runaway protection detects that the wrong value of the 3D printer thermistor (temperature reader by detecting the variation in resistance) is being processed for a long time, it will automatically shut down the printing process to avoid damages.
Misalignment or fault in the temperature sensor is one of the basic reasons behind the thermal runway errors.
If the thermistor is not working properly, the printer will keep on increasing the printing temperature to reach the targeted heat and can take the temperature to an extreme level.
This feature will protect your printer from thermal runaway error, the risks of catching fire, and damaging the printer or the people around it.
Check out my related article called How to Flash & Upgrade 3D Printer Firmware – Simple Guide.
How Do You Properly Test for Thermal Runaway?
A really simple method shown in the video below is to use a hair dryer on your hotend for a minute or so, to decrease the operating temperature of your nozzle, thereby prompting the ‘Thermal Runaway Printed Halted’ error.
If you don’t have access to a nearby hairdryer, you can do another method.
To do a proper test for the thermal runaway protection feature, you can disconnect the heater element of the hotend or the heated print bed at the time of printing or while sending commands directly to the printer via USB to set a temperature.
You can also disconnect the heater element when the printer is turned off or even if it is heating up.
The disconnecting of the heater element means the nozzle will not be heated. After the temperature testing period and settings specified in the firmware, the printer should stop working and will halt if the thermal protection feature is enabled.
It is recommended to turn off the printer and then reconnect the wires because you may touch the open cables if you try to reconnect the wires while the printer is ON.
When the printer stops working after displaying a thermal runaway error you must restart or reset the printer before starting the printing process.
If the printer keeps on working and does not halt, shut down the printer quickly as it is a clear sign that the thermal runaway protection is not enabled.
If you want a more recent video, Thomas Sanladerer made a simple video on how to test the thermal runaway protection on your machine. The video was created because Voxelab (Aquila) did not ensure this basic protection on their machines that all 3D printers should have.
How Do You Fix a Thermal Runaway?
There are two possibilities of a thermal runaway error, one is that the thermistor is broken or faulty and the other is the thermal runaway protection not activated.
Below, I will go through how to implement the solution to the issue.
Activating Thermal Runaway Protection
The video below takes you through the process of flashing your 3D printer mainboard to activate thermal runaway protection.
Replace Broken Thermistor
The video below goes through how to replace your thermistor if it is broken.
Before you move forward make sure that your printer is not running and is turned off. Unscrew the fan shroud off to take that out of the way.
Cut down the zip ties that are holding the wires. Now take a small Phillips screwdriver to remove the screw that holds the thermistor at the right place.
Take the broken thermistor out but if it got stuck, it is probably due to the fact that molten plastic is holding the thermistor inside.
If you face such an issue, heat up the hotend to around 185°C as it will melt the plastic, remove that plastic with a tool, then set your hotend to cool down before working with it again.
After the cool down, you should be able to pull out the thermistor gently.
As inserting the new thermistor is a bit difficult, you should put the plug end of the thermistor in the old thermistor wire and fix it with tape. Now pull the exact wire back from the opposite side and you can get the thermistor inserted properly.
Now plug in the new thermistor in the exact spot where the old thermistor was plugged.
Put the zip ties again on the wires and double-check that no wire is open and the thermistor is plugged in properly. Now insert the wires on the other end of the thermistor into the bottom hole and screw them up gently.
The screws should be in the center of the two wires. Now screw up the parts and fan shroud back with the printer.
Methods to Fix Printer Halted Heating Failures
If your nozzle doesn’t manage to reach your desired temperature before giving an error, there are a few reasons for it which I’ll describe. There are also some pretty simple solutions to accompany these causes.
A usual fix of a halted heating 3D printer is to double-check the assembly of your extruder, making sure there are no large gaps between the heat break, heater block, and nozzle. Ensure your wiring is secure and is put in the correct way round.
A dodgy connection somewhere in your system can definitely be a reason for the ‘HEATING FAILED’ error in your 3D printer, especially if you didn’t properly follow a tutorial or video guide on assembling your 3D printer.
Common connection problems are found in either the heater or temperature sensor of your 3D printer. It can be a good idea to check the resistance of your heater cartridge, making sure it falls close to the specified value.
Some people have had other issues such as a fried mainboard, needing a Power Supply Unit (PSU) replacement, or a hotend replacement.
Since a thermistor sometimes runs underneath screws, they can easily get crushed or come loose, meaning the connection isn’t secure enough to adequately measure the actual temperature of your heater block.
You can get yourself a new thermistor and replace it using the instructions above.
Make sure when you replace your thermistor, you don’t touch either wire to the heater block because it can fry your mainboard.
- Dialing in your stepper driver voltage can help if they are significantly off
- Replace your thermistor
- Use the original mainboard
- Replace heating element
- Check that wires aren’t loose on heater block – re-tighten screws if needed
- Do PID tuning
Does the Ender 3 Have Thermal Runaway?
The Ender 3s that are being shipped now have thermal runaway protection feature enabled.
In the past, it wasn’t always the case, so if you have bought an Ender 3 recently, it will definitely have this feature enabled but if you bought it a while back, follow the steps about to test whether it is active.
It is recommended to follow precautionary measures to avoid this problem. The first thing you should do is the printer’s regular maintenance. Make sure that the printer is assembled correctly, wiring is pretty fine, and the printer is not making any errors.
Make sure that the thermistor is placed in the center of the heat block and is working properly.
Keep the thermal runaway protection feature activated in your firmware but if your Ender 3 is old and it doesn’t have a thermal runaway protection feature in its firmware then you should install other firmware that has the feature activated such as Marlin.
What is Thermal Runaway Protection?
Thermal runaway protection is now enabled in all Marlin firmware releases. This feature prevents the printer from operating when there is an issue with a heater or thermistor. Thermal runaway errors occur when a thermistor fails to report a temperature properly, when a heater overshoots its target temperature or heats while it should be idle, or when a thermistor fails to register an increase in temperature when attempting to heat that device. In these cases, the firmware should present an error message and then immediately attempt to cut power to all functions of the printer, which prevents overheating, damage, and possible fire.
Thermal runaway errors may NOT be able to control external devices that have their own power supplies or control units. When you encounter a thermal runaway error, you should ensure that you completely power down the printer and any additional devices or accessories attached to it.
The E1 MaxTemp error indicates that there is an issue with the “E1” device, which would be “Extruder 1” or the main hot-end on most 3D printers. An E2 error would indicate an issue on a second extruder/hot-end, and the bed has its own error as well. Typical causes of these errors include:
- Thermistor wire is pinched, damaged, unplugged, not fully seated, etc.
- Heater cartridge wire is pinched, damaged, unplugged, not fully inserted into the screw terminal, plugged into the wrong terminal, etc.
- Bed heater wire is pinched, damaged, de-soldered, unplugged, not fully inserted into the terminal, plugged into the wrong terminal, etc.
- Mainboard damage, including shorts to screw terminals, faulty wiring, blown components, incorrect wire configuration or polarity, etc.
The E1 MaxTemp error IS NOT a problem with the firmware itself in most cases. This instance is the firmware correctly displaying an error when there is a potentially dangerous situation, hence it is operating as intended. Once an error occurs, the printer must be reset by completely powering down the printer then powering it back on.
What do I do if this error occurs?
- Unplug the printer and associated devices from power. This includes any other ancillary items, such as MOSFETS, SSRs, any third-party or external components that have separate power supplies or cables, etc. The printer and ALL accessories should be powered off and disconnected.
- Allow everything to cool before handling. Components may be hot, even if the error occurred while the printer was idle. Make sure to leave time for everything to cool while disconnected from power.
- Completely and thoroughly inspect ALL printer components, with an emphasis on the heaters and thermistors, their wiring, and their connectors. Check for any pinched or damaged wires, check for any loose or improper connections to the mainboard, check for any damaged components.
- Thoroughly examine the printer’s mainboard for damaged components, destroyed terminals, or any signs of an electrical short. The mainboard can also be the cause of the issue if there are electrical shorts, failed components, or improper installation.
- Depending on what component is causing the issue, you may consider replacing that component with a new one. Assuming nothing else on the printer is damaged, you can replace hot-end components as needed. If you can determine the cause of the problem, you can also ensure that the issue is corrected so that it does not occur repeatedly.
- If you are using a brand-new printer that is still under warranty, contact the manufacturer about exercising that warranty. Thermal Runaway errors SHOULD NOT occur on brand-new hardware from the factory. If you encounter this error while the printer is under warranty and still using stock components, immediately discontinue use and contact the manufacturer.
Across all of the problems your 3D printer could ever have, thermal runaway is definitely the scariest one. It can cause your 3D printer to light on fire, destroying itself and possibly anything nearby.
Thermal runaway occurs when your printer loses control over the hot end, and it doesn’t stop heating up until it melts itself alive.
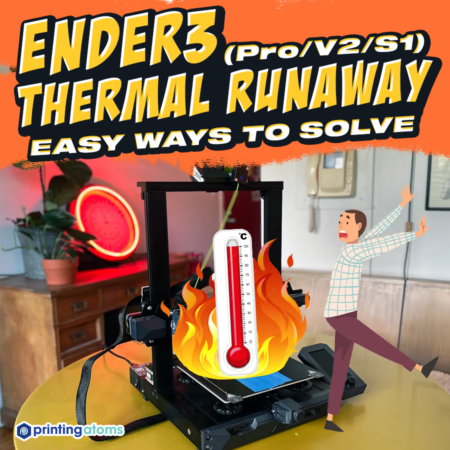
While this issue isn’t super common for most 3D printers, it’s been known to happen on some users’ Ender 3 (Pro/V2/S1) printers. And, because of how damaging thermal runaway can be, it’s absolutely vital to take the proper precautionary measures, so it never happens.
This means making sure that your Ender 3 is running a firmware program that has thermal runaway protection turned on. You also should check that the thermistor wire on your Ender 3’s hot end is positioned correctly.
For a more in-depth review of Ender 3 thermal runaway and how you can prevent it on the Ender 3 (Pro/V2/S1), keep reading!
Table of Contents
- What is Thermal Runaway?
- Why is Thermal Runaway So Dangerous?
- What Causes Thermal Runaway on the Ender 3 (Pro/V2/S1)?
- Broken Thermistor
- Poor Firmware
- How to Fix the Thermal Runaway:
- 1. Activating Thermal Runaway Protection
- 2. Repositioning the Thermistor
- Other Precautionary Measures
- Keep A Fire Extinguisher Nearby
- Use An External Temperature Sensor
- Don’t Place Flammable Materials Nearby
- Conclusion
What is Thermal Runaway?
Thermal runaway is a special and super damaging 3D printing issue where the hot end can’t stop heating up. This causes the hot end to reach super high temperatures, sometimes above 400 °C. At such hot temperatures, the hot end will destroy itself as well as everything that stands in its way.
As we’ve mentioned, thermal runaway isn’t your everyday 3D printing issue (e.g. under extrusion), but it’s been known to happen on some consumer-grade 3D printers like the Ender 3. This is likely because the manufacturers, such as Creality, don’t always put in 110% effort when designing and assembling the machines.
Note: Creality has stated that the newer V2 and S1 versions have thermal runaway protection built into the firmware. That said, it’s best to check for yourself so there are no surprises.
Why is Thermal Runaway So Dangerous?
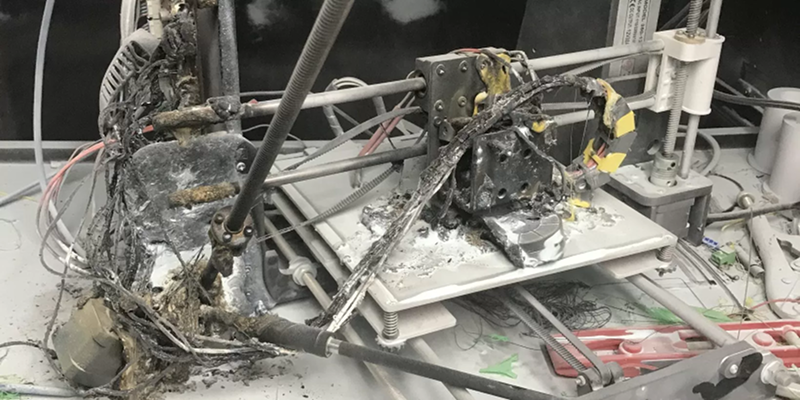
Thermal runaway is super dangerous because, on top of destroying the hot end of your 3D printer, it can also cause significant damage to other components on your machine. Just look at the image above! That’s a real person’s 3D printer after a thermal runaway occurred, burning and permanently ruining literally every component on the printer.
That’s hundreds of your hard-earned dollars just flushed down the drain!
But the damage of thermal runaway doesn’t always stop at your 3D printer. In some cases, thermal runaway has caused 3D printers to light on fire and burn its surroundings, like furniture, walls, and more.
So, unless you want your 3D printer to be the reason your house burns down, I’d suggest you keep reading!
What Causes Thermal Runaway on the Ender 3 (Pro/V2/S1)?
Now that you know how dangerous thermal runaway can be, you’ll want to know what causes it. That’s because knowing the causes of thermal runaway will help us determine the right prevention methods for the issue. We’ve gone over the main causes of thermal runaway in the mini-sections below.
Broken Thermistor
The main cause of thermal runaway on the Ender 3 (Pro/V2/S1), as well as other 3D printers, is almost always a mispositioned thermistor wire.
For reference, the thermistor wire is one of two cables that feed into the hot end assembly, and it’s responsible for telling the motherboard of the printer the temperature of the hot end. The motherboard uses the temperature reading to determine if it should continue to power the heater cartridge, which is the other hot end cable.
When the thermistor wire is mispositioned or over-tightened, it won’t accurately measure the temperature of the hot end, causing the motherboard to continue to send power to the heater cartridge even when it’s already at the right temperature. So then the heater will just continue to heat up until it destroys itself and possibly its surroundings.
Thermal runaway can also happen if the heater cartridge is mispositioned because then the thermistor won’t be able to measure its heat properly. For example, if the heater is not completely inside the hot end’s heater block, it will heat up, but not all of that heat will be detected by the thermistor (which only detects the temperature inside the hot end). This could also cause thermal runaway.
Poor Firmware
While not a direct cause, thermal runaway can also occur when the Thermal Runaway Protection feature is disabled on the firmware.
This feature is the main way a 3D printer, like the Ender 3, can stop thermal runaway before it causes damage to your printer. And, if it’s turned off or not present in the firmware your Ender 3 is using, then thermal runaway can occur without anything to stop it.
Unfortunately, not all batches of the Ender 3 are shipped out with firmware that has the Thermal Runaway Protection feature activated. We’re not sure why Creality would do this, but it’s been proven by many YouTubers (and myself). It’s mainly a possibility with older versions of the Ender 3, like the original and Pro versions, but it could happen with newer versions too.
How to Fix the Thermal Runaway:
Now that we know what causes thermal runaway on the Ender 3 (Pro/V2/S1), it’s time to get into how you can fix it. And by “fix it”, we really mean preventing thermal runaway because there’s no way to fix the damage caused by this issue. We’ve gone over the best prevention practices in the sections below!
1. Activating Thermal Runaway Protection
The first and most effective prevention practice for thermal runaway on the Ender 3 is turning on the Thermal Runaway Protection feature on your printer’s firmware. This feature is available in most firmware programs, but the best and most reliable option is with Marlin firmware.
Creality printers, like the Ender 3, already run a Marlin-based firmware program, so this will work perfectly.
What the Thermal Runaway Protection feature does is detect a variance between the thermistor and the heater cartridge. If the motherboard notices that it’s been sending a lot of power to the heater and isn’t seeing much of a change in the thermistor temperature, it will send a thermal runaway error.
A thermal runaway error will stop all heating on the printer, which is annoying but it’s better to get a thermal runaway error than have a broken printer.
There are two ways you can do this: either go into the existing firmware and activate the feature or install a completely new firmware with the feature already activated. Personally, I recommend going with the latter option because it’s just easier. But if you’re using custom-configured firmware and don’t want to make all of those modifications again, the first option might be easier for you.

To turn on the feature, start by downloading the latest version of Marlin off their website or GitHub page. Make sure you configure it for the Ender 3 (and the specific version of the Ender 3 that you have) by picking out the right configuration files. Then open up the file set in an IDE, like Microsoft VSCode.
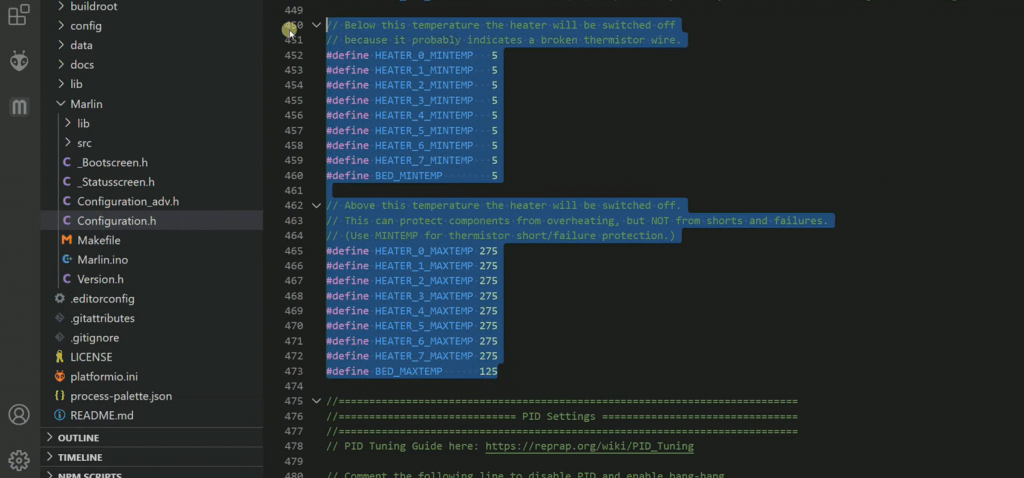
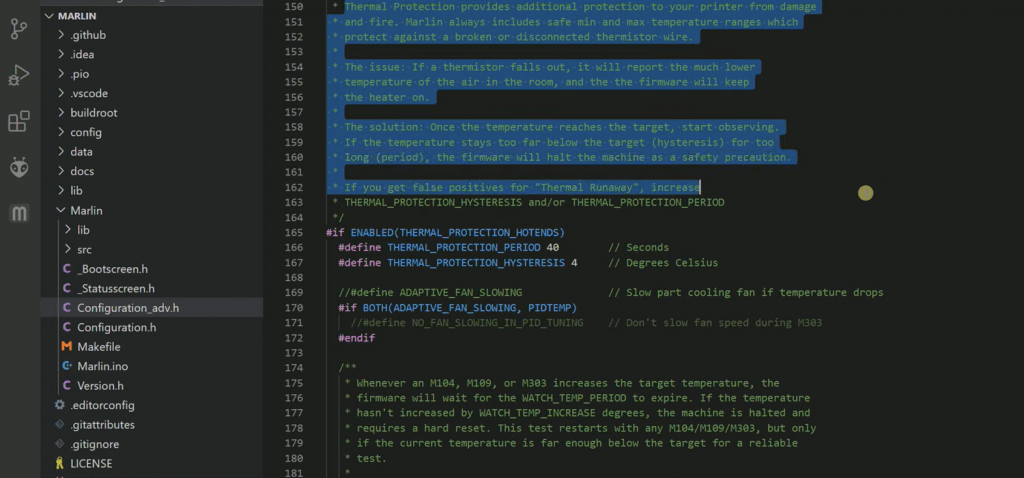
In VSCode, find and open the “Configuration.h” file. Then, use the Ctrl-F feature and look for the phrase “Thermal Runaway”. You’ll see a few lines related to thermal runaway protection. Make sure the following three scripts are activated (no “//” in front of them):
- #define THERMAL_PROTECTION_HOTENDS
- #define THERMAL_PROTECTION_BED
- #define THERMAL_PROTECTION_CHAMBER
And that’s it!
Now just upload the firmware back to your Ender 3. For the V2 and S1 versions of the Ender 3, you can do this via the MicroSD card slot on the printer. And for the original and Pro versions of the printer, you’ll have to use the ISP port on the motherboard, but it shouldn’t be too hard.
2. Repositioning the Thermistor
The second main prevention method for thermal runaway is repositioning the thermistor cable.
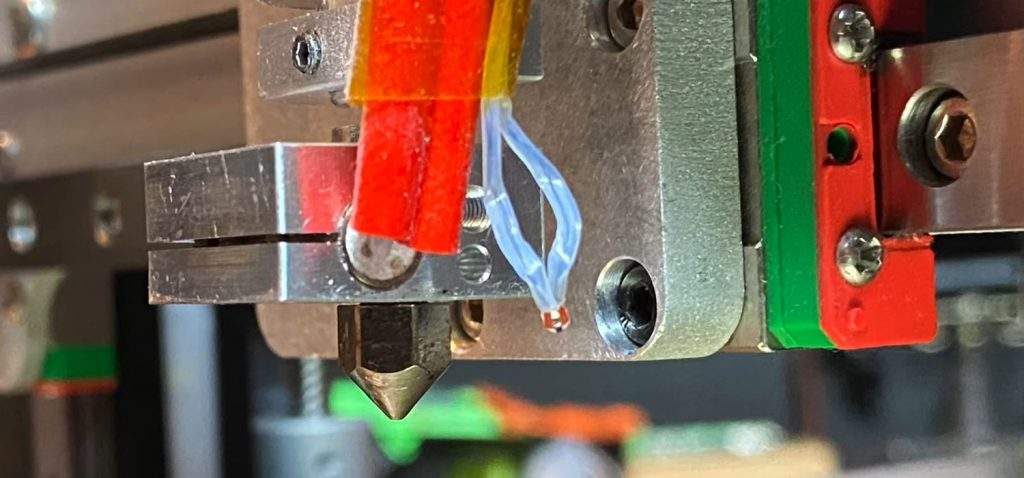
To do this, start by unscrewing the printhead shroud on your Ender 3. Then locate the heater block on the hot end of your Ender 3, as seen in the image above.
Now, with the printer turned off, remove the silicone sock around the heater block. You should see two sets of cables going into the heater block. The one with the thicker red wires is the heater cartridge; the smaller set of cables (they should be white) is the thermistor.
Use a small Phillips head screwdriver and unscrew the thermistor cable very gently, and then slowly and carefully remove it from the hot end. Give it a good blow of air to make sure it’s clean, and then stick it back in the small hole in the hot end. Now screw it back in just tight enough where it won’t ever fall out, but not tight enough where the wire could be damaged.
And that’s all there is to it!
Now just turn the printer on and heat it up to your typical printing temperatures, and make sure that it’s displaying the temperature accurately and working.
Other Precautionary Measures
While we’ve gone over the main prevention methods for thermal runaway, there are some precautionary measures that you might want to follow. These are good for if your printer does ever run into thermal runaway as these measures will ensure the damage doesn’t go beyond your printer.
Keep A Fire Extinguisher Nearby
Our first precautionary measure is to keep a fire extinguisher nearby. This is a pretty self-explanatory one because if your 3D printer ever runs into thermal runaway, you’ll always have a quick-and-easy way to extinguish the heat.
Some users also like to use a fire extinguisher ball, which is a heat-activated ball that releases fire extinguishing chemicals once it detects too much heat. A good idea for this is to hang it above the print space of your 3D printer because the heat will rise.
Use An External Temperature Sensor
Next, you might want to set up an external temperature sensor. This can be done with a digital sensor or a simple analog one. This is just a good way for you to know the real temperature of the area around your 3D printer so that you can know if the thermistor on your Ender 3 is working properly or not. And then, if it’s not, you can reposition or replace the cable to prevent thermal runaway or stop it in its tracks.
Don’t Place Flammable Materials Nearby
My last precautionary measure for you is to not place any flammable objects nearby your printer. This seems like an obvious one, but some people like to use hairspray, a flammable item, for the bed adhesion on their Ender 3. And in some cases in the past, this has led to thermal runaway causing massive destruction.
Some other items not to keep nearby your Ender 3 include the following:
- Febreeze (or another scented spray)
- Wool
- Furniture with cloth
- Alcohol (e.g. IPA)
Conclusion
Overall, thermal runaway is an extremely scary issue for 3D printers like the Ender 3 (Pro/V2/S1). But it’s also an issue that can be prevented fairly easily.
The best advice I can give for preventing thermal runaway is to install a new version of Marlin firmware with Thermal Runaway Protection enabled, as well as reposition your thermistor cable. Some other things you can do is keep a fire extinguisher nearby, have a thermometer nearby so you can know how hot your printer is getting, and make sure nothing flammable is nearby your machine.
I hope this helps, and stay safe!
Thermal Runaway is a safety feature designed to cut power to the heaters in case of a thermistor malfunction. If your printer’s thermistor would somehow dislodge itself, electronic parts would get a lower (incorrect) temperature reading. In an attempt to compensate for the lower temperature, the heater could reach dangerously high temperatures, with the printer potentially becoming a fire hazard. Thermal Runaway prevents that from happening.
Make sure to distinguish between the Thermal runaway error and the Bed thermal runaway error:
- Thermal runaway — indicates an issue with the temperature readout of the hotend.
- Bed thermal runaway — indicates an issue with the temperature readout of the heatbed.
Thermal Runaway is configured to shut down the printer when the temperature drops by more than 15 °C for more than 45 seconds. If the temperature reading doesn’t recover in the set time period, the printer will shut down and display the Thermal Runaway error.
Thermal Runaway (hotend)
- If you have recently re-assembled your hotend, make sure everything is exactly as instructed. An incorrectly assembled hotend can also cause this error.
- Check the ambient temperature. The suggested ambient temperature is 16 °C or more. An unheated garage in winter might cause thermal runaway as the heater doesn’t have enough power once the print cooling fan kicks in.
- Visually check the thermistor if it is still securely and correctly installed in the heater block. The whole cartridge should be inside the block, with no part of it sticking out.
- Move the whole extruder left and right, at the full length of the X-axis, and wiggle the cable wrap behind it. Check whether there are any fluctuations in the temperature readings. This would indicate an issue with the cable.
- Check the thermistor cable connector on the EinsyRAMBO or miniRAMBo. Re-seat the connector so you know it is secure.
- Check the fan shroud for any kind of damage. In some cases, users bent the shroud during assembly or when they were removing the printed object. A damaged or tilted shroud can change the airflow and start cooling the heater block directly. For safety reasons, the heater doesn’t have enough power (by design) to compensate for that.
MK2.5/S consideration
Due to the cooling properties of the MK2.5/S extruder design and the Mk2.5/S being a 12-volt system, you may need to run the print fan at only 70-80% when printing at PLA temperatures (190 — 215 °C). Printing other higher temp materials, like PETG and ASA, should need no changes to your slicer settings.
E3D Silicone Sock
During the testing, we didn’t find the E3D sock to be very beneficial, as it can fall off and cause print failures and even damage the printer. However, if you are facing issues with Thermal Runaways on MK2.5/S and 70-80% fan flow is not sufficient for your application, this may be worth considering. We do not provide this, but it can be ordered from E3D directly.
If you see a drop by 5 °C — 10 °C when the print fan is switched on (especially when the printer transitions from the 1st to the 2nd layer), it is normal. The nozzle temperature should recover rather quickly as the PID regulation kicks in.
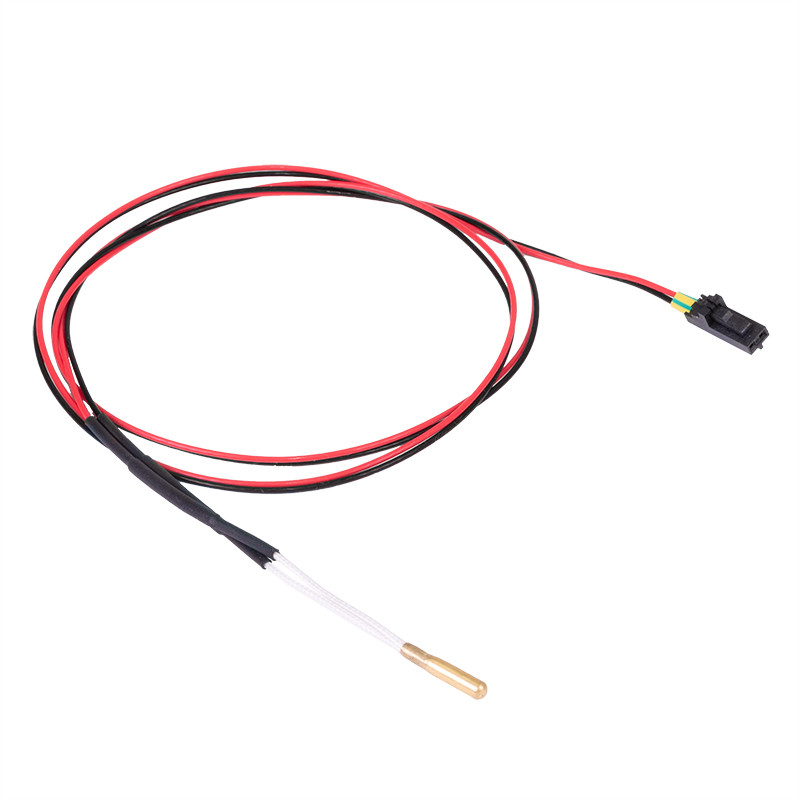 Cartridge-type hotend thermistor used on MK2/S, MK2.5/S, MK3/S/+, and MINI/+.
Bed thermal runaway
- Check the ambient temperature. The suggested ambient temperature is 16 °C or higher. An unheated garage in winter might cause a bed thermal runaway error if the heater doesn’t have enough power when the print cooling fan kicks in.
- Keep the printer away from any unintentional sources of cooling. Positioning the printer near an air-conditioning unit or an open window might be the cause of unwanted temperature drops.
- Make sure the bed thermistor is still secured underneath the golden Kapton tape.
- Move the heatbed back and forth, at the full length of the Y-axis, and wiggle/move the cable wrap behind it. Check whether there are any large fluctuations in the temperature readings (more than 15-20 °C). This would indicate an issue with the cable.
Check the thermistor cable connector on the EinsyRAMBO or miniRAMBo. Re-seat the connector so you know it is secure. - If you are printing small objects with PETG, try to multiple at once and/or place them away from the center of the heatbed.
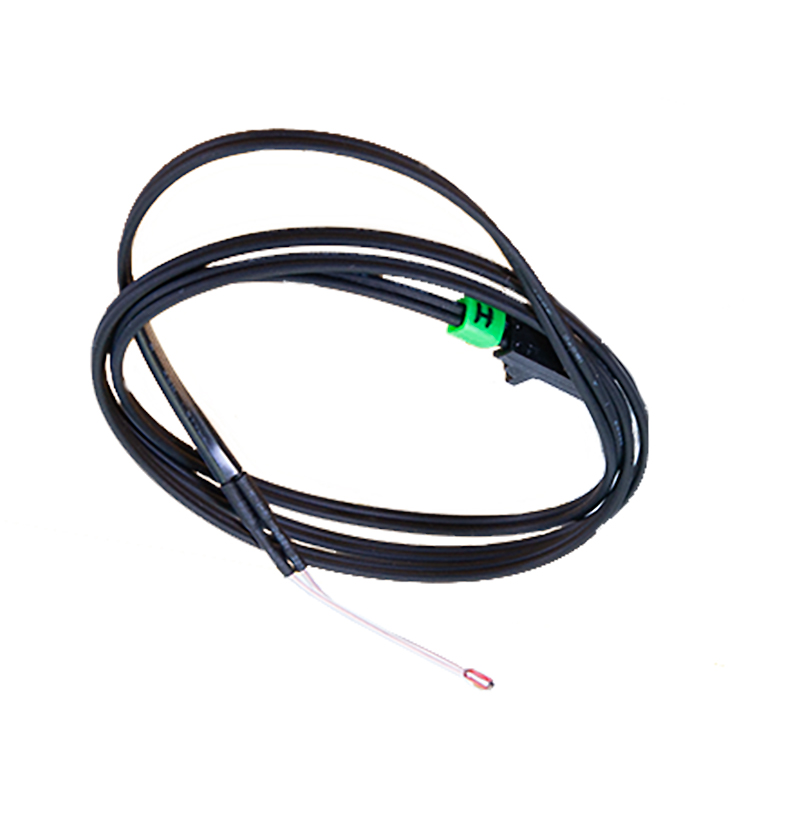 Glass bead heatbed thermistor used on MK2/S, MK2.5/S, MK3/S/+, and MINI/+.
Damaged component
If the thermistor, or more likely its cable has been damaged it must be replaced completely. As the thermistor functions by the mainboard reading its resistance, this might change if soldered or spliced and is therefore not recommended.
- For how to replace the hotend thermistor, please see How to replace a hotend thermistor (MK3S/MK3S+).
- For how to replace the heatbed thermistor, please see How to replace a heatbed thermistor (MK3S+/MK3S/MK2.5S/MK2S).