[ad_1]
Ошибка 0141 — это ошибка Dell, которая отображается, когда возникают проблемы с жестким диском вашей системы. Типичная сообщение, отображаемое для этой ошибки — это «2000-0141» и отражает какие-то проблемы с жестким диском вашего ПК. Многие люди сообщают, что видят эту ошибку, даже если это не влияет на жесткий диск, и для того, чтобы это исправить, нужно использовать следующий учебник, чтобы исправить любые проблемы внутри …
Что вызывает Dell 0141 Ошибка?
* Поврежденный параметры реестра
* Инфекции от вирусов
* Поврежденные настройки жесткого диска на вашем ПК Dell
Как вы исправлена ошибка Dell 0141?
Шаг 1 — сначала нужно запустить средство «Dell Self Test», чтобы просканировать ваш компьютер & # 39; Компьютер и рассказать о любых проблемах, которые могут быть в нем. Это часть программного обеспечения, предоставляемого компанией Dell, и она используется, чтобы помочь вам преодолеть любые проблемы или проблемы, часто приводят к обнаружению ошибок комп & # 39; ютера. Вы можете воспользоваться этим средством с помощью «Dell Resource CD», поставляемый вместе с комп & # 39; ютером Dell. Выполнив это испытание, вы увидите, что неправильно с вашей системой, а затем предоставит вам прямой способ решить проблемы
Шаг 2 — после этого следует запустить «антивирусное сканирование», чтобы удалить любые возможные инфекции, находятся внутри ваша система. Вирусы похожи на небольшие программы, которые закрепляются на вашем компьютере & # 39; Компьютеры и в аппаратном обеспечении, и вызывают много проблем на вашем ПК. Чтобы это исправить, вам нужно использовать надежную антивирусную программу для сканирования через вашу систему и удаления любых вирусов, которые могут быть в вашей системе и вызвать хаос.
Шаг 3. После выполнения этих двух шагов вам следует выполнить сканирование реестра, чтобы помочь исправлять реестр комп & # 39; ютера. Реестр является центральной базой данных, которая хранит различные настройки и информацию для вашей системы. К сожалению, реестр также является одной из основных причин проблем для вашего ПК, и это заставляет комп & # 39; компьютеров работать с ошибками. К счастью, вы можете исправить это и сделать ваш компьютер & # 39; Компьютер работать гораздо быстрее, используя очиститель реестра & # 39; чтобы исправить любые проблемы, которые находятся в этой части Windows. Настоятельно рекомендуется исправить ошибку 0141.
[ad_2]
If you have a Dell PC that is currently displaying an Error 2000-0141 message when you try to boot it up, you’re probably very frustrated right now. However, while a Dell error code 0141 message can be a sign of a severe issue with your PC’s hard disk drive, that’s not all it can mean. There could actually be an easy fix for your Dell PC. Read on to find out more about this error, how you can diagnose it, and what options are available to you to repair your PC.
The Dell error code 0141, also known as error code 2000-0141, is an error you might see on your Dell PC. Dell PCs use their own firmware, which includes custom error codes such as Error Code 0141 and Error Code 0142, so you won’t encounter this particular error code on any other brand of PC. Error code 0141 means that your PC can no longer detect your hard drive. No hard drive means no operating system and no data. No operating system means you can’t use your computer.
Surely if your hard drive can’t be found, that means you have to buy a new hard drive (or, if your Dell PC is still under warranty, have them replace it) and accept that any files you had on your PC (documents, photos, music, videos, etc.) that weren’t backed up are gone forever, right?
Not quite. A 0141 error can mean that your PC’s hard disk drive no longer works. But there are other causes for this error that you may actually be able to fix on your own.
Want to learn more about data recovery pricing?

There are a few potential causes of a Dell Error Code 0141 message:
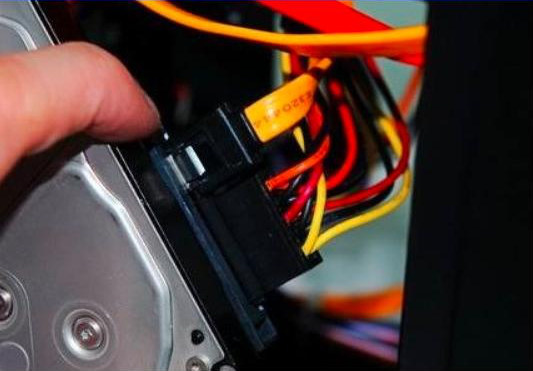
Loose SATA/IDE cable
The cable that connects your hard disk drive to your PC’s power supply unit and motherboard might have come loose. Make sure your computer is powered down, open it up, and poke around to make sure the connection on all ends (power supply, motherboard, and hard disk drive) are secure, and then restart your PC to see what happens.
Damaged SATA/IDE cable
The cable connecting your hard disk drive to your PC might no longer work. Fortunately, your PC’s CD/DVD drive is connected to your computer using the same kind of connection as your hard drive. Make sure your computer is powered down, open it up, and swap the two cables, then restart your PC to see what happens.
Corrupt BIOS
The settings in your BIOS handle how all of the hardware in your PC talks to each other. Sometimes these settings can become corrupt and cause an error code 0141 to appear. With your computer powered down, find and remove the CMOS battery for several seconds before putting it back in. This will clear the CMOS memory and reset the BIOS to its default functions.
Hard disk failure
The direst possibility is that your hard drive has broken.
You can diagnose your hard drive by running a DST (disk self-test), which assesses the health of the drive. To run a disk self-test on your Dell PC, do this:
- On a Dell desktop PC, press Ctrl + Alt + D on the BIOS splash screen (the first thing you see when your computer turns on).
- On a Dell laptop, press the Power button and the Fn key simultaneously.
Hard disk drives have a limited lifespan that typically ranges between five and ten years, but can be much shorter. Your hard drive may have had a minor defect that shortened its lifespan by a few years. You may have left your PC running 24/7 for weeks, putting more strain on the hard disk than normal. Maybe a power surge fried the hard drive’s PCB. Maybe your hard drive wasn’t securely fastened and vibrated itself to death.
Whatever the reason, the only way you can deal with hard disk drive failure on your own is by replacing the drive and reinstalling a fresh Windows operating system. You could just buy a new hard drive yourself. Or if your computer is under warranty, you could have Dell send you a free replacement.
But wait just a moment before you throw out your old hard drive or send it back to Dell and ask yourself just one question.
Data Recovery Software to recover
lost or deleted data on Windows
If you’ve lost or deleted any crucial files or folders from your PC, hard disk drive, or USB drive and need to recover it instantly, try our recommended data recovery tool.
Retrieve deleted or lost documents, videos, email files, photos, and more
Restore data from PCs, laptops, HDDs, SSDs, USB drives, etc.
Recover data lost due to deletion, formatting, or corruption
Are all of my important files backed up?
It’s easy to forget to back up data that’s important to you. Documents, family photos and videos, and creative projects can be lost in the blink of an eye when your PC’s hard drive stops working if you haven’t backed them up recently… or haven’t backed them up at all.
This leaves you with a dilemma. How do you get that data back?
How to fix a Dell error code 0141:
Firmly connect the SATA cable
Use a different cable to connect the hard drive to your PC
Reset the CMOS battery
Replace your hard drive
Send it to Gillware’s data recovery lab
f your PC’s hard disk drive won’t boot, and especially if you notice it making strange noises such as regular clicking or beeping, the only way to safely salvage any important files from it is to send it to Gillware’s professional data recovery lab.
Sending your PC’s hard drive to a data recovery lab sounds daunting. So does the prospect of all the valuable files on your PC going up in smoke. That’s why Gillware has made it a top priority to make data recovery as easy and painless of a process as possible since 2003.
- You can ship your PC’s hard drive to our data recovery lab for free (feel free to call our friendly advisors if you need help removing the hard drive from your PC)
- Our engineers perform a free evaluation in our ISO-5 Class 100 cleanroom lab and give you a firm, exact price quote
- You tell us what data is important to you and you only pay us if we can recover it at the price you agree to
- There are no upfront costs and no fees for unsuccessful data recovery attempts
- Gillware respects warranties from all hard drive manufacturers and has a special relationship with Dell as a trusted data recovery services provider
- Our SOC II Type 2 compliant secure data recovery facilities keep your data 100% secure from start to finish
To learn more about Gillware’s capabilities, read our case study below about a customer of ours whose Dell PC gave them a 2000-0141 error and needed our help:
Error Code 2000-0141 Data Recovery Case Study
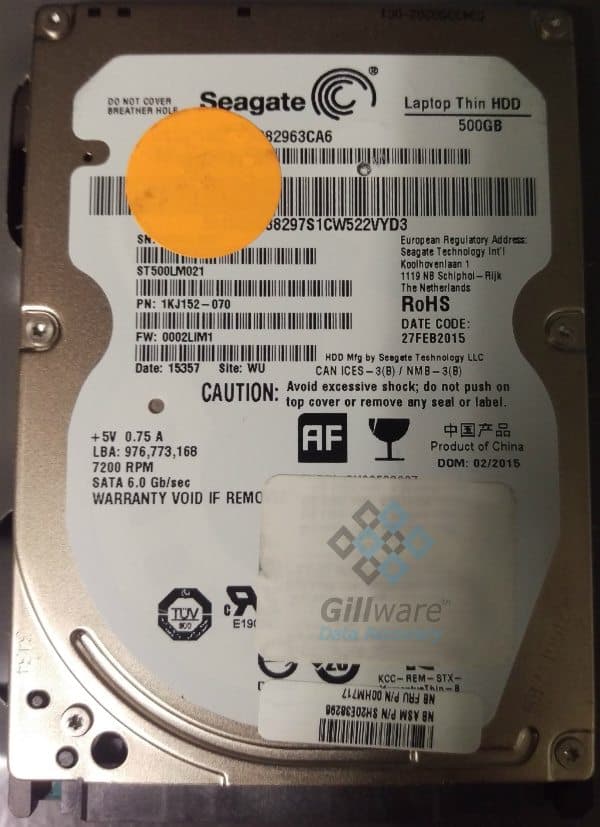
Hard Drive Recovery Case Study: Dell Error Code 0141
Drive Model: Seagate Laptop Thin HDD ST500LM021
Drive Capacity: 500 GB
Operating System: Windows
Situation: Hard drive inside Dell Inspiron laptop showed error code 0141, hard drive would not mount; data inaccessible
Type of Data Recovered: Quickbooks files and other user documents
Binary Read: 46.3%
Gillware Data Recovery Case Rating: 9
The client in this hard drive recovery case study had been using a Dell Inspiron laptop to help them run their small business. One day, upon booting up their computer, they encountered a boot error. Running Dell’s ePSA diagnostic tool, they saw the Dell error code 2000-0141. This error code told them that the computer could not detect the presence of a hard drive. Of course, the hard drive was still there—it wasn’t like somebody had opened his machine and plucked it out—but something was wrong with the drive.
The client removed the drive and hooked it up to another computer. But they could not mount the drive to gain access to its data. They brought the failed Seagate hard drive to Gillware to retrieve their critical Quickbooks files and other business documents.
An evaluation of the failed drive in our hard drive recovery cleanroom showed that the drive’s read/write heads had failed. The read/write heads, as their name implies, allows the user to read from and write to the hard drive’s data storage platters. When they fail, the drive becomes inaccessible. Failed read/write heads can also damage the drive’s platters. If this damage occurs in just the right (or wrong) places, some important data can become irretrievable. To salvage the client’s data, our data recovery experts had to replace its heads.
Questions?
Overcoming Seagate Firmware Corruption
However, there was more to this case than failed heads. As a result of this hard drive’s read/write heads failure, the drive had suffered firmware corruption. Hard drive firmware is the most important bit of data on any hard drive. Whenever you power on a hard drive, the first thing the read/write heads search for is the firmware zone. Until the drive successfully reads the firmware, it cannot read any of the rest of the data on the drive.
The firmware is the “operating system” of the hard drive. Your computer’s operating system allows it to properly use your computer’s hardware to run the programs you’ve installed. And likewise, your hard drive’s firmware allows it to properly use the drive’s hardware to access the data you’ve put on it. Among other things, hard drive firmware monitors your hard drive’s performance and keeps track of its defects to make sure your drive continues to run smoothly. Like a computer O/S, if the hard drive firmware encounters a severe enough problem, it can crash and become corrupted. But while it’s not too difficult to repair or reinstall a corrupted operating system, repairing hard drive firmware is much tougher.
Hard drive firmware is one of those things the user just isn’t meant to know (or care much) about. It works in the background, flying under the user’s radar. Hard drive manufacturers don’t want people meddling with their drives’ firmware. Accessing the hard drive firmware is impossible outside of the manufacturer’s factory floor or without special tools.
Hard drive firmware is designed to be very robust since it cannot be so easily accessed and fixed if something goes wrong. But the firmware can become corrupted—especially when the same read/write heads that read and write data to the firmware zone are failing!
Hard Drive Recovery Results
After our engineers had replaced the drive’s mangled read/write heads, our experts could access and repair the failed Seagate hard drive’s firmware. To access hard drive firmware, our engineers must use special tools to connect to the hard drive and “trick” it into behaving as if it is on the factory floor and ready to be programmed. From here, a highly skilled data recovery expert with a keen eye for figuring out how hard drive firmware works must carefully examine the firmware to find and repair the corrupted areas. Until the firmware is back in working order, nobody can read any more of the data on the platters.
After repairing the corrupted firmware and regaining access to the drive, our engineers successfully salvaged the vast majority of the client’s critical data. After reading 46.3% of the sectors on the hard drive’s platters, our engineers had read 99.8% of the drive’s file definitions and fully recovered 96.6% of the client’s files. Due to some damage on the platters, our engineers couldn’t fully recover all of the client’s data. However, a spot test of their critical files showed that we had completely recovered all of their most important files, with no corruption affecting the recovered files. We rated this data recovery case a 9 on our ten-point case rating scale.
Error code 0141 is a common issue on your Dell PC. What does Dell error code 2000-0141 mean? How to fix Dell error code 0141? From this post given by MiniTool, you can know what the error is and some troubleshooting tips you can try. Besides, how to get the data on that hard drive is introduced here.
Dell uses its own firmware and hardware which includes custom error codes to warn you about hardware or software problems. These codes can help manufacturers and technicians to identify and solve issues.
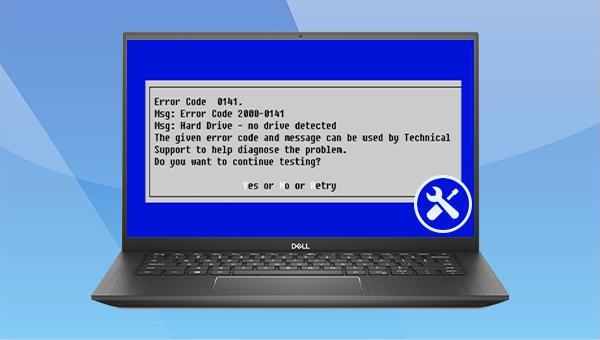
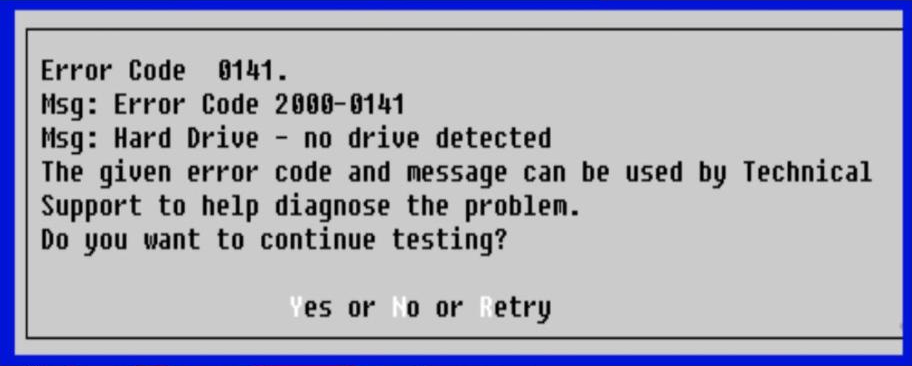
If you have a Dell PC and try to boot up it, you may run into an error called 0141, also known as Dell error code 2000-0141, which is one of the custom error codes. On the computer screen, you can see the following error messages:
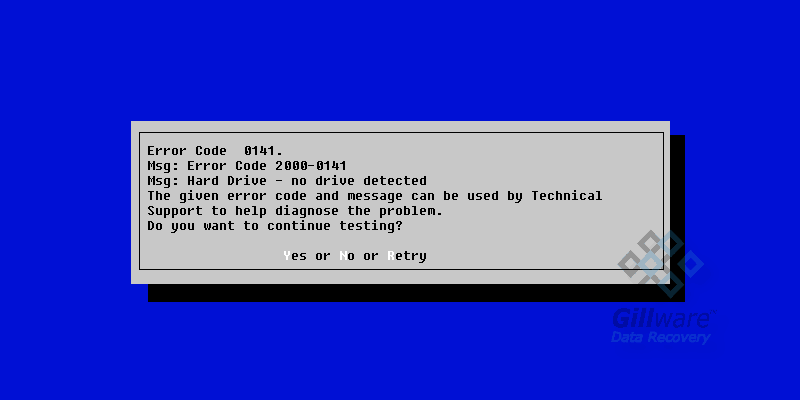
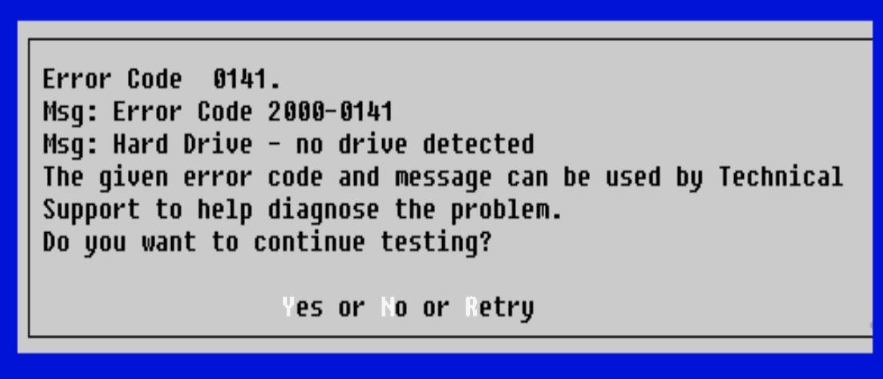
“Error code 0141.
Msg: Error Cod 2000-0141
Msg: Hard Drive – no drive detected
…”
In addition to 2000-0141, you may run into other custom error codes on Dell like 2000-0151, 2000-0146, 2000-0145, etc. when starting the PC.
This error means that your PC cannot detect the hard drive. No hard drive means no operating system, and you cannot use your computer.
What are the common reasons for Dell error code 2000-0141?
- Bad hard drive firmware update or firmware corruption
- File system corruption
- Damaged BIOS
- Loose SATA/IDE cable
- Hard drive failing
- Physical damage to the hard drive
No matter which triggers the error code 0141, the urgent thing is to find solutions to solve this issue. Let’s move to the next part to know how to fix Dell error code 0141.
How to Fix Error Code 2000-0141 Dell
Run Dell Diagnostic Tool
In the Dell laptop, there is a built-in ePSA (Enhanced Pre-boot System Assessment) diagnostic tool It is embedded in BIOS. This tool can be used to perform a complete check of your hardware including the display, processor, fan speed, storage, and several other crucial components. If your hardware goes wrong, this diagnostic tool will show you error messages like 2000-0141.
Just go to run this tool to have a check:
Shut down your Dell PC, press and hold the Fn key while pressing the Power button, and then release these two buttons. Then, the machine will enter the Enhanced Pre-boot System Assessment window. Alternatively, boot the Dell PC, press the F12 key when seeing the Dell logo and choose Diagnostics on the boot menu screen. Then, the system will enter the diagnostic mode.
Next, start a scan. After that, Dell error code 2000-0141 may disappear. Or else, you need to try another fix.
Check the Connection Between Hard Drive and Dell PC
If your hard drive is not connected properly to the motherboard and power supply, the system may not detect your hard drive with code 0141. The connection may be disconnected due to loose or damaged SATA/IDE cables. Just go to check these cables on your PC.
Proper equipment like a right screwdriver and antistatic band is required to disassemble a computer. After that, check the connection. You can also use a clean cloth to clear the dirt from the connecting cables and reconnect your hard drive. Next, boot up your Dell PC and see if error code 2000-0141 still persists. If yes, continue the fix in the following methods.
Reset CMOS
CMOS, short for complementary metal-oxide semiconductor, is a small amount of memory on the motherboard of a computer. It stores the Basic Input/Output System (BIOS) settings. BIOS, a firmware embedded on the chip, can help to initialize and test the system hardware components.
If Dell error code 2000-0141 is related to BIOS settings and you don’t confirm which setting is causing the error, you can try to fix your issue by clearing CMOS.
To do this thing, shut down the PC, open your computer case and disconnect the connection between the CMOS battery and the motherboard. After a few seconds, connect the battery and then BIOS will be reset to its default settings. Next, boot up your Dell computer to see if code 0141 is fixed.
If you want to know more details on clearing CMOS, refer to our previous post — How to Clear CMOS? Focus on 2 Ways.
Use a Linux Live USB or Connect the Drive to Another Dell PC
If all of these methods mentioned above fail to help to fix Dell error code 2000-0141, use a Linux live USB flash drive to boot the Dell PC to see if the hard drive is accessible. To do this task, you need to create a Linux live USB drive.
Step 1: On a normal PC, download an ISO file of a Linux distribution like Ubuntu from the official website. This will take some time to download the file and wait patiently.
Step 2: Download Rufus and open it.
Step 3: Select a USB drive, choose the ISO file you have downloaded, and then click the START button to begin ISO burning to USB.
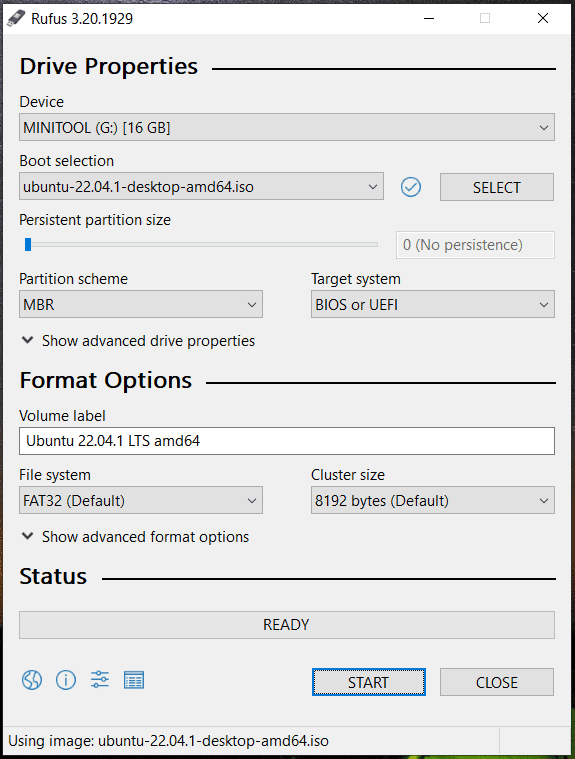
Step 4: Connect the Bootable USB drive to your Dell PC, change the boot order in BIOS and then boot the PC from that USB drive.
Step 5: Open the file manager and access your hard drive.
Alternatively, you can directly connect the hard drive to another PC via a SATA cable or a SATA to USB connector cable. If you can still access the data on the hard disk, the file system or boot sector may have an issue and you can back up your important files to an external hard drive. Then, run the CHKDSK scan or format the drive and reinstall Windows.
If you don’t want to take time to create a Linux live USB drive and recover files from that drive, you can try another way to back up your important files & folders. MiniTool ShadowMaker is a professional PC backup software that is designed to create a system image for Windows 11/10/8/7, back up files, folders, disks, and partitions. All these contents can be compressed to an image file, which saves much disk space.
Besides, you can sync folders & files on your hard drive to another location for backup. Furthering more, hard drive cloning is supported. If you want to make a disk backup, cloning is also a good option.
Well then, how to get your disk data backed up when Dell error code 2000-0141 happens with this backup program? Since the Dell PC is unbootable, you need to use MiniTool ShadowMaker Bootable Edition.
Step 1: Free download MiniTool ShadowMaker Trial Edition by clicking the button below.
Free Download
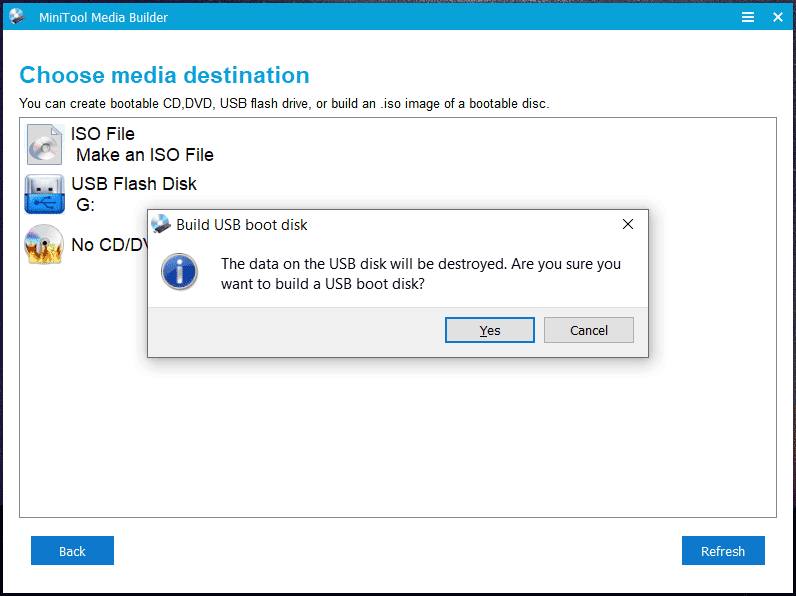
Step 2: Launch this backup software on a working PC, go to Tools and click Media Builder.
Step 3: Then, follow the on-screen instructions to create a bootable USB flash drive, USB hard drive, or CD/DVD.
Step 4: Remove the bootable medium from the computer and connect it to the Dell PC with the error code 0141, press F2 during the boot process to enter the BIOS menu and change the boot order to let the machine start up from that drive.
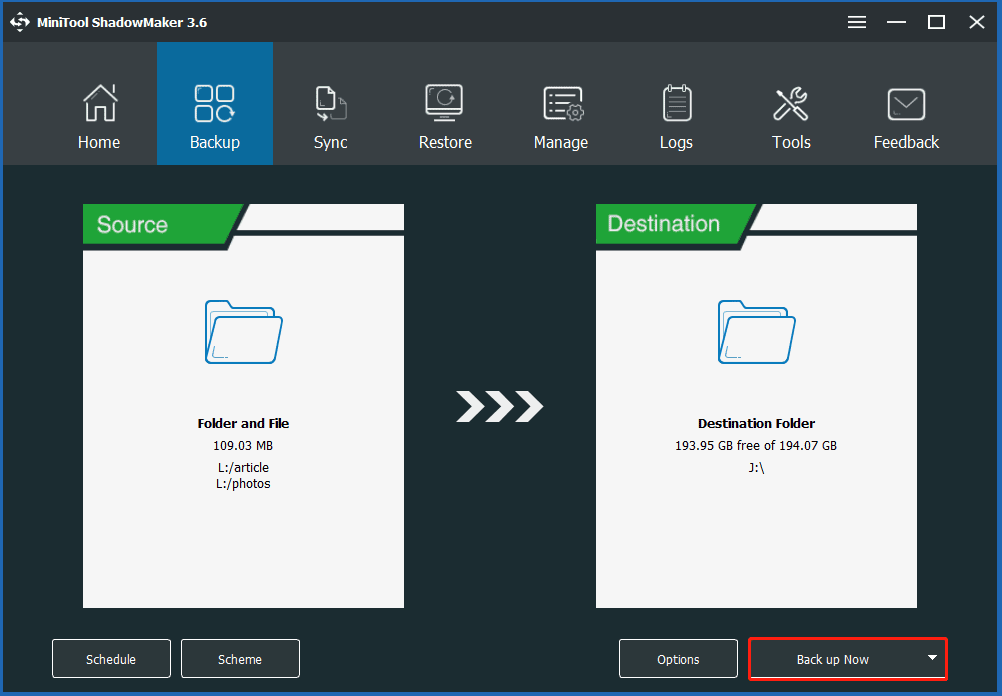
Step 5: Open MiniTool ShadowMaker Bootable Edition. In the Backup page, click Source, choose Folders and Files, check the box of files/folders you want to back up, and click OK.

Step 6: Click Destination to choose an external hard drive to store the backup.
Step 7: Click Back up Now to start the backup task at once.
The steps are about how to back up files from your PC with Dell error code 2000-0141 via imaging backup. After fixing your PC, you need to restore the files you have backed up from the image file to access them.
In addition, you can use the Sync feature to back up the data you need. This won’t require image recovery for access. If you want to know more information about Backup and Sync, refer to our previous post — Backup vs Sync: What Are the Differences Between Them.
Recover Files from Dell with Code 0141
In addition to MiniTool ShadowMaker, you can try professional data power recovery software to recover files from your Dell PC. If your hard drive is not accessible, you can also achieve this aim. There is a chance that hard drive failure happens when the error code 2000-0141 occurs.
Well then, how to recover files from your problematic Dell PC? This is not a difficult thing and a professional tool is required. Here, we strongly recommend using MiniTool Power Data Recovery.
As data recovery software designed for Windows, it can be used to recover data from various situations, for example, formatted/damaged/deleted/lost partition, inaccessible hard drive, unbootable PC, and more. When meeting error code 2000-0141 Dell, this program can be a good assistant.
To retrieve data from your Dell, you need to use a paid edition of MiniTool Power Data Recovery like Personal Ultimate to create a bootable USB drive/CD/DVD by clicking the disc icon and following the on-screen wizards. After that, boot the PC from that drive to enter the main interface of MiniTool Data Recovery Bootable Edition. Then, start the recovery operation.
Step 1: After opening this data recovery software, choose the hard drive from the Devices tab and click the Scan button.
Step 2: The scan will take some time. If there are an amount of data on your disk, several minutes will be required, and wait patiently. To make sure you have a good recovery result, don’t stop the scan.
Step 3: After that, go to look for the files and folders you need, check the box of these items, and click Save. It is recommended to save data to an external hard drive.

After trying to fix Dell error code 2000-0141 via the given ways but your Dell still fails to boot with the same error, you can choose to replace the hard drive after getting data back from your hard drive. Or take your Dell PC to a repair shop to ask for help. Good luck to you.
Wrapping Things up
This post introduces you to what Dell error code 2000-0141 is, the reasons for this error, and possible solutions. If you are plagued by this issue, try to fix it using the given methods above. Besides, if you cannot fix the code 0141, it is possible that your hard drive goes wrong and you can take measures to get your important files back.
MiniTool ShadowMaker and MiniTool Power Data Recovery are recommended for you to back up data or recover files from an unbootable Dell computer.
If you encounter issues during using MiniTool software or find some other workarounds to fix the issue, let us know by leaving a comment below. We will reply to you as soon as possible. Thanks a lot.
Dell Error Code 2000-0141 FAQ
How do I fix error code 2000-0142 on my hard drive?
If you run into Dell error code 2000-0142, try to rebuild MBR, repair the existing bad sectors, reinstall Windows and replace the hard drive. To know detailed solutions, refer to our related post — Dell Error Code 2000-0142: Causes & What to Do.
How do I fix error code 2000 0151 Dell?

Выкинуть Dell. Бери Lenovo
robot12 ★★★★★
(20.04.10 22:15:20 MSD)
- Ссылка

Вот что выдается при повторном тесте:
Error Code 0141
MSG: Error Code 2000-0141
и предложение продолжить тест.
pashazz ★★★★
(20.04.10 22:25:35 MSD)
- Показать ответ
- Ссылка
Ответ на:
комментарий
от pashazz 20.04.10 22:25:35 MSD

Ответ на:
комментарий
от pashazz 20.04.10 22:36:12 MSD
![]()
Вытащить винт, помолиться, воткнуть обратно. Одолжить у друга новый винт, попробовать его. Не увидит — ноут в ремонт, увидит — винт на помойку.
Nastishka ★★★★★
(20.04.10 22:42:01 MSD)
- Показать ответ
- Ссылка
![]()
заменить винт, ему *опа
yltsrc ★
(20.04.10 22:45:48 MSD)
- Ссылка
Ответ на:
комментарий
от pashazz 20.04.10 22:36:12 MSD

Вытащи винт. Он наверняка 2,5″. И попробуй либо воткнуть старый винт в настольник, либо попробуй новый винт воткнуть в ноут в магазе. Либо винт, либо контроллер полетел.
stave ★★★★★
(20.04.10 22:50:27 MSD)
- Ссылка

Помер жёсткий диск или одна из его жизненно важных частей. Решение: заменить жёсткий диск.
AITap ★★★★★
(20.04.10 23:38:10 MSD)
- Ссылка
>Что делать?
Написать в раздел Hardware
robot12 ★★★★★
(20.04.10 23:44:52 MSD)
- Ссылка

Ответ известен давно.
Что делать?
Учиться делать бэкапы, чтобы в следующий раз поменять НЖМД без лишних тем на L.o.r.’е.
Camel ★★★★★
(21.04.10 00:27:50 MSD)
- Ссылка
Ответ на:
комментарий
от Nastishka 20.04.10 22:42:01 MSD
Ответ на:
комментарий
от Okitain 21.04.10 00:40:06 MSD
![]()
Глянь мануал, винты обычно user-replaceable.
Deleted
(21.04.10 00:56:39 MSD)
- Ссылка
Ответ на:
комментарий
от Okitain 21.04.10 00:40:06 MSD
![]()

Меняй винт
Ip0 ★★★★
(21.04.10 08:33:31 MSD)
- Ссылка
Ответ на:
комментарий
от Okitain 21.04.10 00:40:06 MSD

>А гарантия в таких случаях за разборку не слетает?
таки слетает
- Ссылка
Ответ на:
комментарий
от Nastishka 21.04.10 04:56:47 MSD
А кто говорил о пломбах? Другое дело, что они могут быть помечены краской, которая видна под ультрафиолетовыми лучами.
Lighting ★★★★★
(21.04.10 13:53:39 MSD)
- Ссылка
Решил все-таки обратьтиться в саппорт, а то ноут новенький.
pashazz ★★★★
(21.04.10 14:48:42 MSD)
- Ссылка

MHDD
спасет отца…дальше продолжать?
Cargo ★
(21.04.10 21:56:59 MSD)
- Ссылка
Вы не можете добавлять комментарии в эту тему. Тема перемещена в архив.
Summary: If you are using dell inspion and device shows an error i.e. dell error code 0141 that encodes for no drive detected. Then you should read this blog as it holds all the solution you can try to fix this issue.

PC manufacturers or OEMs like Dell design and develop their own firmware and hardware. While developing the firmware — BIOS that facilitates communication between the OS and the hardware — the OEMs also include certain predefined or custom error codes that warn end users about hardware or software problems. These codes help manufacturers, programmers, and tech gurus to quickly identify and resolve the issues.
The Dell Inspiron error code 0141 is one such custom error code used by Dell to explain to the user that there is an issue with the computer hard drive, as the system is not able to detect it. If you are experiencing the boot error code 2000-0141 and your Dell Inspiron is still under warranty, it is important for you to reach out to the Dell technical support. Otherwise, follow the below explained troubleshooting methods and workarounds that may help you fix the issue and save you from losing your crucial data.

Common Causes of Dell Inspiron Error Code 0141
There is a common myth that error code 0141 indicates a failed hard drive. However, that is usually not the case. Most of the time your hard drive is healthy, but due to a loose SATA connector or a damaged SATA cable, the system is not able to detect the hard drive and thus, throws an error message 2000-0141. Other factors and issues that can lead to error 0141 are:
- Bad hard drive firmware update or firmware corruption
- Failing hard drive
- File system corruption
- Damaged or corrupt BIOS
- Mechanical failure
- Physical damage to drive
Troubleshooting Methods to Resolve Dell Inspiron Error code 0141
Run Dell Diagnostic Tool
Dell provides an inbuilt ePSA diagnostic tool on their laptop that is used to scan the hardware for faults. The diagnostic tool checks the display, storage, processor, fan speed, and several other crucial components.
If something is wrong with the hardware, the diagnostic tool displays the error detail that is causing the issue such as error 0141.
To enter diagnostic mode,
- Press and hold the Fn key on your Dell Inspiron laptop and while holding the Fn key, press the ‘Power’ button
- The system enters into the diagnostic mode. You can follow along with the wizard and allow the diagnostic tool to run a scan
If the diagnostic scan also displays that the hard drive is not found or detected, proceed to the next troubleshooting method to inspect for physical connection.
Check If the Drive is Properly Seated and Well Connected
If you have never dismantled a laptop before, it is recommended that you should avoid this step to cause any further damage.
Disassembling a computer requires proper equipment like a right screwdriver, antistatic band, etc. otherwise, you might cause further damage to your laptop.
Still, if you want to risk it, use a clean cloth; gently clean the connectors and then reconnect the hard drive. Turn on your system and check if the error persists.
Reset CMOS
Complementary Metal-Oxide Semiconductor (CMOS) is a small memory on the PC motherboard, which stores the BIOS information such as changes in BIOS settings or configurations related to hardware.
BIOS settings help you control your PC hardware at low-level. Therefore, if the issue is related to BIOS settings and you are not sure which setting is affecting the hardware communication, clear the CMOS memory by removing the CMOS battery
(refer to the pictures below).

You can do so by carefully opening the outer cover and disconnecting the CMOS battery from your Dell Inspiron motherboard. After removing the CMOS battery, wait for a few seconds and then connect the battery. This resets the BIOS to its default settings.
Then turn on your Dell Inspiron and check if the error 0141 is resolved.
Use a Linux Live USB or Connect the Drive to Another PC or Laptop
A Live Linux USB drive will help you detect whether there is a problem with the hardware or with the driver and firmware of the system.
For this, you need to create a bootable Linux USB drive.
- Use UNetbootin or Rufus app with a Linux distribution such as Ubuntu or Puppy Linux to create a Linux Live USB

- Connect the bootable USB to your Dell Inspiron and boot from it to enter the Linux OS in live mode
- Open the File Manager app and try to access the drive
Alternatively, try connecting the drive to another PC directly to SATA port or with the help of a SATA to USB connector cable.
In case it is accessible, backup your data to an external drive immediately as the error indicates that there is an issue with the boot sector or files system of the drive. Later, to fix the error code 0141, you can either use a Windows Repair/Installation Disc to repair boot sector and run CHKDSK scan or merely format the drive after backup and reinstall Windows OS.
However, if the drive is visible but is not accessible, it is probably corrupt and logically damaged. Fortunately, you can still retrieve your data from a corrupt & inaccessible hard drive using Stellar Data Recovery- Standard for Windows. The steps to recover data from such logically corrupt and damaged hard drive with this DIY data recovery software are mentioned in the below point.
Use a Data Recovery Software
When nothing works and you are still not able to fix the issue or access the drive, follow the steps mentioned below to retrieve your data and fix the hard drive error 0141.
Connect the affected hard drive to a different Windows PC via SATA port or with the help of a SATA to USB connector

- Download, install and run the Stellar Data Recovery- Standard for Windows software
- Click ‘All Data’ and then click ‘Next.’
- Under ‘Connected Drives’, choose the affected drive
- Turn on the ‘Deep Scan’ toggle switch that appears at the bottom left of the software window
- Click the ‘Scan’ button and wait for the scan process to finish
- After a successful scan, the files and folders are listed in the left tree view pane. Select the folders and files you want to recover from your corrupt and inaccessible drive
- Click ‘Recover.’ A pop up appears
- Click the ‘Browse’ button and navigate to the location where you want to save the recovered data.
NOTE: Always choose a location on a different drive with enough storage space to save your recovered data. You can use either an internal or an external storage drive to save the retrieved data. Alternatively, you can also use Advanced Settings to compress the recovered files that help you conserve storage space.
- After choosing the location, click ‘Start Saving’ and wait for the software to save your data
- Now open the Disk Management tool and format the drive
- Reconnect the drive to your Dell Inspiron laptop and install fresh Windows OS
- Finally, restore the recovered data to your Dell Inspiron laptop
TIP: In case your drive is not detected even after trying all the options including the data recovery software, get in touch with a data recovery service (DRS) provider. Data from a physically damaged or failed drive cannot be retrieved with a software or troubleshooting methods. Therefore, immediately reach out to a professional data recovery expert to get your crucial data restored.
Conclusion
Error code 0141 can occur at any time as hard drive failure or corruption is inevitable. Therefore, always keep a backup and a reliable data recovery software such as Stellar Data Recovery- Standard for Windows handy to avoid permanent data loss due to similar hard drive related errors.
Additionally, you can use the S.M.A.R.T. disk monitoring system to check the drive health frequently and to know when you need to replace the drive. Similarly, CHKDSK helps you remove bad sectors from the drive and keeps your drive healthy by preventing file system errors.
About The Author
Aruna
Aruna Attri is a Senior Data Recovery Expert at Stellar®. She is a technology blogger and Windows expert. She has experience in Windows data recovery domain. She loves to troubleshoot Windows issue and write technical tips and tutorials.
Best Selling Products

Stellar Data Recovery Professional
Stellar Data Recovery Professional softw
Read More

Stellar Data Recovery Premium
Stellar Data Recovery Premium for Window
Read More

Stellar Data Recovery Technician
Stellar Data Recovery Technician intelli
Read More

Stellar Data Recovery Toolkit
Stellar Data Recovery Toolkit is an adva
Read More
|
6 / 6 / 1 Регистрация: 29.09.2009 Сообщений: 91 |
|
|
1 |
|
|
06.11.2009, 17:12. Показов 4739. Ответов 1
Значит так обьясняю ситуацию, уронил ноутбук(Dell Inspiron 1525) после этого при включении слышно какое то попискивание и появляется черный экран где написано : При нажатии на F5 проводится диагностика устройств(проводится в биосе) и на устройстве Hard Drive вылетает ошибка вида
__________________ 0 |

|
Programming Эксперт 94731 / 64177 / 26122 Регистрация: 12.04.2006 Сообщений: 116,782 |
06.11.2009, 17:12 |
|
Ответы с готовыми решениями: No drive detected delays detected CallbackOnCollectedDelegate was detected Есть PCI плата и библиотека для упраления PCI-Dask.dll Есть… Console Detected!!! 1 |
|
12384 / 7223 / 758 Регистрация: 09.09.2009 Сообщений: 28,185 |
|
|
06.11.2009, 21:25 |
2 |
|
поплохело винчестеру. Добавлено через 3 минуты Проверить можно винчестер — вынув из ноутбука. Если интерфейс SATA, он спокойно подключается к соответствующим разъемам внутри обычного стационарного компьютера. Хуже, если винт с интерфейсом IDE — понадобитя переходник. Хотя в продаже бывают унивесальные USB кабели с переходниками… 1 |
|
IT_Exp Эксперт 87844 / 49110 / 22898 Регистрация: 17.06.2006 Сообщений: 92,604 |
06.11.2009, 21:25 |
|
Помогаю со студенческими работами здесь glibc detected No signal detected No keyboard detected Google Drive Искать еще темы с ответами Или воспользуйтесь поиском по форуму: 2 |
by
·
Published
· Updated
The Dell error code 0141 is a hardware related error which appears when you first load your Dell computer. The error that normally appears will have the error code “2000-0141” and will relate to the hard drive components of your computer. This error generally shows even though there might not be anything wrong with your PC. Here’s what you need to do to fix this problem:
What Is The 0141 Error?
The 0141 error is a problem caused by an issue / mismatch between the hard drive and your operating system of your PC. The error is typically shown to warn you about the lack of an Internal hard drive, but if there’s one in your system it suggests that this problem is caused by a mismatch inside the Windows system. The typical causes of this error are as follows:
- Corrupt or damaged Windows processes
- Damaged registry settings on your system
- A computer infected with viruses or malware
How To Fix The Dell Error Code 0141 Error
Step 1 – Use The “Dell Hard Drive Self-Test” Facility
The “Self Hard Drive Test” is a feature of Dell computers which allows you to test the integrity and reliability of your hard drive(s) on your system. This tool is used to help you gauge how well your hard drive is running and will allow you to pinpoint the exact cause of the 0141 error on your Dell PC.
Using The Self-Test Utility From The Dell Resource CD
Note: If you do not have the Dell resource CD installed on your PC, please use the steps below this method to install it.
To run the DST Hard Drive Diagnostics test, please follow these steps:
- Restart your PC and after Windows has restarted, reinsert the ResourceCD into the CD or DVD drive.After the original install, the ResourceCD auto-runs when inserted.
- In the Welcome Dell System Owner window, click Next to display the Criteria page.
- Under the System Criteria column, choose ALL for the system model, ALL for the operating system, ALL for the device type, and DIAGNOSTICS under Topics.
- Under System, click Dell DST Diagnostic Utility.
- Run the DST diagnostics utility.
- If the diagnostic test reports an error, refer to Dell Troubleshooting Wizard
How To Install The Dell Resource CD
- Insert the CD into the CD or DVD drive to display the CD auto-runs and the installation screen.
- Click OK to start the installation and display the InstallShield window.
- Click Next to continue and allow the files to copy to the hard drive.
- When the InstallShield Complete Screen window appears, click Yes, I want to restart my computer now.
- Click Finish.
- Eject the ResourceCD from the CD or DVD drive.
Performing this self-test will show you what is happening on your computer, and will allow you to see whether your hard drive has any sort of intermittent problem or has any damaged parts to it. This will give you a much better understanding of the problem, and should help you if you want to contact Dell Support about the issue.
Step 2 – Scan For Viruses
Viruses are also a major reason why the Dell 0141 error will show. Viruses are basically small software programs which latch onto your PC and corrupt many of the programs and files that Windows needs to run. In order to ensure your system is able to run as smoothly and effectively as possible (without the 0141 error), you should use an antivirus program to remove any of the possible infections inside your PC.
Step 3 – Clean Out The Registry
The registry is also a big cause of problems on many Dell systems, and is one of the big causes of the 0141 error. This is a part of your computer which stores settings and information, allowing your PC to “remember” many different files and settings for your system. Unfortunately, the registry is constantly causing problems on your PC as it makes Windows unable to read the files and settings it needs to run, as it’s forever being corrupted and damaged. It’s often the case that this database will store a setting or file that Windows will be unable to read, causing Windows to think it’s not present on your system, which will cause the 0141 error. It’s highly recommended that you use a “registry cleaner” to fix this problem. You can download our recommended registry cleaner below:
Error code 0141 is a common issue on your Dell PC. What does Dell error code 2000-0141 mean? How to fix Dell error code 0141? From this post given by MiniTool, you can know what the error is and some troubleshooting tips you can try. Besides, how to get the data on that hard drive is introduced here.
What Is Dell Error Code 2000-0141?
Dell uses its own firmware and hardware which includes custom error codes to warn you about hardware or software problems. These codes can help manufacturers and technicians to identify and solve issues.
If you have a Dell PC and try to boot up it, you may run into an error called 0141, also known as Dell error code 2000-0141, which is one of the custom error codes. On the computer screen, you can see the following error messages:
“Error code 0141.
Msg: Error Cod 2000-0141
Msg: Hard Drive – no drive detected
…”
Tips:
In addition to 2000-0141, you may run into other custom error codes on Dell like 2000-0151, 2000-0146, 2000-0145, etc. when starting the PC.
This error means that your PC cannot detect the hard drive. No hard drive means no operating system, and you cannot use your computer.
What are the common reasons for Dell error code 2000-0141?
- Bad hard drive firmware update or firmware corruption
- File system corruption
- Damaged BIOS
- Loose SATA/IDE cable
- Hard drive failing
- Physical damage to the hard drive
No matter which triggers the error code 0141, the urgent thing is to find solutions to solve this issue. Let’s move to the next part to know how to fix Dell error code 0141.
How to Fix Error Code 2000-0141 Dell
Run Dell Diagnostic Tool
In the Dell laptop, there is a built-in ePSA (Enhanced Pre-boot System Assessment) diagnostic tool It is embedded in BIOS. This tool can be used to perform a complete check of your hardware including the display, processor, fan speed, storage, and several other crucial components. If your hardware goes wrong, this diagnostic tool will show you error messages like 2000-0141.
Just go to run this tool to have a check:
Shut down your Dell PC, press and hold the Fn key while pressing the Power button, and then release these two buttons. Then, the machine will enter the Enhanced Pre-boot System Assessment window. Alternatively, boot the Dell PC, press the F12 key when seeing the Dell logo and choose Diagnostics on the boot menu screen. Then, the system will enter the diagnostic mode.
Next, start a scan. After that, Dell error code 2000-0141 may disappear. Or else, you need to try another fix.
Check the Connection Between Hard Drive and Dell PC
If your hard drive is not connected properly to the motherboard and power supply, the system may not detect your hard drive with code 0141. The connection may be disconnected due to loose or damaged SATA/IDE cables. Just go to check these cables on your PC.
Proper equipment like a right screwdriver and antistatic band is required to disassemble a computer. After that, check the connection. You can also use a clean cloth to clear the dirt from the connecting cables and reconnect your hard drive. Next, boot up your Dell PC and see if error code 2000-0141 still persists. If yes, continue the fix in the following methods.
Reset CMOS
CMOS, short for complementary metal-oxide semiconductor, is a small amount of memory on the motherboard of a computer. It stores the Basic Input/Output System (BIOS) settings. BIOS, a firmware embedded on the chip, can help to initialize and test the system hardware components.
If Dell error code 2000-0141 is related to BIOS settings and you don’t confirm which setting is causing the error, you can try to fix your issue by clearing CMOS.
To do this thing, shut down the PC, open your computer case and disconnect the connection between the CMOS battery and the motherboard. After a few seconds, connect the battery and then BIOS will be reset to its default settings. Next, boot up your Dell computer to see if code 0141 is fixed.
Tips:
If you want to know more details on clearing CMOS, refer to our previous post — How to Clear CMOS? Focus on 2 Ways.
Use a Linux Live USB or Connect the Drive to Another Dell PC
If all of these methods mentioned above fail to help to fix Dell error code 2000-0141, use a Linux live USB flash drive to boot the Dell PC to see if the hard drive is accessible. To do this task, you need to create a Linux live USB drive.
Step 1: On a normal PC, download an ISO file of a Linux distribution like Ubuntu from the official website. This will take some time to download the file and wait patiently.
Step 2: Download Rufus and open it.
Step 3: Select a USB drive, choose the ISO file you have downloaded, and then click the START button to begin ISO burning to USB.
Step 4: Connect the Bootable USB drive to your Dell PC, change the boot order in BIOS and then boot the PC from that USB drive.
Step 5: Open the file manager and access your hard drive.
Alternatively, you can directly connect the hard drive to another PC via a SATA cable or a SATA to USB connector cable. If you can still access the data on the hard disk, the file system or boot sector may have an issue and you can back up your important files to an external hard drive. Then, run the CHKDSK scan or format the drive and reinstall Windows.
If you don’t want to take time to create a Linux live USB drive and recover files from that drive, you can try another way to back up your important files & folders. MiniTool ShadowMaker is a professional PC backup software that is designed to create a system image for Windows 11/10/8/7, back up files, folders, disks, and partitions. All these contents can be compressed to an image file, which saves much disk space.
Besides, you can sync folders & files on your hard drive to another location for backup. Furthering more, hard drive cloning is supported. If you want to make a disk backup, cloning is also a good option.
Well then, how to get your disk data backed up when Dell error code 2000-0141 happens with this backup program? Since the Dell PC is unbootable, you need to use MiniTool ShadowMaker Bootable Edition.
Step 1: Free download MiniTool ShadowMaker Trial Edition by clicking the button below.
MiniTool ShadowMaker TrialClick to Download100%Clean & Safe
Step 2: Launch this backup software on a working PC, go to Tools and click Media Builder.
Step 3: Then, follow the on-screen instructions to create a bootable USB flash drive, USB hard drive, or CD/DVD.
Step 4: Remove the bootable medium from the computer and connect it to the Dell PC with the error code 0141, press F2 during the boot process to enter the BIOS menu and change the boot order to let the machine start up from that drive.
Step 5: Open MiniTool ShadowMaker Bootable Edition. In the Backup page, click Source, choose Folders and Files, check the box of files/folders you want to back up, and click OK.
Step 6: Click Destination to choose an external hard drive to store the backup.
Step 7: Click Back up Now to start the backup task at once.
The steps are about how to back up files from your PC with Dell error code 2000-0141 via imaging backup. After fixing your PC, you need to restore the files you have backed up from the image file to access them.
In addition, you can use the Sync feature to back up the data you need. This won’t require image recovery for access. If you want to know more information about Backup and Sync, refer to our previous post – Backup vs Sync: What Are the Differences Between Them.
Recover Files from Dell with Code 0141
In addition to MiniTool ShadowMaker, you can try professional data power recovery software to recover files from your Dell PC. If your hard drive is not accessible, you can also achieve this aim. There is a chance that hard drive failure happens when the error code 2000-0141 occurs.
Well then, how to recover files from your problematic Dell PC? This is not a difficult thing and a professional tool is required. Here, we strongly recommend using MiniTool Power Data Recovery.
As data recovery software designed for Windows, it can be used to recover data from various situations, for example, formatted/damaged/deleted/lost partition, inaccessible hard drive, unbootable PC, and more. When meeting error code 2000-0141 Dell, this program can be a good assistant.
To retrieve data from your Dell, you need to use a paid edition of MiniTool Power Data Recovery like Personal Ultimate to create a bootable USB drive/CD/DVD by clicking the disc icon and following the on-screen wizards. After that, boot the PC from that drive to enter the main interface of MiniTool Data Recovery Bootable Edition. Then, start the recovery operation.
Step 1: After opening this data recovery software, choose the hard drive from the Devices tab and click the Scan button.
Step 2: The scan will take some time. If there are an amount of data on your disk, several minutes will be required, and wait patiently. To make sure you have a good recovery result, don’t stop the scan.
Step 3: After that, go to look for the files and folders you need, check the box of these items, and click Save. It is recommended to save data to an external hard drive.
After trying to fix Dell error code 2000-0141 via the given ways but your Dell still fails to boot with the same error, you can choose to replace the hard drive after getting data back from your hard drive. Or take your Dell PC to a repair shop to ask for help. Good luck to you.
Wrapping Things up
This post introduces you to what Dell error code 2000-0141 is, the reasons for this error, and possible solutions. If you are plagued by this issue, try to fix it using the given methods above. Besides, if you cannot fix the code 0141, it is possible that your hard drive goes wrong and you can take measures to get your important files back.
MiniTool ShadowMaker and MiniTool Power Data Recovery are recommended for you to back up data or recover files from an unbootable Dell computer.
If you encounter issues during using MiniTool software or find some other workarounds to fix the issue, let us know by leaving a comment below. We will reply to you as soon as possible. Thanks a lot.
Dell Error Code 2000-0141 FAQ
How do I fix error code 2000-0142 on my hard drive?
If you run into Dell error code 2000-0142, try to rebuild MBR, repair the existing bad sectors, reinstall Windows and replace the hard drive. To know detailed solutions, refer to our related post — Dell Error Code 2000-0142: Causes & What to Do.
How do I fix error code 2000 0151 Dell?
If you have a Dell PC that is currently displaying an Error 2000-0141 message when you try to boot it up, you’re probably very frustrated right now. However, while a Dell error code 0141 message can be a sign of a severe issue with your PC’s hard disk drive, that’s not all it can mean. There could actually be an easy fix for your Dell PC. Read on to find out more about this error, how you can diagnose it, and what options are available to you to repair your PC.
The Dell error code 0141, also known as error code 2000-0141, is an error you might see on your Dell PC. Dell PCs use their own firmware, which includes custom error codes such as Error Code 0141 and Error Code 0142, so you won’t encounter this particular error code on any other brand of PC. Error code 0141 means that your PC can no longer detect your hard drive. No hard drive means no operating system and no data. No operating system means you can’t use your computer.
Surely if your hard drive can’t be found, that means you have to buy a new hard drive (or, if your Dell PC is still under warranty, have them replace it) and accept that any files you had on your PC (documents, photos, music, videos, etc.) that weren’t backed up are gone forever, right?
Not quite. A 0141 error can mean that your PC’s hard disk drive no longer works. But there are other causes for this error that you may actually be able to fix on your own.
Want to learn more about data recovery pricing?
There are a few potential causes of a Dell Error Code 0141 message:
Loose SATA/IDE cable
The cable that connects your hard disk drive to your PC’s power supply unit and motherboard might have come loose. Make sure your computer is powered down, open it up, and poke around to make sure the connection on all ends (power supply, motherboard, and hard disk drive) are secure, and then restart your PC to see what happens.
Damaged SATA/IDE cable
The cable connecting your hard disk drive to your PC might no longer work. Fortunately, your PC’s CD/DVD drive is connected to your computer using the same kind of connection as your hard drive. Make sure your computer is powered down, open it up, and swap the two cables, then restart your PC to see what happens.
Corrupt BIOS
The settings in your BIOS handle how all of the hardware in your PC talks to each other. Sometimes these settings can become corrupt and cause an error code 0141 to appear. With your computer powered down, find and remove the CMOS battery for several seconds before putting it back in. This will clear the CMOS memory and reset the BIOS to its default functions.
Hard disk failure
The direst possibility is that your hard drive has broken.
You can diagnose your hard drive by running a DST (disk self-test), which assesses the health of the drive. To run a disk self-test on your Dell PC, do this:
- On a Dell desktop PC, press Ctrl + Alt + D on the BIOS splash screen (the first thing you see when your computer turns on).
- On a Dell laptop, press the Power button and the Fn key simultaneously.
Hard disk drives have a limited lifespan that typically ranges between five and ten years, but can be much shorter. Your hard drive may have had a minor defect that shortened its lifespan by a few years. You may have left your PC running 24/7 for weeks, putting more strain on the hard disk than normal. Maybe a power surge fried the hard drive’s PCB. Maybe your hard drive wasn’t securely fastened and vibrated itself to death.
Whatever the reason, the only way you can deal with hard disk drive failure on your own is by replacing the drive and reinstalling a fresh Windows operating system. You could just buy a new hard drive yourself. Or if your computer is under warranty, you could have Dell send you a free replacement.
But wait just a moment before you throw out your old hard drive or send it back to Dell and ask yourself just one question.
Data Recovery Software to recover
lost or deleted data on Windows
If you’ve lost or deleted any crucial files or folders from your PC, hard disk drive, or USB drive and need to recover it instantly, try our recommended data recovery tool.
Retrieve deleted or lost documents, videos, email files, photos, and more
Restore data from PCs, laptops, HDDs, SSDs, USB drives, etc.
Recover data lost due to deletion, formatting, or corruption
Are all of my important files backed up?
It’s easy to forget to back up data that’s important to you. Documents, family photos and videos, and creative projects can be lost in the blink of an eye when your PC’s hard drive stops working if you haven’t backed them up recently… or haven’t backed them up at all.
This leaves you with a dilemma. How do you get that data back?
How to fix a Dell error code 0141:
Firmly connect the SATA cable
Use a different cable to connect the hard drive to your PC
Reset the CMOS battery
Replace your hard drive
Send it to Gillware’s data recovery lab
f your PC’s hard disk drive won’t boot, and especially if you notice it making strange noises such as regular clicking or beeping, the only way to safely salvage any important files from it is to send it to Gillware’s professional data recovery lab.
Sending your PC’s hard drive to a data recovery lab sounds daunting. So does the prospect of all the valuable files on your PC going up in smoke. That’s why Gillware has made it a top priority to make data recovery as easy and painless of a process as possible since 2003.
- You can ship your PC’s hard drive to our data recovery lab for free (feel free to call our friendly advisors if you need help removing the hard drive from your PC)
- Our engineers perform a free evaluation in our ISO-5 Class 100 cleanroom lab and give you a firm, exact price quote
- You tell us what data is important to you and you only pay us if we can recover it at the price you agree to
- There are no upfront costs and no fees for unsuccessful data recovery attempts
- Gillware respects warranties from all hard drive manufacturers and has a special relationship with Dell as a trusted data recovery services provider
- Our SOC II Type 2 compliant secure data recovery facilities keep your data 100% secure from start to finish
To learn more about Gillware’s capabilities, read our case study below about a customer of ours whose Dell PC gave them a 2000-0141 error and needed our help:
Error Code 2000-0141 Data Recovery Case Study
Hard Drive Recovery Case Study: Dell Error Code 0141
Drive Model: Seagate Laptop Thin HDD ST500LM021
Drive Capacity: 500 GB
Operating System: Windows
Situation: Hard drive inside Dell Inspiron laptop showed error code 0141, hard drive would not mount; data inaccessible
Type of Data Recovered: Quickbooks files and other user documents
Binary Read: 46.3%
Gillware Data Recovery Case Rating: 9
The client in this hard drive recovery case study had been using a Dell Inspiron laptop to help them run their small business. One day, upon booting up their computer, they encountered a boot error. Running Dell’s ePSA diagnostic tool, they saw the Dell error code 2000-0141. This error code told them that the computer could not detect the presence of a hard drive. Of course, the hard drive was still there—it wasn’t like somebody had opened his machine and plucked it out—but something was wrong with the drive.
The client removed the drive and hooked it up to another computer. But they could not mount the drive to gain access to its data. They brought the failed Seagate hard drive to Gillware to retrieve their critical Quickbooks files and other business documents.
An evaluation of the failed drive in our hard drive recovery cleanroom showed that the drive’s read/write heads had failed. The read/write heads, as their name implies, allows the user to read from and write to the hard drive’s data storage platters. When they fail, the drive becomes inaccessible. Failed read/write heads can also damage the drive’s platters. If this damage occurs in just the right (or wrong) places, some important data can become irretrievable. To salvage the client’s data, our data recovery experts had to replace its heads.
Questions?
Overcoming Seagate Firmware Corruption
However, there was more to this case than failed heads. As a result of this hard drive’s read/write heads failure, the drive had suffered firmware corruption. Hard drive firmware is the most important bit of data on any hard drive. Whenever you power on a hard drive, the first thing the read/write heads search for is the firmware zone. Until the drive successfully reads the firmware, it cannot read any of the rest of the data on the drive.
The firmware is the “operating system” of the hard drive. Your computer’s operating system allows it to properly use your computer’s hardware to run the programs you’ve installed. And likewise, your hard drive’s firmware allows it to properly use the drive’s hardware to access the data you’ve put on it. Among other things, hard drive firmware monitors your hard drive’s performance and keeps track of its defects to make sure your drive continues to run smoothly. Like a computer O/S, if the hard drive firmware encounters a severe enough problem, it can crash and become corrupted. But while it’s not too difficult to repair or reinstall a corrupted operating system, repairing hard drive firmware is much tougher.
Hard drive firmware is one of those things the user just isn’t meant to know (or care much) about. It works in the background, flying under the user’s radar. Hard drive manufacturers don’t want people meddling with their drives’ firmware. Accessing the hard drive firmware is impossible outside of the manufacturer’s factory floor or without special tools.
Hard drive firmware is designed to be very robust since it cannot be so easily accessed and fixed if something goes wrong. But the firmware can become corrupted—especially when the same read/write heads that read and write data to the firmware zone are failing!
Hard Drive Recovery Results
After our engineers had replaced the drive’s mangled read/write heads, our experts could access and repair the failed Seagate hard drive’s firmware. To access hard drive firmware, our engineers must use special tools to connect to the hard drive and “trick” it into behaving as if it is on the factory floor and ready to be programmed. From here, a highly skilled data recovery expert with a keen eye for figuring out how hard drive firmware works must carefully examine the firmware to find and repair the corrupted areas. Until the firmware is back in working order, nobody can read any more of the data on the platters.
After repairing the corrupted firmware and regaining access to the drive, our engineers successfully salvaged the vast majority of the client’s critical data. After reading 46.3% of the sectors on the hard drive’s platters, our engineers had read 99.8% of the drive’s file definitions and fully recovered 96.6% of the client’s files. Due to some damage on the platters, our engineers couldn’t fully recover all of the client’s data. However, a spot test of their critical files showed that we had completely recovered all of their most important files, with no corruption affecting the recovered files. We rated this data recovery case a 9 on our ten-point case rating scale.
Table of Contents
Dell Error Code 2000-0141 – Possible Reasons
Dell Error Code 2000-0141 often arises due to some default in the hard disk drive. Though there are few other possibilities. We are mentioning here, all such reasons.
- No Drive Detected – Hard Drive
Dell Computers use their own firmware and have customized error codes, such as Error code 0141 and error code 0142. And this being the reason, you would not find these error codes on any other computer.
Error Code 0141 signifies that your Computer no longer identifies the hard drive. No hard drive in turn results in no operating system and therefore, no previous data lives. And your computer will stop working if does not have an operating system.
- Impaired IDE or SATA Cable
SATA cable stands for Serial Advanced Technology Attachment Cable. These cables are used to connect devices like hard drives and optical drives to the motherboard. SATA Cables can transmit information and data to and from the computer at a speed that is not possible for other cables to have. And IDE, which stands for Integrated Drive Electronics, is a standard type of connection for storage components in a computer.
Dell Error Code 20000-0141 might have cropped up due to an impaired SATA Cable. We will mention later, ways to check and fix this problem. - Loose SATA/IDE Cable
Since these cables are generally shielded, they come loose, without us noticing them. Another reason for Dell Error Code 2000-0141, is a probable loose SATA cable. - Corrupt BIOS
BIOS is an acronym for Basic Input/ Output System. It is a firmware responsible for performing hardware initialization. The settings can result in the computer showing Dell Error Code 2000-0141.
Related: Fix Dell supportassist no bootable devices found
How to fix Dell Error Code 2000-0141
If you come across the Dell Error Code 2000-0141, it is advised to first go through the possible reasons for the error to occur. Identify if, your computer has any loose or damaged SATA Cable or if the computer cannot recognize the hard drive.
Solutions to the above-mentioned problems are thoroughly explained here.
- Computer Not Detecting Hard Drive
If your computer cannot identify the hard drive, you might have to replace the hard drive with a new one.
Hard drives have a life span of anywhere between five to ten years. But some might die down even before five years. Excessive work, PC always staying active, can put a strain on the hard drive, therefore, shorter hard drive life. Few other reasons for a hard drive malfunctioning are, a sudden power surge that burned the hard drive’s PCB, a loosened hard drive that vibrated ceaselessly.
You can run a simple test to assess the condition of the hard drive.
On your Dell Desktop PC, the first screen, the BIOS Splash Screen, press Ctrl + Alt + D.
And on a Dell laptop, press the ‘fn’ key and the power button simultaneously.
If the trouble is in fact due to faulty hardware, replace it with a new hard drive and reinstall a fresh Windows Operating System. If your Dell computer is under warranty period, you can get a new hard drive delivered by the company itself. - Loose SATA/IDE Cable
Loose cables are easy to miss. If your computer is showing Dell Error Code 2000-0141, check all the cables for loose ends. The SATA cables connecting hard drives to the motherboard often come loose. And these loose cables result in the computer not identifying the hard drive and thus the Dell Error Code 2000-0141.
Turn off your Dell computer and find these cables, once you have found these loosened cables, fix them up. And the error is likely to go away. - Impaired SATA/IDE Cables
These cables, connecting hard drives and optical drives to the motherboard, if damaged, can cause the computer to show Dell Error Code 2000-0141. These cables might have heated up with continuous use, or even torn up. Get new SATA cables and connect the ends to the hard drive and the motherboard. The process to fix this error is quick and simple. Replacing the impaired cable with a new once will help.
Switch off the power and check for any damaged cable, after finding, take it out and place the new one back in. - Corrupt BIOS Settings
The BIOS settings are responsible for managing the communication between the hardware devices. Misdirected settings can lead to several problems, one of them being Dell Error Code 2000-0141. These BIOS settings can be managed through the BIOS screen, which shows up right when the computer turns on. Corrupt settings can cause this error to crop up. To correct it, turn off the power of the computer, and find the CMOS battery and remove it. Put it back in after cleaning the dust off. Make sure to give it a few seconds to rest. This will clear the CMOS of its junk content, and reset the BIOS to its default functions.
Also, check how you can fix error code 2000-0142
Dell Error Code 2000-0141 – Hard Drive Memory
It is always advised to keep the backup of your important files and document, safe and secure. Gadgets are prone to sudden malfunction and losing your vital data with it is not viable. Therefore, always ensure that you have the backup of your data.
One important aspect of replacing the hard drive is, retracting the files and data. If your Dell computer cannot detect the hard drive, it is possible that no other computer will detect the hard drive. This would leave you with lost files and data. The read and write heads on these hard drives often fail. These read and write heads allow users to read from and write to the hard drive storage platters. Failed read and write heads can also cause the hard drive storage platters to malfunction. The data becomes irretrievable.
How The Lost Memory Is Retrieved – This issue of failed read and write heads can be fixed by experts. These impaired reads and write heads are accessed. And are replaced with newer ones. This helps in retrieving all of the lost data.
Another issue associated with a failed Hard Drive is firmware corruption. Firmware acts as the operating system of the hard drive. This firmware is what allows the hard drive to access the information stored in it. Hence, firmware corruption can lead to losing all the data and information therein. The firmware also tells you of the health of the hard drive. It also communicates with the computer. The firmware keeps track of the activities of the hard drive and helps it run smoothly.
Although not impossible, fixing a hard drive firmware is quite a task. You will have to get it fixed by technical experts. In a few cases, some parts of the data can never be retrieved.
If there is a Dell Error Code 2000-0141, it is most likely because of a crashed hard drive. But there are other reasons too. Check your Dell computer for all these issues, and fix them up. You can also contact our experts at dell support number to fix error code 0141 issue
Inline Feedbacks
View all comments
Related Guides
511-CPU Fan Not Detected
November 17, 2020
A fan functions to throw out the internal system heat and keeps it cool. Similarly, CPU fan is a unit which sinks the system heat
Read More »
Dell Supportassist not working
October 20, 2020
Dell Supportassistant is an active and expert support solution for laptops and tablets. Dell Supportassistant checks the condition of the servers, memory, and other devices
Read More »
Lenovo Laptop No Sound
September 10, 2020
Is Your Machine Suffering Lenovo Laptop No Sound problem With the advent of advanced computing, a concept that has turned into reality recently due to
Read More »
Dell Laptop Won’t Turn On
August 21, 2020
Laptops have special place in our daily home and work life and you usually use them for various activities ranging from watching videos, playing games,
Read More »
PCL XL Error
June 22, 2021
Printing with HP Printers is quite satisfying and reliable. But, there is a common error that the users encounter. It is PCL XL Error. In
Read More »
About Repinasec
RepInAsec is a contact search platform that provides contact information of major US companies. Not only we provide updated customer service phone numbers but also the other source of contact like chat, email, social media etc. On RepInAsec one can learn tips to avoid common customer service mistakes like dialing the correct number or reaching the correct platform for particular kind of service. In short RepInAsec is one stop solution for all & updated customer service information free of cost. We do not charge anything from anyone as we’re a team of passionate content creators who aim to solve basic customer service related queries faster than ever.
Newsletters
Reach Us
Follow US
© 2023 Repinasec | All Right Reserved

28 July 2023 Senior Product Manager
Summary
Learn how to solve the error code 2000-0141 on Dell computers with this informative article. Transfer or backup your important data without entering the system.
I. What is error code 2000-0141?
Error code 2000-0141 is an error message that appears on a Dell computer and means that the computer cannot detect your hard drive. No hard disk means no operating system and data, and no operating system means you cannot use your computer normally. The appearance of this error code may be related to the following factors:
1. The connection between the hard disk and the motherboard is loose
2. The hard disk cable or data cable is damaged
3.BIOS damage or setting error
4. The hard disk itself fails
The following will introduce the corresponding solutions for these factors, let’s take a look together.
II. How to fix Dell computer error code 2000-0141?
1. Check the connection between the hard disk and the motherboard
If the connection between the hard disk and the motherboard is loose, there may be a problem that the computer cannot detect the hard disk. You can find the corresponding hard disk location in the computer, and then check the connection between the hard disk and the motherboard. If the hard disk cable or data cable is loosely connected, you can disconnect it and then reconnect it. In addition, if the connection is unstable because there is a gap between the hard disk and the hard disk bracket, you can also consider using spacers to make the hard disk connection more stable.
2. Replace the hard disk cable or data connection cable
If you find that the hard disk cable or data connection cable is damaged, you can try to replace it with a new one or other cables and data cables that can be used normally. Then turn the Dell computer back on and check if the problem is resolved.
3. Reset BIOS settings
A problem with the BIOS settings may also cause the hard disk to not be detected when the computer starts. It is best to reset the BIOS to the default settings and check whether the problem is resolved.
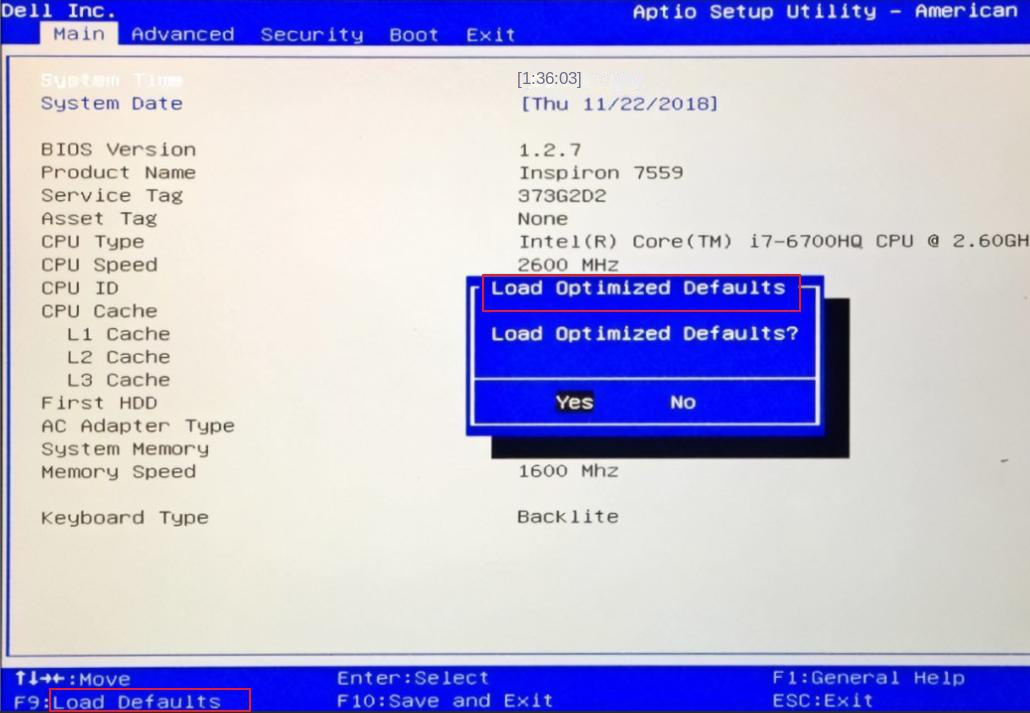
Step 1: Click the shortcut key continuously during the boot process (the following picture is an example, the shortcut key is F2) to enter the BIOS setting.

Step 2: After entering the BIOS setting interface, try to find the option containing “default”, such as (Load Defaults) or (Reset to Default) (Note: different computer brands or BIOS versions, the options may be slightly different). Take the following picture as an example, you can press F9 to reset the BIOS settings, and finally save the BIOS settings, restart the computer to check whether the Dell computer starts normally.
4. Repair the hard disk through the chkdsk command
If the hard disk has bad sectors or file system problems, you can use the chkdsk command to repair them. But because the Dell computer can no longer start normally, we can use the Windows installation disk to enter the recovery environment and then repair it. The Windows recovery environment has some useful repair tools, which can scan the system and try to repair damaged files, and can also repair various startup problems. If your computer cannot operate normally, you can enter the Windows recovery environment to solve the problem. Here we take the Windows 10 system as an example, the specific operation steps are as follows:
Step 1: Download the Windows 10 Media Creation tool on another computer to create a Windows 10 installation disk. download link:
https://www.microsoft.com/en-gb/software-download/windows10
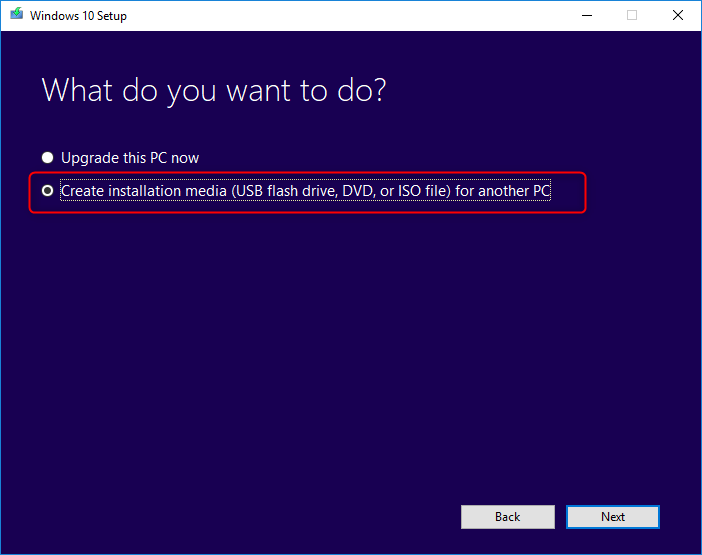
Step 2: Run the Windows 10 Media Creation tool, agree to the usage agreement, and then select Create installation media (USB flash drive, DVD, or ISO file) for another PC, and then click Next.
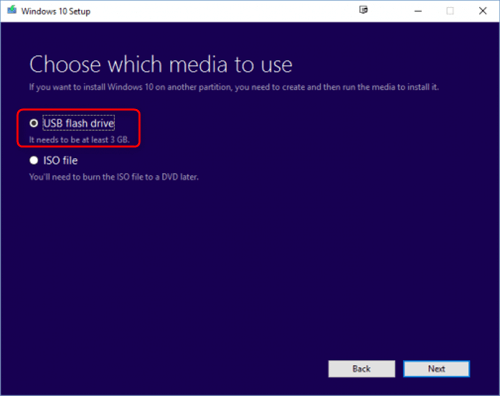
Step 3: When it comes to selecting the media to use, select the USB flash drive. (You need to ensure that the U disk space is at least 8G, otherwise this step will prompt an error.)
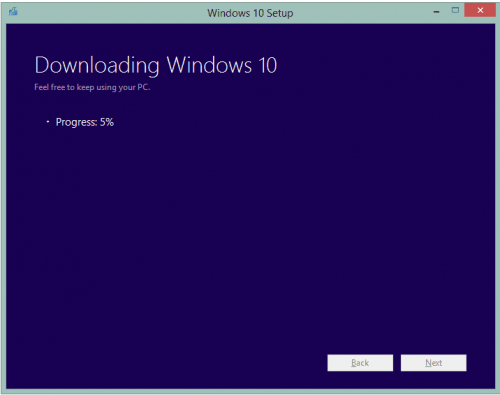
Step 4: You will be prompted that the Windows 10 installation file is being downloaded, please wait patiently for the download to complete.
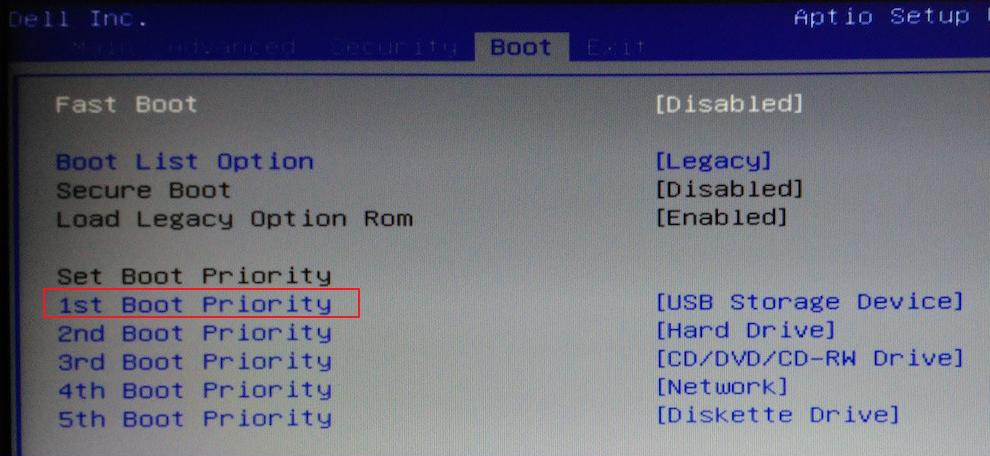
Step 5: Connect the completed installation USB flash drive to the target computer and press the shortcut key (such as F2/DEL/F10, etc., you can check the prompt in the boot interface) to enter the BIOS when starting the computer. Priority), choose to install the U disk, that is, the installation U disk is at the first place in the boot order, then save the settings and restart the computer.
Step 6: After successfully booting from the installation U disk, you will enter the Windows 10 installation interface, and then click Repair your computer in the lower left corner to enter the recovery environment.
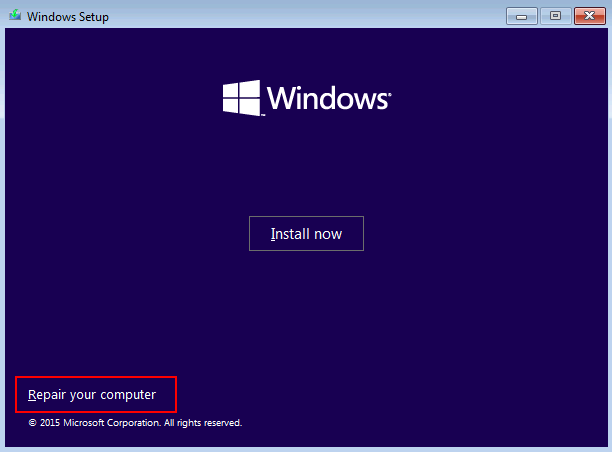
Step 7: After entering the Windows Recovery Environment, please select the Troubleshooting > Advanced Options > Command Prompt option.

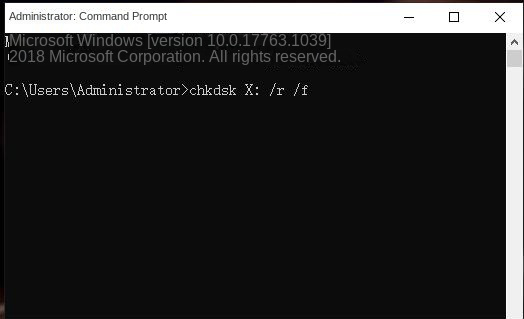
Step 8: Enter the command chkdsk X: /r /f in the command prompt window (X: refers to the hard disk drive letter to be repaired, here should be changed to the drive letter of your system disk; /r can find bad sectors and restore readable information, /f fixes errors found on the disk), and press Enter to fix errors. After the fault repair is complete, remove the Windows 10 installation USB flash drive and restart the computer to check whether the problem is resolved.
5. Replace the system hard disk
If none of the above methods can solve the problem that the computer cannot detect the hard disk, the error code 2000-0141 still appears and the system cannot be accessed. Then it may be that the hard disk where the system is located has a serious failure, and a new hard disk needs to be replaced at this time. It should be noted that if you do not have a deep understanding of computers, please seek the help of professional maintenance organizations or professionals, and do not remove and install the hard disk by yourself, so as not to cause damage to other components. If it is within the warranty period, you can consult and go to an official maintenance agency for repairs.
Before replacing the hard disk or sending the computer to a repair organization, it is recommended that you back up and transfer important data in the computer to avoid data loss. Since the computer can no longer be started normally, it is recommended that you use Renee PassNow to create a boot disk for subsequent operations without entering the Windows system.
III. When unable to enter the system, use Renee PassNow to backup or transfer important data
1. What is Renee PassNow?
Renee PassNow is a professional system rescue software, which can help Windows users clear Windows account passwords, create new administrator accounts; restore disk/memory card data, recover data after hard disk formatting; transfer disk files; erase or scan Disk files, etc. In addition, this software also supports repairing Windows system problems, such as: repairing MBR boot records, DBR error parameters, 0xc00000e, Windows system startup failure, and some problems that cause black screen or blue screen, etc. As a system rescue tool with various functions, it is perfectly compatible with multiple systems including Windows 10/8.1/8/7/XP/Vista, and can meet the system rescue needs of different users.
Hot Topic — ADsRenee PassNow – 3 Steps to transfer data from the crashed system 
Easy to use 3 steps to transfer the files.
Transfer the files Transfer the important files of the computer without system.
Preview the files Preview the files while transferring the data.
Multifuctional Data recovery, Windows password reset, bootable problem recovery can be run without system.
Highly compatible Windows 10/8.1/8/7/XP/Vista. Also supports UEFI boot mode.
Easy to use 3 steps to transfer the files.
Transfer the files Transfer the important files of the computer without system.
Preview the files Preview the files while transferring the data.
Free TrialFree TrialNow 2000 people have downloaded!
2. How to use Renee PassNow to backup or transfer data?
Step 1: Download and install Renee PassNow on other computers that can log in and run normally, then connect the U disk to the PC, run Renee PassNow, and then check in “Step 1: Select creation method” (Create a Live USB) option. (Note: Before performing this operation, please make sure that the important files in the U disk have been saved in other locations, because the operation process will delete all the data in the U disk.)
Step 2: Next, select (x64) or (x86) according to the system type, click the (Download Now) button to download the ISO file, click the (Create a Live USB) button after the file is downloaded, and click the (Eject USB) button.

Step 3: Connect the created boot device to the computer that needs to transfer data, turn on the computer, and then the shortcut key to enter the BIOS will be displayed on the computer screen (the display time of this interface is very short, maybe only one or two seconds), click continuously BIOS shortcut key to enter the BIOS setting interface, and then set the boot U disk as the first in the boot sequence in Boot Priority, then save the settings and restart the computer.
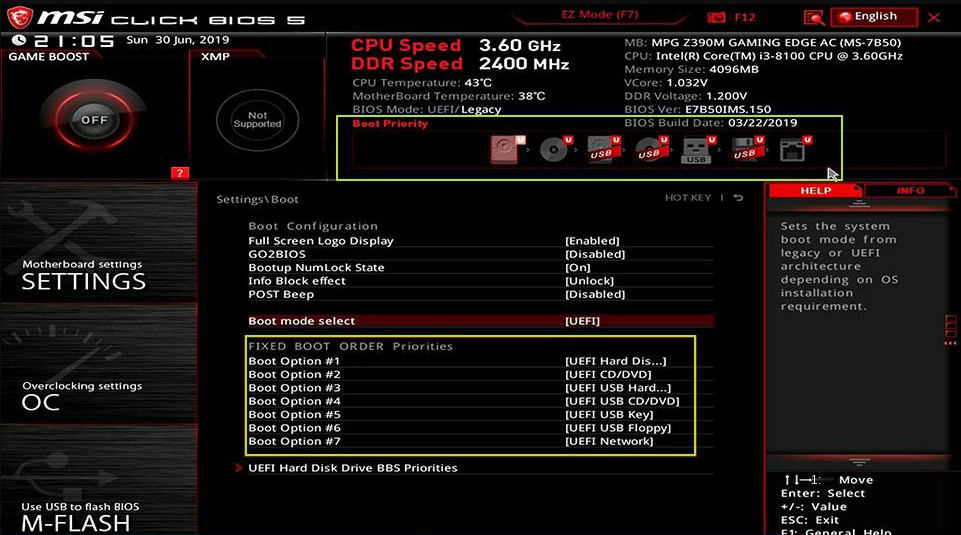
Step 4: After booting the computer from the bootable USB flash drive and entering the application, select the option Data Backup. This option is equivalent to completely cloning the hard disk to other hard disks, so the hard disk capacity for saving backup files needs to be larger.
Step 5: Select the hard disk to back up files in the source list, select the hard disk to save files in the destination list, and finally click the button clone and wait for the cloning to complete to successfully back up the computer files.

Step 6: If you only need to transfer some important files, the function Data Transfer will be more suitable for you.

Step 7: You can click on each disk drive letter (C/D/E/F, etc.) to find the files to be transferred. It is recommended that you transfer them to an external disk. The operation of transferring data is very simple. For example, if you want to transfer the data in the C drive to the G drive, you can first select the C drive on the upper left, select the G drive on the upper right, and then select the files in the C drive, and click the Copy function button in the middle. Disk data can be easily transferred. If there is a file you want to delete, you can also click the Delete button in the middle after selecting the file, but the deletion operation cannot be undone, please operate with caution.

Kind tips If you find that files are lost during the process of backing up or transferring data, please select the option Undeleter on the main function interface to perform data recovery operations.