Windows 10 offers automatic method for the users to install a new rollout through Settings app. However, the process is not as smooth as it seems always rather; you might end up encountering errors and complications. Some error codes may appear preventing the system from looking for the new patches or even installing them after downloading. 0x8024001d is such an annoying error code responsible for the failure to install an update. Furthermore, “RSAT installer encountered an error: 0x8024001d” may occur when you attempt to re-install the tool after the successful installation of a patch.
It’s hard to assume truly from where error 0x8024001d is generated and forbidding the update installation to the system. Generally, such issues occur from wrongly configured Windows Registry entries, invalid Date & Time, corrupted Windows file system, and internet access problems. Besides, defective Windows Update services, misconfigured hard disk, malware infection can bring forth the same. Although, some common fixes might rectify the error.
Here is how to Fix Windows update Error 0x8024001d –
1] Prepare Windows 10 for successful RSAT installation
After upgrading Windows 10, you find Remote Server Administration Tools missing from your system. Once you download RSAT tool manually and try to install it, the process throws error 0x8024001d. If the same happens to you, go through the below steps for a successful installation.
- Press – Windows + S.
- Type – cmd.
- Right-click on Command Prompt and choose – Run as administrator.
- To allow User Account Control, click – Yes.
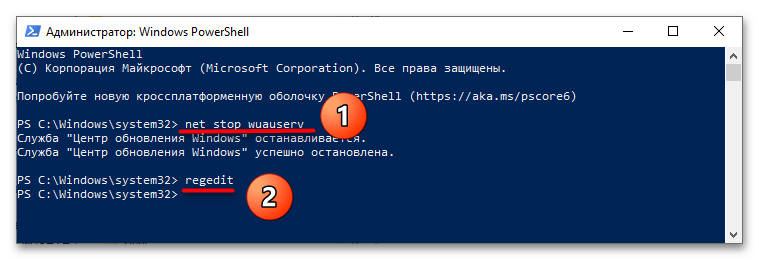
- In the black pane, insert –
net stop wuauserv. - Hit – Enter.
- Minimize Command Prompt.
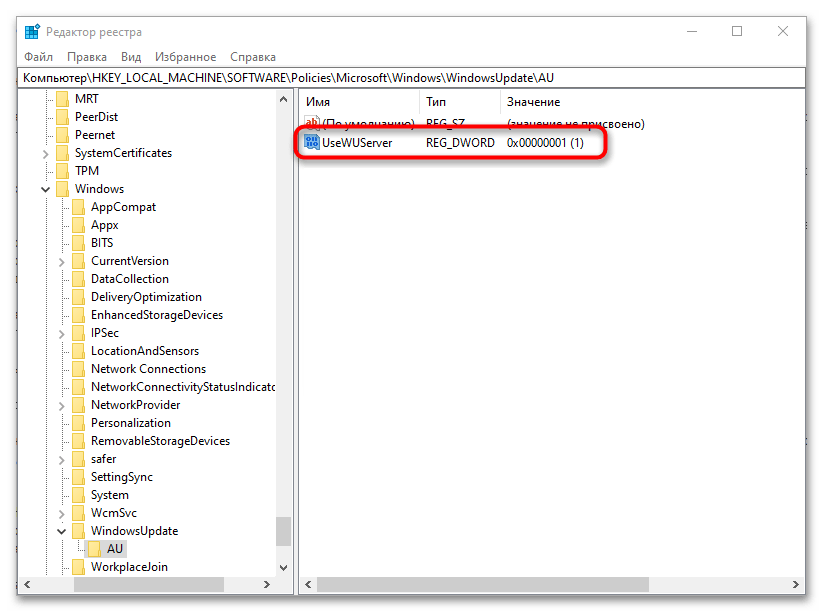
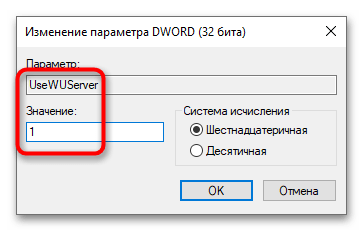
- Now, Open Registry Editor.
- Navigate to –
HKEY_LOCAL_MACHINE\SOFTWARE\Policies\Microsoft\Windows\WindowsUpdate\AU
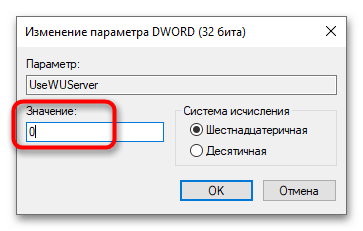
- From right-pane, double-click – UseWUServer.
- Put 0 in the Value data box.
- Click – OK.
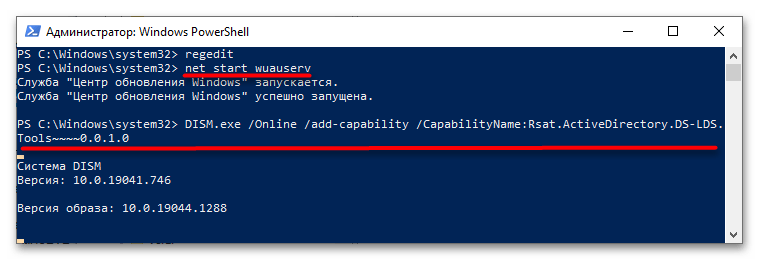
- Go back to Command Prompt.
- Run –
net start wuauservcommand. - Thereafter, copy the following command-line and paste the same in elevated Command Prompt –
DISM.exe /Online /add-capability /CapabilityName:Rsat.ActiveDirectory.DS-LDS.Tools~~~~0.0.1.0- Press – Enter.
- Now, revert the UseWUServer value to 1 that you changed through Registry Editor.
- Reboot Windows 10.
- When the system powers up, try installing RSAT again.
- This will fix 0x8024001d RSAT error.
2] Run System File checker
Oftentimes, the system finds it complicated to read the files necessary to complete an installing process. Hence, some unexpected errors might show up one of which is Windows update Error 0x8024001d. To obliterate these error codes, fixing the system files is only the option.
Some errors are too associated with missing system components or corrupted ones. The one tool that can fix all of these torments is System File Checker. But if the found corruption is too much complicated, you might need to run DISM tool to make the System File checker work. Therefore, we will run the DISM command-line prior to SFC scan in order to save some time.
- Click search icon present on taskbar.
- Type – cmd.
- Press – Ctrl+ Shift+ Enter.
- Permit User Account Control by hitting – Yes.
- Copy-paste the following commands in the black pane one by one and hit Enter after each–
dism /online /cleanup-image /scanhealth
dism /online /cleanup-image /checkhealth
dism /online /cleanup-image /restorehealth
- Once you are done running the above commands, type in
sfc /scannowand then press – Enter. - Wait and let the scanning process ends fully.
- If the found corruption gets fixed, close Command Prompt and reboot the PC.
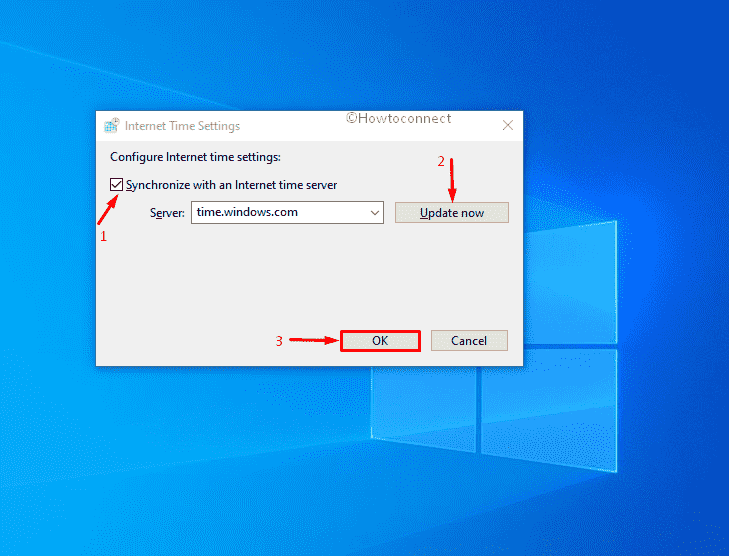
3] Set correct the Date & Time
Windows update process often fails to initiate if the Date & Time settings are incorrect. This happens when someone changes time zone and the automatic syncing of time is not toggled on. However, this can be easily settled by adjusting Date & Time Settings. Here are the steps to follow –
- Press – Windows + R.
- In the Run command, type – control.
- Click – OK.
- Set the View by option to Category.
- Click – Clock and Region.
- From the right pane of the subsequent page, hit – Date and Time.
- Shift to Internet Time tab.
- Click – Change settings.
- Check the box set before Synchronize with an Internet time server.
- Hit – Update now.
- Finally, click – OK.
4] Reconnect internet connection
The autonomous Windows updating process starts only when a stable internet connection is available. If you have encountered Windows update Error 0x8024001d unexpectedly, check the internet connection first for proper connectivity.
When everything seems alright, disconnect the computer from Wi-Fi connection or remove the ethernet cable for the time being. After some time, reconnect the connections and try updating Windows again. This will possibly resolve the issue.
5] Reset Windows Update Service
In order to function Windows updating Process properly, number of services work together. If accidentally any of these services are unavailable in Windows, the updating process will end up in trouble and may bring forth error 0x8024001d. Resetting the Windows Update Service and other associate components may help in such a case.
- Click the Start button.
- Type in – cmd.exe.
- Press – Ctrl + Shift + Enter.
- When User Account Control prompts, click – Yes.
- Copy the following commands in turn and paste them into the appearing black pane. Don’t forget to press Enter after each line –
net stop wuauserv

net stop cryptSvc

net stop bits

net stop msiserver

ren C:\Windows\SoftwareDistribution SoftwareDistribution.old

ren C:\Windows\System32\catroot2 Catroot2.old

net start wuauserv

net start cryptSvc

net start bits

net start msiserver
- Close Command Prompt.
- Restart your Windows machine.
- After signing back in, check whether the error shows up anymore.
6] Start Windows in Clean Boot to fix 0x8024001d RSAT
Clean Boot is a specialized startup process where Windows negates all third-party services, applications, and settings and runs with default setup only. Quite often detrimental third-party suits, services are too responsible to block the Windows updating process hence you can see Error 0x8024001d on screen. To eliminate this issue, boot Windows in Clean Boot and see if it helps. Guidelines are as following –
- Press – Windows key.
- Type – msconfig.exe.
- Hit – Enter to launch System Configuration.
- Select the radio button present before Selective startup.
- Uncheck – Load startup items.
- Shift to Services tab.
- Tick the checkbox set for Hide all Microsoft services.
- Click – Disable all.
- Move to the Startup tab.
- Click the link – Open Task Manager.
- When the dedicated window turns up, disable all startup programs.
- For that, right-click on each application individually and choose – Disable.
- Go back to System Configuration window.
- Click Apply and then OK.
- Restart the PC.
- When PC starts in clean boot mode, try updating Windows.
7] Unplug USB devices
USB peripherals like speaker, mouse, keyboard, scanner/printers are also found to be causing trouble in Windows updating process hence you can experience Error 0x8024001d. This might seem strange and the exact reason behind this is yet to be known. There is no official explanation from Microsoft as well to settle down the matter.
For instance, you can unplug the USB device that is causing trouble until the Windows updating process ends up smoothly. If you don’t know which specific accessory is at fault, pull out cords of all peripherals gently. Reconnect necessary peripherals when the system finishes installing updates successfully.
8] Run Windows Update Troubleshooter
This is quite normal that the Windows update entangled with numerous bugs and issues from time to time. Starting from searching the latest patches to installing them to Windows, you may come across error codes obstructing the process. Hence, Microsoft came up with a suitable utility so that users can fix the associated issues and have the latest patches installed smoothly. Windows Update Troubleshooter exists in every version of the Operating System and makes sure you utilize this in case of problems.
- Press – Windows + I.
- Click – Update & Security.
- From the left sidebar, choose – Troubleshoot.
- Move to right-pane and then click – Additional troubleshooters.
- Select – Windows update.
- From the expanded tray, click – Run the troubleshooter.
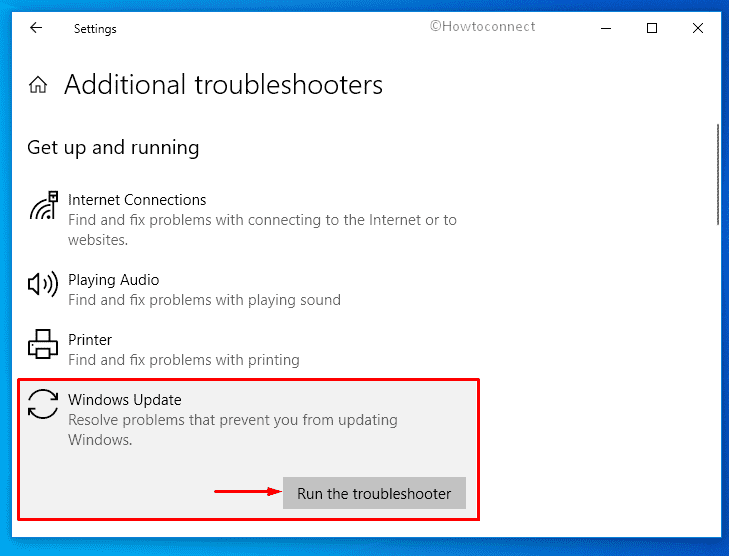
- Comply with on-screen instructions to continue the process.
- After scanning the system; if the utility comes with a resolution, click – Apply this fix.
9] Fix the hard Disk corruption
Check disk tool is an amazing utility that can bring forward hard disk defective areas and resolve them automatically. Since error 0x8024001d is often caused by poor portions in the Hard Disk, running the tool may help to resolve the issue. Follow the below steps to run the utility in Windows –
- Open Command Prompt as administrator.
- In the command prompt, insert –
chkdsk C: /f /r /x - Hit – Enter.
- If the volume is currently in use, press Y to initiate the scanning process at the next startup.
10] Uninstall third-Party anti-virus
Anti-malware programs often misinterpret the update components as malware and block them eventually. This doesn’t only obstruct the Windows Update but also generates error codes like 0x8024001d. You can uninstall the third-party anti-malware programs straightway following the below instructions –
- Right-click Start button and choose – Run.
- In the dialog box, type – appwiz.cpl.
- Click – OK.
- When the ‘Programs and Features’ window shows up, look for the third-party antivirus program installed on your system.
- Right-click the same and then select – Uninstall.
- Comply with on-screen instructions to finish the removal process.
11] Disable Default Windows Firewall
Disabling the Firewall is not recommended at all since malware is always looking for a sleek chance to break into the system. However, we have found some update files might have issues with the Windows Firewall. Keeping the service enabled, you cannot accomplish the installation process and therefore, disable Firewall temporarily using the below steps –
- Press – Windows key.
- In the search bar, type – firewall.cpl.
- Hit – Enter.
- From the left sidebar of the newly appeared window, click – Turn Windows Defender Firewall on or off.
- Select the checkboxes of Turn off Windows Defender Firewall (not recommended) for both Private network settings and Public network settings.
- Click – OK.
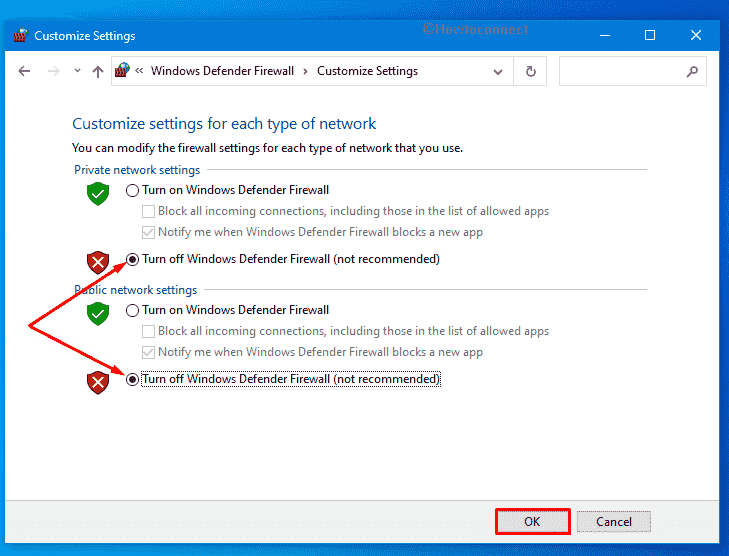
Note – Don’t forget to enable Windows Firewall after resolving the update error.
12] Download the update from Windows Update Catalog
Windows Update Error 0x8024001d mostly arises when the system tries to install updates through an autonomous process. And most of the time, it gets fixed when you initiate the process manually. Doing so is quite simple if you follow the below steps precisely –
- Visit the webpage of Windows Update Catalog.
- Click the search bar of the website.
- Type KB number you want to get.
- Click – Search.
- When the result appears, look for the version that matches your PC specs.
- Click Download present next to the suitable package.
- Doing so will bring forth a new window.
- Click the link available there.
- If prompted, opt for Save File and then click – OK.
- Double-click the msu file you downloaded.
- Allow User Account Control by clicking – Yes.
- Comply with on-screen instructions to finish the process.
Methods list:
1] Prepare Windows 10 for successful RSAT installation
2] Run System File checker
3] Set correct the Date & Time
4] Reconnect internet connection
5] Reset Windows Update Service
6] Start Windows in Clean Boot
7] Unplug USB devices
8] Run Windows Update Troubleshooter
9] Fix the hard Disk corruption
10] Uninstall third-Party anti-virus
11] Disable Default Windows Firewall
12] Download the update from Windows Update Catalog
That’s all!!!
Repair any Windows problems such as Blue/Black Screen, DLL, Exe, application, Regisrty error and quickly recover system from issues using Reimage.
If Windows 11 or Windows 10 is displaying error 0x8024001D while installing Windows Update or while downloading a game or an app from Microsoft Store, the suggestions mentioned in this post are sure to help you fix the problem. The most common causes of Windows update errors and Microsoft Store errors are the corrupted Windows Update Components and corrupted Microsoft Store cache. According to the affected users, a few minutes after starting the download from Microsoft Store, they see the error code 0x8024001D.
0x8024200D (WU_E_UH_NEEDANOTHERDOWNLOAD)

Go through the following solutions to fix the 0x8024001D Windows Update or Microsoft Store error.
- Rename the Software Distribution folder
- Reset the Windows Update Components
- Update Microsoft Store
- Clear Microsoft Store cache or reset Microsoft Store
Below, we have explained all these fixes in detail.
1] Rename the Software Distribution folder
The Software Distribution folder is an important component of Windows Update. It contains the temporary files needed to install the latest Windows updates on a user’s system. In case Windows Update fails, deleting the contents inside the Software Distribution folder or renaming it can fix the issue. Deleting the contents inside it is considered safe because Windows recreate the files inside it if removed. Even if you delete the Software Distribution folder, Windows will recreate it.
If any file inside the Software Distribution folder is corrupted, it will create issues while installing the Windows Updates due to which Windows displays an error code. Either rename or delete the contents inside the Software Distribution folder and check if it helps.
Open an elevated command prompt windows, type the following commands one after the other, and hit Enter:
net stop wuauserv
net stop bits
rename c:\windows\SoftwareDistribution SoftwareDistribution.bak
net start wuauserv
net start bits
2] Reset the Windows Update Components
This error code usually appears when running the Windows Update Standalone Installer. To fix the error, reset the Windows Update Components. Resetting Windows Update Components is one of the troubleshooting methods to fix Windows Update problems. You can do it manually or use the Reset Windows Update Tool. After performing this action, the Windows update should get installed on your system without any error.
3] Update Microsoft Store
For the best experience on Microsoft Store, it is always suggested to use the latest version of Microsoft Store. Issues can occur if you are using an outdated version of Store. Check for Microsoft Store updates manually and see if it fixes the problem. To update Microsoft Store, follow the steps below:
- Launch Microsoft Store.
- If you are a Windows 11 user, go to “Library > Get Updates.”
- Windows 10 users have to select the See more option and then go to “Downloads and updates > Get updates.”
- If an update for Microsoft Store is available, it will start installing automatically.
After updating Microsoft Store, the issue should get fixed. If not, try the next solution.
4] Clear Microsoft Store cache or reset Microsoft Store

If the Microsoft Store cache is corrupted, you will experience several errors while installing and updating apps and games via the Microsoft Store. One way to fix the corrupted Microsoft Store cache problem is to clear the cache. To do so, open an elevated Command Prompt and type the following command. After that, hit Enter.
WSReset.exe
This process will take some time. After the process gets completed, Microsoft Store will be launched automatically. Now, check if you can download or update apps or games from the Store.
If after clearing the Microsoft Store cache, the issue still persists, reset Store. An option to reset Microsoft Store is available in Windows 11/10 Settings. The following instructions will guide you on this.
- Open Windows 11/10 Settings.
- Go to “Apps > Apps & features.”
- Scroll down and locate Microsoft Store.
- In Windows 10. select Microsoft Store and click on Advanced options.
- In Windows 11, click on the three horizontal dots next to Microsoft Store and select Advanced options.
- Scroll down and click on the Reset button.
The above action will delete the app’s data and sign-in preferences. After resetting Microsoft Store, you have to sign into Store again.
Read: Fix Microsoft Store error 0x80131505
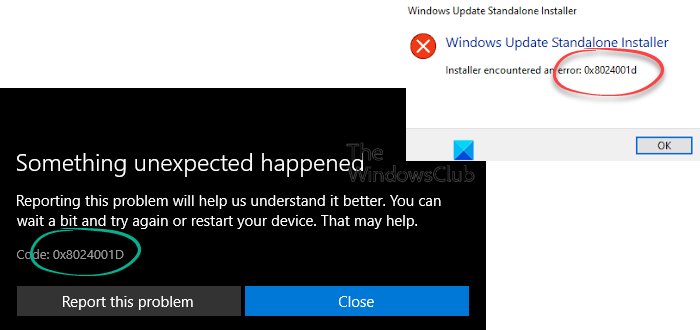
Windows Update Standalone Installer encountered an error 0x8024001d
If you see Windows Update Standalone Installer Error 0x8024001d when running Windows Update Standalone Installer, we suggest you run Windows Update Troubleshooter and Enable Windows Identity Foundation and see if it helps.
How do I fix Installer encountered an error 0x8024001D?
You may see the “Installer encountered an error:0x8024001d” while installing RSAT on your system. By using the RSAT or Remote Server Administration Tool, the IT administrators can manage roles and features in Windows Server remotely. If you cannot install RSAT via Windows Installer, you can try installing it via Windows PowerShell. If this does not work, you have to modify a Registry key.
How do I fix error code 0x8024402c?
The Windows Update error 0x8024402c usually occurs if the firewall or proxy settings on your computer are configured incorrectly. Due to this, the connection to the Windows Update servers fails. To fix this issue, you have to clear the proxy cache after removing characters from the proxy server list. If this does not work, enable the “Automatically detect settings” option in Internet Options.
How do I fix error 0x8024402f?
If you see the error 0x8024402f while installing Windows Update, the first thing that you should do is to run the Windows Update Troubleshooter. Troubleshooters are automated tools that help users fix problems that they face on their Windows devices. In addition to this, you can also try resetting Windows Update Components and deleting the contents of the Software Distribution folder.
There might be a background application interfering with Windows Update. You can check this by troubleshooting your computer in a Clean Boot state. If you find such a program, consider uninstalling it or check for its updated version on its official website.
Read next: Fix Windows Update Error 0x800f080a.

Remote Server Administration Tools — позволяет администрировать контроллер домена со своего рабочего компа. В моём случае с Windows 10.
RSAT — Remote Server Administration Tools
Есть три способа установки:
- Общий вариант, когда мы качаем пакет и устанавливаем его вручную.
- Через дополнительные компоненты.
- Через PowerShell.
Ошибка 0x8024001d
При общем варианте установки вы можете увидеть ошибку:
Установщик обнаружил ошибку 0x8024001d
Это означает, что ваша версия Windows больше не поддерживает общий вариант установки RSAT. Устанавливайте через дополнительные компоненты или через PowerShell.
Ошибка 0x800f0954
При попытке установить RSAT через дополнительные компоненты вы можете столкнуться с ошибкой «сбой установки».
В журнале при этом ничего вразумительного не написано.
При попытке установить RSAT через PowerShell та же ошибка выглядит несколько иначе.
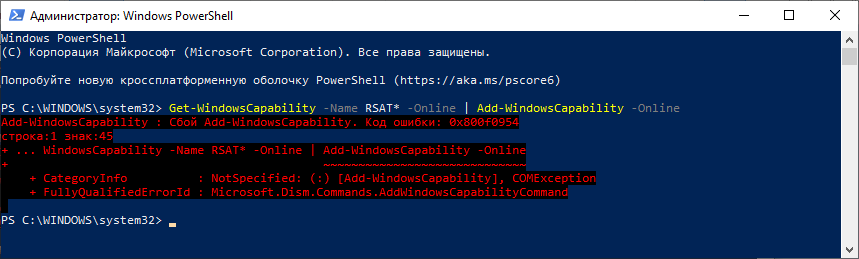
Get-WindowsCapability -Name RSAT* -Online | Add-WindowsCapability -OnlineСбой Add-WindowsCapability. Код ошибки: 0x800f0954
Покопавшись я понял, что проблема кроется в политиках домена, скорее всего, дополнительные компоненты пытаются установиться через доменный WSUS, а нужных пакетов там нет. С одной стороны это и не плохо, нечего юзерам ставить всякое админское ПО. С другой стороны, мне-то оно нужно.
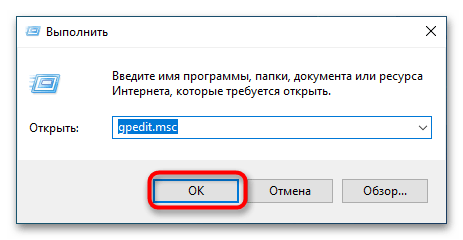
Решим проблему через локальные политики. Запускаем gpedit.msc:
gpedit.msc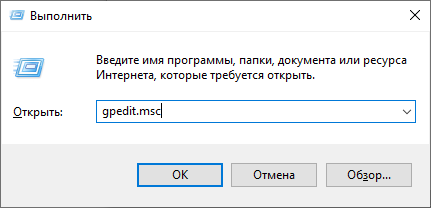
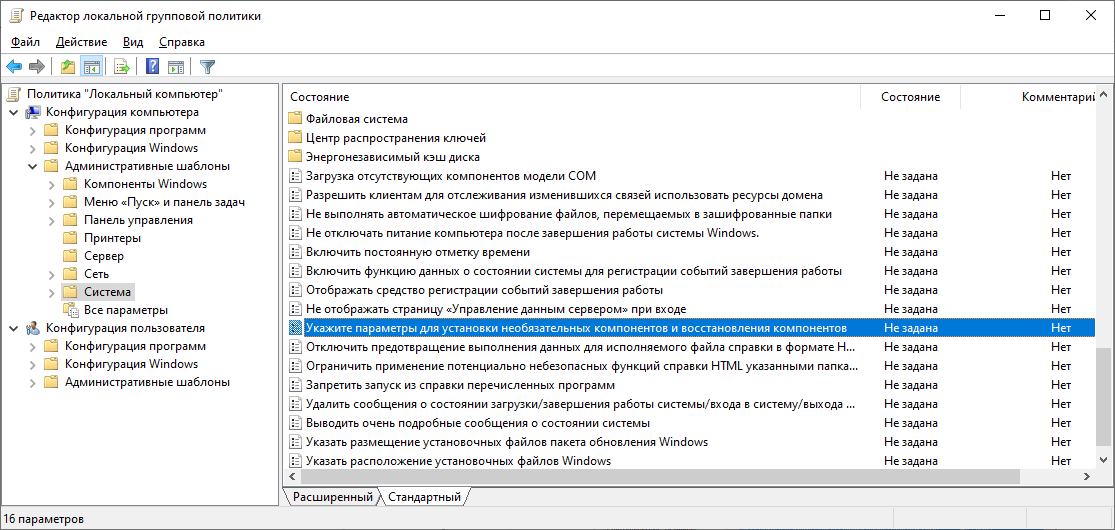
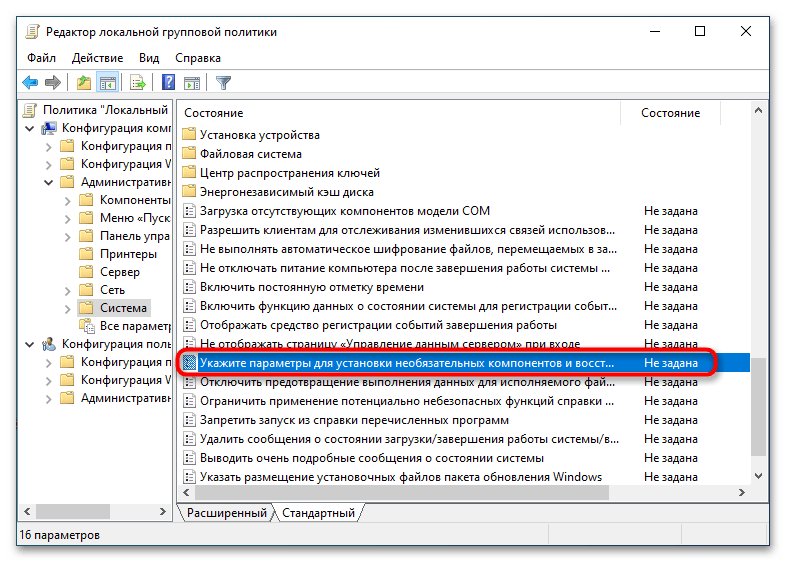
Открывается редактор локальной групповой политики. Нам нужен раздел Конфигурация компьютера > Административные шаблоны > Система > Укажите параметры для установки необязательных компонентов и восстановления компонентов. Или Computer Configuration > Administrative Templates > System > Specify settings for optional component installation and component repair.
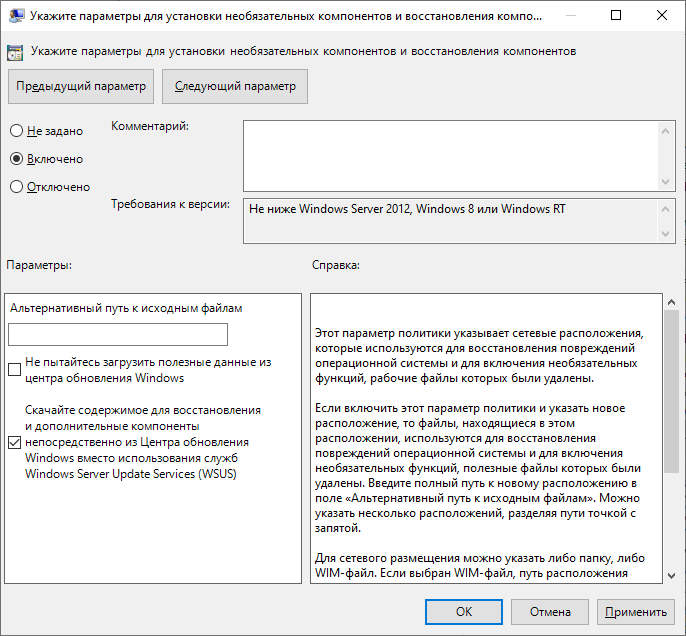
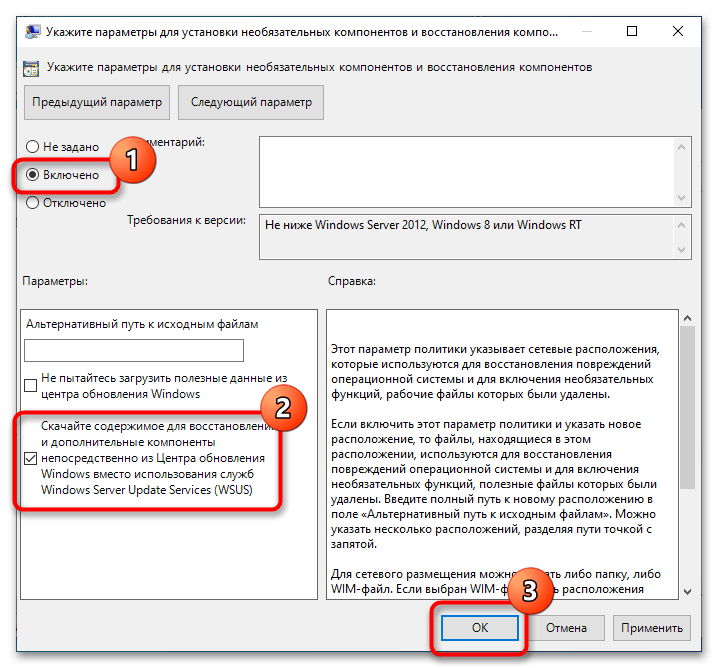
Редактируем политику. Включаем и ставим галку «Скачайте содержимое для восстановления и дополнительные компоненты непосредственно из Центра обновления Windows вместо использования служб Windows Server Update Services (WSUS)».
OK.
Теперь, если доступ в Интернет есть, всё установится. Проверяем установку RSAT через дополнительные компоненты.
Проверяем установку RSAT через PowerShell.
Get-WindowsCapability -Name RSAT* -Online | Add-WindowsCapability -Online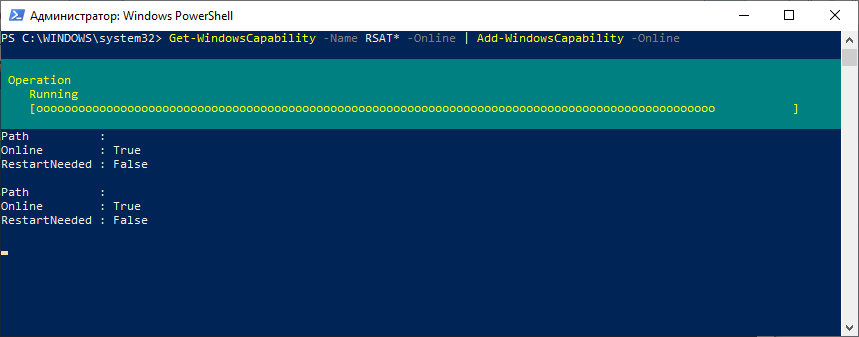
Всё устанавливается.

Содержание
- Способ 1: Настройка локальной политики
- Способ 2: Переустановка RSAT
- Способ 3: Перерегистрация библиотеки wups2
- Вопросы и ответы
Столкнуться с ошибкой с кодом 0x8024001d можно при установке или обновлении компонента Remote Server Administration Tools (RSAT), позволяющего управлять Windows 10 с удаленного клиентского компьютера. Сбой установки может быть вызван повреждением файлов RSAT, некоторых ключей реестра, а также некорректных настроек политик Windows.
Способ 1: Настройка локальной политики
Наиболее вероятной причиной описываемой ошибки является недоступность необходимых пакетов компонента при попытке его установки через доменный WSUS. Чтобы Windows 10 смогла скачать RSAT непосредственно из «Центра обновлений», в локальных политиках нужно включить и настроить один параметр.
- Откройте «Редактор локальных групповых политик», для чего выполните в вызванном нажатием комбинации Win + R окошке команду gpedit.msc.
- В левой колонке открывшейся оснастке перейдите по цепочке «Конфигурация компьютера» → «Административные шаблоны» → «Система» и дважды кликните по политике «Укажите параметры для установки необязательных компонентов и восстановления компонентов» в правой колонке, чтобы открыть ее настройки.
- Включив политику, отметьте флажком опцию «Скачайте содержимое для восстановления и дополнительные компоненты непосредственно из Центра обновления Windows вместо использования служб Windows Server Update Services (WSUS)». Сохраните настройки.
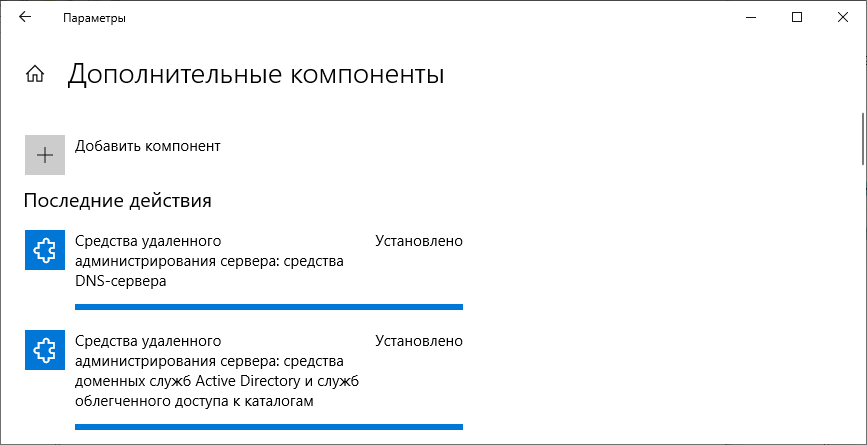
Готово, можете устанавливать RSAT через приложение «Параметры», перейдя в раздел «Приложения и возможности» → «Добавить компонент» → «Дополнительные компоненты».
Способ 2: Переустановка RSAT
Поскольку ошибка также может быть вызвана повреждением файлов компонента, стоит попробовать выполнить переустановку средства удаленного администрирования сервера.
- Запустите от имени администратора «Командную строку» или «Windows PowerShell».

- Выполните в ней команду net stop wuauserv, чтобы остановить службу компонента обновления.
- Откройте «Редактор реестра», для чего тут же в консоли выполните команду regedit.
- Разверните в левой колонке ветку HKLMSOFTWAREPoliciesMicrosoftWindowsWindowsUpdateAU и дважды кликните по параметру «UseWUServer» в правой колонке.
- В открывшемся диалоговом окошке измените его значение с «1» на «0». Не закрывайте окно редактора.
- Вернитесь в «Командную строку» и выполните одну за другой две эти команды:
net start wuauserv
DISM.exe /Online /add-capability /CapabilityName:Rsat.ActiveDirectory.DS-LDS.Tools~~~~0.0.1.0
- Вернитесь в «Редактор реестра» и восстановите исходное значение «UseWUServer», то есть «1».
Перезагрузите компьютер. В результате RSAT будет переустановлен.
Способ 3: Перерегистрация библиотеки wups2
Менее трудоемким, но и менее надежным решением является перерегистрация системной библиотеки wups2.dll. Воспользоваться этим способом вы можете, если модули RSAT не устанавливаются в разделе «Дополнительные компоненты» приложения «Параметры».
- Откройте «Редактор реестра» командой regedit как было показано выше.
- Перейдите к ключу HKLMSOFTWAREPoliciesMicrosoftWindowsWindowsUpdateAU и измените значение параметра UseWUServer с «1» на «0» (см. шаги 4-5 в предыдущем способе).
- Откройте от имени администратора «Командную строку» или «Windows PowerShell» и последовательно выполните три эти команды:
net stop wuauserv
regsvr32 %windir%system32wups2.dll
net start wuauserv

- Восстановите исходное значение параметра «UseWUServer» (см. шаг 7 в предыдущем способе).
Перезагрузите компьютер и попробуйте установить RSAT через «Дополнительные компоненты» (как это сделать, написано в конце Способа 1).
Если избавиться от ошибки 0x8024001d не получается, можно решиться на радикальную меру — сброс Windows 10 к исходному состоянию.
Подробнее: Возвращаем Windows 10 к заводскому состоянию
Содержание
- Способ 1: Настройка локальной политики
- Способ 2: Переустановка RSAT
- Способ 3: Перерегистрация библиотеки wups2
- Вопросы и ответы
Столкнуться с ошибкой с кодом 0x8024001d можно при установке или обновлении компонента Remote Server Administration Tools (RSAT), позволяющего управлять Windows 10 с удаленного клиентского компьютера. Сбой установки может быть вызван повреждением файлов RSAT, некоторых ключей реестра, а также некорректных настроек политик Windows.
Способ 1: Настройка локальной политики
Наиболее вероятной причиной описываемой ошибки является недоступность необходимых пакетов компонента при попытке его установки через доменный WSUS. Чтобы Windows 10 смогла скачать RSAT непосредственно из «Центра обновлений», в локальных политиках нужно включить и настроить один параметр.
- Откройте «Редактор локальных групповых политик», для чего выполните в вызванном нажатием комбинации Win + R окошке команду
gpedit.msc. - В левой колонке открывшейся оснастке перейдите по цепочке «Конфигурация компьютера» → «Административные шаблоны» → «Система» и дважды кликните по политике «Укажите параметры для установки необязательных компонентов и восстановления компонентов» в правой колонке, чтобы открыть ее настройки.
- Включив политику, отметьте флажком опцию «Скачайте содержимое для восстановления и дополнительные компоненты непосредственно из Центра обновления Windows вместо использования служб Windows Server Update Services (WSUS)». Сохраните настройки.
Готово, можете устанавливать RSAT через приложение «Параметры», перейдя в раздел «Приложения и возможности» → «Добавить компонент» → «Дополнительные компоненты».
Поскольку ошибка также может быть вызвана повреждением файлов компонента, стоит попробовать выполнить переустановку средства удаленного администрирования сервера.
- Запустите от имени администратора «Командную строку» или «Windows PowerShell».
- Выполните в ней команду
net stop wuauserv, чтобы остановить службу компонента обновления. - Откройте «Редактор реестра», для чего тут же в консоли выполните команду
regedit. - Разверните в левой колонке ветку
HKLMSOFTWAREPoliciesMicrosoftWindowsWindowsUpdateAUи дважды кликните по параметру «UseWUServer» в правой колонке. - В открывшемся диалоговом окошке измените его значение с «1» на «0». Не закрывайте окно редактора.
- Вернитесь в «Командную строку» и выполните одну за другой две эти команды:
net start wuauserv
DISM.exe /Online /add-capability /CapabilityName:Rsat.ActiveDirectory.DS-LDS.Tools~~~~0.0.1.0 - Вернитесь в «Редактор реестра» и восстановите исходное значение «UseWUServer», то есть «1».
Перезагрузите компьютер. В результате RSAT будет переустановлен.
Способ 3: Перерегистрация библиотеки wups2
Менее трудоемким, но и менее надежным решением является перерегистрация системной библиотеки wups2.dll. Воспользоваться этим способом вы можете, если модули RSAT не устанавливаются в разделе «Дополнительные компоненты» приложения «Параметры».

- Откройте «Редактор реестра» командой
regeditкак было показано выше. - Перейдите к ключу
HKLMSOFTWAREPoliciesMicrosoftWindowsWindowsUpdateAUи измените значение параметра UseWUServer с «1» на «0» (см. шаги 4-5 в предыдущем способе). - Откройте от имени администратора «Командную строку» или «Windows PowerShell» и последовательно выполните три эти команды:
net stop wuauserv
regsvr32 %windir%system32wups2.dll
net start wuauserv - Восстановите исходное значение параметра «UseWUServer» (см. шаг 7 в предыдущем способе).
Перезагрузите компьютер и попробуйте установить RSAT через «Дополнительные компоненты» (как это сделать, написано в конце Способа 1).
Если избавиться от ошибки 0x8024001d не получается, можно решиться на радикальную меру — сброс Windows 10 к исходному состоянию.
Подробнее: Возвращаем Windows 10 к заводскому состоянию
Еще статьи по данной теме:
Помогла ли Вам статья?
Remote Server Administration Tools — позволяет администрировать контроллер домена со своего рабочего компа. В моём случае с Windows 10.
RSAT — Remote Server Administration Tools
Есть три способа установки:
- Общий вариант, когда мы качаем пакет и устанавливаем его вручную.
- Через дополнительные компоненты.
- Через PowerShell.
Ошибка 0x8024001d
При общем варианте установки вы можете увидеть ошибку:
Установщик обнаружил ошибку 0x8024001d
Это означает, что ваша версия Windows больше не поддерживает общий вариант установки RSAT. Устанавливайте через дополнительные компоненты или через PowerShell.
Ошибка 0x800f0954
При попытке установить RSAT через дополнительные компоненты вы можете столкнуться с ошибкой «сбой установки».
В журнале при этом ничего вразумительного не написано.
При попытке установить RSAT через PowerShell та же ошибка выглядит несколько иначе.
Get-WindowsCapability -Name RSAT* -Online | Add-WindowsCapability -OnlineСбой Add-WindowsCapability. Код ошибки: 0x800f0954
Покопавшись я понял, что проблема кроется в политиках домена, скорее всего, дополнительные компоненты пытаются установиться через доменный WSUS, а нужных пакетов там нет. С одной стороны это и не плохо, нечего юзерам ставить всякое админское ПО. С другой стороны, мне-то оно нужно.
Решим проблему через локальные политики. Запускаем gpedit.msc:
gpedit.msc
Открывается редактор локальной групповой политики. Нам нужен раздел Конфигурация компьютера > Административные шаблоны > Система > Укажите параметры для установки необязательных компонентов и восстановления компонентов. Или Computer Configuration > Administrative Templates > System > Specify settings for optional component installation and component repair.
Редактируем политику. Включаем и ставим галку «Скачайте содержимое для восстановления и дополнительные компоненты непосредственно из Центра обновления Windows вместо использования служб Windows Server Update Services (WSUS)».
OK.
Теперь, если доступ в Интернет есть, всё установится. Проверяем установку RSAT через дополнительные компоненты.
Проверяем установку RSAT через PowerShell.
Get-WindowsCapability -Name RSAT* -Online | Add-WindowsCapability -Online
Всё устанавливается.
- Remove From My Forums
-
Вопрос
-
После обновления ОС до версии 2004 пропали оснастки RSAT, при попытке установить пакетов WindowsTH-RSAT_WS2016-x64.msu, WindowsTH-RSAT_WS_1803-x64.msu, WindowsTH-RSAT_WS_1709-x64.msu
получаю ошибку 0x8024001d. Возможно есть еще какие то пакеты?
Ответы
-
уже давно все инструменты RSAT ставятся через Power Shell:
Get-WindowsCapability -Name RSAT* -Online | Add-WindowsCapability -Online
-
Помечено в качестве ответа
4 июня 2020 г. 8:33
-
Помечено в качестве ответа
-
так на страничке RSAT написано что на новых ос оснастки уже встроены и их просто необходимо включить
посмотрите инстукцию установки на сайте загрузки rsat
The opinion expressed by me is not an official position of Microsoft
-
Помечено в качестве ответа
Vector BCOModerator
4 июня 2020 г. 8:33
-
Помечено в качестве ответа
-
Пуск — Параметры — Приложения — Дополнительные компоненты — Добавить компонент
Скажите — ГДЕ я тут указал, что нужна Панель управления и ее
Установка/удаление программ ???Как бы пора уходить плавно от старой панели управления в новые интерфейсы, пока еще есть возможность
-
Изменено
SlalomJohn
2 июня 2020 г. 12:24 -
Помечено в качестве ответа
Vector BCOModerator
4 июня 2020 г. 8:34
-
Изменено
-
Спасибо за уделённое время. После советов, появилась другая ошибка. Решение оказалось простым. Прямой интернет. Кривая прокси в организации, не давала обновить. Всё заработало.
-
Помечено в качестве ответа
Vector BCOModerator
4 июня 2020 г. 8:34 -
Изменено
ПётрВ
4 июня 2020 г. 10:25
-
Помечено в качестве ответа
Windows 10 offers automatic method for the users to install a new rollout through Settings app. However, the process is not as smooth as it seems always rather; you might end up encountering errors and complications. Some error codes may appear preventing the system from looking for the new patches or even installing them after downloading. 0x8024001d is such an annoying error code responsible for the failure to install an update. Furthermore, “RSAT installer encountered an error: 0x8024001d” may occur when you attempt to re-install the tool after the successful installation of a patch.
It’s hard to assume truly from where error 0x8024001d is generated and forbidding the update installation to the system. Generally, such issues occur from wrongly configured Windows Registry entries, invalid Date & Time, corrupted Windows file system, and internet access problems. Besides, defective Windows Update services, misconfigured hard disk, malware infection can bring forth the same. Although, some common fixes might rectify the error.
Here is how to Fix Windows update Error 0x8024001d –
1] Prepare Windows 10 for successful RSAT installation
After upgrading Windows 10, you find Remote Server Administration Tools missing from your system. Once you download RSAT tool manually and try to install it, the process throws error 0x8024001d. If the same happens to you, go through the below steps for a successful installation.
- Press – Windows + S.
- Type – cmd.
- Right-click on Command Prompt and choose – Run as administrator.
- To allow User Account Control, click – Yes.
- In the black pane, insert –
net stop wuauserv. - Hit – Enter.
- Minimize Command Prompt.
- Now, Open Registry Editor.
- Navigate to –
HKEY_LOCAL_MACHINESOFTWAREPoliciesMicrosoftWindowsWindowsUpdateAU
- From right-pane, double-click – UseWUServer.
- Put 0 in the Value data box.
- Click – OK.
- Go back to Command Prompt.
- Run –
net start wuauservcommand. - Thereafter, copy the following command-line and paste the same in elevated Command Prompt –
DISM.exe /Online /add-capability /CapabilityName:Rsat.ActiveDirectory.DS-LDS.Tools~~~~0.0.1.0- Press – Enter.
- Now, revert the UseWUServer value to 1 that you changed through Registry Editor.
- Reboot Windows 10.
- When the system powers up, try installing RSAT again.
- This will fix 0x8024001d RSAT error.
2] Run System File checker
Oftentimes, the system finds it complicated to read the files necessary to complete an installing process. Hence, some unexpected errors might show up one of which is Windows update Error 0x8024001d. To obliterate these error codes, fixing the system files is only the option.
Some errors are too associated with missing system components or corrupted ones. The one tool that can fix all of these torments is System File Checker. But if the found corruption is too much complicated, you might need to run DISM tool to make the System File checker work. Therefore, we will run the DISM command-line prior to SFC scan in order to save some time.
- Click search icon present on taskbar.
- Type – cmd.
- Press – Ctrl+ Shift+ Enter.
- Permit User Account Control by hitting – Yes.
- Copy-paste the following commands in the black pane one by one and hit Enter after each–
dism /online /cleanup-image /scanhealth
dism /online /cleanup-image /checkhealth
dism /online /cleanup-image /restorehealth
- Once you are done running the above commands, type in
sfc /scannowand then press – Enter. - Wait and let the scanning process ends fully.
- If the found corruption gets fixed, close Command Prompt and reboot the PC.
3] Set correct the Date & Time
Windows update process often fails to initiate if the Date & Time settings are incorrect. This happens when someone changes time zone and the automatic syncing of time is not toggled on. However, this can be easily settled by adjusting Date & Time Settings. Here are the steps to follow –
- Press – Windows + R.
- In the Run command, type – control.
- Click – OK.
- Set the View by option to Category.
- Click – Clock and Region.
- From the right pane of the subsequent page, hit – Date and Time.
- Shift to Internet Time tab.
- Click – Change settings.
- Check the box set before Synchronize with an Internet time server.
- Hit – Update now.
- Finally, click – OK.
4] Reconnect internet connection
The autonomous Windows updating process starts only when a stable internet connection is available. If you have encountered Windows update Error 0x8024001d unexpectedly, check the internet connection first for proper connectivity.
When everything seems alright, disconnect the computer from Wi-Fi connection or remove the ethernet cable for the time being. After some time, reconnect the connections and try updating Windows again. This will possibly resolve the issue.
5] Reset Windows Update Service
In order to function Windows updating Process properly, number of services work together. If accidentally any of these services are unavailable in Windows, the updating process will end up in trouble and may bring forth error 0x8024001d. Resetting the Windows Update Service and other associate components may help in such a case.
- Click the Start button.
- Type in – cmd.exe.
- Press – Ctrl + Shift + Enter.
- When User Account Control prompts, click – Yes.
- Copy the following commands in turn and paste them into the appearing black pane. Don’t forget to press Enter after each line –
net stop wuauserv
net stop cryptSvc
net stop bits
net stop msiserver
ren C:WindowsSoftwareDistribution SoftwareDistribution.old
ren C:WindowsSystem32catroot2 Catroot2.old
net start wuauserv
net start cryptSvc
net start bits
net start msiserver
- Close Command Prompt.
- Restart your Windows machine.
- After signing back in, check whether the error shows up anymore.
6] Start Windows in Clean Boot to fix 0x8024001d RSAT
Clean Boot is a specialized startup process where Windows negates all third-party services, applications, and settings and runs with default setup only. Quite often detrimental third-party suits, services are too responsible to block the Windows updating process hence you can see Error 0x8024001d on screen. To eliminate this issue, boot Windows in Clean Boot and see if it helps. Guidelines are as following –
- Press – Windows key.
- Type – msconfig.exe.
- Hit – Enter to launch System Configuration.
- Select the radio button present before Selective startup.
- Uncheck – Load startup items.
- Shift to Services tab.
- Tick the checkbox set for Hide all Microsoft services.
- Click – Disable all.
- Move to the Startup tab.
- Click the link – Open Task Manager.
- When the dedicated window turns up, disable all startup programs.
- For that, right-click on each application individually and choose – Disable.
- Go back to System Configuration window.
- Click Apply and then OK.
- Restart the PC.
- When PC starts in clean boot mode, try updating Windows.
7] Unplug USB devices
USB peripherals like speaker, mouse, keyboard, scanner/printers are also found to be causing trouble in Windows updating process hence you can experience Error 0x8024001d. This might seem strange and the exact reason behind this is yet to be known. There is no official explanation from Microsoft as well to settle down the matter.
For instance, you can unplug the USB device that is causing trouble until the Windows updating process ends up smoothly. If you don’t know which specific accessory is at fault, pull out cords of all peripherals gently. Reconnect necessary peripherals when the system finishes installing updates successfully.
8] Run Windows Update Troubleshooter
This is quite normal that the Windows update entangled with numerous bugs and issues from time to time. Starting from searching the latest patches to installing them to Windows, you may come across error codes obstructing the process. Hence, Microsoft came up with a suitable utility so that users can fix the associated issues and have the latest patches installed smoothly. Windows Update Troubleshooter exists in every version of the Operating System and makes sure you utilize this in case of problems.
- Press – Windows + I.
- Click – Update & Security.
- From the left sidebar, choose – Troubleshoot.
- Move to right-pane and then click – Additional troubleshooters.
- Select – Windows update.
- From the expanded tray, click – Run the troubleshooter.
- Comply with on-screen instructions to continue the process.
- After scanning the system; if the utility comes with a resolution, click – Apply this fix.
9] Fix the hard Disk corruption
Check disk tool is an amazing utility that can bring forward hard disk defective areas and resolve them automatically. Since error 0x8024001d is often caused by poor portions in the Hard Disk, running the tool may help to resolve the issue. Follow the below steps to run the utility in Windows –
- Open Command Prompt as administrator.
- In the command prompt, insert –
chkdsk C: /f /r /x - Hit – Enter.
- If the volume is currently in use, press Y to initiate the scanning process at the next startup.
10] Uninstall third-Party anti-virus
Anti-malware programs often misinterpret the update components as malware and block them eventually. This doesn’t only obstruct the Windows Update but also generates error codes like 0x8024001d. You can uninstall the third-party anti-malware programs straightway following the below instructions –
- Right-click Start button and choose – Run.
- In the dialog box, type – appwiz.cpl.
- Click – OK.
- When the ‘Programs and Features’ window shows up, look for the third-party antivirus program installed on your system.
- Right-click the same and then select – Uninstall.
- Comply with on-screen instructions to finish the removal process.
11] Disable Default Windows Firewall
Disabling the Firewall is not recommended at all since malware is always looking for a sleek chance to break into the system. However, we have found some update files might have issues with the Windows Firewall. Keeping the service enabled, you cannot accomplish the installation process and therefore, disable Firewall temporarily using the below steps –
- Press – Windows key.
- In the search bar, type – firewall.cpl.
- Hit – Enter.
- From the left sidebar of the newly appeared window, click – Turn Windows Defender Firewall on or off.
- Select the checkboxes of Turn off Windows Defender Firewall (not recommended) for both Private network settings and Public network settings.
- Click – OK.
Note – Don’t forget to enable Windows Firewall after resolving the update error.
12] Download the update from Windows Update Catalog
Windows Update Error 0x8024001d mostly arises when the system tries to install updates through an autonomous process. And most of the time, it gets fixed when you initiate the process manually. Doing so is quite simple if you follow the below steps precisely –
- Visit the webpage of Windows Update Catalog.
- Click the search bar of the website.
- Type KB number you want to get.
- Click – Search.
- When the result appears, look for the version that matches your PC specs.
- Click Download present next to the suitable package.
- Doing so will bring forth a new window.
- Click the link available there.
- If prompted, opt for Save File and then click – OK.
- Double-click the msu file you downloaded.
- Allow User Account Control by clicking – Yes.
- Comply with on-screen instructions to finish the process.
Methods list:
1] Prepare Windows 10 for successful RSAT installation
2] Run System File checker
3] Set correct the Date & Time
4] Reconnect internet connection
5] Reset Windows Update Service
6] Start Windows in Clean Boot
7] Unplug USB devices
8] Run Windows Update Troubleshooter
9] Fix the hard Disk corruption
10] Uninstall third-Party anti-virus
11] Disable Default Windows Firewall
12] Download the update from Windows Update Catalog
That’s all!!!
Repair any Windows problems such as Blue/Black Screen, DLL, Exe, application, Regisrty error and quickly recover system from issues using Reimage.
Информация о системе:
На вашем ПК работает: …
специальное предложение
0x8024001D часто может появляться из-за неправильно настроенных параметров системы или из-за нарушений в реестре Windows. Эту ошибку относительно быстро и легко исправить, если использовать PC Repair, настроенную на решение всех распространенных проблем с реестром.
![]()
- Название ошибки: 0x8024001D
- Совместимо с: Windows 10, 11, 8, 7, Vista, XP
- 0x8024001D появляется и начинает нарушать окно активной программы;
- 0x8024001D появляется на экране;
- Появляется сообщение ‘Обнаружена проблема, и Windows была выключена, чтобы предотвратить повреждение компьютера. Похоже, что проблема вызвана следующим файлом…’;
- Компьютер пользователя перестает работать, выдавая ошибку 0x8024001D при запуске программы;
- Windows работает плохо, медленно реагируя на команды;
- Компьютер пользователя часто зависает
0x8024001D сообщения об ошибке могут появляться из-за засорения реестра Windows и ошибочных записей несуществующих программ, поскольку пользователь обычно неправильно удаляет программное обеспечение. Другими распространенными причинами являются неправильный ввод данных, отсутствие файлов, которые были случайно удалены из реестра, что вызывает проблемы в работе системы.
- 1. Скачать PC Repair.
- 2. Установить и запустить программу.
- 3. Нажмите Scan Now для обнаружения ошибок и различных отклонений от оптимального уровня.
- 4. Нажмите Repair All для устранения каждой проблемы.
Эта страница доступна на других языках:
English |
Deutsch |
Español |
Italiano |
Français |
Indonesia |
Nederlands |
Nynorsk |
Português |
Українська |
Türkçe |
Malay |
Dansk |
Polski |
Română |
Suomi |
Svenska |
Tiếng việt |
Čeština |
العربية |
ไทย |
日本語 |
简体中文 |
한국어
Remote Server Administration Tools (RSAT) enables IT administrators to remotely manage roles and features in Windows Server from a Windows client machine. If RSAT install failed on your Windows 11 or Windows 10 computer, then this post is intended to help you with solutions to the issue. Note that the solutions offered in this post apply to all RSAT installation-related error codes on Windows 11/10.

If RSAT installer encountered an error and the install failed with error 0x800f0954, 0x8024402c, 0x8024001d, 0x80244017, etc. then these suggestions are sure to help you fix the issue:
- Initial checklist
- Install RSAT via PowerShell
- Configure Group Policy to download optional features from Windows Update
- Modify UseWUServer registry key
- Reset Windows 11/10
Let’s take a look at the description of the process involved concerning each of the listed solutions.
1] Initial checklist
Before you try the solutions below, you can try the following task, and after each task see if you can successfully install RSAT on your device without issues:
- Restart your PC. This goes without saying, as in most cases a quick restart of your computer will resolve most minor issues; typically temporary software glitches.
- Update Windows. More often than not, you may encounter issues on your PC if the installed version/build is outdated. So, we recommend making sure Windows is always up to date. You can check for updates and install any available bits on your Windows 11/10. In the likely event, the issue started after a recent Windows update, given that you’re sure you were able to install RSAT components prior to updating, you can perform System Restore or uninstall the update – or proceed with the solutions below if you prefer not to do neither, at least not as your first line of action.
2] Install RSAT via PowerShell
After going through the initial checklist but RSAT install still failed via Optional Features in the Settings app on your PC, you can try the installation via PowerShell. To perform this task, follow the instructions in the guide on how to install Remote Server Administration Tools (RSAT) on Windows 11/10. Since the command line is bare-bones, it will usually eliminate issues associated with performing some tasks via the GUI.
3] Configure Group Policy to download optional features from Windows Update

Starting with Windows 10 version 1809, FOD (Features on Demand) and language packs can only be installed from Windows Update and not via WSUS. So, given that RSAT is an optional feature (aka FOD), you’ll need to make sure Group Policy is configured to go directly to Windows Update to download and install FOD. Once done, you can retry the RSAT installation normally.
If the error reoccurs, try the next solution.
4] Modify UseWUServer registry key

This a registry hack alternative to the Group Policy method above. The UseWUServer registry key set to the value of 1 will configure Automatic Updates to use a server that is running Software Update Services instead of Windows Update.
This registry method will simply disable WSUS on your device. Since this is a registry operation, it is recommended that you back up the registry or create a system restore point as necessary precautionary measures. Once done, you can proceed as follows:
- Press Windows key + R to invoke the Run dialog.
- In the Run dialog box, type regedit and hit Enter to open Registry Editor.
- Navigate or jump to the registry key path below:
HKEY_LOCAL_MACHINESOFTWAREPoliciesMicrosoftWindowsWindowsUpdateAU
- At the location, on the right pane, double-click the UseWUServer entry to edit its properties.
- Input 0 in the Value data field.
- Click OK or hit Enter to save the change.
- Exit Registry Editor.
- Restart the Windows Update service or restart your PC.
Once done, you should be able to complete RSAT installation on your device without any issues. Alternatively, you can automatically disable the UseWUServer key in the registry. Here’s how:
- Press Windows key + R to invoke the Run dialog.
- In the Run dialog box, type notepad and hit Enter to open Notepad.
- Copy and paste the code below into the text editor.
[HKEY_LOCAL_MACHINESOFTWAREPoliciesMicrosoftWindowsWindowsUpdateAU]"UseWUServer"=dword:00000000
- Now, click the File option from the menu and select Save As button.
- Choose a location (preferably desktop) where you want to save the file.
- Enter a name with .reg extension (eg; DisableWSUS.reg).
- Choose All Files from the Save as type drop-down list.
- Double-click the saved .reg file to merge it.
- If prompted, click on Run > Yes (UAC) > Yes > OK to approve the merge.
- You can now delete the .reg file if you like.
- Restart PC.
5] Reset Windows 11/10

If the issue in focus persists to this point, you may be dealing with severe OS corruption. In this case, to resolve the issue, you can reset Windows 11/10 with the option to keep your personal files. Once your PC has been reset to a pristine state, you can try the RSAT install normally.
Hope this helps!
Related post: RSAT missing DNS server tools
How to fix RSAT Installation Error 0x80244017?
The RSAT error code 0x80244017 can be fixed by temporarily disabling the WSUS on the Windows 11/10 client machine and then manually restarting the Windows Update service.
How do I install RSAT on Windows 11?
To add the optional feature (FOD) like RSAT so that you can manage Windows Server roles and features from a Windows 11 device, navigate to Settings > Apps > Optional features.
Если в Windows 11 или Windows 10 отображается ошибка 0x8024001D при установке Центра обновления Windows или при загрузке игры или приложения из Microsoft Store, рекомендации, упомянутые в этом посте, обязательно помогут вам решить проблему. Наиболее распространенными причинами ошибок обновления Windows и ошибок Магазина Microsoft являются поврежденные компоненты Центра обновления Windows и поврежденный кэш Магазина Microsoft. По словам пострадавших пользователей, через несколько минут после начала загрузки из Microsoft Store они видят код ошибки 0x8024001D.
Воспользуйтесь следующими решениями, чтобы исправить ошибку 0x8024001D Центра обновления Windows или Microsoft Store.
- Переименуйте папку распространения программного обеспечения
- Сброс компонентов Центра обновления Windows
- Обновить Магазин Майкрософт
- Очистить кэш Microsoft Store или сбросить настройки Microsoft Store
Ниже мы подробно объяснили все эти исправления.
1]Переименуйте папку распространения программного обеспечения.
Папка распространения программного обеспечения является важным компонентом Центра обновления Windows. Он содержит временные файлы, необходимые для установки последних обновлений Windows в системе пользователя. В случае сбоя Центра обновления Windows проблема может быть устранена путем удаления содержимого папки распространения программного обеспечения или ее переименования. Удаление содержимого внутри него считается безопасным, поскольку Windows воссоздает файлы внутри него, если они удалены. Даже если вы удалите папку «Распространение программного обеспечения», Windows создаст ее заново.
Если какой-либо файл в папке «Распространение программного обеспечения» поврежден, это создаст проблемы при установке обновлений Windows, из-за которых Windows отображает код ошибки. Либо переименуйте, либо удалите содержимое папки «Распространение программного обеспечения» и проверьте, помогает ли это.
Откройте окна командной строки с повышенными привилегиями, введите следующие команды одну за другой и нажмите Enter:
net stop wuauservnet stop bitsrename c:windowsSoftwareDistribution SoftwareDistribution.baknet start wuauservnet start bits2]Сброс компонентов Центра обновления Windows
Этот код ошибки обычно появляется при запуске автономного установщика Центра обновления Windows. Чтобы исправить ошибку, сбросьте компоненты Центра обновления Windows. Сброс компонентов Центра обновления Windows — это один из способов устранения неполадок, связанных с Центром обновления Windows. Вы можете сделать это вручную или использовать инструмент сброса обновлений Windows. После выполнения этого действия обновление Windows должно быть установлено в вашей системе без каких-либо ошибок.
3]Обновить Магазин Microsoft
Для наилучшего взаимодействия с Microsoft Store всегда рекомендуется использовать последнюю версию Microsoft Store. Проблемы могут возникнуть, если вы используете устаревшую версию Store. Проверьте наличие обновлений Microsoft Store вручную и посмотрите, решит ли это проблему. Чтобы обновить Microsoft Store, выполните следующие действия:
- Запустите Магазин Microsoft.
- Если вы являетесь пользователем Windows 11, перейдите в «Библиотека > Получить обновления».
- Пользователям Windows 10 необходимо выбрать параметр «Дополнительно», а затем перейти к «Загрузки и обновления > Получить обновления».
- Если доступно обновление для Microsoft Store, оно начнется автоматически.
После обновления Microsoft Store проблема должна быть устранена. Если нет, попробуйте следующее решение.
4]Очистите кеш Магазина Microsoft или сбросьте настройки Магазина Microsoft.
Если кэш Microsoft Store поврежден, вы столкнетесь с несколькими ошибками при установке и обновлении приложений и игр через Microsoft Store. Один из способов решить проблему с поврежденным кешем Microsoft Store — очистить кеш. Для этого откройте командную строку с повышенными привилегиями и введите следующую команду. После этого нажмите Enter.
WSReset.exe
Этот процесс займет некоторое время. После завершения процесса Microsoft Store будет запущен автоматически. Теперь проверьте, можете ли вы загружать или обновлять приложения или игры из Магазина.
Если после очистки кеша Microsoft Store проблема не устранена, сбросьте Store. Возможность сброса Microsoft Store доступна в настройках Windows 11/10. Следующие инструкции помогут вам в этом.
- Откройте настройки Windows 11/10.
- Перейдите в «Приложения > Приложения и функции».
- Прокрутите вниз и найдите Microsoft Store.
- В Windows 10 выберите Microsoft Store и нажмите Дополнительные параметры.
- В Windows 11 нажмите на три горизонтальные точки рядом с Microsoft Store и выберите «Дополнительные параметры».
- Прокрутите вниз и нажмите кнопку «Сброс».
Вышеупомянутое действие удалит данные приложения и настройки входа. После сброса Microsoft Store вам необходимо снова войти в Магазин.
Чтение: исправить ошибку Microsoft Store 0x80131505
Как исправить установщик обнаружил ошибку 0x8024001D?
Вы можете увидеть сообщение «Установщик обнаружил ошибку: 0x8024001d» при установке RSAT в вашей системе. Используя RSAT или инструмент удаленного администрирования сервера, ИТ-администраторы могут удаленно управлять ролями и функциями в Windows Server. Если вы не можете установить RSAT с помощью установщика Windows, вы можете попробовать установить его с помощью Windows PowerShell. Если это не работает, вам нужно изменить ключ реестра.
Как исправить код ошибки 0x8024402c?
Ошибка Центра обновления Windows 0x8024402c обычно возникает, если параметры брандмауэра или прокси-сервера на вашем компьютере настроены неправильно. Из-за этого не удается подключиться к серверам Центра обновления Windows. Чтобы решить эту проблему, вы должны очистить кеш прокси после удаления персонажей из списка прокси-серверов. Если это не работает, включите опцию «Автоматически определять настройки» в Internet Explorer.
Как исправить ошибку 0x8024402f?
Если вы видите ошибку 0x8024402f при установке Центра обновления Windows, первое, что вам нужно сделать, это запустить средство устранения неполадок Центра обновления Windows. Средства устранения неполадок — это автоматизированные инструменты, которые помогают пользователям устранять проблемы, с которыми они сталкиваются на своих устройствах Windows. В дополнение к этому вы также можете попробовать сбросить компоненты Центра обновления Windows и удалить содержимое папки распространения программного обеспечения.
Возможно, фоновое приложение мешает работе Центра обновления Windows. Вы можете проверить это, устранив неполадки на компьютере в состоянии чистой загрузки. Если вы найдете такую программу, рассмотрите возможность ее удаления или проверьте ее обновленную версию на ее официальном сайте.
Читать далее . Исправьте ошибку Центра обновления Windows 0x800f080a.