by Matthew Adams
Matthew is a freelancer who has produced a variety of articles on various topics related to technology. His main focus is the Windows OS and all the things… read more
Updated on
- Windows Update errors are quite common, but so are the solutions to fixing them.
- For example, we will be showing you how to fix Windows Update error 0x8024000b in this article.
- This error occurs when Windows cannot read a file required for the installation of an update.

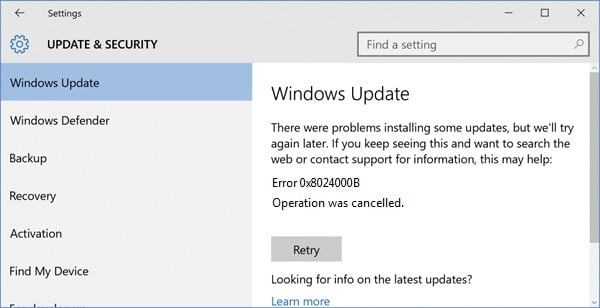
Error 0x8024000b is another in a long line of Windows Update error codes. That error, like the other update issues, stops Windows receiving updates. This error arises when Windows can’t access the manifest update file.
When the error occurs, you’ll see an error 0x8024000b and Operation was cancelled error message within Settings’ Windows Update tab. Read on to find out how to fix it.
How can I fix the error 0x8024000b?
- How can I fix the error 0x8024000b?
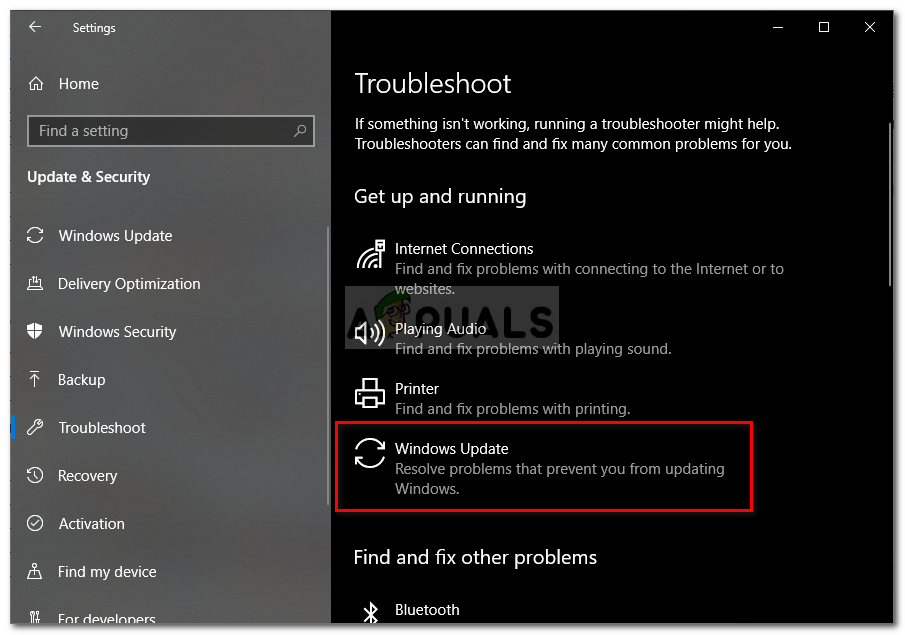
- 1. Run the Windows Update troubleshooter
- 2. Clear superseded updates
- 3. Change the Spupdsvc.exe’s file title
- 4. Reset Windows Update components
- 5. Restore Windows to an earlier date
1. Run the Windows Update troubleshooter
Numerous users have confirmed that the Windows Update troubleshooter fixed error 0x8024000b for them.
2. Clear superseded updates
Clearing superseded updates on your desktop or laptop is another way to fix error 0x8024000b.
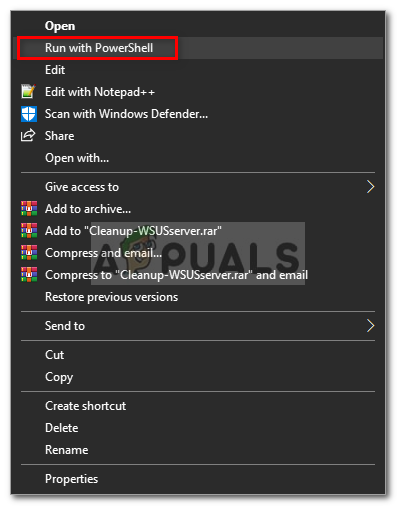
- To do that, open the Cleanup (decline) superseded updates page on Microsoft Technet.
- Click the Cleanup-WSUSserver.ps1 button on that page.

- Open File Explorer by clicking its taskbar button.
- Open the folder you downloaded the script to.
- Right-click the script file and select the Run with Powershell context menu option.
- Then restart Windows after running the script.

3. Change the Spupdsvc.exe’s file title
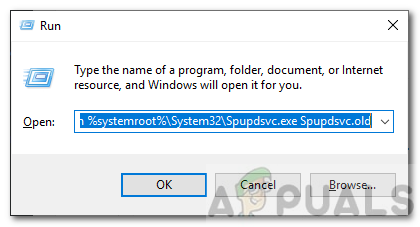
- Try renaming the Spupdsvc file. To do that, press the Windows key + R key combination, which opens Run.
- Input this command into Run’s text box and press Enter:
- cmd /c ren %systemroot%System32Spupdsvc.exe Spupdsvc.old.

- cmd /c ren %systemroot%System32Spupdsvc.exe Spupdsvc.old.
- Close Run’s window, and restart your desktop and laptop.
- Run the Windows Update once more.

4. Reset Windows Update components
Some users might need to reset Windows Update components to fix error 0x8024000b.
- To do so, open Windows 10’s search utility.
- Type cmd in the search utility’s text box.
- Right-click Command Prompt to open its context menu, and select the Run as administrator option.
- Then input these separate commands into the Command Prompt:
net stop wuauserv
net stop cryptSvc
net stop bits
net stop msiserver
- Enter Ren C:WindowsSoftwareDistribution SoftwareDistribution.old in the Prompt, and press the Return keyboard key.
- Input the Ren C:WindowsSystem32catroot2 Catroot2.old command and press Return to edit the catroot2 folder title.
- Enter the following commands separately, and press Return after each one:
net start wuauserv
net start cryptSvc
net start bits
net start msiserver

5. Restore Windows to an earlier date
- Rolling Windows back to a restore point with System Restore might also be worth a shot.
- Enter rstrui in Run and click OK to open System Restore.
- Press the Next button to proceed to the restore points list.
- Select the Show more restore points option to fully expand the list of restoration points.

- Choose a restore point that will roll back Windows to a time when there wasn’t an update issue.
- You’ll lose some software installed after the selected restore point.
- To see what software gets deleted, click the Check for affected programs button.

- To see what software gets deleted, click the Check for affected programs button.
- Click Next and Finish to roll back the platform.


- Adding layers in Windows 11’s Paint greatly increases RAM usage
- How to copy texts from images with Snipping Tool’s Text Action
- The Windows 11’s weather widget now offers a detailed weather forecast
- Windows 11’s share window will let you send files to your Teams contacts
- Windows 11 now has SMB NTLM blocking, adding an extra layer of protection
So, try fixing error 0x8024000b with the resolutions above. They are among the most likely fixes for the error, as researched online.
Let us know which of the solutions worked best by leaving us a message in the comments section below.
![]()
Сообщение об ошибке 0x8024000b не дает возможности обновить Windows версии от XP до 10. Корень неисправности — файл Update Manifest, который обязателен для апдейта, но в текущий момент времени не доступен. Способ исправления ошибки зависит от того, каким образом обновления попадают на ПК.
Методы решения ошибки 0x8024000b
№1: апдейт — с сервера Майкрософт
Зажмите комбинацию клавиш Win+R. В появившемся окне введите следующее: Cmd /c ren %systemroot%\System32\Spupdsvc.exe Spupdsvc.old. Выполните команду нажатием на Ок. После успешно обновляйте ОС.
№2: апдейт — с корпоративного сервера WSUS
Измените название файла Spupdsvc.exe. Скиньте настройки Центра обновлений. Переименуйте директорию SoftwareDistribution, перед этим приостановите службу обновления за счет запуска в командной строке запроса net stop wuauserv. После этого службу обязательно включите — net start wuauserv. Это должно избавить от ошибки 0x8024000b.
На чтение 3 мин Просмотров 557 Опубликовано
Ошибка обновления Windows 0x8024000b возникает, когда операционная система не может получить доступ к файлам манифеста для обновлений, которые используются при установке обновлений в системе. Файлы манифеста – это в основном файлы XML, которые сопровождаются приложениями, а также обновлениями Windows. 
Microsoft выталкивает обновления для различных приложений Windows, а также для операционной системы, чтобы все шло гладко. Эти обновления часто содержат исправления недостатков безопасности, различные исправления ошибок, а также стабильность, а иногда и новый дизайн для определенных приложений. Несмотря на то, что обновления приветствуются, они иногда могут быть пугающими, не предоставляя подробной информации о возможной причине ошибки. Тем не менее, в этой статье мы рассмотрим причину указанного кода ошибки, а позже предоставим список решений, которые вы можете реализовать, чтобы избавиться от нее.
Содержание
- Что вызывает ошибку Центра обновления Windows 0x8024000b в Windows 10?
- Решение 1. Запуск сценария Powershell
- Решение 2. Использование средства устранения неполадок Центра обновления Windows
- Решение 3: Переименование файла Spupdsvc.exe
Что вызывает ошибку Центра обновления Windows 0x8024000b в Windows 10?
Чтобы предоставить вам более подробную информацию , давайте рассмотрим, что на самом деле вызывает ошибку при обновлении вашей операционной системы.
- Файлы манифеста обновления: Причина в которых отображается ошибка, это файлы манифеста, связанные с обновлениями Windows. Ошибка появляется, когда Windows не может получить доступ или прочитать файлы манифеста для обновлений Windows. Это происходит, когда обновление отменяется в середине либо службой Центра обновления Windows, либо самим пользователем. Вот почему сообщение об ошибке сопровождается контекстом «Операция была отменена».
Теперь, когда вы знаете причину проблемы, давайте продолжим решения для указанного сообщения об ошибке.
Решение 1. Запуск сценария Powershell
Самый простой способ исправить сообщение об ошибке – запустить сценарий Powershell, который очистит замененные обновления в вашей системе. Сценарий предоставляется в Microsoft Technet, поэтому вам не нужно беспокоиться о заражении вашей системы. Вот как запустить сценарий:
- Перейдите в эту страницу и загрузите сценарий.
- После того, как вы загрузили сценарий, перейдите в каталог загрузок и щелкните файл правой кнопкой мыши.
- Выберите Запустить с Powershell , чтобы выполнить сценарий, и дождитесь его завершения.

- Перезагрузите систему и повторите попытку обновления.

Решение 2. Использование средства устранения неполадок Центра обновления Windows
Следующее, что вы можете сделать для решения вашей проблемы, – это использовать средство устранения неполадок Центра обновления Windows. Если вы не отменили обновление самостоятельно, средство устранения неполадок Центра обновления Windows может определить проблему с вашими службами обновления Windows и обойти ее.. Чтобы запустить средство устранения неполадок обновления окон, выполните следующие действия:
- Нажмите Windows Key + I , чтобы открыть окно настроек.
- Перейдите в Обновление и безопасность .
- Перейдите к панели Устранение неполадок с левой стороны .
- Выберите Центр обновления Windows , чтобы запустить средство устранения неполадок.
- Дождитесь завершения устранения неполадок, а затем снова запустите обновление, чтобы убедиться, что проблема решена.

Решение 3: Переименование файла Spupdsvc.exe
Наконец, ошибку можно решить, переименовав файл с именем spupdsvc.exe. Spupdsvc в основном означает Microsoft Update RunOnce Service , а файл является процессом этой службы. Это используется при загрузке обновлений Windows, однако иногда его необходимо переименовать, чтобы решить некоторые проблемы. Вот как переименовать файл:
- Нажмите Windows Key + R , чтобы открыть диалоговое окно Выполнить . поле.
- Когда он откроется, вставьте следующую команду и нажмите клавишу Enter :
cmd/c ren% systemroot% System32 Spupdsvc.exe Spupdsvc.old
- Наконец, перезагрузите компьютер и попробуйте чтобы запустить обновление, надеюсь, оно устранит вашу проблему.

The Windows update error 0x8024000b is caused when the operating system cannot access the manifest files for updates that are used while installing updates on the system. Manifest files are basically XML files that are accompanied by applications as well as Windows updates.
Microsoft pushes out updates for various Windows applications as well as for the operating system to keep things going smoothly. These updates are often packed with security flaw patches, various bug fixes along with stability and sometimes a new design for certain applications. Even though updates are appreciated, they can sometimes tend to be daunting without providing much information about the possible cause of the error. Nonetheless, in this article, we’ll be going through the cause of the said error code and later on provide a list of solutions that you can implement to get rid of it.
To provide you with more detailed insight, let us cover what actually triggers the error while updating your operating system.
- Update Manifest Files: The reason due to which the error is being shown are the manifest files that are associated with Windows updates. The error pops up when Windows is not able to access/read the manifest files for Windows updates. This happens when the update is canceled in the middle by either the Windows Update service or the user itself. That is why the error message is accompanied by the context ‘Operation was canceled’.
Now that you are aware of the cause of the issue, let us continue with the solutions for the said error message.
Solution 1: Running a Powershell Script
The easiest way of fixing the error message is to run a Powershell script that will clean up superseded updates on your system. The script is provided on Microsoft Technet, thus, you don’t have to worry about your system getting infected. Here’s how to run the script:
- Go to this page and download the script.
- Once you have downloaded the script, go to your downloads directory and right-click the file.
- Select Run with Powershell to execute the script and then wait for it to complete.

Running the Script with Powershell - Restart your system and then try updating again.
Solution 2: Using the Windows Update Troubleshooter
The next thing that you can do in order to resolve your issue is to use the Windows Update Troubleshooter. In case you didn’t cancel the update yourself, then the Windows Update Troubleshooter might be able to pinpoint the issue with your Windows update services and circumvent it. To run the Window Update Troubleshooter, follow the given steps:
- Press Windows Key + I to open up the Settings window.
- Go to Update & Security.
- Navigate to the Troubleshoot pane on the left-hand side.
- Select Windows Update to run the troubleshooter.

Running Windows Update Troubleshooter - Wait for it to complete troubleshooting and then run the update again to see if it the issue has been resolved.
Solution 3: Renaming the Spupdsvc.exe File
Lastly, the error can be solved by renaming a file named spupdsvc.exe. Spupdsvc basically stands for Microsoft Update RunOnce Service and the file is a process of this service. This is utilized while downloading Windows updates, however, at times it needs to be renamed to solve some issues. Here’s how to rename the file:
- Press Windows Key + R to open up the Run dialog box.
- Once it opens up, paste in the following command and then hit the Enter key:
cmd /c ren %systemroot%\System32\Spupdsvc.exe Spupdsvc.old

Renaming spupdsvc.exe - Finally, restart your computer and then try to run the update, hope it fixes your issue.

Kevin Arrows
Kevin Arrows is a highly experienced and knowledgeable technology specialist with over a decade of industry experience. He holds a Microsoft Certified Technology Specialist (MCTS) certification and has a deep passion for staying up-to-date on the latest tech developments. Kevin has written extensively on a wide range of tech-related topics, showcasing his expertise and knowledge in areas such as software development, cybersecurity, and cloud computing. His contributions to the tech field have been widely recognized and respected by his peers, and he is highly regarded for his ability to explain complex technical concepts in a clear and concise manner.
Обновления Windows важны для операционной системы; однако они могут иногда вызывать ошибки. Одной из таких ошибок является ошибка Центра обновления Windows 0x8024000B . Ошибка возникает, когда Windows не может прочитать файл манифеста обновления, необходимый для установки обновлений. Это означает, что операция была отменена пользователем или службой. Это также может произойти, если вы не можете отфильтровать результаты.

WU_E_CALL_CANCELLED: операция была отменена.
Это указывает на то, что операция была отменена ОС. Вы также можете столкнуться с этой ошибкой, когда мы не можем отфильтровать результаты.
Ошибка Центра обновления Windows 0x8024000B
Попробуйте последовательно решить следующие проблемы.
1] Запустить очистку (отклонить) Замененные обновления скрипта PowerShell
Простым решением этой проблемы было бы использование этого Cleanup (Отклонение) Замененных обновлений PowerShell WSUS Сценарий PowerShell, представленный на веб-сайте Microsoft Technet. Просто скачайте и запустите его.
Перезагрузите систему, как только вы закончите.
2] Переименуйте файл Spupdsvc.exe
Если предыдущее решение не сработало, вы можете переименовать проблемный файл Spupdsvc.exe в Spupdsvc.old. Процедура для этого заключается в следующем:
Нажмите Win + R, чтобы открыть окно «Выполнить». Введите следующую команду и нажмите Enter, чтобы выполнить ее:
cmd/c ren% systemroot% \ System32 \ Spupdsvc.exe Spupdsvc.old
Перезагрузите систему после выполнения команды.
3] Запустите средство устранения неполадок обновлений Windows.

Средство устранения неполадок обновлений Windows проверит состояние служб, связанных с процессом, и при необходимости запустит/перезапустит их. Таким образом, это может быть полезно для этой проблемы. Процедура для этого заключается в следующем:
Перейдите в Пуск> Настройки> Обновления и безопасность> Устранение неполадок. Выберите и запустите средство устранения неполадок обновлений Windows из этого списка и перезагрузите систему, как только это будет сделано.
Мы надеемся, что что-то здесь помогло вам.