Download Windows Speedup Tool to fix errors and make PC run faster
You may encounter Error 0x80070666 when installing Microsoft Visual C++ redistributable package on your Windows 11 or Windows 10 computer. In this post, we will identify the potential causes, as well as provide the most adequate solutions affected PC users can apply to fix the error on their system.

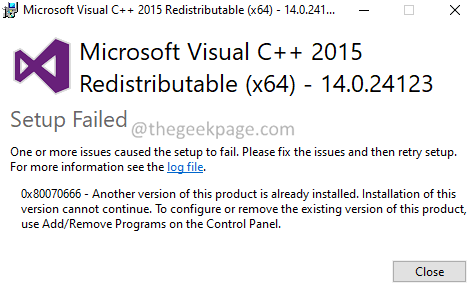
When you encounter this issue, you’ll receive the following full error message;
Setup Failed
One or more issues caused the setup to fail. Please fix the issues and then retry setup. For more information see the log file.
0x80070666 – Another version of this product is already installed. Installation of this version cannot continue. To configure or remove the existing version of this product, use Add/Remove Programs on the Control Panel.
You may encounter this error due to one or more of the following reasons:
- Visual C++ is already installed on the system.
- Botched Visual C++ installation on the system.
- Pending Windows Update installation for the same version of the Visual C++ package.
If the Error 0x80070666 has occurred on your Windows 11/10 device when installing Microsoft Visual C++ redistributable package, you can try our recommended solutions below in no particular order and see if that helps to resolve the issue.
- Run Program Install and Uninstall Troubleshooter
- Uninstall all current Visual C++ Redistributable Package
- Repair the Visual C++ installation
- Perform a Clean Boot and install package
Let’s take a look at the description of the process involved concerning each of the listed solutions.
Before you try the solutions below, check for updates and install any available pending bits on your Windows 11/10 device and see if the error reappears when you try the Visual C++ install operation again.
1] Run Program Install and Uninstall Troubleshooter

You can begin troubleshooting to fix the Error 0x80070666 that has occurred on your device when installing Microsoft Visual C++ by running the Program Install and Uninstall Troubleshooter from Microsoft and see if the issue is resolved. The Program Install and Uninstall troubleshooter fixes corrupted registry keys and is designed to help you automatically repair issues when you’re blocked from installing or removing programs on Windows 11/10 system.
2] Uninstall all current Visual C++ Redistributable Package

You are likely to encounter the error in view if a version (older or newer) of the same distributable package that you’re trying to install is already installed on the system. In this case, to resolve the issue, you need to uninstall (preferably, use third-party software uninstaller), all versions of the package from the system.
To uninstall all current Visual C++ Redistributable Package via Settings app on your Windows 11/10 PC, do the following:
- Press Windows key + I to open Settings app.
- Click Apps on the left navigation pane.
- Now, scroll down on the Apps & features right pane.
- Click the ellipsis (three vertical dots) for a Visual C++ Redistributable.
- Select Uninstall.
- Click Uninstall to confirm.
- Follow the on-screen instructions to finish uninstalling the package.
- Repeat the steps to remove all other packages.
- Once done, reboot the PC.
On boot, try installing the package that was failing earlier and see if the install operation completes successfully. Otherwise, try the next solution.
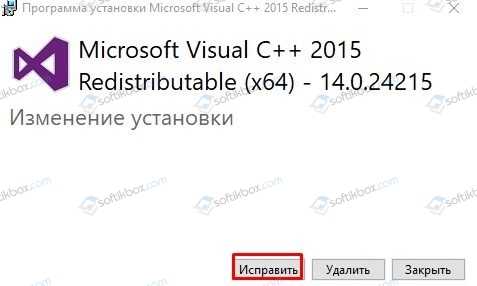
3] Repair the Visual C++ installation

If the Visual C++ installation is corrupted you may encounter this issue. In this case, to fix the error, you can repair the Visual C++ Redistributable via Settings app – do the following:
- Open Settings app.
- Click Apps on the left navigation pane.
- Now, scroll down on the Apps & features right pane.
- Click the ellipsis (three vertical dots) for the problematic Visual C++ Redistributable.
- Select Modify.
- Click Repair.
- Follow the on-screen instructions to finish the repair operation.
Alternatively, you can repair the Visual C++ Redistributable via Programs and Features on your Windows 11/10 computer by following the instructions in the guide on how to fix Runtime Error R6034.
Some affected users reported they had no means of repairing the package as it was not listed in Programs and Features in Control Panel or Apps & features in Settings app. In this case, you need to download the Visual C++ package installation executable and force the repair window to appear through Command Prompt. Do the following:
- Download the installer for the redistributable package to a location (preferably desktop) on your PC.
- Next, press Windows key + R to invoke the Run dialog.
- In the Run dialog box, type cmd and then press CTRL + SHIFT + ENTER to open Command Prompt in admin/elevated mode.
- In the command prompt window, type the command below and hit Enter. Replace the UserName placeholder with the actual logged in username.
CD C:\Users\UserName\Desktop
- Next, type in the command below and hit Enter:
vc_redist.x64.exe /uninstall
- Now, click Repair.
- Follow the on-screen instructions to finish the repair operation.
- Reboot PC when done.
On boot, try to install the Microsoft Visual C++ Redistributable package again. If the error reappears, you can try the next solution.
4] Perform a Clean Boot and install package

This solution requires you to perform a Clean Boot to remove any conflicts that may occur during the Visual C++ package installation. This means starting your Windows 11/10 computer with the minimum required drivers and programs, and then running the package installation in that system state.
Hope this helps!
Related post: Fix Error 0xC0070652 when installing or uninstalling Programs.
How do I fix Microsoft Visual C++ 14.0 required error?
To fix Microsoft Visual C++ 14.0 required error, do the following:
- Go to Build Tools for Visual Studio 2017.
- Select free download under Visual Studio Community 2017 to download the installer.
- Run the installer.
- Select what you need under the Workload tab.
- Under Windows, there are 3 choices. Only check Desktop development with C++.
- In the CMD prompt, type pip3 install misaka, and hit Enter.
Hope this helps.
Obinna has completed B.Tech in Information & Communication Technology. He has worked as a System Support Engineer, primarily on User Endpoint Administration, as well as a Technical Analyst, primarily on Server/System Administration. He also has experience as a Network and Communications Officer. He has been a Windows Insider MVP (2020) and currently owns and runs a Computer Clinic.
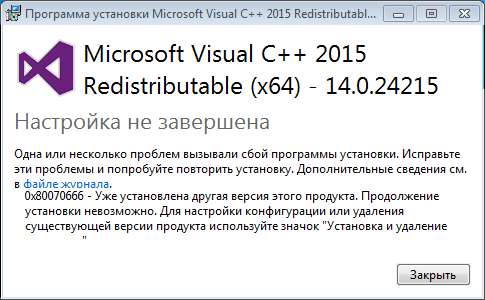
Уже установлена другая версия этого продукта
Рассмотрим как исправить ошибку Настройка не завершена:
0x80070666 Уже установлена другая версия этого продукта при установке библиотек Microsoft Visual C ++ 2015, 2017.
Данная ошибка может встречаться на Windows 10, 8, 7, Vista, XP
Ошибка 0x80070666 — говорит от том, что уже установлена другая версия этого продукта. Так же может звучать так: Cannot install a product when a newer version is installed — что говорит что более новая версия этой библиотеки уже установлена. По сути вы пытаетесь установить более старую. Из-за этого как раз вы и наблюдаете данную ошибку.
Решение ошибки 0x80070666
По большому счету если вы пытаетесь установить Microsoft Visual C ++ 2015 или 2017 и получаете эту ошибку, то устанавливать ее не требуется, так как более новая версия уже установлена.
Если вам все же необходимо установить более старую версию, то для начала необходимо удалить более новую версию. Для этого перейдите в панель управления — установка удаление программ и найдите в списке установленных программ, тот пакет который вы пытаетесь удалить (2015, 2017 или 2019), если этого пакета нет, то удалите все вышестоящие.
Например:
Хотите установить Microsoft Visual C ++ 2015 — надо удалить 2015, 2017, 2019 если имеются.
Хотите установить Microsoft Visual C ++ 2017 — надо удалить 2017, 2019 если имеются.
Скчать пакеты Microsoft Visual можно по ссылке
Если вы не видите в списке установленных программ Microsoft Visual C ++ 2015
Необходимо учитывать, что при установке Microsoft Visual C ++ 2017, пакет 2015 года автоматически удаляется. Это происходит по причине того, что в пакете 2017 включен пакет 2015. То есть при установке 2017, автоматически устанавливается и 2015.
Если вы не видите в списке установленных программ Microsoft Visual C ++ 2017
Посмотрите, возможно у вас установлен пакет Microsoft Visual C ++ 2015-2019. В этом пакете присутствует и 2017 версия.
Быстрое решение
Проще всего чтобы на компьютере у вас были все имеющиеся версии Microsoft Visual C, установите их одним файлом. В этом файле содержатся все версии Microsoft Visual C ++ с 2015-2019.
При установке всех версий одним файлом ни каких ошибоук у вас не возникнет, он автоматически переустановит все имеющиеся пакеты Microsoft Visual C ++ и добавит те пакеты которые не установлены.
И вам не придется устанавливать каждый пакет отдельно.
Скачать все версии одним файлом
25.03.2020
Просмотров: 4534
Во время установки пакета Microsoft Visual C++ пользователи могут столкнуться с ошибкой 0x80070666, которая сопровождается пояснением, что уже установлена другая версия библиотеки. При этом, если удалить все установленные библиотеки С++, ошибка 0x80070666 все равно будет появляться заново.
Причина такой неполадки кроется в уже установленном пакете. Дело в том, что Microsoft Visual C++ 2017 уже имеет компоненты Microsoft Visual C++ 2015, а Microsoft Visual C++ 2015 включает в себя компоненты более ранних сборок. Из-за этого происходит конфликт компонентов. Поэтому, чтобы исправить ошибку 0x80070666 при установке Microsoft Visual C++ на различных сборках Windows, стоит воспользоваться следующими рекомендациями.
Читайте также: Как исправить системную ошибку DirectX с файлами DXError.log DirectX.log?
Методы исправления ошибки 0x80070666 при установке Microsoft Visual C++
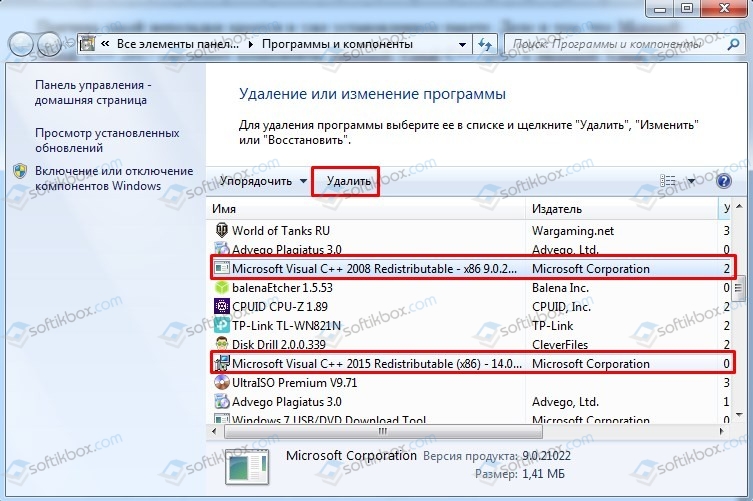
Для того, чтобы исправить ошибку 0x80070666 при установке Microsoft Visual C++, стоит в первую очередь очистить Windows от уже установленных библиотек. Для этого нужно выполнить следующие действия:
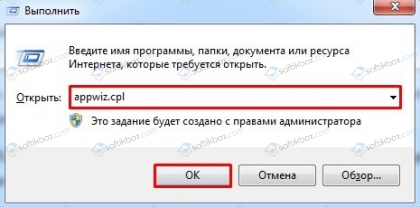
- Жмем «Win+R» и вводим «appwiz.cpl», чтобы открылось окно «Удаление программ и компонентов Windows».
- Находим уже установленные пакеты C++ и удаляем их.
- После удаления всех пакетов нужно перезагрузить систему, чтобы изменения вступили в силу. Повторяем попытку установки нужного пакета Microsoft Visual C++.
Если же такая неполадка возникает на компьютере с Windows 10, то причина может крыться в недостающем обновлении. Необходимо перейти в «Параметры», «Обновления и безопасность» и запустить проверку на наличие обновлений.
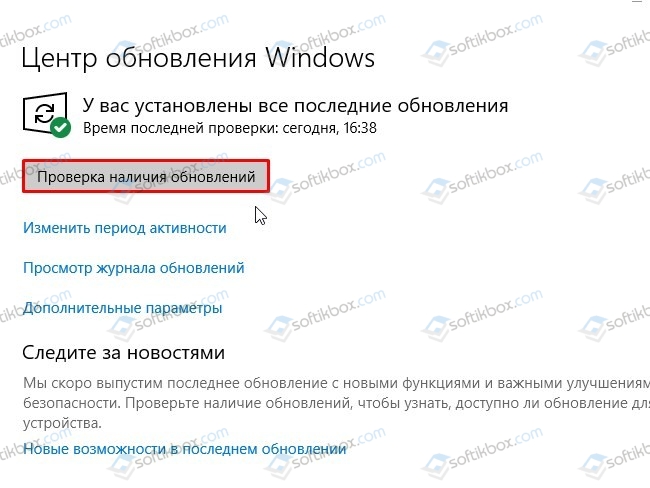
После установки обновлений стоит опять повторить попытку установки библиотеки. Если ошибка 0x80070666 не исчезла, то необходимо выполнить восстановление компонентов C++. Для этого нужно запустить командную строку с правами Администратора и ввести такие команды:
- CD C:\Users\*YourUser*\Downloads
- vc_redist.x64.exe /uninstall
ВАЖНО! Вместо *YourUser* вводим имя своего пользователя.
Появиться небольшое окно самой библиотеки. Кликаем на кнопку «Исправить».
Если сама программа не смогла исправить неполадку, то рекомендуем попробовать запустить штатный инструмент для поиска и исправления неполадок с софтом. Для этого нужно в поисковой строке Windows прописать запрос «Устранение неполадок», а далее выбрать раздел с софтом.
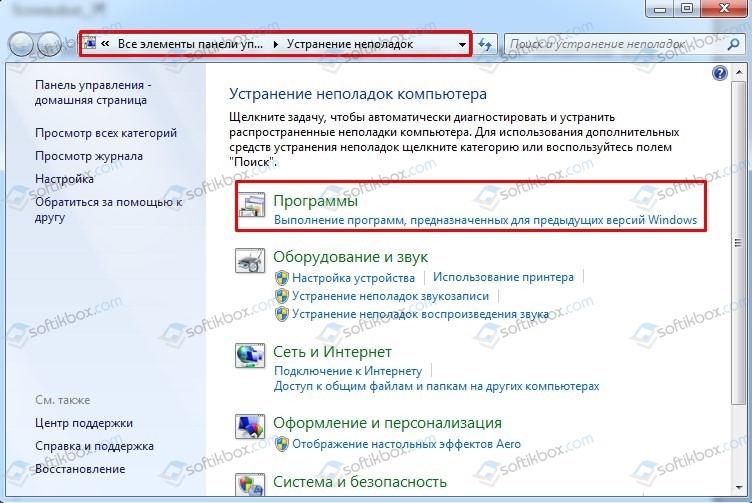
Если штатный инструмент не обнаружил нарушений в работе программ и компонентов, тогда рекомендуем сразу подключить к ПК установочный диск и выполнить восстановление системы, а затем повторить попытку установки Microsoft Visual C++ нужной версии.
Several Windows users are encountering the “0x80070666” error when trying to install Microsoft Visual C++, Lumberyard or a similar distribution package. The error message is typically reported to occur at the very start of the installation process. This particular issue is not specific to a certain Windows version since it’s confirmed to occur on Windows 7, Windows 8.1 and Windows 10.

What is causing the 0x80070666 Error when Installing Microsoft Visual C++?
We investigated this particular issue by looking at various user reports and the repair strategies that most affected users have deployed in order to resolve this particular error message. From what we gathered, there are several different scenarios that will trigger this error message:
- Another Visual C++ installation is already present – As it turns out, Visual C++ 2015 and Visual C++ 2017 will contain some common binary files that are known to conflict. If you already have Visual C++ Redist 2017 and you’re trying to install the 2015 Redist, you’ll likely see this particular error message. In this case, uninstalling the newer Visual C++ should resolve the issue.
- Bad Visual C++ installation – There are certain scenarios that might end up contributing to a bad installation of the Visual C++ Redistributable package. Whenever this occurs, you have little other choices that running a specialized Fix-it tool or trying to force the Repair screen to pop up using Command Prompt.
- Windows Update is planning on installing the same Visual C++ package – Another scenario in which you might encounter this particular issue is if the updating component (Windows Update) has a pending update that will update the same Visual C++ package. In this case, installing every pending Windows update should resolve the issue automatically.
If you’re currently for a fix that will allow you to bypass the 0x80070666 error and complete the installation of the distribution package, this article will provide you with several troubleshooting methods. Down below, you have several potential fixes that other users in a similar situation have successfully used to get the issue resolved.
The methods are ordered by efficiency and severity, so please follow them in the order that they are presented. One of them is bound to resolve the issue in your particular scenario.
Method 1: Uninstalling all current Visual C++ Redistributable packages
As a lot of users have reported, this particular issue is mostly occurring if your computer already contains a version (older or newer) of the same distributable package that you’re trying to install.
In most cases, the error appears when the user tries to install Visual C++ Redist 2015 but a newer installation is already present on that system. Several affected users have reported being able to resolve the Setup failed – 0x80070666 installation error by uninstalling the newer version.
Here’s a quick guide on how to do this:
- Press Windows key + R to open up a Run dialog box. Then, type “appwiz.cpl” and press Enter to open up the Programs and Features screen.

Type appwiz.cpl and Press Enter to Open Installed Programs List - Inside the Programs and Features screen, scroll down through the list of installed programs and locate all your Microsoft Visual C++ Redist installations.
- Right-click on every Microsoft Visual C++ Redist installation and choose Uninstall. Then, follow the on-screen prompts to complete the uninstallation for every redist package.

Uninstalling every Visual C++ Redist package - Once every Visual C++ package has been uninstalled, restart your computer and wait for the next startup to complete.
- Attempt to install the same Redist package that was previously failing with the 0x80070666 error.


If you’re still encountering the same error message, move down to the next method below.
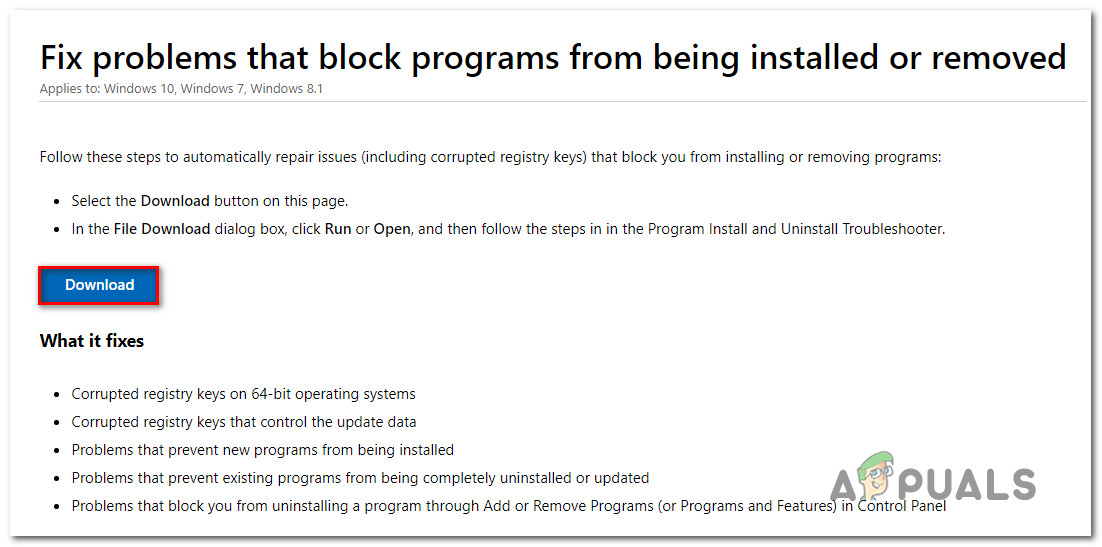
Method 2: Running the Fix-It tool
There is one Microsoft Fix It tool that several affected users have successfully used to resolve the problem that was preventing the redist package from being installed automatically. This particular Fix It tool will perform several repair strategies that will repair several components (including corrupted registry keys) used during the installation of new programs.
Note: This Fix it tool will work for Windows 7, Windows 8, Windows 8.1 and Windows 10.
Here’s a quick guide on using this Fix It tool to resolve the 0x80070666 error:
- Visit this link (here) and click the Download button to download the Fix It tool.

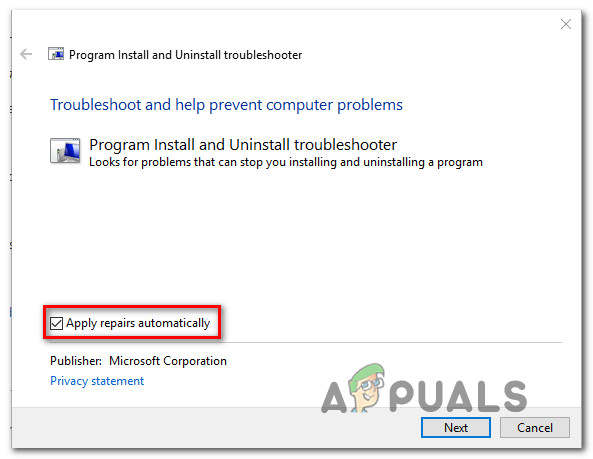
Downloading the Fix it Tool - Once the tool has been downloaded, double click on the .diagcab file to open up the Fix It tool. Once you see the initial screen, click on Advanced and make sure that the box associated with Apply repairs automatically is checked. Then, click Next to advance to the next menu.

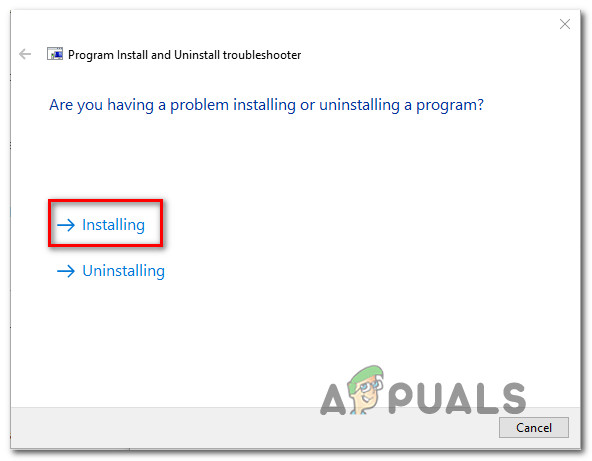
Applying repairs automatically - At the next screen, click on Installing.

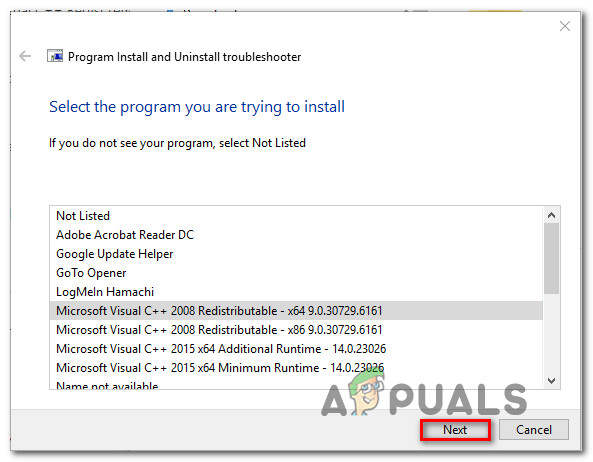
Problems with Installing programs - Wait until the inspection phase is complete, then select which redist package you’re encountering the issues with and click Next.

Selecting the redist package that you’re having issues with - Follow the recommended repair strategies until you reach the end of the program.

Trying out the recommended fixes - Once the Fix It tool has run its course, restart your computer and see if you’re able to install the redist package at the next startup without issues.

If you’re still encountering the 0x80070666 error, move down to the next method below.
Method 3: Installing any pending Windows Updates
As it turns out, you might be encountering the 0x80070666 error because Windows Update is already preparing to install the same redist package. Several affected users reported that upon making the necessary Windows update, the redist package that was previously failing with the 0x80070666 error was installed automatically.
Here’s a quick guide on installing any pending Windows update:
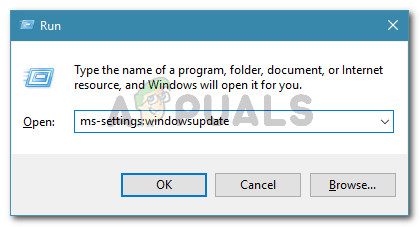
- Press Windows key + R to open up a Run dialog box. Then, type “ms-settings:windowsupdate” and press Enter to open up the Windows Update tab of the Settings app.

Run dialog: ms-settings:windowsupdate Note: If you’re not on Windows 10, use the “wuapp” command instead.
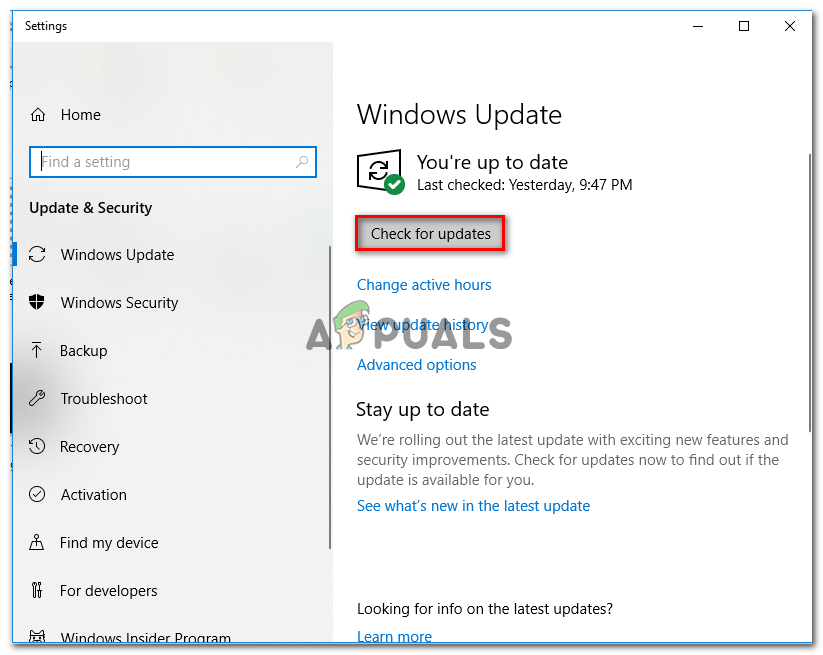
- Once you arrive at the Windows Update screen, click on Check for updates and follow the on-screen instructions to install all the pending windows updates.

Installing every pending Windows update - Once every pending update has been installed, restart your computer and see if the redist package is not already installed. If it isn’t, try to install it and see if you’re still encountering the same error message.
If you’re still haven’t managed to get rid of the 0x80070666 error, move down to the next method below.
Method 4: Using Command Prompt to repair the Visual C++ installation
Several affected users have reported that they suspected that the Visual C++ installation was corrupted, but they had no means of repair it since the program didn’t appear inside the Add or Remove Programs list. This typically happens with the Visual C++ 2015 Redistributable package.
Fortunately, they were able to fix this by downloading the installation executable and forcing the repair window to appear via Command Prompt. Here’s a quick guide on how to do this:
- Make sure that the installer of the redistributable package that you’re trying to install is present on your computer. Make sure that know it’s exact location. If the installer is not present on your PC, download it again.
- Press Windows key + R to open up a Run dialog box. Then, type “cmd” and press Enter to open up Command Prompt.
- Inside the Command Prompt, use the following command to change the directory to the one holding the file. For example, if the redist installer (e.g. vc_redist.x64.exe) is located inside the Download folder, then you’ll need to use the following command to change to the relevant directory:
CD C:\Users\*YourUser*\Downloads
- Once you’ve made sure that the terminal is working in the right directory, type the name of the installation executable followed by /uninstall to force the install window to appear. Like this:
vc_redist.x64.exe /uninstall
- Then, click Repair and follow the on-screen prompts to repair your Visual C++ redist installation.

Kevin Arrows
Kevin Arrows is a highly experienced and knowledgeable technology specialist with over a decade of industry experience. He holds a Microsoft Certified Technology Specialist (MCTS) certification and has a deep passion for staying up-to-date on the latest tech developments. Kevin has written extensively on a wide range of tech-related topics, showcasing his expertise and knowledge in areas such as software development, cybersecurity, and cloud computing. His contributions to the tech field have been widely recognized and respected by his peers, and he is highly regarded for his ability to explain complex technical concepts in a clear and concise manner.
Приложения Windows, которые разрабатываются на платформе Microsoft Visual Studio Development, ожидают, что в системе будут присутствовать некоторые библиотеки DLL (библиотеки динамической компоновки). Например, Microsoft Visual C ++ 2008 Redistubute, Microsoft Visual C ++ 2015 Redistribute и т. Д. Приложения не запускаются, если эти библиотеки отсутствуют. Некоторые пользователи сообщали о проблемах при попытке загрузить и установить эти библиотеки. Пользователи видят ошибку, когда принимают лицензию и пытаются установить библиотеку в системе. Полное сообщение об ошибке показано ниже –
Если вы столкнулись с проблемой, не паникуйте. В этой статье мы собрали некоторые исправления, которые помогут вам устранить ошибку 0x80070666 при установке пакетов библиотеки Microsoft Visual C ++.
Исправление 1. Удалите текущий пакет.
1. Откройте диалоговое окно «Выполнить» с помощью Windows и R.
2. Введите «appwiz.cpl» и нажмите Enter.
3. В открывшемся окне программы и функции найдите пакет Microsoft Visual C ++ Redistribute.
4. Щелкните пакет правой кнопкой мыши и выберите Удалить.
5. Следуйте инструкциям на экране и завершите процесс установки.
6. Перезагрузите компьютер.
7. Теперь попробуйте снова установить пакет.
Исправление 2: запустите инструмент Fix-It
1. Щелкните значок Fix-It Tool Скачать ссылка на сайт.
2. Нажмите кнопку «Загрузить средство устранения неполадок».
3. Найдите загруженный файл на своем ПК и дважды щелкните исполняемый файл.
4. В появившемся окне выберите опцию Advanced, как показано ниже.
5. Убедитесь, что установлен флажок «Применить ремонт автоматически», и нажмите кнопку «Далее».
6. Щелкните «Установка».
7. Выберите проблемный пакет.
8. Система предложит возможные исправления. Попробуйте оба из них и проверьте, что работает в вашем случае.
Проверьте, работает ли это, если нет, попробуйте следующее исправление.
Исправление 3. Установите ожидающие обновления.
1. Откройте диалоговое окно «Выполнить», используя клавиши Windows и R.
2. Введите команду ниже и нажмите Enter.
ms-settings:windowsupdate
3. В появившемся окне нажмите Проверить наличие обновлений.
4. После установки обновлений перезагрузите систему.
Исправление 4: Восстановите пакет из командной строки
1. Откройте диалоговое окно «Выполнить», используя клавиши Windows и R.
2. Введите cmd и нажмите Enter.
3. В открывшемся окне командной строки скопируйте и вставьте следующие команды одну за другой.
cd C:Users%username%Downloads
vc_redist.x64.exe /uninstall
4. Вы увидите всплывающее окно, нажмите кнопку «Восстановить».
5. Следуйте инструкциям на экране и завершите процесс восстановления.
Это все.
Надеемся, эта статья была информативной. Спасибо за чтение.