Users who have experienced error code 0x80004005 on VirtualBox are here I will help them to fix the issue. Basically, VirtualBox displays the “E_FAIL (0x80004005)” error code while opening any VM on VirtualBox.

Normally the error appears when it can’t open a virtual machine session. The error could be due to problems with the VirtualBox itself, configuration files, or hardware-related issues. While there are different reasons the error appears on your screen, you can also use the methods given to fix it.
Fix E_FAIL 0x80004005 on VirtualBox

Here are the methods to fix E_FAIL (0x80004005) on VirtualBox. But first, please check if you have enabled Virtualization from BIOS. As some users have experienced the issue due to this option being disabled.
1- Update VirtualBox
Here is how to update your VirtualBox.

- Visit the official VirtualBox website using a web browser.
- Navigate to the Downloads section of the website.
- Find the latest version of VirtualBox for your operating system (e.g., Windows, macOS, Linux).
- Click on the download link for the appropriate version. Once the download is complete, locate the downloaded installer file on your computer.
- Double-click on the installer file to start the installation process. Follow the on-screen instructions provided by the installer to update VirtualBox.
- During the installation, you may be prompted to close any running VirtualBox instances or restart your computer. Follow the instructions accordingly
Once the installation is complete, you should have the latest version of VirtualBox installed on your computer.
2- Restart or Disable Hyper-V
Sometimes Hyper-V might get engaged and cause the error. By restarting the Hyper-V, you will fix the issue. To restart the Windows Hypervisor (Hyper-V), you can follow these steps:
- Open the Start menu and search for Control Panel.
- Open Control Panel and inside click on the Programs category.
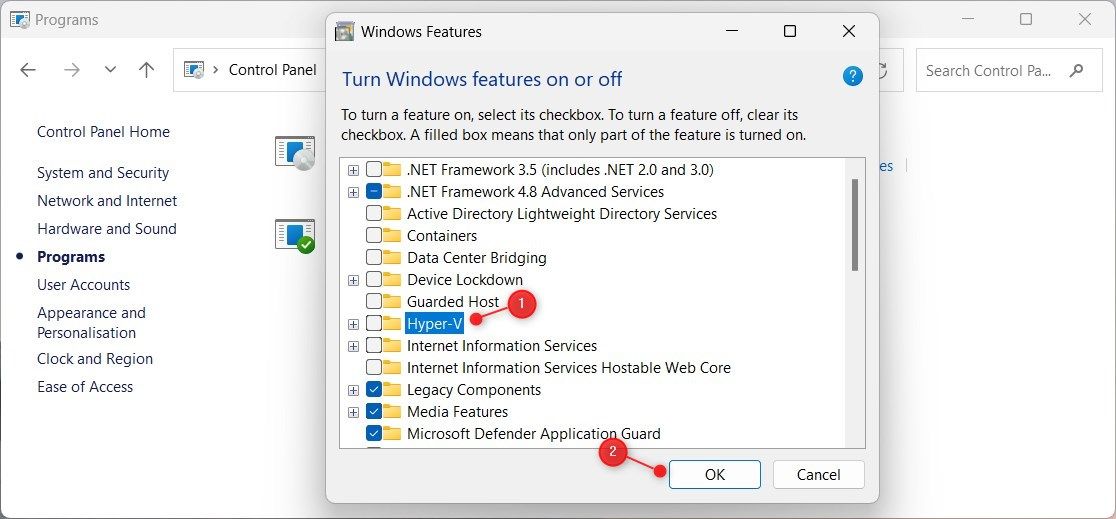
- Under Programs and Features, click on the Turn Windows features on or off link.
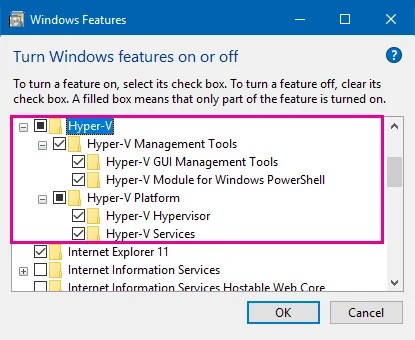
- The Windows Features dialog box will open. Scroll down and locate the Hyper-V option.
- Uncheck the box next to it. Click on the OK button to save the changes.
Windows will apply the changes and may prompt you to restart your computer. If prompted, choose to restart your computer to complete the process. After your computer restarts, follow the steps again to open the Windows Features dialog box.
- This time, check the box next to Hyper-V to enable it again.
- Click on the OK button to save the changes.
Windows will apply the changes and may prompt you to restart your computer. If prompted, choose to restart your computer to complete the process. After the restart, you will probably fix the VirtualBox 0x80004005 issue. If not, you are recommended to disable Hyper-V totally and check for issues.
If disabling Hyper-V has not fixed the issue then you will apply the next method.
3- Discard Save State of the VM
“Discard Saved State” refers to an option in virtualization software like VirtualBox that allows you to discard the saved state of a virtual machine. The saved state refers to a snapshot or a previously saved state of the virtual machine, which includes the virtual machine’s memory, disk, and system state at the time it was saved.
When you choose to “Discard Saved State,” it means that you want to discard the current saved state and start the virtual machine from a fresh state. This action will remove any changes or modifications made since the last saved state and restore the virtual machine to the point where the saved state was taken.
To discard the saved state in VirtualBox, you can follow these steps:
- Open VirtualBox and select the virtual machine for which you want to discard the saved state.
- Ensure the virtual machine is powered off.
- In the VirtualBox menu, go to the Machine option.

- From the drop-down menu, select Discard Saved State.
- VirtualBox will prompt you to confirm the action. If you are sure you want to discard the saved state, click OK or Yes.
VirtualBox will discard the saved state and start the virtual machine from a fresh state.
NOTE: Please note that discarding the saved state is irreversible, and any unsaved data or changes made since the last saved state will be lost. Make sure to save any important work before choosing to discard the saved state.
4- Rename VM XML File
To rename a VirtualBox VM XML file, you can follow these steps:
1. Make sure VirtualBox is closed completely.
2. Locate the directory where the VirtualBox VM XML files are stored. The default location is usually the VirtualBox configuration directory, which varies depending on the operating system:
– Windows: The default location is often “C:\Users\YourUserName\.VirtualBox\”.
– macOS: The default location is typically “/Users/YourUserName/.VirtualBox/”.
– Linux: The default location is commonly “/home/YourUserName/.VirtualBox/”.
3. Inside this directory, you will find:
- VM_NAME.xml-prev
- VM_NAME.xml-tmp
E_FAIL (0x80004005) error occurs, as VirtualBox simply just couldn’t find “VM_NAME.xml” at all. As this file technically doesn’t exist.
To fix the problem, you just need to make a copy of the “VM_NAME.xml-prev” file and rename the copy to “VM_NAME.xml”. Then, you will restart VirtualBox and check for the 0x80004005 error. If you are having the issue then apply the next method.
5- Install VBoxDrv.inf Manually
If you encounter the E_FAIL (0x80004005) error when starting a VirtualBox VM then it might be due to incomplete installation of the VBoxDrv.inf driver. If the driver is not installed automatically then you can manually install it. Here is how to do it:
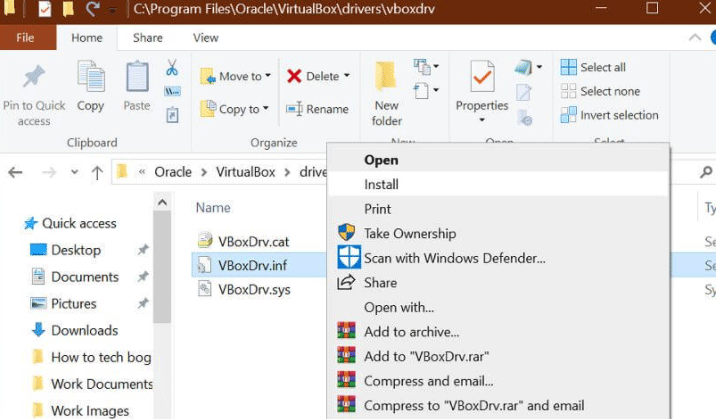
1. Open File Explorer and navigate to the VirtualBox installation folder. By default, it should be located at:
C:\Program Files\Oracle\VirtualBox\drivers\vboxdrv2. In the vboxdrv folder, locate the file named VBoxDrv.inf.
3. Right-click on the VBoxDrv.inf file and select Install.
4. Windows will start the driver installation process.
– If prompted for confirmation, click “Yes” or “Allow” to proceed.
– Follow any on-screen instructions provided by Windows during the installation process.
Once the installation is complete, you should see a message indicating the successful installation of the VBoxDrv.inf driver. You can now try launching your VirtualBox VM again, and it should start without the E_FAIL error.
This manual installation of the VBoxDrv.inf driver resolves the issue caused by incomplete installation and ensures the smooth operation of VirtualBox.
6- Reinstall VirtualBox
If nothing works then the last option to fix the issue is to reinstall VirtualBox. Here’s how to reinstall VirtualBox:
- Ensure that VirtualBox is closed completely.
- Open the Control Panel on your Windows & navigate to Programs or Programs and Features.
- Find Oracle VM VirtualBox in the list of installed programs. Select it and click on the Uninstall or Change button.
Follow the prompts to uninstall VirtualBox from your system. Once the uninstallation is complete, restart your computer. After restarting, download the latest version of VirtualBox.
Run the downloaded installer and follow the on-screen instructions.
Complete the installation process, ensuring that you select any desired options or components. Once the installation is finished, restart your computer again.
Related: How to install macOS Catalina on Virtual Box?
-
Home
-
Partition Manager
- 3 Simple Ways to Fix VirtualBox E_FAIL (0x80004005) Error
By Linda | Follow |
Last Updated
Have you received the Result Code: E_FAIL (0x80004005) when starting a VirtualBox VM? This post from MiniTool Partition Wizard offers you 3 simple ways to solve this problem. Keep reading to get them!
VirtualBox E_FAIL (0x80004005) Error
VirtualBox is an open-source type-2 hypervisor for x86 virtualization. It can be installed on Microsoft Windows, macOS, Linux, Solaris, and OpenSolaris. It supports the creation and management of guest virtual machines running Windows, Linux, BSD, OS/2, Solaris, Haiku, and OSx86, as well as limited virtualization of macOS guests on Apple hardware.
Many people use VirtualBox to run VMs. However, some people report that they have encountered the VirtualBox E_FAIL (0x80004005) error when starting a VM.
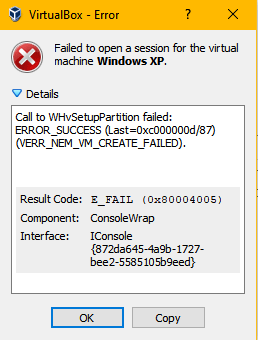
The error details, the component, and the interface may be various, but the “Failed to open a session for the virtual machine xx.” message and “Result Code: E_FAIL (0x80004005)” will not change.
How to Fix VirtualBox E_FAIL (0x80004005) Error
To solve the Result Code: E_FAIL (0x80004005), you can try the following methods.
Fix 1. Use CMD to Disable Hyper-V
Since version 6.0, VirtualBox is able to use the Hyper-V API to coexist next to Hyper-V. If you use an old version of VirtualBox, it may be incompatible with Windows Hyper-V. When the Hyper-V is enabled, VirtualBox VM won’t start.
Many people have confirmed that the Result Code: E_FAIL (0x80004005) may be caused by Hyper-V and disabling it will solve the problem. However, disabling Hyper-V in Windows Features may don’t work. You should disable Hyper-V using CMD. Here is the guide:
- Type “cmd” in the Windows search bar, right-click the best-matched result, and then click Run as administrator.
- Execute this command: bcdedit /set hypervisorlaunchtype off.
- Restart your PC and start the VirtualBox VM again to see whether the problem is solved.
Tip: To enable the Hyper-V later, you can use this command: bcdedit /set hypervisorlaunchtype auto.
Fix 2. Check the VM XML File
When the E_FAIL (0x80004005) error occurs, please navigate to the folder “C:UsersCOMPUTER_NAME.VirtualBoxMachinesVM_NAME” and check whether there are the following two files:
- VM_NAME.xml-prev
- VM_NAME.xml-tmp
When VirtualBox starts a VM, it needs to find an XML file. However, when the E_FAIL (0x80004005) error occurs, it seems that VirtualBox simply just couldn’t find “VM_NAME.xml” because this file technically doesn’t exist.
To solve this problem, you just need to make a copy of the “VM_NAME.xml-prev” file and rename the copy to “VM_NAME.xml”. Then, restart VirtualBox and it will work just fine.
Fix 3. Install VBoxDrv.inf Manually
VBoxDrv.inf is a driver used for VirtualBox. However, it’s possible that due to some permission issues, the installation of this crucial driver isn’t completed during the initial installation. Then, the VM won’t start and the error E_FAIL (0x80004005) occurs. In this case, you can solve the problem by installing the VBoxDrv.inf manually. Here is the guide:
Navigate to the VirtualBox installation folder and find the VBoxDrv.inf. If you didn’t customize the installation location, the VBoxDrv.inf file path should be C:Program FilesOracleVirtualBoxdriversvboxdrv. Right-click this file and choose Install.
If all the above three methods fail to solve the problem, you can try reinstalling VirtualBox.
Bottom Line
Are the above methods useful to you? Do you have other solutions to the Result Code: E_FAIL (0x80004005) issue? Please share them with us in the following comment zone. I will appreciate that very much.
About The Author

Position: Columnist
Linda has been working as an editor at MiniTool for 5 years. She is always curious about computer knowledge and learns it crazily. Her articles are simple and easy to understand. Even people who do not understand computer can gain something. By the way, her special focuses are disk management, data recovery and PDF editing.
Главная » Windows » Как исправить ошибку 0x80004005 в VirtualBox на Windows: руководство для начинающих
Если вы занимаетесь настройкой виртуальных машин, то наверняка сталкивались с ошибкой 0x80004005 в VirtualBox. Эта ошибка может возникнуть по разным причинам и на разных этапах работы с виртуальной машиной. В данной статье мы рассмотрим, что означает код ошибки 0x80004005, какие могут быть причины ее возникновения и как ее исправить.
Содержание
- Что означает код ошибки 0x80004005 в VirtualBox?
- Причины возникновения ошибки 0x80004005 в VirtualBox.
- Как исправить ошибку 0x80004005 в VirtualBox?
- Коды ошибок, связанные с 0x80004005 в VirtualBox и их исправление
- Ответы на вопросы
- Делаем выводы
Что означает код ошибки 0x80004005 в VirtualBox?
Код ошибки 0x80004005 — это неопознанная ошибка, которая может возникнуть в процессе работы с виртуальными машинами в VirtualBox. Она может проявиться при установке или запуске виртуальной машины, а также при выполнении других операций. Исправление этой ошибки может потребовать от пользователя выполнения нескольких действий.
Причины возникновения ошибки 0x80004005 в VirtualBox.
Существует несколько причин, почему может возникнуть ошибка 0x80004005 в VirtualBox. Рассмотрим некоторые из них:
- Вирусное заражение системы. Вирусы и другие вредоносные программы могут привести к нарушению работы VirtualBox и, как следствие, к возникновению ошибки 0x80004005.
- Неправильная установка VirtualBox.Неправильно выполненная установка VirtualBox может стать причиной возникновения ошибки 0x80004005.
- Конфликт с антивирусным программным обеспечением. Антивирусное ПО может блокировать доступ к файлам и папкам, необходимым для работы VirtualBox, что приводит к возникновению ошибки 0x80004005.
- Неисправность драйвера VirtualBox. Неисправность драйвера VirtualBox может привести к ошибке 0x80004005 при запуске виртуальной машины или выполнении других операций.
- Ограничения прав доступа пользователя. Недостаточно прав доступа пользователя может привести к возникновению ошибки 0x80004005 при запуске виртуальной машины или выполнении других операций.
Как исправить ошибку 0x80004005 в VirtualBox?
Для исправления ошибки 0x80004005 в VirtualBox можно выполнить несколько действий. Рассмотрим некоторые из них:
- Очистка системы от вредоносных программ. Перед началом работы с виртуальными машинами рекомендуется проверить компьютер на наличие вирусов и других вредоносных программ. Если они обнаружены, необходимо удалить их и выполнить полную проверку системы.
- Переустановка VirtualBox. Если ошибка 0x80004005 возникает из-за неправильно выполненной установки VirtualBox, рекомендуется переустановить программу.
- Отключение антивирусного ПО. Если антивирусное ПО блокирует работу VirtualBox, можно попробовать временно отключить его или добавить исключения для файлов и папок, используемых VirtualBox.
- Обновление драйверов VirtualBox. Если ошибка 0x80004005 возникает из-за неисправности драйвера VirtualBox, можно попробовать обновить драйвер до последней версии.
- Настройка прав доступа пользователя. Если недостаточно прав доступа пользователя стала причиной ошибки 0x80004005, можно попробовать изменить настройки прав доступа для соответствующих файлов и папок.
Коды ошибок, связанные с 0x80004005 в VirtualBox и их исправление
Ошибки e fail 0x80004005, vboxhardening e fail 0x80004005, ns error failure 0x80004005 и ошибки при извлечении zip могут также быть связаны с ошибкой 0x80004005 в VirtualBox.
Для их исправления могут потребоваться дополнительные действия, такие как переустановка VirtualBox, настройка прав доступа или изменение настроек безопасности.
Ответы на вопросы
Что означает ошибка 0x80004005 в VirtualBox?
Ошибка 0x80004005 — это неопознанная ошибка, которая может возникнуть в процессе работы с виртуальными машинами в VirtualBox.
Какие могут быть причины возникновения ошибки 0x80004005 в VirtualBox?
Неправильная установка VirtualBox, вирусное заражение системы, конфликт с антивирусным программным обеспечением, неисправность драйвера VirtualBox и ограничения прав доступа пользователя могут привести к возникновению ошибки 0x80004005.
Как исправить ошибку 0x80004005 в VirtualBox?
Для исправления ошибки 0x80004005 можно выполнить несколько действий, включая очистку системы от вредоносных программ, переустановку VirtualBox, отключение антивирусного ПО, обновление драйверов VirtualBox и настройку прав доступа пользователя.
Какие коды ошибок могут быть связаны с 0x80004005 в VirtualBox?
Ошибки e fail 0x80004005, vboxhardening e fail 0x80004005, ns error failure 0x80004005 и ошибки при извлечении zip могут быть связаны с ошибкой 0x80004005 в VirtualBox.
Какие рекомендации можно дать для предотвращения возникновения ошибок в VirtualBox?
Рекомендуется регулярно проверять компьютер на наличие вирусов и других вредоносных программ, устанавливать VirtualBox правильно, изменять настройки безопасности и настраивать права доступа пользователя.
Что делать, если после выполнения рекомендаций ошибка 0x80004005 не исчезает?
Если после выполнения рекомендаций ошибка 0x80004005 не исчезает, рекомендуется обратиться за помощью к специалисту.
Может ли ошибка 0x80004005 возникать на других операционных системах кроме Windows?
Да, ошибка 0x80004005 может возникать на других операционных системах, но рекомендации по ее исправлению могут отличаться.
Как можно проверить драйвер VirtualBox на наличие неисправностей?
Для проверки драйвера VirtualBox можно выполнить обновление драйвера до последней версии. Если это не помогает, можно попробовать переустановить VirtualBox.
Как можно изменить настройки прав доступа для файлов и папок в Windows?
Для изменения настроек прав доступа для файлов и папок в Windows необходимо выполнить следующие шаги: щелкнуть правой кнопкой мыши на файле или папке, выбрать «Свойства», перейти на вкладку «Безопасность» и изменить настройки прав доступа.
Что такое антивирусное ПО и как оно может влиять на работу VirtualBox?
Антивирусное ПО — это программа, которая предназначена для защиты компьютера от вирусов и других вредоносных программ. Она может блокировать доступ к файлам и папкам, необходимым для работы VirtualBox, что может привести к ошибкам в программе.
Делаем выводы
Ошибка 0x80004005 может возникнуть по разным причинам и на разных этапах работы с виртуальными машинами в VirtualBox. Для ее исправления необходимо определить причину ошибки и выполнить соответствующие действия. Рекомендуется также регулярно проверять компьютер на наличие вирусов и других вредоносных программ, чтобы предотвратить возникновение ошибок в будущем. Если вы столкнулись с ошибкой 0x80004005 в VirtualBox, не отчаивайтесь — с нашими рекомендациями вы сможете ее легко исправить.

Надеюсь, мой материал помог тебе и был полезен! Пожалуйста, если будут вопросы — пиши.
Get VirtualBox back with these fixes for the 0x80004005 error.

VirtualBox is widely used open-source software that allows you to run multiple operating systems on your computer. Sometimes while using the program you may come across the error code E_FAIL (0x80004005). This particular issue prevents you from accessing the software and generally occurs when launching any virtual machine.
Fortunately, there are ways to tackle the issue and continue enjoying the various features of this versatile software.
What Causes Error 0x80004005?
VirtualBox E_FAIL (0x80004005) errors can occur for a variety of reasons. It includes faulty settings in VirtualBox and incompatibilities with third-party applications. Additionally, improper Network Adapter configuration and incorrect configuration files may also cause this issue. The error generally appears after you install a new release of VirtualBox.
Let’s now see how to fix this issue.
1. Disable Hyper-V
Hyper-V is a hardware virtualization technology from Microsoft that conflicts with VirtualBox, resulting in errors like this. To disable it, follow these steps:
- Open Control Panel (see how to open Control Panel) and select Programs.
- In the Programs and Features section, click on Turn Windows features on or off.
- Uncheck Hyper-V in Windows Features and click OK.

- Next, press Win + X on your keyboard and select Terminal (Admin).
- If the User Account Control window appears, select Yes.
- In the command prompt window, type this command and hit Enter:
bcdedit /set hypervisorlaunchtype off
Now close the window and restart your computer. After that, launch VirtualBox and check if the issue has been resolved.
2. Install the Latest Version of VirtualBox
Installing the latest version is the key to solving many issues and keeping your system glitch-free. Doing so will ensure that all software features and components are up-to-date and operating correctly.
To update your version, follow these steps:
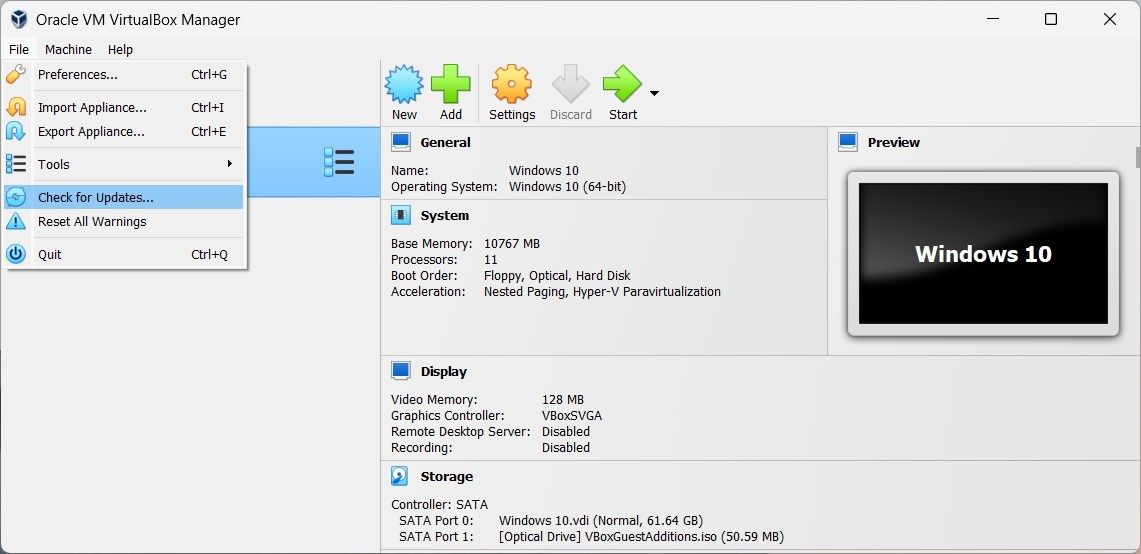
- Search for the VirtualBox Manager app and open it.
- On the top menu, go to File and select Check for Updates. If any updates are available, a pop-up will appear.

- Click on the link to download and follow the onscreen instructions to install the update.
After you perform the installation process, try launching your virtual machine and see if the error has been fixed.
3. Rename the VM XML File
Another way to fix the issue is by renaming the VM XML file. This file includes important settings and configurations related to your virtual machine, which might cause the error. To rename it, follow these steps:
- Open File Explorer (see how to open File Explorer) and navigate to the following directory:
C:\Users\username\VirtualBox VMs\ - Now locate your virtual machine folder with a suffix of .xml-prev.
- Right-click on it, select Rename, and remove the -prev suffix.

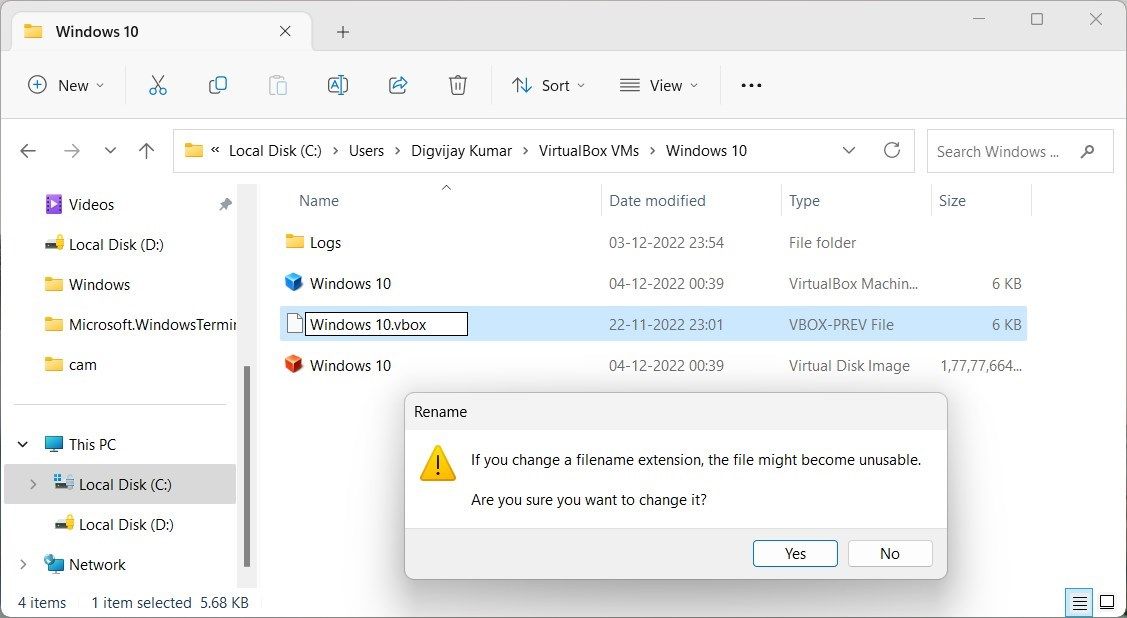
Upon doing so, a confirmation message pops up. Click Yes and relaunch the virtual machine. If the issue persists, move to the next solution.
4. Uninstall Third-Party Applications
Certain third-party applications like antivirus software or other security programs may interfere with VirtualBox and cause this error. Uninstalling them might help resolve the issue.
To do so, follow these steps:
- Open Control Panel and select Programs & Features.
- Locate the applications you want to remove and click Uninstall.
After uninstalling the programs, restart your computer, and try running VirtualBox again.
5. Try Reinstalling VirtualBox
If none of the above methods work, you may need to reinstall the program. Here’s how to do it.
- Open Control Panel and go to Programs & Features.
- Right-click on the VirtualBox entry and select Uninstall.
- Follow the prompt to remove it from your system.

Once done, restart your computer. Then head to the official website for Oracle VM VirtualBox and download the latest version. After that, install it, and see if that helps fix the issue.
Fixing the VirtualBox E_FAIL (0x80004005) Error on Windows
While opening the virtual machine, you may encounter the error code E_FAIL (0x80004005) on your Windows PC. This error may be caused by a number of things, such as the VirtualBox app being faulty, Hyper-V blocking access from Virtual or potential hardware difficulties. Read this guide to learn the possible ways to fix this issue.
Пользователи Windows достаточно часто сталкиваются с ошибкой 0x80004005. Она может появляться при установке обновлений операционной системы, попытке получить доступ к общим папкам или виртуальным машинам и даже изменении атрибутов файлов. Код ошибки 0x80004005, по сути, означает неопределенную ошибку. Но на самом деле все не так страшно, как кажется. Сегодня мы разберем основные причины ее появления и расскажем о нескольких способах решения проблемы.
Содержание
- Ошибка 0x80004005 в VirtualBox
- Ошибка при работе с поврежденными файлами
- Ошибка при доступе к общим файлам и папкам
- Выводы
Ошибка 0x80004005 в VirtualBox
В первом случае для решения проблемы достаточно включить в BIOS поддержку виртуализации. В зависимости от версии BIOS эта опция находится в ветке Advanced и называется Virtualization Technology или Intel(R) VT for Directed I/O. Просто переключите соответствующую опцию в положение Enabled, и проблема исчезнет.
В случае неудачного сохранения последней сессии необходимо переименовать файлы, связанные с запуском операционной системы в виртуальной машине. Чаще всего они находятся в папке VirtualBox VMs, а имена файлов звучат как [придуманное вами название].vbox и [придуманное вами название ОС].vbox-prev. Скопируйте первый файл в другое место, а в названии второго удалите окончание «-prev». Аналогичные действия нужно произвести в папке C:\Users\имя_пользователя\.VirtualBox. Только на сей раз имена нужных нам файлов звучат как VirtualBox.xml и VirtualBox.xml-prev.

Ошибка e fail 0x80004005 часто возникает после обновления виртуальной машины. В этом случае все достаточно просто — вам нужно откатиться до прежней, гарантированно рабочей версии VirtualBox. Для этого удалите текущую версию программы (не забудьте сохранить все нужные файлы в отдельную папку), и установите более ее старую версию. Для простой переустановки VirtualBox нужно запустить инсталлятор приложения и выбрать пункт меню «Repair».

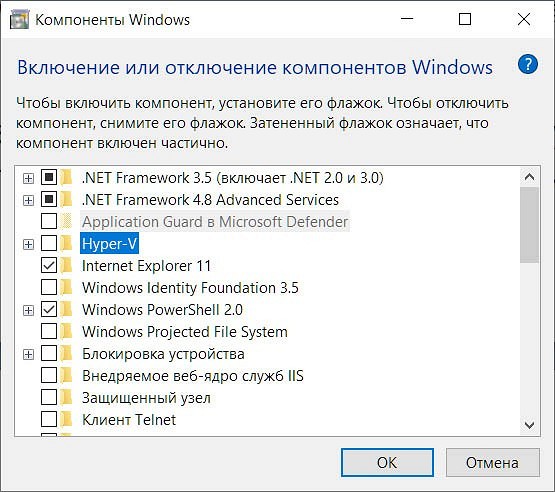
Кроме того, достаточно часто проблемы с VirtualBox вызывает гипервизор Hyper-V, конфликтующий со сторонней виртуальной машиной на 64-разрядных системах. Для исключения этого конфликта кликните на «Включение или отключение компонентов Windows» в «Панели управления Windows». А в открывшемся окне снимите галку напротив компонента Hyper-V и подтвердите изменения. Таким образом, вы отключите Hyper-V, и конфликт исчезнет.
В подавляющем большинстве случаев описанных выше мер хватит для исчезновения в VirtualBox ошибки e fail 0x80004005.
Ошибка при работе с поврежденными файлами
Надпись 0x80004005 часто можно увидеть при повреждении системных файлов Windows. Но здесь решение проблемы выглядит еще более простым. Вам достаточно провести проверку целостности файлов встроенными средствами операционной системы.
Для этого запустите командную строку или PowerShell от имени администратора и введите там команду sfc /scannow. После сканирования системы вы получите сообщение об отсутствии проблем, успешном восстановлении поврежденных файлов или невозможности их восстановления.
Если системе не удалось восстановить поврежденные файлы, можно пойти более долгим, но эффективным путем. Введите в командной строке «findstr /c:»[SR]» %windir%\Logs\CBS\CBS.log >»%userprofile%\Desktop\sfclogs.txt». После этого на рабочем столе появится файл sfclogs.txt с логом сканирования. Посмотрите, какие файлы операционной системы были повреждены и замените их — такие файлы можно найти на любом компьютере с этой же версией Windows.
Кроме того, исправлению поврежденных файлов может мешать сама Windows. Поэтому здесь может помочь загрузка и восстановление с флешки или диска с дистрибутивом Windows. Нажмите сочетание клавиш Win + I. Найдите там раздел «Обновление и безопасность» -> «Восстановление» -> «Особые варианты загрузки» и нажмите кнопку «Перезагрузить сейчас».
Подождите немного, и вы увидите меню, один из пунктов которого звучит как «Поиск и устранение неисправностей». Перейдите в него, нажмите «Дополнительные параметры» и выберите командную строку. После этого действуйте по приведенной выше инструкции.
Ошибка при доступе к общим файлам и папкам
Ошибка 0x80004005 в Windows 10 может возникать и при попытке доступа к общим файлам и папкам. В этом случае, в первую очередь, стоит проверить операционную систему на лишние виртуальные сетевые адаптеры. Кликните правой кнопкой мышки по меню «Пуск» и выберите в выпадающем списке «Диспетчер устройств». Затем откройте меню «Вид» -> «Показать скрытые устройства. Откройте ветку «Сетевые адаптеры» и удалите все устройства, в названиях которых есть «Microsoft 6to4».
Эта же проблема может возникать и из-за проблем с реестром. Запустите командную строку сочетанием клавиш Win + R и откройте редактор реестра командой «regedit». Перейдите в ветку \HKEY_LOCAL_MACHINE\SOFTWARE\Microsoft\Windows\CurrentVersion. В случае 32-битной операционной системы создайте там параметр DWORD с названием LocalAccountTokenFilterPolicy и значением «1», а 64-битной — QWORD с такими же названием и значением.
Перезагрузите компьютер. Проблема должна исчезнуть.

Выводы
Как вы видите, причин появления ошибки 0x80004005 может быть совсем немало. Но во всех случаях ее исправление не представляет собой особой сложности. Достаточно лишь четко придерживаться предложенной нами инструкции. Хотя, конечно, вы всегда можете решить эту проблему и банальной переустановкой Windows, но такой способ больше напоминает лечение головной боли отрубанием головы, и мы не советуем им злоупотреблять.
Читайте также
- Ошибка с библиотекой msvcp140.dll: как от нее избавиться
- Ошибка 0xc0000005 при запуске игры или приложения: как ее исправить