hp-concentra-wrapper-portlet
![]()
Actions
Issue
A ‘Carriage Jam. The print carriage cannot move. Open the ink cartridge access door, clear any paper jam or obstruction, and select OK‘ message displays on the printer control panel.
One of the following error codes might display with the message:
-
0x61000008
-
0x6100000B
-
0x6100001D
The carriage, which holds the cartridges, stalls in the printer. A paper jam might have occurred previously.
You might also experience the following symptoms:
-
The printer does not print.
-
The print job stops unexpectedly.
Solution one: Restart the printer
Follow these steps to restart the printer, and then try to print a test page.
Step one: Restart the printer
-
Press the Power button to turn off the printer.
-
Wait 60 seconds.
-
Press the Power button to turn on the printer.
note:
The printer might go through a warm-up period which can last several minutes. Wait until the printer is idle and silent before continuing.
Step two: Print a Printer Status Report
Video on printing a test page
The following video demonstrates how to print a printer status report.
note:
This video shows the HP Officejet 4620 e-All-in-One Printer series, but the steps are the same for your printer.

Print a test page to make sure that the hardware functions correctly.
-
Load plain white U.S. letter or A4 size paper in the tray.
-
On the product control panel, press the Setup button (
 ).
). -
Press the button (
) next to the Down Arrow ( ) until Reports displays next to OK, and then press the button next to OK. -
Press the button next to the Down Arrow (
) until Printer Status Report displays next to OK, and then press the button next to OK again. The test page prints.
 ).
). ) next to the Down Arrow (
 ) until
 -
If these steps resolved the issue, and the test page prints, there is no need to continue troubleshooting.
-
If the issue persists, continue with the next solution.
-
If the test page does not print, continue with the next solution.
Solution two: Clear the jam from inside the printer
Follow these steps to clear the jam from the cartridge access area, the cleanout area, and from underneath the printer.
note:
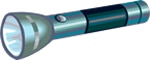
Use a flashlight to complete these steps.
Video on clearing a carriage jam
The following video demonstrates how to clear a carriage jam.
note:
This video shows the HP Officejet 4620 e-All-in-One Printer series, but the steps are the same for your printer.
Step one: Clear the jam from the cartridge access area
Follow these steps to remove jammed paper from inside the cartridge access area.
-
Press the Power button to turn on the printer, if it is not already turned on.
-
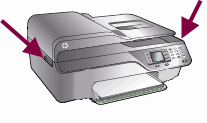
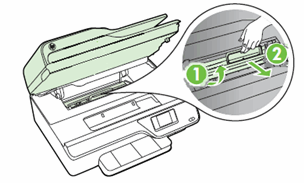
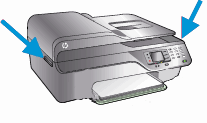
Locate the slots on the sides of the printer.
Figure : Locate the slots on the sides of the printer
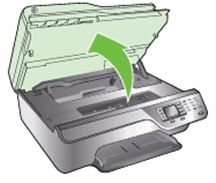
-
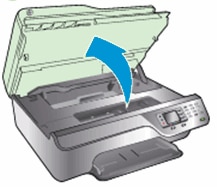
Place your fingers in the two slots on the sides of the printer, and then lift the cartridge access door. The carriage moves into the cartridge access area.
Figure : Open the cartridge access door
-
Disconnect the power cord from the rear of the printer.
warning:Do not reach into the cartridge access
area when the printer is plugged into an electrical outlet.
-
Disconnect the USB cable from the rear of the printer if you have a USB connection to the computer.
-
Gently remove any jammed paper from the cartridge access area. To avoid tearing any whole sheets of paper, pull the paper with both hands.
-
Use a flashlight to thoroughly check for torn pieces of paper that might remain in the cartridge access area. If any torn pieces of paper remain inside the printer, more jams are likely to occur.
Use a flashlight
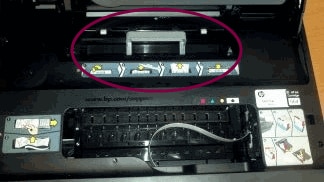
Paper jammed in carriage path
-
Slide the carriage to the right side of the cartridge access area, and then inspect the left side of the cartridge access area for torn pieces of paper that might remain inside the printer.
-
Remove any torn pieces of paper you find.
-
Slide the carriage to the left side of the cartridge access area, and then inspect the right side of the cartridge access area for torn pieces of paper that might remain inside the printer.
-
Remove any torn pieces of paper you find.

Step two: Clear the jam from inside the cleanout door
Follow these steps to remove any jammed paper from the cleanout door.
-
Make sure that the power is off and that the power cord is disconnected from the rear of the printer.
warning:Do not reach into the cartridge access
area when the printer is plugged into an electrical outlet.
-
Make sure the USB cable is disconnected from the rear of the printer, if you have a USB connection to the computer.
-
With the cartridge access door open, locate the cleanout door. The door is behind the cartridge access area towards the rear of the printer.
Figure : The cleanout door
-
Pull the cleanout door up and then out to remove it from the printer.
Figure : Remove the cleanout door
-
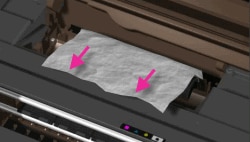
Gently remove any jammed paper. To avoid tearing any whole sheets of paper, pull the paper with both hands.
Figure : Remove any jammed paper
-
Use a flashlight to thoroughly check for torn pieces of paper that might remain in the cleanout area. If any torn pieces of paper remain inside the printer, more jams are likely to occur.
Figure : Use a flashlight
-
Remove any torn pieces of paper you find.
-
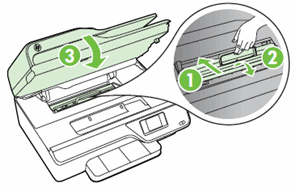
Gently reinsert the cleanout door into the cleanout area, and then press down on the handle until the door snaps into place.
-
Close the cartridge access door.
-
Insert the cleanout door into the cleanout area
-
Push down on the door handle until the door snaps into place
-
Close the cartridge access door
Figure : Reinsert the cleanout door and close the cartridge access door
-
Step three: Clear the jam from underneath the Printer
If you are unable to remove jammed paper from the cartridge access area or from inside the cleanout door, follow these steps to clear the jam from underneath the printer.
-
Press the Power button to turn off the printer, if it is not off already.
-
Disconnect the power cord from the rear of the printer, if it is not disconnected already.
-
Turn the printer onto its right side so that you can access its underside.
caution:Before turning the printer, use your hand to secure the scanner lid.
-
Slide the paper tray out until it stops.
-
Gently remove any jammed paper and bits of torn paper from the input tray area and from underneath the printer. To avoid tearing any whole sheets of paper, pull the paper with both hands.
Figure : Remove paper from underneath the printer
-
Use a flashlight to thoroughly check for torn pieces of paper that might remain inside the printer. If any torn pieces of paper remain inside the printer, more jams are likely to occur.
Figure : Use a flashlight
-
Remove any torn pieces of paper you find.
-
Slide the paper tray back in until it stops.
-
Return the printer to its normal position.
-
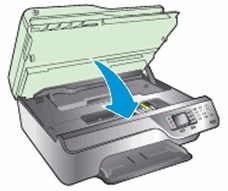
Open the cartridge access door, and then look inside the printer for any loose objects that might have shifted when you turned the printer over. Remove any loose objects you find.
-
Close the cartridge access door.
Figure : Close the cartridge access door
-
Reconnect the power cord to the rear of the printer.
-
Press the Power button to turn on the printer.

Step four: Print a Printer Status Report
Print a test page to make sure that the hardware functions correctly.
How to print a test page
Follow these steps to print a test page.
-
Load plain white U.S. letter or A4 size paper in the tray.
-
On the product control panel, press the Setup button (
). -
Press the button (
) next to the Down Arrow ( ) until Reports displays next to OK, and then press the button next to OK. -
Press the button next to the Down Arrow (
) until Printer Status Report displays next to OK, and then press the button next to OK again. The test page prints.
-
If these steps resolved the issue, and the test page prints, there is no need to continue troubleshooting.
-
If the issue persists, continue with the next solution.
-
If the test page does not print, continue with the next solution.
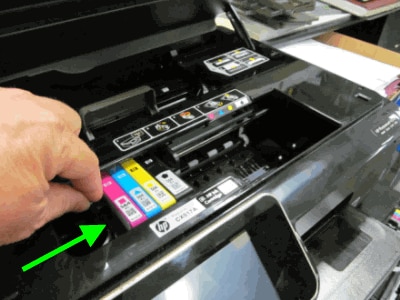
Solution three: Remove and reinsert the cartridges
Improper placement or installation of the cartridges can cause the printer to indicate a carriage jam error. Follow these steps to remove and then reinsert the cartridges.
Step one: Remove and reinsert the cartridges
Follow these steps to remove and then reinsert the cartridges.
-
Press the Power button to turn on the printer, if it is not already on.
-
Locate the two slots on the sides of the printer.
Figure : Slots on the sides of the printer
-
Place your fingers in the slots on the right and left sides of the printer, and then lift to open the cartridge access door. The carriage moves into the carriage access area.
Figure : Open the cartridge access door
-
Wait until the carriage is idle and silent before proceeding.
-
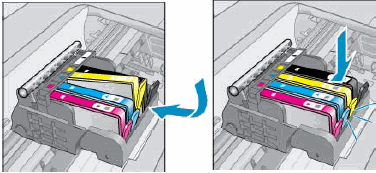
Press in the tab on the front of a cartridge to release it, and then pull up on the cartridge to remove it from the slot.
Figure : Remove the cartridge from its slot
-
Repeat these steps to remove the other cartridges.
-
To reinsert a cartridge, hold the cartridge so that the cartridge contacts are facing toward the printer.
-
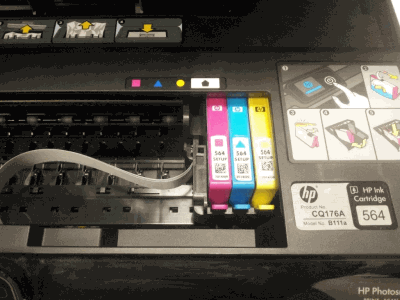
Match the colored dot on the cartridge with the dot of the same color on the carriage.
-
Slide the cartridge into its slot, and then gently press the cartridge down until it clicks into place.
note:
Make sure that the colored dot on the cartridge label matches the colored dot on the slot.
Figure : Install the cartridge
-
Repeat these steps to reinsert the other cartridges.
-
Close the cartridge access door.
Figure : Close the cartridge access door

Step two: Print a Printer Status Report
Print a test page to make sure that the hardware functions correctly.
How to print a test page
Follow these steps to print a test page.
-
Load plain white U.S. letter or A4 size paper in the tray.
-
On the product control panel, press the Setup button (
). -
Press the button (
) next to the Down Arrow ( ) until Reports displays next to OK, and then press the button next to OK. -
Press the button next to the Down Arrow (
) until Printer Status Report displays next to OK, and then press the button next to OK again. The test page prints.
-
If these steps resolved the issue, and the test page prints, there is no need to continue troubleshooting.
-
If the issue persists, continue with the next solution.
-
If the test page does not print, continue with the next solution.
Solution four: Make sure that the posts in the cartridge parking area are not blocking the carriage
The carriage might move freely to the left and right even though the error displays on the control panel. Follow these steps to check if the posts are blocking the carriage.
Step one: Make sure that the posts in the cartridge parking area are not blocking the carriage
note:
Consider using gloves to perform these steps.
-
Unplug the power cord from the power source or electrical outlet.
-
Open the cartridge access door.
Figure : Open the cartridge access door
-
Reach into the cartridge access area, and then manually move the carriage to the left of the printer and then the right. The carriage should move completely underneath the cover on the right side of the printer.
-
If you cannot move the carriage completely underneath the cover on the right side of the printer, continue with these steps.
Figure : Example of the carriage partially under the cover on the right side of the printer
-
Figure : Example of the carriage resting underneath the cover on the right side of the printer
-
-
Move the carriage to the left side of the printer, and then use a flashlight to look inside the printer under the right cover.
Figure : Example showing where to look under the printer cover
-
Make sure that the posts are not blocking the carriage from moving all the way to the right.
Figure : Example of posts that might be blocking the carriage
-
If you see posts that could be blocking the carriage, continue with these steps.
-
-
Use a long, slim object (such as the eraser-end of a pencil) to gently push in the post.
Figure : Example of pushing in the post with a pencil
-
Reach into the cartridge access area, and then manually move the carriage to the right of the printer. The carriage should move under the printer cover.
warning:Do not lift up on the carriage.
Figure : Push the carriage to the right
Figure : Example of the carriage resting under the cover
-
Close the cartridge access door.
Figure : Close the cartridge access door
-
Reconnect the power cord to the rear of the printer.
-
Plug the power cord back into the power source or electrical outlet.
-
If the printer does not turn on automatically, press the Power button to turn it on.


Step two: Print a Printer Status Report
Print a test page to make sure that the hardware functions correctly.
How to print a test page
Follow these steps to print a test page.
-
Load plain white U.S. letter or A4 size paper in the tray.
-
On the product control panel, press the Setup button (
). -
Press the button (
) next to the Down Arrow ( ) until Reports displays next to OK, and then press the button next to OK. -
Press the button next to the Down Arrow (
) until Printer Status Report displays next to OK, and then press the button next to OK again. The test page prints.
-
If these steps resolved the issue, and the test page prints, there is no need to continue troubleshooting.
-
If the issue persists, continue with the next solution.
-
If the test page does not print, continue with the next solution.
Solution five: Plug the printer directly into a wall outlet
Follow these steps to plug the printer directly into a wall outlet, and then print a test page.
Step one: Plug the printer directly into a wall outlet
Plug the printer directly into an electrical outlet to make sure that the power source functions correctly.
-
Disconnect the power cord from the rear of the printer.
-
Unplug the power cord from any power strip or surge suppressor.
-
Plug the power cord directly into an electrical outlet.
-
Reconnect the power cord to the rear of the printer.
-
Press the Power button to turn on the printer.
Step two: Print a Printer Status Report
Print a test page to make sure that the hardware functions correctly.
How to print a test page
Follow these steps to print a test page.
-
Load plain white U.S. letter or A4 size paper in the tray.
-
On the product control panel, press the Setup button (
). -
Press the button (
) next to the Down Arrow ( ) until Reports displays next to OK, and then press the button next to OK. -
Press the button next to the Down Arrow (
) until Printer Status Report displays next to OK, and then press the button next to OK again. The test page prints.
-
If these steps resolved the issue, and the test page prints, there is no need to continue troubleshooting.
-
If the issue persists, continue with the next solution.
-
If the test page does not print, continue with the next solution.
Solution six: Reset the printer
Follow these steps to reset the printer.
Step one: Perform a power reset
-
With the printer turned on, disconnect the power cord from the rear of the printer.
-
Unplug the power cord from the wall outlet.
-
Wait at least 15 seconds.
-
Plug the power cord back into the wall outlet.
-
Reconnect the power cord to the printer.
-
Turn the printer on.
Step two: Print a test page
Print a test page to make sure that the hardware functions correctly.
How to print a test page
Follow these steps to print a test page.
-
Load plain white U.S. letter or A4 size paper in the tray.
-
On the product control panel, press the Setup button (
). -
Press the button (
) next to the Down Arrow ( ) until Reports displays next to OK, and then press the button next to OK. -
Press the button next to the Down Arrow (
) until Printer Status Report displays next to OK, and then press the button next to OK again. The test page prints.
-
If these steps resolved the issue, and the test page prints, there is no need to continue troubleshooting. Reconnect the USB cable, and then try to print again.
-
If the test page prints successfully, but you continue to experience an issue with your printer, then the issue is not related to the hardware.
-
Experiencing another issue?
If your printer prints a test page and there is still an issue with your printer, go to HP Customer Support, type your printer model, and then browse for the appropriate support document to troubleshoot the issue.
-
-
If the printer does not print a test page, there is an issue with the printer hardware. Continue to the next step or solution.
Solution seven: Service the printer
Service or replace your HP product if the issue persists after completing all the preceding steps.
Go to Contact HP Customer Support to schedule a product repair or replacement. If you are in Asia Pacific, you will be directed to a local service center in your area.
To confirm your warranty status, go to HP Product Warranty Check. Repair fees might apply for out-of-warranty products.
-
Home
-
Partition Magic
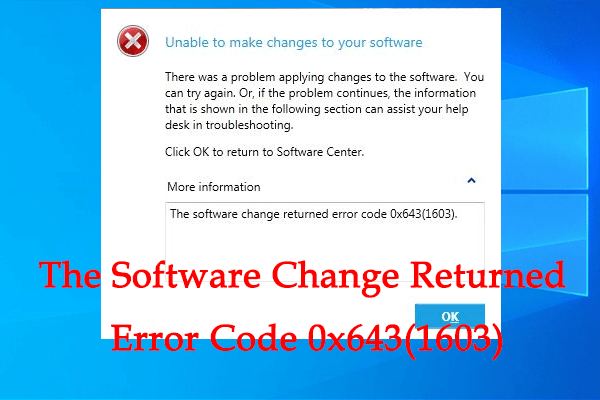
- Fixed: The Software Change Returned Error Code 0x643(1603)
By Yamila | Follow |
Last Updated
Are you upset when the error message “the software change returned error code 0x643 1603” shows up on your Windows 10 PC? In this post, MiniTool Partition Wizard introduces a couple of solutions to this error. You can follow them to get rid of your problem.
The error code 0x643 1603 often occurs when you are attempting to install third-party applications like Adobe software (Photoshop, Illustrator, Lightroom, etc.) and Office products (Word, Excel, PowerPoint, etc.) or when you are deploying System Center Configuration Manager (SCCM) to install a program on multiple computers at once.
Once the above error appears, you will see a message that says “the software change returned error code 0x643(1603)”. This annoying error can be caused by the following reasons:
- Corrupted or missing .NET Framework
- Improper Command line Interpreter path
- Disabled .NET Framework 3.5 / .NET Framework 4.
What can you do when you run into the error: the software change returned error code 0x643 1603? Well, you can try the following methods we summarize for you to fix this error.
Method 1: Point to the Correct Command Line Interpreter Path
If the software change returned error code 0x643 1603 comes out when you are trying to use the SCCM tool to install programs on several PCs, you may fix this error by finding the right command line interpreter path. To do this, you need to run a COMSPEC command. Just follow the steps below.
Step 1: Press the Windows and R keys to open the Run dialog on your PC.
Tips:
If you want to learn more ways to enter Run, you can read this post: 6 Ways – How to Open Run Command Windows 10
Step 2: Type cmd in the text box and then press Ctrl + Shift + Enter to open Command Prompt as an administrator.
Step 3: Click Yes to continue when the UAC window pops up.
Step 4: In the elevated Command Prompt, type the following command and then press Enter to execute this command: %ComSpec%=”C:\WINDOWS\COMMAND.COM
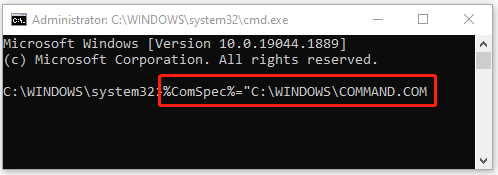
Step 5: After the process is completed, go to check if the error 0x643(1603) is resolved.
Method 2: Repair the .NET Framework
As mentioned above, the software change returned error code 0x643 1603 may be caused by the corrupted or missing .NET Framework as well. In this case, it’s recommended that you repair the .NET Framework using the .NET Repair Tool. It’s a useful way especially when you are installing Adobe software. The following are detailed steps for you.
Step 1: Go to the official Microsoft webpage on your browser and download the .NET Framework Repair Tool.
Step 2: After the downloading process finishes, double-click the .exe file to open it.
Step 3: In the prompted window, check the I have read and accept the license terms option. Then click Next.
Step 4: After that, the .NET Framework Repair Tool will begin detecting issues. Once the process completes, it will show you the changes that may solve the current installation issues you encounter. To apply these changes, click Next.
Step 5: Wait until the changes are executed. Then click Finish and restart your PC to see if the error 0x643 1603 disappears.
Method 3: Enable .NET Framework 3.5 and 4.8
The software change returned error code 0x643 1603 may appear as well if the existing .NET framework on your computer is disabled. To remove this error, you can try enabling the needed .NET framework.
Step 1: Search for Turn Windows features on or off in the search bar and then press Enter.
Step 2: In the Windows Features window, tick the checkbox next to .NET Framework 3.5 (this package includes .NET 2.0 and 3.0) and .NET Framework 4.8 Advanced Services.
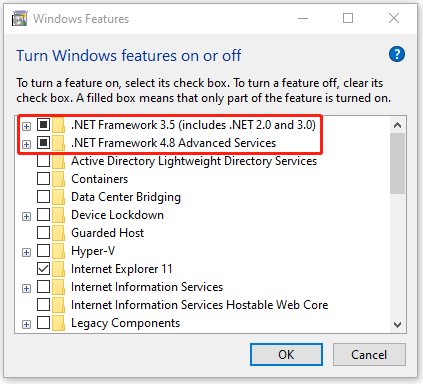
Step 3: Click OK and then Yes to confirm the operation.
Step 4: Once done, restart your system.
All these solutions mentioned in this post are available. After you get stuck in the software change returned error code 0x643 1603, you can follow them to fix this error. If you have any other methods for fixing this error, you can share them with us in the following comment area.
If you have problems while managing your partitions and disks, you can take advantage of MiniTool Partition Wizard. It’s a professional partition manager with various features. If you are interested in this program, you can visit its official website.
About The Author

Position: Columnist
Yamila is a fan of computer science. She can solve many common issues for computer users by writing articles with simple and clear words. The very aspect that she is good at is partition management including create partition, format partition, copy disk and so on.
When she is free, she enjoys reading, doing some excerpts, listening to music and playing games.

Scenario
You are deploying an SCCM application. The application installation fails resulting in an error code 0x643(1603)
Troubleshooting
The first thing I wanted to do was to verify what command SCCM was trying to run. To do this, I went to the AppEnforce log from the client on which I as trying to install the software. It showed the following:
Context: Machine
Command line: msiexec /i «PBIDesktop_x64.msi» /q
Allow user interaction: No
UI mode: 0
User token: not null
Session Id: 2
Content path: C:\Windows\ccmcache\d
And the result was as follows:
<![LOG[ Process 3912 terminated with exitcode: 1603]LOG]!>
<![LOG[ Unmatched exit code (1603) is considered an execution failure.]LOG]!>
So the .msi failed when trying to install. Fortunately, you can turn on msi logging to get more information on why the .msi installation failed. To do this, see this article: https://support.microsoft.com/en-us/help/223300/how-to-enable-windows-installer-logging
Turn On MSI Logging
Open Regedit and navigate to HKEY_LOCAL_MACHINE\Software\Policies\Microsoft\Windows
Once there, create a key called Installer. Then create a REG_SZ called Logging in that key and a REG_DWORD called Debug. The Logging value should be voicewarmupx and the Debug value should be 7.

After you have made these changes, attempt the install of the .msi as you did before. After it fails, you will have an MSI log in the following folder C:\Windows\Temp

You will see several MSIxxxx files. Select the one from the time and date when you attempted the failed install.
Cause
In my case, the log was very helpful. It showed the following:
EULA has not been accepted while executing the installation in reduced UI mode. Please add the flag ACCEPT_EULA=1 to the command line.
Resolution
I added this to the command line in the SCCM application, and tested and it resolved the issue.

NOTE: Be sure to remove the «Installer» key in the registry after you complete your troubleshooting.
I have a question with sccm 2012 r2 and failed packages. For every package I try to deploy there is the odd one that always returns a generic error message 0x643(1603).
I know that this is a generic msi package message, but something has me confused. When i tried to deploy adobe flash.msi it would download the package, seem to install it but will give an error past due — will be retried.
I have set the time for the package to expire 6 hours ahead of the deployment, so a timeout isn’t an issue.
When i looked at the appenforce.log on the client machine ( located at c:\windows\CCM\logs\Appenforce.log) I found the following in the log
[LOG[++++++ App enforcement completed (11 seconds) for App DT "Adobe Flash Player 21 ActiveX - Windows Installer (*.msi file)" [ScopeId_C8F1F365-A3C5-47CB-BD87-DB1E3BCFB76D/DeploymentType_a629d54a-d453-49a1-84c1-0192f983f1e4], Revision: 1, User SID: ] ++++++]LOG]!><time="15:45:20.777+420" date="05-27-2016" component="AppEnforce" context="" type="1" thread="29796" file="appprovider.cpp:2448">

[LOG[+++ Starting Install enforcement for App DT "Adobe Flash Player 21 ActiveX - Windows Installer (*.msi file)" ApplicationDeliveryType - ScopeId_C8F1F365-A3C5-47CB-BD87-DB1E3BCFB76D/DeploymentType_a629d54a-d453-49a1-84c1-0192f983f1e4, Revision - 1, ContentPath - C:\WINDOWS\ccmcache\13, Execution Context - System]LOG]!><time="15:49:09.871+420" date="05-27-2016" component="AppEnforce" context="" type="1" thread="31144" file="appprovider.cpp:1702">

[LOG[    A user is logged on to the system.]LOG]!><time="15:49:09.872+420" date="05-27-2016" component="AppEnforce" context="" type="1" thread="31144" file="appprovider.cpp:2083">

[LOG[    Performing detection of app deployment type Adobe Flash Player 21 ActiveX - Windows Installer (*.msi file)(ScopeId_C8F1F365-A3C5-47CB-BD87-DB1E3BCFB76D/DeploymentType_a629d54a-d453-49a1-84c1-0192f983f1e4, revision 1) for system.]LOG<time="15:49:09.874+420" date="05-27-2016" component="AppEnforce" context="" type="1" thread="31144" file="appprovider.cpp:2148">

[LOG[+++ MSI application not discovered [MSI Product Code: {FA944726-00F8-43B5-BB97-33E6FF409C22}, MSI Product version: ]]LOG]!>
<time="15:49:09.875+420" date="05-27-2016" component="AppEnforce" context="" type="1" thread="31144" file="msihandler.cpp:131">

[LOG[    App enforcement environment:
    Context: Machine
    Command line: msiexec /i "install_flash_player_21_active_x.msi" /q
    Allow user interaction: No
    UI mode: 0
    User token: null
    Session Id: 3
    Content path: C:\WINDOWS\ccmcache\13
    Working directory: ]LOG]!><time="15:49:09.875+420" date="05-27-2016" component="AppEnforce" context="" type="1" thread="31144" file="appcontext.cpp:85">

[LOG[    Prepared working directory: C:\WINDOWS\ccmcache\13]LOG]!><time="15:49:09.876+420" date="05-27-2016" component="AppEnforce" context="" type="1" thread="31144" file="appcontext.cpp:189">
<![LOG[Found executable file msiexec with complete path C:\WINDOWS\system32\msiexec.exe]LOG]!><time="15:49:09.878+420" date="05-27-2016" component="AppEnforce" context="" type="1" thread="31144" file="executility.cpp:188">

[LOG[    Prepared command line: "C:\WINDOWS\system32\msiexec.exe" /i "install_flash_player_21_active_x.msi" /q /qn]LOG]!><time="15:49:09.879+420" date="05-27-2016" component="AppEnforce" context="" type="1" thread="31144" file="appcontext.cpp:338">

[LOG[Valid MSI Package path = C:\WINDOWS\ccmcache\13\install_flash_player_21_active_x.msi]LOG]!><time="15:49:09.880+420" date="05-27-2016" component="AppEnforce" context="" type="1" thread="31144" file="appcontext.cpp:765">

[LOG[    Advertising MSI package [C:\WINDOWS\ccmcache\13\install_flash_player_21_active_x.msi] to the system.]LOG]!><time="15:49:09.881+420" date="05-27-2016" component="AppEnforce" context="" type="1" thread="31144" file="appcommon.cpp:125">

[LOG[    Executing Command line: "C:\WINDOWS\system32\msiexec.exe" /i "install_flash_player_21_active_x.msi" /q /qn with user context]LOG]!><time="15:49:10.268+420" date="05-27-2016" component="AppEnforce" context="" type="1" thread="31144" file="appexcnlib.cpp:201">

[LOG[    Working directory C:\WINDOWS\ccmcache\13]LOG]!><time="15:49:10.269+420" date="05-27-2016" component="AppEnforce" context="" type="1" thread="31144" file="appexcnlib.cpp:215">

[LOG[    Post install behavior is BasedOnExitCode]LOG]!><time="15:49:10.272+420" date="05-27-2016" component="AppEnforce" context="" type="1" thread="31144" file="appcommon.cpp:1094">

[LOG[    Waiting for process 27844 to finish.  Timeout = 120 minutes.]LOG]!><time="15:49:10.273+420" date="05-27-2016" component="AppEnforce" context="" type="1" thread="31144" file="appexcnlib.cpp:1958">

[LOG[    Process 27844 terminated with exitcode: 1603]LOG]!><time="15:49:21.074+420" date="05-27-2016" component="AppEnforce" context="" type="1" thread="31144" file="appexcnlib.cpp:1967">

[LOG[    Looking for exit code 1603 in exit codes table...]LOG]!><time="15:49:21.075+420" date="05-27-2016" component="AppEnforce" context="" type="1" thread="31144" file="appexcnlib.cpp:505">

[LOG[    Unmatched exit code (1603) is considered an execution failure.]LOG]!><time="15:49:21.075+420" date="05-27-2016" component="AppEnforce" context="" type="2" thread="31144" file="appexcnlib.cpp:591">

[LOG[++++++ App enforcement completed (11 seconds) for App DT "Adobe Flash Player 21 ActiveX - Windows Installer (*.msi file)" [ScopeId_C8F1F365-A3C5-47CB-BD87-DB1E3BCFB76D/DeploymentType_a629d54a-d453-49a1-84c1-0192f983f1e4], Revision: 1, User SID: ] ++++++]LOG]!><time="15:49:21.076+420" date="05-27-2016" component="AppEnforce" context="" type="1" thread="31144" file="appprovider.cpp:2448">

[LOG[+++ Starting Install enforcement for App DT "Adobe Flash Player 21 ActiveX - Windows Installer (*.msi file)" ApplicationDeliveryType - ScopeId_C8F1F365-A3C5-47CB-BD87-DB1E3BCFB76D/DeploymentType_a629d54a-d453-49a1-84c1-0192f983f1e4, Revision - 1, ContentPath - C:\WINDOWS\ccmcache\13, Execution Context - System]LOG]!><time="15:49:27.388+420" date="05-27-2016" component="AppEnforce" context="" type="1" thread="31144" file="appprovider.cpp:1702">

[LOG[    A user is logged on to the system.]LOG]!><time="15:49:27.388+420" date="05-27-2016" component="AppEnforce" context="" type="1" thread="31144" file="appprovider.cpp:2083">

[LOG[    Performing detection of app deployment type Adobe Flash Player 21 ActiveX - Windows Installer (*.msi file)(ScopeId_C8F1F365-A3C5-47CB-BD87-DB1E3BCFB76D/DeploymentType_a629d54a-d453-49a1-84c1-0192f983f1e4, revision 1) for system.]LOG]!><time="15:49:27.391+420" date="05-27-2016" component="AppEnforce" context="" type="1" thread="31144" file="appprovider.cpp:2148">

[LOG[+++ MSI application not discovered [MSI Product Code: {FA944726-00F8-43B5-BB97-33E6FF409C22}, MSI Product version: ]]LOG]!><time="15:49:27.391+420" date="05-27-2016" component="AppEnforce" context="" type="1" thread="31144" file="msihandler.cpp:131">

[LOG[    App enforcement environment:
    Context: Machine
    Command line: msiexec /i "install_flash_player_21_active_x.msi" /q
    Allow user interaction: No
    UI mode: 0
    User token: null
    Session Id: 3
    Content path: C:\WINDOWS\ccmcache\13
    Working directory: ]LOG]!><time="15:49:27.392+420" date="05-27-2016" component="AppEnforce" context="" type="1" thread="31144" file="appcontext.cpp:85">

[LOG[    Prepared working directory: C:\WINDOWS\ccmcache\13]LOG]!><time="15:49:27.393+420" date="05-27-2016" component="AppEnforce" context="" type="1" thread="31144" file="appcontext.cpp:189">

[LOG[Found executable file msiexec with complete path C:\WINDOWS\system32\msiexec.exe]LOG]!><time="15:49:27.394+420" date="05-27-2016" component="AppEnforce" context="" type="1" thread="31144" file="executility.cpp:188">

[LOG[    Prepared command line: "C:\WINDOWS\system32\msiexec.exe" /i "install_flash_player_21_active_x.msi" /q /qn]LOG]!><time="15:49:27.395+420" date="05-27-2016" component="AppEnforce" context="" type="1" thread="31144" file="appcontext.cpp:338">

[LOG[Valid MSI Package path = C:\WINDOWS\ccmcache\13\install_flash_player_21_active_x.msi]LOG]!><time="15:49:27.395+420" date="05-27-2016" component="AppEnforce" context="" type="1" thread="31144" file="appcontext.cpp:765">

[LOG[    Advertising MSI package [C:\WINDOWS\ccmcache\13\install_flash_player_21_active_x.msi] to the system.]LOG]!><time="15:49:27.396+420" date="05-27-2016" component="AppEnforce" context="" type="1" thread="31144" file="appcommon.cpp:125">

[LOG[    Executing Command line: "C:\WINDOWS\system32\msiexec.exe" /i "install_flash_player_21_active_x.msi" /q /qn with user context]LOG]!><time="15:49:27.800+420" date="05-27-2016" component="AppEnforce" context="" type="1" thread="31144" file="appexcnlib.cpp:201">

[LOG[    Working directory C:\WINDOWS\ccmcache\13]LOG]!><time="15:49:27.801+420" date="05-27-2016" component="AppEnforce" context="" type="1" thread="31144" file="appexcnlib.cpp:215">

[LOG[    Post install behavior is BasedOnExitCode]LOG]!><time="15:49:27.803+420" date="05-27-2016" component="AppEnforce" context="" type="1" thread="31144" file="appcommon.cpp:1094">

[LOG[    Waiting for process 29956 to finish.  Timeout = 120 minutes.]LOG]!><time="15:49:27.805+420" date="05-27-2016" component="AppEnforce" context="" type="1" thread="31144" file="appexcnlib.cpp:1958">

[LOG[    Process 29956 terminated with exitcode: 1603]LOG]!><time="15:49:38.441+420" date="05-27-2016" component="AppEnforce" context="" type="1" thread="31144" file="appexcnlib.cpp:1967">

[LOG[    Looking for exit code 1603 in exit codes table...]LOG]!><time="15:49:38.441+420" date="05-27-2016" component="AppEnforce" context="" type="1" thread="31144" file="appexcnlib.cpp:505">

[LOG[    Unmatched exit code (1603) is considered an execution failure.]LOG]!><time="15:49:38.442+420" date="05-27-2016" component="AppEnforce" context="" type="2" thread="31144" file="appexcnlib.cpp:591">

[LOG[++++++ App enforcement completed (11 seconds) for App DT "Adobe Flash Player 21 ActiveX - Windows Installer (*.msi file)" [ScopeId_C8F1F365-A3C5-47CB-BD87-DB1E3BCFB76D/DeploymentType_a629d54a-d453-49a1-84c1-0192f983f1e4], Revision: 1, User SID: ] ++++++]LOG]!><time="15:49:38.443+420" date="05-27-2016" component="AppEnforce" context="" type="1" thread="31144" file="appprovider.cpp:2448">
In the error codes for the package i have:
 0 - success (no reboot)
1707- success (no reboot)
3010 - soft reboot
1641 - hard reboot
1618 - fast retry
I guess my main question is why does this package keep failing? This has me scratching my head. I am sorry for the formatting of the log files, I tried to clear it up as best as i could.
Thanks!
Hi!
Currently trying to deploy an application «Lightroom 5.2» to a device collection.
We’ve done the packaging ourselves, and installation to our test machines — just by installing from the .msi straight out gives no errors.
However, deploying this .msi to this one client in the collection gives the error «Deployment failed» — Error 0x643 (1603). When it’s not in the error status, as it currently is — it says «Content downloaded» — Status type: In progress. I guess it’s shifting between these two statuses.
As a part of the troubleshooting, I’ve added the parameter «/l*v C:\temp\lightroom.log» to the msi installation to see if I can find some more information from verbose logging. The strange part is that there is no «lightroom.log» located in C:\temp on the client.
I’m guessing that this means that the installation actually never starts?
Other than that, I’m actually quite stuck. Don’t know where else to look, which log files etc.
Any tips/hints is greatly appreciated! ![]()
Brgds,
Stian M.