Check the best solutions for quick troubleshooting
by Vladimir Popescu
Being an artist his entire life while also playing handball at a professional level, Vladimir has also developed a passion for all things computer-related. With an innate fascination… read more
Updated on
- The Error code 0x104 appears when trying to remotely connect to another PC using the Remote Desktop feature.
- It usually arises due to misconfigured network or firewall settings but can also be a result of incorrect credentials.
- To fix the issue, change the name of the exchange server, disable the active VPN, and run the critical services, amongst other solutions.
RDP or Remote Desktop Protocol, as the name suggests, allows users to access another computer remotely, i.e., without being physically present. But the connection is not as stable as many would imagine, with Error code 0x104 frequently encountered by some.
This poses a major problem, given that the feature to remotely gain access to the PC has gained prominence over the years. Though there are several third-party apps to establish remote access, let’s first try to fix the Error code 0x104 with Microsoft remote desktop.
What is error code 0x4 in Microsoft Remote Desktop?
As per the error message, Error code 0x104 arises when Windows can’t find the remote PC, and subsequently, the connection cannot be established. Here are a few reasons you might be getting the error:
- The Remote Desktop feature is disabled: For the feature to work, you must first enable Remote Access in Windows. And if it’s disabled, the error will show up.
- Misconfigured firewall settings: You may come across Error code 0x104 if the firewall settings are misconfigured.
- Network Discovery is turned off: Enabling Network Discovery is critical for your PC to identify others on the network and remotely connect to them.
- Incorrect DNS server: An incorrect DNS is just as likely to trigger the error, but this can easily be fixed.
How can I fix error code 0x104?
Before we head to the slightly complex solutions, here are a few quick ones to try:
- Turn on the Airplane Mode on the device you are using to connect to the remote desktop, disable it in 15-30 seconds, and then try establishing a connection.
- Change the name of the exchange server to something simple in case the current one is lengthy or intricate.
- When remotely connecting to the desktop via a mobile phone, try switching the network type. Say, if you are one 4G, try 3G, 4G LTE, or 5G if available.
- Try establishing a connection using the PC’s IP address (check in the desktop settings) instead of the PC name, and verify if Error code 0x104 is fixed.
- Make sure Port Forwarding is enabled on your router, and contact the ISP (Internet Service Provider) to help configure a port forwarding rule for mapping an external port using TCP 3389.
- If you are using a VPN while trying to remotely access the PC, disable it.
If these don’t work, move to the ones listed next.
1. Make sure Remote Desktop is enabled
- Press Windows + I to open Settings, and in the System tab, click on Remote Desktop on the right.

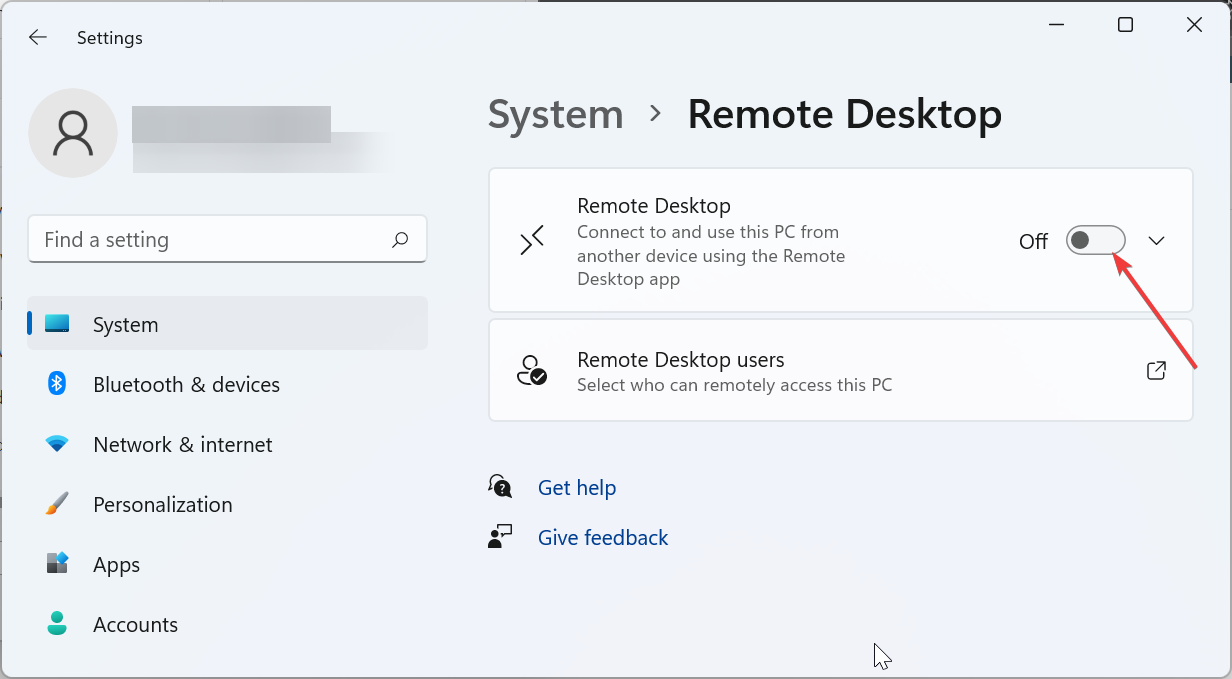
- Now, enable the toggle for Remote Desktop.

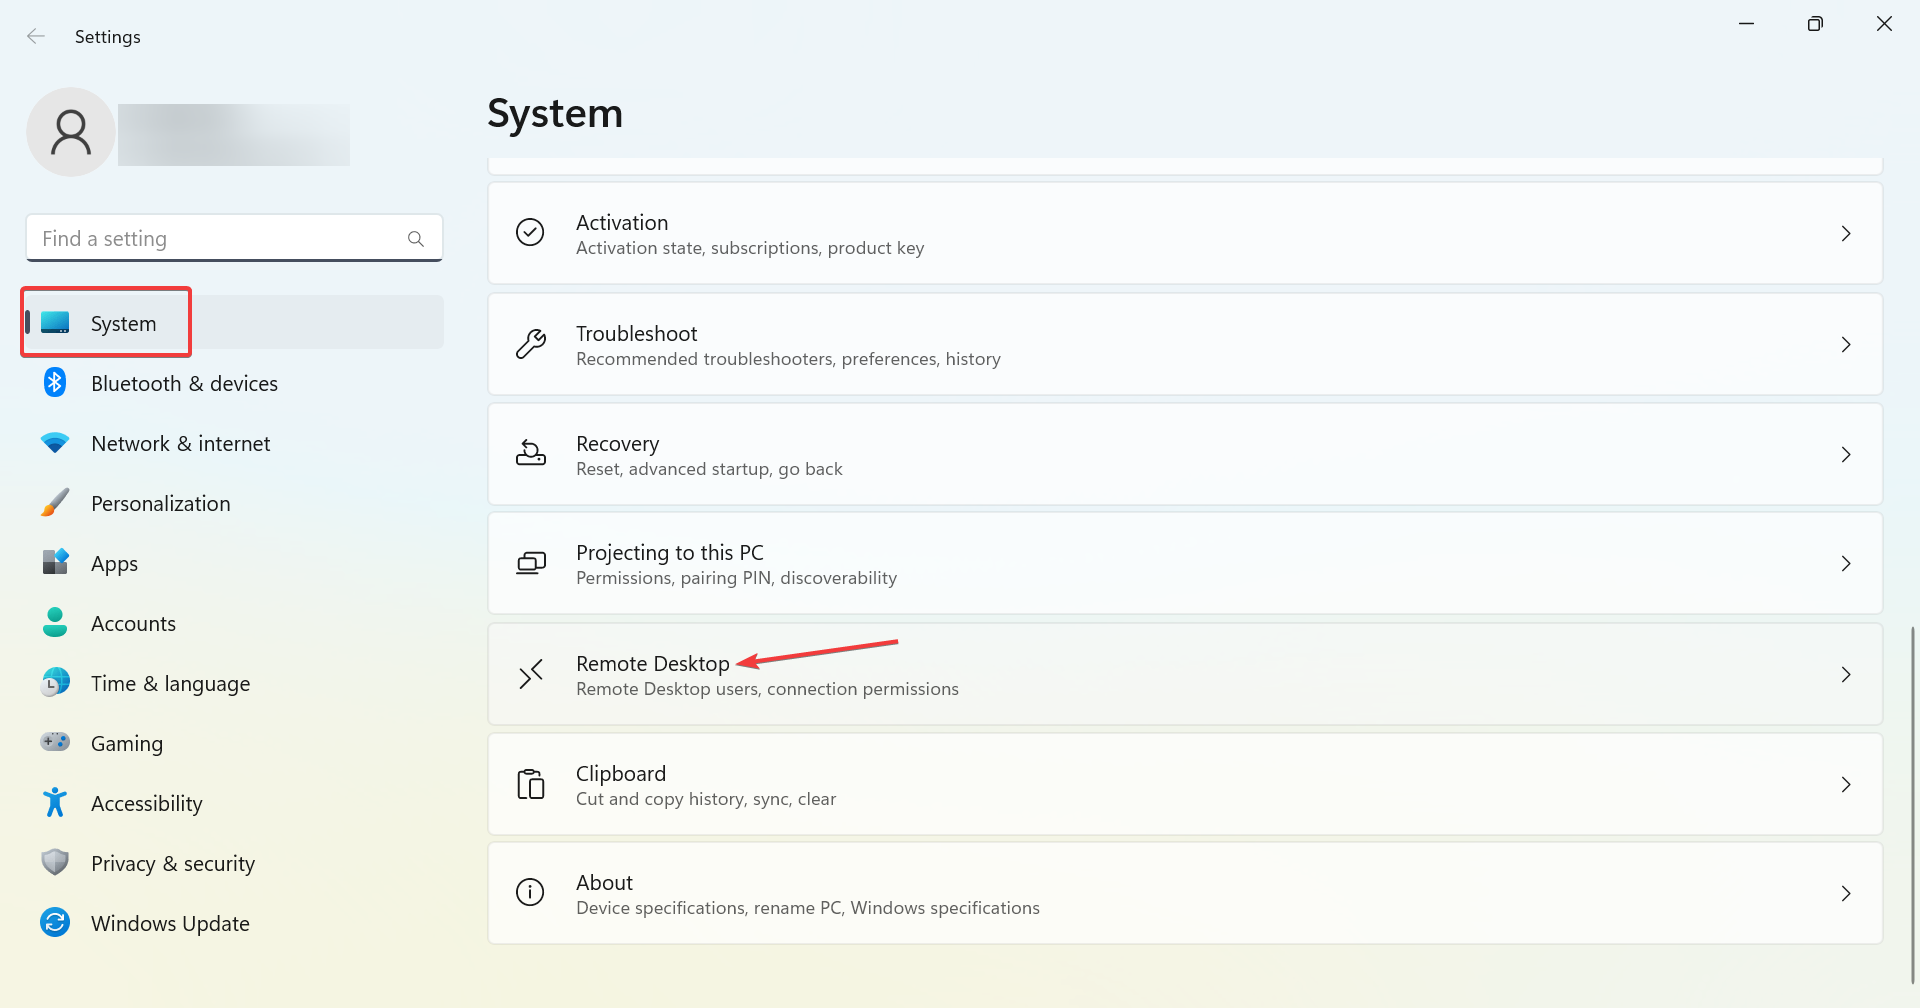
If the Remote Desktop feature was disabled recently, you might get Error code 0x104 while trying to remotely access the PC.
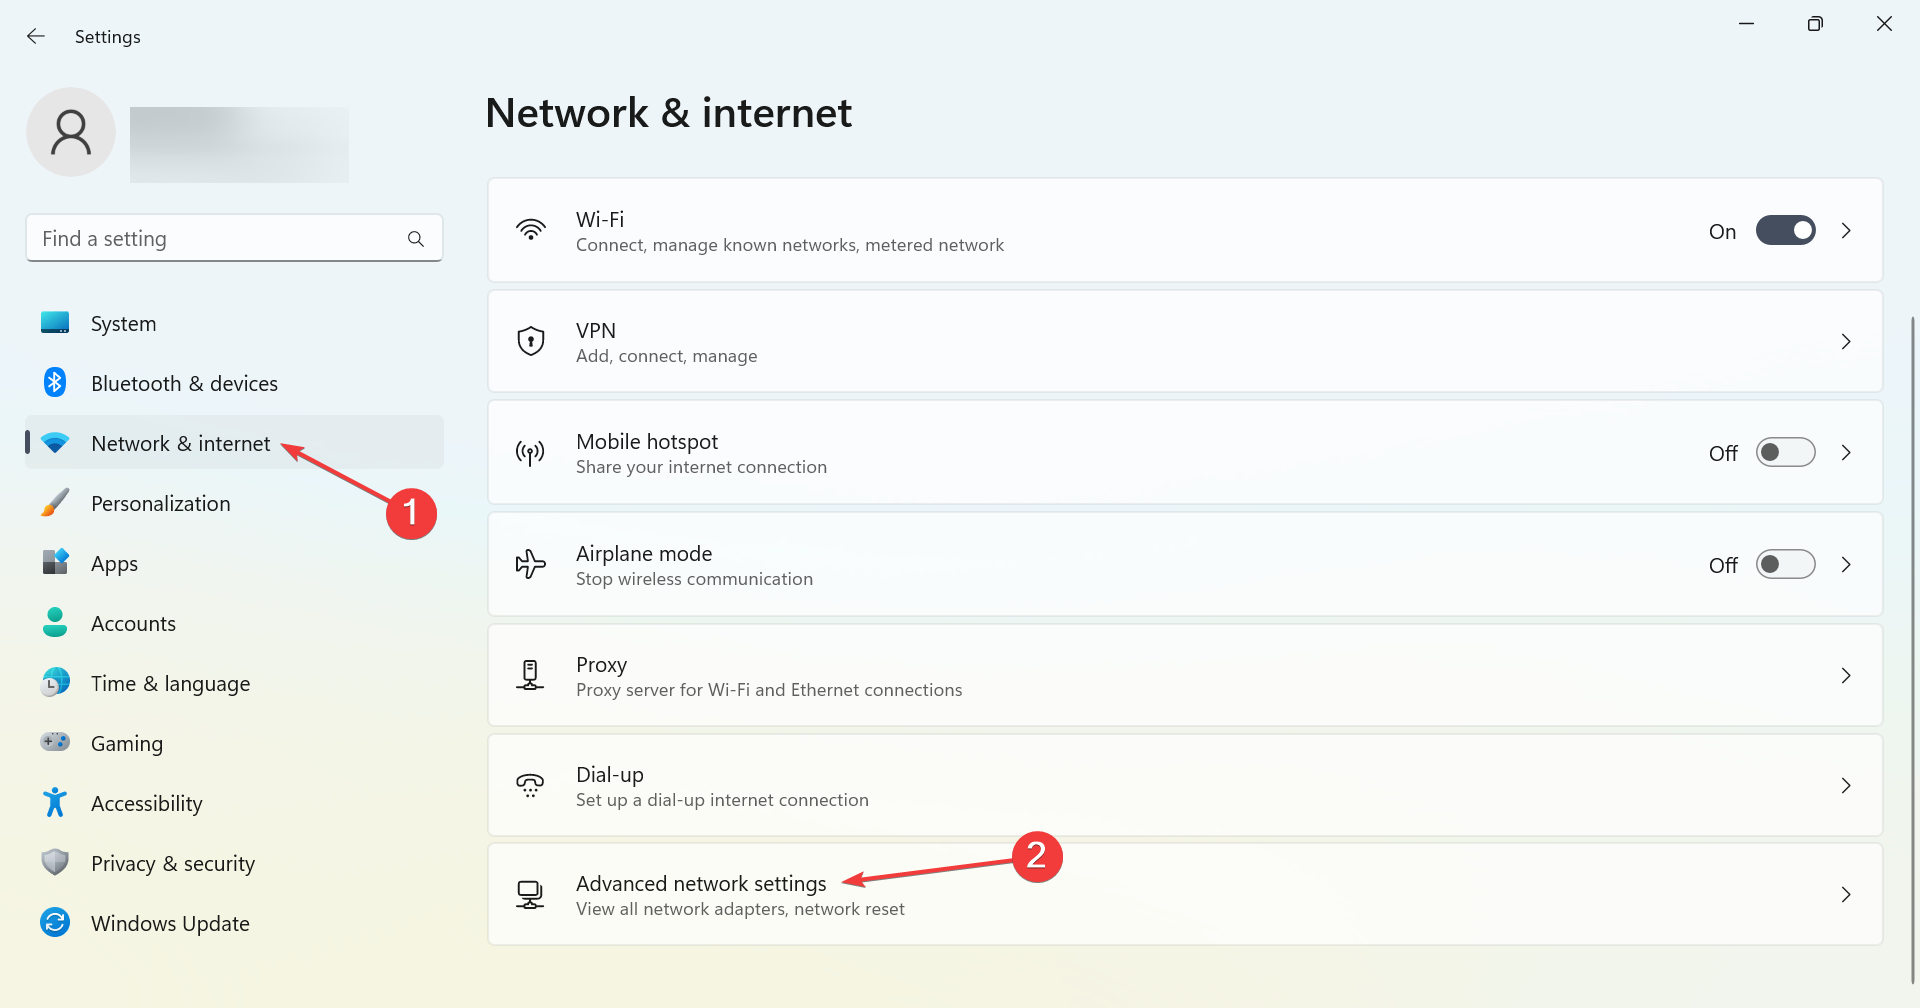
2. Enable Network Discovery
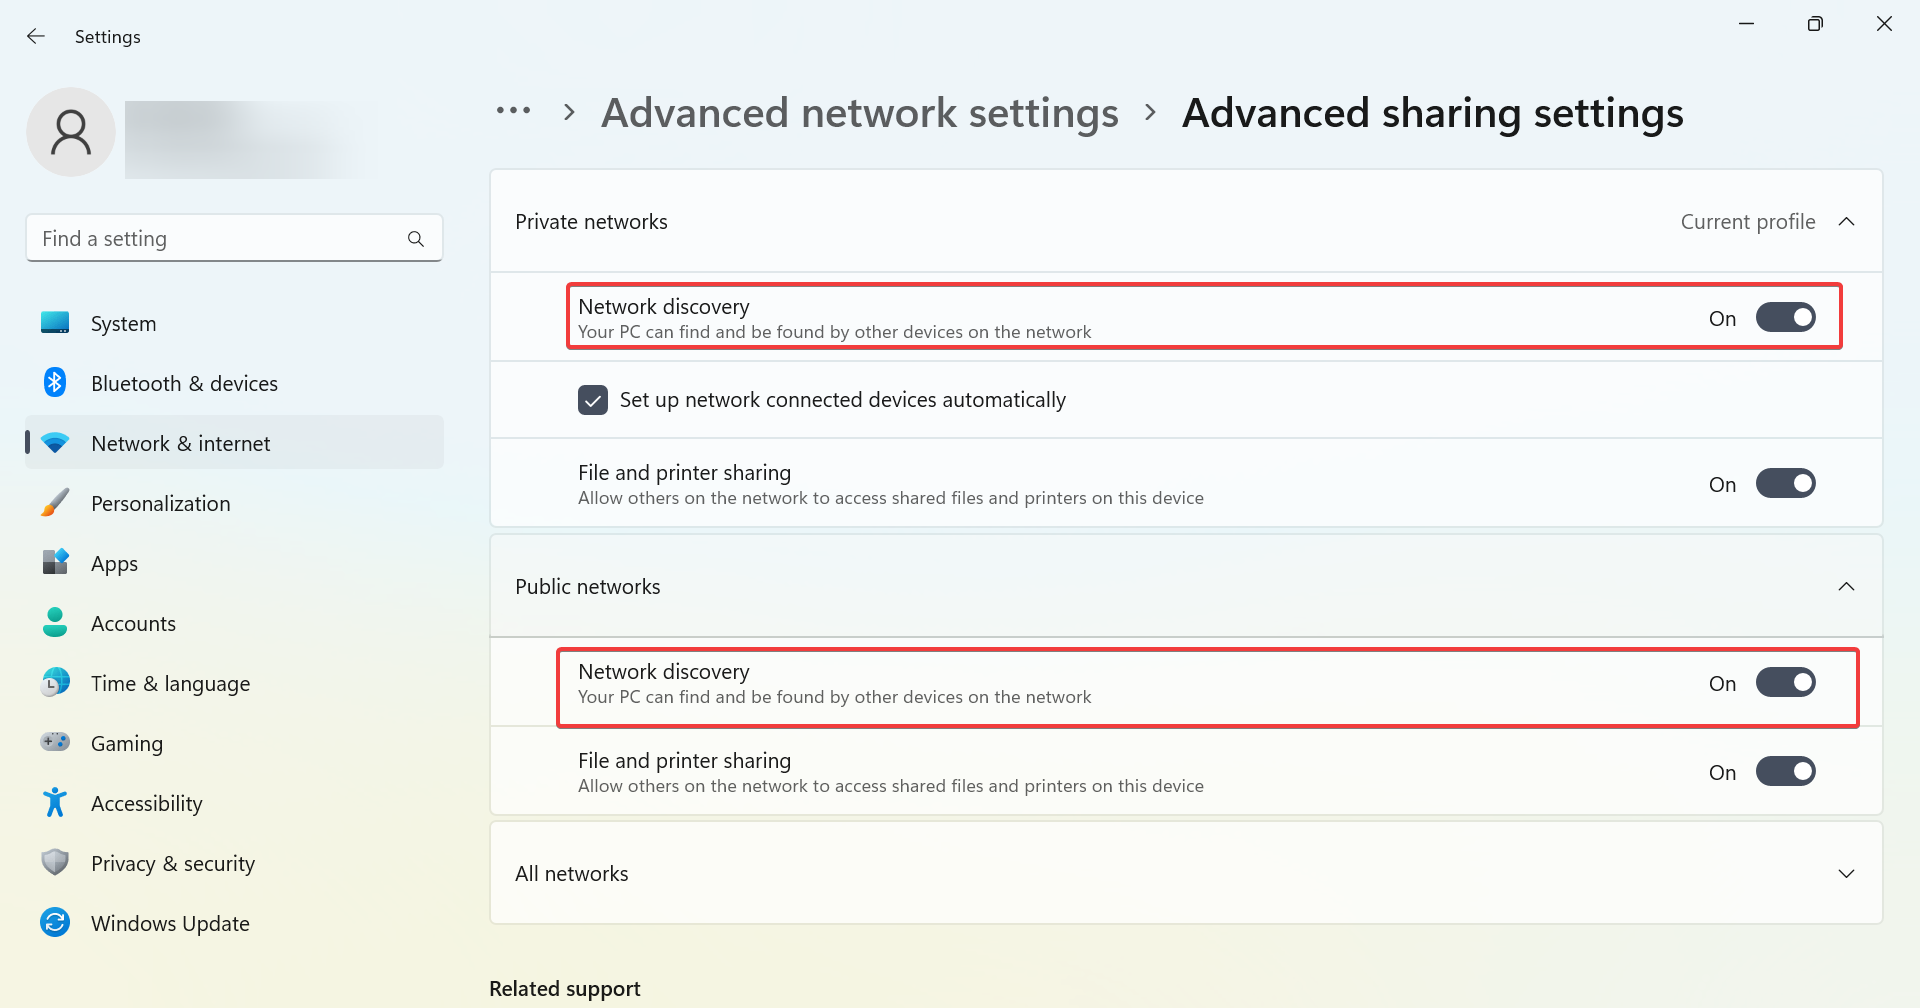
- Press Windows + I to open Settings, select Network & Internet from the navigation pane, and click on Advanced network settings.
- Click on Advanced sharing settings on the right.
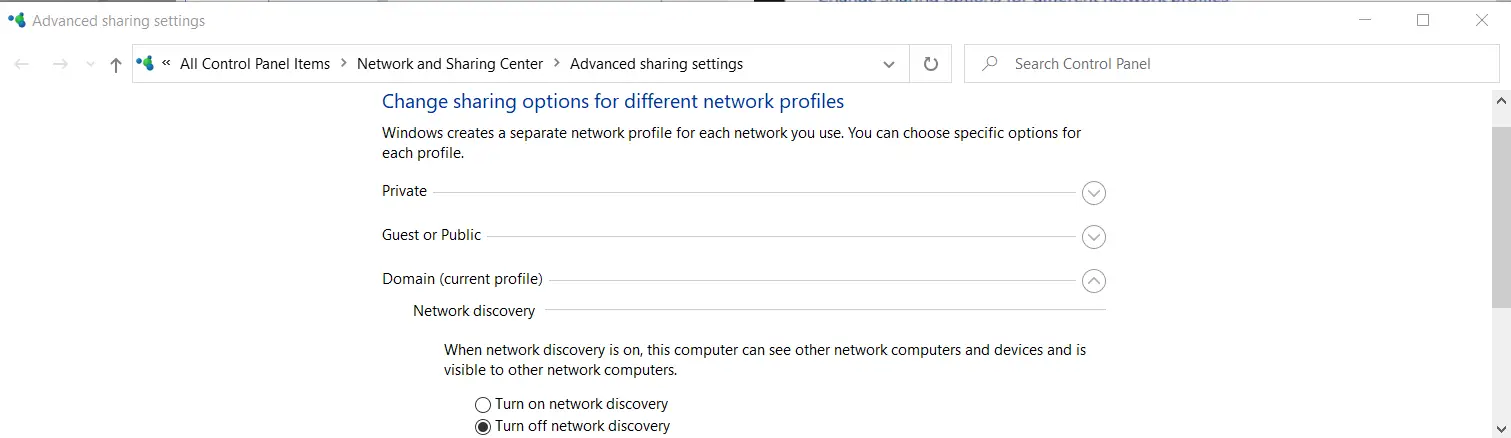
- Now, make sure Network discovery is turned on under both Private networks and Public networks.

3. Modify firewall settings
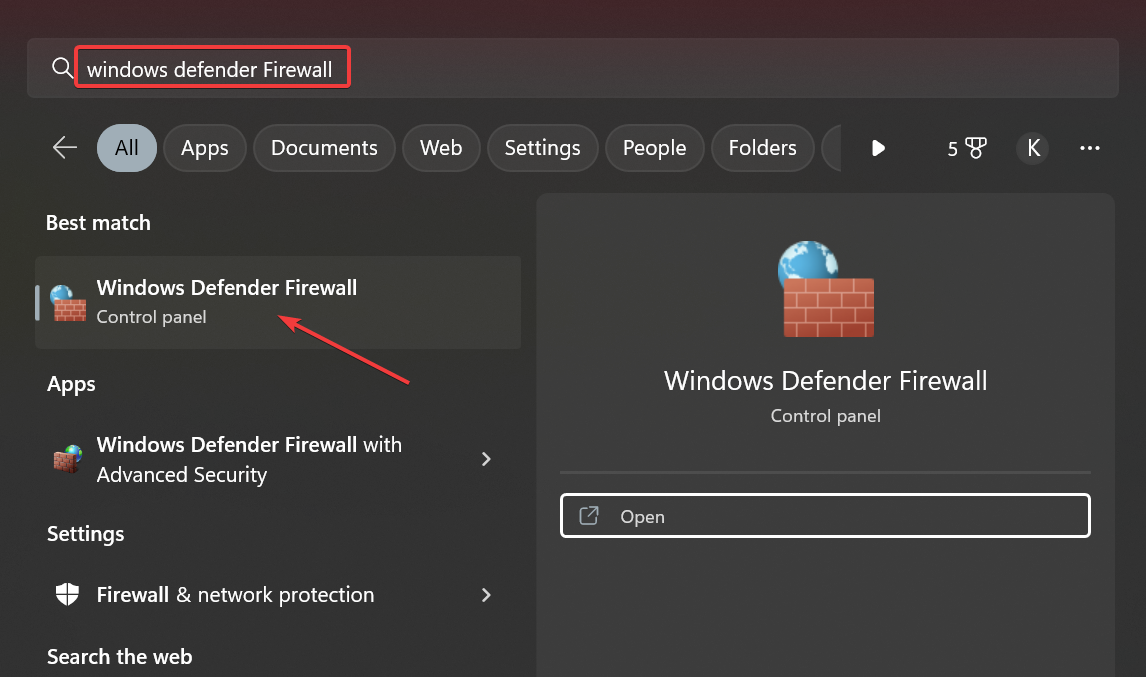
- Press Windows + S to open Search, type Windows Defender Firewall in the text field, and click on the relevant search result.

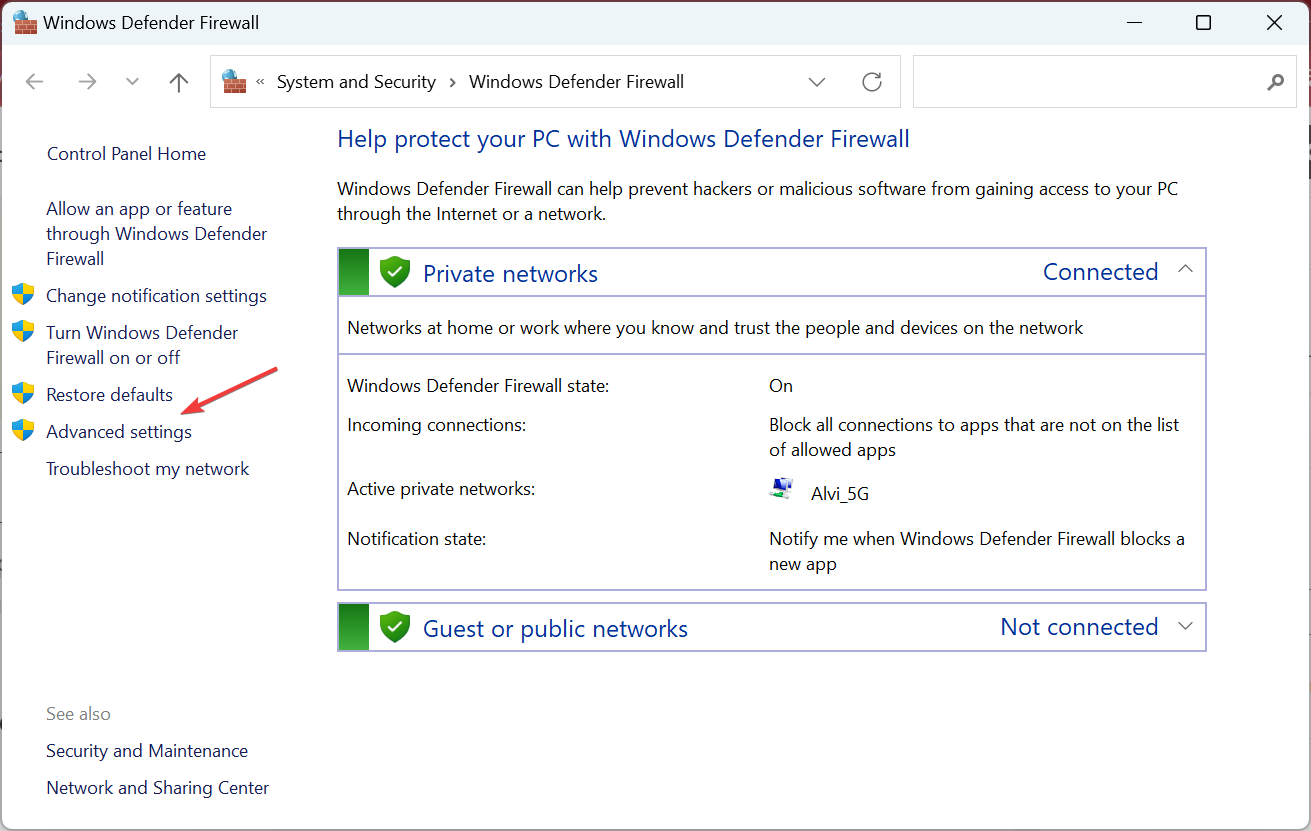
- Click on Advanced settings on the left.

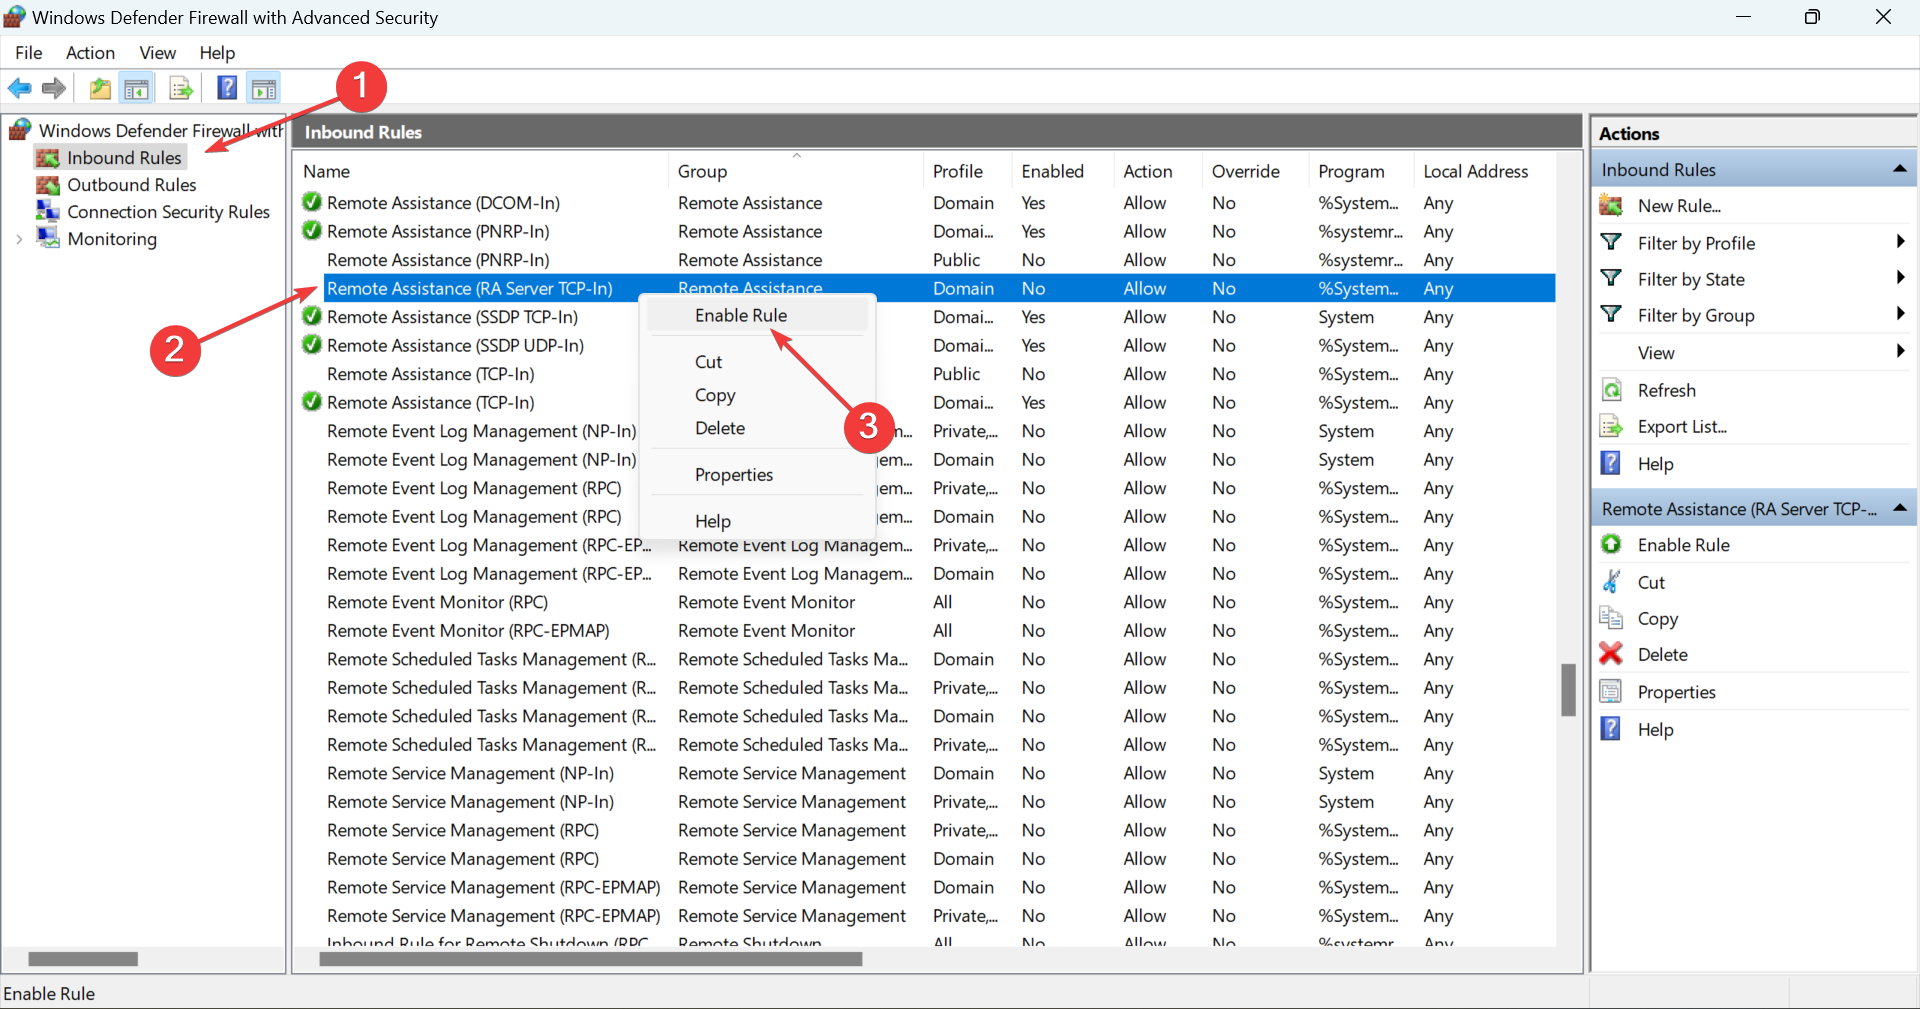
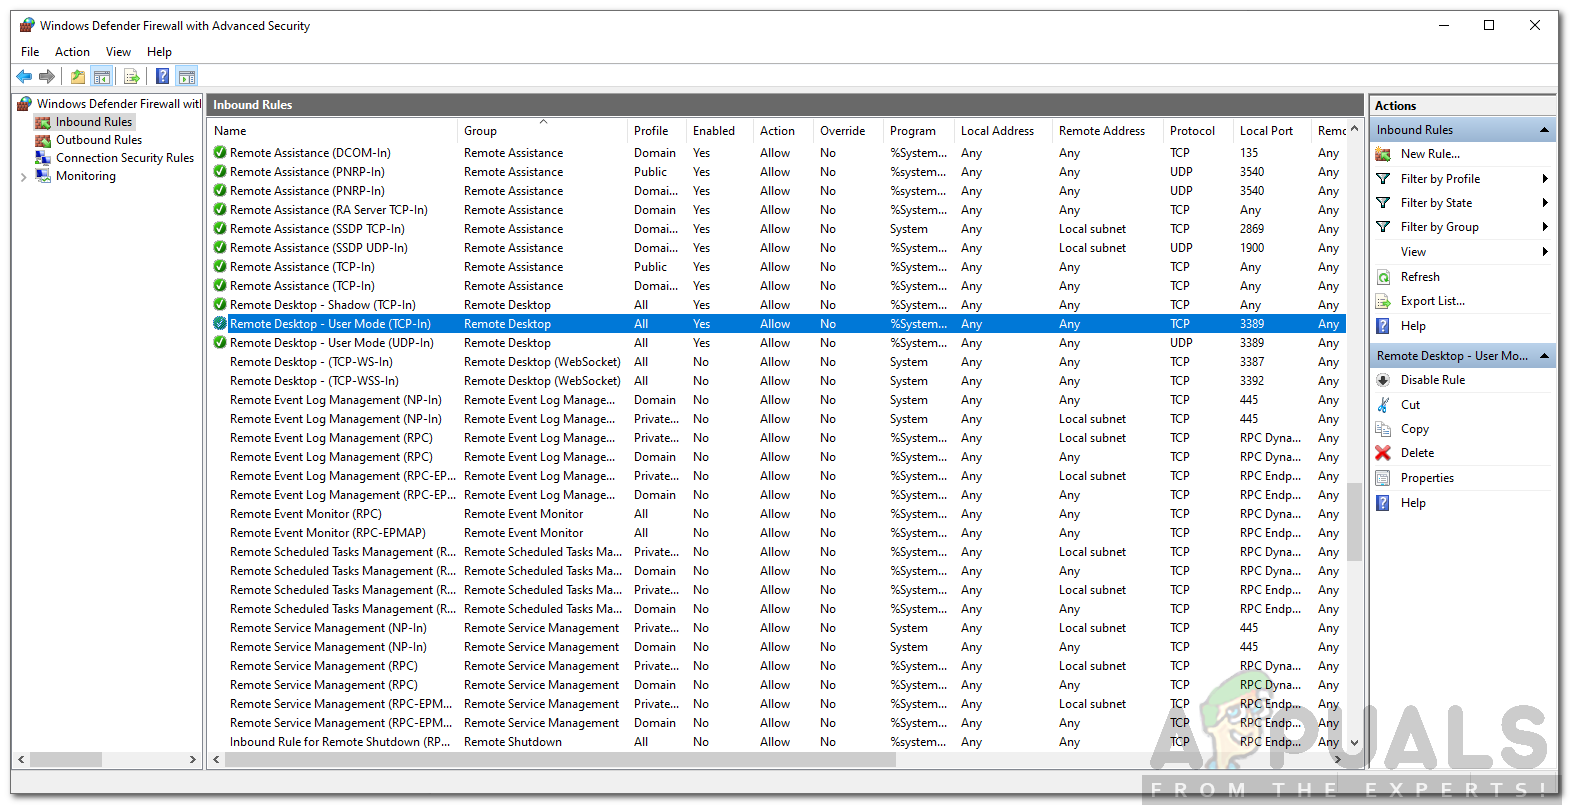
- Choose Inbound Rules from the navigation pane, right-click on Remote Assistance (RA Server TCP-In), and choose Enable Rule.

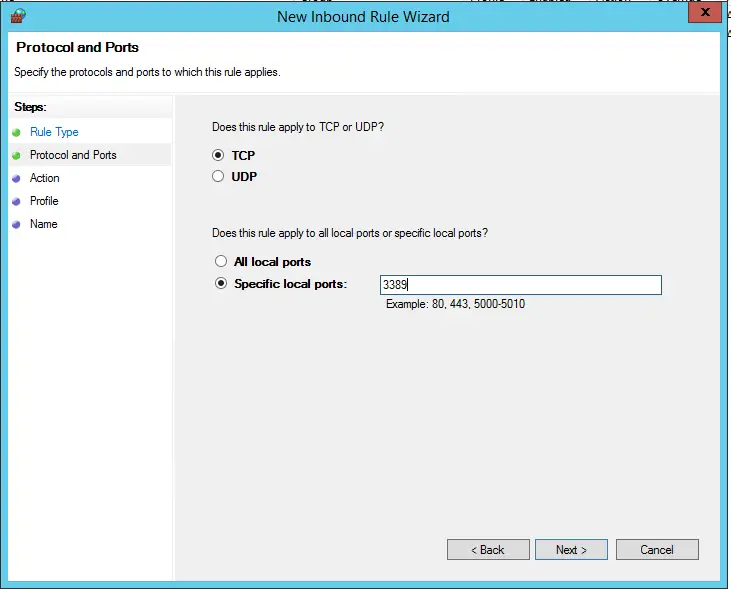
- Similarly, enable Remote Desktop – User Mode (TCP-In) and Remote Desktop – User Mode (UDP-In) rules, while making sure the Ports column next to both reads 3389.
After you have made the changes, check whether the Error code 0x104 while using Remote Desktop is fixed. If not, head to the next solution.
- Technology Addiction: Real World Stats & Facts for 2023
- How to Correctly Calibrate an Xbox One Controller on Windows 11
- Goldflake Error on Warzone: 3 Ways to Quickly Fix it
- 4 Ways to Check & Reset Windows 11 Uptime
- Local Users and Groups is Missing on Windows 11: How to Add it
4. Run the critical services
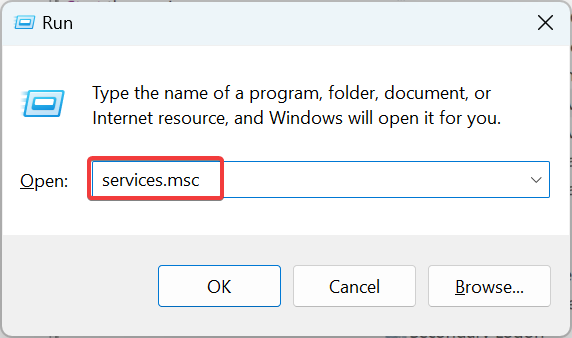
- Press Windows + R to open Run, type services.msc in the text field, and hit Enter.

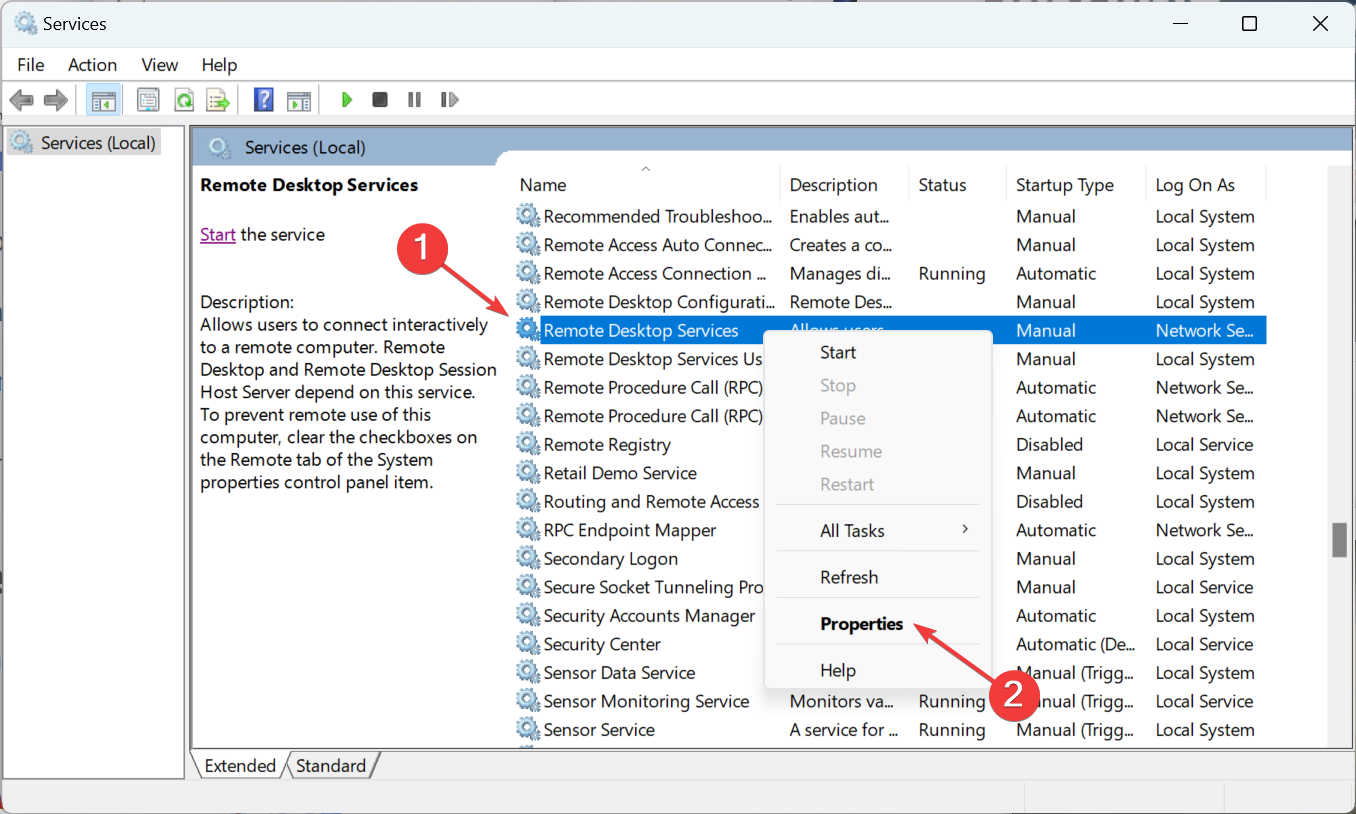
- Locate the Remote Desktop Services entry, right-click on it, and choose Properties.

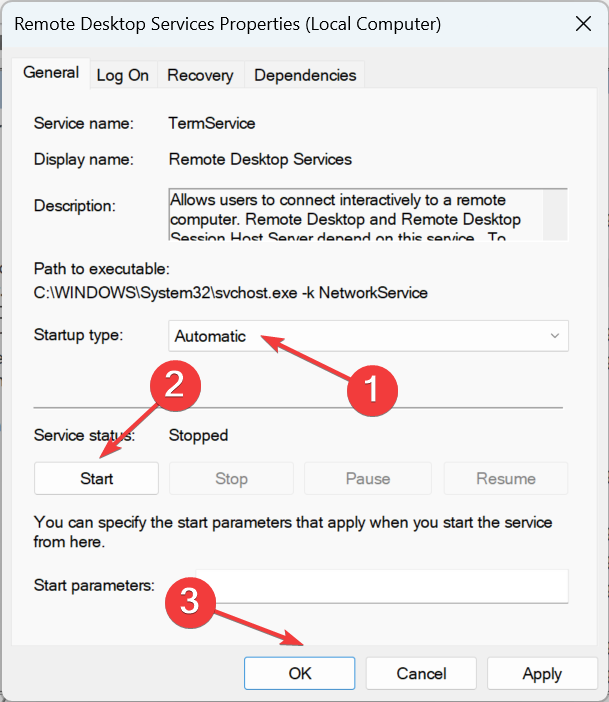
- Now, select Automatic from the Startup type dropdown menu, click on the Start button, and after the service starts running, click OK to save the changes.

- Similarly, run the Remote Access Auto Configuration Manager service and configure it to run automatically at startup.
5. Change network settings
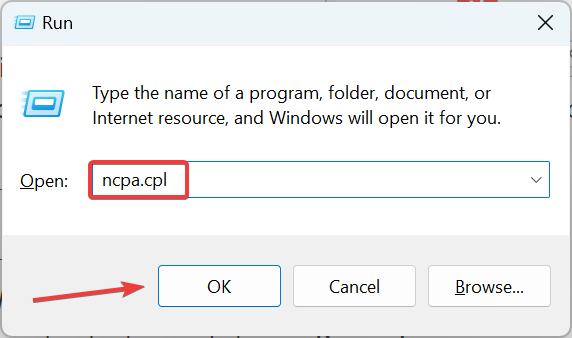
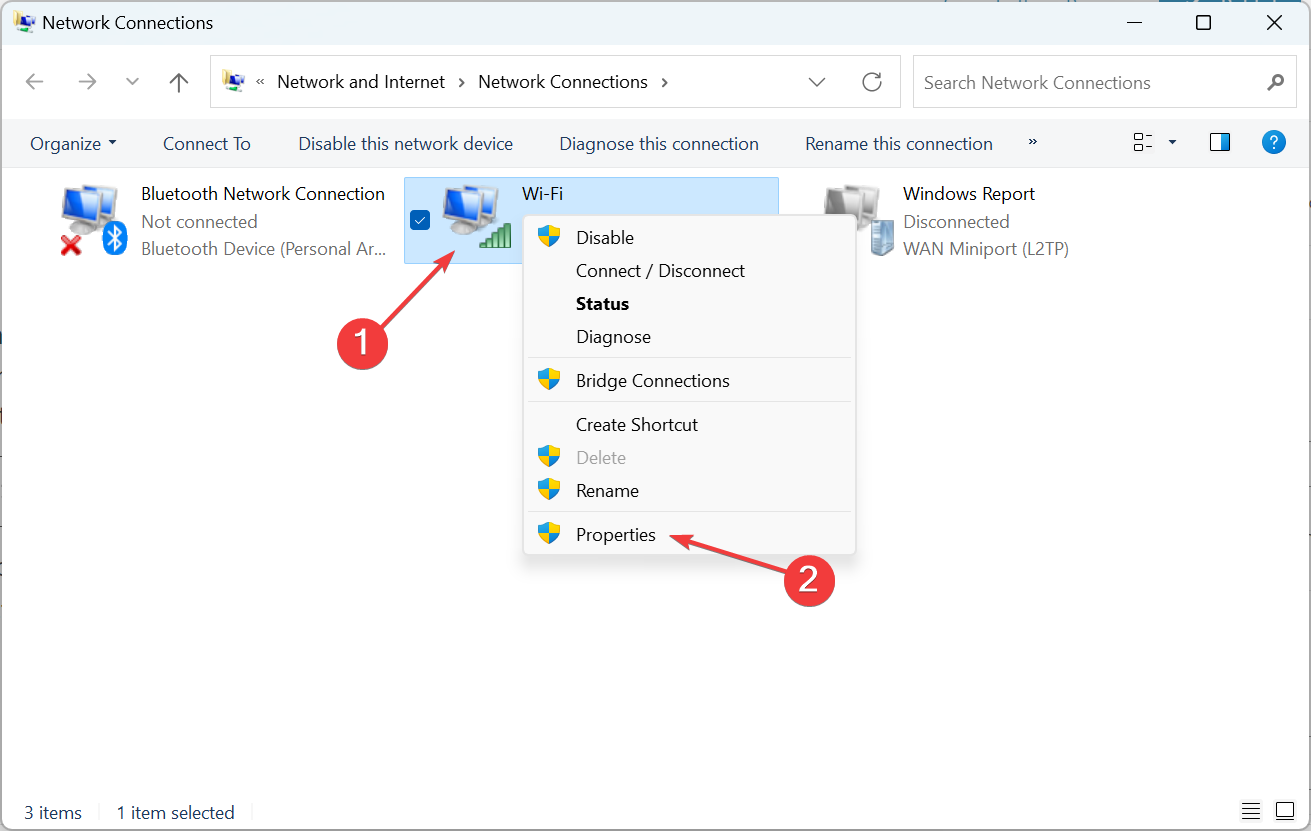
- Press Windows + R to open Run, type ncpa.cpl, and click OK.
- Right-click on the active network adapter and choose Properties.
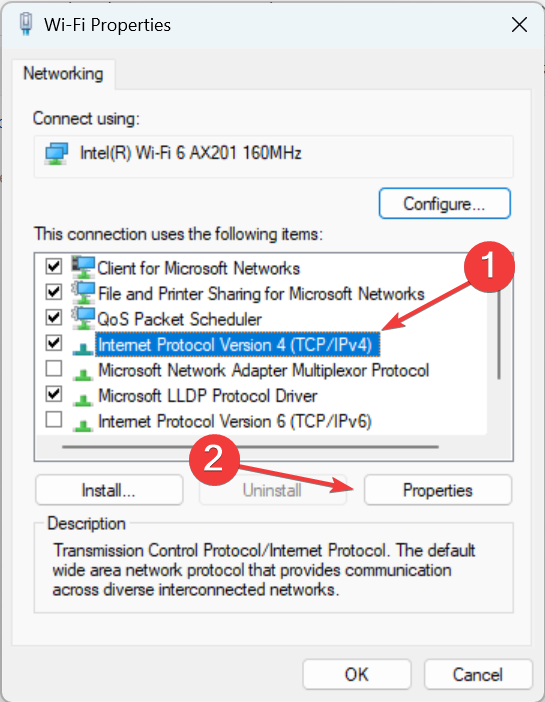
- Select Internet Protocol Version 4 (TCP/IPv4), and again click Properties.

- Choose the Obtain DNS server address automatically option, and click OK to save the changes.

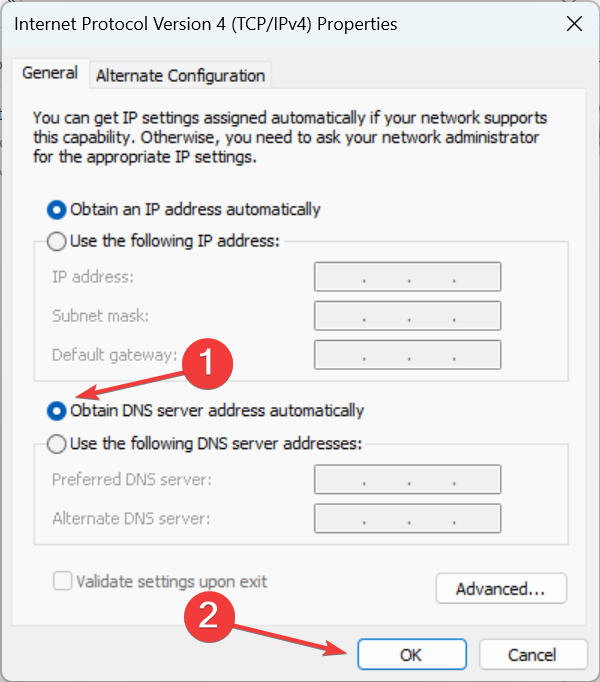
That’s it! If the previous solutions didn’t work, settings the DNS service to automatic should help fix Error code 0x104 in Windows.
Also, do not forget to check the best remote desktop software for gaming without any lags or drops in FPS. For regular use, most recommend Mikogo, a popular and easy-to-use alternative. It has many useful features, like hosting meetings, a session scheduler, and session recording.
Do tell us which fix worked for you in the comments section below.
Still experiencing issues?
SPONSORED
If the above suggestions have not solved your problem, your computer may experience more severe Windows troubles. We suggest choosing an all-in-one solution like Fortect to fix problems efficiently. After installation, just click the View&Fix button and then press Start Repair.
![]()
RDP (Remote Desktop Protocol) is a Windows Utility that allows users to access a computer on the same network or even a different network without any physical access. With this feature, you can control any target system or network with just a few clicks. There are third-party apps also that offer similar services but some users just prefer to use the Windows Desktop Protocol. While it’s a free tool, it however comes with its downsides and you’ll be facing some errors, one of such is Error Code 0x104.
The 0x104 remote desktop is shown when you want to connect to a target system on your network or a different network. The error message reads as:
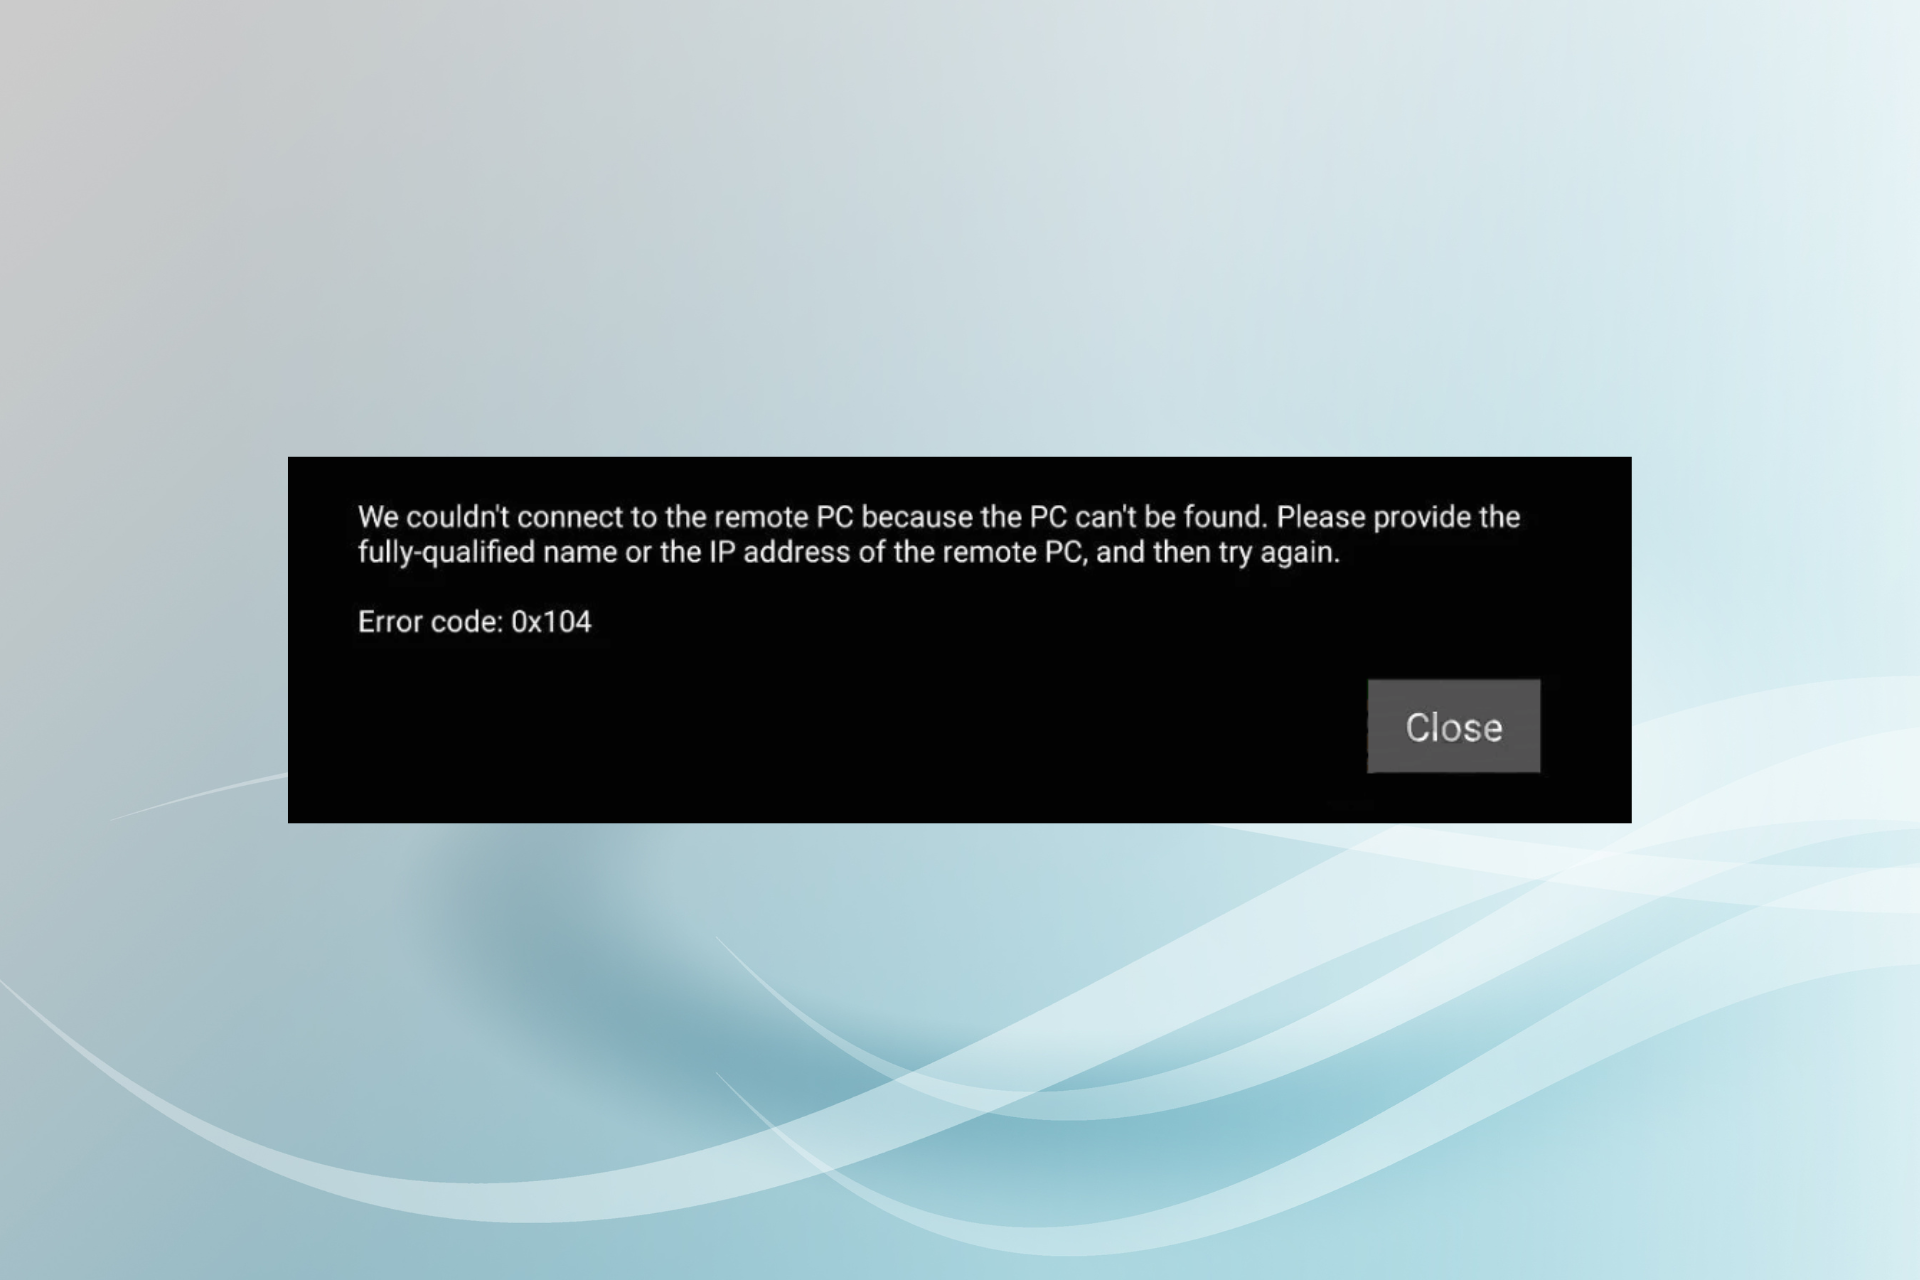
“We couldn’t connect to the remote PC because the PC can’t be found. Please provide the fully-qualified name or the IP address of the remote PC, and then try again.”
Remote Desktop Error Code 0x104
This could be because of wrong network discovery options or DNS settings. Even firewalls can block the connection to compromise your privacy settings and block the system that’s on the network.
Check Also: Remote Dekstop Error 0x204
In this post, we’ll outline how to fix the Microsoft remote desktop 0x104 including the causes and solutions, plus also some tips that will help you avoid the error.
Causes Of Microsoft Remote Desktop 0x104
-
DNS Settings
This is the case especially if you’re using custom DNS servers, or you’ve altered DNS settings in a way they’re not favoring Windows Remote Desktop. Removing custom DNS or any settings that are causing the problem will help you establish the connection successfully.
-
Port blocked By Firewall
The Remote Desktop is utilizing port 3389 when using the RDP connection and if this port is blocked by a Firewall or any Antivirus software, you cannot connect to the systems you’re trying to.
-
Network Discovery is switched OFF
When this is option is turned off, which is under “Network Sharing”, you can’t establish a connection to your target systems, and the error code 0x104 will be displayed on the Remote desktop.
These are the three major causes of the error code 0x104 on remote desktop. Let’s now look at the possible solutions.
How To Fix Remote Desktop Error Code 0x104
-
Turn Network Discovery ON
This is the option that will determine whether your PC is able to scan other networks or systems. By default, it should be ON, but if it happens that it’s turned off, it’s probably the reason why you cannot connect using the Remote desktop. Here is how you can turn it ON:
-
- Go to Control Panel, you can search for it in Windows search.
- Select “Network and Internet” and then “Network and Sharing Center”.
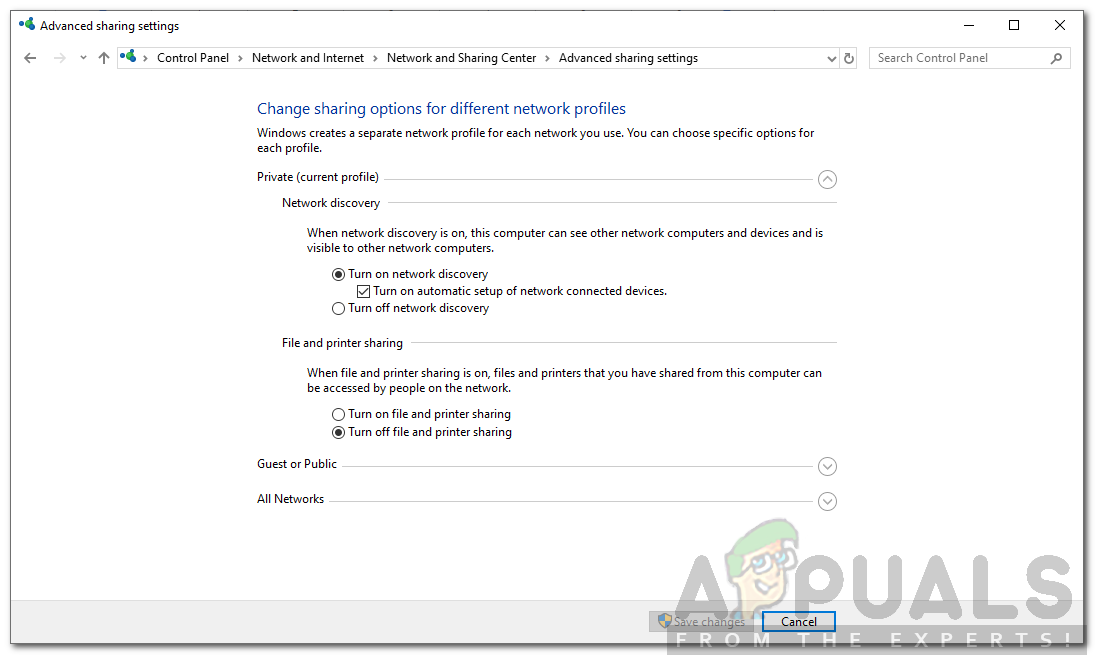
- On the left pane, you can see the option “Change advanced sharing settings”.
- You should now expand the network profile you’re using and choose “Turn ON network discovery”.
- Click “Save Changes” to apply the settings.
- Restart your PC and check to see if the error code 0x104 is gone or not.
Turn Network Discovery ON
-
Provide permission for Port 3389 on Firewall
As mentioned, when this port is blocked you cannot establish connections. So what you want to first do is to disable Windows Firewall or any other antivirus software you might be using. Once you check and the error is gone, you then turn them ON again, but you’ll have to change your settings to allow Port 3389 to run. Whatever security software you’re using just make sure Port 3389 isn’t blocked. Here is how to allow port 3389 on the Firewall.
-
- Open “Remote Settings” by typing it in Windows Search and Hit Enter.
- System windows will now open and you can see “Remote Setting”, click on that.
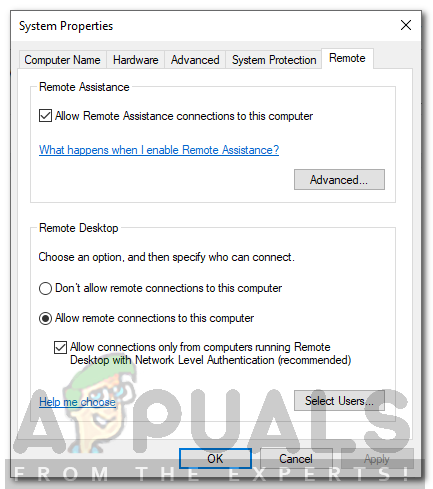
- Click on the “Remote” Tab and under the Remote Desktop you’ll see the option to tick the box for “Allow remote connections to this computer”.
- Next, you head over to the control panel Manager.
- Click on “System and Security” and then “Windows Defender Firewall”.
- By your left pane, you can see the “Advanced Settings”, click on that.
- Then you select “Inbound Rules”, you now locate “Remote Assistance (RA Server TCP-In), you should enable this option.
- Then you look for “Remote Desktop – User Mode (TCP –In and UDP-In), ensure that they’re enabled, the port to add should be 3389. You can see and check the port by making the local port column visible, you just need to expand the Window.
- Go ahead and setup a new connection with Remote Desktop to see if the problem is fixed.
Provide permission for Port 3389 on Firewall
-
Remove Custom DNS Servers
You need to clear custom DNS servers if that’s what you’re using on your System. This is applicable to both the host and target systems. Here is how you can do that:
-
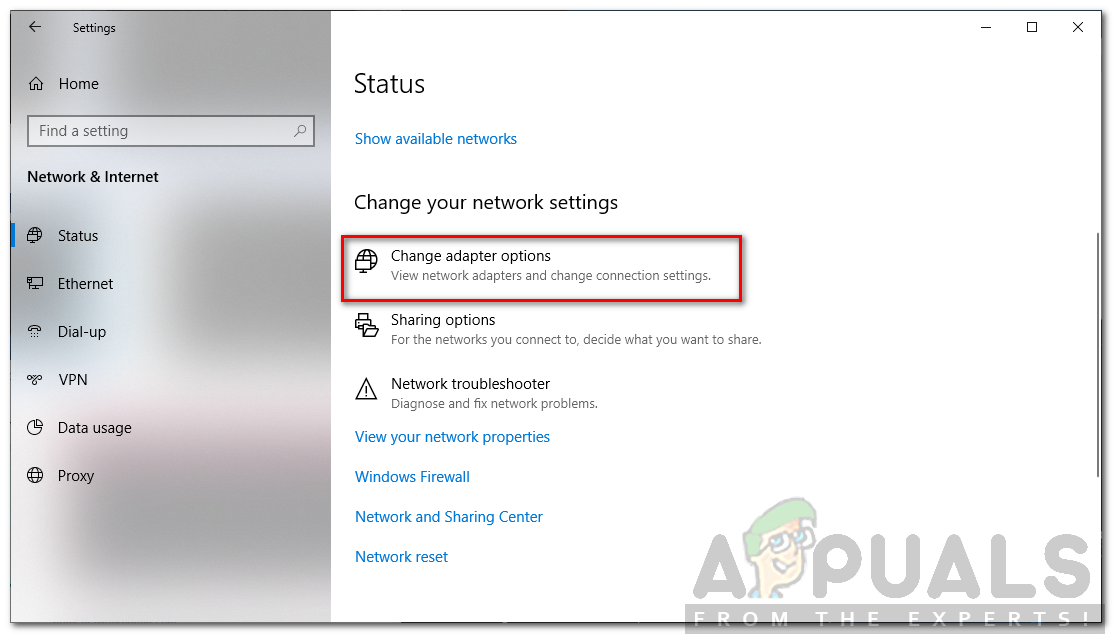
- Locate the Network icon that’s on the taskbar, right-click on it and select “Open Network and Internet Settings”.
- From the right pane menu, you should click “Change adapter settings”
- Locate your adapter and right-click on it, select “Properties” from the options.
- You then click on “internet protocol version 4 and also select “properties”.
- You should ensure that the option “Obtain DNS server address automatically” is checked.
- Click OK and restart your PC and then proceed to establish the connection.
-
Ensure that all computers are using the same network profile type
- Click the Network icon on the taskbar which is near the speaker icon.
- You should connect to the available networks you’re using.
- Then select properties.
- On the settings windows, you should choose either “public or Private” for the computers you’re trying to connect.
- You can go back and check to see if the problem is fixed.
Change your DNS
-
Run SFC Scan with PowerShell
- Press Windows + X keys.
- Select PowerShell (Admin) from the options.
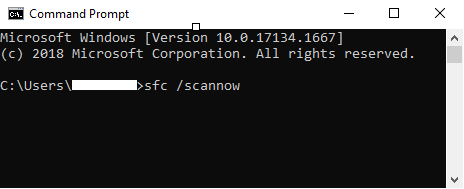
- Type /sfcscannow and hit enter.
- Wait until the process is finished and then check to see if the problem is now resolved.
WerFault Error SFC scan now command
This is it on how to fix error code 0x104 when using a remote desktop on your PC. Let us know how things have worked for you and if you also like to share other methods not mentioned here, please drop them in the comments.
Remote Desktop Protocol is a built-in Windows utility that you can use to access computers over the same or different networks without having physical access. This is useful as you are allowed to control the target system using a few clicks from your office or home. There are tons of third-party RDP utilities out there. The built-in RDP might not “really” be the best off of them; most users still prefer to use it. Of course, there are some issues with it as well, like any other software. The one we are going to discuss in this article is the error code 0x104.

This error message pops up when you are trying to connect to the target system on the same or a different network. The error message states “We couldn’t connect to the remote PC because the PC can’t be found. Please provide the fully-qualified name or the IP address of the remote PC, and then try again”. This can be due to your DNS settings, network discovery options or occasionally, the Windows defender firewall privacy settings.
What causes the Remote Desktop Error Code 0x104?
The cause of the error message can vary depending on different scenarios. Nonetheless, it is often due to the following reasons —
- Network Discovery Turned Off: If the network discovery option is turned off in your Sharing options then that can be the reason for the appearance of the error message.
- Port Blocked by Windows Firewall: Remote Desktop uses the 3389 port by default for RDP connections. In case it is being blocked by Windows Firewall, you will not be able to establish a connection.
- DNS Settings: If you are using any custom DNS servers, the issue might be rising because of that. In such a case, you will have to remove them and then try establishing a connection.
With that said, you can follow the solutions given down below to fix your issue. Please make sure you follow them in the same order as provided.
Solution 1: Turn on Network Discovery
Network Discovery is an option using which you can determine whether your system can see/scan other systems on the network or not. You have to make sure this option is turned on to establish an RDP connection. Here’s how to do it:
- Open up the Control Panel.
- Go to Network and Internet > Network and Sharing Center.
- Then, on the left-hand side, click on ‘Change advanced sharing settings’.
- Expand the network profile that you are currently using and select ‘Turn on network discovery’.

Turning on Network Discovery - Click Save Changes.
Solution 2: Allow Port 3389 Port through Firewall
Like we mentioned earlier, the 3389 port is the default port that is used by Remote Desktop for connections. If in case, it is blocked by the Windows Firewall, you won’t be able to make a connection. Also, you must choose a strong password and username for the connection to secure yourself from malicious attackers. Here’s how to allow the port through the firewall:
- Press the Windows Key to open up the Start Menu.
- Type in Remote Settings and hit Enter. This will open up the System window.
- On the left-hand side, click on Remote settings.
- Under Remote Desktop in the Remote tab, make sure Allow remote connections to this computer is selected.

Allowing Remote Connections - Now, open up the Control Panel.
- Go to System and Security > Windows Defender Firewall.
- On the left-hand side, click on ‘Advanced settings’.
- Now, select Inbound Rules and then search for Remote Assistance (RA Server TCP-In).
- Make sure it is enabled.
- Now look for Remote Desktop – User Mode (TCP-In and UDP-In). Make sure they are enabled and 3389 is the port. You can check the port by expanding the window so that the Local Port column is visible.

Remote Desktop Firewall Rules - Try establishing a connection again.
Solution 3: Clear Custom DNS Servers
If you are using a custom DNS server(s) on your system, you will have to clear it before establishing a remote connection. This applies to both the host and target system. Here’s how to do it:
- Right-click on the Network icon in the taskbar and select Open Network and Internet settings.
- Click on ‘Change adapter options’.

Network Settings - Right-click on your adapter and select Properties.
- Highlight Internet Protocol Version 4 and select Properties.
- Make sure ‘Obtain DNS server address automatically’ is selected.
- Click OK.
- Try connecting again.

Kevin Arrows
Kevin Arrows is a highly experienced and knowledgeable technology specialist with over a decade of industry experience. He holds a Microsoft Certified Technology Specialist (MCTS) certification and has a deep passion for staying up-to-date on the latest tech developments. Kevin has written extensively on a wide range of tech-related topics, showcasing his expertise and knowledge in areas such as software development, cybersecurity, and cloud computing. His contributions to the tech field have been widely recognized and respected by his peers, and he is highly regarded for his ability to explain complex technical concepts in a clear and concise manner.
- Remote desktop error code 0x104 in Windows 10 occurs when you try to grant access to an accessible system on the same or another network.
- If it fails, you may see an error message that says: “Unable to connect to the remote PC because the computer cannot be found” The cause of the error message can vary from script to script, but it is often due to the following reasons: Port 3389 must be open on both PCs when using a remote desktop.
Unlocking the Secrets: Resolving Remote Desktop Error Code 0x104
Enable Remote Desktop
To enable Remote Desktop and fix the Remote Desktop Error Code 0x104, follow these steps:
1. Open the Start menu and search for “Control Panel.”
2. Click on “Control Panel” to open it.
3. In the Control Panel window, search for “Remote Desktop” in the search bar located in the top-right corner.
4. Click on “Remote Desktop” from the search results.
5. In the Remote Desktop window, go to the “Remote” tab.
6. Check the box next to “Allow remote connections to this computer.”
7. Click on “Apply” and then “OK” to save the changes.
8. Close the Control Panel window.
9. You can now use Remote Desktop to connect to your PC.
Troubleshoot Network Discovery
If you’re facing network discovery issues while trying to fix Remote Desktop Error Code 0x104, here are some steps you can take:
1. Check network profiles: Open the Windows Settings and go to Network & Internet. Make sure your network profile is set to “Private” for local network discovery.
2. Enable Network Discovery: Open the Windows Settings and go to Network & Internet. Select your network connection and turn on the Network Discovery option.
3. Allow RDP through Firewall: Open Windows Defender Firewall and click on Allow an app or feature through Windows Defender Firewall. Make sure Remote Desktop is allowed.
4. Check RDP settings: Open Remote Desktop settings and ensure that Remote Desktop is enabled on the target system.
5. Restart RDP services: Open Services by typing “services.msc” in the Windows search bar. Restart the Remote Desktop Services and Remote Desktop Configuration services.
Adjust Firewall Settings
To adjust firewall settings for fixing Remote Desktop Error Code 0x104, follow these steps:
1. Open the Windows Start menu and search for “Firewall & Network Protection”.
2. Click on the “Firewall & Network Protection” option to open the Windows Defender Firewall settings.
3. In the Firewall settings, click on “Allow an app or feature through Windows Defender Firewall”.
4. Click on the “Change settings” button and then scroll down to find “Remote Desktop”.
5. Check both the “Private” and “Public” checkboxes next to “Remote Desktop” and click “OK” to save the changes.
6. Restart your computer to apply the new firewall settings.
By adjusting the firewall settings, you can ensure that Remote Desktop connections are allowed through the firewall, resolving the Error Code 0x104.
Start Critical Services
To start critical services and fix the Remote Desktop Error Code 0x104, follow these steps:
1. Open the Run dialog box by pressing Windows key + R on your keyboard.
2. Type “services.msc” and press Enter to open the Services console.
3. Scroll down and locate the Remote Desktop Services and Remote Desktop Configuration services.
4. Right-click on each service and select Properties.
5. In the Properties window, ensure that the Startup type is set to Automatic.
6. Click on the Start button to start the service if it is not already running.
7. Click OK to save the changes and close the Properties window.
8. Restart your computer to apply the changes.
9. Once your computer has restarted, try connecting to the remote desktop again.
Following these steps should help resolve the Remote Desktop Error Code 0x104.
Unblock Port 3389
To unblock Port 3389 and resolve the Remote Desktop Error Code 0x104, follow these steps:
1. Open the Windows Firewall settings.
2. Click on “Advanced settings.”
3. In the left pane, select “Inbound Rules.”
4. Locate the rule named “Remote Desktop (TCP-In)” and double-click on it.
5. In the “Action” tab, select “Allow the connection.”
6. Click “OK” to save the changes.
Note: If you have a third-party firewall or antivirus software installed, make sure to configure it to allow the Remote Desktop connection.
Remember to restart your PC for the changes to take effect. Once Port 3389 is unblocked, you should be able to establish a Remote Desktop connection without encountering the 0x104 error.
For more troubleshooting solutions and helpful tips, visit the Microsoft Remote Desktop support page.
Clear DNS Servers
Clearing DNS servers can help resolve the Remote Desktop Error Code 0x104. To do this, follow these steps:
1. Press the Windows key + R to open the Run dialog box.
2. Type “ncpa.cpl” and press Enter to open the Network Connections window.
3. Right-click on the network profile you are using and select “Properties.”
4. In the Properties window, scroll down and select “Internet Protocol Version 4 (TCP/IPv4).”
5. Click on the “Properties” button.
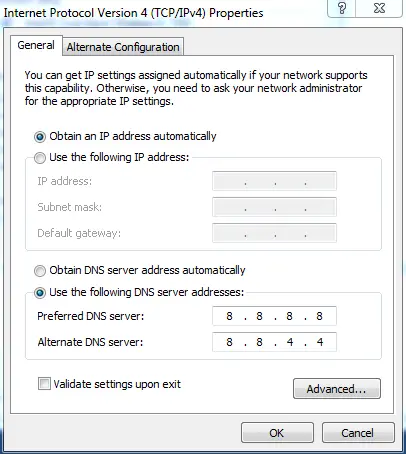
6. In the new window, select the “Use the following DNS server addresses” option.
7. Replace the existing DNS server addresses with the following public DNS servers: 8.8.8.8 and 8.8.4.4
8. Click “OK” to save the changes.
9. Close all windows and restart your computer.
After clearing the DNS servers, try connecting to Remote Desktop again to see if the error is resolved. This method can help resolve DNS-related issues that may be causing the error code 0x104.
Enable Remote Desktop Settings
To fix Remote Desktop Error Code 0x104, you need to enable Remote Desktop settings on your Windows device. Here’s how:
1. Press the Windows key + R to open the Run dialog box.
2. Type “sysdm.cpl” and press Enter to open the System Properties window.
3. Go to the “Remote” tab.
4. Check the box next to “Allow Remote Assistance connections to this computer” and “Allow remote connections to this computer.”
5. Click “Apply” and then “OK”.
Note: Make sure you have administrative privileges to make these changes.
Once you’ve enabled Remote Desktop settings, you should be able to access your device remotely without encountering the 0x104 error.
Ensure Consistent Network Profile
To ensure a consistent network profile and resolve the Remote Desktop Error Code 0x104, follow these steps:
1. Open the Remote Desktop application on your Windows 10 or Mac OS device.
2. Click on the “Options” button to expand the settings.
3. Go to the “Advanced” tab and scroll down to the “Network” section.
4. Check the box that says “Always use the same network profile for this connection.”
5. Click on the “Save” button to apply the changes.
By enabling this option, you ensure that your Remote Desktop connection always uses the same network profile, regardless of the network you are connected to. This helps in avoiding any compatibility issues and resolving the Error Code 0x104.
If you continue to experience issues, consider reaching out to our Server Management Services or contacting your network service provider for further troubleshooting and solutions.
Run SFC Scan in PowerShell (Admin)
To fix the Remote Desktop Error Code 0x104, you can run an SFC scan in PowerShell (Admin). This scan will help identify and repair any corrupted system files that may be causing the error.
Here’s how to run the SFC scan in PowerShell (Admin):
1. Press the Windows key and type “PowerShell”.
2. Right-click on “Windows PowerShell” and select “Run as administrator”.
3. In the PowerShell window, type “sfc /scannow” and press Enter.
4. The scan will now start and may take some time to complete.
5. Once the scan is finished, it will display the results. If any corrupted files are found, the scan will attempt to repair them automatically.
Running the SFC scan can help resolve the Remote Desktop Error Code 0x104 and improve the performance of your system.

Mark Ginter
Mark Ginter is a tech blogger with a passion for all things gadgets and gizmos. A self-proclaimed «geek», Mark has been blogging about technology for over 15 years. His blog, techquack.com, covers a wide range of topics including new product releases, industry news, and tips and tricks for getting the most out of your devices. If you’re looking for someone who can keep you up-to-date with all the latest tech news and developments, then be sure to follow him over at Microsoft.
In the process of establishing connection to a target system on the same or a different network, most Windows users experience Remote Desktop error 0x104.
Here at Ibmi Media, as part of our Server Management Services, we regularly help our Customers to fix Windows related issues.
In this context, we shall go through the necessary steps to tackle this error.
What triggers Remote Desktop error code 0x104?
Generally, error message 0x104 indicates that «We couldn’t connect to the remote PC because the PC can’t be found. Please provide the fully-qualified name or the IP address of the remote PC, and then try again«.
Normally, the error message varies depending upon different scenarios. But often it occurs due to the following reasons.
i. The network discovery option is turned off in the Sharing options.
ii. By default for RDP connections, Remote Desktop uses the 3389 port. In case, if it is blocked by Windows Firewall then it is not possible to establish a connection.
iii. Some custom DNS servers might also create an issue.
In this case, when this error happens, you will see the following error message;
remote desktop error 0x104
Steps to fix the remote desktop error 0x104?
Now let us go through the steps to resolve this error;
Solution 1: Turn on Network Discovery
Network Discovery helps in determining whether the system can see/scan other systems on the network or not. We make sure this option is turned on to establish an RDP connection. Here is how we do it:
1. First, we open the Control Panel.
2. Next, we go to Network and Internet > Network and Sharing Center.
3. Then, on the left-hand side, we click on ‘Change advanced sharing settings’.
4. After that we expand the network profile that we are currently using and select ‘Turn on network discovery’.
5. Finally, we click Save Changes.
Solution 2: Allow Port 3389 Port through Firewall
By default for RDP connections, Remote Desktop uses the 3389 port. In case, if it is blocked by Windows Firewall then we won’t be able to make a connection. Also, we ensure to set a strong password and username for connection to avoid malicious attackers. Here is how we allow the port through the firewall:
1. First, we open up the Start Menu by pressing the Windows Key.
2. Next, we type in Remote Settings and hit Enter. This will open up the System window.
3. Then we click on Remote settings that is present on the left-hand side.
4. Under Remote Desktop in the Remote tab, we make sure ‘Allow remote connections to this computer’ is selected.
5. Now, we open the Control Panel.
6. Here we go to ‘System and Security’ >> ‘Windows Defender Firewall’.
7. Then we click on ‘Advanced settings’ that is present on the left-hand side.
8. Now, we select ‘Inbound Rules’ and then search for Remote Assistance (RA Server TCP-In). We make sure it is enabled.
9. Now we look for ‘Remote Desktop – User Mode (TCP-In and UDP-In)’. We make sure they are enabled and 3389 is the port.
11. Finally, we try establishing a connection again.
Solution 3: Clear Custom DNS Servers
We clear the custom DNS server(s) before establishing a remote connection. This applies to both the host and target system. Here is how we do it:
1. First, we right-click on the Network icon in the taskbar and select Open Network and Internet settings.
2. Next, we click on ‘Change adapter options’.
3. After that, we right-click on the adapter and select Properties.
4. Here we highlight Internet Protocol Version 4 and select Properties.
5. Also, we make sure that the ‘Obtain DNS server address automatically’ is selected.
6. Finally, we click OK and try connecting again.
Solution 4: Enable Remote Desktop settings
Here are the steps that we follow to check whether the Remote desktop settings are enabled on the computer or not.
1. First, we press Windows key+I.
2. After that, we go to the “System“.
3. On the left-hand side, when the System window appears, we scroll down to choose the “Remote Desktop“.
4. On the right side, we check if the “Enable Remote Desktop” is switched to “ON” or not.
Solution 5: Make Sure That All Computers Use the Same Type of Network Profile.
1. First, we click on the network icon in the taskbar.
2. Next, we connect to any preferable network.
3. Then we click on Properties.
4. In the Settings for All PCs window, we select Public or Private.
5. Now finally, we try to see if this solves the problem.
Solution 6: Run SFC scan in PowerShell (Admin)
1. Press Win+X >> select PowerShell (Admin).
2. Next, we type the below command and press Enter.
/sfc scannow
3. It takes some time for the process to complete. Then we check if the issue persists.