Avoid having outdated drivers to prevent the error
by Vladimir Popescu
Being an artist his entire life while also playing handball at a professional level, Vladimir has also developed a passion for all things computer-related. With an innate fascination… read more
Updated on
- Update your PC regularly to ensure that you get the latest bug fixes and features.
- You can attempt to restart the printer to easily resolve the error.
- Adding the printer manually usually fixes the error especially when the computer can’t detect the printer.
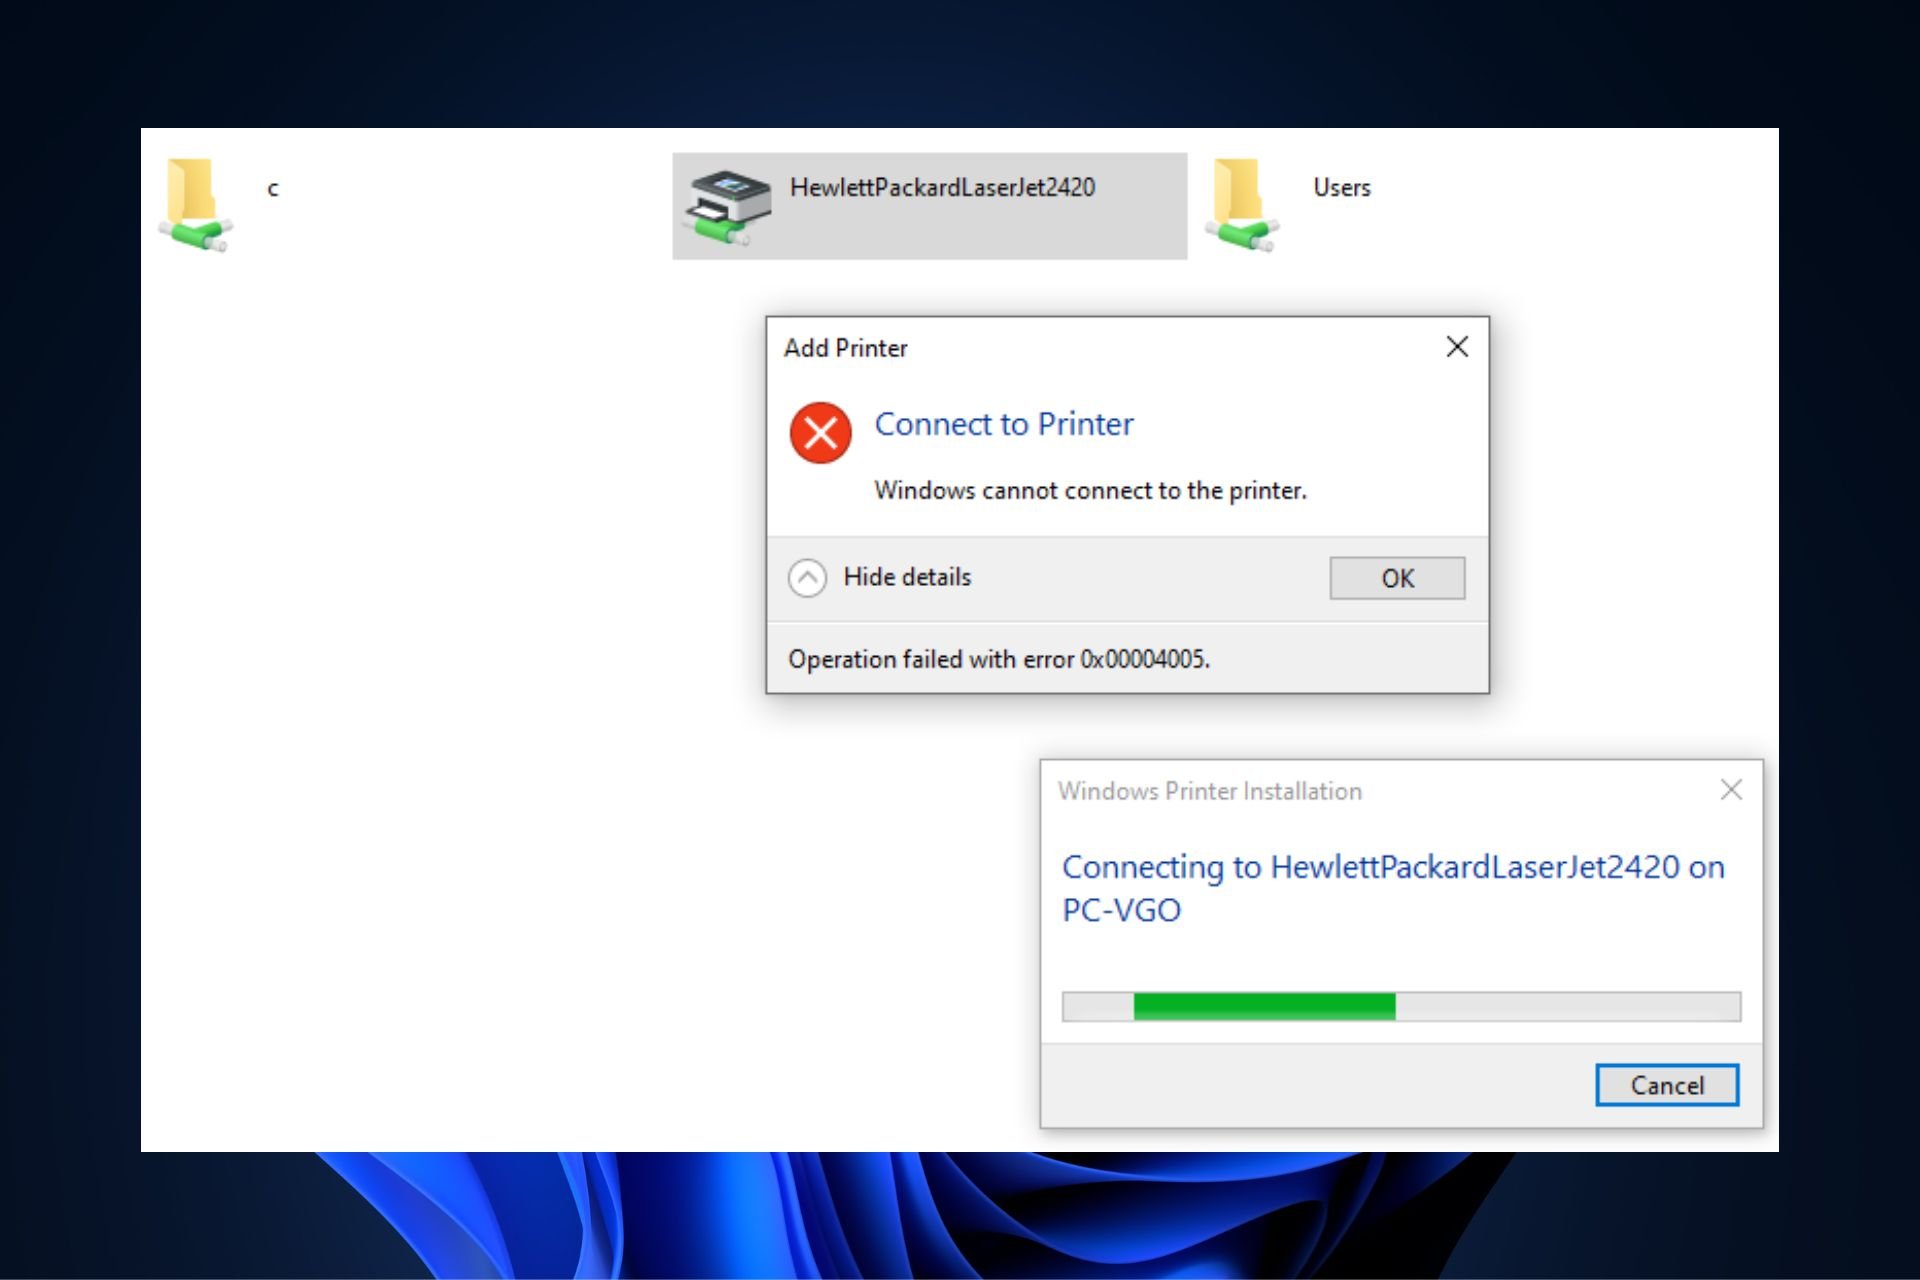
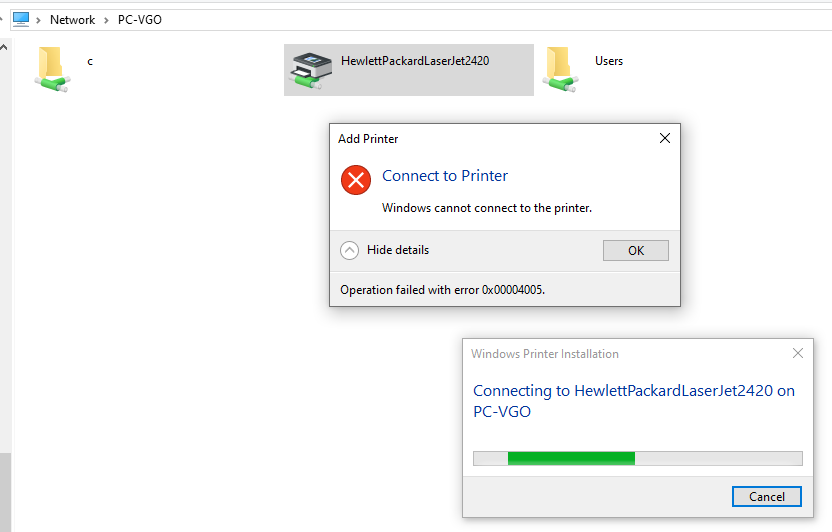
The 0x00004005 error is one of Windows’ most common printer errors. It occurs when users try adding a network printer to their computers.
The error message reads Windows can’t connect to the printer; the operation failed with error 0x00004005. In this article, we’ll briefly discuss the error and its causes and provide you with ways to resolve it.
- What causes Operation Failed With Error 0x00004005?
- How can I fix the Operation Failed With Error 0x00004005?
- 1. Run the Printer Troubleshooter
- 2. Update the Printer driver
- 3. Uninstall and reinstall Printer driver
- 4. Uninstall Latest Windows Updates
- 5. Configure the LAN Manager Authentication Level
- 6. Add the Printer Manually
- 7. Restart Printer Spooler Service
- 8. Update Windows
What causes Operation Failed With Error 0x00004005?
The Operation failed with error 0x00004005 is a common error among Windows users. Here are some of the causes of the error:
- Outdated Drivers – Printers, like most devices we connect to your computers, require specific drivers to run correctly. If the Printer drivers are outdated, you’ll run into errors like the 0x00004005 code.
- Print Spooler Service – The Print Spooler service is built into Windows to temporarily store print jobs in the computer’s memory until the Printer is ready to print them. If this service stops functioning, it’ll lead to lots of printer-related errors.
- Misconfigured Network Settings -The 0x00004005 usually arises when you’re trying to add a shared network printer to their PC. If there’s a misconfiguration in your PC’s network settings, it can cause the 0x00004005 error code.
- Windows Update – Windows users are usually advised to update their PCs regularly. However, installing certain updates can lead to several errors on your PC. In such cases, a Windows recovery point is beneficial as you can restore your PC to an earlier state where it was completely functional.
How can I fix the Operation Failed With Error 0x00004005?
1. Run the Printer Troubleshooter
- Press the Windows key + S, type Troubleshoot, and hit Enter.
- In the Settings app, click on Other troubleshooters.

- Click on Printer, and click Run button.

- Follow the on-screen instructions and restart your PC to check if the Operation Failed With Error 0x0000400 is resolved.

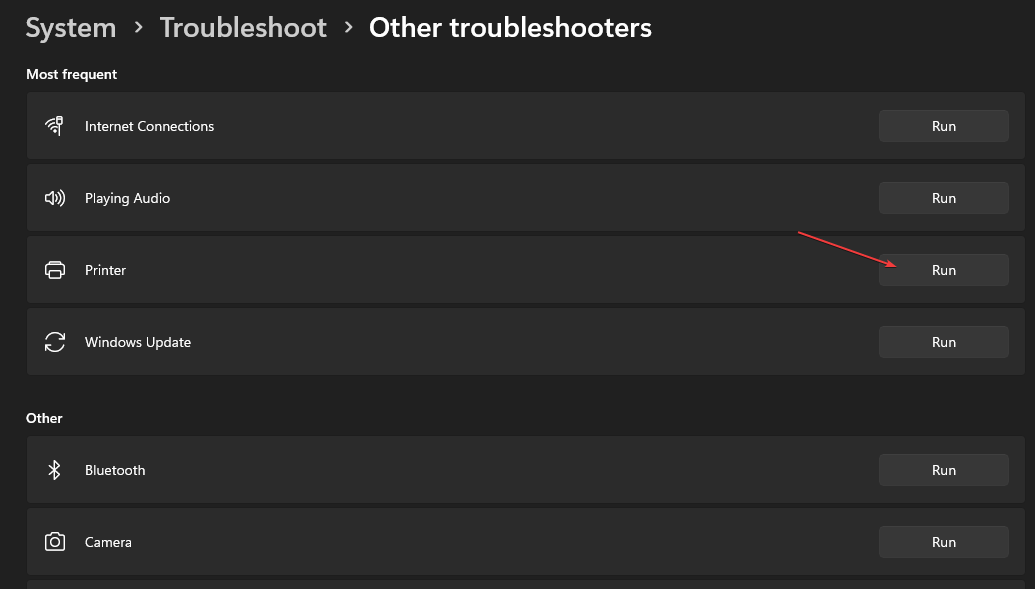
Running the Windows troubleshooter is one of the quickest and easiest ways to resolve the 0x00004005 error.
The troubleshooter will detect anomalies with the Printer Spooler and other necessary services and correct them if required.
2. Update the Printer driver
- Press the Windows key + R, type in devmgmt.msc, and hit Enter.
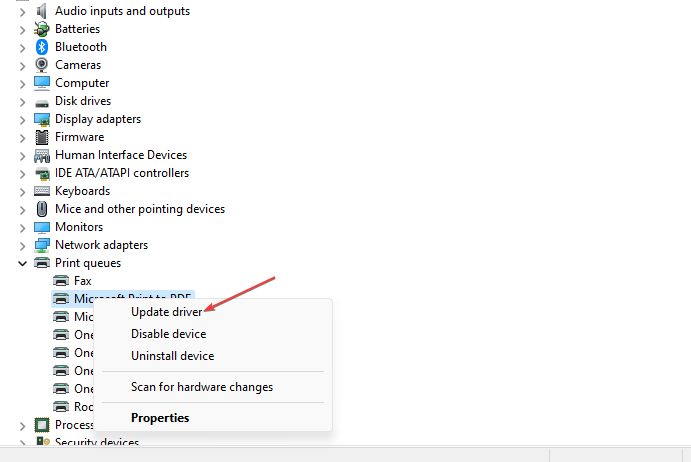
- In the Device Manager window, locate the Printer driver, right-click on the Printer, and select Update driver.

- In the next window, click on Search driver automatically, and wait for Windows to search and install available drivers.

- Restart your PC once the search is completed.

Should you encounter any issues with updating the driver here, you can check out our guide for other ways to go about updating your drivers.
On another hand, you can as well consider a dedicated driver manager that will securely find corrupted or missing drivers that needs updating.
Hence, with Outbyte Driver Updater you can successfully update the Printer driver or any others within a few clicks.
⇒ Get Outbyte Driver Updater
3. Uninstall and reinstall Printer driver
- Press the Windows key + S, type in Device Manager, and hit Enter.
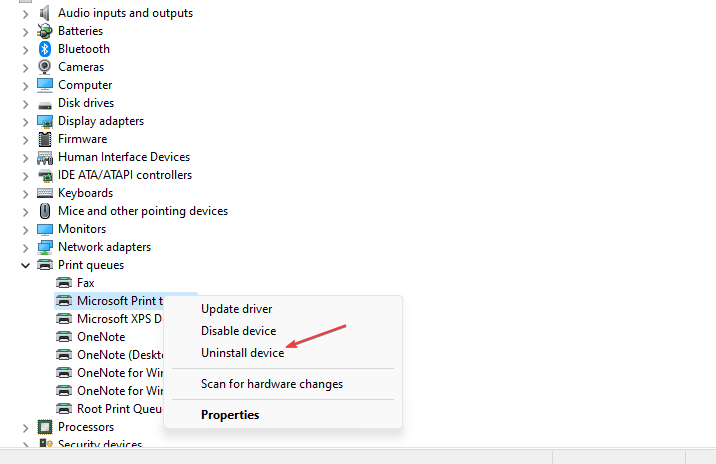
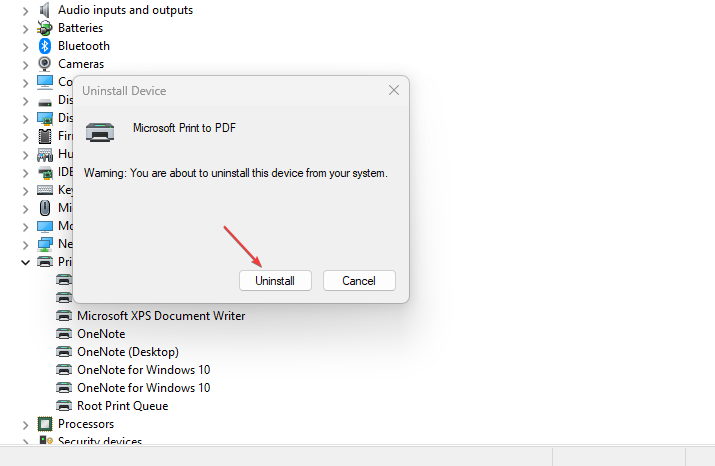
- Locate the printer, and double-click on it to expand the selection. Right-click on the device and select Uninstall device.

- Click Uninstall to confirm the driver removal.

- Restart your PC once the driver is completely uninstalled.
4. Uninstall Latest Windows Updates
- Press the Windows key + I to open the Settings app.
- Click on Windows Update and click on Update History.

- Then, select Uninstall Updates.

- Under the Microsoft Windows section, click on any recent update, and select Uninstall.
- Click on Yes in the confirmation prompt to confirm the deletion.


You’re required to update your PC regularly to ensure that you get the latest features and bug fixes on your OS. However, there are specific updates that lead to more bugs when installed.
First, you’ll ensure the error started after installing a particular update to prevent you from removing important updates from your PC.
- Error Authenticating With Venmo: 6 Ways to Fix it
- Fix: Internet Speed is Fast, but Video Calls are Slow
- Fix: MSI Afterburner Failed to Start Scanning
- Windows 11 Keeps Chiming? Stop it in 8 Steps
- Spacebar, Enter, and Backspace are Not Working on Windows 11 [Fix]
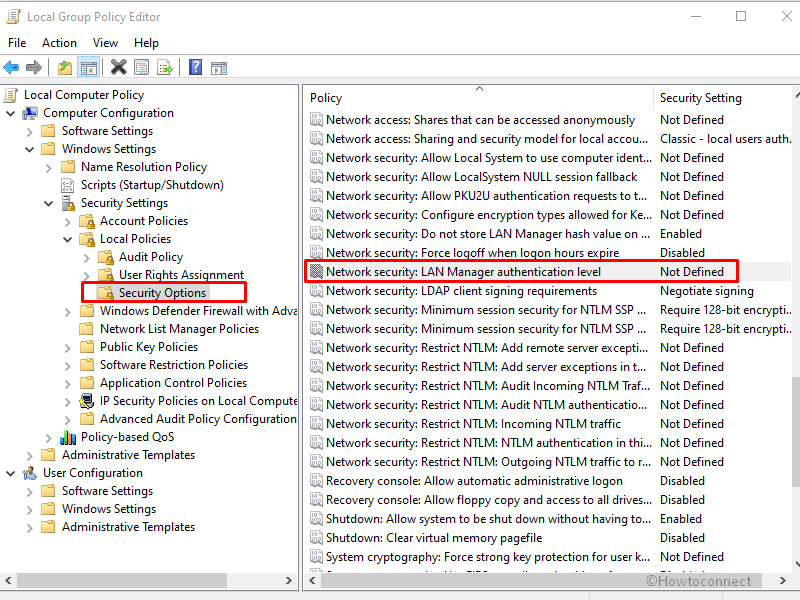
5. Configure the LAN Manager Authentication Level
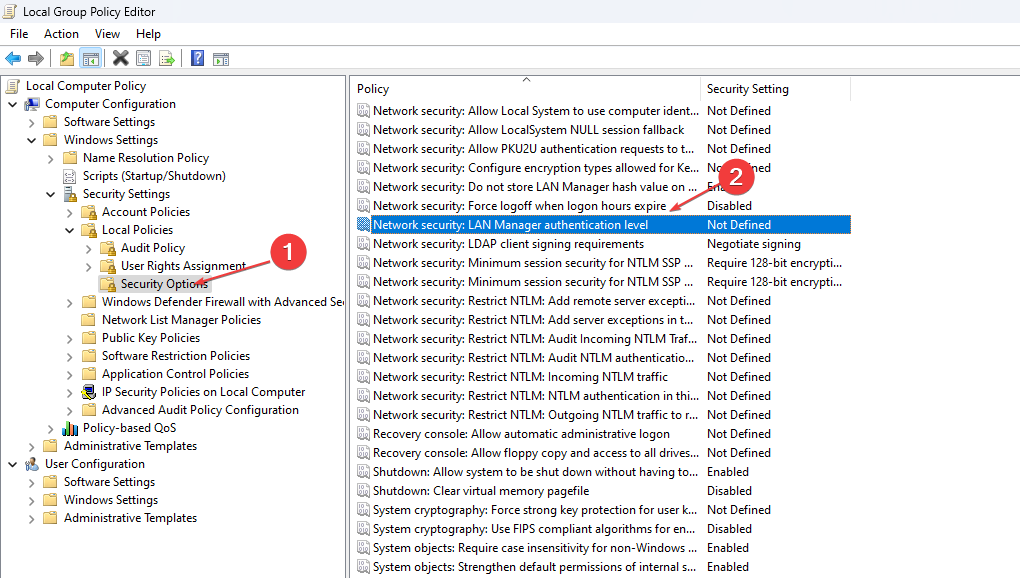
- Press the Windows key + R, type in gpedit.msc, and hit Enter.
- In the Group Policy window, navigate to this path:
Computer Configuration\Windows Settings\Security Settings\Local Policies\Security Options\Network security: LAN Manager authentication level
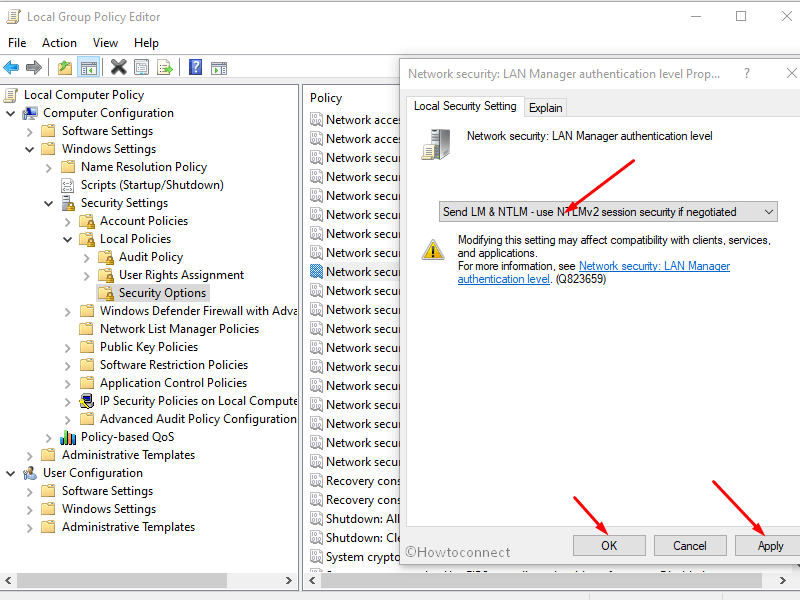
- Double-click on Network security: LAN Manager authentication level to open the Properties window.
- In the Properties window, click the drop-down menu and select Send LM and NTLM – Use NTLMv2 session security if negotiated.

- Click Apply and then click OK.
- Close the Group Policy window and restart your PC.

In most cases, the 0x00004005 error occurs due to incorrect configurations of the network security settings. Reconfiguring the LAN Manager is one way to check and resolve the error.
Here is a detailed guide showing you a list of free and paid software to monitor your LAN.
6. Add the Printer Manually
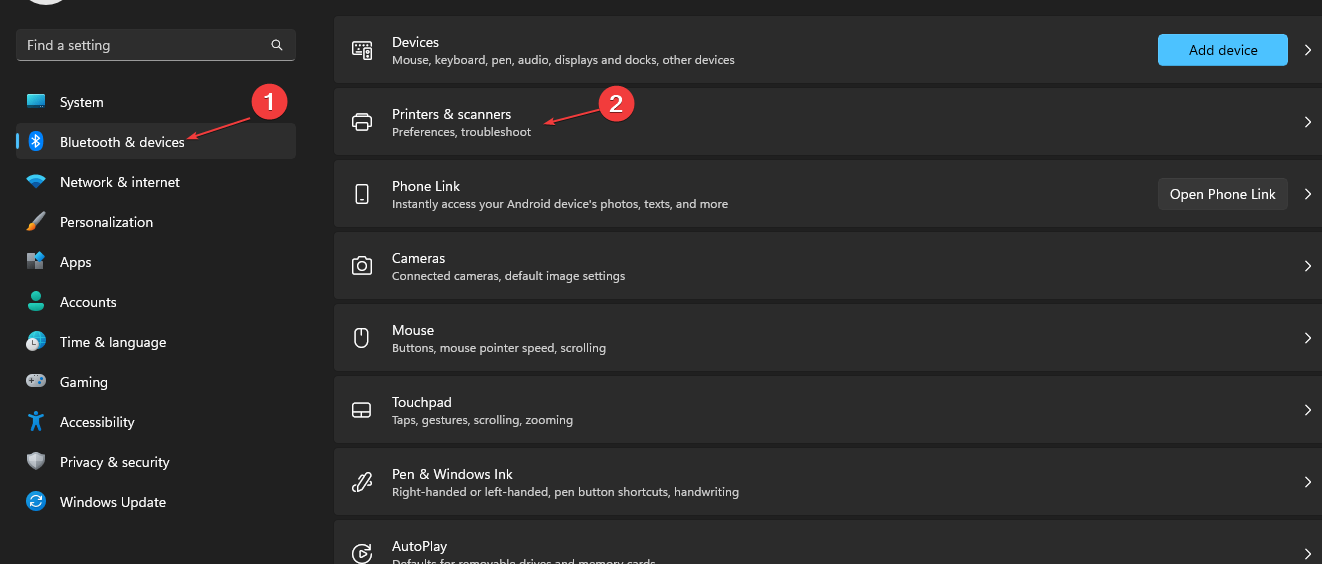
- Press the Windows key + I to open the Settings app.
- Click on Bluetooth and devices and select Printers & Scanners.

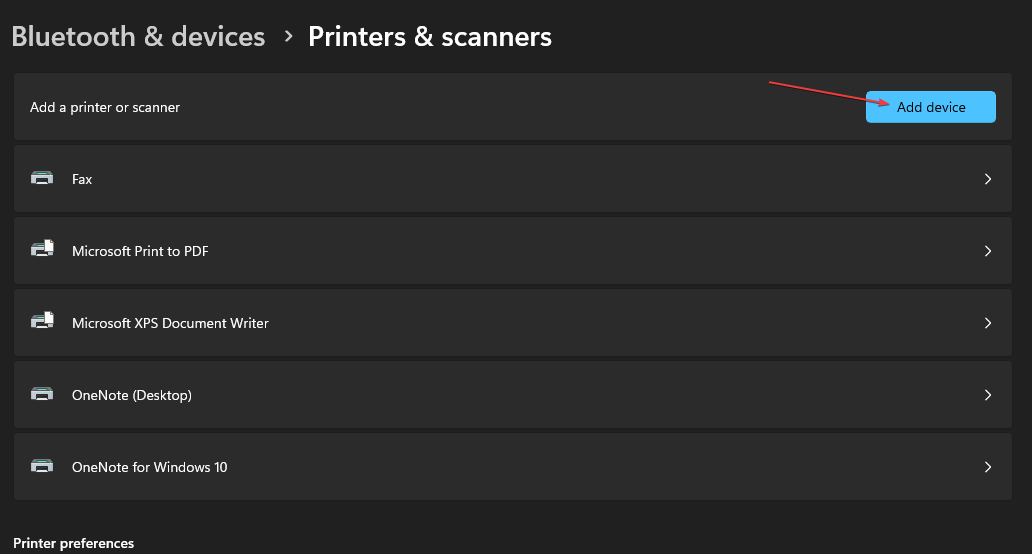
- Click Add device.

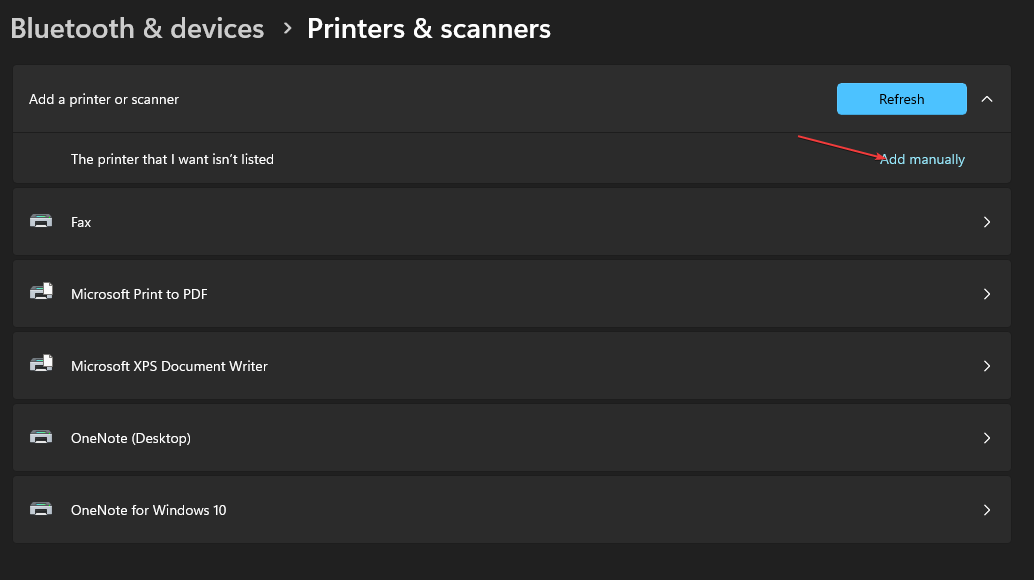
- After a few seconds, you’ll see a link: The printer I want isn’t listed. Then select Add manually.

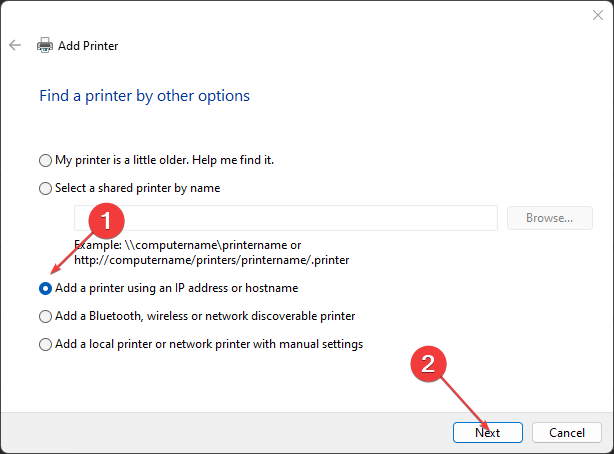
- Click the link, check the box next to Add a printer using a TCP/IP address or hostname, and click Next.

- On the next window, type in your local Hostname or IP Address.
- Type in your Port name, click Next and follow the on-screen instructions to finish adding the printer.
In some cases, Windows might not detect the printer automatically. When this happens, you must manually add the printer to solve the 0x00004005 error.
7. Restart Printer Spooler Service
- Press the Windows key, type in services.msc, and hit Enter.
- On the Services window, right-click on the Printer Spooler service and select Restart.

- Close the Services window and check if the error persists.

The Printer Spooler Service manages the entirety of the printer’s operations on your PC. Sometimes, the service might stop functioning due to several reasons. If the service stops, you’ll be unable to use the Printer.
8. Update Windows
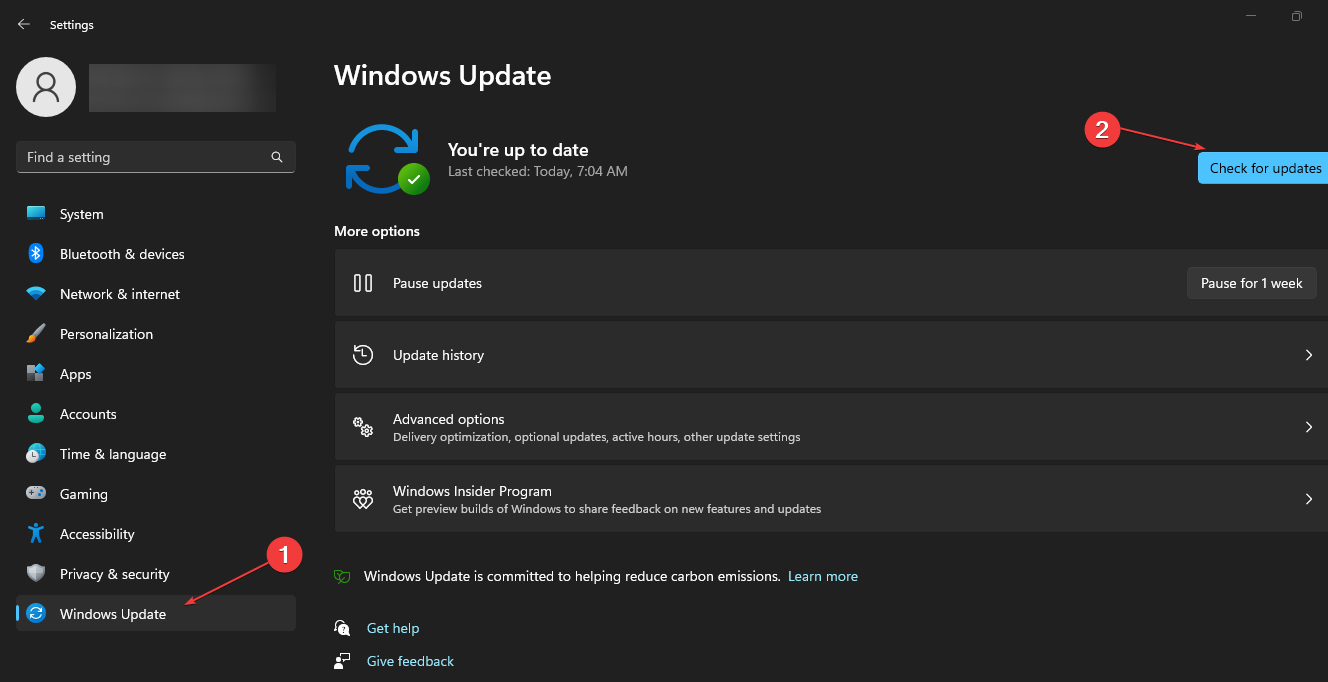
- Press the Windows key + I to open the Settings app.
- Click on Windows Update and select Check for Updates. Wait for Windows to scan for available updates. If there are available updates, click on Download to install them.

- Once the updates are installed, click the Restart now button to restart your PC.
The 0x00004005 error is common among Windows users and involves little technicality. By following the steps listed above, you should get your printer up and running in no time.
However, if you’ve stumbled upon this error in the past and have alternative solutions to help resolve it, feel free to drop them in the comments.
![]()
Printer problems are nightmare for Windows 10 or 11 users as they are constantly reporting error code 0x00000077, 0x0000052e, 0x00000709, 0x0000011b and several other. 0x00004005 is such an issue that appears when trying to add a shared network printer to the laptop or computer and it started after a bug that arrived with Windows update. Fortunately, you can fix it with some solutions having modifications in settings, configuration, and registry entries.
Full message that appears during the problem is “Windows cannot connect to printer. Operation failed with error 0x00004005”. This error occurs mostly due to outdated printer driver, incorrect registry entries, corrupted system files, and buggy Windows update. To keep yourself away from this printer error, here we are sharing a few simple ways for fixing the error on a possible early basis.
Here is how to fix Printer Operation failed with error 0x00004005 windows 10, 11 –
Way-1: Run the Printer Troubleshooter
The best solution to this problem is running the printer Troubleshooter because this is a default program moreover it detects the Print Spooler and other necessary services automatically and corrects them if required. Most of all, the Fixit utility is easy to use which you can start by following the steps –
- Press the Windows key.
- Type – troubleshoot.
- Hit Enter.
- When the Settings app appears, click on – Additional troubleshooter.
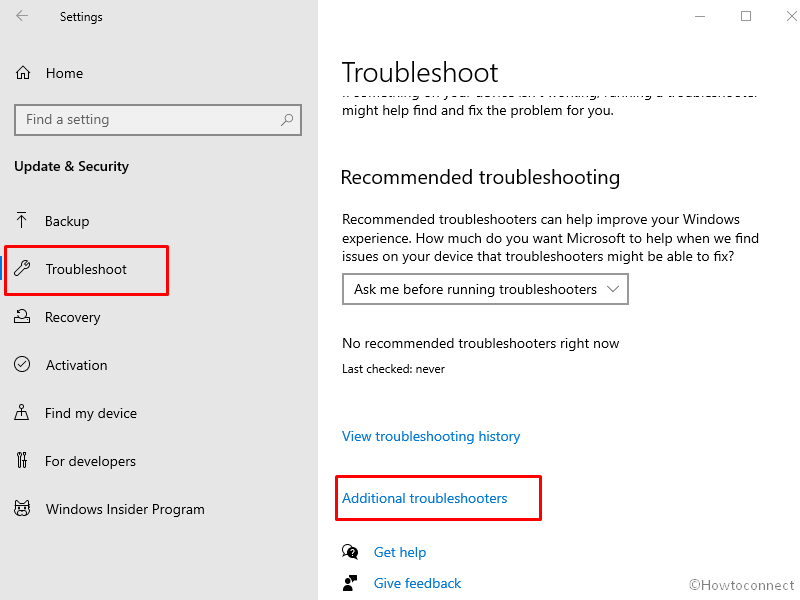
- Click on Printer.
- Now click – Run the Troubleshooter.
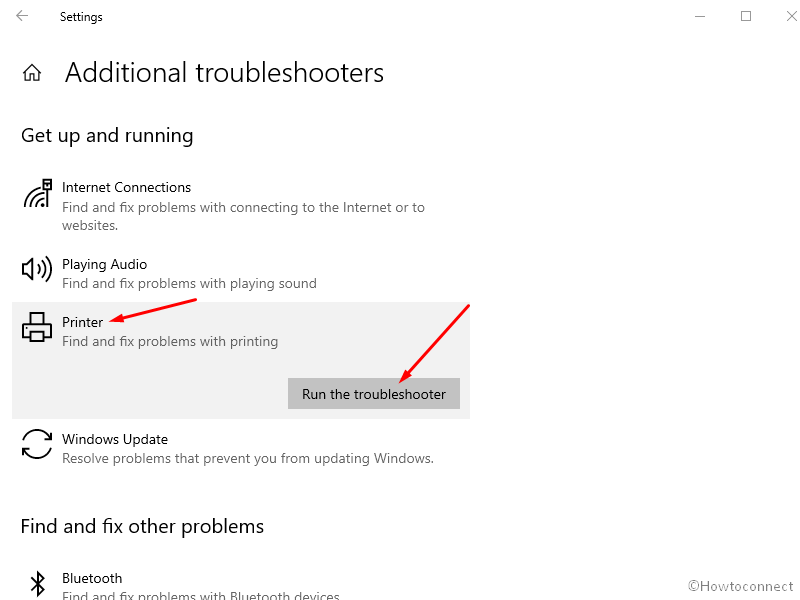
- Follow the instructions shared.
- Restart your system to check if Printer Operation failed with error 0x00004005 is resolved.
Way-2: Update the printer driver
In addition, if you are planning to invest in a new printer, you should get a CD that has all the necessary drivers. Try reinstalling all drivers which match your printer. If CD is not available, you can get all the required drivers from the manufacturer’s official website. Furthermore, Device Manager allows updating the driver staying at your Windows which is an advisable method.
- Press – Windows + R.
- Type – devmgmt.msc.
- Click on OK.
- Once the Device Manager appears, find the printer in the list and double-click on it.
- If you can’t see the device, click on View from the top menu bar.
- Select – Show hidden devices.
- Now go to the printer and right-click on it.
- Select – Update driver.
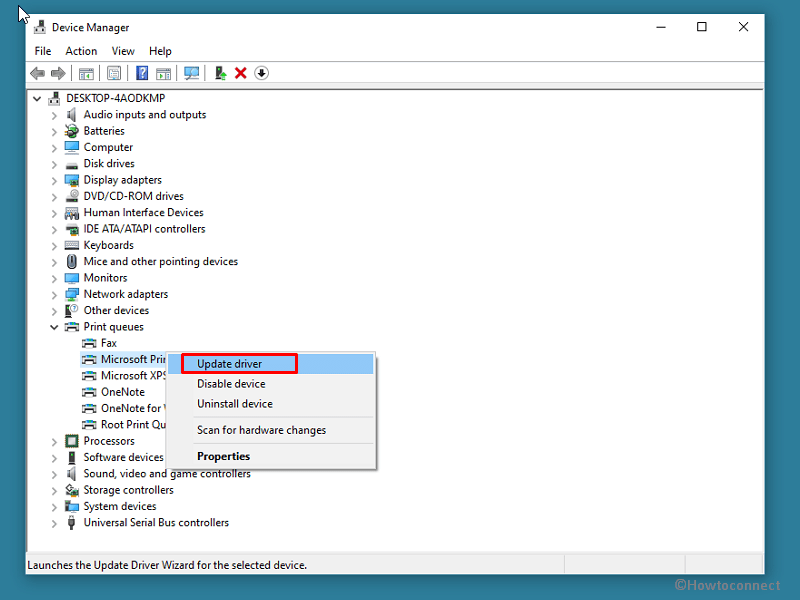
- From the Window, click on Search driver automatically.
- Restart the computer.
Way-3: Uninstall and reinstall the printer driver
When a shared network printer refuses to add to a computer there might be glitches in either the software of the printer or in Windows. Most important component of the printer is the driver which deals with the connection between Windows PC and printer. We have updated the driver in the previous method and the printer is still not working means it is not properly installed on the computer. Therefore, this method will tell you to Uninstall and reinstall the printer driver by following the steps –
- Right-click on the Start.
- Select Device Manager.
- Go to the Printer and double-click on it to expand.
- On the device right-click and select – Uninstall device.
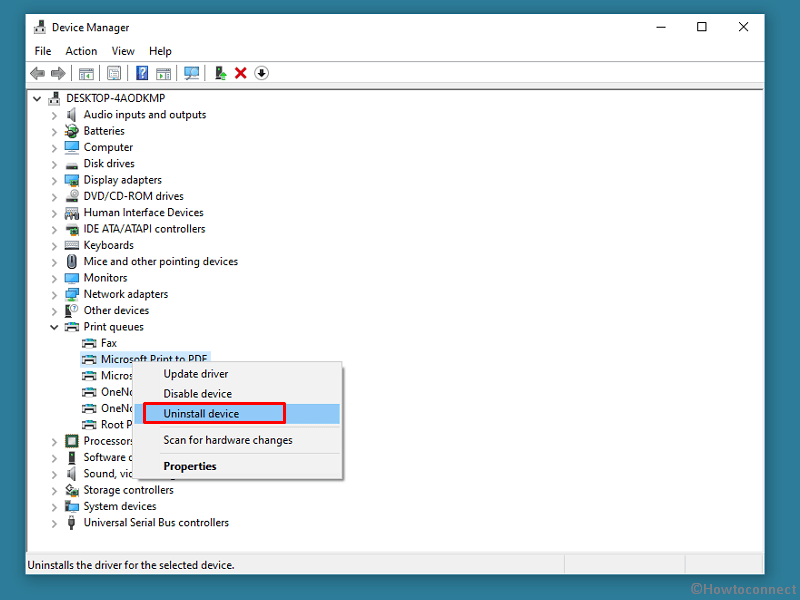
- Click on – Uninstall.
- Reboot the computer and hopefully, the error will be solved.
Way-4: Uninstall Windows update
Sometimes, buggy Windows update is a culprit that triggers Printer Operation failed with error 0x00004005 in Windows 10 and 11. In this condition, you will need to uninstall the update and pause the same until it is not officially resolved. First of all, make sure that the error code started after installing Windows update and then uninstall it using the below steps –
- Click Start.
- Type – updates.
- Press – Enter.
- Click – View update history.
- On the next Settings page, check if any update is installed recently.
- If yes then click on – Uninstall updates.
- A separate window pops up; select the update on that.
- Click on – Uninstall.
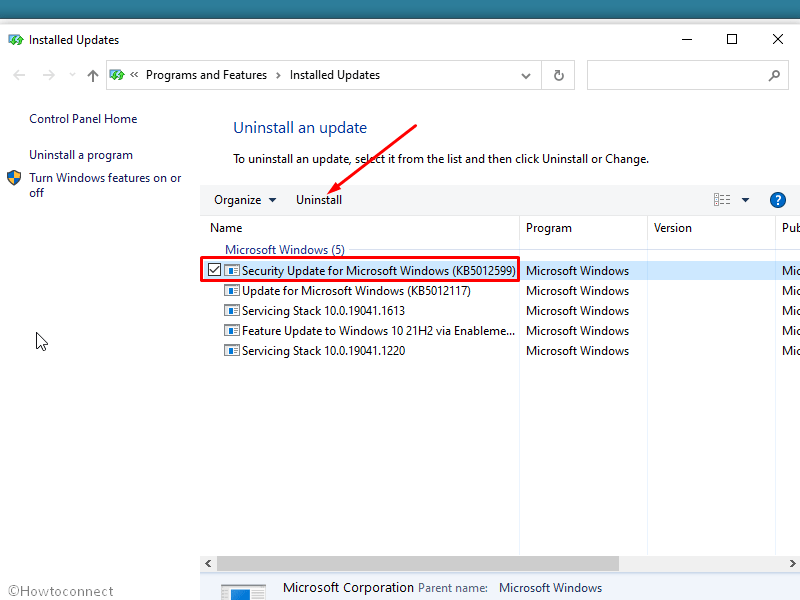
- Select Yes on the confirmation prompt.
Way-5: Configure the LAN Manager authentication level
On many occasions, Printer Operation failed with error 0x00004005 can even occur due to the incorrect configuration of the network security settings. Follow the steps below to handle it easily –
- Press Windows.
- Type – gpedit. msc.
- Once Group Policy Editor opens, Navigate to – “
Computer Configuration > Windows Settings > Security Settings > Local Policies > Security Options > Network security: LAN Manager authentication level“. - Double click on Network security: LAN Manager authentication level.
- On the properties window, click on drop down.
- Select – “Send LM and NTLM – Use NTLMv2 session security if negotiated”.
- Click on Apply and OK.
- Close the Group Policy editor and restart the computer.
Way-6: Manually add the printer
If all the methods above fail to solve Printer Operation failed with error 0x00004005 in Windows 10, 11 you will need to reconfigure the printer and manually add it to the computer. Windows 10 and 11 as well allow you to add printer and scanner through Device Settings manually if the Operating system does not detect the device automatically. Using the section add the shared network printer –
- Press Winkey+I.
- Select – Devices.
- From the next page of Settings, select – Printers & scanners from the left pane.
- Click Add a printer or scanner from the right.
- After a while you will see a link – The printer that I want isn’t listed.
- Check the box for – Add a printer using a TCP/IP address or hostname.
- Click – Next.
- On the next window, type Hostname or IP address.
- Write Port name and click on Next.
- Follow the instructions on the screen and connect the p0rinter.
Way-7: Install Windows update
If the printer error occurred because of faulty Windows update Microsoft should acknowledge this and find a resolution. Then they push it through another update to officially resolve the bug. Therefore, install the pending update after getting the printer problem in Windows 11 or 10 using the below guidelines –
- Click on Search from the taskbar.
- Type updates.
- Press Enter.
- Now, click on – Check for updates.
- Allow the system to download the update as it will consume some time depending on internet speed.
- Once, a dialog box asks you to restart the computer, click on – Restart now.
Way-8: Manually restart Print spooler service
Print Spooler Service is the most essential component to run any printing device without any hitch and glitch. Many times, Printer Troubleshooter checks the service and repairs if its misbehave causes the Operation failed with error 0x00004005 in Windows 11 or 10. But some users experience that the service needs to be manually restarted to fix this error code. So follow the method –
- Click on Search.
- Type – services.
- Hit – Enter.
- On the Services window, right click on Print spooler.
- Select – Restart.
- Hopefully, the error should be resolved now.
Methods list:
Way-1: Run the Printer Troubleshooter
Way-2: Update the printer driver
Way-3: Uninstall and reinstall the printer driver
Way-4: Uninstall Windows update
Way-5: Configure the LAN Manager authentication level
Way-6: Manually add the printer
Way-7: Install Windows update
Way-8: Manually restart Print spooler service
That’s all!!
Repair any Windows problems such as Blue/Black Screen, DLL, Exe, application, Regisrty error and quickly recover system from issues using Reimage.
Есть несколько способов решить ошибку «Windows не удается подключиться к принтеру», отличающихся в зависимости от причины возникновения проблемы. Ошибка появляется как при локальном подключении принтера к персональному компьютеру, так и при использовании терминальной фермы.
Терминальная ферма — популярное решение для средних и крупных компаний, когда приложения и устройства работают на сервере, а пользователи подключаются к ним для работы. Вне зависимости от способа использования принтера, при попытке отправить файл на печать, может высвечиваться одна из вариаций ошибки подключения к устройству. Особо беспокоиться не стоит, поскольку решение проблемы обычно занимает не более нескольких минут.
Оглавление:
- Причины, виды и способы решения ошибки
- Включение службы Диспетчер печати
- Установка принтера через локальный порт
- Очистка или замена папки spool
- Если ничего не помогает

Причины ошибки и способы решения
Основными причинами появления ошибки являются: нарушение работы службы диспетчера печати, изменение доступов администраторами системы (актуально для корпоративных компьютеров), физические проблемы с принтером. Ошибку также могут вызывать слетевшие драйвера, вирусная активность или изменение папки spool или библиотек, необходимых для работы с принтерами.
Вернуть принтер к работе достаточно просто. Но для начала следует убедиться, что проблема не вызвана банальными вещами:
- Если на корпоративном компьютере перестало работать подключение к принтеру по причине «Отказано в доступе», стоит убедиться в наличии прав на доступ к устройству. Разграничение прав на корпоративных устройствах обычно идет по крупным группам пользователей, и какие-либо изменения могли затронуть проблемный компьютер. Для решения ситуации следует обратиться к корпоративному системному администратору.
- Не помешает проверить компьютер на вирусы, а также запустить командную строку, ввести
sfc /scannowи нажать Enter для диагностики всей системы. Это действие позволит Windows восстановить нужные библиотеки и системные файлы, если они были повреждены из-за вирусной активности или по иной причине. - Следует убедиться в отсутствии физических проблем с принтером, компьютером и сетью, из-за которых подключение к устройству может отсутствовать.
Ошибка «Windows не удается подключиться к принтеру» имеет дополнительные коды и уведомления, что иногда позволяет разобраться в причине:
- Локальная подсистема печати не выполняется.
- Отказано в доступе.
- Коды ошибки: 0×00000006, 0×00000002, 0×0000000a, 0×00000057, 0×0000007e, 0×00004005, 0×000003eb, 0×000005b3, 0×0000003eb.
На большое количество системных кодов ошибок можно не обращать внимания. Большинство проблем, вызывающих данную ошибку подключения к принтеру, решаются одними и теми же действиями.
Включение службы Диспетчер печати
Включение Диспетчера печати через Панель управления:
- Нажать «Пуск», выбрать «Панель управления».
- Перейти в раздел «Администрирование», затем открыть вкладку «Службы». Следует открыть именно вкладку
Службы, а неЛокальные службы, как это по ошибке делают многие пользователи. - Открывшийся список нужно пролистывать до тех пор, пока не будет найдена служба «Диспетчер печати». В старых версиях Windows, в том числе Windows XP, служба носит название «Диспетчер очереди печати».
- Открыть службу двойным кликом левой кнопки мыши.

- В открывшемся окне в пункте «Состояние» должен стоять выбор
Автоматически. Если это не так, следует поставить это значение. - Чуть ниже НЕ должна быть активной кнопка «Запустить». Могут работать «Отключить», «Приостановить» или «Продолжить». Если кнопка «Запустить» активна, ее нужно нажать для запуска службы, поскольку она отключена.
- После этого нужно нажать «Применить» и «Ок», чтобы сохранить все настройки.

После выполнения указанных действий окно с настройками можно закрывать. Служба должна быть включена, в общем списке служб состояние Диспетчера печати должно быть в статусе Выполняется. Тип запуска должен быть выставлен Автоматически.
Если проблема была только в службе, то после выполнения этих действий окно с сообщением «Локальная подсистема печати не выполняется» перестанет беспокоить. Если же была нарушена работа и других компонентов, то включенная служба отключится спустя несколько секунд, а ошибка продолжит появляться. Следует попробовать применить другие способы решения проблемы, а затем включить службу еще раз.
Подключение принтера через локальный порт
Иногда обойти ошибку невыполнения локальной подсистемы печати можно, добавив принтер вручную через настройки оборудования в Панели управления. Принтер может начать корректно отображаться и работать, а заодно появится время на поиск настоящей причины ошибки.
Для добавления устройства нужно прописать доступ к сетевому принтеру:
- Зайти в меню «Пуск», открыть «Панель управления».
- Перейти во вкладку «Устройства и принтеры».
- Нажать по кнопке «Установка принтера» в верхнем меню.
- Из появившихся вариантов меню «Выбор типа устанавливаемого принтера» нужно выбрать «Добавить локальный принтер».
- В следующем окне «Выберите порт принтера» нужно поставить точку на чекбокс
Создать новый порти выбратьТип порта—Local Port. - После нажатия кнопки «Далее» появится окошко «Введите имя порта», в которое нужно ввести путь к подключаемому устройству. Посмотреть путь к принтеру можно в проводнике — к примеру, это может быть \\user\HP Printer Model&
- В следующем окне «Установка драйвера принтера» нужно выбрать производителя устройства в левом столбце «Изготовитель» (например, Canon или Xerox) и модель конкретного принтера в правом столбце «Принтеры». Нажать «Далее».


После добавления устройства и указания драйверов таким способом, принтеры часто начинают исправно работать и перестают выдавать ошибку. Если в окне «Установка драйвера принтера» не оказалось драйверов для нужного устройства — это и есть причина проблемы. Загрузить драйвер можно с официального сайта изготовителя принтера, либо установить с диска, идущего в комплекте с устройством.
Очистка или замена папки spool
При появлении ошибки «Windows не удается подключиться к принтеру. Не существует обработчик печати» следует очистить компьютер от деятельности программы-планировщика spooler. Она сохраняет и сортирует файлы, отправленные на печать, организует очередь для печати для принтеров.
В папках и документах, относящихся к программе spool, может присутствовать большое количество лишних файлов. Многие документы могут оставаться от старых принтеров и не использоваться годами. Ошибка «Не существует обработчик текста» — не единственная проблема, вызванная spool. Документы могут просто не отправляться на печать, либо бесконечно отображаться в режиме «ожидание печати».
Описанный ниже способ подразумевает удаление файлов spooler’а, переустановку драйверов и очистку реестра. Эти действия приводит к необратимому драйверов и удалению устройств из памяти компьютера, и после перезагрузки ПК их придется устанавливать заново. Если этими действиями нет желания заниматься, либо нет необходимых навыков, можно попробовать использовать промежуточное решение: скопировать папку spool с другого компьютера, где проблема при печати не возникает. Также можно скопировать драйвера, если на компьютерах установлены совместимые версии Windows.
Очистка лишнего содержимого папки Spool:
- Сначала требуется перезагрузить компьютер в безопасном режиме. В противном случае очистить нужные папки не получится: они используются системой, при попытке удаления будет появляться сообщение «Отказано в доступе» или «Файл открыт или используется программой». Для запуска безопасного режима нужно несколько раз нажать клавишу F8 во время загрузки компьютера.
- После входа в аккаунт администратора в безопасном режиме нужно открыть проводник и перейти в папку по адресу
С:\Windows \System32 \Spool. - Найти папку по адресу
C:\Windows \System32 \spool \prtprocs \w32x86(или x64, в зависимости от разрядности системы) и удалить все ее содержимое. - Открыть папку
C:\Windows \System32 \Spool \Printersи очистить ее, чтобы удалить все известные Windows установленные принтеры. - Найти и очистить папку
C:\Windows \System32 \Spool \Drivers \w32x86(в системах с разрядностью x64 путь к папке будет Drivers\x64). Это действия удалить все драйвера, ранее используемые принтерами. - После очистки указанных папок требуется перезагрузить компьютер, чтобы изменения вступили в силу.
После перезагрузки системы нужно заново установить драйвера для всех используемых принтеров. Ошибка «Не существует обработчик печати» должна перестать беспокоить длительное время. Регулярное появление ошибки возможно на корпоративных серверах, использующих огромное количество различных принтеров и драйверов к ним. Это приводит к большому количеству файлов в очереди на печать и быстрому засорению системы и папок spooler’а лишними файлами. Регулярная очистка файлов позволит избежать появления ошибки, но лучше обратиться к квалифицированным системным администраторам для более качественной настройки системы.
Что делать, если ничего не помогает
В небольшом проценте случаев бывает, что все указанные способы решения не помогают избавиться от появления ошибки. Для этих случаев есть еще несколько советов и ссылок, которые могут помочь разобраться в ситуации самостоятельно и избежать обращения за помощью к специалистам или в сервис.
Что еще можно сделать:
- Проверить наличие на компьютере файла
spoolsv.exe. Его можно найти в строке поиска в меню «Пуск», либо в соответствующей папке в windows/system32. Просканировать файл на наличие вредоносного кода на сайте www.virustotal.com. - Заменить файл
spoolsv.exeили всю папкуspoolс другого компьютера с такой же версией Windows. Это часто помогает, когда ошибка появляется при попытке добавления нового принтера, в процессе установки драйверов. - Если появляется ошибка диспетчера очереди печати или локального обработчика печати, нужно убедиться в наличии файла
\Windows \System32 \spool \prtprocs \w32x86 \winprint.dll. Эта динамическая библиотека необходима для корректной работы диспетчера печати. - Если появляется ошибка «Локальная подсистема печати не выполняется. Перезапустите подсистему или перезагрузите компьютер», но при этом служба «Диспетчер очереди печати» работает нормально, можно попробовать перезагрузить (отключить/включить) службу. После переустановки драйверов и перезагрузки службы нужно перезагрузить компьютер.
- Попробовать воспользоваться советами от Microsoft, связанными с диагностикой и исправлением проблем с принтерами. Страница справки находится на сайте http://support.microsoft.com/mats/.
Если все действия не помогают, следует вернуться к идее отката системы к точке восстановления. Перед этим нужно сохранить все важные данные, которые изменялись с момента последнего момента архивации. После восстановления системы все равно следует диагностировать причину появления ошибки, чтобы вскоре с ней не пришлось столкнуться снова.
Several users with Windows 10 and usually after installing updates, cannot connect to a shared printer because of error «Windows cannot connect to the printer – Operation failed with error 0x00004005 or 0x0000011b».
The printer errors 0x00004005 & 0x0000011b with decryption «Operation Failed – Windows Cannot add/connect to Printer», occurs when you try to add a shared printer to Windows 10 that is shared on another computer running Windows 10 or Server 2016 or Server 2019. To fix the problem, follow the instructions below:

How to FIX Printer Error 0x00004005: Cannot Connect to Printer in Windows 10.
Method 1. Install KB5006738 to fix Printing Error 0x00004005.
Microsoft released update KB5007253 on November 22, 2021, which is supposed to fix printing issues that occurred after installing KB5006670, KB5007186, KB5008212 or KB5006738 updates. So, before you continue further…
1. Download and install the 2021-11 Cumulative Update Preview for Windows 10 (KB5007253) from the Microsoft Update Catalog.
2. After installation, reboot the computer and then check if the printing problem persists.
Method 2. Uninstall Recently Installed Updates.
If you cannot print to a shared printer, or if you cannot add/connect to a shared printer after the installation of Windows updates, proceed to uninstall them and see if that fixes the problem. To do that:
1. Go to Settings -> Update and Security.
2. Click View update history.

3. Click Uninstall updates.

4. Now under «Microsoft Windows» section, proceed and remove any recently installed updates or any of the following KB updates that can cause the printing problem.
- KB5008212
- KB5007186
- KB5006738
- KB5006670
- KB5005573
- KB5005565

5. Restart your PC.
6. After rebooting, try to print or to add the shared printer. If the problem is not solved, continue to next method, otherwise proceed and prevent the removed update(s) to be re-installed, by doing the following:
1. Download the Show or Hide updates tool «wushowhide.diagcab» tool from: https://www.majorgeeks.com/files/details/wushowhide.html
2. Run the tool, click Next and then select Hide updates.
3. Let the tool to find the available update and when this done, select the update you removed and click Next.
4. When the troubleshooting is complete close the troubleshooter and restart your PC


Method 3. Delete Print Spooler Jobs.
1. Press Windows ![]() + R keys to open the run command box.
+ R keys to open the run command box.
2. In the Search box, type: services.msc & click OK.

3. In Services panel, right-click on Print Spooler service and click Stop.

4. Without closing the Services window, open File Explorer and navigate to the following location on disk.
- C:\Windows\system32\spool\printers
5. Delete all files inside the PRINTERS folder and close Explorer.
6. Back in Services window, right-click on Print Spooler service and click Start.
7. Now try to print/connect again to the shared printer.
Method 4. FIX «0x00004005 Cannot Connect to Printer» error via Registry.
Another method to solve the error 0x00004005 when tryin to connect to shared printer, is to modify the RpcAuthnLevelPrivacyEnabled REG_DWORD value in registry on both PCs. To do that: *
* Important: You have to apply the below modification in Registry on both PCs.
1. Press Windows ![]() + R keys to open the run command box.
+ R keys to open the run command box.
2. Type regedit and press Enter.

3. In Registry Editor navigate to the following key:
- HKEY_LOCAL_MACHINE\SYSTEM\CurrentControlSet\Control\Print
4. Right-click at an empty space at the right pane and choose New > DWORD (32-bit) Value

5. Give at new value the name: RpcAuthnLevelPrivacyEnabled
6. Double-click at the RpcAuthnLevelPrivacyEnabled value, set the value data to 0 and click OK.

7. Close the registry editor.
8. Restart your computer.
9. Now try to connect to your network printer. The error 0x00004005 should be resolved.
Method 5. Add the Shared Printer using a Local Port.
Another way to bypass the error 0x00004005 when installing a network printer on Windows 10, is to manually add the printer by using a local port.
1. Navigate to Control Panel > Devices and Printers.
2. Click Add a printer. *
* Note: If the shared printer is already in the list, remove it before proceeding to re-add it.

3. At the next screen, click The printer that I want isn’t listed.

4. Select Add a local printer or network printer with manual settings and click Next.

5. Click Create a new port and select Local Port from the drop-down menu. Click Next.

6. At the screen specify the port name in one of the following formats and click OK:*
- \\ComputerName\SharedPrinterName
- \\ComputerIPAdress\SharedPrinterName
* Examples:
a. If the computer name of the computer that shares the network printer is «Computer01» and the printer’s share name is «HP1100» then the port name is «\\Computer01\HP1100»

b. If the IP Address of the computer that shares the network printer is «192.168.1.20» and the printer’s share name is «HP1100» then the port name is «\\192.168.1.20\HP1100»

7. At the next screen select the network printer model and click Next. *
* Note: If you cannot find the printer’s model here, then download the printer driver from the manufacturer and then install the printer locally on your PC (LPT1). After installation, perform again the steps on this method to manually install the printer by using the «Local Port» option.

8. When the printer installation is completed print a test page to test the printer and you’re done.
That’s all folks! Did it work for you?
Please leave a comment in the comment section below or even better: like and share this blog post in the social networks to help spread the word about this problem.
If this article was useful for you, please consider supporting us by making a donation. Even $1 can a make a huge difference for us.

Ошибка 0x00004005 может возникать при попытке добавить сетевой принтер, например, в локальную сеть. Версия ОС Windows не играет никакой роли. Как правило, появление ошибки 0x00004005 вызвано внезапной остановкой службы очереди печати (spooler) либо устаревшими драйверами для самого принтера. Тем не менее в некоторых отдельных случаях причина может крыться за неправильными сетевыми настройками.
Решение ошибки 0x00004005
Средство устранения неполадок
Прежде чем заниматься чем-то «серьезным», вам нужно опробовать в деле встроенное в Windows средство устранения неполадок. Подобное средство способно быстро и, что важнее всего, в автоматическом режиме выявить те или иные несоответствия в параметрах печати принтера, а после — устранить их, если это, конечно, возможно.
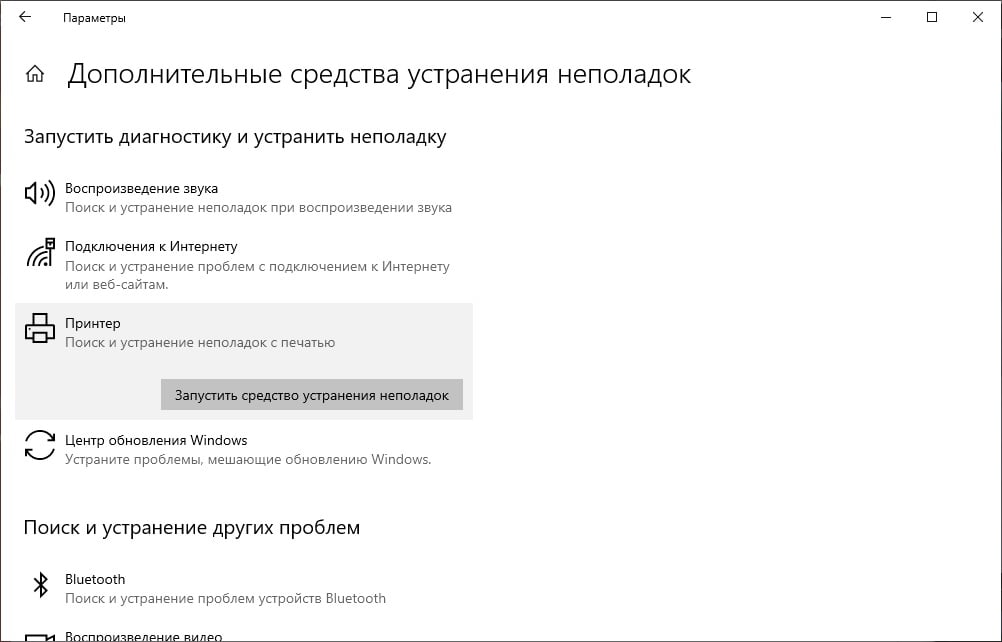
Чтобы запустить средство устранения неполадок с печатью на Windows 10, вам нужно сделать следующее:
- нажмите WIN+I для открытия системных параметров;
- перейдите в раздел «Обновление и безопасность», далее — в подразделы «Устранение неполадок»→«Дополнительные средства устранения неполадок»;
- выберите пункт «Принтер» и нажмите на кнопку для запуска средства;
- выполняйте все указания, которые видите перед собой.
Закончив работу со средством, перезагрузите свой ПК и проверьте наличие ошибки 0x00004005.
Обновление драйвера принтера
Абсолютно все устройства должны иметь в наличии актуальные драйвера. Устаревшие драйвера (либо и вовсе их полное отсутствие) может привести к ряду серьезных проблем, включая и нашу сегодняшнюю 0x00004005. ОС Windows должна автоматически подгружать из сети наиболее актуальные драйвера для устройств, но иногда этого не происходит. Чтобы обновить драйвер вручную:
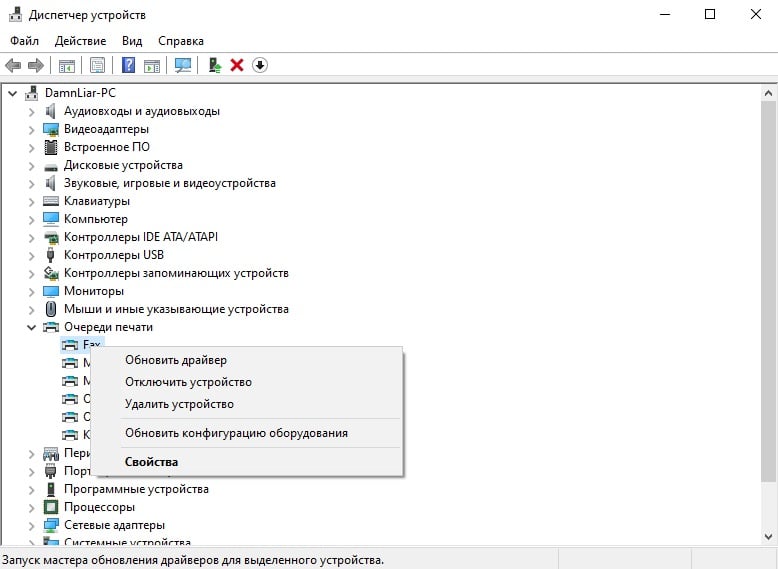
- нажмите ПКМ на меню Пуск и выберите «Диспетчер устройств»;
- раскройте раздел «Очереди печати» и найдите в списке устройств нужный вам принтер;
- нажмите на него ПКМ и выберите «Обновить драйвер»;
- далее нажмите на кнопку «Автоматический поиск драйверов».
Если драйвера вашего принтера действительно устарели, Windows найдет драйвера поновее и установит их в автоматическом режиме. Если же подобный метод не сработал в вашем случае, то рекомендуем установить подходящие драйвера вручную, воспользовавшись официальным сайтом производителя принтера.
Перезапуск «спулера»
Служба диспетчера печати (spooler) — один из важнейших системных компонентов Windows, без нормальной работы которого печать невозможна в принципе. Если данная служба начала работать с ошибками либо и вовсе перестала работать — жди беды. Чтобы перезапустить «spooler» и восстановить его нормальную работу:
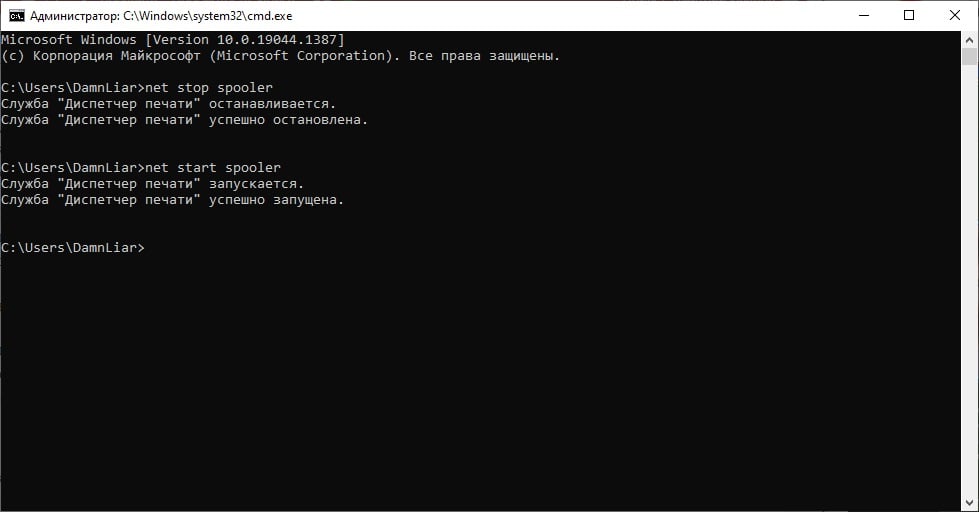
- нажмите на клавиатуре WIN+R для вызова окошка «Выполнить»;
- пропишите в пустой строке «cmd» и нажмите CTRL+SHIFT+ENTER (запуск Командной строке от имени администратора);
- вставьте в консоль «net stop spooler» и нажмите ENTER;
- теперь вставьте «net start spooler» и нажмите ENTER.
Чтобы вы долго не думали: первой командой мы приостановили работу службы диспетчера печати, второй — снова ее запустили. Завершив манипуляции в Командной строке, проверьте, были ли исправлена 0x00004005 или нет.
Отключение проверки подписи драйверов
Проблемы с принтером могут возникать из-за проверки цифр. подписи драйверов, которая в последних версиях Windows максимально ужесточена. Возможно, вашим принтером используется драйвер, у которого отсутствует «валидная» цифровая подпись, т.е. он не был утвержден Майкрософт. Проблема решается деактивацией этой самой проверки. Очевидный минус — повышенная уязвимость системы.
Чтобы отключить проверку цифровых подписей драйверов в Windows:
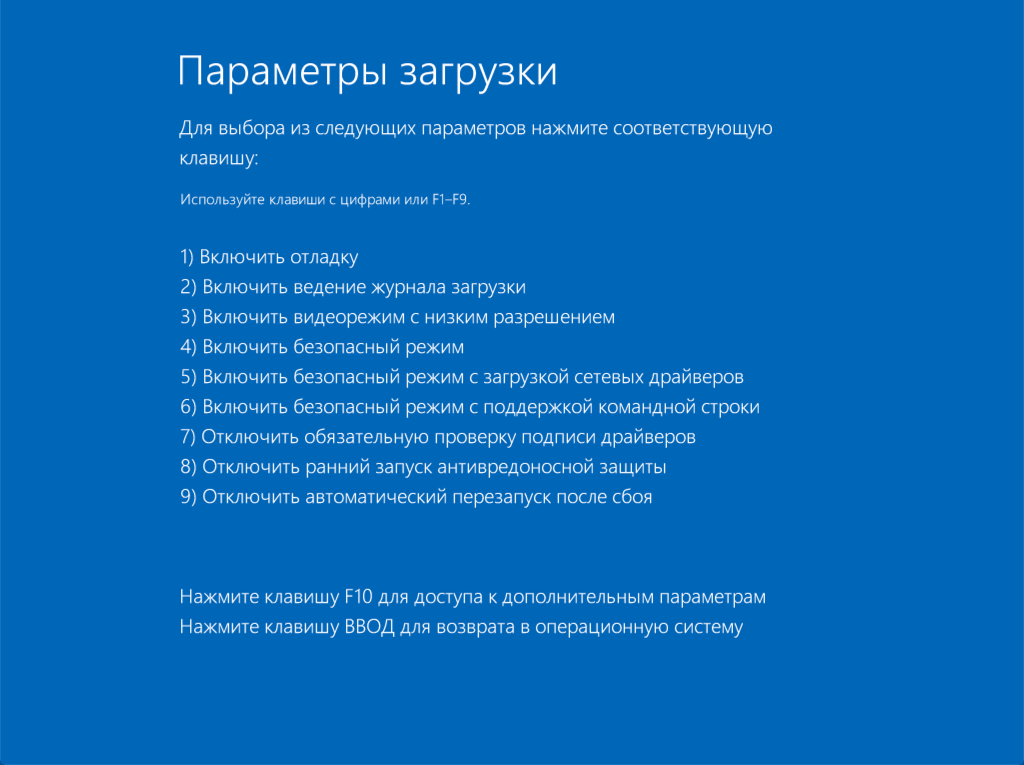
- нажмите WIN+I для открытия окошка «Параметры»;
- перейдите в раздел «Обновление и безопасность», далее — в подраздел «Восстановление»;
- кликните на кнопку «Перезагрузить сейчас» в разделе «Особые варианты загрузки»;
- выберите раздел «Диагностика», потом — подразделы «Дополнительные параметры» и «Параметры загрузки»;
- кликните «Перезагрузить» в правом нижнем углу, после чего нажмите на кнопку F7, чтобы загрузить ОС без обязательной проверки подписи драйверов.
Попробуйте добавить принтер, установить для него драйвер — проверьте наличие ошибки 0x00004005.
Удаление последнего накопительного обновления
К сожалению, накопительные обновления Майкрософт могут ломать некоторые функции ОС Windows, включая и печать. Никак не можете разобраться со своим принтером после установки свежего апдейта? Тогда попробуйте избавиться от последнего. Чтобы удалить последнее накопительное обновление в Windows 10:
- откройте окно «Параметры» и перейдите в раздел «Обновление и безопасность»;
- перейдите в подраздел «Центр обновления Windows» и кликните на пункт «Журнал обновлений»;
- кликните на кнопку «Удалить обновления», чтобы открыть список обновлений, установленных в вашей системе;
- найдите последнее накопительное обновление, выделите его и нажмите на «Удалить»;
- после удаления апдейта перезагрузите ПК.
Как только получите полный контроль над системой, проверьте наличие ошибки 0x00004005.