-
-
Xerox Phaser 6600 «Invalid Yellow» / «Неверный желтый»
kotya-potya в форуме Принтеры, МФУ, факсы, копиры формата A4
- 5
- 5928
3100

Пн ноя 18, 2019 8:24 pm
-
Xerox Phaser 6600 «Invalid Yellow» / «Неверный желтый»
-
-
Xerox WC 3119: «Замятие 1»
kokubenko в форуме Принтеры, МФУ, факсы, копиры формата A4
- 22
- 39999
kokubenko
Ср ноя 23, 2011 4:47 pm
-
Xerox WC 3119: «Замятие 1»
-
-
прошил xerox 3160b прошивкой FIX_b2580_1010079.fls не прошил
Володья в форуме Принтеры, МФУ, факсы, копиры формата A4
- 8
- 13148
Володья
Сб апр 30, 2011 8:05 am
-
прошил xerox 3160b прошивкой FIX_b2580_1010079.fls не прошил
-
-
Xerox 3428 «Установите Картридж»
Roller-ch в форуме Принтеры, МФУ, факсы, копиры формата A4
- 6
- 9733
SeMi
Сб авг 27, 2011 6:42 pm
-
Xerox 3428 «Установите Картридж»
-
-
Xerox WC 3119 без признаков «жизни»
MorZ в форуме Принтеры, МФУ, факсы, копиры формата A4
- 5
- 7060
Goldwater
Чт окт 08, 2020 11:34 pm
-
Xerox WC 3119 без признаков «жизни»
Вернуться в Принтеры, МФУ, копиры формата A3
Кто сейчас на форуме
Сейчас этот форум просматривают: нет зарегистрированных пользователей и гости: 14
![]()
WorkCentre 5021/5019
Service Documentation
WC 5021/5019 Service Documentation
702P00886
Initial Issue
08/2012
***Xerox Private Data***
All service documentation is supplied to Xerox external customers for informational purposes only. Xerox service documentation is intended for use by certified, product-trained service personnel only. Xerox does not warrant or represent that it will notify or provide to such customer any future change to this documentation. Customer performed service of equipment, or modules, components, or parts of such equipment may affect whether Xerox is responsible to fix machine defects under the warranty offered by Xerox with respect to such equipment. You should consult the applicable warranty for its terms regarding customer or third-party provided service.
If the customer services such equipment, modules, components or parts thereof, the customer releases Xerox from any and all liability for the customer actions, and the customer agrees to indemnify, defend and hold xerox harmless from any third party claims which arise directly or indirectly for such service.
While Xerox has tried to make the documentation accurate, Xerox will have no liability arising out of any inaccuracies or omissions. Changes are periodically made to this document. Changes, technical inaccuracies, and typographical errors will be corrected in subsequent editions.
Prepared by Creative and Technical Communications – North America
800 Phillips Road, Building 218-01A
Webster, New York 14580
ISO9001 and ISO27001 Certified
©2012 by Xerox Corporation. All rights reserved.
XEROX® and XEROX and design® are trademarks of Xerox Corporation in the US and/or other countries.
Changes are periodically made to this document. Changes, technical inaccuracies, and typographic errors will be corrected in subsequent editions.
CAUTION
This equipment generates, uses and can radiate radio frequency energy, and if not installed and used in accordance with the instructions documentation, may cause interference to radio communications. It has been tested and found to comply with the limits for a Class A computing device pursuant to subpart B of part 15 of FCC rules, which are designed to provide reasonable protection against such interference when operated in a commercial environment. Operation of this equipment in a residential area is likely to cause interference in which case the user, at his own expense, will be required to correct the interference.
|
Initial Issue |
08/2012 |
Front Matter |
|
WorkCentre 5021/5019 |
0-1 |

0 Introduction
|
0.1 |
Getting to know this Service Manual……………………………………………………………… |
0-3 |
|
0.2 |
How to use the Service Manual ……………………………………………………………………. |
0-3 |
|
0.3 |
Description for Terminology And Symbols ……………………………………………………… |
0-4 |
|
Initial Issue |
08/2012 |
Introduction |
|
WorkCentre 5021/5019 |
0-1 |

|
0.1 Getting to know this Service Manual |
0.2 How to use the Service Manual |
This manual is used as the standard service manual for WorkCentre 5021/ 5019.
This manual describes the standard procedures for the servicing this product. Refer to Chapter 1 Service Call Procedure for efficient and effective servicing during maintenance calls.
For more information on the options, refer to the options manual.
2.1 Contents of Manual
This manual is divided into 10 chapters as described below.
•Chapter 1 Service Call Procedure
This chapter describes the general work and servicing procedures for the maintenance of this product.
•Chapter 2 Troubleshooting
This chapter describes the troubleshooting procedures other than image quality troubleshooting for this product.
•Chapter 3 Image Quality Troubleshooting
This chapter describes the image quality troubleshooting procedures for this product.
•Chapter 4 Disassembly/Assembly and Adjustment
This chapter describes the disassembly, assembly, adjustment and replacement procedures for components of this product.
•Chapter 5 Parts List
This chapter contains the spare parts information for this product.
•Chapter 6 General
This chapter contains the following information.
6.1Specifications
6.2Tools/Service Consumables/Consumables
6.3Service Data
6.4Service Mode
6.6KO PROGRAM# LIST
•Chapter 7 Wiring Data
This chapter contains the information about the Wiring Connector List/Locations, the Wiring Data, and the BSD for this machine.
•Chapter 8 Accessories (not yet issued)
•Chapter 9 Installation/Removal
This chapter contains the installation and removal procedures for this product and the options that are specific to it.
•Chapter 10 Mechanism & Functions Overview (not yet issued)
Initial Issue
WorkCentre 5021/5019
2.2 Information on Updating
This manual will be sent to each Service Center as specified below. Revisions must be incorporated correctly to keep the manual up-to-date.
Updating Procedure:
•When the manual is updated, the issue number ‘Ver. 1’ will be changed to Ver. 1.1, Ver. 1.2, and so on.
|
08/2012 |
Introduction |
|
|
0.1, 0.2 |
||
|
0-3 |

0.3 Description for Terminology And Symbols
The terms and symbols used throughout this manual are explained here.
•The terms and symbols used at the beginning of a text are defined as follows:
DANGER
Indicates an imminently hazardous situation, such as death or serious injury if operators do not handle the machine correctly by disregarding the statement.
WARNING
Indicates a potentially hazardous situation, such as death or serious injury if operators do not handle the machine correctly by disregarding the statement.
CAUTION
Purpose
Used to describe the purposes of Adjustment and Troubleshooting.
REP: Indicates the disassembly/assembly procedure for reference.
ADJ: Indicates the adjustment procedure for reference.
PL: Indicates the parts list for reference.
Terminology
Indicates a potentially hazardous situation, such as injury or property damage if operators do not handle the machine correctly by disregarding the statement.
Instruction: Used to alert you to a procedure which, if not strictly observed, could result in damage to the machine or equipment.
|
Table 1 Terminology |
|
|
Terminology |
Description |
|
Assy |
Means Assembly. |
|
TEC Value |
Abbreviation of Typical Electricity Consumption, which means the standard |
|
power consumption. Read as ‘tec’. |
|
|
Introduction |
08/2012 |
Initial Issue |
|
0.2, 0.3 |
||
|
0-4 |
WorkCentre 5021/5019 |

1 Service Call Procedures
|
1.1 |
Before Starting the Servicing ……………………………………………………………………….. |
1-3 |
|
1.2 |
Service Call Procedure ……………………………………………………………………………….. |
1-5 |
|
1.3 |
Detailed Contents of the Service Call ……………………………………………………………. |
1-6 |
|
1.4 |
TRIM Check List…………………………………………………………………………………………. |
1-7 |
|
1.5 |
Periodic Replacement Parts/Consumables List ………………………………………………. |
1-7 |
|
Initial Issue |
08/2012 |
Service Call Procedures |
|
WorkCentre 5021/5019 |
1-1 |

1.1 Before Starting the Servicing
1.1.1 Safety
To prevent any accident that may occur during a maintenance service, any warning or any caution regarding the servicing must be strictly observed. Do not perform any hazardous operation.
1.Power Supply
To prevent electrical shocks, burns, or injury, etc., be sure to switch OFF the machine and disconnect the plug before starting the maintenance service. If the machine has to be switched ON, such as when measuring the voltage, take extra care not to get an electrical shock.
2.Drive Area
Never inspect, clear or lubricate the drive area such as chain belts, chain wheel or gears during the machine operation.
3.Heavy Parts
Position your hip lower when removing or installing heavy parts.
4.Safety Device
See that safety devices for preventing mechanical accidents, such as fuses, circuit breakers, interlock switches, etc., and those for protecting customers from injury, such as panels and covers, function properly. Modifications that hinder the function of any safety devices are strictly prohibited.
5.Installing and Removing Parts
The edge of parts and covers may be sharp, take care not to touch them. Be careful not to touch those parts, and wipe off any oil that may have adhered to your fingers or hands before servicing. When removing parts, cables, and etc. do not pull them out by force but remove them slowly.
6.Specified Tools
Follow the instruction when a tool is specified.
7.Cleaning the Toner and Developer
As the toner can be explosive, sweep or brush the spilled toner into a container for collecting the sweepings.
Clean away the remaining toner with a damp cloth or use a standard vacuum cleaner that is toner-tolerant. Never use the customer’s vacuum cleaner.’
Do the same when cleaning the Developer because it also contains some toner.
8.Organic Solvents
When using an organic solvent such as the Drum Cleaner or Machine Cleaner, pay attention to the following:
•Ensure good ventilation in the room to prevent too much inhalation of solvent fumes.
•Do not use heated solvent.
•Keep it away from fire.
•Wash your hands thoroughly after use.
9.Harmful Laser
The customer or service personnel would not be exposed to any harmful laser during the usual copying or scanning of documents. However, if a customer finds that the lamp that is used for exposing documents is too bright when performing platen copy or scan, it is possible to block the light from the platen glass by covering the portion of the platen document area that is usually not used for copying or scanning documents.
|
Initial Issue |
08/2012 |
Service Call Procedure |
|
1.1 |
||
|
WorkCentre 5021/5019 |
1-3 |

1.1.2 Things to Take Note When Handling Customer Information
1.Handling of customer’s electronic information — samples of copy/print (paper data), log files (Activity Report), and etc.
Before you bring back any samples for the purpose of investigation/analysis, always obtain permission from the customer. Make sure to assure them that the data will not be used for any other purpose.
2.Handling of a PWB, etc. that contains customer information.
Data such as Fax Address Numbers and URLs that are registered in the customer’s machine are all important customer information. These types of information are stored in the PWB, etc. within the machine. Take extra care when handling them.
(1)In case of replacements, transfer the data to the new PWB and make sure that all data in the old parts is thoroughly erased before disposing it. Make sure that no important customer information gets leaked. (For details, refer to the preface in Chapters 4 and 5)
(2)If a component was replaced and it was not found to be the cause of the malfunction, return it to the machine it came from. (For components that were temporarily installed/removed for troubleshooting, etc. clear the data using the CE Mode, etc.)
1.1.3 Other Precautions
Pay attention to the following when performing maintenance service to avoid wrong or redundant servicing:
1.Reference Materials
Before performing maintenance servicing, read all relevant technical materials to make a systematic approach.
2.Disassembling
Make sure to check the assembled condition before removing parts or disassembling the machine.
3.Installation/Adjustment
After the installation or adjustment is complete, check that no parts or tools are left inside or on the assemblies before using the machine.
4.Handling of replaced parts/consumables
Make sure that the replaced parts or consumables as well as their packaging materials are collected back to the Service Center.
For the separation and processing methods for the collected items, refer to the Common Technical Information No. 2-027 for all machines.
• Drum Cleaner
WARNING
Never discard the Drum Cleaner into a fire. Always keep it away from open flames to prevent it from catching and causing a fire. Always dispose of the Drum Cleaner after it is completely used up. For recyclable parts, fill the necessary items in the [U-TAG] and perform collection.
5.General Precautions
•Take care not to disturb the customer’s daily work.
•Place a drop cloth or paper on the floor of the service area to keep the site clean.
•Throw any trash generated during the maintenance service into a trash bag and bring them back to the Service Center.
•Record clearly the service details and the consumables and parts replaced at visit in the Machine Service Log.
|
Service Call Procedure |
08/2012 |
Initial Issue |
|
1.1, 1.2 |
||
|
1-4 |
WorkCentre 5021/5019 |

1.2 Service Call Procedure
1.2.1 Initial Actions
1.Ask the operator(s) about the machine condition.
2.Record the billing meter readings.
3.Inspect any error copies, then check the machine.
4.Check the Service Log.
1.2.2 When UM is requested, perform the following:
1.Check the problem status by performing the Level 1 Troubleshooting in [Chapter 2 Troubleshooting].
2.Perform the applicable Level 2 Troubleshooting FIP in [Chapter 2 Troubleshooting].
3.If there are no applicable items, troubleshoot by referring to [Chapter 7 BSD].
4.Check the copy quality.
Make several sheets of copies using the Test Chart (499T 00247), then check the quality of the copies for problems.
5.Output the following [Error History Report] and check the [System Fail History] and [Paper Jam History] in order to understand the machine status.
(1)Enter the System Administrator Mode.
i.Press the [Log In / Out] button and hold it down for 4 s or longer until the following screen is displayed.
Figure 1 j0lj41896
ii.Use the keypad to enter the Passcode [11111]*1 (5 ‘1’ digits) and press the [Start] button.
NOTE: *1: Default Value
iii.The Program Number input screen is displayed.
Figure 2 j0lj41897
(2)Load any one of A4 SEF, A4 LEF, Letter SEF, or Letter LEF into the Tray.
(3)Enter ‘202’ at the Program Number and press the [Start] button.
(4)Enter ‘4’ for [Error History Report] and press the [Start] button.
(5)Once printing has completed, press the [Log In / Out] button to exit from the System Administrator Mode.
NOTE: When replacing parts that will incur cost to the customer, obtain the customer’s agreement before performing the replacement.
6.Repair all the secondary problems.
7.Perform TRIM Service.
1.2.3 When SM is requested, perform the following:
1.Check the copy quality.
Make several sheets of copies using the Test Chart (499T 00247), then check the quality of the copies for problems.
2.Output the [Error History Report] and check the [System Fail History] and [Paper Jam History] in order to understand the machine status.
•For how to output the [Error History Report], refer to [1.2.2 When UM is requested, perform the following:].
NOTE: When replacing parts that will incur cost to the customer, obtain the customer’s agreement before performing the replacement.
3.Perform TRIM Service.
1.2.4 Final Actions
1.Check overall operation/features.
2.Check the machine exterior and consumables.
3.Train the operator as required.
4.Complete the Service Log and Service Report.
|
Initial Issue |
08/2012 |
Service Call Procedure |
|
1.2 |
||
|
WorkCentre 5021/5019 |
1-5 |

5.Keep the copy samples with the Service Log.
1.3 Detailed Contents of the Service Call
1.3.1 Initial Actions
1. Ask the operator(s) about the machine condition.
• How often and where do paper jams have been occurring recently
• How is the copy quality
2. Record the copy meter readings.
3. Inspect any error copies, then check the machine.
4. Check the print samples from previous service calls and the Service Log.
1.3.2 Checking Reproducibility of Problem
1. Check the problem status by performing the Level 1 Troubleshooting in [Chapter 2 Troubleshooting].
2. Perform the applicable Level 2 Troubleshooting FIP in [Chapter 2 Troubleshooting].
3. If there are no applicable items, troubleshoot by referring to [Chapter 7 BSD].
1.3.3 Checking Copy Quality
1. Make several sheets of copies using the Test Chart (499T 00247), then check the quality of the copies.
1.3.4 TRIM Servicing
Perform TRIM servicing during a service call to maintain the machine performance.
1. Follow the TRIM Check List to perform the required TRIM items.
2. Check for parts that require periodical cleaning/replacement (consumables, parts) by referring to the TRIM Chec List, the Periodic Replacement Parts/Consumables List, and the Maintenance Report, and clean them if necessary. After a replacement, make sure that you enter the CE Mode and use [HFSI Read / Clear] to clear the applicable counter(s).
|
Service Call Procedure |
08/2012 |
Initial Issue |
|
1.3, 1.4 |
||
|
1-6 |
WorkCentre 5021/5019 |

1.4TRIM Check List
C:Perform checking. Clean, replace, or feed if necessary.
O:Always perform cleaning and checking.
*: Always perform replacement service at the specified interval.
|
Table 1 |
||||
|
Every |
||||
|
No. |
Servicing Items |
time |
Service Details |
|
|
1.1 |
Pre-servicing Check |
C |
• |
Activate the machine and check that abnormal |
|
(Check the machine |
noise is not heard. |
|||
|
operation sound) |
||||
|
1.2 |
Pre-servicing Check |
C |
• |
Make several sheets of copies using the Test |
|
(Copy and print the |
Chart (499T 00247), then check the quality of |
|||
|
Test Chart) |
the copies. |
|||
|
2 |
Clean the interior of the |
C |
• |
Clean any paper dust and toner residue in the |
|
machine |
paper path and on the jam sensor. |
|||
|
(Clean the paper trans- |
• |
Especially, clean the operation section of the |
||
|
port system) |
operator carefully. |
|||
|
3 |
Cleaning the IIT |
C |
• |
Clean the Platen Glass surface and the Platen |
|
Cushion with the optical cleaning cloth. |
||||
|
• |
Clean the Reflector, back of the Platen Glass, |
|||
|
mirrors and lens with the optical cleaning cloth. |
||||
|
4 |
Clean the DADF |
C |
• |
Clean the Feed Roll, Nudger Roll, and Retard |
|
Roll with a cloth that has been wrung dry. |
||||
|
• |
Clean the DADF Platen Glass with the optical |
|||
|
cleaning cloth. |
||||
|
5 |
Safety Check |
O |
• |
Make sure that the power plug is plugged in |
|
properly. |
||||
|
• |
Make sure that the power cords are not |
|||
|
cracked and no wires are exposed. |
||||
|
• |
Make sure that no extension cord with insuffi- |
|||
|
cient length or power cord outside the specifi- |
||||
|
cation, such as an off-the-shelf power strip, is |
||||
|
being used. |
||||
|
• |
Make sure that a single socket does not have |
|||
|
multiple power plugs plugged into it. |
||||
|
6.1 |
Post-servicing check |
C |
• |
Make several sheets of copies using the Test |
|
(Copy Quality Check) |
Chart (499T 00247), then check if the quality |
|||
|
satisfies the specification. |
||||
|
6.2 |
Post-servicing check |
C |
• |
Check the paper feed and abnormal noise. |
|
(Check the machine |
||||
|
operation) |
||||
|
6.3 |
Post-servicing check |
C |
• |
Create the Service Log and Service Report. |
|
(Check the meter) |
||||
1.5 Periodic Replacement Parts/Consumables List
When servicing, check the number of copies and number of fed sheets for the consumables and parts that require periodical cleaning/replacement. Clean or replace them if necessary. The history can be checked by printing the Maintenance Report or by checking the approriate counter in [HFSI Read / Clear] in CE Mode (6.4.2.9 HFSI Read / Clear).
For the items that cannot be checked in CE Mode, clean or replace them according to the replacement intervals (standard PV).
CAUTION
Do not place the imaging materials, such as the Toner and the Drum, in the car for a long time.
NOTE: Clean the Platen Glass with a Platen Wax Cleaner 499D 00194 (194D) every 10K Feeds.
Table 1
|
HFSI |
||||
|
Parts/Consumables |
[Chain- |
Replacement |
||
|
No |
Name/PL No. |
Link] |
Interval |
Check the counter |
|
1 |
Tray 1 Feed No. |
950-803 |
50,000PV |
1 Feed = 1 Count Up. |
|
Tray 1 Feed Roll / Retard |
Replace both at the same |
|||
|
Pad |
time. |
|||
|
(PL 9.2) |
||||
|
2 |
Tray 2 Feed No. |
950-804 |
300,000PV |
1 Feed = 1 Count Up. |
|
Tray 2 Feed Roll/Nudger |
Replace all 3 at the same |
|||
|
Roll/Retard Roll |
time. |
|||
|
(PL 10.3) |
||||
|
3 |
MSI Feed Count |
950-802 |
50,000PV |
1 Feed = 1 Count Up. |
|
MSI Feed Roll/MSI Nudger |
Replace all 3 at the same |
|||
|
Roll/MSI Retard Pad |
time. |
|||
|
(PL 13.3) |
||||
|
4 |
Fusing Unit |
950-801 |
175,000PV |
1 pass through the Fusing Unit |
|
(PL 7.1) |
Exit Sensor = 1 Count Up. |
|||
|
5 |
BTR Unit |
950-800 |
100,000PV |
1 pass through the Fusing Unit |
|
(PL 6.1) |
Exit Sensor = 1 Count Up. |
|||
|
6 |
Document Feed No. |
955-806 |
200,000PV |
Replace the Feed Roll, |
|
DADF Feed Roll/Nudger |
Nudger Roll, and Retard Pad |
|||
|
Roll |
at the same time. |
|||
|
(PL 56.5) |
NOTE: Clean the Platen Glass |
|||
|
DADF Retard Pad |
||||
|
with a Platen Wax Cleaner |
||||
|
(PL 56.13) |
||||
|
499D 00914 (194D) every 10K |
||||
|
Feeds. |
||||
|
7 |
Toner Cartridge |
— |
9,000PV |
|
|
(PL 8.1) |
||||
|
8 |
Drum Cartridge *1 |
950-807 |
343k cycle |
<Refer- |
|
(PL 8.1) |
ence>75KPV*1@18PPM / |
|||
|
80KPV*1@20PPM |
||||
|
Initial Issue |
08/2012 |
Service Call Procedure |
|
1.5 |
||
|
WorkCentre 5021/5019 |
1-7 |
![]()
*1: The maximum number of prints is a reference value under the condition of A4 LEF and simplex printing. Some specific conditions such as paper size, number of copies for a print job, etc. might cause a serious deterioration of image quality before the time to replace the drum cartridge comes.
|
Service Call Procedure |
08/2012 |
Initial Issue |
|
1.5 |
||
|
1-8 |
WorkCentre 5021/5019 |

2 Status Indicator RAPs
|
2.1 Introduction |
010-327 |
Fusing Unit On Time Fail ……………………………………………………………………… |
2-17 |
||
|
2.1.1 |
How to Troubleshoot ………………………………………………………………………………… |
2-3 |
010-379 |
Fusing Unit Hot Not Ready Return Time Fail…………………………………………… |
2-18 |
|
2.1.2 How to Switch the Error Code Display ………………………………………………………… |
2-3 |
010-392 |
NOHAD Fan Defect……………………………………………………………………………… |
2-18 |
|
|
2.1.3 |
Glossary …………………………………………………………………………………………………. |
2-4 |
010-602 |
Over Temp Cooling Mode …………………………………………………………………….. |
2-18 |
2.2 Product FIP
2.2.1 Level 1 FIP
|
2.2.1.1 Level 1 FIP …………………………………………………………………………………………… |
2-7 |
|
|
2.2.2 Level 2 FIP |
||
|
CHAIN 3 |
||
|
003-500/795 N-Up NG Out Of Range/ AMS NG Out Of Range………………………………. |
2-9 |
|
|
003-754 IPS Overrun ……………………………………………………………………………………….. |
2-9 |
|
|
003-942 Not-Supported Doc Size ………………………………………………………………………. |
2-9 |
|
|
003-951 1Job Max Page Over …………………………………………………………………………… |
2-9 |
|
|
003-963 APS NG Out Of Range ………………………………………………………………………… |
2-9 |
|
|
003-972 EPC Memory Full………………………………………………………………………………… |
2-9 |
|
|
003-973 Auto Rotation NG Out Of Range……………………………………………………………. |
2-9 |
|
|
CHAIN 4 |
||
|
004-345 HVPS Communication Error …………………………………………………………………. |
2-11 |
|
|
CHAIN 5 |
||
|
005-122 DADF Simplex/Side 1 Pre Regi Sensor On Jam ……………………………………… |
2-13 |
|
|
005-123 DADF Simplex/Side 1 Regi Sensor On Jam……………………………………………. |
2-13 |
|
|
005-125/145 DADF Regi Sensor Off Jam/ DADF Regi Sensor Off Jam on Inverting…. |
2-13 |
|
|
005-131/132 DADF Invert Sensor On Jam on Inverting/ DADF Invert Sensor On Jam. |
2-13 |
|
|
005-134/139 DADF Invert Sensor Off Jam on Inverting/ DADF Invert Sensor Off Jam. |
2-14 |
|
|
005-135 DADF Side 2 Pre Regi Sensor On Jam ………………………………………………….. |
2-14 |
|
|
005-136 DADF Side 2 Regi Sensor On Jam………………………………………………………… |
2-14 |
|
|
005-147 DADF Pre Regi Sensor Off Jam on Inverting ………………………………………….. |
2-15 |
|
|
005-196 Size Mismatch Jam on No Mix-Size ………………………………………………………. |
2-15 |
|
|
005-197 Prohibit Combine Size Jam…………………………………………………………………… |
2-15 |
|
|
005-198/199 Too Short Size Jam/ Too Long Size Jam …………………………………………. |
2-15 |
|
|
005-210 DADF Download Fail …………………………………………………………………………… |
2-15 |
|
|
005-275/280 DADF RAM Fail/ DADF EEPROM Fail …………………………………………….. |
2-15 |
|
|
005-305 DADF Feeder Cover Interlock Open………………………………………………………. |
2-16 |
|
|
005-500 DADF Download Flash Write Error ………………………………………………………… |
2-16 |
|
|
005-907/908/913 DADF Pre Regi Sensor/DADF Regi Sensor/DADF Invert Sensor Static Jam |
||
|
2-16 |
||
|
005-940 |
DADF No Original Fail …………………………………………………………………………. |
2-16 |
|
005-948 SS-Size Mismatch Jam on No Mix-size ………………………………………………….. |
2-16 |
|
|
CHAIN 10 |
||
|
010-311 |
Fusing Unit Center Thermistor Defect ……………………………………………………. |
2-17 |
|
010-312 |
Fusing Unit Rear Thermistor Defect ………………………………………………………. |
2-17 |
|
010-320 |
Over Heat Temperature Fail …………………………………………………………………. |
2-17 |
CHAIN 16
|
016-500 |
Controller Download Flash Write Error …………………………………………………… |
2-19 |
|
|
016-501 |
Controller Boot Flash Write Error …………………………………………………………… |
2-19 |
|
|
016-502 |
UI Panel Download Flash Write Error …………………………………………………….. |
2-19 |
|
|
016-570 No Response from USB-Host for Scan Job …………………………………………….. |
2-19 |
||
|
016-571 No Response from USB-Host for Print Job……………………………………………… |
2-19 |
||
|
016-742/744 |
Download File Error/ Download File Check Sum Error ……………………….. |
2-19 |
|
|
016-749/799 |
HBPL or XPJL Syntax Error/ Print Instruction Fail ……………………………… |
2-20 |
|
|
016-759 |
Copy Counter Full ……………………………………………………………………………….. |
2-20 |
|
|
016-776 |
Marker Code Detection Fail ………………………………………………………………….. |
2-20 |
CHAIN 23
|
023-600 Held Down key Error (UI Panel)…………………………………………………………….. |
2-21 |
CHAIN 24
|
024-910/911/915 |
Tray 1/Tray 2/MSI Paper Length Mismatch ………………………………… |
2-23 |
|
024-950/951/954 Tray 1/Tray 2/MSI No Paper …………………………………………………….. |
2-23 |
|
|
024-958/959/960 |
MSI/Tray 1/Tray 2 Paper Size Mismatch ……………………………………. |
2-23 |
|
024-965 APS NG Unselected…………………………………………………………………………….. |
2-23 |
CHAIN 41
|
041-210/211 STM NVM Out-Of-Order/ STM NVM R/W Error…………………………………. |
2-25 |
CHAIN 42
|
042-325/614 Main Motor Rotation Error/ Main Motor Rotation Warning …………………… |
2-27 |
CHAIN 45
|
045-310 |
Image Ready Error………………………………………………………………………………. |
2-29 |
|
045-313 |
IOT Logic Fail……………………………………………………………………………………… |
2-29 |
CHAIN 61
|
061-321 |
ROS Motor Fail …………………………………………………………………………………… |
2-31 |
|
061-325 |
No SOS Fail ……………………………………………………………………………………….. |
2-31 |
CHAIN 62
|
062-277 DADF Communication Fail……………………………………………………………………. |
2-33 |
|
|
062-311 |
IIT Software Logic Fail …………………………………………………………………………. |
2-33 |
|
062-360 |
Carriage Position Fail…………………………………………………………………………… |
2-33 |
|
062-371/380 Lamp Illumination Fail/ AGC Fail……………………………………………………… |
2-33 |
|
|
062-386 AOC Fail…………………………………………………………………………………………….. |
2-34 |
|
|
062-389 |
Carriage Over Run Fail (Scan End Side) ………………………………………………… |
2-34 |
|
062-396 |
CCD Cable Connection Fail ………………………………………………………………….. |
2-34 |
CHAIN 71
|
071-105 Regi Sensor On Jam (Tray 1) ……………………………………………………………….. |
2-35 |
|
Initial Issue |
08/2012 |
Status Indicator RAPs |
|
WorkCentre 5021/5019 |
2-1 |

CHAIN 72
|
072-102 Feed Out Sensor 2 On Jam ………………………………………………………………….. |
2-37 |
||
|
072-105 |
Regi Sensor On Jam (Tray 2) ……………………………………………………………….. |
2-37 |
|
|
072-210 |
Tray 2 |
Lift Up Fail………………………………………………………………………………… |
2-37 |
|
072-212 |
Tray 2 |
Size Sensor Broken …………………………………………………………………… |
2-37 |
|
072-215 |
MCU-STM Communication Fail …………………………………………………………….. |
2-37 |
CHAIN 75
|
075-135 Regi Sensor On Jam (MSI)…………………………………………………………………… |
2-39 |
CHAIN 77
|
077-101 Regi Sensor Off Jam……………………………………………………………………………. |
2-41 |
|
|
077-103 |
Fusing Unit Exit Sensor Off Jam (Long) …………………………………………………. |
2-41 |
|
077-104 |
Fusing Unit Exit Sensor Off Jam (Short)…………………………………………………. |
2-41 |
|
077-106 Fusing Unit Exit Sensor On Jam……………………………………………………………. |
2-41 |
|
|
077-129 |
Regi Sensor On Jam (Duplex Wait)……………………………………………………….. |
2-42 |
|
077-212 |
Tray Module Reset Fail………………………………………………………………………… |
2-42 |
|
077-300/301/305 Front Cover/Left Hand Cover/STM Cover Open………………………….. |
2-42 |
|
|
077-900/901/904 Regi Sensor/Fusing Unit Exit Sensor/Feed Out Sensor 2 Static Jam |
2-42 |
CHAIN 91
|
091-313 CRUM ASIC Communication Fail ………………………………………………………….. |
2-43 |
||
|
091-401/402 |
Drum Cartridge Quality Life Over/ Drum Cartridge Life Over ………………. |
2-43 |
|
|
091-406/424 |
Drum Cartridge Normal Life Over/ Drum Cartridge Abnormal Life Over… |
2-43 |
|
|
091-430 |
Drum Cartridge Life End ………………………………………………………………………. |
2-43 |
|
|
091-440 |
Drum Cartridge Pre Near End……………………………………………………………….. |
2-43 |
|
|
091-441 |
Drum Cartridge Near End …………………………………………………………………….. |
2-44 |
|
|
091-914 |
Drum CRUM Communication Fail………………………………………………………….. |
2-44 |
|
|
091-915/916 Drum CRUM ID Error/ Drum CRUM Market Identity Mismatch ……………. |
2-44 |
|
117-326 Controller Backup NVM Data Defect………………………………………………………. |
2-53 |
CHAIN 123
|
123-314 UI Panel Communication Fail………………………………………………………………… |
2-55 |
2.2.3 Other Failure FIP
|
2.2.3.1 AC Power FIP……………………………………………………………………………………….. |
2-57 |
|
|
2.2.3.2 |
+5VDC Power FIP…………………………………………………………………………………. |
2-57 |
|
2.2.3.3 |
+24VDC Power FIP……………………………………………………………………………….. |
2-58 |
2.2.4 Generic FIP
|
2.2.4.1 |
Reflective Sensor Failure FIP………………………………………………………………….. |
2-59 |
|
2.2.4.2 |
Permeable Sensor Failure FIP ………………………………………………………………… |
2-59 |
|
2.2.4.3 |
Switch (Normal/Open) Failure FIP …………………………………………………………… |
2-60 |
|
2.2.4.4 |
Solenoid/Clutch Not Energized Failure FIP……………………………………………….. |
2-60 |
|
2.2.4.5 |
Solenoid/Clutch Left Energized Failure FIP ………………………………………………. |
2-61 |
|
2.2.4.6 |
Motor Does Not Rotate Failure FIP ………………………………………………………….. |
2-61 |
|
2.2.4.7 |
Motor Left Running Failure FIP ……………………………………………………………….. |
2-62 |
|
2.2.4.8 NIP/RELEASE SOLENOID Not Energized Failure FIP……………………………….. |
2-62 |
2.3 NET System Fault Check
|
2.3.1 |
No output is available, no data is printed …………………………………………………….. |
2-65 |
|
2.3.2 |
Printing can be performed but abnormally …………………………………………………… |
2-65 |
CHAIN 92
|
092-660/668 ATC Amplitude Fail/ ATC Average Fail…………………………………………….. |
2-45 |
|
|
092-661 |
Temperature Sensor Fail ……………………………………………………………………… |
2-45 |
|
092-910 |
ATC Sensor Fail………………………………………………………………………………….. |
2-45 |
CHAIN 93
|
093-312 |
Toner Dispense Motor Rotation Fail ………………………………………………………. |
2-47 |
|
093-400 Toner Near Empty……………………………………………………………………………….. |
2-47 |
|
|
093-406 Toner Pre Near Empty …………………………………………………………………………. |
2-47 |
|
|
093-912 |
Toner Empty ………………………………………………………………………………………. |
2-47 |
|
093-956 |
Drum New CRU Installation Fail ……………………………………………………………. |
2-47 |
|
093-959 |
Drum New CRU Installation Fail Exceeds Thresholding Times………………….. |
2-47 |
CHAIN 95
|
095-910 No Drum Cartridge………………………………………………………………………………. |
2-49 |
CHAIN 116
|
116-321 |
Controller Logic Fail …………………………………………………………………………….. |
2-51 |
|
116-323 |
Controller NVM Data Defect …………………………………………………………………. |
2-51 |
|
116-334 NVM Data Mismatch ……………………………………………………………………………. |
2-51 |
|
|
116-377 |
IIT Interrupt Time out …………………………………………………………………………… |
2-51 |
|
116-747 |
Invalid Page Margin …………………………………………………………………………….. |
2-51 |
CHAIN 117
|
Status Indicator RAPs |
08/2012 |
Initial Issue |
|
2-2 |
WorkCentre 5021/5019 |

2.1.1 How to Troubleshoot
Level 1 Troubleshooting:
•Level 1 Troubleshooting (Level 1 FIP) is the first step to diagnose a problem. Level 1 FIP asks you whether any Fault Code and other problematic symptoms exist, guiding you to Level 2 Troubleshooting or BSD to resolve the problem.
Level 2 Troubleshooting:
•Level 2 Troubleshooting is a diagnostic procedure of separating a problem by Fault Code, document/paper jam and other problematic symptoms. Performing a FIP or an appropriate procedure in the Check Procedure enables you to discover causes of a problem in a short period of time.
How to proceed with troubleshooting and Cautions:
•First, perform Level 1 FIP to categorize a problem. Second, proceed to an appropriate Level 2 FIP or BSD to resolve the problem. To find the causes of the problem using FIP or Check Procedure etc., thoroughly read the instructions and follow the procedure properly. Sometimes, when two or more causes exist, they cannot be identified at once, so the same FIP should be repeated. In this case, pay attention to a different judgment made in the process of the same FIP.
•For source voltage related problems, such as being unable to power up the machine, refer to ‘Other Failure FIP’ to proceed with the troubleshooting.
•The Check Procedure for general electrical parts (Motor, Solenoid/Clutch, Switch, Sensor etc.) may not be shown in each troubleshooting for some cases. In such cases, proceed to troubleshoot by referring to ‘Generic FIP’.
2.1.2 How to Switch the Error Code Display
When a problem has occurred in the machine, an Error Code or a Fault Code (Chain-Link) will be displayed on the UI screen. When an Error Code is being displayed, you can perform the following operation to switch the display to the Chain-Link number that correspond to that Error Code. To repair, check the Chain-Link number and proceed with the appropriate FIP.
How to switch to the Chain-Link number
1.When a problem has occurred, the displayed Error Code will be flashing.
Figure 1 j0lj21201
2.With the Error Code being displayed, press and hold down the [ID Card Copy] button on the Control Panel.
•As long as the button is being pressed, the Chain-Link number will be displayed and flashing.
|
Figure 2 |
j0lj21202 |
|
|
Initial Issue |
08/2012 |
Status Indicator RAPs |
|
2.1.1, 2.1.2 |
||
|
WorkCentre 5021/5019 |
2-3 |

3.Releasing the [ID Card Copy] button returns the display to the Error Code.
2.1.3 Glossary
The following terminology are used throughout the troubleshooting section. The meaning of these terminology must be fully understood when performing problem analysis.
Common terms:
Status Indicator RAPs
2.1.2, 2.1.3
•Fault Code
This 6-digit code appears when the machine has found problems.
•Actuate (Deactuate)
To mechanically push (release) the Actuator of the switch or the connected mechanical linkage.
•Block
To place a sheet of document or paper on the photo sensor surface for detection.
•Check
To visually check for operation failure of parts such as relay or mechanical linkage, and the failure status of the parts.
•Enter the CE Mode
To enter the CE Mode by following the procedure described in ‘How to Enter/Exit the CE Mode’ of Chapter 6.
•Check the connection for short circuit
Turn the power OFF. Measure the resistance between the wire and the frame using the ohm range of a tester.
•Check the connection for open circuit
Turn the power OFF. Measure the resistance between both ends of the wire using the ohm range of a tester.
•Input Check [xxx-xxx]/Output Check [xxx-xxx]
To enter the Component Check by following the procedure described in ‘How to Use the CE Mode’ of Chapter 6.
•Analog Monitor [xxx-xxx]
To enter the Analog Monitor by following the procedure described in ‘How to Use the CE Mode’ of Chapter 6.
•Check the voltage level
|
Table 1 |
||
|
Voltage |
Level |
Range |
|
+3.3VDC |
(H) |
+3.2 to +3.6VDC |
|
(L) |
0.0 to +1.0VDC |
|
|
+5VDC |
(H) |
+4.8 to +5.4VDC |
|
(L) |
0.0 to +1.0VDC |
|
|
+24VDC |
(H) |
+23.3 to +25.7VDC |
|
(L) |
0.0 to +3.0VDC |
|
•PL 4.2
Refer to PL 4.2 in Chapter 5 Parts List.
•CH 6.2 Zone J4
|
08/2012 |
Initial Issue |
|
2-4 |
WorkCentre 5021/5019 |

Refer to Chain 6.2 Zone J4 in Chapter 7 BSD.
•REP 4.1.3
Refer to REP 4.1.3 in Chapter 4.
•ADJ 4.1.3
Refer to ADJ 4.1.3 in Chapter 4.
•Replace the parts in sequence
When it is impossible to analyze causes of a problem further, replace the parts in sequence. The part with a higher replacement frequency or higher possibility of causing a problem is listed first for replacement.
|
Initial Issue |
08/2012 |
|
WorkCentre 5021/5019 |
2-5 |
Status Indicator RAPs
2.1.3

|
Status Indicator RAPs |
08/2012 |
Initial Issue |
|
2.1.3 |
||
|
2-6 |
WorkCentre 5021/5019 |

2.2.1.1 Level 1 FIP
Procedure
Ask the operator about the problem. Did the operator operate the machine correctly?
YN
Explain the correct way to operate the machine to the operator.
Output all jobs that are stored in the memory. Turn the power OFF and ON. Is the UI display normal?
YN
Refer to [BSD (CH2.1)] and [2.2.3 Other Failure FIP] to repair the malfunction in UI display.
Check the Shutdown History. Refer to [6.4.2.1 Shutdown History] to display the Fault Code on the UI. Is the Fault Code displayed on the UI?
YN
Refer to [Troubleshooting] in the User guide and repair the following errors.
•Problems With Hardware
•Problems With Image Quality
•Problems With Copy
•Problems With Printer
•Problems With Scanner
•Problems With Network
•In Case of Paper Jam
•In Case of Document Jam
Proceed to Level 2 Troubleshooting and perform the applicable FIP.
|
Initial Issue |
08/2012 |
|
WorkCentre 5021/5019 |
2-7 |
Status Indicator RAPs
2.2.1.1

|
Status Indicator RAPs |
08/2012 |
Initial Issue |
|
2.2.1.1 |
||
|
2-8 |
WorkCentre 5021/5019 |

003-500/795 N-Up NG Out Of Range/ AMS NG Out Of
Range
BSD-ON:-
[N-Up NG Out Of Range]
During 2-Up or 4-Up, the reduce/enlarge ration was not within the range of 25 to 400%.
[AMS NG Out Of Range]
During AMS (Auto Magnification Selection), the reduce/enlarge ration was not within the range of 25 to 400%
Cause/Action
Press [Stop] on the UI Panel and change the settings.
003-951 1Job Max Page Over
BSD-ON:-
During Copy Job, the number of pages that can be scanned has been exceeded.
Cause/Action
Press [Stop] on the UI Panel and reduce the number of document pages.
003-963 APS NG Out Of Range
BSD-ON:-
During Copy Job, when APS is selected, the image size obtained from document size x reduce/enlarge ratio was detected to be larger than the largest Standard Paper Size.
003-754 IPS Overrun
BSD-ON:-
The IPS processing has overtook the Scan processing.
Cause/Action
This might be avoided by setting the R/E ratio to 99% or 101%. If this occurs frequently, obtain the document from the User and contact the Support Department for assistance.
003-942 Not-Supported Doc Size
BSD-ON:-
During DADF Scan of a Copy Job, an unsupported document size was detected.
Cause/Action
1.Press [Stop] on the UI Panel.
2.Check the setting of the document size group.
3.Check whether the document size is a supported size.
4.If the document size is a supported size, the DADF might have malfunctioned. Refer to following FIP to check the DADF.
•005-196 (Size Mismatch Jam on No Mix-size)
•005-948 (SS-Size Mismatch Jam on No Mix-size)
Cause/Action
Press [Stop] on the UI Panel and change the settings.
003-972 EPC Memory Full
BSD-ON:-
During Copy Job, the EPC memory is filled up.
Cause/Action
Print out all the images that had been successfully scanned by the DADF so far and then perform the copy again for the documents (images) that were unable to be scanned.
003-973 Auto Rotation NG Out Of Range
BSD-ON:-
During Copy Job, the following conditions were met.
•Rotation is required.
•The length of the image obtained by document x reduce/enlarge ratio is longer than 297 mm.
Cause/Action
Press [Stop] on the UI Panel and change the reduce/enlarge ratio.
|
Initial Issue |
08/2012 |
Status Indicator RAPs |
|
003-500/795, 003-951 |
||
|
WorkCentre 5021/5019 |
2-9 |
![]()
|
Status Indicator RAPs |
08/2012 |
Initial Issue |
|
003-500/795, 003-951 |
||
|
2-10 |
WorkCentre 5021/5019 |

004-345 HVPS Communication Error
BSD-ON:CH9.2
Communication failure between the ESS/MCU PWB and the HVPS was detected.
Cause/Action
1.Turn the power OFF and ON.
2.Turn OFF the power and check the connection between the HVPS J500 and the ESS/ MCU PWB J402 for open circuit, short circuit, and poor contact.
3.If no problem is found, replace the following parts in sequence:
•HVPS (PL 18.1)
•ESS/MCU PWB (PL 18.1)
|
Initial Issue |
08/2012 |
|
WorkCentre 5021/5019 |
2-11 |
Status Indicator RAPs
004-345

|
Status Indicator RAPs |
08/2012 |
Initial Issue |
|
004-345 |
||
|
2-12 |
WorkCentre 5021/5019 |

005-122 DADF Simplex/Side 1 Pre Regi Sensor On Jam
BSD-ON:CH5.4
•After Pre-Feed started for the first sheet (DADF Feed Motor On (CW)) in Simplex and Duplex, the DADF Pre Regi Sensor did not turn ON within the specified time.
•After Pre-Feed started for the second sheet onwards (DADF Feed Motor On (CW)) in Duplex, the DADF Pre Regi Sensor did not turn ON within the specified time.
005-125/145 DADF Regi Sensor Off Jam/ DADF Regi Sensor Off Jam on Inverting
BSD-ON:CH5.5, CH5.4
[DADF Regi Sensor Off Jam]
After the DADF Pre Regi Sensor turned OFF at Scan operation, the DADF Regi Sensor did not turn OFF within the specified time.
Cause/Action
Check the following:
•Transportation failure due to foreign substance on the document path.
•The surface of the Feed Roll and Nudger Roll for foreign substances.
•The surface of the Feed Roll and Nudger Roll for wear.
•The DADF Pre Regi Sensor (Input Check [005-206]) for operation failure. (PL 56.14)
•The DADF Feed Clutch (Output Check [005-062]) for operation failure. (PL 56.7)
•The DADF Feed Motor (Output Check [005-008]) for operation failure. (PL 56.6)
•The Drive Gear for wear and damage.
If no problem is found, replace the DADF PWB. (PL 56.2)
005-123 DADF Simplex/Side 1 Regi Sensor On Jam
BSD-ON:CH5.5, CH5.4
The DADF Regi Sensor does not turn ON within the specified time after the DADF Pre Regi Sensor On.
[DADF Regi Sensor Off Jam on Inverting]
After the DADF Pre Regi Sensor turned OFF at Invert operation, the DADF Regi Sensor did not turn OFF within the specified time.
Cause/Action
Check the following:
•Transportation failure due to foreign substance on the document path.
•The surface of the Regi Roll, Out Roll, and Exit Roll for foreign substances.
•The surface of the Regi Roll, Out Roll, and Exit Roll for wear.
•The DADF Regi Sensor (Input Check [005-110]) for operation failure. (PL 56.14)
•The DADF Pre Regi Sensor (Input Check [005-206]) for operation failure. (PL 56.14)
•The DADF Feed Motor (Output Check [005-008]) for operation failure. (PL 56.6)
•The Drive Gear for wear and damage.
If no problem is found, replace the DADF PWB. (PL 56.2)
Cause/Action
Check the following:
•Transportation failure due to foreign substance on the document path.
•The surface of the Takeaway Roll and Regi Roll for foreign substances.
•The surface of the Takeaway Roll and Regi Roll for wear.
•The DADF Regi Sensor (Input Check [005-110]) for operation failure. (PL 56.14)
•The DADF Pre Regi Sensor (Input Check [005-206]) for operation failure. (PL 56.14)
•The DADF T/A Clutch (Output Check [005-098]) for operation failure. (PL 56.7)
•The DADF Feed Motor (Output Check [005-008]) for operation failure. (PL 56.6)
•The Drive Gear for wear and damage.
If no problem is found, replace the DADF PWB. (PL 56.2)
005-131/132 DADF Invert Sensor On Jam on Inverting/ DADF Invert Sensor On Jam
BSD-ON:CH5.5, CH5.4
[DADF Invert Sensor On Jam on Inverting]
After the DADF Regi Sensor turned ON at Invert operation, the DADF Invert Sensor did not turn ON within the specified time.
[DADF Invert Sensor On Jam]
After the DADF Regi Sensor turned ON in the Scan operation, the DADF Invert Sensor did not turn ON within the specified time.
Cause/Action
Check the following:
•Transportation failure due to foreign substance on the document path.
|
Initial Issue |
08/2012 |
Status Indicator RAPs |
|
005-122, 005-125/145 |
||
|
WorkCentre 5021/5019 |
2-13 |

•The surface of the Out Roll for foreign substances.
•The surface of the Out Roll for wear.
•The DADF Invert Sensor (Input Check [005-211]) for operation failure. (PL 56.10)
•The DADF Regi Sensor (Input Check [005-110]) for operation failure. (PL 56.14)
•The DADF Feed Motor (Output Check [005-008]) for operation failure. (PL 56.6)
•The Drive Gear for wear and damage.
If no problem is found, replace the DADF PWB. (PL 56.2)
005-134/139 DADF Invert Sensor Off Jam on Inverting/ DADF Invert Sensor Off Jam
BSD-ON:CH5.5, CH5.4
[DADF Invert Sensor Off Jam on Inverting]
During the Invert operation where there is a next document, after the DADF Regi Sensor turned OFF, the DADF Invert Sensor did not turn OFF within the specified time.
[DADF Invert Sensor Off Jam]
During the Simplex and Duplex Scan operation, after the DADF Regi Sensor turned OFF, the DADF Invert Sensor did not turn OFF within the specified time.
Cause/Action
Check the following:
•Transportation failure due to foreign substance on the document path.
•The surface of the Out Roll and Exit Roll for foreign substances.
•The surface of the Out Roll and Exit Roll for wear.
•The DADF Invert Sensor (Input Check [005-211]) for operation failure. (PL 56.10)
•The DADF Regi Sensor (Input Check [005-110]) for operation failure. (PL 56.14)
•The DADF Feed Motor (Output Check [005-008]) for operation failure. (PL 56.6)
•The Exit Pinch Roll for operation failure (including for the operation failure of the Exit Nip Release Solenoid (Output Check [005-072])). (PL 56.7)
•The Drive Gear for wear and damage.
If no problem is found, replace the DADF PWB. (PL 56.2)
005-135 DADF Side 2 Pre Regi Sensor On Jam
BSD-ON:CH5.4, CH5.5
After the DADF Feed Motor started the reverse rotation at Invert operation, the DADF Pre Regi Sensor did not turn ON within the specified time.
Cause/Action
Check the following:
•Transportation failure due to foreign substance on the document path.
•The surface of the Exit Roll for foreign substances.
•The surface of the Exit Roll for wear
•The DADF Pre Regi Sensor (Input Check [005-206]) for operation failure. (PL 56.14)
•The DADF Feed Motor (Output Check [005-048]) for operation failure. (PL 56.6)
•The Exit Pinch Roll for operation failure (including for the operation failure of the Exit Nip Release Solenoid (Output Check [005-072])). (PL 56.7)
•The Drive Gear for wear and damage.
If no problem is found, replace the DADF PWB. (PL 56.2)
005-136 DADF Side 2 Regi Sensor On Jam
BSD-ON:CH5.5, CH5.4
After the DADF Pre Regi Sensor turned ON at Invert operation, the DADF Regi Sensor did not turn ON within the specified time.
Cause/Action
Check the following:
•Transportation failure due to foreign substance on the document path.
•The surface of the Exit Roll, Takeaway Roll, and Regi Roll for foreign substances.
•The surface of the Exit Roll, Takeaway Roll, and Regi Roll for wear.
•The DADF Regi Sensor (Input Check [005-110]) for operation failure. (PL 56.14)
•The DADF Pre Regi Sensor (Input Check [005-206]) for operation failure. (PL 56.14)
•The DADF Feed Motor (Output Check [005-008]) for operation failure. (PL 56.6)
•The DADF T/A Clutch (Output Check [005-098]) for operation failure. (PL 56.7)
•The Exit Pinch Roll for operation failure (including for the operation failure of the Exit Nip Release Solenoid (Output Check [005-072])). (PL 56.7)
•The Drive Gear for wear and damage.
If no problem is found, replace the DADF PWB. (PL 56.2)
|
Status Indicator RAPs |
08/2012 |
Initial Issue |
|
005-131/132, 005-135 |
||
|
2-14 |
WorkCentre 5021/5019 |
005-147 DADF Pre Regi Sensor Off Jam on Inverting
BSD-ON:CH5.4, CH5.5
After the DADF Feed Motor started the reverse rotation at Invert operation, the DADF Pre Regi Sensor did not turn OFF within the specified time.
Cause/Action
Check the following:
•Transportation failure due to foreign substance on the document path.
•The surface of the Exit Roll, Takeaway Roll, Regi Roll, and Out Roll for foreign substances.
•The surface of the Exit Roll, Takeaway Roll, Regi Roll, and Out Roll for wear.
•The DADF Pre Regi Sensor (Input Check [005-206]) for operation failure. (PL 56.14)
•The DADF Feed Motor (Output Check [005-048/008] (CCW/CW)) for operation failure. (PL 56.6)
•The Exit Pinch Roll for operation failure (including for the operation failure of the Exit Nip Release Solenoid (Output Check [005-072])). (PL 56.7)
•The Drive Gear for wear and damage.
If no problem is found, replace the DADF PWB. (PL 56.2)
005-196 Size Mismatch Jam on No Mix-Size
BSD-ON:CH5.4, CH5.2
The 2nd sheet or later of the document was detected to be of a different size conpared to the 1st sheet (the length of the document’s 2nd sheet or later in SS direction is longer).
Cause/Action
1.Check the size of the document that was fed by the User.
2.If the error is not cleared, check the following:
Cause/Action
Explain to the User that Mixed Size is not supported.
005-198/199 Too Short Size Jam/ Too Long Size Jam
BSD-ON:CH5.4, CH5.2
[Too Short Size Jam]
It was detected that the document length in Slow Scan direction is shorter than the specifications (Simpex: 85 mm, Duplex: 110 mm).
[Too Long Size Jam]
It was detected that the document length in Slow Scan direction is at the specifications (Simpex: 1275 mm, Duplex: 480.1 mm) or longer.
Cause/Action
Check the size of the document that was fed by the user. If it is within the permitted length for DADF transport, check the following:
•The DADF Pre Regi Sensor (Input Check [005-206]) for operation failure. (PL 56.14)
•The Document Tray Size Sensor 1/2 (Input Check [005-221/222]) for operation failure. (PL 56.11)
If no problem is found, replace the DADF PWB. (PL 56.2)
005-210 DADF Download Fail
BSD-ON:CH3.1
When the IISS starts up (including at Power ON/Sleep recovery), it was detected that the DADF is in Download Mode.
•The DADF Pre Regi Sensor (Input Check [005-206]) for operation failure. (PL 56.14)
•The Document Tray Size Sensor 1/2 (Input Check [005-221/222]) for operation failure.
(PL 56.11)
3.If no problem is found, replace the DADF PWB. (PL 56.2)
Cause/Action
Perform the DADF software download.
005-275/280 DADF RAM Fail/ DADF EEPROM Fail
BSD-ON:CH3.1
|
005-197 Prohibit Combine Size Jam |
[DADF RAM Fail] |
||
|
BSD-ON:CH5.4 |
|||
|
A Mixed Size document was detected. |
The DADF PWB RAM failed during the Read/Write operation. (At Power ON) |
||
|
[DADF EEPROM Fail] |
|||
|
Initial Issue |
08/2012 |
Status Indicator RAPs |
|
|
005-147, 005-198/199 |
|||
|
WorkCentre 5021/5019 |
2-15 |

Write failure to DADF EEPROM or communication failure with EEPROM was detected.
Cause/Action
1.Turn the power OFF and ON.
2.If the problem persists, replace the DADF PWB. (PL 56.2)
005-305 DADF Feeder Cover Interlock Open
BSD-ON:CH5.1
The DADF Feeder Cover Interlock Switch was opened during DADF operation.
• DADF Invert Sensor (Input Check[005-211]) (PL 56.10)
3.If no problem is found, replace the DADF PWB. (PL 56.2)
005-940 DADF No Original Fail
BSD-ON:CH5.1
It was detected that the document was pulled out during document feed.
Cause/Action
Reload the document.
Cause/Action
1.Check the DADF Feeder Cover for mismatch.
2.Check the DADF Feeder Cover Interlock Switch (Input Check [005-212]) for operation failure.
(PL 56.6)
3.If no problem is found, replace the DADF PWB. (PL 56.2)
005-500 DADF Download Flash Write Error
BSD-ON:CH3.1
Failed to write into the Flash ROM during DAFD Download.
Cause/Action
1.Turn the power OFF and ON.
2.If the problem persists, replace the following parts in sequence:
•DADF PWB (PL 56.2)
•ESS/MCU PWB (PL 18.1)
005-948 SS-Size Mismatch Jam on No Mix-size
BSD-ON:CH5.4, CH5.2
In No Mix mode, it was detected that a document with a shorter size in Slow Scan (SS) direction was transported from the DADF.
Cause/Action
1.Check the size of the document that was fed by the User.
2.If the error is not cleared, check the following:
•The DADF Pre Regi Sensor (Input Check [005-206]) for operation failure. (PL 56.14)
•The Document Tray Size Sensor 1/2 (Input Check [005-221/222]) for operation failure.
(PL 56.11)
3.If no problem is found, replace the DADF PWB. (PL 56.2)
005-907/908/913 DADF Pre Regi Sensor/DADF Regi Sensor/DADF Invert Sensor Static Jam
BSD-ON:CH5.4, CH5.5
Paper was detected by the applicable sensor at Power ON, Feeder Cover Interlock Close, or DADF Open Sensor Close.
Cause/Action
1.Check the applicable sensor for remaining paper, the Actuator for return failure, contamination on sensor, and etc.
2.Check the applicable sensor for operation failure.
•DADF Pre Regi Sensor (Input Check[005-206]) (PL 56.14)
•DADF Regi Sensor (Input Check[005-110]) (PL 56.14)
|
Status Indicator RAPs |
08/2012 |
|
|
005-275/280, 005-940 |
||
|
2-16 |
Initial Issue
WorkCentre 5021/5019

010-311 Fusing Unit Center Thermistor Defect
BSD-ON:CH10.2
An open circuit abnormality (the AD value of the STS is equivalent to the open circuit value) of the Heat Roll Center Thermistor was detected.
Procedure
Turn OFF the power and disconnect the Heat Roll Center Thermistor connector P/J600. Measure the resistance between the Heat Roll Center Thermistor J600 pin-1 and J600 pin-2. Is the resistance infinite?
YN
Reconnect the connector P/J600 and measure the resistance between the ESS/MCU PWB J403 pin-1 and J403 pin-2. Is the resistance infinite?
Y N
Replace the ESS/MCU PWB. (PL 18.1)
Check the following connections for open circuits and poor contacts.
• Between ESS/MCU PWB J403-1 and Heat Roll Center Thermistor P600-4
• Between ESS/MCU PWB J403-2 and Heat Roll Center Thermistor P600-3
Replace the Fusing Unit. (PL 7.1)
010-312 Fusing Unit Rear Thermistor Defect
BSD-ON:CH10.2
An open circuit abnormality (the AD value of the STS is equivalent to the open circuit value) of the Heat Roll Rear Thermistor was detected.
010-320 Over Heat Temperature Fail
BSD-ON:CH10.2, CH10.1
A high temperature error was detected at the Center Thermistor (245 degrees C or higher) or the Rear Thermistor (270 degrees C or higher).
NOTE: To clear this Fail, first remove the cause, next clear the value of NVM [744-040] (Over Heat Temp Fail) to ‘0’, and then turn the power OFF then ON. The relationship between the displayed value and the Thermistor that detected the high temperature error is as follows:
•0: Normal
•1: High Temperature Error of Heat Roll Center Thermistor
•2: High Temperature Error of Heat Roll Rear Thermistor
Cause/Action
Check the following:
•The Center Thermistor or the Rear Thermistor for dropped parts, sensor contamination, and foreign substances blocking the sensor.
•The Heat Roll for wound up, stuck paper.
•The Heat Roll Center Thermistor (Analog Monitor [010-050]) for operation failure.
•The Heat Roll Rear Thermistor (Analog Monitor [010-051]) for operation failure.
•The Heater Rod for operation failure.
If no problem is found, replace the following parts in sequence:
•Fusing Unit (PL 7.1)
•LVPS (PL 18.1)
•ESS/MCU PWB (PL 18.1)
Procedure
Turn OFF the power and disconnect the Heat Roll Rear Thermistor connector P/J600. Measure the resistance between the Heat Roll Rear Thermistor J600 pin-3 and J600 pin-4. Is the resistance infinite?
YN
Reconnect the connector P/J600 and measure the resistance between the ESS/MCU PWB J403 pin-3 and J403 pin-4. Is the resistance infinite?
Y N
Replace the ESS/MCU PWB. (PL 18.1)
Check the following connections for open circuits and poor contacts.
• Between ESS/MCU PWB J403-3 and Heat Roll Rear Thermistor P600-2
• Between ESS/MCU PWB J403-4 and Heat Roll Rear Thermistor P600-1
Replace the Fusing Unit. (PL 7.1)
010-327 Fusing Unit On Time Fail
BSD-ON:CH10.2, CH10.1
Any of the following was detected:
•The Heater Rod did not turn OFF within the specified time after the Heater Rod On.
•After power ON, the temperature of the Fusing Unit does not reach the specified value within the specified time.
Cause/Action
Check the following:
•The Heater Rod for operation failure.
•The connection between the LVPS J511 and the Fusing Unit P10 for open circuit and poor contact
•The Center Thermistor for dropped parts, sensor contamination, and foreign substances blocking the sensor.
•The Heat Roll for wound up, stuck paper.
|
Initial Issue |
08/2012 |
Status Indicator RAPs |
|
010-311, 010-320 |
||
|
WorkCentre 5021/5019 |
2-17 |

If no problem is found, replace the following parts in sequence:
•Fusing Unit (PL 7.1)
•LVPS (PL 18.1)
•ESS/MCU PWB (PL 18.1)
010-379 Fusing Unit Hot Not Ready Return Time Fail
BSD-ON:CH10.2, CH10.1
The time taken to recover from High Temperature Not Ready state has exceeded the specified time.
Cause/Action
1.Turn the power OFF and ON.
2.Turn OFF the power and check the following:
•The Fusing Unit for improper installation.
•The connection between the Fusing Unit P10 and the LVPS J511 for open circuit, short circuit, and poor contact.
•The connection between the Fusing Unit P600 and the ESS/MCU PWB J403 for open circuit, short circuit, and poor contact.
•The connection between the ESS/MCU PWB J401 and the LVPS J513 for open circuit, short circuit, and poor contact.
•The Heat Roll for wound up, stuck paper.
3.If the problem persists, replace the following parts in sequence:
•Fusing Unit (PL 7.1)
•LVPS (PL 18.1)
•ESS/MCU PWB (PL 18.1)
010-602 Over Temp Cooling Mode
BSD-ON:CH10.2
Unable to print because the temperature in the machine has risen above the specification value.
Cause/Action
Wait until the temperature in the machine has dropped.
010-392 NOHAD Fan Defect
BSD-ON:CH10.3
NOHAD Fan failure was detected. When the NOHAD Fan Fail signal indicating an abnormality of the Fan was monitored at the specified time interval, it was found to have failed the specified number of times or higher in a row.
Cause/Action
1.Check the NOHAD Fan (Output Check [042-002]) for operation failure. (PL 4.1)
2.Check the NOHAD Fan for foreign substances.
3.If no problem is found, replace the ESS/MCU PWB. (PL 18.1)
|
Status Indicator RAPs |
08/2012 |
Initial Issue |
|
010-327, 010-602 |
||
|
2-18 |
WorkCentre 5021/5019 |

016-500 Controller Download Flash Write Error
BSD-ON:-
Unable to write the Download File of Controller Main into the Flash ROM.
Cause/Action
1.Press [Stop] on the UI Panel.
2.Check the connection of the USB Cable between this machine and the PC.
3.Check the status (is it powered OFF, frozen, etc.) of the PC.
Cause/Action
1.Turn the power OFF and ON.
(If the contents of the Flash ROM is corrupted, the machine will boot up in Emergency Boot Download mode after Power ON.)
2.If the problem persists, replace the ESS/MCU PWB. (PL 18.1)
016-501 Controller Boot Flash Write Error
BSD-ON:-
Unable to write the Download File of Controller Boot into the Flash ROM.
Cause/Action
1.Turn the power OFF and ON.
2.If the problem persists, replace the ESS/MCU PWB. (PL 18.1)
016-571 No Response from USB-Host for Print Job
BSD-ON:CH3.2
When any of the following has occurred as USB Print or Download data interpretation is in progress.
•The command from the PC was disrupted for 2 minutes.
•The machine has detected a communication error with the USB Device.
•The sending of commands to the PC remained unsuccessful even when 500 ms has passed.
NOTE: This Fault will clear automatically. (It will not be displayed on the UI Panel)
Cause/Action
1.Check the connection of the USB Cable between this machine and the PC.
2.Check the status (is it powered OFF, frozen, etc.) of the PC.
016-502 UI Panel Download Flash Write Error
BSD-ON:CH2.1
Unable to write the Download File of UI Panel into the Flash ROM.
Cause/Action
1.Turn the power OFF and ON.
2.If the problem persists, replace the following parts in sequence:
•ESS/MCU PWB (PL 18.1)
•UI PWB (PL 1.6)
016-570 No Response from USB-Host for Scan Job
BSD-ON:CH3.2
When any of the following has occurred as Scan to PC (USB) is in progress.
•The command from the PC was disrupted for 5 seconds.
•The machine has detected a communication error with the USB Device.
•The sending of commands to the PC remained unsuccessful even when 500 ms has passed.
(The timeout time is the time calculated from the size of the data being sent only when sending image data.)
016-742/744 Download File Error/ Download File Check
Sum Error
BSD-ON:-
[Download File Error]
It was detected that there is an error with either the file format of the Download File, the Device Identifier, the Device Serial Number, or the Target Device Character String.
[Download File Check Sum Error]
The Download File checksum error was detected.
Cause/Action
1.Turn the power OFF and ON.
2.Install a firmware with the correct version.
|
Initial Issue |
08/2012 |
Status Indicator RAPs |
|
016-500, 016-570 |
||
|
WorkCentre 5021/5019 |
2-19 |
![]()
016-749/799 HBPL or XPJL Syntax Error/ Print Instruction Fail
BSD-ON:-
[HBPL or XPJL Syntax Error]
When the Print Job data interpretation is in progress, an illegal command that cannot be ignored was received from the Client driver.
[Print Instruction Fail]
During the Print Job, the Job cannot be executed with the specified combination of print parameters (Stored File Size, Paper Size, Paper Tray, Duplex Settings, Output Tray, and etc.).
NOTE: During Continuous Print, this error will not occur until the paper that immediately precedes the paper where the applicable image is supposed to be printed on has been output successfully.
Cause/Action
1.Press [Stop] on the UI Panel.
2.Check whether the Printer Driver that is being used is the correct one.
3.Check whether the specified print parameters are correct.
016-759 Copy Counter Full
BSD-ON:-
During Multi Account Mode, any of the following has occurred:
•The general user that is logged in has reached the alotted maximum print count.
•A general user that has reached the alotted maximum print count has logged in.
Cause/Action
1.Press [Stop] on the UI Panel.
2.Clear the count for the user.
016-776 Marker Code Detection Fail
BSD-ON:-
During Copy Job or Print Job, when expanding only up to the size that was specified at the expansion, the End Code cannot be found in the compressed data.
NOTE: Before the occurrence of this fail, there are cases where [045-310 Image Ready Error] would occur first.
NOTE: During Continuous Print, this error will not occur until the paper that immediately precedes the paper where the applicable image is supposed to be printed on has been output successfully.
Cause/Action
1.Turn the power OFF and ON.
2.If the problem reoccurs, determine whether it is caused by the Copy document or the Print data and contact the Support Department for assistance.
|
Status Indicator RAPs |
08/2012 |
Initial Issue |
|
016-749/799, 016-776 |
||
|
2-20 |
WorkCentre 5021/5019 |

023-600 Held Down key Error (UI Panel)
BSD-ON:CH2.1
Any key on the UI Panel has been pressed and held down for 1 minute or longer.
Cause/Action
Check whether any key on the UI Panel is pressed and held down.
|
Initial Issue |
08/2012 |
Status Indicator RAPs |
|
023-600 |
||
|
WorkCentre 5021/5019 |
2-21 |

|
Status Indicator RAPs |
08/2012 |
Initial Issue |
|
023-600 |
||
|
2-22 |
WorkCentre 5021/5019 |

024-910/911/915 Tray 1/Tray 2/MSI Paper Length Mismatch
BSD-ON:CH8.3, CH8.1
The Paper Size for the applicable Tray is longer by 10.1 mm or more, or shorter by 13.1 mm or more than the setting.
Cause/Action
Check the following:
•Transportation failure due to foreign substance on the document path.
•The surface of the Feed Roll, T/A Roll 2 (Tray 2), Regi. Roll, and Idler Roll of the applicable Tray for foreign substances.
•The surface of the Feed Roll, T/A Roll 2 (Tray 2), Regi. Roll, and Idler Roll of the applicable Tray for wear.
•The Regi Sensor (Input Check [071-105]) for operation failure. (PL 15.1)
•The Regi Clutch (Output Check [071-001]) for operation failure. (PL 15.1)
•The MSI Feed Clutch (Output Check [072-006]) for operation failure. (MSI) (PL 13.3)
•The BTR for contamination, wear, and transportation failure due to deterioration.
•The Drive Gear for wear and damage.
•Usage of out of spec paper.
If no problems are found, replace the ESS/MCU PWB. (PL 18.1)
•ESS/MCU PWB (Tray 1/MSI) (PL 18.1)
•STM PWB (Tray 2) (PL 10.6)
024-958/959/960 MSI/Tray 1/Tray 2 Paper Size Mismatch
BSD-ON:-
During Print Job, the paper size settings of the selected Tray is different from the paper size specified for the Job.
Cause/Action
Change the paper settings of the selected Tray to the appropriate one.
024-965 APS NG Unselected
BSD-ON:-
During Copy Job, Print Job, and Report Job with APS settings, the Paper Size and paper orientation (SEF/LEF) settings specified by the Job are different from the settings at Tray 1 and Tray 2.
Cause/Action
Change the paper settings of the Tray to the appropriate one.
024-950/951/954 Tray 1/Tray 2/MSI No Paper
BSD-ON:CH7.2, CH7.3, CH7.4
Any of the following was detected:
•The paper in the applicable Tray has ran out.
(When the APS function of Tray 1 and Tray 2 is disabled)
•Although the paper in the applicable Tray was detected to have ran out, paper is not supplied from another Tray. (When the APS function of Tray 1 and Tray 2 is enabled)
Cause/Action
1.Load paper into the applicable Tray. (If this had occurred during APS of Tray 1 or Tray 2, load paper with the same settings as for the aplicable Tray into other than MSI.)
2.If the problem persists, check the following:
•The paper supply mechanism of the applicable Tray for damage and foreign substances.
•The No Paper Sensor of the applicable Tray (Input Check [072-100/101/102]) for operation failure. (PL 9.1, PL 10.3, PL 13.3)
•The No Paper Sensor of the applicable Tray for contamination, improper installation, and Actuator operation failure.
3.If no problem is found, replace the following parts:
|
Initial Issue |
08/2012 |
Status Indicator RAPs |
|
024-910/911/915 , 024-950/951/954 |
||
|
WorkCentre 5021/5019 |
2-23 |

|
Status Indicator RAPs |
08/2012 |
Initial Issue |
|
024-910/911/915 , 024-950/951/954 |
||
|
2-24 |
WorkCentre 5021/5019 |

041-210/211 STM NVM Out-Of-Order/ STM NVM R/W Error
BSD-ON:CH3.2
[STM NVM Out-Of-Order]
The NVM of the STM is malfunctioning.
[STM NVM R/W Error]
Unable to perform NVM Read / Write for the STM.
Cause/Action
1.Turn the power OFF and ON.
2.If the problem persists, replace the STM PWB. (PL 10.6)
|
Initial Issue |
08/2012 |
Status Indicator RAPs |
|
041-210/211 |
||
|
WorkCentre 5021/5019 |
2-25 |

|
Status Indicator RAPs |
08/2012 |
Initial Issue |
|
041-210/211 |
||
|
2-26 |
WorkCentre 5021/5019 |

042-325/614 Main Motor Rotation Error/ Main Motor
Rotation Warning
BSD-ON:CH4.1
[Main Motor Rotation Error]
The Main Drive Motor revolution failure was detected. When the Lock Up (Main Drive Motor Fail) signal of the Motor Drive output was monitored at the specified time interval after a certain time has passed since the Main Drive Motor operation had started, it was found to have failed 5 times in a row.
[Main Motor Rotation Warning]
The Main Drive Motor revolution failure was detected. When the Lock Up (Main Drive Motor Fail) signal of the Motor Drive output was monitored at the specified time interval after a certain time has passed since the Main Drive Motor operation had started, it was found to have failed 2 times in a row.
Procedure
|
Enter the CE Mode and turn ON the Output Check [042-001] (Main Drive Motor). Does |
the |
|
|
Main Drive Motor rotate? |
||
|
Y N |
||
|
Check the power supply line (+24VDC, +5VDC) of the Main Drive Motor. Is the |
power |
|
|
supply of the Main Drive Motor normal? |
||
|
Y N |
||
|
Check the power supply circuit to the Main Drive Motor. |
||
Turn OFF the power and check the following:
•The connection between the Main Drive Motor J202 and the ESS/MCU PWB J403 for open circuit, short circuit, and poor contact.
•The Drive Gear for wear, damage, and bearing blockage.
•The Main Drive Motor for loading.
If no problem is found, replace the following parts in sequence:
•Main Drive Motor (PL 3.1)
•ESS/MCU PWB (PL 18.1)
Press [Stop] and turn OFF the power. Check the connection between the Main Drive Motor J202-8 and the ESS/MCU PWB J403-5 for open circuit, short circuit, and poor contact.
If no problem is found, replace the following parts in sequence:
•ESS/MCU PWB (PL 18.1)
•Main Drive Motor (PL 3.1)
|
Initial Issue |
08/2012 |
|
WorkCentre 5021/5019 |
2-27 |
Status Indicator RAPs
042-325/614

|
Status Indicator RAPs |
08/2012 |
Initial Issue |
|
042-325/614 |
||
|
2-28 |
WorkCentre 5021/5019 |

045-310 Image Ready Error
BSD-ON:CH3.2
Unable to send the Image-valid signal cannot within the specified time.
NOTE: When the attempt to expand the image has failed, [016-776 Marker Code Detection Fail] occurs after the recover operation.
Cause/Action
1.Check the USB Cable (Local) for poor connection.
2.If no problem is found, replace the ESS/MCU PWB. (PL 18.1)
045-313 IOT Logic Fail
BSD-ON:-
The IOT Software error was detected.
Cause/Action
1.Turn the power OFF and ON.
2.Install the correct version of the IOT firmware.
3.If the problem persists, replace the ESS/MCU PWB. (PL 18.1)
|
Initial Issue |
08/2012 |
Status Indicator RAPs |
|
045-310, 045-313 |
||
|
WorkCentre 5021/5019 |
2-29 |
![]()
|
Status Indicator RAPs |
08/2012 |
Initial Issue |
|
045-310, 045-313 |
||
|
2-30 |
WorkCentre 5021/5019 |

061-321 ROS Motor Fail
BSD-ON:CH6.4
The number of rotation of the ROS Motor did not come within the standard range within the specified time (5 s) after the ROS Motor On.
061-325 No SOS Fail
BSD-ON:CH6.4
After the detection of ROS Motor Ready (steady rotation), the SOS interval was detected to be longer than the reference value 5 times in a row.
|
Cause/Action |
Cause/Action |
1.Turn the power OFF and ON.
2.Check whether the Drum Cartridge is installed.
3.Check the ROS Motor (Output Check [061-001]) for operation failure.
4.Check the LD +5VDC power supply of the LD PWB J140 pin-8.
5.If no problem is found, replace the following parts in sequence:
•ROS Assembly (PL 2.1)
•ESS/MCU PWB (PL 18.1)
1.Turn the power OFF and ON.
2.Check whether the Drum Cartridge is installed.
3.Turn OFF the power and check the connections between the ESS/MCU PWB J410, J411 and the LD PWB J140, J160 for open circuits, short circuits, and poor contacts.
4.If no problem is found, replace the following parts in sequence:
•ROS Assembly (PL 2.1)
•ESS/MCU PWB (PL 18.1)
|
Initial Issue |
08/2012 |
Status Indicator RAPs |
|
061-321, 061-325 |
||
|
WorkCentre 5021/5019 |
2-31 |

|
Status Indicator RAPs |
08/2012 |
Initial Issue |
|
061-321, 061-325 |
||
|
2-32 |
WorkCentre 5021/5019 |

062-277 DADF Communication Fail
BSD-ON:CH3.1
Transmission cannot be established between the ESS/MCU PWB and the DADF PWB.
Cause/Action
1.Turn the power OFF and ON.
2.Turn OFF the power and check the connections between the ESS/MCU PWB J421 and the DADF PWB J751, J752 for open circuits, short circuits, and poor contacts.
3.If no problem is found, replace the following parts in sequence:
•DADF PWB (PL 56.2)
•ESS/MCU PWB (PL 18.1)
062-311 IIT Software Logic Fail
BSD-ON:-
A software error was detected at the ESS/MCU PWB.
Cause/Action
1.Turn the power OFF and ON.
2.Update the software version to the latest one.
3.If no problem is found, replace the ESS/MCU PWB. (PL 18.1)
062-360 Carriage Position Fail
BSD-ON:CH6.2
Any of the following was detected:
•An error with the count value of the Carriage Position Control.
•There is no Regi Sensor input during Carriage initialization.
•An error with the Regi Sensor detection position.
062-371/380 Lamp Illumination Fail/ AGC Fail
BSD-ON:CH6.3, CH6.1
[Lamp Illumination Fail]
Insufficient light from Lamp detected in CCD. (During white gradation correction/AGC before Scan starts)
[AGC Fail]
Insufficient lamp brightness was detected when performing AGC.
Initial Actions
Check whether there is something blocking the light and check the Lamp, Lens, Mirror, and White Color Correction Plate for deterioration or contamination.
Procedure
1.Turn ON the power and enter the Diag mode. Change the value for NVM [715-030] to ‘1’ and then perform [NVM Write].
2.A 3 or 4-digit number is displayed in the current value column.
3.Check the upper 1 or 2 digits, or the lower 2 digits using the following table and replace the appropriate parts.
Sample Display
•110 (3-digit display):
LED Lamp failure and LED Lamp Flexible Flat Cable is damaged or has poor contact.
(The first digit ‘1’ in ‘110’ is the upper digit, which indicates the LED Lamp (‘0′ in ’01’ is not displayed). The lower 2 digits ’10’ indicates the LED Lamp Flexible Flat Cable.)
•1000 (4-digit display):
The LED Lamp Flexible Flat Cable is damaged or has poor contact.
(The first 2 digits ’10’ in ‘1000’ are the upper digits, which indicates the LED Lamp Flexible Flat Cable. The lower 2 digits ’00’ indicates that nothing is applicable (no failures).)
NOTE: Perform IIT diagnostic and then call NVM [715-030] again (press the Change Settings button) to check the value (diagnostic result).
Cause/Action
Check the following:
•The Pre Regi Sensor (Input Check [062-212]) for operation failure. (PL 1.3)
•The Carriage Motor (Output Check [062-005/006] (Scan/Return)) for operation failure. (PL 1.4)
•The Drive Belt and Drive Wire for slack and wear.
•The Carriage operation for mechanical loading.
If no problems are found, replace the ESS/MCU PWB. (PL 18.1)
Table 1
|
Current value |
Component Name |
PL No. |
|
00 |
Not applicable (No errors) |
— |
|
01 |
LED Lamp (LED Lamp PWB) |
PL 1.5 |
|
02 |
IIT Carriage |
PL 1.3 |
|
03 |
CCD Flexible Flat Cable |
PL 1.3 |
|
04 |
This value is not displayed |
— |
|
05 |
This value is not displayed |
— |
|
Initial Issue |
08/2012 |
Status Indicator RAPs |
|
062-277, 062-371/380 |
||
|
WorkCentre 5021/5019 |
2-33 |

Table 1
|
Current value |
Component Name |
PL No. |
|
06 |
This value is not displayed |
— |
|
07 |
This value is not displayed |
— |
|
08 |
This value is not displayed |
— |
|
09 |
This value is not displayed |
— |
|
10 |
LED Lamp Flexible Flat Cable |
PL 1.5 |
4.After replacing the appropriate parts, again change the value for NVM [715-030] to ‘1’ and then perform ‘NVM Write’.
5.Check that the current value column becomes ‘0’.
6.If the problem persists after performing the above procedure, check the following:
•Check for burnt out LED Lamp (DC330 [062-002]). (PL 1.5)
•Check the Flat Cable between the LED Lamp PWB J7002 and the IIT Carriage J7001 for open circuits, short circuits, and poor contacts (especially, check whether the Flat Cable was inserted in a skewed manner).
•Check the Flat Cable between the IIT Carriage J700 and the ESS/MCU PWB J420 for open circuits, short circuits, and poor contacts (especially, check whether the Flat Cable was inserted in a skewed manner).
7.If no problem is found, replace the ESS/MCU PWB. (PL 18.1)
062-386 AOC Fail
BSD-ON:CH6.3
A CCD output error was detected when performing AOC.
Cause/Action
1.Turn ON the power and enter the Diag mode. Change the value for NVM [715-030] to ‘1’ and then perform [NVM Write].
2.A 3 or 4-digit number is displayed in the current value column.
3.Check the upper 1 or 2 digits, or the lower 2 digits and replace the appropriate parts. (For more information on display example and part selection, refer to Procedure 3 in 062371 FIP.)
NOTE: Perform IIT diagnostic and then call NVM [715-030] again (press the Change Settings button) to check the value (diagnostic result).
4.After replacing the appropriate parts, again change the value for NVM [715-030] to ‘1’ and then perform ‘NVM Write’.
5.Check that the current value column becomes ‘0’.
6.If the problem persists after performing the above procedure, check the Flat Cable between the IIT Carriage J700 and the ESS/MCU PWB J420 for open circuits, short circuits, and poor contacts (especially, check whether the Flat Cable was inserted in a skewed manner).
7.If no problem is found, replace the ESS/MCU PWB. (PL 18.1)
062-389 Carriage Over Run Fail (Scan End Side)
BSD-ON:CH6.2
The Carriage has overrun at the Scan End.
Cause/Action
Check the following:
•The Drive Belt and Drive Wire for slack and wear.
•The Carriage operation for mechanical loading.
•The Carriage Motor (Output Check [062-005/006] (Scan/Return)) for operation failure. (PL 1.4)
•The IIT Regi. Sensor (Input Check [062-212]) for operation failure. (PL 1.3)
If no problems are found, replace the ESS/MCU PWB. (PL 18.1)
062-396 CCD Cable Connection Fail
BSD-ON:CH3.1
A CCD Flat Cable connection error was detected.
Cause/Action
1.Turn the power OFF and ON.
2.Turn OFF the power and check the Flat Cable between the IIT Carriage J700 and the ESS/MCU PWB J420 for open circuits, short circuits, and poor contacts (especially, check whether the Flat Cable was inserted in a skewed manner).
3.If no problem is found, replace the following parts in sequence:
•CCD Flexible Flat Cable (PL 1.3)
•ESS/MCU PWB (PL 18.1)
|
Status Indicator RAPs |
08/2012 |
Initial Issue |
|
062-371/380, 062-389 |
||
|
2-34 |
WorkCentre 5021/5019 |

071-105 Regi Sensor On Jam (Tray 1)
BSD-ON:CH8.3, CH4.1, CH8.1
During paper feed from Tray 1, the Regi Sensor did not turn ON within the specified time after the Tray 1 Feed Clutch On.
Cause/Action
Check the following:
•The Regi Sensor (Input Check [071-105]) for operation failure. (PL 15.1)
•The Main Drive Motor (Output Check [042-001]) for operation failure. (PL 3.1)
•The Tray 1 Feed Clutch (Output Check [072-001]) for operation failure. (PL 9.1)
•The Feed Roll for contamination, wear, and transportation failure due to deterioration.
•The Drive Gear for wear and damage.
•A paper transportation failure due to foreign substances on the paper path.
•Usage of out of spec paper.
If no problems are found, replace the ESS/MCU PWB. (PL 18.1)
|
Initial Issue |
08/2012 |
|
WorkCentre 5021/5019 |
2-35 |
Status Indicator RAPs
071-105

|
Status Indicator RAPs |
08/2012 |
Initial Issue |
|
071-105 |
||
|
2-36 |
WorkCentre 5021/5019 |

072-102 Feed Out Sensor 2 On Jam
BSD-ON:CH8.2, CH7.3
During paper feed from Tray 2, the Feed Out Sensor 2 did not turn ON within the specified time after the Tray 2 Feed Motor On.
Cause/Action
Check the following:
•The Feed Out Sensor 2 (Input Check [072-104]) for operation failure. (PL 10.5)
•The STM Take Away Motor (Output Check [072-004]) for operation failure. (PL 10.6)
•The STM Take Away Roll Clutch (Output Check [072-003]) for operation failure. (PL 10.6)
•The Tray 2 Feed/Lift Up Motor (Output Check [072-002] (Feed)) for operation failure. (PL 10.3)
•The T/A Roll 2, Feed Roll, Nudger Roll, and Pinch Roll for transportation failure due to contamination, wear, and deterioration.
•The LH Cover for improper latching.
•The Drive Gear for wear and damage.
•A paper transportation failure due to foreign substances on the paper path.
•Usage of out of spec paper.
If no problem is found, replace the STM PWB. (PL 10.6)
•STM PWB (PL 10.6)
072-210 Tray 2 Lift Up Fail
BSD-ON:CH7.3
Any of the following was detected:
•A Tray 2 Lifter error.
•A Tray 2 Paper Size detector component malfunction.
Cause/Action
Check the following:
•The Tray 2 Nudger Level Sensor (Input Check [072-103]) for operation failure. (PL 10.3)
•The Tray 2 Feed/Lift Motor (Output Check [072-005] (Lift Up)) for operation failure. (PL 10.3)
•The drive system between the Bottom Plate and the Tray 2 Feed/Lift Motor for operation failure.
•The Tray for Paper misload
•The Tray for existence of objects other than Paper.
If no problem is found, replace the STM PWB. (PL 10.6)
072-105 Regi Sensor On Jam (Tray 2)
BSD-ON:CH8.3, CH8.2
During paper feed from Tray 2, the Regi Sensor did not turn ON within the specified time after the Feed Out Sensor 2 On.
072-212 Tray 2 Size Sensor Broken
BSD-ON:CH7.1
Abnormal output AD value from Tray 2 Paper Size Switch was detected.
Cause/Action
Check the following:
•The Regi Sensor (Input Check [071-105]) for operation failure. (PL 15.1)
•The STM Take Away Motor (Output Check [072-004]) for operation failure. (PL 10.6)
•The STM Take Away Roll Clutch (Output Check [072-003]) for operation failure. (PL 10.6)
•The T/A Roll 2, Feed Roll, and Pinch Roll for transportation failure due to contamination, wear, and deterioration.
•The Drive Gear for wear and damage.
•A paper transportation failure due to foreign substances on the paper path.
•Usage of out of spec paper.
Cause/Action
Check the following:
•Broken link and damage at the bottom of the Tray
•The Actuator at the rear of the Tray for operation failure
•The Tray 2 Paper Size Switch (Analog Monitor [072-050], Output Check [072-105]) for operation failure. (PL 10.1)
•The Tray for Paper misload
•The Tray for existence of objects other than Paper.
If no problem is found, replace the STM PWB. (PL 10.6)
If no problem is found, replace the following parts in sequence:
•ESS/MCU PWB (PL 18.1)
072-215 MCU-STM Communication Fail
|
Initial Issue |
08/2012 |
Status Indicator RAPs |
|
072-102, 072-105 |
||
|
WorkCentre 5021/5019 |
2-37 |

BSD-ON:CH3.2
Communication failure between the ESS/MCU PWB and the STM PWB was detected.
Cause/Action
1.Turn the power OFF and ON.
2.Turn OFF the power and check the connection between the ESS/MCU PWB J413 and the STM PWB J541C for open circuit, short circuit, and poor contact.
3.If no problem is found, replace the following parts in sequence:
•STM PWB (PL 10.6)
•ESS/MCU PWB (PL 18.1)
|
Status Indicator RAPs |
08/2012 |
|
|
072-215 |
||
|
2-38 |
Initial Issue
WorkCentre 5021/5019

075-135 Regi Sensor On Jam (MSI)
BSD-ON:CH8.3, CH4.1, CH8.1
During paper feed from the MSI, the Regi Sensor did not turn ON within the specified time after the MSI Feed Clutch On.
Cause/Action
Check the following:
•The Regi Sensor (Input Check [071-105]) for operation failure. (PL 15.1)
•The Main Drive Motor (Output Check [042-001]) for operation failure. (PL 3.1)
•The MSI Feed Clutch (Output Check [072-006]) for operation failure. (PL 13.3)
•The MSI Feed Roll and the MSI Nudger Roll for contamination, wear, and transportation failure due to deterioration.
•The Drive Gear for wear and damage.
•A paper transportation failure due to foreign substances on the paper path.
•Usage of out of spec paper.
If no problems are found, replace the ESS/MCU PWB. (PL 18.1)
|
Initial Issue |
08/2012 |
|
WorkCentre 5021/5019 |
2-39 |
Status Indicator RAPs
075-135
 Thanks: 0
 Likes: 0
 Dislikes: 0
-
05-15-2016
#1

Senior Tech
100+ Posts
- Join Date
- Oct 2008
- Posts
- 115
- Rep Power
- 0
xerox 5021 error 061-321
-
05-16-2016
#2
Re: xerox 5021 error 061-321
Can’t see your machine or what it is doing.
More info, please.


Quick Navigation
Xerox
Top
- Site Areas
- Settings
- Private Messages
- Subscriptions
- Who’s Online
- Search Forums
- Forums Home
- Forums
- System Forums
- System Announcements
- Site Feedback & Questions
- Newbie Check In!
- Technical Forums
- Copier Technical Discussion
- Canon
- Konica Minolta
- Kyocera Mita, Copystar
- Muratec
- Panasonic
- Ricoh, Savin, Gestetner, Lanier
- Sharp
- Samsung
- Toshiba
- Xerox
- Other Copier Brands
- Fax & Printer Technical Discussion
- Brother
- Canon
- HP
- Kyocera
- Lexmark
- Ricoh
- Other Brands
- Digital Duplicators
- Connectivity
- Cash Registers, Calculators, Telecom, Other…
- Service Manual Requests
- Business Talk
- For Sale, Trade, or Wanted
- The Parts Room
- Employment
- Copier Technical Discussion
- Non-Technical Forums
- Rants, Raves, and Everything Else
- Gamers’ Forum
- Industry News
- Test Forum
Bookmarks
Bookmarks
Posting Permissions

- You may not post new threads
- You may not post replies
- You may not post attachments
- You may not edit your posts
- BB code is On
- Smilies are On
- [IMG] code is On
- [VIDEO] code is On
- HTML code is Off
Forum Rules

Устранение неисправностей
WorkCentre 5019/5021
Руководство пользователя
11-27
041-210
041-211
Произошла ошибка.
Выключите аппарат и снова включите его
после того, как погаснет дисплей. Если снова
появится данный код ошибки, обратитесь
в центр технической поддержки Xerox.
042-325
042-400
042-608
042-614
045-313
061-321
061-325
062-277
062-311
062-360
062-371
062-380
062-386
062-389
062-396
072-210
072-212
072-215
077-212
077-214
091-402
Заканчивается срок службы принт-
картриджа.
Замените принт-картридж.
См. раздел
Замена принт-картриджа
на
стр. 10-6.
091-440
Приготовьте принт-картридж для
замены.
Приготовьте принт-картридж для замены.
091-441
Принт-картридж вскоре потребуется
заменить.
Приготовьте принт-картридж для замены.
092-660
092-668
Значение ATC SNR в принт-картридже
выходит за пределы установленного
диапазона.
Выключите аппарат и снова включите его
после того, как погаснет дисплей. Если снова
появится данное сообщение, обратитесь
в центр технической поддержки Xerox.
092-661
Значение температуры SNR в принт-
картридже выходит за пределы
установленного диапазона.
092-910
Произошла ошибка.
093-312
Код ошибки Причина
Устранение
188 страниц подробных инструкций и пользовательских руководств по эксплуатации
 13:58
13:58
#6 Xerox WorkCentre 5019 5021 5022 5024 бледно печатает | Чем и как заправить Xerox 006R01573
 22:46
22:46
#116 МФУ Xerox WC 5019 5021 5022 5024 замена девелопера, барабана | Восстановление 013R00670
 02:51
02:51
Replace waste toner from Xerox 5021 Part 1 YouTube
 04:13
04:13
Xerox Workcentre 5021/ 5019
 11:59
11:59
#51 Копир Xerox WorkCentre 5016 / 5020 восстановление драм картриджа | Фотобарабан Xerox 101R00432
 02:30
02:30
Xerox Printer Installation & Driver Defaults
 00:31
00:31
Разорваный резиновый вал от принтера
 10:03
10:03
Ремонт лотка подачи бумаги XEROX WC 5021
Устранение неисправностей
WorkCentre 5019/5021
Руководство пользователя
11-27
041-210
041-211
Произошла ошибка.
Выключите аппарат и снова включите его
после того, как погаснет дисплей. Если снова
появится данный код ошибки, обратитесь
в центр технической поддержки Xerox.
042-325
042-400
042-608
042-614
045-313
061-321
061-325
062-277
062-311
062-360
062-371
062-380
062-386
062-389
062-396
072-210
072-212
072-215
077-212
077-214
091-402
Заканчивается срок службы принт-
картриджа.
Замените принт-картридж.
См. раздел
Замена принт-картриджа
на
стр. 10-6.
091-440
Приготовьте принт-картридж для
замены.
Приготовьте принт-картридж для замены.
091-441
Принт-картридж вскоре потребуется
заменить.
Приготовьте принт-картридж для замены.
092-660
092-668
Значение ATC SNR в принт-картридже
выходит за пределы установленного
диапазона.
Выключите аппарат и снова включите его
после того, как погаснет дисплей. Если снова
появится данное сообщение, обратитесь
в центр технической поддержки Xerox.
092-661
Значение температуры SNR в принт-
картридже выходит за пределы
установленного диапазона.
092-910
Произошла ошибка.
093-312
Код ошибки Причина
Устранение

Устранение неисправностей
WorkCentre 5019/5021
Руководство пользователя
11-28
093-400
Закончился тонер.
Замените тонер-картридж.
См. раздел
Замена тонер-картриджа
на
стр. 10-3.
116-321
116-323
116-334
116-377
Произошла ошибка.
Выключите аппарат и снова включите его
после того, как погаснет дисплей. Если снова
появится данное сообщение, обратитесь
в центр технической поддержки Xerox.
116-747
Не удается выполнить сканирование,
т. к. слишком мала область
сканирования.
Уменьшите значение для стирания рамки или
масштаб.
См. раздел
Уменьшить/Увеличить
на
стр. 5-12.
117-326
117-327
Произошла ошибка.
Выключите аппарат и снова включите его
после того, как погаснет дисплей. Если снова
появится данное сообщение, обратитесь
в центр технической поддержки Xerox.
123-314
Произошла ошибка.
Код ошибки Причина
Устранение

Застревание бумаги, Застревание бумаги -29, Аппарата. см. раздел
Страница 163
- Изображение
- Текст
Устранение неисправностей
WorkCentre 5019/5021
Руководство пользователя
11-29
Застревание бумаги
В данном разделе приведены действия по извлечению застрявшей бумаги.
Когда в аппарате застревает бумага, он останавливается и на схеме состояния аппарата
загорается индикатор лотка и пиктограмма застревания. Кроме того, на дисплее появляется код
ошибки, указывающий, какие действия нужно выполнить, чтобы извлечь застрявшую бумагу.
Аккуратно извлеките застрявшую бумагу, чтобы не порвать ее. Не оставляйте в аппарате
обрывки бумаги.
Примечания
•
Если после извлечения застрявшей бумаги на дисплее по-прежнему отображается
код ошибки по застреванию, значит бумага застряла на другом участке аппарата
или в нем остались обрывки бумаги. Проверьте это по схеме состояния аппарата
и по коду ошибки и полностью извлеките застрявшую бумагу.
•
После извлечения застрявшей бумаги работа копирования возобновляется
автоматически.
•
Работа печати возобновляется с той страницы, при печати которой произошло
застревание.
•
Если бумага застревает при выполнении работы копирования с помощью
податчика оригиналов без подборки копий (когда оригиналы подаются
и сканируются по одному листу), после извлечения застрявшей бумаги
автоматически возобновляется копирование уже отсканированного оригинала.
Одна для подачи и сканирования остальных вложенных оригиналов необходимо
снова нажать кнопку
Старт.
ПРЕДУПРЕЖДЕНИЕ.
Если необходимо выдвинуть лоток для извлечения застрявшей бумаги,
обратитесь в местное представительство Xerox. Во избежание ожогов не выдвигайте лоток.
ВНИМАНИЕ.
Не пытайтесь извлечь бумагу, застрявшую глубоко внутри аппарата,
например, намотанную на блок фьюзера или нагревательный вал. Это может привести
к травмам или ожогам. Немедленно выключите аппарат и обратитесь в местное
представительство Xerox.
Примечания
•
Если выдвинуть лоток после застревания бумаги, не определив участок
застревания, бумага может порваться и в аппарате останутся обрывки. Во
избежание повреждения аппарата определите место застревания бумаги, прежде
чем приступать к ее извлечению.
•
Если в аппарате останутся обрывки бумаги, указание застревания бумаги на схеме
состояния не исчезнет.
•
При извлечении застрявшей бумаги оставьте аппарат включенным. Отключение
питания приведет к удалению информации, хранящейся в памяти аппарата.
•
Не прикасайтесь к внутренним частям аппарата. Это может вызвать ошибки при
печати.

E-1. застревание бумаги за левой крышкой a, E-1. застревание бумаги за левой крышкой a -30, E-1. застревание бумаги за левой
Крышкой a
- Изображение
- Текст
Устранение неисправностей
WorkCentre 5019/5021
Руководство пользователя
11-30
E-1. Застревание бумаги за левой крышкой A
Для извлечения застрявшей бумаги из-за левой крышки аппарата выполните следующие
действия.
Примечание.
При извлечении бумаги на ремне переноса (из черной пленки) за левой
крышкой может содержаться изображение. Не прикасайтесь к ремню переноса. Это может
привести к снижению качества изображения или повреждению ремня переноса, после
которого потребуется замена ремня.
1.
Откройте обходной лоток (1), осторожно откройте левую крышку (3), удерживая рычажок
(2) в приподнятом состоянии.
Если бумага застряла на участке блока фьюзера
a.
Опустите защелку.
b.
Извлеките застрявшую бумагу.
Примечание.
Не оставляйте в аппарате обрывков бумаги.
c.
Верните защелку в исходное положение.

Устранение неисправностей
WorkCentre 5019/5021
Руководство пользователя
11-31
Если бумага застряла за левой крышкой
a.
Если бумага застряла в месте, указанном на данном рисунке, извлеките ее, потянув
вверх.
b.
Если бумага застряла в месте, указанном на данном рисунке, извлеките ее, потянув
вверх.
2.
Нажав на центр левой крышки, медленно закройте ее и поднимите обходной лоток.

E-2: застревание бумаги в однолотковом модуле b, E-2: застревание бумаги, В однолотковом модуле b
Страница 166
- Изображение
- Текст
Устранение неисправностей
WorkCentre 5019/5021
Руководство пользователя
11-32
E-2: Застревание бумаги в однолотковом модуле B
Для извлечения застрявшей бумаги из-за крышки однолоткового аппарата выполните
следующие действия.
1.
Потяните за фиксирующий рычаг и осторожно откройте крышку однолоткового модуля.
2.
Извлеките застрявшую бумагу.
Примечания
•
Бумага может застрять в верхней части, где ее трудно увидеть. Внимательно
проверьте наличие застрявшей бумаги.
•
Если бумага порвется, проверьте, чтобы внутри аппарата не осталось обрывков.
3.
Осторожно закройте крышку однолоткового модуля.

E-3. застревание бумаги в лотке 1, E-3. застревание бумаги в лотке 1 -33
Страница 167
- Изображение
- Текст
Устранение неисправностей
WorkCentre 5019/5021
Руководство пользователя
11-33
E-3. Застревание бумаги в лотке 1
Для извлечения застрявшей бумаги из лотка 1 выполните следующие действия.
1.
Извлеките застрявшую бумагу, см. раздел
E-1. Застревание бумаги за левой крышкой A
на
стр. 11-30.
2.
Если застрявшая бумага не извлекается, выдвиньте лоток.
Примечание.
Если выдвинуть лоток после застревания бумаги, не определив участок
застревания, бумага может порваться и в аппарате останутся обрывки. Во избежание
повреждения аппарата определите место застревания бумаги на дисплее, прежде чем
приступать к ее извлечению.
3.
Извлеките застрявшую бумагу.
Если лоток пуст, загрузите бумагу.
Примечание.
Если бумага порвется, проверьте, чтобы внутри аппарата не осталось
обрывков.
4.
Аккуратно задвиньте лоток до упора.

E-4. застревание бумаги в лотке 2, E-4. застревание бумаги в лотке 2 -34
Страница 168
- Изображение
- Текст
Устранение неисправностей
WorkCentre 5019/5021
Руководство пользователя
11-34
E-4. Застревание бумаги в лотке 2
Для извлечения застрявшей бумаги из лотка 2 выполните следующие действия.
1.
Извлеките застрявшую бумагу, см. раздел
E-2: Застревание бумаги в однолотковом модуле
B
на стр. 11-32.
2.
Если застрявшая бумага не извлекается, выдвиньте лоток.
Примечание.
Если выдвинуть лоток после застревания бумаги, не определив участок
застревания, бумага может порваться и в аппарате останутся обрывки. Во избежание
повреждения аппарата определите место застревания бумаги на дисплее, прежде чем
приступать к ее извлечению.
3.
Извлеките застрявшую бумагу. Если лоток пуст, загрузите бумагу.
Примечание.
Если бумага порвется, проверьте, чтобы внутри аппарата не осталось
обрывков.
4.
Аккуратно задвиньте лоток до упора.

E-5. заст²евание бумаги в обходном лотке, E-5. застревание бумаги в обходном лотке -35, E-5. застревание бумаги
В обходном лотке, E-5. застревание бумаги в обходном лотке
- Изображение
- Текст
Устранение неисправностей
WorkCentre 5019/5021
Руководство пользователя
11-35
E-5. Застревание бумаги в обходном лотке
Для извлечения застрявшей бумаги из обходного лотка выполните следующие действия.
1.
Извлеките застрявшую бумагу, см. раздел
E-1. Застревание бумаги за левой крышкой A
на
стр. 11-30.
2.
Осмотрите обходной лоток изнутри (около отверстия подачи бумаги) и извлеките
застрявшую бумагу.
Примечания
•
Если вложено несколько листов бумаги, уберите их все на время извлечения
застрявшей бумаги.
•
Если бумага порвется, проверьте, чтобы внутри аппарата не осталось обрывков.
3.
Если вложено несколько листов бумаги, извлеките их и выровняйте по углам.
4.
Вложите бумагу стороной для печати вниз так, чтобы передняя кромка листов касалась
входного отверстия лотка.

Застревание оригиналов, Застревание оригиналов -36, Застревание
Оригиналов
- Изображение
- Текст
Устранение неисправностей
WorkCentre 5019/5021
Руководство пользователя
11-36
Застревание оригиналов
Если в податчике застревает оригинал, аппарат останавливается и на дисплее появляется код
ошибки A-1, A-2, A-3. На схеме состояния аппарата загорается индикатор оригиналов
и пиктограмма застревания.
Далее приведено описание извлечения застрявших оригиналов из податчика.
Примечание.
В конфигурации некоторых моделей податчик оригиналов в стандартную
комплектацию не входит.
Для извлечения застрявшего оригинала выполните следующие действия.
1.
Потяните переднюю рукоятку крышки податчика документов, затем полностью откройте
крышку податчика документа.
Примечание.
В полностью открытом положении крышка фиксируется. Открывайте крышку
осторожно.
2.
Если оригинал еще не вошел в податчик, извлеките его.

Комментарии
Во время работы с аппаратом могут возникать проблемы, связанные с неисправностями «железа» или ПО. И если расходные материалы можно просто заменить, то с «мозгами» нужно разбираться. Поэтому, для экономии времени и удобства, ниже представлены возможные коды ошибок (FAULT ERROR CODE), которые показывают Xerox DocuColor DC 240/250/242/252/260 и WorkCentre WC 7655/7665/7675/7755/7765/7775 при неисправности, и их значение:
002-770 ERROR — RAP Insufficient HDD capacity while processing the job template within a job.
003-318 ERROR — RAP IIT software failure.
003-319 ERROR — RAP IIT Video Driver Detection Fail.
003-320 ERROR — RAP IIT-ESS Communication Fail 1.
003-321 ERROR — RAP IIT-ESS Communication Fail 2.
003-322 ERROR — RAP IIT-ESS Communication Fail 3.
003-323 ERROR — RAP IIT-ESS Communication Fail 4.
003-324 ERROR — RAP IIT-ESS Communication Fail 5.
003-325 ERROR — RAP IIT-ESS Communication Fail 6.
003-326 ERROR — RAP IIT-ESS Communication Fail 7.
003-327 ERROR — RAP IIT-ESS Communication Fail 8.
003-328 ERROR — RAP IIT-ESS Communication Fail 9.
003-329 ERROR — RAP IIT-ESS Communication Fail 10.
003-330 ERROR — RAP IIT-ESS Communication Fail 11.
003-331 ERROR — RAP IIT-ESS Communication Fail 12.
003-332 ERROR — RAP IIT-ESS Communication Fail 13.
003-333 ERROR — RAP IIT-ESS Communication Fail 14.
003-334 ERROR — RAP IIT-ESS Communication Fail 15.
003-335 ERROR — RAP IIT-ESS Communication Fail 16.
003-336 ERROR — RAP IIT-ESS Communication Fail 17.
003-337 ERROR — RAP IIT-ESS Communication Fail 18.
003-338 ERROR — RAP IIT-ESS Communication Fail 19.
003-339 ERROR — RAP IIT-ESS Communication Fail 20.
003-340 ERROR — RAP IIT-ESS Communication Fail 21.
003-341 ERROR — RAP IIT-ESS Communication Fail 22.
003-342 ERROR — RAP IIT-ESS Communication Fail 23.
003-343 ERROR — RAP IIT-ESS Communication Fail 24.
003-344 ERROR — RAP Power on hotline failure.
003-345 ERROR — RAP X PIO Unmatch Fail 1.
003-346 ERROR — RAP X PIO Unmatch Fail 2.
003-750 ERROR — RAP Book Duplex-Insufficient Docs.
003-751 ERROR — RAP Under PANTHER Capacity (Scan).
003-752 ERROR — RAP This status code is displayed if 600dpi cannot be scanned (DADF).
003-753 ERROR — RAP This status code is displayed if over 300dpi cannot be scanned (DADF).
003-754 ERROR — RAP S2X Recoverable Error.
003-755 ERROR — RAP S2X Command Error.
003-757 ERROR — RAP This status code is displayed if over 400dpi cannot be scanned (DADF).
003-760 ERROR — RAP Scan Settings Error.
003-761 ERROR — RAP Incorrect Paper Tray Size.
003-763 ERROR — RAP Adjustment Chart Not Found.
003-764 ERROR — RAP Adjustment Chart Not Found.
003-780 ERROR — RAP Scan Image Compression Error.
003-795 ERROR — RAP AMS Limit Error.
003-940 ERROR — RAP DAM Memory is insufficient.
003-942 ERROR — RAP Document Size Error.
003-944 ERROR — RAP Image Repeat Count Fail.
003-946 ERROR — RAP Copy Vertical/Horizontal Difference (APS).
003-947 ERROR — RAP Replaced Original Count Error.
003-948 ERROR — RAP Replaced Original Mismatch.
003-952 ERROR — RAP Return Documents Color mismatch.
003-955 ERROR — RAP Documents Size Exchange Error.
003-956 ERROR — RAP Documents Size Unknown Error.
003-963 ERROR — RAP No APS Object Tray.
003-965 ERROR — RAP ATS/APS No Paper. There is no paper in the trays that can be selected with APS.
003-966 ERROR — RAP AATS/APS No Destination Error.
003-968 ERROR — RAP Punch Position Error.
003-969 ERROR — RAP Punch Size Error.
003-972 ERROR — RAP Maximum Stored Page Over Flow.
003-973 ERROR — RAP Every Direction Difference.
003-974 ERROR — RAP Next Original Specification.
003-977 ERROR — RAP Document Miss Match (Multi Scan).
003-978 ERROR — RAP Color Document Mismatch (Multi Scan).
003-980 ERROR — RAP Staple Position Error.
003-981 ERROR — RAP Staple Size Error.
003-982 ERROR — RAP IITsc HDD Access Error.
005-121 ERROR — RAP DADF Feed Sensor ON Jam.
005-122 ERROR — RAP DADF Simplex/Side 1 Pre Reg Sensor ON Jam.
005-123 ERROR — RAP DADF Simplex/Side 1 Reg Sensor ON Jam.
005-124 ERROR — RAP DADF Lead Reg Sensor ON Jam.
005-125 ERROR — RAP DADF Reg Sensor OFF Jam.
005-126 ERROR — RAP DADF Out Sensor ON Jam.
005-127 ERROR — RAP DADF Out Sensor OFF Jam.
005-128 ERROR — RAP DADF Exit Sensor 1 ON Jam (Simplex Mode).
005-129 ERROR — RAP DADF Exit Sensor 1 OFF Jam (Simplex Mode).
005-130 ERROR — RAP DADF Invert Sensor ON Jam (Duplex Mode).
005-131 ERROR — RAP DADF Invert Sensor On Jam (Inverting).
005-132 ERROR — RAP DADF Invert SNR on Jam 2.
005-133 ERROR — RAP DADF Invert Sensor OFF Jam.
005-134 ERROR — RAP DADF Invert SNR off Jam (Inv).
005-135 ERROR — RAP DADF Pre Reg Sensor ON Jam (Invert).
005-136 ERROR — ERROR — RAP DADF Reg Sensor ON Jam (Invert).
005-137 ERROR — RAP DADF Exit Sensor 2 ON Jam.
005-138 ERROR — RAP DADF Exit Sensor 1 ON Jam.
005-139 ERROR — RAP DADF Invert SNR off Jam.
005-141 ERROR — RAP DADF Feed Sensor OFF Jam.
005-142 ERROR — RAP DADF Exit Sensor 1 OFF Jam (Duplex Mode).
005-143 ERROR — RAP DADF Exit Sensor 2 OFF Jam.
005-144 ERROR — RAP DADF Too First Pre Reg Sensor ON Jam.
005-145 ERROR — RAP DADF Reg Sensor Off Jam (Invert).
005-146 ERROR — RAP DADF Pre Reg Sensor Off Jam.
005-147 ERROR — RAP DADF Pre Reg Sensor Off Jam (Invert).
005-150 ERROR — RAP DADF Feed Sensor OFF Jam (Perforated Original Mode).
005-151 ERROR — RAP DADF Pre Reg Sensor OFF Jam (Perforated Original Mode).
005-152 ERROR — RAP DADF Reg Sensor OFF Jam (Perforated Original Mode).
005-153 ERROR — RAP DADF Reg Sensor OFF Jam (Perforated Original Mode).
005-154 ERROR — RAP DADF Out Sensor OFF Jam (Perforated Original Mode).
005-155 ERROR — RAP DADF Exit Sensor 1 OFF Jam (Perforated Original Mode) (Simplex).
005-156 ERROR — RAP DADF Exit Sensor 1 OFF Jam (Perforated Original Mode) (Duplex).
005-157 ERROR — RAP DADF Invert Sensor OFF Jam (Perforated Original Mode).
005-158 ERROR — RAP DADF Exit Sensor 2 OFF Jam (Perforated Original Mode).
005-160 ERROR — RAP DADF Tray Lift Up Fail (Document Set) (Within Job).
005-190 ERROR — RAP DADF Feed Motor Logic Jam.
005-194 ERROR — RAP Size Mismatch Jam on Slow Scan Mix Size.
005-195 ERROR — RAP Size Mismatch Jam on No Mix Size.
005-196 ERROR — RAP Size Mismatch Jam on No Mix Size.
005-197 ERROR — RAP Prohibit Combine Size Jam.
005-198 ERROR — RAP Too Short Size Jam.
005-199 ERROR — RAP Too Long Size Jam.
005-275 ERROR — RAP DADF RAM Fail.
005-280 ERROR — RAP DADF EEPROM Fail.
005-282 ERROR — RAP DADF Tray Lift Up Fail (No Document).
005-283 ERROR — RAP DADF Stack Height Sensor Logic Fail.
005-284 ERROR — RAP DADF APS Sensor Logic Fail.
005-285 ERROR — RAP DADF Nudger Lift Up Fail.
005-286 ERROR — RAP DADF Feed Out Sensor Fail.
005-303 ERROR — RAP DADF Tray Interlock is open.
005-304 ERROR — RAP Platen Interlock Open.
005-305 ERROR — RAP DADF Feeder Cover Interlock Open (Run).
005-306 ERROR — RAP DADF Tray Interlock Open (Run).
005-308 ERROR — RAP The DADF L/H Cover Interlock is open.
005-309 ERROR — RAP DADF L/H Cover Interlock Open (Run).
005-906 ERROR — RAP DADF Feed Sensor Static Jam.
005-907 ERROR — RAP DADF Pre Reg Sensor Static Jam.
005-908 ERROR — RAP DADF Reg Sensor Static Jam.
005-909 ERROR — RAP DADF Lead Reg Sensor Static Jam..
005-910 ERROR — RAP DADF Out Sensor Static Jam.
005-911 ERROR — RAP DADF Exit Sensor 1 Static Jam.
005-912 ERROR — RAP DADF Exit Sensor 2 Static Jam.
005-913 ERROR — RAP DADF Invert Sensor Static Jam.
005-914 ERROR — RAP DADF No. 1/2/3 APS Sensor Static Jam.
005-915 ERROR — RAP DADF No. 1 APS Sensor Static Jam.
005-916 ERROR — RAP DADF No. 2 APS Sensor Static Jam.
005-917 ERROR — RAP DADF No. 3 APS Sensor Static Jam.
005-918 ERROR — RAP DADF Invert Sensor 2 Static Jam.
005-919 ERROR — RAP DADF Tray Lift Up Fail (Document Set).
005-940 ERROR — RAP DADF No Original Fail.
005-941 ERROR — RAP DADF Not Enough Document.
005-942 ERROR — RAP DADF Tray Stack Over Fail.
010-311 ERROR — RAP Fuser Heat Roll STS-1 Disconnection Fail. It was detected that fuser heat roll STS-1 disconnected.
010-319 ERROR — RAP Fuser NC Sensor Differential Amp Fail.
010-320 ERROR — RAP Heat Roll Over Heat Fail.
010-321 ERROR — RAP Fuser Nip Fail.
010-322 ERROR — RAP Fuser NC Center Sensor Disconnection Fail. (Fuser Temperature Sensor Fail).
010-323 ERROR — RAP Fuser Rear Sensor Disconnection Fail. (Fuser Temperature Sensor Fail).
010-324 ERROR — RAP Fuser NVM Fail.
010-326 ERROR — RAP Wait Heat Roll Fuser On Time Fail.
010-327 ERROR — RAP Standby Heat Roll Fuser On Time Fail.
010-330 ERROR — RAP Fuser Motor Fail.
010-420 ERROR — RAP Fuser Assembly Life Near End.
010-421 ERROR — RAP Fuser Assembly Life End.
012-112 ERROR — RAP Finisher Interface Entrance Sensor ON.
012-113 ERROR — RAP Booklet In Sensor ON Jam.
012-114 ERROR — RAP Booklet In Sensor OFF Jam.
012-115 ERROR — RAP Booklet Folder Roll Exit Sensor ON Jam.
012-125 ERROR — RAP Gate Sensor ON JAM: Finisher.
012-132 ERROR — RAP Finisher Transport Entrance Sensor ON Jam (Long).
012-142 ERROR — RAP Buffer Path Sensor ON Jam A.
012-151 ERROR — RAP Compile Exit Sensor OFF Jam.
012-152 ERROR — RAP Compile Exit Sensor ON Jam A.
012-161 ERROR — RAP Set Eject Jam.
012-162 ERROR — RAP Finisher Interface EXIT. Sensor ON Jam.
012-171 ERROR — RAP Top Tray Exit Sensor ON Jam A.
012-172 ERROR — RAP Top Tray Exit Sensor OFF Jam A.
012-180 ERROR — RAP Booklet Folder Roll Exit Sensor OFF Jam.
012-211 ERROR — RAP Stacker Tray Fail.
012-212 ERROR — RAP Stacker Tray Upper Limit Fail.
012-213 ERROR — RAP Stacker Tray Lower Limit Fail.
012-221 ERROR — RAP Tamper Home Sensor ON Fail.
012-223 ERROR — RAP Tamper Home Sensor OFF Fail.
012-224 ERROR — RAP Rear Tamper Home Sensor OFF Fail.
012-225 ERROR — RAP Booklet Tamper F Home Sensor ON Fail.
012-226 ERROR — RAP Booklet Tamper F Home Sensor OFF Fail.
012-227 ERROR — RAP Booklet End Guide Home Sensor OFF Fail.
012-228 ERROR — RAP Booklet End Guide Home Sensor ON Fail.
012-229 ERROR — RAP Booklet Tamper R Home Sensor ON Fail.
012-230 ERROR — RAP Booklet Tamper R Home Sensor OFF Fail.
012-243 ERROR — RAP Booklet Knife Home Sensor ON Fail.
012-246 ERROR — RAP Booklet Stapler Fail.
012-247 ERROR — RAP Side Regi Sensor OFF Fail.
012-260 ERROR — RAP Eject Clamp Up Sensor ON Fail.
012-261 ERROR — RAP Booklet Knife Folding SNR Fail.
012-263 ERROR — RAP Finisher Rear Tamper Home Sensor ON.
012-264 ERROR — RAP Booklet Drawer Broken Fail.
012-265 ERROR — RAP Booklet Knife Home Sensor OFF Fail.
012-266 ERROR — RAP Booklet Compiler No Paper Sensor Fail.
012-270 ERROR — RAP Top Offset Home Sensor ON Fail: Finisher.
012-271 ERROR — RAP Top Offset Home Sensor OFF Fail: Finisher.
012-282 ERROR — RAP Eject Clamp Up Sensor OFF Fail.
012-283 ERROR — RAP Finisher Set Clamp Home Sensor ON Fail.
012-284 ERROR — RAP Finisher Set Clamp Home Sensor OFF Fail.
012-291 ERROR — RAP Stapler Fail.
012-295 ERROR — RAP Finisher Stapler Move Sensor On Fail.
012-296 ERROR — RAP Finisher Stapler Move Sensor OFF Fail.
012-300 ERROR — RAP Finisher Eject Cover Open (Compiler Cover).
012-302 ERROR — RAP Finisher Front Door Interlock Open.
012-307 ERROR — RAP Booklet Drawer Set Fail.
012-320 ERROR — RAP Punch Home Sensor ON Fail.
012-321 ERROR — RAP Punch Home Sensor OFF Fail.
012-322 ERROR — RAP Puncher Move Home Sensor OFF Fail.
012-323 ERROR — RAP Puncher Move Home Sensor On Fail.
012-325 ERROR — RAP Side Regi Home Sensor On Fail.
012-330 ERROR — RAP Decurler Cam Home Sensor OFF Fail.
012-332 ERROR — RAP Decurler Cam Home Sensor ON Fail.
012-334 ERROR — RAP Download Mode Fail.
012-335 ERROR — RAP Booklet Sub CPU Communication Fail.
012-900 ERROR — RAP Buffer Path Sensor Static Jam.
012-901 ERROR — RAP Finisher Paper Remains at H-Transport Entrance.
012-902 ERROR — RAP Finisher Paper Remains H-Transport Exit.
012-903 ERROR — RAP Compile Exit Sensor Static Jam.
012-905 ERROR — RAP Compile Tray No Paper Sensor Static Jam.
012-907 ERROR — RAP Top Tray Exit Sensor Static Jam.
012-920 ERROR — RAP Gate Sensor static JAM (to Top Tray) A: Finisher.
012-932 ERROR — RAP Gate SNR static JAM (to Stacker Tray) A.
012-934 ERROR — RAP Gate SNR static JAM (to Stacker Tray) C.
012-935 ERROR — RAP Finisher Paper Remains at Transport Entrance Sensor.
012-936 ERROR — RAP Paper Remain at Booklet In SNR A.
012-949 ERROR — RAP Finisher Punch DustBox Miss Set.
013-902 ERROR — RAP Booklet Compile No Paper Sensor Static Jam.
013-903 ERROR — RAP Booklet Folder Roll Exit Sensor Static Jam.
016-210 ERROR — RAP Software Option Fail (HDD Not Exist).
016-211 ERROR — RAP Software Option Fail (System Memory Low Volume).
016-212 ERROR — RAP SW Option Fail (Page Memory Low).
016-213 ERROR — RAP SW Option Fail (Printer CARD Not Exist).
016-215 ERROR — RAP SW Option Fail (JPEG Board Not Exist).
016-216 ERROR — RAP SW Option Fail (Ext Memory Not Exist).
016-217 ERROR — RAP SW Option Fail (Controller ROM not Printer kit).
016-218 ERROR — RAP Because PS Kit is not installed, XDOD functions cannot be fulfilled.
016-219 ERROR — RAP License is required (Printer Kit).
016-220 ERROR — RAP S2X Unrecoverable Error.
016-221 ERROR — RAP S2X Communication Error.
016-222 ERROR — RAP S2X Self-Diag Error.
016-223 ERROR — RAP SS2X SDRAM Error.
016-224 ERROR — RAP S2X PCI Reg Error.
016-225 ERROR — RAP S2X ROM CheckSum Error.
016-226 ERROR — RAP S2X IIT Connection Error.
016-227 ERROR — RAP S2X DDR Error.
016-228 ERROR — RAP S2X Image Processing Error.
016-229 ERROR — RAP SW Option Fail (FCW-UI Not Exist).
016-311 ERROR — RAP The scanner was not detected.
016-315 ERROR — RAP NIIT Interface Fail.
016-316 ERROR — RAP Page Memory Not Detected.
016-317 ERROR — RAP Page Memory Broken-Standard.
016-318 ERROR — RAP Page Memory Broken-Option.
016-320 ERROR — RAP A fatal error with doc conversion software was detected.
016-322 ERROR — RAP JBA Account Full.
016-450 ERROR — RAP SMB Host Name Duplicated.
016-454 ERROR — RAP DNS Renewal Failure of Dynamic.
016-455 ERROR — RAP SNTP Server Time Out.
016-456 ERROR — RAP SNTP Time Asynchronous.
016-503 ERROR — RAP SMTP Server Address Resolution Fail.
016-504 ERROR — RAP POP Server Address Resolution Fail.
016-505 ERROR — RAP POP Authentication Fail.
016-600 ERROR — RAP KO Authentication Locked.
016-601 ERROR — RAP Illegal Access Detection.
016-647 ERROR — RAP With APS selected or with APS set up, there were no trays loaded with paper sizes for Auto Paper Selection.
016-648 ERROR — RAP Job with Booklet selected was discontinued because it had a cover with an image, a divider, or a blank page.
016-701 ERROR — RAP Out of ART EX Memory.
016-702 ERROR — RAP Out of Page Buffer.
016-703 ERROR — RAP Email to Invalid Box.
016-704 ERROR — RAP Mailbox is Full.
016-705 ERROR — RAP Secure Print Fail.
016-706 ERROR — RAP Max. User Number Exceeded.
016-707 ERROR — RAP Sample Print Fail.
016-708 ERROR — RAP HD Full by Annotation/Watermark Image.
016-709 ERROR — RAP ART EX Command Error.
016-710 ERROR — RAP Delayed Print Fail.
016-711 ERROR — RAP Tried to send data whose size is over the system data upper limit.
016-712 ERROR — RAP Under PANTHER Capacity (I-Formatter).
016-713 ERROR — RAP Security Box Password Error.
016-714 ERROR — RAP Security Box is not Enabled.
016-716 ERROR — RAP TIFF Data Overflow.
016-718 ERROR — RAP Out of PCL6 Memory.
016-719 ERROR — RAP Out of PCL Memory.
016-720 ERROR — RAP PCL Command Error.
016-721 ERROR — RAP Other Error.
016-722 ERROR — RAP Job Cancel by Staple Position NG.
016-723 ERROR — RAP Job Cancel by Punch Position NG.
016-724 ERROR — RAP Complex Position Error of Staple and Punch.
016-726 ERROR — RAP PDL Auto Switch Fail.
016-728 ERROR — RAP Unsupported TIFF Data.
016-729 ERROR — RAP TIFF Data Size too Big.
016-730 ERROR — RAP Unsupported ART Command.
016-731 ERROR — RAP Invalid TIFF Data.
016-732 ERROR — RAP Form Not Registered.
016-733 ERROR — RAP Destination Address Resolution Error.
016-734 ERROR — RAP Simple Transmission report invocation error.
016-735 ERROR — RAP Updating Job Template.
016-736 ERROR — RAP Remote directory lock error. Lock directory creation failed.
016-737 ERROR — RAP Remote lock directory remove error.
016-738 ERROR — RAP PS Booklet Print Output Paper Size is illegal.
016-739 ERROR — RAP Mismatch between PS Booklet Doc and Output Paper.
016-740 ERROR — RAP PS Booklet Output Tray is incorrect.
016-746 ERROR — RAP Unsupported PDF File.
016-748 ERROR — RAP HD Full.
016-749 ERROR — RAP JCL Syntax Error.
016-751 ERROR — RAP PDF Error.
016-752 ERROR — RAP PDF Short of Memory.
016-753 ERROR — RAP PDF Password Mismatched.
016-754 ERROR — RAP PDF LZW Not Installed.
016-755 ERROR — RAP PDF Print Prohibited.
016-756 ERROR — RAP Auditron-Prohibit Service.
016-757 ERROR — RAP Auditron-Invalid User.
016-758 ERROR — RAP Auditron-Disabled Function.
016-759 ERROR — RAP Auditron-Reached Limit.
016-760 ERROR — RAP PS Decompose Failure.
016-761 ERROR — RAP FIFO Empty.
016-762 ERROR — RAP Print LANG Not Installed.
016-764 ERROR — RAP SMTP Server Connect Error.
016-765 ERROR — RAP SMTP Server HD Full.
016-766 ERROR — RAP SMTP Server File System Error.
016-767 ERROR — RAP Invalid E-mail Address.
016-768 ERROR — RAP Invalid Sender Address.
016-769 ERROR — RAP SMTP Server Unsupported DSN.
016-771 ERROR — RAP Scan Data Repository ERR.
016-772 ERROR — RAP Scan Data Repository ERR.
016-773 ERROR — RAP Invalid IP Address.
016-774 ERROR — RAP HD Full-Compression Convert.
016-775 ERROR — RAP HD Full-Image Convert.
016-776 ERROR — RAP Image Convert ERR.
016-777 ERROR — RAP HD Access ERR-Image Convert.
016-778 ERROR — RAP HD Full-Scan Image Convert.
016-779 ERROR — RAP Scan Image Conversion Error.
016-780 ERROR — RAP HD Access ERR-Image Convert.
016-781 ERROR — RAP Scan Server Connect ERR.
016-782 ERROR — RAP Scan Server Login ERR.
016-783 ERROR — RAP Invalid Server Path.
016-784 ERROR — RAP Server Write ERR.
016-785 ERROR — RAP Server HD Full.
016-786 ERROR — RAP HD Full-Scan Write ERR.
016-787 ERROR — RAP Invalid Server IP ADD.
016-788 ERROR — RAP Retrieve to Browser Failed.
016-789 ERROR — RAP HD Full-Job Memory.
016-791 ERROR — RAP File Retrieve Fail.
016-792 ERROR — RAP Specified Job Not Found.
016-793 ERROR — RAP MF I/O HD Full.
016-794 ERROR — RAP Media Reader: Media No Insert.
016-795 ERROR — RAP Media Reader: Format Error.
016-796 ERROR — RAP Document insert operation error.
016-797 ERROR — RAP Media Reader: Image File Read Error.
016-798 ERROR — RAP No Trust Marking Option.
016-799 ERROR — RAP Print Instruction Fail.
016-940 ERROR — RAP With Duplex Output selected, a size difference between side 1 and side 2 was detected.
016-941 ERROR — RAP With Booklet selected, mixed-in-size/orientation pages with images were detected.
016-942 ERROR — RAP After a duplexed page was deleted, a size difference between side 1 and side 2 was detected.
016-943 ERROR — RAP After a document or divider was inserted, a size difference between side 1 and side 2 was detected.
016-944 ERROR — RAP Documents were merged, including the cover with an image, or a document with a divider.
016-945 ERROR — RAP A document unavailable for duplex print was inserted after a document available for Duplex was inserted.
016-946 ERROR — RAP A document or a divider was inserted after the cover or divider page.
016-949 ERROR — RAP The user inserted a documnet different in size/orientation from the page to be processed.
016-981 ERROR — RAP A failure in access to HDD.
016-982 ERROR — RAP HDD Access Error 2.
016-985 ERROR — RAP Data Size Over Flow (Scan to Email).
024-340 ERROR — RAP IOT-ESS Communication Failure 1.
024-341 ERROR — RAP IOT-ESS Communication Failure 2.
024-342 ERROR — RAP IOT-ESS Communication Failure 3.
024-343 ERROR — RAP IOT-ESS Communication Failure 4.
024-345 ERROR — RAP IOT-ESS Communication Failure 5.
024-346 ERROR — RAP IOT-ESS Communication Failure 6.
024-347 ERROR — RAP IOT-ESS Communication Failure 7.
024-348 ERROR — RAP IOT-ESS Communication Failure 8.
024-349 ERROR — RAP IOT-ESS Communication Failure 9.
024-350 ERROR — RAP IOT-ESS Communication Failure 10.
024-351 ERROR — RAP IOT-ESS Communication Failure 11.
024-352 ERROR — RAP IOT-ESS Communication Failure 12.
024-353 ERROR — RAP IOT-ESS Communication Failure 13.
024-354 ERROR — RAP IOT-ESS Communication Failure 14.
024-355 ERROR — RAP IOT-ESS Communication Failure 15.
024-356 ERROR — RAP IOT-ESS Communication Failure 16.
024-357 ERROR — RAP IOT-ESS Communication Failure 17.
024-358 ERROR — RAP IOT-ESS Communication Failure 18.
024-359 ERROR — RAP IOT-ESS Communication Failure 19.
024-360 ERROR — RAP IOT-ESS Initialization Failure.
024-361 ERROR — RAP Invalid IOT PaperSizeGroup Information.
024-362 ERROR — RAP Page Sync Illegal Start.
024-363 ERROR — RAP Page Sync Illegal Stop.
024-364 ERROR — RAP DMA Transfer Failure.
024-365 ERROR — RAP Overflow on the Loop Back Write.
024-366 ERROR — RAP JBIG Library Other Failure.
024-367 ERROR — RAP Decompress Other Failure.
024-368 ERROR — RAP PCI Error.
024-370 ERROR — RAP Marker Code Detect Failure.
024-371 ERROR — RAP IOT-ESS Communication Failure 21.
024-372 ERROR — RAP IOT-ESS Communication Failure 22.
024-373 ERROR — RAP IOT-ESS Communication Failure 23.
024-374 ERROR — RAP Regi Con PLL Parameter Failure.
024-375 ERROR — RAP IOT-ESS Communication Failure 24.
024-600 ERROR — RAP Billing master counter repair.
024-601 ERROR — RAP Billing backup counter #1 repair.
024-602 ERROR — RAP Billing backup counter #2 repair.
024-603 ERROR — RAP SWKey master counter repair.
024-604 ERROR — RAP SWKey backup counter #1 repair.
024-605 ERROR — RAP SWKey backup counter #2 repair.
024-606 ERROR — RAP Production Number/Serial Number Failure.
024-746 ERROR — RAP Selected Paper Tray Parameter Mismatch.
024-747 ERROR — RAP Print Instruction Failure.
024-910 ERROR — RAP Tray 1 Size Mismatch.
024-911 ERROR — RAP Tray 2 Size Mismatch.
024-912 ERROR — RAP Tray 3 Size Mismatch.
024-913 ERROR — RAP Tray 4 Size Mismatch.
024-914 ERROR — RAP Tray 6 Size Mismatch.
024-915 ERROR — RAP Tray 7 Size Mismatch.
024-917 ERROR — RAP Stacker Tray Staple Set Over Count.
024-919 ERROR — RAP Face UP Tray Close.
024-920 ERROR — RAP Face Down Tray 1 Paper FULL.
024-922 ERROR — RAP Face Down Tray 2 Paper FULL.
024-923 ERROR — RAP Operation Yellow Toner Empty.
024-924 ERROR — RAP Operation Magenta Toner Empty.
024-925 ERROR — RAP Operation Cyan Toner Empty.
024-926 ERROR — RAP Punch Dust Box Missing Set.
024-927 ERROR — RAP Offset Catch Tray Full Stack.
024-930 ERROR — RAP Stacker Tray Full (Small Size Full).
024-934 ERROR — RAP Paper type mismatch.
024-935 ERROR — RAP Tray 1 Paper Mismatch.
024-936 ERROR — RAP Tray 2 Paper Mismatch.
024-937 ERROR — RAP Tray 3 Paper Mismatch.
024-938 ERROR — RAP OHP kind Mismatch at Tray 4 (Not White Frame OHP).
024-939 ERROR — RAP Transparency type mismatch (No white border).
024-940 ERROR — RAP Folder Tray Out of Place.
024-941 ERROR — RAP Folder Tray Full Stack.
024-942 ERROR — RAP Booklet Sheets Over Count.
024-943 ERROR — RAP Booklet Low Staple.
024-945 ERROR — RAP Booklet Full Stack.
024-946 ERROR — RAP Tray 1 Not In Position.
024-947 ERROR — RAP Tray 2 Not In Position.
024-948 ERROR — RAP Tray 3 Not In Position.
024-949 ERROR — RAP Tray 4 Not In Position.
024-950 ERROR — RAP Tray 1 No Paper.
024-951 ERROR — RAP Tray 2 No Paper.
024-952 ERROR — RAP Tray 3 No Paper.
024-953 ERROR — RAP Tray 4 No Paper.
024-954 ERROR — RAP MSI No Paper.
024-955 ERROR — RAP Tray 6 No Paper.
024-956 ERROR — RAP Tray 7 No Paper.
024-957 ERROR — RAP Interposer No Paper.
024-958 ERROR — RAP MSI Size Mismatch.
024-959 ERROR — RAP Tray 1 Paper Size Mismatch.
024-960 ERROR — RAP Tray 2 Paper Size Mismatch.
024-961 ERROR — RAP Tray 3 Paper Size Mismatch.
024-962 ERROR — RAP Tray 4 Paper Size Mismatch.
024-965 ERROR — RAP ATS/APS No Paper.
024-966 ERROR — RAP ATS/APS No Destination Error.
024-967 ERROR — RAP Different Width Mix Paper Detect (Staple Job).
024-968 ERROR — RAP Stapler/Punch Batting.
024-969 ERROR — RAP Different Width Mix Punch.
024-970 ERROR — RAP Tray 6 Not In Position.
024-971 ERROR — RAP Tray 7 Not In Position.
024-972 ERROR — RAP Tray 6 Paper Size Mismatch.
024-973 ERROR — RAP Tray 7 Paper Size Mismatch.
024-974 ERROR — RAP Interposer Tray Size Mismatch.
024-975 ERROR — RAP Booklet Sheets Over Count (Not Field Attachment).
024-976 ERROR — RAP Finisher Staple Status incorrect.
024-977 ERROR — RAP Stapler Feed Ready Failure.
024-978 ERROR — RAP Booklet Stapler incorrect.
024-979 ERROR — RAP Stapler Near Empty.
024-980 ERROR — RAP Finisher Stacker Tray Full.
024-981 ERROR — RAP Finisher Top Tray Full.
024-982 ERROR — RAP Stacker Lower Safety Warning.
024-983 ERROR — RAP Booklet Tray Full.
024-984 ERROR — RAP Booklet Low Staple F.
024-985 ERROR — RAP SMH Stop Check.
024-987 ERROR — RAP Envelope Folder Tray Full.
024-988 ERROR — RAP Envelope Folder Tray Set Failure.
024-989 ERROR — RAP Booklet Low Staple R.
024-990 ERROR — RAP Punch Dust Full.
025-596 ERROR — RAP Diag HDD Failure 1.
025-597 ERROR — RAP Diag HDD Failure 2.
027-452 ERROR — RAP Duplicate IP address.
027-500 ERROR — RAP SMTP Server Address Resolution Failure.
027-501 ERROR — RAP POP Server Address Resolution Failure.
027-502 ERROR — RAP POP Authentication Failure.
027-700 ERROR — RAP Media Failure.
027-701 ERROR — RAP Media Not Found.
027-702 ERROR — RAP Media Data Not Found / Not Supported.
027-703 ERROR — RAP Media Reader Failure / Disconnected.
027-706 ERROR — RAP Certificate not found.
027-707 ERROR — RAP Certificate expired.
027-708 ERROR — RAP Certificate untrusted.
027-709 ERROR — RAP Certificate revoked.
027-710 ERROR — RAP S/MIME mail was disabled.
027-711 ERROR — RAP S/MIME mail sender certificate not found.
027-712 ERROR — RAP S/MIME mail sender certificate not valid.
027-713 ERROR — RAP S/MIME mail was altered.
027-714 ERROR — RAP S/MIME mail sender impersonation.
027-715 ERROR — RAP S/MIME mail certificate not supported.
027-716 ERROR — RAP No-Signed mail receipt was rejected.
027-720 ERROR — RAP Ext Srv. Host Not Found. A server specified for a remote application was not found, or DNS resolution was not possible.
027-721 ERROR — RAP Ext Srv. Not Found.
027-722 ERROR — RAP Ext Srv. Timeout Failure.
027-723 ERROR — RAP Ext Srv. Authentication Failure.
027-724 ERROR — RAP Ext Srv. Access Failure.
027-725 ERROR — RAP Ext Srv. Operation Failure.
027-726 ERROR — RAP Ext Srv. Unknown State.
027-727 ERROR — RAP Ext Srv. Req Invalid Parameters.
027-728 ERROR — RAP Ext Srv. Required File Exceeded.
027-737 ERROR — RAP Template Server Read Error.
027-739 ERROR — RAP Invalid Template Server Path.
027-740 ERROR — RAP Template Server Login Error.
027-741 ERROR — RAP Template Server Connect Failure.
027-742 ERROR — RAP HD File System Full.
027-743 ERROR — RAP Template Server Install Error.
027-744 ERROR — RAP Template Server ADD Error.
027-745 ERROR — RAP Template Server ADD Error.
027-746 ERROR — RAP Job Template Pool Server Not Ready.
027-751 ERROR — RAP Job Template Analysis Error.
027-752 ERROR — RAP Must User un Inputting.
027-753 ERROR — RAP Job Flow Service Request Disabled.
027-760 ERROR — RAP XJT Command Failure.
027-770 ERROR — RAP PDL Error.
027-771 ERROR — RAP DFE Disk Full.
027-796 ERROR — RAP Email Not Printed.
027-797 ERROR — RAP Invalid Output Destination.
042-313 ERROR — RAP Rear Cooling Fan Failure.
042-320 ERROR — RAP Yellow Drum Motor Drive Failure.
042-321 ERROR — RAP Magenta Drum Motor Drive Failure.
042-322 ERROR — RAP Cyan Drum Motor Drive Failure.
042-323 ERROR — RAP Black Drum Motor Drive Failure.
042-324 ERROR — RAP IBT Drive Motor Failure.
042-325 ERROR — RAP Main Motor Failure.
042-326 ERROR — RAP Belt Home Position too long.
042-327 ERROR — RAP Belt Position Failure.
042-328 ERROR — RAP Belt Edge Sensor Failure.
042-330 ERROR — RAP Fuser Exhaust Fan Failure.
042-331 ERROR — RAP Blower Motor Fan Failure.
042-600 ERROR — RAP Belt Walk Failure.
042-601 ERROR — RAP Belt Edge Learn Failure.
042-602 ERROR — RAP Belt Edge Check Failure.
042-603 ERROR — RAP Suction Filter Life End Failure.
045-310 ERROR — RAP Image Ready NG.
045-311 ERROR — RAP Controller Comm Failure.
045-312 ERROR — RAP Driver Connect Failure.
047-210 ERROR — RAP OCT Offset Failure.
047-310 ERROR — RAP MCU-Finisher Communication Failure.
061-310 ERROR — RAP Clapper 1 Failure.
061-311 ERROR — RAP Clapper 2 Failure.
061-313 ERROR — RAP SOS Long Failure Magenta.
061-315 ERROR — RAP SOS Long Failure Black.
061-317 ERROR — RAP SOS Short Failure.
061-319 ERROR — RAP SOS Short Failure Black.
061-320 ERROR — RAP Polygon Motor Failure.
061-321 ERROR — RAP ROS Motor Failure.
Содержание
- Xerox 5021 j5 error
- Xerox 5021 j5 error
- Xerox 5021 j5 error
- Xerox 5021 j5 error
- Устранение неисправностей на принтере Xerox WorkCentre 5021
- Неисправности аппарата
- Отпечатки светлые (блеклые, нечеткие)
- На копиях появляются черные пятна
- На отпечатках с равными интервалами появляется загрязнение
- На участках заполнения черным цветом появляются белые пятна
- На руках остаются следы от отпечатков
- Направление подачи бумаги
- Проблемы с копиями
- Печать не выполняется
- Проблемы с отпечатками
- Проблемы при сканировании
- Сканирование не выполняется
- Данные сканирования не загружаются на компьютер
- Проблемы с качеством изображения сканирования
- Коды ошибок
- Примеры отображения кодов ошибки
- Код ошибки (X-X)
- Застревание бумаги
- E-1. Застревание бумаги за левой крышкой A
- E-2: Застревание бумаги в однолотковом модуле B
- E-3. Застревание бумаги в лотке 1
- E-4. Застревание бумаги в лотке 2
- E-5. Застревание бумаги в обходном лотке
- Застревание оригиналов
Xerox 5021 j5 error
КОНФЕРЕНЦИЯ СТАРТКОПИ
Принтеры, копировальные аппараты, МФУ, факсы и другая офисная техника:
вопросы ремонта, обслуживания, заправки, выбора
0. mangutkin 10.06.15 14:28
Кто сталкивался с проблемой? принтер пишет ошибку J-5. Грешили на чип, но после замены с другим чипом ошибка осталась.
1. northpiter 10.06.15 14:47
3. mangutkin 11.06.15 08:32
ну это понятно. проблема в общем то решена с ошибкой. Её причиной был элементарно чип.
4. mangutkin 11.06.15 08:42
заказали чип оригинал, поставили и поняли что картриджи в общем не очень хорошо печатают, их было два старых. у обоих ушлепаные силеновые. да и дивилопер на подходе. было решено взять новые картриджи драм.,
но вот незадача новые картриджи пишут j-5.
ну ладно! меняем чип — ошибка пропала! ура.
но вот незадача! бумага не доходя до картриджа останавливается и пишет 061-321 (произошла ошибка выклоючить и включить аппарат) пробуем и ошибка та же!
меняю крышку драма от старого (под которой чип стоит) и — Ура. начал печатать!
но вот незадача ! лист совершенно белый!
пока что кроме матерных слов в голову ни чего не пришло)) мож кто чего посоветует?
заранее благодарен!
5. Портной Нёма 11.06.15 11:16
mangutkin (4): заказали чип оригинал, — уже смешно, учитывая то, что производитель отдельно чипами не торгует.
мож кто чего посоветует? Совет один — начать учить матчасть и разобраться с принципом работы аппарата в частности с системой работы CRUM.
Настораживает появление кода 061-321. Сбой лазера — не просто так.
6. komardin_dima 11.06.15 12:59
(4) Учите сначала мат часть а потом лезьте в аппарат. А лучше отдайте в офф сервисный центр
7. komardin_dima 11.06.15 13:02
(5) может у данного человека дядя на заводе ксерокса работает )))) у него(дяди) этих чипов просто завались )) вот и шлют кому не поподя ))))
8. mangutkin 21.06.15 13:57
Портной Нёма (5): mangutkin (4): заказали чип оригинал, — уже смешно, учитывая то, что производитель отдельно чипами не торгует.
Суровое начальство утверждает что чип оригинал. )))))
9. mangutkin 21.06.15 14:04
Да ладно с юмором все понятно. по поводу машины ни чего понятного нет! есть пять десять заводов выпускающих разные принтеры и комплектующие вроде бы как на одну и ту же модель, но в то же время ни чего ни к чему не подходит. если не по размерам то по схеме.
Решено было следующее выдрать комплектующие нового друма и воткнуть их в старый который как ни как худо но печатал.
машина работает, ошибок нет, клиент доволен!
10. mangutkin 21.06.15 14:05
Вопрос что такое мат часть? если кому не сложно объяснить. буду благодарен
Источник
Xerox 5021 j5 error
КОНФЕРЕНЦИЯ СТАРТКОПИ
Принтеры, копировальные аппараты, МФУ, факсы и другая офисная техника:
вопросы ремонта, обслуживания, заправки, выбора
Имеются 2 аппарата wc 5019 :
В 1ом аппарате качество печати плохое но работает. Требуется драм картридж поменять ( который идет с девелопером чипом и . )
2й аппарат пишет ошибку j5 и все на этом. сброс настроек делал 999 999 не помогло, менял чип в принт картридже (китайский брал в чипкарте) увы все равно пишет j5 .
1)Подскажите если я поставлю чип с 1го аппарата ( где стоит оригинальная расходка) во второй будет ли работать?
2)Если я поставлю блок с нерабочего на рабочий будет ли работать и не убьет ли это мать.
Вообще конечно буду эксперементировать, но хотелось бы помощи. Спасибо всем кто откликнулся и простите если что не так отписал.
Только что в нерабочем аппарате скинул ячейку 095 910 поствил 0 он пожужжал и выдал уже другую ошибка 093 956
Усовец (1): 093 956
093-956 Drum New CRU Installation Fail
During the developing powder installation mode after installing the Drum Cartridge, the ATC Measured Value is found to be abnormal. (Seal not removed)
1. Remove the developing powder seal from the Drum Cartridge.
2. If the problem persists after removing the seal, replace the Drum Cartridge.
(2) там девелопер в аппарате лежит горой + на самом барабане идет слой тонера щас перебираю блок отработку вычистил , чип похоже хоть китайскии но рабочий оказался. по результату отпишу блага времени много. А на счет уплотнение парашка как переводчик переводит я так понял это дозирующее лезвие?
Уважаемые инженеры получилось! и Так докладываю что делал
Первое действие открываем переднюю крышку. входим в сервисный там в ячейке памяти жмем 095 910 стаим 0 потом удерживая 0 зажимаем старт. Потом выкл вкл. должен выйти код 093 956
Достаем драм чистим отработку, в драм засыпаем с тубы парашка я на гла засыпал грам 100 далее включаем вставляем в аппарат он начнет мешать, в момент перемешивания открываем боковую крышку несколько раз я раз 15 открывал , чтобы инсталяция долго шла и счастье случилось. Пока тестирую все отлично качество лучше чем с завода.
Усовец (5): Первое действие открываем переднюю крышку. входим в сервисный там в ячейке памяти жмем 095 910 стаим 0 потом удерживая 0 зажимаем старт. Потом выкл вкл. должен выйти код 093 956
Достаем драм чистим отработку, в драм засыпаем с тубы парашка я на гла засыпал грам 100 далее включаем вставляем в аппарат он начнет мешать, в момент перемешивания открываем боковую крышку несколько раз я раз 15 открывал , чтобы инсталяция долго шла и счастье случилось. Пока тестирую все отлично качество лучше чем с завода.
Вы инженер? Или шаман?
С Xerox, так нельзя. Он отомстит.
С Xerox, так нельзя. Он отомстит. поддерживаю. И мстя его будет страшна
Пока тестирую все отлично качество лучше чем с завода перед смертью всегда становиться внезапно лучше
8. sahrikov1945 24.03.16 19:22
(5) а тот ли вы парашок засыпали, если печать лучше чем с завода )))
МСТЯ аппарата будет страшна )))
(8) Я правильно понимаю, что имелось в виду — пОрОшок?
Источник
Xerox 5021 j5 error
КОНФЕРЕНЦИЯ СТАРТКОПИ
Принтеры, копировальные аппараты, МФУ, факсы и другая офисная техника:
вопросы ремонта, обслуживания, заправки, выбора
0. gemeni85 02.04.13 17:47
Здравствуйте, клиент сказал вот такой код ошибки «J5». Если у кого есть сервиска скажите на что он ругается. Гуглил, не нашёл.
1. Mishel01 02.04.13 17:52
2. gemeni85 02.04.13 17:59
Там аппараты ВСЕ другие 5018, 4500 — это всё старые модели , а это новая, и для каждой модели ошибка J5 разная например в 4500 это «нет контакта с мотором оптики» , а в 5018 «заканчивается картридж». ТАК ЧТО НЕТ ЭТО ЧУТОК НЕ ТО
там наклейка должна быть на нем с кодами ошибок
4. Mishel01 02.04.13 18:03
gemeni85 (2): для каждой модели ошибка J5 разная
Уважаемый, приведите, пожалуйста, названия двух моделей цифровых копиров Херох, для которых один и тот же код ошибки имеет разные значения (. ). Если не сможете — придется извиниться за ложь.
(3) +1.
(0) а «клиент» ничего не путает по поводу ошибки?
6. Портной Нёма 02.04.13 18:22
Стандартный вариант: ремонт по телефону, деньги — по факсу.
(0) Пока сами не увидите ошибку, ничего не предпринимайте.. Наворочаете делов..
7. gemeni85 03.04.13 13:38
(4)Xerox 5328 J5, J6 ADF to machine communications problem,
Xerox 5400N
Error Code J5: Toner Low Troubleshooting Procedure. Да действительно лучше съездить. Ехать далеко в другой город.
8. gemeni85 03.04.13 13:39
5400N правда принтер.
9. Mishel01 03.04.13 15:23
(8) Вопрос был про цифровые копиры/МФУ, а не про все Херохи подряд, если помните.
Источник
Xerox 5021 j5 error
КОНФЕРЕНЦИЯ СТАРТКОПИ
Принтеры, копировальные аппараты, МФУ, факсы и другая офисная техника:
вопросы ремонта, обслуживания, заправки, выбора
пришел с ошибкой J6
последовательность действий
ставим новый оригинальный блок барабана — J5
ставим новый тонер
отрываем-закрываем крышку — мешает — J5
и так делаем три раза — J5
после третьего раза мешания — опять ошибка — J6
в каком направлении двигаться
на глаз мало смеси (тонер/девелопер) в блоке — мешалка не покрывается
блок чистили — все крутится
Двигаться в направлении поиска и вдумчивого чтения сначала Руководства пользователя, а потом — SM. Давно не тайна.
У этой модели нормальные коды отказов шестизначные (ххх-ххх).
Цитата из РП: «Когда отображает двухзначный код (X-X), можно проверить соответствующий шестизначный код (XXX-XXX), нажав и удерживая кнопку «Копия удостоверения«. (русский вариант, стр. 11-21)
Предположу код отказа 092-910
Pavels (0): отрываем-закрываем крышку — тогда уж зарывайте то что оторвали :))
дополнительный код 93959. В s.m. согласно гугл переводчику пишут:
Количество выполненных порошковых установок в режиме установки превысило верхний предел.
И добавляют:
Замените его подходящим барабанным картриджем.
(2)наверно всё-таки код 093-959. Drum New CRU Installation Fail Exceeds
Thresholding Times — это значит в процессе установки (когда аппарат мешает проявку и замеряет концентрацию) было слишком много попыток, после чего аппарат «сдаётся» и отображает ошибку.
The number of developing powder installation mode executions has exceeded the upper limit. — количество попыток замера концентрации превысило предельное значение.
Теперь понятно, что проблема с процессом инсталляции носителя. ИМХО, возможно значение с датчика «скачет» (но в пределах нормальных значений), поэтому аппарат считает, что смесь нужно размешать. После нескольких попыток «по мнению» аппарата значение датчика ATC должно быть постоянным, а оно продолжает меняться — вот и ошибка.
(3) Все так и было, но делать то что? Кормить новыми блоками — накладно, чипами -тоже как-то не то. Может есть сброс этой ошибки, а я не вижу?
(4)Какой «сброс ошибки»? У вас алгоритм инсталляции нарушен, из-за чего отсюда не видно. Может мешалки не крутятся, может проблемы в цепи датчика, может пробой вытягивает носитель. Если бы просто по счётчику закончился принт-картридж было бы J4, а J6 — это неисправность. Поставили заведомо исправный блок — получили J6? Ну так отстаньте от блока, займитесь машиной.
Источник
Устранение неисправностей на принтере Xerox WorkCentre 5021
Неисправности аппарата
При появлении признака неисправности проверьте состояние аппарата.
Аппарат не включается.
Вилка шнура питания вставлена не в розетку.
Выключите питание и проверьте надежность подключения шнура питания. Затем снова включите питание.
Шнур питания не подсоединен к аппарату
Розетка не обеспечивает надежную подачу электропитания.
Чтобы убедиться, что питание подается, подключите к розетке другое устройство.
Мигает индикатор ошибки.
Неисправность системы аппарата или установленных устройств.
Выключите и снова включите питание. Если после этого неисправность не устранится, обратитесь в центр технической поддержки.
Светится индикатор ошибки.
Застряла бумага или оригинал.
Извлеките застрявшую бумагу или оригинал.
Открыта передняя или другая крышка аппарата.
Выполните указания, отображаемые для данного кода ошибки.
Светится кнопка Энергосбережение.
Аппарат находится в режиме энергосбережения. Для выхода из режима энергосбережения нажмите кнопку Энергосбережение.
Не выполняется печать или копирование.
На дисплее панели управления отображается код ошибки.
Выполните указания, отображаемые для данного кода ошибки.
Шнур питания не подключен.
Выключите питание и проверьте надежность подключения шнура питания к розетке. Затем снова включите питание.
Индикатор передачи данных не светится даже при отправке работы на печать.
Интерфейсный кабель не подключен.
Проверьте подключение интерфейсного кабеля.
Рабочая среда компьютера настроена неправильно.
Проверьте рабочую среду компьютера, например настройки драйвера принтера.
Печать не выполняется, хотя для работы указан обходной лоток.
Бумага заданного размера не вложена в данный лоток.
Выполните указания, отображаемые для данного кода ошибки — загрузите бумагу заданного размера и попробуйте снова.
Низкое качество печати.
Проблема с качеством изображения.
Примите соответствующие меры по устранению, указанные в разделе Проблемы с качеством изображения.
Не вставляется или не снимается лоток.
Во время печати открывалась крышка или отключалось питание.
Не прилагайте к лотку чрезмерных усилий при установке или снятии. Выключите питание. Через несколько секунд снова включите питание. Когда аппарат будет готов к приему данных, вставьте или снимите лоток.
Не удается скопировать оригинал указанного размера.
Загрязнено стекло экспонирования или его крышка.
Очистите стекло экспонирования или его крышку.
Копируется пленка или прозрачный материал.
Копируйте со стекла экспонирования, накрыв оригинал листом белой бумаги.
Оригинал в неправильном положении.
Поместите оригинал правильно.
Оригинал вложен неправильно.
Направляющие оригиналов на податчике установлены неправильно.
Установите направляющие оригиналов правильно.
Оригинал со складками.
Распрямите оригинал и поместите его правильно.
Когда бумага вкладывается в обходной лоток и нажимается кнопка Старт, выдается код ошибки.
Проверьте положение направляющих бумаги в обходном лотке.
Установите направляющие бумаги в правильное положение.
Часто застревают оригиналы.
Оригиналы неподходящего типа.
Правильно вложите в податчик оригиналы подходящего типа.
Копируются оригиналы неправильной формы, визитки, пленки или тонкие документы.
На оригиналах имеются наклейки, зажимы или липкая лента.
Перед копированием удалите с оригиналов наклейки, зажимы или липкую ленту.
Направляющие оригиналов установлены неправильно.
Отрегулируйте положение направляющих оригиналов.
В податчике оригиналов остались обрывки бумаги.
Откройте крышку податчика оригиналов и проверьте наличие бумаги.
Сгибается кромка оригинала.
Распрямите оригинал и вложите его заново.
Вероятная причина Устранение
Сдвиг или перекос копий.
Оригинал размещается неправильно.
Поместите оригинал правильно.
Неправильно вложена бумага в лоток.
Вложите бумагу правильно.
Если бумага подается из выходного лотка, значит направляющие не касаются бумаги.
Вложите бумагу правильно.
Направляющие в податчике оригиналов установлены неправильно.
Правильно разместите оригинал и установите направляющие так, чтобы они касались оригинала.
Лоток вставлен не до конца.
Задвиньте лоток в аппарат до упора.
Пробелы на копиях.
На влажной бумаги могут получаться пропуски изображения или нечеткие копии. Вложите бумагу из неоткрытой пачки.
Бумага в лотке сгибается или мнется.
Уберите проблемные листы или вложите бумагу из неоткрытой пачки.
Копируется мятый оригинал или оригинал с наклеенными фрагментами.
Мятый оригинал или оригинал с наклеенными фрагментами может неплотно прилегать к стеклу экспонирования. Чтобы добиться правильного прилегания оригинала к стеклу экспонирования, прижмите его сверху стопкой белой бумаги.
Полосы на копиях.
Попытка чрезмерного увеличения копии оригинала.
При чрезмерном увеличении оригинала на копии могут появляться полосы. Уменьшите масштаб копий.
Отпечатки светлые (блеклые, нечеткие)

Принт- картр и дж выработал ресурс или поврежден.
Вложите новую бумагу.
Установите новый принт-картридж.
Установите новый тонер-картридж.
На копиях появляются черные пятна
Принт-картридж выработал ресурс или поврежден.
Установите новый принт-картридж.

На отпечатках появляются черные или цветные линии.
Принт-картридж выработал ресурс или поврежден.

Загрязнена узкая полоска стекла.
Очистите узкую полоску стекла.
На отпечатках с равными интервалами появляется загрязнение
Загрязнение тракта подачи бумаги.
Распечатайте несколько листов.

Принт- картр и дж выработал ресурс или поврежден (продать в Новосибирске, скупка новых для принтера, awella страница, url, скупка hp, epson, xerox, продать просроченные по рыночной цене, выкуп оригиналки, покупка просрочки).
На участках заполнения черным цветом появляются белые пятна
Вложите бумагу подходящего типа.
Принт- картридж выработал ресурс или поврежден.
На руках остаются следы от отпечатков
Тонер не закрепляется на бумаге.
Бумага загрязнена тонером.
Вложите новую бумагу.
Вложите бумагу подходящего типа.
Отпечаток полностью черный.

Принт- картр и дж выработал ресурс или поврежден.
Неисправность высоковольтного источника питания.
Обратитесь в центр технической поддержки.
Отпечаток получается пустым.
Подача сразу нескольких листов (двойная подача).
Перед вкладыванием пачки бумаги пролистайте листы.

Сбой питания или неисправность высоковольтного источника питания.
Обратитесь в центр технической поддержки.
На отпечатках белые участки л ибо белые или цветные полосы.
Вложите новую бумагу.
Вложите бумагу подходящего типа.
Весь отпечаток получается блеклым.

Если используется обходной лоток, значит указанный в драйвере принтера размер или тип бумаги не соответствует размеру или типу бумаги в лотке.
Вложите в обходной лоток бумагу соответствующего размера и типа.
Подача сразу нескольких листов.
Перед вкладыванием пачки бумаги пролистайте листы.

Вложите новую бумагу.
Добавление бумаги к уже вложенной в лоток.
Вложите новую бумагу.
Добавление бумаги к уже вложенной в лоток.
Белые или цветные вертикальные полосы.
Принт- картр и дж выработал ресурс или поврежден.
Направление подачи бумаги
Наклона изображения на отпечатке.
Неправильно установлены направляющие бумаги.
Установите правильно горизонтальную и вертикальную направляющие бумаги.
Проблемы с копиями
В таблице ниже приведены возможные причины проблем с копиями.
Вероятная причина Устранение
Загрязнение стекла экспонирования или его крышки.
Очистите стекло экспонирования или его крышку.
Копируется пленка или прозрачный материал.
Если загрязнена крышка стекла экспонирования, при копировании прозрачных оригиналов это отражается на копиях. Перед копированием накройте оригинал листом белой бумаги.
Копируется оригинал на цветной или грубой бумаге, либо светокопия.
Копируется фоновый цвет. Перед копированием настройте плотность копий, качество изображения или подавление фона.
Оригинал напечатан на глянцевой бумаге.
Глянцевая бумага легко прилипает к стеклу экспонирования, и на копиях могут воспроизводиться тени. Перед копированием подложите под оригинал прозрачный лист или пленку.
Копии слишком светлые или слишком темные.
Неправильно настроена плотность копий.
Настройте плотность копий.
Настройте плотность копий.
Неправильная настройка качества изображения.
Если копия с черным текстом получается слишком светлой, установите для параметра «Тип оригинала» настройку «Текст».
Небольшой сдвиг копий.
Неправильное вкладывание бумаги в лоток.
Выровняйте пачку бумаги и вложите ее так, чтобы передняя кромка совмещалась с углами лотка.
Вероятная причина Устранение
Пробелы на копиях.
На влажной бумаги могут получаться пропуски изображения или нечеткие копии. Вложите бумагу из неоткрытой пачки.
Бумага в лотке сгибается или мнется.
Уберите проблемные листы или вложите бумагу из неоткрытой пачки.
Мятый оригинал или оригинал с наклеенными фрагментами.
Мятый оригинал или оригинал с наклеенными фрагментами может неплотно прилегать к стеклу экспонирования. Чтобы добиться правильного прилегания оригинала к стеклу экспонирования, прижмите его сверху стопкой белой бумаги.
Неверный размер оригинала.
Проверьте правильность установки размера оригинала.
Неверный размер бумаги.
Проверьте правильность установки размера бумаги.
Полосы на копиях.
Слишком большое увеличение оригинала.
При чрезмерном увеличении оригинала на копии могут появляться полосы. Уменьшите масштаб копий.
Сдвиг или перекос копий.
Оригинал размещается неправильно.
Поместите оригинал правильно.
Направляющие в податчике оригиналов установлены неправильно.
Правильно разместите оригинал и установите направляющие так, чтобы они касались оригинала.
Лоток вставлен не до конца.
Задвиньте лоток в аппарат до упора.
Неправильно установлены направляющие бумаги в обходном лотке.
Правильно разместите оригинал и установите направляющие так, чтобы они касались оригинала.
Неверный размер оригинала.
Проверьте правильность установки размера оригинала.
Неверный размер бумаги.
Проверьте правильность установки размера бумаги.
Вероятная причина Устранение
Размер копий не соответствует ожидаемому размеру.
Загрязнение стекла экспонирования или его крышки.
Очистите стекло экспонирования или его крышку.
Копируется пленка или прозрачный материал.
Перед копированием накройте оригинал листом белой бумаги.
Поместите оригинал правильно.
Направляющие в податчике оригиналов установлены неправильно.
Правильно разместите оригинал и установите направляющие так, чтобы они касались оригинала.
Оригинал со складками.
Распрямите оригинал и поместите его правильно.
Неверная настройка размера оригинала.
Проверьте правильность установки размера оригинала.
Неверная настройка размера бумаги.
Проверьте правильность установки размера бумаги.
Обрезание копий по краям.
Размер оригинала больше области печати.
Немного уменьшите масштаб копий.
Неверный размер оригинала.
Проверьте правильность установки размера оригинала.
Неверный размер бумаги.
Проверьте правильность установки размера бумаги.
Печать не выполняется
В таблице ниже приведены возможные причины того, что не выполняется печать.
Данные не исчезают с пиктограммы принтера.
Питание аппарата не включено.
Включите питание аппарата.
Не подключен кабель компьютера.
Подключите кабель компьютера.
Не подключен кабель аппарата.
Подключите кабель аппарата.
Проверьте сведения об ошибке и примите соответствующие меры.
Данные отправлены на аппарат.
Не вложена бумага.
Отсутствует бумага указанного размера.
Вложите бумагу указанного размера.
Проверьте сведения об ошибке и примите соответствующие меры.
Отмените работу с экрана, если это требуется.
Проблемы с отпечатками
В таблице ниже приведены возможные причины проблем с отпечатками.
Отпечатки выполнены на бумаге неправильного размера.
В указанный лоток вложена бумага неправильного размера.
Вложите в лоток бумагу другого размера или измените параметры печати в соответствии с бумагой в лотке.
Обрезание изображения по краям.
Размер документа больше области печати аппарата.
Увеличьте область печати аппарата или уменьшите область печати документа.
Отключены настройки для параметров печати.
Используется драйвер принтера для другой модели аппарата.
Установите драйвер принтера для данного аппарата.
На аппарате не установлено соответствую щее устройство.
Проверьте установленные на аппарате устройства и выберите их в драйвере принтера, в группе «Элементы» раздела «Опции».
На компьютере не используется драйвер принтера, прилагаемый к аппарату (используется драйвер другого производителя).
Проверьте на компьютере, используется ли драйвер принтера, прилагаемый к аппарату.
Выберите на компьютере драйвер принтера, прилагаемый к аппарату. Если драйвер принтера отсутствует в списке для выбора, его следует установить, а затем выбрать. При использовании драйвера принтера другого производителя функционирование не гарантируется.
Проблемы при сканировании
В данном разделе приведены способы устранения неисправностей, которые могут возникать при сканировании.
Сканирование не выполняется
В таблице ниже приведены возможные причины того, что не выполняется сканирование.
Неправильная подача оригиналов податчиком.
Размер оригинала слишком мал.
Минимальный формат бумаги в податчике оригиналов: А5.
Данный тип оригиналов не поддерживается.
Податчик не подает оригиналы неправильной формы, визитки, пленки или тонкие документы, а также оригиналы с наклейками, зажимами и липкой лентой.
Неправильно установлены направляющие оригиналов.
Установите направляющие по размеру оригинала.
В податчике оригиналов застряли обрывки.
Откройте крышку податчика оригиналов и извлеките застрявшие обрывки.
Данные сканирования не загружаются на компьютер
В таблице ниже приведены возможные причины того, что данные сканирования не загружаются на компьютер.
Не удается найти сканер.
Питание аппарата не включено.
Включите питание аппарата.
Не подключен USB-кабель компьютера.
Подсоедините USB-кабель компьютера.
Не подключен USB-кабель аппарата.
Подсоедините USB-кабель аппарата.
Вероятная причина Устранение
Не удается загрузить данные со сканера из-за ошибки связи с драйвером TWAIN.
Драйвер сканера не установлен.
Установите драйвер сканера.
Остановлено выполнение операции при загрузке данных.
Слишком большой размер файла.
Уменьшите настройку разрешения и попробуйте снова загрузить данные.
Проблемы с качеством изображения сканирования
В таблице ниже приведены возможные причины проблем с качеством изображения сканирования.
Загрязнение изображения сканирования.
Загрязнение стекла экспонирования или его крышки.
Очистите стекло экспонирования или его крышку.
Копируется пленка или прозрачный материал.
Если загрязнена крышка стекла экспонирования, при сканировании прозрачных оригиналов это отражается на отпечатках. Перед сканированием накройте оригинал листом белой бумаги.
Копируется оригинал на цветной или грубой бумаге, либо светокопия.
Перед сканированием настройте плотность сканирования или качество изображения.
Сканируемый оригинал напечатан на глянцевой бумаге.
Глянцевая бумага легко прилипает к стеклу экспонирования, и на отпечатках могут воспроизводиться тени. Перед сканированием подложите под оригинал прозрачный лист или пленку.
Изображение слишком светлое или слишком темное.
Неправильно настроена плотность сканирования.
Настройте плотность сканирования.
Неподходящий тип оригинала.
Выберите подходящий тип оригинала.
Пробелы на изображении.
Мятый оригинал или оригинал с наклеенными фрагментами.
Мятый оригинал или оригинал с наклеенными фрагментами может неплотно прилегать к стеклу экспонирования. Чтобы добиться правильного прилегания оригинала к стеклу экспонирования, прижмите его сверху стопкой белой бумаги.
Вероятная причина Устранение
Размер изображения не соответствует ожидаемому размеру.
Загрязнение стекла экспонирования или его крышки.
Очистите стекло экспонирования или его крышку.
Копируется пленка или прозрачный материал.
Перед сканированием накройте оригинал листом белой бумаги.
Поместите оригинал правильно.
Направляющие в податчике оригиналов установлены неправильно.
Правильно разместите оригинал и установите направляющие так, чтобы они касались оригинала.
Оригинал со складками.
Распрямите оригинал и поместите его правильно.
Установлено низкое разрешение.
Установите более высокое разрешение.
Коды ошибок
Если из-за ошибки некорректно завершается печать или возникает неисправность аппарата, мигает код ошибки (X-X) или (XXX-XXX).
Примеры отображения кодов ошибки


В таблице ниже приведены коды ошибок и способы их устранения.
• Когда отображается код ошибки, могут быть утрачены данные печати в аппарате, а также информация, хранящаяся в памяти аппарата.
• Если отображается код ошибки, которого нет в таблице ниже, или ошибку не удается устранить после выполнения приведенных в таблице указаний, обращайтесь в центр технической поддержки Xerox. Номер контакта напечатан на наклейке или карточке, прикрепленной к аппарату.
• Когда отображает двухзначный код (X-X), можно проверить соответствующий шестизначный код (XXX-XXX), нажав и удерживая кнопку Копия удостоверения.
Код ошибки (X-X)
Код ошибки Причина
Застревание оригинала в податчике.
Извлеките застрявший оригинал.
Размер оригиналов в податчике не поддерживается.
Поместите данный оригинал на стекло экспонирования.
Не удается определить размер оригинала.
Проверьте следующее: — В податчике находятся только оригиналы. — Направляющие установлены по размеру оригинала. — Все оригиналы одинакового размера. Нельзя вкладывать одновременно оригиналы разного размера. Для работы с оригиналами разного размера пользуйтесь стеклом экспонирования.
Чтобы продолжить выполнение работы, заново вложите оригиналы, которые не были скопированы или отсканированы, и нажмите кнопку Старт.
Открыта крышка податчика оригиналов.
Отсутствует лоток для автовыбора или нет бумаги подходящего размера в выбранном лотке.
Сначала выберите лоток из тех, у которых светится индикатор, нажав кнопку Снабжение бумагой, и выдвиньте данный лоток. Затем вложите бумагу, размер и ориентация которой отображаются в области индикации на схеме состояния аппарата, и нажмите кнопку Старт.
Для отмены работы нажмите кнопку Стоп.
Нет бумаги в лотке 1.
Снова загрузите бумагу в лоток 1. Если лоток пуст, загрузите бумагу.
Код ошибки Причина
Нет бумаги в лотке 2.
Снова загрузите бумагу в лоток 2. Если лоток пуст, загрузите бумагу.
Нет бумаги в обходном лотке.
Заново вложите бумагу в обходной лоток. Если лоток пуст, загрузите бумагу.
Размер и ориентация бумаги в лотке 1 не соответствуют настройкам аппарата.
Убедитесь, что размер и ориентация бумаги в лотке 1 соответствуют настройкам, отображаемым в области индикации на схеме состояния аппарата, заново вложите бумагу и установите направляющие в правильное положение. Если настройка размера или ориентации бумаги изменились, сначала отмените работу кнопкой Стоп.
Размер и ориентация бумаги в лотке 2 не соответствуют настройкам аппарата.
Убедитесь, что размер и ориентация бумаги в лотке 2 соответствуют настройкам, отображаемым в области индикации на схеме состояния аппарата, заново вложите бумагу и установите направляющие в правильное положение. Если настройка размера или ориентации бумаги изменились, сначала отмените работу кнопкой Стоп.
Код ошибки Причина
Размер и ориентация бумаги в обходном лотке не соответствуют настройкам аппарата.
Убедитесь, что размер и ориентация бумаги в обходном лотке соответствуют настройкам, отображаемым в области индикации на схеме состояния аппарата, заново вложите бумагу и установите направляющие в правильное положение. Если настройка размера или ориентации бумаги изменились, сначала отмените работу кнопкой Стоп.
При копировании в режиме «Страниц на листе» значение масштаба, требуемое для размещения указанного числа страниц на листе, выходит за пределы диапазона 25 — 400 %.
Нажмите кнопку Стоп. Измените масштаб так, чтобы все страницы могли разместиться на листе, поместите все оригиналы и нажмите кнопку Старт.
Застревание бумаги за левой крышкой аппарата.
Откройте левую крышку аппарата и извлеките застрявшую бумагу.
Застревание бумаги за крышкой однолоткового модуля аппарата.
Откройте крышку однолоткового модуля аппарата и извлеките застрявшую бумагу.
Застревание бумаги в лотке 1.
Извлеките застрявшую бумагу.
Застревание бумаги в лотке 2.
Извлеките застрявшую бумагу.
Застревание бумаги в обходном лотке.
Извлеките застрявшую бумагу.
Открыта левая крышка аппарата.
Открыта передняя крышка аппарата.
Открыта крышка однолоткового модуля аппарата.
Код ошибки Причина
При текущей настройке изображение будет обрезаться.
Поместите оригинал в горизонтальной ориентации и нажмите кнопку Старт.
е. Если используется податчик оригиналов, заново вложите в него все оригиналы, не открывая крышку стекла экспонирования.
Идет охлаждение внутри аппарата.
Запускается автоматически. Не открывайте никакие крышки аппарата.
Выключите питание, подождите 10 секунд после того, как погаснет экран, затем снова включите питание. Если это изображение не снимается со схемы состояния аппарата, замените.
Истек гарантийный срок по качеству изображения.
Качество изображения может ухудшиться. Рекомендуется заменить.
Истек гарантийный срок функционирования.
Это может привести к повреждению аппарата. Замените.
Срочно замените. В противном случае возможно повреждение аппарата.
Исчерпан лимит копий, если он установлен. Кроме того, активен сеанс пользователя, исчерпавшего лимит копий.
Нажмите кнопку Стоп и обратитесь к системному администратору.
Работа отменена из-за нехватки памяти при чтении.
Изменив настройку, попробуйте снова.
Изменив настройку, попробуйте снова.
Выключите аппарат и снова включите его после того, как погаснет дисплей.
Выключите аппарат и снова включите его после того, как погаснет дисплей. Если снова появится данный код ошибки, обратитесь в центр технической поддержки.
Выключите аппарат и снова включите его после того, как погаснет дисплей.
Выключите аппарат и снова включите его после того, как погаснет дисплей. Если снова появится данный код ошибки, обратитесь в центр технической поддержки.
Выключите аппарат и снова включите его после того, как погаснет дисплей.
Ошибка податчика оригиналов.
После завершения копирования выполните следующие действия: нажмите любую кнопку на панели управления и выполните новую работу или дождитесь завершения тайм-аута для сброса ошибки.
010-311 010-312 010-320 010-327 010-392
Выключите аппарат и снова включите его после того, как погаснет дисплей. Если снова появится данный код ошибки, обратитесь в центр технической поддержки.
016-500 016-501 016-502 016-504 016-571 016-742 016-744
Выключите аппарат и снова включите его после того, как погаснет дисплей.
Изменив настройку, попробуйте снова.
Код ошибки Причина
Выключите аппарат и снова включите его после того, как погаснет дисплей. Если снова появится данный код ошибки, обратитесь в центр технической поддержки.
042-325 042-400 042-608 042-614
062-277 062-311 062-360 062-371 062-380 062-386 062-389 062-396
072-210 072-212 072-215
Заканчивается срок службы.
Приготовьте для замены.
Приготовьте для замены.
Принт-картридж вскоре потребуется заменить.
Приготовьте для замены.
Значение ATC SNR выходит за пределы установленного диапазона.
Выключите аппарат и снова включите его после того, как погаснет дисплей. Если снова появится данное сообщение, обратитесь в центр технической поддержки.
Значение температуры SNR выходит за пределы установленного диапазона.
Код ошибки Причина
116-321 116-323 116-334 116-377
Выключите аппарат и снова включите его после того, как погаснет дисплей. Если снова появится данное сообщение, обратитесь в центр технической поддержки.
Не удается выполнить сканирование, т. к. слишком мала область сканирования.
Уменьшите значение для стирания рамки или масштаб.
Выключите аппарат и снова включите его после того, как погаснет дисплей. Если снова появится данное сообщение, обратитесь в центр технической поддержки.
Застревание бумаги
В данном разделе приведены действия по извлечению застрявшей бумаги.
Когда в аппарате застревает бумага, он останавливается и на схеме состояния аппарата загорается индикатор лотка и пиктограмма застревания. Кроме того, на дисплее появляется код ошибки, указывающий, какие действия нужно выполнить, чтобы извлечь застрявшую бумагу.
Аккуратно извлеките застрявшую бумагу, чтобы не порвать ее. Не оставляйте в аппарате обрывки бумаги.
• Если после извлечения застрявшей бумаги на дисплее по-прежнему отображается код ошибки по застреванию, значит бумага застряла на другом участке аппарата или в нем остались обрывки бумаги. Проверьте это по схеме состояния аппарата и по коду ошибки и полностью извлеките застрявшую бумагу.
• После извлечения застрявшей бумаги работа копирования возобновляется автоматически.
• Работа печати возобновляется с той страницы, при печати которой произошло застревание.
• Если бумага застревает при выполнении работы копирования с помощью податчика оригиналов без подборки копий (когда оригиналы подаются и сканируются по одному листу), после извлечения застрявшей бумаги автоматически возобновляется копирование уже отсканированного оригинала. Одна для подачи и сканирования остальных вложенных оригиналов необходимо снова нажать кнопку Старт.
Если необходимо выдвинуть лоток для извлечения застрявшей бумаги, обратитесь в местное представительство Xerox. Во избежание ожогов не выдвигайте лоток.
Не пытайтесь извлечь бумагу, застрявшую глубоко внутри аппарата, например, намотанную на блок фьюзера или нагревательный вал. Это может привести к травмам или ожогам. Немедленно выключите аппарат и обратитесь в местное представительство.
• Если выдвинуть лоток после застревания бумаги, не определив участок застревания, бумага может порваться и в аппарате останутся обрывки. Во избежание повреждения аппарата определите место застревания бумаги, прежде чем приступать к ее извлечению.
• Если в аппарате останутся обрывки бумаги, указание застревания бумаги на схеме состояния не исчезнет.
• При извлечении застрявшей бумаги оставьте аппарат включенным. Отключение питания приведет к удалению информации, хранящейся в памяти аппарата.
• Не прикасайтесь к внутренним частям аппарата. Это может вызвать ошибки при печати.
E-1. Застревание бумаги за левой крышкой A
Для извлечения застрявшей бумаги из-за левой крышки аппарата выполните следующие действия.
При извлечении бумаги на ремне переноса (из черной пленки) за левой крышкой может содержаться изображение. Не прикасайтесь к ремню переноса. Это может привести к снижению качества изображения или повреждению ремня переноса, после которого потребуется замена ремня.
1. Откройте обходной лоток (1), осторожно откройте левую крышку (3), удерживая рычажок (2) в приподнятом состоянии.

Если бумага застряла на участке блока фьюзера
a. Опустите защелку.
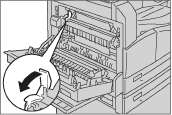
b. Извлеките застрявшую бумагу.

Не оставляйте в аппарате обрывков бумаги. c. Верните защелку в исходное положение.
Если бумага застряла за левой крышкой
a. Если бумага застряла в месте, указанном на данном рисунке, извлеките ее, потянув вверх.
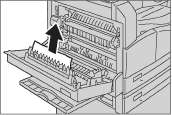
b. Если бумага застряла в месте, указанном на данном рисунке, извлеките ее, потянув вверх.

2. Нажав на центр левой крышки, медленно закройте ее и поднимите обходной лоток.
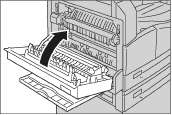
E-2: Застревание бумаги в однолотковом модуле B
Для извлечения застрявшей бумаги из-за крышки однолоткового аппарата выполните следующие действия.
1. Потяните за фиксирующий рычаг и осторожно откройте крышку однолоткового модуля.

2. Извлеките застрявшую бумагу.

• Бумага может застрять в верхней части, где ее трудно увидеть. Внимательно проверьте наличие застрявшей бумаги.
• Если бумага порвется, проверьте, чтобы внутри аппарата не осталось обрывков. 3. Осторожно закройте крышку однолоткового модуля.

E-3. Застревание бумаги в лотке 1
Для извлечения застрявшей бумаги из лотка 1 выполните следующие действия.
1. Извлеките застрявшую бумагу.
2. Если застрявшая бумага не извлекается, выдвиньте лоток.

Если выдвинуть лоток после застревания бумаги, не определив участок застревания, бумага может порваться и в аппарате останутся обрывки. Во избежание повреждения аппарата определите место застревания бумаги на дисплее, прежде чем приступать к ее извлечению.
3. Извлеките застрявшую бумагу. Если лоток пуст, загрузите бумагу.

Если бумага порвется, проверьте, чтобы внутри аппарата не осталось обрывков.
4. Аккуратно задвиньте лоток до упора.

E-4. Застревание бумаги в лотке 2
Для извлечения застрявшей бумаги из лотка 2 выполните следующие действия.
1. Извлеките застрявшую бумагу.
2. Если застрявшая бумага не извлекается, выдвиньте лоток.

Если выдвинуть лоток после застревания бумаги, не определив участок застревания, бумага может порваться и в аппарате останутся обрывки. Во избежание повреждения аппарата определите место застревания бумаги на дисплее, прежде чем приступать к ее извлечению.
3. Извлеките застрявшую бумагу. Если лоток пуст, загрузите бумагу.
Если бумага порвется, проверьте, чтобы внутри аппарата не осталось обрывков.
4. Аккуратно задвиньте лоток до упора.
E-5. Застревание бумаги в обходном лотке
Для извлечения застрявшей бумаги из обходного лотка выполните следующие действия.
1. Извлеките застрявшую бумагу.
2. Осмотрите обходной лоток изнутри (около отверстия подачи бумаги) и извлеките застрявшую бумагу.

• Если вложено несколько листов бумаги, уберите их все на время извлечения застрявшей бумаги.
• Если бумага порвется, проверьте, чтобы внутри аппарата не осталось обрывков.
3. Если вложено несколько листов бумаги, извлеките их и выровняйте по углам.
4. Вложите бумагу стороной для печати вниз так, чтобы передняя кромка листов касалась входного отверстия лотка.

Застревание оригиналов
Если в податчике застревает оригинал, аппарат останавливается и на дисплее появляется код ошибки A-1, A-2, A-3. На схеме состояния аппарата загорается индикатор оригиналов и пиктограмма застревания.
Далее приведено описание извлечения застрявших оригиналов из податчика.
В конфигурации некоторых моделей податчик оригиналов в стандартную комплектацию не входит.
Для извлечения застрявшего оригинала выполните следующие действия.
1. Потяните переднюю рукоятку крышки податчика документов, затем полностью откройте крышку податчика документа.

В полностью открытом положении крышка фиксируется. Открывайте крышку осторожно.
2. Если оригинал еще не вошел в податчик, извлеките его.
3. Если оригинала не видно, поднимите ручку и откройте внутреннюю крышку.

4. Закройте внутреннюю крышку податчика оригиналов.
5. Закройте верхнюю крышку податчика оригиналов, чтобы она защелкнулась, и убедитесь, что крышка плотно прилегает к податчику с обеих сторон.
6. Если оригинала не видно, аккуратно поднимите податчик. Если оригинал виден, извлеките его и закройте податчик.
7. Если обнаружить оригинал согласно инструкциям в пункте 6 не удалось, поднимите лоток податчика и удалите документ.

8. Аккуратно верните лоток податчика оригиналов в исходное положение.
9. Следует убедиться, что оригинал не порван, не смят и не сложен, затем нужно снова загрузить оригиналы, которые еще не были скопированы или отсканированы.
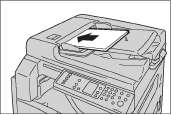
Рваные и мятые страницы оригиналов или страницы со сгибами могут застревать и вызывать повреждение аппарата. Для копирования таких оригиналов используйте стекло экспонирования.
10. Чтобы начать копирование, нажмите кнопку Старт. Для сканирования запустите процесс с компьютера.
Источник